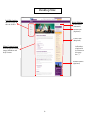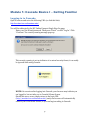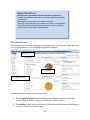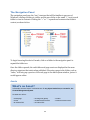
1
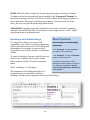
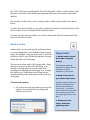
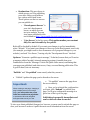
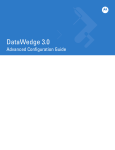
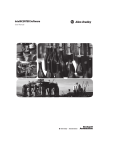
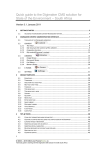
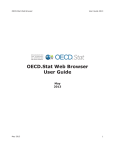
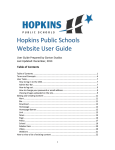
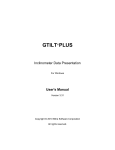
Updating Main McCormick Site in Cascade A Guide for Site Administrators By the McCormick Office of Marketing and External Communications and IT Resources Version 1.2 Updated September 2, 2014 1 Contents What’s Responsive? ............................................................................................................. 5 Module 1: Cascade Basics I – Getting Familiar .................................................................. 9 Logging in to Cascade ...................................................................................................... 9 The Dashboard .............................................................................................................. 10 The Navigation Panel .................................................................................................... 12 Assets.......................................................................................................................... 12 Naming Files, Folders, and Webpages .......................................................................... 13 The Toolbar .................................................................................................................... 13 Recent History ........................................................................................................... 14 Tool............................................................................................................................. 15 The Contextual Menu .................................................................................................... 15 Recycle Bin..................................................................................................................... 15 Module 2: Editing a Basic Page ......................................................................................... 16 Page Location/URL ....................................................................................................17 Inline Metadata ...........................................................................................................17 Header Image/Slider ................................................................................................. 18 Jump Menu ................................................................................................................ 19 Editor Toolbar - WYSIWYG .......................................................................................... 21 Basic Formatting ........................................................................................................... 24 Headings and Subheadings ........................................................................................... 25 Copying and Pasting ...................................................................................................... 26 Inserting and Editing Links........................................................................................... 27 Anchor Links.................................................................................................................. 28 Sidebar Options ............................................................................................................. 29 Draft ............................................................................................................................... 31 “Submit” Vs. “Publish” .................................................................................................. 31 Publishing Your Webpages ............................................................................................ 32 Writing for the Web ....................................................................................................... 34 Optimize System Names ............................................................................................ 34 Use Descriptive Page Titles........................................................................................ 35 2 Include Metadata ....................................................................................................... 35 Optimize Your Copy ................................................................................................... 35 Use Headers and Subheaders .................................................................................... 36 Link Frequently and Use Keywords .......................................................................... 37 Use Alt Tags on All Images ........................................................................................ 38 Module 3: Images, Documents & Videos .......................................................................... 38 Preparing Images ........................................................................................................... 38 Uploading Image/Doc ................................................................................................... 40 Inserting Image on Page ................................................................................................ 41 Working with Images .................................................................................................... 43 Assigning an Image Class .......................................................................................... 43 Aligning an Image to the Right or Left ...................................................................... 43 Editing and Replacing Images ................................................................................... 44 Inserting Video on Page ................................................................................................ 44 Image/Video Size Cheat Sheet ...................................................................................... 46 Header Images ........................................................................................................... 46 Images in Body Area of Basic Pages .......................................................................... 46 Images on Staff Listings Pages .................................................................................. 46 Images in Sidebar Features ....................................................................................... 47 Videos in Body Area of Basic Page ............................................................................ 47 Module 4: Cascade Basics II – Structural Additions/Changes ........................................ 48 Creating Section Folders ............................................................................................... 48 Editing Index Pages ....................................................................................................... 50 Creating Webpages (Second-Level Navigation) ........................................................... 51 Creating Third-Level Navigation................................................................................... 52 Folder Order: Changing Your Site’s Navigation ........................................................... 52 Copying Folders/Files ................................................................................................... 53 Moving Folders/Files .................................................................................................... 54 Publishing Folders/Files ............................................................................................... 54 Deleting Folders/Files ................................................................................................... 55 Development Server ...................................................................................................... 55 3 Module 5: Other Helpful Tips ........................................................................................... 55 Versions ......................................................................................................................... 55 Creating Line or Paragraph Breaks ............................................................................... 55 Basic Troubleshooting ................................................................................................... 56 4 What’s Responsive? Today, you can access websites on a desktop, laptop, tablet, mobile phone and other devices, each with varying screen sizes. Responsive design is a method of creating a flexible or fluid website layout that will adapt to any size screen. The layout of the page changes and items, shrink, shift around and collapse as the viewing screen size decreases. Because the layout transforms for different screen sizes, it’s important not to refer to things on the page as “to the left,” “above,” “below,” or “to the right.” The position may change. It’s also very important to follow guidelines illustrated in this manual for headers, image sizes, etc. to ensure the site looks good and performs well on different devices. Take a look at how the basic page transforms as the screen decreases from desktop size down to mobile: 5 Desktop Size Left Navigation Right Sidebar Menu for pages in this site section Breadcrumbs (Automatic) Related Info (Optional) Contact Info (Required) Main Content Area Callout Box (Optional & not shown on this page. See…) Includes optional header image/slideshow and body content Sidebar Feature (Optional) 6 Tablet Size At tablet size, the right sidebar is not present. Instead: Breadcrumbs turn into collapsible menu The sidebar feature no longer displays Related Info and Contact Info areas move to the bottom of the page 7 Mobile Phone Size At mobile size, the feature slideshow becomes one static image w/o caption. And the site's navigation is accessed via menu bar icons. The left navigation and breadcrumbs are now expandable from the blue Section Menu 8 The main site navigation can be expanded by clicking the purple menu bar icon at the screen's top right. Module 1: Cascade Basics I – Getting Familiar Logging in to Cascade Open a browser and enter the following URL (or click this link): http://mordac.itcs.northwestern.edu/ You will be redirected to the NU Online Passport Single Sign-On page. Enter your Net ID and password. Then press “Enter” or click “Log In.” Click “Continue” if a security warning message pops up. This security warning is not an indicator of an actual security threat; it can safely be ignored while using Cascade. NOTE: On occasion after logging into Cascade, your browser may indicate you are logged in, but not take you to Cascade’s Home Screen. Should this error occur, simply return to the login URL (http://mordac.itcs.northwestern.edu/) and your browser will automatically redirect you to the Home Screen, so you can begin working in Cascade. 9 Best Practice: McCormick IT recommends Cascade users work in Chrome or Firefox. Internet Explorer also works, but Chrome and Firefox generally perform better. Mac users are also advised to use Chrome or Firefox. When previewing changes to your website in a browser, it is suggested to avoid using Firefox since you may need to force its cache to refresh in order to load your site’s latest content changes. The Dashboard The first thing you’ll see upon logging in to Cascade is the Home Screen, which serves as a sort of home base for your work while logged into Cascade. Toolbar Dashboard Navigation Panel The Home Screen consists of three main areas: • The navigation panel, which runs along the left side, is used to locate and select webpages, folders, images, and files (also called “assets”). • The toolbar, which runs across the top of the screen, allows you to perform a set of actions, such as creating an asset. 10 • The dashboard / main panel, which takes up the majority of the screen, changes according to the task you are performing. You’ll notice a drop-down menu at the top of your screen that says “Global” by default. Clicking the down arrow on the menu tab reveals the sites you have access to view and edit in Cascade. 11 The Navigation Panel The navigation panel uses the “tree” structure that will be familiar to any user of Windows: a listing of folders is visible, and the user clicks on the small “+” next to each folder to view its contents. Clicking the “+” or “-” expands and contracts that folder’s content, as shown below. To begin browsing the site in Cascade, click on a folder in the navigation panel to expand the folder tree. Once the folder expands, the sub-folders and page assets are displayed in the same directory structure that exists when published. Choosing a page in the folder, such as “index,” will bring up a preview of the web page in the main system window, just as it would appear online. Assets What’s an Asset? In Cascade, the word “asset” is a blanket term for any object loaded into, or created in, the Content Management System. An asset can refer to: • a web page • a PDF • an external link • an image file (photo) • an MS Word document • an internal link 12 • a folder • an MS Excel document Naming Files, Folders, and Webpages Since asset filenames become part of their URL addresses and also affect how readily your website appears in search results, it is important to follow certain conventions as you name your assets in Cascade. When providing the System Name of any asset in Cascade, please follow these guidelines: • System Names should not contain any spaces and should not be unnecessarily long. • They should use keywords, all lowercase, separated by hyphens. • They should not include dates that will expire. Here are examples of good and bad System Names: GOOD BAD catalysis-research-laboratory.jpg CatReschlab.jpg john-smith.jpg John Smith Good Headshot1.jpg john-smith-publications.pdf Johnsmith_Pubs_9-12-11.pdf smith-group-newsletter.pdf SmithResearchgroupNewsletterApril2012.pdf research-safety-guidelines.doc Rsch Safety 2011 Guidelines.doc Following good hygiene when naming your assets also saves you time and trouble as you organize and maintain your website content in Cascade. The Toolbar Cascade’s toolbar is similar to those in most desktop applications, like Microsoft Word or Excel. Some toolbar items are simply buttons; others are drop-down menus (indicated by a double downward arrow). The functions available in the Toolbar are similar to those found on the Dashboard, but are consistently available, unlike the Dashboard. 13 • The Cascade Swirl menu gives you access to the Publisher screen and allows you to set your User Preferences. The Publisher Screen Clicking the Cascade Swirl button, then navigating to “Publisher” and “Active Jobs” shows a list of pages currently publishing in Cascade throughout Northwestern (not just McCormick sites). • The Home button returns you to the Cascade Server Home screen. • The New menu is used to create new assets. • The History button shows you where you have been since you logged in. • The Help menu contains in-system help (though this guide should be considered the authoritative document for McCormick Web editors). • The “Quick Links” link causes a drop-down menu with access to the items on your Dashboard to appear. You can use the Publisher to see if pages you’ve recently published have transitioned to the live server yet. Single pages generally publish almost immediately; larger folders or entire sites frequently take Recent History Often, as you’re working within the system, you’ll want an easy way to return to content you were working on earlier. The History function lets you see a list of your most recently viewed or edited assets. 14 Recent History is displayed on the Dashboard; you can also view it by clicking the History button, located in the Toolbar or by visiting Quick Links—a link at the top right, just above the blue toolbar. Tool Cascade allows for multiple images to be uploaded at a single time via the Zip archive importer. An archive is a file that contains other files and folders packaged together in a zipped format. To upload many images at once, zip the folder on your desktop then go to Tools -> Zip Archive (if available) and drag and drop or browse for you file. The Contextual Menu When you hover over an asset in the left navigation tree, a small white downward arrow will appear. Clicking that arrow reveals the contextual menu for that asn bset. The contextual menu is a shortcut that allows you to quickly jump into editing and other functions available in the Toolbar without waiting for the page preview to load in Cascade first. Recycle Bin The Recycle Bin contains assets you and other site users have recently deleted. These assets are kept in case of accidental deletion. NOTE: assets in the Recycle Bin are deleted permanently after 15 days. Access the recycle bin in the last tab of the Dashboard window or in the Quick Links drop down menu. To restore an asset to its original location, click the green icon in the Action column. 15 Module 2: Editing a Basic Page To edit a basic page, select that page from the left-hand navigation tree. Then choose "Edit." This will bring up the editing view of the page. Here's a look at the editing view of the "About McCormick" page of the site: 16 Page Location/URL At the top of the editing window you'll notice and indication of the page's location on the sited noted in a path directory format: about/index. This indicates that the page has a System Name of "index" and is located in the "about" folder. It also indicates what the page's url is: http://mccormick.northwestern.edu/about/index.html Note: Because this is an index page, http://mccormick.northwestern.edu/about/ will also direct to this page. Inline Metadata When editing an existing page, you'll notice the "Inline Metadata" section is filled in with the page's "Display Name," "Title," etc. The Display Name appears in the left navigation of the site and the "You Are Here" breadcrumbs. The title appears on the actual page. 17 Learn more on how to fill out this section in the "Include Metadata" subsection of this guide. Header Image/Slider If you would like to include a Header Image or slideshow at the top of the page, click to expand the Main Content >Header Image(s)/Slider section. As you answer the series of "Yes/No" questions about your image(s)/slideshow, options will appear to further indicate specifications such as: • one header image or a multi-image slider • automatically cycle through images on the page or leave it up to the user to advance the slideshow • advance slides every 20 seconds (default) or for a number of seconds you specify 18 If you've chosen to create a multi-image slider, the area to add the image and caption for each slide will appear below the options section: Click to expand this section and edit the fields for the slides. Add more slides by clicking the green plus sign in the top left of the expanded slide area. Jump Menu The basic page type has a Jump Menu option to create a list of links to various sections of the page. This is ideal for lengthy pages on a responsive site so mobile users can skip to the information they’re looking for rather than scrolling through all the page’s content. 19 To use this menu, select "Yes" for "Include jump menu?" Click the "Main Content>>Jump Menu" box that appears. You'll first notice an area for optional Preface Content which would appear before the jump menu on the page. Use this area for an introductory message to your pages content if necessary. Below, is the area to create your menu links. You must fill in the field for the link Text (the text that will appear in the menu on the page) and the Anchor Name (the section of the page you to jump to). Then, you must create anchors with the same names in the Body Content section in the area of the page you wish to link to. See the "Anchor Links" section of this guide to learn how to create anchors. 20 Editor Toolbar - WYSIWYG Since Cascade uses a WYSIWYG (What You See Is What You Get) editor, the formatting you apply to your content is generally how it will appear on your website. Cascade’s editor toolbar lets you apply the same basic formatting you’d have access to in any word processor — headers, paragraph (body) copy, bulleted and numbered lists, bold, italics, and much more. Many of the options on the Cascade editor toolbar (especially the ones on the left side) will be familiar to users of common word processing software. You can perform many of the same actions to format text as you can in a program like Microsoft Word. Important! Use only Cascade’s built-in formatting tools! McCormick IT has configured Cascade’s text formatting to ensure that web pages are uniform and consistent throughout McCormick websites. As such, editors should refrain from making adjustments to the HTML code that would do things like change the font size, color, or typeface. However, there are some tools – noted in the graphic above – that may require some additional explanation with regards to how they function. 21 Custom Character: Use this tool to insert special characters such as ampersands, accent marks, letters in foreign languages, artistic symbols and the like. Paste: This function works the same as in other word processing software; however, you should be aware of two things: 1. The pasted item may not appear exactly as you might expect if you are pasting in content from, say, Microsoft Word or a PDF; some software includes additional formatting that is not totally compatible with Cascade. (See the section of this guide on “Copying and Pasting”.) 2. This tool may not work in some browsers. Instead, you’ll need to use the “Control + V” (for PC) or “Command + V” (for Mac) shortcut to paste your content. Paste as Plain Text: If you are pasting content in from Word or PDFs, you may want to use this option – just be aware that it will strip your content of all formatting, such as headers and numbered lists. See the section titled “Copying and Pasting” for more information about pasting content into Cascade from outside sources. The “Styles” drop-down menu applies more complex formatting to text and images than Cascade’s WYSIWYG editor. These styles are particularly useful when fitting images alongside your content text. The styles configured on your website will vary somewhat, but in general the following styles should be available: • • • • indented: add space before line of text back_to_top: formats text in a smaller font size and a specific color; this style is only for use on the “Return to Top” links used on very long pages of text. Use this style when linking to a "top" anchor on your pages. link-arrows: formats link as purple text with double right arrows after it link-bttn, anchor-link-bttn: both creates button with purple background and arrow. Arrow points down for anchor link style. 22 • inline-callout: creates a grayish box around a block of text You’ll notice additional styles such as “image_floatLeft” and “image_floatRight” in the Styles drop down menu. Use of those features is addressed in the “Working with Images” section of this guide. NOTE: When changing styles (for example, if you are trying to see whether an image looks better when floated to the left or to the right), you must remove formatting first using the “Remove Formatting” tool noted above. Cascade does not automatically replace one style with another. Link/Unlink: These tools will allow you to create/edit hyperlinks out of any text or image within your body content. Insert/Edit Anchor: Anchors allow you to mark points anywhere on your web page so that they can be easily accessible by users. They are most often used on web pages with a large amount of content, as they offer the ability to go directly to a single piece of content rather than scrolling down through the entire page. Insert/Edit Image: Select this icon to insert an image into your page. Please read the “Inserting Images” section of this manual for important information on this process [page 41]. Horizontal Rule: This tool allows you to add a horizontal line at any point on your web page, which may be useful for separating sections of content. You can specify the width and height of the line, as well as choose whether or not it has a shadow. Insert New Table: Do not use tables on the site! It will not format correctly when sized down to mobile. Most data can be represented well with headers and bullets. If you have information that absolutely needs a tabular display, please contact marketing at [email protected]. 23 Cleanup Messy Code: Sometimes, there will be unnecessary code related to your content – code that does not affect the function of the page but might affect its loading time. This tool allows you to remove such code, if it exists in a highlighted section of your content. Remove Formatting: Use this tool very carefully – it will erase any hard work you’ve done to align text, bold/italicize/underline it or otherwise format it using the other tools. This may come in handy, however, when you’re working with content that has a lot of superfluous formatting that you want to change completely. You should also use this tool to remove a previous alignment class for an image before adding a new alignment for that image or other created by the style drop down menu. Edit HTML Source: This option allows you to take a look “under the hood” at the actual code that you’re creating through the Cascade editor. However, it is advisable to leave this alone unless you are familiar with HTML code – changes made here can affect the functionality of your site. Guidelines/Invisible Elements: If you are using any guides to help you format your page (such as a grid), this tool will let you view them or make them invisible. Full screen Mode: Clicking this icon will move your view to a full screen mode in your browser to allow for added working space. Click the icon again to return to the standard view. NOTE: You will notice buttons in the editor toolbar to “underline,” “strike-through” and “indent” text in the editor window. Those styles are not preserved when you submit your page in Cascade and will not publish. Basic Formatting Formatting text as bold, italic, subscript, superscript, and setting its alignment to left, right, or justified, works the same in Cascade as it does in any word processor: Simply select the appropriate text, then apply the formatting you want it to have. 24 NOTE: When the editor is blank, the format drop-down menu will just say “Format.” To make sure the text automatically gets formatted to the “Paragraph” format, hit Enter after entering your lines of text. You can also hit Enter before typing anything (or select the format “Paragraph” in the drop-down menu). If you do not do one of the above, the text you type will display larger than normal. ALSO NOTE: Cascade is currently configured to remove the “centered” formatting available in the WYSIWYG editor. If you want to center-align any text, use the “Styles” drop-down menu as explained earlier. Headings and Subheadings Best Practice: It is important to keep your content well organized so your visitors can easily navigate and find the information they need. Use headings and subheadings on your pages to create a visual hierarchy for your visitors, similar to a document outline. Use Headings and Subheadings To create a heading in Cascade, select the text you wish to use as a header, then, in the Cascade Editor window, click the “Format” drop-down menu. Select “Heading 2” or “Heading 3.” Frequently! • Use “Heading 2” to make a header in your page’s main content area. • Use “Heading 3” to make a subheader in page’s main content area. For additional information on using headings and other formatting to improve your website’s searchability, read the section of this guide titled “Optimizing Your Content”. The importance of a heading descends as its number ascends, so information used as a Heading 2 should be more important than that of a Heading 3. 25 NOTE: With this website template, you should not use any “Heading 1” or “Heading 2” formatting, since Cascade automatically formats your site and page titles to those headings. Copying and Pasting As you build and maintain your webpages in Cascade, you can type in your content by hand using the WYSIWYG content editor. You may find you need to input larger amounts of content from Microsoft Word documents or Adobe PDF files. Important! Clicking the “Cut,” “Copy,” or “Paste” buttons in the Cascade editor don't work. Use keyboard hotkeys instead: Before copying and pasting any content into Cascade, please review the following: In most cases, copying and pasting directly from Word or PDF documents into Cascade is not recommended. Documents from word processing programs often contain hidden formatting which can create errors in the way content is displayed on the web. Cut: “Control + X” (for PC) or “Command + X” (for Mac) Copy: “Control + C” (for PC) or “Command + C” (for Mac) Paste: “Control + V,” (for PC) or “Command + V” (for Mac). To remove hidden formatting, it is recommended that you select the “Paste as Plain Text” toggle button located in the Cascade editor toolbar. With that button selected, text you paste into Cascade will automatically be stripped of any hidden formatting. Click the button a second time to return to normal pasting mode. Another option you could use is to first paste your content into a plain text editor such as TextEdit or Notepad. Make that content “plain text,” and then copy and paste it again from there into Cascade. That process will strip any hidden code that you may accidentally include with your content. Whenever you paste or enter text into Cascade, you will need to reformat your text using the tools in Cascade’s editor toolbar, creating headers, paragraphs, links, and other formatting manually as desired. 26 Making sure your text is pasted into Cascade as plain text will ultimately save you a lot of trouble later and ensure that your content appears exactly how you would like it to appear on the web. Inserting and Editing Links To create a hyperlink on a line of text or an image, highlight that piece of text or the image you’d like to link and click the chainlink button in the Cascade editor toolbar. From there, you will need to specify the following: • whether the link target is an internal page or an external URL • whether the link will open in the same window or in a new window • what the link’s title (which appears as the floating “tool tip” when a user hovers over link text) will be NOTE: external links that go to webpages not part of your own site should open in a new window. Internal links to pages on your site should stay in the same window. To create a link to someone’s email address, select the external link option and type “mailto:” followed by the desired email address in the URL field. For example, if you wanted to link to John Smith’s email address, type “mailto:[email protected]” (without quotes) in the external URL field. In 27 the “Title” field, enter something like “E-mail John Smith.” When a visitor clicks on that link on your website, their default email program will open a new email to that email address. You can also use this tool to point to a page anchor, which is discussed in more detail below. To edit a link, select the link in your editor window and click the chain-link button in the editor toolbar. You can modify the link’s attributes there. To remove a link, select the link in your editor window and click the broken chain-link button in the editor toolbar. Anchor Links Anchors allow you to mark specific points anywhere on your webpage that can be linked to from external pages. For example, using an anchor link, it would be possible to link to, say, the third paragraph of a page, rather than the top of that page. They are most often used on Web pages with a large amount of content, as they offer the ability to go directly to a single piece of content rather than scrolling down through the entire page. For example, the “back to top” links often used in long lists are actually pointing to the same page anchor at the top of the page. To insert an anchor: 1. Go to the area of the page where you want the anchor to be (usually near a heading) and click the anchor tool. Important! 1. Anchor names should be treated as System Names: Use lowercase keywords separated by hyphens. Do not use spaces or special characters in your anchors. 2. Keep close track of your anchor link names! Cascade’s system for linking to anchors in a page does not provide a list of anchors to choose from — you have to enter the anchor name yourself. If the anchor name you enter isn’t exactly right, the link won’t work! 3. Always test your anchor links after publishing them. 28 2. Enter an anchor name and click “Insert.” Anchor names must start with a letter and cannot include spaces. 3. 4. When you want to link to that specific section from a table of contents at the top of the page: a. Use the link tool as you would for an ordinary link, but rather than choosing an external page to link to, enter the name of the anchor link on the current page. 5. When you want to link to an anchor on a page other than the one you’re currently editing: a. Use the Link tool to select the page elsewhere in the site. b. Enter the name of the anchor link on that page in the “Anchor” field. Sidebar Options All pages have a right sidebar at desktop size. You can include the following 4 widgets: • Related Links (optional) o Select “Yes” for “Include related info?” then click "Sidebar >>Related Links". Enter content for links. Click the green plus icons to add another group/individual links. • Contact Info (required) o Enter contact information. Click the green plus icons to add another group/individual contacts. 29 • Call-out (optional) o Fill out the Header and Content regions • Sidebar Feature (optional) To add, select "Yes" for "Include a Sidebar Feature?" Then, click the "Sidebar>>Sidebar Feature" box. You can create a feature for the specific page you’re editing or use a feature block, which can be added to multiple pages. o Create a feature: Select an image with dimensions 242 by 170px and fill out the Header and Content regions. Select the "Link Type" if you want the feature to link to another page. To add slides, click the green plus sign at the top right. o Feature block: Select this option if you would like to insert a general sidebar feature bloc for more than one page. Sidebar feature blocks are stored in the “sidebar-features” folder and each will have a block icon To create a new general sidebar feature: 1. Go to NewSidebar Feature and give your general feature a descriptive System Name. 2. Fill in the appropriate fields for your slide(s) and submit. Responsive Note: At the tablet and mobile phone screen sizes, the Sidebar Feature does not display. Related Links, Contact Info and the Call-out move to the bottom of the page. 3. Publish any image assets added to the block separately. Unfortunately, the images won’t appear in the sidebar slideshows if you have not published them separate from the page(s) you add the block to. 4. The feature-block will be stored in the “sidebarfeatures” folder and you can choose to add it to any page by selecting the Feature block sidebar option. 30 Draft A “Draft” is exactly what the name implies: a working, but not complete, copy of a webpage with changes in progress. Drafts are automatically created and periodically updated as you work on a page. That’s why you’ll see the options below appear at the bottom left of your editing window once you start editing the page. To save a page as a draft, click the “Update Draft” button at the bottom of the Edit window. Important: You are the only person who can see your draft of a page. If you’ve made changes to a page but saved it as a draft (instead of clicking “Submit”), other users will not be able to see your changes when they open the page. If you need another user to see your changes, go ahead and click “Submit” — it’s easy to roll back changes in Cascade, if needed. Drafts are useful for when you’re working on a page, but need to stop and focus on something else for a while. You can access your draft on your dashboard. Or, the next time you edit the page, you can click on the blue link to “continue editing it” that will appear in the alert box at the top of the edit window. You can view your draft at any time by selecting “View” then the small “Draft” link at the top of the preview. “Submit” Vs. “Publish” When you make changes to any page, folder, or other asset in Cascade, you will see a button at the bottom of that window called “Submit.” Clicking the Submit button saves your changes in Cascade. If you don’t click “Submit,” your changes will not be saved. 31 When you return to that page or file in Cascade, even after logging out of the system, it will display the most recent updates that were submitted. NOTE: Clicking the Submit button does NOT put your pages or files on the web. Publishing is the process by which your pages, folders, or other assets are copied from Cascade and put onto one of McCormick’s public web servers. Publishing a page, folder, or other asset, makes that content visible on the web. Conversely, unpublishing removes content from the web. Publishing Your Webpages Clicking “Submit” at the bottom of the page you’re editing saves your changes in Cascade. However, it will not yet appear on the web. After submitting your changes, your page still needs to be uploaded to the web server. That process is called Publishing. The publishing process is simple: 1. After submitting, click the “Publish” tab at the top of the page preview window. You can also hover over the page in the left navigation panel and click the white down arrow that appears next to the system name and select “Publish.” 2. You’ll see three areas of the screen, where you’ll configure the publishing process for your pages: 32 • Destination: This area shows to which servers you’ll be publishing your edits. Here you should see two options with check boxes. Those options are the two servers you can publish to: o “Development Server” is your site’s development server, on which you can test your website. You can view pages published to this environment at http://mccormick-dev.tech.northwestern.edu. o “Live Server” is the live server. This option makes your content fully live and viewable by the public. Both will be checked by default. If you want your changes to go live immediately, select “Submit.” If you want your changes to show up on the development server only (for example, you might want to show someone a set of proposed changes to your website), uncheck “Live Server,” leaving only the “Development Server” checked. Options: “Generate a publish report message,” if checked, means that you’ll receive a message within Cascade’s internal messaging system (viewable from your Dashboard or from the “Messages” link in the Quick Links menu) confirming that your page was published, and what errors, if any, occurred during publication. This is good to have, but not necessary. “Publish” and “Un-publish” mean exactly what they seem to: • “Publish” updates the page you’ve altered on the server Important: When creating a new page, changing a page’s display name or removing a page, you must publish the parent folder that contains that page/folder to update the left-hand navigation throughout that area of your site. • “Un-publish” removes the page from the server entirely. 3. Once you’ve selected the configuration you want, click “Submit” to publish your page. You’ll get a confirmation message in a green bar at the top of the page. Publishing is generally immediate and can be done as often as needed. To view your latest published changes in a browser, you may need to refresh the page or clear your browser’s cache so it pulls the most recent information from the server. 33 Writing for the Web When creating web content, remember two important ideas: • Make your webpages easy to scan. Visitors are generally looking to find the information they need quickly and move on. • Make your webpages easy for search engines to find. This is called Search Engine Optimization (SEO). Having excellent content isn’t of much use if users can't locate it by searching. While there are no guarantees when it comes to SEO, implementing the following best practices may result in better search results. In addition to improving SEO, the practices mentioned below will improve the experience of visitors to your website and are an important part of complying with accessibility standards for the web. Optimize System Names In Cascade, the names of the actual files and folders are called System Names. System Names also become part of the webpage's URL that is visible in the address bar of web browsers. It's important that they're consistent and optimized for search engines. System Names should always be: • made up of keywords relating to the content • formatted as lowercase • separated by hyphens. Do not use spaces or capital letters. For example, "research-laboratory-staff" and "guidelines-for-faculty-publications.pdf" follow best practices for System Names. It's also best to avoid using dates in System Names. This prevents you from having to create a new file or change the system name if you need to update that information. For example, "student-handbook.pdf" is better and easier to maintain than "studenthandbook-feb-2013.pdf." This also saves you the trouble of having to recreate the links to that document on your webpages. 34 Use Descriptive Page Titles The page title is the phrase that appears in the top of the web browser bar while a user views a page. Search engines weigh page titles heavily when determining search results. This information also appears as the page title at the top of your webpage’s content area. In Cascade, you can edit the title of your page under in the Edit tab, in the “Inline Metadata” section where it says “Title.” Include Metadata In Cascade’s page editor, below the Display Name and Title fields, you will see fields for Keywords and Description. In the Description field, type a descriptive, concise sentence explaining the contents of the page you’re working on. This description will appear on Google’s search results pages. Include relevant search terms in the Keywords field. This will also help search engines like Yahoo find your webpages. Optimize Your Copy • Make your page copy simple and concise. • Break it into more numerous small paragraphs. 35 • Use bullet points whenever possible. Use Headers and Subheaders Google's search engine (and Northwestern’s internal search appliance) gives more weight to pages containing search terms in header tags. In addition, usability studies have repeatedly shown that users scan web pages, rather than setting out to read them from top to bottom. This means that concise copy and frequent (but judicious) use of subheadings is vital to making your pages useful to your readers. Using headings and subheadings frequently is also important to building ADAcompliant pages: Screen readers used by people with visual impairments detect the HTML code that indicates headers (<h1>, <h2>, <h3>) and pay more attention to them than they do to ordinary paragraph copy — even if paragraph copy is set in bold or italic. To create a heading or subheading in the Cascade content management system, select the text you wish to use as a header, then, in the Cascade Editor window, click the “Format” drop-down menu: • For headers in the content areas of your webpages, use “Heading 2” • For subheaders, use “Heading 3.” The importance of a heading descends as its number ascends — information used as a Heading 2 should be more important than that of a Heading 3. With this website template, you should not use any “Heading 1” formatting, since Cascade automatically formats your site title to that heading. 36 Link Frequently and Use Keywords If you mention a page or document in your text, link to that page or document, particularly if it’s necessary to complete the task your visitor is trying to accomplish. When choosing what words to activate as your link, it’s best to link to the key words in that sentence, not the entire sentence. Also, avoid writing “click here” as your link. Take the example of this sentence with a “click here” link: “Professor Smith has worked extensively with the Smith Catalysis Laboratory (click here for more info).” It’s better to create the link like this: “Professor Smith has worked extensively with the Smith Catalysis Laboratory.” For detailed instructions on adding links in Cascade, see the “Inserting and Editing Links” section of this guide. It is also important to fill in the “Title” of your link. The text you enter into the “Title” field shows up as the “tool tip” text that appears over a link when a user hovers their mouse over it on a finished page. Not only can this information be extremely helpful when navigating our website, it’s also a requirement to keep a web page compliant with ADA standards 37 Use Alt Tags on All Images Cascade requires you to fill in the “Alternate Text” field (producing what’s known as an “Alt” tag) when including any photograph. The Alt tag text becomes the image caption on the page. Therefore, it’s important to use complete sentences to describe what’s shown in a photo. Alt tags are a requirement for ADA compliance. Module 3: Images, Documents & Videos Preparing Images Before you upload your images into Cascade, it’s important that they meet best practices for the web, which may require modifying image dimensions and file sizes before putting them into Cascade. With the McCormick template you are using for your website, photos should follow the guidelines below and be cropped to the following dimensions prior to uploading into Cascade. Image sizes are measured in pixels (px). See the "Image Size Cheat Sheet" Resolution of all images should be 72 pixels per inch (ppi). You can adjust the resolution of images in a photo editing program. All McCormick staff can download the latest version of Adobe Creative Cloud software (includes Photoshop, InDesign, Illustrator, Acrobat, and more). Find instructions and info at http://www.it.northwestern.edu/software/adobe There are a few important things to keep in mind when preparing images: 38 • Keep the aspect ratio (the ratio of the width of the image to its height) the same as the original file in order to prevent distortion. No squashed heads! • Do not increase image dimensions. If you increase an image’s size to something greater than its original dimensions, this will create a pixelated effect. Start with a larger image and size down as necessary. • If you’re using Photoshop, be sure to select “Save for Web & Devices” when saving your image and adjust the quality to keep the image’s file size under 60 kilobytes (60k) for larger photos. Generally .jpg and .png file types work well for most images and photos. Use .gifs for smaller images with blocks of color or animations. 39 Uploading Image/Doc 1. In the Menu Bar, select “New” > “Image – JPG GIF PNG” for images and “New” > “Document – PDF TXT DOC PPT POT XLS” for documents. 2. The main panel will change to the “New File” panel. You can drag and drop your image file to this area or select “Choose File” to search for the file on your computer. 3. Once you’ve found and attached the file, the name of the name of the file will be populated in the “System Name” field above. a. You can then edit the name of the file in the field. Be sure the System Name of your new file follows the guidelines mentioned above (e.g., use keywords, all lowercase, no spaces, words separated by hyphens). Also specify the proper file extension (e.g., .pdf, .doc, .xls, .txt) Important: Do not move your images or documents into any other folder besides images/documents and their subfolders. • Documents and non-image files go in your “documents” folder. • Images go in your “images” folder. b. Parent Folder: Click this link to specify in which “images” or “documents” subfolder the file will be stored. By default, any image file will be stored in the “images” folder and any document will be stored in “documents” 4. Click “Submit” to upload and save your file. 40 Inserting Image on Page 1. Place your mouse cursor in the area of the copy where you want to place an image, and click on the “Insert Image” icon (the tree picture) in the toolbar. 2. Choose whether you want to create an internal or an external image. An internal image (default option) is a file that is already in the system, or one that you upload. (An external image is one that you link to using a URL. This option is rarely used and is for images hosted by external sites.) 3. Next to Image, you will see two icons – a red cancel/delete icon and an image icon. Click on the image icon. In the new image chooser window, select the images folder in the asset tree on the left. You can then either navigate to an existing image using the default Browse option, Search for an image, or click on the Upload option to upload a file. If you choose to upload a new image into Cascade, always upload new images to the images folder. If you are going to be working with a lot of images, you may want to create subfolders under the “images” folder to keep them organized. 41 4. Once you have the image selected, click Confirm to close the image chooser window. The image path will appear in the “Insert/Edit Image” window. 5. In the Alternate Text field, type in a text description of what the image depicts in a complete sentence. This required text becomes the image’s caption on the page and ensures that if the image doesn’t load properly, or if a screen reader is being used, the user can still understand what the content is. While you can specify the width/height of the image here, it is highly recommended that you size photos outside of Cascade, as explained in the section of this guide called “Preparing Images”. 6. Click “Insert” for the image to be placed within the copy you selected. 42 Working with Images Using the tools below you can shift the layout of your inserted images or edit and replace the images on your webpages. Assigning an Image Class If you’re planning on aligning an image to the right or left you must use the “Styles” menu to assign it a “class.” Aligning an Image to the Right or Left 1. Select the image in the Edit window. 2. Click the “Styles” menu and select image_floatRight or image_floatLeft. This will align your image to the right or left, and add padding around it, which keeps page text from getting too close. IMPORTANT: Image styles are “additive,” meaning the code created when you choose a style or alignment is not removed if you choose another style for the image. To change an image style or alignment, you must first select the image and click the “Remove Formatting” tool from the tool bar. That step removes the previous alignment. Then you can select a new style or alignment from the styles drop down menu 43 Editing and Replacing Images You may want to alter an image once you’ve added it to a page: • Select the image in the Edit window and either click the image icon in the toolbar or right-click and select “Insert/Edit Image.” • You will then be able to change the image path, or use the options on the “Advanced” tab to add more space around the image. If you have an alternate version of an image that you would like to upload in the place of the current image: • Navigate to the existing image file in the “images” folder. • Once the file is selected, click “Edit,” then use the “Upload” option to upload your new image. Cascade will point to the new image instead of the previous one. Replacing your images assets this way instead of creating whole new files prevents clutter in your images folder. Inserting Video on Page You have the ability to embed a video from YouTube so that it plays on one of your site’s webpages. To embed a video so it displays on one of your pages: 1. Go to that video’s page on YouTube. 2. Click the "Share" tab under the video player 3. Copy the video page’s url where it appears below. 44 In Cascade, select the Video Reel icon and paste the YouTube video url in the File/URL field. Uncheck "Constrain Proportions" in the next line and enter the proper video dimensions: 670x377 for the basic page. Click Insert. An orange rectangle will appear in your editing window indicating its placement on the page. You can preview the video only after submitting your edits to Cascade or updating and viewing your Draft. Important: Do not use the embed code method of inserting videos on your page. You will receive and error message while previewing in Cascade and on the live site if published. Note: If you do not enter the dimensions, the video will display with large black bars above and below it. Video Embed w/o dimensions Video Embed w/ dimensions Publish this page to see how it appears on the web by following the instructions in the section of this guide called “Publishing Your Webpages” 45 Image/Video Size Cheat Sheet Images must be cropped to the desired size before uploading to Cascade, using Photoshop or other programs. Always select “Save for Web & Devices…” in Photoshop. Adjust quality of image to balance image quality vs. file size. File size of images affects page load time and data usage on mobile. Note suggested file sizes below (e.g., 10k, 40k, etc.). All image resolutions should be 72 pixels per inch. Important: The new website template is responsive, so images will change in size and location depending on the browser width or the device being used to view the website. Below are the specifications people should use to create and upload their images; the rest happens automatically. Dimensions noted below are in pixels. If your image is a logo or has solid bands of color, save it as a .gif file to reduce file size. Header Images These images must be 770 x375px wide. Try to keep file size below 100k. Images in Body Area of Basic Pages Full width images (spans full width of content area): Images that span the full width of the main content area should be 670 pixels wide. Try to keep file size around 60-80k, depending on image size. Height can vary. Images using “float left” or “float right” styles: If you want to wrap text around the image, when using “float left” or “float right” image styles: Keep your image under 250-300 pixels wide (about half the content area). Again, height can vary. Smaller images should be around 40-60k. Images on Staff Listings Pages Thumbnail images should be exactly 100 x 100px, around 10-12k. 46 Images in Sidebar Features Microsite and department site administrators may want to add sidebar feature slides on their sites. Slide images should be 242 x 170px, around 30k. Videos in Body Area of Basic Page Embedded YouTube videos should be 670 x 377px. 47 Module 4: Cascade Basics II – Structural Additions/Changes Creating Section Folders The first step in creating your site’s structure is to create the folders that organize your content. When creating a new section of your site, you will use the Section Folder asset, which creates both a folder with an “index” page inside. Both the folder and index page must be edited. You’ll learn more about index pages in the next section. It is highly recommended that you create a Section Folder in Cascade for each top-level link or section you would like to appear in your left-hand navigation, even if you only plan to have one webpage in that section. There are two reasons for using folders this way: • Should you decide to add more webpages or content to a section of your site in the future, you will already have the folder in place that is properly named and ready to contain those additional pages. • Should you decide to expand an area of your website from a single page to a section containing multiple pages, without a proper folder structure, you would need to change the System Name and location of that one page and possibly others. Since the System Name becomes part of a page’s URL, this could lead to multiple broken links for visitors who return to your site after the adjustment. It’s best to start off with a folder structure that allows your website to grow. Since Cascade generates your site’s navigation from folders and their names, it’s important to name them properly. This begins when you create a folder. 1. For this example, we’ll create a “student-projects” folder which will contain pages telling visitors about McCormick student projects. 2. In the Menu bar, click “New,” and then click “Section Folder.” 3. Replace the default “section” name in “System Name” field with your new name. In this case, call it “student48 projects.” NOTE: The system names of all assets in Cascade, including folders, should be lower-case and should substitute hyphens for spaces. No Cascade Asset should contain spaces in its system name. In addition, it’s important to use keywords in your System Names. The System Name becomes part of the URL path. 4. Make sure that the “Parent Folder” shown is the one where you want the new asset to “live.” You can change the Parent Folder by clicking the link next to the folder icon. This will open a new window that will let you choose the correct Parent Folder. In our example, since we want the “students” folder to appear as a top-level link in the site’s navigation, put it directly in the Base Folder which is indicated by [/]. If it is not chosen by default, select the folder and click “Confirm.” 5. The section marked “Inline Metadata” contains the Display Name for your new section folder and the option to display it in the left navigation. New folders you create will display in the navigation by default unless you select “No” in the dropdown. 49 A Cascade asset’s Display Name is the name that appears in the left navigation panel and the page’s breadcrumb navigation. Enter a Display Name. Display Names should substitute “&” for the word “and” since space is limited in the left sidebar. In our example, you can name it “Student Projects.” 6. In the area marked “Metadata Set,” there are two checkboxes that should be checked by default: “Include when publishing” means that this folder and its contents can be published with the rest of your site, so they will appear on the live website. “Include when indexing” means that the pages within this folder will be included (and show up in) the left-hand navigation of your site. 7. Click “Submit.” Editing Index Pages Once your section folder is created, you’ll notice an “index” page inside it. The index page is the webpage that a browser automatically displays when a visitor navigates to a folder. It’s the default or “start page” for visitors to that section of your website. • Edit the Title of the index page. The Display Name of the folder, rather than the index page, will appear in the breadcrumbs and left-hand navigation of your website. The Title will appear at the top of the content area of your page and also in the browser’s title bar. 50 To improve your search engine optimization (SEO), complete the Keywords and Description sections. (See “Optimizing Your Content” for more information about improving SEO.) • When finished, click the “Submit” button at the bottom of the page. Creating Webpages (Second-Level Navigation) Pages that are not the “index” page in a folder will appear to a visitor as a second-level of links in your website’s left-hand navigation. 1. (Optional): Navigate to the folder where you want to create a new webpage. (If you don’t do this now, you can choose the destination folder in a moment.) 2. In the top blue Menu Bar, click “New,” then choose “Basic Web Page.” The “New Page” window will appear in your Main Panel. 51 3. Give your new webpage a System Name. Since your System Name becomes part of that page’s URL, it is best to give your page a System Name that uses lowercase keywords separated by hyphens. Do not use any spaces. 4. If you didn’t already do so in Step 1, select the “Parent Folder” link and navigate to the site folder where you want to put your new page. Responsive Note: The left-hand navigation becomes condensed into the blue section menu at mobile screen sizes. 5. Enter your new page’s Display Name and Title in the appropriate fields, and (if you have it ready) place your new page’s content in the main content field. 6. Click “Submit.” NOTE: You will need to manually publish your changes; see “Publishing Your Webpages” for more information on publishing pages. Creating Third-Level Navigation The website template used by McCormick allows for the left-hand navigation to display up to three levels at once, which enables you to better organize areas with a large amount of content. If you would like to create a third level of navigation, create a new folder inside one of your other folders. Then repeat the steps above to create a new section folder and addition pages as needed. NOTE: You will need to publish all folders affected by your changes in order for the left-hand navigation on your website to reflect the latest updates. Folder Order: Changing Your Site’s Navigation This section explains how to change the order of folders, subfolders, and assets in Cascade. 52 The left-hand navigation of your website is determined by the order of the folders and assets in Cascade. You can reorder the folders and the webpages contained within those folders, which will then change the order of links in your site’s left-hand navigation. In this example, we’ll be changing the left navigation of a subsection of the site. 1. In the navigation panel, click on a desired subfolder (Click the folder link, not the “+” sign next to it.). 2. Click the column header marked “Order.” The assets should reorder from lowest to highest. If they don’t, click “Order” again to reverse the sort order. Note that this sorting is necessary for any re-ordering to work. 3. Click and drag each folder/file to the desired position, or use the arrows at right to move them up or down in the order. Your changes will be saved automatically when you navigate away from the folder. NOTE: In order for these changes to display on the web, you must republish the entire folder you’ve re-ordered. See “Publishing Your Webpages” to learn more about publishing your website folders. Copying Folders/Files To copy a single folder or file, click on the folder or file and select Copy from the top menu. Specify the new system-name for the copied asset and new location. Submit. To copy multiple folders or files at once: • Click on the parent folder of the asset • Check the boxes of those you want to copy • In the dropdown box below the asset list, select Copy • Specify copy location 53 Moving Folders/Files To move a single folder or file, click on the folder or file and select Move/Rename from the top menu. You can also hover over assets in the left navigation panel and click the white down arrow that appears and select “Move/Rename” from the contextual menu. Specify the new location of the asset. Submit. • Check Unpublish Content to remove the page from its original location on the live site as well as Cascade. IMPORTANT: If you do not check this box, a copy of the page will remain in its original location on the live site with no way to edit it in the future. To move multiple folders or files at once: • Click on the parent folder of the asset(s) • Check the boxes of those you want to Move • In the dropdown box, select Move • Specify the new location of the asset(s) *NOTE: There is no way to unpublish files from their original location while moving multiple files at once. Files should be unpublished first by selecting PublishUnpublish. Publishing Folders/Files You can publish individual pages, multiple pages, and entire folders. • Individual pages • Click the Publish tab on the page. • Choose which server to publish to (development or live or both) • Request will be sent to the automated publisher • Any images on the page will also be published, no need to publish them separately • Multiple pages • Select the parent folder of the pages to be published • Check the boxes of the pages to be published • In the dropdown, choose Publish • Cannot choose which server to publish to (must publish to all) • Entire folders • Select the folder to be published • Click the Publish tab on the page. • Choose which server to publish to (development or live or both) You can also hover over assets in the left navigation panel and click the white down arrow that appears and select “Publish” from the contextual menu. 54 Deleting Folders/Files Click on the asset Click More >> Delete in the top page tabs. Check Un-publish Content while deleting to remove the page from the live site as well as Cascade. IMPORTANT: If you do not check this box the page will remain on the site with no way to edit it in the future. • Cascade also displays alerts for what pages/assets are linking to the file and will need to be updated before deleting. • Deleted files stay in Recycle Bin for 15 Days You can also hover over assets in the left navigation panel and click the white down arrow that appears and select “Delete” from the contextual menu. • • • Development Server The McCormick site has a development environment which is essentially a copy of the entire site accessible at http://mccormick-dev.tech.northwestern.edu. This location is not indexed by Google and can only be accessed by sharing its url. The development server can be useful for publishing pages for others to review who do not have access to Cascade before making that page live. See more details on this in the "Publishing Your Webpages" section of this guide. Module 5: Other Helpful Tips Versions • • • • • Cascade retains the 50 most recent versions of an asset To view previous versions, click the More tab and click Versions You should be presented with a table of all previous versions. • When they were last modified and who modified them. To restore an older version, Activate that version Once Activated, the version can be published or edited. Creating Line or Paragraph Breaks • • In WYSIWYG editor • Enter creates a new paragraph • Shift+Enter creates a line break If the text appears to be larger than normal make sure the block of text in formatted for paragraph. 55 When writing a single line of text, hit Enter to ensure that text is in a paragraph Basic Troubleshooting Here are a few troubleshooting tips to try if you find a webpage isn’t loading correctly on the web: After checking that all the links and formatting are correct on your page in Cascade, be sure you have published the page. Try publishing the page a second time if: • • • the page isn’t displaying the same on your website as it appears in Cascade the page isn’t loading correctly there are broken links on the page If the page still doesn’t load correctly after publishing, it might be a caching issue related to your Internet browser: • Try to reload the page in your browser without cache by selecting Ctrl+F5 (for Windows) or Cmd+Shift+R (for Mac). If the page still doesn't load correctly, it may still be in the process of publishing. You can check the publisher queue in Cascade to see if it that page (or other assets) is still in the process of publishing. To check the publishing queue: • Select the Cascade “C” swirl on the top left of the toolbar, then select “Publisher” and select “Active Jobs.” There you can see what assets are in the process of publishing. If the page has been published and the problem still remains, or the publisher appears to be stuck, you may contact McCormick IT at [email protected]. IT may be able to address the problem. 56