1
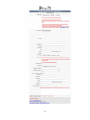
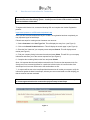
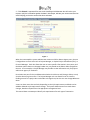
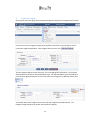
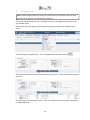
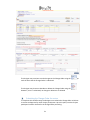
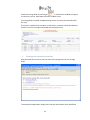
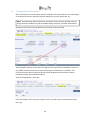
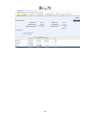
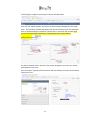
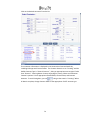
InterscopePlus User Manual
Table of Contents
I. InterscopePlus Overview ...................................................................................................................... 3 II. Definitions and Terminology ................................................................................................................. 4 III. Users, Roles and Permissions ............................................................................................................ 5 A. New Account Instructions for Designers ........................................................................................... 6 B. New Account Instructions for Contractors ........................................................................................ 9 C. New Account Instructions for Owner Agencies ............................................................................... 10 IV. Navigation ....................................................................................................................................... 12 A. Home ............................................................................................................................................... 12 B. Searches ........................................................................................................................................... 12 V. Entering Information ........................................................................................................................... 13 A. Authorization ................................................................................................................................... 13 B. Creating a Program .......................................................................................................................... 15 C. Allocating Funds .............................................................................................................................. 17 D. Creating a Project ............................................................................................................................ 21 E. Assigning Funds ............................................................................................................................... 24 F. Entering Cost Estimate .................................................................................................................... 27 G. Determining Project Type ................................................................................................................ 28 H. Financial Worksheet ........................................................................................................................ 33 I. Creating a Design Contract .............................................................................................................. 36 J. Entering Design Amendment .......................................................................................................... 41 K. Creating a Construction Contract .................................................................................................... 44 L. Construction Contract Change Orders ............................................................................................ 48 1. Creating the Change Order ......................................................................................................... 48 2. Submitting the Changer Order for review .................................................................................. 51 3. Receiving and responding to the Alert ....................................................................................... 52 4. Reviewing and Approving Change Orders .................................................................................. 53 Change Order Sequencing .................................................................................................................. 54 M. Contingency Funds .......................................................................................................................... 54 N. Entering Other Commitments ......................................................................................................... 56 1 O. Entering Expenditures ..................................................................................................................... 59 1. Designer Expenditures ................................................................................................................ 59 2. Construction Expenditures .......................................................................................................... 60 3. Other Expenditures ..................................................................................................................... 61 P. Entering HUB Data ........................................................................................................................... 63 1. HUB Entry as part of a Standard Project – Single Prime ............................................................. 63 2. HUB Entry as part of a Standard Project – CM at Risk ................................................................ 67 3. HUB Only data entry/Non‐code‐item‐center entry .................................................................... 70 Q. Closing a Project .............................................................................................................................. 75 1. Construction Closeout ................................................................................................................. 75 2. Design Contract ........................................................................................................................... 76 3. Contract Closeout ....................................................................................................................... 77 4. Financial Closeout ....................................................................................................................... 78 R. Closing a Program ............................................................................................................................ 80 Advanced Functions ........................................................................................................................ 81 VI. A. Funds Transfers ............................................................................................................................... 81 VII. 1. Funds Transfer ............................................................................................................................ 81 2. Increase/Decrease ...................................................................................................................... 84 Reporting......................................................................................................................................... 85 2 I.
InterscopePlus Overview
Interscope was originally created in 200X for the State Construction Office for internal use in tracking projects as they moved through the office. In 2012, the decision was made to incorporate the functionality of the University System’s “CAPSTAT” Capital Project Status software into Interscope, and then further to create a state‐wide Capital Project System that would be used by the University System, Community College System, and all State Agencies. InterscopePlus is now that system. Screen representations shown throughout this manual currently reflect the Interscope system label, but will subsequently be modified to reflect the new name. InterscopePlus is designed to track the life cycle of Capital Projects from the time they are authorized until they are closed out, including funding sources and HUB data. 3 II.
Definitions and Terminology
Allocate: Designating funds from an authorization to a program. All funds must be allocated to programs before they are active. Amendment: A change to a design contract. Assign: Designating funds from a program for use in a project. Funds must be assigned to a project before they can be committed or obligated for contracts or other expenses. Authorization: Approval by the relevant State governing body(ies) (legislature, OSBM, UNC Board of Governors) or County to execute a project. It includes title, description/scope, amount, funding type (general fund, non‐general fund, state debt, non‐state debt, R&R, R&R debt), budget code, item, center, and date. Community Colleges may have authorizations approved by the County. Authorizations may be allocated to one or more Programs. Category: Project cost estimates are delineated by 4 categories: Design, Construction, Contingency, and Other. Design represents the estimated cost of the design contract Construction represents the estimated cost of all construction contracts Contingency represents the estimated cost of construction contingency Other represents the estimated cost of project related or owner costs, such as soils exploration, materials testing, advertising, fixed furnishings and equipment (FF&E), etc. Change Order: A change to a construction contract, either to the dollar amount, duration or both. Code: A 5 digit number that designates the funding authorization assigned by OSBM. The first digit is a 4, which signifies capital project. The second and third digit represents the fiscal year that the project is authorized (14 = 2014). The last two digits indicate the state agency or UNC institution. For Community Colleges that are authorized funding by the County a 5 digit number that does not start with 4 will be used. Commitment: A signed contract or Purchase Order for which the State or County is obligated to pay the stated amount. Estimated Cost: Total estimated cost of the project, broken down by category. Typically this would come from the State Construction Office OC‐25 form or, for Community Colleges the NCCCS 3‐1 Form. Expenditure: A dollar amount that has actually been paid. Fund Source: There are 6 different sources of funds defined: General Fund: Appropriated funds Non‐General Fund: Receipts, grants, gifts, cash, County appropriated funds, etc. State Debt: State Bonds, COPS, or Special Indebtedness Non‐State Debt: Bonds issued by Institutions, county, or self‐liquidating funds 4 R&R: Funding for R&R from appropriations R&R Debt: Funding for R&R from State Debt HUB: Historically Underutilized Businesses, and commonly used to refer to Minority Participation or Minority Business Enterprises (MBE). Item: A 3‐digit number assigned by OSBM in combination with the code to form a unique identifier for an authorized capital project. Item numbers are assigned sequentially within each fiscal year. Milestone: Key date that is used to measure progress of a contract or project. NCAS Center: A unique data item of up to 8 alphanumeric characters that identifies the financial account in the North Carolina Accounting System (NCAS) related to a capital code‐item. Package: A “process container” for a construction project within the InterscopePlus system which provides a place to record detailed information captured during design review, bidding, award, and the construction administration phases of a construction project. Primavera (P6): Statewide project scheduling system. Schedules are required based on Project Type. Program: A collection of one or more projects closely related by initial authorization, by the related nature of their execution, and/or having multiple funding sources for a single project. The program serves as a “bucket” for funds from different authorizations that can then be assigned to projects as needed. Program IDs are generated and assigned by the system. Project: A project is typically any work requiring a design and construction contract, and may involve construction or renovation of a single building or repairs to numerous buildings as authorized in “R&R” funding. Project IDs are generated and assigned by the system. Projects must be created in the Program from which they will be funded. Project Type: A designation based on agency/institution, dollar amount of project, funding type, and other factors that determines what oversight role SCO will exercise, such as managing design and construction contracts, reviews, etc. and the P6 schedule requirements. There are different project types based on the department/agency, authorization, and dollar amount of the project. Special Project Designation: Classification of certain projects that are not given an OSBM code‐
item and do not follow the typical financial controls. These include HUB only, Code only, or Chancellor’s Projects. III.
Users, Roles and Permissions
Every user must have a username and password. If you do not have one, go to the State Construction Office Website http://interscope2.doa.state.nc.us:88/interscope/logon.action? Click on the Request Logon. 5 A.
New Account Instructions for Designers
Follow these steps for creating a new Designer user account:
1 – Select Designer in the User Type field. This will display the entry form in Figure 2. [Where?
Can’t find figure labeled as 2. Also, where’s figure 1? And 3? Next figure number is 4 on page
10. Similar reference to missing figure 3 under contractor’s login.
2 – ComComplete the form for the fields indicated.
Note: It is important that the email address entered for the Firm be one that
represents the firm directly and is not necessarily defined for a particular individual
since all communication from InterScope for this account will be sent to the email
address on file. 3 – Click Submit. A request will be sent to the InterScope Administrator who will review your
request, verify the information against the data in InterScope, activate your account and send an
email notifying you that the account has been activated.
6 Note: A user account cannot be established for any firm that does not have prior or
current approved and active construction projects setup in InterScope. 7 8 B.
New Account Instructions for Contractors
Note: Any Contractor requesting to use InterScope must first be registered with Vendor
Link, the Interactive Purchasing System. InterScope uses Vendor Link to obtain verifiable
name and address information.
To register with Vendor Link, access the following URL and complete the Vendor Registration
process:
https://www.ips.state.nc.us/IPS/vendor/vndpubmain.asp
Once you have received notification that your Vendor Link registration has been completed, you
may request a logon for InterScope.
Follow these steps for creating a new Contractor user account:
1 – Select Contractor in the User Type field. This will display the entry form (see Figure 3).
2 – Click on the Search VendorLink button. This will display the search page in (see Figure 4).
3 – Enter the first 3 letters of your company name and press Search. This will display search
results (see Figure 5).
4 – Find your company listing in the search results and press Select. This will fill in your company
information and return you to the account request form (see Figure 6).
6 – Complete the remaining fields on the form and press Submit.
Note: It is important that the email address entered for the Firm be one that represents the firm
directly and is not necessarily defined for a particular individual since all communication from
InterScope for this account will be sent to the email address on file.
7 - A request will be sent to the InterScope Administrator who will review your request, verify the
information against the data in InterScope, activate your account and send an email notifying you
that the account has been activated.
Note: A user account cannot be established for any contractor that does not have prior
or current approved and active construction projects setup in InterScope.
Figure 4
9 Figure 5
Figure 6
C.
New Account Instructions for Owner Agencies
Follow these steps for creating a new Agency user account:
1 – Select State Employee [Aren’t some community college employees county not State so
that this should read differently? I’ll check.]in the User Type field. This will display the entry
form in Figure 7.
2 – Select your Department and Agency from the drop down lists and complete the remaining
fields as indicated.
10 3 – Click Submit. A request will be sent to the InterScope Administrator who will review your
request, verify the information against the data in InterScope, activate your account and send an
email notifying you that the account has been activated.
Figure 7
When the InterscopePlus system administrator creates an SCO or Owner‐Agency user, the user is assigned one or more roles such as Project Manager, or Capital Project Coordinator (CPC), or Financial Manager. Each role allows the user to access specific information in the system, and the Menu options shown on the page header may vary based on the Role or Roles assigned to the user. As an example, a Project Manager may be able to view information only for projects within their agency or institution. Permissions are part of roles, and determine whether the Role can add, change, delete, or only view the data on a given screen. The Project Manager role can allow the user to view the funding sources for a project but not be able to change them, but the user can change Milestone dates. A user can have more than one Role, depending on their job requirements, and Roles can be added or deleted as job requirements change. The System Administrator must make those changes, based on requests from the appropriate management level. This manual does not attempt to identify role requirements for each type of interaction. 11 IV.
Navigation
A.
Home
Each user has a home screen and may have a list of My Favorites that will allow them to go directly to a program or project they want to work on. Depending on your position or role, you may have additional clipboards such as ‘My Projects’, ‘Change Orders in Progress’ or ‘Funds Transfers’. The organization of the information is hierarchical and flows from authorization > program > project > design contract>package>construction contract>HUB data. There are tabs that show where you are in the hierarchy and the options within the various levels. Click on any tab at any level to move around the system. B.
Searches
Much of the navigation in InterscopePlus is accomplished using Searches. You can enter as few or as many criteria as you wish. The more that are filled in, the shorter the list of returned data. It is possible to put in enough criteria that the search will return 0 results. If changing search criteria, be sure to clear any unneeded items, or . 12 V.
Entering Information
A.
Authorization
Authorizations will typically be entered by a senior level person within a State Agency Department, by the System Office for Community Colleges or by UNC General Administration for Universities. Your user profile should autofill the Department. From the Home screen, select Authorizations>Authorization. This will bring up the Authorization Search screen. Select the “Add a New Authorization” button Fill in the appropriate information. Budget Code is required. Item OR Center is required, but not both, however all three may be entered. Click on . Note that the Status is “Allocation in Progress”. This will not change until all funds are allocated to programs. 13 Once saved, the Authorization detail tabs show up on the lower part of the screen. There is also a system assigned Authorization #. Select the ‘Authorization Item Detail’ tab, where you will enter the amount of the authorization in the proper fund source(s). When all fund sources have been entered, . You will need to create a program and allocate funds before the authorization will become “Active” for use. 14 B.
Creating a Program
At the top of your home page, select Programs>Program to bring up the Program Search Screen. If you are not sure if a Program already exists, perform a search for it by entering any search criteria that might be applicable. If the Program does not exist, click The New Capital Program screen comes up. Fill in the appropriate information. The Program Name should be the same as the Authorization Title. The Alternate Name is not required but it is for the local Agency/Institution to use if they refer to the Program by a different name. Then . You should now see the Program Screen with the new Program # and tabs below it. The Program # is generated by the system and cannot be changed. 15 16 C.
Allocating Funds
Funds are allocated from an Authorization to one or more Programs. If there are multiple fund sources for an authorization, make sure that you select the one you want to allocate. You must perform a separate allocation for each fund source to each Program. NOTE: All funds must be allocated to change the status from ‘Allocation in Progress’ to ‘Active’
Start by selecting Authorizations>Authorization. This will bring you to the Search screen. Fill in appropriate data and authorization. for the The search will return a list, below, of all Authorizations that meet the criteria. Select the appropriate one by clicking on the ‘SELECT’, Auth ID or Code‐Item‐Center for that Authorization. 17 That will bring you to the Authorization Information screen. Select the ‘Program Allocation’ tab, then the ‘Add Allocation’. This will bring up a Program Search. Fill in the appropriate information and 18 . From the search results, ‘Select’ the desired Program. This takes you back to the Authorization Program Allocation screen with the selected program displayed, ready for you to enter the appropriate dollar amount to be allocated. 19 Enter the amount to allocate to the Program and click on the . You will then see that the funds are allocated, they are available to assign, and because all funds are now allocated, that the Authorization Status is “Active”. 20 D.
Creating a Project
NOTE: The Project must be created under the Program that will provide the funding for it. At the top of your home page, select Programs>Program to bring up the Program Search Screen. Fill in the appropriate information and . The search results will show all Programs that meet your criteria. ‘Select’ the Program you want. You will now be in the Program. Select the ‘Projects’ tab, then the ‘Add Project’ button. 21 Now you are on the New Capital Project screen. Fill in the Project Information – Basic, and Advanced as appropriate. The Title and Description are required. The Agency Project Code is optional. In the Advanced block, select the appropriate type of project under Special Project Description. Standard Project: The default type that will apply to most Capital projects. Performance Contract: This applies to Guaranteed Energy Savings Performance Contracts Foundation Projects: This applies primarily to UNC System projects that are designed/constructed by a foundation but must be reviewed by SCO Non‐Code‐Item Projects: This is for projects that do not go through the normal State authorization process, such as county funded projects at Community Colleges, or projects completed with operating funds. This will also be used for reporting small project HUB information. An Estimated Project Completion date, Funding Source, and Fiscal Year Funded must be entered. 22 NOTE: Once you have selected the project designation and saved, it cannot be changed. If it is the wrong designation, it will have to be deleted and re‐entered with the proper designation. Then . This assigns a project number and displays all of the respective tabs. 23 E.
Assigning Funds
Note: Before assigning funds to a project, the project must exist and there must be funds allocated to the program and available for assignment.
If there are multiple funding sources in a program, funds can be assigned to the project from any available source. At the top of your home page, click on Programs>Program to bring up the Program Search Screen. This will bring up a Program Search. Fill in the appropriate information and click . The search results will show all Programs that meet your criteria. ‘Select’ to choose the Program you want. This will bring you to the program screen. Select the ‘Assign Amounts to Projects’ tab and click on ‘Add Assignment’. 24 A new window will appear with a list of Projects in the Program. Click on the desired project and then . Enter the amount of funds you want to assign and then . To Change an Assignment Amount, type in the new desired amount and . To review the outcome of your action, you may click on the Project ID or Project Name and it will take you to the Project. Select the ‘Funds Assigned’ tab and you can see the funds have been assigned. 25 26 F.
Entering Cost Estimate
Cost Estimate, in terms of InterscopePlus, refers to the OC‐25 for capital projects, or Form 3‐1 for Community Colleges. If the OC‐25 for the project has been certified by SCO, it will show on the screen for the ‘Cost Estimate’. If the project name has been changed, the system may not find the OC‐25 and the ‘Search’ feature can be used to find it. If an OC‐25 does not exist, there is an option to create one. Estimate information is entered as part of the process of establishing the project type described in detail in the next section. 27 G.
Determining Project Type
Select the ‘Project Type’ tab. Here you will enter information about the project which will be used to determine a Project Type, which in turn determines SCO’s oversight role, what type of P6 schedule will be required, and which milestones will be required. Click on the “Institution and Cost” tab to start the process. 28 For State Agencies and Community Colleges, the Estimated Cost must be subdivided into 4 categories: Design Fee, Construction, Contingency, and Other. For UNC Institutions, the Estimated Costs must be subdivided into the 4 categories for projects estimated at more than $2M and so subject to SCO oversight. For projects estimated at less than $2M, the estimate may be entered in the 4 categories, or as a lump sum cost by selecting the appropriate radio button. Enter the cost estimate for the entire project, regardless of the amount of funding that is available. For example, you may only have been authorized funding for advanced planning, but you will enter the estimated cost for the entire project here. 29 Click on each successive tab and complete the required information: State Debt would only be applicable if the funding was provided through State Debt (Bonds, Certificates Of Participation (COPS), or R&R‐Debt). State Land – This will be applicable to most projects except for Community Colleges and some Foundation projects. Special Project Designation – you already selected this when you created the project. City/County Oversight – This applies primarily to Community Colleges, but would apply to any project where the local government will be responsible for plan approval and inspections. 30 Oversight Request – If the project would not require SCO oversight, but the Agency/Institution would prefer SCO to have oversight, it can be requested here. An example is if the estimated cost for an Agency project is $490,000, they could request SCO treat it as if it were over $500,000. When all of the Attributes have been completed, click right of the screen for a quick review. 31 located at the bottom If the information is correct, click , or ‘Change Attributes’ to modify the information. When it is ‘Saved’, the Project Type is determined and displayed along with the P6 Schedule Requirement, the SCO Role, and Milestones Required. 32 H.
Financial Worksheet
The financial worksheet provides information on the financial aspects of the project, including such things as contractual commitments to design and construction. To access this information, navigate to the Project, select the ‘Financial Worksheet’ tab and it will display the Estimated vs Committed tab. The Assigned Funds are automatically displayed, based on the total amount of funds assigned from the Program, regardless of funding source. Details can be viewed on the “Funds Assigned” tab. The Estimated Cost data is automatically displayed from the data entered in the Project Type> ”Estimated Costs” tab. These costs can be changed by selecting the appropriate cost category and entering a new number in the field. If the project type has not been established, Estimated Cost information may be entered here. The Total Committed is the sum of all commitments (design contracts, construction contracts and any Purchase Orders). The amounts of the design contract and construction contract are automatically completed when the respective contract is executed. Changes to those contracts are shown in the Revised Contracts column and the total of the Revised Contracts will become the total committed. Refer to sections on creating design contracts, creating construction contracts, and change orders for details. The system will allow the Estimated Cost to be greater or less than the Assigned Funds, but it will not allow Total Committed funds to be greater than Assigned Funds for Standard Projects. Simply put, you cannot contract for any work without sufficient funds available. 33 Other $ would be other owner related costs that would appropriately be charged to the project such as advertising, soils exploration, materials testing, fixed furnishings and equipment (FF&E), etc. Refer to the section on entering Other Commitments for detailed instructions. Contingency $ are assumed to be the construction contingency. For projects with design contracts under negotiation, the amount listed as the estimated contingency will automatically be shown as construction contingency when the design contract is established. This may be modified in the design contract negotiation process and revised as appropriate. Because of the different methods Agencies/Institutions use and track contingency, there are different options. Option A is to move funds from Contingency $ to the respective category in which they will be spent by decreasing the Contingency $ value and increasing the category into which the funds are going i.e. Design $ or Construction $. There is no audit trail for this option, and the Estimated Cost amount in the category (Construction $) must be greater than or equal to the commitment. Option B: Click on the Contingency Tab NOTE: Funds cannot be committed/expended directly from the Contingency $ category. However, note that the selection may be made to have contingency affected automatically as a result of change order processing, as shown below. Each movement of Contingency funds can be entered in the details either by entering the change amount or the new total and where it is transferred to. The Reason for Change is optional, but recommended to complete the audit trail. The Estimated Cost amount in the category (Construction $) must be greater than or equal to the commitment, or total commitment to approve a change order. 34 Option C: Check the box to have the system automatically move funds from contingency to the appropriate category (Design $, Construction $) to make the Estimated Cost in the respective category equal to the total commitment. In all cases, commitments in Other $ cannot exceed the Estimated Cost for Other $. 35 I.
Creating a Design Contract
For projects that have full SCO oversight, SCO will enter the design contract. This section is intended for non‐SCO users to enter University “download” or any informal project design contracts. Navigate to the Project for which the contract will be created. Select the “Contracts” tab, then the “Add Design Contract.” This brings up a Select Designer window. Fill in the appropriate information to retrieve the desired designer, then . Select the designer. 36 This will bring up the Detail tab, autofills the designer information, assigns a Contract ID, fills in the Financial Worksheet Summary and the Target Contract amounts from the Project, as shown below. 37 Set Contract Status to “Creating”, then select the appropriate Contract Type. 38 There are several Contract Types to choose from and it is important to pick the correct one. Standard Design Contract (Fully Funded): Typical design contract where all funds are available at the time of execution and contract is the full State standard design agreement. [As I understand it Ryan still releases CA on these as they move to bid, not at initial design contract.] Standard Design Contract (Advanced Planning Only): This would apply where the design contract amount is negotiated but only a portion is funded. Examples include funding through DD development or through full design but without construction administration (CA) funding availability. Contract is the full State standard design agreement. Letter Agreement (General Use): A design agreement using the letter agreement format with the work as described in the agreement. Examples include feasibility studies or work under an open‐end design agreement. Letter Agreement (Programming): Contract for programming using the letter agreement format and as described in the agreement. Letter Agreement (Commissioning): Contract for commissioning using the letter agreement format and as described in the agreement. Letter Agreement (Sustainable Energy Programming): Contract for energy modeling using the letter agreement format and as described in the agreement. Not Applicable: This would apply to projects where there is no design contract or code review, such as HUB Only. Change the Construction Target $, Contingency Reserve Target $, and/or the Original Design Fee $ as necessary. Note that the target construction amount is assumed to be the construction budget estimate. If the design agreement should reflect a different amount, for example if you want to design to 85 or 90% of the construction budget during periods of rapidly escalating prices, change the target amount. If the project is funded for Advanced Planning Only, and funds are not available for Construction Administration, check the box for Limit Design Fee Commitment to the following amount and insert the proper dollar amount. The financial controls will not allow a commitment greater than the funds Available to Commit. You can at any time. 39 Enter the Selection Date, RFP Letter Date if applicable, Agreement date if agreement has been reached and Signed”. . This will automatically update the Contract Status to “Created – Not Select Generate Contract to produce a word version of the standard contract, which can then be edited as necessary. When the Signed by Designer and Signed by Agency dates are entered and 40 saved, the Contract Status will be changed to “Active.” Once the Contract Status is “Active”, the screen will show the CURRENT DESIGN CONTRACT information and the updated commitment in the Financial Worksheet Summary. J.
Entering Design Amendment
For projects that have full SCO oversight, SCO will enter the design amendments. This section is intended for non‐SCO users to enter University “download” or any informal project design contract amendments. Navigate to the design contract, select the Amendments tab, and click on Add Amendment It shows the Current contract amount, the Financial Worksheet Summary, Amendment Fees and Funds and Amendment Dates. Enter only the changes to the Fees and Target Funds necessary for this amendment. These changes will be added to the existing contract. There must be a description of the amendment. Enter the appropriate dates and 41 and it takes you back to the Contract Amendments tab and shows you the results of the amendment. On the Detail tab, it shows the updated Current Design Contract Design Fee and updated Total Committed. 42 And on the Project Financial Worksheet it shows the Revised Contracts amount. 43 K.
Creating a Construction Contract
For projects that have full SCO oversight, SCO will enter the construction contract. This section is intended for non‐SCO users to enter University “download” or any informal project construction contracts. Within the InterscopePlus system, design contracts typically lead to designs that require reviews at different stages of design. At the end of the design process, there is a construction contract, and therefore the construction contract is linked to a design contract. The item that connects the design contract and the construction contract is called a Package, and it is primarily how SCO tracks the design review process. To create a construction contract, navigate to the appropriate design contract, select the Packages tab and select the correct package. Normally there is only one package. You will need to update the Bidding/Construction Contracts information by indicating whether it is a formal contract and the construction procurement type of contract (Single Prime, Construction Manager at Risk, etc.) from the drop down lists. Filling in other information or updating status is optional. Then Select the Construction Contracts tab and then New Construction Contract. 44 The Select Contractor window will appear. Enter criteria needed to find the correct contractor, and select the contractor from the search results. The contractor information is automatically entered, based on your selection, in the Construction Contract Detail tab. The Contract Status is set to “Creating” and the default Contract Type is “General Contract.” Select an appropriate contract type if other than “General.” Entering Owner Contact, Safety Officer, Surety, Sheets and Contractor Contact is optional. Enter appropriate Award Details, Contract Dates, and Contract Amounts. If this is a Standard Project, the system will not allow commitments greater than the assigned funds. To 45 avoid losing data, you can as long as the status is “Creating.” When sufficient funds are available to award the contract, change the status to “Valid Contract” and . Select the Project # tab in the hierarchy, then the Financial Worksheet. The construction contract now shows up as a commitment. [Are there differences in required entry dates based on project type and owner? Didn’t we say we didn’t want to require all of the dates? For example approved for bid is important to SCO, less so for us, especially on informals. I assume that if they’ve reviewed it they’ll enter this date? We need awarded and NTP. Don’t we just want contract date and projected completion? As it currently operates, are all dates required?] 46 47 L.
Construction Contract Change Orders
The construction change order process is controlled by a work flow that requires the sequential execution of the steps by the respective parties. Only Designers (or InterscopePlus users given the appropriate permission) are allowed to create and submit change orders for review, processing and approval. The electronic change order process is used for all formal projects, both those subject to SCO oversight and University “download” projects. University change orders follow a slightly different approval process, with the final approval being at the University level rather than at SCO, 1.
Creating the Change Order
NOTE: Each Proposed Change Order (PCO) requires supporting documentation to be uploaded for review and acceptance. A PCO cannot be added without supporting documentation. It is recommended that all supporting documentation be gathered prior to change order entry. After logging in, the designer selects the Active Construction Contracts tab on his/her Home screen, then selects the contract for which the Change Order (CO) will be entered and clicks on it. Tip:
Use the SCO File# to identify the correct Construction Contract.
On the Construction Contract Screen, select the Change Orders tab, then go to .
Fill in the appropriate information. To upload files, select
screen,
at the bottom of the
In the File Uploader window, select Choose File to browse for the file to upload.
48 When the file is selected, it will be uploaded to the window. Upload as many files as
necessary. Add a description and
To add more PCOs, click the
and repeat the steps for each PCO, then
49 ..
After it is saved, it will show as Change Order # with the next sequential number, show the Status and the Work Flow Activity and the 50 icon appears. The Designer may continue to make changes to the Change Order using the until the time that the Change Order is submitted. up The Designer may choose to abandon or delete the Change Order using the However, once it is submitted, no changes or deletions are allowed . 2.
Submitting the Changer Order for review
To complete this workflow step, the Designer must submit the Change Order to initiate its review and approval by other Project participants. Up to this point, no other Project participant has been involved in the Change Order processing.
51 Submit the Change Order by selecting the.
A Confirmation window will appear to confirm this action. Select Yes to continue or No to return. The Change Order workflow is updated and processes any Alerts that are defined for this step. The system is configured to send Alerts to the Owner, Contractor and Project Monitor. An Alert is sent for each logon associated with each project role.
3.
Receiving and responding to the Alert
Each participant will receive an alert via email concerning actions for each Change Order. To access the Change Order, simply click on the link at the bottom of the Alert Email.
52 You will be prompted to Logon and are then directed immediately to the Change Order
page
4.
Reviewing and Approving Change Orders
Each participant will receive an alert via email concerning actions for each Change Order. When the Contractor logs on to InterscopePlus, he/she sees a “Change Orders In Progress” clipboard on his/her Home screen. By selecting a Change Order, he/she can view the Work Flow Activity of that Change Order. Change Orders that are awaiting their action are highlighted in yellow. At this workflow step there are only 2 options that can be performed – Approve or Reject. They are available from the . Approving the Change Order moves the process along to the next step in the Workflow. Rejecting the Change Order at any step in the Workflow causes the Change Order to be returned to Step 2 where the originator (Designer) can change and resubmit. The workflow is then reset and the audit trail (found at the bottom of the page) maintains a record of the prior workflow events. This process continues until the final Workflow Step is completed and the Change Order is marked as Approved (See Status field). Alerts are sent to all Project participants as a notification that the Change Order has been officially approved. The owner must certify that sufficient funds are available for the change order before approving. 53 Change Order Sequencing Change orders must be entered, submitted and approved in sequence. There are safeguards in place to check for any outstanding prior change orders before a newer change order can be approved. Change orders may also be deleted at any time before submission. The system will review the current sequence of change orders and re‐sequence them as appropriate to maintain a consistent ordering. M.
Contingency Funds
Within the context of InterscopePlus, contingency funds are the construction contingency funds that are shown as a line item in the design contract. The amount entered in the estimated cost field for contingency is automatically carried into the design contract, but can be modified before contract commitment. Some Agencies/Institutions choose to use the contingency line as a total project contingency, which is acceptable. For projects with SCO Full Oversight, the amount of construction contingency must be clearly communicated to SCO at the time of design negotiations. There is no mechanism for committing or expending funds from the contingency line, with one exception described below. These funds must be moved to Design, Construction, or Other to be committed. For Standard Projects, the system financial controls will not allow making commitments unless funds are available in the category in which the commitment will be made, i.e. a design contract or contract amendment cannot be signed if there are not enough funds in the Design Fee category in Estimated Cost. You must move funds into that Category equal to or greater than the amount to be committed. The simplest way to move contingency funds is in the Financial Worksheet Estimated vs Committed tab. Here the amount in the Estimated Cost can be changed by entering the new amount and . A transaction of this type is shown in the example below. If a more detailed audit trail is desired, the entries may be made directly on the Contingency tab. 54 Enter the amount of change, or the new total, the reason for the change and where the funds are going. Then . [There’s no reason shown for this example. This makes the new “blank” look just like the history change and so is confusing.]
The exception to the rule that contingency funds must be moved to Design, Construction, or Other before being committed/expended is when the “Automatically draw down contingency amounts to fund change orders” box is checked. In that case, the system will move Contingency funds to the Construction category to cover the Change Order, up to the amount of Contingency funds available. The “History of Changes” tracks all changes in Contingency regardless of the method of change. 55 N.
Entering Other Commitments
Other Commitments are those owner expenses related to the project that do not involve design or construction contracts, typically things like advertising, surveys, permit fees, etc. NOTE: Commissioning, Special Inspections, and similar services that are selected using the design contract procedures must be recorded as design contracts, not Other commitments. Navigate to the Project Financial Worksheet, Estimated vs Committed tab. The Estimated Cost Other Funds shows $15,000 but the amount of funds Available to Commit is only $2000, and the system will not allow committing more funds than are available. This financial constraint does not apply to Special Project Designations (Performance Contract, Foundation Project, Non‐Code‐Item Project). Select the Expenditures – Other tab Enter the number of lines you want to add, 1 line for each PO or other commitment and click the + sign. 56 If the vendor is a HUB, check the box at the left. Assign a commitment #, which can be a PO number or anything you want, a purpose or description of what is being purchased, the vendor, and the commitment amount, then . Vendors must be selected from the vendor search. Unlike design or construction contracts, there is no formal process for changing these commitments. If there is an increase or decrease to the commitment amount, simply enter the new correct amount in the Commitment Amt. and . Entering expenditures (payments/invoices) is optional. If there are invoices entered, the commitment amount cannot be reduced below the expenditures and the commitment cannot be deleted. All of the information from this tab rolls up automatically to the Estimated vs Committed tab, as shown below. 57 58 O.
Entering Expenditures
Entering expenditures is optional in this system, but was provided to assist users in tracking payments to designers, contractors, and other vendors. 1.
Designer Expenditures
Navigate to the Financial Worksheet Expenditures – Design tab, and click on ”Add New Row.” Enter the invoice number, date, and amount. If you are tracking multiple funding sources, insert the proper funding code from which the funds were taken for the invoice. Then . The amount expended and remaining balance are shown on the “Total Design Contracts” line. Note that if you now go to the Estimated vs Committed tab, the 59 expenditure also appears. 2.
Construction Expenditures
Construction expenditures are recorded similarly to Designer expenditures. Navigate to the Financial Worksheet > Expenditures – Construction tab, and click on “Add New Row.” Enter the invoice number, date, and amount. If you are tracking multiple funding sources, insert the proper funding code from which the funds were taken for the invoice. Then . 60 The amount expended and remaining balance are shown on the “Total Construction Contracts” line. Again, if you now go to the Estimated vs Committed tab, the expenditure also appears. 3.
Other Expenditures
To enter Other expenditures, a commitment needs to exist first. See Entering Other Commitments. Navigate to the Financial Worksheet > Expenditures – Other tab and click ”Add Invoice.”
As with Design and Construction Expenditures, enter the invoice number, date, and amount. If you are tracking multiple funding sources, insert the proper funding code from which the funds were taken for the invoice. Then . 61 The amount expended and remaining balance are shown to the “Total” line and the expenditure appears on the Estimated vs Committed tab. 62 P.
Entering HUB Data
HUB data must be entered as part of a construction contract. For Standard Projects with designers or SCO code review, HUB data should be entered at the time of contract award, and the data is saved as “At award.” If the minimum 10% participation goal is not achieved, then the Good Faith Effort must be entered. HUB data should be updated as it changes through the life of the contract and verified before the project is closed. Non‐Code‐Item Projects that are construction only (no designer or SCO code review) can be entered as ”HUB Only,” which will allow you to go directly to creating a construction contract. The project must be created as a Non‐Code‐Item Project and the HUB Only check box must be checked in order to utilize the abbreviated data entry method. NOTE: If a project exists in InterscopePlus because of design or code review, the construction contract and HUB data must be entered under that project, regardless of dollar amount of project. 1.
HUB Entry as part of a Standard Project – Single Prime
Navigate to the desired Project Contracts tab, and select the construction contract. 63 Click on the HUB Participation tab. This provides information on the HUB status of the Prime Contractor, and the current HUB participation. If the contractor does not meet the HUB Goal (currently 10%), then the Good Faith Efforts must be documented. Select the HUB Good‐Faith Efforts tab, f enter the appropriate information, and 64 Once saved, the system will calculate the number of points and determine if the contractor is responsive. If the contractor has submitted an Affidavit C, on the HUB Participation tab click on the 65 This will bring up the “Add Subcontractor” search box. Enter information about the desired subcontractor and . Select the desired contractor from the pick list. Selection may be made from either “Request” or “Select” options displayed. The difference between these two options is a system parameter involving where address information is stored. If the desired company is not listed, click on the additional box for “Add New Contractor” (not shown in this illustration) to request the addition. This will open a screen for entry of contractor information including name, address, and telephone which will be routed to the system administrator for approval/entry. HUB participation information for this firm may not be entered until the contractor is approved and loaded into the system. An automatic e‐mail will be generated back to the requester when this has been done so that HUB entries may be completed. 66 The selected subcontractor is displayed on the contractor list, as shown below. Now complete the CSI Division, Work, and Awarded amount, and The HUB particpation is automatically calculated and displayed for Certified HUB contractors. Uncertified HUB firms may be listed, but will not be reflected in the disiplayed calculations. Continue adding subcontractors as necessary. 2.
HUB Entry as part of a Standard Project – CM at Risk
HUB Entry for CM at Risk differs from Single Prime in that participation must be reported for each 1st tier subcontractor. Therefore there is a Trade/Sub Package for each 1st tier subcontractor or Package Prime Contractor, and the HUB subcontractors under each Trade/Sub Package are recorded. 67 If the construction contract was created as a CMAR, the appropriate HUB Participation (CMAR) tab will show up under the contract. For each Trade/Sub Package, enter the Pkg# and type of work, then Select Package Prime Contractor. The Pkg # is user‐defined and may be whatever is customary for the organization making the entries. Similarly, the type of work under “For” is a user‐
defined entry, but should be generally descriptive of the nature of the work. Search for the desired contractor and select them.
68 Enter the Pkg Amount at Award. If there are HUB subcontractors for the Package Prime, they should be added by clicking “Add Subcontractor.” 69 It is recommended that you after each contractor, as the Hub Participation Summary will be updated when you save. Continue entering Trade/Sub Packages and Subcontractors until all HUB data is complete. 3.
HUB Only data entry/Non‐code‐item‐center entry
Small projects that are NOT part of a code‐item‐center capital project or, by their nature have no design or code review, such as small projects like painting, road patching, etc. need to be entered for reporting capital activity as well as recording HUB data. There is an abbreviated method for these entries. NOTE: If a project exists in InterscopePlus because of design or code review, the construction contract and HUB data must be entered under that project, regardless of the dollar amount of the project. If the Project is funded from a Capital Project Code‐Item‐Center, including R&R, it must NOT be entered as a Non‐Code‐Item Project/HUB Only. 70 At the Program, navigate to the Projects tab and click Add Project. Enter the Title and Description, then select the Special Project Designation “Non‐Code‐
Item.” The HUB Only checkbox will appear and must be clicked to enter the checkmark. Enter an Estimated Project Completion, Funding Source, and Fiscal Year Funded, [isn’t this box to be 2014‐2015 consistently? Should match what’s shown back at authorizations.] then You will be asked to confirm that this is the project designation you want, as it cannot be changed at a later time. Go to the Project Type tab, select Institution and Cost Attribute and enter the Estimated Construction Cost. 71 Select State Land Attribute and check box if appropriate. Go to City/County Oversight Attribute and select appropriate option, then 72 The Project type is now established. Go to the Contracts tab and select ”Add Construction Contract.” At the Select Contractor search window, enter selection criteria and . 73 Click on the desired contractor from the list. The contractor information is displayed in the Construction Contract Detail tab, including HUB type and Contract status. The Contract Status is set to “Creating” and the default Contract Type is “General Contract.” Select an appropriate contract type if other than “General.” Entering Owner Contact, Safety Officer, Surety, Sheets and Contractor Contact is optional. Enter appropriate Award Details, Contract Date, and Contract Amounts. To avoid losing data, you can as long as the status is “Creating.” When all data is complete, change Contract Status to the appropriate “Valid” contract type 74 (“Valid Informal” in this example) and
. Enter Good Faith Efforts and additional HUB participation as appropriate. Q.
Closing a Project
Closing a project will allow it to be placed in an “Inactive” status, and by limiting searches to “Active” projects, minimize the number of projects returned in searches. It is also beneficial to close projects while all information and people involved are available and current. 1.
Construction Closeout
Project closeout begins with the construction project. Once work is completed and the contract is documentation is being finalized, a contractor evaluation is required. That is completed on the Construction Contract>“Evaluation” tab. (This does not show in the sandbox). Review and update HUB data on the “HUB Participation” tab. Change HUB status to “Finalization,” check the “HUB Data is FINAL” box and 75 . Go to the “Construction Contract Detail” tab, change the Contract Status to “Complete,” and . 2.
Design Contract
Select the Design>Evaluation tab (Not currently shown in sandbox), and complete designer evaluation. 76 Select the Design>Detail tab and change Contract Status to “Complete,” and . 3.
Contract Closeout
Select the Project>Closeout Project tab. If the Steps 1 and 2 above were completed correctly, all of the check boxes for “1 Contracts” should be checked. The boxes report completed activities and cannot be manually checked. If they are not checked, something was not completed in Steps 1 or 2. For “2 Milestones” check the box. (Milestones are currently under development and will be found on the Project>Milestones tab). After completing the above, . 77 4.
Financial Closeout
After the Design and Construction contracts have been closed, the next step is Financial Closeout. In the Financial Closeout section is a summary of assigned funds, committed funds and any available funds. To close out the project, the Available to Commit must be $0. and let the system There are 2 options. The first option is to select the “Un‐assign” the funds, releasing them back to the Program. This is recommended if there is only one fund source assigned to the project. If there are multiple fund sources and the is used, the system will select which fund source to “Un‐
78 assign. Option 2 is to navigate to the Program>Assign Funds to Projects tab and change the assignment amount to equal the committed amount and . Return to the Project>Closeout Project tab and the “Available to Commit” should equal $0. Select . After executing this, the project is closed. 79 R.
Closing a Program
80 VI.
Advanced Functions
A.
Funds Transfers
Funds transfers allow moving funds from an Authorization/Program to another Authorization/ Program. It begins with entering a request, and continues with a sequential multi‐step approval process. A separate request must be created for each source of funds to be transferred. The Program that the funds will be transferred from must have unassigned funds equal to or greater than the amount to be transferred within the source of funds to be transferred, i.e. the program must have $15,000 unassigned Non‐General Fund (NGF) funds in order to be able to transfer $15,000 NGF. Excess funds in projects may be unassigned to increase the amount of unassigned funds available within a program. At the top of your home page, select Funds Transfer>Funds Transfer to bring up the Funds Transfer Search Screen. On the search screen, you can search for a previous request that has been made to check the status or create a new request. A new request may be either a transfer of existing funds from one program to another or an increase/decrease in authority. Increase/decrease in authority applies generally to Non‐General Fund or Non‐State Debt funding sources where the agency/institution is providing the funds, or releasing unneeded funds. Both follow a similar approval process. 1.
Funds Transfer
Select the New Funds Transfer button. Search for the Program that you want to transfer the funds from and select the desired program. Enter the amount you wish to transfer. If there are multiple fund sources in the program, be sure to select the desired fund source. Then, search for and select the Program to which you will transfer the funds. Enter appropriate remarks as to why you are transferring the funds. Then . 81 This brings up the summary of the request. Select with the current status. and you will see the workflow This also creates a “Pending Change” for the Authorization and Program financials. Select to send the request forward for approval. 82 Normally, the requester will not be approving the request for the Agency/Institution, but an email will be sent to the Approver, notifying him/her that there is a request for his/her action. The person who is the next level up in the approval process will open the transaction and make a decision to accept or reject the request, by selecting the appropriate button under Workflow. They may make comments in the space provided at the bottom of the workflow, and an explanation in the comments is mandatory if they Reject the request. If that person disapproves the request, the original requester is notified and the process is complete. If that person approves the request, the system notifies the next higher level approver. The 3rd level person must log in and navigate to the pending request. 83 They have the option of approving or disapproving the request using the , and making comments. If they disapprove, the requester and Agency approver are notified and the process is complete. If they approve, the request goes forward to the next level. The status for the request remains in “Pending” until disapproved, or until the top level of the approval process approves it. Once it receives final approval, the funds will be updated and there will no longer be funds in a pending status. While funds are in a pending status, they may not be assigned, committed, or otherwise affected. 2.
Increase/Decrease
To request an increase or decrease in funds, select the New Increase/Decrease button. 84 NOTE: You may only increase or decrease existing authority.
Search for and select the authorization you wish to increase. Enter amount and remarks, then . This brings up the summary of the request. Select with the current status. Select and you will see the workflow to send the request forward for approval. The workflow continues the same as a funds transfer request until it is approved or rejected. VII. Reporting
85