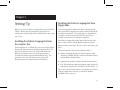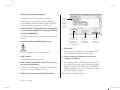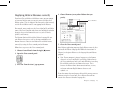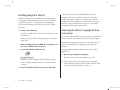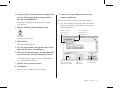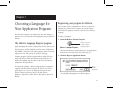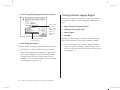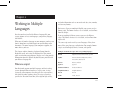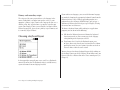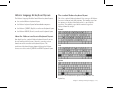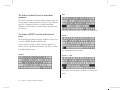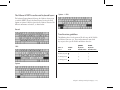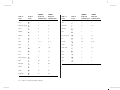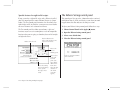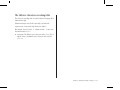
1
Macintosh Hebrew Language Kit Installation and User’s Manual Manuel d’installation et d’utilisation K Apple Computer, Inc. This manual and the software described in it are copyrighted by Apple, with all rights reserved. Under the copyright laws, this manual or the software may not be copied, in whole or in part, without the written consent of Apple, except in the normal use of the software or to make a backup copy of the software. The same proprietary and copyright notices must be affixed to any permitted copies as were affixed to the original. This exception does not allow copies to be made for others, whether or not sold, but all of the material purchased (with all backup copies) may be sold, given, or loaned to another person. Under the law, copying includes translating into another language or format. © 1995 Apple Computer, Inc. 1 Infinite Loop Cupertino, CA 95014-2084 (408) 996-1010 Apple, the Apple logo, Macintosh, Power Macintosh, and QuickDraw are trademarks of Apple Computer, Inc., registered in the U.S. and other countries. TrueType and WorldScript are trademarks of Apple Computer, Inc. Adobe and PostScript are trademarks of Adobe Systems Incorporated, which may be registered in certain jurisdictions. You may use the software on any computer owned by you, but extra copies cannot be made for this purpose. Arial and Corsiva are registered trademarks of The Monotype Corporation. New Peninim is a trademark of The Monotype Corporation. The Apple logo is a trademark of Apple Computer, Inc., registered in the U.S. and other countries. Use of the “keyboard” Apple logo (Option-Shift-K) for commercial purposes without the prior written consent of Apple may constitute trademark infringement and unfair competition in violation of federal and state laws. Times is a registered trademark of Linotype-Hell AG and/or its subsidiaries. Every effort has been made to ensure that the information in this manual is accurate. Apple is not responsible for printing or clerical errors. Simultaneously published in the United States and Canada. Mention of third-party products is for informational purposes only and constitutes neither an endorsement nor a recommendation. Apple assumes no responsibility with regard to the performance or use of these products. Contents Chapter 1 Introduction A-1 About this manual A-1 About the Hebrew Language Kit A-1 Requirements A-2 Chapter 2 Setting Up A-3 Installing the Hebrew Language Kit from the compact disc A-3 Installing the Hebrew Language Kit from floppy disks A-3 Displaying Hebrew filenames correctly A-5 Installing SimpleText Hebrew A-6 Removing the Hebrew Language Kit from your system A-6 Chapter 3 Choosing a Language for Your Application Program A-9 The Hebrew Language Register program A-9 Registering your program for Hebrew A-9 Creating a Roman Language Register A-10 Chapter 4 Working in Multiple Languages A-11 What are scripts? A-11 Primary and secondary scripts A-12 Choosing a keyboard layout A-12 Hebrew Language Kit keyboard layouts A-13 About the Hebrew transliterated keyboard layouts A-13 The standard Hebrew keyboard layout A-13 The Hebrew keyboard layout for PowerBook computers A-14 The Hebrew-QWERTY transliterated keyboard layout A-14 The Hébreu-AZERTY transliterated keyboard layout A-15 Transliteration guidelines A-15 The Keyboard control panel A-17 The Text control panel A-17 Specific features for right-to-left scripts A-18 The Hebrew Setting control panel A-18 The Hebrew characters encoding table A-19 Chapter 5 Troubleshooting A-21 A-iii Chapter 1 Introduction About this manual This manual explains how to install your Hebrew Language Kit. You will also learn how to designate which of your application programs should be opened in Hebrew, and how to use the new control panels and menus that the language kit adds to your system software. Here is how to use this manual: 1. Install the Hebrew Language Kit. Follow the instructions in Chapter␣ 2 to install Hebrew language support in your computer. 2. Display Hebrew file and folder names correctly. Follow the instructions in Chapter 2 to adjust the Views control panel so that you can read Hebrew filenames. 3. Display Hebrew menus correctly in your Hebrew application programs. Most Hebrew application programs display Hebrew correctly after you install the Hebrew Language Kit. Follow the instructions in Chapter␣ 3 to designate Hebrew as the language for your Hebrew program. 4. To find out more about the Hebrew language support you have installed, read Chapter␣ 4 of this manual. Chapter␣ 4 explains how to use the new Keyboards menu, and how to set your Text, Keyboard, and Hebrew Setting control panels. It also displays the keyboard layouts provided with the language kit. About the Hebrew Language Kit The Hebrew Language Kit contains all the software you need to work in Hebrew on your computer. You can use your computer’s Hebrew capabilities in two ways: m If you have a Macintosh application program that has been localized for use in Hebrew, the menus, dialog boxes, help messages, and other elements will be displayed in Hebrew. A-1 NOIR/PANTONE 1 1 m You can enter English, Hebrew, and Yiddish in a single document, using any Hebrew or non-Hebrew application program that takes advantage of WorldScript I. (Check with the program’s manufacturer if you’re not sure your program is fully compatible with WorldScript I.) Requirements The Hebrew Language Kit includes: m At least 4 megabytes of RAM (8 megabytes if you are using Macintosh System 7.5 with QuickDraw GX installed). m The Hebrew Language Register, a program that lets you specify which of your application programs should be opened in Hebrew. Programs registered for Hebrew will display menus and dialog boxes in Hebrew. m WorldScript I, an extension to system software version 7.1 or later that enables your system to handle languages like Hebrew, which are written from right to left. m System software resources needed for Hebrew. m Four Hebrew TrueType fonts: Arial, Corsiva, New Peninim, and Raanana m Two Hebrew bitmap fonts: Eilat, Hermon m A set of key caps labels with Hebrew characters to stick on your keyboard. m SimpleText Hebrew. m A choice of keyboard layouts, including the standard Hebrew layout, as well as phonetically transcribed keyboard layouts for the standard QWERTY (English) and AZERTY (French) keyboard layouts. A-2 Chapter 1: Introduction NOIR/PANTONE 2 2 The Hebrew Language Kit runs on any Macintosh computer equipped with the following: m Macintosh system software version 7.1 or later. On a Power Macintosh at least 8 megabytes of RAM (16 megabytes if you are using System 7.5 and QuickDraw GX). m An internal or external hard disk drive. m A floppy disk drive capable of reading high-density (1.4-megabyte) floppy disks, or a CD-ROM drive. Chapter 2 Setting Up Installing the Hebrew Language Kit from floppy disks Before you can use the Hebrew Language Kit you must install the software. You may also want to consider setting your Views control panel to display Hebrew file and folder names correctly on your screen. The installation process automatically makes a backup copy of your System Folder (to protect the contents during installation of the Hebrew Language Kit). The backup copy uses approximately 3␣ megabytes of space on your hard disk. This space is made available to you again after installation is completed. Installing the Hebrew Language Kit from the compact disc Your Hebrew Language Kit includes four Installation disks. You will need three of these disks for English installation, Install 1, English, Install 2, and Install 3. Have these disks ready before you begin. If your computer has a CD-ROM drive, you can install the Hebrew Language Kit from the Macintosh Hebrew Language Kit CD disc that came with your kit. To use the CD-ROM for installation, follow the instructions in the next section of this manual, “Installing the Hebrew Language Kit from Floppy Disks.” The procedure is the same, but you won’t have to swap disks. Everything you need is contained on the CD-ROM disc. The Installer provides you with two installation choices: m Hebrew installation (includes the Hebrew keyboard layout, the Hebrew-QWERTY [English] transliterated keyboard layout, and four Hebrew TrueType fonts). m Optional items (includes additional keyboard layout choices). v Note: To find out more about the keyboard layouts included in your Hebrew Language Kit, read Chapter␣ 4 of this manual.␣ v Unless you’ve already installed Hebrew, you should select Hebrew language support. You can choose as many of the optional installation items as you want. A-3 NOIR/PANTONE 3 3 1. Quit any open application programs. If you have any virus-detection software, turn it off. v Note: It’s best to start your computer with all extensions turned off before doing the installation. To do so, hold the Shift key down while your computer is starting.␣ v Click the checkbox of each item you want to install. 2. Insert the Install 1, English disk into your floppy drive (or insert the Macintosh Hebrew Language Kit CD disc into your CD-ROM drive). You should see the Installer icon in the Install 1, English disk’s window. 3. Open the Installer by double-clicking its icon. Make sure this is the name of the disk where you want to install the language kit. Click here to switch to a different disk for installation. Click here to install the Hebrew Language Kit. 7. Click Install. After a few moments, you see a welcome screen. 4. Click Continue. The Custom Install dialog box appears. 5. Make sure that the hard disk named is the one where you want to install Hebrew. If a different disk name appears, click the Switch Disk button until you see the name of the correct disk. 6. Click the items you want to install to select them. A-4 Chapter 2: Setting Up NOIR/PANTONE 4 4 Messages tell you when you need to insert another disk. It takes a few minutes to complete the installation. 8. If you see a message telling you to restart your computer, click Restart. v Note: If you installed on a disk different from your startup disk, you will first be asked to quit the Installer application. You must designate the hard disk where you installed the Hebrew Language Kit, then restart your computer to activate the Hebrew language support.␣ v Your computer now supports Hebrew. Displaying Hebrew filenames correctly If you have files and folders with Hebrew names on your computer, you may find that your system can’t correctly display these Hebrew names. This can happen if the font your system currently uses for file and folder names is not appropriate for Hebrew. 4. Choose Hermon (or any other Hebrew font you prefer). Choose Hermon. For example, many people use the Geneva font for file and folder names, but Geneva contains only characters for English and other languages that use the Roman character set (such as French, Spanish, and German). The Hermon font installed with the Hebrew Language Kit contains Hebrew characters as well as the most commonly used Roman characters. You can view Hebrew file and folder names correctly by setting the Views control panel to Hermon. Follow these steps to set the Views control panel: 1. Choose Control Panels from the Apple (K) menu. 2. Open the Views control panel. 3. Press the “Font for views” pop-up menu. 5. Close the Views control panel. Most Hebrew application programs display Hebrew correctly after you install the Hebrew Language Kit. Follow the instructions in Chapter␣ 3 to designate Hebrew as the language for your Hebrew program. v Note: If your computer’s primary language uses the Roman character set, but is not English, specifying a Hebrew font in the Views control panel may cause some difficulties in reading file and folder names that use Roman characters. This is because the Hebrew fonts do not contain umlauts, accents, and some other non-English Roman characters and symbols.␣ v If you have more than one language kit installed, you may want to continue using the Geneva font, since a Hebrew font will not contain the characters for other language kits. Chapter 2: Setting Up A-5 NOIR/PANTONE 5 5 Installing SimpleText Hebrew SimpleText Hebrew is a basic multilingual text-editing program that supports traditional Hebrew characters as well as all other available writing systems. This program is not automatically installed with your language kit. If you wish to install it, follow these steps: 1. Do one of the following: If you have a CD-ROM drive, insert the CD Install disc into the CD-ROM drive. Otherwise, insert the Install 1, English floppy disk into your floppy drive. 2. When the floppy disk or CD-ROM disc icon appears on the screen, double-click it to open it. 3. Locate the SimpleText Hebrew icon. If you have more than one version of SimpleText on your computer—for instance, SimpleText Hebrew and an English version—the wrong version may start when you try to open a SimpleText file. Instead of opening a SimpleText file directly, first open the version of SimpleText you want to use, then choose Open from the File menu to open your file. Removing the Hebrew Language Kit from your system If you wish to remove Hebrew from your system, use the Installer to remove all the files that provided the Hebrew language support. If you have other language kits on your system, don’t worry. The Installer will not remove any support needed for your other languages. To remove Hebrew language support you need the Install 1, English disk. 1. Quit any open application programs. If you have any virus-detection software, turn it off. If you don’t see the SimpleText Hebrew iconin the window, resize the window to make it larger, or scroll the window to see more. 4. Drag the SimpleText Hebrew icon to your hard disk. A-6 Chapter 2: Setting Up NOIR/PANTONE 6 6 v Note: It’s best to start your computer with all extensions turned off before doing the removal. To do so, hold the Shift key down while your computer is starting. v 2. Insert the Install 1, English disk into your floppy drive (or insert the Macintosh Hebrew Language Kit CD disc into your CD-ROM drive). You should see the Installer icon in the Install 1, English disk’s window. 3. Open the Installer by double-clicking its icon. 9. If you see a message telling you to restart your computer, click Restart. Hebrew is not removed until you restart your computer. v Note: If your language kit was installed on a disk different from your startup disk, you will only be asked to quit the Installer application.␣ v Click the checkbox of the items you want to remove. Press this pop-up menu and choose Custom Remove. A welcome screen appears. 4. Click Continue. The Install dialog box appears. 5. Press the pop-up menu at the upper-left corner of the dialog box and choose Custom Remove. 6. Make sure that the disk named is the disk from which you want to remove your Hebrew language software. If the wrong disk name appears, click Switch Disk until you see the name of the correct disk. 7. Click the items you want to remove. Make sure this is the name of the disk where the language kit is installed. Click here to switch to a different disk. Click here to remove the selected files. 8. Click Remove. There is a short wait while the files are removed. Chapter 2: Setting Up A-7 NOIR/PANTONE 7 7 A-8 NOIR/PANTONE 8 8 Chapter 3 Choosing a Language for Your Application Program Now that your computer can work in more than one language, it must have a way to determine which programs must be opened in Hebrew. The Hebrew Language Register program Application programs contain a region code that tells your system which language and font should be used for menus, dialog boxes, help balloons, and other items. Some programs, however, contain region codes that don’t specify the preferred language. Suppose you open a Hebrew program whose region code does not specify Hebrew. With your Hebrew Language Kit you can work in the program, but you won’t be able to read the menus, dialog boxes, or help balloons. To remedy this problem, a Hebrew Language Register program is supplied with your Hebrew Language Kit. You can use the Language Register to “register” the programs you want to use in Hebrew. You may not need to register all your Hebrew programs—only those in which menus don’t appear correctly in Hebrew. Registering your program for Hebrew You need only register a program once. After it is registered, a program always opens in the language you specified, unless you change the program’s name or re-register it in a different language. To register a program: 1. Open the Hebrew Language Register. Double-click here to open the Hebrew Language Register. You’ll find the Hebrew Language Register in the Apple Extras folder on the hard disk where you installed the kit. 2. Click the Register Application button. Click Register Application. A list of application programs and folders appears. A-9 NOIR/PANTONE 9 9 3. Select the application program you want to register. Creating a Roman Language Register If you register a program as Hebrew by accident, you can change it back to your computer’s primary language by following these steps: If the program you want to register is not listed, use this menu to see files in other folders. Click the program you want to register. 4. Click the Register button. Now you can open your program and begin working in Hebrew. v Tip: You can use a short-cut method to register your programs. If the program you want to register is open, quit it. Then drag the program’s icon to the icon for the Hebrew Language Register. When the Language Register icon is highlighted, release the mouse button. A message confirms that the program is registered.␣ v A-10 Chapter 3: Choosing a Language for Your Application Program NOIR/PANTONE 10 10 1. Open the Hebrew Language Register. 2. Pull down the Language menu. 3. Choose Roman. 4. Click OK. Your Hebrew Language Register changes to a Roman Language Register. You can now use it to re-register programs as Roman. v Hint: As a convenience, you can create additional language registers for any of the languages installed on your system, and then use the short-cut method described at left to register your programs.␣ v Chapter 4 Working in Multiple Languages Now that you have installed the Hebrew Language Kit, your system supports at least two languages: your primary language and Hebrew. When you add another language to your computer, you have new choices about how text should appear on your desktop and in documents. The more languages your computer supports, the more choices you have. This chapter explains choosing a keyboard layout from the Keyboards menu, and setting the Keyboard and Text control panels to tailor how your computer displays text. It also provides information about the different keyboard layouts provided with your Hebrew Language Kit. and other information such as sort order and date, time, number, and currency formats. For instance, if you are working in English, your system uses the Roman script. The Roman character set is available, and text flows from left to right. If you are working in Hebrew, your system uses the Hebrew script. The Hebrew character set is available, and text flows from right to left. The same script can be used by several languages if they share most of the same characters and behaviors. For example, Roman script is used for English, French, German, and Spanish. Examples of Macintosh scripts and corresponding languages Roman English, French, German, Italian, Spanish Cyrillic Russian, Ukrainian, Bulgarian, Serbian, Macedonian, Belorussian Hebrew Hebrew, Yiddish What are scripts? Japanese Japanese Your Macintosh supports multiple languages and their writing systems through software known as a script system. A script system tells your computer what characters the script contains, and which keystrokes produce them. The script system also specifies the direction of text flow (left to right or right to left), Traditional Chinese Traditional Chinese Simplified Chinese Simplified Chinese Korean Korean Arabic Arabic, Persian A-11 NOIR/PANTONE 11 11 Primary and secondary scripts The script used by your system software—the language in the menus, dialog boxes, and other items on the screen—is your computer’s primary script. If you install a language kit that uses a different script, that script becomes a secondary script for your system. For example, if your system is English, and you install the Hebrew Language Kit, your system’s primary script is Roman, and its secondary script is Hebrew. Choosing a keyboard layout If you work in two languages, you can switch from one language to another by choosing the appropriate keyboard layout from the Keyboards menu. Using a Hebrew application program, or a program that takes advantage of WorldScript I, you can type a document in Hebrew that includes passages in English, all using the correct fonts and characters. To choose a keyboard layout while working in an application program, you can do one of the following: m Pull down the Keyboards menu and choose the keyboard layout you want to use. You can now type in the language corresponding to the layout you selected. m If you know what’s listed in the Keyboards menu, press x–Space Bar to switch to the next section of the list without opening the menu. Press x–Option–Space Bar to switch to the next choice within the same section. You may also need to change keyboard layouts while working on the desktop. If you want to edit a Hebrew file or folder name, you first need to select a Hebrew font in the Views control panel (see Chapter 2). In the upper-right corner of your screen, you’ll see a Keyboards menu in the menu bar. The Keyboards menu is available on any system with more than one language installed. A-12 Chapter 4: Working in Multiple Languages NOIR/PANTONE 12 12 Hebrew Language Kit keyboard layouts The standard Hebrew keyboard layout The Hebrew Language Kit offers four different keyboard layouts: This is the standard Hebrew keyboard. It lets you type all Hebrew characters in Normal and Shift positions. The numbers typed on the top row are displayed from right to left, as on a Hebrew typewriter. The numbers typed on the numeric keypad are displayed from left to right. m the standard Hebrew keyboard layout m the Hebrew keyboard layout for PowerBook computers m the Hebrew-QWERTY (English) transliterated keyboard layout m the Hébreu-AZERTY (French) transliterated keyboard layout Normal About the Hebrew transliterated keyboard layouts You should use the standard Hebrew keyboard layout if you are already familiar with this layout. Otherwise, you may want to choose one of the transliterated keyboard layouts. The transliterated keyboard layouts phonetically map the Hebrew characters to the standard QWERTY or AZERTY keyboard layout. Shift Option Diacritics can be found on the top row by holding down the Option key. Chapter 4: Working in Multiple Languages A-13 NOIR/PANTONE 13 13 The Hebrew keyboard layout for PowerBook computers This layout is similar to the standard Hebrew keyboard except that you type numbers from the top row as if they were typed from the keypad. It is recommended for use with Apple PowerBook computers, which do not have a numeric keypad integrated into the keyboard. The Hebrew-QWERTY transliterated keyboard layout Shift Press Shift to obtain final (sofit) consonants and long vowels. Option This keyboard layout phonetically maps the Hebrew characters to a standard QWERTY (English) keyboard layout. Pressing the Shift, Option, or Option+Shift keys provides the Hebrew characters for different consonants and vowels, as shown in the following illustrations. Normal Press Option to obtain short vowels. Option + Shift Press Option and Shift together to obtain very short (hataf) vowels. A-14 Chapter 4: Working in Multiple Languages NOIR/PANTONE 14 14 The Hébreu-AZERTY transliterated keyboard layout Option + Shift This keyboard layout phonetically maps the Hebrew characters to a standard AZERTY (French) keyboard layout. Pressing the Shift, Option, or Option+Shift keys provides the Hebrew characters for different consonants and vowels, as shown below. Normal Transliteration guidelines The following charts list the names of all the letters of the Yiddish and Hebrew character sets. The transliteration tells you which keys to press for a specific Yiddish or Hebrew character. Shift QWERTY Keyboard Transliteration AZERTY Keyboard Transliteration Double-yod-patah ] ù Fe with upper bar p\ p` Ve with upper bar b\ b` Name of Letter Yiddish Form Option Chapter 4: Working in Multiple Languages A-15 NOIR/PANTONE 15 15 QWERTY Keyboard Transliteration AZERTY Keyboard Transliteration Name of Letter Alef a a Beth (with dagesh) b` Veth QWERTY Keyboard Transliteration AZERTY Keyboard Transliteration Nun n n b^ Nun Sofit N N, § b b Samekh s s Ghimal g g Ayn e e Daleth d d Pe (with dagesh) p` p^ He h h Fe f, p f, p Waw u, o, v u, o, v Fe Sofit F, P F, P, à Zayn z z Tsade c c Heth j, H j, H Tsade Sofit C C, é Teth y, T y, T Qof q q Yod i i Resh r r Kaf (with dagesh) k` k^ Shin w w Khaf k, x k, x Tav t t Khaf Sofit K K, è Lamed l l Mem m m Mem Sofit M M, ç Name of Letter Hebrew Form A-16 Chapter 4: Working in Multiple Languages NOIR/PANTONE 16 16 Hebrew Form The Keyboard control panel 3. Select the new default keyboard layout you want. Use the Keyboard control panel to choose which keyboard layout is the default—the one automatically selected in your Keyboards menu—for each script on your system. The keyboard layouts displayed in the Keyboard control panel correspond to the language currently selected in your Keyboards menu. For instance, if the U.S. keyboard is currently selected in your Keyboards menu, the Keyboard control panel lists all the keyboard layouts available for the Roman script. If you want to set the default keyboard layout for the Hebrew script, choose a Hebrew keyboard in the Keyboards menu. Then follow the instructions given here. To set the default Hebrew keyboard layout: 1. Choose Control Panels in the Apple (K) menu. 2. Open the Keyboard control panel. The current default keyboard is highlighted. Select a new default keyboard from this list. 4. Close the Keyboard control panel. The Text control panel As explained at the beginning of this chapter, the same script can be used by more than one language. Two languages that share the same script may have different rules for such things as sorting order or capitalization. When more than one set of rules exists for the script you are using, you can use the Text control panel to specify which rules you want to apply. For your primary script, the rules also determine how file and folder names are sorted on your desktop. For example, if your primary script is Roman and you’ve installed support for both French and U.S. systems, you could set the Roman script to follow U.S. rules for sorting. Chapter 4: Working in Multiple Languages A-17 NOIR/PANTONE 17 17 Specific features for right-to-left scripts The Hebrew Setting control panel If your system has a right-to-left script such as Hebrew installed, your Text control panel has some additional features (as shown below). The Text control panel determines the direction (left to right or right to left) in which the system presents text and other on-screen elements such as buttons and menus. This control panel lets you select a Roman font to be associated with Hebrew fonts. It will be used by the system when you work in applications that allow only one text font per section. The Text control panel also allows you to choose “split caret” insertion, so you can see insertion points at each of two possible locations when you are typing at a boundary between left-to-right and right-to-left text. 1. Choose Control Panels in the Apple (K) menu. Hebrew rules selected. This box illustrates the effects of the insertion point options chosen below. Choose the cursor’s blinking speed. Choose the writing direction (for dialog boxes, System messages, and so forth). A-18 Chapter 4: Working in Multiple Languages NOIR/PANTONE 18 18 Choose if you want a split insertion point. (The upper half of the Insertion Point shows where the next character of the current script will appear.) To adjust your Hebrew Setting control panel, follow these steps: 2. Open the Hebrew Setting control panel. 3. Select a new default font. 4. Close the Hebrew Setting control panel. The Hebrew characters encoding table The character encoding table used in the Hebrew Language Kit is shown on the right. Column rank represents the first code digit, and row rank represents the second code digit. Rank starts from 0. For example, letter b is in the 6. column and the .2 row, so its hexadecimal code is $62. v Important: The Hebrew space character code is $A0. This is not the same as the Roman space character code, which is $20.␣ v Chapter 4: Working in Multiple Languages A-19 NOIR/PANTONE 19 19 A-20 NOIR/PANTONE 20 20 Chapter 5 Troubleshooting I changed my Views control panel to the Hermon font, but I still see odd characters in my Hebrew application program. This section contains information about some common problems you may encounter while working on a computer that supports Hebrew. Your system may not recognize your Hebrew program as Hebrew. Follow the instructions in Chapter␣ 3 of this manual to register your program as Hebrew. I see odd characters that I can’t read in some of my file and folder names. I changed my Views control panel to the Hermon font, and now I can’t read some of my non-Hebrew file and folder names. The font your system is using for file and folder names may not contain any Hebrew characters. Hebrew names can’t be properly displayed unless your system uses a font that contains Hebrew characters. Choose Hermon in your Views control panel (see the section “Displaying Hebrew Filenames Correctly” in Chapter␣ 2). The Hermon font contains Hebrew characters as well as the most commonly used Roman characters. You can view almost all Hebrew and Roman file and folder names correctly by setting the Font for views to Hermon. If you still see odd characters on your screen, read on. If you have file or folder names that contain non-English Roman characters, such as accents or umlauts, they will not be correctly displayed after you change the Views control panel to the Hermon font. A few other characters, such as typographic quotation marks and ellipses, will also not be correctly displayed. This is because the Hermon font does not have a complete set of Roman characters, only the most commonly used ones. In the Views control panel, choose a font that will correctly display your non-Hebrew file and folder names. Then use nonHebrew names for all your files and folders, even those that contain Hebrew. A-21 NOIR/PANTONE 21 21 Setting the Views control panel to Hermon is necessary only to read Hebrew file and folder names. If you don’t set the Views control panel, you will still see Hebrew correctly displayed within your Hebrew or multilingual application programs. You can write and print in Hebrew; remember to give your files non-Hebrew names. I can’t edit a Hebrew file or folder name. I changed my Views control panel to the Hermon font, but I still see odd characters in my Application menu. I reinstalled one of my Hebrew application programs. Do I need to re-register it in Hebrew? Not all the problems of working in multiple languages on one computer have been solved. Unfortunately, the Application menu cannot display Hebrew names, even after you set your Views control panel to a Hebrew font. The names of your Hebrew application programs will not be correctly displayed in the Application menu and in certain dialog boxes. If the name of your program changes, you must re-register it. See Chapter 3 for instructions on registering a program in Hebrew. Icons that appear in the Application menu next to each program’s name will help you to identify your Hebrew programs. You may have a non-Hebrew keyboard selected in the Keyboards menu. Pull down the Keyboards menu and select a Hebrew keyboard. For more information on the Keyboards menu, see Chapter␣ 4. I can’t work in Hebrew with my usual application program. Your application program may not be completely compatible with WorldScript I. If it isn’t, it won’t automatically switch to a Hebrew font when you select a Hebrew keyboard, or it may not let you see the Hebrew fonts in the font menu, or it may not support right-toleft text entry. To determine if your application program is WorldScript I compatible, please consult the dealer from whom you purchased the program or the program’s manufacturer. A-22 Chapter 5: Troubleshooting NOIR/PANTONE 22 22 Since I installed the Hebrew Language Kit, I can no longer work with some of my other application programs, even in Roman. Since I installed the Hebrew Language Kit, unwanted keyboard layouts appear in my Keyboards menu. How do I remove them? This may be due to a lack of memory. The Hebrew Language Kit, when installed, is automatically loaded in memory at startup along with system software. Your system software takes up more space in memory, and the amount of memory available for programs decreases. To remove unnecessary keyboard layouts, open the System file in the System folder. Select the unnecessary keyboard layouts and drag them to the Trash or into a temporary folder. If you are sure that you have enough memory, this problem may be due to an incompatibility between Hebrew and your program. You may need to deactivate the Hebrew Language Kit while you are using the application. You can do so by disabling the WorldScript I extension in the Extensions Manager control panel (included with Macintosh System 7.5 and later). Chapter 5: Troubleshooting A-23 NOIR/PANTONE 23 23