1
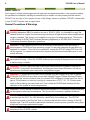
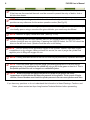
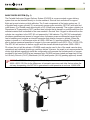
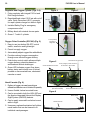
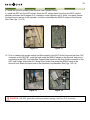
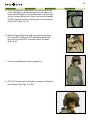
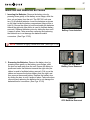
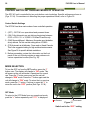
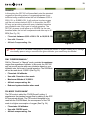
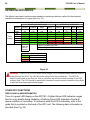
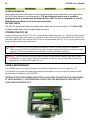
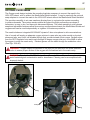
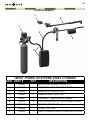
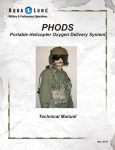
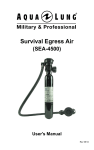
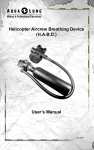
1
PHODS
Portable Helicopter Oxygen Delivery System
User’s Manual
Rev. 01/09
2
PHODS User’s Manual
COPYRIGHT NOTICE
This owner’s manual is copyrighted, all rights reserved. It may not, in whole or in part, be copied,
photocopied, reproduced, translated, or reduced to any electronic medium or machine readable form
without prior consent in writing from Aqua Lung International, Inc.
©2009 AQUA LUNG AMERICA
Portable Helicopter Oxygen Delivery System (PHODS)
Owner’s Manual P/N 102999
PHODS P/N 102935
You can contact a Technical Advisor via e-mail at:
[email protected]
[email protected]
[email protected]
[email protected]
Military Sales: [email protected]
TRADEMARK NOTICE
Aqua Lung® is a registered trademark of Aqua Lung America, Inc.
MH® is a registered trade mark of Mountain High Equipment & Supply Company.
NOTICE OF NON-LIABILITY
Before the Portable Helicopter Oxygen Delivery System (PHODS) is put to use, it is the responsibility
of any user who will use this device to become familiar with the operation and safety aspects of this
device. Using the system improperly could cause failure and lead to possible property damage and/or
personal injury.
Aqua Lung America assumes no responsibility for property damage, accidents, injury or death that
may result from the misuse of this device or equipment. This includes any use of this device or
equipment outside the scope of common sense, the Instruction Manual, inserts and other related
documentation. (Portions of this manual are excerpts from the MH OPC M1 Instruction Manual, used
by permission of Mountain High Equipment & Supply Company®, Redmond, OR.)
Warnings, Cautions and Notes
Pay special attention to information provided in warnings, cautions, and notes which are accompanied
by these symbols:
A WARNING indicates a procedure or situation that may
result in serious injury or death to the user.
A CAUTION indicates any situation or technique that will
result in potential damage to the product.
A NOTE is used to emphasize important points, tips, and
reminders.
3
Contents
Change record..................................................................................................................... 5
BASIC SAFETY........................................................................................................................... 6
General Precautions & Warnings.................................................................................................... 6
SYSTEM Description............................................................................................................. 8
Basic PHODS System.................................................................................................................. 8
Regulator and Oxygen Cylinder...................................................................................................... 9
Oxygen Pulse Controller (OPC-M1)................................................................................................. 9
Nasal Cannula............................................................................................................................ 9
system setup........................................................................................................................ 11
Removing The Tubing. ............................................................................................................... 14
Nasal Cannula Mounting............................................................................................................. 14
IHADSS Cannula Mounting. ........................................................................................................ 16
inserting and removing batteries.............................................................................. 17
control switch settings and modes of operation............................................. 18
Control Switch Settings............................................................................................................... 18
modes selection................................................................................................................. 18
Off Mode. ................................................................................................................................ 18
On Mode. ................................................................................................................................ 19
R/M: (Reserve/Manual Mode). ..................................................................................................... 19
F20 Mode “PHODS Mask”........................................................................................................... 19
Oxygen Delivery Matrix............................................................................................................... 20
Other opc functions........................................................................................................ 20
Display And Alarm Information...................................................................................................... 20
Flow Fault Alarm. ...................................................................................................................... 21
Apnea Alarm............................................................................................................................. 21
Low Battery.............................................................................................................................. 22
Alarm Information...................................................................................................................... 21
Battery Check........................................................................................................................... 22
storing the opc-m1............................................................................................................ 22
care and maintenance..................................................................................................... 22
4
PHODS User’s Manual
manufacturers recommended phods pre-flight checklist........................... 23
Check. .................................................................................................................................... 23
Helmet-Nasal Cannula................................................................................................................ 23
Helmet-PHODS Mask................................................................................................................. 24
manufacturers recommended phods post-flight checklist......................... 24
Check. .................................................................................................................................... 24
phods checklist insert................................................................................................... 25
Regulator and Cylinder change out........................................................................ 25
Troubleshooting............................................................................................................... 26
Optional phods mask........................................................................................................ 27
specifications...................................................................................................................... 28
phods regulator schematic......................................................................................... 29
5
CHANGE RECORD
Change No.
Date
Title or Description
Change made by
6
PHODS User’s Manual
BASIC SAFETY
Pure oxygen is a highly oxidizing gas and can vigorously accelerate combustion. It can provide a catalyst
for spontaneous combustion resulting in personal injury or death if not used properly and with caution.
DO NOT use any type of oil or grease on any of the fittings, valves or cylinders. DO NOT smoke while
in use. DO NOT operate near an open flame.
General Precautions & Warnings
WARNING - This device is classified as, and is only suitable for use as, a supplementary
breathing apparatus (SBA) for aviation use up to 18,000 ft. MSL. It is intended to supply the
needed amount of oxygen for persons during excursions at flight altitudes where supplemental
oxygen is needed. This device is not suitable for any type of medical operations. This device
is not suitable for SCBA (Self Contained Breathing Apparatus) or SCUBA (Self Contained
Underwater Breathing Apparatus) operations.
WARNING - When operating the PHODS around high power emitters such as friendly or
threat systems, PHODS may stop providing oxygen, or may start pumping oxygen when not
expected or required. If the unit is not operational, turning the OPC M1 power OFF then ON
will be required. An operational check must therefore be performed immediately prior to use
at high altitudes.
WARNING - Before using the PHODS, it is important to receive hypoxia awareness and
aeromedical training. Use of the PHODS without proper training is dangerous and can result
in serious injury, or death.
WARNING - DO NOT apply any type of petroleum-based lubricant or grease to any part of
the PHODS. Hydrocarbon contamination, including petroleum-based lubricants, can cause
spontaneous combustion when exposed to compressed oxygen.
WARNING - It is important to fill the PHODS cylinder only with Oxygen 90% pure or greater.
If filling the PHODS from any other source than a Mobile Oxygen Cylinder Recharge Station,
ensure that the moisture content does not exceed 0.005 milligrams of water vapor per liter of
gas at 760 millimeters of mercury (mmHg) at a temperature of 70ºF / 21.1ºC. Excess water
vapor in the breathing gas can cause ice to form inside the PHODS and interfere with the
operation of the system at colder temperatures.
WARNING - Do not attempt to loosen or remove the regulator Q. D. connector or safety burst plug
on the regulator under any circumstances. This should only be done by a qualified technician.
WARNING - The OPC M1 LED is Night Vision Goggle (NVG) compatible and therefore difficult
to see through the NVG. The LED should be viewed with the unaided eye. The OPC M1
should be mounted on the Survival Vest in a location that will allow direct viewing of the LED
indicator light. The LED should be periodically checked to ensure proper operation during flight
at altitudes requiring supplemental oxygen.
WARNING - Crew members are required to periodically check the amount of oxygen
remaining in their PHODS cylinder.
7
WARNING - PHODS oxygen cylinder may burst from impact of small arms fire, resulting in
overpressure shock, shrapnel injury and/or flash fire.
WARNING - The OPC M1 does not provide an indication of remaining battery life. Ensure new
batteries are installed in the PHODS during Pre-flight.
WARNING - Failure to breathe properly through the nose while using the cannula may result in
oxygen deprivation.
WARNING - DO NOT modify or alter the length of any hoses or tubing. This should only be
done by a qualified technician, using original manufacturer hose assemblies.
WARNING - Disinfect the PHODS Mask or Nasal Cannula & Nose Piece after each use to
avoid bacteriological contamination and for cleanliness. Cleaning can be accomplished with
isopropyl alcohol.
WARNING - Oxygen should be delivered to the inlet port on the side of the mask inhalation
valve to ensure proper dilution of the oxygen with the ambient air in the mask cavity.
WARNING - DO NOT increase or decrease the length of the Nasal Cannula or the coiled hose.
The removable Nose Piece may be trimmed for comfort.
WARNING - If after consulting the Troubleshooting section of this manual the situation is not
resolved, immediately return the PHODS system to a qualified technician for inspection.
CAUTION - When donning the flight equipment, ensure all PHODS straps and hoses are
properly secured to the Survival Vest to prevent snagging during egress.
CAUTION - DO NOT apply any type of aerosol spray to the PHODS. Doing so may cause
permanent damage to certain plastic components, including the delivery tubing.
CAUTION - PHODS operation has not been verified below -25ºF and performance may be
degraded at lower temperatures.
CAUTION - DO NOT pull on the tubing without pushing in the collar; it will damage the connector.
CAUTION - DO NOT pinch the outlet hose when inserting it into the “Out” connector.
NOTE -The OPC M1 unit is programmed to start operation once it senses a pressure altitude of
8,000 ± 500 ft. PA. Due to the differences in barometric pressures and other factors where the
unit may be operating, the OPC M1 is guaranteed to start operation at and over 10,000 ft.PA.
NOTE - If the OPC M1 is not going to be used for 30 days or more, remove the batteries.
When using the OPC M1 for the first time after storage, replace the batteries to ensure proper
operation. A fresh set of batteries should be part of your pre-flight inventory.
8
PHODS User’s Manual
NOTE - DO NOT store the OPC M1 connected to the cylinder while the inlet is under pressure.
If the lines are disconnected the ends must be covered to prevent the entry of debris, dust or
dirt into clean hoses.
NOTE - Before proceeding, review the information on the back panel of the unit, which
provides an easy reference for the various operation modes (See Fig.16).
NOTE - The OPC ON mode is designed to provide the amount of oxygen needed by an average
size healthy person using a cannula at the given altitudes; your needs may be different.
NOTE - Batteries fit tightly, handle with care. (See Fig. 27-29).
NOTE - If wearing the HGU-56/P Helmet, the OPC M1 should be worn on right front chest;
cylinder should be worn on right kidney. If wearing the IHADSS Helmet, the OPC M1 should be
worn on the left front chest; cylinder should be worn on left kidney.
NOTE - The unit should not be stored with oxygen in the cylinder. Instead, store with oxygen
compatible air or dry nitrogen. When put back into service, be sure to purge the cylinder and
regulator prior to filling with oxygen for use.
NOTE - Factory prescribed service for the PHODS must only be performed by a qualified technician.
NOTE - Due to the small size of the dial gauge, the working pressure of 2100 psi & its 5%
gauge accuracy, it is possible that the needle will only go just to the green or next to it. This is
acceptable provided the unit is charged on a calibrated system.
NOTE - While the regulator dial gauge indicates a full cylinder on the ground, the colder
temperatures at higher altitudes will reduce the pressure in the cylinders. This is normal. At higher
altitudes, Aircrew members must check the cylinder pressure in the user worn cylinders more often.
If you have any questions or do not understand the information in these Warnings, Cautions, and
Notes, please contact an Aqua Lung America Technical Advisor before proceeding.
9
SYSTEM Description
BASIC PHODS SYSTEM (Fig. 1)
The Portable Helicopter Oxygen Delivery System (PHODS) is a man-mounted oxygen delivery
system that can be attached directly to a crew member’s Survival Vest and helmet to support
flight and ground missions at high altitudes. The 3 main components of the basic system are: (1)
a regulator and oxygen cylinder; (2) an automatic oxygen pulse controller (OPC M1) with inlet and
outlet hoses; (3) a flexible nasal cannula with a Q.D. coiled hose assembly. The oxygen cylinder is a
Department of Transportation (DOT) certified steel cylinder that is placed in a pocket made from fire
resistant material that is attached to the crew member’s Survival Vest. Oxygen is delivered from the
cylinder via a regulator to the OPC M1 unit powered by 2 AA batteries. The OPC M1 automatically
provides a predetermined amount of oxygen when it senses a pressure differential caused by the
user’s breathing and contains an internal barometer that detects changes in altitude. When the
system is turned on, it will become active at 8,000 ± 500 feet (ft.) pressure altitude (PA) and will
start to deliver measured quantities of oxygen to the crew member from 8,000 ft. PA to 10,000 ft PA.
The OPC M1 will continue to deliver oxygen until the aircraft altitude drops below 8,000 ± 500 ft.
PA, where the unit will de-activate. A PHODS mask may be used in lieu of the nasal cannula when
operational and individual physiology conditions dictate. However, the mask is not recommended for
routine high altitude operations since this configuration will consume the limited quantity of oxygen
provided by the basic PHODS at an increased rate. PHODS has been tested and approved for use
on US Army Chinook (CH-47), Blackhawk (UH-60) and Apache (AH-64) (pending approval) aircraft.
NOTE :The OPC M1 unit is programmed to start operation once it senses a pressure altitude of
8,000 ± 500 ft. PA. Due to the differences in barometric pressures and other factors where the
unit may be operating, the OPC M1 is guaranteed to start operation at and over 10,000 ft.PA.
3
3
1
2
2
Figure 1
10
PHODS User’s Manual
Regulator and Oxygen Cylinder (Figs. 2-4).
1. Piston regulator with integral Fill Port and
Dial Gauge Indicator.
2. Regulated fixed output 15-25 psi with on/off
valve. Quick Disconnect (Q.D.) connector
for rapid cylinder change-out while in flight.
Figure 2
Figure 3
ON/Off Valve
Dial Gauge
ON/Off Valve
Q.D. Output
Fill Port
3. Installed Safety Plug for emergency
overpressure relief.
4. Military black with minimal chrome parts.
Figure 4
5. Green 1.7 cubic ft. cylinder.
Oxygen Pulse Controller (OPC-M1) (Fig. 5).
1. Easy-to-use two-button ON-OFF control
switch, small size and light weight.
Safety Disc
1.7 CF (Green)
Cylinder &
Regulator
2. Preset to supply oxygen.
3. Automatically adjusts oxygen flow with altitude.
4. Provides reduced oxygen consumption
through more efficient oxygen delivery.
5. Push button control switch allows multiple
oxygen delivery schedules based on
workload and altitude challenges.
6. Green LED indicates oxygen flow, alarm,
battery status and informs user of kinked,
pinched or disconnected lines, obstructed
cannula or mask.
Figure 5
Power On/Off and Control
Fixed Hose Oxygen inlet
6 mm (Larger) outlet connects
to cannula or face mask
Nasal Cannula (Fig. 6).
1. Delivery of oxygen via nasal cannula is an
efficient and effective use of a limited O2 quantity.
2. Uses a flexible, helmet mounted boom.
3. Can be mounted to both the HGU-56P and
the Apache Integrated Helmet And Display
Sight System (IHADSS) helmets.
4. Can be easily removed from helmet mount
while in flight.
5. Uses easy replaced/maintained soft rubber
nasal inserts that can be trimmed to fit
individual nasal passages.
Static ports (4)
(DO NOT COVER)
Green LED indicator for User
Figure 6
Nasal Insert
Nasal Cannula
11
SYSTEM set up
To conserve the limited oxygen supply of the PHODS, it is required that you perform a preflight
inspection of the system as follows prior to donning the Survival Vest:
WARNING - The OPC M1 LED is Night Vision Goggle (NVG) compatible and therefore difficult
to see through the NVG. The LED should be viewed with the unaided eye. The OPC M1
should be mounted on the Survival Vest in a location that will allow direct viewing of the LED
indicator light. The LED should be periodically checked to ensure proper operation during flight
at altitudes requiring supplemental oxygen.
WARNING - Crew members are required to periodically check the amount of oxygen
remaining in their PHODS cylinder.
WARNING - PHODS oxygen cylinder may burst from impact of small arms fire, resulting in
overpressure shock, shrapnel injury and/or flash fire.
WARNING - The OPC M1 does not provide an indication of remaining battery life. Ensure new
batteries in the PHODS during Pre-flight.
WARNING - Failure to breathe properly through the nose while using the cannula may result in
oxygen deprivation.
CAUTION - When donning the flight equipment, ensure all PHODS straps and hoses are
properly secured to the Survival Vest to prevent snagging during egress.
CAUTION - PHODS operation has not been verified below -25°F and performance may be
degraded at lower temperatures
NOTE - While the regulator dial gauge indicates a full cylinder on the ground, the colder
temperatures at higher altitudes will reduce the pressure in the cylinders. This is normal. At higher
altitudes, Aircrew members must check the cylinder pressure in the user worn cylinders more often.
1. To verify that your PHODS cylinder is fully charged, ensure that the
gauge is reading in the “GREEN” zone, 2,100 psi. (See Fig. 7)
NOTE - Due to the small size of the dial gauge, the working
pressure of 2100 psi & its 5% gauge accuracy, it is possible
that the needle will only go just to the green or next to it. This is
acceptable provided the unit is charged on a calibrated system.
2. Open the battery cover on the back of the OPC M1, ensure the
2AA batteries are installed correctly and replace the battery cover.
NOTE - Batteries fit tightly, handle with care. (See Fig. 27-29)
3. Ensure the OPC pocket is installed on the right front of the Survival
Vest using the MOLLE system straps (See Figs. 11 & 12).
OXYGEN
Figure 7
12
PHODS User’s Manual
4. Ensure the PHODS cylinder pocket is installed on right kidney area of the Survival Vest using the
MOLLE system straps.
NOTE - If wearing the HGU-56/P Helmet, the OPC M1 should be worn on right front chest;
cylinder should be worn on right kidney. If wearing the IHADSS Helmet, the OPC M1 should be
worn on the left front chest; cylinder should be worn on left kidney.
WARNING - The OPC M1 LED is Night Vision Goggle (NVG) compatible and therefore difficult
to see through the NVG. The LED should be viewed with the unaided eye. The OPC M1
should be mounted on the Survival Vest in a location that will allow direct viewing of the LED
indicator light. The LED should be periodically checked to ensure proper operation during flight
at altitudes requiring supplemental oxygen.
5. Turn the Regulator Valve Handwheel counterclockwise to open the valve (“ON” position). Verify
there is no red showing in the Valve Handwheel window. (See Figs. 8 & 9).
Figure 9
Figure 8
OFF
ON
6. Verify your PHODS cylinder is fully charged. Gauge is reading
“GREEN”. (See Fig. 10)
NOTE - Due to the small size of the dial gauge, the working
pressure of 2100 psi & its 5% gauge accuracy, it is possible
that the needle will only go just to the green or next to it. This is
acceptable provided the unit is charged on a calibrated system.
OXYGEN
Figure 10
7. Open the battery cover on the back of the MH-OPC M1 unit, ensure the 2AA batteries are installed
correctly and replace the battery cover.
NOTE - Batteries fit tightly, handle with care. (See Figs. 27-29).
13
8. Install the PHODS cylinder in the Survival Vest Cylinder Pocket.
9. Install the OPC into the OPC pocket. Route the 30” oxygen Input Hose from the OPC over the
shoulder and insert the 90 degree Q.D. connector on the regulator until it “clicks” into place. Ensure
the Input Hose is secure on the shoulder. It will be routed under the MOLLE straps on the Survival
Vest. (See Figs. 11 & 12)
Figure 11
Figure 12
10. Prior to inserting the oxygen output end (blue tipped) of the OPC Outlet Hose into the 6mm “Out”
connector on the OPC M1, route the hose under the MOLLE straps on the Survival Vest prior to
connecting to the OPC. Push the Blue Tipped Outlet Hose into the 6mm Outlet connector on the
OPC until it stops. Attach the Q.D. fitting of the Outlet Hose using the MOLLE strap to the
Survival Vest. Attach the input hose to the Hook and Loop fastener. (See Figs. 13 & 14)
Figure 13
Figure 14
CAUTION - DO NOT pinch the outlet hose when inserting it into the “Out” connector.
14
PHODS User’s Manual
REMOVING THE TUBING
To remove the tubing, push in slightly on the tubing, then push in the connector collar (1) while you
pull gently on the tubing to remove it (2). (See Fig. 15)
1
2
Figure 15
CAUTION - DO NOT pull on the tubing without pushing in the collar; it will damage the connector.
NASAL CANNUla mounting
If the Nasal Cannula is not mounted in the helmet, it must be mounted prior to use of the Helmet.
1. Shown is the Nasal Cannula Mounting Clip for the
HGU-56/P Helmet installed on the inside right dome
of the helmet. (See Fig. 16)
Figure 16
2. This is the Mounting Clip and the Nasal Cannula
interface. To mount the Nasal Cannula, align the
interface of the Nasal Cannula and the Clip with
the nose piece to the front, and press tightly until it
snaps into place. (See Fig. 17)
Figure 17
3. After mounting the Nasal Cannula, ensure the 90°
fitting is pointing down and out of the rear of the
helmet. (See Fig. 18)
4. The Nasal Cannula must be removed to use the
optional PHODS Mask. To remove the Nasal
Cannula, grasp the Nasal Cannula firmly on one side
of the clip and pull down firmly.
Figure 18
15
5. Prior to donning the Flight Helmet, connect the open end
of the coiled hose to the Nasal Cannula in the Helmet (or
optional PHODS Mask) if not already done. Push the hose
into the Cannula fitting until it stops. Use only the supplied
PHODS Cannula as other cannula may not work properly
with the OPC (See Fig. 19).
Figure 19
6. After the Flight Helmet is donned, connect the coiled hose
Q.D. to the OPC outlet hose Q.D. attached to the Survival
Vest. Push in until the Q.D. connector “clicks” into place
(See Fig. 20).
Figure 20
7. The unit is installed and ready for operation.
8. OPC M1, Nasal Cannula, Regulator connection, Regulator
and Cylinder. (See Figs. 21 & 22).
Figure 21
Figure 22
16
PHODS User’s Manual
Ihadss CANNUAL MOUNTING
To install the IHADSS Clip, loosen the helmet microphone
knurled knob on the left side of the helmet. Slip the IHADSS
clip over the post behind the knob. Retighten knob and adjust
the clip/cannula as needed (See Figs. 24 - 26).
Figure 23
Figure 24
Figure 25
Figure 26
17
INSERTING AND REMOVING BATTERIES
1. Inserting the Batteries; Remove the battery door by
pressing down gently on the battery cover flange; slide the
door out and away from the unit. The OPC M1 unit uses
two (2) AA alkaline batteries. Insert the batteries as shown
on the label inside the battery compartment (they will be a
tight fit). Ensure the ribbon is positioned under the batteries
toward the right side (the ribbon is used to facilitate battery
removal). Replace the battery door by sliding the door until
it snaps in place. Take care when removing and replacing
the batteries as to not damage the batteries and/or
connectors. (See Figs. 27-29)
Figure 27 - OPC Back
Battery Cover Installed
NOTE - Batteries fit tightly, handle with care. (See Figs. 27-29)
2. Removing the Batteries; Remove the battery door by
pressing down gently on the battery cover flange; slide
the door out and away from the unit. Ensure the ribbon is
positioned under the batteries towards the right side (the
ribbon is used to facilitate battery removal). Pull up on the
ribbon and remove the bottom battery from the right, and
then remove the second battery. Replace the battery door
by sliding the door in until it snaps in place. Take care when
removing and replacing the batteries as to not damage the
batteries and/or connectors. (See Figs. 27-29)
Figure 28- OPC Back
Battery Cover Removed
Figure 29
OPC Batteries Removed
18
PHODS User’s Manual
CONTROL SWITCH SETTINGS AND MODES OF OPERATION
The OPC M1 unit is controlled by two push button control switches. Specific settings are shown in
(Figs. 31-34). For assistance in selecting the proper operational Mode, refer to Figure 35.
Control Switch Settings
The OPC M1 has three main modes of user controlled operation:
1. (OFF) - OPC M1 non-operational and powered down.
2. (ON) Fully-Automatic pre-set delivery beginning between
8,000 ± 500 ft. PA to 10,000 ft. PA Nasal Cannula only.
3. (R/M) Reserve/Manual - Maximum flow pulse upon inhalation
at any altitude. Do Not use this setting above 16,000 ft.
4. (F20) Automatic at all altitudes - Face mask or Nasal Cannula.
This is the suggested setting for high workload environments.
See Figure 35 for specific altitude restrictions.
5. Before proceeding, review the information on the front
panel of the unit, which provides an easy reference to
various operational modes (See Fig. 30).
MODE SELECTION
Figure 30
To turn the OPC on from the OFF position, press the “I”
button once. The display will change to “ON” mode. This
will power up the unit and make it operational for normal
use. Press the “I” button once more and the unit will
change to “R/M” mode. Press the “I” button again and the
unit will change to “F20” mode. To return the to a previous
mode, press the “+” button. Continue to press the “+” to
return the unit to the “OFF” position (See Figs. 31-34).
OFF Mode
To return to the OFF Mode from any operational mode,
push the “+” button repeatedly until “OFF” is displayed.
( ) Push Button
(+) Push Button
Figure 31
Switch set in the “OFF” setting
19
ON MODE
In this setting the OPC M1 will immediately start the standard
oxygen flow providing pulses of oxygen appropriate for an
individual using a cannula when the unit is between 8,000 ±
500 ft. PA to 10,000 ft. PA . It will continue to pulse oxygen
until the unit returns below 8,500 ft. In this mode, the OPC
M1 may not provide a pulse with every inhalation based on
your inhalation rate; this is part of normal operation. The
OPC M1 at power up will allow up to 20 BPM. As the user
breathes faster, the unit will compensate and allow up to 45
BPM (See Fig. 32).
• Flow start: between 8,000 ± 500 ft. PA to 10,000 ft. PA
• Use with: Cannula
• Altitude Compensating: Yes
Figure 32
NOTE - The OPC ON mode is designed to provide the amount of oxygen needed by an average
size healthy person using a cannula at the given altitudes; your needs may be different.
R/M: “RESERVE/MANUAL”
R/M, for “Reserve” or “Manual” mode, provides the maximum
oxygen flow regardless of altitude. In this mode, the OPC M1
may not provide a pulse with every inhalation based on your
inhalation rate; this is part of normal operation. The R/M Mode
will not be used above 16,000 ft (See Fig. 33).
• Flow start: All altitudes
• Use with: Cannula or face mask
• Maximum Altitude of 16,000 ft.
• Altitude compensating: No
Figure 33
• Reduced system duration when used
F20 MODE “PHODS MASK”
The F20 mode is called the “PHODS mask” setting. It
supplements the standard oxygen flow by adding to the OPC
M1’s perceived altitude. The F20 mode is designed to be
used with the PHODS Mask, the consequence of the F20
mode is a higher consumption of oxygen (See Fig. 34).
• Flow starts: All altitudes
• Use with: PHODS mask
• Altitude compensating: Yes
Figure 34
20
PHODS User’s Manual
Oxygen delivery matrix
This Matrix is provided to assist aircrew members in selecting a delivery method for the projected
operational consumption of oxygen (See Fig. 35).
Flight
Altitude
Delivery
Method
OPC
Mode
8K
10K
12K
14K
16K
18K
DELIVERY MODE MATRIX
PILOTS/LOW WORK LOAD
Nasal
Nasal
Cannula
Cannula
Mask
Mask* #
ON
F20
Preferred
Mode and
Delivery
Method
F20
R/M
CE/FE/HEAVY WORKLOAD
Nasal
Nasal
Cannula
Cannula Mask Mask* #
ON
F20
F20
R/M
**
**
**
**
**
**
* R/M may be used below 10k for heavy smokers or while flying at
night for increased night vision
# R/M mode greatly reduces consumption at all Altitudes
Duration Color Code
Normal Duration
Short duration only
Do not use
**
Figure 35
WARNING - The OPC M1 LED is Night Vision Goggle (NVG) compatible and therefore difficult
to see through the NVG. The LED should be viewed with the unaided eye. The OPC M1
should be mounted on the Survival Vest in a location that will allow direct viewing of the LED
indicator light. The LED should be periodically checked to ensure proper operation during flight
at altitudes requiring supplemental oxygen.
OTHER OPC FUNCTIONS
DISPLAY AND ALARM INFORMATION
There is a green LED display on the OPC M1. A lighted Green LED indicates oxygen
flow for every breath during inhalation. A flashing Green LED indicates a flow fault,
apnea condition or low battery. To determine what the LED is indicating, refer to the
guide that is provided on the back of the OPC unit. The following alarm information is
provided (See Fig. 36).
21
FLOW FAULT ALARM
Coinciding with your inhalation, the OPC M1 will produce a two second flashing Green LED to
indicate that the oxygen flow from the cylinder has stopped. This typically means that:
1. The oxygen supply is depleted.
2. The supply line has been pinched closed.
3. The supply line is plugged up or disconnected.
4. The valve has failed to open.
Apnea alarm
After 30 seconds of undetected breathing, the OPC M1 will produce a visible Green LED (4 flashes)
Apnea alarm every four seconds until breathing resumes. This typically occurs for the following
reasons:
1. The user has quit breathing for 30 seconds.
2. The cannula/face mask is improperly worn.
3. The outlet tube from the OPC M1 to the mask or cannula has become disconnected.
4. The outlet tubing has become pinched or is plugged off.
Low battery
The OPC M1 will operate for approximately 100 hours with a fresh set of alkaline batteries under
normal operation. The OPC M1 provides 3 levels of low battery warning:
1. First warning will occur when the battery level reaches approximately 4-8 hours remaining and
will appear as a single flash of the Green LED every 2 seconds. The unit will continue to operate
properly for about 4-8 hours at 70°F (25°C) after the indicator starts to flash. Replace batteries as
soon as practical.
2. Second warning occurs approximately 1-2 hours remaining. The Green LED will double flash
every 2 seconds. Batteries must be replaced as soon as possible.
3. Within the last approximate 1 hour of battery life remaining, the oxygen flow will stop and
batteries must be replaced IMMEDIATELY.
Figure 36
22
PHODS User’s Manual
ALARM INFORMATION
When setting the unit to ON mode, the user should wear the cannula. Otherwise, even when below
the 10,000 feet threshold, the Apnea alarm is “ON” and will detect that no one is breathing,
causing the alarm to activate with the flashing Green LED. The unit is calibrated for up to 45
BPM (Breaths per Minute) in all active switch positions.
BATTERY CHECK
The OPC M1 provides a battery and system check when the unit is first turned on. The Green LED
will flash multiple times and the audible alarm will sound.
STORING THE OPC M1
When not being used, the OPC M1 unit, oxygen hoses, Nasal cannula’s, etc., should be disconnected
from the oxygen supply and stored in a secure manner to ensure that dirt and debris do not enter the
inlet and outlet tubes. The supplied Storm Case is recommended (See Fig. 37) or zip-top plastic bags
are good alternative storage containers.
NOTE - If the OPC M1 is not going to be used for 30 days or more, remove the batteries.
When using the OPC M1 for the first time after storage, replace the batteries to ensure proper
operation. A fresh set of batteries should be part of your pre-flight inventory.
NOTE - The unit should not be stored with oxygen in the cylinder. Instead, store with oxygen
compatible air or dry nitrogen. When put back into service, be sure to purge the cylinder and
regulator prior to filling with oxygen for use.
CARE & MAINTENANCE
The PHODS system should be returned to its protective case when not in use (See Fig. 37).
It is important to provide the proper preventative maintenance in order to ensure the best possible
performance and reliability of the PHODS.
OBTAIN FACTORY PRESCRIBED SERVICE BY A QUALIFIED TECHNICIAN FOR YOUR PHODS
AT LEAST ANNUALLY. YOUR PERSONAL SAFETY AND THE MECHANICAL INTEGRITY OF
YOUR PHODS DEPENDS ON IT.
Figure 37
23
MANUFACTURERS RECOMMENDED PHODS PRE-FLIGHT CHECKLIST
Check
1. Verify all PHODS components are present.
2. Verify PHODS Valve is open and the regulator gauge is in the green.
NOTE - Due to the small size of the dial gauge, the working pressure of 2100 psi & its 5%
gauge accuracy, it is possible that the needle will only go just to the green or next to it. This is
acceptable provided the unit is charged on a calibrated system.
3. Install 2 new AA batteries in the OPC. Ensure the battery compartment door is secure.
4. Push the “ I “ button on the OPC once to the ON Mode. The OPC Green LED will produce a
series of flashes and the audible alarm will sound. If LED continues to flash rapidly after the initial
series refer to Troubleshooting pg 50.
5. Verify PHODS cylinder pocket is secured to the Survival Vest properly.
6. Verify OPC M1 pocket is secured to the Survival Vest properly.
7. Install the PHODS Cylinder and Regulator into the Cylinder pocket and secure with the fasteners.
8. Install the OPC M1 into the OPC pocket. Ensure the hook and loop closure is securely fastened.
9. Route the 30” OPC Hose through MOLLE straps, over the shoulder and connect the 90°
connector into the Q.D. connector on the Regulator. Ensure the Q.D. connector clicks into place.
10.Route the OPC Outlet hose through the MOLLE straps from the upper chest to the OPC Pocket.
11.Verify the MOLLE attachment on the Q.D. Fitting is attached to the Survival Vest and the Blue Tip
of the hose has sufficient length to be pushed into the OPC.
12.Push the OPC Outlet hose into the 6mm connector on the OPC.
13.Select Helmet mounted delivery method.
Check
Helmet - Nasal Cannula
1. Ensure the Nasal Cannula is mounted in the helmet securely and it has the 90° connector at the
rear, facing outward.
2. Ensure the Nasal Cannula has a removable Nose Piece installed.
3. Push the open end of the Coiled Hose into the 90° fitting until it stops.
4. Don the Helmet and push the Q.D. fitting on the Coiled hose into the Q.D. fitting attached to the
Survival Vest.
5. Position the Nasal Cannula into the nose and inhale while observing the OPC in the R/M position.
The Green LED should flash once indicating a properly functioning unit.
6. To Simulate the Flow fault alarm. Disconnect the Q.D. 90° connector from the regulator and
inhale. The Green LED should produce a constant flashing for 2 seconds. This indicates a flow
fault. Reconnect Q.D 90° connector.
7. The system is verified functional.
8. Remove the Nasal Cannula from the nose, disconnect the Coiled Hose Q.D. by pushing the Vest
Fitting Q.D. lever in, remove the helmet, Change the mode on the OPC by pushing the “+ “ button
once to the ON Mode. The unit is ready for use. When not breathing on the device the LED with
will flash 4 times indicating no breaths have been taken in 30 seconds.
24
PHODS User’s Manual
Check
Helmet - PHODS Mask
1. Ensure the Nasal Cannula is removed from the helmet.
2. Ensure there is a red plug in the other unused 90° fitting on the exhalation side of the mask.
3. Push the open end of the Coiled Hose into the 90° fitting on the inhalation side of the mask until it stops.
4. Push the Q.D. fitting on the Coiled hose into the Q.D. fitting attached to the Survival Vest.
5. Don the Helmet and attach the PHODS Mask to the helmet. Ensure correct fit.
6. Inhale while observing the OPC in the F20 position. The Green LED should flash once indicating a
properly functioning unit.
7. The system is verified functional.
8. Remove the Mask from one side of the helmet, disconnect the Coiled Hose Q.D. by pushing the
Vest Fitting Q.D. lever in, remove the helmet; the unit is ready for use. When not breathing on the
device the LED with will flash 4 times indicating no breaths have been taken in 30 seconds.
MANUFACTURERS RECOMMENDED PHODS POST-FLIGHT CHECKLIST
Check
1. Turn off the OPC by pressing the “ + “ button to the OFF Mode.
2. Shut the Cylinder valve off.
3. Disconnect the Coiled hose from the Vest Q.D. connector by pushing the lever in until the Hose
Q.D. releases.
4. Remove the Coiled Hose from the PHODS Mask or Nasal Cannula by pushing the Black ring on
the fitting and pulling the Hose out.
5. Remove the OPC Outlet Hose from the OPC by pushing the Black ring on the fitting and pulling
the Hose out.
6. Disconnect the MOLLE Strap from the Survival Vest and remove the OPC Outlet hose.
7. Disconnect the OPC Inlet hose from the Regulator pushing the lever in until the Hose Q.D. releases.
8. Remove the OPC from the pocket after unthreading the OPC inlet hose from the Survival Vest.
9. Unsnap the retaining straps and remove the Regulator and Cylinder from the pocket.
10.Disinfect the Mask or Nasal Cannula & Nose Piece with Isopropyl Alcohol wipe. Let Air Dry.
11.Remove batteries from OPC and return all components to the proper position in the PHODS case.
12.Report any discrepancies to the Qualified Technician upon return.
25
PHODS Checklist Insert
DISPLAY AND ALARM INFORMATION
Normal Operation
- Green LED single flash per breath during inhalation
- When you set the unit to ON mode...you must wear your cannula
or face mask. Even though you are below the 10,000 feet threshold,
the Apnea alarm is “ON” and will detect that no one is breathing,
causing the alarm to activate with the flashing Green LED. The
unit is calibrated for up to 45 BPM (Breaths per Minute) in all
active switch positions.
FLOW FAULT ALARM
Coinciding with your inhalation, the OPC M1 will produce a two second
flashing Green LED to indicate that the oxygen flow from the regulator
has stopped.
APNEA ALARM
Green LED (4 flashes) every four seconds to indicate that breathing
has not been detected within the past 30 seconds and will continue to
flash until breathing is resumed.
LOW BATTERY
The OPC M1 provides 3 levels of low battery warning:
(1) The first warning Green LED will single flash of every 2 seconds.
(2) The second warning Green LED will double flash every 2 seconds.
(3) The third warning ~ 1 hour, the oxygen flow will stop
BATTERY CHECK
When OPC M1 is turned on- Green LED will flash rapidly and an
audible alarm will sound - verifies the batteries and circuits are working.
Figure 38 is a cut out for the pilot’s knee board
Regulator and Cylinder change out
1. To change out an empty or non-operational Regulator and Cylinder.
2. Shut the Regulator supply valve off the cylinder in use.
3. Disconnect the Q.D. fitting on the Regulator by depressing the lever until the 90° Q.D. fitting
releases.
4. Unsnap the cylinder retaining straps and remove the Regulator and Cylinder from the Pocket.
5. Obtain a full cylinder from the Qualified Technician or from the Mission kit while in flight.
6. Turn on the new cylinder and verify that it is full with the gauge in the green. Turn off the cylinder
valve.
7. Install the new cylinder in the pocket an attach the straps if possible.
8. Push the 90° Q.D. fitting into the Q.D. fitting on the regulator.
9. Turn on the cylinder supply valve.
10.Check the OPC for flow and proper operation.
26
PHODS User’s Manual
table 1: troubleshooting
General Checks
WARNING - If after consulting the Troubleshooting section of this manual the situation is not
resolved, immediately return the PHODS system to a qualified technician for inspection or
contact an Aqua Lung Technical Advisor.
NOTE - Due to the small size of the dial gauge, the working pressure of 2100 psi & its 5%
gauge accuracy, it is possible that the needle will only go just to the green or next to it. This is
acceptable provided the unit is charged on a calibrated system.
1. Verify sufficient Oxygen is in the PHODS cylinder.
2. If any of the following conditions exist, descend to safer altitude as soon as possible.
The OPC M1 unit emits no audible alarm or start-up oxygen pulse when turned on:
1. Check batteries to make certain they are fresh.
2. Check oxygen cylinder valve is on.
3. Check oxygen supply tube for proper connection.
4. Check oxygen supply tube for obstructions.
5. Check OPC M1 outlet tubing for obstructions.
Audible alarm on start-up is heard, but no start-up oxygen pulse delivered:
1. Check oxygen cylinder valve is on.
2. Check oxygen supply tube for proper connection.
3. Check oxygen supply tube for obstructions.
4. Check OPC M1 outlet tubing for obstructions.
When using the face mask, no oxygen pulse on inhalation:
1. Make sure the face mask is sealed against the skin.
2. Check for obstructions on the OPC M1 outlet tubing.
3. At altitude to allow breathing, make certain you are in “F20” mode.
Oxygen pulses are delivered, but the Green LED indicates no flow condition:
1. Check the batteries to make certain they are fresh.
2. Check for obstructions in the Nasal Cannula/Face Mask and tubing.
The OPC M1 does not trigger at higher altitudes:
1. Turn the OPC to the OFF Mode, then return to the previous mode.
2. Try a different mode.
3. Descend to a lower, safer altitude.
WARNING - Do not increase or decrease the length of the Nasal Cannula or the coiled hose.
The removable Nose Piece may be trimmed for comfort.
27
OPTIONAL PHODS Mask
The Oxygen mask design includes the mounting brackets necessary to connect the mask to the
HGU-56/P helmet, with or without the Maxillofacial Shield installed. It may be used with the optional
snap adapters to connect the mask to the HGU-84/P helmet without the Maxillofacial Shield installed.
This provides versatility to air crew members allowing them to customize the system according
to mission demands. The system remains stable throughout the flight performance envelope of
helicopters, is easy to don, and has quick disconnect features. The mask assembly’s quick release
snaps and adjustable fasteners allow three unique configurations wherein the Maxillofacial Shield and
oxygen mask can be used independently or together for maximum protection.
The mask includes an integrated M-169A/AIC dynamic 5-ohm microphone to aid communications.
Use of a mask will supply an adequate oxygen mixture to users who are under mental or physical
stress and who, as a result, will breathe through their mouths instead of their noses. Oxygen enters
from the OPC Regulator hose and travels through 90 degree oxygen inlet port of the Mask to allow
the oxygen to enter the mask cavity. Exhaled gasses exit the mask through the exhalation valve
(See Figs. 39 & 40).
WARNING - Oxygen should be delivered to the inlet port on the side of the mask inhalation
valve to ensure proper dilution of the oxygen with the ambient air in the mask cavity.
WARNING - Disinfect the PHODS Mask or Nasal Cannula & Nose Piece after each use to
avoid bacteriological contamination and for cleanliness. Cleaning can be accomplished with
isopropyl alcohol.
Plug
Figure 39
Inlet port
Plug
Figure 40
28
PHODS User’s Manual
SPECIFICATIONS
Maximum respiration rate: The OPC M1 at power up will allow up to 20 BPM. As the user breathes
faster, the unit will compensate and allow up to 45 BPM.
Apnea time-out: Approximately 30 seconds. Apnea alarm will flash a Green LED in the “ON” mode
if your actual pressure altitude is below the 10,000 ft. altitude setting and/or you are not breathing
normally through the cannula or mask.
Operating inlet pressures: 15 -25 psi. At higher inlet pressures the valve may open to relieve the
pressure and the unit will not operate correctly.
Battery type: 2 Standard AA alkaline DURACELL© type MX1500 or equivalent.
Operating Voltage: 3 VDC
Low-Voltage Warning: 4 ~ 8 hours remaining - 1 flash of the Green LED every 2 seconds. Replace
batteries as soon as practical.
Extreme Low-Voltage Warning: 1 ~ 2 hours remaining - 2 flashes of Green LED every 2 seconds.
Batteries must be replaced as soon as possible.
Dead Battery: OPC M1 Stops delivering oxygen. Batteries must be replaced IMMEDIATELY.
Battery Life: 100 Hours @ 25 C. operating, assuming fresh alkaline batteries under normal
conditions.
Storage: The OPC M1 will not draw any current during storage while in the “OFF” setting.
Physical characteristics
MH OPC M1 unit:
Width: 3.15” (8.0 cm.)
Height: 5.25” (13.2 cm.) enclosure and ports
Depth: .93” (2.23 cm.)
Weight: 8.2 oz. (0.233 kg.) with batteries
PHODS Regulator and Cylinder
Pressure Rating: 2100 psi (145 bar)
Capacity:1.7 Cu. Ft. (48.36 Liters)
Floodable Volume: 20.4 Cu. In. (.334 liters)
Height: 12.00” (30.48 cm) [Cylinder-9.25”(23.5 cm) & Regulator-2.75”(6.99 cm)]
Diameter: 2.00”(5.08 cm)
Weight: Empty 2.47 lbs (1.12 kg.) Full approx. 2.5 lbs (1.13 kg)
Testing and characterization was done under normal operating conditions i.e. 77ºF / 25ºC and
responding to a respiration rate of about 15 breaths per minute. Specifications are subject to change
without notice.
29
phods SCHEMATIC
3
4
1
2
5
6
102935 - PHODS, O2 SYSTEM, STEEL CYLINDER
SEQ PART #
QTY
DESCRIPTION
1
102940
1
REGULATOR, PHODS, STEEL CYL.
2
102958
1
HOSE ASSY., OPC OUTLET, PHODS
3
102906
1
NOSEPIECE, PHODS (1/PK)
4
102980
1
CANNULA ASSY., W/O CLIP
5
102957
1
HOSE ASSY., 6MM COILED, PHODS
6
102970
1
CONTROLLER OPC-M1 WITH HOSE, PHODS
7
1005866-3
1
POCKET, UBD-AW, UC
8
1005950
1
POCKET, OPC, AW
9
102933
1
CASE, STORM W/FOAM, PHODS O2 SYSTEM
PHODS
Portable Helicopter Oxygen Delivery System
2340 Cousteau Court • Vista, CA 92081
Phone (760) 597-5000 • Fax (760) 597-4900
www.aqualung.com/military
©2009 Aqua Lung International
P/N 102999 Rev. 01/09