1
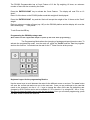
PS2000 Programmable Postage Computing Scale
Operating the PS2000 Programmable Scale
1.
To turn on the PS2000 Scale, press the ON/OFF button. Be sure that there is battery inside or
adapter plug-in on the scale.
The scale will display 'Auto-Test' as it conducts a self-test.
The default service as you power on the scale is 1st Class.
2.
3.
Note: For first time users and those who have bought new data chips during a rate change, please refer to
the section on Downloading the rates Super Erase Mode before proceeding with the operations of
the scale.
Basic Postal Services available on the PS2000 Programmable
a. 1st Class/Priority
1ST/PRIO
b. Packages/Media Mail
Packages
c. Postage to CANADA
Air Ltr
CAN
d. Postage to MEXICO
Air Ltr
MEX
e. International Air
Air Ltr
f. Domestic Express Mail / Global Express Mail Express Mail
Special Services:
g. Registered
h. Certified
i. Return Receipt
4.
Rg
C
Rr
The default display shows the service on the first line of the LCD with the weight displayed on the
bottom left of the second line and the corresponding postage displayed on the bottom right of the
LCD display. (See figure F1 below).
Figure F1 : LCD Display
Postal Service Display
1
0
S
Lb
t
1
C
.
Weight Display
l
0
a
o
s
z
s
$
0
.
3
9
Postage Display
5. Choosing the desired service:
a. Letter 1st Class/Priority
- Press the '1ST/PRIO' button. '1ST' is the service indicator for Letter 1st Class/Priority service, i.e. on
the right end of the display ‘1ST Class’ will be displayed.
b. Packages/Media Mail
- Press the 'Packages‘ button. 'Packages zX' is the service indicator for Package Services Parcel
Post where ‘X’ is the corresponding zone. Zone 0 (z0) is the Local Parcel Post rate while z1 to z8
are the rates for Inter-BMC/ASF Zip codes destination.
- To display the Medial Mail rates, press the ‘Packages/Media Mail’ again.
c. Postage to Canada
- Press the 'Canada' button. 'Air Ltr CAN' is the service indicator for Postage to Canada service.
d. Postage to Mexico
- Press the 'MEXICO' button. 'Air Ltr MEX' is the service indicator for Postage to Mexico service.
e. Letter International Air
Press the 'INT’L AIR' button. 'Air Ltr zX’ is the service indicator for Letter International Air service
where ‘X’ is the corresponding rate group. First press will display the postage for Rate Group 3, next
press will show postage for Rate Group 4 and third press for Rate Group 5.
Domestic Express Mail / Global Express Mail
Press the “Express Mail” key you will be prompted with “(1UK 2CHN 3JPN)?”
Press ‘1’ to show the Global Express Mail rates for UK/Great Britain/No. Ireland
Press ‘2’ to show the Global Express Mail rates for China
Press ‘3’ to show the Global Express Mail rates for Japan
Press ‘7’ to show the Global Express Mail rates for Canada
Press ‘8’ to show the Global Express Mail rates for Mexico
Press ‘0’ or any other number to show the Domestic Express Mail rates.
Special Services:
f. Registered Mail
- Press the 'REG’ button you will be prompted with ‘REG
VALUE?’, at this point type in desired
registration value
followed by the ‘ENTER’ key. 'Rg’ is the service indicator for
Registered
mail service. Registration will be displayed with your selected basic service i.e. ‘1st Class Rg’ for 1st
Class registered mail.
g. Certified
- Press the ‘CERT' button. 'C' is the service indicator.
h. Return Receipt
- Press the 'RTRN/RCPT’ button. 'Rr' is the service indicator.
6.
If any of the services are not available for a particular destination then 'No Service' will be displayed.
7.
The PS2000 is powered by 6 AA batteries or with a center negative AC adapter with a 9 volts
specification.
8.
If during use, the battery or power gets low, a 'Battery Low' message will flash on the LCD.
9.
To tare the current weight on the scale, press the
displays will be tared.
'TARE/ZERO'
10.
Use the 'ON-OFF' key to return to normal weight mode.
11.
Count Feature
key.
All
subsequent
weight
The PS2000 Programmable has a Count Feature of 10 lbs. By weighing 10 items, an unknown
number of items can be counted by the Scale.
Press the ENTER/COUNT key to activate the Count Feature. The display will read "Put on 10
Items".
Place 10 of the items on the PS2000 platform and their weight will be displayed.
Press the ENTER/COUNT key and the Scale will accept the weight of the 10 items as the "fixed"
weight.
Place an unknown number of items (say 100) on the PS2000 platform and the display will count the
items and display
"100 pieces".
To exit Press the CE key.
Programming the PS2000 postage rates
(Note: Please use the supplied AC adaptor to power up the scale when programming.)
The Programming Mode allows the changing of postage and special service rates. To
activate the programming mode, turn the scale off, press the ‘On/Off’ and the ‘Tare’ key together
and turn the scale on. You should see the rate for the 1st Class Service at the prompt.
Keyboard Layout for the programming Routine
Use the arrow keys to scroll between the rates for the different zones or services. The ‘save’ button
will save the current rate and move you to the next rate. Once you are positioned on the rate that
needs to be changed, use the ‘+‘ or ‘–‘ keys to change the value of the rate. By default the rate
changes by $0.01 but this can be set to multiples of 5,10 or back to 1 by using the ‘5’, ‘10’ or ‘1’ key.
Be sure to press the ‘save’ key to save the rate-change. Once you are done programming, press
the ‘OFF’ button to switch the scale off.
Downloading the rates Super Erase Mode
(Note: Please use the supplied AC adaptor to power up the scale when programming.)
The Super Erase mode downloads the original rates into the non-volatile memory of the scale. To
activate this mode, turn the scale off, press the ‘On/Off’ and ‘CE’ key together and turn the scale on.
Calibrating the PS2000.
1.
2.
3.
4.
5.
6.
7.
8.
Turn off the PS2000 scale.
Press the 'ENTER' button as you press 'ON-OFF'.
'CALIBRATION MODE' will be displayed on the LCD.
The display will be cleared. On the left side of the LCD, the non-blinking WEIGHT frequency and the
blinking BASE frequency is displayed alternately. The weight in oz is displayed on the right.
Located underneath the keyboard case on the right is a PCB with two potentiometers. The one on
the left is use to adjust the base frequency, the other is use to calibrate the weight.
Remove any weights on the scale. Adjust the base frequency approximately to 1030Hz by slowly
turning the leftmost potentiometer either clockwise or counter-clockwise. The non-blinking frequency
display is the current weight frequency. The blinking frequency display is the base frequency. Adjust
the rightmost potentiometer until the frequency display is approximately equal to 1030Hz. Press the
‘TARE’ button to zero the weight display.
Put a predetermined weight on the scale, for example 1kg. Calibrate the weight by turning the
rightmost potentiometer clockwise or counter-clockwise until the weight displays shows the correct
value. Try removing the weight to see if the display returns back to zero. Press the ‘TARE’ button to
return it to zero. Replace the weight to see if display is correct.
Repeat the procedure above until the desired weight calibration is achieved.