1
Gigaset AS200-AS200A-AS300_AS300A_UK _ A31008-M2208-L101-1-7619
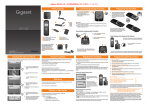
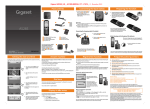
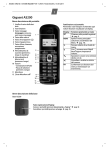
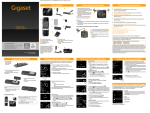
Pack contents
1
Connecting the base station
¤
2
or
Connect power adapter 1 and
Phone jack 2 to the base and
place the cable recesses.
Please ensure the power lead is
fully inserted.
2
1
Preparing the handset
¤
1
1
¤
Insert the batteries the right way
round. The polarity is indicated
in/on the battery compartment.
Then slide the battery cover back
into the main casing until it clicks
into place.
3
4
"4"4"
"4"4"
5
85
GIGAS
ET. INSPIR
ING
CONV
Connecting the charging cradle (if included)
¤
ERSAT
ION.
1
1 one Gigaset AS200/AS200A/AS300/AS300A Base station
2 one mains adapter
3 one Gigaset AS200H/AS300H handset
4 one phone cord
6 one battery cover
5 two batteries
7 this Quick start guide
If you have purchased a model
with multiple handsets the
package should contain two
batteries, a battery cover, a
charging cradle 8 with mains
adapter 9 for each additional
handset.
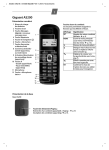
GIGASET. INSPIRING CONVERSATION.
If you need to open the battery cover, for
instance to replace the batteries, place
your fingertip in the grooved area on the
top of the cover and slide down.
7
6
AS1
Quick start guide
Please note:
u The mains adapter must always be connected, as the Phone will not operate
without a mains connection.
u Always use the power adapter and Phone cord supplied. Pin connections on
Telephone cables can vary.
8
2
¤
Connect the flat plug from the
mains adapter 1.
Initial charging and discharging of the batteries
Plug the mains adapter into the
plug socket 2.
¤
9
Set the date and time so that the correct date and time can be assigned to incoming
calls, and so that the alarm can be used.
If you need to disconnect the plug from the
charging cradle, press the release button 3 and
disconnect the plug 4.
INT
MENU
¤
¤
3
Press the bottom of the control
key ...
“
OK
¤
Date/Time
“
OK
The Date/Time menu item appears on
the display.
¤
¤
Date: DD: MM: YY
T
OK
Press the key below OK on the
display screen to confirm your
selection.
The active cursor position is flashing.
Enter day, month and year as an
6-digit number via the handset,
e.g. Q11Q1Q for 01/10/10.
Your handsets should already be registered by default, if your handset is flashing the
text "No Base" then it can be that:
u Your base station is not switched on, please check if the power supply is connected
Activating/deactivating the answer machine (AS200A/AS300A only)
MENU ¢ Voice Mail ¢ OK ¢ Answer Mach. ¢ OK (‰ = on)
In the case that the handset has not been pre-registered, or you want to register an
additional handset to your base station, use the manual registration procedure
below.
To retrieve your messages, just press the flashing ‘ key on your handset.
Automatic registering procedure
properly.
u There is too much distance between the handset and base.
u Your handset has not been pre-registered in the factory.
V
Put into base
MENU
Dial tone
The dial tone will only be heard when pressing the c call button for 2 seconds.
A short press will open the redial list.
You can also use the dspeaker button (AS300/AS300A only).
Display in idle status
Press the key below OK on the
display screen to open the input
field.
Registration handset
u missed calls (if caller ID is enabled for your line numbers will be shown)
u new messages on the answer machine (AS200A/AS300A only)
u new text messages (SMS) received
If the answer machine is activated, the answer machine icon ± will be displayed in
the header.
... until the Settings menu item
appears.
Settings
“
Press the key below MENU on the
display screen to open the main
menu.
Message indication
Message Indication Key ‘ on handset will flash to indicate one or all of the
following events:
u 2: internal number, if more then one handset is registered
u ±: answer machine is activated (AS200A/AS300A only)
u Battery charge status:
– = e V U (empty to full)
– = flashes: batteries almost empty
– e V U flashes: charging procedure
7h
4
GIGASET HELPLINE: 0845 3670812
Setting the date and time
The correct charge status can only be displayed if
the batteries are first fully charged and discharged.
V
Put
Registering
into base
MENU
Place the handset with the
display facing up in the base
station.
The handset registers
automatically. Registration
can take up to 5 minutes.
Do not remove the handset
from the base station during
this time.
Manual registration procedure
1. On the handset:
MENU
¢ Settings ¢ OK ¢ Handset ¢ OK ¢ Register HS ¢ OK ¢ enter the
system PIN for the base and press OK. Default PIN = 0000
2. On the base station:
Within 60 seconds of entering the system PIN, press and hold the registration/paging
key
(min. 3 seconds). Registration takes approx. 1 minute.
You can register up to four handsets to your base. You can also register other Gigaset
handsets and handsets from other devices with GAP functionality.
Place the handset in the charger
for 7 hours.
Then remove the handset from the charger, make and receive Phone calls, setup the
Phone etc. and do not put it on the charger until the batteries are fully discharged.
Frequently asked questions
Q: There is no dial tone.
A: Press call button for 2 seconds (long press) to obtain dial tone.
A short press opens the redial list.
Q: The line is crackling / not clear.
A: Have you used the new line cable provided? Please do not use an old cable.
Q: The display is not clear / seems to be broken.
A: The display is protected by a plastic film, please make sure you have removed
the protective film.
Q: The handset is not registered.
A: If your handset is not registered, please follow the Registration handset procedure.
(Described on this page)
Q: The caller ID is not working.
A: Have you subscribed to this service (CLIP) from your provider?
Q: Message indicator flashing and I cannot retrieve my message.
A: Message indicator will flash to indicate missed calls as well as new messages of text
messages. (Described on this page)
Please check:
Have you used the phone cord supplied
Have you fully inserted the power cable into the base station
Have you inserted the batteries correctly
Have you charged the batteries for 7 hours
Have you set up the Date/Time
To download the latest manuals, visit our web-site: http://www.gigaset.com
You have questions? As a Gigaset customer, you can take advantage of our comprehensive
service offerings. You can find help quickly in this User Manual and in the service pages of
our Gigaset online portal: http://www.gigaset.com
If you have problems setting up or operation this product please call
GIGASET UK HELPLINE 0845 3670812
GIGASET IRL HELPLINE 1850 777277
Product may not be fully compatible with the national telephone network. It is clearly
specified on the box near the CE mark as well as on the bottom of the base station for which
country/countries the equipment has been developed. If the equipment is used in a
manner inconsistent with this advice or with the instructions of the manual and on the
product itself, this may have implications on the conditions for warranty or guarantee
claims (repair or exchange of product).
In order to make use of the warranty, the product purchaser is asked to submit a receipt
which proves the date of purchase (date from which the warranty period starts) and the
type of goods that have been purchased.
Gigaset AS200-AS200A-AS300_AS300A_UK _ A31008-M2208-L101-1-7619
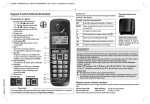
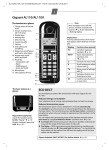
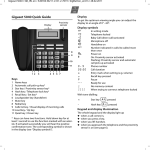
The handset and base at a glance
The handset at a glance
Display keys on handset:
Pressing a key launches the function that appears above that key
in the display.
1 Charge status of the batteries
2 Answer machine icon
(AS200A/AS300A only)
3 Display keys
4 Message key
Flashes: new messages received
1
5 AS200/AS200A:
2
h Directory key
AS300/AS300A:
d Handsfree key
6 Control key (u)
7 Talk key
3
8 AS300/AS300A:
h Directory key
4
(press down)
5
9 End call and
6
On/Off key
7
8
10 Ringer on/off
9
(press and hold
in idle status)
11 Keypad lock on/off
(press and hold)
12 Recall key
- Consultation call
10
(flash)
11
- Dialling pause
12
(press and hold)
13
13 Microphone
14
14 "Microphone off" key
Display Function when
icon
pressed
±
11.12.
INT
Call other registered
handsets.
MENU
Open main/submenu.
“
Go back one menu
level.
T
˜
OK
Scroll up/down or
adjust volume with u.
Move cursor to left/
right with u.
Backspace deletes one
character at a time
from right to left.
Confirm menu
function or save entry.
Making external calls and ending
calls
External calls are calls using the public telephone
network.
~ (Enter the phone number)
c.
The phone number is dialled. (Or you can first
press and hold c [dial tone] and then enter the
number.) During the call you can adjust the earpiece volume using t and set the volume with u.
End the call/cancel dialling:
Press the end call key a.
You can automatically insert a network provider
dialling code before any phone number.
¢
Accepting a call
The handset indicates an incoming call by ringing
and by a display on the screen. Press the talk key
c to accept the call. When Auto Answer is activated, simply remove the handset from the base
station/charging cradle. In idle status, use t to
activate the menu for setting the call volume and
use u to set the volume.
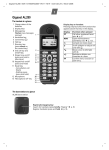
Directory
1
5
7
4
3
Registration/paging key:
Search for handsets (press briefly, "Paging" )
Register handsets (press and hold ).
2 On/Off key: activate and deactivate answer machine.
Lights up: answer machine is activated.
Flashes: there is at least one new message or message is
in the process of being recorded.
Flashes very quickly for about 4 seconds: memory is full.
3 Volume keys: (– = quieter; + = louder)
During message playback: adjust the speaking volume.
While phone is ringing: adjust ringer volume.
4 Play/Stop key:
Play back messages from the answer machine, or cancel
playback.
During message playback:
5 Delete current message.
6 Skip to the start of the current message (press once) or go
to the previous message (press twice).
7 Skip to next message.
To open the directory: press h.
You can store up to 40 numbers (max. 32 digits)
and associated names (max. 14 characters).
Enter letters/characters.
¢
¢ ¢
¢ ¢
¢
¢
¢
¢
¢
¢
¢
¢
Saving the first number in the directory
New Entry?
OK
~ (enter number)
h
OK
~ (enter name)
OK
Storing a number in the directory
MENU
New Entry
OK
h
~ (enter number)
OK
~ (enter name)
OK
Selecting a directory entry
Open the directory with h. You have the follow-
ing options:
u Use u to scroll through the entries until the
required name is selected.
u Enter the first character of the name and scroll
to the entry with u, if required.
¢
¢
Dialling with the directory
u (select entry)
c
h
Phone settings
Changing the display language
¢
¢
¢
¢
¢
¢
¢ select the language ¢ OK
MENU
Settings
OK
Handset
OK
Language
OK
The current language is indicated by ‰.
If you accidentally choose a language you do not
understand:
421
MENU
(press the keys one after the other)
Select the correct language with u and press OK.
¢
Resetting the handset
You can reset individual settings and changes that
you have made. Entries in the directory, the calls
list and the handset's registration to the base
station will be retained.
MENU
Settings
OK
Handset
OK
Reset Handset
OK
Cancel the reset with a.
¢
¢
¢
¢
¢
¢
Restoring the base station to the
factory settings
When restoring factory settings:
u All handsets are de-registered
u Individual settings are reset
u All lists are deleted
u The system PIN is reset to the original
code 0000
Only the date and time are retained.
¢
¢
¢ ¢
¢
¢
Software reset
MENU
Settings
OK
Base
OK
Base Reset
OK
Hardware reset
Disconnect the power cord from the base station.
Hold down the registration/paging key on the
base station while reconnecting the power cable
to the base station. Release the key after approximately 5 seconds.
Repeater mode
With a repeater you can increase the range of your
base station. You will need to activate repeater
mode. Repeater mode and Eco mode or Eco
mode+ cancel each other out.
Operating the base station on
the PABX
The following settings are only necessary if
your PABX requires them, see the user guide
for your PABX.
When entering the digits, enter them slowly
one after the other.
Using several handsets
Making internal calls
¢ The number for the set dialling mode flashes:
¢
Internal consultation call/
connecting a call
¢
0 = touch tone dialling (DTMF);
1 = dial pulsing (DP)
enter number
OK.
¢
¢
Setting recall
MENU
4IO12
¢The number for the current recall flashes:
0 = 80 ms; 1 = 100 ms; 2 = 120 ms; 3 = 400 ms;
4 = 250 ms; 5 = 300 ms; 6 = 600 ms; 7 = 800 ms
enter number
OK.
¢
¢
Changing pause after line seizure
You can set the length of the pause inserted
between pressing the talk key c and sending the
phone number.
¢4 I O 1O
¢ The number for the current pause length
flashes: 1 = 1 sec.; 2 = 3 sec.; 3 = 7 sec.
¢ enter number ¢ OK.
MENU
¢
¢ The number for the current pause length
flashes: 1 = 800 ms; 2 = 1600 ms; 3 = 3200 ms
¢ enter number ¢ OK.
Changing the pause after the recall key
MENU
4IO14
Locating a handset ("paging")
You can locate your handset using the base
station.
u Briefly press the registration/paging key on
the base station.
u All handsets will ring simultaneously
("paging"), even if the ringer tones are
deactivated.
End paging: briefly press the registration/paging
key on the base station or the talk key c on a
handset.
Calling Line Identification
Using shortcut keys
When you receive a call, the caller's number will be
displayed on your handset; the caller's name will
be displayed if it is stored in the directory.
You can assign directory entries to the keys 0
and 2–9:
h
u (select entry)
MENU
Shortcut
OK
~ (press the key you want to assign the
entry to)
Requirements:
1 You have asked your network provider for the
caller's number (CLIP) to be displayed on your
handset screen.
2 The caller has asked the network provider for his
number to be identified (CLI).
® appears in the display if you have
not requested Calling Line Identification,
Withheld appears if the caller has withheld CLI,
and Unavailable appears if CLI has not been
requested.
Switch to mute
You can mute your handset when making
external calls. Your caller can no longer hear you.
Press the "Microphone off" key m during the call
to activate/deactivate the function.
¢
¢
To dial, press and hold the required shortcut key.
Transferring the directory to
another handset
Requirements:
u The sending and receiving handsets must
both be registered to the same base station.
u The other handset and the base station can
send and receive directory entries.
¢ u (select entry) ¢ MENU
¢ Send Entry / Send List ¢ OK
¢ ~ (enter the internal number of the
receiving handset) ¢ OK
h
Last number redial list
This list contains the ten last dialled numbers.
¢
Using other functions
h
u (select entry)
MENU
The following functions can be selected with u:
New Entry
¢
¢
¢
¢
Save new phone number.
Show Number Display the phone number.
Dialling from the last number redial list
c (press briefly)
u (select entry)
c
¢
¢
You are in conversation with an external
participant. Press the INT key and call one or all
handsets. The external participant hears the hold
music.
u Before the internal participant has answered,
press the end call key a; the call is diverted
to the participant who answers the call.
u After the internal participant has answered,
you can talk to him. Press the end call key a;
the call is diverted, or press the display key ”;
you are reconnected to the external participant.
Listening in to an external call
You are conducting an external call. An internal
participant can listen in on this call and take part
in the conversation (conference).
Precondition: The Listening in function must be
activated.
Activating/deactivating listening in
¢ Settings ¢ OK ¢ Base ¢ OK
¢ Listening in ¢ OK (‰ = on)
MENU
Internal listening in (conference)
You want to listen in to an existing external call.
Press and hold the c key. You can listen in to the
call. All participants hear a signal tone.
To end: press the end call key a. All participants
hear a signal tone.
If the first internal participant presses the end call
key a, the handset that has "listened in" remains
connected to the external participant.
Delete Entry
Delete selected entry.
Send Entry
Send a single entry to another
handset.
Copy to Dir.
Copy an entry to the directory.
Delete List
Delete all directory entries.
Delete Entry
Delete selected entry.
Send List
Send the complete list to
another handset.
Delete List
Delete all entries.
Shortcut
For shortcuts, assign the current
entry to a key.
You can select the following settings:
Use Number
Edit or add to the number.
Then dial or select other
functions from the MENU.
¢ Voice Mail ¢ OK ¢ Announcements
¢ OK ¢ Rec announce ¢ OK
¢ Speak after OK ¢ OK
Activating/deactivating the alarm clock
¢
¢
¢
¢
When activated:
¢ Set the wake-up time ¢ OK
MENU
Alarm Clock
OK
Activation
OK (‰ = on)
u
u
When the alarm clock rings, press any key to
switch it off for 24 hours.
If the alarm clock is set, the wake-up icon l will
appear on the screen and the wake-up time will
be displayed instead of the date.
¢
¢
Setting the wake-up time
¢
u
u
MENU
Alarm Clock
OK
Wake-up time
OK
Enter the wake-up time in hours and minutes,
then press OK.
Entering letters/characters
Press the relevant key the number of times
indicated.
Briefly press the hash key # to switch from
"Abc" to "123" mode, from "123" to "abc" mode
and from "abc" to "Abc" mode.
Standard characters
3
£
c
f
i
l
o
r
v
y
?
(
#
4
$
2
3
4
5
6
s
8
z
!
)
@
5
¥
ä
ë
ï
6
¤
á
é
í
ö
7
ü
9
0
<
\
ñ
ß
ú
ÿ
+
=
&
à â ã ç
è ê
ì î
ó ò ô õ
û
æ ø å
: ¿ ¡ "
%
u
u
u
u
7 8 9 10 11 12 13 14
ù
ý
>
§
u
’
;
_
Only use the mains adapter supplied.
Fit only the recommended, rechargeable
batteries, i.e. never use any other battery type
or non-rechargeable batteries as this could
result in significant health risks and personal
injury.
The operation of medical appliances may be
affected. Be aware of the technical conditions
in your particular environment, e.g. doctor's
surgery.
Do not hold the rear of the handset to your
ear when it is ringing. Otherwise you risk
serious and permanent damage to your
hearing.
The handset may cause an unpleasant
humming noise in hearing aids.
Do not install the phone in a bathroom or
shower room. The handset and base station
are not splashproof.
Do not use your phone in environments with
a potential explosion hazard, e.g. paint shops.
If you give your Gigaset to someone else,
make sure you also give them the user guide.
Please remove faulty base stations from use
or have them repaired by Service, as they
could interfere with other wireless services.
Disposal:
Batteries should not be disposed of in general
household waste. Observe the local waste
disposal regulations, details of which can be
obtained from your local authority or the
dealer you purchased the product from.
All electrical and electronic equipment must
be disposed of separately from general
household waste using the sites designated
by local authorities. If a product displays this
symbol of a crossed-out rubbish bin, the
product is subject to European Directive
2002/96/EC. The appropriate disposal and
separate collection of used equipment serve
to prevent potential harm to the environment
and to health. They are a precondition for the
re-use and recycling of used electrical and
electronic equipment.
For further information on disposing of your
used equipment, please contact your local
authority, your refuse collection service or the
dealer you purchased the product from.
you will be connected directly to the answer
machine (network mailbox).
You can check and activate your answer machine
from any other telephone (hotel, pay phone etc.).
CallsList 01+02
¢
Open the calls list
CallsList 01+02
f
¢ OK
Delete Entry
Delete current entry.
Copy to Dir.
Copy an entry to the directory.
Date/Time
Call date and time (if set).
Status
New Call: new missed call.
Old Call: entry already read.
Answ.: call taken.
Delete List
Warning! All old and new
entries will be deleted.
¢
¢
You hear the ready tone (short tone). Now say
your announcement (at least 3 seconds).
Press OK to confirm or press a or ” to reject your
recording. After recording, the announcement is
played back for you to check.
Please note:
Recording ends automatically when the max.
recording time of 170 seconds is reached or if
there is a break in speaking of more than
2 seconds.
Requirements:
u You have set a system PIN other than 0000.
u The phone you are using for remote
operation has touch tone dialling (DTMF),
i.e. you hear different tones when you press
the keys.
Playing/deleting messages
the system PIN
The following keys are used for operation:
A Go to the start of the current message.
Press twice to go back to the previous
message.
B Stop playback. Press again to resume.
3 Skip to next message.
0 delete current message.
Open the voicemail list to play back messages.
Stopping and controlling playback
During message playback:
2
t
Stop playback. Press 2 again to resume.
Go to the start of the current message.
2 x t Skip to the previous message.
v
Skip to the next message.
2 x v Go to the next message but one.
Deleting individual messages
While playback is paused, press the ˜ display key.
Deleting all old messages
During playback or pause:
¢
¢
Emergency numbers cannot be dialled if the
keypad lock is activated!
Not all of the functions described in this user
guide are available in all countries.
Care
Wipe down the base station and handset with a
damp cloth (no solvents) or an antistatic cloth.
Never use a dry cloth. This can cause static.
Contact with liquid !
¢
to ring until you hear the message: "Please enter
PIN")
~ enter system PIN
Specifications
Recommended batteries
Technology: Nickel-metal-hydride (NiMH)
Size:
AAA (Micro, HR03)
Voltage:
1.2 V
Capacity:
400–800 mAh
We recommend the following types of battery:
GP 550/700 mAh, Yuasa Phone 700/800 mAh,
Peacebay 550/650 mAh (Valid at the time of going
to press). The handset is supplied with recommended batteries.
Reduced energy consumption
Guarantee Certificate United Kingdom
The transmission power of your telephone is
reduced automatically:
The handset's transmission power is reduced
depending on the distance to the base station.
The transmission power on the base station is
reduced to virtually zero when only one handset
is registered and the handset is in the base
station.
You can reduce the transmission power of the
handset and base station even more by using
Eco Mode/Eco Mode+:
u Eco Mode: 80% transmission pow
er reduction in standby mode and during a
call (the range of the base station is
reduced).
u Eco Mode+: 100% transmission power deactivation in standby mode (top left display
icon ½). Press and hold the talk key c to
check that the base station can be reached.
You will hear the ringing tone if the base station can be reached.
Registering handsets that do not support
Eco Mode+ causes the mode to be deactivated on the base and all other handsets.
Activating the answer machine
~ (Enter your own number and allow the phone
You can still accept a call while the answer
machine is recording the message by pressing c.
Recording stops and you can speak to the caller.
Base station power consumption
Reduced transmission power
¢
Accepting call from answer machine
If the handset should come into contact with
liquid:
u Switch the handset off and remove the
batteries immediately.
u Allow the liquid to drain from the handset.
u Pat all parts dry, then place the handset with
the battery compartment open and the
keypad facing down in a dry, warm place
for at least 72 hours (not in a microwave,
oven etc.).
u Do not switch on the handset again until it
is completely dry.
When it has fully dried out, you will normally be
able to use it again.
ECO DECT
You are helping to protect the environment with
your Gigaset AS200/AS200A/AS300/AS300A.
Your telephone has a power-saving adapter plug
and uses less power.
Calling the answer machine and playing
back messages
while listening to
~ (Dial your own number)
your announcement: press the 9 key and enter
MENU
Delete all old
OK (confirm the security prompt)
Safety
Read this user guide and the safety precautions
carefully before use. Explain their content and the
potential hazards associated with using the
telephone to your children.
1) Space
OK ( = on)
When the answer machine is switched on,
the ± icon appears in the display.
Assigning key 1 for fast access to the answer
machine (network mailbox)
Simply press and hold key 1 on the handset and
Remote operation when on the move
¢
¢
Safety precautions
123
-->
abc
¢
MENU
The answer machine has already been preset at
the factory. Make individual settings using the
handset.
Details on how to set a delay time, after which the
answer machine is to answer a call, as well as
details on how to set the recording length and
activate call screening during the recording, are
available from the Menu tree.
MENU
Calling back a caller from the calls list
CallsList 01+02
OK
f
u (select entry)
c
Setting the alarm clock
Abc
-->
123
¢‰Voice Mail ¢ OK ¢ Answer Mach.
Activating/deactivating the answer machine
Setting up the answer machine
Recording your own announcement
Using other functions
u (select entry)
MENU
The following functions can be selected with u:
Edit selected entry.
The answer machine can be operated from the
handset or by using the key on the base station.
The telephone is supplied with a pre-recorded
announcement. You can only record your own
announcement messages using the handset.
This pre-recorded announcement is used if no
personal announcement is available.
If the memory is full, the answer machine switches
itself off automatically. It activates again automatically when you delete old messages.
Precondition: CLIP
Depending on the type of list set, the calls list
contains
u answered calls
u missed calls
u calls on the answer machine (AS200A/AS300A)
Depending on the type of list set, all numbers of
the last 25 incoming calls are saved or just the
missed calls are saved.
The calls list is displayed as follows:
¢
¢
¢ MENU
Answer machine (AS200A/AS300A)
Calls list
The last incoming call is displayed.
If necessary, use u to select another entry.
Edit Entry
#
Please note:
If calls are saved in the network mailbox, you will
receive a message if the appropriate settings
have been set (depending on your network
provider).
Managing entries in the last number
redial list
c (press briefly)
u (select entry)
Edit or add to the number.
Then dial or select other
functions from the MENU.
1 2
1)
1
1
2 a b
3 d e
4 g h
5 j k
6 m n
7 p q
8 t u
9 w x
0 . ,
P* /
An advisory tone sounds and the message key
flashes as soon as a new entry appears in the calls
list/voicemail list. A message appears in the
display.
When you press the f key, all the lists are displayed. If only one list contains new messages,
this will be opened automatically.
¢
¢
Use Number
¢
Calls list/voicemail (network
mailbox) list
Number of new entries + number of old, read entries
General
Internal calls are free calls to other handsets that
are registered to the same base station.
To make a call to other handsets, press
u INT
~ (1...4, enter internal number of
the handset), the handset is called or
u INT
star key P, all handsets are called.
When a participant answers you can speak to
them. To end the call, press the end call key a.
Changing the dialling mode
MENU
4IO11
Using the directory and lists
Using the directory and lists
AS200/AS200AAS300/AS300A
1
6
11:56
MENU
INT
U
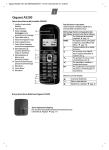
The base station at a glance
2
V
Making calls
In standby mode
– Handset in base station
– Handset outside base station
During a call
approx. 1.3 W
approx. 1.3 W
approx. 1.5 W
General specifications
DECT standard
GAP standard
Range
Base station power
supply
Environmental conditions in operation
is supported
is supported
up to 300 m outdoors
up to 50 m indoors
230 V ~/50 Hz
+5°C to +45°C, 20% to
75% relative humidity
Without prejudice to any claim the user (customer)
may have in relation to the dealer or retailer, the customer shall be granted a manufacturer's Guarantee
under the conditions set out below:
u In the case of new devices and their components
exhibiting defects resulting from manufacturing
and/or material faults within 24 months of purchase, Gigaset Communications shall, at its own
option and free of charge, either replace the device
with another device reflecting the current state of
the art, or repair the said device. In respect of parts
subject to wear and tear (including but not limited
to, batteries, keypads, casing), this warranty shall
be valid for six months from the date of purchase.
u This Guarantee shall be invalid if the device defect
is attributable to improper treatment and/or failure to comply with information contained in the
user guides.
u This Guarantee shall not apply to or extend to services performed by the authorised dealer or the
customer themselves (e. g. installation, configuration, software downloads). User guides and any
software supplied on a separate data medium shall
be excluded from the Guarantee.
u The purchase receipt, together with the date of
purchase, shall be required as evidence for invoking the Guarantee. Claims under the Guarantee
must be submitted within two months of the Guarantee default becoming evident.
u Ownership of devices or components replaced by
and returned to Gigaset Communications shall
vest in Gigaset Communications.
u This Guarantee shall apply to new devices purchased in the European Union. For Products sold in
the United Kingdom the Guarantee is issued by:
Gigaset Communications UK Limited, Quatro
House, Lyon Way, Camberley, Surrey, GU16 7ER.
u Any other claims resulting out of or in connection
with the device shall be excluded from this Guarantee. Nothing in this Guarantee shall attempt to
limit or exclude a Customers Statutory Rights, nor
the manufacturer's liability for death or personal
injury resulting from its negligence.
u The duration of the Guarantee shall not be
extended by services rendered under the terms of
the Guarantee.
u Insofar as no Guarantee default exists, Gigaset
Communications reserves the right to charge the
customer for replacement or repair.
u The above provisions does not imply a change in
the burden of proof to the detriment of the customer.
To invoke this Guarantee, please contact the Gigaset
Communications telephone service. The relevant
number is to be found in the accompanying user
guide.
Authorisation
This device is intended for analogue phone lines
in the UK. Country-specific requirements have
been taken into consideration.
We, Gigaset Communications GmbH, declare that
this device meets the essential requirements and
other relevant regulations laid down in Directive
1999/5/EC. A copy of the 1999/5/EC Declaration of
Conformity is available at this Internet address:
www.gigaset.com/docs
Issued Gigaset Communications GmbH
Frankenstr. 2a, D-46395 Bocholt.
Manufactured by Gigaset Communications GmbH
under trademark license of Siemens AG.
As of 1 Oct. 2011 Gigaset products bearing the
trademark "Siemens" will exclusively use the
trademark "Gigaset".
© Gigaset Communications GmbH 2011
All rights reserved. Subject to availability.
Rights of modification reserved.
www.gigaset.com
This user guide is made from 100% recycled paper.
A31008-M2208-L101-1-7619