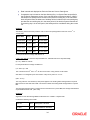
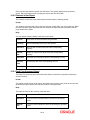
1
General Ledger Version-1.0 9NT1438-ORACLE FCUBS V.UM 11.1.US.1.0.0.0 [March] [2011] Oracle Part Number E51715-01 Document Control Author: Documentation Team Group: UBPG Created on: October 01, 2008 Revision No: Final Updated by: Documentation Team Reviewed by: Development/Testing teams Approved by: Software Quality Assurance Team Updated on: March 17, 2011 Reviewed on: March 17, 2011 Approved on: March 17, 2011 General Ledger Table of Contents 1. ABOUT THIS MANUAL................................................................................................................................ 1-1 1.1 INTRODUCTION ........................................................................................................................................... 1-1 1.2 AUDIENCE .................................................................................................................................................. 1-1 1.3 ORGANIZATION .......................................................................................................................................... 1-1 1.3.1 Related Documents ............................................................................................................................ 1-2 1.3.2 Glossary of Icons ............................................................................................................................... 1-2 2. GENERAL LEDGER - AN OVERVIEW ..................................................................................................... 2-1 2.1 2.2 2.3 3. SETTING UP CHART OF ACCOUNTS ...................................................................................................... 3-1 3.1 3.2 3.3 3.4 3.5 3.6 3.7 3.8 3.9 3.10 4. INTRODUCTION ........................................................................................................................................... 2-1 FEATURES OF GL SUB-SYSTEM .................................................................................................................. 2-1 NEED TO INVOKE GL SUB-SYSTEM ............................................................................................................ 2-2 INTRODUCTION ........................................................................................................................................... 3-1 SPECIFYING GL DETAILS ............................................................................................................................ 3-3 SPECIFYING GL LINKAGES ....................................................................................................................... 3-16 VIEW GLS HIERARCHICAL POSITION ........................................................................................................ 3-18 INDICATING STATEMENT GENERATION DETAILS FOR GL......................................................................... 3-22 MAINTAINING CLEARING ACCOUNT NUMBERS FOR INTERNAL GL’S ....................................................... 3-24 REPOSTING OF FCY ENTRIES FOR REALIZED P&L GLS IN LCY .............................................................. 3-25 ENTRY-BASED REVALUATION OF INCOME/EXPENSE GLS ........................................................................ 3-26 LINKING GL TO POSITION OR POSITION EQUIVALENT GL ........................................................................ 3-27 SPECIFYING SWIFT BIC INFORMATION FOR LEAF GL............................................................................. 3-28 MAINTAINING REPORTING LINE STRUCTURE ................................................................................. 4-1 4.1 INTRODUCTION ........................................................................................................................................... 4-1 4.1.1 Creating New Reporting Line Structure ............................................................................................ 4-2 4.1.2 Linking GL to Reporting Line ............................................................................................................ 4-3 4.1.3 Maintaining Transaction Code Restrictions for GL Entries .............................................................. 4-4 5. DEFINING ALTERNATE REPORTING LINES........................................................................................ 5-1 5.1 INTRODUCTION ........................................................................................................................................... 5-1 5.1.1 Linking GL to CB Line ....................................................................................................................... 5-2 5.1.2 Indicating CB Debit Line and CB Credit Line ................................................................................... 5-2 5.1.3 Operations on GL Code to CB Line Linkage Record ........................................................................ 5-2 5.2 LINKING GL TO MIS CLASS ....................................................................................................................... 5-3 5.2.1 Operations on GL MIS Linkages Record ........................................................................................... 5-3 6. GL REPORT CLASSIFICATION ON MIS CLASS ................................................................................... 6-1 6.1 6.2 7. INTRODUCTION ........................................................................................................................................... 6-1 MAINTAINING GL BRANCH PARAMETERS .................................................................................................. 6-4 ENTERPRISE GL INTEGRATION ............................................................................................................. 7-1 7.1 INTRODUCTION ........................................................................................................................................... 7-1 7.2 ENTERPRISE GL EXTRACTION INFRASTRUCTURE ....................................................................................... 7-1 7.2.1 Maintaining Enterprise GL Parameters ............................................................................................ 7-1 7.2.2 Specifying Enterprise GL Mapping Parameters ................................................................................ 7-2 7.2.3 Defining Enterprise GL Master ......................................................................................................... 7-4 7.2.4 7.2.5 7.2.6 8. Specifying Values for Mapping Parameters ...................................................................................... 7-5 Data Extraction Processing ............................................................................................................... 7-6 Handoff Generation ........................................................................................................................... 7-7 ERROR CODES AND MESSAGES .............................................................................................................. 8-1 8.1 9. ERROR MESSAGES ...................................................................................................................................... 8-1 GLOSSARY ..................................................................................................................................................... 9-1 9.1 10. GENERAL LEDGER TERMS .......................................................................................................................... 9-1 REPORTS .................................................................................................................................................. 10-1 10.1 INTRODUCTION ......................................................................................................................................... 10-1 10.2 ACCOUNTING JOURNAL REPORT .............................................................................................................. 10-1 10.2.1 Selection options .............................................................................................................................. 10-2 10.2.2 Contents of the Report ..................................................................................................................... 10-3 10.3 TRIAL BALANCE REPORT .......................................................................................................................... 10-3 10.3.1 Contents of the Report ..................................................................................................................... 10-4 10.4 MULTI-CURRENCY P AND L REPORT ........................................................................................................ 10-5 10.4.1 Generating a Consolidated Report .................................................................................................. 10-5 10.4.2 Generating the Balance Sheet or P n L Report for a Period in the Past ......................................... 10-5 10.4.3 Selection options .............................................................................................................................. 10-6 10.4.4 Contents of the Report ..................................................................................................................... 10-6 10.5 DAILY AVERAGE BALANCE REPORT ........................................................................................................ 10-7 10.5.1 Selection Options ............................................................................................................................. 10-8 10.5.2 Contents of the Report ..................................................................................................................... 10-9 10.6 GENERAL LEDGER PERIODICAL AVERAGE BALANCE ............................................................................. 10-10 10.6.1 Report Options ............................................................................................................................... 10-10 10.6.2 Contents of the Report ................................................................................................................... 10-11 10.7 GENERAL LEDGER REPORT .................................................................................................................... 10-11 10.7.1 Report Option ................................................................................................................................ 10-12 10.7.2 Contents of the Report ................................................................................................................... 10-14 10.8 GENERAL LEDGER POSTING REPORT ...................................................................................................... 10-14 10.8.1 Report Options ............................................................................................................................... 10-16 10.9 CASH FLOW REPORT .............................................................................................................................. 10-18 10.9.1 Report Options ............................................................................................................................... 10-18 10.9.2 Contents of the Report ................................................................................................................... 10-19 10.9.3 Cash Flow Summary Report .......................................................................................................... 10-19 10.10 CURRENCY-WISE CASH FLOW REPORT ............................................................................................... 10-20 10.10.1 Report Options ........................................................................................................................... 10-20 10.10.2 Contents of the Report ............................................................................................................... 10-20 10.11 UNCOLLECTED FUNDS REPORT .......................................................................................................... 10-21 10.11.1 Contents of the Report ............................................................................................................... 10-21 10.12 CURRENCY POSITION REPORT ............................................................................................................ 10-21 10.12.1 Contents of the Report ............................................................................................................... 10-22 1. About this Manual 1.1 Introduction This Manual is designed to help you quickly get acquainted with the General Ledger (GL) subsystem of Oracle FLEXCUBE. It provides an overview to the module and takes you through the various steps involved in setting up a GL structure and reporting details of the GLs maintained at your bank. You can further obtain information specific to a particular field by placing the cursor on the relevant field and striking <F1> on the keyboard. 1.2 Audience This manual is intended for the following User/User Roles: 1.3 Role Function Operations To define the GL structure Operations Managers/Officers Authorization functions Financial Control To generate reports on GLs MIS Operators Generation of reports Organization This Manual is organized into the following chapters: Chapter 1 About this Manual gives information on the intended audience. It also lists the various chapters covered in this User Manual. Chapter 2 General Ledger - An Overview is a snapshot of the features and functionality that the module provides. Chapter 3 Setting up Chart of Accounts details the procedure to set up a GL structure for your bank. Chapter 4 Maintaining Reporting Line Structure describes the procedure for defining an alternate reporting structure for your Head Office and Federal Reserve. Chapter 5 Defining Alternate Reporting Lines deals with the setting up of alternate reporting lines for GLs when a branch is located abroad. Chapter 6 GL Report Classification on MIS Class gives details on reports that be generated based on MIS classes. 1-1 Chapter 7 Enterprise GL Integration deals with extraction of accounting data from Oracle FLEXCUBE core GL system and mapping of the same to an enterprise GL external to the system. Chapter 8 Error Codes and Messages for General Ledger deals with the various error codes and messages that can be generated for the GL module. Chapter 9 Glossary defines the terms used in this manual. Chapter 10 Reports provides a list of reports that can be generated in this module and also explains their contents. 1.3.1 Related Documents The Oracle FLEXCUBE Procedures User Manual The Oracle FLEXCUBE Operations User Manual The Oracle FLEXCUBE Core Services User Manual The Oracle FLEXCUBE Core Entities User Manual 1.3.2 Glossary of Icons This User Manual may refer to all or some of the following icons. Icons Function New Copy Save Delete Unlock Print Close Re-open Reverse Template Roll-over Hold 1-2 Icons Function Authorize Liquidate Exit Sign-off Help Add row Delete row Option List Confirm Enter Query Execute Query Refer the Procedures User Manual for further details about the icons. 1-3 2. General Ledger - An Overview 2.1 Introduction The General Ledger (GL) sub-system is the pillar on which the various functional components of Oracle FLEXCUBE rest. Through this single entity, you can consolidate and maintain balances and turnovers of all types of accounts your bank holds. In addition, the module enables you to retrieve on-line information on the GLs maintained for your bank. In Oracle FLEXCUBE, GLs have been structurally fashioned as a tree, bearing a multi-level structure (like a tree’s main branch and sub-branches). On the head stands the Head GL that does not report to any other GL. The subsequent levels consist of Nodes and Leaves. A Node GL is one that reports to another GL and has other GLs reporting to it. A Leaf GL is one that reports to another GL but does not have any GL reporting to it. The number of levels in the tree structure, and the various constituents of the head, nodes, and leaves have been left open to your choice, the only restriction being that a report will be restricted to the number of levels that a 132-column paper can hold. The GL structure for your bank has to be created at the bank level and maintained by different branches. Using this structure, you can consolidate the GL balances and turnovers across modules and products and retrieve on-line information on the same. 2.2 Features of GL Sub-system Flexible GL structure Keeping in mind the different type of accounts maintained in your bank, GL has been broadly classified into the following categories: Asset Liability Expense Income Contingent Asset Contingent Liability Memo Position Position Equivalent A Head GL can be assigned any of the above categories. Two Head GLs can have the same category. All GLs that fall under a Head GL will essentially belong to the category defined for the Head. Each category can have any number of GLs under it, but the category allocated to a GL should be assigned at the head of any GL stream. All nodes and leaves by default take the category of the Head GL to which they report. At no other level can you assign a category. 2-1 Leaf GLs are merely points of contact through which all entries are passed to the nodes. It is at the nodes that consolidation of all accounting takes place. Therefore, any specification like the Currency type or GL type though specified at the leaf GL will be applicable only for the respective node of that leaf. Peripheral activities like linking a customer account to a GL or posting to a GL can be done only at the leaf. All your profit and loss entries can be passed in LCY only; however, for reporting purposes you can also maintain a record of these in any FCY or even in all currencies. This makes it possible to have multi-currency GLs. Along with this, revaluation of currencies has also been provided for. Categorization into MIS Classes The sub-system enables you to categorize information into MIS Classes, which are exclusively for reporting purposes. This feature serves not only your need for classified information, but also helps simplify the GL structure of the bank. For instance, you can categorize information by the defined Customer/Transaction MIS Class. Under each type — Customer or Transaction you can create several MIS Classes and Subclasses. This is done at the Bank level and used by the different branches. Information Retrieval You have been provided with various report definition options, so that you can tailor your report to suit your needs. In addition, the report generator helps you prepare reports in the format of the Head Office and Federal Reserve debit/credit lines, which may be at variance with the existing GL structure at the branch level. Consolidation of GLs can take place at different branch levels. That is, at the Regional Office or Head Office levels depending upon the branch structure that you have defined in the Core Entities Module. The final consolidation of all GLs is done at the Head Office where the total consolidated GL is provided in a report. Even during consolidation, the break-up based on MIS Classes will be provided. 2.3 Need to Invoke GL Sub-system You will need to invoke the General Ledger (GL) sub-system to: Maintain a General Ledger structure for your bank Avail of services provided by GL to different modules like EOD update of GL etc. Interface with the MIS System Set up Reporting lines and associate GLs to these debit and credit lines Specify break up of GLs by either customer or transaction MIS Class Run Year-end P/L account on book closure Extract reports on GL data history Obtain reports of General Ledgers for specific periods 2-2 3. Setting up Chart of Accounts 3.1 Introduction Oracle FLEXCUBE supports a multilevel structure for your bank’s Chart of Accounts. You can create broad groups of accounts in the categories of assets, liabilities, income, expenses, etc., and further divide these groups into several levels. The groups at each of these levels are referred to as GLs. For instance, you can create a three level GL structure as follows: Head GL1 Node GL2 GL3 GL4 Node Leaf GL5 GL6 GL7 Leaf Leaf Leaf The GLs at the lowermost level are referred to as Leaf GLs. The balances and turnovers of leaf GLs are consolidated at higher level GLs called Node GLs. The GL at the top of the structure is referred to as the Head GL. In the GL reporting hierarchy, a GL is a parent GL for GLs reporting to it. For instance, GL2 is the parent of GL 5 and 6, and GL1 is the parent GL for GLs 2, 3, and 4. The reporting GLs, GLs 5 and 6 in the first instance, are referred to as child GLs of GL 2. Similarly, GLs 2, 3, and 4 are child GLs with respect to GL1. This multilevel GL structure can be maintained in the Chart of Accounts screen by the branch marked as the Head Office of your bank. In Oracle FLEXCUBE, the GL balances are stored as currency wise balances as well as overall balance in LCY on GL level. This enables currency-wise break up of each GL account. However overall balance in local currency is also available. You can invoke the ‘Chart of Accounts Maintenance’ screen by typing ‘GLDCHACT’ in the field at the top right corner of the Application tool bar and clicking the adjoining arrow button. To define the details of a new GL, click new icon. 3-1 GL Code In Oracle FLEXCUBE, a GL is identified by a Code. The length and composition of the code depends upon the GL Mask defined in the ‘Bank-wide Parameters’ Screen. The code that you enter can have a maximum of nine alphanumeric characters. External Code Using External Code, you can upload the existing record into Oracle FLEXCUBE, when the record is loaded for the first time. The old GL code will be defaulted as external code and you can enter new code and save it as well. External Code has to do nothing while entering new GL entries after installation of Oracle FLEXCUBE. Description You can enter a brief description to help identify the GL in this field. You can use this description for the internal reference of your bank. Leaf GL In Oracle FLEXCUBE, a GL that you create can be one of the following: Node GL Leaf GL A Node GL is one that reports to another GL and has other GLs reporting to it. In the reporting relationship, if a GL reports to another GL, but no GLs report to it, then it is a Leaf GL. A Head GL is a Node that does not report to another GL. The Chart of Accounts detailed screen is designed with four tabs. By invoking the screens that correspond with these tabs you can create GLs and maintain a GL structure of your bank. 3-2 GL Details — In this screen, you can set up a GL, indicate its type, assign a category to the Head GL. GL Linkages — Click this tab to define the GLs that constitute your Chart of Accounts. Reporting Lines — In this screen, you can define the debit and credit reporting lines for leaf GLs. This helps to organize reports on the lines of your Head Office and Federal Reserve. 3.2 Specifying GL Details To define details for a GL, click on the tab titled GL Details. The details that you can specify for a GL depend on the type of GL that you create. If a particular field is disabled, it means that the field is not relevant to the type of GL that you are creating. You can capture the GL Details in the following fields: GL Type For both customer and internal GLs that you create, you should indicate the type. The GL type is indicative of the type of accounting entries that are posted into the GL. For a customer GL, the GL type could be Normal, Misc. Debit, Misc. Credit, and Nostro. For an Internal GL, the GL type could be Normal, Misc. Debit, misc. Credit, cash, and inter-branch. Those GLs in which a debit entry is to be offset with multiple credit entries or a credit entry to be offset with multiple debit entries should be assigned the Misc. Debit and Misc. Credit type respectively. 3-3 Miscellaneous debit and credit entries should be associated with an instrument number. This will ensure proper reconciliation of the debit and credit entries made to the GL. Choose this option to indicate that the GL should cater only to entries related to your bank s account with another bank. All cash transactions, like in the Data Entry module, are posted directly into a GL by linking the GL with the Till ID. Choose this option to indicate that only interbranch related accounting entries can be posted to the GL. The debit or credit entries of accounts that do not fall into any of the other types can be assigned to the Normal Type GL. The leaf GLs that you create will be taken as Normal Type by default. GL Category GL category can be specified only for a GL head. A Head GL can be assigned any of the following categories: Asset Liability Expense Income Contingent Asset Contingent Liability Memo Position Position Equivalent Two Head GLs can have the same category. All GLs that fall under a Head GL will essentially belong to the category defined for the Head. Each category can have any number of GLs under it. But, the category allocated to a GL should be assigned at the head of any GL stream; all nodes and leaves by default take the category of the Head GL to which they report. Customer/Internal GL A GL that you create in Oracle FLEXCUBE can be defined as a Customer or an Internal GL. Internal GLs are accounts that are internal to the bank, such as cash accounts, interest income and expense accounts, and so on. These also comprise of customer account balances from the front-end modules - Loans, Deposits, Money Market, etc. The customer savings, current, and nostro accounts of your bank are opened under GLs designated as customer GLs. The GL combinations that you can have include: GL type Direct posting of entries Internal Node No Customer Node No Internal Leaf Yes 3-4 GL type Direct posting of entries Customer Leaf No As indicated above, you can post direct entries (i.e., link it to your bank’s internal accounts) only to internal leaf GLs. For internal and customer node GLs and customer leaf GLs, you would associate accounts with them. Avg Bal Required Oracle FLEXCUBE will compute and store average balances for customer GLs on a daily basis. However, the average balance computation is performed on the basis of transaction dated balance and any value dated adjustment will not be considered for this computation. If a working day is followed by any holiday(s), the average balance computation will be done as per the specifications defined in the GL Branch Parameter Maintenance screen. That is, the balance will either include the accumulated balance for the number of days inclusive of the following holidays or the system will compute the balance on the next working day. The system will compute and store average balances for customer GLs only if you select the Avg Bal Required option. You will not be allowed to modify this option at a later date. The balances will be computed on a daily basis and will be based only on booking dated transactions. The system will store debit, credit and net average balances in FCY as well as in LCY. In the case of back dated transactions, the system will not update the average balances of previous periods. You can query the average balances of customer GLs in the GL Average Balances screen. The query can be done using the following, either individually or in combination: GL Code Currency Code Branch Financial Year Period Code Note the following: The computation can be enabled only for internal leaf GLs. If you enable this option the system will compute average balance for GLs as part of EOD processing. The average balance will be computed on the Book-Dated balance. The Debit, Credit and Net average balances in FCY as well as LCY will be stored. Back-period entries do not affect average balance retrospectively. Computation includes the effect of revaluation entries and fin-closure entries. 3-5 Data is stored and displayed as Period-to-Date and Year-to-Date figures. Computation can be based on the Next Working Day-1 or System Date as specified in the GL Branch Parameters screen. If the average balance calculation basis is ‘NWD-1’, the balances of holidays will be included in the previous working day. If the calculation basis is System Date, the balances of holidays will be included on the next working day provided the next working day is in the same period. If the basis is System Date but the next working day is in the next period, the holidays will be considered during the current run. Example I st The following entries have been posted to a GL for which the opening balance was zero on the 1 of January 2001. Book Date Entry Period Value Date 01-Jan-2001 Dr 100 M01 01-Jan-2001 10-Jan-2001 Dr 200 M01 10-Jan-2001 20-Jan-2001 Cr 500 M01 20-Jan-2001 01-Feb-2001 Cr 500 M01 15-Jan-2001 For the period M01 the average debit balance is (*100) + (10 * 300 ) [For the first 9 days the balance is 100 Debit and next 10 days 300 Debit]. (9 + 10) = 3900/19 = 205.26 For the period M01 the average Cr Balance is (12 * 200 / 12) = 200 th st This is because from 20 Jan to 31 Jan the GL has had a closing balance of 200 Credit. Note that it is not weighted by the total number of days in the period i.e. it is not (200 * 12 / 31) The entry posted on 01-Feb-2001 (Cr 500) would appear in the booking dated average balance of period M02 because 01-Feb-2001 lies in M02. This would not affect the booking dated average balance of period M01. Thus assuming that there were no further entries to the above GL in period M02, the average credit balance of period M02 would be 700 . (500 + 200) Example II Significance of the field Average Balance Calculated Till –> NWD-1 or System Date Consider the following case for M01 Thu 1st GL1 Closing Bal = 60 Debit Fri 2nd GL1 Closing Balance =80 Debit 3-6 rd Sat 3 – Holiday th Sun 4 – Holiday Monday 5th GL1 Closing Balance = 100 Debit Scenario 1 If the Average Balance Calculation Till = NWD-1 then Avg Dr Bal for M01 as on Fri 2nd = (60+80+80+80) / 4 = 300 / 4 = 75 Else Avg Dr Bal for M01 as on Fri 2nd = (60+80) / 2 = 140 / 2 = 70 End if In either case : Avg Dr Bal for M01 as on Mon 5th = (60+80+80+80+100) / 5 = 400 / 5 = 80 Scenario 2 A new GL for which the opening and closing balances have been zero for the first 10 days of a period and then two debit entries of 100 and 50 are posted. st th 1 to 10 Closing Balance = 0 Credit th Closing Balance = 100 Debit th Closing Balance = 44 Debit 11 12 Now Avg Dr balance for the period is 144/2 = 72 Avg Cr Balance for the period = 0/10 = 0 Avg Net Balance = 144/12 = 12 Dr Scenario III Average Balance Calculation is System Date and NWD is in the Next Period Consider the following case: for M01 (JAN) st From 1 to 27 th Jan the closing balance has been 10 Dr th Thu 28 GL1 Closing Bal = 60 Debit th GL1 Closing Balance =80 Debit GL1 Closing Balance = 100 Debit Fri 29 0th Sat 3 – Holiday st Sun 31 – Holiday st Monday 1 Feb 3-7 If the Average Balance Calculation Till = NWD-1 or SYS DATE, then because the next working day is in the next period, Avg Dr Bal for M01 after eod of Fri 29th = (27*10 + 1*60 + 3*80) / 31 = 570 / 31 = 18.387. Report As Accrual Check against this field if you want the system to calculate the accrual entries posted to this GL independently for displaying during the online query of FX positions. Depending on your selection in this field, system will arrive at the cash and accrual positions. Example Assume that on a particular day, the FX positions for the currency USD is as follows: The sum of the entries of settled FX deals is 34,516.65. The sum of the entries of profit and loss items that have been accrued but not collected or paid from GL’s for which the option ‘Report As Accruals’ is not allowed is 5,743.80. The sum of all the entries of profit and loss items that have been accrued but not collected or paid from GL’ s for which the option ‘Report As Accrual’ is allowed is 12,456.78. Keeping these numbers in view, during online query of FX positions, system displays the cash position and accrual position as shown: The Cash Position for USD on that particular day will be (34,516.65 + 5,743.80) = 40,260. 45 USD. The accrual position will be 12,456.78 USD. Note that checking this option does not have any effect on spot and forward positions. Revaluation Specify whether currency revaluation is applicable to the GL. Check against the Revaluation option to indicate that the GL should be revalued. Leave it unchecked to indicate otherwise. You can revalue the balances of asset, liability, contingent asset, and contingent liability GLs. You can also revalue the balances in Income / Expense GLs. If you indicate that revaluation is applicable, Oracle FLEXCUBE will revalue the GL when the End of Day (EOD) process is run. If transaction entry happens on STANDARD rate then the system does not post any revaluation, even though you have enabled revaluation for the GL002C Transfer Balance on MIS Reclassification Indicate whether the MIS balances in the GL must be transferred, upon MIS reclassification, into the new MIS code. A batch process performs the transfer of balances upon reclassification, for each GL for which this option has been set. Blocked Oracle FLEXCUBE offers you the option to temporarily mark the status of the GL as Blocked. During this period, no entries can be passed into the GL. You can open a GL marked with blocked status by unchecking the blocked status box. 3-8 This feature is useful as you need not close the GL. Blocking is temporary whereas closure is permanent. Reval Split Required You can choose to break-up revaluation profit/loss for the GL you are defining into: Trading P&L – P&L due to revaluation of foreign currency transactions during the day. Revaluation P&L – P&L due to revaluation of opening balances (balances without current day’s turnover). The following example compares the accounting entries posted when you do not choose to split revaluation profit/loss and when you do. Example An Asset GL to be revalued as per the following data. The account currency is USD and the local currency is EUR. The rates of EUR against USD are: st Rate as of 1 Jan 2001: 1.2 Rate as of 2 nd Jan 2001: 1.3 rd Rate as of 3 Jan 2001: 1.4 Before Revaluation Date 01-JAN2001 Opening Balance Daily Turnover Closing Balance FCY LCY EQ. FCY LCY EQ FCY LCY EQ 1000 1100 Nil Nil 1000 1100 st Since there are no FCY transactions on 1 Jan 2001, the opening balance is the same as the closing st balance. But the closing rate as of 1 Jan 2001 is 1.2. Hence new LCY Equivalent on 1st Jan should be: 1000 * 1.2 = 1200 EUR. (Gain of 100 EUR) Since there is no daily turnover, the P&L due to trading is nil and all the P&L arising out of the revaluation is accounted to the Revaluation P&L GL. Hence the entries posted are. Debit. Asset account with 100 EUR Credit. P&L account with 100 EUR. After Revaluation Date Opening Balance Daily Turnover Closing Balance FCY FCY FCY LCY EQ. LCY 3-9 LCY EQ Date Opening Balance Daily Turnover Closing Balance EQ 01-JAN2001 On 2 nd 1000 1100 Nil Nil 1000 1200 Jan 2001, consider the following scenario. Before Revaluation Date 02-JAN2001 Opening Balance Daily Turnover Closing Balance FCY LCY EQ. FCY LCY EQ FCY LCY EQ 1000 1200 100 140 1100 1340 nd There is an FCY transaction on the 2 of January with a FCY amount of 100 and LCY Equivalent is 140. nd Because of this transaction, the closing balance as of 2 Jan are 1100 FCY and 1340 LCY. But the rate as of 2 nd Jan is 1.3. Hence the new LCY equivalent is 1100 * 1.3 = 1430 EUR. (Net Gain of 90 EUR) Since there is a FCY transaction, the P&L arising out of this transaction would have to be allocated to trading. For that the revaluation of the opening balance is done with today’s rate. Hence the LCY Equivalent of the opening balance at today’s rate: 1000 * 1.3 = 1300 (Gain of 100 EUR) The accounting entries posted are Debit Asset account with 100 EUR Credit P&L account with 100 EUR. Now, the revaluation of the today’s FCY entries is performed. The LCY Equivalent of the FCY entry at today’s rate is: 100 * 1.3 = 130 (Loss of 10 EUR) The entries posted are: Credit Asset account with 10 EUR Debit Trading P&L account with 10 EUR. 3-10 After Revaluation Date 01-JAN2001 Opening Balance Daily Turnover Closing Balance FCY LCY EQ. FCY LCY EQ FCY LCY EQ 1000 1200 100 140 1100 1430 Hence the net effect because of the two revaluation processes is : Debit Asset account with 90 EUR Credit P&L account with 100 EUR Debit Trading P&L account with 10 EUR. The revaluation splitting is done for revaluation-into GL’s also. Refer the chapter ‘Account Revaluation Maintenance’ in the Core Services User Manual for further details about revaluation. 3.2.1.1 Indicating Profit and Loss Revaluation Details EOD Reval Of FCY Entries (Single Entry) Journal entries that do not have an offset entry cannot be revalued using the EOD revaluation of FCY entries option. Enable this option if such journal entries are to be revalued. EOD Reval Of FCY Entries (Entry Pair) As part of the End of Day processes, before the account revaluation batch process executes on a given business day, the revaluation batch process for performing accounting entry-based revaluation for FCY entries in Income/Expense GLs is run. This process performs entry-based revaluation for those Income/Expense GLs for which such revaluation has been indicated in the Chart of Accounts. You can enable this option to indicate that the entry wise revaluation of FCY entries posted during the day should be performed during the EOD processes, for each entry pair in the same FCY. EOD Reval Of FCY Reversals Enable this option if the revaluation of reversal entries has to be performed as part of the EOD processes. If you leave this box unchecked, the reversal entries will be posted with the Exchange Rate as of event date. As mentioned earlier, if entry-based revaluation is indicated for a GL, the FCY Entries Revaluation batch, which executes before the normal revaluation batch, will perform the revaluation for the GL. Refer the Entry-based Revaluation of Income/Expense GLs section for detailed information on the entry-based revaluation batch. 3-11 Repost FCY Entries in LCY While defining Income or Expense type of Leaf GL’s you can indicate whether FCY entries have to be reposted as LCY entries during the EOD processes by checking this option. If you enable this option, you must trigger the GL Reporting Batch (ACIDPRVL) as part of the EOD processes to post FCY entries in LCY. While doing this you should consider the logical order of revaluation as well as intraday posting processes. The exchange rate at which the original FCY entry was posted is used for reposting in LCY. Refer the Reposting of FCY entries for Realized P&L GL’s in LCY section for detailed information on the batch. The revaluation parameters that you set for a GL cannot be modified after it is authorized. Intraday Posting GL You can choose to post FCY income/expenses booked during the day into a balance sheet GL and have them transferred to the P & L GL after revaluation at the EOD exchange rate. Profit or loss due to this revaluation is posted in LCY equivalent with ‘0’ FCY postings. While defining an Income/Expense GL in the Chart of Accounts screen, you can specify an intraday GL into which FCY entries posted into this GL are to be transferred. This designated Intraday GL should be of Asset/Liability type. The option of specifying an intra-day GL is allowed only for Income/Expense GLs. Another precondition is that either or both of EOD Reval of FCY Entries options should be enabled. Given below is an example that illustrates the entries that are posted if you choose to post income/expense entries into an intra-day GL. Example Entry Pair Transaction During the day Dr/Cr Acc. /GL Amount Rate LCY Equivalent Debit Customer 100 USD 110 11,000 JPY Credit Intra Day Positing GL 100 USD 110 11,000 JPY End of Day: If the end-of-day rate is 1 USD = 120 JPY, the following entries are passed (event: IDPL): Dr/Cr Acc. /GL Amount Debit Customer 0 USD Rate LCY Equivalent 1000 JPY 3-12 Dr/Cr Acc. /GL Amount Rate LCY Equivalent Credit Intra Day Positing GL 0 USD Debit Intra Day Posting GL 100 USD 120 12,000 JPY Credit P/L GL 100 USD 120 12,000 JPY 1000 JPY Single Entry Transaction: The entries posted during the day are: Dr/Cr Acc. /GL Amount Rate LCY Equivalent Credit Intra Day Positing GL 100USD 110 11,000 JPY The entries posted at the end of the day are (event: IDPL): Dr/Cr Acc. /GL Amount Rate LCY Equivalent Debit Exchange P/L 0 USD 1000 JPY Credit Intra Day Positing GL 0 USD 1000 JPY Debit Intra Day Posting GL 100 USD 120 12,000 JPY Credit P/L GL 100 USD 120 12,000 JPY Processing features You need to run a batch process at EOD from the following functions: Revaluation of the entry/entries posted into the intra-day GL using the EOD exchange rate. Moving the intra-day GL balances into the actual income/expense GLs. If you have defined an intra-day posting GL for the Income/Expense GL that you are defining, then all entries meant for the latter throughout the day (starting with the BOD batch processes) are transferred into the intra-day GL. This continues till you run the batch process to post intra-day entries into the actual Income/Expense GL. Subsequent entries get posted directly into the actual Income/Expense GL. The revaluation entries are posted with the same Contract Reference and Event Sequence as that of the original entry. The entries are posted with respective event codes for entry-pair and single entry. Thus, for entry-pair the entries are posted using the event RVEP whereas for single entry, entries are posted using the event RVSE. The revaluation accounting entries for the contract can be seen from the accounting entry view in the contract online. Currency Restrictions You can specify currency restrictions only for Internal GLs. In effect, you indicate the currencies in which postings can be made to the GL. The options available are: Single currency 3-13 All foreign currencies All currencies By default, you will be able to post entries of transactions in all currencies into a GL. If you indicate Single currency then you should also indicate the specific currency in which transactions can be posted to the GL. If you indicate ‘All’ foreign currencies then you can post entries of all transactions in any currency other than the local currency of your bank. If you select ‘All’ currencies then no currency based restriction is applicable for transactions posted to the GL. 3.2.1.2 Indicating Position Account Details Positioning Required You can retrieve the position of a foreign currency, any time, by opting for Position Accounting in your bank. When you opt for position accounting, you maintain a Position GL and a Position Equivalent GL for every foreign currency maintained in your bank. The Position GL reflects the current position in the currency. You can opt for position accounting while indicating your preferences in the Bank-Wide Parameters screen. If you opt for position accounting while defining Bank-Wide Parameters, you can maintain Position GLs and Position Equivalent GLs for every foreign currency that your bank deals in. When maintaining the GLs in your bank, you can opt to link the different currencies, associated with the GL, to: The Position GLs that you have specified for the currency (Your specifications in the Currency Definition screen will default here), or Position GLs of your choice In the GL Category field, indicate if you are maintaining a Position GL or a Position Equivalent GL. The position accounting happens event and entry pair-wise. Each entry is considered. If any currency mismatch is found then position accounting for each posting pairs are considered for position accounting. Example You have initiated an FT transaction where account is denominated in USD but the transfer amount is EUR. Charge is calculated in USD. In this case, the system will pass position entries for transfer amount as well as charge amount. If transfer happens in USD from an USD account while charge is settled in EUR from an EUR account number position entry will be posted as no currency mismatch exists. 3-14 Display on Report With When you maintain a Position GL, you can define the manner in which you would like the currency position to be reported in the Currency-Wise Position report. In the Display on Report With field, under Position Accounting Details, indicate if you would like the currency position to be reported under one of the following: The head Asset The head Liability Under a separate head (that is, separately, as Currency Position) Branch Restrictions You have the option to indicate branch restrictions for an internal leaf GL. By default, both the Head Office and the branches of your bank can post and view entries made to a GL. You can allow the Head Office, the branches of your bank or both to post entries to a GL. If you indicate Branch GL, only the branches of your bank can post entries to the GL. The Head Office can however view the accounting entries passed to Branch GLs. If you specify Head Office GL then only the Head Office can post entries to the GL. The branches can however view the entries posted to a Head Office GL. It is important to note that you cannot restrict specific branches from posting entries to a GL. Posting Restrictions Posting restrictions, like branch restrictions, can be specified only for internal leaf GLs. This is because, in Oracle FLEXCUBE, you can post entries only to internal leaf GLs. The posting of entries to an internal leaf GL can be direct or indirect. In the case of direct posting, accounting entries are posted directly to the Internal GL through Data Entry Module of Oracle FLEXCUBE. In case of indirect posting, accounting entries are passed into the GL from the various modules of Oracle FLEXCUBE, for example - a loan or a money market contract. Back Period Entry Allowed You can also choose to post back period entries to the GL by enabling the Back Period Entry Allowed option. If you choose not to restrict back period entries, you will be allowed to post journal entry transactions for the GL as long as the period is open. While posting back-valued transactions, the System verifies whether the Back Period Entry Allowed option has been enabled for the GL. If the option has not been enabled an error message is displayed. This check is also performed while uploading journal entry transactions. Reconciliation If the GL that you are creating belongs to the miscellaneous debit or credit type, you should indicate reconciliation preferences. The method in which entries posted to a GL can be reconciled could be one of the following: 3-15 Direct Split In the case of direct reconciliation, each debit entry is offset by the corresponding credit entry and vice versa (e.g. Manager’s Check). For Split reconciliation, one debit entry can be offset against multiple credit entries and vice versa (e.g. Sundry Debtors and Creditors). Revaluing unrealized P&L GLs in Oracle FLEXCUBE Using Oracle FLEXCUBE, you can compute and book the due income earned not collected and the expense incurred not paid into unrealised (memo) income/expense accounts in a specified currency. The revaluation process that performs revaluation of the total balance in the GL can be used to revalue unrealised Income/Expense GLs. The movement of entries from unrealized to realized GLs is performed at the contract level. 3.3 Specifying GL Linkages Click the tab titled GL Linkages from the Chart of Accounts screen to define linkages for the GL that you are defining. In the GL Linkages screen you maintain the following: the parent to which a GL should report the year-end profit and loss accounts into which balances would be posted 3-16 3.3.1.1 Indicating Parent GL Parent GL You can indicate the GL to which the current GL should report. This GL in effect becomes the parent of the current GL. You can select a parent GL from the option list available. The option list will contain only a list of Node GLs that you have already created. Category You can assign a Category only to a Head GL (a GL that does not report to another GL). If the GL that you indicated as the parent GL, is a Head GL the category assigned to it is also displayed. 3.3.1.2 Indicating Year-End Profit & Loss Accounts Profit A/C You can specify the accounts into which the year-end profit or loss entries for the GL should be posted. The profit account is the account into which all income GL account balances are posted at the end of the year. On the last day of the financial cycle all balances from the account are posted into the year-end profit account. You can select an account code from the option list available. Loss A/C The Loss account is the account into which all expense GL account balances are posted at the end of the year. On the last day of the financial cycle, all balances from the loss accounts are posted into the year-end loss account. You can specify the same GL for posting both your profits and losses. 3.3.1.3 Identifying Previous Year Adjustment GL Prev Yr Adj GL You can indicate the GL to which the previous year’s adjustment entries for unrealized income and expense are to be posted. As a result the system automatically posts adjustment entries between Unrealised Income/Expense GL and an Adjustment GL for the interest/commission accrued in the Previous year, as these would already have moved to the year-end P and L GL during financial closure. Adjustment entries are passed at the contract level to the effect that the improper balances on Revaluation Income/Expense GL’s on account of Reversal of Previous Day’s Revaluation entries (if there was a financial movement in between), get corrected. Given below is a set of sample entries: Accrual Debit/Credit Indicator Event Currency 3-17 Amount Debit/Credit Indicator Event Currency Amount Debit IENC USD 10 Credit Unrealized Income USD 10 Debit/Credit Indicator Event Currency Amount Debit Customer USD 10 Credit IENC USD 10 Debit Unrealized Income USD 10 Credit Realized Income USD 10 Liquidation Revaluation of unrealized P and L GLs is performed only for interest and commission entries and is therefore applicable for the Money Markets, Trade Finance (LC, BC), Securities and Derivatives modules of Oracle FLEXCUBE. 3.4 View GLs Hierarchical Position Click on the button titled Other GLs Linked to this Parent from the ‘Chart of Accounts’ screen to view the hierarchical position of any GL. 3-18 You can view the structural hierarchy of a GL based on two criteria: The GLs that are at the same level as the GL you are creating The GLs that report to the GL you are creating Example Let us assume that your GL Head of Overdrafts is structured as follows: Overdrafts (OD) AS190000 OD Clean AS190300 OD Working Capital AS190100 OD - Stocks AS190101 OD - Book Debts AS190102 OD Others AS190400 OD - Employees AS190201 OD Retail Lending AS190200 OD - Shares AS190202 OD - Mortages AS190203 Suppose AS190100 is on display in the field GL Code. On choosing the other GLs linked to this parent option, the following list will be displayed: GL Code GL Description AS190200 OD Retail Lending AS190300 OD Clean AS190400 OD Others If you click on Child GLs for the Current GL the following list will be displayed: GL Code GL Description AS190101 OD Stocks 3-19 GL Code GL Description AS190102 OD Book Debts Thus by clicking on the second option under hierarchy level, you can view the list of GLs that report to the current GL. To understand the sequence of steps involved in creating a new GL structure, let us take an example: Example Assume you are creating an asset Head GL for bank balances held with other banks. Your GL mask is defined as NNNNNAAAD in the Bank-wide Parameters screen. You assign a GL code 50000ASS D to the Head GL. D is the last element of the code, which is system generated and is called the check digit. It will be an alphabet of the English language if it is represented in the mask as d and will be numeric if it is represented as D. Under GL 50000ASS, you want to create two sub-GLs - 50100ASS representing balances with Federal Reserve Bank and 50200ASS representing balances with Commercial banks. Under sub-GL 50200ASS stand two GLs -- 50201ASS and 50202ASS representing balances with commercial banks in local currency and foreign currency respectively. The hierarchical structure of this GL tree is as follows: 50000ASSD 50100ASSD 50200ASSD 50202ASSD 50201ASSD To create this new GL structure, invoke the ‘Chart of Accounts’ screen, the ‘GL Linkages’ screen is displayed. Click new icon. A new screen with no prior inputs will be invoked. You can click on any of the four broad heads listed atop the screen to activate that screen. Follow the given sequence of steps: 3-20 Step 1: Step 2: Creating GLs which report to Head GL Create GLs by assigning code & description 50100ASS 50200ASS in GL Linkages table specify node or leaf 50100ASS - leaf 50200ASS - node specify the parent specify details for leaf GLs 50000ASS GL type Customer/ Internal GL Posting preferences Branch restrictions Currency restrictions ... 3-21 in GL Details table Step 3: Create GLs which report to second level GL and so on... 3.5 Indicating Statement Generation Details for GL For each new GL that you define in the Chart of Accounts, you may need to generate a periodic statement of accounts for transactions involving the GL. You can indicate whether a periodic statement of accounts needs to be generated for transactions involving the GL through the Statement Details sub-screen in the GL Chart of Accounts screen. To specify the statement related details click on the ‘Statement’ button in the Chart of Accounts screen. The ‘Statements Detail’ screen will be displayed. Account Statement Indicate that an account statement is to be generated periodically by the system for the particular account by specifying the format in which the statement is to be generated. The options available are: 3-22 Detailed – indicating that the statement should be a detailed account of all the transactions tracked against the particular GL Code Summary - indicating that only a summary of the transaction details is enough If you do not want a periodic statement of transactions involving the account, you can specify so by selecting the None option. Cycle Select the frequency at which the account statement should be generated from the adjoining drop-down list. This list displays the following values: Annual Semi-annual Quarterly Monthly Fortnightly Weekly Daily On Select the start date and month for the generation of the statement based on the frequency that you specify from the adjoining drop-down list. For a weekly generation of the account statement, specify the day of the week on which account statements should be generated. For a monthly generation of statement you can specify the day of month. To specify the day of the month for the monthly generation of statements enter a number between 1 and 31 (corresponding to the system date). If you set the statement date to 30, then account statements will be generated on: The last working day for months with less than 30 days th th For months with 30 days on the 30 day. If the 30 day is a holiday, it will be generated on the next working day st If you set the statement date to the 31 of the month, account statements will be generated on: st The 31 , for months with 31 days The last working day for months for months with less than 31 days For all other cycles, the account statement will be generated on the last day of that cycle. Based on the preferences that you specify, the system generates a statement of accounts automatically, as part of the end of cycle processing. 3-23 Generate Choose to generate the statement of accounts only when there has been a movement of funds into the account or when funds have been transferred out of the account. st For instance, let us assume that on the 21 of August 2001, you have set the account statement th generation frequency as Daily for the account LI0202308. On the 5 of September 2001, there has been no movement of funds in the particular account. If you have opted for the Generate th Only on Movement option the system will not generate a statement message for 5 Sept 2001. You can also choose to generate the statement of accounts regardless of whether or not there has been a movement of funds to and from the account. Statement Required There may be times when you would have maintained the relevant account statement details for a particular GL. However, you would like to generate the account statements only a month or two later. You can choose to stall the generation of account statement for a temporary period of time by keeping the statement required check box unchecked. To enable the generation of account statements you can unlock the contract and uncheck this box to re-start the generation of messages. Media Identify the media through which the account statement is to be sent to the receiver. A list of all the different types of media maintained in the Media Maintenance screen will be displayed in the option list positioned next to this field. You can select the appropriate media from the available choices. Address You may need to send account statement details to your Federal Reserve for statutory reporting purposes. While maintaining account statement details for a GL you can capture the mailing address of the receiver of the account statement details. The address that you specify in the first line will be used for correspondence with the party concerned. 3.6 Maintaining Clearing Account Numbers for Internal GL’s For an internal Leaf GL you can maintain the Clearing Account number to be used for outgoing payments where the internal GL is the remitter account. Click ‘IBAN Account Number’ button in the ‘Chart of Accounts’ screen. The ‘Additional Information’ screen is displayed. 3-24 In this screen, you can specify the Clearing Account Number for the GLand the Bank Code of the GL. If a Clearing Account maintained for a GL is found in an uploaded incoming payment the System resolves the actual GL for the payment as per your maintenance in this screen. If the IBAN Number maintained for a GL is found in the incoming payment the System resolves the actual GL as per your maintenance in this screen. 3.7 Reposting of FCY Entries for Realized P&L GLs in LCY If you have indicated that the entries posted to realized income and expense GL’s in FCY are to be posted in LCY, you must trigger the Batch Program during the EOD processes whereby all FCY entries for such GLs are reposed as LCY entries. The reposted entries are posted against the RPOS event but they will have the same Transaction Reference and Event Sequence number as that of the original transaction. Example Given below are samples of entries, which will be posted, when the Repost FCY Entries in LCY option is enabled for a specific GL. During the Day Account Currency FCY Amount LCY Amount Dr/Cr Indicator Customer USD 100 400 Debit INC1 USD 100 400 Credit During Revaluation Account Currency FCY Amount LCY Amount Dr/Cr Indicator INC1 USD - 10 Credit Reval P&L USD - 10 Debit During EOD (Entries for reposting) Account Currency FCY Amount LCY Amount Dr/Cr Indicator INC1 USD 100 400 Debit INC1 PLN - 400 Credit 3-25 Account Currency FCY Amount LCY Amount Dr/Cr Indicator INC1 USD - 10 Debit INC1 PLN - 10 Credit To trigger the batch process invoke common batch function and choose GLREPDLY as the function id and execute, which will post FCY entries in LCY for those GL for which the Repost FCY entries in LCY option has been enabled. 3.8 Entry-based Revaluation of Income/Expense GLs As part of the End of Day processes, before the account revaluation batch process executes on a given business day, the revaluation batch process for performing accounting entry-based revaluation for FCY entries in Income/Expense GLs is run. This process performs entry-based revaluation for those Income/Expense GLs for which such revaluation has been indicated in the Chart of Accounts. If transaction entry happens on STANDARD rate then the system does not post any revaluation, even though you have enabled revaluation for the GL, It executes according to the sequence of processes as shown below: Entry-pair revaluation Single entry revaluation Reversal revaluation Entry-pair Revaluation First, the FCY accounting entries passed during the day into Income/Expense marked for entrybased revaluation are revalued, using the revaluation rate for the rate type defined in the Account Revaluation Maintenance for entry-based revaluation. The revaluation is done only for entry pairs in respect of which: both the main and offset entries are in the same FCY the FCY amount is greater than zero The revaluation offset entry is posted to the Account/GL of the actual offset entry of the transaction in respect of which the FCY entries were passed. The offset Account/GL is identified based on the Contract Reference Number, Event Sequence Number and Amount Tag combination, and the revaluation entries are posted with the same Contract Reference Number and Event Sequence Number as the original entry. The event code RVEP is used to pass the entries. Appropriate position entries are also passed. 3-26 Single Entry Revaluation After the entry-pair revaluation, the journal FCY accounting entries (that is, entries without corresponding offset entries) passed during the day are revalued, using the revaluation rate for the rate type defined in the Account Revaluation Maintenance for entry-based revaluation. Only those entries with FCY amounts greater than zero are revalued. The revaluation offset entry is posted to the Profit/Loss GL maintained for the revalued GL in the Account Revaluation Maintenance, with the same Contract Reference Number and Event Sequence Number as the original entry. The event code RVSE is used to pass the entries. Appropriate position entries are also passed. Reversal Revaluation Revaluation of FCY reversal entries into Income/Expense GLs is done for those GLs for which such revaluation has been indicated, in the Chart of Accounts. If an entry is posted into an Income/Expense GL’s with a negative amount, it is considered a reversal entry. All reversal entries are ordered according to: Contract Reference Number Event Sequence Number (Reversal event sequence number) Debit / Credit Indicator Amount Tag Account The entries are consolidated according to amount tags, and the resultant net amounts are revalued using the revaluation rate for the rate type defined in the Account Revaluation Maintenance for entry-based revaluation. The revaluation offset entry is posted into the FX Profit/Loss GL defined for the revalued GL in the Account Revaluation Maintenance, with the same reference number and the event sequence number of the reversal event, with the event code RVRL. Since the revaluation offset entry in each case is passed with the reference number of the original transaction, the relevant MIS updates are also made just as is done for the original transaction. The reversal revaluation entries can be viewed in the LCY statement for the revalued Income/Expense GLs. 3.9 Linking GL to Position or Position Equivalent GL When defining a GL in the Chart of Accounts, you must link all the foreign currencies linked to a GL to a Position GL, and a Position Equivalent GL if you have opted for position accounting in the Bank Wide Parameters screen. 3-27 If you do not want position accounting for a particular GL, do not choose the Positioning required option under Position Accounting Details in the Chart of Accounts. Click ‘Positioning GL Maintenance’ button in the ‘Chart of Accounts’ screen. The ‘Position GL Maintenance’ screen is displayed. In this screen, you can: Choose the currency of the GL Indicate the corresponding Position GL and the Position Equivalent GL defined for the Currency, or a Position GL of your choice. You can choose to retain the Position GL that defaults (according to your specifications in the Currency Maintenance screen), or indicate a Position GL of your choice. You should maintain Position GLs before you can identify one for a GL that you are maintaining. 3.10 Specifying SWIFT BIC Information for Leaf GL For a leaf GL, you can link the SWIFT BICs representing the sender entities that are authorized to specify the GL account as the debit account for a funds transfer transaction. While uploading an incoming SWIFT payment message, and deriving the debit and credit accounts, the Oracle FLEXCUBE Straight Through Processing (STP) process checks whether the given Sender SWIFT BIC is authorized to specify a the Leaf GL as the Debit Account for incoming SWIFT payment messages. To specify the Sender SWIFT BIC information for a leaf GL, click ‘BIC’ button in the ‘Chart of Accounts’ screen. The WIN BIC screen is opened, where you can specify the SWIFT BICs of the Sender entities that are authorized to specify the leaf GL as the Debit Account as the Debit Account for incoming SWIFT payment messages. 3-28 For details about how Oracle FLEXCUBE processes incoming SWIFT payment message transactions and for details about the STP process, consult the Funds Transfer user manual. 3-29 4. Maintaining Reporting Line Structure 4.1 Introduction To recall, in the Chart of Accounts screen, you define a GL and set up a GL hierarchy for your bank. We shall call this hierarchy the regular GL structure of the bank. Your Head Office or Federal Reserve may desire to have the balance sheet and profit and loss account categorized in a structure that is different from the regular GL structure of your bank. Oracle FLEXCUBE offers you the flexibility of defining an alternate reporting structure for Head Office and Federal Reserve reporting purposes. This is achieved by setting up reporting lines. The heads of financial information required for your Head Office and Federal Reserve are defined as Reporting Lines. Each of these lines is assigned a unique code. After you have set up reporting lines, you can indicate the GLs that should report to the line. Ideally, you should first set up the Head Office and Federal Reserve lines and then define the regular GL structure for the bank. The advantage is that when defining the regular GL structure, you can indicate the Head Office or Federal Reserve line to which a GL should report. In the Reporting Line Maintenance screen, you can define reporting lines (heads of financial information) and indicate an alternate reporting structure for your Head Office and Federal Reserve. To invoke this screen, click on General Ledger in the Application Browser, select Reporting Lines and click on Detailed under it. You can also invoke this screen by typing ‘GLDLINE’ in the field at the top right corner of the Application tool bar and clicking on the adjoining arrow button. To create a new reporting line structure, click new icon. In this table, you capture the following for your Head Office and the Federal Reserve reporting lines: 4-1 The branch code A code to identify the reporting line A description of the line The type of line — Head Office or Federal Reserve Category specified for this line — asset, liability, income, expense, etc. The type of line – Node or Leaf The parent line code for this reporting line The reporting lines that you create are, for alternate reporting. Alternate reporting is required when the GL structure defined for the balance sheet of the Head Office or the Federal Reserve are different from the GL structure created by your bank. The order in which the GL categories - Asset, Liability, Expense, Income, Contingent Asset, Contingent Liability appear in the balance sheet cannot be changed. However, under a category you can redefine the position of the various GL heads and shift a head from one GL category to another, if required. For all practical purposes, GL heads appear in order of their numeric sequence number assigned. Federal Reserve and Head Office reporting lines can be created only at the Head Office of your bank. 4.1.1 Creating New Reporting Line Structure To understand the sequence of steps involved in creating a new reporting line structure, let us take the following example: Example Requirement Assume you need to create a reporting line for your Head Office, representing investments of your bank. Under the head Investments, your Head Office wants information classified under financial investments and business investments. Further, under business investments, you require to report holdings in subsidiaries and holdings in associates. Solution To create this new reporting structure, invoke the Reporting Lines Maintenance screen. First create the Head Reporting Line. In our example, it is Investments and assign it a description and a category - asset. Leave the parent details blank, since this does not report to another line. Then create the lines at the second level, Financial investments, and Business investments. Indicate Investments as the Parent line for both these lines. Thereafter, create the third level of GLs holdings in subsidiaries and holdings in associates respectively. Specify their parent line as Business investments. The category assigned to the Parent Line is defaulted. 4-2 The hierarchical structure of this Head Office reporting line would be as follows: INVESTMENTS Business Inv. Financial Inv. Holdings in subsidiaries Holdings in Associates 4.1.2 Linking GL to Reporting Line After you have defined Federal Reserve and Head Office lines, you can indicate the leaf GLs that should report to the line. While creating a GL, you can indicate the Federal Reserve or Head Office line to which it should report. Click on the ‘Reporting Lines’ tab on the ‘Chart of Accounts Maintenance’ screen to indicate the reporting lines to which leaf GLs should report. A GL that you create can report to Federal Reserve and Head Office reporting lines. 4.1.2.1 Associating GL with Federal Reserve Reporting Line For Federal Reserve reporting purposes, you should associate a GL with a debit and credit reporting line. 4-3 Debit Line The Federal Reserve debit line indicates the line to which an account under a GL should report, if in debit. Credit Line Similarly, you can indicate the line to which an account under a GL should report, if in credit. You can select a reporting line from the option list. The option list will contain a list of all the lines maintained in the Reporting Line Maintenance screen. The description of each specified reporting line appears alongside the line number. The debit and credit reporting lines you define for a leaf can be the same. 4.1.2.2 Associating GL with Head Office Reporting Line In order to include a GL under a Head Office reporting line, you should associate it with debit and credit reporting line. Debit Line The Head Office debit line indicates the line to which an account under a GL should report, if in debit. Credit Line Similarly, you can indicate the line to which an account under a GL should report, if in credit. You can select a reporting line from the option list. The option list will contain a list of all the lines maintained in the Reporting Line Maintenance screen. The description of each specified reporting line appears alongside the line number. The debit and credit reporting lines you define for a leaf can be the same. After you have made the required entries save the entries. 4.1.3 Maintaining Transaction Code Restrictions for GL Entries You can maintain restrictions on transaction codes so as to allow/disallow their use in GL entries using the ‘Transaction Code Restriction for Journal Entry’ screen. 4-4 Click ‘Restriction’ button within the ‘Chart of Accounts Maintenance’ screen to invoke this screen. Specify the following details here: GL Code Specify a code for the transaction code restriction being maintained. Restriction Type Indicate the type of restriction being maintained. You can select one of the following options. Allowed Disallowed Transaction Codes Here you can specify the transaction codes for which the restriction is being maintained and also the nature of transaction to which the restriction is applicable. Txn Code Specify a valid transaction code on which the restriction needs to be maintained. The adjoining option list displays all valid transaction codes maintained in the system. You can select the appropriate one. 4-5 Transaction Description The system displays the transaction description. Dr Check this box to indicate that the restriction is applicable to debit transactions. Cr Check this box to indicate that the restriction is applicable to credit transactions. You can maintain restrictions only for ‘Leaf GL’ and ‘Internal GL’ combinations with ‘Posting Restrictions’ set to ‘Direct Posting’. 4-6 5. Defining Alternate Reporting Lines 5.1 Introduction Oracle FLEXCUBE offers you the flexibility to define alternate reporting lines for Head Office and Federal Reserve reporting purposes. If your bank has a network of branches spread over several countries, you can opt to maintain Federal Reserve (CB) lines at the branch level. This means all branches or Regional Offices can maintain CB lines. In the Reporting Line Maintenance screen you can define reporting lines (heads of financial information) and indicate an alternate reporting structure for your Head Office or Federal Reserve depending on which branch of the bank you are working at. For instance, if you are operating from the Head Office (HO) level, you will be allowed to define both HO and CB lines. However, if you are working at the branch level, you can only define CB lines. You can invoke the ‘Reporting Line Maintenance’ screen by typing ‘GLDLINE’ in the field at the top right corner of the Application tool bar and clicking the adjoining arrow button. To create a new reporting line structure, click new icon. The ‘Reporting Line Maintenance’ screen will be displayed without any details except for the ‘Branch Code’ field. Here the code assigned to the branch where you are currently working will be defaulted. You will not be allowed to change the branch code. The other details that you need to specify for your Head Office and Federal Reserve reporting lines are as follows: a code to identify the reporting line a description of the line the type of line - Head Office or Federal Reserve category specified for this line - asset, liability, income, expense etc the parent line code for this reporting line 5-1 For detailed information on how to create a new reporting line structure, refer to the chapter on Maintaining a Reporting Line Structure of the General ledger module. 5.1.1 Linking GL to CB Line Once you define Federal Reserve lines, you can indicate the leaf GL that should report to the line. If you are working at the Head Office, you can specify this linkage under the Reporting Lines section of the Chart of Accounts screen. At the branch level you need to indicate this linkage in the GL Code to CB Line Linkage screen. You can invoke the ‘GL Federal Reserve Line Linkage Maintenance’ screen by typing ‘GLDGLLN’ in the field at the top right corner of the Application tool bar and clicking the adjoining arrow button 5.1.2 Indicating CB Debit Line and CB Credit Line The CB Debit Line indicates the line to which an account under a GL should report, if in debit. Similarly, you can indicate the line to which an account under a GL should report, if in credit. You can select a reporting line from the option list. The option list will contain a list of all the lines maintained in the Reporting Line Maintenance screen. The description of each specified reporting line appears alongside the line number. The debit and credit reporting lines you define for a leaf can be the same. 5.1.3 Operations on GL Code to CB Line Linkage Record Apart form defining a new linkage you can perform any of the following operations (if any icon is disabled in the application toolbar, it means that the function is not allowed for the record) on an existing record. Amend the details of a record Authorize a record Close the record Reopen the record 5-2 Print the details of the record Delete the details of the record For details on these operations refer to the Oracle FLEXCUBE User Manual on Common Procedures. 5.2 Linking GL to MIS Class By linking a GL code to an MIS class you can generate GL reports in which the balances are reported against the entries defined in the linkage. The advantage of a GL to MIS linkage is that it helps you group information under different MIS entities. The advantage in linking a GL to an MIS class is that the reported information will be grouped based on the MIS Class specified during linkage. You can invoke the ‘GL MIS Linkage Maintenance’ screen by typing ‘GLDREP’ in the field at the top right corner of the Application tool bar and clicking the adjoining arrow button If you are maintaining a new GL-MIS Linkage, click new icon. The ‘GL MIS Linkages’ screen will be displayed without any values. 5.2.1 Operations on GL MIS Linkages Record On an existing GL MIS Linkages record, you can perform any of the following operations (if any icon is disabled in the application toolbar, it means that the function is not allowed for the record): Amend the details Authorize the addition or amendment of a record Copy the details record to another 5-3 Close the record Reopen the record Print the details of a record Delete the addition of a record Refer to the manual on common procedures for details of these operations. 5-4 6. GL Report Classification on MIS Class 6.1 Introduction In order to manage cumbersome information, you can classify it under broad heads called classes. An MIS Class is an entity based on which you can classify information relating to customer and internal general ledgers. Based on your requirement, you can categorize information under MIS classes. Each class is assigned a code based on which you can retrieve information. A class can have several categories under it, for example, under a class called business segment you can have further sub-classifications represented by categories, like, big business, small-scale industries, business for charity etc. This classification into MIS classes helps to manage efficiently information related to GLs. Example Requirement: Assume you want to have a consolidated report of all the loans disbursed from your bank. You also want to classify the loans into short term, medium term, and long term loans. However, for information management purposes you want to further classify information of these GLs and sub-ledgers based on: The type of customer to whom the loan disbursed are categorized, could be: Individual Corporate Banks and Financial Institutions The industry to which the customer belongs, for instance, Fisheries Agriculture Manufacturing Software The aim is to see that the GL structure does not become unwieldy and difficult to work with. Solution You can set up a GL called Loans. All loans disbursed from your bank will be consolidated at this GL. You should further set up sub-GLs to classify loans into short term, medium term, and long term loans. We have already defined two GL levels. Instead of adding more GLs and making the structure complex, you can use the MIS class categorization to further classify information. 6-1 Therefore, you should set up two MIS classes called Customer Type and Industry type. You can have the MIS Codes Individuals, Banks, Corporate, Financial Institutions reporting to the class Customer Type. You can associate the MIS codes, Fisheries, Agriculture, Manufacturing, and Software to the class Industry Type. This helps simplify the GL structure of the bank and serves the purpose of providing you the classified information that you require. MIS classes can be created only at the Head Office of your bank. In order to maintain MIS classes, you need to invoke the ‘MIS Class Maintenance’ screen by typing ‘GLDCLASS’ in the field at the top right corner of the Application tool bar and clicking on the adjoining arrow button. In this screen, you can define various categories based on which reports on general ledgers should be classified. To maintain details of a new MIS class, click new icon Here you can maintain the following details: MIS class In Oracle FLEXCUBE, each MIS class that you maintain is identified by a unique nine-character code called a Class Code. You can follow your own convention for devising this code. 6-2 Description You can specify a short description that will enable you to identify the MIS class quickly. The short description that you specify is for information purposes only and will not be printed on any customer correspondence. MIS Type An important detail in defining an MIS class is to specify the type of class that you are creating. The MIS class type identifies the basic nature of the class. In Oracle FLEXCUBE you can set up the following type of MIS classes: Transaction class — A transaction class refers to all transactions that have taken place through any of the front-end modules like foreign exchange, money market etc. Customer Class relates to customer accounts. Customer class — Select this option if you are defining a customer-based classification. Composite class — Choose this option to indicate that the MIS class can be used both at customer definition and at the time of processing a transaction. Fund class — Refer to the Core Services User manual for details on setting up a Fund MIS class This is the basic feature of a class and will determine the type of MIS codes that can constitute the class. For each of these MIS types you can create a maximum of ten classes. Mandatory Using this field, you can indicate whether entering an MIS code is mandatory for a particular MIS class or not. Whenever any transaction is stored, the system checks if an MIS code is supplied for this MIS class invoked in the transaction. MIS Codes Under a class, you can indicate the sub-divisions that should be reported under the class. Each of the sub-classes is given unique code identifiers. The MIS codes that you associate with a class will fall under the class at the time of reporting or consolidation. Click add icon to associate an MIS code to a class. To remove an MIS class from the list, place your cursor in that row and click delete icon. The MIS codes that you associate will depend on the Type of MIS Class that you are creating. While setting up the details of a customer, you can associate the customer to a customer type MIS Code. Therefore the set up serves more for management purposes and makes the management of GLs simple and easy. Saving the record Click save icon to save the record. Click delete icon to exit without saving the details that you entered. An MIS Class that you have created will be available for use only after it has been authorized by a user bearing another ID. 6-3 Similarly, you cannot make any modifications to a Class or Category until the previous modification made, has been authorized. After you have made the required entries, click ‘Exit’ button to exit the screen. You will be returned to the Application Browser. 6.2 Maintaining GL Branch Parameters You can maintain branch level parameters that govern the processing of GL in a particular branch of your bank through the General Ledger Branch Parameters screen. You can invoke the ‘General Ledger Branch Parameters Maintenance’ screen by typing ‘GLDBRPRM’ in the field at the top right corner of the Application tool bar and clicking the adjoining arrow button. The General Ledger Branch Parameter screen will be displayed. You will need to maintain the following branch details: 6.2.1.1 Defining Branch Identification Details Branch Code In Oracle FLEXCUBE, each branch of your bank is identified by a unique three-character code called the branch code. This code will be displayed upon invoking the screen. Description The description of the branch will be displayed by default when the screen is invoked. You can also specify the name that identifies the branch. 6.2.1.2 Defining Batch Processing Details You can define Batch Processing Details in way detailed below. 6-4 MIS Average Balance Retention Days The MIS average balance details will be retained in the system only for those numbers of days you mention in this field. The Retention day is entered always in terms of days and is greater than the system date. General Ledger Average Balance Retention Days The GL average balance details will be retained in the system only for those numbers of days you mention in this field. The Retention day is entered always in terms of days and is greater than the system date. When a GL-MIS average balance report is requested for a date beyond the retention date, the system will display an error message stating that the data is not available. Account Statement Retention Days The Customer Account Statistics will be retained in the system only for those numbers of days you mention in this field. Specify the retention days in terms of days and which is greater than the system date. All records older than the period that you specify are purged as part of the purge process. The purge process should be initiated manually. The current period data is not purged. General Ledger MIS Process Days Those events, which have to be triggered automatically, will be processed accordingly during batch process. You have the option to specify whether the batch process should be processed as part of the EOD process till the next working date - 1 day or not. Check the box to indicate that the processing has to be done till the next working date - 1 day. Leave the box unchecked to indicate otherwise. General Ledger Average Balance Process Days Computation of Average Balance can be based on the Next Working Day-1 or System Date. If the average balance calculation basis is NWD-1, the balances of holidays are included in the previous working day. If the calculation basis were System Date, the balances of holidays are included on the next working day provided the next working day is in the same period. If the basis is System Date but the next working day is in the next period, the holidays are considered during the current run. 6-5 7. Enterprise GL Integration 7.1 Introduction Oracle FLEXCUBE when deployed in a bank as a product processor allows extraction of accounting data from its core GL system and mapping of the same to an enterprise GL which is external to the system. Oracle FLEXCUBE GL collates the accounting entries from all the modules within Oracle FLEXCUBE and transmits the relevant information to the Data Extraction layer. This layer further interfaces with the external adapter which processes the data as per the requirements of the external GL and transmits the same to it. 7.2 Enterprise GL Extraction Infrastructure Data extraction process is an End of Day process which is executed during the End of Financial Input stage. In this stage the system consolidates the accounting entries from different modules and passes them on to the extraction layer. Accounting entries related to revaluation and the year end profit and loss transfer are not included in the data extraction process. All the other accounting entries are transmitted. After the data extraction is complete, a notification is triggered in Oracle FLEXCUBE to indicate that the data is ready to be processed by the Adapter Layer. On receiving this notification the Adapter Layer would start process the accounting data provided by the extraction layer, according to the requirement of the enterprise GL. 7.2.1 Maintaining Enterprise GL Parameters Enterprise GL parameters can be captured in the ‘Enterprise GL Parameters’ screen .This is a head office (HO) level maintenance screen where only one set of Enterprise GL Parameters is allowed. Hence, this screen allows you to maintain only one record at the HO Branch level. You can invoke the ‘Enterprise GL Parameters’ screen by typing ‘EGDGLPRM’ in the field at the top right corner of the Application tool bar and clicking the adjoining arrow button. The following information can be captured in this screen. HO Branch Head Office branch code is defaulted to this field. You can not modify the value. 7-1 Reversal Indicator In cases where Enterprise GL systems are not able to accept negative numbers in the amount field, the reversal entries will be handled by flipping the accounting entry indicator (Dr/Cr) and always quoting an absolute number in the amount fields. Reversal Indicator provides an option to choose among flipping the accounting entry indicator or providing negative amounts. Consider Position Accounting Choose this option if you want the position accounting entries to be included for reporting. Bank Level Consol Handoff If you choose this option, the handoff creation process will be triggered only after the data extraction is completed in all the branches. Data extraction in Oracle FLEXCUBE will always be performed at branch level. Default Transaction Code Specify the transaction code that should be used to handle report accounting entries when there is a change in the customer account reporting GL. This change could be due to current balance movement or account status change or reporting GL maintenance change. A brief description of the chosen transaction code is displayed alongside. External Suspense GL During data extraction the system validates whether the accounting entries posted to the GLs are valid or not based on the branch and currency restrictions specified in the EGL Master screen. In case such violations are found the system will have to post those accounting entries in a separate suspense GL. You can specify the suspense GL that should be used to report such accounting entries, here This should be a valid external GL. You can select the appropriate suspense GL from the adjoining option list which displays all the GLs defined in the ‘EGL Master’ screen. 7.2.2 Specifying Enterprise GL Mapping Parameters You can map different combinations like the GL code and currency in Oracle FLEXCUBE to a GL in the Enterprise GL system. These parameters can be maintained for a given effective date and any modification made will be effective from corresponding business date. Change in the mapping will not have any effect on the historical information that has been already extracted or handed off. You can invoke the ‘Enterprise GL Mapping Parameters’ screen by typing ‘EGDMAPRM’ in the field at the top right corner of the Application tool bar and clicking the adjoining arrow button. 7-2 Mapping parameters can be chosen as any of the following fields: Effective Date The date from which mapping is effective is displayed here. This field is always defaulted to the application date and you can not change it. 7.2.2.1 Specifying Mapping Parameters Branch Code Check this option if you wish to include branch as on of the mapping parameters Transaction MIS The system displays all the transaction MIS classes defined in Oracle FLEXCUBE. However only the ones that have been defined as ‘mandatory’ in the MIS Class Maintenance screen will be enabled. Choose the class that you want to include in the mapping parameters. Customer MIS The system displays all the customer MIS classes defined in Oracle FLEXCUBE. However only the ones that have been defined as ‘mandatory’ in the MIS Class Maintenance screen will be enabled. Choose the class that you want to include in the mapping parameters Composite MIS The system displays all the composite MIS classes defined in Oracle FLEXCUBE. However only the ones that have been defined as ‘mandatory’ in the MIS Class Maintenance screen will be enabled. Choose the class that you want to include in the mapping parameters 7-3 7.2.3 Defining Enterprise GL Master You can define External GLs for a combination of Oracle FLEXCUBE attributes in the ‘EGL Master’ screen. This maintenance is effective date based and any modification made to the existing data will be effective from the date of modification. This screen is also a Head Office function. You can invoke the ‘Enterprise GL Master Maintenance’ screen by typing ‘EGDEGMST’ in the field at the top right corner of the Application tool bar and clicking the adjoining arrow button. Effective Date The application date of the Head Office is defaulted here on creation of any new record or modification to the existing data. GL Code Specify the Oracle FLEXCUBE GL Code which should be mapped to the External GL. The adjoining option list displays all the GL codes maintained in Oracle FLEXCUBE. You can choose the appropriate one. 7-4 Enterprise GL Enter a GL code to which you wish to map a Oracle FLEXCUBE GL. You can specify a GL maintained in the Enterprise GL system or a GL code to represent suspense GL (for posting violated accounting entries). Refer the section titled ‘External Suspense GL’ under ‘Maintaining Enterprise GL’ Parameters for further details on violated accounting entries. Currency Choose the currency that should be mapped along with the chosen Oracle FLEXCUBE GL to the External GL. The adjoining option list displays all the currency codes maintained in Oracle FLEXCUBE. You can choose the appropriate one. You can also choose or the wildcard ‘***’. 7.2.4 Specifying Values for Mapping Parameters Here you can select different MIS codes for the relevant MIS classes to be mapped to the External GL Code. Branch Code Select the appropriate branch code from the adjoining option list which displays all the branch codes defined in the system. Transaction MIS The system displays all the transaction MIS codes for the relevant transaction MIS classes defined in Oracle FLEXCUBE. You need to specify the appropriate MIS code against every MIS class listed. The adjoining option list displays all the MIS codes coming under the MIS class. Only the MIS classes selected in the ‘Enterprise GL Mapping Parameters’ screen will be enabled for selection. Customer MIS The system displays all the customer MIS codes for the relevant transaction MIS classes defined in Oracle FLEXCUBE. You need to specify the appropriate MIS code against every MIS class listed. The adjoining option list displays all the MIS codes coming under the MIS class. Only the MIS classes selected in the ‘Enterprise GL Mapping Parameters’ screen will be enabled for selection. Composite MIS The system displays all the composite MIS codes for the relevant transaction MIS classes defined in Oracle FLEXCUBE. You need to specify the appropriate MIS code against every MIS class listed. The adjoining option list displays all the MIS codes coming under the MIS class. Only the MIS classes selected in the ‘Enterprise GL Mapping Parameters’ screen will be enabled for selection. 7.2.4.1 Specifying Restrictions Posting Allowed By default this option will be selected. Uncheck this option if you want to impose a restriction. Branch Allowed/Disallowed From the set of available branches, you can maintain a list of Branches which are either allowed or disallowed for the external GL. 7-5 Select the required branch from the option list. You can add additional branches by clicking add icon. Accounting entries can be posted to this GL only from the branches selected here. Currencies Allowed/Disallowed From the set of available currencies, you can maintain a list of currencies which are either allowed or disallowed for the external GL. Select the required currency from the option list. You can add additional currencies by clicking add icon. Accounting entries can be posted to this GL only in the currencies selected here. 7.2.5 Data Extraction Processing Information mapping and data extraction can be performed using a batch process. This batch process should be triggered during End of Financial Input stage in EOD. This process will contain two major portions to it - one, to handle accounting entries to internal type GLs and the second to handle accounting entries to customer accounts and building fictitious accounting entries to customer GLs in order to represent the balance movement when ever there is a change in reporting GL mapped to them. You can also invoke this batch by typing ‘EGBEGLEX’ in the field at the top right corner of the Application tool bar and clicking the adjoining arrow button. 7.2.5.1 Identification of Internal GL’s System will pick up the values of different attributes defined to be mapped to an External GL for all the accounting entries posted to Internal GLs. Then the External GL Code will be identified using these attributes. Failure to identify an External GL will terminate the process. Identified External GL for each accounting entry will logged in an intermediary data store. You can run this process as an intra-day job to reduce the processing time required during End of Day. 7.2.5.2 Identification of Customer Accounts & Customer GL’s Identification of reporting Customer GL for a Customer Account requires the closing balance in the customer account. Since account balances are reconciled at EOD, this process relating to entries to Customer should be run only during End of Financial Input window. As a first step, the system will identify the reporting Customer GL for each Customer Account and the External GL mapped to such a Customer GL. It will also identify the corresponding Oracle CCID mapped. If there is a change in the reporting GL the system will automatically create fictitious accounting entries to Customer GL to report the balance movement. The following example illustrate this process Example: Customer Account: CustAC007 Cr GL Mapped to ‘CustAC007’: CrGL000 Dr GL Mapped to ‘CustAC007’: DrGL000 Closing balance in ‘CustAC007’ on 11/Oct/2006: -750 INR (reporting GL will be DrGL000) Closing balance in ‘CustAC007’ on 12/Oct/2006: 2500 INR (reporting GL will be CrGL000) 7-6 On 12/Oct/2006, apart from that day’s accounting entries posted to ‘CustAC007’, system will also report the following fictitious accounting entries to Enterprise GL system. 12/Oct/2006 Dr DrGL000 -750 INR 12/Oct/2006 Cr CrGL000 -750 INR Now, assuming closing balance in ‘CustAC007’ on 13/Oct/2006 as -220 (reporting GL will be DrGL000), fictitious entries to be reported on 13/Oct/2006 will be: 13/Oct/2006 Dr CrGL000 2500 INR 13/Oct/2006 Cr DrGL000 2500 INR 7.2.6 Handoff Generation A daily handoff data store will be provided which would contain all the basic accounting entry related information to the external GL mapped. While providing this data system will identify whether there are any violations to the restrictions defined in the EGL Master screen. If found these accounting entries will be reported to using the External Suspense GL maintained in the ‘Enterprise GL Parameters’ screen. Successful completion of this process will mark the end of the process. 7-7 8. Error Codes and Messages 8.1 Error Messages Error Code Message FMS-0001 Duplicate FMS value FMS-0002 Mapping already exists GL-0001 Line code cannot be null GL-0002 Line code length cannot be less than three characters GL-0003 Line description cannot null GL-0004 Cannot change the line type GL-0005 The line type of the parent does not match with that of the line GL-0006 The category of the parent does not match with that of the child GL-0007 $1 is the consolidation point for $2 GL-0008 Record already exists GL-0009 First authorize the lines above the current line in the hierarchy GL-0010 Enter valid parent GL-0011 Mandatory fields not input GL-0012 The length of the GL code cannot be lesser than three characters GL-0013 Duplicate GL code, customer account or account short code GL-0014 The GL code does not match with the GL Mask GL-0015 Check digit could not be generated for the current GL code GL-0016 The scope of currency restriction cannot be reduced GL-0017 The scope of the branch restriction cannot be reduced GL-0018 A head office or branch Restriction can be modified to both only GL-0019 Record already exists 8-1 Error Code Message GL-0020 Some branches are not at End of Day GL-0021 Closure disallowed. Customer Accounts linked to the GL at following nodes: $1 GL-0022 The type does not allow Modification GL-0023 Balance for the current GL is not zero at following nodes: $1 GL-0024 First authorize the GL above the current GL in the hierarchy GL-0025 Enter the currency GL-0026 Current GL is a parent of some open GLs GL-0027 The parent GL for the current GL has been modified to a leaf - cannot open this GL GL-0028 Spaces not allowed in GL code GL-0029 Length of the field cannot be less than three characters GL-0030 A maximum of ten customer classes and ten transaction classes allowed GL-0031 A maximum of two classes can be maintained for budget for each customer/transaction class GL-0032 Input mandatory GL-0033 Gl_Code cannot be null GL-0034 MIS_Class cannot be null GL-0035 Invalid record GL-0036 The Parent_GL for the current GL is unauthorized - cannot open this GL GL-0037 The Parent_GL for the current GL is closed - cannot open this GL GL-0038 Before running the consolidated report run the GL report for the branch - $1 GL-0039 Could not generate the report GL-0040 Failed to perform the consolidation for the nodes GL-0041 GL code already used 8-2 Error Code Message GL-0042 Failed to update the Balances for the customer GLs GL-0043 Budget name cannot be empty GL-0044 Invalid budget description GL-0045 Financial year cannot be empty GL-0046 Period code cannot be empty GL-0047 M I S class cannot be empty GL-0048 M I S code cannot be empty GL-0049 Currency code cannot be empty GL-0050 Amount cannot be empty GL-0051 Branch cannot be empty GL-0052 No records available GL-0053 GL code cannot be empty GL-0054 All (AL) option cannot be selected, when a currency has been already selected GL-0055 Input a valid date GL-0056 Spaces not allowed in report name GL-0057 Failed to perform consolidation GL-0058 Spaces are not allowed in MIS class GL-0059 Spaces are not allowed in MIS code GL-0060 Change of MIS type is not allowed GL-0061 Cannot delete the last detail record GL-0062 Detail records cannot be empty GL-0063 Duplicate record GL-0064 All (AL) option has been selected, other currencies not allowed GL-0065 Enter a valid category GL-0066 Enter a valid category group 8-3 Error Code Message GL-0067 Cannot change the category of the line GL-0068 Current line is a parent of some open lines GL-0070 The parent line for the current line is closed - cannot open this line GL-0071 The parent line for the current line is unauthorized - cannot reopen this line GL-0072 Budgeting is being done for this GL. Closure disallowed GL-0073 Reporting is being done for this GL. Closure disallowed GL-0074 MIS update failed GL-0075 Budget update failed GL-0076 This report is being run by another user. Please wait GL-0077 Type not allowed for customer GL GL-0078 Type not allowed for internal GL GL-0079 Category not allowed for customer GL GL-0080 Financial year/period code cannot be null GL-0081 Date cannot be null GL-0082 Report name mandatory GL-0083 Days cannot be greater than 27 if months present GL-0084 Days cannot be greater than 364 if years present GL-0085 Months cannot be greater than 11 if years present GL-0086 Tenor cannot be negative GL-0087 Period code cannot be null GL-0088 Financial year cannot be null GL-0089 Cannot change leaf to a node GL-0090 Do you want to close the financial year? GL-0091 Do you want to close the period? GL-0092 Could not close financial year 8-4 Error Code Message GL-0093 Could not close period GL-0094 Enter the financial year before the period GL-0095 Cannot use this MIS class for further allocation order GL-0096 Interbranch GL - only one MIS group allowed GL-0097 Mandatory field MIS group cannot be null GL-0098 A position GL or position eqv. GL cannot be defined as node GLs. GL-0099 This process can be run only between end of financial input and End of Day GL-0100 This process has already been run GL-BUD01 Period code is not maintained for the budget GL-BUD02 The MIS class 1 for the budget is not maintained GL-BUD03 The MIS code 1 for the budget is not maintained GL-BUD04 The MIS class 2 for the budget is not maintained GL-BUD05 The MIS code 2 for the budget is not maintained. GL-CPT01 This combination of product, allocation code, transaction type and MIS code for the given financial cycle and period code is already maintained GL-CPT02 Product or allocation code or transaction type cannot be null GL-CPT03 Both cost code and cost per transaction cannot be null GL-CPT04 Financial cycle or period code cannot be null GL-CPT05 The selected period code is not for the chosen financial cycle GL-CPT06 Segment code cannot be null GL-CTG1 Asset accounts should be of debit category GL-CTG2 Liability accounts should be of credit category GL-CTG3 Income accounts should be of credit category GL-CTG4 Expense accounts should be of debit category 8-5 Error Code Message GL-CTG5 Invalid FMS account code GLDEBUG 1 GLFINCL001 Finance closure successful GLFINCL002 Finance closure unsuccessful GL-FMS1 The legal vehicle of the FMS account is not valid GL-FMS2 Incorrect length of FMS account GL-FMS3 The currency is not valid GL-FMS4 The FMS account exists GL-FMS5 The GL code is a new GL. Do you want to auto-maintain it? GL-FMS6 The RC code is new. Do you want to auto-maintain it? GLFMUP001 Failed to get commit frequency for process ZDWU GLFMUP002 No data found in cotms_source_pref for source $1 GLFMUP003 Failed to get upload ID for process ZDWU GLFMUP004 Failed to translate external entity $1 for $2 - check if it is authorized/open or not maintained GLFMUP005 GL - $1 closed GLFMUP006 GL - $1 unauthorized GLFMUP007 $1 duplicate GL GLFMUP008 $1 - failed to insert in GLTMS_GLMASTER GLFMUP009 $1 - failed to insert in STTBS_ACCOUNT GL- MIS group - $1 closed 8-6 Error Code Message FMUP010 GLFMUP011 MIS group - $1 unauthorized GLFMUP012 Failed to get the Maximum class number for transaction class GLFMUP013 RC01 - failed to insert into GLTMS_MIS_Class GLFMUP014 $1 - RC01 - failed to insert into GLTMS_MIS_Code GLFMUP015 $1 - $2 - failed to insert into GLTMS_GL_MIS_Group GLFMUP016 Failed to insert in GLTBS_FMS_Details GLFMUP017 Record already exists in GLTBS_FMS_Details GLFMUP018 $1 - $2 - failed to get start and end date GLFMUP019 EOM balances not sent by FMS GLFMUP020 AVG balances not sent by FMS GLFMUP021 LCY balance not sent but the currency is local currency GLFMUP022 No MIS head maintained for transaction code $1 GLFMUP023 $1 - MIS group not maintained GLFMUP024 Failed to insert in MITBS_Class_Mapping GLFMUP025 Failed to update processed flag GLFMUP026 General failure in FMS upload process GLFMUP027 No records to process 8-7 Error Code Message GLFMUP028 The record is already processed GLFMUP029 $1 cannot be null GLFMUP030 FMS upload successful GLFMUP031 Failed to insert in GLTBS_FMS_Master GLFMUP032 FMS and ISO currency should be same GLFMUP035 Account code invalid GL-GRP01 Source group name cannot be null GL-GRP02 Source group name should be unique GL-GRP03 Please maintain at least one GL code for this group GL-POS01 Currency field cannot be null GL-POS02 At least one of the fields (position GL or position eqv. GL) has to be populated GL-POS03 GL is linked for positioning in GL maintenance - cannot be closed GL-POS04 GL is linked for positioning in currency maintenance - cannot be closed 8-8 9. Glossary 9.1 General Ledger Terms The following terms have been used in this manual. GL This module forms the single repository in Oracle FLEXCUBE for financial information and accounting for all types of accounts held by the bank. Balances, turnovers and so on for any account or type of account can be maintained and consolidated. Leaf GL A GL that reports to a node GL and is not itself reported to by any other GL. Node GL A GL that reports to a main head GL above it and is itself reported to by leaf GLs’ under it. MIS Class An identifier for the kind of entity that is identified as the basis for MIS reporting LCY The local currency in which profit and loss entries can be posted to a GL. Reporting will obtain details in this currency. FCY A foreign currency in which record of the profit and loss entries posted to a GL can be maintained. Chart of Accounts The structure or framework in which the different GL’s are maintained, in the bank Contingent Asset One of the categories of head GLs that can be maintained in the structure, for the posting of entries related to contingent assets. Contingent Liability One of the categories of head GLs that can be maintained in the structure, for the posting of entries related to contingent liabilities. Position Accounting Maintaining the position of a foreign currency, by setting up a Position GL and a Position Equivalent GL for each foreign currency 9-1 Reporting Lines Unique codes assigned to each financial information head required for the Head Office and Federal Reserve. Reporting lines can be associated with the appropriate GL’s that would report to them. 9-2 10. Reports 10.1 Introduction Several reports giving information on the financial details of the bank, like the balance sheet, profit and loss statement, cash flow, etc. can be generated in Oracle FLEXCUBE. Many of these reports are available in the standard format, and can be readily generated. Many more can be generated to suit your needs through Business Objects, the Report Generator for Oracle FLEXCUBE. You can generate the following reports for the GL module: Accounting Journal report Trial balance report Report on GL Balances in Local Currency Multi-currency P and L report Consolidated GL report Daily Average Balance report General Ledger Periodical Average Balance report General Ledger Report Cash Flow Report Currency-wise Cash Flow Report Uncollected Funds Repot Currency Position Report 10.2 Accounting Journal Report The Accounting Journal contains the accounting entries passed for transactions processed during the day. The journal contains all information related to transactions like account number, currency, transaction code, transaction description, etc. The accounting journal can be generated at any time during the day. Ideally, after End of Transactions Input (EOTI), the user who made the inputs should take a print out of the transaction journal for the relevant transactions, put it along with the vouchers or tickets based on which the inputs were made, and hand them over to the authorizer. The authorizer can then check the entries passed for each transaction and then authorize the transaction. Oracle FLEXCUBE provides you with many options to enable you to generate the journal for specific entries. This would be a convenient way of checking out details for the authorizer. However, details of the entries are available for the authorizer on-line during authorization also. Mandatory generation of the report during End of Day During end of day, after all the automatic processing for the day has been completed, you have to generate the transaction journal for all transactions during the day. This should be irrespective of whether the journal was generated during the day for specific transactions. This report can be spooled and stored in a file so that it can be retrieved later on. This information may come in handy at a later point in time, even though there are other ways of retrieving past data. 10-1 Besides, you cannot proceed with the end of day processing for the day without generating the transaction journal for all transactions processed during the day. 10.2.1 Selection options By default, the transaction journal will be generated for all transactions processed during the day. However, you can customize the report to contain details of transactions satisfying certain criteria: Module You can generate the report for all modules or for a single module. To generate the report for a single module click on Single and from the option-list choose the module that you want to generate the report for. If you want the report to be generated for all modules choose ‘All’. Product For a particular module(s) you can generate a product wise report. To generate a product wise report for a specific module, click on Single and choose the product from the option list. If you want the generated report to contain details of all the products, click ‘All’. User You can generate the report for transactions entered by a particular user or for all users. To generate the report for entries made by a particular user, click on Single and choose a User ID from the option list. Click ‘All’ to generate a report containing entries made by all users. Example You want to generate a report for accounting entries passed by a person with the User ID GAIU000. At the User option if you specify the ID GAIU000 only those entries passed by the person with that User Id will be generated in the report. Specifying the batch numbers Teller and journal entries are passed into batches. You can generate the report for specific batch numbers only, a range of them, or all of them. If you need to generate the report for a range, enter the ‘From’ and ‘To’ teller or journal entry batch for which you want details. Indicating transaction preferences Click on All if you want to generate the report for all transactions made during the day. Click on This Branch if you want to generate the report for all transactions involving accounts of your branch only. Click on Posted to Other Branch if the report has to be generated for transactions involving entries posted to accounts in other branches. Click on This branch acted as bridge if you want details of those transactions, in which your branch acted as an intermediary in an inter-branch transaction. Print Copies Once the details of a transaction have been printed in the journal, they will be marked off as printed. However, you have the option to print these details again. However, at End of Day, it is recommended that you take the journal for all the transactions, irrespective of whether their details were printed during the day. 10-2 You can invoke the screen by typing the code ‘ACRJRNAL’ in the field at the top right corner of the Application tool bar and click on the adjoining arrow button. 10.2.2 Contents of the Report The report options that you select while generating the report will be printed at the beginning of the report. Body of the report The transactions processed during the day in each module will be reported in the alphabetic order of the module code. Totals will be provided in local currency for each module. Reference number This is the reference number of the contract involved in the transaction being reported. Account number This is the account number for which the accounting entry was passed. Account branch This is the branch to which the account belongs. Account description This is the description of the account. Currency This is the SWIFT code of the account currency. Dr/Cr This indicates whether the transaction was a debit or credit. Transaction Code Every accounting entry in Oracle FLEXCUBE involves a transaction code. The transaction code describes the nature of the entry for which you are generating the report. Transaction description This is the description assigned to the transaction code. Value date The accounting entry was passed on this date. FCY amount If the transaction is in a foreign currency, the amount expressed in the foreign currency is displayed. Exchange rate If the transaction currency is different from the local currency, the exchange rate used is displayed. LCY amount This is the local currency equivalent of the amount involved in the transaction. 10.3 Trial Balance report The trial balance report gives details of all transactions involving a particular account. You can generate this report only after End of Financial Input is marked for the day. 10-3 You can invoke the screen by typing the code ‘GLRPTBAL’ in the field at the top right corner of the Application tool bar and click on the adjoining arrow button. Since there are no selection options available for this report, click ‘OK’ button to generate the report. Click ‘Exit’ button if you do not want to generate the report. 10.3.1 Contents of the Report Apart from the header the following information is provided for each account. Body of the report The report is sorted in the alphabetic order of the accounts and GLs involved in transactions during the day. This is in contrast with the transaction journal report that reports the transactions during the day, sorted on the module. The trial balance report gives the list of accounts or GLs involved in transactions, in any module. The following details will be reported for each account: Account number This is the account number involved in the transactions being reported. Account currency This is the currency of the account. Fcy amount If the account is in foreign currency, this is the transaction amount in the foreign currency. Lcy amount This is the equivalent of the transaction amount in local currency. The conversion is done at the rate used for the transaction. Batch number If the transaction being reported was a teller or journal entry, this is the batch into which the transaction was posted. Current number If the transaction being reported is a teller or journal entry, this is the current number of the batch that is being reported. Transaction reference number This is the reference number of the transaction being reported. It will be empty for a teller or voucher entry. Period code The period for which the transaction is being processed. Current Balance The current balance in the specific account 10-4 10.4 Multi-Currency P and L report This is the multi-currency profit and loss report. It gives the latest balances in the income and expense GLs. The way in which the balances in different currencies for a GL are reported can be explained by way of an example. Example In Greenville Global Bank, INCLCISSCM is an income account into which the issue commission of letters of credit is credited, irrespective of the currency of the commission. In the multi-currency profit and loss report, the commissions due to LCs in different currencies will be reported. It could be something as follows: LCs in USD USD100000 LCs in GBP GBP200000 LCs in DEM DEM150000 The local currency equivalent of these amounts, along with the local currency totals for the GL, will be provided. The currency conversion will be as of the date on which the income account was credited with the commission amount. Note: Typically in a bank, accruals are carried out at regular intervals, say monthly. It would be ideal to generate the PnL report on a month-end after the accruals for the month have been carried out. This would get the latest balances in the income and expense reports. On any other day, this report will give the income and expense figures as of the date on which accruals were done last. 10.4.1 Generating a Consolidated Report You can indicate that the report should be consolidated across the branches as per the reporting structure defined at your branch. If you choose to consolidate the balances (to recall, the GL structure will be the same in all the branches in a reporting structure), you should also indicate the date as of which the consolidation should be done. This date assumes significance when the different branches in the reporting structure are on different dates. In such a case, the consolidation should ideally be made as of the earliest of the dates of the branches, or earlier. The report will be as of the date you enter here, for all branches across which the balances are being consolidated. 10.4.2 Generating the Balance Sheet or P n L Report for a Period in the Past You can generate the report to retrieve the balance sheet or the P n L report for any date in the past. Such a history report can be generated either for a past financial period or a financial year. 10-5 10.4.3 Selection options You can generate the report for the following options. Consolidation You can indicate whether you want a report consolidated across the branches in the reporting structure defined for your branch. Past period and period code Indicate that you want to generate the report for a period in the past, by highlighting this field. Financial year By choosing a past financial year, you can generate the report for that period. You can invoke the screen by typing the code ‘GLRPGLCY’ in the field at the top right corner of the Application tool bar and click on the adjoining arrow button. 10.4.4 Contents of the Report The report options that you select while generating the report will be printed at the beginning of the report. Apart from the header the following information is provided for each contract. Body of the report Currency/GL Code This is the currency for which the balances are being reported. The GL Code is the GL for which the balances are being reported. When the contributions from contracts in a foreign currency are reported, the local currency equivalent of the amounts is also shown. The conversion rate would be the one that was used for the transaction. Description This is the description of the GL Code for which the balances are reported. Debit balance For an expense GL, the debit balance will be reported in foreign currency, followed by the local currency equivalent of the amount. The conversion rate would be the one used for the transaction. 10-6 Credit balance For an income GL, the credit balance will be reported in foreign currency, followed by the local currency equivalent of the amount. The conversion rate would be the one used for the transaction. Summation Debit and credit totals will be provided for all categories of GL. 10.5 Daily Average Balance Report In Oracle FLEXCUBE, the GL – MIS average balance report can be generated daily. It gives the latest value date average balances or the book date average balances based on the option you chose at the time of report generation. The report displays the average balance with branch code, GL code, currency code, MIS class and MIS code. The report can be generated for All Customers as well as Single Customer. By defining GL reports with MIS linkages, you can generate a GL report in which the balances are reported against the entities defined in the linkage. These reports help you group information under different MIS entities. The following example illustrates this concept: Example In your chart of accounts, you would typically have specific GLs under which specific products are processed. For example, you may have the following structure: The asset GLs for various types of bills are as follows: Advance under LCs AS2202003 Bills purchased AS2202004 Acceptance bills AS2202005 The income GLs for these types of bills are as follows: Advance under LCs IN2202003 Bills purchased IN2202004 Acceptance bills IN2202005 All these GLs come under the purview of the MIS Class called the Business Segment. Now, if you generate a normal GL report for these GLs, the balances will be reported under the GLs, separately. If an MIS Linkage report is defined, the information will be grouped based on the MIS Class you specify during linkage. While defining this linkage, you would link all the six GLs, and indicate the MIS Class as a Business Segment. The GL report for these GLs would present a break-up of figures by the business segment. While generating the GL report, you can indicate that an MIS Linkage report should be generated instead of a normal report. The contents of the report will be the same as that of a normal GL report, except for the break-up provided for each MIS Class. It also includes the effects of revaluation and financial closure entries on the average balance. 10-7 You can invoke the screen by typing the code ‘GLRISAVG’ in the field at the top right corner of the Application tool bar and click on the adjoining arrow button. 10.5.1 Selection Options You can generate the report for the following options: Indicating the preference for GLs You can generate the report for all GLs or for a GL. To generate the report for a single GL click on Single and from the option list choose the GL that you want to generate the report for. If you want the report to be generated for all GLs choose ‘All’. Indicating the Currencies preference To generate the report for a single currency click on Single and from the option list choose the currency code that you want to generate the report for. If you want the report to be generated for all currencies choose ‘All’. Indicating the Customer criteria To generate the report for a single customer click on Single and from the option list choose the customer number that you want to generate the report for. If you want the report to be generated for all customers choose ‘All’. Defining the MIS Class criteria To generate the report for a single MIS class click on Single and from the option list choose the MIS class that you want to generate the report for. If you want the report to be generated for all MIS class choose ‘All’. 10-8 Specifying the date preference for generation of the report You have the option to specify the date option for generating the report. You can generate the report to reflect the average balance report for any date in the past. However this date has to be within the retention date you have mentioned in the GL Branch Parameters screen. Select the value date button if you want to generate value date GL-MIS average balance report. To generate book date GL-MIS average balance report, select book date button. 10.5.2 Contents of the Report You can generate the GL-MIS average balance report for a single customer or for all customers for a specific date till date. The system will generate the report based on the parameters specified by you. The contents of the daily average balance report are given below: Header The ‘Header’ carries the title of the report, branch code, branch date, user ID, module from which the report has been generated, date and time at which the report has been generated and the page number of the report. Body The report contains the average balance for financial year to date and period to date for the foreign currency and the local currency. The average balance includes the effect of account revaluation and financial closure entries for both book date and value date. The value date average balance reflects adjustment due to back value entries in addition to normal value date balance. The book date average balance is based on the booking date and hence there is no adjustment. The financial year ‘To date’ and period ‘To date’ average balance values are with respect to the financial year and period code of the bank. Each column in the report contains the following details: Branch Code The code that identifies the branch GL Code The code that identifies the general ledger Currency The currency MTD LCY Month to date local currency balance MIS Class The class of MIS MIS Code The code that identifies the MIS 10-9 MTD ACY Month to date account currency balance Customer Number The CIF of the customer whose details are being generated YTD LCY Year to date local currency balance YTD ACY Year to date account currency balance 10.6 General Ledger Periodical Average Balance You can generate the average balance report from General Ledger module of Oracle FLEXCUBE. This report gives you details of GL balance in both transaction currency and local currency. You can set preferences as to generation of the report using ‘Reports – GL Average Balance’ screen. To invoke the screen, type ‘GLRPAVG’ in the field at the top right corner of the Application tool bar and click the adjoining arrow button. 10.6.1 Report Options You can set the following preferences: Financial Year – From Year Specify the financial year. The system will generate the report for all financial years beginning from the year specified here. Financial Year – To Year Specify the financial year. The system will generate the report for all financial years since the ‘From Year’ till the year specified here. From Period Specify the start date of the report period. To Period Specify the end date of the report period. Include Zero Balances Check this option to include zero balances in the report. 10-10 Once you have captured the details, click OK button. The system will display the print options screen. Set your preferences and click OK to print. 10.6.2 Contents of the Report The contents of Account Structure report have been discussed under the following heads: Header The ‘Header’ carries the title of the report, branch code, branch date, user ID, module from which the report has been generated, date and time at which the report has been generated and the page number of the report. Body You can find the following details in the body of the report: GL Code The code that identifies the general ledger Financial Year The financial year for which you require the general ledger average balance Period Code The code that identifies the period for which the details are required Currency The code of the transaction currency Currency Balance The GL balance amount in terms of transaction currency Lcy Balance The GL balance amount in terms of local currency 10.7 General Ledger Report The general ledger report displays credit and debit balances in various accounts maintained in Oracle FLEXCUBE. You can set preferences as to generation of the report using ‘General Ledger Report’ screen. 10-11 To invoke the screen, type ‘GLRPBAL’ in the field at the top right corner of the Application tool bar and click the adjoining arrow button. 10.7.1 Report Option You can set the following preferences for the report: Report Branch The system defaults report branch. Report Name Specify the name of the report. The option list displays all valid report names maintained in the system. Choose the appropriate one. From General Ledger You can generate the report with details of a particular general ledger alone. The option list displays all valid GL codes maintained in the system. Choose the appropriate one. If you do not specify a GL code here, the system will generate the report for all general ledgers. General Ledger MIS Break If you check this option, the report will represent GL balances break-up details with corresponding MIS codes. If you do not check this, the system will not generate the breakup in the report. Only Leaf General Ledger Leaf general ledgers are maintained under Nod general ledgers. If you check this option, the system will include only the Leaf general ledger details in the report. If you do not check this, the report will be generated for the Leaf general ledger as well as the corresponding Nod general ledgers. Skip Zero Balances Check this option to exclude details of zero balance general ledgers from the report. If you do not check this option, the system will include details of zero balance general ledgers in the report. 10-12 Category Specify the category to which the general ledger belongs. You can choose one of the following categories from the dropdown list: Asset Liability Expense Income Contingent asset Contingent liability Category Groups Specify the category group. You can choose one of the following groups: Asset / Liability Income / Expense, Contingence Level Chart of accounts have been grouped hierarchically under six levels. You can generate the report for accounts that fall under a certain level of this hierarchical structure. Specify the level of hierarchy. Customer / Internal Choose the general ledger types for which the report is being generated. You can choose one of the following options: Only customer general ledgers Only internal general ledgers Both Past Period Check this option to indicate that the report is being generated a period in the past. Financial Year Specify the financial year for which you are generating the report. Period Code Period codes are maintained for each financial year. If this report is being generated for a particular period within a financial year, specify the period code. The option list displays all valid period codes maintained under the financial year selected above. Consolidation Check this option to generate a report that is consolidated across the branches in the reporting structure defined for your branch. 10-13 Date Specify the date of the report. Once you have specified the details, click OK button. The system displays the print option screen. Set your preferences as to printing the report and click OK button. 10.7.2 Contents of the Report The contents of General Ledger report have been discussed under the following heads: Header The ‘Header’ carries the title of the report, branch code, branch date, financial year/period code, user ID, module from which the report has been generated, date and time at which the report has been generated and the page number of the report. Body You can find the following details in the body of the report: GL/MIS Code The code that identifies the GL Description The description of the account Debit Balance The debit balance in the selected account Credit Balance The credit balance in the selected account Total Real Balance and Euro Eqv The total real credit as well as debit balances and equivalent values in terms of Euro Total Contingent Balance and Euro Eqv. The total contingent credit as well as debit balances and equivalent values in terms of Euro Grand Total and Euro Eqv. The grand total credit as well as debit balances and equivalent values in terms of Euro 10.8 General Ledger Posting Report Oracle Flexcube allows you to generate online report for viewing the details of credit and debit transactions posted as on current date on GL’s. This report contains details of the transactions for the current date posted on all GL’s. You can set preferences as to generation of the report using ‘General Ledger Posting Report’ screen. 10-14 To invoke the screen, type ‘GLRPOSRE’ in the field at the top right corner of the Application tool bar and click the adjoining arrow button. In this screen you need to specify the following details: GL Select one of the following GL options: Single GL All GL GL Code Specify the GL code. The adjoining option list displays the valid GL codes maintained in the system. You can select the appropriate one. After specifying the above details, click on the OK button to proceed. Upon clicking ok, you can see the Report Options screen. 10-15 In this screen you can set your preferences for report generation. 10.8.1 Report Options You can specify the following preferences: Format Select the format from the adjoining drop-down list in which the report should be generated. The formats available are: HTML RTF PDF Excel Output Select the type of the output. The options available are: Print – The report will be printed directly on to a printer of your choice View - The details of the report will be displayed Spool - The details of the report will be stored in a spool file and this can be printed later Print At Select one of the following options for printing location: Client server Printer Specify the printer for generating the report. The adjoining option list displays the valid printers along with the identifiers maintained in the system. You can select the appropriate one. 10-16 After specifying the above details, click on ok button. On clicking OK button, the report gets generated in the specified format. The sample output of the report is given below: The General Ledger Posting Report displays the following fields: Fields Description Source The place from where the transaction is given as input Transaction Date It specifies the booked date. Effective Date It specifies the value date. Account Number It specifies the General Ledger Code. MIS Code It specifies the cost center head for the 10-17 Fields Description transaction if it is present. Debit Amount It specifies the amount that has been debited from the Account. Credit Amount It specifies the amount that has been credited from the Account. Transaction Description/Additional Text It specifies the transaction description of the transaction code. The General Ledger Posting Report includes only GL Accounts. Any module which posts to a GL account comes under the scope of this report. 10.9 Cash Flow Report Cash flow report gives you details of inflow, outflow and the net inflow of cash for each product. You can set preferences as to generation of this report using ‘Cash Flow Report’ screen. To invoke the screen, type ‘GLRPCFLO’ in the field at the top right corner of the Application tool bar and click the adjoining arrow button. 10.9.1 Report Options You can set the following record preferences: From Product Specify the product code. The system will generate the report of cash flow from this product to the product selected in ‘To Product’ field. To Product Specify the product code. The system will generate the report of cash flow to this product from the product selected in ‘From Product’ field. Report Specify the name of the report. The option list displays all valid report names maintained in the system. Choose the appropriate one. 10-18 Once you have specified the details, click OK button. The system displays the print options screen. Set your preferences as to printing the report and click OK button. 10.9.2 Contents of the Report The contents of cash flow report have been discussed under the following heads: Header The ‘Header’ carries the title of the report, branch code, branch date, user ID, module from which the report has been generated, date and time at which the report has been generated and the page number of the report. Body You can find the following details in the body of the report: Product The product of which the details are generated Currency The corresponding currency for each product Amount In Inflow of cash for each product and the corresponding currency Amount Out Outflow of cash for each product and the corresponding currency Net Inflow Net inflow for each product and the corresponding currency Effective Date The effective date of the corresponding account Euro Eqv. The equivalent of each of the above values in terms of Euro 10.9.3 Cash Flow Summary Report The Cash Flow summary report summarizes the details of cash flow for particular Accounts or Account Classes. Header The Header carries the title of the report, information on the branch code, the ID of the user who generated the report and the date and time at which it was generated. Body The report is sorted on the currency of the cash flow. Currency This is the S.W.I.F.T code of the contract currency. Amount In This is the amount credited into the account for the specific period. Amount Out This is the amount debited to the account during the specified period. 10-19 Currency This is the S.W.I.F.T code of the contract currency. Net Flow This is the net amount available in the account for the specified period. 10.10 Currency-wise Cash Flow Report Currency-wise Cash flow report gives you details of inflow, outflow and the net inflow of cash for different currencies. You can set preferences as to generation of the report using ‘Currency-wise Cash Flow Report’ screen. To invoke the screen, type ‘GLRPNFLO’ in the field at the top right corner of the Application tool bar and click the adjoining arrow button. 10.10.1 Report Options You can set the following record preference: Report Specify the name of the report. The option list displays all valid report names maintained in the system. Choose the appropriate one. Once you have specified the details, click OK button. The system displays the print option screen. Set your preferences as to printing the report and click OK button. 10.10.2 Contents of the Report The contents of cash flow report have been discussed under the following heads: Header The ‘Header’ carries the title of the report, branch code, branch date, user ID, module from which the report has been generated, date and time at which the report has been generated and the page number of the report. Body You can find the following details in the body of the report: Currency The currency for which the cash flow details are generated Amount In Inflow of cash for each currency Amount Out Outflow of cash for each currency 10-20 Total for Currency Total inflow and outflow of cash for the specific currency 10.11 Uncollected Funds Report You can set preferences as to generation of this report using ‘Uncollected Funds Report’ screen. To invoke the screen, type ‘GLRPUNC’ in the field at the top right corner of the Application tool bar and click the adjoining arrow button. Once you have specified the details, click OK button. The system displays the print option screen. Set your preferences as to printing the report and click OK button. 10.11.1 Contents of the Report The contents of this report have been discussed under the following heads: Header The ‘Header’ carries the title of the report, consolidation status, financial year / period code, indication as to whether the period is closed, the branch code, branch date, user ID, module from which the report has been generated, date and time at which the report has been generated and the page number of the report. Body You can find the following details in the body of the report: GL / Currency Code The code of the GL whose details are displayed in the report Description The description Uncollected Amount Uncollected amount from each GL 10.12 Currency Position Report 10-21 You can set preferences as to generation of this report using ‘Currency Position Report’ screen. To invoke the screen, type ‘GLRPCCY’ in the field at the top right corner of the Application tool bar and click the adjoining arrow button. The screen is as shown below: Once you have specified the details, click OK button. The system displays the print option screen. Set your preferences as to printing the report and click OK button. 10.12.1 Contents of the Report The contents of this report have been discussed under the following heads: Header The ‘Header’ carries the title of the report, consolidation status, financial year / period code, indication as to whether the period is closed, the branch code, branch date, user ID, module from which the report has been generated, date and time at which the report has been generated and the page number of the report. Body You can find the following details in the body of the report: GL / Currency Code The code of the GL whose details are displayed in the report Description The description Debit Balance The debit balances in terms of local currency as well as Euro Credit Balance The credit balances in terms of local currency as well as Euro Currency The currency Currency Description Description of the currency 10-22 General Ledger [March] [2011] Version 1.0 Oracle Corporation World Headquarters 500 Oracle Parkway Redwood Shores, CA 94065 U.S.A. Worldwide Inquiries: Phone: +1.650.506.7000 Fax: +1.650.506.7200 www.oracle.com/ financial_services/ Copyright © [2011] Oracle Financial Services Software Limited. All rights reserved. No part of this work may be reproduced, stored in a retrieval system, adopted or transmitted in any form or by any means, electronic, mechanical, photographic, graphic, optic recording or otherwise, translated in any language or computer language, without the prior written permission of Oracle Financial Services Software Limited. Due care has been taken to make this document and accompanying software package as accurate as possible. However, Oracle Financial Services Software Limited makes no representation or warranties with respect to the contents hereof and shall not be responsible for any loss or damage caused to the user by the direct or indirect use of this document and the accompanying Software System. Furthermore, Oracle Financial Services Software Limited reserves the right to alter, modify or otherwise change in any manner the content hereof, without obligation of Oracle Financial Services Software Limited to notify any person of such revision or changes. All company and product names are trademarks of the respective companies with which they are associated.