1
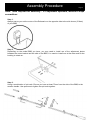
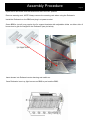
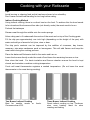
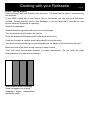
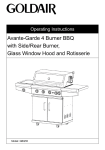
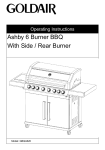
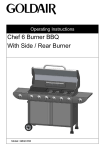
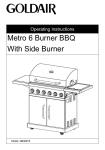
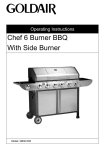
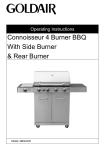
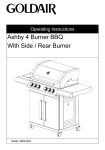
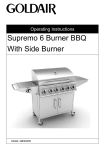
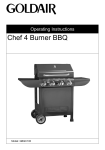
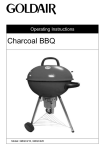
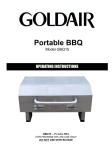
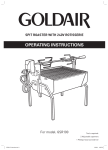
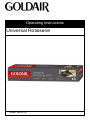
Operating Instructions
Universal Rotisserie
Model: GBQR100
Read Me First
Page 1
Rotisserie
Please read these instructions & user manual carefully.
To be read in conjunction with your BBQ manual
o Take extra care when unpacking and assembling your Goldair Rotisserie. Some
edges may be sharp from the manufacturing process and may result in cuts if not
handled with care.
o Before attempting to assemble your Goldair Rotisserie, ensure all parts are correct
and contained within the box as per the components list.
o Goldair suggests laying out all components on a large flat surface and removing any
plastic or protective material before assembling your Rotisserie.
o If your BBQ has lockable castors ensure these are locked before attempting to fit the
Rotisserie as the BBQ may move during assembling resulting in injury.
o Do not dispose of packaging until completely satisfied with assembly of your
Rotisserie
Please refer to your user manual for operating instructions, further information or trouble
shooting before you call the Customer Service number listed within the user manual.
Your Rotisserie has some Stainless Steel components, please note the following:
Note: Stainless Steel will rust.
Failure to store, clean & maintain your Rotisserie regularly will result in Stainless Steel
‘tea staining’ & rusting and is not covered by the warranty.
Goldair recommends the use of stainless steel protectors & cleaners.
Please refer to your user manual.
Safety Guide
Page 2
•
Do not leave food unattended on the Rotisserie
•
In case of a fat fire turn gas off at cylinder immediately
•
Particular care must be taken when removing the BBQ fat drip tray. Hot fat can cause
serious burn injuries
•
Turn off all gas valves including cylinder after use
•
Do not allow build up of unburned gas. Always use a spanner to tighten all gas
fittings
•
Accessible parts maybe very hot. Always keep children away from the Rotisserie
•
Always wear protective gloves when handling hot components
•
Never lean over Rotisserie when lighting
•
Never use Rotisserie with BBQ cover on
•
Never dismantle Rotisserie motor
•
Never modify the construction of the Rotisserie this will void your Warranty.
•
Always switch off the Rotisserie before moving
•
The use of unauthorised parts will void your Warranty and can create an unsafe
environment and conditions of use.
•
Never use charcoal or any other solid fuel with this Rotisserie
•
Never disconnect any gas fittings while the Rotisserie is in use.
•
In the event that a burner goes out and gas escapes, turn off the burner knobs, open
the BBQ hood fully and let it air out. Wait 5 minutes before attempting to relight the
BBQ.
•
Never let clothing, pot holders or other flammable materials come in contact with or
close to any grill, burner or hot surface until it has cooled. Fabric may ignite and
result in personal injury. Certain materials or items, when stored under or near the
BBQ, will be subjected to radiant heat and could be seriously damaged. Clothing or
other combustible materials should not be hung from the Rotisserie, or placed on or
near the Rotisserie. Combustible materials are considered to be wood, compressed
paper, plant fibres, plastic or other materials capable of being ignited and burned
Assembly Procedure
Page 3
Note: Tools required for assembly - 2 x adjustable spanners, Medium Philips
screwdriver.
Step 1.
Always ensure you set the motor of the Rotisserie on the opposite side to the side burner (if fitted)
of your BBQ
Step 2.
Depending on the model BBQ you have, you may need to install one of the adjustment plates
between the motor bracket and the side of the BBQ. You need to install one at the other end for the
bushing to rotate on.
Step 3.
Using a combination of spit rods. Ensure you have at least 75mm from the side of the BBQ to the
wooden handle. Use spanners to tighten the spit rods together.
Assembly Procedure
Page 4
Open the lid and make sure that all burners are in the OFF position
Remove warming rack, NOTE Always remove the warming rack when using the Rotisserie
Install the Rotisserie on the BBQ and plug in at power socket
Some BBQ’s (not all) may require the 2x support brackets with adjustable slides on either side of
burner box to gain the height for the Rotisserie (see pic below)
Insert skewer into Rotisserie motor housing and switch on.
Once Rotisserie is set up, light burners on BBQ to pre heat the BBQ.
Operating your Rotisserie
Page 5
•
Never leave burners on high for more than 10 minutes unless actually cooking. If the
burner makes hissing sounds when lit, it may be burning inside. Turn burner off,
allow it to cool and try again.
•
Close the gas cylinder valve after each use.
•
Never use plastic or glass utensils on the Rotisserie
•
Never use the BBQ or Rotisserie in strong winds
•
Never allow the flexible gas supply hose or any electrical cord to come in contact with
any heated surface of the Rotisserie.
•
Before you start cooking for the first time, clean the Rotisserie thoroughly with hot
soapy water. This is necessary to remove residuals and solvents, oil and grease,
which may have remained from the manufacturing process. The hotplate and grill on
your BBQ should be thoroughly cleaned in the same manner.
•
Do not exceed 3kg cooking weight
•
Always attach Rotisserie to BBQ first then plug cord into the power.
•
To protect against electric shocks, do not immerse motor, power adaptor or power
cord in water or expose to rain.
•
Do not operate Rotisserie with a damaged cord or plug.
•
Do not allow children to operate the Rotisserie.
•
Unplug Rotisserie and remove motor when not in use.
•
Do not use Rotisserie for any other purpose than its intended use.
•
When Rotisserie cooking place a drip pan under the food being cooked.
•
The Rotisserie is for outdoor use only.
•
If the BBQ is fitted with a side burner, do not operate the side burner when the
Rotisserie is attached.
Operating your Rotisserie
Page 6
Controlling the flames
The knobs have three basic positions: Off, High and Low. You can achieve any flame
height between low and high by rotating the BBQ control knob between these positions.
Checking the flame
Look underneath the BBQ so that you can see the flames. They should be a soft blue
colour with yellow tips. If the flames are too yellow, there is too much gas and not enough
air. The flame will be inefficient and will give off too much smoke. If the flame is too pale,
there is too much air and not enough gas. If either of these situations occur you may
need to clean the burners (See ‘Maintenance’ section of this manual).
Note: ‘Blowback’ is a situation where the flame burns inside the burner, towards the front.
It can be recognised by a sharp roaring sound coming from the burner. It is not
dangerous unless it is allowed to persist. If this occurs, simply turn the burner off, wait a
few seconds then relight.
Controlling flare up
Flare-ups are sudden bursts of flame that come up over the top of the grill. They are
caused by natural cooking juices from your food falling onto the flame tamer and then
burning.
A little bit of flare-up, as well as the resulting smoke, is a good thing. It’s what gives
BBQ’d food that unique outdoor flavour. But if it happens too often, or if the flame last
more than a couple of seconds, your food will char, so you need to control it.
First of all, cooking very fatty foods will cause a lot of flare up. You should trim excess fat
off your meat. Also, excess flaring usually means your controls are up too high. Try
turning them down.
Cooking with your Rotisserie
There are so many advantages to Rotisserie cooking. Meats are generally juicier, selfbasted and slow roasted. Of course there are a few differences between grilling and
Rotisserie cooking that you need to be aware of, remember that while a lot of grilling is
done over a very hot fire you need a lot less heat for the Rotisserie.
The most important thing to remember in using a Rotisserie is balance and security.
Place the meat on the middle of the Rotisserie skewer and fasten as firmly as you can. If
you are cooking poultry remember to secure the wings and legs in as tightly as possible.
If parts are loose to flop around as it turns you can get burning and it can throw off the
balance. If the meat is unbalanced you will put stress on the Rotisserie motor and will
make one side turn slower than the other causing uneven cooking. Adjust until you have
a good balance.
Note: If the Prong doesn’t turn smoothly, or makes a struggling sound as it turns, the
meat is not properly balanced. If this happens, reset the meat on the prongs until it is
balanced. Cooking with an unbalanced Prong will eventually burn the motor out.
Using a meat thermometer is best for assessing when the meat is ready.
If you set up your Rotisserie so that the top of the item is moving away from you and
place the drip pan slightly towards the front of the grill then you will have an easier time
scooping up the drippings for basting.
Cooking with your Rotisserie
Page 7
Tips
Avoid burning or charring food as this has been shown to be unhealthy.
Don’t leave cooked food standing for too long before eating.
Indirect Cooking Method
Using indirect cooking, there is no direct heat on the food. To achieve this the hood needs
to be closed and the burners either side (not directly under) the meat need to be on.
Preheat the barbeque
Skewer meat through the middle onto the centre prongs
Allow a drip pan to fit underneath the centre of the meat and on top of the Cooking grate.
Fill the drip pan approximately one inch high (depending on the height of the pan) with
water and add your favourite fruit juice, wine or beer.
The drip pan's contents can be improved by the addition of cinnamon, bay leaves,
rosemary, star-anise cardamom pods or lemongrass. This will add flavour and keep the
meat moist during the cooking process.
Place the balanced Rotisserie shaft in the motor and turn on.
Leave the burners directly under the meat off and leave the remaining burners on low.
Now close the hood. For heat circulation and flavour retention ensure the hood is kept
closed, and maintain a medium cooking temperature.
Cook until meat thermometer registers a cooked temperature. (Do not leave the meat
thermometer in the roast during cooking)
Two Burner Indirect Cooking
Best for smaller meals or
Consumes less LPG.
foods.
Three Burner Indirect Cooking
Great indirect cooking on low. Produces
slow, even heating. Ideal for slow
roasting and baking
Cooking with your Rotisserie
Page
Page18
8
Direct Cooking Method
Direct cooking uses heat directly under the food. The hood can be open or closed during
this process.
If your BBQ comes with a rear burner, this is the burner you use with your Rotisserie
cooking. Ensure that the food on the Rotisserie is not too large that it touches the rear
burner while the Rotisserie is operating.
Preheat the barbeque
Skewer meat through the middle onto the centre prongs
Turn the burners directly under the food on.
Place the balanced Rotisserie shaft in the motor and turn on.
Cook the food with a medium heat, being careful to avoid burning.
Turn the burners towards high or low depending on the height of the food above the grill.
Baste the food a few times during cooking to keep it moist.
Cook until meat thermometer registers a cooked temperature. (Do not leave the meat
thermometer in the roast during cooking).
ON
ON
ON
Three Burner direct Cooking
Good for bigger cuts of meat.
Generates higher temperatures
around the meat.
Maintenance
Page 9
Storing your Rotisserie
Your Rotisserie is designed to be used outdoors. However, just like a car, you will
prolong the life of the Rotisserie if you store it out of direct exposure to the elements
when not in use.
When the Rotisserie is not being used, it should be removed from the BBQ, dismantled
and stored away from the elements.
If you don’t intend to use it for a few months, lightly spray all the surfaces with canola oil.
This will help protect against corrosion.
•
Do not perform any servicing on the Rotisserie yourself. This includes internal
adjustment of motor. Servicing can only be carried out by authorised technicians. Your
BBQ should be serviced annually by a certified gas service agent.
Rust on your Rotisserie from misuse or lack of cleaning or protective agents are
expressly excluded from Warranty.
On-going Maintenance
Chrome Rotisserie Prongs and Rod
Overtime grease, fat and other cooking oils may build up on your Rotisserie. To clean,
wash with warm/hot soapy water. Wash off soapy water with warm/hot clean water, leave
to air dry. Apply a light cooking oil to the prongs to protect the stainless steel surface.
This will apply a protective coating and assist in repelling the elements.
Stainless steel parts will rust if you do not look after them properly.
From time to time spotting may occur on Rotisserie. This is normal and is due to moisture
and/or other elements. To ensure that spotting and discoloration does not become worse
and more visible resulting in permanent damage to your Rotisserie, it should be cleaned
and removed straight away. This is best done with a steel cleaner/cutback solution, or if
the spotting is larger and harder to remove, use a steel/metal polish and then a
cleaner/solution. Always use a soft cloth to clean your Rotisserie.
SUPPORT AND TECHNICAL ADVICE
PO Box 100707, NSMC, Auckland, New Zealand
Monday – Friday 8am-5pm
Phone: 0800 232 633
Website: www.goldair.co.nz
One Year Warranty
Your Goldair product has been inspected,
tested and is guaranteed subject to the
following for a period to one year from the
date of purchase against defects in
workmanship and materials. During this
period, such defects will be rectified by repair
or replacement of the product purchased.
Your Warranty becomes invalid if in our
opinion the product has been misused,
incorrectly assembled, tampered with, stored
outdoors and exposed to the elements or not
regularly maintained as per the “Maintenance”
notes at the end of this user manual. The
Warranty does not include any labour or other
associated expense that may be involved in
removal or installation of the product. Normal
wear & tear and any issues involving
spider/insect web build up’s inside motor are
expressly excluded.
If your Goldair product fails to operate
satisfactorily, please contact Goldair via phone
in the first instance. To obtain a repair or
replacement product under this Warranty, you
will need to produce satisfactory evidence of
date of purchase. The completed Warranty
and purchase receipt must be presented with
the product. The Warranty should be filled out
at the time of purchase. It is in your interest to
make sure this is done.
If the product is to be replaced (cannot be
repaired) then that replacement will be of the
same or similar product or accessory
excluding packaging, instruction card etc.
Where a replacement product is supplied, this
shall be guaranteed for the balance of the
original Warranty period.
Any model that is no longer available will be
replaced by a model of a value and with such
features as we consider appropriate in the
circumstances. Goldair Ltd is not responsible
for freight forwarding charges, losses or
damage in transit.
If service is required after the Warranty period
has expired, the product should be inspected
by a qualified gas service technician. Service
outside of the Warranty period will be at your
cost.
Consumers Guarantee Act (1993).
In accordance with the above act, consumers
are advised that: The manufacturer does not
undertake that repair facilities and parts are
necessarily available for this product.
If any of the provisions of the foregoing are
contrary to any relevant legislation, then that
provision shall be deemed to be excluded from
the Warranty and the rest of the provisions will
continue to apply.
IMPORTANT: Please retain this Warranty card
Name ……………………………………………… Purchased from …………………………………
Address …………………………………………… Date of purchase …………………………………
………………………………………………………. Name of product …………………………………
Suburb …………………………………………… Model no ……………………………………………