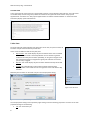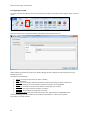
1
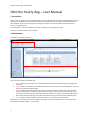
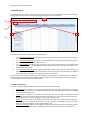
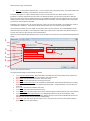
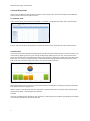
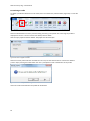
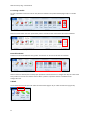
Ottó the hourly dog U s er M a nu a l NETConductor [email protected] www.ruedenet.is Ottó the hourly dog – User Manual Contents Ottó the hourly dog – User Manual .................................................................................................................. 3 1 Introduction .................................................................................................................................................. 3 2 Main Window ................................................................................................................................................ 3 3 Calendar Pane ............................................................................................................................................... 4 3.1 New Journal Entry ......................................................................................................................................... 4 3.2 Description Field Commands......................................................................................................................... 6 4 Journal Entry Views ....................................................................................................................................... 7 4.1 Calendar View ............................................................................................................................................... 7 4.2 Chart View ..................................................................................................................................................... 7 4.3 Text View ....................................................................................................................................................... 8 5 Jobs Pane ...................................................................................................................................................... 8 6 Details Pane .................................................................................................................................................. 9 7 Search ........................................................................................................................................................... 9 8 Profiles ........................................................................................................................................................ 10 8.1 Creating a New Profile................................................................................................................................. 11 8.2 Importing a Profile ...................................................................................................................................... 12 8.3 Opening a Profile ......................................................................................................................................... 13 8.4 Exporting a Profile ....................................................................................................................................... 14 8.5 Editing a Profile ........................................................................................................................................... 15 8.6 Deleting a Profile ......................................................................................................................................... 16 8.7 Closing a Profile ........................................................................................................................................... 17 8.8 Profile Themes ............................................................................................................................................ 17 9 Work ........................................................................................................................................................... 17 9.1 Saving .......................................................................................................................................................... 18 9.2 Synchronization ........................................................................................................................................... 18 10 Multiple Instances ..................................................................................................................................... 19 11 Glossary ..................................................................................................................................................... 21 Document History 31.05 2010 14.6 2010 2 Viktor Einarsson Alfred B. Thordarson Created original document Overhauling of the document Ottó the hourly dog – User Manual Ottó the hourly dog – User Manual 1 Introduction Ottó is a Journal written entirely using Microsoft’s new .NET Windows Presentation Framework (WPF). Its main feature is its capability to synchronize its Journal entries directly into the Job Journal of Microsoft Dynamics NAV. However, this is not its only feature, among many others it can also be used to represent the user’s entries in a graphical form. Essentially Ottó is a tool to manage your Journal and allows you to analyze your hours. This user manual describes how to use Ottó. 2 Main Window The Ottó main window is like this: 1 3 2 4 Figure 1: Initial start-up screen for Ottó The main areas of the main window are: Area 1 contains tools relevant to the tab selected above it (the tools visible in Figure 1 belong to the work tab). Area 2 contains information on the different Jobs and Tasks, which work can be assigned to. See more info in the Jobs Pane chapter below. Area 3 contains three different views of the journal entries of Ottó: 1) the calendar pane where the entries are displayed in a calendar, 2) the charts pane used to analyze journal entries and 3) a text pane where a normal text list of the entries can be accessed. The arrows on the left and right side of the calendar and the small dots on the top of the calendar pane are used to switch between views. Area 4 contains text-format details of journal entries, chart sectors and search results. When Ottó is minimized an icon will be stored in the taskbar and to restore Ottó, when it is minimized, the global shortcut of WIN + SHIFT + J can be used. 3 Ottó the hourly dog – User Manual 3 Calendar Pane The calendar pane is located in the middle of the application. It is used to display journal entries in a calendar, show graphical analysis of journal entries and display journal entries in text format. 1 4 2 3 Figure 2: The Calendar Pane The different areas of the calendar pane are the following: Area 1 Calendar View Format: The user can select one of these buttons to change the view format of the calendar pane. Area 2 Calendar Navigation: The user can press the left button to show older journal entries or press the right button to show newer journal entries. Area 3 Journal Entry: An example of a journal entry. The journal entry displayed is from 10:00 to 12:30 and has the description “Creating documentation for Ottó and testing” and the job and task can be seen below the description. Area 4 Calendar View Modes: Pressing the left and right arrows on the far left and right switches the calendar pane view mode. The top circular buttons can also be used for quick switching. The different view modes of the calendar pane are explained later in this chapter. The calendar pane, in calendar mode, is the main method of manipulating and analyzing journals in Ottó. The working days are colored white from 08:00 to 17:00 but weekends and non-working hours are colored gray. The current day and current time are colored yellow. 3.1 New Journal Entry There are a couple of different methods of inserting a new journal entry in Ottó: 4 Double Click: The calendar cells can be double clicked to add a new entry relevant to the time, date and size of the calendar cell. A calendar cell selection can span any length within one day and dragging is used to select multiple cells. Typing: When a calendar cell is selected, colored dark gray, the user can type on his keyboard to add a new entry relevant to the time, date and size of the calendar cell. A calendar cell selection can span any length within one day and dragging is used to select multiple cells. Right Click: A calendar cell can be right clicked and the new option can be clicked to add a new entry relevant to the time, date and size of the calendar cell. A calendar cell selection can span any length within one day and dragging is used to select multiple cells. Drag from Jobs Pane: A task can be dragged from the jobs pane onto the calendar. Depending on the task dragged and where the task is dropped the job, task and start time of the entry is filled out. Ottó the hourly dog – User Manual Win + J: The keyboard shortcut Win + J can be used to add a new journal entry. This method offers the possibility of setting a work date for the new journal entry. The work date option is a special feature which comes in handy when the user wants to fill in his hours gradually or needs to log bulk of journal entries. The work date option can be used in conjunction with this shortcut so that every time the keyboard shortcut is used Ottó remembers the day and time the user was last adding a journal entry to and enters the next available time on that date. This only happens if the user checks the “Save as next worktime” checkbox. Example: A user wants to fill in all journal entries for June 1. The user presses WIN + J and checks the “Save as next worktime” check box. The user then selects the start date as June 1 and the start time 08:00. The end date is selected as June 1 09:00. So now there exists a journal entry for June 1 from 08:00 to 09:00. Next time the user uses WIN + J the dialog will already have chosen June 1 and set the start time as 09:00, all the user has to do is to fill in the job, task and description. When any of the methods described previously in this chapter are used the user is presented the Appointment dialog. 1 8 3 4 5 6 9 7 Figure 3: New Appointment Dialog The appointment dialog has many fields of interest: 5 Area 1 Personal Appointment: If this checkbox is checked then the journal entry will be marked as a personal appointment and will be colored red in the calendar view. Area 2 Start: The start date and time for the journal entry. Area 3 End: The end date and time for the journal entry. Area 4 Save as next work time: If this checkbox is checked then the dialog will be filled out according to last journal entry entered. See the keyboard shortcut WIN + J explained earlier in this chapter for more info. Area 5 Job: The job to be related to the entry. Area 6 Task: The task to be related to the entry. Area 7 Description: The description of the entry. See Description Field Commands later in this chapter. Area 8 Start Time/Date Adjust Buttons: The +1day button adds one day to the start date, -1day reduces the date by one day, the start of day button sets the start time to the 09:00 and the start of next day sets the start time to 09:00 the following day. Area 9 Span: The span of the journal entry in hours. The minimum span is 0.5 (30 minutes) and the span cannot span into the next day. Ottó the hourly dog – User Manual 3.2 Description Field Commands There are command inputs available for the description field. When typing in the description field it is possible to type a semi comma (;) and all words after that are considered to be commands. Syntax: Some Description; command command command... Example: Creating a guide for Ottó; 2h 09:00–11:00 Rue/NAVJobJournal Ottó can suggest a task and a job when the user tries to add a journal entry when there is no job or task assigned to the entry. Pressing F12 causes Ottó to validate the commands but not add them to the calendar. Pressing enter or save causes Ottó to validate the commands and add them to the calendar. Ottó can prompt the user to confirm it´s suggestion; the prompt for validation will only appear when there is no job and task selected and there are no commands (words after the semi comma). The following formats are available in the description field: #h = Alters the span of the journal entry. Example: ‘2h‘ - entry spans 2 hours. ##:## = Alters the start time of the journal entry. Example: ‘09:00‘ - entry´s start time is 09:00. ##:##-##:## = Alters the start and end time of the journal entry. Example: ‘09:00-12:00‘ = Entry‘s start time is 09:00 and end time is 12:00. First letters of the word ‘Personal’ = Marks or un-marks the journal entry as personal. Example: ‘p‘ or ‘pers‘ - Entry is marked as Personal (If Personal was not marked before) Job/Task = Sets the journal entry´s job and task. Example: ‘rue/navjobjournal‘ – Assigns job ‘Rue de Net ehf’ and task ‘NAVJobJournal Dev’. Example: ‘rue/documentation‘ – Assigns job ‘Rue de Net ehf’ and task ‘Documentation’. A typical visible example: A user has been working on documenting Ottó (Codename ‘NAVJobJournal’) and simply types ‘Documenting Ottó; NAVJobJournal’ in the description field (Figure 4) Figure 4: Description Field Syntax Then, when the user clicks the save button, presses the enter key (triggering the default button) or presses F12 (forces validation of commands without closing the dialog) the words following the semicolon are considered commands, in this scenario the only command is ‘NAVJobJournal’. Ottó considers the word as a keyword in searching for a job and a task. Ottó finds the job ‘Rue de Net ehf’ and the task ‘NAVJobJournal Dev’ related to the keyword ‘NAVJobJournal’ and removes the command but leaves the rest in the description field, that is the ‘Documenting Ottó’ (Figure 5). Figure 5: Description Field after accepting suggestion 6 Ottó the hourly dog – User Manual 4 Journal Entry Views There are three different viewing modes available in the calendar pane. These view modes provide different viewing modes of the journal entries in Ottó. 4.1 Calendar View In this view mode all journal entries are ordered in a calendar according to their dates, start- and end-times. Figure 6: The Calendar View Mode Further, this view mode can be displayed in day format, week format, month format and a timeline format. 4.2 Chart View In the chart view mode a graphical analysis of jobs and tasks are presented to the user. The view contains a pie chart showing ‘Working hours per job’ and a graph displaying ’Working hours per day‘. The entries that the graphs are created from can be filtered by months using the month combo box in upper left corner of the chart view mode. The “Only synced appointments” checkbox indicates if the graphs should only represent entries that will be synchronized into Dynamics NAV or if it should consider all entries. Figure 7: The Chart View Mode When different parts of the graphs are left clicked the detail pane below the calendar pane will be populated with details related to the graph area. When a column in the ‘Working hours per day’ graph is double clicked the user is taken to the calendar view mode with the week , containing the day, selected. Example: If the pie representing jobs worked for ‘Rue de Net ehf’ is left clicked, then the detail pane displays information on all entries related to the ‘Rue de Net ehf’ job. 7 Ottó the hourly dog – User Manual 4.3 Text View In this view mode all of the entries are represented in text form and ordered by date and time. The view mode can be filtered by months using a drop-down box located in the upper left corner and the “Only synced appointments” checkbox. The “Only synced appointments” checkbox indicates whether or not the text view should only display synchronized entries. Figure 8: The Text View Mode 5 Jobs Pane On the far left side of the application the jobs pane can be seen, this pane contains all the tasks and jobs retrieved from Dynamics NAV. There are three different views for the jobs pane: My Favorites: This mode displays all jobs and tasks that the user has added to favorites. This mode is extremely efficient as users tend to log entries related to the same jobs and tasks repeatedly, so using this view gets rid of the overhead of having to navigate through all jobs and tasks each time a journal entry is logged. My Jobs: This mode displays all jobs and tasks related to the Dynamics NAV user. All Jobs: This mode displays all of the jobs and tasks retrieved from Dynamics NAV. In this mode the user can right click a task and add it to My Favorites. Different jobs and tasks can be made unique in the task properties dialog. Figure 9: The Jobs Pane Figure 10: The Task Properties Dialog The task properties dialog can be opened by right clicking a task and selecting properties. The items in the task properties dialog are the following: 8 Job: The name of the job. Ottó the hourly dog – User Manual Task: The name of the task. Keywords: Values in this box, separated by spaces, represent the keywords for this job and task. Keywords can be used by typing them in when creating a calendar entry in Ottó. If Ottó finds a keyword in the input when creating a new calendar entry, the job and task will be selected for the entry according to the keyword. See the Calendar Pane -> New Journal Entry chapter for more info on automatic job and task fill-in. Color: All calendar entries related to the selected task selected can be colored differently with the color drop down box. Sync: If the sync checkbox is not checked then all entries related to the selected task will not be synchronized with Dynamics NAV. 6 Details Pane The details pane resides in the bottom of the Ottó application. Depending on how Ottó is being used the details pane gets updated with different kinds of information and details. Figure 11: The Details Pane The details pane contains information on the following items: Appointment Detail: When the appointment detail tab is selected (located at the bottom left of the details pane), the details pane shows text-form information on the selected entry. Chart Appointments: When a slice of the „Working hours per job“ pie chart is selected the details pane shows text-form information on all the job journal entries related to the job. When a column in the „Working hours per day“ is selected the details pane shows text-form information on all the job journal entries related to the day represented by the column. The text-format of the journal entries can be double clicked and the user will be taken directly to the calendar view mode with the entry selected. Search Result: This tab of the details pane shows results from using the search in Ottó. See more info on searching in the Search chapter. 7 Search Ottó has the ability to search through all journal entries using the search text box located at the top right corner. The user simply types in a keyword to search for and the results are displayed in the search result tab of the details pane. Figure 12: The Search Input Figure 13: The Search result tab To show the journal entry in the calendar view mode the result line can be double clicked and the entry will be shown in the calendar and be selected. 9 Ottó the hourly dog – User Manual 8 Profiles A profile represents a user in Dynamics NAV. When a certain profile is open, Ottó will only synchronize job journal entries for the user related to the profile. In order to be able to use Ottó a valid profile must be supplied, a profile file can either be imported or a new one can be created. Tools to work with profiles can be found in the profiles toolbar (Figure 15) or under the File menu (Figure 14). The various operations on profiles are explained in this chapter. Figure 15: The Profiles Toolbar Figure 14: The File menu button 10 Ottó the hourly dog – User Manual 8.1 Creating a New Profile To create a new profile the new tool can be used, which is located in the profiles toolbar (Figure 16) or in the File menu. Figure 16: The New Tool When the new button is pressed the new profile dialog is displayed to the user. Figure 17: New Profile dialog In the new profile dialog some information needs to be filled in: Name: The name of the profile (ex. Viktor´s Profile) Type: Timesheet Read Only: This checkbox indicates whether the profile should only be able to read entries. Prefix: The prefix to put in front of files related to the profile. (ex. ViktorRDNR) Directory: The folder to store the files related to the profile. (ex. C:\Otto) Username: The username for the profile. (ex. Viktor) Password: The password for the profile. (ex. 1234) Webservice URLs: URLs to the Ottó web services. (ex. www.someurl.com/OttoWS.asmx) When done filling in the information for the profile the save button is used to save to profile. The profile can now be opened. 11 Ottó the hourly dog – User Manual 8.2 Importing a Profile To import a profile the import tool can be used, which is located in the profiles toolbar (Figure 18) or in the file menu. Figure 18: The Import Tool When the import tool is pressed the import profile dialog is displayed to the user. Figure 19: Import Profile dialog When importing a profile the values in the profile settings window are filled out automatically but can be edited by the user. The fields are the following: Name: The name of the profile (ex. Viktor´s Profile) Type: Timesheet Read Only: This checkbox indicates whether the profile should only be able to read entries. Prefix: The prefix to put in front of files related to the profile. (ex. ViktorRDNR) Directory: The folder to store the files related to the profile. (ex. C:\Otto) Username: The username for the profile. (ex. Viktor) Password: The password for the profile. (ex. 1234) Webservice URLs: URLs to the Ottó web services. (ex. www.someurl.com/OttoWS.asmx) When done filling in the information for the profile the save button is used to save to profile. The profile can now be opened. 12 Ottó the hourly dog – User Manual 8.3 Opening a Profile When a profile has been saved using the import or the new tool the profile is accessible from the file menu under the profiles area. Figure 20: The Profile area of the File menu To open a profile from the profiles area in the file menu the user simply clicks the profile he wants to open. When Ottó is opened the last profile that was opened is automatically opened. 13 Ottó the hourly dog – User Manual 8.4 Exporting a Profile To export a profile the export tool can be used, which is located in the profiles tab (Figure 21) or in the file menu. Figure 21: The Export Tool When the export tool is pressed the export profile dialog is displayed to the user. Figure 22: Export Profile dialog The fields used when exporting a profile are the following: Profile to Export: The profile to export. File to Export to: The file to export to (ex. C:\Otto\exportedProfile.opf) Password to Lock File: The password for the profile. This field cannot be empty. Read Only Export: If the box is checked, the profile will be read-only, which means it can only view entries, not modify them. When the user is satisfied with the information in the dialog, the export button can be pressed and the profile will be exported. 14 Ottó the hourly dog – User Manual 8.5 Editing a Profile To edit a profile the edit tool can be used, which is located in the profiles toolbar (Figure 23) or in the file menu. Figure 23: The Edit Tool When the edit button is pressed the edit profile dialog is displayed to the user. Figure 24: Edit Profile dialog The user can edit the settings for the profile by filling in the fields in the edit profile dialog. The fields are the following: Name: The name of the profile (ex. Viktor´s Profile) Type: Timesheet Read Only: This checkbox indicates whether the profile should only be able to read entries. Prefix: The prefix to put in front of files related to the profile. (ex. ViktorRDNR) Directory: The folder to store the files related to the profile. (ex. C:\Otto) Username: The username for the profile. (ex. Viktor) Password: The password for the profile. (ex. 1234) Webservice URLs: URLs to the Ottó web services. (ex. www.someurl.com/OttoWS.asmx) When done filling in the information for the profile click save. 15 Ottó the hourly dog – User Manual 8.6 Deleting a Profile To delete a profile the delete tool can be used, which is located in the profiles toolbar (Figure 25) or in the file menu. Figure 25: The Delete Tool When the delete button has been pressed a dialog containing a drop-down box containing the profiles is displayed to the user. The user must choose what profile to delete. Note: An open profile cannot be deleted. The profile must be closed first. Figure 26: Select a profile to delete When the correct profile has been selected the user can press the select button to continue the deletion process. Upon pressing the select button the user is prompted to confirm the deletion of the profile. Figure 27: Deletion confirmation dialog If the user confirms the deletion the profile will be deleted. 16 Ottó the hourly dog – User Manual 8.7 Closing a Profile To close a profile the close tool can be used, which is located in the profiles toolbar(Figure 28) or in the file menu. Figure 28: The Close Tool When the close button has been pressed the profile is closed and the close button will become disabled. Figure 29:The Close Tool, Profile closed 8.8 Profile Themes A theme can be associated with every profile. The themes can be seen under the work toolbar. Figure 30: The Work Toolbar, Themes When a theme is selected, the currently open profile will save the theme to a configuration file; this means that each profile can have its own distinct theme. When a profile is opened its theme is loaded from the configuration file. 9 Work Tools related to work can be found under the work toolbar (Figure 31) or under the file menu (Figure 32). Figure 31: The Work Toolbar 17 Ottó the hourly dog – User Manual Figure 32: The File menu The various operations under the work toolbar are explained in this chapter. 9.1 Saving To save all entries in the profile to the profile XML file the save button is used. To save the profile press the save tool in the work toolbar (Figure 33) or in the file menu. Figure 33: The Save Tool When saving the profile, all entries currently in Ottó are written to an XML file. Note: Pressing save does not transfer journal entries to Dynamics NAV! To write journal entries to Dynamics NAV see the Synchronization chapter. 9.2 Synchronization To synchronize entries in Ottó to Dynamics NAV the sync toolbar group in the work toolbar is used (Figure 34). Figure 34: The Synchronization Toolbar Group 18 Ottó the hourly dog – User Manual The following buttons are available in the sync toolbar group: Sync Journal: This button synchronizes the entries in Ottó to the entries in the job journal in Dynamics NAV. Sync All: This button synchronizes the entries in Ottó to the entries in the job journal in Dynamics NAV and retrieves all jobs and tasks from Dynamics NAV. When either of the Sync tools are pressed, depending on whether the synchronization was successful, a message is displayed in the status bar of Ottó, positioned at the lower left corner. Figure 35: The Status bar, Successful synchronization If the synchronization was not successful the status bar reports an error (Figure 36) and the status bar can then be clicked to display a dialog containing more information on the error (Figure 37). Figure 36: The Status bar, errorous synchronization Figure 37: Error dialog 10 Multiple Instances Several instances of Ottó can be open at one time. When a new instance of Ottó is started the user is prompted to confirm whether or not to kill the previously running Ottó. Figure 38: Kill other Ottó Prompt If the user chooses not to kill the previous instance of Ottó the user is prompted to confirm whether he wants to start a new instance of Ottó. To start a new different instance of Ottó the user can press the yes button to confirm the start-up of the new instance. 19 Ottó the hourly dog – User Manual Figure 39: Start new instance Prompt The first instance of Ottó is different to instances opened later; the first instance is the only instance that can use the keyboard shortcuts. 20 Ottó the hourly dog – User Manual 11 Glossary Toolbar: The toolbars are located at the top of Ottó and contain the different tools to work with Ottó. There are two toolbars: work and profile. Tool Group: The tools in the toolbars are split into different groups called Tool Groups (fx. Themes and Synchronization). Tool: The different Tools of Ottó can be found in the Toolbars. The Tools are used to interact with Ottó in some way. View Format: The Calendar Pane, using the Calendar View Mode, can be displayed using different Calendar View Formats. The View Formats are Day Format, Week Format, Month Format and Timeline Format. View Modes: The Calendar Pane can be viewed with different View Modes. The View Modes are Calendar View Mode, Graph View Mode and Text View Mode. Calendar Cells: Each Calendar Cell in the Calendar Pane, using the Calendar View Mode, represents 30 minutes of a day. Option: When parts of Ottó are right clicked, a menu appears with different Options, depending on where the user right clicked. 21