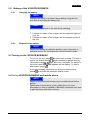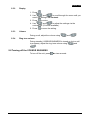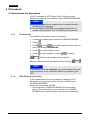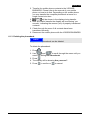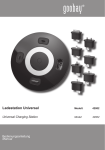
1
ENGLISH WARNING The VOSSOR BUSINESS should only be used in such ways that free sight in the rear view mirror will not be obstructed or limited. NOTE The VOSSOR BUSINESS is to be mounted on the existing rear view mirror of your car. Content 1 2 3 4 5 6 Preface................................................................................3 1.1 Information about this manual.......................................3 1.2 Warnings.......................................................................3 1.3 Corporate veil................................................................4 1.4 Copyright protection......................................................4 Safety ..................................................................................5 2.1 Intended use .................................................................5 2.2 General warnings..........................................................5 Transport and packaging.....................................................6 3.1 Warnings.......................................................................6 3.2 Accessories and transport inspection ...........................6 3.3 Disposal of packaging...................................................6 Configuration and functions.................................................7 4.1 General .........................................................................7 4.2 Characteristics of the VOSSOR BUSINESS .................7 4.3 The device ....................................................................8 4.4 Keys and functions........................................................9 4.5 Display symbols ..........................................................10 Getting started with your VOSSOR BUSINESS ................11 5.1 Installing the VOSSOR BUSINESS ............................11 5.2 Battery of the VOSSOR BUSINESS ...........................12 5.2.1 Charging the battery .........................................12 5.2.2 Disposal of the battery ......................................12 5.3 Turning on the VOSSOR BUSINESS .........................12 5.4 VOSSOR BUSINESS and mobile phone ....................12 5.4.1 First time pairing ...............................................13 5.4.2 After pairing ......................................................13 5.5 Setting up the VOSSOR BUSINESS ..........................13 5.5.1 Setting the menu language ...............................13 5.5.2 Display ..............................................................14 5.5.3 Volume..............................................................14 5.5.4 Ring tone volume ..............................................14 5.6 Turning off the VOSSOR BUSINESS .........................14 Phonebook ........................................................................15 1 ENGLISH 6.1 Synchronize the phonebook........................................15 6.1.1 AT command ....................................................15 6.1.2 OPP (Object Push Profile) ................................15 6.1.3 Deleting the phonebook ....................................16 7 Making calls ......................................................................17 7.1 Warnings.....................................................................17 7.2 Making calls from the phonebook ...............................17 7.3 Receiving calls ............................................................17 7.4 Making calls from call register/ last dialed number......17 7.5 Caller ID display..........................................................18 7.6 Rejecting calls.............................................................18 7.7 Voice dial ....................................................................18 7.8 Options during a call ...................................................18 7.8.1 Call waiting .......................................................18 7.8.2 Call transfer between VOSSOR BUSINESS and mobile phone ........................................................18 7.8.3 DTMF................................................................19 8 Other functions of the VOSSOR BUSINESS.....................20 8.1 A2DP functions ...........................................................20 8.1.1 Establishing an A2DP connection .....................20 8.1.2 A2DP functions .................................................20 8.2 Multiconnecting ...........................................................21 8.2.1 Connecting additional mobile phones ...............21 8.2.2 Voice functions .................................................21 8.2.3 Phonebook functions in multiconnecting...........22 8.3 TTS & ASR Feature ....................................................22 9 Care and maintenance ......................................................23 9.1 Cleaning and safety instructions .................................23 10 Trouble-shooting ...............................................................24 10.1 Warnings.....................................................................24 10.2 Trouble-shooting .........................................................24 11 Disposal ............................................................................26 12 Warranty............................................................................27 13 Specifications ....................................................................28 14 Declaration of conformity...................................................29 2 ENGLISH 1 Preface Please read the instruction in this manual carefully to get familiar with your VOSSOR BUSINESS and be able to use its functions properly. We hope you enjoy your product. 1.1 Information about this manual This manual is part of the VOSSOR BUSINESS (referred to as ‚unit’ in the following) and contains important instructions regarding the setup, safety, intended use and maintenance of the unit. Keep the manual near the unit for future reference. Please hand over the manual along with the unit to any subsequent owner. 1.2 Warnings In this manual the following warnings will be used: WARNING A warning of this class indicates a potentially dangerous situation. If you do not avoid such dangerous situation, this might result in serious injuries. ► Follow the instructions of these warnings to avoid injuries to persons. ATTENTION A warning of this class indicates a potential damage to property. If you do not avoid such situation, this might result in damage to property. ► Follow the instructions of these warnings to avoid damage to property. NOTE A note indicates additional information that can make usage of the unit easier. 3 ENGLISH 1.3 Corporate veil All specifications, data and instructions for installation, operation and maintenance in this manual comply with our actual knowledge at the time of printing and have been made in consideration of our experience and to the best of our knowledge. No claims can be derived from any data, pictures and explanation in this manual. The manufacturer is not liable for defects resulting from: Non-observance of this manual Improper usage Improper repairs Technical modifications Use of improper accessories Translations have been carried out to the best of our knowledge. We are not liable for translation errors, even if the translation has been carried out by us or on our request. Only the original German text is binding. 1.4 Copyright protection This documentation is protected by copyrights. Seecode Technology Ltd & Co. KG reserves the right to photomechanically print, to reproduce and distribute parts or all the content via special means (e.g. data processing, storage medium or data networks). Content and specifications are subject to change. 4 ENGLISH 2 Safety This chapter contains important safety instruction for the use of this unit. The unit complies with all mandatory safety regulations. 2.1 Intended use This unit is intended for the use as handsfree unit in cars only. Any other or extended use will not be considered intended use. We are not liable for any defects resulting from improper use. The user bears the risk. 2.2 General warnings Please observe the following safety warnings for a safe usage: ► Check the unit for externally visible damage before using. Do not use a damaged unit. ► Have repairs done by qualified experts only, those qualified by the manufacturer. ► Repairs during the warranty period are to be conducted by a customer service authorized by the manufacturer, otherwise any claim for subsequent damage under this warranty will be void. ► Damaged parts must be replaced by original parts only. Only such parts fulfill all relevant safety regulations. 5 ENGLISH 3 Transport and packaging This chapter contains important information on transport and packaging of the unit. Please follow the instructions to avoid dangers and damage. 3.1 Warnings WARNING ► Packaging materials must not be used as toys. There is a risk of suffocation. 3.2 Accessories and transport inspection The following accessories are provided: Handsfree unit VOSSOR BUSINESS 12/24V car charger Built-in battery Guard bands User manual NOTE ► Check the package for completeness and visible damage. ► Immediately inform the forwarder, insurance and distributer about incomplete delivery or damage resulting from inadequate packaging or transport. 3.3 Disposal of packaging The packaging shields the unit from damage during transport. The packaging materials have been selected under consideration of environmental compatibility and disposal methods and are therefore fully recyclable. Returning packaging materials to the material flow will save resources and reduce waste accumulation. Please dispose used packaging materials at collection points provided by the »Green Dot« recycling initiative. NOTE ► Please keep the original packaging during the warranty period in order to properly ship the unit in case of any warranty claims. 6 ENGLISH 4 Configuration and functions This chapter contains important information on the configuration and functions of the unit. Please follow the instructions in order to avoid dangers or damage. 4.1 General The VOSSOR BUSINESS is a handsfree unit for cars, which will be easily mounted on the rear view mirror of a car. The unit will connect to a mobile phone via BluetoothTM. Phone numbers of the mobile phone may be synchronized with the VOSSOR BUSINESS . 4.2 Characteristics of the VOSSOR BUSINESS Synchronize phone book via OPP (Object-PushProfile) or AT commands Phonebook memory for up to 2000 numbers Continuous caller ID display (if saved in the memory of the VOSSOR BUSINESS) Signal strength display for the connected mobile phone (if the mobile phone being used supports this function) DSP technology for echo cancellation and noise reduction Supports DTMF tones (DUAL TONE MODULATION FREQUENCY) Digital volume control Dot matrix LCD (liquid crystal display) Memory for dialed/received/missed calls Voice dial Adjustable screen contrast Battery status display Software can be updated 7 ENGLISH 4.3 The device Display Microphone Volume - Volume + Receiving Menu End On/off switch Power connection / service connection Battery compartment Battery Speakers Clamps Battery cover 8 ENGLISH 4.4 Keys and functions Receive calls Voice dial Call transfer Yes (in menu) End calls Reject calls No (in menu) Turn on/off (press for 2 seconds) Bluetooth link connection Volume + Up (in menu) Left (in menu) Volume Down (in menu) Right (in menu) DTMF (Dial Tone Modulation Frequency) Only active during a call Phonebook Transferring mobile phone contact details (integrated and SIM phonebook) to VOSSOR BUSINESS via OPP or AT commands LCD setup Contrast Disconnect Bluetooth link Delete phonebook Delete complete phonebook 9 ENGLISH 4.5 Display symbols LCD symbols SEECODE Welcome screen BT pairing mode BT pairing successful BT search mode (flashing) SEECODE DAVID DAVID DAVID BT disconnected Outgoing call Incoming call Missed call Menu Signal strength indicator (for the paired mobile phone) Battery display (charge state of the VOSSOR BUSINESS) Call transfer to mobile phone Voice dial Call Register Call register Volume indicator AT command „Inquire“ AT command „Phonebook transfer in progress“ AT command „Phonebook transfer successful“ OPP phonebook transfer in progress BT = Bluetooth TM 10 ENGLISH 5 Getting started with your VOSSOR BUSINESS This chapter contains information on how to get started with the unit. Please follow the instructions in order to avoid dangers or damage. 5.1 Installing the VOSSOR BUSINESS WARNING A unit improperly or carelessly installed in the car might impede the driving safety! ► Properly install the unit and ensure correct mounting! ► Only use the unit, if there is no obstruction of the view in the rear view mirror! NOTE Before installing the VOSSOR BUSINESS: ► Turn off your car engine. ► Fasten the handbrake. Take all parts included in the VOSSOR BUSINESS from the packaging. Turn the unit with the back side pointing to you. Push the two brackets of the guard bands marginally into the four supports (1) next to the clamp holder (2). Thereby respectively mount the band (3) with the buckle on the top. Adjust the bands according to the size of the car rear view mirror. Mount the unit on the car rear view mirror and respectively push the flap into the buckle. In order to unlock, press the middle part of the buckles. 3 1 11 2 ENGLISH 5.2 Battery of the VOSSOR BUSINESS 5.2.1 Charging the battery NOTE Charge the battery for at least 8 hours before using the first time; this is to prolong the battery life. NOTE The battery can remain in the unit during charging. 1. Connect the cable of the charger with the cigarette lighter of your car. 2. Connect the cable of the charger with the charger socket of the unit. 5.2.2 Disposal of the battery NOTE Dispose the battery at collection points in your community or specialist shops. Do not dispose as normal domestic waste. 5.3 Turning on the VOSSOR BUSINESS To turn on the unit, press for about two seconds. The unit is now in the search mode and searches for paired devices. This search mode stays active for 5 seconds. If a phone is not found, then SEECODE appears on the display. To start a new search, press . If you have already paired the unit and your mobile phone, press to activate the automatic search mode. 5.4 Pairing VOSSOR BUSINESS and mobile phone NOTE Switch on the Bluetooth function of your mobile phone before pairing. Please refer to the manual of the mobile phone for more information on how to establish a Bluetooth connection and how to pair the phone with other devices. 12 ENGLISH 5.4.1 First time pairing 1. Turn on the VOSSOR BUSINESS and wait till the search mode has been finished. 2. Press and hold the menu button for two seconds; the text READY PAIRING appears on the display. 3. Use your mobile phone to search for other Bluetooth devices. After the VOSSOR BUSINESS has been found, it will appear in the list of devices with its ID SEECODE. 4. Enter the pairing code "0000" when asked for the password. 5. will be shown in the display and indicates the pairing was successful. NOTE You can use the VOSSOR BUSINESS as a handsfree unit for multiple mobile phones (see Multiconnecting section). Each of these mobile phones must first be paired with the VOSSOR BUSINESS. During the pairing, no other mobile phone may be connected to the VOSSOR BUSINESS. 5.4.2 5.5 After pairing After successful pairing you may connect the mobile phone with the VOSSOR BUSINESS by pressing on the VOSSOR BUSINESS one time. Make sure the Bluetooth function of your mobile phone has been activated before pressing . After successful connection you will hear a single beep and the display shows the Bluetooth identification of your mobile phone . Setting up the VOSSOR BUSINESS NOTE The setup function is only available during an activated Bluetooth connection. 5.5.1 Setting the menu language 1. Press the menu button. 2. Use the and the Setting menu item. 3. Press buttons to move in the menu to to confirm. 4. Use the and buttons to move to the Language Setting menu item and press again to confirm. 5. Use the language. 6. Press and buttons to select the desired to save the setting. 13 ENGLISH 5.5.2 Display 1. Press . 2. Use and to scroll through the menu until you reach the setting LCD Contrast. 3. Press to enter. 4. Use and to adjust the settings via the contrast bar (10 levels available). 5. Press 5.5.3 to save the setting. Volume During a call, adjust the volume using 5.5.4 and . Ring tone volume During standby (VOSSOR BUSINESS is turned on but no call in progress), adjust the ring tone volume using and . 5.6 Turning off the VOSSOR BUSINESS To turn off the unit, press for two seconds. 14 ENGLISH 6 Phonebook 6.1 Synchronize the phonebook Via AT command or OPP (Object Push Profile) you may transfer all mobile phone contacts to the VOSSOR BUSINESS. NOTE ► Not every mobile phone supports the phonebook transfer function via AT command. ► The VOSSOR BUSINESS can manage phonebooks for multiple mobile phones. See the Multiconnecting section. 6.1.1 AT command To transfer the phonebook via AT command: 1. Connect the mobile phone with the VOSSOR BUSINESS. 2. Press . and to scroll through the menu until you 3. Use reach the setting PHONEBOOK. 4. Press to enter transfer mode. 5. Press to start transfer or press to cancel. flashes in the display during transfer. After successful transfer the display will be showing NOTE If the display shows no response, your mobile phone does not support transfer via AT command. Please try transferring via OPP. 6.1.2 OPP (Object Push Profile) If your mobile phone does not support the transfer via AT command, you may also transfer contacts via OPP to the VOSSOR BUSINESS. To transfer phonebook via OPP: 1. Disconnect the VOSSOR BUSINESS from the mobile phone. The mobile phone now considers the VOSSOR BUSINESS as a remote station and not as car accessory. 15 . ENGLISH 2. Transfer the mobile phone contacts to the VOSSOR BUSINESS. Please refer to the manual of your mobile phone on how to do that. Depending on the mobile phone you may transfer the complete phonebook at once or a single contact at a time. 3. will be shown in the display during transfer. 4. After successful transfer the display will be showing “xxx records“, indicating the amount (xxx) of properly transferred contacts. 5. Check through the menu if all contacts have been transferred correctly. 6. Reconnect the mobile phone with the VOSSOR BUSINESS. 6.1.3 Deleting the phonebook NOTE Only the entire phonebook can be deleted. To delete the phonebook: 1. Press 2. Use and to scroll through the menu until you reach the setting Del Phonebook. 3. Press . 4. The display will be showing Are you sure? 5. Press to confirm or to cancel. 16 ENGLISH 7 Making calls This chapter contains important information on the operation of the unit. Please follow the instructions to avoid dangers or damage. 7.1 Warnings WARNING Distractions by phone calls and careless driving may result in severe accidents! ► Keep your attention at driving when making calls using the VOSSOR BUSINESS. You may engage calls with the VOSSOR BUSINESS or your mobile phone. 7.2 Making calls from the phonebook 1. Press 2. Use and to scroll through the menu until you reach the setting Phonebook. to enter the phonebook. 3. Press 4. Select the initial letter of your desired contact using or , and press to search the contact. 5. Use or to continue searching among the contacts with the same initial letter. to call the selected contact. 6. Press If you have saved several numbers under one contact, the respective number will be shown with an additional letter behind the contact: M (Mobile), H (Home, private) or O (Office, work). 7.3 Receiving calls You may receive calls through your mobile phone or the VOSSOR BUSINESS . Press VOSSOR BUSINESS. 7.4 to answer a call with the Making calls from call register/ last dialed number 1. Press 2. Use . and to scroll to the desired number. 3. Press to call. Dialed numbers are indicated by in front of the name, received calls by, and missed calls by . To redial the last number dialed, press 17 two times. ENGLISH 7.5 Caller ID display The VOSSOR BUSINESS displays incoming calls in 3 ways: 1. Name The VOSSOR BUSINESS displays the name of the caller, if it has been saved in the phonebook of the unit. 2. Number If the caller has not been saved in the phonebook, only the number will be displayed. 3. Number withheld If the caller withholds their caller ID, “withheld“ will be showing in the display. 7.6 Rejecting calls Press 7.7 to reject a call. Voice dial NOTE To use this function, you must have saved voice tags in your mobile phone for the respective number. To start voice dial: Press and hold for two seconds. Say the desired name after the tone. If the unit fails to recognize the name, you will hear a tone twice. Press 7.8 to repeat above steps. Options during a call 7.8.1 Call waiting NOTE The call waiting function depends on the network and might not be everywhere available. To accept a new call during a conversation: 1. Press ; the second call will be answered. 2. Press to switch between both calls. 3. Use 4. Press / to chose the desired line to confirm. 7.8.2 Call transfer between VOSSOR BUSINESS and mobile phone Press and hold for at least two seconds in order to transfer an active call from the VOSSOR BUSINESS to your mobile phone. 18 ENGLISH 7.8.3 DTMF NOTE This function is necessary when numeric entries during a call with a computer voice (e.g. hotline) are required. 1. Press 2. Use 3. Press for two seconds. or to select or 19 to select the desired digit. to cancel. ENGLISH 8 Other functions of the VOSSOR BUSINESS 8.1 A2DP functions NOTE ► Devices connected to the VOSSOR BUSINESS (mobile phones / media players) must also support the A2DP profile. ► A2DP is only available if only one mobile phone is connected to the VOSSOR BUSINESS. If a second phone is connected, A2DP is automatically deactivated. The VOSSOR BUSINESS supports the A2DP profile. If there is an active connection to a media player / mobile phone, the A2DP function can be used to playback music and to control the media player remotely by means of the VOSSOR BUSINESS. 8.1.1 Establishing an A2DP connection According to the features of the mobile phone, an A2DP connection to the VOSSOR BUSINESS can be established automatically when you start playing back music on the mobile phone. appears on the display of If there is an A2DP connection, the VOSSOR BUSINESS. If your mobile phone does not automatically establish the connection, follow the instructions in the phone’s manual for establishing an A2DP connection before you start playing back the music. 8.1.2 A2DP functions The following functions can be used with a mobile phone that supports both A2DP and also AVRCP for controlling the phone’s music player remotely by means of the VOSSOR BUSINESS: Start A2DP mode: Press Play: Press . Stop: Press . two times. Volume: Use the volume. or Next title: Press for two seconds. button to change the Previous title: Press for two seconds. Disconnect: Press the menu button twice. NOTE In case there is an incoming call, the music playback is interrupted. You can accept or reject the call as usual. After the end of the call, the music playback is continued automatically. 20 ENGLISH 8.2 Multiconnecting The VOSSOR BUSINESS can be connected simultaneously to up to two mobile phones. 8.2.1 Connecting additional mobile phones The VOSSOR BUSINESS can be connected to additional (already paired) mobile phones in different ways. After the VOSSOR BUSINESS is turned on, the unit connects to max. Two mobile phones that were last connected. Connection starting from the VOSSOR BUSINESS: If there is no active connection, press . The VOSSOR BUSINESS connects to the mobile phone that was last used. Then it connects automatically to the other mobile phone that was last used. NOTE If the desired mobile phone is not the one that was last used, start the connection from the mobile phone. Connection starting from the mobile phone. Connect the VOSSOR BUSINESS to the mobile phone as described in the phone’s manual. NOTE Each additional connection can be established only after successful connection of the first mobile phone. After all of the mobile phones have been successfully connected, the first is the primary phone and the others are set to stand-by mode. The order can be changed only after the primary phone has been disconnected from the VOSSOR BUSINESS. Only the name of the primary phone appears on the display of the VOSSOR BUSINESS. Outgoing calls via the VOSSOR BUSINESS, such as redial or voice dial, are performed only with the primary phone. Outgoing calls from all of the mobile phones are performed via the VOSSOR BUSINESS just as normally as in the case of a single connection. 8.2.2 Voice functions In the case of a simultaneous connection with two mobile phones: If only one device receives a call, the call can be accepted completely normally via the VOSSOR BUSINESS. If two devices receive calls at the same time, the VOSSOR BUSINESS can accept only the call that reached it first. In this case, all of the operating options of the VOSSOR BUSINESS only apply to the call that was 21 ENGLISH received first. After the end of the first call, press , in order to hand the second call over to the VOSSOR BUSINESS, otherwise the call remains on the mobile phone. 8.2.3 Phonebook functions in multiconnecting This feature will automatically activate when a mobile is connected with the unit at the first time. You will see an ARROW sign showing the download is in process and it will disappear when download is completed. After you have uploaded your phonebook contact from the first mobile, if you are trying to connect a second mobile when the first mobile is not connected, auto phonebook download will be automatically activate and download the second phonebook. Phonebook from the previous mobile will be deleted. 8.3 TTS & ASR Feature To enable/disable TTS & ASR feature: Press MENU Scroll to Setting and press SEND Scroll to TTS Press SEND to enable or disable TTS function *Note: When TTS disabled, ASR will also be disabled. How to use voice command to accept call: When there is incoming call, TTS will announce the caller’s name or number. Then you will hear a tone “DO” afterward. At that time, you can say “Answer” to accept the call or “Reject” to refuse the call. . 22 ENGLISH 9 Care and maintenance This chapter contains important information on cleaning and maintenance of the unit. Please follow the instructions to avoid damage from improper cleaning and to ensure trouble-free operation. 9.1 Cleaning and safety instructions ATTENTION Observe the following cleaning and safety instructions before you start cleaning the unit: ► Do only clean with a dry, soft, lint-free cloth. ► Even in case of severe staining, only slightly dampen the cloth, preferably with very little water. ► Do not use aggressive or abrasive cleaning agents, even in case of severe staining, and do under no circumstance use solvents as these might destroy the synthetic surface of the VOSSOR BUSINESS. 23 ENGLISH 10Trouble-shooting This chapter contains important information on trouble-shooting. Please follow the instructions to avoid dangers and damage. 10.1 Warnings ATTENTION ► Only experts qualified by the manufacturer should repair electrical appliances. ► Improper repairs may result in significantly damaging the unit. 10.2 Trouble-shooting Network strength is not displayed: This function is not supported by all mobile phones. Pairing not possible: Turn the unit off/on and try again. Before pairing, turn off other Bluetooth devices. Make sure the VOSSOR BUSINESS displays READY PAIRING. Volume too low: Increase the volume during a call with your mobile phone to maximum setting. Voice of the VOSSOR user too low on the other side: Try the following steps during a call: or The caller increases the volume of their mobile phone to maximum setting. The caller receives loud echo: Transfer the call to your mobile phone and check if the echo remains. If the echo disappeared, transfer the call back to the VOSSOR BUSINESS and reduce the volume, until the echo disappears. If the echo remains with the use of the mobile phone, it is caused by the phone or the network and may not be removed by changing the settings of the VOSSOR BUSINESS. Volume to high/low and not adjustable: First adjust the volume of the mobile phone and then use the volume settings of the VOSSOR BUSINESS for precise adjustment. 24 ENGLISH A dialed number cannot be found in the call register: Numbers dialed directly from the mobile phone cannot be stored in the call register of the unit. The display freezes and the keys do not function: Turn the VOSSOR BUSINESS off and on again. The mobile phone supports A2DP, but the A2DP service does not automatically connect to the VOSSOR BUSINESS: For some mobile phones, the A2DP connection must be established manually from the mobile phone. Refer to the user’s manual of the mobile phone. Multiconnecting is not possible: Make sure that a first pairing has already been performed. Disconnect A2DP for the connected mobile phone. Try to establish a connection through the mobile phone. The unit is no longer responding to key presses: On the back side of the VOSSOR BUSINESS there is an opening in the housing above the warranty seal. Using a narrow point (e.g., a bent paper clip), briefly press (do not hold) the reset button that is located in this opening. The unit will be reset. Product-specific problems: Many Nokia phones: Call transfer: When the VOSSOR BUSINESS transfers a call to the mobile phone, the Bluetooth connection will be disconnected. In order to reconnect, shortly press (do not hold) the receive call button. LG KG800: When the connection to the VOSSOR BUSINESS is initiated by the mobile phone, only the headset mode will be supported. Features like call transfer, rejecting calls or DTMF are therefore not available. If the connection is initiated from the unit, the mobile phone will be connected in handsfree mode, and all features are available. 25 ENGLISH 11 Disposal This chapter contains important information on the disposal of the unit. Please follow the instructions in order to avoid damage from improper storage. Old electric and electronic appliances often contain valuable materials, but also hazardous materials necessary for their functioning and safety. If disposed through residual waste or if treated improperly, these may harm physical health and the environment. Do under no circumstances dispose your unit through residual waste. NOTE ► Dispose your unit at collection points provided by your community for the recycling of old electric and electronic appliances. Check with your local authority, waste collection or retailer. ► Keep old appliances out of reach for children. 26 ENGLISH 12 Warranty For this product we issue a guarantee of 24 months, starting from the date of purchase, for defects that verifiably result from manufacturing or material errors. Your legal warranty claim rights according to §439 ff. BGB-E shall remain unaffected. The guarantee does not cover defects from improper use or operation, or defects that do only have an insignificant impact on the functioning and value of the unit. Furthermore not covered under this guarantee are parts subject to wear and tear, transport damage unless caused by us, as well as damage caused by repairs that have been conducted by others than us. In case of valid claims we will optionally repair or replace the defect unit. Visible defects are to be announced within 14 days after delivery. Further claims shall be excluded. To claim warranty rights, please contact us before sending back the unit (always with purchase receipt!). 27 ENGLISH 13 Specifications Battery 3.7V, 1700mAh, Li-Ion Speakers 8 Ohm/1W (normal) MIC -62 +/- 2dB Power consumption Max. 200mA Mains connection 5V/650mA Frequency range 2400MHz - 2480MHz Modulation method GFSK, 1Mbps, 0.5BT Gaussian Transmission power typ. 1,0dBm Hopping 1600 hops/sec, space RX Sensitivity typ. -83,0dBm Integrated memory Flash Memory (8MBit) Operation temperature -10 to 50 °C Storage temperature -20 to 70 °C Noise elimination yes Echo cancelation yes Supported profiles HSP, HFP, OPP Standby time 500 hrs Talk time 25 hrs 1MHz channel 28 ENGLISH 14 Declaration of conformity Declaration of Conformity We hereby declare that the following designated product rear-view-mirror with integrated Bluetooth hands-free system Model VOSSOR BUSINESS is in conformity to all the essential requirements of EMC directive. The product satisfies all the technical regulations applicable to the product within the scope of Article 3.1 (b) of Directive 1999/5/EC Standards applied: EN 301 489-17 : V1.3.2 (2008-04) EN301 489-1 : 2008 V1.8.1 EN300 328 : 2006 V1.7.1 EN 50371 2002 The declaration is in responsibility of the Manufacturer Seecode Technology Ltd & Co KG Rösrather Str. 333 51107 Köln Germany Date of Issue: 5 December 2007 Signature of authorized person 29