1
DYNAMIC MASS MARKETING PROCESSOR
A thesis written at
ROSEVILLE CHRYSLER JEEP
and submitted to
KETTERING UNIVERSITY
in partial fulfillment
of the requirements for the
degree of
BACHELOR OF SCIENCE IN COMPUTER SCIENCE
by
ANTHONY MONTALBANO
Author
Employer Advisor
Faculty Advisor
DISCLAIMER
This thesis is submitted as partial and final fulfillment of the cooperative work
experience requirements of Kettering University needed to obtain a Bachelor of Science in
Computer Science Degree.
The conclusions and opinions expressed in this thesis are those of the writer and do
not necessarily represent the position of Kettering University or Roseville Chrysler Jeep, or
any of its directors, officers, agents, or employees with respect to the matters discussed.
ii
PREFACE
This thesis represents the capstone of my five years combined academic work at
Kettering University and job experience at Roseville Chrysler Jeep. Academic experience in
Computer Science proved to be a valuable asset while I developed this thesis and addressed
the problem it concerns.
Although this thesis represents the compilation of my own efforts, I would like to
acknowledge and extend my sincere gratitude to the following persons for their valuable time
and assistance, without whom the completion of this thesis would not have been possible:
1.
Wayne Andrei
2.
Gil Hale
3.
David Johnston
4.
Jim Huggins
iii
TABLE OF CONTENTS
DISCLAIMER ....................................................................................................................... ii
PREFACE ............................................................................................................................. iii
LIST OF ILLUSTRATIONS ................................................................................................ vi
I.
INTRODUCTION ..................................................................................................... 1
Problem Topic ............................................................................................... 1
Background .................................................................................................... 1
Criteria and Parameter Restrictions ............................................................... 2
Methodology .................................................................................................. 2
Primary Purpose ............................................................................................. 3
Overview ........................................................................................................ 3
II.
CONCLUSIONS AND RECOMMENDATIONS .................................................... 4
III.
PREVIOUS SOLUTIONS........................................................................................... 6
Third Party Marketing Tools ........................................................................... 6
Dealership Customer Management System Market Tool................................ 7
Previous Solutions Concluding Thoughts........................................................ 8
IV.
DEALERSHIP CUSTOMER MANAGEMENT SYSTEM (DCMS)......................... 9
V.
USER FUNCTIONALITY ........................................................................................ 10
Main ............................................................................................................... 10
Create/Edit Document.................................................................................... 12
Build Document ............................................................................................. 19
Preview Document......................................................................................... 22
VI.
TECHNICAL UNDERSTANDING.......................................................................... 24
Initializing RosePro ....................................................................................... 24
Creating/Editing a RosePro Document.......................................................... 25
Building the Document .................................................................................. 26
Merging the Document .................................................................................. 28
Concluding Technical Thoughts .................................................................... 28
iv
REFERENCES .................................................................................................................... 30
GLOSSARY ........................................................................................................................ 31
APPENDICES ..................................................................................................................... 34
APPENDIX A: SOURCE CODE ............................................................................. 35
APPENDIX B: USER’S MANUAL......................................................................... 70
APPENDIX C: PROGRAM OUTCOMES .............................................................. 81
v
LIST OF ILLUSTRATIONS
Figures
Page
1.
Main window example ................................................................................................... 11
2.
Create/edit document window example ......................................................................... 13
3.
Build document window example ................................................................................. 20
4. Details of loaded data file .............................................................................................. 21
5.
Preview document window example ............................................................................. 22
vi
I. INTRODUCTION
The Dynamic Mass Marketing Processor is an application developed for Roseville
Chrysler Jeep. The application is completely dependent on the Dealer Customer
Management System (DCMS), developed by Gil Hale. The Dynamic Mass Marketing
Processor has been titled RosePro. RosePro is a tool to generate mass marketing lists
from the current customer database.
Problem Topic
At Roseville Chrysler Jeep, like all dealerships, keeping in contact with its
customers is a big key to success. Over the years the dealership has build a very large
and extensive database of customers. Roseville Chrysler Jeep has never been able to use
this customer database for a marketing strategy. The dealership wants to be able to build
unique customer lists for specific marketing, but has no tool simple enough to use.
Background
A simple software system was proposed. The software was titled RosePro and
would be a simple, easy-to-use program allowing anyone in the dealership to create mark
able customer lists. Currently, within Gil's DCMS, there is a feature that generates lists
specific to criteria, but each option is hard coded into DCMS and there are no options to
modify the selection of data. RosePro puts the creation of generating marketing data in
the user’s hands. Previous methods to creating marketing material involved many hours
writing unique scripts to pull information from the database and then creating documents
1
into which to merge the data. Roseville Chrysler Jeep wanted to simplify this process
and make it as "user-friendly" as possible. Development of the project was guided by
Wayne Andrei
Criteria and Parameter Restrictions
There were very specific development criteria. Since it is very easy to get carried
away with software development features, each criterion was chosen carefully. To limit
the budget, no new software development tools were purchased. The project was
developed within Microsoft Access 2002, which Roseville Chrysler Jeep currently owns.
This still gave the flexibility of Visual Basic without the need for a new Visual Basic
license. Obviously, the new system must operate within the data constraints provided by
the DCMS FoxPro database.
Methodology
To make this project possible an Open Database Connectivity (ODBC)
connection to the DCMS FoxPro database was established. Once the connection was
made, the database tables were linked into Microsoft Access. This allowed the software
to be designed specifically for the data tables now present in Microsoft Access. Before
laying out any of the graphical user interface (GUI), a list of fields that would be most
commonly used as criteria in specifying customer details (i.e.- name, address, vehicle
make, vehicle model) was created. Small scripts were written in order to test the integrity
of the database. After a few days of testing a generic formula that would be used in
selecting a list of customers from the database. Using this formula a program was created
2
that would input all of the variables. Finally a GUI that was simple and easy to use was
created to communicate with the rest of the program. The software was tested for a few
weeks before users were asked to test software. Errors were recorded and later fixed.
One final test was done with successful results. The project was completed.
Primary Purpose
RosePro, a dynamic mass marketing processor, successfully generates data highly
sufficient for creating marketing campaigns for Roseville Chrysler Jeep and merges them
into documents formatted for direct market use.
Overview
The following chapters describe the research, implementation, execution, and
testing of RosePro, a dynamic mass marketing processor. Considerable time was spent
researching and learning the details and system structures of both Gil's DCMS database
and the possibilities of final output. This lead to a plan of attack on implementation and
testing. Upon completing the project was put through many tests, by the developer and
other testers. Reports came back and changes were made to fix the flaws. A second set
of tests were made and the project proved very successful.
3
II. CONCLUSIONS AND RECOMMENDATIONS
Developing marketing lists was made much easier with the creation of RosePro.
The program will continue to be used at the dealership in many different marketing
campaigns Roseville Chrysler Jeep will undertake. Now, almost anyone can create
marketing documents and unique customer lists in a few minutes, as opposed to multiple
hours. In the future, possible upgrades will allow the user to create not only the customer
lists, but also the formatted documents used for merging within RosePro. Other fields
could be added to broaden the possible choices for delimiting what criteria to use when
making customer selection.
During the development and implementation of my software, further
unanticipated problems were encountered. The different individual conclusions and key
findings are listed below. They are listed in chronological order, starting with the
research regarding possible recommendations for the future.
1.
The first major problem was trying to connect to the database. A direct database
connection was not possible. This lead to the creation of an ODBC connection
and then linking the tables within the database.
2.
Once into the database tables trying to decipher the meaning behind the names of
the fields became very confusing. After multiple phone conversations with Gil
Hale a list of database table fields and a description of each field was created.
3.
At a technical level, creating queries to pull the data became very tedious. The
sample results did not match with manual results. The initial formula for creating
a query to be run on the database needed to be restructured. Joining the tables in
different orders yielded lists that were accurate.
4
4.
A couple of early tests revealed that creating customer lists based on a date range
had an effect on the frequency with which these lists were built. Assuming a user
built a 0 to 7 day list today and two days later did the same build, there is
potential overlap of five days. To correct this potential problem the ability to do a
progressive build was added. When progressive build is enabled the system will
look at the last time the document was created and base its criteria on this date,
which will eliminate any overlap. This feature became optional, since the
situation will not always occur.
5.
When the initial formula was created a few of the date fields chosen for
comparison were based off of the same model Gil Hale had used in his DCMS.
Initial results matched well with DCMS, but after further examination we were
able to see that actually these values were wrong. Instead a new formula that was
a combination of date formulas was required. In the end we were able to fix a
problem that was previously undetected.
6.
An issue that came up during the testing phase was determining exactly what the
created document in RosePro will do, after creation. So a new feature was added
that allows the user to preview what that document will do.
7.
While error testing RosePro it became apparent that required fields must be filled
out in order for a minimal list to be built. To alleviate any potential human error,
a new document in RosePro cannot be saved without the required fields properly
filled out.
8.
Since RosePro is dependent on being connected to the database remotely, it is
possible for the computer in which RosePro is installed on to become
disconnected. If, the computer became disconnected during a user's build, they
would never know this and it would appear that RosePro is continually building,
forever. Even though this case is rare a 30 minute time out was established, after
which RosePro will notify the user that there is an issue with the connection to the
database and a simple computer reboot should re-establish the connection.
5
III. PREVIOUS SOLUTIONS
Prior to the creation of RosePro, previous systems did exist. There were
essentially two other methods for obtaining mass marketing material for Roseville
Chrysler Jeep. In this chapter these two methods will be described followed by the
drawbacks to the systems. One of the methods required interaction with a third party that
was not only costly and limited, but took a substantial amount of time, (three to five
days). The other method, quicker, but similar to the first method, was limited in its use.
Both methods limited the creativity and extensibility of the dealership's marketing
techniques.
Third Party Marketing Tools
Before any in-house software solutions were provided, Roseville Chrysler relied
on a third-party marketing company to develop unique customer lists. The third-party
company provided choices the dealership could make on marketing strategies (e.g.
customers with three purchases, new weekly customers). The third-party company had
access to the dealership customer database and within a few days would mail the
marketing lists and/or documents to Roseville Chrysler Jeep.
The third-party company did offer a wide variety of marketing choices, but the
choices were still limited. This method was successful, but it also was costly, depending
how often the dealership needed to create new marketing documents and how urgently
6
they needed them. Roseville Chrysler Jeep relied on this method heavily, up until about
three years ago, when a better method was created.
Dealership Customer Management System Market Tool
Within Gil Hale’s DCMS is a feature that allowed its users to build mailing lists.
In this feature one could not create a new type of mailing list, but only use pre-existing
ones. Once a build has been completed in DCMS data is outputted to a CSV file, which
could be used for any purpose.
Given this CSV file, a manual process was created to make the CSV data more
appealing. These steps include the following:
1.
The file was opened using Microsoft Excel and a set of fields that are irrelevant to
the rest of the process was removed. Also, while the document is open in Excel,
all records that were missing required fields for mailing were removed. The file
was resaved.
2.
Second, a Microsoft Word document was opened, and the details of the
marketable document were created. Next, using Word’s mail merge, the
previously edited CSV file were linked to the document. Using the mail merge
toolbar, fields from the CSV file were entered into the document. This Word
document was then saved, for potential re-use.
3.
Finally the Word document was merged, typically to the printer. This complete
process is repeated for each unique marketing list and document.
7
Prior to the use of RosePro, this was the primary method for achieving custom
marketing documents. If there was a case where a new type of marketing list was
needed, outside of the choices available in DCMS, Gil Hale was contacted and he would
have to hard code a new type of marketing list. This process could take a few days.
There was a lot of room for human error during the manipulation and creation of the new
documents. The process was relatively tedious and could take up to an hour to complete.
Previous Solutions Concluding Thoughts
While both systems were effective, the biggest drawbacks to their use were time
and limited functionality. The goal of RosePro is to expand on infinite possibilities of
marketing, in a timely manner. Wayne Andrei had once mentioned the fact that there are
thousands of records in the DCMS database and the data is barely being used. This is
where RosePro is put to the test.
8
IV. DEALERSHIP CUSTOMER MANAGEMENT SYSTEM (DCMS)
Dealership Customer Management System or DCMS, for short, was developed by
Gil Hale. Gil Hale is an independent database programmer who has spent over five years
developing DCMS. Roseville Chrysler Jeep is one of his “guinea pig” clients. Currently
there are two main database systems that nearly all vehicle dealerships use: ADP and
Reynolds & Reynolds. DCMS is a Microsoft Windows application that synchronizes the
database from either ADP or Reynolds & Reynolds. The purpose of DCMS is to provide
a user-friendly solution to viewing and modifying customer data in the database.
DCMS was developed in Microsoft Visual FoxPro. Within DCMS there are
many tools including the ability to search customer records and view information in great
detail. A tool within DCMS allows one to select a list of customer builds, tentatively
called Builds. These builds, as previously stated in chapter III, output unique customer
lists to files. Examples of builds include all customers who have purchased a vehicle in
the past 30 days or all sales customers.
The functionality of DCMS is extensible and rather easy to use. Tools for mass
marketing beyond the “Builds” feature have not yet been developed. It is currently
limited to the array of lists within DCMS. At the time of this writing, DCMS remains
under development. A larger number of dealerships have begun to use DCMS.
9
V. USER FUNCTIONALITY
The following chapter will explain the user functionality of RosePro. There are
four main windows for user interaction. Each window will be explained describing its
purpose and usage. Further the process of using RosePro and its efficiency will be
explained.
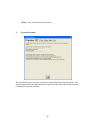
Before using RosePro for its first time, a few things are required. Microsoft
Access is required to run it and an ODBC database connection must be established. To
do so, the location of DCMS’s FoxPro database is needed. In Microsoft Windows XP
the user can create a data source connection, also known as an ODBC. Here the user will
create a data source of type Microsoft Visual FoxPro Driver, give it a name and select the
path of the DCMS database. Upon completion, RosePro is ready to be used.
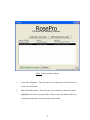
Main
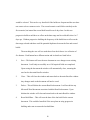
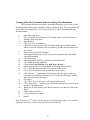
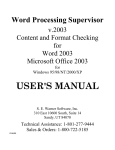
The main window is the first window seen when starting RosePro. The main
window shows all of the current build documents that exist. On this window the user can
also create, edit, preview, or build a document. Figure 1, on the following page, is an
example of RosePro’s main window.
On the main window there are five buttons that do the following:
10
Figure 1. Main window example.
1.
Create New Document – This will open a new window that will allow the user
create a new document.
2.
Edit Selected Document – This will open a new window to edit the document
highlighted in the list of existing builds. The user may also double click on an
existing document and it will open up the same window.
11
3.
Build Selected Document – This will open a new window that allows the user to
build data for the selected document. The user can also merge the data to a Word
document.
4.
Preview – This will open a new window that will display exactly what the
selected document will filter out when built.
5.
Exit – This will simply exit out of the RosePro application and return to Microsoft
Windows.
The main window has an interactive list of currently existing documents in the
middle. The document name, where the document will be sent to upon its merge, and the
last time the document was run are displayed here. Clicking on a document highlights it.
Double clicking on it opens up a new window to edit the details of the document.
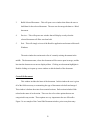
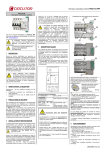
Create/Edit Document
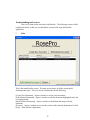
This window includes the heart of the document. In this window the user is given
all of the fields necessary to customizing the type of document to be built and merged.
This window is broken down into four essential sections. Each section includes fields
related to the name of each section. There are also a few other options that are not
categorized in any section. These options are very important to the use of RosePro.
Figure 2 is an example of the Create/Edit Document window, prior to any data entry.
12
Figure 2. Create/edit document window example.
1.
The Document section of the Create/Edit Document window includes fields
specific to the creation of the document. The first objective would be to give the
document a name. Next would be to choose what criteria should be outputted to
file. The user can create documents for mailing, documents that have lists of
phone numbers of customers to be called, or documents that can be emailed. The
user can choose any combination of the three types of lists: address, phone, or
email. Depending on the user’s choice the final Microsoft Word document can be
merged to either a new Word Document, directly to a printer, or to Microsoft
Outlook, in the form of an email.
13
The user will next see a disabled drop down box, defaulting to Sales. (Further
detail about this drop down box can be found later in the chapter.) There is a
sentence with two fields that can be filled in by the user. The sentence reads
“Date Range from ___ days ago to ___ days ago”. By filling in the fields with
numerical values the user can have the document select a list of sales customers
from a specified date range. If both values are left blank, no date range will be
applied. If the first field is left blank, the program will select all customers up
until the date generated by the second field. If the second field is left blank, the
program will select all customers starting with the date generated from the first
field.
The next field down can be automatically filled in by clicking the button labeled
Find Directory. This will allow the user to select the directory into which to save
all archived builds for this document. Next the user will select the Microsoft
Word document into which to merge the data. Clicking Find Side 1 will allow the
user to browse the computer for the Word document. If the user opts to merge
data to the opposite side of the document there is a field and a correlating button
that will act similarly to finding the first Word document.
The new RosePro document cannot be saved without completing a few required
fields. These fields include Name, Send To, Set Save Directory, and Set Side 1.
14
If the user tries to save the document with any of these fields blank, the program
will alert the user of the missing fields and highlight the fields in red.
2.
The next section for the user to consider relates to specific information regarding
the customer. The section is simply labeled Customer. All fields in the Customer
section are optional. Here the user can select all customers with the same first or
last name, or city. If, for example, the user chooses to select more than one zip
code, the user can input a list of zip codes separated by a comma. The same
technique can be used for first name, last name, and city. Furthermore the user
can select, from a drop down box, the birth month of a customer. This can be
very beneficial if Roseville Chrysler Jeep would like to send out a promotion to
all customers that have a birthday within a particular month. There is also a drop
down box to select the state in which the customer lives.
3.
The next section, labeled Sale, concentrates on what type of sale was completed
and who completed the sale. Here a drop down box lists all of the current
salespersons at Roseville Chrysler Jeep. By selecting a salesperson, only
customers who purchased and/or leased from the selected salesperson will be
chosen. There are two check boxes which allow the users to select all sales of
vehicles that were bought or vehicles that were leased (or both).
15
4.
The fourth section, labeled Vehicle, relates to different details regarding the
customer’s vehicle. The user can input the vehicle year, make, and/or model. All
three of these fields allow for multiple inputs, similar to the zip code entry
previously mentioned. If the user opts more than one year, then each year should
be separated by a comma. The same technique can be applied to make and
model.
The user will also see two check boxes which allows for any combination of new
or used vehicles. Finally, disabled, there is a drop down box and an input field
labeled with Mileage. This part will be explained later within this chapter.
As previously mentioned, the four sections have detailed options regarding the
RosePro document, relating to the title of each section. There are also check boxes and
buttons that are not in any section. The details and functionality of each of these options
are a vital part of RosePro. The user will see four check boxes that do not belong to any
section. Each of these check boxes will be explained further.
The check box labeled “Remove Empty Fields” is selected by default. This
option, if selected, will remove all records that do not have the necessary fields to send
out marketing material. If a record is missing any of the following fields, it will be
removed: first name, last name, address, city, state, and zip code. This feature is optional.
16
The check box labeled “Highly Detailed Results” is not selected by default. This
option, if selected, will output the build file with over 100 different fields. This option is
here if the user would like to use the build data for other reasons beyond marketing.
The check box labeled “Include Service History” is not selected by default. This
option, if selected, will not only search sales history, but also service history. The user
will notice, upon making this selection, the Sales drop down box in the Customer section
will become enabled. Also the drop down box and field labeled Mileage under the
Vehicle section will become enabled. Now the user has the ability to search service
history and repair order date by a date range. In the Vehicle section the user can select all
vehicles based on its current mileage at the last time the vehicle was serviced. The drop
down box allows the users to select mileage greater than, equal, or less than the specified
miles in the next field. This option is optional, whether or not service history is included.
The check box labeled “Progressive Builds” is not selected by default. This
option, if selected, will only apply if the document is based on a date range. Given that a
date range has been applied two different scenarios could occur, depending on the
frequency of the document’s build. Given that the user set the date range from 0 to 7
days ago the two scenarios would act out like this. In the first scenario the user would
build the document today and again tomorrow. If the progressive builds option is
selected then the program will look at the last time the document was built. If the date of
the last build is within 7 days, then the program will use the last build day as the limit for
the date range. So the second time building the document only customers from 0 to 1 day
17
would be selected. This can be very beneficial if the builds are frequent and the user does
not want to select customers twice. The second scenario would follow similarly to the
first scenario, but instead the second build would occur 8 days later. In this case
progressive builds would have no effect on the date range and it would still select 0 to 7
days ago. Without progressive building the frequency of the builds has no effect on the
date range selected and there could be potential duplicates between the first and second
builds.
The next thing the user will see under these four check boxes is a collection of
five buttons. Each button has a different action and its details are listed below.
1.
Save – This button will save the new document or save changes to an existing
document. It will only successfully save if all required fields are completed.
Upon saving the document the window will automatically close, returning the
user back to the main RosePro window.
2.
Close – This will close the window and return back to the main RosePro window.
Any changes made to the document will not be saved.
3.
Delete – This will delete the current RosePro document. It will not delete any
Microsoft Word documents associated with the RosePro document. Upon
deletion the window will close and return back to the main RosePro window.
4.
Reset Build Date – This will reset the date of the last build for the current
document. This could be beneficial if the user plans on using progressive
building and wants to restart the last build date.
18
5.
Clear Temp Files – Occasionally during builds, temporary Microsoft Word files
will be left in the document save directory during its mail merging. These
temporary files can cause conflict with further builds. To relieve any possibility
of error, this button will remove any temporary files in this directory.
With the Create/Edit Document window the user has full control of infinite
possibilities regarding what can be created. All fields on this window are optional except
for the four fields mentioned in the Document section.
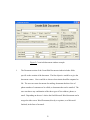
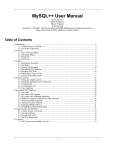
Build Document
The Build Document window will only be visible upon clicking the Build
Selected Document on the main RosePro window. This window processes all of the data
selected during the Create/Edit Document window. In this window the user can build
new data which will be archived to the directory previously set. If the user opts not to
build new data the user can select a previous build from the archives and use that data file
to merge. The user will also use this window to merge the data files to the Microsoft
Word document(s) set for the current document. There are three main buttons on this
window that will perform these functions. Figure 3 is an example of what the Build
Document window looks like.
19
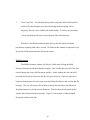
Figure 3. Build document window example.
In the middle of this window is a white status window which is updated with the
status of the build and the progress of the mail merge. The first step, before merging the
document, is to obtain the data to be merged. There are two different ways to obtain this
data. The first option is to click the Build List button, which creates a new list of
customers. When the build is finished, RosePro will archive the customer list to the
directory previously set. The second option is to select an archived build. To do this the
user clicks on Use Archived Build. This brings up a dialog window to browse for the
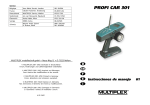
location of the archived build file. When the data file is loaded into RosePro, more
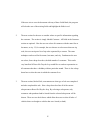
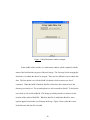
options appear between the set of buttons on the top. Figure 4 shows what the screen
looks like once the data file is loaded.
20
Figure 4. Details of loaded data file.
Now the program will show the location of the file to be merged. By default,
upon building a new list, the most recent build file will be selected. Also, by default, all
records will be selected as shown in the range. If the user would like to change the range
of records to merge to file, the user would simply type in the requested range. When the
user is satisfied with the data selection, clicking on the Merge Document button will
merge the data file to the Microsoft Word document associated with the current RosePro
document. When the merge is completed the Microsoft Word document will open up on
the screen for the user to see the final result. From here the user can save this Word
document or discard it.
Back on the Build Document window the status window will update the progress
of the build and merge. Upon a successful completion of the full process the time is
outputted here in the status window. Clicking on the Close button at the bottom of the
screen will close this window and return back to the main RosePro screen.
21
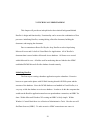
Preview Document
This window shows the user exactly what the selected RosePro document will
process. Figure 5 is an example of what the Preview Document window looks like.
Figure 5. Preview document window example.
The first sentence on this window describes the possible date range selected and
whether or not it is progressively built. The next section of the window shows what
criteria have been selected based on a customer stand point. All customer criteria are
22
separated between the two horizontal lines. Finally the last section of this window
explains the details of the merge and the location of the files and directory for archiving.
The button on the bottom of this window will close the window returning to the main
RosePro window. This window is strictly for information purposes. It gives the user a
simpler way to view exactly what the selected RosePro document will select when built.
The functionality of RosePro was designed for simplicity and ease of use for the
users. A copy of the user’s manual can be found in Appendix B. Many aspects of the
functionality have been designed with human error in mind. Unnecessary fields cannot
be changed or are invisible unless possible. Required fields are alerted before any saving.
Overall, RosePro is simple and easy to use. Only three main windows are needed to use
nearly all of the features created in RosePro.
23
VI. TECHNICAL UNDERSTANDING
This chapter will provide an in-depth look at the technical background behind
RosePro’s design and functionality. Functionality can be seen as the combination of four
processes: initializing RosePro, creating/editing a RosePro document, building the
document, and merging the document.
Due to constraints at Roseville Chrysler Jeep, RosePro was developed using
Microsoft Access and it’s built in Visual Basic for Applications. All of RosePro’s
document data is stored within a Microsoft Access database. All forms were created
within Microsoft Access. All tables used for marketing data are linked to the ODBCestablished DCMS Microsoft FoxPro database located remotely.
Initializing RosePro
The first step to creating a database application requires a database. Extensive
hours were spent on the phone with Gil Hale learning about his DCMS system and the
structure of the database. Since the DCMS database was handled in Visual FoxPro, it is
very easy to link the database to an Access database. In order to do this the computer that
would run the RosePro application must have an open database connection, an ODBC for
short. Within Microsoft Windows XP creating an ODBC is fairly simple. Within
Window’s Control Panel there is a collection of Administrative Tools. Here the user will
find Data Sources (ODBC). To make an active ODBC connection a new source is
24
created and the database file is selected. In this case the DCMS Visual FoxPro database
is selected, on a remote computer across the network at Roseville Chrysler. After the
connection has been established, within Microsoft Access the user has the ability to find
active ODBC connections and selected one recently created. This will allow the user to
import tables from the remote database into Microsoft Access. Since the Microsoft
Access settings are already established within the RosePro file, an initial installation
would only require the creation of a new data source (an ODBC). Otherwise RosePro is
ready to start running actions on the database.
Creating/Editing a RosePro Document
A RosePro document is nothing more than a record within an internal Microsoft
Access database. This database has many fields corresponding to the characteristics of a
RosePro document. All of the values saved into this database are used during the
processing and building of data from the remote DCMS database. On the main window
of RosePro, when the user clicks on the button to create a new RosePro document, the
user is, in reality, creating a new record in the internal RosePro database. After the new
record is created it opens up a new form that allows the user to input all the necessary
fields associated with that record. By creating a form, such as the window seen in figure
2, data entry is easy to understand and aesthetically pleasing to the user. Entering data
manually into a spreadsheet-like view can be very confusing. The form design to
create/edit a RosePro document was done using Microsoft Access. Very little actual
25
Visual Basic coding was necessary. In Microsoft Access it was possible to set the data
selection of each field to a field relating to a field in the RosePro database. This makes it
very easy to keep data synchronized with the Create/Edit Document window and the
RosePro database. Design constraints on the form limit the user to how and when data
can be entered. The purpose is clearly to keep a standardized structure relevant to how
RosePro will use the data for processing. When the user has finished entering all of the
data in the form, or RosePro window, the Save button will save the record to the RosePro
database. This button will also close the window, bringing the user back to the main
window.
Building the Document
When the user has finished creating a new RosePro document, the next step is to
process the document so that it outputs the results for further use. To do so the user
would then click on the Build Selected Document button on the main RosePro window.
This will open up a new window which actually handles two separate large processes.
Both of these processes were automated using Visual Basic for Applications, a
programming language environment. The first of the two will be explained in this
section. The first thing the user does is to get some actual data from the DCMS database.
The amount of data is dependent upon the characteristics set for the selected RosePro
document, or technically, record. By clicking on the Build List button RosePro extracts
the necessary data from the DCMS database. To make this happen RosePro creates a
26
highly elaborate query statement. Like many databases a structured query language, or
SQL, is used. Based on all of the variables in the RosePro database record RosePro
creates a SQL statement and applies it to the DCMS database. In return a set of records
returns that match the query given. This set of records is then outputted to a text file in
the directory set for the RosePro document. A query can take as little as a few seconds or
as long as minutes to complete. Typically large record sets take longer. Upon the
completion of the query RosePro will then analyze the newly created text document and
output to the user the number of records found. On the same Build and Merge Data
window the user can also select a previous build text document, instead of creating a new
one. To do so the user simply clicks on the Use Archived Build button and proceeds to
browse and select the previously build he/she would like to process. When browsing the
computer for an archived file, RosePro uses a Microsoft Windows common dialog box.
To achieve this, a new class was created within Visual Basic relating to Microsoft
Windows and the built in application programming interface, or API. The same
technique is used on the Create/Edit Document window, when setting the directory for
archiving and selecting the Word documents to merge. Similar to creating a new build,
RosePro will then analyze the archived build and output the number of records found.
Once the data set has been selected and loaded into RosePro, the next step for the user is
to merge that dataset into a Microsoft Word document.
27
Merging the Document
To merge the dataset to the previously set Microsoft Word document the user
simply clicks on the Merge Document button. RosePro now creates an instance of
Microsoft Word and opens the Word document selected when the RosePro document was
created. When RosePro creates a new instance of Word it also hides it in the background
as it does the work. It then uses a build-in function in Word, called Mail Merge, which
merges the dataset into the Word document and outputs the final result to one of three
possible choices: new document, printer, or email. This choice is previously set by the
user when he/she creates the RosePro document. When RosePro has finished merging all
of the data to the Word document it will make the Word document visible with the
dataset merged. Here the user can either save the Word document or discard it. The
merge process is complete.
Concluding Technical Thoughts
The progress of the build and merge process is displayed in the large status
window on the lower half of the Build and Merge Data window. Most of the work that
RosePro does occurs during the Build and Merge processes. The Create/Edit window
simply sets up all the variables necessary to complete the Build and Merge process. In
the end the complete process from creating the RosePro document to merging the data to
a Word document can be accomplished in about five minutes on average. The previous
28
method would take over an hour. RosePro automates many of the steps that human
interaction can slow down. At the same time it also eliminates human error.
29
REFERENCES
Litwin, P., Getz, K., Gunderloy, M. (2001) Access 2002 Desktop Developer’s Handbook,
Alameda, CA: Sybex.
Litwin, P., Getz, K., Gunderloy, M. (2001) Access 2002 Enterprise Developer’s Handbook,
Alameda, CA: Sybex.
30
GLOSSARY
Application Programming Interface (API): An API is the interface that a computer system,
library or application provides in order to allow requests for services to be
made of it by other computer programs, and/or to allow data to be exchanged
between them.
Automated Data Processing (ADP): ADP is the largest payroll and tax filing processor in the
world. ADP is used by Roseville Chrysler Jeep as its primary database for not
only customer information, but also for employee information. The initial
source for the data being used by RosePro is indirectly related to the data
found in the Roseville Chrysler Jeep ADP database.
Comma Separate Values (CSV):
The CSV common file format is a delimited data format
that has fields separated by the comma character and records separated by
newlines. Essentially RosePro archives all data builds to a CSV format.
Database:
A database is a collection of records. Examples of databases include those
found in Microsoft Access and Microsoft Visual FoxPro.
Dealership Customer Management System (DCMS):
DCMS is a software application
designed by Gil Hale directed towards car dealerships. The DCMS system was
developed on Microsoft Visual FoxPro and is based on a database.
Fields:
A field is an identifier within a database that helps organize different pieces of
information. Each record in a database contains a collection of data which are
each identified within a field.
Graphical User Interface (GUI):
A GUI is typically a user interface making it simpler for
the user to interact with the computer. In RosePro each window that the user
interacts with is all a part of the system’s GUI.
Mail Merge: Mail Merge is a feature found in Microsoft Word that allows the user to select
a dataset of records. Mail merge then allows the user to customize a Word
document as a template to merge the record field values. Essentially this will
produce a unique Word document specific to the dataset.
Microsoft Access:
Microsoft Access is a database application tool developed by
Microsoft. RosePro was developed completely in Microsoft Access.
31
Microsoft Excel:
Microsoft Excel is a spreadsheet application developed by Microsoft.
Microsoft Office:
Microsoft Office is a collection of common applications used in
productivity. Common Office applications include Word, Excel, and
PowerPoint.
Microsoft Visual Basic (VB): VB is an event driven programming language and associated
development platform produced by Microsoft.
Microsoft Visual Basic for Applications (VBA):
VBA is a scaled down version of VB
which is built into most of Microsoft Office applications.
Microsoft Visual FoxPro:
Visual FoxPro is a data-centric object-oriented and procedural
programming language produced by Microsoft. DCMS was developed in
Visual FoxPro.
Microsoft Windows XP:
Microsoft Windows XP is the current operating system (at the
time of this writing) produced by Microsoft. All applications upon which
RosePro is dependent run on Windows XP.
Microsoft Word:
Microsoft Word is a word processing application developed by
Microsoft. RosePro uses Word to merge data to user-created templates.
Open Database Connection (ODBC): An ODBC is a specification that offers a procedural API
for using SQL queries to access data. RosePro is dependent on an ODBC that
connects the DCMS database to RosePro.
Query:
A query is a form of questioning. To run a query on a database is to ask the
database to return a set of data specific to its questioning. The build process of
RosePro relies on this method.
Record:
A record is a single entry of data in a table. A database is a collection of
tables. Each table has a collection of records. Each record has a collection of
data separated into fields.
Reynolds & Reynolds:
Reynolds & Reynolds helps automobile dealers sell cars and
service customers through use of its dealer management systems.
Structure Query Language (SQL): SQL is the most popular computer language used to
create, modify, retrieve and manipulate data from relational database
32
management systems. When RosePro builds data it does so by creating a SQL
statement to be processed on the database.
Table:
A table is a collection of records. Typically a collection of tables is found in a
database.
33
APPENDICES
34
APPENDIX A
SOURCE CODE
35
Form_Main
Option Compare Database
Private Sub BuildDoc_Click()
On Error GoTo Err_EditDoc_Click
Dim stDocName As String
Dim stLinkCriteria As String
stDocName = "BuildDocument"
stLinkCriteria = "[Doc_ID]=" & Me.DocList.Value
DoCmd.OpenForm stDocName, , , stLinkCriteria
Exit_EditDoc_Click:
Exit Sub
Err_EditDoc_Click:
MsgBox Err.Description
Resume Exit_EditDoc_Click
End Sub
Private Sub DocList_Click()
Me.Repaint
If Me.DocList.Value <> "" Then
BuildDoc.Enabled = True
ViewPreview.Enabled = True
End If
End Sub
Private Sub DocList_DblClick(Cancel As Integer)
On Error GoTo Err_DocList_DblClick
Dim stDocName As String
Dim stLinkCriteria As String
36
stDocName = "NewDocument"
stLinkCriteria = "[Doc_ID]=" & Me.DocList.Value
DoCmd.OpenForm stDocName, , , stLinkCriteria
Exit_DocList_DblClick:
Exit Sub
Err_DocList_DblClick:
MsgBox Err.Description
Resume Exit_DocList_DblClick
End Sub
Private Sub DocList_GotFocus()
Me.Refresh
End Sub
Private Sub EditDoc_Click()
On Error GoTo Err_EditDoc_Click
Dim stDocName As String
Dim stLinkCriteria As String
stDocName = "NewDocument"
stLinkCriteria = "[Doc_ID]=" & Me.DocList.Value
DoCmd.OpenForm stDocName, , , stLinkCriteria
Exit_EditDoc_Click:
Exit Sub
Err_EditDoc_Click:
MsgBox Err.Description
Resume Exit_EditDoc_Click
37
End Sub
Private Sub Form_Load()
BuildDoc.Enabled = False
ViewPreview.Enabled = False
End Sub
Private Sub NewDoc_Click()
On Error GoTo Err_NewDoc_Click
Dim stDocName As String
Dim stLinkCriteria As String
stDocName = "NewDocument"
DoCmd.OpenForm stDocName, , , stLinkCriteria
DoCmd.GoToRecord , , acNewRec
Exit_NewDoc_Click:
Exit Sub
Err_NewDoc_Click:
MsgBox Err.Description
Resume Exit_NewDoc_Click
End Sub
Private Sub ExitRosePro_Click()
On Error GoTo Err_ExitRosePro_Click
DoCmd.Quit
Exit_ExitRosePro_Click:
38
Exit Sub
Err_ExitRosePro_Click:
MsgBox Err.Description
Resume Exit_ExitRosePro_Click
End Sub
Private Sub ViewPreview_Click()
On Error GoTo Err_ViewPreview_Click
Dim stDocName As String
Dim stLinkCriteria As String
stDocName = "Preview"
stLinkCriteria = "[Doc_ID]=" & Me.DocList.Value
DoCmd.OpenForm stDocName, , , stLinkCriteria
Exit_ViewPreview_Click:
Exit Sub
Err_ViewPreview_Click:
MsgBox Err.Description
Resume Exit_ViewPreview_Click
End Sub
Form_NewDocument
Option Compare Database
Private Type BROWSEINFO
hOwner As Long
pidlRoot As Long
pszDisplayName As String
39
lpszTitle As String
ulFlags As Long
lpfn As Long
lParam As Long
iImage As Long
End Type
Private Declare Function SHGetPathFromIDList Lib "shell32.dll" Alias _
"SHGetPathFromIDListA" (ByVal pidl As Long, _
ByVal pszPath As String) As Long
Private Declare Function SHBrowseForFolder Lib "shell32.dll" Alias _
"SHBrowseForFolderA" (lpBrowseInfo As BROWSEINFO) _
As Long
Private Const BIF_RETURNONLYFSDIRS = &H1
Private Sub FindSide1_Click()
Dim cdlg As New CommonDialogAPI
Dim lFormHwnd As Long
Dim lAppInstance As Long
Dim sInitDir As String
Dim sFileFilter As String
Dim lResult As Long
Dim sLogFile As String
lFormHwnd = Me.Hwnd
lAppInstance = Application.hWndAccessApp
sInitDir = "C:\"
sFileFilter = "Word Files (*.doc)" & Chr(0) & "*.doc*" & Chr(0)
40
lResult = cdlg.OpenFileDialog(lFormHwnd, lAppInstance, sInitDir,
sFileFilter)
If cdlg.GetStatus = True Then
sLogFile = cdlg.GetName
End If
DocSide1.Locked = False
DocSide1.Value = sLogFile
DocSide1.Locked = True
If cdlg.GetStatus = True Then
MsgBox "You selected file: " & _
cdlg.GetName
Else
MsgBox "No file selected."
End If
End Sub
Private Sub FindSide2_Click()
Dim cdlg As New CommonDialogAPI
Dim lFormHwnd As Long
Dim lAppInstance As Long
Dim sInitDir As String
Dim sFileFilter As String
Dim lResult As Long
Dim sLogFile As String
lFormHwnd = Me.Hwnd
lAppInstance = Application.hWndAccessApp
sInitDir = "C:\"
sFileFilter = "Word Files (*.doc)" & Chr(0) & "*.doc*" & Chr(0)
41
lResult = cdlg.OpenFileDialog(lFormHwnd, lAppInstance, sInitDir,
sFileFilter)
If cdlg.GetStatus = True Then
sLogFile = cdlg.GetName
End If
DocSide2.Locked = False
DocSide2.Value = sLogFile
DocSide2.Locked = True
If cdlg.GetStatus = True Then
MsgBox "You selected file: " & _
cdlg.GetName
Else
MsgBox "No file selected."
End If
End Sub
Private Sub ClearTmp_Click()
deleteTmpFiles (TheDir.Value)
End Sub
Private Sub deleteTmpFiles(path As String)
Dim fso As FileSystemObject
Dim letfolder As Folder
Dim recentFile As File
Dim beginFile As String
Dim delCount As Integer
delCount = 0
Set fso = New FileSystemObject
Set letfolder = fso.GetFolder(path)
For Each recentFile In letfolder.Files
42
beginFile = Left(recentFile.Name, 2)
If beginFile = "~$" Then
recentFile.Delete
delCount = delCount + 1
End If
Next recentFile
MsgBox (CStr(delCount) + " temp files deleted.")
End Sub
Private Sub ResetBD_Click()
[Doc_Last_Run] = ""
MsgBox "Build Date Reset!"
End Sub
Private Sub CloseDoc_Click()
On Error GoTo Err_Handler
DoCmd.Close
Exit_Handler:
Exit Sub
Err_Handler:
MsgBox Err.Description, vbExclamation, "Error No: " & Err.Number
Resume Exit_Handler
DoCmd.Close
End Sub
Private Sub DelDoc_Click()
On Error GoTo Err_DelDoc_Click
'Confirms with user to delete the current document
confirming = MsgBox("Are You Sure You Want To Delete This?",
vbYesNo, "Confirm Delete")
'If user selects yes the following will delete the document
If confirming = vbYes Then
43
DoCmd.DoMenuItem acFormBar, acEditMenu, 8, , acMenuVer70
DoCmd.DoMenuItem acFormBar, acEditMenu, 6, , acMenuVer70
DoCmd.Close
Dim db As DAO.Database
Set db = CurrentDb()
db.QueryDefs.Delete (DFName.Value)
Else
End If
Exit_DelDoc_Click:
Exit Sub
Err_DelDoc_Click:
MsgBox Err.Description
Resume Exit_DelDoc_Click
End Sub
Private Sub DFService_Click()
If DFService.Value = -1 Then
DFSaleServ.Enabled = True
DFMileType.Enabled = True
DFMileage.Enabled = True
Else
DFSaleServ.Enabled = False
DFSaleServ.Value = "Sales"
DFMileType.Enabled = False
DFMileType.Value = ""
DFMileage.Enabled = False
DFMileage.Value = ""
End If
End Sub
44
Private Sub FindDir_Click()
Dim sLogFile As String
sLogFile = BrowseFolder("Browse for folder")
TheDir.Value = sLogFile
If sLogFile <> "" Then
MsgBox "You selected directory: " & _
Else
sLogFile
MsgBox "No directory selected."
End If
End Sub
Private Sub Form_Load()
If [Doc_IncService] = -1 Then
DFSaleServ.Enabled = True
DFMileType.Enabled = True
DFMileage.Enabled = True
End If
End Sub
Private Sub SaveDoc_Click()
On Error GoTo Err_SaveDoc_Click
Dim Missing As String
Missing = "The following fields are required:" & vbCrLf & vbCrLf
If DFName.Value = "" Then
Missing = Missing & "Document Name" & vbCrLf
DFName.BackColor = "8421631"
End If
If DFType.ListIndex = -1 Then
Missing = Missing & "Send To" & vbCrLf
45
DFType.BackColor = "8421631"
End If
If TheDir.Value = "" Then
Missing = Missing & "Save Directory" & vbCrLf
TheDir.BackColor = "8421631"
End If
If DocSide1.Value = "" Then
Missing = Missing & "Merge Side 1"
DocSide1.BackColor = "8421631"
End If
If Missing = "The following fields are required:" & vbCrLf & vbCrLf Then
DoCmd.DoMenuItem acFormBar, acRecordsMenu, acSaveRecord, ,
acMenuVer70
[Doc_Created] = Now()
'Closes The Edit Document Form
DoCmd.Close
Else
MsgBox Missing, vbExclamation, "Missing Fields"
End If
Exit_SaveDoc_Click:
Exit Sub
Err_SaveDoc_Click:
MsgBox Err.Description
Resume Exit_SaveDoc_Click
End Sub
Public Function BrowseFolder(szDialogTitle As String) As String
Dim X As Long, bi As BROWSEINFO, dwIList As Long
46
Dim szPath As String, wPos As Integer
With bi
.hOwner = hWndAccessApp
.lpszTitle = szDialogTitle
.ulFlags = BIF_RETURNONLYFSDIRS
End With
dwIList = SHBrowseForFolder(bi)
szPath = Space$(512)
X = SHGetPathFromIDList(ByVal dwIList, ByVal szPath)
If X Then
wPos = InStr(szPath, Chr(0))
BrowseFolder = Left$(szPath, wPos - 1)
Else
BrowseFolder = vbNullString
End If
End Function
Form_BuildDocument
Option Compare Database
Dim recTotal As Integer
Dim startTime, endTime As Date
Private Sub ArchiveBuild_Click()
startTime = Now()
RecLabel.visible = True
TxtFileLoc.visible = True
TxtFileLoc.Value = ""
FindTextLoc.visible = True
SelLbl1.visible = True
47
SelLbl2.visible = True
RecMin.visible = True
RecMax.visible = True
End Sub
Private Sub MergeDoc_Click()
On Error GoTo MergeErr
Dim totMin, totSec As Integer
If TxtFileLoc.Value = "" Then
MsgBox "Please provide a record source!"
Else
StatusWin.AddItem ("Merge Document Initialized...")
If recTotal = 0 Then
StatusWin.AddItem ("No record seletion has been made!")
Else
StatusWin.AddItem ("Found " & recTotal & " records to be merged")
StatusWin.AddItem ("(Merging records from " & RecMin.Value & " to "
& RecMax.Value & ")")
Dim newWord As wordMerge
Set newWord = New wordMerge
If [Doc_Merge_Side1] <> "" Then
printSide1 = MsgBox("Do you want to print side 1 of " &
[Doc_Name], vbYesNo)
If printSide1 = vbYes Then
newWord.hide
newWord.openDocument ([Doc_Merge_Side1])
newWord.openDataSource (TxtFileLoc.Value)
newWord.printSelect RecMin, RecMax, [Doc_Type]
newWord.visible
StatusWin.AddItem ("Side 1 merged successfully")
End If
48
End If
If [Doc_Merge_Side2] <> "" Then
printSide2 = MsgBox("Do you want to print side 2 of " &
[Doc_Name], vbYesNo)
If printSide2 = vbYes Then
newWord.hide
newWord.openDocument ([Doc_Merge_Side2])
newWord.openDataSource ([Doc_Directory])
newWord.printSelect RecMin, RecMax, [Doc_SendTo]
newWord.closeDocument
StatusWin.AddItem ("Side 2 merged successfully")
End If
End If
endTime = Now()
StatusWin.AddItem ("All merging has been successful")
totSec = DateDiff("s", startTime, endTime)
secPart = totSec Mod 60
minPart = (totSec - (totSec Mod 60)) / 60
If minPart < 1 Then
StatusWin.AddItem ("Total process took " & secPart & " seconds.")
Else
StatusWin.AddItem ("Total process took " & minPart & " minutes
and " & secPart & " seconds.")
End If
End If
End If
MergeErr:
MsgBox Err.Description
End Sub
49
End Sub
Private Sub FindTextLoc_Click()
Dim cdlg As New CommonDialogAPI
Dim lFormHwnd As Long
Dim lAppInstance As Long
Dim sInitDir As String
Dim sFileFilter As String
Dim lResult As Long
Dim sLogFile As String
lFormHwnd = Me.Hwnd
lAppInstance = Application.hWndAccessApp
sInitDir = "C:\"
sFileFilter = "Text Files (*.txt)" & Chr(0) & "*.txt*" & Chr(0)
lResult = cdlg.OpenFileDialog(lFormHwnd, lAppInstance, sInitDir,
sFileFilter)
If cdlg.GetStatus = True Then
sLogFile = cdlg.GetName
End If
Dim fso As New FileSystemObject
Dim ts As TextStream
Dim getRecordTotal As Integer
Set ts = fso.OpenTextFile(cdlg.GetName, ForReading, False,
TristateUseDefault)
Do Until ts.AtEndOfStream
If ts.ReadLine <> "" Then
getRecordTotal = getRecordTotal + 1
50
End If
Loop
getRecordTotal = getRecordTotal - 1
Set fso = Nothing
Set ts = Nothing
BlComplete.Value = getRecordTotal & " records found in archived file"
RecMin.Value = 1
RecMax.Value = getRecordTotal
recTotal = getRecordTotal
TxtFileLoc.Value = sLogFile
If cdlg.GetStatus = True Then
MsgBox "You selected file: " & _
cdlg.GetName
Else
MsgBox "No file selected."
End If
End Sub
Private Sub Form_Load()
RecLabel.visible = False
TxtFileLoc.visible = False
FindTextLoc.visible = False
SelLbl1.visible = False
SelLbl2.visible = False
RecMin.visible = False
RecMin.Value = ""
RecMax.visible = False
RecMax.Value = ""
BlComplete.Value = ""
StatusWin.Locked = True
51
recTotal = 0
End Sub
Private Sub QueryRun_Click()
On Error GoTo HandleErr
startTime = Now()
StatusWin.AddItem ("Build data records initialized...")
BlComplete.Value = ""
Dim useDir As String
Dim curDate As String
Update_Query
StatusWin.AddItem ("Query design complete")
curDate = Format(Now(), "yyyy-mm-dd_hh-mm-ss")
useDir = [Doc_Name] & "_" & curDate & ".txt"
useDir = Replace(useDir, " ", "_")
useDir = [Doc_Directory] & useDir
DoCmd.TransferText acExportDelim, , [Doc_Name], useDir, 1
StatusWin.AddItem ("Record archiving complete")
Dim fso As New FileSystemObject
Dim ts As TextStream
Dim getRecordTotal As Integer
Set ts = fso.OpenTextFile(useDir, ForReading, False, TristateUseDefault)
Do Until ts.AtEndOfStream
If ts.ReadLine <> "" Then
getRecordTotal = getRecordTotal + 1
End If
Loop
getRecordTotal = getRecordTotal - 1
Set fso = Nothing
Set ts = Nothing
52
recTotal = getRecordTotal
BlComplete.Value = getRecordTotal & " records completed"
RecLabel.visible = True
TxtFileLoc.visible = True
TxtFileLoc.Value = useDir
FindTextLoc.visible = True
SelLbl1.visible = True
SelLbl2.visible = True
RecMin.visible = True
RecMin.Value = 1
RecMax.visible = True
RecMax.Value = getRecordTotal
If getRecordTotal = 0 Then
RecMin.Value = 0
End If
[Doc_Last_Run] = Now()
HandleErr:
If Err.Number = 3151 Then
MsgBox "Connection to DCMS Database failed!" & vbCrLf & "Please
close RosePro and restart your PC to re-establish connection" & vbCrLf &
vbCrLf & "Detailed error description:" & vbCrLf & Err.Description,
vbCritical, "Database Connection Error"
End If
StatusWin.AddItem ("Build canceled - no connection to database")
StatusWin.AddItem ("Please close RosePro and restart your PC")
Exit Sub
End Sub
Private Sub CloseBuild_Click()
On Error GoTo Err_CloseBuild_Click
53
DoCmd.Close
Exit_CloseBuild_Click:
Exit Sub
Err_CloseBuild_Click:
MsgBox Err.Description
Resume Exit_CloseBuild_Click
End Sub
Private Sub Update_Query()
On Error GoTo ErrQuery
Dim db As DAO.Database
Dim qdf As DAO.QueryDef
Dim SQLstring As String
Dim plusOne As String
Dim BackDate As Integer
'*******************************************
'* This section checks either creates or
'* updates the query to be built
'*******************************************
Set db = CurrentDb()
If QueryExists([Doc_Name]) Then
db.QueryDefs.Delete ([Doc_Name])
End If
Set qdf = db.CreateQueryDef([Doc_Name])
'*******************************************
54
'* This section is based on whether or not
'* the detailed results was selected
'* (Defines the SQL SELECT clause)
'*******************************************
If [Doc_Detailed] = -1 Then
SQLstring = "SELECT DISTINCT customer.*, employee.*, vehicle.*"
Else
SQLstring = "SELECT DISTINCT TRIM(fiwip.adp2) AS
status,TRIM(fiwip.adp4) AS contractdate, TRIM(fiwip.adpfin_lse) AS
buylease, TRIM(fiwip.adp52) AS newused, TRIM(fiwip.cficustnum) AS
custnum, TRIM(customer.csalutn) AS salut, TRIM(customer.ctitle) AS title,
TRIM(customer.cfirstname) AS cfirstname, TRIM(customer.clastname) AS
clastname, TRIM(customer.dbirthdate) AS cbirthdate,
TRIM(employee.cfirstname)" & Chr$(38) & Chr$(34) & " " & Chr$(34) &
Chr$(38) & "TRIM(employee.clastname) AS salesperson,
TRIM(employee.cempphone) AS salesphone, TRIM(employee.cemailemp)
AS salesemail, TRIM(vehicle.cyear) AS vyear, TRIM(vehicle.cmake) AS
vmake, TRIM(vehicle.cmodel) AS vmodel, TRIM(vehicle.cvehid) AS vin"
If [Doc_IncService] = -1 Then
SQLstring = SQLstring & ", TRIM(svcgnhist.dclosedate) AS
servicedate, TRIM(svcgnhist.nmileage) AS mileage"
End If
If [Doc_Address] = -1 Then
SQLstring = SQLstring & ", TRIM(customer.caddrline1) AS
caddress, TRIM(customer.czipcode) AS czipcode, TRIM(customer.ccity) AS
ccity, TRIM(customer.cstate) AS cstate"
End If
If [Doc_Phone] = -1 Then
SQLstring = SQLstring & ", TRIM(customer.cadpphone) AS cphone"
End If
If [Doc_Email] = -1 Then
55
SQLstring = SQLstring & ", TRIM(customer.cemail1) AS cemail"
End If
End If
'*******************************************
'* This section joins the multiple tables
'* together to extract data from
'* (Defines the SQL FROM clause)
'*******************************************
If [Doc_IncService] = -1 Then
'SQLstring = SQLstring & " FROM (((customer LEFT JOIN fiwip ON
customer.ccustnum = fiwip.cficustnum) LEFT JOIN employee ON
customer.cassign=employee.cassign) LEFT JOIN svcgnhist ON
right(fiwip.adp41,8)=svcgnhist.cvehid) LEFT JOIN vehicle ON
svcgnhist.cvehid=vehicle.cvehid"
SQLstring = SQLstring & " FROM (((customer LEFT JOIN vehicle ON
customer.ccustnum = vehicle.ccustnum) LEFT JOIN fiwip ON
right(fiwip.adp41,8)=vehicle.cvehid) LEFT JOIN employee ON
customer.cassign=employee.cassign) LEFT JOIN svcgnhist ON
svcgnhist.cvehid=vehicle.cvehid"
Else
'SQLstring = SQLstring & " FROM ((customer LEFT JOIN fiwip ON
customer.ccustnum = fiwip.cficustnum) LEFT JOIN employee ON
customer.cassign=employee.cassign) LEFT JOIN vehicle ON
right(fiwip.adp41,8)=vehicle.cvehid"
SQLstring = SQLstring & " FROM ((customer LEFT JOIN vehicle ON
customer.ccustnum = vehicle.ccustnum) LEFT JOIN fiwip ON
right(fiwip.adp41,8)=vehicle.cvehid) LEFT JOIN employee ON
customer.cassign=employee.cassign"
End If
56
'*******************************************
'* This section builds the criteria
'* to be filtered within the document
'* (Defines the SQL WHERE clause)
'*******************************************
SQLstring = SQLstring & " WHERE (vehicle.laltercust=0) AND
(customer.lnomail=0) AND (customer.lnoemail=0) AND
(customer.lnocall=0) AND ((fiwip.adp2 = " & Chr$(34) & "I" & Chr$(34) &
") OR (fiwip.adp2 = " & Chr$(34) & "F" & Chr$(34) & ") OR (fiwip.adp2 = "
& Chr$(34) & "B" & Chr$(34) & "))"
If [Doc_Clean] = -1 Then
SQLstring = SQLstring & " AND (customer.cfirstname>' ') And
(customer.clastname>' ') And (customer.caddrline1>' ') And
(customer.czipcode>' ') And (customer.ccity>' ') And (customer.cstate>'
')"
End If
If [Doc_SaleService] = "Sales" Then
If [Doc_Range_Start] <> "" Then
NewDate = DateAdd("d", -([Doc_Range_Start]), Now())
SQLstring = SQLstring & " AND (fiwip.adp4<=CDate(" & Chr$(39)
& NewDate & Chr$(39) & "))"
End If
If [Doc_Range_End] <> "" Then
If ([Doc_Last_Run] > "") And ([Doc_Progress] = -1) Then
BackDate = CInt(DateDiff("d", [Doc_Last_Run], Now()))
NewDate = DateAdd("d", -(BackDate), Now())
Else
NewDate = DateAdd("d", -([Doc_Range_End]), Now())
End If
SQLstring = SQLstring & " AND (fiwip.adp4>=CDate(" & Chr$(39)
& NewDate & Chr$(39) & "))"
57
End If
Else
If [Doc_Range_Start] <> "" Then
NewDate = DateAdd("d", -([Doc_Range_Start]), Now())
SQLstring = SQLstring & " AND (svcgnhist.dclosedate<=CDate(" &
Chr$(39) & NewDate & Chr$(39) & "))"
End If
If [Doc_Range_End] <> "" Then
If ([Doc_Last_Run] > "") And ([Doc_Progress] = -1) Then
BackDate = CInt(DateDiff("d", [Doc_Last_Run], Now()))
NewDate = DateAdd("d", -(BackDate), Now())
Else
NewDate = DateAdd("d", -([Doc_Range_End]), Now())
End If
SQLstring = SQLstring & " AND (svcgnhist.dclosedate>=CDate(" &
Chr$(39) & NewDate & Chr$(39) & "))"
End If
End If
If [Doc_Salesperson] <> "" Then
SQLstring = SQLstring & " AND ((TRIM(employee.cfirstname)" &
Chr$(38) & Chr$(34) & " " & Chr$(34) & Chr$(38) &
"TRIM(employee.clastname))=" & Chr$(34) & [Doc_Salesperson] &
Chr$(34) & ")"
End If
If [Doc_Buy] = -1 And [Doc_Lease] = -1 Then
SQLstring = SQLstring & " AND ((fiwip.adpfin_lse = 0) OR
(fiwip.adpfin_lse = 1))"
Else
If [Doc_Buy] = -1 Then
SQLstring = SQLstring & " AND (fiwip.adpfin_lse = 0)"
End If
58
If [Doc_Lease] = -1 Then
SQLstring = SQLstring & " AND (fiwip.adpfin_lse = 1)"
End If
End If
If [Doc_First_Name] <> "" Then
plusOne = ""
SQLstring = SQLstring & " AND ("
For i = LBound(Split([Doc_First_Name], ",")) To
UBound(Split([Doc_First_Name], ","))
SQLstring = SQLstring & plusOne & "(customer.cfirstname=" &
Chr$(34) & Split([Doc_First_Name], ",")(i) & Chr$(34) & ")"
plusOne = " OR "
Next i
SQLstring = SQLstring & ")"
End If
If [Doc_Last_Name] <> "" Then
plusOne = ""
SQLstring = SQLstring & " AND ("
For i = LBound(Split([Doc_Last_Name], ",")) To
UBound(Split([Doc_Last_Name], ","))
SQLstring = SQLstring & plusOne & "(customer.clastname=" &
Chr$(34) & Split([Doc_Last_Name], ",")(i) & Chr$(34) & ")"
plusOne = " OR "
Next i
SQLstring = SQLstring & ")"
End If
If [Doc_City] <> "" Then
plusOne = ""
SQLstring = SQLstring & " AND ("
For i = LBound(Split([Doc_City], ",")) To UBound(Split([Doc_City], ","))
59
SQLstring = SQLstring & plusOne & "(customer.ccity=" & Chr$(34)
& Split([Doc_City], ",")(i) & Chr$(34) & ")"
plusOne = " OR "
Next i
SQLstring = SQLstring & ")"
End If
If [Doc_State] <> "" Then
SQLstring = SQLstring & " AND (customer.cstate=" & Chr$(34) &
[Doc_State] & Chr$(34) & ")"
End If
If [Doc_Month] <> "" Then
'Determine numerical value of month
Dim vbMonth As Integer
Select Case [Doc_Month]
Case "January": vbMonth = 1
Case "February": vbMonth = 2
Case "March": vbMonth = 3
Case "April": vbMonth = 4
Case "May": vbMonth = 5
Case "June": vbMonth = 6
Case "July": vbMonth = 7
Case "August": vbMonth = 8
Case "September": vbMonth = 9
Case "October": vbMonth = 10
Case "November": vbMonth = 11
Case "December": vbMonth = 12
End Select
SQLstring = SQLstring & " AND " & Chr$(40) & "DatePart(" & Chr$(34)
& "m" & Chr$(34) & ", customer.dbirthdate)=" & Chr$(34) & vbMonth &
Chr$(34) & ")"
End If
60
If [Doc_Year] <> "" Then
plusOne = ""
SQLstring = SQLstring & " AND ("
For i = LBound(Split([Doc_Year], ",")) To UBound(Split([Doc_Year], ","))
SQLstring = SQLstring & plusOne & "(vehicle.cyear=" & Chr$(34) &
Split([Doc_Year], ",")(i) & Chr$(34) & ")"
plusOne = " OR "
Next i
SQLstring = SQLstring & ")"
End If
If [Doc_Make] <> "" Then
plusOne = ""
SQLstring = SQLstring & " AND ("
For i = LBound(Split([Doc_Make], ",")) To UBound(Split([Doc_Make],
","))
SQLstring = SQLstring & plusOne & "(vehicle.cmake=" & Chr$(34)
& Split([Doc_Make], ",")(i) & Chr$(34) & ")"
plusOne = " OR "
Next i
SQLstring = SQLstring & ")"
End If
If [Doc_Model] <> "" Then
plusOne = ""
SQLstring = SQLstring & " AND ("
","))
For i = LBound(Split([Doc_Model], ",")) To UBound(Split([Doc_Model],
SQLstring = SQLstring & plusOne & "(vehicle.cmodel=" & Chr$(34)
& Split([Doc_Model], ",")(i) & Chr$(34) & ")"
plusOne = " OR "
Next i
SQLstring = SQLstring & ")"
61
End If
If [Doc_New] = -1 And [Doc_Used] = -1 Then
SQLstring = SQLstring & " AND ((fiwip.adp52 =" & Chr$(34) & "NEW"
& Chr$(34) & ") OR (fiwip.adp52 =" & Chr$(34) & "USED" & Chr$(34) & "))"
Else
If [Doc_New] = -1 Then
SQLstring = SQLstring & " AND (fiwip.adp52 =" & Chr$(34) &
"NEW" & Chr$(34) & ")"
End If
If [Doc_Used] = -1 Then
SQLstring = SQLstring & " AND (fiwip.adp52 =" & Chr$(34) &
"USED" & Chr$(34) & ")"
End If
End If
If [Doc_Zipcode] <> "" Then
plusOne = ""
SQLstring = SQLstring & " AND ("
For i = LBound(Split([Doc_Zipcode], ",")) To
UBound(Split([Doc_Zipcode], ","))
SQLstring = SQLstring & plusOne & "(customer.czipcode=" &
Chr$(34) & Split([Doc_Zipcode], ",")(i) & Chr$(34) & ")"
plusOne = " OR "
Next i
SQLstring = SQLstring & ")"
End If
If [Doc_IncService] = -1 And [Doc_Mileage] <> "" And [Doc_MileType]
<> "" Then
Select Case [Doc_MileType]
Case "Greater Than"
SQLstring = SQLstring & " AND (svcgnhist.nmileage >=" &
[Doc_Mileage] & ")"
62
Case "Equal To"
SQLstring = SQLstring & " AND (svcgnhist.nmileage =" &
[Doc_Mileage] & ")"
Case "Less Than":
SQLstring = SQLstring & " AND (svcgnhist.nmileage <=" &
[Doc_Mileage] & ")"
End Select
End If
'*******************************************
'* Save the SQL statement in a table and
'* the appropriate query
'*******************************************
[Doc_SQL] = SQLstring
qdf.Sql = SQLstring
ErrQuery:
MsgBox Err.Description
End Sub
End Sub
Function QueryExists(MyQueryName)
Dim i
Dim db2 As Database
Set db2 = CurrentDb()
QueryExists = False
For i = 0 To db2.QueryDefs.Count - 1
If db2.QueryDefs(i).Name = MyQueryName Then
63
QueryExists = True
Exit Function
End If
Next i
End Function
Public Function BrowseFolder(szDialogTitle As String) As String
Dim X As Long, bi As BROWSEINFO, dwIList As Long
Dim szPath As String, wPos As Integer
With bi
.hOwner = hWndAccessApp
.lpszTitle = szDialogTitle
.ulFlags = BIF_RETURNONLYFSDIRS
End With
dwIList = SHBrowseForFolder(bi)
szPath = Space$(512)
X = SHGetPathFromIDList(ByVal dwIList, ByVal szPath)
If X Then
wPos = InStr(szPath, Chr(0))
BrowseFolder = Left$(szPath, wPos - 1)
Else
BrowseFolder = vbNullString
End If
End Function
Form_Preview
Option Compare Database
64
Private Sub Close_Click()
On Error GoTo Err_Close_Click
DoCmd.Close
Exit_Close_Click:
Exit Sub
Err_Close_Click:
MsgBox Err.Description
Resume Exit_Close_Click
End Sub
Private Sub Form_Load()
Dim TheString As String
If [Doc_SaleService] = "Sales" Then
TheString = "This document will select all sales records from " &
[Doc_Range_Start] & " days ago to " & [Doc_Range_End] & " days ago"
Else
TheString = "This document will select all service records from " &
[Doc_Range_Start] & " days ago to " & [Doc_Range_End] & " days ago"
End If
If [Doc_Progress] = -1 Then
TheString = TheString & " with progressive building." & vbCrLf &
vbCrLf
Else
TheString = TheString & " with out progressive building." & vbCrLf &
vbCrLf
End If
65
TheString = TheString & "Customers with only the following criteria
will be selected:" & vbCrLf & "-----------------------------------------------" & vbCrLf
If [Doc_Zipcode] <> "" Then
TheString = TheString & "Live in the following zipcode(s) " &
[Doc_Zipcode] & vbCrLf
End If
If [Doc_City] <> "" Then
TheString = TheString & "Live in the following city(s) " & [Doc_City] &
vbCrLf
End If
If [Doc_State] <> "" Then
TheString = TheString & "Live in " & [Doc_State] & vbCrLf
End If
If [Doc_First_Name] <> "" Then
TheString = TheString & "With first name " & [Doc_First_Name] &
vbCrLf
End If
If [Doc_Last_Name] <> "" Then
TheString = TheString & "With last name " & [Doc_Last_Name] &
vbCrLf
End If
If [Doc_Month] <> "" Then
TheString = TheString & "Born in " & [Doc_Month] & vbCrLf
End If
If [Doc_Salesperson] <> "" Then
TheString = TheString & "With salesperson " & [Doc_Salesperson] &
vbCrLf
End If
If [Doc_Lease] = -1 And [Doc_Buy] = -1 Then
TheString = TheString & "Financed or leased" & vbCrLf
66
Else
If [Doc_Lease] = -1 Then
TheString = TheString & "Leased" & vbCrLf
End If
If [Doc_Buy] = -1 Then
TheString = TheString & "Financed" & vbCrLf
End If
End If
If [Doc_New] = -1 And [Doc_Used] = -1 Then
TheString = TheString & "New Or Used" & vbCrLf
Else
If [Doc_New] = -1 Then
TheString = TheString & "New" & vbCrLf
End If
If [Doc_Used] = -1 Then
TheString = TheString & "Used" & vbCrLf
End If
End If
If [Doc_Year] <> "" Then
TheString = TheString & "With vehicle year in any of the following: "
& [Doc_Year] & vbCrLf
End If
If [Doc_Make] <> "" Then
TheString = TheString & "With vehicle make in any of the following: "
& [Doc_Make] & vbCrLf
End If
If [Doc_Model] <> "" Then
TheString = TheString & "With vehicle model in any of the following:
" & [Doc_Model] & vbCrLf
End If
67
If [Doc_IncService] = -1 And [Doc_Mileage] <> "" And [Doc_MileType]
<> "" Then
Select Case [Doc_MileType]
Case "Greater Than"
TheString = TheString & "With vehicle mileage greater than " &
[Doc_Mileage] & vbCrLf
Case "Equal To"
TheString = TheString & "With vehicle mileage equal to " &
[Doc_Mileage] & vbCrLf
Case "Less Than":
TheString = TheString & "With vehicle mileage less than " &
[Doc_Mileage] & vbCrLf
End Select
End If
TheString = TheString & "-----------------------------------------------" & vbCrLf & vbCrLf
TheString = TheString & "The merge document will include "
Dim plus As String
If [Doc_Address] = -1 Then
TheString = TheString & " the address"
plus = ", "
End If
If [Doc_Phone] = -1 Then
TheString = TheString & plus & "phone number"
End If
If [Doc_Email] = -1 Then
TheString = TheString & plus & "email address"
End If
TheString = TheString & " of the customer." & vbCrLf
If [Doc_Detailed] = -1 Then
68
TheString = TheString & "The results will be highly detailed." &
vbCrLf
End If
If [Doc_Clean] = -1 Then
TheString = TheString & "All results with missing address, city,
state, and zip will be removed." & vbCrLf
End If
If [Doc_IncService] = -1 Then
TheString = TheString & "All service customers will be included." &
vbCrLf
End If
TheString = TheString & "All archived builds will be saved in: " &
[Doc_Directory] & vbCrLf
TheString = TheString & "The results will be merged to " &
[Doc_Merge_Side1]
If [Doc_Merge_Side2] <> "" Then
TheString = TheString & " and " & [Doc_Merge_Side2]
End If
TheString = TheString & " and sent to " & [Doc_Type] & "."
PreTxt.Value = TheString
End Sub
69
APPENDIX B
USER’S MANUAL
70
RosePro Manual
Version 1.0
By: Anthony Montalbano
© 2006
71
TABLE OF CONTENTS
Introduction and Installing RosePro……………………………………...….3
Creating a RosePro document without existing Word document………..….4
Creating a RosePro document with existing Word document……….……...5
Edit a RosePro document………………………………………………....…5
Understanding each screen…………………………………………….…….6
I. Main………………………………………………………6
II. Create/Edit Document………………………………….…7
III. Build Document……………………………………….….9
IV. Preview Document………………………………………10
72
Introduction
RosePro was creating with the intent to create quick and fast marketing
documents for Roseville Chrysler Jeep. This program is strongly dependent on the
DCMS database developed by Gil Hale. With RosePro you are given the ability to create
Microsoft Word documents with mail merge capabilities associated with the dealership
database found in DCMS. The following pages will help you install and run the
application smoothly. If for some reason any errors or problems come up please contact
me with the information provided below:
Anthony Montalbano
Cell Phone: (586) 242-4157
Email: [email protected]
Installing RosePro
1.
2.
3.
4.
5.
6.
7.
8.
9.
10.
The following instructions are necessary for RosePro to properly work.
Click [Start]
Goto “Control Panel”
Goto “Adminstrative Tool”
Goto “Data Sources (ODBC)”
Click [Add]
Choose “Microsoft Visual FoxPro Driver” then click [Finish]
Type in “DCMS Database” for Data Source Name
Type in “V:\cdb\App\DBC\translationengine.dbc” for Path
Click [Ok] to close the window, then [Ok] to close the other window
Finish!
Upon successfully completing the following steps RosePro should be setup to use. Please
see further instruction on how to use RosePro.
73
Creating a RosePro document without existing Word document
The following directions will guide you through the proper way to create a Word
mail merge document specific to RosePro in Microsoft Word 2002. These directions will
only need to be completed this way for the initial build of a new document with a new
Word document.
1.
2.
3.
4.
5.
6.
7.
8.
9.
10.
11.
12.
13.
14.
15.
16.
17.
18.
19.
20.
21.
22.
23.
Open Microsoft Word
Save your blank Word document to a location where it will not be moved.
Minimize Microsoft Word
Open RosePro
Click [Create New Document]
Choose the criteria specific to this document, make sure to include a name,
where to send the document, the save directory, and the Word document you
just created.
Save your newly created document
On the main RosePro screen click on your new document and click [Build
Selected Document]
Click [Build List]
Upon completion of build switch back to Microsoft Word
Click Tools on the top menu bar
Choose Letters and Mailing, then Mail Merge Wizard…
On the right of your screen you should see the Mail Merge side bar
Click “Next: Starting document” at the bottom of the screen
Click “Next: Select recipients” at the bottom of the screen
Click “Browse…” and navigate to the directory that you chose when you
created the new RosePro document and click on the file that begins with the
name of your RosePro document.
Click [Ok]
Click “Next: Write your letter” at the bottom of the screen
Click “More items…” and here you will find the fields that you can use in the
creation of Word document.
When you are done creating your Word document, save and close Microsoft
Word
Switch back to RosePro
Click on [Merge Document]
Finish!
Note: If you have a 2nd side to your document you will need to do steps 1-3 to create the
document, then steps 11-20 to merge the data to your document
74
Creating a RosePro document with existing Word document
If you have already created a mail merge Word document and would like to use it
in a new RosePro document, then follow the instructions below:
1.
2.
3.
4.
5.
6.
7.
8.
Open RosePro
Click [Create New Document]
Choose the criteria specific to this document, make sure to include a name,
where to send the document, the save directory, and the Word document you
just created.
Save your newly created document
On the main RosePro screen click on your new document and click [Build
Selected Document]
Click [Build List] or [Use Archived Build] (if you would like to merge an
archived)
Click on [Merge Document]
Finish!
Edit a RosePro document
You can edit an existing RosePro document by highlighting it on the main
RosePro screen and click [Edit Selected Document] or double clicking it. This will open
a familiar screen as seen when you created the document. Make any necessary changes
and save it.
75
Understanding each screen
There are 4 main screen associated with RosePro. The following screens will be
explained in detail, so that you can familiarize yourself with using the RosePro
application.
I.
Main
This is the main RosePro screen. The main screen shows all of the current build
documents that exist. There are also five buttons that do the following:
[Create New Document] – Opens a window to create a new document.
[Edit Selected Document] – Opens a window to edit the document highlighted in the list
of existing builds.
[Build Selected Document] – Opens a window to build data and merge to Word
document.
[Preview] – Opens a window to preview the criteria of the selected document to be built.
[Exit] – Exits RosePro Application.
76
II.
Create/Edit Document
This is the screen that does the most work. All of the build information will be
determined on this screen. There are four main sections to this screen, and will be
explained further below:
(* are required fields)
(+ are fields that accept multiple values separated by a comma)
Document (Everything in this section relates to the document itself)
*Name – Here you will type in the name of the RosePro document
Type – Choose any combination of address, phone, and email, and this
will output the corresponding material in the build, for mail merging
*Send To – Choose where you want to send your merged Word document
to, Printer, New Document, or Email
Date Range – The drop down box to the left of these criteria is only
enabled if you include service history. Here you can choose the range of
days that will be chosen. By default “Sales” is chosen and will choose the
range of days based on the contract date. If you happen to include
“Service” you can choose the range of days based on the RO close date.
*Set Save Directory – By clicking on [Find Directory], this will set the
location for all builds to be saved and archived.
77
*Set Word Document – By clicking on [Find Side 1], you can find the
Word document to merge into. You are also given the option to set a
different 2nd side of the document by clicking on [Find Side 2].
Customer (Everything in this section relates to the customer)
+First Name – Type in first name(s) of customers you want to select
+Last Name – Type in last name(s) of customers you want to select
+Zipcode – Type in zipcode(s) of customers you want to select
+City – Type in city(s) of customers you want to select
State – Select a state where customers live
Sale (Everything in this section relates to the sale)
Salesperson – Select the salesperson
Buy and/or Lease – Select any combination of Buy or Lease that you
would like to select
Vehicle (Everything in this section relates to the sale)
+Year – Type in the year(s) of the vehicles you want to select
+Make – Type in the make(s) of the vehicles you want to select
+Model – Type in the model(s) of the vehicles you want to select
New and/or Used – Select any combination of New or Lease that you
would like to select
Mileage – This is only available if service history is included. You are
given the option to selecting the mileage of service customers, greater to,
equal, or less than the amount you provide.
There are also four options that you can set. These options are outlined below:
Remove Empty Fields – This will remove any records that do not have the
necessary fields to send mailers, such values as customer name, address, city, state, and
zipcode.
Highly Detailed Results – This will return a very large number of fields that you
could use in merging your Word Document.
Include Service History – This will also return results from our service history,
not necessarily limited to our vehicle sales customers.
Progressive Builds – This will not select any records past the previous build.
This option will be used for documents with scheduled builds.
There are five buttons that do the following:
[Save] – Saves the RosePro document
[Close] – Closes the window and does not save the RosePro document
[Delete] – Deletes the RosePro document
[Reset Build Date] – Resets the last build date for the RosePro document
[Clear Temp Files] – Clears any temporary files left from the build
78
III.
Build Document
This is the screen that does the actual document building and mail merging. In the
middle of the screen is a status window that will be updated with the status of the build
and progress of the mail merge. There are four main buttons that will be detailed below:
[Build List] – This will process the RosePro document and build the records
needed for merging.
[Use Archived Build] – This will allow you to search for a previous build that
you would like to merge.
Note: Upon completion of build or selection of archived build the following will
become visible on the screen:
This outputs the amount of records found, the location of the file to merge,
and the range of records to merge. You can change the range of records, if for
some reason you did not want to print all of them.
[Merge Document] – This will merge your RosePro document with the
associated Microsoft Word document(s). Again, progress will be displayed in the status
window.
79
[Close] – This will close the current screen.
IV.
Preview Document
This screen shows you a preview of what your selected RosePro document will do. The
criteria in between the two horizontal lines is specific to the criteria that will be selected.
Clicking [Ok] closes this window.
80
APPENDIX C
PROGRAM OUTCOMES
81
The Computer Science department at Kettering University set forth these four
program objectives:
1. Computer Science graduates will have a broad, mathematically rigorous program in
the fundamental areas of computer science that will allow them to continue their
professional development and sustain a life-long career in computer science either
through graduate study or continuing self-directed learning and development
activities.
2. Computer Science graduates will have developed a sufficient depth of understanding
in computer science, and the skill, confidence, professionalism, and experience
necessary for successful careers in computer science and related fields.
3. Computer Science graduates will have the teamwork, communication, and
interpersonal skills to enable them to work efficiently with interdisciplinary teams in
industry, government, and academia.
4. The Computer Science faculty will provide its degree majors an excellent education
experience through the incorporation of current pedagogical techniques,
understanding of contemporary trends in research and technology, and hands-on
laboratory experiences that enhance the educational experience.
82