1
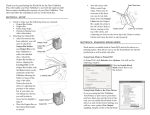
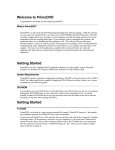
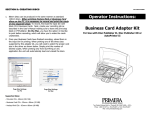
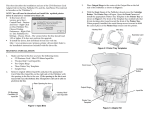
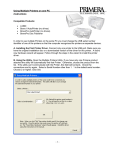
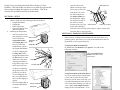
Thank you for purchasing the Kiosk Kit for the Bravo™ Disc Publisher. This will enable your Bravo to use both the right and left bins as input, doubling the capacity of your Bravo. This sheet describes the installation and use of the Kiosk Kit. SECTION I: SETUP 1. Check to make sure the following items are enclosed: • Output Bin Holder • Output Bin • Teflon Tape Strips • Operators Manual and other information 2. Attaching the Output Bin • After the software has been updated, you will Output Chute need to attach the Output Bin Output Bin Holder Holder and Output Bin to the Output Bin Bravo to collect the finished discs. Attach the Output Bin Holder as shown, aligning the Locating Tabs on the Output Bin Holder with the Slots located on the Slots underside of the Bravo allowing the holder to hang off the edge of the Locating Tabs table. Notice the slots do allow for adjusting the position of the output bin. If your discs are not falling into the bin, you will be able to move the bin slightly to align it. • Place the Output Bin on Output Holder the Output Bin Holder Output Bin as shown. • Start Tape Here Your kit comes with Teflon coated tape strips. These may be necessary Ribs if the discs you use do not slide freely down the Output Chute into the Output Bin. Apply the strips to the ribs of the Chute as shown, Lower Lip of Chute starting at the top of the Output Chute chute, and continuing on down to the lower lip of the Chute to reduce friction and cause the discs to eject properly. SECTION II: ENABLING KIOSK MODE Kiosk mode is available both in PrimoDVD and in the driver as a printing option. This allows you to use the Kiosk Mode for full CD production as well as print-only jobs. Using Kiosk Mode in PrimoDVD In PrimoDVD, click Robotics then Options. You will see the following window: Click the Enable Kiosk Mode Check Box to use this feature. Using Kiosk Mode in the Print Driver If you are using the Bravo AutoPrinter, or just want to print discs and have them eject out the front of the unit, you can enable Kiosk Mode in the driver as well. In the Driver Settings you will see a new option, Disc Output Location. Simply set this to Kiosk Mode. If you 012204-510710 are creating jobs in PrimoDVD, it is not necessary to change this driver setting if you already have set Kiosk Mode active under Robotic Options. The PrimoDVD Kiosk Mode option overrides any driver setting. NOTE: In print-only jobs, you may see a Windows "Time Out" error when the Bravo is out of discs in one bin and switches over to the other. This is normal, and will not affect the completion of the print job. The Bravo will retry automatically requiring no operator intervention. Kiosk Kit For use with Bravo™ Disc Publisher Using Kiosk Mode in Discribe Set up your job as described in your Bravo Disc Publisher Macintosh User's Manual. In the Robot Write pane you will see a check box option that will enable Kiosk Mode. Using Kiosk Mode in the Mac Print Driver If you are using the Mac Bravo AutoPrinter, or just want to print discs and have them eject out the front of the unit, you can enable Kiosk Mode in the driver as well. Click Print Setup to see the driver pane and all of its settings. You will want to click the Copies and Pages button and select Publisher Settings option in the dropdown menu to see the full pane and access all the printer driver settings. At the bottom of the Settings pane you will see a check box that will enable Kiosk Mode. Congratulations! You are now ready to use Kiosk Mode, doubling the capacity of your Bravo Disc Publisher or Bravo AutoPrinter! Operator's Instructions 2003 All rights reserved