1
PortICConnector. Installation and configuration manual
PortICConnector is an application designed to be installed and executed from a machine
servant and that is in charge to make the documentary interchange between PortIC and all that
that sends or receives documents with PortIC.
Installation (test environment)
PortICConnector needs Java 2 Runtime Environment, v1.4 to be able to be executed.
Optionally we will execute it using Java Web Start, a tool of Sun that is in charge to execute the
application (in this PortICConnector case) and loss of Internet new versions of the same one in
case of having them.
1. To install JRE v1.4 (if or it is not installed)
2. Instalar Java Web Start v.1.2 (if or it is not installed) in the directory "C:\Archivos de
programa\Java Web Start".
3. Although in some cases it is not necessary, in this point is recommendable to reinitiate
the server.
4. If we have the direct access Install.PortICConnector.Test.lnk we will execute it
directly to execute the application by means of Java Web Start. In case it is the first time
that one executes the application, the last version of the product will be downloaded by
Internet from PortIC of. If this did not work or we did not have this icon we will have to
open to Java Web Start and to go a: to Archivo/Preferencias/Avanzadas, to modify the
URL by remote http://webstarttest.portic.net b. Aceptar c. Ver/Aplicaciones d.
Seleccionar 5, PortICConnector (TEST) and Iniciar Aceptar the certificates, to create
the icons of direct access and when it appears the window of configuration we will
introduce code PAIS+NIF, the code of USER and password of the test surroundings or
tests provided by PortIC previously.
If the icon of direct access were not created on the desktop, go to JWS:
a)
b)
c)
d)
to Ver/Aplicaciones unloaded
Seleccionar PortICConnector (TEST)
Aplicación/Eliminar direct access
Aplicación/Crear direct access
Installation (real environment)
The installation of PortICConnector for the real environment is done following the same steps
that made up the installation in the test environment, with the exception of point 4, in that we
will use the direct access “Install.PortICConnector.Real.lnk”. If we also do not have this direct
access we can download the application by means of Java Web Start using the URL
http://reing.portic.net/portic/PortICConnector.html in point a).
User manual
In order to initiate PortICConnector it will be enough with executing the icon created by Java
Web Start:
PortICConnector (TEST): for test environment
PortICConnector: for the real evironment
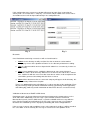
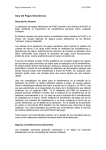
If the stored company, user and password in the configuration are correct, a graphical window
will appear (fig 1) indicating activation of that part of the program that is in charge of the
document sending (Sender) or the one in charge of the reception (Receiver). Based on the
configuration, the Sender and Receiver will be inactive more or less time after having been
activated.
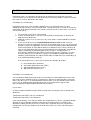
If this configuration were not correct a window will appear for Login (fig 2) requesting the
country code + fiscal code of the . company, a user name and password. Once correct values
are introduced, these will be kept automatically in the configuration file.
Fig. 1
Fig. 2
Directories
Once PortICConnector being executed, we will use four directories:
1. outbox: In this directory we will put all the files that we want to send to another
company by means of the platform of PortIC. It is the directory of document sending.
2. sent: If a document which we have deposited in outbox has sent correctly, it moves to
this directory.
3. error: If some problem occurs sending the document or some error of format is
detected, it moves to this directory. Whenever a file transfer fails and the file is moved
here, another file with the same name but extension"err "with a small description of the
error will be generated, describing what the failure is due to.
4. inbox: All the documents that are sent to our company will appear in this directory. this
is the directory of document reception.
There is an additional directory called log that is used to store logs of the application. Every
day two new logs will be generated: PortICConnector.log (general logs of the application)
and AditLog.log (it will only contain information on documents that are sent and received).
Validation of documents of ESMT in XML format
PortICConnector is in charge of document interchange between the company that uses the
client and PortIC. Additionally, if the message is part of ESMT (Entrance and Exit of
Merchandise by truck) and is in XML format, a syntactic validation of the message will take
place (Checker module) that will indicate if the message is correct or not. It is possible to
deactivate this validation by means of property VALIDAR_XML of the configuration file.
If the message is correct and no problem occurs at the moment of sending, it will be moved to
the “sent” folder. If on the contrary the message is not correct or some problem in the
interchange takes place, it will be moved to the “error “ folder and the description of the error
will be created.
It is possible that, although the document is valid and moves to the “sent” folder, in PortIC is
performing additional validations and this causes that the document to be rejected, generating
the APERAK message of that error.
MESSAGE_TYPE.SENDER.RECEIVER.DOCUMENT_NUMBER.MESSAGE_NUMBER.FORM
AT.IS_SIGNED.msg
MESSAGE_TYPE:
SENDER:
RECEIVER:
DOCUMENT_NUMBER:
MESSAGE_NUMBER:
FORMAT:
IS_SIGNED:
msg:
document type. For example IFTMCS
Country code + fiscal code of the sender. Por ejemplo
ESA12345678
EDIXML, EDIFACT, FTABLA…
{S,N} S: Document is signed electronically. N: Document is NOT
signed electronically. Default value is N.
file extension. PortICConnector only sends documents with
extension msg, reason why we recommended that if a file is
being generated in the directory outbox, first it is generated
without extension and later the name is modified adding the
extension msg. This way we avoid that PortICConnector tries to
send a document that still is being generated. PortICConnector
works in the same way generating files in the folder inbox.
Configuration File
There is a configuration file that is located in the directory $HOME of the user who is executing
PortICConnector. The name of the file is PortICConnector.properties. If we modify a parameter
it will be necessary to reinitiate PortICConnector. Some of the parameter s that we will find here
are:
COMPANY:
.
USERNAME:
User code for PortIC applications
PASSWORD:
User password (encrypted)
BASEDIR:
Directory for installing PortICConnector.
MAX_DAYS_DELETE_LOGS: Los ficheros de log que sean más antiguos que el número de
días aquí configurado se borrarán. Si esta propiedad no existe, se
ignora y no se borran los ficheros de log.
LASTSYNC:
Última fecha de sincronización con el servidor de PortIC
comprobando si hay nuevos documentos para recuperar.
SLEEPING_SENDER:
Cada cuántos minutos comprobará PortICConnector si hay nuevos
documentos en el directorio outbox para enviarlos a PortIC. Si el
valor es –1, entonces se desactiva el envío de documentos.
SLEEPING_RECEIVER: Cada cuántos minutos se conectará PortICConnector con PortIC
para comprobar si hay nuevos documentos para recuperar. Si el
valor es –1, entonces se desactiva la recepción de documentos.
SEPARADORCOLUMN: En caso que recibamos en formato FTABLA aquí especificaremos
cuál será el carácter que se utilizará como separador de campos de
tabla.
NULLCOLUMN:
En caso que recibamos en formato FTABLA aquí especificaremos
cuál será el texto que se escribirá cuando un campo no aparezca. Lo
más habitual es dejarlo en blanco para que no escriba nada, pero
sería posible escribir textos como por ejemplo “null”.
RECEIVE.{TIPO_DOCUMENTO}.FORMAT:
Podemos especificar en qué formato deseamos
recibir un tipo de documento en concreto. Para esto añadiremos
varias entradas de este parámetro. Por ejemplo:
RECEIVE.*.FORMAT = DEFAULT
RECEIVE.IFTMCS.FORMAT = FTABLA
RECEIVE.COPARNE01.FORMAT = EDIXML
RECEIVE.COPARNE02.FORMAT = EDIFACT
SEND.{TIPO_DOCUMENTO}.FORMAT:
Del mismo modo también podremos especificar
el formato en el que desearemos enviar un documento. Por ejemplo:
SEND.*.FORMAT = DEFAULT
PLUGIN.{TIPO_DOC}.CLASSNAME:
Es posible también especificar una clase java
que realice distintas cosas según la configuración establecida. Por
defecto la clase que se utiliza como PlugIn es la clase
portic.PortICConnector.PlugIn.ByPassPlugIn, que no hace nada. La
configuración por defecto es:
USE_SSL:
PLUGIN.*.CLASSNAME=portic.PortICConnector.PlugIn.ByPassPlugIn
Comunicación con PortIC mediante SSL. VALORES: TRUE (utilizamos
SSL), FALSE (no utilizamos SSL)
TRANSFORM.{TIPO_DOCUMENTO}.{FORMATO} = {TRUE,FALSE}: Podemos especificar
que para un tipo de documento y un formato tan solo se realice una
transformación sin que se envíe el documento. Por ejemplo:
TRANSFORM.IFCSUM.TELEINF = TRUE
TRANSFORM.IFCSUM.* = TRUE
TIMEOUT:
Se indica en segundos el timeout que se aplicará a todas las
conexiones con PortIC. Si no se indica esta propiedad, se usará el
timeout por defecto, 60 segundos. Esta propiedad no aparece por
defecto, debe ser insertada en el fichero por el usuario si éste desea
especificar el timeout.
LOGDIRECTORY:
Se indica la localización del directorio donde se dejarán los ficheros
de log. Si no se especifica esta propiedad, los ficheros se dejarán en
el directorio “log” situado en el directorio indicado en la propiedad
BASEDIR
VALIDAR_XML:
Utilizando esta propiedad podemos desactivar la validación de los
documentos de ESMT en formato XML. Esta propiedad puede tomar
los valores { TRUE , FALSE }. Si toma valor FALSE no realizará la
validación y un documento XML incorrecto lo enviará a la plataforma
PortIC sin validarlo. Una vez en la plataforma se generará el
correspondiente APERAK de error, que recibirá PortICConnector si
así está configurado. Si toma valor TRUE o no se ha especificado la
propiedad, un documento de ESMT en formato XML se validará,
moviéndose a la carpeta error si éste es incorrecto.
KEEP_SIGNED_DOC = { TRUE , FALSE }: Esta propiedad tan solo aplica a documentos que
se reciban firmados. Con valor true se conservará el documento
firmado, aunque PortICConnector se encargue de validarlo y de
generar el documento original. En todos los otros casos se validará
el documento firmado, se generará el documento original y se
borrará el original firmado.