1
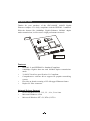
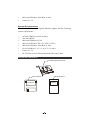
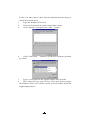
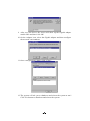
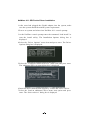
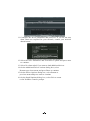
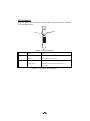
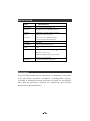
GNC-0100SX
1000SX Gigabit Ethernet Adapter
User's Manual
INTRODUCTION
Thanks for your purchase of the GNC-0100SX 1000SX Gigabit
Ethernet Adapter. It is fully compliant with the IEEE802.3 standard.
With the features like 1000Mbps Gigabit Ethernet, full/half duplex
mode transmission, it offers users a high performance network.
Tested to Comply
With FCC Standards
FOR HOME OR OFFICE USE
Features
•
IEEE802.3z and IEEE802.3x Standard Compliant
•
1000Mbps Gigabit data rate and full/half duplex transmission
mode.
•
32-bit PCI local bus specification 2.1 Compliant
•
Comprehensive software driver support for popular networking
system.
•
Provides on-board screening of VLAN tagged Ethernet frames.
•
Duplex SC fiber connector.
Network Drivers Support
•
Novell NetWare Server 3.12, 3.2 , 4.1x, 5.0 or later
•
Microsoft Windows 95/98
•
Microsoft Windows NT3.51, NT4.0, NT5.0
•
•
Microsoft Windows 2000 Beta or later
Linux 2.0, 2.2
System Requirements
T he GNC-0100SX 1000SX Gigabit Ethernet Adapter has the following
system requirements:
•
•
•
•
•
•
•
•
At least 32MB of system memory.
The latest BIOS.
Microsoft Windows 95/98
Microsoft Windows NT3.51, NT4.0, NT5.0
Microsoft Windows 2000 Beta or later
Novell NetWare 3.12, 3.2, 4.1x, 5.0 or later
Linux 2.0, 2.2
62.5/125um or 50/125um multi-mode fiber optic cable
PACKAGE CONTENTS
PCI 1000Mbps Gigabit Ethernet Adapter
USERS MANUAL
DRIVER DISKETTE
Adapter Driver
MANUAL
HOW TO USE THIS GIGABIT ETHERNET ADAPTER
Follow the instructions in this section for installing the GNC-0100SX
1000SX Gigabit Ethernet Adapter in your system.
1.Make sure your system meets the system requirements.
2.Shut down and power off your system.
3.Plug this Gigabit Ethernet adapter into your system’s PCI slot
4.Connecting the network cables.
Multi-mode Fiber
62.5/125 um
50/125 um
Operating Distance 2 to 260 meters 2
to
meters
550
Connect one end of the cable to the Gigabit Ethernet adapter, as
shown in below.
5.Turn on your system power.
In the driver diskette in which is provided by vendor, the file name is
“install.txt”, read this file carefully, there are more detail information.
Windows NT 4.0 installation procedure
Installin g the Windows NT 4.0 NDIS4 Device Driver
1.
Users’ system must meet the minimum system requirement, or
the driver installation may be fail.
2.
Make sure your Windows NT4.0 desktop had been install Service
Packet 3 (or later) and you have Network Administrator privileges to
install the network driver.
3.
Login the Windows NT4.0 OS.
4.
Clicks the Network icon on the Control Panel menu.
5.
Clicks “Adapter” item and select “ Add…”button.
6.
Clicks “Have Disk…” button to use the driver diskette provided
by vendor.
7.
8.
Type a correct path for the Gigabit Adapter and click OK.
The system will copy some of files. Users may need to prepare
the Windows NT4.0 CD. And the system will successfully install the
Gigabit adapter driver.
9. After copy the driver, the screen will show up the Gigabit adapter
model name and then click OK.
10. On the Adapter icon, select the Gigabit adapter and then configure
the network environment.
11. Once configuration is done, click “Close”.
12. The system will ask you to shutdown and reboot the system or not?
Click Yes button to shutdown and reboot the system.
NetWare 4.11 ODI Device Driver installation
1.After users had plugged the Gigabit adapter into the system, make
sure the system match the minim system requirement.
2.Power on system and reboot into NetWare 4.11 console prompt
.
3.At the NetWare console prompt enter the command “load install” to
start the install utility. The Installation Options dialog box is
displayed.
4.Select the “Driver Options” menu item and press enter. The Driver
Options dialog box is displayed.
5.Select the “Configure Network Drivers” menu item and press enter.
The Additional Driver Actions dialog box is displayed.
6.Insert the driver diskette that support by vendor and select a driver.
7.Select the Load an additional driver menu item option and press
enter. The “Select a driver” dialog box is displayed.
8. Press the “Ins” key to “install an unlisted driver”.
9.
Specify the pat h for the drivers.
10. Press enter to select the JT1ODI.LAN from the Select a driver to
install dialog box. A message asking if you want to copy the driver
is displayed. Select Yes to continue. The device driver is copied.
11. Configure the driver parameters and protocols. If you are not sure
what values are required for your network, contact your network
administrator.
12. Select the Save Parameters and Load Driver option and press enter
to continue.
13. Select No when asked if you want to load additional drivers
14. On the Additional Driver Actions dialog box, select
Return to previous menu and press Enter to continue
15. On the Driver Options dialog box, select Return to
previous menu and press enter to continue
16. On the Install Options dialog box, select Exit to return
to the NetWare console prompt.
LED Indicators
Figure 1 shows two indicators, which indicate the presence of situation
Link and Data status.
DATA
LINK
Figure 1 LED indicators
ON/BLINK
LINK
DATA
* L ink up is a green
*Blinking in green means data packet being
light.
OFF
transmitted or received.
*Power off.
*Power off.
*Link down.
* No data packet being transmitted or
received.
Table 1. Status of the indicators
SPECIFICATION
ITEM
DESCRIPTION
Bus Interface
PCI-bus specifications Rev 2.1
Network
*IEEE802.3z for 1000Mbps Ethernet
Standard
*IEEE802.3x for full-duplex operation
Cable/
*Duplex SC fiber connector
Connector
*62.5/125-micron multi-mode fiber
*50/125-micron multi-mode fiber
Data Rate
1000Mbps
Boot ROM
128Kbyte Boot ROM design
Power
6.5W
Environment
*Temperature Operating: 0 to 40
*Storage: -20 to +70
*Humidity Operating: 10% to 80% RH
*Storage: 5% to 90% RH
Emissions
FCC part 15Class B, CE Class B
COPYRIGHT
No part of this manual may be reproduced or transmitted, in any form
or by any means, electronic, mechanical, including photo copying,
recording or information storage and retrieval system, for any purpose
other than the purchaser‘s personal use, without the prior writ ten
permission of the manufacturer.
FCC WARNING
This equipment has been tested and found to comply with the limits for
Class B device, pursuant to part 15 of FCC rules. These limits are
designed to provide reasonable protection against harmful interference
when the equipment is operated in a commercial environment. This
equipment generates, uses, and can radiate radio frequency energy. If it
is not installed and used in accordance with the instruction manual, it
may cause harmful interference to radio communications. Operation of
this equipment in a residential area is likely to cause harmful
interference, in which case users will be required to take whatever
measures may be necessary to correct the interference at their own
expense.