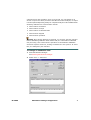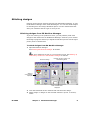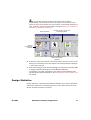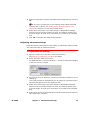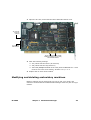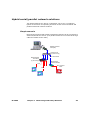
1
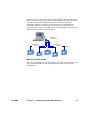
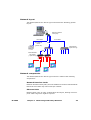
Embroidery Software 2006
Machine Manager
Supplement
Copyright © 1998-2005 Wilcom International Pty Ltd. All rights reserved.
No parts of this publication or the accompanying software may be copied or
distributed, transmitted, transcribed, stored in a retrieval system or translated into any
human or computer language, in any form or by any means, electronic, mechanical,
magnetic, manual, or otherwise, or disclosed to any third party without the express
written permission of:
Wilcom International Pty Ltd. (A.B.N. 62 062 621 943)
146-156 Wyndham Street, Alexandria (Sydney)
New South Wales, 2015, Australia
PO Box 581, Alexandria, 1435
Phone: +61 2 9578 5100
Fax: +61 2 9578 5108
Email: [email protected]
Web: http://www.wilcom.com.au
The Stitch Processor (SP) portion of this product is protected by the following patents:
US Patent Nº 4,821,662
European Patent Nº 0221163
Japanese Patent Nº 2029491
Curve Line Fill Stitching in this product is protected by US Patent No. 6,587,745.
TrueView™ and Point & Stitch™ are trademarks of Wilcom International Pty Ltd.
Portions of the imaging technology of this product are copyrighted by AccuSoft
Corporation. The EPS File Import/Export Convertor used in this product is copyrighted
by Access Softek, Inc. All rights reserved.
Wilcom International Pty Ltd. makes no representation or warranties with respect to
the contents of this publication and specifically disclaims any implied warranties of
merchantable quality or fitness for any particular purpose.
Further, Wilcom International Pty Ltd. reserves the right to revise this publication and
to make changes in it from time to time without obligation of Wilcom International Pty
Ltd. to notify any person or organization of such revisions or changes.
The screen illustrations in this publication are intended to be representations, not
exact duplicates of the screen layouts generated by the software.
Subject to any warranties implied by law which are incapable of limitation or exclusion,
the software is purchased ‘as is’ without any warranty as to its performance, accuracy,
freedom from error or to any results generated through its use and without any implied
warranty of merchantability or of fitness for any particular purpose for which the
software is being acquired. The purchaser relies on its own skill and judgement in
selecting the software for its own use and assumes the entire risk as to the results and
performance of the software. Wilcom International Pty Ltd. specifically does not
warrant that the software will meet the purchaser’s requirements or operate without
interruption or error.
Rev 1
July 2005
Chapter 1
ES Machine Manager
ES Machine Manager is a tool for controlling the workflow of multiple
embroidery machines. Its main tasks are to download designs to machines,
manage queues, monitor machine and job status, and collect productivity
and maintenance statistics.
ES Machine Manager is machine- rather than design-oriented. It is ideally
suited for use in larger embroidery factories where production managers
and supervisors must know exactly what many machines are doing and how
jobs are progressing.
You can also use ES Machine Manager to send designs to machines from
within ES Designer or Design Workflow, and then view and manage job
queues.
ES Machine Manager features
Depending on the options available in your software implementation, ES
Machine Manager allows you to:
! Download multiple designs to many machines
! Manage and view all design queues simultaneously in an embroidery
machine network
! Change the design queues by drag-and-drop and cut-and-paste — i.e.
move designs around in the queue or move designs to a different
machine. Designs can even be moved between different brands and
models of machine
! Delete one or more selected designs, or the entire design queue, using
Delete or Cut, or Delete Queue
! Drag-and-drop or cut-and-paste one or many designs from Windows
Explorer directly onto a ES Machine Manager queue
! Recall designs that were queued when ES Machine Manager was last
closed.
ES 2006
ES Machine Manager Supplement
1
Serial line feedback
The following features are also available for machines that can send
feedback via a serial connection:
! monitoring stitching progress of each design on each machine
! displaying a statistical summary of machine performance for a given
period
! exporting machine statistics to other applications for further analysis
and reporting
! producing sophisticated production analysis reports from machine
feedback (including head, needle and thread break information, and
performance for any given period)
! generating ready-made production efficiency reports.
Starting and exiting ES Machine Manager
ES Machine Manager can be started and closed using the normal Windows
options. You can start it using a desktop icon, from the Windows Start
button, by double-clicking the ES Machine Manager EXE file in Windows
Explorer, and from inside ES Designer. You can also exit the program using
the standard Windows program options.
Starting ES Machine Manager
ES Machine Manager can be started in a number of ways:
! via the File menu inside ES Designer
! from the Windows desktop
! from Windows Start > Programs.
Tip If there is no ES Machine Manager icon on your Windows desktop, add
one by making a shortcut of the ES Machine Manager EXE file and then
dragging the shortcut to your desktop (see ‘Shortcuts’ in Windows Help for
details).
To start ES Machine Manager
! If ES Designer is not being used, double-click the ES Machine Manager
icon on the Windows desktop.
ES 2006
Chapter 1
ES Machine Manager
2
Tip If the desktop is not visible, right-click a blank area of the Windows
taskbar, then select Minimize all Windows (or press M).
! If ES Designer is not being used, click Windows Start > Programs >
Wilcom ES > Machine Manager.
! If ES Designer is being used, select File > Stitch to Machine Manager.
! If Design Workflow is being used, select File > Stitch to Machine
Manager.
Exiting ES Machine Manager
You can close ES Machine Manager at any time using the standard Windows
File > Exit, or by clicking the x button at the top right of the window.
To exit ES Machine Manager
! Select File > Exit, or
! Click the x button at the top right of the window.
Note If any designs are queued, you will be asked whether you want
save the queue until the next time you open ES Machine Manager. We
recommend that you save the queue.
ES Machine Manager views
Depending on the options available in your software implementation, ES
Machine Manager provides a number of views for managing your design
queues. These are:
! Queue view (the default) which shows each machine plus thumbnails of
any designs in its queue.
! Machine view which shows all of the machines on line, with details of
their current status.
! Design Details which shows a large thumbnail of the selected design
plus all of its design details.
! Statistics which displays all of the details of designs sent to machines
over a selected period plus feedback from machines that generate serial
feedback.
ES 2006
ES Machine Manager Supplement
3
Changing to Queue view
The Queue view window provides a flexible visual environment for
managing your design queues. You can scroll through all of your machines
and see a thumbnail and brief details for all queued designs. Most designs
are sent for stitching from this view.
To change to Queue view
1
Start ES Machine Manager.
See Starting ES Machine Manager.
2
Select View > Queue View.
3
Use the appropriate methods below:
! To change a design’s position in a queue, drag it to any position in
the current queue.
! To stitch a design to a different machine, drag-and-drop it to any
position in that machine’s queue.
! To delete a design from a queue, select it and press Delete. You will
be asked to confirm the deletion.
! To stitch a copy of the same design in a queue, select the design,
press Ctrl + C, then press Ctrl + V to paste the design in the queue.
Alternatively, right-click the design, select Number of Runs, enter
the number of runs required in the dialog and click OK.
! To add more designs to the queues, drag-and-drop one or more
designs directly from Windows Explorer onto a ES Machine Manager
queue.
ES 2006
Chapter 1
ES Machine Manager
4
Tip Drag selected designs from Explorer over the minimized ES Machine
Manager taskbar icon. ES Machine Manager will automatically maximize
and allow you to drop the design/s onto a queue.
Where necessary, you will be prompted to change machine format.
Changing to Machine view
Machine view displays details for all the machines in a factory. It shows the
reference number (e.g., Machine 1) and model (e.g., Melco) of each
machine, the name and icon of the last design that was downloaded, and
the number of stitches and colors in the design. If no design is running on
a machine, only the machine’s reference information and status are
displayed.
For machines without feedback, the download progress displays as a
percentage. When the design is downloaded, the status displays as
Downloaded & Stitching. Machines with serial feedback show the actual
stitching progress of the current design and current machine status.
To change to Machine view
1
Start ES Machine Manager.
See Starting ES Machine Manager.
2
ES 2006
Select View > Machine View.
ES Machine Manager Supplement
5
Changing to Design Details view
The Design Details window displays a selected design for detailed
(enlarged) viewing. It includes the following information:
! basic machine information including machine reference number and
model
! design information including design name, stitch count, number of
colors and color sequence
! current stitch count progress and percentage completion (serial line
feedback only)
! current machine status (serial line feedback only).
To change to Design Details view
1
Start ES Machine Manager.
See Starting ES Machine Manager.
2
Select View > Queue View.
3
Right-click the design’s thumbnail.
4
Select View > Design Details from the dropdown menu.
Changing to Statistics view
ES Machine Manager automatically collects machine data for machines that
support serial line feedback. This data provides summary statistics
ES 2006
Chapter 1
ES Machine Manager
6
(collected from each machine) for a given period. You can display it on
screen or export it to Excel, Access or text files for further analysis, or export
it to the optional Reporting Utility for complete analysis of all available data.
Summary statistics for each machine include:
!
!
!
!
!
total number of stitches
total number of stops
total number of thread breaks
total minutes stopped
total minutes operated.
Warning Once design stitching is finished, you need to wait two minutes
before submitting statistics data. Before that, the information submitted
may be wrong. This is because the operation of the Statistics database
consumes system resources, causing a bottleneck in the system. To avoid
this, it is delayed by two minutes.
To change to Statistics view
1
Start ES Machine Manager.
See Starting ES Machine Manager.
2
ES 2006
Select View > Statistics.
ES Machine Manager Supplement
7
Stitching designs
Designs can be sent for stitching directly from ES Machine Manager, or sent
to ES Machine Manager from inside ES Designer. You can also send designs
for stitching from the Design Workflow option. Use the method that best
suits your workflow and the type of work you do.
Stitching designs from ES Machine Manager
If you are working in the production area, you will probably send most
designs to the machines from ES Machine Manager. It allows you to monitor
the design’s progress and lets you adjust the machine queues so that higher
priority work is finished first.
To stitch designs from ES Machine Manager
1
Open ES Machine Manager.
See Starting ES Machine Manager for details.
Note If no machines are set up, you must do so now. See Setting up
embroidery machines in ES Machine Manager for details.
Send next design
Designs remain in queue until
downloading starts
Status of
current design
displayed
Stitch and color data
displayed
ES 2006
2
Click the thumbnail of the machine that will stitch the design.
3
Add a design or designs to the selected machine’s queue. To do this,
either:
Chapter 1
ES Machine Manager
8
! Select File > Open, browse to the folder containing the design(s),
select the design(s) and click Open.
! Drag-and-drop, or cut-and-paste, designs onto the machine’s
thumbnail from Windows Explorer. See also Changing to Design
Details view.
Note If you want queued designs to be sent to this machine
automatically, select the Auto Download option in the Embroidery
Machine Connection dialog. Or, if you want to control when designs are
sent, clear the Auto Download option. See also Setting up embroidery
machines in ES Machine Manager.
4
If the Auto Download option in the Embroidery Machine Connection
dialog is not selected, select the machine and select Machine Manager
> Send Next Design.
Stitching designs from ES Designer
If you are a designer, most of your designs will be sent to production from
inside ES Designer. This minimizes the time you spend before getting back
to the next design. In larger factories, the design’s progress will be
monitored by production staff, but you can still monitor the design queue
using ES Machine Manager if necessary.
To stitch a design from ES Designer
ES 2006
1
From ES Designer open or digitize a design.
2
Choose File > Stitch to Machine Manager.
ES Machine Manager Supplement
9
Note If no machines have been set up, you will be prompted to add a
new machine unit. See Setting up embroidery machines in ES Machine
Manager for details.
Melco
ES 2006
3
Select the required machine from the Machine Identification
dropdown list.
4
Select the correct machine format from the Output as Machine Format
dropdown, and click OK.
5
ES Machine Manager opens in Queue View mode. The machines
registered in the system appear in the left side of the window. The
design(s) for stitching are queued to the right.
Chapter 1
ES Machine Manager
10
Note If you want queued designs to be sent to this machine
automatically, select the Auto Download option in the Embroidery
Machine Connection dialog. Or, if you want to control when designs are
sent, clear the Auto Download option. See also Setting up embroidery
machines in ES Machine Manager.
Send next design
Designs remain in queue until
downloading starts
Status of
current design
displayed
Stitch and color data
displayed
6
If the Auto Download option in the Embroidery Machine Connection
dialog is not selected, select the machine and select Machine Manager
> Send Next Design.
7
Send other designs to ES Machine Manager as required. Press Alt + Tab
to toggle between ES Designer and ES Machine Manager.
The designs you send will appear in the design queues waiting to be
stitched to the specified machines. See Changing to Design Details view
for details.
Design Statistics
Design statistics, collected by ES Machine Manager from serial-interfaced
embroidery machines, can be displayed on screen and exported in Excel,
Access and text formats for analysis.
ES 2006
ES Machine Manager Supplement
11
Note The optional Reporting Utility allows complete analysis of all
available data from your embroidery machines. See your Wilcom dealer for
full information about this valuable tool.
Exporting design statistics
You can export the statistics collected by ES Machine Manager in common
spreadsheet, database and text formats. You can then use the power of your
spreadsheet or database program to provide meaningful management
statistics.
To export design statistics
1
Select Statistics from the ES Machine Manager menu. Or, right-click a
machine unit in the left panel and select Statistics from the popup
menu.
Export data to
external file
Specify period for
which statistics are
required
Statistics viewing
panels
ES 2006
2
In the Date From and To fields, specify the period for which machine
statistics are required.
3
Click Update.
Chapter 1
ES Machine Manager
12
Data stored in the ES Machine Manager database is extracted and
displayed in the Machine Statistics and Thread Breaks per Head
viewing windows.
4
Click Export to export the data for further analysis in a database or
spreadsheet.
The Export Statistics dialog opens.
5
Choose an export report file format from the list, enter a suitable file
name, and click OK.
Note Do not add a file extension — e.g. TXT — to the file name. ES
Machine Manager adds the correct extension automatically.
The export report file is written to the \bin subdirectory of your current
software installation. You can now view and further analyze the data
using a database or spreadsheet program, depending on the file format
you have chosen.
Initializing the ES Machine Manager database
ES Machine Manager will continue to collect machine data indefinitely.
Periodically you may want to clear the database to free up disk space. You
may decide to do so every time you export any required statistics to another
application. Simply select Initialize Database from the File menu.
Warning Once the ES Machine Manager database has been initialized, the
data is no longer available for export.
Setting up embroidery machines in ES Machine Manager
You can access all of your available machines from within ES Machine
Manager using the procedures below. Details can be modified at any time,
and you can delete machines when they are no longer needed.
ES 2006
ES Machine Manager Supplement
13
Setting up embroidery machines
To set up a machine you need to define a name, the port it is attached to,
and the protocol it uses. You can select whether to download automatically
to the selected machine and — for machines that support serial feedback —
whether to view design feedback as you stitch out. For every machine, you
need to select the machine formats it supports. You can select from a
selection of standard formats, or create new formats if necessary.
To set up an embroidery machine
1
Connect the embroidery machine using the instructions that came with
the machine. Carefully note the port settings, which must also be
entered in the ES Machine Manager Embroidery Machine Connection
dialog.
2
Start ES Machine Manager.
See Starting ES Machine Manager for details.
3
Select Machine Manager > Add Machine.
The Embroidery Machine Connection dialog opens.
ES 2006
4
In the Name field, enter a name for the machine—e.g. Machine 1.
5
In the Model field, enter the brand and model of the machine.
Chapter 1
ES Machine Manager
14
6
In the Info field, enter a comment as required.
7
In the Number of Heads field, enter the number of machine heads.
8
In the Number of Needles field, enter the number of needles.
9
In the Machine Type panel, select the compatible machine formats.
To do this, select compatible machine types in the Available list, and
click > to move them to the For this machine list.
Select
machine type
supported machine
types
Click > to move machine types to the
For this machine list
Note Machine format values can be added or changed if required. See
the ES Designer User Manual for details.
10 From the Port dropdown list, select the port to which the machine is
connected.
! If you select a serial port (e.g. COM1, COM2 etc.), go to Adjusting
serial port settings.
! If you select a parallel port (e.g. LPT1, LPT2, etc.), go to Adjusting
parallel port settings.
! If you select Network, go to Adjusting network settings.
! If you select Ethernet, go to Adjusting ethernet settings.
Adjusting serial port settings
PC serial COM ports are male connectors, and can be either 9-pin or 25-pin.
They are named COM1, COM2, COM3, etc. Read the instructions that came
with the embroidery machine, and take particular note of the recommended
Port and Protocol settings.
Note You must be able to identify the ports on your computer. If in doubt,
consult a PC technician.
To adjust serial port settings
1
Complete the initial setup of the embroidery machine.
See Setting up embroidery machines for details.
ES 2006
ES Machine Manager Supplement
15
2
Select a serial port — e.g. COM1 — from the Port pulldown.
3
Select a serial protocol from the Protocol pulldown. The protocol
selected should be one recommended by the machine’s manufacturer.
4
Click Setup to open the Serial Port Setup dialog.
5
Enter the Baud rate, Data Bits, Stop Bits and Parity and Handshaking
settings for the device.
Note The port settings must match those of the embroidery machine
or selected device. The type of handshaking must match the type of
cable you are using. Check the communications setup section of the
documentation that came with the device.
6
Select Auto Download if you want designs in ES Machine Manager
queues to be sent to this machine as soon as it finishes stitching the
previous design. Or clear Auto Download if you want to be prompted
first.
7
Select Feedback if you want to view machine feedback and/or collect
machine statistics. This option is only available for machines that
support serial line feedback.
8
Click OK to complete the setup of this machine.
Adjusting parallel port settings
Parallel ports are used to connect some embroidery machines. They are
named LPT1, LPT2, etc. Read the instructions that came with the
embroidery machine, and take particular note of the recommended Port and
Protocol settings.
To adjust parallel port settings
1
Complete the initial setup of the embroidery machine.
See Setting up embroidery machines for details.
ES 2006
Chapter 1
ES Machine Manager
16
2
Select a parallel port — e.g. LPT1 — from the Port pulldown.
3
Select a parallel protocol from the Protocol pulldown. The protocol
selected should be one recommended by the machine’s manufacturer.
4
Select Auto Download if you want designs in ES Machine Manager
queues to be sent to this machine as soon as it finishes stitching the
previous design. Or clear Auto Download if you want to be prompted
first.
5
Click OK to complete the setup of this machine.
Adjusting network settings
If an embroidery machine connection uses a Melco StarLAN network with a
Melco StarLAN card, enter the network settings.
To adjust network settings
1
Complete the initial setup of the embroidery machine.
See Setting up embroidery machines for details.
2
Select Network from the Port pulldown.
3
Select Melco StarLAN from the Protocol pulldown, and enter the ID
number.
Note The ID number appears in the Melco machine’s LCD display when
it is switched on. ID 1 is displayed as Machine 01, ID 2 as Machine 02,
etc.
4
ES 2006
Click Setup to open the Melco Network Card Setup dialog.
ES Machine Manager Supplement
17
5
Enter the IRQ, Base Address and DMA network card settings, and click
OK.
Note If you do not know the correct settings for the Melco StarLAN
network card in this PC, see Finding Melco StarLAN network card
settings for methods you can use to obtain them.
6
Select Auto Download if you want designs in ES Machine Manager
queues to be sent to this machine as soon as it finishes stitching the
previous design. Or clear Auto Download if you want to be prompted
first.
7
Click OK to complete the setup of this machine.
Adjusting ethernet settings
Enter the following information when setting up embroidery machines that
are connected using an ethernet network.
To adjust ethernet settings
1
Open the Embroidery Machine Connections dialog.
See Setting up embroidery machines for details.
2
Select Ethernet from the Port list.
An additional field — Peripheral Name — and three checkboxes display
in the Connected To panel.
3
From the Peripheral Name list, select the embroidery machine you are
setting up.
(The system searches automatically for all machines connected on the
ethernet and adds them to the dropdown list.)
ES 2006
4
Select Auto Download if you want designs in ES Machine Manager
queues to be sent to this machine as soon as it finishes stitching the
previous design. Or clear Auto Download if you want to be prompted
first.
5
Select Auto Delete to automatically delete files from machine memory
after stitching is complete.
Chapter 1
ES Machine Manager
18
6
Select Auto Queue to automatically send designs to the head of the
machine’s memory queue (i.e. as the next one to stitch). Clear it to send
the design to the end of the existing queue.
Note This setting is different from Auto Download, which only controls
designs before they go to machine memory.
7
Click OK to complete the setup of this machine.
Finding Melco StarLAN network card settings
Before embroidery machines can be installed to run on a network using a
Melco StarLAN network card, you need to know the card’s IRQ, Base
Address and DMA settings. There are a number of ways you can do this.
Try the following:
! If you can find the documentation that came with card, read that
carefully.
! If the card has been working with ES Designer on this PC, check the
present settings from inside ES Designer.
! If the card has been working with other software, check the settings
from inside that software (see that software’s documentation).
! If none of the above methods provide the settings, open the PC’s case
and examine the card. You may require help from a PC technician to do
this.
To find Melco StarLAN network card settings
1
ES 2006
Disconnect the PC from the power.
ES Machine Manager Supplement
19
2
Open the PC case, and locate the Melco StarLAN network card.
JP1 sets the
Base I/O
Address
JP2 sets the
IRQ address
JP3 & JP4 (Sometimes named
'DREQ' and 'DACK' on the card)
set the DMA address
3
Note the following settings:
! JP1 (which sets the Base I/O Address)
! JP2 (which sets the IRQ Address)
! JP3 & JP4 (DREQ and DACK on the card) set the DMA address — both
must be set to the same setting, whether it is 0, 1 or 2.
4
Replace the PC case when finished.
Modifying and deleting embroidery machines
Machine settings can be changed at any time to suit your needs, and
machines can be deleted from ES Machine Manager when they are no longer
needed.
ES 2006
Chapter 1
ES Machine Manager
20
Modifying machine settings
Embroidery machine settings can be changed at any time from inside ES
Machine Manager. The methods used are similar to those used to set up the
machine initially.
To modify machine settings
1
Start ES Machine Manager.
See Starting ES Machine Manager.
2
Select the machine to be modified.
3
Select Machine Manager > Modify Machine to open the Embroidery
Machine Connection dialog.
4
Follow the procedure in Setting up embroidery machines.
5
Click OK when all settings are correct.
Note You will see a message, Updating Settings. Please Wait... This
may take up to several minutes to complete.
Deleting machines
Delete embroidery machines from your system when they are no longer
required.
To delete a machine
1
Select the machine in either Queue View or Machine View.
2
Select Machine Manager > Delete Machine.
You will be prompted to confirm deletion of the selected machine. Note
that any queued designs for that machine will also be removed.
ES 2006
ES Machine Manager Supplement
21
Chapter 2
Networking Embroidery
Machines
This section provides information about the three styles of embroidery
machine for which networking solutions are required — serial-interfaced,
parallel-interfaced, and ethernet-interfaced — and describes a variety of
networking solutions for each.
Most networked machines are serial-interfaced and these make up about
90% of installations. Parallel-interfaced machines, which are generally older
in style, account for about 5% of the installed base. The newer style
ethernet-interfaced machines also comprise a relatively small proportion of
installations.
Some configurations include a mixture of some or all of these machine
types, so any networking solution needs to cater for all eventualities,
including hybrid configurations.
ES Machine Manager can theoretically support up to 128 machines under
Windows 9x, or 256 machines under Windows NT 4.
Serial-interfaced network solution
Windows uses serial ports to connect the PC to all manner of peripheral
devices (cutters, digitizers, scanners, printers, plotters, tape
punch/readers), as well as embroidery machines. The number of serial ports
needed by ES Designer varies according to the number of peripherals
required.
The following network solutions represent ‘pure’ serial-interfaced
configurations — i.e. networking serial-interfaced embroidery machines
only. A real-world environment may, however, also incorporate other
interface types.
ES 2006
ES Machine Manager Supplement
22
Simple serial connections
The simplest way to provide serial ports is via the two standard PC serial
ports, COM1 and COM2. You can increase the number of embroidery
machines and other peripherals attached to a PC by adding extra COM ports.
You can increase the number further by using a switch box that allows the
PC to share existing COM ports between different peripherals. Note,
however, that only one embroidery machine on a switch box can provide
feedback at any one time. A simple serial-interfaced network has the
following general layout:
Supervisor PC
COM port
UTP or STP
serial port
Serial-interfaced machines
Shielded Twisted Pair (STP) cable
Serial connections, which need only eight conductors, generally use
Category 5 (twisted pair) cable. This should be shielded — i.e. STP. With
STP, capacitance increases with length of cable, which can cause signal
drops over long distances.
Unshielded Twisted Pair (UTP) cable
Unshielded Twisted Pair (UTP) cable is sometimes used instead of STP
because it is cheaper, but it should only be used over short distances to
decrease interference.
Multiple serial connections
Where more than eight serial-interfaced embroidery machines are
networked, a Multi-Port Serial Card can be used. These cards typically use
only one IRQ to provide multiple serial ports — e.g. eight to 32 ports.
Supported cards include:
! Comtrol RocketPort 8-port serial ISA/PCI card with fan-out cables
! 16-port PC Card and associated interface (requires an interface box).
ES 2006
ES Machine Manager Supplement
23
Multi-Port Serial Cards are plugged directly into the PC ISA or PCI BUS.
With multiple multi-port cards, a PC running Windows 9x can support up to
128 ‘virtual’ COM ports and thus potentially 128 serial-interfaced
embroidery machines. Windows NT can support up to 256 machines.
Proprietary software is required to make many ports available to the
operating system. This is provided by the card manufacturer. This type of
network has the following general layout.
Multi-Port
Serial Card
UTP or STP
cables
UTP or STP
cables
serial port
Multi-Port Serial Cards
Multi-Port Serial Cards can provide anything from four ports upwards. They
use a single IRQ address, and usually plug into a BUS slot on the PC
motherboard.
ES 2006
Chapter 2
Networking Embroidery Machines
24
Limitations
Where many machines are involved, this type of layout can become very
clumsy as it involves running a point-to-point connection from the
supervisor PC to each machine, as shown in the following diagram.
Parallel-interfaced network solution
While relatively few machines are parallel-interfaced, they still appear in
networked environments. The following network solutions represent ‘pure’
parallel-interfaced configurations which may not represent real-world
situations.
Simple parallel connections
The simplest kind of pure parallel-interfaced network involves a single
supervisor PC running Wilcom ES Machine Manager and up to three
parallel-interfaced embroidery machines. (Windows 9x and NT support up
ES 2006
ES Machine Manager Supplement
25
to four ‘native’ COM ports.) This type of network has the following general
layout.
Supervisor PC
LPT port
shielded 25-conductor unpaired cables
parallel port
Cable connections
Parallel connections generally use shielded 25-conductor unpaired cable.
Serial-to-parallel connections
Embroidery machines which have only a paper tape reader parallel port can
be networked with the aid of Wilcom Direct Connect Interface (iBox)
boxes. Up to four machines can be connected directly to the PC using this
type of configuration. This type of network has the following general layout.
iBox Machine
Interface Module
LPT ports
COM ports
iBox serial
cable
iBox
machine
cable
ES 2006
Chapter 2
paper tape
reader port
Networking Embroidery Machines
26
iBox Machine Interface Module
The iBox is a hardware device that connects multi-head and monogram
embroidery machines to a PC. Designs are transferred to the machine
through the PC’s serial port via iBox to the paper tape reader port on the
embroidery machine. The iBox buffers up to 85,000 stitches and transmits
them in parallel to the embroidery machine. For more details, see the
Wilcom iBox User Manual.
Multi-parallel connections
More than four parallel-interfaced embroidery machines can be networked
using a Multi-Port Serial Card in conjunction with several iBox boxes. This
becomes a very expensive option as the number of machines increases.
Ethernet/Serial Thin Server solution
Ethernet is a relatively inexpensive, widely-understood networking solution.
It allows for wide propagation, ideal for a large or distributed factory
situation. It also permits much more efficient cabling than other multi-serial
connections.
Although very few embroidery machines interface directly to Ethernet, you
can add an Ethernet-to-Serial Thin Server connection. The great advantage
of this type of network solution is that the Ethernet/Serial Thin Server is
‘owned’ by the supervisor PC and becomes an extension of that PC. Its ports
appear as local ports on the supervisor PC, and feedback from the
embroidery machines returns to ES Machine Manager as local data.
ES 2006
ES Machine Manager Supplement
27
Network layout
The Ethernet/Serial Thin Server type network has the following general
layout:
Network Interface
Card (NIC)
UTP cables
Any Ethernet
device
(printer, etc)
UTP cables
UTP
Ethernet Hub
(4 ports and up)
UTP
Ethernet/Serial
Thin Server
(1 port and up)
STP
Network components
The Ethernet/Serial Thin Server type network is made of the following
components:
Network Interface Cards
Network Interface Cards (NIC) are now standard on most PC motherboards.
Note that some NICs may cause interrupt conflicts.
Ethernet Hubs
Ethernet hubs come in many configurations and styles, starting from four
ports. Most range from eight to 24 ports.
ES 2006
Chapter 2
Networking Embroidery Machines
28
Note Both the NIC and Ethernet Hub must be capable of running at 10
Mbps because this is the fastest speed currently supported by
Ethernet/Serial Thin Servers. Some Ethernet implementations are not
capable of running that slowly.
Ethernet/Serial Thin Servers
Why ‘server’? Because it manages data to and from the peripheral device,
in this case a serial-interfaced embroidery machine. Why ‘thin’? Because it
does not have to do much apart from manage the data flow. Ethernet/Serial
Thin Servers may come in configurations of one, four or eight ports.
Note The only Ethernet/Serial Thin Server to date found to perform
according to required specifications, is the Comtrol Ethernet Serial Hub
(4 port).
Unshielded Twisted Pair (UTP) cabling
Unshielded Twisted Pair (UTP) cabling is sufficient for use between PC and
Ethernet Hubs, and between Hubs and Ethernet/Serial Thin Servers. This is
because Ethernet runs at 900 MHz, a frequency higher than most potential
sources of interference.
Shielded Twisted Pair (STP) cabling
Shielding is required between Ethernet/Serial Thin Servers and
serial-interfaced embroidery machines. Shielded Twisted Pair (STP) cables
are recommended. Interference can come from three potential sources:
! High frequency welders used for welding plastic appliqué to fabrics
! Large motors
! Inductors (e.g. fluorescent light ballasts).
Note The STP needs to be of the proper configuration to permit
handshaking with the particular embroidery machine.
Serial connections
Both Ethernet/Serial Thin Servers and embroidery machines generally
implement the RS232-C serial port standard of the Electronics Industry
Association.
ES 2006
ES Machine Manager Supplement
29
Hybrid serial/parallel network solutions
The Ethernet/Serial Thin Server combination can service a completely
hybrid environment incorporating elements of both serial-interfaced and
parallel-interfaced network solutions.
Simple scenario
Both serial-interfaced and parallel-interfaced machines can be connected to
a Ethernet/Serial Thin Server. (The parallel machines are connected through
a iBox box added to the chain.)
Network Interface
Card (NIC)
Ethernet Hub
(4 ports and up)
iBox serial cable
Ethernet/Serial
Thin Server
(1 port and up)
iBox Machine
Interface Module
STP
STP
ES 2006
Chapter 2
iBox machine
cable
Networking Embroidery Machines
30
Complex scenario
Ethernet/Serial Thin Server technology can theoretically support a
completely hybrid environment including and preserving legacy
components. The following diagram shows one such scenario.
Multi-Port
Serial Card
COM1
LPT1
Network Interface
Card (NIC)
LPT2
Ethernet Hubs
(4 ports and up)
Ethernet/Serial
Thin Server
(1 port and up)
STP
iBox serial cable
iBox Machine
Interface Module
iBox machine
cable
ES 2006
ES Machine Manager Supplement
31
Chapter 3
Networking Specifications
This section details networking specifications for embroidery machine
networks. See also Networking Embroidery Machines.
Specification for DB25M Tajima Machine serial cable
The following specification details the serial cable connection for Ethernet
Serial Hub (ESH) or Multi-port Serial Cards to Tajima Serial Port embroidery
machines.
Componentry
!
!
!
!
Category 5 (CAT5) data cable
Shielded Twisted Pair (STP)
4 pair stranded, plus foil shield with separate drain wire
RJ45 male plug, with metal case on plug, or shielded DB9/DB25 as
applicable
! DB25M (male) plug, without shielding on DB25 connector, with screw
locks at embroidery machine end
! Length: nominal 5 meters (16 feet) (suggested only — others may be
suitable)
! Custom pin connections as below (crossed with custom hardware
handshaking)
! Custom pairing combinations to avoid RxD and TxD in same pair
! 2 conductors used for signal ground1 connection — one each paired with
RxD and TxD — to minimize noise on these signal lines
1. RxD fixed reference (Pin 6) performed via power supply of device carrying RJ45 socket.
ES 2006
ES Machine Manager Supplement
32
! Crossed TxD/RxD, crossed DTR/CTS and crossed RTS/DSR conform to
‘Tajima Embroidery Machines Network Two-Way Serial Communication
Specifications’, v1.00 rev1.
Signal Name
RJ45 Pin
DB9 Pin
DB25 Pin
Wire
DB25 Pin
Signal Name
RTS
1
7
4
Pair 1: Blue
6
DSR
DTR
2
4
20
Pair 1: Blue/White
5
CTS
Signal Gnd
3
5
7
Pair 2: Orange
7
Signal Gnd
TxD
4
3
2
Pair 2:
Orange/White
3
RxD
RxD
5
2
3
Pair 3: Green
2
TxD
DCD
6
1
8
Pair 3: Green/White
-
Fixed
Reference
DSR
7
6
6
Pair 4: Brown
4
RTS
CTS
8
8
5
Pair 4: Brown/White
20
DTR
Earth Gnd
metal case
metal case
metal case
Drain Wire
Shield Foil
-
Guidelines
! Unshielded serial cables will work in good office conditions but are
susceptible to electronic interference and data errors. Use shielded
twisted-pair CAT5 cable instead.
! For the shielding to be effective, the cable shield must be connected at
the Ethernet Serial Hub or Multi-port Serial Card plug, and thence to AC
earth ground through the Ethernet Serial Hub. The cable must not be
earth-grounded at the Tajima machine end (to avoid ground loops).
! Each end of this cable must be labelled:
RJ45 end: Tajima Machine Serial Cable STP. Connect to RJ45 PC or
HUB SERIAL PORT.
DB25M end: Tajima Machine Serial Cable STP. Connect to Tajima
Serial Port ONLY.
Specification for use with ES Machine Manager software
Large numbers of embroidery machines downloading at high data rates
require:
ES 2006
ES Machine Manager Supplement
33
! Wide bandwidth in the Multi-Port Serial Card and interface serving
them
! Large receive-FIFO buffers that allow feedback (multiple bursts) to be
accepted and buffered whenever the software is momentarily unable to
accept feedback
! High performance from the PC running the ES Machine Manager
software. Large numbers of machines and high data rates require both
high CPU specification and high serial performance.
Specification
!
!
!
!
!
Serial interface meeting RS-232C
!
!
!
!
!
36MHz ASIC I/O processor (maximum 8 ports per processor)
Supplied driver software for Wilcom-supported CPU operating system
Device driver control matching selected data bits, parity and stop bits
PCI or ISA bus connector to suit CPU system
4 to 128 ports available in modules of 4, 8, 16 and 32 ports, with a
maximum of four modules per CPU system
I/O memory mapped design. This does not require IRQ allocation
Receive FIFO buffer 1024 bytes per port
Transmit FIFO buffer 256 bytes per port
Data rate support (both PCI/ISA card and interface box if applicable) up
to 230.4kbps on every port, with all ports in simultaneous use
! DB9, DB25 or RJ45 data connectors to match chosen serial cable system
! Agency approvals — for example:
Canada EMC requirements
USA FCC requirements
UL product safety requirements
European EMC requirements
Surge protection EN 50082-1
and others as may be required for the territory of installation
! CPU and power supply guidelines
RJ45 data connectors
The Multi-Port Serial hardware should have RJ45 data connectors to
minimize the use of adapters between cables and the data connectors. We
offer these RJ45 connectors on our 4, 8, 16 and 32 port units. Wilcom
ES 2006
Chapter 3
Networking Specifications
34
standard serial cables (see separate specification) will plug directly onto our
Multi-Port Serial hardware, without intervening adapters.
CPU capability
Under Windows NT, a very general guideline to the required CPU capability
is:
! up to 32 machines, Pentium 200 with 48Mb of RAM
! up to 64 machines, Pentium-II 400 with 64Mb of RAM
! up to 128 machines, multiple processor (2 to 4 CPUs) each Pentium-II
400 with 128Mb of RAM.
ES Machine Manager PC
The ability of a production supervisor to manage 128 machines is doubtful
in a busy workshop. An architecture including multiple PCs running ES
Machine Manager (for multiple production supervisors) is suggested here.
The ES Machine Manager PC must power the Multi-Port Serial hardware
installed in it. Wilcom Multi-Port Serial hardware draws power from all of the
+5v, +12v and -12v arms of the PC power supply, as shown in the following:
Number of Ports
Power Supply
+5v
+12v
-12v
4 ports
410mA
100mA
160mA
8 ports
600mA
110mA
160mA
16 ports
940mA
220mA
320mA
32 ports
1.9A
440mA
660mA
Note If a modem is attached to the ES Machine Manager PC and is powered
from a serial port, add the modem’s power consumption to the above
figures.
Basic multiport requirement
Any Windows-compatible multi-port serial board (e.g. a Hostess, Decision
or a lower-specification Comtrol board) will work with ES Designer. A basic
configuration is:
ES 2006
ES Machine Manager Supplement
35
! No machine feedback
! Only iBox or serial connections (9600 baud rate).
Higher multiport requirement
A higher specification for a higher requirement is:
! Machine feedback
! Baud rate higher than 9600.
ES Designer has been tested with the Comtrol RocketPort Multi-port Serial
Card for this higher specification. The types tested were:
! RocketPort 4-port serial ISA & PCI cards with RJ45 sockets
! RocketPort 8-port Serial ISA card with Fan-out cables
! 16-port PCI Card and associated interface (requires an interface box).
Theoretically, any multiple serial port card with similar specifications will
work, but Wilcom only supports this model of multi-port serial card.
Specific technical details of the RocketPort card
The 36Mhz ASIC (Application Specific Integrated Circuit) enables the
RocketPort to transmit and receive data at rates far higher than multiport
cards based on conventional 16550 UART technology — up to 921 Kbps full
duplex across all ports simultaneously. Along with improved throughput
speed and reduced load on the host system CPU, the AIOPIC chip also adds
increased reliability — it has the highest level of integration and longest
mean time between failures of any multiport serial card currently on the
market.
RocketPort uses transmit FIFOs of 256 bytes, and receive FIFOs of 1024
bytes for multiport cards designed with 16550 UARTs. This helps eliminate
bottlenecks at the serial controller level while conserving CPU resources. For
more technical details, please refer to the RocketPort website at
http://www.comtrol.com.
Please refer to the setup documentation that came with the device for
details on how to set up the device under Windows. Once the device is set
up in Windows, ES Designer will recognize the ports and a list of the
available ports will be available to choose from.
Setup and troubleshooting of a multiple serial port card
To set up and troubleshoot a multiple serial port card, refer to the
troubleshooting section of the manual provided with the device, or refer to
ES 2006
Chapter 3
Networking Specifications
36
the device manufacturer. To troubleshoot the regular serial ports, refer to
the Windows troubleshooting guide found in Start > Help > Contents >
Troubleshooting.
ES 2006
ES Machine Manager Supplement
37
Index
A
H
Auto Delete
Ethernet setting 18
Auto Queue
Ethernet setting 18
hardware
setting up machines 13
hybrid networks
complex 31
serial/parallel networks 30
simple 30
Ethernet hubs 28
Ethernet network interface
cards 28
Ethernet/serial thin servers 29
hybrid serial/parallel
networks 30
multiple parallel connections 27
multiple serial connections 23
serial to parallel connections 26
simple parallel connections 25
simple serial connections 23
C
cabling
STP with Ethernet 29
STP with serial 23
UTP with Ethernet 29
UTP with serial 23
connection settings
Ethernet 18
Melco StarLAN 17
network 17
parallel ports 16
serial ports 15
D
deleting machines
from Machine Manager 21
design details view
Machine Manager 6
E
embroidery machines
automatic download 14
feedback 14
setting up 13
Ethernet
Auto Delete setting 18
connection settings 18
Ethernet/serial thin servers 29
hubs 28
network interface cards 28
networking 27
Ethernet setting
Auto Queue 18
exiting
Machine Manager 2
ES 2006
M
Machine Manager
deleting machines 21
design details view 6
exiting 2
features 1
initializing database 13
machine view 5
modifying machine settings 21
queue view 4
setting up machines 13, 14
starting 2
stitching 8
stitching from main
application 9
summary statistics 12
using queue view 4
viewing statistics 6
machine view
Machine Manager 5
Melco StarLAN
network card settings 19
network settings 17
modifying machine settings
Machine Manager 21
N
network card settings
Melco StarLAN 19
network settings 17
Ethernet 18
networking 22–31
all parallel machines 25
all serial machines 22
Ethernet and serial 27
P
parallel connections
multiple 27
serial to parallel 26
simple 25
parallel ports
connection settings 16
parallel-interface
hybrid networks 30
networking 25
ports
parallel 16
serial 15
Q
queue view 4
Machine Manager 4
R
Reporting Utility
statistical analysis option 12
S
serial connections
multiple 23
simple 23
serial devices
recommended settings 15
ES Machine Manager Supplement
38
serial ports
connection settings 15
serial-interface
hybrid networks 30
networking 22
setting up
machines in Machine
Manager 13
StarLan — see Melco StarLAN
starting
Machine Manager 2
stitching designs
queue view 4
using Machine Manager 8, 9
STP
Ethernet cabling 29
serial cabling 23
shielded twisted pair cabling 29
U
UTP
Ethernet cabling 29
serial cabling 23
unshielded twisted pair
cabling 29
V
viewing designs
with Machine Manager 4
views
design details view 6
machine view 5
queue view 4
statistics view 6
ES 2006
ES Machine Manager Supplement
39