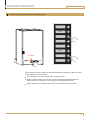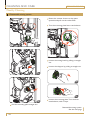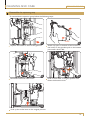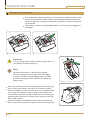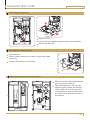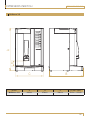
1
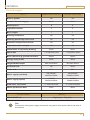
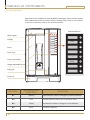
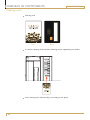
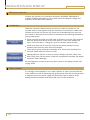
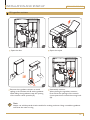
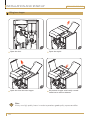
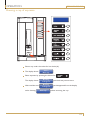
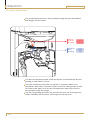
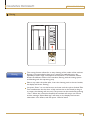
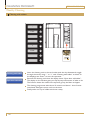
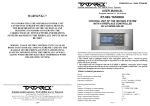
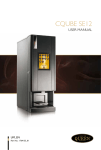
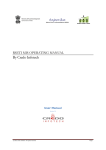
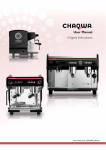
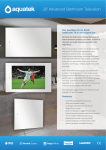
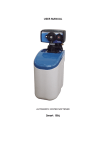
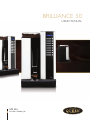
BRILLIANCE 3.0
USER MANUAL
UM_EN
Part No.: 1704041_06
CONTENT
BRILLIANCE 3.0
CONTENT......................................................................................................................................................................2
SYMBOL DESCRIPTION........................................................................................................................................3
Hazard intensity levels......................................................................................................................................................... 3
GENERAL.........................................................................................................................................................................4
Introduction........................................................................................................................................................................... 4
Warnings................................................................................................................................................................................. 4
Precautions............................................................................................................................................................................. 4
Intended use........................................................................................................................................................................... 4
Facts & weight........................................................................................................................................................................ 5
OVERVIEW OF COMPONENTS......................................................................................................................6
Front exterior........................................................................................................................................................................ 6
Front interior......................................................................................................................................................................... 7
Cleaning card......................................................................................................................................................................... 8
INSTALLATION AND START-UP......................................................................................................................9
Suitable locations.................................................................................................................................................................. 9
Water connection................................................................................................................................................................. 9
Electrical connection..........................................................................................................................................................10
Initialization..........................................................................................................................................................................10
Water softener....................................................................................................................................................................10
Fill ingredient canisters......................................................................................................................................................11
Filling bean hopper..............................................................................................................................................................12
OPERATION...............................................................................................................................................................13
Brewing a cup of espresso................................................................................................................................................13
Grinder adjustment............................................................................................................................................................14
CLEANING PROGRAM.......................................................................................................................................15
Rinsing...................................................................................................................................................................................15
Cleaning with tablets..........................................................................................................................................................16
Launching the rinsing without cleaning card.................................................................................................................17
CLEANING AND CARE......................................................................................................................................18
Disassemble mixing system..............................................................................................................................................18
Wash these parts................................................................................................................................................................19
Reassemble mixing system ..............................................................................................................................................19
Disassemble the espresso group.....................................................................................................................................20
Reassemble the espresso group......................................................................................................................................21
Cleaning the espresso group............................................................................................................................................22
Removing the coffee waste tray......................................................................................................................................23
Removing the drip tray......................................................................................................................................................23
Cleaning outside and inside of the machine.................................................................................................................23
MESSAGE SHOWN ON DISPLAY................................................................................................................24
Temporary warnings messages........................................................................................................................................24
Alarms...................................................................................................................................................................................25
What to do if.......................................................................................................................................................................26
DIMENSION SKETCH...........................................................................................................................................27
Brilliance 3.0.........................................................................................................................................................................27
2
SYMBOL DESCRIPTION
BRILLIANCE 3.0
Hazard intensity levels
There are three different levels of hazard intensity, identified by signal words DANGER, WARNING
and IMPORTANT. The level of hazard is determined by the following definitions.
Observe the statements to ensure safety, performance, prevent injury and machine damage.
Important:
Alerts against unsafe practices. Observe to ensure drink quality, machine performance,
food safety, to prevent minor personal injury or damage to the machine.
WARNING!
Indicates a potentially hazardous situation which, if not avoided, could result in scalding,
serious injury and even death.
DANGER!
INDICATES A IMMINENTLY HAZARDOUS SITUATION WHICH, IF NOT
AVOIDED, WILL RESULT IN SERIOUS INJURY AND EVEN DEATH.
i
Note:
Gives additional information which may be helpful during the cleaning procedure or
operation of the machine.
3
GENERAL
BRILLIANCE 3.0
Introduction
Thank you for choosing a BRILLIANCE 3.0 vending machine.
We hope you enjoy it !
Read the user guide before using the machine.
This guide contains important instructions for
proper and safe use of the vending machine.
Always keep this guide close at hand for future
reference.
Warnings
Never immerse the machine, plug or mains
cable in water because there is a danger of
electric shock.
The appliance is not intended for use by
persons (including children) with reduced
physical, sensory or mental capabilities, or
lack of experience and knowledge, unless they
have been given supervision or instruction
concerning the use of the appliance by a person
responsible for their safety.
Children should be supervised to ensure they
do not play with the appliance.
Do not use the machine if the mains cable, plug
is damaged or the machine has fallen down.
If the mains cable is damaged it must be
replaced by the manufacturer, service agent or
similarly qualified persons in order to avoid a
hazard.
Only plug the machine into a properly installed
earthed safety socket whose line voltage
matches the technical data for the machine.
Precautions
Do not use the machine outdoors so it can be
exposed to weather (rain, snow, frost). It will
cause material damage to the machine.
Do not try to open the machine or repair it in
any way. To avoid danger only have the machine
repaired in a technical workshop, Service
Centre or by a qualified person.
Remove the mains cable from the socket when
the machine is not in use for longer periods. To
do this, pull the plug not the cable.
This appliance must be placed in a horizontal
position which is resistant to any water that
may leak.
Place the machine out of the reach of children.
Position the mains cable so that people cannot
trip over it. Keep it away from sharp edges and
heat sources.
The new hose-sets supplied with this appliance
are to be used, old hose-sets must not be reused.
This appliance is not suitable for installation in
an area where a water jet could be used.
This appliance must not be cleaned by a water
jet.
Intended use
This appliance is intended to be used in
household and similar applications such as:
- Staff kitchen areas in shops.
- Offices and other commercial working
environments.
- On agricultural estates.
- By clients in hotels, motels and other
residential type environments.
- Bed and breakfast type environments.
4
For the optimal performance of the machine
these parameters shall not be exceeded:
- Maximum permissible inlet water pressure :
800KPa (8Bar)
- Minimum permissible inlet water pressure:
200KPa (2Bar)
- Maximum working temperature: 40°ºC
- Minimum working temperature: 10°ºC
GENERAL
BRILLIANCE 3.0
Facts & weight
FACTS
VIBRATION PUMP 2.0
ROTARY PUMP (RP)
Yes
Yes
None
None
Drink options
8
8
Ingredient canister
2
2
Bean hopper
1
1
Brewing mechanism
Yes
Yes
Cleaning function by smart card
Yes
Yes
Electronic temperature control
Yes
Yes
Adjustable coffee strength
Yes
Yes
None
None
~ 75 espresso pucks
~ 75 espresso pucks
Option
Option
Energy saving mode
None
None
Height, Width, Depth
664, 394, 474mm
664, 394, 474mm
Yes
None
0.7 L
0.7 L
Power supply (standard)
220-230VAC,
50/60Hz/1500W
220-230VAC,
50/60Hz/1500W
Power supply (option)
110VAC,
50/60Hz/1000W
110VAC,
50/60Hz/1000W
Cold water connection
½” External thread
½” External thread
Water purification filter
None
None
Built-in grinder
Function for selecting jug
Illumination of cup during brewing
Waste box
Base cabinet: large grounds container
Air break tank
Boiler tank
MODEL/NAME
BRILLIANCE 3.0
i
WEIGHT
35kg(Empty) / 39kg (Full)
Noe:
To determine what power supply the machine uses, please check power label at the back of
the machine.
5
OVERVIEW OF COMPONENTS
BRILLIANCE 3.0
Front exterior
Eight buttons are available to select 8 different beverages. Some of these buttons
have additional functions as below (while in settings menu, which is not covered
in this user manual but refer to the technical manual.
Selection Button
Bean hopper
_
K1
Canc
K2
Display
K3
Door
K4
Door lock
Smart card reader
+
K5
Enter
K6
Height-adjustable spouts
K7
Drip grid
K8
Drip tray
BUTTON
SUPPLEMENTARY
FUNCTION
K1
-(Minus)
K2
Canc
K5
+(Plus)
K6
Enter
6
FUNCTION
Decreases the value or changes to previous selection
Cancel selection and/or exit to previous menu
Increases the value or changes to next selection
Confirms selection
OVERVIEW OF COMPONENTS
BRILLIANCE 3.0
Front interior
Bean hopper
Ingredient canisters
Mixing bowl
Espresso group
Height-adjustable spouts
Grounds container
Drip tray
Ingredient canisters
DETAIL
Bean Hopper
INGREDIENTS
Beans
WIDTH
DEPTH
HEIGHT
CAPACITY
CUPS/
UNIT
----
----
----
~2kg
~250 cups
Canister
Chocolate
65mm
165mm
250mm
~1kg
~50 cups
Canister
Milk/Topping
65mm
165mm
250mm
~0.6kg
~75 cups
7
OVERVIEW OF COMPONENTS
BRILLIANCE 3.0
Cleaning card
Cleaning card
Face
Back
Is used for cleaning of the machine. Cleaning card is supplied by your dealer.
Insert cleaning card with the chip in, according to the figure.
8
INSTALLATION AND START-UP
BRILLIANCE 3.0
Suitable locations
This vending machine is not suitable for operating outdoors.
It should be installed in dry locations, since excessive humidity will affect the
dispensing.
When installing the machine near a wall, the fan in the back of the machine
should have enough space of at least 10cm to ensure proper airflow.
Do not cover the machine with plastic film or cloths.
Water connection
Max 20W
24VDC
After unpacking the machine and placing it in its final location, please level the
machine by turning its rotating feet.
Connect the machine to a drinkable water supply with pressure ranging from 2
and 8 bars.
Please make sure that the water hose is not bended so the water flow is blocked.
9
INSTALLATION AND START-UP
BRILLIANCE 3.0
Electrical connection
Connect the machine to a grounded connection of 230VAC 50Hz/60Hz or
110VAC 50/60Hz (depending on the model); check the adequate voltage and
frequency at the back of the machine.
Initialization
When the machine is delivered from the factory, neither the boiler nor the
air-break tank (a small deposit inside the machine) is full of water. So before the
machine can be put into service, the system has to be filled up. Every time the
main switch in the back of the machine is switched on, the following initialization
process takes place:
Time Out Alarm –
Filling Up
Check air-break and open the inlet valve to fill water if not full. If the machine
does not dectec that the air break is full within a certain time, display will
show “Time Out Alarm – Filling Up”. (just for vibration pump version)
Check that water tap is turned on and you have water preassure to the
machine, make sure the water hose isn’t bended.
The espresso group will make a complete cycle. Some water will drip from
the front outlet when full. This is normal.
Temp. Low
Select Beverage
Heating element will start to heat up and the display will show “Temp. Low”
After some time, if all the above 4 steps has completed successfully the display
will show “Select Beverage”.
For an explanation of what to do if any alarm shows in the display, please refer
to page 23-25.
Water softener
It is strongly recommended to use a water softener in order to extend the life
of the machine as well as dispensing high quality drinks. This will remove particles
in suspension from the water supply, and avoid lime scale to build up in the
heating element and boiler walls, which will cause further problems.
10
INSTALLATION AND START-UP
BRILLIANCE 3.0
Fill ingredient canisters
02
01
Open the door
Open the top lid
B
A
03
Remove the ingredient canisters to avoid
spilling in the machine and fill with ingredients.
When filling the ingredients, keep the opening
of the canister chute upwards (A).
i
04
Reassembly canisters.
When placing the ingredient canisters,
Ensure that the openings of the canister
chutes point down toward the mixing bowl
(B).
Note:
Always use soluble powder drinks suitable for vending machines. Using unsuitable ingredients
will cause the mixer to clog.
11
INSTALLATION AND START-UP
BRILLIANCE 3.0
Filling bean hopper
01
Open the door
02
Open the top lid
04
03
Open the lid of the bean hopper
i
12
Fill the bean hopper with freshly roasted
coffee beans without additives.
Note:
Always use high quality beans in order to produce good quality espresso coffee.
OPERATION
BRILLIANCE 3.0
Brewing a cup of espresso
A
Place a cup under the outlet for hot drinks.(A)
The display shows:
Select
Beverage
Select espresso by pressing the button for
The display shows:
Brewing
in Progress
and the brew process starts.
Wait until the text
Brewing
in Progress
has disappeared from the display
and is showing
Take Cup
before removing the cup.
13
OPERATION
BRILLIANCE 3.0
Grinder adjustment
The grinder adjustment can be easily reached through the space left between
bean hopper and the chassis.
CW for
Coarser
Grinding
CCW for
Finer
Grinding
To adjust the coarseness, please rotate the adjuster counterclockwise for finer
grinding, or clockwise for coarser.
Take into consideration that after the adjuster is moved, the effect is not
immediate; it takes about 3 espresso cycles for the new cofee grounds to reach
the outlet of the doser. So to test the new adjustment, observe the third or
fourth espresso after the change.
The finer the grinding, the slower the espresso will come out, and longer time
will be needed for the extraction of the espresso and vice versa.
14
CLEANING PROGRAM
BRILLIANCE 3.0
Rinsing
Rinsing
This rinsing function allows for an easy cleaning of the outlets of the machine.
Rinsing is recommended at least once a week, but preferable every day,
especially if used in high consumption environments. This software routine
flushes the different outlets of the machine, Starting with the mixing system
and finishing with the espresso group.
Place a cup under the outlet after, Insert the cleaning card in the card reader,
the display will show: “Rinsing” .
Just press, “Enter” to run this function, and wait until the cycle is finished. Take
into consideration that the door of the machine has to be closed (as long as
it is open, the cleaning will not start). The process can be canceled by pressing
“Canc”. When the routine has finished, the machine will return into service
and the message “Select Beverage” will show on the display. This function
takes about 1min 45secs, and uses aprox. 150ml of water.
15
CLEANING PROGRAM
BRILLIANCE 3.0
Weekly Cleaning
Cleaning with tablets
_
K1
Canc
K2
K3
K4
+
K5
Enter
K6
K7
K8
Cleaning with tablet
Open door add tablet
Insert the cleaning card in the card reader with the chip downwards, toggle
through the menus using “-” or “+” until “Cleaning with tablet” is shown on
the display, press “Enter” to start the operation.
Remove the cleaning card when the display shows “Open door add tablet”.
The display on the machine gives you step-by-step information of what to do.
The function cleans the inside of the espresso group, the filters and pipes.
The cleaning programme takes about 10 minutes and about 1 litre of water
mixed with detergent comes out from the drain.
Finally, make one cup of coffee and throw it away
16
CLEANING PROGRAM
BRILLIANCE 3.0
Launching the rinsing without cleaning card
_
K1
Canc
K2
K3
K4
+
K5
Enter
K6
Switch
K7
K8
The execution of the rinsing can be launched without having to open the door
of the machine. As to do that :
Turn off power to the machine from its main switch.
With its door closed, turn on the machine, and simultaneously keep the
buttons K3 & K7 pressed. The rinsing process will begin shortly.
When finished, the machine will enter the normal functioning mode.
17
CLEANING AND CARE
BRILLIANCE 3.0
Weekly Cleaning
Disassemble mixing system
Rotate the canister chutes so they point
upwards and pull out the outlet hose.
Turn the mounting plate lever anticlockwise.
01
02
Loosen the mixing bowl by pulling it straight
out.
Loosen the whipper by pulling it straight out.
03
04
05
06
Loosen the mounting plate. Turn the lever
anticlockwise, until it stops.
Pull the mounting plate straight out.
Reassemble mixing system
See the next page
18
CLEANING AND CARE
BRILLIANCE 3.0
Weekly Cleaning
Wash these parts
Mixing bowl
i
Condensation trap
Mounting plate
Clean with a moist
cloth and wipe dry.
Whipper
Note:
All parts must be dry before reassembly.
Reassemble mixing system
01
Important:
Check all seals (red) before
reassembly of parts.
02
The flat side of the whipper shaft must correspond with the
marked arrow on the whipper.
To fit the whipper push onto the shaft until a click sound can be
heard. It is only possible to assemble the whipper in one way.
i
03
Fix the mixing bowl and
condensation trap. Push-fit
the mixing bowl and fix with
lever.
04
Note:
Ensure that all
water hoses have
been connected
and fitted.
Connect the outlet hose.
19
CLEANING AND CARE
BRILLIANCE 3.0
Disassemble the espresso group
To remove the espresso group follow the following steps:
01
pen the door and push down the
O
outlet beam.
02
Press down the safty ring on the connector simultaneously
pull the teflon tube straight up.
03
Loosen the fixation screw at the bottom of the brewer.
04
L oosen the outlet tube from the brewer
by pulling it straight out.
05
ut your hand under the brewer, push up and
P
forward at the same time until the brewer is
detached at the back.
20
06
Pull the brewer straight out.
CLEANING AND CARE
BRILLIANCE 3.0
Reassemble the espresso group
To reassemble the espresso group follow the following steps:
01
Replace the brewer in front of the gearbox.
03
Reconnect inlet and outlet tubes.
“Click”
02
Attach top part at the back of the brewer to
the hooks on the gearbox. push in the bottom
part untill a click is felt.
04
Push in the brewer to original position and
fasten the fixation screw.
05
Push up the outlet beam to the original position.
21
CLEANING AND CARE
BRILLIANCE 3.0
Cleaning the espresso group
First, remove the espresso group from the machine as explained earlier in this
manual. Then proceed to clean it with neutral detergents (avoid solvents that
could damage paint or plastics). Disinfectant products as Chlorine-detergents
are preferred.
The producer declines all responsibilities due to the use of caustic/aggressive
detergents.
Important:
Turn the group upside down to clean the upper filter of
the espresso chamber. (See fig. A)
i
Note:
Whenever the quality or speed of the outgoing
espresso changes, clean the upper filter thoroughly.
It will be very likely partially clogged with tiny coffee
particles. Cleaning this filter will solve the speed and
quality issues.
After this, proceed to clean the remaining surfaces of the group.
Dry up the brewer using a soft rag. turn the brewer upside down and shake it to force as much water out as possible. Make
sure to pay extra attention when drying up the powder cone
located above the brew chamber, as this is the one receiving the
grinded coffee. If this cone is humid, it may cause the cone clog
with coffee powder.
Once all cleaning is completed and the brewer heve been put back in place, we recommend to perform an auto-cleaning cycle.
22
A
CLEANING AND CARE
BRILLIANCE 3.0
Removing the drip tray
Open the door.
Pull the drip-tray slightly upwards to take it out of position.
Remove the drip-tray
Removing the coffee waste tray
Open the door.
Lift the outlet if necessary in order to remove the coffee
waste tray.
Take out the waste tray and empty it.
Cleaning outside and inside of the machine
Please use a soft rag and cleaning liquid
agent to prevent scratches. Open, disassemble the canisters, the
espresso group, remove the drip-tray,
coffee waste tray, and mixing system
removable parts, and proceed to clean
all surfaces both inside and outside of
the machine.
23
MESSAGE SHOWN ON DISPLAY
BRILLIANCE 3.0
Temporary warnings messages
Important:
There are two levels of alarms, warnings and fixed alarms.
In this type of warnings, once the issue is solved, the message will disappear from
the display and the machine will operate as normal.
Insufficient Credit
Insufficient Credit
Warning
If a selection is made without having enough credit on the inserted smartcard,
the display will show “Insufficient Credit Warning”. Please, proceed to recharge
the credit of your smartcard first to the nearest location, then insert the smart
card again and select the desired beverage.
Empty Coffee Tray
Empty Coffee Tray
i
After a certain number of coffees, a warning showing “Empty Coffee Tray” will
appear on the screen when the coffee waste tray is full to prevent coffee spillage
inside the machine. To remove this warning, please proceed as follows:
With the machine turned on, open the door of the machine.
Lift the outlet if necessary in order to remove the coffee waste tray.
Take out the waste tray and empty it, the micro-switch in the back of the tray
once released will remove the warning message from the display.
Please reassemble the waste tray and close the door to continue the normal
operation.
Note:
The machine has to be powered as to detect if the waste tray is removed or
not. In the case of emptying it with the machine powered off, the counter in
the control board will not be reset to 0, and the error “Empty Coffee Tray” will
appear the next time the machine is powered on.
Coffee Tray Alarm
Alarm Coffee Tray
Whenever the grounds coffee tray is removed from its place, an “Alarm Coffee
Tray” will appear on the screen. This alarm resets the espressos counter to 0,
(when it remains on for more than 2 secs).
During normal functioning of the machine when replacing the grounds coffee
tray to its place, the alarm will dissapear. But, if this alarm lights up during the
start up of the machine, we will have to restart it as to make it dissapear.
Take Cup
When the machine has finished dispensing a beverage, once the beverage is
ready, this message will appear on the display for some seconds, advising to take
the cup.
Air-Break Filling Up
Some times we will see this message appearing on the screen for a short while.
During this short time, the machine will be temporarily unavailable, as it will be
performing an internal refilling of an interior water deposit.
Drip-Tray Full
Drip-Tray full
24
The display will show the warning “Drip-Tray Full” when the drip-tray sensor
pins detects the presence of water in front drip-tray, the machine will block
dispensing of any beverage until the drip tray is emptied to prevent water
spillage.
MESSAGE SHOWN ON DISPLAY
BRILLIANCE 3.0
Alarms
This type of alarms requires the user to turn off and on the machine, in order
to remove the message on the display. If the problem persist, the next time the
machine is powered the alarm will show again.
No Coffee
No Coffee
When the machine runs out of coffee beans, the display will show “No Coffee”.
This alarm will show to prevent the grinder to overheat, in case the doser does
not fill up with ground coffee. When the machine is showing “no coffee” on the
display, it’s not possible to dispense any beverage that include espresso.
In order to refill the bean hopper with coffee, please follow the steps described
on page 12 To reset this alarm after refilling, please, restart the machine, turning
off and on the main switch in the back.
Stop Irregular Cycle
Stop Irregular Cycle
The espresso group is controlled by two micro-switches located inside the grey
gearbox, in the right side of the group. If the espresso group does not reach
certain positions so that these two micro-switches are activated on time, when
rotating to complete one cycle the alarm “Stop Irregular Cycle” will show on
the display. This is normally occurring due to wrong assembly of the group. If
after inspecting the group and making sure that is properly assembled the alarm
keeps showing, please call service and support.
Temperature Probe Unconnected
This alarm occurs when the control board detects a failure in the connection of
the temperature probe ntc. Disconnect the machine and call service & support.
Time-Out Alarm Filling Up
This alarm shows when an excessive time has been detected to fill up the air
break deposit. This is often caused by too low pressure at the inlet valve.
Note: in some occasions more than one dispenser is connected to the same
water supply; and from time to time, both machines will try to get water
simultaneously, failing to give enough pressure, causing this alarm to show.
Connecting each machine to an independent water supply will then solve this
issue.
No Water
No Water
If the pump has been working for a certain time while dispensing a beverage and
no water flow is detected by the flow meter, the display will show “No Water”.
This can be caused by:
The adjustment of the grinder being too thin, preventing the water from
getting through the coffee cake. In order to solve this issue, try to adjust the
grinder to a coarser setting then make two or three coffees (as described in
page 10 due to the doser stores between two to three doses), to check if the
flow improves, if still too slow, adjust coarser and try again.
By a defective flow-meter unit, in which case, please call service and support
for replacement.
25
MESSAGE SHOWN ON DISPLAY
BRILLIANCE 3.0
Coffee Doser Error
Doser Error
If the control board detects a problem when opening the doser to empty the
ground coffee into the espresso group chamber before the extraction starts, the
display will show “Doser Error”. This alarm can be caused by a bad connection
in the wire of the doser to the control board, or by a defective doser unit.
Disconnect the machine and call service and support.
Anti Flooding Alarm
Alarm TimeOut In Dication
If due to any reason, there is some kind of water leakage inside the machine, so
that the control board detects (by the flow-meter count) water consumption
without dispensing any beverage; the third time that the air break needs to be
refilled, the display will show “Alarm Time-Out In Dication”. Disconnect the
machine and call service and support.
Alarm Temperature Boiler
Alarm Temperature
Boiler
In case that the temperature probe inside the boiler, senses a temperature
higher than a certain safety limit for more than 5 seconds, the display will show
“Alarm Temperature Boiler” and the heating element will be disconnected. The
alarm will remain as long as the temperature remains higher than the safety limit.
The recommendation in this case is to disconnect the machine and call service
and support.
What to do if
Outgoing speed of espresso decreases over time
The most common cause for this to occur is the lack of cleaning the espresso
group. Paying special attention to the filters in the top piston and in the bottom
of the chamber.
Other factors that can affect the performance and quality of the product in
the cup are changing weather conditions, mainly humidity. If humidity is higher
than usual, the speed of the outgoing espresso will be affected, please consider
adjusting the grinder to a slightly coarser setting.
Mixer Cloggs
The clogging of the mixing bowl will cause water and soluble product to be
spilled inside the machine. If this happens from the first time you use the
machine; this will be very likely caused by using inappropriate soluble products
or wrong recipes.
If this happens after the machine has been in service, please check that all the
components in the mixing system are correctly assembled.
Water spillage under the machine
If water hardness is too low, it might be causing a defective level sensing in the
machine. The reccomended hardness level is between 3 and 50 (Geman degree)
(30mg/l). Lower levels will cause corrosion in the inner parts of the machine. To
reduce water hardness problems it’s recommended to install a water filter.
26
DIMENSION SKETCH
BRILLIANCE 3.0
A
Brilliance 3.0
D
B
C
Model
A
B
C
D (Min~ Max)
Brilliance 3.0
664mm
474mm
394mm
75mm ~ 133mm
27
For the warranty to be valid the conditions for maintenance must have been
followed according to our instructions, proper precaution has been made and
warranty claim been issued without delay.
The affected equipment may not be used during awaiting service if there is any risk
that the damage or defect would worsen.
The warranty will not cover consumption supplies such as glassware, normal
maintenance such as cleaning of filters, contaminations in water, lime, incorrect
voltages, pressure or adjustment of water amounts.
The warranty will not cover damages of defects caused by incorrect handling and
operation of the appliance.
FOR SERVICE
Please contact your dealer
Your Dealer
www.creminternational.com