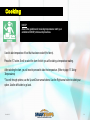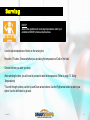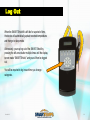
1
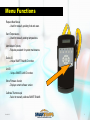
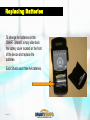
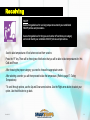
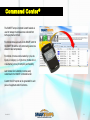
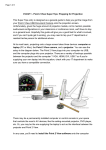
SMART Shield®
User Manual
Version 2.2
Introduction
COLLECTS
SMART Guard®
Monitors Control Point
Temps
Thank you for choosing SMART Temps® Temperature
Management and HACCP Compliance program!
Our system is so SMART, you’ll never have to manually record another
temperature!
SMART Shield®
Provides Total HACCP Control and
Accountability
We designed our SMART Temps System to make your job easier while
increasing food safety. SMART Temps is a complete temperature monitoring
system that utilizes SMART LINK® Technology to Collect and Report
temperatures while protecting you and your customers. Temperatures from your
freezers, refrigerators, coolers, hot holding cabinets, store rooms, and even food
temps are recorded and reported automatically. Reports are managed online,
giving you a summary of all the compliant and noncompliant items you need to
know about.
SMART Link®
SMART Temps enables operators to manage HACCP systems. Notes
throughout the manual reference key HACCP polices, procedures and
recommendations.
Monitors Critical Control Point
Temps
REPORTS
SMART Command Center®
PROTECTS
Communicates data to the
Command Center
Version 2.2
2
Table of Contents:
Controls………………………………………………………………………… 4
Menu Functions………………………………………………………………… 5
Replacing Batteries…………………………………………………………..… 6
SMART Temps® Probes……………………………………………………… 7
Powering On………………………………………………………………………8
Log-in………………………………………………………………………………9
Calibration……………………………………………………………………… 10
Flow of Food ……………………………………………………………………. 11
Receiving………………………………………………………………………….12
Prepping………………………………………………………………………….. 13
Cooking…………………………………………………………………………… 14
Holding……………………………………………………………………………. 15
Serving……………………………………………………………………………. 16
Taking Temperatures – Manually…………………………………………….. 17
Corrective Actions……………………………………………………………… 18
Log-out……………………………………………………………………………. 19
Trouble Shooting……………………………………………………………….. 20
SMART Command Center®…………………………………………………… 21
Contact Information……………………………………………………………. 22
Version 2.2
3
Controls
The center button with the thermometer icon is used
as the “Enter” button to make selections.
Each letter button denotes the category for
your food items:
R: Receiving
P: Preparation
C: Cooking
H: Holding
S: Serving
The Left and Right arrows direct
you back and forth through the
menu, with the Right arrow also
acting as the “Enter” button.
Up and Down arrows are used
for scrolling through options.
Version 2.2
The “Menu” button enables you to turn on
the device access additional options.
4
Menu Functions
Request New Menus
- Used for manually updating food and users.
Send Temperatures
- Used for manually sending temperatures.
Administrator Options
- Requires password for system maintenance.
Device ID
- Unique SMART Shield® ID number.
Link ID
- Unique SMART Link® ID number.
Show Firmware Version
- Displays current software version.
Calibrate Thermocouple
- Select to manually calibrate SMART Shield®.
Version 2.2
5
Replacing Batteries
To change the batteries on the
SMART Shield®, simply slide back
the battery cover located on the front
of the device and replace the
batteries.
Each Shield uses three AA batteries.
Version 2.2
6
SMART Temps® Probes
SMART Temps® Probe is used for taking instant temperatures of ready-to-eat foods.
To connect a probe into the SMART Shield®,
simply plug the two prongs into the top slot.
Be sure to insert the large prong into the large
slot and insert the small prong into the small
slot.
Version 2.2
HACCP
Cleaning and sanitizing probes
between food products and uses
should follow established HACCP
Guidelines
7
Powering On
To power on your SMART Shield® for the
first time or after each battery change,
press the center temperature button
located in the middle of the control panel.
After the initial power-up, you may use
any button to wake up the SMART
Shield.
*The SMART Shield will automatically
shut off after five minutes of inactivity to
conserve battery life.
Version 2.2
8
Log-In
After turning the device on, the screen will read
“SMART-TEMPS” on top line and the SMART Shield®
name on the second line.
To begin reading and managing temperatures, the
user must first choose the flow of food (“R”, “P”, “C”,
“H”, “S”).
Once the flow of food is selected, the device will
display user names to choose from. Use the up and
down arrows to scroll through choices and press the
right arrow to select your choice to continue.
Version 2.2
9
Calibration
HACCP
Calibration should occur within the established HACCP policies and procedures.
After selecting calibrate from the Menu:
Select YES to perform a calibration or NO if you want to be
reminded later.
To properly calibrate, have a cup of ice with just enough
water to cover the ice. Insert the probe into the ice water and
stir for 10 seconds.
Click the up or down arrow until the number displays 32
degrees. Click the middle thermometer button or right arrow
to save the change.
Version 2.2
10
Flow of Food
Each letter button at the top designates a single flow of food
category such as: Receiving, Prepping, Cooking, Holding and
Serving.
Up and down arrow buttons allow for scrolling of user names
and food items.
The right arrow button is used to select an item. The center
button is used to take the temperature of food.
R: Receiving
Version 2.2
P: Preparation
C: Cooking
H: Holding
S: Serving
11
Receiving
HACCP
Assure that guidelines for receiving temperatures match your established
HACCP policies and procedures.
Assure that guidelines for the types and number of food items per category
and vendor match your established HACCP policies and procedures.
Used to take temperatures of food when received from vendors.
Press the “R” key. There will be three types of deliveries that you will be able to take temperatures for: Hot,
Cold and Frozen
After choosing the proper category, you need to choose the appropriate vendor .
After selecting a vendor, you will then proceed to take the temperature. (Refer to page 17: Taking
Temperatures)
*To scroll through options, use the Up and Down arrow buttons. Use the Right arrow button to select your
option. Use the left button to go back.
Version 2.2
12
Preparation
HACCP
Assure that guidelines for receiving temperatures match your
established HACCP policies and procedures.
Used to take temperatures of cold food during preparation.
Press the “P” key. Scroll to select the item of which you will be taking a temperature reading.
After selecting the item, you will need to proceed to take the temperature. (Refer to page 17: Taking
Temperatures).
*To scroll through options, use the Up and Down arrow buttons. Use the Right arrow button to select your
option. Use the left button to go back.
.
Version 2.2
13
Cooking
HACCP
Assure that guidelines for receiving temperatures match your
established HACCP policies and procedures.
Used to take temperature of food that has been cooked (Hot items).
Press the “C” button. Scroll to select the item of which you will be taking a temperature reading.
After selecting the item, you will need to proceed to take the temperature. (Refer to page 17: Taking
Temperatures)
*To scroll through options, use the Up and Down arrow buttons. Use the Right arrow button to select your
option. Use the left button to go back.
Version 2.2
14
Holding
HACCP
Assure that guidelines for receiving temperatures match your
established HACCP policies and procedures.
Used to take temperatures of Hot / Cold foods being held before serving.
Press the “H” button. Choose whether you are taking the temperature of a Cold or Hot food item.
Choose the item you want to take a temperature of.
After selecting the item, you will need to proceed to take the temperature. (Refer to page 17: Taking
Temperatures)
*To scroll through options, use the Up and Down arrow buttons. Use the Right arrow button to select your
option. Use the left button to go back.
Version 2.2
15
Serving
HACCP
Assure that guidelines for receiving temperatures match your
established HACCP policies and procedures.
Used to take temperatures of items on the serving line.
Press the “S” button. Choose whether you are taking the temperature of Cold or Hot food.
Choose the item you wish you temp.
After selecting the item, you will need to proceed to take the temperature. (Refer to page 17: Taking
Temperatures)
*To scroll through options, use the Up and Down arrow buttons. Use the Right arrow button to select your
option. Use the left button to go back.
Version 2.2
16
Taking Temperatures Manually
To take a temperature with the SMART Shield®,
make sure the probe is connected to the device
and insert the metal end of the probe into the
food.
*To take temperatures without sending the information, press
the “left arrow” button multiple times until the display screen
reads: “SMART Shield.” At this time you will be logged out of
the system and can press the center thermometer button to
take temperatures without logging the information.
Version 2.2
17
Corrective Actions
If, after taking temperatures of items, they are not within
the appropriate range, you will be prompted to choose a
corrective action.
Some options for corrective actions may include:
• “Retake Temperatures”
• “Throw Item Away”
• “Notify Supervisor”
Note: You may have additional corrective actions
assigned for corrective action as determined by your
supervisor.
To scroll through options, use the Up and Down arrow
buttons. Use the Center thermometer or Right arrow
button to select your option
Version 2.2
18
Log Out
When the SMART Shield® is left idle for a period of time,
the device will automatically upload recorded temperatures
and then go to sleep mode.
Alternatively, you may log out of the SMART Shield by
pressing the left arrow button multiple times until the display
screen reads “SMART Shield,” and you will then be logged
out.
You will be required to log in each time you change
categories.
Version 2.2
19
Trouble Shooting
1. Dim screen or no Screen – Replace Batteries
2. No Menus – Go to Command Center® and ensure menus are entered
3. No Menus – Ensure you have internet connection
Version 2.2
20
Command Center®
The SMART Temps Command Center® website is
used to manage the temperatures collected from
both equipment and food.
Food items/menus are sent via the SMART Link® to
the SMART Shield® so only items being served are
viewed to take temperatures.
Food items or menus can be loaded by cycle, site
by site, or category, (i.e. high school, middle school
or elementary school) for simplicity and flexibility.
Last minutes food substitution can be easily
customized in the SMART Command Center.
Custom HACCP reports can be generated for each
piece of equipment and/or food items..
Version 2.2
21
Contact Information
SMART Temps®
3640 Edison Lakes Parkway, Mishawaka, IN 46545
Phone: 877-272-3111
Fax: 574-257-7777
Email: [email protected]
Website: www.SMART-Temps.com
SMART Temps, LLC. ® 2007-2010. All rights reserved. This document may not be not be copied, modified, distributed or otherwise disseminated,
in whole or part, without express written permission from SMART Temps, LLC. “SMART Temps” is a registered trademark of SMART Temps, LLC.
Version 2.2
22