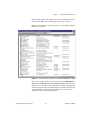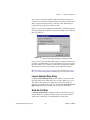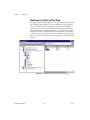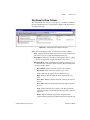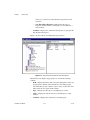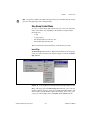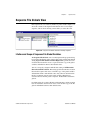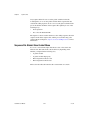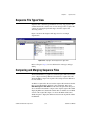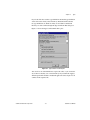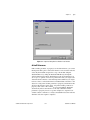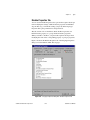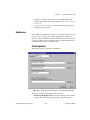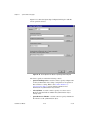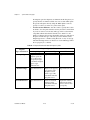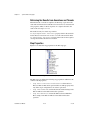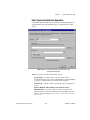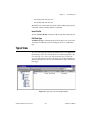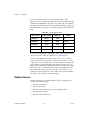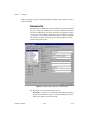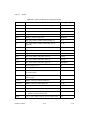
1
User Manual
TestStand User Manual
March 2001 Edition
Part Number 322016B-01
Support
Worldwide Technical Support and Product Information
ni.com
National Instruments Corporate Headquarters
11500 North Mopac Expressway
Austin, Texas 78759-3504
USA Tel: 512 794 0100
Worldwide Offices
Australia 03 9879 5166, Austria 0662 45 79 90 0, Belgium 02 757 00 20, Brazil 011 284 5011,
Canada (Calgary) 403 274 9391, Canada (Ottawa) 613 233 5949, Canada (Québec) 514 694 8521,
Canada (Toronto) 905 785 0085, China (Shanghai) 021 6555 7838, China (ShenZhen) 0755 3904939,
Denmark 45 76 26 00, Finland 09 725 725 11, France 01 48 14 24 24, Germany 089 741 31 30,
Greece 30 1 42 96 427, Hong Kong 2645 3186, India 91805275406, Israel 03 6120092, Italy 02 413091,
Japan 03 5472 2970, Korea 02 596 7456, Mexico 5 280 7625, Netherlands 0348 433466,
New Zealand 09 914 0488, Norway 32 27 73 00, Poland 0 22 528 94 06, Portugal 351 1 726 9011,
Singapore 2265886, Spain 91 640 0085, Sweden 08 587 895 00, Switzerland 056 200 51 51,
Taiwan 02 2528 7227, United Kingdom 01635 523545
For further support information, see the Technical Support Resources appendix. To comment on the
documentation, send e-mail to [email protected]
Copyright © 1998, 2001 National Instruments Corporation. All rights reserved.
Important Information
Warranty
The media on which you receive National Instruments software are warranted not to fail to execute programming instructions, due to defects
in materials and workmanship, for a period of 90 days from date of shipment, as evidenced by receipts or other documentation. National
Instruments will, at its option, repair or replace software media that do not execute programming instructions if National Instruments receives
notice of such defects during the warranty period. National Instruments does not warrant that the operation of the software shall be
uninterrupted or error free.
A Return Material Authorization (RMA) number must be obtained from the factory and clearly marked on the outside of the package before
any equipment will be accepted for warranty work. National Instruments will pay the shipping costs of returning to the owner parts which are
covered by warranty.
National Instruments believes that the information in this document is accurate. The document has been carefully reviewed for technical
accuracy. In the event that technical or typographical errors exist, National Instruments reserves the right to make changes to subsequent
editions of this document without prior notice to holders of this edition. The reader should consult National Instruments if errors are suspected.
In no event shall National Instruments be liable for any damages arising out of or related to this document or the information contained in it.
EXCEPT AS SPECIFIED HEREIN, NATIONAL INSTRUMENTS MAKES NO WARRANTIES, EXPRESS OR IMPLIED, AND SPECIFICALLY DISCLAIMS ANY WARRANTY OF
MERCHANTABILITY OR FITNESS FOR A PARTICULAR PURPOSE. CUSTOMER’S RIGHT TO RECOVER DAMAGES CAUSED BY FAULT OR NEGLIGENCE ON THE PART OF
NATIONAL INSTRUMENTS SHALL BE LIMITED TO THE AMOUNT THERETOFORE PAID BY THE CUSTOMER. NATIONAL INSTRUMENTS WILL NOT BE LIABLE FOR
DAMAGES RESULTING FROM LOSS OF DATA, PROFITS, USE OF PRODUCTS, OR INCIDENTAL OR CONSEQUENTIAL DAMAGES, EVEN IF ADVISED OF THE POSSIBILITY
THEREOF. This limitation of the liability of National Instruments will apply regardless of the form of action, whether in contract or tort, including
negligence. Any action against National Instruments must be brought within one year after the cause of action accrues. National Instruments
shall not be liable for any delay in performance due to causes beyond its reasonable control. The warranty provided herein does not cover
damages, defects, malfunctions, or service failures caused by owner’s failure to follow the National Instruments installation, operation, or
maintenance instructions; owner’s modification of the product; owner’s abuse, misuse, or negligent acts; and power failure or surges, fire,
flood, accident, actions of third parties, or other events outside reasonable control.
Copyright
Under the copyright laws, this publication may not be reproduced or transmitted in any form, electronic or mechanical, including photocopying,
recording, storing in an information retrieval system, or translating, in whole or in part, without the prior written consent of National
Instruments Corporation.
Trademarks
CVI™, LabVIEW™, National Instruments™, ni.com™, and TestStand™ are trademarks of National Instruments Corporation.
Product and company names mentioned herein are trademarks or trade names of their respective companies.
WARNING REGARDING USE OF NATIONAL INSTRUMENTS PRODUCTS
(1) NATIONAL INSTRUMENTS PRODUCTS ARE NOT DESIGNED WITH COMPONENTS AND TESTING FOR A LEVEL OF
RELIABILITY SUITABLE FOR USE IN OR IN CONNECTION WITH SURGICAL IMPLANTS OR AS CRITICAL COMPONENTS IN
ANY LIFE SUPPORT SYSTEMS WHOSE FAILURE TO PERFORM CAN REASONABLY BE EXPECTED TO CAUSE SIGNIFICANT
INJURY TO A HUMAN.
(2) IN ANY APPLICATION, INCLUDING THE ABOVE, RELIABILITY OF OPERATION OF THE SOFTWARE PRODUCTS CAN BE
IMPAIRED BY ADVERSE FACTORS, INCLUDING BUT NOT LIMITED TO FLUCTUATIONS IN ELECTRICAL POWER SUPPLY,
COMPUTER HARDWARE MALFUNCTIONS, COMPUTER OPERATING SYSTEM SOFTWARE FITNESS, FITNESS OF COMPILERS
AND DEVELOPMENT SOFTWARE USED TO DEVELOP AN APPLICATION, INSTALLATION ERRORS, SOFTWARE AND
HARDWARE COMPATIBILITY PROBLEMS, MALFUNCTIONS OR FAILURES OF ELECTRONIC MONITORING OR CONTROL
DEVICES, TRANSIENT FAILURES OF ELECTRONIC SYSTEMS (HARDWARE AND/OR SOFTWARE), UNANTICIPATED USES OR
MISUSES, OR ERRORS ON THE PART OF THE USER OR APPLICATIONS DESIGNER (ADVERSE FACTORS SUCH AS THESE ARE
HEREAFTER COLLECTIVELY TERMED “SYSTEM FAILURES”). ANY APPLICATION WHERE A SYSTEM FAILURE WOULD
CREATE A RISK OF HARM TO PROPERTY OR PERSONS (INCLUDING THE RISK OF BODILY INJURY AND DEATH) SHOULD
NOT BE RELIANT SOLELY UPON ONE FORM OF ELECTRONIC SYSTEM DUE TO THE RISK OF SYSTEM FAILURE. TO AVOID
DAMAGE, INJURY, OR DEATH, THE USER OR APPLICATION DESIGNER MUST TAKE REASONABLY PRUDENT STEPS TO
PROTECT AGAINST SYSTEM FAILURES, INCLUDING BUT NOT LIMITED TO BACK-UP OR SHUT DOWN MECHANISMS.
BECAUSE EACH END-USER SYSTEM IS CUSTOMIZED AND DIFFERS FROM NATIONAL INSTRUMENTS' TESTING
PLATFORMS AND BECAUSE A USER OR APPLICATION DESIGNER MAY USE NATIONAL INSTRUMENTS PRODUCTS IN
COMBINATION WITH OTHER PRODUCTS IN A MANNER NOT EVALUATED OR CONTEMPLATED BY NATIONAL
INSTRUMENTS, THE USER OR APPLICATION DESIGNER IS ULTIMATELY RESPONSIBLE FOR VERIFYING AND VALIDATING
THE SUITABILITY OF NATIONAL INSTRUMENTS PRODUCTS WHENEVER NATIONAL INSTRUMENTS PRODUCTS ARE
INCORPORATED IN A SYSTEM OR APPLICATION, INCLUDING, WITHOUT LIMITATION, THE APPROPRIATE DESIGN,
PROCESS AND SAFETY LEVEL OF SUCH SYSTEM OR APPLICATION.
Conventions
The following conventions are used in this manual:
[]
Square brackets enclose optional items—for example, [response].
»
The » symbol leads you through nested menu items and dialog box options
to a final action. The sequence File»Page Setup»Options directs you to
pull down the File menu, select the Page Setup item, and select Options
from the last dialog box.
This icon denotes a note, which alerts you to important information.
bold
Bold text denotes items that you must select or click on in the software,
such as menu items and dialog box options. Bold text also denotes
parameter names.
italic
Italic text denotes variables, emphasis, a cross reference, or an introduction
to a key concept. This font also denotes text that is a placeholder for a word
or value that you must supply.
monospace
Text in this font denotes text or characters that you should enter from the
keyboard, sections of code, programming examples, and syntax examples.
This font is also used for the proper names of disk drives, paths, directories,
programs, subprograms, subroutines, device names, functions, operations,
variables, filenames and extensions, and code excerpts.
monospace italic
Italic text in this font denotes text that is a placeholder for a word or value
that you must supply.
Contents
Chapter 1
TestStand Architecture Overview
General Test Executive Concepts ..................................................................................1-1
TestStand Capabilities and Concepts.............................................................................1-2
Major Software Components of TestStand....................................................................1-4
TestStand Sequence Editor..............................................................................1-5
TestStand Run-Time Operator Interfaces........................................................1-5
TestStand Test Executive Engine....................................................................1-6
Module Adapters .............................................................................................1-6
TestStand Building Blocks ............................................................................................1-7
Variables and Properties..................................................................................1-7
Expressions .......................................................................................1-8
Categories of Properties ....................................................................1-9
Steps ................................................................................................................1-11
Built-In Step Properties.....................................................................1-11
Step Types.........................................................................................1-12
Sequences ........................................................................................................1-15
Sequence Parameters.........................................................................1-15
Sequence Local Variables .................................................................1-15
Lifetime of Local Variables, Parameters, and Custom
Step Properties ...............................................................................1-16
Step Groups.......................................................................................1-16
Built-in Sequence Properties.............................................................1-17
Sequence Files .................................................................................................1-17
Storage of Types in Files ..................................................................1-17
Process Models................................................................................................1-17
Station Model ....................................................................................1-18
Main Sequence and Client Sequence File.........................................1-18
Model Callbacks ...............................................................................1-19
Entry Points.......................................................................................1-19
Automatic Result Collection ...........................................................................1-23
Callback Sequences .........................................................................................1-23
Engine Callbacks...............................................................................1-24
Front-End Callbacks .........................................................................1-24
Sequence Executions .......................................................................................1-25
Normal and Interactive Executions...................................................1-25
Terminating and Aborting Executions..............................................1-26
© National Instruments Corporation
v
TestStand User Manual
Contents
Chapter 2
Sequence Editor Concepts
Sequence Editor Screen................................................................................................. 2-1
Windows ......................................................................................................... 2-2
Views ................................................................................................ 2-2
Tabs .................................................................................................. 2-3
Lists and Trees.................................................................................. 2-3
Context Menus.................................................................................. 2-4
Copy, Cut, and Paste......................................................................... 2-4
Drag and Drop .................................................................................. 2-5
Menu Bar......................................................................................................... 2-5
Toolbars .......................................................................................................... 2-5
Status Bar ........................................................................................................ 2-5
Sequence Editor Windows ............................................................................................ 2-6
Sequence File Window ................................................................................... 2-6
Execution Window.......................................................................................... 2-6
Type Palette Window...................................................................................... 2-7
Station Globals Window ................................................................................. 2-8
Workspace Window ........................................................................................ 2-9
Users Window................................................................................................. 2-14
Basic Tasks in TestStand............................................................................................... 2-14
Creating a Sequence........................................................................................ 2-14
Controlling Sequence Flow............................................................................. 2-18
Preconditions .................................................................................... 2-19
Post Action ....................................................................................... 2-20
Goto Built-In Step Type ................................................................... 2-20
Run-Time Errors............................................................................... 2-21
Running a Sequence........................................................................................ 2-21
Debugging a Sequence.................................................................................... 2-22
Generating Test Reports.................................................................................. 2-23
Using an Operator Interface ............................................................................ 2-25
Chapter 3
Configuring and Customizing TestStand
Configuring TestStand................................................................................................... 3-1
Sequence Editor Startup Options .................................................................... 3-1
Configure Menu .............................................................................................. 3-2
Customizing TestStand.................................................................................................. 3-3
TestStand Directory Structure......................................................................... 3-3
NI and User Subdirectories............................................................... 3-4
The Components Directory .............................................................. 3-4
TestStand User Manual
vi
ni.com
Contents
Creating String Resource Files........................................................................3-6
Resource String File Format .............................................................3-7
Using Data Types ............................................................................................3-8
Creating Step Types ........................................................................................3-8
Using the Tools Menu .....................................................................................3-9
Customizing the Engine and Front-End Callbacks .........................................3-10
Modifying the Process Model .........................................................................3-10
Using Process Model Callbacks ......................................................................3-11
Creating Code Templates ................................................................................3-11
Modifying Run-Time Operator Interfaces.......................................................3-12
Adding Users and Managing User Privileges .................................................3-12
Chapter 4
Sequence Editor Menu Bar
Menus.............................................................................................................................4-1
File Menu.........................................................................................................4-1
Login .................................................................................................4-2
Logout ...............................................................................................4-2
New ...................................................................................................4-2
Open ..................................................................................................4-2
Close..................................................................................................4-2
New Workspace ................................................................................4-2
Open Workspace ...............................................................................4-2
Save...................................................................................................4-3
Save As .............................................................................................4-3
Save All.............................................................................................4-3
Unload All Modules..........................................................................4-3
Most Recently Opened Files .............................................................4-3
Exit ....................................................................................................4-3
Edit Menu ........................................................................................................4-4
Cut and Copy ....................................................................................4-4
Paste ..................................................................................................4-4
Delete ................................................................................................4-4
Select All...........................................................................................4-5
Diff Sequence File With ...................................................................4-5
Sequence Properties ..........................................................................4-5
Sequence File Properties ...................................................................4-6
Sequence File Callbacks ...................................................................4-6
View Menu ......................................................................................................4-7
Station Globals..................................................................................4-8
Type Palette.......................................................................................4-8
User Manager ....................................................................................4-8
Workspace.........................................................................................4-8
© National Instruments Corporation
vii
TestStand User Manual
Contents
Paths.................................................................................................. 4-8
Find Type.......................................................................................... 4-12
Browse Sequence Context ................................................................ 4-13
Toolbars ............................................................................................ 4-14
Status Bar.......................................................................................... 4-14
Launch Report Viewer...................................................................... 4-14
Execute Menu ................................................................................................. 4-15
Execution Entry Point List ............................................................... 4-15
Run Active Sequence........................................................................ 4-15
Restart ............................................................................................... 4-15
Run Selected Steps ........................................................................... 4-16
Run Selected Steps Using................................................................. 4-16
Loop on Selected Steps..................................................................... 4-16
Loop on Selected Steps Using .......................................................... 4-17
Break On First Step .......................................................................... 4-17
Tracing Enabled................................................................................ 4-18
Debug Menu.................................................................................................... 4-18
Resume ............................................................................................. 4-18
Step Over .......................................................................................... 4-18
Step Into............................................................................................ 4-19
Step Out ............................................................................................ 4-19
Break................................................................................................. 4-19
Terminate.......................................................................................... 4-19
Abort (no cleanup)............................................................................ 4-19
Break All........................................................................................... 4-19
Terminate All.................................................................................... 4-20
Abort All (no cleanup)...................................................................... 4-20
Resume All ....................................................................................... 4-20
Configure Menu .............................................................................................. 4-20
Sequence Editor Options .................................................................. 4-20
Station Options ................................................................................. 4-21
Search Directories............................................................................. 4-34
External Viewers .............................................................................. 4-35
Adapters............................................................................................ 4-35
Report Options.................................................................................. 4-35
Model Options .................................................................................. 4-36
Source Control Menu ...................................................................................... 4-36
Tools Menu ..................................................................................................... 4-37
Sequence File Documentation .......................................................... 4-37
Sequence File Converters ................................................................. 4-39
Update Sequence Files...................................................................... 4-39
Import/Export Properties .................................................................. 4-40
Update Automation Identifiers ......................................................... 4-40
Assemble Test VIs for Run-time Distribution.................................. 4-40
TestStand User Manual
viii
ni.com
Contents
Run Engine Installation Wizard ........................................................4-40
Run Database Viewer........................................................................4-41
Customize..........................................................................................4-41
Window Menu .................................................................................................4-44
Cascade .............................................................................................4-44
Tile ....................................................................................................4-44
Close All Windows ...........................................................................4-44
Close Completed Execution Displays...............................................4-44
<List of Open Windows>..................................................................4-44
Chapter 5
Sequence Files
Sequence File Window Views .......................................................................................5-1
All Sequences View.......................................................................................................5-2
Sequence View Context Menu ........................................................................5-3
Open Sequence..................................................................................5-3
Insert Sequence .................................................................................5-3
Rename..............................................................................................5-3
Browse Sequence Context ................................................................5-3
View Contents...................................................................................5-3
Sequence Properties ..........................................................................5-3
Sequence File Properties ...................................................................5-6
Sequence File Callbacks ...................................................................5-10
Individual Sequence View .............................................................................................5-11
Main, Setup, and Cleanup Tabs.......................................................................5-11
Step Group List View and Tree View...............................................5-12
Step Group List View Columns ........................................................5-13
Step Group Context Menu ................................................................5-15
Parameters Tab ................................................................................................5-31
Lifetime of Local Variables, Parameters, and Custom
Step Properties ...............................................................................5-31
Parameters Tab Context Menu..........................................................5-32
Locals Tab .......................................................................................................5-34
Lifetime of Local Variables, Parameters, and Custom
Step Properties ...............................................................................5-35
Locals Tab Context Menu.................................................................5-35
Preconditions Dialog Box ..............................................................................................5-38
Sequence File Globals View..........................................................................................5-41
Lifetime and Scope of Sequence File Global Variables..................................5-41
Sequence File Globals View Context Menu ...................................................5-42
Insert Global......................................................................................5-43
View Contents...................................................................................5-43
Go Up One Level ..............................................................................5-44
© National Instruments Corporation
ix
TestStand User Manual
Contents
Browse Sequence Context ................................................................ 5-44
Rename ............................................................................................. 5-44
Properties .......................................................................................... 5-44
Sequence File Types View ............................................................................................ 5-45
Comparing and Merging Sequence Files ...................................................................... 5-45
Chapter 6
Sequence Execution
Sequence Editor and Run-Time Operator Interfaces..................................................... 6-1
What is an Execution? ................................................................................................... 6-1
Starting an Execution .................................................................................................... 6-2
Execution Entry Points.................................................................................... 6-2
Executing a Sequence Directly ....................................................................... 6-2
Interactively Executing Steps.......................................................................... 6-3
Sequence Editor Execution Window............................................................................. 6-3
Steps Tab......................................................................................................... 6-4
Tracing.............................................................................................. 6-5
Debugging ........................................................................................ 6-5
Steps Tab Columns ........................................................................... 6-5
Steps Tab Context Menu .................................................................. 6-6
Context Tab..................................................................................................... 6-7
Context Tab Context Menu .............................................................. 6-8
Report Tab....................................................................................................... 6-9
Call Stack Pane ............................................................................................... 6-11
Watch Expression Pane................................................................................... 6-12
Edit Expression................................................................................. 6-13
Add Watch ........................................................................................ 6-13
Modify Value.................................................................................... 6-13
Refresh.............................................................................................. 6-14
Status Bar ........................................................................................................ 6-14
Result Collection ........................................................................................................... 6-15
Custom Result Properties................................................................................ 6-17
Standard Result Properties .............................................................................. 6-18
Subsequence Results ....................................................................................... 6-19
Loop Results ................................................................................................... 6-21
Engine Callbacks ........................................................................................................... 6-22
Step Execution............................................................................................................... 6-25
Step Status ..................................................................................................................... 6-27
Failures............................................................................................................ 6-28
Run-Time Errors............................................................................................................ 6-29
TestStand User Manual
x
ni.com
Contents
Chapter 7
Station Global Variables
Station Globals Window ................................................................................................7-1
View Ring Control for Station Globals ...........................................................7-2
Context Menu for the Globals View..............................................................................7-2
Insert Global......................................................................................7-2
View Contents...................................................................................7-3
Go Up One Level ..............................................................................7-3
Browse Sequence Context ................................................................7-3
Rename..............................................................................................7-3
Global Variable Properties................................................................7-3
Reload Station Globals......................................................................7-3
Persistence .....................................................................................................................7-4
Special TestStand Station Globals .................................................................................7-5
Chapter 8
Sequence Context and Expressions
Sequence Context ..........................................................................................................8-1
Sequence Context Subproperties.....................................................................8-3
StationGlobals...................................................................................8-3
RunState ............................................................................................8-4
RunState.SequenceFile and Other SequenceFile Objects.................8-8
RunState.Sequence and Other Sequence Objects .............................8-9
RunState.Step and Other Step Objects..............................................8-10
RunState.InitialSelection...................................................................8-10
Using the Sequence Context............................................................................8-12
Expressions ....................................................................................................................8-13
Chapter 9
Types
Creation, Modification, and Storage of Types...............................................................9-1
Where You Create and Modify Types.............................................................9-1
Storage of Types in Files and Memory ...........................................................9-2
Using Data Types...........................................................................................................9-4
Specifying Array Sizes ....................................................................................9-6
Dynamic Array Sizing ......................................................................9-7
Empty Arrays ....................................................................................9-8
Display of Data Types .....................................................................................9-8
Modifying Data Types and Values..................................................................9-10
Single Values ....................................................................................9-10
Arrays................................................................................................9-12
© National Instruments Corporation
xi
TestStand User Manual
Contents
Numeric Value Formats.................................................................... 9-12
Containers ......................................................................................... 9-15
Using the Standard Named Data Types .......................................................... 9-15
Path ................................................................................................... 9-16
Error and Common Results .............................................................. 9-16
Creating and Modifying Data Types ............................................................................. 9-17
Custom Data Types Tab Tree and List Views ................................................ 9-17
Value Field ....................................................................................... 9-19
Creating a New Custom Data Type ................................................................ 9-21
Adding Fields to Data Types .......................................................................... 9-22
Properties Dialog Box for Custom Data Types .............................................. 9-22
General Tab ...................................................................................... 9-23
Bounds Tab....................................................................................... 9-24
Version Tab ...................................................................................... 9-25
Struct Passing Tab ............................................................................ 9-25
Properties Dialog Box for Data Type Fields .................................... 9-26
Property Flags ................................................................................................. 9-27
Using Step Types........................................................................................................... 9-30
Creating and Modifying Custom Step Types ................................................................ 9-32
Custom Step Type Properties.......................................................................... 9-33
Lifetime of Local Variables, Parameters, and Custom
Step Properties ............................................................................... 9-34
Built-In Step Type Properties ......................................................................... 9-34
General Tab ...................................................................................... 9-36
Menu Tab.......................................................................................... 9-38
Substeps Tab..................................................................................... 9-40
Disable Properties Tab...................................................................... 9-43
Code Templates Tab ......................................................................... 9-44
Version Tab ...................................................................................... 9-51
Struct Passing Tab ............................................................................ 9-51
Apply Changes to All Loaded Steps ............................................................... 9-51
View Changes ................................................................................................. 9-51
View Contents .................................................................................. 9-51
Other Step Type Editing Features ................................................................................. 9-52
Combining Step Types.................................................................................... 9-52
Step Type Menu Editor ................................................................................... 9-53
Type Palette Window .................................................................................................... 9-54
Chapter 10
Built-In Step Types
Overview ....................................................................................................................... 10-1
Custom Properties That Are Common to All Built-In Step Types ................. 10-1
Step Status, Error Occurred Flag, and Run-Time Errors ................................ 10-3
TestStand User Manual
xii
ni.com
Contents
Customizing Built-In Step Types ....................................................................10-3
Step Types That You Can Use with Any Module Adapter ...........................................10-4
Action ..............................................................................................................10-4
Pass/Fail Test...................................................................................................10-5
Numeric Limit Test .........................................................................................10-7
Multiple Numeric Limit Test...........................................................................10-11
String Value Test.............................................................................................10-15
Step Types That Work With a Specific Module Adapter ..............................................10-18
Sequence Call ..................................................................................................10-18
Step Types That Do Not Use Module Adapters ............................................................10-20
Statement .........................................................................................................10-20
Message Popup................................................................................................10-21
Call Executable................................................................................................10-26
Property Loader ...............................................................................................10-28
Importing/Exporting Properties.......................................................................10-28
Goto .................................................................................................................10-29
Label ................................................................................................................10-29
Chapter 11
Synchronization Step Types
Synchronization Objects ................................................................................................11-1
Common Attributes of Synchronization Objects ............................................11-2
Synchronization Step Types ..........................................................................................11-4
Lock.................................................................................................................11-5
Create Operation ...............................................................................11-6
Lock Operation .................................................................................11-7
Early Unlock Operation ....................................................................11-9
Get Status Operation .........................................................................11-10
Step Properties ..................................................................................11-11
Semaphore .......................................................................................................11-12
Create Operation ...............................................................................11-12
Acquire Operation.............................................................................11-14
Release Operation .............................................................................11-15
Get Status Operation .........................................................................11-16
Step Properties ..................................................................................11-17
Rendezvous......................................................................................................11-19
Create Operation ...............................................................................11-19
Rendezvous Operation ......................................................................11-20
Get Status Operation .........................................................................11-21
Step Properties ..................................................................................11-22
Queue...............................................................................................................11-23
Create Operation ...............................................................................11-23
Enqueue Operation............................................................................11-25
© National Instruments Corporation
xiii
TestStand User Manual
Contents
Dequeue Operation ........................................................................... 11-27
Flush Operation ................................................................................ 11-30
Get Status Operation......................................................................... 11-31
Step Properties .................................................................................. 11-33
Notification ..................................................................................................... 11-35
Create Operation............................................................................... 11-35
Set Operation .................................................................................... 11-37
Clear Operation................................................................................. 11-39
Pulse Operation................................................................................. 11-40
Wait Operation ................................................................................. 11-41
Get Status Operation......................................................................... 11-45
Step Properties .................................................................................. 11-46
Wait ................................................................................................................. 11-48
Wait for Time Interval Operation ..................................................... 11-48
Wait for Time Multiple Operation.................................................... 11-49
Wait for Thread Operation................................................................ 11-50
Wait for Execution Operation........................................................... 11-51
Retrieving the Results from Executions and Threads ...................... 11-52
Step Properties .................................................................................. 11-52
Thread Priority ................................................................................................ 11-53
Set Thread Priority Operation........................................................... 11-54
Get Thread Priority Operation .......................................................... 11-55
Step Properties .................................................................................. 11-56
Batch Synchronization .................................................................................... 11-56
Synchronized Sections...................................................................... 11-56
Requirements for Using Enter and Exit Operations ......................... 11-58
Enter Synchronized Section Operation............................................. 11-59
Exit Synchronized Section Operation............................................... 11-60
Step Properties .................................................................................. 11-61
Batch Specification ......................................................................................... 11-62
Create Operation............................................................................... 11-62
Add Thread Operation ...................................................................... 11-63
Remove Thread Operation................................................................ 11-65
Get Status Operation......................................................................... 11-66
Step Properties .................................................................................. 11-67
Chapter 12
User Management
User Manager Window.................................................................................................. 12-1
Users View .................................................................................................................... 12-2
User List Tab................................................................................................... 12-3
User List Context Menu ................................................................... 12-3
TestStand User Manual
xiv
ni.com
Contents
Profiles Tab .....................................................................................................12-5
Profiles Tab Context Menu ...............................................................12-6
Types View ....................................................................................................................12-7
User Standard Data Types ...............................................................................12-8
Adding New Properties and Privileges to the User Data Type .......................12-10
Verifying User Privileges ..............................................................................................12-11
Accessing Privilege Settings for the Current User ..........................................12-11
Accessing Privilege Settings for Any User .....................................................12-12
Chapter 13
Module Adapters
Overview........................................................................................................................13-1
Configuring Adapters ....................................................................................................13-3
Source Code Templates .................................................................................................13-4
DLL Flexible Prototype Adapter ...................................................................................13-5
Configuring the DLL Adapter .........................................................................13-5
Specifying a DLL Adapter Module.................................................................13-5
Module Tab .......................................................................................13-6
Editing the Function Call ..................................................................13-11
Source Code Tab ...............................................................................13-12
Debugging DLLs .............................................................................................13-14
Debugging LabVIEW DLLs You Call with the Flexible
DLL Adapter ..................................................................................13-15
Using MFC in a DLL ......................................................................................13-15
Loading Subordinate DLLs .............................................................................13-16
LabVIEW Standard Prototype Adapter .........................................................................13-16
LabVIEW Standard Prototype Adapter Module Structure..............................13-16
Test Data Cluster...............................................................................13-17
Error Out Cluster...............................................................................13-19
Input Buffer.......................................................................................13-20
Invocation Information .....................................................................13-20
Sequence Context..............................................................................13-21
Configuring the LabVIEW Standard Prototype Adapter ................................13-22
Specifying a LabVIEW Standard Prototype Adapter Module ........................13-24
Debugging a LabVIEW Standard Prototype Adapter Module........................13-25
C/CVI Standard Prototype Adapter ...............................................................................13-27
C/CVI Standard Adapter Module Prototypes..................................................13-27
Example C/CVI Standard Prototype Code Module.........................................13-31
Specifying a C/CVI Standard Prototype Adapter Module ..............................13-32
Configuring the C/CVI Standard Prototype Adapter ......................................13-35
Executing Code Modules In-Process ................................................13-36
© National Instruments Corporation
xv
TestStand User Manual
Contents
Executing Code Modules in an External Instance
of LabWindows/CVI...................................................................... 13-38
Loading Subordinate DLLs............................................................................. 13-39
Sequence Adapter.......................................................................................................... 13-40
Specifying a Sequence Adapter Module ......................................................... 13-41
Multithreading and Remote Execution Settings ............................... 13-44
Setting up TestStand as a Server for Remote Execution ................................ 13-49
ActiveX Automation Adapter........................................................................................ 13-51
Specifying an ActiveX Automation Adapter Module..................................... 13-51
Running and Debugging ActiveX Automation Servers.................................. 13-55
Configuring the ActiveX Automation Adapter............................................... 13-56
Using ActiveX Servers with TestStand .......................................................... 13-58
Registering a Server.......................................................................... 13-58
Compatibility Issues with Visual Basic............................................ 13-58
HTBasic Adapter ........................................................................................................... 13-60
Configuring the HTBasic Adapter .................................................................. 13-61
Specifying an HTBasic Adapter Module.......................................... 13-62
Debugging an HTBasic Adapter Module ......................................... 13-63
Passing Data To and Returning Data From a Subroutine................. 13-64
Chapter 14
Process Models
TestStand Process Models............................................................................................. 14-1
Features Common to all TestStand Process Models....................................... 14-2
Sequential Model ............................................................................................ 14-2
Parallel and Batch Models .............................................................................. 14-3
Parallel Model................................................................................... 14-4
Batch Model ..................................................................................... 14-6
Selecting the Default Process Model .............................................................. 14-9
Directory Structure for Process Model Files ................................................................. 14-9
Special Editing Capabilities for Process Model Sequence Files ................................... 14-10
Sequence Properties Model Tab ..................................................................... 14-11
Normal Sequences ............................................................................ 14-12
Callback Sequences .......................................................................... 14-12
Entry Point Sequences ...................................................................... 14-13
Chapter 15
Managing Reports
Implementation of the Test Report Capability .............................................................. 15-1
Using Test Reports ........................................................................................................ 15-2
Failure Chain in Reports ................................................................................. 15-5
Batch Reports.................................................................................................. 15-6
TestStand User Manual
xvi
ni.com
Contents
Report Options Dialog Box ...........................................................................................15-6
Contents Tab....................................................................................................15-7
Report File Pathname Tab ...............................................................................15-10
Property Flags that Affect Reports....................................................15-13
Chapter 16
Run-Time Operator Interfaces
Overview........................................................................................................................16-1
TestStand Run-Time Operator Interfaces ......................................................................16-2
LabWindows/CVI Run-Time Operator Interface............................................16-2
LabVIEW Run-Time Operator Interface.........................................................16-4
Building a Standalone Executable ....................................................16-4
Visual Basic Run-Time Operator Interface.....................................................16-5
Delphi Run-Time Operator Interface ..............................................................16-7
Distributing a Run-Time Operator Interface .................................................................16-8
Chapter 17
Distributing TestStand
Creating a Run-Time TestStand Engine Installation .....................................................17-1
Using a Custom TestStand Engine Installation ...............................................17-5
Distributing your Operator Interface .............................................................................17-7
Installing the Customized Engine....................................................................17-7
LabVIEW ..........................................................................................17-7
LabWindows/CVI .............................................................................17-7
Visual Basic ......................................................................................17-8
Delphi................................................................................................17-9
Distributing Sequences and Code Modules ...................................................................17-9
Distributing Sequence Files.............................................................................17-9
Distributing DLL Code Modules.....................................................................17-9
Distributing DLLs Called By LabVIEW VIs..................................................17-10
Distributing Object and Static Library Code Modules....................................17-10
Distributing LabVIEW Test VIs .....................................................................17-11
Packaging VIs and SubVIs for a Sequence File ...............................17-12
Distributing VIs by Saving Them without Full Hierarchy ...............17-13
Distributing VIs by Saving Them with Full Hierarchy.....................17-14
Distributing ActiveX Automation Code Modules...........................................17-14
Customizing and Distributing a LabVIEW Run-Time Server.......................................17-15
Rebuilding the TestStand LabVIEW Run-Time Server..................................17-16
Distributing the TestStand LabVIEW Run-Time Server ................................17-16
© National Instruments Corporation
xvii
TestStand User Manual
Contents
Chapter 18
Databases
Database Concepts......................................................................................................... 18-1
Databases and Tables ...................................................................................... 18-1
Database Sessions ........................................................................................... 18-2
Microsoft ADO, OLE DB, and ODBC Database Technologies..................... 18-3
Data Links ....................................................................................................... 18-5
Database Logging Implementation ................................................................. 18-6
Using Database Logging ............................................................................................... 18-7
Database Options Dialog Box......................................................................... 18-8
Logging Options Tab........................................................................ 18-9
Data Link Tab ................................................................................... 18-10
Schemas Tab..................................................................................... 18-12
Statements Tab ................................................................................. 18-14
Columns/Parameters Tab.................................................................. 18-17
Logging Property in the Sequence Context .................................................... 18-20
TestStand Database Result Tables................................................................................. 18-22
Default TestStand Table Schema .................................................................... 18-22
Creating the Default Result Tables ................................................................. 18-29
Adding Support for Other Database Management Systems ........................... 18-30
Database Viewer............................................................................................................ 18-31
Menus.............................................................................................................. 18-33
File Menu.......................................................................................... 18-33
Options Menu ................................................................................... 18-34
SQL Menu ........................................................................................ 18-34
Windows Menu................................................................................. 18-34
Using Data Links........................................................................................................... 18-34
Data Link Properties Dialog Box.................................................................... 18-35
Provider Tab ..................................................................................... 18-35
Connection Tab................................................................................. 18-37
Advanced Tab................................................................................... 18-38
All Tab .............................................................................................. 18-39
Using the ODBC Administrator .................................................................................... 18-39
Third-Party ODBC Database Drivers ............................................................. 18-42
Example Data Link and Result Table Setup for Microsoft Access ................ 18-42
Database Options—Specifying a Data Link and Schema ................ 18-43
Database Viewer—Creating Result Tables ...................................... 18-43
Built-In Database Step Types........................................................................................ 18-44
Using the Select Data Link Dialog Box.......................................................... 18-45
Open Database ................................................................................................ 18-48
Data Link Tab ................................................................................... 18-49
Custom Properties............................................................................. 18-50
TestStand User Manual
xviii
ni.com
Contents
Close Database ................................................................................................18-50
Custom Properties .............................................................................18-51
Open SQL Statement.......................................................................................18-52
SQL Statement Tab...........................................................................18-52
Advanced Tab ...................................................................................18-54
Custom Properties .............................................................................18-57
Close SQL Statement ......................................................................................18-58
Custom Properties .............................................................................18-59
Data Operation.................................................................................................18-59
Record/Operation Tab.......................................................................18-60
Column Values Tab ..........................................................................18-62
Custom Properties .............................................................................18-64
Property Loader ...............................................................................................18-65
Loading From File ............................................................................18-66
Properties Tab ...................................................................................18-67
Source Tab ........................................................................................18-68
Loading From Database ....................................................................18-69
Properties Tab ...................................................................................18-71
Filtering Tab......................................................................................18-74
Custom Properties .............................................................................18-75
Importing/Exporting Properties .....................................................................................18-78
Source/Destination Tab ...................................................................................18-78
Importing/Exporting Using Files or Clipboard .................................18-79
Properties Tab..................................................................................................18-82
Additional Columns Tab .................................................................................18-83
Structured Query Language (SQL)................................................................................18-85
SQL Commands ..............................................................................................18-86
SQL Objects ....................................................................................................18-87
SQL Clauses ....................................................................................................18-88
SQL Operators.................................................................................................18-89
SQL Functions.................................................................................................18-91
Format Strings................................................................................................................18-93
Date/Time Format Strings ...............................................................................18-93
Numeric Format Strings ..................................................................................18-96
Appendix A
Technical Support Resources
Glossary
Index
© National Instruments Corporation
xix
TestStand User Manual
Contents
Figures
Figure 1-1.
Figure 1-2.
Figure 1-3.
Figure 1-4.
Figure 1-5.
TestStand System Architecture............................................................. 1-4
Expression Browser Dialog Box........................................................... 1-9
Flowchart of Test UUTs Sequence in the Default Process Model ....... 1-20
Test UUTs Entry Point Sequence in the Default TestStand
Process Model ....................................................................................... 1-21
List of All Sequences in TestStand Process Model .............................. 1-22
Figure 2-1.
Figure 2-2.
Figure 2-3.
Figure 2-4.
Figure 2-5.
Figure 2-6.
Figure 2-7.
Figure 2-8.
Figure 2-9.
Figure 2-10.
Figure 2-11.
Figure 2-12.
Example Sequence Editor Screen ......................................................... 2-2
Example Sequence File Window .......................................................... 2-6
Example Execution Window ................................................................ 2-7
Type Palette Window............................................................................ 2-8
Example Station Globals Window........................................................ 2-8
Workspace Window.............................................................................. 2-10
Users Window....................................................................................... 2-14
Main Step Group in an Example Sequence .......................................... 2-15
Insert Step Submenu ............................................................................. 2-15
Step Properties Dialog Box................................................................... 2-17
Preconditions Dialog Box ..................................................................... 2-19
HTML Report for an Example Sequence ............................................. 2-24
Figure 4-1.
Figure 4-2.
Figure 4-3.
Figure 4-4.
Figure 4-5.
Figure 4-6.
Figure 4-7.
Figure 4-8.
Figure 4-9.
Figure 4-10.
Figure 4-11.
Figure 4-12.
Figure 4-13.
Figure 4-14.
Figure 4-15.
Figure 4-16.
Figure 4-17.
Figure 4-18.
Figure 4-19.
Figure 4-20.
Figure 4-21.
Figure 4-22.
File Menu .............................................................................................. 4-1
Edit Menu.............................................................................................. 4-4
Sequence Properties Dialog Box .......................................................... 4-5
Sequence File Properties Dialog Box ................................................... 4-6
Sequence File Callbacks Dialog Box.................................................... 4-7
View Menu............................................................................................ 4-7
Edit Paths in Files Dialog Box.............................................................. 4-9
Edit Paths Dialog Box........................................................................... 4-10
Find Type Dialog Box .......................................................................... 4-12
Browse Variables and Properties in Sequence Context Dialog Box .... 4-13
Execute Menu ....................................................................................... 4-15
Loop on Selected Steps Dialog Box—Loop Count Tab ....................... 4-16
Loop on Selected Steps Dialog Box—Stop Expression Tab ................ 4-17
Debug Menu.......................................................................................... 4-18
Configure Menu .................................................................................... 4-20
Execution Options................................................................................. 4-22
Time Limits Options ............................................................................. 4-25
Preferences Options .............................................................................. 4-27
Model Options ...................................................................................... 4-29
User Manager Options .......................................................................... 4-30
Localization Options ............................................................................. 4-31
Source Control Options......................................................................... 4-32
TestStand User Manual
xx
ni.com
Contents
Figure 4-23.
Figure 4-24.
Figure 4-25.
Figure 4-26.
Figure 4-27.
Figure 4-28.
Search Directories Dialog Box..............................................................4-34
Source Control Menu ............................................................................4-36
Tools Menu............................................................................................4-37
Customize Tool Menu Dialog Box .......................................................4-41
Export Tools Menu Dialog Box ............................................................4-43
Window Menu.......................................................................................4-44
Figure 5-1.
Figure 5-2.
Figure 5-3.
Figure 5-4.
Figure 5-5.
Figure 5-6.
Figure 5-7.
Figure 5-8.
Figure 5-9.
Figure 5-10.
Figure 5-11.
Figure 5-12.
View Ring Control for Sequence Files..................................................5-2
All Sequences View in the Sequence File Window ..............................5-2
Sequence Properties Dialog Box ...........................................................5-4
General Tab in the Sequence File Properties Dialog Box.....................5-6
Advanced Tab in the Sequence File Properties Dialog Box .................5-8
Synchronization Tab in the Step Properties Dialog Box.......................5-9
Callbacks Dialog Box............................................................................5-10
Individual Sequence View for an Example Sequence...........................5-11
Step Group Tree View (Left) and List View (Right) ............................5-12
Step Group List View Columns for Steps .............................................5-13
Step Group List View Columns for Step Properties .............................5-14
Insert Step Menu with LabVIEW Standard Prototype
Adapter Selected....................................................................................5-15
General Tab in the Step Properties Dialog Box ....................................5-20
Run Options Tab in the Step Properties Dialog Box.............................5-21
Post Actions Tab in the Step Properties Dialog Box.............................5-25
Loop Options Tab in the Step Properties Dialog Box...........................5-27
Synchronization Tab in the Step Properties Dialog Box.......................5-29
Expressions Tab in the Step Properties Dialog Box..............................5-30
Parameters Tab ......................................................................................5-31
Insert Parameter Submenu.....................................................................5-32
Locals Tab .............................................................................................5-35
Insert Local Submenu............................................................................5-36
Preconditions Dialog Box for a Sequence.............................................5-38
Sequence File Globals View for an Example Sequence .......................5-41
Insert Global Submenu..........................................................................5-43
Step Types Tab in Sequence File Types View......................................5-45
Differ Window ......................................................................................5-46
Figure 5-13.
Figure 5-14.
Figure 5-15.
Figure 5-16.
Figure 5-17.
Figure 5-18.
Figure 5-19.
Figure 5-20.
Figure 5-21.
Figure 5-22.
Figure 5-23.
Figure 5-24.
Figure 5-25.
Figure 5-26.
Figure 5-27.
Figure 6-1.
Figure 6-2.
Figure 6-3.
Figure 6-4.
Figure 6-5.
Figure 6-6.
Figure 6-7.
Steps Tab in the Sequence Editor Execution Window..........................6-4
Context Tab in an Execution Window ..................................................6-8
HTML Report for an Example Sequence..............................................6-10
Call Stack Pane while Suspended in a Subsequence.............................6-11
Steps Tab Displaying a Sequence Invocation in the Middle
of the Call Stack ....................................................................................6-12
Watch Expression Pane .........................................................................6-13
Execution Window Status Bar ..............................................................6-14
© National Instruments Corporation
xxi
TestStand User Manual
Contents
Figure 6-8.
Figure 6-9.
A Result in a ResultList Array.............................................................. 6-16
Run-Time Error Dialog Box ................................................................. 6-30
Figure 7-1.
Figure 7-2.
Station Globals Window ....................................................................... 7-1
Insert Global Submenu ......................................................................... 7-2
Figure 8-1.
Figure 8-2.
Variables/Properties Tab of the Expression Browser ........................... 8-14
Operators/Functions Tab of the Expression Browser ........................... 8-15
Figure 9-1.
Figure 9-2.
Figure 9-3.
Figure 9-4.
Type Conflict In File Dialog Box ......................................................... 9-3
Insert Local Submenu ........................................................................... 9-5
Initial State of Array Bounds Dialog Box............................................. 9-6
Array Bounds Dialog Box with Settings for
a Three-Dimensional Array .................................................................. 9-7
Array Bounds Dialog Box with an Initially Empty Array .................... 9-8
Local Variables with Various Data Types ............................................ 9-9
Properties Dialog Box for a Number Local Variable ........................... 9-11
Contents of Array Local Variable in List View.................................... 9-12
Numeric Format Dialog Box ................................................................ 9-13
Standard Data Types Tab of the Type Palette Window........................ 9-16
Custom Data Types Tab with Root Node Selected .............................. 9-18
Custom Data Types Tab Showing the Contents of a Container ........... 9-19
Custom Data Types Tab Showing the Value Field for a Number ........ 9-20
Modify Numeric Value Dialog Box ..................................................... 9-20
Insert Custom Data Type Submenu ...................................................... 9-21
Insert Fields Submenu........................................................................... 9-22
Properties Dialog Box for a Numeric Data Type.................................. 9-23
Edit Flags Dialog Box........................................................................... 9-27
Edit Data Type Flags Dialog Box ......................................................... 9-29
Insert Step Submenu ............................................................................. 9-30
Step Types Tab of the Type Palette Window ....................................... 9-32
Custom Properties of a Step Type ........................................................ 9-33
Step Type Properties Dialog Box—General Tab.................................. 9-36
Step Type Properties Dialog Box—Menu Tab ..................................... 9-39
Step Type Properties Dialog Box—Substeps Tab ................................ 9-41
Step Type Properties Dialog Box—Disable Properties Tab................. 9-43
Step Type Properties Dialog Box—Code Templates Tab .................... 9-47
Create Code Templates Dialog Box ..................................................... 9-48
Edit Code Template Dialog Box........................................................... 9-49
Combine with Step Type Operation ..................................................... 9-52
Step Type Menu Editor Dialog Box ..................................................... 9-53
Type Palette Window—Palette Ring .................................................... 9-55
Configure Type Palettes Dialog Box .................................................... 9-55
Figure 9-5.
Figure 9-6.
Figure 9-7.
Figure 9-8.
Figure 9-9.
Figure 9-10.
Figure 9-11.
Figure 9-12.
Figure 9-13.
Figure 9-14.
Figure 9-15.
Figure 9-16.
Figure 9-17.
Figure 9-18.
Figure 9-19.
Figure 9-20.
Figure 9-21.
Figure 9-22.
Figure 9-23.
Figure 9-24.
Figure 9-25.
Figure 9-26.
Figure 9-27.
Figure 9-28.
Figure 9-29.
Figure 9-30.
Figure 9-31.
Figure 9-32.
Figure 9-33.
TestStand User Manual
xxii
ni.com
Contents
Figure 10-1.
Figure 10-2.
Figure 10-3.
Figure 10-4.
Figure 10-5.
Figure 10-6.
Figure 10-7.
Figure 10-8.
Figure 10-9.
Figure 10-10.
Figure 10-11.
Figure 10-12.
Figure 10-13.
Figure 10-14.
Figure 10-15.
Figure 10-16.
Figure 10-17.
Figure 10-18.
Figure 10-19.
Figure 10-20.
Figure 10-21.
Figure 10-22.
Figure 11-1.
Figure 11-2.
Figure 11-3.
Figure 11-4.
Figure 11-5.
Figure 11-6.
Figure 11-7.
Figure 11-8.
Figure 11-9.
Figure 11-10.
Figure 11-11.
Figure 11-12.
Figure 11-13.
Figure 11-14.
Figure 11-15.
Properties That All Steps Contain .........................................................10-2
Edit Pass/Fail Source Dialog Box .........................................................10-6
Pass/Fail Test Step Properties ...............................................................10-6
Limits Tab in Edit Numeric Limit Test Dialog Box .............................10-7
Data Source Tab in the Edit Numeric Limit Test Dialog Box ..............10-9
Numeric Limit Test Step Properties......................................................10-10
Edit Multiple Numeric Limit Test Dialog Box .....................................10-12
Multiple Numeric Limit Test Properties ...............................................10-13
Multiple Numeric Limit TestData Source Tab
with Array Data Source.........................................................................10-14
Multiple Numeric Limit TestData Source Tab
with Multiple Data Sources...................................................................10-15
Limits Tab in the Edit String Value Test Dialog Box...........................10-16
Data Source Tab in Edit String Value Test Dialog Box........................10-17
String Value Test Step Properties .........................................................10-17
Specify Module Dialog Box for Sequence Call Step ............................10-19
Edit Statement Step Dialog Box............................................................10-21
Configure Message Box Step Dialog Box—Text and Buttons Tab......10-22
Configure Message Box Step Dialog Box—Options Tab.....................10-23
Message Popup Step Properties ............................................................10-24
Configure Call Executable Dialog Box.................................................10-26
Call Executable Step Properties ............................................................10-27
Edit Goto Step Dialog Box....................................................................10-29
Label Step Properties.............................................................................10-30
Create Operation for Lock Step Configuration Dialog Box..................11-6
Lock Operation for Lock Step Configuration Dialog Box....................11-7
Get Early Unlock Operation for Lock Step Configuration
Dialog Box ............................................................................................11-9
Get Status Operation for Lock Step Configuration Dialog Box ...........11-10
Lock Step Properties .............................................................................11-11
Create Operation for Semaphore Step Configuration Dialog Box........11-13
Acquire Operation for Semaphore Step Configuration Dialog Box .....11-14
Release Operation for Semaphore Step Configuration Dialog Box......11-15
Get Status Operation for Semaphore Step Configuration
Dialog Box ............................................................................................11-16
Semaphore Step Properties....................................................................11-17
Create Operation for Rendezvous Step Configuration Dialog Box ......11-19
Rendezvous Operation for Rendezvous Step Configuration
Dialog Box ............................................................................................11-20
Get Status Operation for Rendezvous Step Configuration
Dialog Box ............................................................................................11-21
Rendezvous Step Properties ..................................................................11-22
Create Operation for Queue Step Configuration Dialog Box ...............11-24
© National Instruments Corporation
xxiii
TestStand User Manual
Contents
Figure 11-16.
Figure 11-17.
Figure 11-18.
Figure 11-19.
Figure 11-20.
Figure 11-21.
Figure 11-22.
Figure 11-23.
Figure 11-24.
Figure 11-25.
Figure 11-26.
Figure 11-43.
Enqueue Operation for Queue Step Configuration Dialog Box ........... 11-25
Dequeue Operation for Queue Step Configuration Dialog Box ........... 11-27
Flush Operation for Queue Step Configuration Dialog Box ................ 11-30
Get Status Operation for Queue Step Configuration Dialog Box......... 11-31
Queue Step Properties........................................................................... 11-33
Create Operation for Notification Step Configuration Dialog Box ...... 11-36
Set Operation for Notification Step Configuration Dialog Box ........... 11-37
Clear Operation for Notification Step Configuration Dialog Box........ 11-39
Pulse Operation for Notification Step Configuration Dialog Box........ 11-40
Wait Operation for Notification Step Configuration Dialog Box......... 11-42
Get Status Operation for Notification Step Configuration
Dialog Box ............................................................................................ 11-45
Notification Step Properties .................................................................. 11-46
Wait for Time Interval Operation for Wait Step
Configuration Dialog Box..................................................................... 11-48
Wait for Time Multiple Operation for Wait Step
Configuration Dialog Box..................................................................... 11-49
Wait for Thread Operation for Wait Step Configuration
Dialog Box ............................................................................................ 11-50
Wait for Execution Operation for Wait Step Configuration
Dialog Box ............................................................................................ 11-51
Wait Step Properties ............................................................................. 11-52
Set Thread Priority Operation for Thread Priority
Configuration Dialog Box..................................................................... 11-54
Get Thread Priority Operation for Thread Priority
Configuration Dialog Box..................................................................... 11-55
Thread Priority Step Properties............................................................. 11-56
Enter Operation for Batch Synchronization Step
Configuration Dialog Box..................................................................... 11-59
Exit Operation for Batch Synchronization Step
Configuration Dialog Box..................................................................... 11-60
Batch Synchronization Step Properties................................................. 11-61
Create Operation for Batch Specification Step
Configuration Dialog Box..................................................................... 11-62
Add Thread Operation for Batch Specification Step
Configuration Dialog Box..................................................................... 11-64
Remove Thread Operation for Batch Specification Step
Configuration Dialog Box..................................................................... 11-65
Get Status Operation for Batch Specification Step
Configuration Dialog Box..................................................................... 11-66
Batch Specification Step Properties...................................................... 11-67
Figure 12-1.
Figure 12-2.
Users View in the User Manager Window ........................................... 12-2
User List Tab for Users View ............................................................... 12-3
Figure 11-27.
Figure 11-28.
Figure 11-29.
Figure 11-30.
Figure 11-31.
Figure 11-32.
Figure 11-33.
Figure 11-34.
Figure 11-35.
Figure 11-36.
Figure 11-37.
Figure 11-38.
Figure 11-39.
Figure 11-40.
Figure 11-41.
Figure 11-42.
TestStand User Manual
xxiv
ni.com
Contents
Figure 12-3.
Figure 12-4.
Figure 12-5.
Figure 12-6.
Figure 12-7.
Insert New User Dialog Box .................................................................12-4
Edit User Dialog Box ............................................................................12-5
Profile Tab in the Users View ...............................................................12-6
Types View in the User Manager Window ...........................................12-7
User Standard Data Type ......................................................................12-8
Figure 13-1.
Figure 13-2.
Figure 13-3.
Adapter Configuration Dialog Box .......................................................13-3
Choose Code Template Dialog Box......................................................13-4
Specify Module Dialog Box for DLL Flexible
Prototype Adapter—Module Tab..........................................................13-6
Specify Module Dialog Box for DLL Flexible
Prototype Adapter—Source Code Tab..................................................13-12
Test Data Cluster ...................................................................................13-17
Standard Error Out Cluster....................................................................13-19
Invocation Information Cluster .............................................................13-20
Sequence Context Control.....................................................................13-21
LabVIEW Adapter Configuration Dialog Box .....................................13-22
Specify Module Dialog Box for LabVIEW Standard
Prototype Adapter..................................................................................13-24
Stepping into a LabVIEW VI ................................................................13-26
Specify Module Dialog Box for C/CVI Standard
Prototype Adapter—Module Tab..........................................................13-32
Specify Module Dialog Box for C/CVI Standard
Prototype Adapter—Source Code Tab..................................................13-34
C/CVI Standard Adapter Configuration Dialog Box ............................13-36
Auto-Load Library Configuration Dialog Box .....................................13-37
Example Sequence Parameters..............................................................13-40
Specify Module Dialog Box for the Sequence
Adapter—Edit Sequence Call Tab ........................................................13-41
Thread Settings Dialog Box ..................................................................13-44
Execution Settings Dialog Box .............................................................13-45
Remote Execution Settings Dialog Box................................................13-47
Specify Module Dialog Box for ActiveX Automation Adapter............13-51
Edit <parameter> Value Dialog Box.....................................................13-54
Automation Adapter Configuration Dialog Box ...................................13-56
HTBasic Adapter Configuration Dialog Box........................................13-61
Specify Module Dialog Box for HTBasic Adapter ...............................13-62
Figure 13-4.
Figure 13-5.
Figure 13-6.
Figure 13-7.
Figure 13-8.
Figure 13-9.
Figure 13-10.
Figure 13-11.
Figure 13-12.
Figure 13-13.
Figure 13-14.
Figure 13-15.
Figure 13-16.
Figure 13-17.
Figure 13-18.
Figure 13-19.
Figure 13-20.
Figure 13-21.
Figure 13-22.
Figure 13-23.
Figure 13-24.
Figure 13-25.
Figure 14-1.
Figure 14-2.
Figure 14-3.
Figure 14-4.
Figure 14-5.
The Model Options Dialog Box ............................................................14-3
Parallel Model Test UUTs Dialog Box .................................................14-5
Batch UUT Identification Dialog Box ..................................................14-7
Batch Results Dialog Box .....................................................................14-8
Process Model Settings on the Advanced Tab
of the Sequence File Dialog Box...........................................................14-11
© National Instruments Corporation
xxv
TestStand User Manual
Contents
Figure 14-6.
Figure 14-7.
Type Ring Control in the Sequence Properties Model Tab .................. 14-12
Model Tab for an Execution Entry Point Sequence.............................. 14-14
Figure 15-1.
Figure 15-2.
Figure 15-3.
Figure 15-4.
Figure 15-5.
Figure 15-6.
HTML Test Report on the Report Tab ................................................. 15-3
ASCII-Text Test Report on the Report Tab.......................................... 15-4
Failure Chain in HTML Report ............................................................ 15-5
Example Batch Report .......................................................................... 15-6
Report Options Dialog Box—Contents Tab ......................................... 15-7
Report Options Dialog Box—Report File Pathname Tab .................... 15-10
Figure 17-1.
Figure 17-2.
Figure 17-3.
Figure 17-4.
Figure 17-5.
Opening Dialog Box for the TestStand Engine Installation Wizard..... 17-2
Installation Wizard: Default Components to Include ........................... 17-3
Customize Files to Include in Installation Dialog Box ......................... 17-3
Select Files to Include Dialog Box ....................................................... 17-4
Select MDAC Installer Dialog Box ...................................................... 17-5
Figure 18-1.
Figure 18-2.
Figure 18-3.
Figure 18-4.
Figure 18-5.
Figure 18-6.
Figure 18-7.
Figure 18-8.
Figure 18-9.
Figure 18-10.
Figure 18-11.
Figure 18-12.
Figure 18-13.
Figure 18-14.
Figure 18-15.
Figure 18-16.
Figure 18-17.
Figure 18-18.
Figure 18-19.
Figure 18-20.
Figure 18-21.
Figure 18-22.
Figure 18-23.
Figure 18-24.
Figure 18-25.
Figure 18-26.
Figure 18-27.
Figure 18-28.
Microsoft Windows Database Technologies ........................................ 18-4
Database Options Dialog Box—Logging Options Tab ........................ 18-9
Database Options Dialog Box—Data Link Tab ................................... 18-11
Database Options Dialog Box—Schemas Tab ..................................... 18-13
Database Options Dialog Box—Statements Tab .................................. 18-14
Database Options Dialog Box—Columns/Parameters Tab .................. 18-18
Subproperties of the Logging Property................................................. 18-21
Database Viewer Main Window ........................................................... 18-32
Data Link Properties Dialog Box—Provider Tab................................. 18-35
Data Link Properties Dialog Box—Connection Tab ............................ 18-37
Data Link Properties Dialog Box—Advanced Tab .............................. 18-38
Data Link Properties Dialog Box—All Tab ......................................... 18-39
ODBC Data Source Administrator Dialog Box—User DSN Tab ........ 18-40
ODBC Microsoft Access 97 Setup Dialog Box.................................... 18-41
ODBC Data Source Administrator Dialog Box—Drivers Tab............. 18-42
Build SQL Select Statement Dialog Box.............................................. 18-46
Select Data Link Dialog Box ................................................................ 18-46
Edit Data Link Dialog Box ................................................................... 18-47
Edit Open Database dialog box—Data Link Tab ................................. 18-49
Edit Close Database Dialog Box........................................................... 18-51
Edit Open SQL Statement dialog box—SQL Statement Tab ............... 18-52
Build SQL Select Statement Dialog Box.............................................. 18-53
Edit Open SQL Statement Dialog Box—Advanced Tab...................... 18-55
Edit Close SQL Statement Dialog Box................................................. 18-58
Data Operation Dialog Box—Record/Operation Tab........................... 18-60
Data Operation Dialog Box—Column Values Tab .............................. 18-62
Edit Property Loader Dialog Box—Properties Tab.............................. 18-67
Edit Property Loader Dialog Box—Source Tab ................................... 18-68
TestStand User Manual
xxvi
ni.com
Contents
Figure 18-29.
Figure 18-30.
Figure 18-31.
Figure 18-32.
Property Loader Dialog Box—Properties Tab......................................18-71
Create Columns Dialog Box..................................................................18-73
Property Loader Dialog Box—Column Values Tab .............................18-74
Import/Export Properties Dialog Box—Source/Destination
Tab for File............................................................................................18-79
Figure 18-33. Import/Export Properties Dialog Box—Source/Destination
Tab for Databases..................................................................................18-81
Figure 18-34. Import/Export Properties Dialog Box—Properties Tab........................18-82
Figure 18-35. Import/Export Properties Dialog Box—Additional Columns Tab........18-84
Tables
Table 1-1.
Callback Types ......................................................................................1-23
Table 2-1.
Table 2-2.
Mouse and Keyboard Actions for Navigating List and Tree Views .....2-3
Standard Values for the Status Property after Execution Completes....2-18
Table 3-1.
Table 3-2.
Table 3-3.
Table 3-4.
Sequence Editor Startup Options ..........................................................3-1
TestStand Subdirectories.......................................................................3-3
TestStand Component Subdirectories ...................................................3-5
Resource String File Escape Codes.......................................................3-8
Table 6-1.
Table 6-2.
Table 6-3.
Table 6-4.
Table 6-5.
Table 6-6.
Custom Properties in the Step Results for Steps That
Use the Built-In Step Types ..................................................................6-17
Standard Step Result Properties ............................................................6-18
Property Names for Subsequence Results.............................................6-19
Engine Callbacks...................................................................................6-22
Order of Actions That a Step Performs .................................................6-25
Standard Values for the Status Property................................................6-27
Table 7-1.
Status of Station Globals in Various Contexts ......................................7-4
Table 8-1.
Table 8-2.
Table 8-3.
Table 8-4.
Table 8-5.
Table 8-6.
Table 8-7.
Table 8-8.
Table 8-9.
First-Level Properties of a Sequence Context .......................................8-2
StationGlobals TS Subproperty in the Sequence Context.....................8-3
RunState Subproperty in the Sequence Context....................................8-4
Subproperties of the SequenceFile Objects in the Sequence Context...8-8
Subproperties of the Sequence Objects in the Sequence Context .........8-9
InitialSelection Subproperty in the Sequence Context..........................8-11
Expression Operators ............................................................................8-16
Function Expression Operators .............................................................8-17
Levels of Precedence in Expressions ....................................................8-21
© National Instruments Corporation
xxvii
TestStand User Manual
Contents
Table 9-1.
Table 9-2.
Table 9-3.
Table 9-4.
Graphical Interfaces Where you Access Data Types
and Step Types ...................................................................................... 9-1
Creating Data Type Instances from Context Menus............................. 9-4
Adapter Dialog Box Names .................................................................. 9-31
Creation of Types.................................................................................. 9-57
Table 10-1.
Numeric Limit Test Comparison Types ............................................... 10-7
Table 11-1.
Table 11-2.
Table 11-3.
Table 11-4.
Dequeue Behaviors for Data You Enqueue by Value........................... 11-28
Dequeue Behaviors for Data You Enqueue by Reference.................... 11-29
Wait Behaviors for Data Set or Pulsed by Value.................................. 11-43
Wait Behaviors for Data Set or Pulsed by Reference ........................... 11-44
Table 12-1.
Description of Subproperties in User Data Type .................................. 12-8
Table 13-1.
Table 13-2.
Table 13-3.
Table 13-4.
Table 13-5.
Table 13-6.
Table 13-7.
Table 13-8.
Table 13-9.
Table 13-10.
Table 13-11.
Table 13-12.
Table 13-13.
Table 13-15.
Specific Names of the Specify Module Dialog Boxes.......................... 13-2
TestStand Numeric Data Types ............................................................ 13-8
TestStand String Data Types ................................................................ 13-9
Adapter Interpretation of Ambiguous Declarations.............................. 13-13
Options for Stepping Out of LabWindows/CVI DLL Functions.......... 13-15
Test Data Cluster Elements................................................................... 13-18
Old Test Data Cluster Elements from LabVIEW Test Executive ........ 13-19
Error Out Cluster Elements................................................................... 13-20
Error Out Cluster Elements................................................................... 13-21
tTestData Structure Member Fields ...................................................... 13-27
tTestError Structure Member Fields ..................................................... 13-29
Step Properties Updated by C/CVI Standard Prototype Adapter ......... 13-30
Path Resolution of Sequence Pathnames for Remotely
Executed Steps ...................................................................................... 13-48
Variant Data Types Supported by the ActiveX
Automation Adapter.............................................................................. 13-55
HTBasic routines for Accessing TestStand Properties ......................... 13-64
Table 14-1.
TestStand Process Models .................................................................... 14-1
Table 16-1.
Table 16-2.
Table 16-3.
Table 16-4.
Files in the LabWindows/CVI Run-Time Operator Interface
Project File ............................................................................................ 16-2
Top-Level Files in the LabVIEW Run-Time Operator Interface ......... 16-4
Top-Level Files in the Visual Basic Run-Time Operator Interface...... 16-5
Top-Level Files in the Delphi Run-Time Operator Interface ............... 16-7
Table 17-1.
Custom TestStand Engine Installer Actions ......................................... 17-6
Table 13-14.
TestStand User Manual
xxviii
ni.com
Contents
Table 18-1.
Table 18-2.
Table 18-3.
Table 18-4.
Table 18-5.
Table 18-6.
Table 18-7.
Table 18-8.
Table 18-9.
Table 18-10.
Table 18-11.
Table 18-12.
Table 18-13.
Table 18-14.
Table 18-15.
Table 18-16.
Table 18-17.
Table 18-18.
Table 18-19.
Table 18-20.
Table 18-21.
Table 18-22.
Example Database Table .......................................................................18-2
UUT_RESULT Table Schema..............................................................18-23
STEP_RESULT Table Schema.............................................................18-23
STEP_CALLEXE Table Schema.........................................................18-25
STEP_MSGPOPUP Table Schema......................................................18-25
STEP_PASSFAIL Table Schema ........................................................18-25
STEP_STRINGVALUE Table Schema...............................................18-26
STEP_PROPERTYLOADER Table Schema ......................................18-26
STEP_SEQCALL Table Schema.........................................................18-27
MEAS_NUMERICLIMIT Table Schema............................................18-27
MEAS_SINGLEPOINT Table Schema ...............................................18-28
MEAS_WAVE Table Schema .............................................................18-28
MEAS_WAVEPAIR Table Schema ....................................................18-29
Example Data for Property Loader Step ...............................................18-70
SQL Commands ....................................................................................18-86
SQL Objects ..........................................................................................18-87
SQL Clauses ..........................................................................................18-88
SQL Operators.......................................................................................18-89
SQL Functions.......................................................................................18-91
Example Format Strings........................................................................18-93
Symbols for Date/Time Format Strings ................................................18-93
Symbols for Numeric Format Strings ...................................................18-96
© National Instruments Corporation
xxix
TestStand User Manual
TestStand Architecture
Overview
1
This chapter describes the TestStand architecture and provides an overview
of important TestStand concepts and components. This chapter also
introduces many terms and features that later chapters discuss in more
detail. It is a good idea to become familiar with the contents of this chapter
before proceeding to other chapters in the manual.
Getting Started with TestStand contains brief descriptions of TestStand
components and the installation instructions for TestStand. It is a good idea
to read Getting Started with TestStand before you read this manual. For a
brief description of the TestStand sequence editor and how you perform
basic tasks in it, refer to Chapter 2, Sequence Editor Concepts.
General Test Executive Concepts
A test executive is a program in which you can organize and execute
sequences of reusable test modules. The test modules often have a standard
interface. Ideally, a test executive permits you to create the modules in a
variety of programming environments.
This document uses a number of concepts that are applicable to test
executives in general and some that are unique to the TestStand Test
Executive. The following concepts are applicable to test executives in
general.
•
Code module—A program module, such as a Windows dynamic
link library (.dll) or LabVIEW VI (.vi), containing one or more
functions that perform a specific test or other action.
•
Test module—A code module that performs a test.
•
Step—An individual element of a test sequence. A step may call
step modules or perform other operations.
•
Step module—The code module that a step calls.
© National Instruments Corporation
1-1
TestStand User Manual
Chapter 1
TestStand Architecture Overview
•
Sequence—A series of steps you specify for execution in a particular
order. Whether and when a step is executed can depend on the results
of previous steps.
•
Subsequence—A sequence that another sequence calls. You specify a
subsequence call as a step in the calling sequence.
•
Sequence file—A file that contains the definition of one or more
sequences.
•
Sequence editor—A program that provides a graphical user interface
for creating, editing, and debugging sequences.
•
Run-time operator interface—A program that provides a graphical
user interface for executing sequences on a production station.
A sequence editor and run-time operator interface can be separate
application programs or different aspects of the same program.
•
Test executive engine—A module or set of modules that provide an
application programming interface (API) for creating, editing,
executing, and debugging sequences. A sequence editor or run-time
operator interface uses the services of a test executive engine.
•
Application Development Environment (ADE)—A programming
environment such as LabVIEW, LabWindows/CVI, or Microsoft
Visual C/C++, in which you can create test modules and run-time
operator interfaces.
•
Unit Under Test (UUT)—The device or component that you are
testing.
TestStand Capabilities and Concepts
TestStand is a flexible, powerful test executive framework that has the
following major features:
TestStand User Manual
•
Out-of-the-box configuration and components that give you a
ready-to-run, full-featured test executive.
•
Numerous methods for you to modify the out-of-the-box configuration
and components or to add new components. These extensibility
mechanisms enable you to create the test executive that meets your
particular requirements without modifying the TestStand test
execution engine. You can upgrade to newer versions of TestStand
without losing your customizations.
•
Sophisticated sequencing, execution, and debugging capabilities and a
powerful sequence editor that is separate from the run-time operator
interfaces.
1-2
ni.com
Chapter 1
TestStand Architecture Overview
•
Four separate run-time operator interfaces with source code for
LabVIEW, LabWindows/CVI, Visual Basic, and Delphi.
•
Independence from particular ADEs. You can create test modules in a
wide variety of ADEs and call preexisting modules or executables. You
can create your own run-time operator interface in any programming
language that can control ActiveX automation servers.
•
Conversion of sequence files from the LabVIEW Test Executive
Toolkit Version 2.0 or the LabWindows/CVI Test Executive Toolkit
Version 2.0 to TestStand.
•
Comprehensive ActiveX API for building multithreaded test
executives and other sequencing applications.
To provide these features, TestStand expands on the traditional test
executive concepts and introduces many new ones. The new concepts
include step types, step properties, sequence variables, sequence
parameters, module adapters, and process models.
The remainder of this chapter consists of two major sections that introduce
the new concepts as well as the enhancements to the traditional concepts.
The first section discusses the major software components of TestStand.
The second section discusses the features and building blocks in TestStand
that you use to create test sequences and entire test systems.
© National Instruments Corporation
1-3
TestStand User Manual
Chapter 1
TestStand Architecture Overview
Major Software Components of TestStand
This section provides an overview of the major software components of
TestStand.
Figure 1-1 shows the high-level relationships between elements of the
TestStand system architecture.
Figure 1-1. TestStand System Architecture
As shown in Figure 1-1, the TestStand engine plays a pivotal role in the
TestStand architecture. The TestStand engine can run sequences.
Sequences contain steps that can call external code modules. By using
module adapters that have a standard adapter interface, the TestStand
engine can load and execute different types of code modules. TestStand
sequences can call subsequences through the same adapter interface.
TestStand uses a special type of sequence called a process model to direct
the high-level sequence flow. The TestStand engine exports an ActiveX
TestStand User Manual
1-4
ni.com
Chapter 1
TestStand Architecture Overview
Automation API that the TestStand sequence editor and run-time operator
interfaces use.
TestStand Sequence Editor
The TestStand sequence editor is an application program in which you
create, modify, and debug sequences. The sequence editor gives you easy
access to all the powerful TestStand features, such as step types and
process models. The sequence editor has the debugging tools you are
familiar with in ADEs such as LabVIEW, LabWindows/CVI, and
Microsoft Visual C/C++. These debugging tools include breakpoints,
single-stepping, stepping into or over function calls, tracing, a variable
display, and a watch window.
In the TestStand sequence editor, you can start multiple concurrent
executions. You can execute multiple instances of the same sequence,
and you can execute different sequences at the same time. Each execution
instance has its own Execution window. In trace mode, the Execution
window displays the steps in the currently executing sequence. When
execution is suspended, the Execution window displays the next step to
execute and provides single-stepping options.
TestStand Run-Time Operator Interfaces
Your TestStand software includes four run-time operator interfaces in
source and executable form. Each run-time operator interface is a separate
application program. The operator interfaces differ primarily based on the
programming language and ADE in which each is developed. TestStand
comes with run-time operator interfaces developed in LabVIEW,
LabWindows/CVI, Visual Basic, and Delphi.
Although you can use the TestStand sequence editor on a production
station, the TestStand run-time operator interfaces are simpler and fully
customizable. Like the sequence editor, the run-time operator interfaces
allow you to start multiple concurrent executions, set breakpoints, and
single-step. Unlike the sequence editor, however, the run-time operator
interfaces do not allow you to modify sequences, and they do not display
sequence variables, sequence parameters, step properties, and so on.
If you want to customize one of the run-time operator interfaces, modify
the source code for the program. If you want to write your own run-time
operator interface, use the source code of one of the run-time operator
interfaces as a starting point. Refer to Chapter 16, Run-Time Operator
Interfaces, for more information on the run-time operator interfaces that
come with TestStand.
© National Instruments Corporation
1-5
TestStand User Manual
Chapter 1
TestStand Architecture Overview
TestStand Test Executive Engine
The TestStand test executive engine is a set of DLLs that export an ActiveX
Automation Application Programming Interface (API) you can use to
create, edit, execute, and debug sequences. The TestStand sequence editor
and run-time operator interfaces use the engine API. You can call the
engine API from any programming environment that supports access to
ActiveX Automation Servers. Thus, you can call the engine API from test
modules, including test modules you write in LabVIEW and
LabWindows/CVI.
The Help menu of the sequence editor contains a link to the online help.
For more information on the engine API, refer to the TestStand
Programmer Help.
Module Adapters
Most steps in a TestStand sequence invoke code in another sequence or in
a code module. When invoking code in a code module, TestStand must
know the type of code module, how to call it, and how to pass parameters
to it. The different types of code modules include LabVIEW VIs, objects in
ActiveX Automation Servers, C functions in DLLs, and C functions in
source, object, or library modules that you create in LabWindows/CVI or
other compilers. Also, TestStand must know the list of parameters that the
code module requires.
TestStand uses module adapters to obtain this knowledge. TestStand
currently provides the following module adapters for the following
purposes:
TestStand User Manual
•
DLL Flexible Prototype Adapter—Calls C functions in a DLL with
a variety of parameter types.
•
LabVIEW Standard Prototype Adapter—Calls any LabVIEW VI
that has the TestStand standard G parameter list.
•
C/CVI Standard Prototype Adapter—Calls any C function that has
the TestStand standard C parameter list. The function can be in an
object file, library file, or DLL. It also can be in a source file that is in
the project you are currently using in the LabWindows/CVI ADE.
•
ActiveX Automation Adapter—Calls methods and accesses the
properties of an ActiveX object.
•
Sequence Adapter—Calls subsequences with parameters.
•
HTBasic Adapter—Calls HTBasic subroutines.
1-6
ni.com
Chapter 1
TestStand Architecture Overview
The module adapters contain other important information in addition to the
calling convention and parameter lists. If the module adapter is specific to
an ADE, the adapter knows how to open the ADE, how to create source
code for a new code module in the ADE, and how to display the source for
an existing code module in the ADE. The ActiveX Automation Adapter and
the DLL Flexible Prototype Adapter can query the type library for server
information or the DLL for the parameter list information and display it to
the sequence developer.
TestStand Building Blocks
This section provides an overview of the TestStand features and building
blocks you use to create test sequences and entire test systems.
Variables and Properties
TestStand gives you various places in which you can store data values.
These places are called variables and properties.
Variables are properties you can freely create in certain contexts. You can
have variables that are global to a sequence file or local to a particular
sequence. You also can have station global variables. The values of station
global variables are persistent across different executions and even across
different invocations of the sequence editor or run-time operator interfaces.
The TestStand engine maintains the value of station global variables in a
file on the run-time computer.
Each step in a sequence can have properties. For example, a step might have
an integer error code property. The type of a step determines the set of
properties it has. Refer to the Step Types section later in this chapter for
more information on types of steps.
You can use TestStand variables to share data among tests that you write in
different programming languages even if they do not have compatible data
representations. You can pass values you store in variables and properties
to code modules. You also can use the TestStand API to access variable and
property values directly from code modules.
When executing sequences, TestStand maintains a SequenceContext that
contains references to all global variables and all local variables and step
properties in active sequences. The contents of the sequence context
changes depending on the currently executing sequence and step. If you
© National Instruments Corporation
1-7
TestStand User Manual
Chapter 1
TestStand Architecture Overview
pass a sequence context object reference to the code module, you can use
the TestStand API to access the variables and properties in the sequence
context.
Expressions
In TestStand, you can use the values of variables and properties in
numerous ways, such as passing a variable to a code module or using a
property value to determine whether to execute a step. Sometimes you want
to use an expression, which is a formula that calculates a new value from
the values of multiple variable or properties. You can use an expression
wherever you can use a simple variable or property value. In expressions,
you can access all variables and properties in the sequence context that is
active when TestStand evaluates the expression. The following is an
example of an expression:
Locals.MidBandFrequency = (Step.HighFrequency +
Step.LowFrequency) / 2
TestStand supports all applicable expression operators and syntax that
you use in C, C++, Java, and Visual Basic. If you are not familiar with
expressions in these standard languages, TestStand also provides an
expression browser dialog box you access by clicking the Browse button
that appears next to controls that accept expressions. With the expression
browser, you can interactively build an expression by selecting from lists of
available variables, properties, and expression operators. The expression
browser also lists a number of functions you can use in expressions. The
expression browser has help text for each expression operator and function.
TestStand User Manual
1-8
ni.com
Chapter 1
TestStand Architecture Overview
Figure 1-2 shows the Expression Browser dialog box.
Figure 1-2. Expression Browser Dialog Box
Categories of Properties
A property is a storage space for information. A property can store a single
value or an array of values of the same data type. Each property has a name.
One type of property, the container property, does not have a value.
A container property can contain any number of subproperties.
A value is a number, a string, a Boolean, or an ActiveX reference. TestStand
stores numbers as 64-bit, floating-point values in the IEEE 754 format.
TestStand stores an ActiveX reference as an IDispatch pointer or an
IUnknown pointer. Values are not containers and thus cannot contain
subproperties. Arrays of values can have multiple dimensions.
© National Instruments Corporation
1-9
TestStand User Manual
Chapter 1
TestStand Architecture Overview
The following are the major categories of properties according to the kinds
of values they contain.
•
A single-valued property contains a single value. Because TestStand
has four types of values, TestStand has four types of single-valued
properties: number properties, string properties, Boolean properties,
and ActiveX reference properties.
•
An array property contains an array of values. TestStand has number
array properties, string array properties, Boolean array properties, and
ActiveX reference array properties.
•
A property-array property contains a value that is an array of
subproperties of a single type.
•
A container property contains no values. Usually, container properties
contain multiple subproperties. Container properties are analogous to
structures in C/C++ and to clusters in LabVIEW.
Standard and Custom Named Data Types
When you create a variable or property, you specify its data type. In some
cases, you use a simple data type such as a number or a Boolean. In other
cases, you want to define your own data type by adding subproperties to a
container to create an arbitrarily complex data structure. You can do so by
creating a named data type. When you create a named data type, you can
reuse it for multiple variables or properties. Although each variable or
property you create with a named data type has the same data structure,
the values they contain can differ.
TestStand defines certain standard named data types. You can add
subproperties to the standard data types, but you cannot delete any of their
built-in subproperties. The standard named data types include Path,
Error, and CommonResults.
You can define your own custom named data types. You must choose a
unique name for each of your custom data types. You can add or delete
subproperties in each custom data type without restriction. For example,
you might create a Transmitter data type that contains subproperties
such as NumChannels and PowerLevel.
When you create a variable or property, you can select from among the
simple property types and the named data types.
TestStand User Manual
1-10
ni.com
Chapter 1
TestStand Architecture Overview
Built-In and Custom Properties
TestStand defines a number of properties that are always present for objects
such as steps and sequences. An example is the run mode property for steps.
TestStand normally hides these properties in the sequence editor, although
it lets you modify some of them through dialog boxes. Such properties are
called built-in properties.
You can define new properties in addition to the built-in properties.
Examples are high- and low-limit properties in a step or local variables in
a sequence. Such properties are called custom properties.
Steps
A sequence consists of a series of steps. In TestStand, a step can perform
many actions, such as initializing an instrument, performing a complex test,
or making a decision that affects the flow of execution in a sequence. Steps
can perform these actions through several types of mechanisms. A step can
jump to another step, execute an expression, call a subsequence, or call an
external code module.
In TestStand, steps can have custom properties. For steps that call code
modules, custom step properties are useful for storing parameters to pass to
the code module for the step. They also serve as a place for the code module
to store its results. You can use the TestStand API to access the values of
custom step properties from code modules.
Not all steps call code modules. Some steps perform standard actions you
configure using a dialog box. In this case, custom step properties are useful
for storing the configuration settings you specify.
Built-In Step Properties
TestStand steps have a number of built-in properties you can specify using
the various options on the Step Properties dialog box. The following list
explains the capabilities of each built-in step property.
•
Preconditions—Set this property to specify the conditions that must
be true for TestStand to execute the step during the normal flow of
execution in a sequence.
•
Load/Unload Options—Set this property to control when TestStand
loads and unloads the code modules or subsequences that each step
invokes.
•
Run Mode—Set this property to specify whether TestStand skips a step
or forces the step to pass or fail without executing the step module.
© National Instruments Corporation
1-11
TestStand User Manual
Chapter 1
TestStand Architecture Overview
•
Record Results—Set this property to specify whether TestStand stores
the results of the step in a list. Refer to the Automatic Result Collection
section in this chapter for more information.
•
Step Failure Causes Sequence Failure—Set this property to specify
whether TestStand sets the status of the sequence to Failed when the
status of the step is Failed.
•
Ignore Run-Time Errors—Set this property to specify whether Test
Stand continues execution normally after the step even though a
run-time error occurs in the step.
•
Post Actions—Set this property to execute callbacks or jump to other
steps after executing the step, depending on the pass/fail status of the
step or any custom condition.
•
Loop—Set this property to cause a single step to execute multiple
times before executing the next step. You can specify the conditions
under which to terminate the loop. You also can specify whether to
collect results for each loop iteration, for the loop as a whole, or for
both.
•
Pre Expressions—Set this property to specify an expression to
evaluate before executing the step module.
•
Synchronization—Set this property to specify whether a step should
block another instance of the step from executing at the same time in a
different thread.
•
Post Expressions—Set this property to specify an expression to
evaluate after executing the step module.
•
Status Expression—Set this property to specify an expression that
determines the value of the status property of the step.
For more information on using these properties, refer to the Step Properties
Dialog Box section of Chapter 5, Sequence Files.
Step Types
Just as each variable or property has a data type, each step has a step type.
A step type can contain any number of custom properties. Each step of that
type has the custom step properties in addition to the built-in step
properties. All steps of the same type have the same properties, but the
values of the properties can differ.
The step type specifies the initial values of all the step properties. When you
create the step in the sequence editor, TestStand sets the initial values of the
step properties from the values that the step type specifies.
TestStand User Manual
1-12
ni.com
Chapter 1
TestStand Architecture Overview
To modify the values of the built-in step properties you use the Step
Properties dialog box. Usually, you can modify the values of custom step
properties using a dialog box specific to the step type. If the step type does
not have a dialog box for the custom properties, you view the custom
properties by selecting View Contents from the context menu for the step.
Although step modules usually do not modify the values of the built-in step
properties at run time, they often modify and interrogate the values of the
custom step properties.
A step type also can use any number of substeps to define standard behavior
for each step of that type. Substeps are actions that the TestStand engine
performs for a step in addition to calling the step module. Because a step
type defines its substeps, each step of that type shares the same set of
substeps. The different categories of substeps are as follows:
•
Edit substep
•
Pre Step substep
•
Post Step substep
•
Custom substep
The sequence developer invokes the Edit substep by selecting a menu item
in the context menu for the step or by clicking a button in the Step
Properties dialog box for the step. The step type specifies the name of the
menu item and the caption of the button. The Edit substep displays a dialog
box in which the sequence developer edits the values of custom step
properties. For example, an Edit substep might display a dialog box in
which the sequence developer specifies the high and low limits for a test.
The Edit substep might then store the high and low limit values as step
properties.
The engine calls the Pre Step substep before calling the step module.
You can specify an adapter and a module to invoke in the Pre Step substep.
For example, a Pre Step substep might call a code module that retrieves
measurement configuration parameters and stores those parameters in step
properties for use by the step module.
The engine calls the Post Step substep after calling the step module. You
can specify an adapter and a module to invoke in the Post Step substep.
A Post Step substep might call a code module that compares the values the
step module stored in step properties against limit values that the Edit
substep stored in other step properties.
© National Instruments Corporation
1-13
TestStand User Manual
Chapter 1
TestStand Architecture Overview
Currently, TestStand does not call Custom substeps. Operator interface
programs, test code, and other modules can use the TestStand API to invoke
Custom substeps that you define.
TestStand includes a number of predefined step types. Some of the more
generally applicable step types are as follows:
•
Action
•
Numeric Limit Test
•
String Value Test
•
Pass/Fail Test
•
Label
•
Goto
•
Statement
•
Property Loader
•
Message Popup
•
Call Executable
•
Sequence Call
For a description of each of these step types, refer to Chapter 10, Built-In
Step Types. Although you can create a test application using only the
predefined step types, you also can create your own step types. By creating
your own step types, you can define standard, reusable classes of steps that
apply specifically to your own application. For example, you might define
a Switch Matrix Configuration step or a Transmitter Adjacent Channel
Power Test step.
The sequence developer creates a new step by selecting the Insert Step
item in the context menu that appears when you right click a sequence
window. The Insert Step item opens a hierarchical submenu that contains
the step types available on the computer. When you create a new step type,
you specify its name and position within the submenu.
Source Code Templates
When you create a step type, you also can define source code templates for
that step type. When the sequence developer creates a new step of that type,
the developer can use a source code template to generate source code for
the step module. For a particular step type, you can specify different source
code templates for the different module adapters.
TestStand User Manual
1-14
ni.com
Chapter 1
TestStand Architecture Overview
Sequences
In TestStand, a sequence consists of the following:
•
Parameters
•
Local variables
•
A main group of steps
•
A group of setup steps
•
A group of cleanup steps
•
Built-in sequence properties
Sequence Parameters
Each sequence has its own list of parameters. You use parameters to pass
data to a sequence when you call that sequence as a subsequence. This use
of parameters is analogous to passing arguments to a function call or wiring
data to terminals when you call a SubVI in LabVIEW. You can also specify
a default value for each parameter. When the sequence developer inserts a
step that calls one sequence from another, the developer can specify the
values to pass for the parameters of the subsequence.
You can specify the number of parameters and the data type of each
parameter. If the developer does not specify the value of a parameter,
TestStand passes the default value. You can access parameters from code
modules of steps in the sequence by using the TestStand API.
You also can pass parameters by value or by reference to any step in the
sequence that calls one of the following items:
•
A subsequence
•
A DLL, using the DLL Flexible Prototype Adapter
•
A method or property on an object, using the ActiveX Automation
Adapter
Sequence Local Variables
You can create an unlimited number of local variables in a sequence.
You can use local variables to store data relevant to the execution of the
sequence. You can access local variables from code modules of steps in the
sequence using the TestStand API. You also can pass local variables by
© National Instruments Corporation
1-15
TestStand User Manual
Chapter 1
TestStand Architecture Overview
value or by reference to any step in the sequence that calls one of the
following items:
•
A subsequence
•
A DLL, using the DLL Flexible Prototype Adapter
•
A method or property on an object, using the ActiveX Automation
Adapter
Lifetime of Local Variables, Parameters, and
Custom Step Properties
Multiple instances of a sequence can run at the same time. This situation
can occur when you call a sequence recursively or when a sequence runs in
multiple concurrent threads. Each instance of the sequence has its own
copy of the sequence parameters, local variables, and custom properties of
each step. When a sequence completes, TestStand discards the values of the
parameters, local variables, and custom properties.
Step Groups
A sequence contains the following groups of steps: Setup, Main, and
Cleanup. When TestStand executes a sequence, the steps in the Setup group
execute first. The steps in the Main group execute next. The steps in the
Cleanup group execute last. Usually, the Setup group contains steps that
initialize instruments, fixtures, or a Unit Under Test (UUT). The Main
group usually contains the bulk of the steps in a sequence, including the
steps that test the UUT. The Cleanup group contains steps that power down
or restore the initial state of instruments, fixtures, and the UUT.
If you use separate step groups, you ensure that the steps in the Cleanup
group execute regardless of whether the sequence completes successfully
or a run-time error occurs in the sequence. If a Setup or Main step causes a
run-time error to occur, the flow of execution jumps to the Cleanup step
group. The Cleanup steps always run even if some of the Setup steps do not
run. If a Cleanup step causes a run-time error, execution continues at the
next Cleanup step.
If a run-time error occurs in a sequence, TestStand reports the run-time
error to the calling sequence. Execution in the calling sequence jumps to the
Cleanup group in the calling sequence. This process continues up to the
top-level sequence. Thus, when a run-time error occurs, TestStand
terminates execution after running all the Cleanup steps of all the sequences
in the sequence call hierarchy.
TestStand User Manual
1-16
ni.com
Chapter 1
TestStand Architecture Overview
Built-in Sequence Properties
Sequences have a few built-in properties that you can specify using the
Sequence Properties dialog box. For example, you can specify that the flow
of execution jumps to the Cleanup step group whenever a step sets the
status of the sequence to Failed.
Sequence Files
Sequence files can contain one or more sequences. Sequence files also can
contain global variables that all sequences in the sequence file can access.
Sequences files have a few built-in properties that you can specify using the
Sequence File Properties dialog box. For example, you can specify Load
and Unload Options that override the Load and Unload Options of all the
steps in all the sequences in the file.
Storage of Types in Files
Each sequence file contains the definitions of all data types and step types
that the variables, properties, parameters, and steps in the sequence file use.
This is true for all TestStand files that use types.
In memory, TestStand allows only one definition for each type. If you load
a file that contains a type definition and a type definition of the same name
already exists in memory, TestStand verifies that the two type definitions
are identical. If they are not identical, TestStand informs you of the conflict.
You can select one of the definitions to replace the other, or you can rename
one of them so that they can coexist.
Process Models
Testing a UUT requires more operations than executing a set of tests.
Usually, the test executive must perform a series of operations before and
after it executes the sequence that performs the tests. Common operations
include identifying the UUT, notifying the operator of pass/fail status,
generating a test report, and logging results. These operations define the
testing process. The set of such operations and their flow of execution is
called a process model. Some traditional test executives implement their
process models internally and do not allow you to modify them. Other test
executives do not define a process model at all. TestStand comes with a
default process model that you can modify or replace.
Having a process model is essential so that you can write different test
sequences without repeating standard testing operations in each sequence.
© National Instruments Corporation
1-17
TestStand User Manual
Chapter 1
TestStand Architecture Overview
Ability to modify the process model is essential because the testing process
can vary based on your production line, your production site, or the systems
and practices of your company.
TestStand provides a mechanism for defining a process model. A process
model is a sequence file. You can edit a process model in the same way that
you edit your other sequences. TestStand comes with a fully functional
default process model. You can write your own process model, or you can
copy the default process model and then modify it.
Always make modifications to a copy of the default process model. If you modify
the default process model, your edits may be overwritten when you install subsequent
TestStand releases.
Note
Station Model
You can select a process model file to use for all sequence files. This
process model file is called the station model file. The TestStand
installation program establishes SequentialModel.seq as the station
model file. You can use the Station Options dialog box to select a different
station model. You also can use the Station Options dialog box to allow
individual sequence files to specify their own process model file.
Main Sequence and Client Sequence File
In TestStand, the sequence that initiates the tests on a UUT is called the
main sequence. You must name each main sequence MainSequence.
When you create a new sequence file, TestStand automatically inserts a
MainSequence sequence in the file. The process model invokes the main
sequence as part of the overall testing process. The process model defines
what is constant about your testing process, whereas main sequences define
the steps that are unique to the different types of tests you run.
When you begin an execution, you usually do so from a main sequence in
one of your sequence files. TestStand determines which process model file
to use with the main sequence. TestStand uses the station model file unless
the sequence file specifies a different process model file and you set the
Station Options to allow sequence files to override your station model
setting.
After TestStand identifies the process model to use with a main sequence,
the file that contains the main sequence becomes a client sequence file of
the process model.
TestStand User Manual
1-18
ni.com
Chapter 1
TestStand Architecture Overview
Model Callbacks
By default, each main sequence you execute uses the process model that
you select for the entire test station. TestStand has a mechanism called a
model callback that allows the sequence developer to customize the
behavior of a process model for each main sequence that uses it. By
defining one or more model callbacks in a process model, you specify the
set of process model operations that the sequence developer can customize.
You define a model callback by adding a sequence to the process model file,
marking it as a callback, and calling it from the process model. The
sequence developer can override the callback in the model sequence file by
using the Sequence File Callbacks dialog box to create a sequence of the
same name in the client sequence file.
For example, the default TestStand process model defines a TestReport
callback that generates the test report for each UUT. Normally, the
TestReport callback in the default process model file is sufficient
because it handles many types of test results. The sequence developer can,
however, override the default TestReport callback by defining a different
TestReport callback in a particular client sequence file.
Process models use callbacks to invoke the main sequence in the client
sequence file. Each client sequence file must define a sequence named
MainSequence. The process model contains a MainSequence callback
that is merely a placeholder. The MainSequence in the client sequence file
overrides the MainSequence placeholder in the model file.
To alter the behavior of the process model for all sequences, you can
modify a copy of the process model or replace it entirely. To redefine the
set of customizable operations, you can define new callbacks in, or delete
existing callbacks from, the process model file.
Entry Points
A process model defines a set of entry points. Each entry point is a
sequence in the process model file. You mark a sequence in the model file
as an entry point in the Sequence Properties dialog box.
By defining multiple entry points in a process model, you give the test
station operator different ways to invoke a main sequence. For example, the
default TestStand process model provides two entry points: Test UUTs and
Single Pass. The Test UUTs entry point initiates a loop that repeatedly
identifies and tests UUTs. The Single Pass entry point tests a single UUT
without identifying it. Such entry points are called execution entry points.
© National Instruments Corporation
1-19
TestStand User Manual
Chapter 1
TestStand Architecture Overview
Execution entry points appear in the Execute menu of the sequence editor
or operator interface when the active window contains a non-model
sequence file that has a MainSequence callback.
Figure 1-3 contains a flowchart of the major operations of the Test UUTs
entry point sequence in the default process model. Notice that the sequence
implements many of its operations as callbacks. The box on the left shows
the flow of control. The box on the right shows the action that each callback
in the default model performs if you do not override it.
Process Model Callback Sequences
Test UUTs Entry Point
Call PreUUTLoop
No Action (Place Holder)
Call ConfigureReportOptions
No Action (Place Holder)
Call PreUUT
Display UUT Serial Number Dialog
More
UUTs?
No
Yes
Call MainSequence
Run the Main Sequence
from the Selected File
Call PostUUT
Display Pass/Fail/Error/Terminated
Banners
Call TestReport
Generate Report
from Main Sequence Results
Call LogToDatabase
Log Main Sequence Results
to Database
Call PostUUTLoop
No Action (Place Holder)
Figure 1-3. Flowchart of Test UUTs Sequence in the Default Process Model
TestStand User Manual
1-20
ni.com
Chapter 1
TestStand Architecture Overview
Like any other sequence, the sequence for a process model entry point can
contain calls to DLLs, calls to subsequences, Goto steps, and so on.
Figure 1-4 shows the entire set of steps for the Test UUTs entry point in the
default process model.
Figure 1-4. Test UUTs Entry Point Sequence in the Default TestStand Process Model
To execute a sequence without a process model, select the Run Sequence
Name item in the Execute menu, where Sequence Name is the name of the
sequence you are currently viewing. This option is useful for debugging. It
executes the sequence directly, skipping the process model operations such
as UUT identification and test report generation. You can execute any
sequence this way, not only main sequences.
© National Instruments Corporation
1-21
TestStand User Manual
Chapter 1
TestStand Architecture Overview
A process model can define other types of entry points, such as
configuration entry points. An example is the Config Report Options
entry point, which appears as Report Options in the Configure menu of
the sequence editor or run-time operator interface. Refer to Chapter 14,
Process Models, for more information on process model entry points.
Figure 1-5 shows a list of all the sequences in the default TestStand process
model. The first five sequences are entry points. The last four sequences are
utility subsequences that the execution entry points call. The other
sequences are callbacks that you can override in a client sequence file.
Figure 1-5. List of All Sequences in TestStand Process Model
TestStand User Manual
1-22
ni.com
Chapter 1
TestStand Architecture Overview
Automatic Result Collection
TestStand can automatically collect the results of each step. You can enable
or disable result collection for a step, a sequence, or for the entire test
station.
Each sequence has a local array that stores the results of each step. The
contents in the results for each step can vary depending on the step type.
When TestStand stores the results for a step into the array, it adds
information such as the name of the step and its position in the sequence.
For a step that calls a sequence, TestStand also adds the result array from
the subsequence.
Refer to the Result Collection section in Chapter 6, Sequence Execution,
for more information on how TestStand collects results.
Callback Sequences
Callbacks are sequences that TestStand calls under specific circumstances.
You can create new callback sequences or you can replace existing
callbacks to customize the operation of the test station. To add a callback
sequence to a sequence file, use the Sequence File Callbacks dialog box.
TestStand defines three categories of callbacks. The categories are based on
the entity that invokes the callback and the location in which you define the
callback. Table 1-1 shows the different types of callbacks.
Table 1-1. Callback Types
Callback Type
Where You Define the Callback
Who Calls the Callback
Model Callbacks
Process model file,
the client sequence file,
or StationCallbacks.seq
Sequences in the process
model file
Engine Callbacks
StationCallbacks.seq for
engine station callbacks,
the process model file for engine
process model callbacks,
or a regular sequence file for
engine sequence file callbacks
Engine
Front-End Callbacks
FrontEndCallbacks.seq
Operator interface program
The Process Models section earlier in this chapter discusses model
callbacks in detail.
© National Instruments Corporation
1-23
TestStand User Manual
Chapter 1
TestStand Architecture Overview
Engine Callbacks
The TestStand engine defines a set of callbacks that it invokes at specific
points during execution. These callbacks are called engine callbacks.
TestStand defines the name of each engine callback.
Engine callbacks are a way for you to configure TestStand to call certain
sequences before and after the execution of individual steps, before and
after interactive executions, after loading a sequence file, and before
unloading a sequence file. Because the TestStand engine controls the
execution of steps and the loading and unloading of sequence files,
TestStand defines the set of engine callbacks and their names.
The engine callbacks exist in three general groups, based on the file in
which the callback sequence appears. You can define engine callbacks in
sequence files, in process model files, and in the
StationCallbacks.seq file.
Note TestStand installs a StationCallbacks.seq file in the
<TestStand>\Components\NI\Callbacks\Station directory. You can add
your own station engine callbacks in the StationCallbacks.seq file in the
<TestStand>\Components\User\Callbacks\Station directory.
Front-End Callbacks
Front-end callbacks are sequences in the FrontEndCallbacks.seq file
that operator interface programs call. Front-end callbacks allow multiple
operator interfaces to share the same implementation for a specific
operation. The version of FrontEndCallback.seq that TestStand
installs contains one front-end callback sequence, LoginLogout. The
sequence editor and all operator interfaces that come with TestStand call
LoginLogout.
When you implement operations as front-end callbacks, you write them as
sequences. Thus you can modify a front-end callback without modifying
the source code for the operator interfaces or rebuilding the executables for
them. For example, to change how the various operator interfaces perform
the login procedure, you only have to modify the LoginLogout sequence
in FrontEndCallbacks.seq.
You can create new front-end callbacks by adding a sequence to
FrontEndCallbacks.seq file. You can then invoke this sequence from
each of the operator interface programs that you use. You invoke the
sequence using functions in the TestStand API. You cannot edit the source
TestStand User Manual
1-24
ni.com
Chapter 1
TestStand Architecture Overview
for the TestStand sequence editor. Thus, you cannot make the sequence
editor call new front-end callbacks that you create.
TestStand installs predefined front-end callbacks in the FrontEndCallbacks.seq
file in the <TestStand>\Components\NI\Callbacks\FrontEnd directory.
You can add your own front-end callbacks or override a predefined callback in the
FrontEndCallbacks.seq file in the <TestStand>\Components\User\
Callbacks\FrontEnd directory.
Note
Sequence Executions
When you run a sequence, TestStand creates an execution object. The
execution object contains all the information that TestStand needs to run
your sequence and the subsequences it calls. While an execution is active,
you can start another execution by running the same sequence again or by
running a different one. TestStand does not limit the number of executions
that you can run concurrently. An execution object initially starts with a
single execution thread. You can use the sequence call multithreading
options to create additional threads within an execution or to launch new
executions. An execution groups related threads. If you set a breakpoint in
an execution, all threads in the execution suspend. If you terminate an
execution, all threads in the execution terminate.
Usually, the TestStand sequence editor creates a new window for each
execution. This window is called an Execution window. In the Execution
window, you can view steps as they execute, the values of variables and
properties, and the test report. Usually, run-time operator interface
programs also have a view or window for each execution.
Normal and Interactive Executions
You start an execution in the sequence editor by selecting the Run
Sequence Name item or one of the process model entry points from the
Execute menu. This is called a normal execution.
You run steps in interactive mode by selecting one or more steps and
choosing the Run Selected Steps or Loop Selected Steps items in the
context menu. In interactive mode, only the selected steps in the sequence
execute, regardless of any branching logic that the sequence contains. The
selected steps run in the order in which they appear in the sequence.
You can run steps in interactive mode from two different contexts:
•
© National Instruments Corporation
You can run steps interactively from a Sequence File window. When
you do so, you create a new execution. This is called a root interactive
1-25
TestStand User Manual
Chapter 1
TestStand Architecture Overview
execution. You can set station options to control whether the Setup and
Cleanup step groups of the sequence run as part of a root interactive
execution.
•
You also can run steps interactively from an existing Execution
window for a normal execution that is suspended at a breakpoint. You
can run steps only in the sequence and step group in which execution
is suspended. When you do this, the selected steps run within the
context of the normal execution. This is called a nested interactive
execution. The steps that you run interactively can access the variable
values of the normal execution and add to its results. These results are
included in the test report if you used the process model for the original
execution. When the selected steps complete, the execution returns to
the step at which it was suspended when you chose Run Selected
Steps or Loop Selected Steps.
You can configure whether TestStand evaluates preconditions when
executing interactively by selecting Configure»Station Options and
setting the Evaluate Preconditions in Interactive Mode option on the
Execution tab.
Terminating and Aborting Executions
The menus in the sequence editor and run-time operator interfaces have
commands that allow you to stop execution before the execution has
completed normally. The TestStand engine API has corresponding
methods that allow you to stop execution from a code module. You can stop
one execution or all executions. You can issue the stop request at any time,
but it does not take effect in each execution until the currently executing
code module returns control.
You can stop executions in two ways. When you terminate an execution,
all the Cleanup step groups in the sequences on the call stack run before
execution ends. Also, the process model can continue to run. Depending on
the process model, it might continue testing with the next UUT or generate
a test report.
When you abort an execution, the Cleanup step groups do not run, and
process model cannot continue. In general, it is better to terminate
execution so that the Cleanup step groups can return your system to a
known state. You abort an execution when you want the execution to stop
completely as soon as possible. Usually, you abort an execution only when
you are debugging and you are sure that is safe to not run the cleanup steps
for a sequence.
TestStand User Manual
1-26
ni.com
Sequence Editor Concepts
2
This chapter describes the various parts of the main window for the
TestStand sequence editor. It also describes how you perform basic
tasks in the sequence editor.
Sequence Editor Screen
The sequence editor main window contains standard window features
common to Windows applications, such as windows, menus, toolbars,
and a status bar.
© National Instruments Corporation
2-1
TestStand User Manual
Chapter 2
Sequence Editor Concepts
Figure 2-1 shows an example of the sequence editor main window.
Figure 2-1. Example Sequence Editor Screen
Windows
The sequence editor uses child windows to display sequence files,
sequence executions, station globals, data types, step types, users, user
privileges, and projects in the workspace. This manual refers to these child
windows simply as windows.
Views
Each TestStand window can contain different views to display various
elements of sequence files, sequence executions, types, or globals. For
example, a sequence file contains multiple sequences. The pull-down ring
control in the upper right corner of the Sequence File window sets the
current view for the Sequence File window. The Sequence File window
views include a list of all sequences, a list of steps in a particular sequence,
TestStand User Manual
2-2
ni.com
Chapter 2
Sequence Editor Concepts
a list of the sequence file global variables, and a list of types that the
sequence file uses.
Tabs
Some TestStand windows display a series of tabs in which you can access
detailed information unique to the view. For example, when you view a
sequence in a sequence file, the following tabs are available:
•
Main—Displays the steps in the main sequence.
•
Setup—Displays steps that execute before the Main step group runs.
•
Cleanup—Displays steps that execute after the Main step group runs.
•
Parameters—Lists the values that the sequence receives when
another sequence calls it.
•
Locals—Displays variables accessible by any of the steps in the
sequence.
Lists and Trees
The sequence editor uses lists and trees to show the relationship and
hierarchical nature of the data that appears in each view. For example, a list
view for the Sequence File window displays all the sequences in a sequence
file. When you select a sequence in that list and press <Ctrl-Enter>, the
view changes to a list of all steps in the selected sequence. You also can
display the steps of a sequence in a tree view where the steps are the nodes
and the step properties are the branches of the tree.
Table 2-1 describes the standard behavior for keyboard and mouse actions
that you perform on objects in list views and tree views.
Table 2-1. Mouse and Keyboard Actions for Navigating List and Tree Views
Mouse Action
Keyboard Action
Type of View
Behavior
Double-click
Press <Enter>
List view
Displays the Properties
dialog box for the object.
<Ctrl>-Double-click
Press <Ctrl-Enter>
List view
Expands the object to
show its contents.
Double-click a
closed node
Press <Enter>
or <+>
Tree view
Expands the tree
view node.
Double-click an
opened node
Press <Enter>
or <->
Tree view
Collapses the tree
view node.
© National Instruments Corporation
2-3
TestStand User Manual
Chapter 2
Sequence Editor Concepts
Table 2-1. Mouse and Keyboard Actions for Navigating List and Tree Views (Continued)
Mouse Action
Keyboard Action
Type of View
Behavior
Click to select node
Use arrows to
select node
Tree view
Show contents of tree
node in list view
<Alt>-Double-click
Press <Alt-Enter>
List or tree view
Displays the Properties
dialog box for the object.
(None)
<Backspace>
List or tree view
Go up one level in tree
view and show contents
of that level in list view
Each item in a list view can have multiple columns. For example, a step in
a list view has a Step column, a Description column, an Execution Flow
column, and a Comment column. You can expand a column to the width of
its largest entry by double-clicking the vertical separator at the right edge
of the column heading.
Context Menus
To open a context menu in a window, click the right mouse button. The list
of menu items in a context menu varies depending on the view, the mouse
position, and whether any items are selected. Most of the context menu
items do not appear in the main window menu bar, so you can access them
only from the context menus. For example, you can insert a step into a
sequence only by using the Insert Step context menu item.
Certain menu items appear in several different context menus. Whenever
you right click an object to display its context menu, you see commands
that are relevant to that object. For example, the Properties item displays
the Properties dialog box for the object. The View Contents item displays
the contents of the object in the list view.
When you right click the list view background and select the Go Up 1
Level menu item, the focus moves up one level in the tree view and the
contents of that level appear in the list view.
Copy, Cut, and Paste
While you are viewing sequences, steps, types, workspace items, or
variables in a list or tree format, you can cut, copy, and paste items between
different views and windows.
TestStand User Manual
2-4
ni.com
Chapter 2
Sequence Editor Concepts
Drag and Drop
While you are viewing sequences, steps, types, workspace items, or
variables in a list or tree format, you can drag and drop items between
different views and windows. You can use this technique to move steps up
or down in a sequence.
Menu Bar
The sequence editor uses a common menu bar. Some menu items might
dim depending on the state of the sequence editor session and which
window is active. Refer to Chapter 4, Sequence Editor Menu Bar, for
information on the sequence editor main menu bar and menu items.
Toolbars
Toolbars and their icons give you quick access to commonly used menu
items. To find out what a toolbar button does, position the mouse cursor
over the button. A help description appears on the status bar of the main
window.
The sequence editor maintains three toolbars: the Standard, Debug, and
Environment toolbars. To configure which toolbars are visible, select
View»Toolbar or right click the toolbar area.
Status Bar
The status bar at the bottom of the sequence editor window displays the
current state of the editor or displays help information. The left portion of
the status bar displays help messages. When you select menu items or
toolbar icons, a short description appears for the selected item. Otherwise,
the status bar displays the current execution state, such as Edit or
Running.
The right portion of the status bar displays the current user and the process
model for the active sequence window. You can open the process model
sequence file in a new window by double-clicking on the model pathname
in the status bar.
© National Instruments Corporation
2-5
TestStand User Manual
Chapter 2
Sequence Editor Concepts
Sequence Editor Windows
This section describes all the windows in the sequence editor.
Sequence File Window
In the sequence editor, you use a Sequence File window to view and edit a
sequence file. Figure 2-2 shows an example Sequence File window. You
use the View ring control at the top right of the Sequence File window to
view an individual sequence, a list of all sequences in the file, the global
variables in the file, or the types you use in the file. In an individual
sequence view, you use the tabs to view the Main, Setup, or Cleanup step
groups, the sequence parameters, or the sequence local variables.
Figure 2-2. Example Sequence File Window
Refer to Chapter 5, Sequence Files, to learn more about editing a sequence
file using the Sequence File window.
Execution Window
The sequence editor displays each execution in a separate window, called
the Execution window. The Execution window is divided into several
areas. The top half of the window contains tabs that display the Steps view,
the Context view, and the Report view. The bottom half of the window is
divided into the Call Stack view and the Watch Expression view. A status
bar appears at the bottom edge of the window.
TestStand User Manual
2-6
ni.com
Chapter 2
Sequence Editor Concepts
Figure 2-3 shows an example of a sequence editor Execution window.
Figure 2-3. Example Execution Window
Refer to Chapter 6, Sequence Execution, to learn more about using the
Execution window to start and debug an execution.
Type Palette Window
You use the Type Palette window to store the data types and step types that
you want to be available to you in the sequence editor at all times. The Type
Palette window contains tabs for step types, custom data types, and
standard data types, as shown in Figure 2-4.
© National Instruments Corporation
2-7
TestStand User Manual
Chapter 2
Sequence Editor Concepts
Figure 2-4. Type Palette Window
Refer to Chapter 9, Types, to learn more about using data types and step
types.
Station Globals Window
The Station Globals window displays the variables that TestStand
maintains from one TestStand session to the next. Usually, you use station
global variables to maintain statistics or to represent the configuration of
your test station.
Figure 2-5 shows an example Station Globals window.
Figure 2-5. Example Station Globals Window
TestStand User Manual
2-8
ni.com
Chapter 2
Sequence Editor Concepts
Refer to Chapter 7, Station Global Variables, to learn more about using
station globals. Refer to Chapter 9, Types, to learn more about using data
types.
Workspace Window
The Workspace window displays the contents of a TestStand workspace
(.tsw) file. A workspace file displays a list of any number of TestStand
project (.tsp) files. In TestStand, a project file can contain any type of file
or folder but a workspace file can contain only projects.
Use TestStand projects to organize related files. You can insert any number
of files into a project. You also can insert folders to contain files or other
folders. Workspace files and project files do not contain the contents of
other files. Instead, they retain references to the files they organize.
The following icons appear in the Workspace window.
•
Project file.
•
Workspace file.
•
Sequence file.
•
Any file, other than a sequence file, within a project.
•
File is a code module or folder contains code modules.
•
File not found on disk.
•
File is currently checked into the source code control system.
•
File is currently checked out of the source code control system.
The Workspace window tree view enables you to browse all the files in the
workspace. The list view displays the contents of the item that you select in
the tree view. The message window in the bottom portion of the Workspace
window displays messages from the source control system you use. In
Figure 2-6, the tree view shows the sequence files in the MessagePopups
project.
© National Instruments Corporation
2-9
TestStand User Manual
Chapter 2
Sequence Editor Concepts
Figure 2-6. Workspace Window
You can open only one workspace file at a time. If you have a workspace
open and you try to open or create another, TestStand prompts you to save
the workspace file before you can open or create another file.
To open any file from within the Workspace window, double-click on the
file. For example, if you double click on a sequence file in the Workspace,
TestStand will open the file in the Sequence Editor.
To organize your files, use the commands in the Edit menu to cut, copy,
paste, and delete any file in the workspace. You also can drag and drop files
and projects within the workspace environment.
You can display a context menu by right-clicking in the Workspace
window. The items in the context menu vary depending on the location that
you click on in the window. The context menu can contain the following
items:
TestStand User Manual
•
Open—Opens the selected file. If you choose this command from the
context menu of a sequence file, TestStand opens the file in the
Sequence Editor.
•
Add Existing Project to Workspace—Adds an existing project to the
workspace.
2-10
ni.com
Chapter 2
Sequence Editor Concepts
•
Insert New Project into Workspace—Creates a new project on disk
and adds the project to the workspace.
•
Insert Code Modules— Adds code module files to the workspace.
Under each sequence file, TestStand creates a folder called Code
Modules that contains the code modules the sequence file calls. The
folder also includes any code module source files that the sequence file
references.
•
New Folder—Adds a new folder to the selected project or file.
•
Insert New Folder From Disk—Adds a folder from disk to the
selected project or file. After you select the folder, a dialog box asks
you if you want to add the files within the folder. Select Yes to insert
the folder you select and all of its contents such that the content of the
new folder in the Workspace matches the directory structure of the
folder on disk. Select No to insert the folder and its subfolders without
adding the files that the folders contain. When you select to add files,
code module files appear in code module folders beneath the sequence
files that reference them.
•
Add Files—Adds the files you choose from a dialog box to the
selected workspace item.
•
Add to Source Control—Adds the selected project or file to source
control.
•
Get Latest Version—Copies the latest version of the selected project
or file from source control to your local machine. Click the Advanced
Options button to display a dialog box that varies based on your source
code control provider.
•
Check Out—Checks the selected files out of source control and places
a writable copy of the files on your local machine. Click the Advanced
Options button to display a dialog box that varies based on your source
code control provider.
Before you make changes to a file, check the file out of source control. If, for a file
checked into source control, you make the local copy of the file writable and then make
changes, TestStand asks you if you want to reload the file when you try to check the file
out. If you reload the file, the version checked into source control overwrites the version
on your local machine and you lose the changes you have made to the local file.
Note
© National Instruments Corporation
2-11
TestStand User Manual
Chapter 2
Sequence Editor Concepts
•
Check In—Checks the selected file into source control.
–
•
Undo Check Out—Checks the selected file back into source control
and discards any changes you have made to the file. Click the
Advanced Options button to display a dialog box that varies based on
your source code control provider.
•
Show History—Shows the source code control history of the selected
file. The history gives you information about previous versions of the
file.
•
Show Differences—Shows the differences between the two files you
select to compare. For example, you might compare your local copy of
a file with the same file checked into source control. If you select to
compare sequence files and you have either Microsoft Visual
SourceSafe or MKS Source Integrity as your default provider, the
TestStand Differ shows the differences between the two sequence files.
If you have a provider other than Visual SourceSafe or MKS Source
Integrity, the diff utility for your provider presents the differences
between the two files in a new window. In this case, the source code
control provider diff window only allows you to diff the sequence files
as text files. Unless the files have only minor differences, it is not
practical to diff sequence files as text files. To diff the files as sequence
files, complete the following steps:
1.
To preserve your changes, make a copy of your local file.
2.
Undo checkout of your local file and recheck the file out to obtain
the latest changes from source control.
3.
Load the local file and the copy that contains your changes into the
sequence editor.
4.
Use the sequence editor diff window to merge the changes from
the copy into the local file you have checked out.
•
View Contents—Selects in the tree view the selected project, folder,
or file that you select in the list view. The list view then displays the
contents of the selected item.
•
Properties—Shows the properties of the selected file. This command
brings up a dialog box that can contain the following tabs:
–
TestStand User Manual
Keep Checked Out—Checks the latest file changes into source
control while keeping the file checked out to your local machine
so you can continue to edit it.
General—Displays the path name of the file, the date the file was
last modified, and the source code control status of the file.
2-12
ni.com
Chapter 2
–
Sequence Editor Concepts
Source Control—This tab appears for workspace and project
items only. Use this tab to change the source control project and
launch the source control system. Click the Advanced Options
button to display a dialog box that varies based on your source
code control provider. For a workspace item, this tab also enables
you to change and connect to a source control provider and to
change the source control user name.
•
Rename—Allows you to change the name the Workspace window
displays for the selected project or folder.
•
Clear Messages—Clears the messages in the Message window.
•
Hide Messages Window—Hides the Message window.
•
Remove from Source Control—Removes the selected project or file
from source control. You can only access this option from the Source
Control menu in the sequence editor.
Some source code control providers delete the local machine copy of the files you
remove from source control using this command.
Note
•
Refresh All—Refreshes the source code control status of all files in
the workspace and verifies that the files exist on disk.
•
Provider Options—Allows you to view and set options for your
source code control system.
•
Run—Launches your source code control provider. You can access
this option by selecting Source Control»Run or by right-clicking in
the workspace and selecting Properties from the context menu.
•
Load/Unload—Loads or unloads workspace files. You can only
access this option from the Workspace Browser in an operator
interface.
•
Show SCC Messages—Displays messages from the source control
system. You can only access this option from the Workspace Browser
in an operator interface.
© National Instruments Corporation
2-13
TestStand User Manual
Chapter 2
Sequence Editor Concepts
Users Window
You use the Users window to view and change the user list, user privileges,
and the profiles for adding new users, as shown in Figure 2-6.
Figure 2-7. Users Window
Refer to the User Manager Window section in Chapter 12, User
Management, to learn more about adding users and changing user
privileges.
Basic Tasks in TestStand
This section describes how to perform some basic tasks in TestStand.
Creating a Sequence
In the sequence editor, you use a Sequence File window to view and edit
a sequence file. You can open an existing sequence file by selecting
File»Open, or you can create a new Sequence File window by selecting
File»New.
You use the View ring control at the top right of the Sequence File window
to view an individual sequence, a list of all sequences in the file, the global
variables in the file, or the types that you use in the file. In an individual
sequence view, you use the tabs to view the Main, Setup, or Cleanup step
groups, the sequence parameters, or the sequence local variables.
Figure 2-8 shows the Main step group of an example sequence in the
Sequence File window.
TestStand User Manual
2-14
ni.com
Chapter 2
Sequence Editor Concepts
Figure 2-8. Main Step Group in an Example Sequence
To insert steps in the Main, Setup, and Cleanup tabs of an individual
sequence view, right click and use the context menu that appears. The
Insert Step item in the context menu displays a submenu of all the step
types, including the step types that come with TestStand and any custom
step types that you create. Each step in a sequence has a step type. The step
type defines the custom step properties and standard behavior for each step
of that type.
Figure 2-9 shows the submenu for the Insert Step item.
Figure 2-9. Insert Step Submenu
© National Instruments Corporation
2-15
TestStand User Manual
Chapter 2
Sequence Editor Concepts
An icon appears to the left of each step type in the submenu. When you
select a step type, TestStand displays the same icon next to the name of the
new step in the list view. Many step types, such as the Pass/Fail Test and
Action step types, can work with any module adapter. For these step types,
the icon that appears in the submenu is the same as the icon for the module
adapter that you select in the ring control on the tool bar. In Figure 2-9, the
LabVIEW Standard Prototype Adapter is the current adapter, and its icon
appears next to several step types, including Pass/Fail Test and Action. If
you select one of these step types, TestStand uses the LabVIEW Standard
Prototype Adapter for the new step.
Some step types require a particular module adapter and always use the
icon for that adapter. For example, the Sequence Call step type always uses
the Sequence Adapter icon. Other step types, such as Statement and Goto,
do not use module adapters and have their own icons.
When you select an entry in the submenu, TestStand creates a step using the
step type and module adapter that the submenu entry indicates. After you
insert the step, you use the Specify Module item in the context menu for
the step to specify the code module or sequence, if any, that the step calls.
The Specify Module command displays a dialog box that is different for
each adapter. Some adapters require you to specify the values to pass as
arguments when executing the code module. Refer to Chapter 13, Module
Adapters, for information on the Specify Module dialog box for each
adapter.
For each step type, other items can appear in the context menu above
Specify Module. For example, the Edit Limits item appears in the context
menu for Numeric Limit Test steps, and the Edit Destination item appears
in the context menu for Goto steps. You use these menu items to modify
step properties that are specific to the step type. Refer to Chapter 10,
Built-In Step Types, for information on the menu item for each step type.
To modify step properties that are common to all step types, use the
Properties command in the context menu, double-click the step, or press
<Enter> when the step is selected.
TestStand User Manual
2-16
ni.com
Chapter 2
Sequence Editor Concepts
Figure 2-10 shows the Step Properties dialog box.
Figure 2-10. Step Properties Dialog Box
The Step Properties dialog box contains the following tabs:
•
General—Contains buttons to display the Specify Module dialog box,
the step-type-specific dialog box and the Preconditions dialog box.
•
Run Options—Specifies various options for loading and running the
step code module.
•
Post Actions—Specifies what action to take when the step finishes
executing.
•
Loop Options—Specifies whether TestStand loops on the step.
TestStand can loop a fixed number of times or loop until a specified
number of iterations pass or fail. You also can customize the loop
conditions.
© National Instruments Corporation
2-17
TestStand User Manual
Chapter 2
Sequence Editor Concepts
•
Synchronization—Specifies when TestStand should postpone
execution of this step or other steps to synchronize the execution of
multiple steps. You also can use the synchronization step types to
perform more advanced types of synchronization. Refer to Chapter 11,
Synchronization Step Types, for more information on the
synchronization step types.
•
Expressions—Specifies expressions that TestStand executes before
and after the step executes.
Refer to Chapter 5, Sequence Files, for more information on sequence files
and adding steps to sequences.
Controlling Sequence Flow
TestStand has several features you can use to control the flow of execution
in a sequence. These include the post actions for a step, the preconditions
for a step, and the Goto step type. You can combine these features in
various ways. For example, you can use the preconditions on a Goto step
to specify when to loop back to an earlier statement.
Every step in TestStand has a status property. The status property is a string
that indicates the result of the step execution. Although TestStand imposes
no restrictions on the values to which the step or its code module can set the
status property upon completion, TestStand recognizes the values that
appear in Table 2-2.
Table 2-2. Standard Values for the Status Property after Execution Completes
Value
Meaning
Passed
Indicates that the step performed a test that passed.
Failed
Indicates that the step performed a test that failed.
Error
Indicates that a run-time error occurred.
Done
Indicates that the step completed without setting its
status.
Terminated
Indicates that the step called a subsequence that
terminated.
Skipped
Indicates that the step did not execute.
The preconditions and post actions you define can use the step status to
control the flow of execution.
TestStand User Manual
2-18
ni.com
Chapter 2
Sequence Editor Concepts
Preconditions
The preconditions for a step specify the conditions that must be true for
TestStand to execute the step during the normal flow of execution in a
sequence. You access the Preconditions dialog box by clicking the
Preconditions button on the Sequence Properties dialog box or by clicking
the Preconditions button on the Step Properties dialog box.
Figure 2-11 shows the Preconditions dialog box.
Figure 2-11. Preconditions Dialog Box
You can use a simple step status comparison as a condition. For example,
you might want to execute a step only when the Power On test passes. The
Preconditions dialog box has special controls to make this easy. You also
can specify an arbitrary expression that TestStand evaluates at run time.
For example, you might want to execute the Keyboard test only when the
Locals.KeyboardInstalled variable is True. You also can create
complex preconditions by grouping conditions with the All Of and the
© National Instruments Corporation
2-19
TestStand User Manual
Chapter 2
Sequence Editor Concepts
Any Of operators. The All Of operator evaluates to True when all
conditions in its group are True. The Any Of operator evaluates to True
when at least one condition in its group is True. All Of is analogous to
logical AND while Any Of is analogous to logical OR.
Refer to the section Preconditions Dialog Box in Chapter 5, Sequence
Files, for more information on how to use preconditions.
Post Action
You use the Post Actions tab in the Step Properties dialog box to specify
an action that occurs after the step executes. You can make the action
conditional on the Pass/Fail status of the step or on any custom condition.
Your choices of actions include:
•
Goto next step—Execution continues normally with the next step.
This is the default value.
•
Goto destination—Execution branches to the destination you select.
You can branch to any step in the current step group, to the end of the
current step group, or to the Cleanup step group. If the post action for
a step specifies that execution branches to the Cleanup step group and
the current step is in the Cleanup step group, execution proceeds
normally with the next step in the Cleanup group.
•
Terminate execution—Execution terminates. Refer to the
Terminating and Aborting Executions section in Chapter 1, TestStand
Architecture Overview, for more information on execution
termination.
•
Call sequence—TestStand calls a sequence before continuing to the
next step. You can select any sequence in the sequence file. TestStand
does not pass any arguments to the sequence. If the sequence has
parameters, TestStand uses the default values of the parameters.
•
Break—TestStand suspends execution before continuing to the
next step.
Refer to the Step Properties Dialog Box section in Chapter 5, Sequence
Files, for more information on the Post Action tab of the Step Properties
dialog box.
Goto Built-In Step Type
You use Goto steps to set the next step that the TestStand engine executes.
You usually use a Label step as the target of a Goto step. This lets you
rearrange or delete steps in a sequence without having to change the target
names in Goto steps. You specify the Goto step target by selecting the Edit
TestStand User Manual
2-20
ni.com
Chapter 2
Sequence Editor Concepts
Destination item from the step context menu or the Edit Destination
button on the Step Properties dialog box.
Refer to the Goto section in Chapter 10, Built-In Step Types, for more
information on how to use the Goto step type.
Run-Time Errors
When a run-time error occurs in a step, execution in the sequence jumps to
the Cleanup step group. After the Cleanup step group completes executing,
TestStand reports the run-time error to the sequence call step in the calling
sequence. This process continues up through the top-level sequence. Thus,
when a run-time error occurs, TestStand terminates execution after running
all the Cleanup steps of the sequences that are active at the time of the
run-time error.
Running a Sequence
You can initiate an execution by launching a sequence through a model
entry point, by launching a sequence directly, or by executing a group of
steps interactively.
A list of entry points appears in the Execute menu of the sequence editor
and operator interfaces. Each entry point in the menu represents a separate
entry point sequence in the process model that applies to the active
sequence file. When you select an entry point from the Execute menu, you
actually run an entry point sequence in a process model file. The entry point
sequence, in turn, invokes the main sequence in the active sequence file.
The default TestStand process model provides two execution entry points:
Test UUTs and Single Pass. The Test UUTs entry point initiates a loop
that repeatedly identifies and tests UUTs. The Single Pass entry point
tests a single UUT without identifying it.
To execute a sequence without using a process model, select the Run
Sequence Name item in the Execute menu, where Sequence Name is the
name of the sequence you are currently viewing. This command executes
the sequence directly, skipping the process model operations such as UUT
identification and test report generation. You can execute any sequence this
way, not only main sequences. Usually, you execute a sequence in this way
to perform unit testing or debugging.
You can execute selected steps in a sequence interactively by choosing
Run Selected Steps or Loop Selected Steps from the context menu in the
sequence editor or by clicking the Run Tests or Loop Tests buttons in the
run-time operator interfaces. When you run steps interactively, TestStand
© National Instruments Corporation
2-21
TestStand User Manual
Chapter 2
Sequence Editor Concepts
does not evaluate step preconditions. If you execute steps in a Sequence
File window, you initiate the interactive execution as an independent,
top-level execution. If you execute steps in an Execution window when
the execution is suspended, you initiate a nested interactive execution.
When you start a new execution, the sequence editor creates a new
Execution window. Run-time operator interface programs update a view
or create a new window for each new execution.
Refer to Chapter 14, Process Models, for more information on process
models. Refer to Chapter 6, Sequence Execution, for more information on
starting executions.
Debugging a Sequence
TestStand has several features you can use to debug a sequence. These
include tracing, breakpoints, single-stepping, the sequence context
browser, and watch expressions.
If tracing is enabled, the sequence editor and operator interfaces display the
progress of an execution by highlighting the currently executing step in a
step view. Usually, you disable tracing if you want to avoid using computer
time to display the progress of your execution. You use the Tracing
Enabled item in the Execute menu to enable or disable tracing. You set
tracing options on the Execution tab in the Station Options dialog box.
Refer to the Configure Menu and Execute Menu sections in Chapter 4,
Sequence Editor Menu Bar, for more information on the tracing options.
The sequence editor and operator interfaces allow you to set breakpoints,
to step into or step over steps, to step out of sequences, and to set the next
step to execute. You also can terminate execution, abort execution, and run
or loop on selected steps while at a breakpoint. In the sequence editor, these
commands appear in the Debug menu. Refer to the Debug Menu section in
Chapter 4, Sequence Editor Menu Bar, for more information on debugging
commands.
When using the sequence editor, you can display the variables and
properties during an execution by selecting the Context view of the
Execution window. The Context view displays the sequence context for
the sequence invocation that is currently selected in the call stack. The
sequence context contains all the variables and properties that the steps in
the selected sequence invocation can access. You use the Context view to
examine and modify the values of these variables and properties.
TestStand User Manual
2-22
ni.com
Chapter 2
Sequence Editor Concepts
You can drag individual variables or properties from the Context view to the
Watch Expression view so that you can view changes in specific values
while you single-step or trace through the sequence.
Refer to Chapter 8, Sequence Context and Expressions, for more
information on sequence contexts. Refer to Chapter 6, Sequence Execution,
for more information on running and debugging an execution.
Generating Test Reports
TestStand automatically collects the results of an execution. As each step
executes, TestStand appends the results from the step to a tree of results for
an entire execution. When an execution completes, the default process
model can generate a report from the information stored in the result tree.
By default, an execution generates a report only when you start the
execution through a model entry point such as Test UUTs or Single
Pass.
To set options that control report generation, select the Report Options
item in the Configure menu. You can select either HTML or ASCII text
formats. You can specify the report file name and whether TestStand
generates the file name from the sequence file name, the time and date, or
the UUT serial number. You can specify a result-filtering expression. For
example, you can choose to include results only for steps that fail during an
execution. You can specify whether TestStand appends results to the file if
a file already exists. You also can specify whether the report includes
measurement values, test limits, and execution times.
The Report view of the sequence editor Execution window displays the
report for the current execution. Usually, the Report view is empty until
execution completes. You also can use an external application to view
reports by selecting View»Launch External Viewer. You can use
Configure»External Viewers to specify the external application that
TestStand launches to display a particular report format.
© National Instruments Corporation
2-23
TestStand User Manual
Chapter 2
Sequence Editor Concepts
Figure 2-12 shows an HTML report for an example sequence.
Figure 2-12. HTML Report for an Example Sequence
Refer to the Result Collection section in Chapter 6, Sequence Execution,
for more information on how TestStand collects results. Refer to
Chapter 15, Managing Reports, for more information on available report
options and customizing the report output.
TestStand User Manual
2-24
ni.com
Chapter 2
Sequence Editor Concepts
Using an Operator Interface
Although you can use the TestStand sequence editor on a production
station, the TestStand run-time operator interfaces are simpler. Also, they
come with full source code so that you can customize them. Like the
sequence editor, the run-time operator interfaces allow you to start
multiple, concurrent executions, set breakpoints, and single-step. Refer to
Chapter 16, Run-Time Operator Interfaces, in this document for more
information on the operator interfaces included with TestStand.
© National Instruments Corporation
2-25
TestStand User Manual
3
Configuring and
Customizing TestStand
This chapter describes how to configure and customize a TestStand station.
Configuring TestStand
This section outlines the configuration options in TestStand.
Sequence Editor Startup Options
You can append certain options to the sequence editor command line,
separating various parameters by spaces. The valid startup options for the
sequence editor appear in Table 3-1.
Table 3-1. Sequence Editor Startup Options
Option
Purpose
filename1 {filename2}…
The sequence editor automatically loads the sequence files at startup.
Example:
SeqEdit "c:\MySeqs\seq1.seq" "c:\MySeqs\seq2.seq"
The sequence editor, LabWindows/CVI operator interface, Visual Basic
operator interface, and Delphi operator interface support command-line
options to open and run sequences.
You can open sequence files from the command line as shown below:
testexec.exe c:\sequencefiles\asequencefiletoopen.seq
c:\sequencefiles\anothersequencefiletoopen.seq
The following are examples that show how to run a particular sequence in
a sequence file and how to run an execution entry point, such as TestUUTs:
testexec.exe -run MainSequence
c:\sequenceFiles\Asequencefiletorun.seq
testexec.exe -runEntryPoint "Test UUTs"
c:\sequenceFiles\Asequencefiletorun.seq
© National Instruments Corporation
3-1
TestStand User Manual
Chapter 3
Configuring and Customizing TestStand
Notice that quotes are necessary since there is a space in the argument
"Test UUTs".
The LabVIEW operator interface does not support command-line options.
Configure Menu
The Configure menu in the sequence editor and in the operator interfaces
contains commands that control the operation of the TestStand station. This
section gives a brief overview of the items in the Configure menu. Refer
to the Configure Menu section in Chapter 4, Sequence Editor Menu Bar,
for more information on each menu item.
You can use the Station Options command to set preferences for your
TestStand station. The settings affect all sequence editor and operator
interface sessions that you run on your computer. The command displays a
dialog box with the following tabs.
•
Execution—Contains options for breakpoints, tracing, and interactive
execution.
•
Time Limits—Specifies time limits for executions. If you specify a
time limit, you choose an action to take when a time limit expires.
•
Preferences—Specifies general options for the TestStand station, such
as the name of the test station.
•
Model—Specifies the process model file for the station as a whole and
whether each individual sequence may specify its own process model
file.
•
User Manager—Specifies whether TestStand enforces user
privileges. It also specifies the location of the user manager
configuration file.
•
Localization—Specifies the language in which to display text and
other region specific settings.
•
Remote Execution—Specifies whether remote test stations may run
sequences on this test station.
•
Source Control—Specifies general options that apply to source
control operations in TestStand.
The Search Directories command lets you customize the search paths for
finding files. The dialog box displays a list of paths. The paths that appear
first in the list take precedence over the paths that appear later. When you
first run TestStand, the list contains a default set of directory paths.
TestStand User Manual
3-2
ni.com
Chapter 3
Configuring and Customizing TestStand
The External Viewers command displays a dialog box in which you can
specify the external viewer to use for each report format.
The Adapters command displays a dialog box in which you can configure
a specific module adapter or specify the active module adapter. Refer to the
Configuring Adapters section in Chapter 13, Module Adapters, for more
information.
The Report Options command displays a dialog box in which you can
customize the generation of report files. Refer to Chapter 14, Process
Models, for more information on available report options.
The Database Options command displays a dialog box in which you
customize the logging of test result data. Refer to Chapter 18, Databases,
for more information on available database logging options.
The Model Options command displays a dialog box in which you specify
process model specific options such as the number of test sockets in the
system. Currently, this command is not available when you use the
sequential model.
Customizing TestStand
This section outlines methods that you can use to customize a TestStand
station.
TestStand Directory Structure
The TestStand installation program installs the TestStand engine, the
sequence editor, the module adapters, and additional components on your
system. Table 3-2 shows the names and contents of each subdirectory of
the TestStand installation.
Table 3-2. TestStand Subdirectories
Directory Name
Contents
AdapterSupport
Support files for certain Adapters.
Api
Header files and additional utility functions for using the TestStand
API in Visual C++, LabWindows/CVI, and other programming
environments.
Bin
TestStand sequence editor executable, engine DLLs, and support files.
Cfg
Configuration files for TestStand engine and sequence editor options.
© National Instruments Corporation
3-3
TestStand User Manual
Chapter 3
Configuring and Customizing TestStand
Table 3-2. TestStand Subdirectories (Continued)
Directory Name
Contents
CodeTemplates
Source code templates for step types. This directory contains an NI
and a User subdirectory.
Components
Components that come with TestStand and components that you
develop. These components include callback files, converters, icons,
language files, process model files, step type support files, and utility
files. This directory contains an NI and a User subdirectory.
Doc
Documentation files.
Examples
Example sequences and tests.
OperatorInterfaces
LabVIEW, LabWindows/CVI, Visual Basic, and Delphi operator
interfaces with source code. This directory contains an NI and a User
subdirectory.
Setup
TestStand Installer/Uninstaller.
Tutorial
Sequences and code modules that you use in the tutorial sessions in the
Getting Started with TestStand manual.
NI and User Subdirectories
Three of the TestStand directories contain source files that you might
want to modify or replace. They are the OperatorInterfaces,
CodeTemplates, and Components directories. Each directory contains
an NI and a User subdirectory.
TestStand installs its files into the NI subdirectory. If you modify these files
directly, the installers for newer versions of TestStand might overwrite your
customizations. Consequently, it is best to keep the files you create or
modify separate from the files that TestStand installs.
For this purpose, the TestStand installer creates a User subdirectory tree for
you. Not only do you use the User subdirectory to protect your customized
components, you use it as the staging area for the components that you
include in your own run-time distribution of TestStand.
The Components Directory
TestStand installs the sequences, executables, project files, and source files
for TestStand components in the <TestStand>\Components\NI
directory. Most of the subdirectories in the <TestStand>\
Components\NI directory have the name of a type of TestStand
TestStand User Manual
3-4
ni.com
Chapter 3
Configuring and Customizing TestStand
component. For example, the <TestStand>\Components\
NI\StepTypes subdirectory contains support files for the TestStand
built-in step types.
In general, if you want to create a new component or customize a TestStand
component, copy the component files from the NI subdirectory to the User
subdirectory before customizing. This ensures that the installers for newer
versions of TestStand do not overwrite your customizations. If you copy the
component files as the basis for creating a new component, ensure that you
rename the files so that your customizations do not conflict with the default
TestStand components.
The TestStand engine searches for sequences and code modules using
the TestStand search directory path. The default search precedence
places the <TestStand>\Components\User directory tree before the
<TestStand>\Components\NI directory tree. This ensures that
TestStand loads the sequences and code modules that you customize
instead of loading the default TestStand versions of the files. To modify the
precedence of the TestStand search directory paths, use Configure»Search
Directories menu of the sequence editor menu bar.
When you distribute a run-time version of the TestStand engine, you can
bundle your components in the User directory with the TestStand run-time
distribution. Refer to Chapter 17, Distributing TestStand, for more
information on how to distribute the TestStand engine and your custom
components.
Table 3-3 lists each subdirectory in the NI and User directory trees in
<TestStand>\Components.
Table 3-3. TestStand Component Subdirectories
Directory Name
Contents
Callbacks
The Callbacks directory contains the sequence files in which
TestStand stores station engine callbacks and front-end callbacks.
TestStand installs the station engine and front-end callback files into the
<TestStand>\Components\NI\Callbacks directory tree. Refer to
Customizing the Engine and Front-End Callbacks section in this chapter
for more information on customizing the station and front-end callbacks.
Icons
The Icons directory contains icon files for module adapters and step
types. TestStand installs the icon files for module adapters and built-in
step types into the <TestStand>\Components\NI\Icons directory.
Refer to the Creating Step Types section in this chapter for more
information on creating your own icons for your custom step types.
© National Instruments Corporation
3-5
TestStand User Manual
Chapter 3
Configuring and Customizing TestStand
Table 3-3. TestStand Component Subdirectories (Continued)
Directory Name
Contents
Language
The Language directory contains string resource files. It has one
subdirectory per language, for example, English. Refer to the Creating
String Resource Files section in this chapter for more information on
creating resource string files in the Language directory tree.
Models
The Models directory contains the default process model sequence files
and supporting code modules. Refer to the Modifying the Process Model
section in this chapter for more information on customizing the process
model.
RuntimeServers
The RuntimeServers directory contains a LabVIEW run-time
application for executing LabVIEW code modules. Refer to the
Customizing and Distributing a LabVIEW Run-Time Server section in
Chapter 17, Distributing TestStand, for more information on using
LabVIEW run-time servers.
StepTypes
The StepTypes directory contains support files for step types.
TestStand installs the support files for the built-in step types into the
<TestStand>\Components\NI\StepTypes directory tree. Refer to
the Creating Step Types section in this chapter for more information on
customizing your own step types.
Tools
The Tools directory contains sequences and supporting files for the
Tools menu commands. Refer to the Using the Tools Menu section in
this chapter for more information on customizing the Tools menu.
Creating String Resource Files
TestStand uses the GetResourceString function to obtain the string
messages that it displays on windows and dialog boxes in the sequence
editor and operator interfaces. GetResourceString works with string
resource files that are in a .ini style format. GetResourceString takes
a string category and a tag name as arguments. GetResourceString
searches for the string resource in all string resource files that are in a
predefined set of directories.
The directory search order is as follows:
TestStand User Manual
1.
<TestStand>\Components\User\Language\<current
language>
2.
<TestStand>\Components\User\Language
3.
<TestStand>\Components\NI\Language\<current
language>
3-6
ni.com
Chapter 3
Configuring and Customizing TestStand
4.
<TestStand>\Components\NI\Language\English
5.
<TestStand>\Components\NI\Language
To change the current language setting, select Configure»Station Options.
TestStand installs the default resource string files in the
<TestStand>\Components\NI\Language directory tree. If you want
to customize a resource string file for a different language, you must copy
an existing language file from the NI directory tree, place it in the User
directory tree in a language subdirectory, and modify it. If you want to
create a resource string file that applies to all languages, place the resource
file in the base <TestStand>\Components\User\Language directory.
If you want to create your own resource string file for your custom
components, ensure that the category names inside the resource file are
unique so that they do not conflict with any names that TestStand uses.
The TestStand engine loads resource files when you start the TestStand application.
If you make changes to the resource files, you need to restart the TestStand application for
the changes to take effect.
Note
Resource String File Format
Each string resource file must have the .ini file extension. The format of
a string resource file is as follows:
[category1]
tag1 = "string value 1"
tag2 = "string value 2"
[category2]
tag1 = "string value 1"
tag2 = "string value 2"
When you create new entries in a string resource file, begin your category name with
a unique ID such as a company prefix. Using a unique ID will prevent name collision. For
example, NI_SUBSTEPS uses NI as a unique ID.
Note
When you specify custom resource strings, you create the category and
tag names. The number of categories and tags is unlimited.
A string can be of unlimited size. If a string has more than 512 characters,
you must break it into multiple lines. Each line has a tag suffix of
© National Instruments Corporation
3-7
TestStand User Manual
Chapter 3
Configuring and Customizing TestStand
lineNNNN, where NNNN is the line number with zero padding. The
following is an example of a multiple-line string:
[category1]
tag1 line0001 = "This is the first line of a very long"
tag1 line0002 = "paragraph. This is the second line"
You can use escape codes to insert unprintable characters. Table 3-4 lists
the escape codes you can use.
Table 3-4. Resource String File Escape Codes
Escape Code
Description
\n
Linefeed character.
\r
Carriage return character.
\t
Tab character.
\xnn
Hexadecimal value. For example, \x1B represents
the ASCII ESC character, which has a decimal
value of 27.
\\
Backslash character.
The following string shows how to use \n, the embedded linefeed
character:
tag1 = "This is line one.\nThis is line two"
Using Data Types
You can use data types to define station globals, sequence file globals,
sequence locals, or properties of steps and step types. You can create and
modify your own data types in TestStand. You also can modify the
TestStand standard named data types by adding subproperties to them.
Refer to the Creating and Modifying Data Types and Using the Standard
Named Data Types sections in Chapter 9, Types, for more information.
Creating Step Types
If you want to change or enhance a TestStand built-in step type, do not edit
the built-in step type or any of its supporting source code modules. Instead,
copy and rename the built-in step type in the sequence editor. Also, copy
its supporting modules from the <TestStand>\Components\NI\
StepTypes directory tree to <TestStand>\Components\User\
StepTypes directory. Make the changes to the copies. This practice
TestStand User Manual
3-8
ni.com
Chapter 3
Configuring and Customizing TestStand
ensures that a newer installation of TestStand does not overwrite your
customizations. Refer to the Using Step Types section in Chapter 9, Types,
for more information on step types and how you use them.
When you create a new step type, you can designate a specific icon to
associate with that step type. The TestStand engine loads all available icons
when you start the engine, so you must restart the sequence editor before
you can associate a new icon with a step type. The <TestStand>\
Components\NI\Icons directory contains icon files for the TestStand
engine, the module adapters, and the built-in step types. If you want to
override the <TestStand>\Components\NI icons or load icons for
your <TestStand>\Components\User\Icons directory and restart the
engine. The TestStand engine loads all icons from the <TestStand>\
Components\User\Icons and <TestStand>\Components\
NI\Icons directories. If an icon of the same name exists in both
directories, the TestStand engine uses the one from the
<TestStand>\Components\User\Icons directory. The TestStand
engine does not search for icon files in any other directories.
When you create new step types, begin your type with a unique ID such as a
company prefix. Using a unique ID will prevent name collision. For example,
NI_PropertyLoader uses NI as a unique ID.
Note
Using the Tools Menu
The <TestStand>\Components\NI\Tools directory contains
sequences and supporting files for the default TestStand Tools menu
commands. The tools include a documentation generator, converters for
LabVIEW and LabWindows/CVI Test Executive toolkit sequences, and a
database viewer application.
If you want to create your own Tools menu commands, place any
supporting code modules in the <TestStand>\Components\User\
Tools directory tree. If you want to change or enhance a TestStand Tools
menu command, do not edit the supporting source code modules. Instead,
copy the files to <TestStand>\Components\User\Tools directory
tree, and make the changes to this copy. This practice ensures that a newer
installation of TestStand does not overwrite your customizations.
Refer to the Tools Menu section in Chapter 4, Sequence Editor Menu Bar,
for more information on how to add your own commands to the
Tools menu.
Refer to Chapter 17, Distributing TestStand, for more information on
distributing a custom Tools menu with the run-time version of TestStand.
© National Instruments Corporation
3-9
TestStand User Manual
Chapter 3
Configuring and Customizing TestStand
Customizing the Engine and Front-End Callbacks
The <TestStand>\Components\NI\Callbacks directory tree contains
sequences and supporting files for the default TestStand front-end and
station engine callbacks. TestStand installs the station engine callbacks in
the Station subdirectory and the front-end callbacks in the FrontEnd
subdirectory.
You can replace these callbacks individually. To do so, you must create a
callback file in the <TestStand>\Components\User\Callbacks
directory tree that has same name and relative location as the NI directory
copy. For example, the FrontEndCallbacks.seq in the
<TestStand>\NI\Callbacks\FrontEnd directory contains the default
LoginLogout callback. To override LoginLogout, create a
LoginLogout sequence in a new version of FrontEndCallbacks.seq
in the <TestStand>\User\Callbacks\FrontEnd directory. TestStand
then loads the LoginLogout sequence from the User directory instead of
from the NI directory.
Refer to the Callback Sequences section in Chapter 1, TestStand
Architecture Overview, for an overview of the different categories of
callbacks. Refer to the Engine Callbacks section in Chapter 6, Sequence
Execution, for more information on engine callbacks.
Note You must not define a SequenceFileUnload callback in the
FrontEndCallback.seq or StationCallbacks.seq sequence files. If you
make this error, TestStand hangs when you shut down the TestStand engine.
Modifying the Process Model
TestStand installs the process model sequence files, Sequential
Model.seq, ParallelModel.seq, and BatchModel.seq, and their
supporting files into the <TestStand>\Components\NI\Models\
TestStandModels directory.
If you want to change or enhance the process model files, copy the entire
contents of the <TestStand>\Components\NI\Models\
TestStandModels directory to <TestStand>\Components\User\
Models and make the changes to the copies. This practice ensures that a
newer installation of TestStand does not overwrite your customizations.
For example, if you want to change the HTML report output for all
sequences, copy the reportgen_html.seq from the NI directory tree to
the User directory tree and make changes to the copy.
TestStand User Manual
3-10
ni.com
Chapter 3
Configuring and Customizing TestStand
Refer to Chapter 14, Process Models, for more information on the default
process model.
Refer to Chapter 15, Managing Reports, for more information on
customizing the reports that TestStand generates.
Using Process Model Callbacks
Model callbacks allow you to customize the behavior of a process model
for each main sequence that uses it. By defining one or more model
callbacks in a process model, you specify which process model operations
the sequence developer can customize. You can override the callback in the
model sequence file by using the Sequence File Callbacks dialog box to
create a sequence of the same name in the client sequence file.
Refer to the Process Models section in Chapter 1, TestStand Architecture
Overview, for an overview of process models and model callbacks. Refer
to Chapter 14, Process Models, for more information on the default process
model and its callbacks.
Creating Code Templates
When you create step types, you can associate one or more code templates
with the step type. Each code template has a name. TestStand installs its
code templates in the <TestStand>\CodeTemplates\NI directory tree,
where each subdirectory name is the name of a code template. Each code
template has different source code files for each module adapter. TestStand
stores the source files for the different module adapters in the template
subdirectory. TestStand also maintains a .ini file in each template
subdirectory. The .ini file contains a description string that TestStand
uses for the code template. TestStand installs a default template in the
Default_Template subdirectory.
Refer to the Code Templates Tab section in Chapter 9, Types, for more
information on using and creating your own code templates.
© National Instruments Corporation
3-11
TestStand User Manual
Chapter 3
Configuring and Customizing TestStand
Modifying Run-Time Operator Interfaces
TestStand installs the executable, project, and source files for each run-time
operator interface in the <TestStand>\OperatorInterfaces\NI
directory tree. If you want to customize one of the run-time operator
interfaces, copy the operator interface project and source files from the
NI subdirectory to the <TestStand>\OperatorInterfaces\User
subdirectory before customizing. This practice ensures that a newer
installation of TestStand does not overwrite your customizations.
Refer to Chapter 16, Run-Time Operator Interfaces, for more information
on the operator interfaces that come with TestStand.
Adding Users and Managing User Privileges
To add users to the TestStand user list, select Configure»User Manager.
Refer to Chapter 12, User Management, for more information on adding
new users, changing user privileges, and adding new user privileges.
TestStand User Manual
3-12
ni.com
4
Sequence Editor Menu Bar
This chapter describes the menu items in the sequence editor menu bar.
Menus
The sequence editor menu bar contains commands that apply to the
entire test station. This section contains descriptions of the menu items
in the sequence editor menu bar. For some commands, the description
summarizes the features of the command and refers you to additional
information later in this document.
File Menu
This section describes the File menu shown in Figure 4-1.
Figure 4-1. File Menu
© National Instruments Corporation
4-1
TestStand User Manual
Chapter 4
Sequence Editor Menu Bar
Login
The Login command, which automatically executes when you open the
sequence editor, prompts you for a login name and password. If you click
the Cancel button, TestStand gives you no privileges. Use the Login
command to log in as a different user. Each user can have different
privilege settings, so logging in as a different user can change your
privileges. Refer to Chapter 12, User Management, for more information.
Logout
The Logout command logs out the current user and displays the Login
prompt.
New
Use the New command to create a new Sequence File window.
Open
Use the Open command to open an existing sequence file. When you select
Open, a dialog box appears prompting you to choose a file to load into a
new window.
Close
Use the Close command to close an existing window. When you select
Close, a dialog box might appear, prompting you to save any changes
before closing the window.
New Workspace
Use the New Workspace command to create a new workspace. Only one
workspace can be open at a time. If a workspace is already open, TestStand
closes it before creating a new workspace.
Open Workspace
Use the Open Workspace command to load an existing workspace file.
Only one workspace can be open at a time. If a workspace is already open,
TestStand closes it before opening a new workspace.
TestStand User Manual
4-2
ni.com
Chapter 4
Sequence Editor Menu Bar
Save
Use the Save command to write the contents of the active Sequence File
window to disk.
Save As
Use the Save As command to write the contents of the active Sequence File
window to disk using a new name that you enter. The title bar on the
Sequence File window displays the new name.
To save a sequence file in TestStand 1.0.x format, select File»Save As from
the sequence editor and select TestStand 1.0.x Sequence File from the Save
as Type control.
If your TestStand sequence file contains step types that are not present in previous
versions of TestStand or if it uses TestStand features that previous versions of TestStand do
not support, the sequence file you save in 1.0.x format will not function correctly. TestStand
does not warn you if the file you save cannot load or run in a previous version of TestStand.
Note
Save All
The Save All command saves all open files to disk, which includes
sequence files, globals, type palette, users, and configuration information.
Unload All Modules
The Unload All Modules command removes from memory all step code
modules, all code modules that substeps call, and all sequence files that are
not currently in a window. You can use this command only if no executions
are active. This command is useful when you want to rebuild a DLL after
an execution, but the DLL is still loaded in TestStand. The ADE that you
use to build the DLL cannot write out the new contents of the DLL until
TestStand unloads it.
Most Recently Opened Files
For your reference, a list of the most recently opened files appears in the
File menu.
Exit
Use the Exit command to close the current sequence editor session. If you
have modified any open files since the last save, or if any windows contain
unnamed files, the sequence editor prompts you to save them.
© National Instruments Corporation
4-3
TestStand User Manual
Chapter 4
Sequence Editor Menu Bar
Edit Menu
You use the items in the Edit menu for editing sequences and steps.
Figure 4-2 shows the Edit menu.
Figure 4-2. Edit Menu
Cut and Copy
The Cut and Copy commands place text or an object in the clipboard. The
Cut command removes the selected text or object and places it in the
clipboard. The Copy command copies the selected text or object and places
it in the clipboard, leaving the original in place.
The text or object that you cut or copy does not remain in the clipboard.
Every time you cut or copy text or an object, you replace the previous
contents of the clipboard.
Paste
The Paste command inserts text or an object from the clipboard. You can
paste text or an object from the clipboard as many times as you like. The
text or object that you paste remains in the clipboard until you use Cut or
Copy again.
Delete
The Delete command deletes selected text or object without replacing the
contents of the clipboard. Because Delete does not place the selected text
or object in the clipboard, you cannot use the Paste command to restore it.
TestStand User Manual
4-4
ni.com
Chapter 4
Sequence Editor Menu Bar
Select All
The Select All command highlights all the objects in the active window.
Diff Sequence File With
The Diff Sequence File With command enables you to select a sequence
file to compare with the selected sequence file. A Differences window
displays the differences between the two files. As you view the differences,
you can transfer individual changes between the files. You cannot compare
differences for a new sequence file until you save the file on disk.
Sequence Properties
The Sequence Properties command displays the properties for a selected
sequence in the active Sequence File window, as shown in Figure 4-3.
Refer to the Sequence View Context Menu section in Chapter 5, Sequence
Files, for more information.
Figure 4-3. Sequence Properties Dialog Box
© National Instruments Corporation
4-5
TestStand User Manual
Chapter 4
Sequence Editor Menu Bar
Sequence File Properties
The Sequence File Properties command displays the pathname, disk size,
and disk date of the active sequence file. You also can use it to edit various
properties of a sequence file, including the load and unload options, a
comment, and the sequence file type. If the sequence file type is normal,
you also can specify a process model file for the sequence file.
Figure 4-4 shows the Sequence File Properties dialog box.
Figure 4-4. Sequence File Properties Dialog Box
Refer to the Sequence View Context Menu section in Chapter 5, Sequence
Files, for more information on sequence file properties.
Sequence File Callbacks
The Sequence File Callbacks command displays a dialog box of all
callbacks that you can override in the sequence file. This includes the
Engine Callbacks that TestStand defines, and the Model Callbacks that
the process model for the sequence file defines.
TestStand User Manual
4-6
ni.com
Chapter 4
Sequence Editor Menu Bar
Figure 4-5 shows the Sequence File Callbacks dialog box.
Figure 4-5. Sequence File Callbacks Dialog Box
Refer to the Sequence View Context Menu section in Chapter 5, Sequence
Files, for more information on using the Sequence File Callbacks
dialog box.
View Menu
This section explains how to use the commands in the View menu.
Figure 4-6 shows the View menu.
Figure 4-6. View Menu
© National Instruments Corporation
4-7
TestStand User Manual
Chapter 4
Sequence Editor Menu Bar
Station Globals
The Station Globals command displays a window containing the station
global variables and the types they use, including built-in and custom data
types. For a detailed discussion of station globals, refer to Chapter 7,
Station Global Variables.
Type Palette
The Type Palette command displays a list of commonly used step types,
built-in data types, and custom data types. For a detailed discussion of the
types and the type palette, refer to Chapter 9, Types.
User Manager
The User Manager command displays a window for managing TestStand
users and their privileges. From this window you can add new users, update
user privileges, and change the types of privileges that users can have.
For a detailed discussion of user management, refer to Chapter 12, User
Management.
Workspace
The Workspace command displays a window for managing projects. You
can organize files into projects so that you are able to quickly open related
files. You also can use the Workspace window to check files and projects
in or out of various source code control systems. TestStand disables the
Workspace menu item when no workspace is loaded. For more information
on the workspace, refer to the Workspace Window section of Chapter 2,
Sequence Editor Concepts.
Paths
The Paths command lets you modify the directory portion of pathnames in
sequence files and station configuration files. This can be useful after you
copy a sequence file or configuration file from one computer to another.
Figure 4-7 shows the Edit Paths in Files dialog box.
TestStand User Manual
4-8
ni.com
Chapter 4
Sequence Editor Menu Bar
Figure 4-7. Edit Paths in Files Dialog Box
The list box contains the station configuration files and sequence files
currently in memory. For each of the sequence files in memory, the list box
shows the simple filename and the complete pathname. For each of the
station configuration files, the list box shows a symbolic tag and a
pathname. The following are the symbolic tags and purposes of the station
configuration files:
•
Engine Settings is the file in which TestStand stores the station
options.
•
Station Globals is the file in which TestStand stores that names
and values of the station global variables.
•
User Manager is the file in which TestStand stores the information
regarding the user manager.
To edit the paths in one of the files in the list box, double-click the file.
To edit paths in multiple files in the list box, select the files and click the
OK button. To edit the paths in a sequence file that is not in the list box,
use the Add Files to List button.
© National Instruments Corporation
4-9
TestStand User Manual
Chapter 4
Sequence Editor Menu Bar
When you select one or more files to edit, the Edit Paths dialog box appears.
Figure 4-8 shows the Edit Paths dialog box.
Figure 4-8. Edit Paths Dialog Box
Each entry in the list box of the Edit Paths dialog box represents a property
that has the Path data type. The list box contains many columns of
information for each entry. The Path column displays the current value of
the property. The current value can be a simple pathname, a relative
pathname, or an absolute pathname. The Status column displays Empty
when the current value of the property is an empty pathname. The Status
column displays Not found when TestStand cannot find the pathname on
disk. The File column displays the name of the file that contains the
property. The Sequence column displays the name of the sequence, if any,
that contains the property. The location column specifies that particular part
of the sequence that contains the property, for example, a step type or one
of the step groups. The Step column displays the name of the step or
substep, if any, that contains the property. The Property column displays the
name of the property.
The Full Path indicator in the bottom left corner of the dialog box shows
the absolute pathname to which TestStand can resolve the current value of
the selected path. TestStand searches for the file through the search paths
you enter using the Search Directories dialog box. If TestStand cannot find
the file, the Full Path indicator shows Not found.
TestStand User Manual
4-10
ni.com
Chapter 4
Sequence Editor Menu Bar
Use the Change button to browse on disk for the file to which you want the
path value to refer. If you find such a file, a dialog box prompts you to set
the path value to the absolute pathname or to save the directory path in the
list of search paths.
Use the Revert button to set the selected path to the value it had when you
opened the dialog box.
Use the Replace button to change a substring in one or more of the path
values. This is particularly useful for path values that are absolute
pathnames. For example, if several pathnames begin with c:\myfiles,
but the files are now in d:\testfiles, you can use the Replace button to
change all instances of c:\myfiles in the list to d:\testfiles.
© National Instruments Corporation
4-11
TestStand User Manual
Chapter 4
Sequence Editor Menu Bar
Find Type
The Find Type command displays a dialog box that contains a list of all
types currently in memory. TestStand generates the list of types from all
sequences currently in memory, the types that the user manager uses, the
types that station global variables use, and types in the Type Palette
window. To jump to the window that contains a type, double-click on the
type or select the type and then click the Goto button. Figure 4-9 shows the
Find Type dialog box.
Figure 4-9. Find Type Dialog Box
TestStand User Manual
4-12
ni.com
Chapter 4
Sequence Editor Menu Bar
Browse Sequence Context
The Browse Sequence Context command displays a tree view of variable
and property names, as shown in Figure 4-10. A sequence context is the
TestStand API object that contains the variables and properties that you can
access at a particular point during execution.
Figure 4-10. Browse Variables and Properties in Sequence Context Dialog Box
The tree view shows variables and properties that you can access in
expressions or in step modules. The set of variable and property names that
appears in the tree view depends on the active window and the currently
selected item.
For example, the Step base property name appears when you use Browse
Sequence Context on a step in the active sequence window. A text message
above the tree view describes the active window and selected item.
The variables and properties that you can access at run time differ
depending on the state of execution.
© National Instruments Corporation
4-13
TestStand User Manual
Chapter 4
Sequence Editor Menu Bar
In expressions you access the value of a variable or property by entering a
path from the sequence context to the particular variable or property. For
example, you can set the status of a step using the following expression:
Step.Result.Status = "Passed"
In step modules, you access the value of a variable or property by using
PropertyObject methods in the TestStand API on the sequence context.
As with expressions, you must specify a path from the sequence context to
the particular property or variable.
You can use the dialog box for the Browse Sequence Context command to
help you to build a string literal that specifies the path to a station variable,
sequence file variable, sequence local variable, sequence parameter, or step
property. Selecting Copy Variable Name copies the string literal to the
system clipboard, which you can then paste into an expression or into the
code for a step module.
Toolbars
The Toolbars command displays a list of available toolbars. Visible
toolbars have checkmarks beside them in the toolbar list.
Status Bar
Use the Status Bar command to specify whether the status bar is visible at
the bottom of the main window. When the status bar is visible, a checkmark
appears beside this command in the menu.
Launch Report Viewer
Use the Launch Report Viewer command to display the report for the
current Execution window in the external viewer associated with the report
format. This option is available only when an Execution window is active
and the execution is complete.
TestStand User Manual
4-14
ni.com
Chapter 4
Sequence Editor Menu Bar
Execute Menu
This section explains how to use the commands in the Execute menu
shown in Figure 4-11.
Figure 4-11. Execute Menu
Execution Entry Point List
Model execution entry points appear at the top of the Execute menu. For
example, the default TestStand process model provides two entry points:
Test UUTs and Single Pass. When you select a model entry point you
invoke an execution using the active sequence. Refer to the Starting an
Execution section in Chapter 6, Sequence Execution, for more information
on using execution entry points to start an execution.
Run Active Sequence
Use the Run Active Sequence command to initiate an execution of the
active sequence without using a process model.
Restart
Use the Restart command to rerun a completed execution. This option is
available only when an Execution window is active and the execution is
complete.
© National Instruments Corporation
4-15
TestStand User Manual
Chapter 4
Sequence Editor Menu Bar
Run Selected Steps
To execute selected steps in a sequence interactively, choose Run Selected
Steps. If you execute steps in a Sequence File window, you initiate the
interactive execution as an independent, top-level execution. If you execute
steps in an Execution window for a sequence execution that is suspended,
you initiate the interactive execution as an extension of the suspended
execution.
Refer to the Interactively Executing Steps section in Chapter 6, Sequence
Execution, for more information on running steps interactively.
Run Selected Steps Using
To interactively execute selected steps using the process model entry point
you select, choose Run Selected Steps Using. When you execute the steps
with an entry point such as Single Pass, the process model can generate a
report and log the results to a database. The Run Selected Steps Using
command is available only in a sequence file window.
Loop on Selected Steps
To execute and loop on selected steps in a sequence interactively, choose
Loop on Selected Steps. Figure 4-12 shows the Loop Count tab in the
Loop on Selected Steps dialog box.
Figure 4-12. Loop on Selected Steps Dialog Box—Loop Count Tab
The Loop Count control specifies the maximum number of times that
TestStand executes the selected steps. If you enable the Loop Indefinitely
checkbox, the Loop Count control dims. You also can specify that
TestStand stop the interactive execution when any step status is error, pass,
or fail. If you want TestStand to evaluate a custom expression after each
TestStand User Manual
4-16
ni.com
Chapter 4
Sequence Editor Menu Bar
step executes to determine whether TestStand continues the interactive
execution, you can use the Stop Expression tab to specify the expression.
The stop expression must evaluate to a Boolean value. TestStand stops
looping if the stop expression evaluates to True.
Figure 4-13 shows the Stop Expression tab. When you enable the Specify
Custom Stop Expression checkbox, the Stop On Condition control dims on
the Loop Count tab.
Figure 4-13. Loop on Selected Steps Dialog Box—Stop Expression Tab
If you execute steps in a Sequence File window, you initiate the interactive
execution as an independent, top-level execution. If you execute steps in an
Execution window for a sequence execution that is suspended, you initiate
the interactive execution as an extension of the suspended execution.
Refer to the Interactively Executing Steps section in Chapter 6, Sequence
Execution, for more information on running steps in a loop interactively.
Loop on Selected Steps Using
Use Loop on Selected Steps Using to interactively loop on the selected
steps using the process model entry point you select. When you loop on
steps with an entry point such as Single Pass, the process model can
generate a report and log the results to a database. The Loop on Selected
Steps Using command is available only in a sequence file window.
Break On First Step
Use Break On First Step to suspend execution on the first step that you
execute whenever you initiate execution in the active sequence. When
enabled, this command has a checkmark beside it in the menu.
© National Instruments Corporation
4-17
TestStand User Manual
Chapter 4
Sequence Editor Menu Bar
Tracing Enabled
Use Tracing Enabled to highlight each step as it becomes the active step
during execution. When you disable this feature, updates to the sequence
execution display occur only when execution is suspended. When enabled,
this command has a checkmark beside it in the menu.
Debug Menu
This section explains how to use the commands in the Debug menu shown
in Figure 4-14.
Figure 4-14. Debug Menu
Resume
Use the Resume command to continue execution when your sequence
execution is in a breakpoint state.
Step Over
Use the Step Over command to execute the step that the execution pointer
points to when your sequence execution is in a breakpoint state. If the step
is a call to another sequence, Step Over executes the entire sequence and
then enters a breakpoint state on the step following the sequence step. If the
engine encounters a breakpoint within the sequence step, Step Over pauses
at the breakpoint.
TestStand User Manual
4-18
ni.com
Chapter 4
Sequence Editor Menu Bar
Step Into
The Step Into command is similar to the Step Over command except that
Step Into enters and suspends within the function, VI, or sequence that the
step calls. If the step calls a code module that TestStand cannot suspend
within, TestStand suspends the execution at the following step.
Step Out
The Step Out command resumes execution through the end of the current
sequence and breakpoints on the next step in the calling sequence.
Break
The Break command suspends the active execution after completing the
execution of the current step.
Terminate
The Terminate command terminates a running or suspended execution.
A running execution terminates only after completing the currently
executing step. When you terminate an execution, TestStand runs the
Cleanup step groups for all active sequences on the call stack.
If any of your step modules wait for user input or do not return quickly for any other
reason, the step module can use the Execution class in the TestStand API to monitor for
termination or abort requests.
Note
Abort (no cleanup)
The Abort command aborts a running or suspended execution. A running
execution aborts only after completing the currently executing step. When
an execution aborts, TestStand does not run any Cleanup step groups.
If any of your step modules wait for user input or do not return quickly for any other
reason, the step module can use the Execution class in the TestStand API to monitor for
termination or abort requests.
Note
Break All
The Break All command is similar to the Break command except that
Break All suspends all running executions.
© National Instruments Corporation
4-19
TestStand User Manual
Chapter 4
Sequence Editor Menu Bar
Terminate All
The Terminate All command is similar to the Terminate command except
that Terminate All terminates all running executions.
Abort All (no cleanup)
The Abort All command is similar to the Abort command except that
Abort All aborts all running executions.
Resume All
The Resume All command is similar to the Resume command except that
Resume All continues all suspended executions.
Configure Menu
This section describes how to use the commands in the Configure menu
shown in Figure 4-15.
Figure 4-15. Configure Menu
Sequence Editor Options
Use the Sequence Editor Options command to set preferences for the
sequence editor. The command displays a dialog box with the following
options:
•
TestStand User Manual
Display Warning on Run Mode Changes in Execution
Window—Displays a warning dialog box when you modify the run
mode for a step in an Execution window. When you modify the run
mode in a Sequence File window, the modification applies to all
subsequent executions, and TestStand writes the new run mode to disk
4-20
ni.com
Chapter 4
Sequence Editor Menu Bar
when you save the sequence file. When you modify the run mode in an
Execution window, the modification affects only that execution and
TestStand does not save the modification to disk.
•
Close Completed Execution Displays on Execution Start—Closes
all completed Execution windows automatically when you start a new
execution.
•
Allow Editing NI Installed Types—Allows you to modify the step
and data types that come with TestStand. This includes built-in step
types, standard data types, and some custom data types. If you attempt
to edit an National Instruments installed type, TestStand displays a
dialog box stating that you must enable this option before you can edit
the type.
•
Disable ’View User Manager’ Command—Disables the User
Manager menu and toolbar items.
•
Allow Editing of Read Only Files—Enables you to make changes in
the sequence editor to files that are marked as read only on disk. You
cannot save changes back to the read only file.
•
Show List View Tip Strips—Disables the tooltip that displays the
entire contents of a field. A tip strip is useful for viewing a field that is
longer than the column that displays it.
•
Save Before Running—Configures the sequence editor to never save
modified files, to always save modified files, or to prompt you to save
modified files before running.
•
Backup Sequence Files When Resaving in Older or Newer
Format—Configures the sequence editor to never backup, always
backup, or to prompt you to backup sequence files you resave with an
older or newer format.
Station Options
Use the Station Options command to set preferences for your TestStand
station. The settings affect all sequence editor and operator interface
sessions that you run on your computer. The command displays a dialog
box with the following tabs: Execution, Time Limits, Preferences, Model,
User Manager, Localization, Remote Execution, and Workspace.
© National Instruments Corporation
4-21
TestStand User Manual
Chapter 4
Sequence Editor Menu Bar
Execution
The Execution tab has options for breakpoints, tracing, and interactive
execution. Figure 4-16 shows the Execution tab.
Figure 4-16. Execution Options
The following options are available on the Execution tab.
•
Enable Breakpoints—Enables all breakpoints. When you enable
breakpoints, the following additional options are available.
–
•
TestStand User Manual
Allow Break While Terminating—Honors breakpoints when
terminating an execution.
Enable Tracing—Enables tracing. When tracing is in effect, the
sequence editor or operator interface program displays each step as
it executes. This is useful for debugging but adds significant
4-22
ni.com
Chapter 4
Sequence Editor Menu Bar
performance overhead to the execution of your test programs. When
you enable tracing, the following additional options are available.
–
Speed—Specifies whether TestStand inserts a delay between
trace events sent to the sequence editor or any operator interface.
This delay only applies when tracing is enabled. You can use this
to slow down the tracing so that you can observe each step as it
executes.
–
Allow Tracing Into Setup/Cleanup—Enables tracing of steps in
the Setup and Cleanup step groups of each sequence.
–
Allow Tracing Into Pre/Post Step Callbacks—Enables tracing
of steps in any of the Pre Step and Post Step Engine Callbacks.
–
Allow Tracing Into Post Action Callbacks—Enables tracing of
steps in Post Action callbacks.
–
Allow Tracing Into Sequence Calls Marked With Tracing
“Off”—Enables tracing into all subsequences when tracing is
enabled for the calling sequence.
In the Run Options tab of the Step Properties dialog box, you
can choose a setting that disables tracing when the step calls a
subsequence. If you enable the Allow Tracing Into Sequence Calls
Marked With Tracing “Off” option in the Station options dialog
box, TestStand ignores that Step Property setting and does not
alter the tracing state when it calls the subsequence.
•
–
Allow Tracing While Terminating—Enables tracing of steps
that run while execution is terminating. Examples of steps that
can run when execution is terminating are steps in Cleanup step
groups that run when you terminate execution in the middle of a
sequence.
–
Trace Into Separate Execution Callbacks—Enables tracing in
callbacks that run as executions separate from the top-level
sequence execution. Examples include front-end callbacks and
callbacks that you execute from the Tools menu.
–
Trace Into Entry Points—Enables tracing of steps in process
model point sequences, such as the Test UUTs and Single Pass
entry points.
Interactive Mode—Use this section to set options that apply when
you run steps interactively.
–
© National Instruments Corporation
Record Results in Interactive Mode—Records the results of
steps that you run interactively. If you run steps interactively from
an Execution window when suspended in a normal execution,
TestStand appends the results to the result list for the active
4-23
TestStand User Manual
Chapter 4
Sequence Editor Menu Bar
sequence invocation. Thus, the results appear in the test report for
the normal execution.
If you run steps interactively from a Sequence File window,
TestStand accumulates the results in a result list for the interactive
execution. If the interactive execution uses a process model that
generates a report, the interactive step results appear in the report.
You also can access an interactive execution result list from an
Engine post-interactive callback.
–
•
TestStand User Manual
Run Setup and Cleanup for Interactive Execution—Specifies
whether to run the Setup and Cleanup step groups for the sequence
that contains the selected steps. This option applies only when you
run the steps from a Sequence File window.
On Run-Time Error—Use this option to specify the action TestStand
takes when a run-time error occurs. The On Run-Time Error ring
control contains the following options:
–
Show Dialog—Displays a dialog box when a run-time error
occurs. The dialog box lists the step, the cause of the error, and
prompts you with options for handling the error. Options for
handling the error include ignoring the error and continuing
execution, retrying the step, jumping to the Cleanup step group,
and aborting immediately. You also can choose to break at the
current step and to suppress the run-time error dialog box during
the remainder of the current execution. Refer to the Run-Time
Errors section in Chapter 6, Sequence Execution, for more
information.
–
Run Cleanup—Execution jumps to the Cleanup step group. If the
error propagates normally to the calling sequence, the calling
sequence also jumps to the cleanup step group. Thus, the cleanup
steps run for all active sequences and the execution terminates.
–
Ignore—Clears the error occurred flag for the step and execution
proceeds at the next step in the sequence.
–
Abort—Immediately halts execution without running cleanup
steps.
•
Always Goto Cleanup On Sequence Failure—Causes execution to
jump to the Cleanup step group when a step sets the sequence status to
Failure. This option takes precedence over Goto Destination post
action settings.
•
Disable Result Recording for All Sequences—When you disable
result recording with this option, the process model does not generate
a result report for sequence executions.
4-24
ni.com
Chapter 4
Sequence Editor Menu Bar
Time Limits
The Time Limits tab allows you to specify time limits for executions. If you
specify a time limit, you choose an action to take when a time limit expires.
Figure 4-17 shows the Time Limits tab.
Figure 4-17. Time Limits Options
The tab maintains different time limits for normal execution and for
executions that run while the engine is exiting. To switch between the
different time limits, use the Settings ring control.
© National Instruments Corporation
4-25
TestStand User Manual
Chapter 4
Sequence Editor Menu Bar
The Time Limit Settings selection ring contains the following types of time
limits.
•
When Executing—Applies to an execution from start to completion.
•
When Terminating—Applies to executions from a termination
request to completion.
•
When Aborting—Applies to executions from an abort request to
completion.
To enable the time limit, place a checkmark in the Set a Time Limit for this
Operation checkbox.
TestStand can take one of the following actions when the time limit expires:
•
Prompt for Action—Displays a dialog box with the option to
terminate, abort, or kill the execution.
•
Terminate Execution—Initiates a termination of a running execution.
•
Abort Execution—Initiates an abort of a running or terminating
execution.
•
Kill the Execution’s Threads—Ends the thread for a running,
terminating, or aborting execution.
When you terminate a running execution, TestStand executes all the
Cleanup step groups in sequences on the call stack before execution stops.
A terminating sequence can time out when a step in one of the Cleanup step
groups hangs or takes a long time to complete. When you abort a running
or terminating execution, TestStand returns up the call stack without
running any Cleanup step groups. An abort operation also can time out
when the last executed step hangs or takes a long time to complete. When
you kill a running, terminating, or aborting execution, TestStand terminates
the thread running the execution without any cleanup of system resources.
This can leave TestStand in an unreliable state.
TestStand User Manual
4-26
ni.com
Chapter 4
Sequence Editor Menu Bar
Preferences
The Preferences tab specifies general options for TestStand. Figure 4-18
shows the Preferences tab.
Figure 4-18. Preferences Options
The following options are available on the Preferences tab.
•
Show Hidden Properties—Displays hidden properties. Most hidden
properties are built-in step properties that TestStand uses.
•
Prompt to Find Files—Displays a file dialog box when TestStand
cannot find necessary files in the current directory search path.
© National Instruments Corporation
4-27
TestStand User Manual
Chapter 4
Sequence Editor Menu Bar
•
Prompt to Change System SetForegroundWindow Behavior—On
versions of Windows subsequent to Windows 95 and NT 4.0, the
operating system allows you to restrict when one application can bring
another application to the front. TestStand removes the restriction so
that it can activate windows in other development environments. This
option causes TestStand to prompt you before removing the restriction.
When you disable this option, TestStand does not prompt you, and
TestStand does not change your system settings.
Notice that this is a system restriction. Changes to this restriction affect
the behavior of any application that attempts to bring its window to the
front when another application window is active.
National Instruments recommends that you enable this checkbox and
allow TestStand to change your system settings when you execute test
modules in external processes.
The system configuration setting is a DWORD value stored in the
registry. The value is HKEY_CURRENT_USER\Control
Panel\Desktop\ForegroundLockTimeout. This value is the
amount of time in milliseconds that a foreground application must be
idle (not receiving user input) before the operating system allows a
background application to bring its window to the front. The typical
value for this setting is 0x7D0 (2,000 m s). TestStand sets the value to
zero.
TestStand User Manual
•
Auto Increment Sequence File Version—Automatically increments
the specified portion of the sequence file version number when you
save a sequence file. A version number consists of four numbers
separated by periods. The numbers are named from left to right in the
following order: Major, Minor, Revision, and Build.
•
Reload Documents When Opening Workspace—Loads the
documents you had open when you last closed the workspace file.
If this option is enabled when you load the workspace, the Sequence
Editor reloads the documents.
•
Reload Last Workspace at Startup—Loads the workspace that was
open when the Sequence Editor last closed. If this option is enabled
when you launch TestStand, the Sequence Editor opens the workspace.
•
Station ID—Specifies whether TestStand identifies the test station
with the name of the computer or with a name you provide.
4-28
ni.com
Chapter 4
Sequence Editor Menu Bar
Model
The Model tab specifies the model options for the station and for
sequences. Figure 4-19 shows the Model tab.
Figure 4-19. Model Options
The following options are available on the Model tab.
•
Use Station Model—Enables the Station Model control, which
specifies the pathname of the station model sequence file. When you
disable this option, no station model is in effect, and individual
sequence files have no process model unless they specify one
explicitly. Usually, sequence files do not specify process model files
explicitly.
•
Allow Other Models—Allows sequence files to specify a process
model file other than the current station model file. When you disable
this option, you can only load sequence files that do not specify a
process model file and sequences that specify the current station model
file as their process model file.
•
Station Model—Specifies the pathname of the station model
sequence file.
© National Instruments Corporation
4-29
TestStand User Manual
Chapter 4
Sequence Editor Menu Bar
User Manager
The User Manager tab specifies whether TestStand enforces user
privileges. It also specifies the location of the user manager configuration
file. Figure 4-20 shows the User Manager tab.
Figure 4-20. User Manager Options
The following options are available on the User Manager tab.
TestStand User Manual
•
Current User Manager File—Displays the user manager file that is
currently in memory. The default file is
<TestStand>\Cfg\Users.ini.
•
Configure—Allows you to specify the location of the user manager
file.
4-30
ni.com
Chapter 4
Sequence Editor Menu Bar
A change to this option does not take effect until the next time you start
the sequence editor.
•
Check User Privileges—Prevents users from accessing features for
which they do not have privileges. When you disable this option, any
user can access any feature without regard to privileges. You must have
sufficient privileges to change this option or any other option that
affects privilege checking.
•
Require User Login—If you disable user privilege checking, this
option disables all privileged operations when a user is not logged in.
When a user logs in, all privileged operations are available.
•
Automatically Login Windows System User—TestStand attempts to
log in the current Windows user name in the TestStand user list. If the
user name is found in the TestStand user list, TestStand automatically
logs in the user at the appropriate level without prompting for a
password. If the user name is not found, TestStand prompts the user to
log in. In order for this option to work, you must create a user entry in
the TestStand User Manager and enter the Windows login name for the
user as their TestStand login name.
Localization
The Localization tab specifies the station language and other regional
settings. Figure 4-21 shows the Localization tab.
Figure 4-21. Localization Options
© National Instruments Corporation
4-31
TestStand User Manual
Chapter 4
Sequence Editor Menu Bar
The Localization tab contains the following controls:
•
Select a Language—Specifies the language that TestStand uses to
display text. The language setting determines the set of string resource
files that TestStand uses. Refer to the Creating String Resource Files
section of Chapter 3, Configuring and Customizing TestStand, for
more information on string resource files.
•
Use Localized Decimal Point—Specifies that TestStand uses the
decimal point character you set in the Windows Regional Options
control panel. If you do not set this option, TestStand uses the period
character as the decimal point symbol.
•
Recognize Multi-byte Characters—Specifies that TestStand
recognizes extended character code sequences when it compares and
processes strings. Set this option if you use strings with extended
character code such as the codes for Japanese or Chinese characters.
This option decreases the speed at which TestStand compares and
processes strings.
Remote Execution
The Remote Execution tab specifies whether a remote machine can run a
sequence on this station.
Source Control
The Source Control tab specifies options that affect various source control
operations. The options on the Source Control tab are available only if a
workspace file is open. Figure 4-22 shows the Source Control tab.
Figure 4-22. Source Control Options
TestStand User Manual
4-32
ni.com
Chapter 4
Sequence Editor Menu Bar
The following options are available on the Source Control tab:
•
Check Out Source Files When Edited—Specifies whether a dialog
box prompts you to check out a file when you edit a sequence file that
is in the current workspace and is checked into source control.
•
Prompt to Add to Source Control When Inserting File into
Workspace—Prompts you to add a file to the source control system
when you insert the file into the workspace.
•
Use Dialog Box for File Checkout—Displays a dialog box that lists
the files you are checking out when you check out files using the
Workspace window.
•
Display only Selected Files in Source Control Dialog
Boxes—Displays only selected workspace files in source code control
dialog boxes. If this options is not set, the source code control dialog
boxes include all files under the selected item in the workspace.
•
System Default Source Code Control Provider—Allows you to
change your default source code control provider.
© National Instruments Corporation
4-33
TestStand User Manual
Chapter 4
Sequence Editor Menu Bar
Search Directories
The Search Directories command lets you customize the search paths for
finding files. Figure 4-23 shows the Edit Search Directories dialog box.
Figure 4-23. Search Directories Dialog Box
The dialog box displays a list of paths, the higher paths taking precedence
over the lower paths. The list contains a default set of paths. A checkbox
appears to the left of each path in the list. When you place a checkmark next
to a path, TestStand includes the path in the overall search path. To reorder
paths in the list, select a path and click the Move Up or Move Down
buttons. Click the Add button to add a custom directory search path.
You can use the File Extension Restrictions control to search only for files
with specific filename extensions. For example, to search for only DLLs
and executable files, enter the following string:
DLL, EXE
To search for all files except for files with specific extensions, enable the
Exclude option. A tilde (~) appears at the beginning of File Extensions
column for the row that you have selected.
TestStand User Manual
4-34
ni.com
Chapter 4
Sequence Editor Menu Bar
The Search Subdirectories option specifies whether to include all
subdirectories within the selected path in the overall search path.
If you add a large directory tree to the search paths and specify the search
subdirectories option, TestStand must search the entire tree each time it locates a file. You
can improve performance by using the File Extension Restrictions control to limit the types
of files for which TestStand searches a directory tree. For example, if a directory tree
contains VI files only, specify VI in the File Extension Restriction control to prevent
TestStand from searching the directory tree for files of other types such as .seq and .dll.
Note
For best performance, move the following search paths to the end of the search path
list: the search paths you add that refer to large directory trees, the search paths you add
that refer to directories on network drives, and the search paths you add that contain files
which you use infrequently.
Note
External Viewers
The External Viewers command displays a dialog box in which you can
specify the external viewer to use for a particular report format. You
specify both the external viewer, such as Microsoft Notepad and Microsoft
Internet Explorer, and the report format, such as text, .txt, and HTML,
.html, files.
Use the Add button to add an entry to the viewer list. Use the Delete button
to remove an entry. If you do not specify an external viewer for a format,
the file opens in the application that Windows associates with the file
extension of the report file.
Adapters
The Adapters command displays a dialog box in which you can select the
active module adapter for inserting steps, or configure a specific module
adapter. Refer to the Configuring Adapters section in Chapter 13, Module
Adapters, for more information.
Report Options
The Report Options command displays a dialog box in which you can
customize the generation of report files. The command calls an entry point
in the default TestStand process model file. The options you set apply to all
sequences you run on the station. Refer to Chapter 15, Managing Reports,
for more information on available report options.
© National Instruments Corporation
4-35
TestStand User Manual
Chapter 4
Sequence Editor Menu Bar
Model Options
The Model Options command displays a dialog box in which you can
customize the behavior of the current process model. This option is
dimmed if the current process model is SequentialModel.seq, the
default TestStand process model. Refer to the Parallel and Batch Models
section in Chapter 14, Process Models, for a description of the Model
Options dialog box.
Source Control Menu
TestStand integrates with any source code control system that supports the
Microsoft SCC interface. You can check files and projects in and out of
your source code control system from a TestStand workspace. You select
your default source code control provider when you install your SCC
program. You can change the default provider by selecting
Configure»Station Options and going to the Source Control tab.
National Instruments has tested TestStand with the following source code control
providers: Microsoft Visual SourceSafe, Perforce, MKS Source Integrity, and Rational
ClearCase.
Note
You can access source control commands in the sequence editor through the
context menu for any file or project in the workspace or through the Source
Control menu in the Sequence Editor. The Source Control menu is shown
in Figure 4-24. The Source Control menu items are available only if a
workspace file is open and the active window is a file window.
Figure 4-24. Source Control Menu
TestStand User Manual
4-36
ni.com
Chapter 4
Sequence Editor Menu Bar
For a description of each command in the Source Control menu, refer to the
Workspace Window section of Chapter 2, Sequence Editor Concepts.
Tools Menu
This section explains how to use the commands in the Tools menu shown
in Figure 4-25.
Figure 4-25. Tools Menu
Sequence File Documentation
Use the Sequence File Documentation submenu to generate ASCII
text or HTML documentation for a sequence file. When you select
Tools»Sequence File Documentation, TestStand displays the following
dialog box in which you specify which items to include in the
documentation.
© National Instruments Corporation
4-37
TestStand User Manual
Chapter 4
Sequence Editor Menu Bar
The Sequence File Documentation dialog box contains the following
controls:
TestStand User Manual
•
File Format—Specifies the file format of the documentation file.
The options are HTML and Text.
•
Destination File Path—Specifies the name and location of the
documentation file to create.
•
Show Parameters—Specifies whether sequence parameters appear in
the documentation file.
•
Show Locals—Specifies whether sequence local variables appear in
the documentation file.
•
Show Sequence File Globals—Specifies whether sequence file global
variables appear in the documentation file.
•
Show Station Globals—Specifies whether the current station global
variables appear in the documentation file.
4-38
ni.com
Chapter 4
Sequence Editor Menu Bar
•
Show Subproperties—Specifies whether the subproperties of
structured variables appear in the documentation file.
•
Show Hidden Properties—Specifies whether variables or properties
that are marked as hidden appear in the documentation file.
•
Show Array Elements—Specifies whether the elements of array
variables appear in the documentation file.
•
Maximum Number of Elements to Show—Specifies the maximum
number of array elements from an array variable to include in the
documentation file.
•
Launch Viewer When Done—Specifies that the documentation tool
opens the documentation file in a viewer application.
Sequence File Converters
Use the Sequence File Converters submenu to convert a sequence file
from the LabWindows/CVI or the LabVIEW Test Executives into a
TestStand sequence file. Refer to the Converting From the LabVIEW Test
Executive to TestStand and Converting From the LabWindows/CVI Test
Executive to TestStand online help documents for more information on
converting sequences. You can access these documents by going to the
<TestStand>\Doc directory or by selecting the appropriate document
from Start»Programs»National Instruments»TestStand»Online Help.
Update Sequence Files
Use the Update Sequence Files command to load and resave all the
sequence files in a folder and its subfolders. When you open a sequence
file, TestStand automatically updates the file to the most recent file format
and updates it to use the latest version of the types it contains. However,
this conversion can increase the time it takes to load a file. You can use the
Update Sequence Files command to ensure that a group of files are
updated such that they load as quickly as possible.
In addition, if you change the definition of a data type or step type and you
do not increment the type version, TestStand prompts you to resolve the
type difference when you later load a sequence file that contains a different
definition of the type. You can use the Update Sequence Files command
to update a group of files to use the changes you make to a type so that
TestStand does not prompt you when you load the updated files.
© National Instruments Corporation
4-39
TestStand User Manual
Chapter 4
Sequence Editor Menu Bar
Import/Export Properties
The Import/Export Properties command imports variables and step
property values from an external file, database, or the system clipboard into
a sequence, or exports variables and step property values from a sequence
to an external file, database, or the system clipboard. A common use of this
command is to import or export the limit properties values for the steps in
a sequence. Refer to the Importing/Exporting Properties section in
Chapter 10, Built-In Step Types, for more information on importing and
exporting properties.
Update Automation Identifiers
The following discussion applies only when you configure the ActiveX
Automation Adapter to use early binding. When you update the interface
for an ActiveX Automation server and the object and member identifiers
for the server have changed, you must re-specify any step that uses the
server. You use the Update Automation Identifiers command to update
the identifiers in the active sequence file based on the name of the object
or member.
For steps that create an object, the command updates the object identifiers,
CLSID and IID. For steps that call a method or property, the command
updates the member identifier, MEMBERID. Refer to the ActiveX Automation
Adapter section of Chapter 13, Module Adapters, for more information on
configuring the adapter to use early or late binding and information on
developing ActiveX servers while you are developing sequences.
Assemble Test VIs for Run-time Distribution
Use the Assemble Test VIs for Run-time Distribution command to save
the entire test VI hierarchy for a specific sequence file. For all steps in a
sequence file that use the LabVIEW Standard Prototype Adapter, the
command saves the test VIs to a single directory and saves all sub VIs,
run-time menu files, and external subroutines to a separate VI library. For
more information, refer to the Packaging VIs and SubVIs for a Sequence
File section of Chapter 17, Distributing TestStand.
Run Engine Installation Wizard
Use the Run Engine Installation Wizard command to create a custom
TestStand engine installation. Refer to the Creating a Run-Time TestStand
Engine Installation section in Chapter 17, Distributing TestStand, for more
information on using the installation wizard.
TestStand User Manual
4-40
ni.com
Chapter 4
Sequence Editor Menu Bar
Run Database Viewer
Use the Run Database Viewer command to launch a utility application
that allows you to create and discard database tables and columns. You also
can use the database viewer to view and edit the values that a database
stores. For more information on the database viewer, refer to the Database
Viewer section of Chapter 18, Databases.
Customize
Use the Customize command to create your own entries in the Tools menu.
Figure 4-26 shows the Customize Tools Menu dialog box.
Figure 4-26. Customize Tool Menu Dialog Box
© National Instruments Corporation
4-41
TestStand User Manual
Chapter 4
Sequence Editor Menu Bar
The Customize Tool Menu dialog box contains the following controls:
•
Add—Inserts a new menu item above the selected item in the Tools
Menu list. You can add the following types of menu items:
–
Submenu—Contains additional menu items.
–
Command—Invokes a Windows executable.
–
Sequence—Initiates an execution on a sequence in a sequence
file.
–
Sequence File—Creates a submenu that lists all sequences in a
sequence file as menu items.
•
Remove—Deletes the menu item from the Tools menu.
•
Move Up and Move Down—Changes the order of items within the
menu or submenus.
•
Expand—Allows you to view the menu items in a submenu.
•
Collapse—Allows you to step out of an item in a submenu.
•
Item Text Expression—Specifies the expression that evaluates to the
literal text to display for the menu item.
•
Insert Separator Before Item—Specifies that a menu separator
precedes the tool menu item.
•
Hidden Expression—Allows you to specify an expression that
determines when a menu item is hidden. If the field is empty, TestStand
treats the expression as False.
Note TestStand evaluates the Hidden Expression in the ConstructToolMenus method
of the Engine class. The sequence editor constructs the Tools menu by calling this method
each time you click that menu in the Sequence Editor, but an operator interface might
construct the Tools menu only once during initialization.
TestStand User Manual
•
Enable Expression—Appears for Command and Sequence item
types. This option lets you specify an expression that determines when
the menu item is enabled. The expression must return True to enable
the menu item and False to dim the menu item.
•
Edits Selected File—Appears for Sequence and Sequence File item
types. Set this option for tool menu items you add that edit the selected
sequence file. This option advises the sequence editor to prompt the
user to check out the selected file from source control if it is not already
checked out.
•
Command—Specifies the executable path. This option appears only
for the Command menu type.
4-42
ni.com
Chapter 4
Sequence Editor Menu Bar
•
Arguments—Specifies the command-line arguments. This option
appears only for the Command menu type.
•
Initial Directory—Specifies the initial working directory for the
executable. This option appears only for the Command menu type.
•
Sequence File and Sequence—Specify the target for the Sequence
File and Sequence menu item types.
•
Export Items To File—Displays a dialog box that contains a list of
tool menu items. You use the dialog box to select which tool menu
items to export to a tool menu file. Tool menu files enable you to
distribute tool menu items to other TestStand installations. You install
tool menu files in <TestStand>\Setup\ToolMenusToInstall.
When TestStand starts, it appends the items stored in all tool menu files
in this directory to the tools menu. After appending the new tool items,
TestStand deletes the tool menu files. The Export Tools Menu dialog
box is shown in Figure 4-27.
Figure 4-27. Export Tools Menu Dialog Box
The Export Tools Menu dialog box contains the following controls:
•
© National Instruments Corporation
Menu Items—List of menu items available for export. This list is
populated by the Tools menu list on the Customize Tools Menu dialog
box.
4-43
TestStand User Manual
Chapter 4
Sequence Editor Menu Bar
•
Move Up and Move Down—Changes the order of items within the
menu or submenus.
•
File Name—Specifies the path to which the file will be saved.
Window Menu
This section explains how to use the commands in the Window menu
shown in Figure 4-28.
Figure 4-28. Window Menu
Cascade
Use the Cascade command to arrange all open windows so that each title
bar is visible.
Tile
Use the Tile command to arrange all open windows in smaller sizes to fit
next to each other.
Close All Windows
Use the Close All Windows command to close all open windows in the
sequence editor.
Close Completed Execution Displays
Use the Close Completed Execution Displays command to close all
execution displays that are no longer executing.
<List of Open Windows>
A list of all open windows appears at the bottom of the Window menu.
TestStand User Manual
4-44
ni.com
5
Sequence Files
This chapter describes TestStand sequence files. Each sequence file
contains one or more sequences. Sequences, in turn, contain steps that
conduct tests, set up instruments, or perform other actions necessary to
test a UUT. In addition to sequences, sequence files can contain global
variables. You can access sequence file global variables from every
sequence in the file. Sequence files also contain the definitions for the
data types and step types that the sequences in the file use.
You use the sequence editor to create and edit sequence files. You can
execute sequences from the sequence editor or from any other TestStand
operator interface program.
Several types of sequence files exist. Most sequence files you work with are
normal sequence files. Normal sequence files contain sequences that test
UUTs. Model sequence files contain process model sequences. Station
Callback sequence files contain the station callback sequences. Front-End
Callback sequence files contain Front-End callback sequences. Usually,
your computer has only one Station Callback sequence file and one
Front-End Callback sequence file.
In the sequence editor, you use a Sequence File window to view and edit
a sequence file. To open an existing sequence file into a Sequence File
window, select File»Open. To create a new Sequence File window, select
File»New.
Sequence File Window Views
You use the View ring control at the top right of the Sequence File window
to select the aspect of the file to display. You can use the View ring control
to view an individual sequence, a list of all sequences in the file, the global
variables in the file, or the types that you use in the file.
© National Instruments Corporation
5-1
TestStand User Manual
Chapter 5
Sequence Files
Figure 5-1 shows the contents of the View ring control for an example
sequence file.
Figure 5-1. View Ring Control for Sequence Files
All Sequences View
Sequence files can contain multiple sequences. To access a list of
the sequences in a file, select All Sequences from the View ring control.
You can use this view to create new sequences and to cut, copy, and paste
sequences. You also can drag and drop sequences from this view to the All
Sequences view in another Sequence File window.
Figure 5-2 shows the All Sequences view for an example file and also
shows the ring control where you select this view.
Figure 5-2. All Sequences View in the Sequence File Window
TestStand User Manual
5-2
ni.com
Chapter 5
Sequence Files
Sequence View Context Menu
To access a context menu, right click the view. The items in the context
menu vary depending on the whether you right click a sequence or the
background area of the view. This section describes the items that the
context menu can contain.
Open Sequence
The Open Sequence command changes the sequence file view to display
the contents of the selected sequence.
Insert Sequence
The Insert Sequence command adds a new sequence to the sequence file.
Rename
The Rename command allows you to edit the name of the selected
sequence.
Browse Sequence Context
The Browse Sequence Context command displays a tree view that
contains the names of variables, properties, and sequence parameters you
can access from expressions and step modules when the sequence is
running. This command also appears in the View menu of the sequence
editor menu bar. Refer to the View Menu section in Chapter 4, Sequence
Editor Menu Bar, for more information.
View Contents
The View Contents command changes the sequence file view to display
the contents of the selected sequence.
Sequence Properties
The Properties command displays the Sequence Properties dialog box for
the selected sequence. You use the Sequence Properties dialog box to view
and edit the built-in properties of the selected sequence. Usually, the dialog
box has a single tab, the General tab. If the current sequence file is a process
model file, the dialog box has a second tab, the Model tab.
© National Instruments Corporation
5-3
TestStand User Manual
Chapter 5
Sequence Files
Figure 5-3 shows the Sequence Properties dialog box.
Figure 5-3. Sequence Properties Dialog Box
The General tab contains the following controls:
TestStand User Manual
•
Goto Cleanup on Sequence Failure—Causes the execution to branch
immediately to the Cleanup step group. TestStand maintains an
internal status value for each executing sequence. When you set the
status property of a step to Failed and the Step Failure Causes
Sequence Failure option is set for the step, TestStand sets the internal
sequence status value to Failed. The Goto Cleanup on Sequence
Failure option controls the flow of execution when TestStand sets the
internal sequence status value to Failed. Disable this option if you
want execution to continue normally at the next step. This option takes
precedence over Goto Destination post action settings.
•
Disable Results for All Steps—Prevents TestStand from adding
results for the steps in the sequence to the results list. Refer to the
Result Collection section in Chapter 6, Sequence Execution, for more
information on the results list.
5-4
ni.com
Chapter 5
•
Sequence Files
Optimize Non-Reentrant Calls to this Sequence—Decreases the
time it takes TestStand to call the sequence after the first call to the
sequence in an execution. If you disable this option, TestStand
initializes a new copy of each custom step property in a sequence each
time it calls the sequence. TestStand performs this initialization so that
the sequence always begins executing with the initial property values
that the steps in the sequence specify. This initialization is necessary
only if a sequence relies on the initial value of a custom step property
and then modifies its value. Few sequences rely on this information.
When you enable this option, TestStand initializes the values of custom
step properties in the sequence the first time it calls the sequence in an
execution. TestStand saves the values of the custom step properties
after the sequence completes and reuses the values when it calls the
sequence again. If the same sequence is called at the same time in
different threads or recursively within the same thread, TestStand
creates unique copies of the custom step properties.
•
Comment—Places a comment for the sequence in the All Sequences
view. The sequence comment also appears in the documentation that
TestStand generates for the sequence file.
•
Preconditions—Displays the Preconditions dialog box in which you
specify the conditions that must be true for each step in the sequence
to run. When you access this dialog box from the Step Properties
dialog box, it applies only to a particular step. When you access the
dialog box from the Sequence Properties dialog box, you can view and
edit the preconditions for each step in the sequence. Refer to the
Preconditions Dialog Box section in this chapter for more information.
If the sequence file is a process model file, the Sequence Properties dialog
box also has a Model tab. Refer to Chapter 14, Process Models, for more
information on sequence properties that are unique to process model files.
© National Instruments Corporation
5-5
TestStand User Manual
Chapter 5
Sequence Files
Sequence File Properties
Select Edit»Sequence File Properties to display the Sequence File
Properties dialog box for the sequence file. Figure 5-4 shows the General
tab in the Sequence File Properties dialog box.
Figure 5-4. General Tab in the Sequence File Properties Dialog Box
The General tab contains the following controls:
TestStand User Manual
•
Full Path—Displays the location of the sequence file on disk.
•
Saved—Displays the time at which you last saved the sequence file.
•
Size—Displays the size of the sequence file on your disk drive.
•
Version—Displays the sequence file version number. A version
number consists of four integer numbers that you separate with
periods. The numbers from left to right denote the Major, Minor,
Revision, and Build version. You can manually specify the version
number or you can select Configure»Station Options and set the
Auto Increment Sequence File Version option on the Preferences
tab. This control specifies that the Sequence Editor increments the
version number each time you save the sequence file.
5-6
ni.com
Chapter 5
•
Sequence Files
Load Option—Specifies one of the following load option settings for
every step in the sequence file.
–
Preload when opening sequence file
–
Preload when execution begins
–
Load dynamically
–
Use step load option
The Use Step Load Option setting tells TestStand to load each
code module according to the load option for the particular step
that calls the code module. Refer to the Step Properties Dialog
Box section in this chapter for more information on the other load
option values.
•
Unload Option—Specifies one of the following unload option
settings for every step in the sequence file.
–
Unload when precondition fails
–
Unload after step executes
–
Unload after sequence executes
–
Unload when sequence file is closed
–
Use step unload option
The Use Step Unload Option setting tells TestStand to unload each
code module according to the unload option for the particular step
that calls the code module. For more information on the other
unload option values, refer to the Step Properties Dialog Box
section in this chapter.
If you enable the sequence property Optimize Non-Reentrant Calls to This
Sequence, TestStand does not unload the code modules for the sequence until after the
execution ends, regardless of the unload options for the sequence file or the steps in the
sequence.
Note
•
© National Instruments Corporation
Sequence File Globals—Specifies whether multiple executions share
the sequence file global variable values. You can select one of the
following settings:
–
Separate File Globals for Each Execution—Specifies that each
execution that runs the file creates a separate run-time copy of the
global variables and initializes them to their default values. This
command is the default setting.
–
All Executions Share the Same File Globals—Specifies that the
first execution that runs the sequence file creates a run-time copy
of the global variables and initializes them to their default values.
5-7
TestStand User Manual
Chapter 5
Sequence Files
You might use this setting to share variables between multiple
executions you start with the Batch or Parallel process model.
Refer to the Lifetime and Scope of Sequence File Global Variables
section in this chapter for more information on sequence file globals.
•
Comment—Places a comment that appears in the documentation that
TestStand generates for the sequence file.
Figure 5-5 shows the Advanced tab in the Sequence File Properties dialog
box.
Figure 5-5. Advanced Tab in the Sequence File Properties Dialog Box
The Advanced tab contains the following controls:
•
Type—Specifies one of the following type settings for the sequence
file.
–
Normal
–
Model
–
Front-End Callbacks
–
Station Callbacks
–
Reserved
If you use the sequence file as a process model, set the type to Model.
If you do not use the file as a process model, leave the type set to
Normal.
•
Model Option—Selects one of the following settings for the process
model file to use for the sequence file.
–
TestStand User Manual
Use Station Model—Causes TestStand to use the process model
file that the Station Model option in the Station Options dialog box
specifies. This is the default setting for this option.
5-8
ni.com
Chapter 5
Sequence Files
–
No Model—Specifies that the sequence file does not use a
process model.
–
Require Specific Model—Specifies a particular process model
file. If you select this value, the tab displays additional controls
that you can use to specify the location of a process model file.
The Require Specific Model setting is valid only when you set the Allow Other
Models setting under Configure»Station Options»Model.
Note
Refer to the Process Models section in Chapter 1, TestStand Architecture
Overview, and to Chapter 14, Process Models, for more information on
process models.
Figure 5-6 shows the Synchronization tab in the Sequence File Properties
dialog box
.
Figure 5-6. Synchronization Tab in the Step Properties Dialog Box
The Synchronization tab contains the following control:
•
© National Instruments Corporation
Default Batch Synchronization—Specifies a default batch
synchronization setting for the sequence file. The default batch
synchronization setting applies to each step in the sequence file
that specifies a batch synchronization option of Use Sequence File
Setting. Refer to the Batch Synchronization section of Chapter 11,
Synchronization Step Types, for a description of batch synchronization
settings.
5-9
TestStand User Manual
Chapter 5
Sequence Files
Sequence File Callbacks
Select Edit»Sequence File Callbacks to display the Callbacks dialog box
for the sequence file. Figure 5-7 shows the Callbacks dialog box.
Figure 5-7. Callbacks Dialog Box
The Callbacks dialog box lists every callback that you can override in the
sequence file. The columns in the list display the name of the callback,
indicate whether the callback is an Engine or Model callback, and indicate
whether the sequence file overrides the callback. The Add button overrides
the selected callback by inserting a sequence with the same name into the
sequence file. The Delete button deletes the sequence that overrides the
selected callback. The Edit button dismisses the dialog box and displays
the sequence that overrides the selected callback. Refer to the Process
Models section in Chapter 1, TestStand Architecture Overview, for more
information on model callbacks. Refer to the Engine Callbacks section in
Chapter 6, Sequence Execution, for more information on engine callbacks.
The following restrictions apply to the SequenceFileLoad and
SequenceFileUnload callbacks.
•
TestStand User Manual
TestStand can hang when it executes a SequenceFileLoad callback
that calls into another sequence file containing a SequenceFileLoad
callback which calls back into the original sequence file. This can
occur with any number of levels of sequence files as long as the
dependencies among the SequenceFileLoad callbacks exist
between sequence files.
5-10
ni.com
Chapter 5
Sequence Files
•
TestStand can enter an infinite loop when it executes a
SequenceFileUnload callback that calls into another sequence file
containing a SequenceFileUnload callback which calls back into
the original sequence file. To break the infinite loop, you select the
Debug»Terminate All Executions command.
•
You must not define a SequenceFileUnload callback in the
FrontEndCallback.seq or StationCallbacks.seq sequence
files. If you make this error, TestStand hangs when you shut down the
TestStand engine.
Individual Sequence View
Each sequence can contain steps, parameters, and local variables. To view
the contents of a specific sequence, select it from the View ring control.
Figure 5-8 shows the contents of an example sequence and also shows the
ring control where you select views.
Figure 5-8. Individual Sequence View for an Example Sequence
The Sequence view has five tabs: Main, Setup, Cleanup, Parameters, and
Locals. You select a tab to choose which part of the sequence to view.
Main, Setup, and Cleanup Tabs
The Main, Setup, and Cleanup tabs each show one of the step groups in the
sequence. In the Setup step group, insert steps that initialize or configure
your instruments, fixtures, and UUT. In the Main step group, insert steps
that test your UUT. In the Cleanup step group, insert steps that power down
or de-initialize your instruments, fixtures, and UUT. Refer to Chapter 6,
Sequence Execution, for more information on how TestStand uses the
different step groups.
© National Instruments Corporation
5-11
TestStand User Manual
Chapter 5
Sequence Files
Step Group List View and Tree View
Each step group tab normally displays a list of the steps in the group. This
list is called the step group list view. You can drag the step group divider
bar away from the left edge of the window to reveal a tree-structured
view that allows you to browse the custom properties for each step. This
tree-structured view is called the step group tree view. The list view always
displays the contents of the item that you select in the tree view. Usually,
you only use the tree view when you design and debug a new step type. In
Figure 5-9, the tree view shows the custom properties of a Numeric Limit
Test step.
Figure 5-9. Step Group Tree View (Left) and List View (Right)
TestStand User Manual
5-12
ni.com
Chapter 5
Sequence Files
Step Group List View Columns
The columns in the list view for a step group vary according to whether the
list view is displaying steps or step properties. Figure 5-10 shows the list
view displaying steps.
Figure 5-10. Step Group List View Columns for Steps
When the list view displays steps, it contains the following columns:
•
Step—Displays the name of the step and its icon. You can click to the
left of the step icon to toggle the breakpoint for the step.
•
Description—Displays a description of the step that varies according
to the type of step and the adapter with which it was created.
•
Execution Flow—Indicates whether the properties of the step are set
to control the flow of execution in the sequence. The following values
can appear in this column:
© National Instruments Corporation
–
Precondition—Indicates that the step has a precondition.
–
Post Action—Indicates that the step has a post action.
–
Loop—Indicates that step has been configured to loop.
–
Skip—Indicates that the run mode of the step has been set to
SKIP.
–
Force Pass—Indicates that the run mode of the step has been set
to PASS.
–
Force Fail—Indicates that the run mode of the step has been set
to FAIL.
–
Lock—Indicates that the step acquires a lock that prevents the
step from executing concurrently with other steps that acquire the
same lock.
–
Batch—Indicates that the step specifies an explicit batch
synchronization setting that synchronizes the execution of the step
5-13
TestStand User Manual
Chapter 5
Sequence Files
on the set of system test sockets when the step runs in a batch
execution.
–
•
New Thread/New Execution—Indicates that the step is a
sequence call that launches a subsequence in a new thread or a
new execution.
Comment—Displays the comment for the step that you specify in the
Step Properties dialog box.
Figure 5-11 shows the list view displaying step properties.
Figure 5-11. Step Group List View Columns for Step Properties
When the list view displays step properties, it contains the following
columns:
TestStand User Manual
•
Field—Displays the names and icons for the subproperties of the step
property that is currently selected in the tree view. If the property
selected in the tree view contains a value or array of values, the value
names and icons also appear in this column.
•
Type—Displays the data type of each subproperty or value.
•
Value—Displays the current value for each subproperty or value
element.
•
Comment—Displays the comment for each subproperty.
5-14
ni.com
Chapter 5
Sequence Files
To expand a column to the width of its largest entry you can double-click the vertical
separator at the right edge of the column heading.
Note
Step Group Context Menu
To access a context menu, right click the tree view or list view. The items
in the context menu vary depending on the whether you right click the
following sites:
•
A step
•
A step property
•
The background area of the tree view
•
The background of the list view
This section describes the items that the context menu can contain.
Insert Step
The Insert Step menu item has a submenu from which you select the type
of step you want to insert into the sequence. Figure 5-12 shows the Insert
Step submenu.
Figure 5-12. Insert Step Menu with LabVIEW Standard Prototype Adapter Selected
Many of the steps types in the Insert Step submenu allow you to call code
modules. Of these step types, some can work with all module adapters, and
others require a specific module adapter. Each adapter allows you to call a
category of code modules, such as LabVIEW VIs, LabWindows/CVI
© National Instruments Corporation
5-15
TestStand User Manual
Chapter 5
Sequence Files
source or object modules, or DLLs. Some adapters also know how to
control the application development environments in which you build these
types of code modules.
Before you insert a step that can call a code module using any adapter, you
must select the appropriate module adapter for the type of code module you
want the step to call. You use the pull-down ring control in the sequence
editor tool bar to select a module adapter. The pull-down ring control shows
an icon for each adapter. When a step type in the Insert Step submenu can
work with any adapter, the icon for the module adapter that is currently
selected in the toolbar appears beside that step type. When you insert a step,
the adapter icon also appears beside the step name. After you create a step
with a particular module adapter, you cannot change its module adapter
assignment.
When a step type in the Insert Step submenu works with only one specific
module adapter, the icon for that module adapter appears beside that step
type. After you insert a step using one of these step types, the adapter icon
also appears beside the step name.
When you insert a step that does not call a code module, such as a Goto or
Label step, the currently selected adapter has no effect. These step types
have unique icons. These icons appear next to these step types in the Insert
Step submenu and next to the steps that you create using these step types.
Edit
The full name of the Edit menu item varies according to the type of the
selected step. For example, the menu item name is Edit Message Settings
for a Message Popup step, Edit Limits for a Numeric List Test step, and
Edit Destination for a Goto step. For each step, the menu item invokes a
dialog box in which you edit the settings that are unique to the type of the
step. Some step types, such as the Label step and the Action step, do not
have step-type-specific settings. For these step types, this menu item is
disabled. A step type may provide more than one Edit menu item so that
you can use separate dialog boxes to edit unrelated step functionality.
Specify Module
The Specify Module command displays a Specify Module dialog box for
the selected step. The dialog box that appears depends on the module
adapter for the step. You use the Specify Module dialog box to specify the
code module that the step calls. You also can specify options that TestStand
uses when it calls the step. Refer to Chapter 13, Module Adapters, for more
information on the Specify Module dialog box for each adapter.
TestStand User Manual
5-16
ni.com
Chapter 5
Sequence Files
Edit Code
The Edit Code command displays the source code for the code module that
the step calls. TestStand uses the module adapter for the step to determine
the appropriate application in which to display the source code.
Toggle Breakpoint
The Toggle Breakpoint command sets or clears the breakpoint state for the
selected steps.
Run Mode
The Run Mode menu item displays a submenu from which you can set the
following run mode values for the selected steps.
•
Force Pass—TestStand does not execute the step. Instead, TestStand
sets the status of the step to Passed automatically.
•
Force Fail—TestStand does not execute the step. Instead, TestStand
sets the status of the step to Failed automatically.
•
Skip—TestStand does not execute the step. Instead, TestStand sets the
status of the step to Skipped automatically.
•
Normal—This value tells TestStand to execute the step normally.
This is the default value.
Run Selected Steps
The Run Selected Steps command runs the selected steps in interactive
mode. Refer to the Interactively Executing Steps section in Chapter 6,
Sequence Execution, for more information on running steps in interactive
mode.
Run Selected Steps Using
To interactively execute selected steps using the process model entry point
you select, choose Run Selected Steps Using. When you execute the steps
with an entry point such as Single Pass, the process model can generate a
report and log the results to a database. The Run Selected Steps Using
command is available only in a sequence file window.
© National Instruments Corporation
5-17
TestStand User Manual
Chapter 5
Sequence Files
Loop Selected Steps
The Loop Selected Steps command loops on the selected steps in
interactive mode. Before running the steps, this command displays a dialog
box that you use to specify how many times to loop. Refer to the Loop on
Selected Steps section in Chapter 4, Sequence Editor Menu Bar, for more
information on this command. Refer to the Interactively Executing Steps
section in Chapter 6, Sequence Execution, for more information on running
steps in interactive mode.
Loop on Selected Steps Using
Use Loop on Selected Steps Using to interactively loop on the selected
steps using the process model entry point you select. When you loop on
steps with an entry point such as Single Pass, the process model can
generate a report and log the results to a database. The Loop on Selected
Steps Using command is available only in a sequence file window.
Open Tree View
The Open Tree View command moves the step group divider bar away
from the left edge of the window so that the tree view is visible. You can
use the tree view to browse the custom properties contained in each step.
Close Tree View
The Close Tree View command moves the step group divider bar flush
against the left edge of the window to hide the tree view. The command also
causes the list view to display the steps in the step group.
View Contents
The View Contents command displays the tree view node that corresponds
to the currently selected item in the list view. The list view then displays
the contents of the item. If the tree view is currently closed, it opens to
display the selected node. You use this command to view the subproperties
of steps and properties.
Go Up One Level
The Go Up One Level command selects the next higher level node in the
tree view. The list view displays the contents of the newly selected node.
If you invoke this command when the highest level node is selected in the
tree view, the Sequence File window displays the All Sequences view.
TestStand User Manual
5-18
ni.com
Chapter 5
Sequence Files
Browse Sequence Context
The Browse Sequence Context command displays a tree view that
contains the names of variables, sequence parameters, and step properties
you can access from expressions and step modules when the selected step
is running. This command also appears in the View menu of the sequence
editor menu bar. Refer to the View Menu section in Chapter 4, Sequence
Editor Menu Bar, for more information.
Sequence Properties
The Sequence Properties command displays the Sequence Properties
dialog box. Refer to the Sequence View Context Menu section earlier in this
chapter for more information on the Sequence Properties dialog box.
Step Properties Dialog Box
The Properties command displays the Properties dialog box for the
selected step or property. If the selected item is a property, you can use the
Properties dialog box to edit the value of the property. If the selected item
is a step, the Step Properties dialog box appears with General, Run Options,
Post Actions, Loop Options, Synchronization, and Expressions tabs in
which you can set characteristics of the step.
© National Instruments Corporation
5-19
TestStand User Manual
Chapter 5
Sequence Files
General Tab
Figure 5-13 shows the General tab in the Step Properties dialog box.
Figure 5-13. General Tab in the Step Properties Dialog Box
The General tab contains the following controls:
TestStand User Manual
•
Comment—Places a comment for the step in the Step Group list view.
The step comment also appears in the documentation that TestStand
generates for the sequence file.
•
Edit—Displays a dialog box you use to edit the settings that are
unique to the type of the step. The button caption varies according to
the type of the step. For example, Figure 5-12 shows an Edit Limits
button. For more information, refer to the discussion of the Edit
context menu item earlier in this chapter.
5-20
ni.com
Chapter 5
Sequence Files
•
Specify Module—Displays the Specify Module dialog box for the
selected step. The dialog box that appears depends on the module
adapter for the step. You use the Specify Module dialog box to specify
the code module that the step calls. You also can specify options that
TestStand uses when it calls the step. Refer to Chapter 13, Module
Adapters, for more information on the Specify Module dialog box for
each adapter.
•
Preconditions—Displays the Preconditions dialog box, where you
specify the conditions that must be true for the step to execute. Refer
to the Preconditions Dialog Box section in this chapter for more
information.
Run Options Tab
Figure 5-14 shows the Run Options tab in the Step Properties dialog box.
Figure 5-14. Run Options Tab in the Step Properties Dialog Box
© National Instruments Corporation
5-21
TestStand User Manual
Chapter 5
Sequence Files
The Run Options tab contains the following controls:
•
•
Load Option—Specifies one of the following load option settings for
the step.
–
Preload when opening sequence file—Loads the step module
when TestStand loads into memory the sequence that contains the
step.
–
Preload when execution begins—Loads the step module when
any sequence in the sequence file that contains the step begins
executing. This value is the default setting.
–
Load dynamically—Does not load the step module until the step
is ready to call it.
Unload Option—Specifies one of the following Unload Option
settings for the step.
–
Unload when precondition fails—Unloads the step module
when the precondition for the step evaluates to False.
–
Unload after step executes—Unloads the step module after the
step finishes executing.
–
Unload after sequence executes—Unloads the step module after
the sequence that contains it finishes executing.
–
Unload when sequence file is closed—Unloads the step module
when TestStand unloads the sequence file that contains the step
from memory. This value is the default setting.
If you enable the general sequence property Optimize Non-Reentrant Calls to This
Sequence, TestStand does not unload the code modules for the sequence until after the
execution ends, regardless of the unload options for the sequence file or the steps in the
sequence.
Note
•
TestStand User Manual
Run Mode—Sets the following run-mode values for the step.
–
Force Pass
–
Force Fail
–
Skip
–
Normal
5-22
ni.com
Chapter 5
•
•
Sequence Files
Precondition Evaluation in Interactive Mode—Determines whether
TestStand evaluates the step precondition when you run the step
interactively. The control contains the following options:
–
Use Station Options
–
Evaluate Precondition
–
Do Not Evaluate Precondition
TestStand Window Activation—Determines whether the TestStand
application activates its window when the step completes. The control
contains the following options:
–
No Activation
–
Activate When Step Completes
–
If Initially Active, Reactivate When Step Completes
•
Record Results—Determines whether the contents of the Result
property for the step are added to the result list for the sequence. Refer
to the Result Collection section in Chapter 6, Sequence Execution, for
more information on result collection.
•
Breakpoint—Causes TestStand to break at this step before executing
it. You also can set the breakpoint state for a step by selecting the
Toggle Breakpoint item in the context menu or by clicking to the left
of the step icon in the sequence editor.
•
Step Failure Causes Sequence Failure—TestStand maintains an
internal status value for each executing sequence. When TestStand sets
the status property of a step to Failed, and you have enabled the Step
Failure Causes Sequence Failure option for the step, TestStand sets the
internal sequence status value to Failed. If the internal status of the
sequence is Failed when the sequence returns, TestStand sets the
status of the calling step to Failed. This affects steps that use the
Sequence Call step type or the Action step type when the adapter is the
Sequence adapter. Steps that use the Pass/Fail Test, Numeric Limit
Test, and String Value Test step types with the Sequence adapter
overwrite the step status.
•
Ignore Run-time Errors—Prevents the step from reporting a
run-time error to the sequence. When a step causes a run-time error, the
step stops executing, and TestStand sets the status of the step to Error.
If you disable this option, TestStand also sets the internal status of the
sequence to Error, and execution branches to the Cleanup step group
for the sequence. If you enable this option, TestStand does not set the
internal status of the sequence to Error. Instead, TestStand resets the
© National Instruments Corporation
5-23
TestStand User Manual
Chapter 5
Sequence Files
Error.Occurred property of the step to False and execution
continues normally with the next step. The value of the
Result.Status property remains set to Error for the step.
If the step is a sequence call, the Run Options tab displays two addition
controls:
•
•
Sequence Call Trace Setting—Controls tracing for calls to a
subsequence. You can choose one of the following options.
–
Use current trace setting—Maintains the current tracing state
when it calls the subsequence. This is the default value. Usually,
only process model files use other values for this option.
–
Enable tracing in sequence—Enables tracing for calls to the
subsequence, and it restores the original tracing state when the
subsequence returns.
–
Disable tracing in sequence—Disables tracing for calls to the
subsequence, and restores the original tracing state when the
subsequence returns. However, if you enable the Allow Tracing
into Sequence Calls Marked with Tracing Off option in the Station
Options dialog box, TestStand ignores this setting and does not
alter the tracing state when it calls the subsequence.
–
Use Initial Execution Setting—Enables the tracing state unless
the execution was created with tracing disabled. Typically, a
process model uses this setting to control the tracing state when
the model calls the main sequence in the client file.
Ignore Termination —Controls what happens when a subsequence
that you call from this step causes execution to terminate. If you enable
this option, TestStand terminates the subsequence, sets the status of the
calling step to Terminated, but allows the calling sequence to
proceed normally from the next step. Usually, only process model files
use this option. This option has no effect when execution aborts. Refer
to the Terminating and Aborting Executions section in Chapter 1,
TestStand Architecture Overview, for more information on execution
termination.
Post Actions Tab
The Post Actions tab in the Step Properties dialog box specifies an action
that occurs after a step executes. You can make the action conditional on
the Pass/Fail status of the step or on any custom condition.
TestStand User Manual
5-24
ni.com
Chapter 5
Sequence Files
Figure 5-15 shows the Post Actions tab in the Step Properties dialog box.
Figure 5-15. Post Actions Tab in the Step Properties Dialog Box
The Post Actions tab contains the following controls:
•
On Pass—Specifies an action that occurs when the step completes and
its status is Passed.
•
On Fail—Specifies an action that occurs when the step completes and
its status is Failed.
•
Destination—Specifies the destination step for the On Pass, On Fail,
On Condition True, and On Condition False controls.
For steps that do not have a Passed or Failed status, you can use a custom condition.
For example, the TestStand engine sets the status of an Action step type to Done, rather
than Passed or Failed. You can select the Specify Custom Condition checkbox and enter a
custom condition expression that evaluates to True or False. Then select the appropriate
Post Actions in the On Condition True and On Condition False ring controls. If you want
Note
© National Instruments Corporation
5-25
TestStand User Manual
Chapter 5
Sequence Files
to unconditionally perform a post action, you can enter True, in the Custom Condition
Expression control.
•
Specify Custom Condition—Specifies that a custom condition
controls the post action for the step.
•
Custom Condition Expression—Specifies the Boolean expression
that controls the post action for the step.
•
On Condition True—Specifies the action that occurs when the step
completes and the custom condition expression evaluates to True.
•
On Condition False—Specifies the action that occurs when the step
completes and the custom condition expression evaluates to False.
The following post actions appear in the ring controls for the On Pass,
On Fail, On Condition True, and On Condition False controls:
•
Goto next step—Execution continues normally with the next step.
This is the default value.
•
Goto destination—Execution branches to the destination you select.
You can branch to any step in the current step group, to the end of the
current step group, or to the Cleanup step group. If the post action for
a step specifies that execution branches to the Cleanup step group and
the current step is in the Cleanup step group, execution proceeds
normally with the next step in the Cleanup group.
•
Terminate execution—Execution terminates. Refer to the
Terminating and Aborting Executions section in Chapter 1, TestStand
Architecture Overview, for more information on execution
termination.
•
Call sequence—TestStand calls a sequence before continuing to the
next step. You can select any sequence in the sequence file. TestStand
does not pass any arguments to the sequence. If the sequence has
parameters, TestStand uses their default values.
•
Break—TestStand breakpoints before continuing to the next step.
Loop Options Tab
The Loop Options tab in the Step Properties dialog box configures an
individual step to run repeatedly in a loop when it executes. To loop on
several steps at once, place the steps in a new sequence, create a Sequence
Call step that calls the sequence, and loop on the Sequence Call step.
Figure 5-16 shows the Loop Options tab in the Step Properties dialog box.
TestStand User Manual
5-26
ni.com
Chapter 5
Sequence Files
Figure 5-16. Loop Options Tab in the Step Properties Dialog Box
The Loop Options tab displays the following options:
•
© National Instruments Corporation
Loop Type—Specifies the type of looping for the step:
–
None—TestStand does not loop on the step. This is the default
value.
–
Fixed number of loops—TestStand loops on the step a specific
number of times and determines the final pass or fail status of the
step based on the percentage of loop iterations in which the step
status is Passed.
–
Pass/Fail count—TestStand loops on the step until the step
passes or fails a specific number of times or until a maximum
number of loop iterations complete. TestStand determines the
final status of the step based on whether the specific number of
passes or failures occur or based on the number of loop iterations
reaches the maximum.
5-27
TestStand User Manual
Chapter 5
Sequence Files
–
Custom—Customizes the looping behavior for the step. You
specify a Loop Initialization expression, a Loop Increment
expression, a Loop While expression, and a final Loop Status
expression. The following example code illustrates the order in
which TestStand uses the loop expressions.
Loop_Initialization_Expression;
while (Loop_While_Expression == True)
{
Execute_Step;
Loop_Increment_Expression;
}
Loop_Status_Expression;
•
Record Result of Each Iteration—Adds the step result to the
sequence results list after each loop iteration. TestStand also adds the
final result that it computes for the step loop as a whole if you have
enabled the Record Results property for the step. Refer to the Result
Collection section in Chapter 6, Sequence Execution, for more
information on result collection.
You do not have to use the Loop Options tab to cause execution to iterate for a step
or for series of steps. Instead, you can use a Goto step to create a loop inside your sequence.
You can use the preconditions for the Goto step in combination with any number of
variables to control the loop.
Note
Synchronization Tab
The Synchronization tab in the Step Properties dialog box specifies a
synchronization action that TestStand performs around the execution of the
step. You can specify that a lock protects the execution of the step or that
the step synchronizes with other steps in a batch execution.
TestStand User Manual
5-28
ni.com
Chapter 5
Sequence Files
Figure 5-17 shows the Synchronization tab in the Step Properties dialog
box.
Figure 5-17. Synchronization Tab in the Step Properties Dialog Box
The Synchronization tab contains the following controls:
•
Use Lock to Allow Only One Thread to Execute the
Step—Specifies that the step acquires a lock before it executes and
releases the lock after it completes.
•
Lock Name or Reference Expression—Specifies which lock the step
acquires and releases. Enter a string expression to specify the name of
an existing lock. You also can enter an expression that evaluates to an
ActiveX reference to an existing lock object. Leave the control empty
to specify that TestStand uses a lock that is unique to the step.
•
Batch Synchronization—Specifies the batch synchronization
operation that the step enters before it executes and exits after it
completes. Refer to the Batch Synchronization section of Chapter 11,
© National Instruments Corporation
5-29
TestStand User Manual
Chapter 5
Sequence Files
Synchronization Step Types, for more information on batch
synchronization operations.
Expressions Tab
You use the Expressions tab to specify optional expressions that TestStand
evaluates before or after it calls the step module.
Figure 5-18 shows the Expressions tab in the Step Properties dialog box.
Figure 5-18. Expressions Tab in the Step Properties Dialog Box
The Expressions tab contains the following controls:
•
TestStand User Manual
Pre Expression—Specifies an expression that TestStand evaluates
before it calls the step module. Usually, you use this expression to set
the value of a custom step property from the values of other variables
and properties.
5-30
ni.com
Chapter 5
Sequence Files
•
Post Expression—Specifies an expression that TestStand evaluates
after it calls the step module. Usually, you use this expression to set the
value of one of the subproperties in the Result property of the step
based on the values of other variables and properties.
•
Status Expression—Sets the status property for the step. Because the
status is a string property, this expression must evaluate to a string.
If you leave an expression field empty, TestStand does not evaluate it.
Certain types of steps such as Numeric Limit Tests, String Value Tests, Pass/Fail
Tests, and Statement steps reserve one or more of these expressions to perform operations
specific to the type of step. In these cases, you cannot use the expressions that the step type
reserves. The expressions appear dimmed in the tab.
Note
Parameters Tab
Sequences can have steps that call other sequences. A sequence can have
parameters so that you can pass values to it and receive values from it. You
define the parameters for a sequence on the Parameters tab. Figure 5-19
shows the Parameters tab for an example sequence.
Figure 5-19. Parameters Tab
Lifetime of Local Variables, Parameters,
and Custom Step Properties
Multiple instances of a sequence can run at the same time. This situation
can occur when you call a sequence recursively or when a sequence runs in
multiple concurrent threads. Each instance of the sequence has its own
copy of the sequence parameters, local variables, and custom properties of
each step. When a sequence completes, TestStand discards the values of the
parameters, local variables, and custom properties.
© National Instruments Corporation
5-31
TestStand User Manual
Chapter 5
Sequence Files
Parameters Tab Context Menu
To access a context menu, right click the tree view or list view on the
Parameters tab. The items in the context menu vary depending on whether
you right click the following sites:
•
A parameter
•
A parameter subproperty
•
The background area of the tree view
•
The background of the list view
This section describes the items that the context menu can contain.
Insert Parameter
The Insert Parameter menu item has a submenu from which you select the
data type for the parameter you want to insert. Figure 5-20 shows the Insert
Parameter submenu in a sequence.
Figure 5-20. Insert Parameter Submenu
If you want to insert a parameter with a custom data type, you must create
a named data type. You can create a named data type in the Sequence File
Types view of the Sequence File window or in the Types Palette window.
Refer to Chapter 9, Types, for more information on types and type editing.
TestStand User Manual
5-32
ni.com
Chapter 5
Sequence Files
After you create the named data type, it appears in the Types submenu of
the Insert Parameter submenu.
View Contents
The View Contents command selects the tree view node that corresponds
to the currently selected item in the list view. The list view then displays
the contents of the item. If the tree view is currently closed, it opens to
display the selected node. You use this command to view the subproperties
of sequence parameters.
Go Up One Level
The Go Up One Level command selects the next higher level node in the
tree view. The list view displays the contents of the newly selected node.
If you invoke this command when the highest-level node is selected in the
tree view, the Sequence File window displays the All Sequences view.
Browse Sequence Context
The Browse Sequence Context command displays a tree view that
contains the names of variables and sequence parameters you can access
from expressions and step modules when the sequence is running. This
command also appears in the View menu of the sequence editor menu bar.
Refer to the View Menu section in Chapter 4, Sequence Editor Menu Bar,
for more information.
Rename
The Rename command allows you to edit the name of the selected
parameter or subproperty.
Pass By Reference
The Pass By Reference command tells TestStand that the parameter is a
reference to the argument that the calling sequence passes to the parameter.
Passing a parameter by reference allows the subsequence to change the
actual value of the argument in the calling sequence.
If you disable the Pass By Reference command for a parameter, TestStand
copies the argument value that the calling sequence passes as the parameter.
This prevents the subsequence from changing the value of the argument in
the calling sequence. On the other hand, copying a large object or array that
you pass as a parameter can degrade performance.
© National Instruments Corporation
5-33
TestStand User Manual
Chapter 5
Sequence Files
You enable the Pass By Reference command if you want to return a value
from a subsequence to the calling sequence. You also can enable the option
to reduce the time it takes to pass a large object or array to a subsequence.
You disable the option if you want to guarantee that any changes that a
subsequence makes to a parameter does not affect the argument in the
calling sequence.
Do not pass a parameter by reference to a subsequence you call in a separate thread
unless you are certain that you want the new thread to see changes that you make to the
variable in the calling sequence after the sequence call returns.
Note
Check Type
The Check Type option tells TestStand to verify that the data type of the
argument you pass as a parameter is compatible with the data type of the
parameter. For example, TestStand reports a run-time error if you set this
option for a String parameter and then pass a numeric value instead.
Although type checking is usually a fast operation, you can turn this option
off if you want to avoid any possible overhead. You also can turn this option
off if you want to pass arguments with different types in the same parameter
field for calls. To pass arguments in this way, you specify Container as
the data type for the parameter and you disable the Check Type option.
You can use the PropertyExists expression function to determine
whether the argument that a calling sequence passes to your container
parameter contains a particular subproperty.
Parameter Properties
The Properties command displays a dialog box that you can use to change
the default value of a parameter or of one of its subproperties. TestStand
uses the default values for all the parameters to a sequence when you run
the sequence directly. When you call the sequence from a step in another
sequence and the step passes fewer arguments than the sequence has,
TestStand uses the default values for the remaining sequence parameters.
Locals Tab
Sequences can have any number of local variables. You can use local
variables to hold values that you set or get in step modules. You also can
use local variables for maintaining counts, for holding intermediate values,
or for any other purpose. Refer to the Using Data Types section in
Chapter 9, Types, for more information on using local variables.
TestStand User Manual
5-34
ni.com
Chapter 5
Sequence Files
Figure 5-21 shows the Locals tab for an example sequence.
Figure 5-21. Locals Tab
Lifetime of Local Variables, Parameters,
and Custom Step Properties
Multiple instances of a sequence can run at the same time. This situation
can occur when you call a sequence recursively or when a sequence runs in
multiple concurrent threads. Each instance of the sequence has its own
copy of the sequence parameters, local variables, and custom properties of
each step. When a sequence completes, TestStand discards the values of the
parameters, local variables, and custom properties.
Locals Tab Context Menu
To access a context menu, right click the tree view or list view on the
Locals tab. The items in the context menu vary depending on whether you
right click the following sites:
•
A local variable
•
A local variable subproperty
•
The background area of the tree view
•
The background of the list view
This section describes the items that the context menu can contain.
© National Instruments Corporation
5-35
TestStand User Manual
Chapter 5
Sequence Files
Insert Local
The Insert Local menu item has a submenu from which you select the data
type for the local variable you want to insert. Figure 5-22 shows the Insert
Local submenu in a sequence view.
Figure 5-22. Insert Local Submenu
If you want to insert a local variable with a custom data type, you must
create a named data type. You can create a named data type in the Sequence
File Types view of the Sequence File window or in the Types Palette
window. Refer to Chapter 9, Types, for more information on types and type
editing. After you create the named data type, it appears in the Types
submenu of the Insert Local submenu.
If you create an array, an Array Bounds dialog box appears. Refer to the
Specifying Array Sizes section in Chapter 9, Types, for more information on
the Array Bounds dialog box.
Notice that sequences always start with one local variable, ResultList.
If you delete this local variable, TestStand cannot collect results for the
sequence. Refer to the Result Collection section in Chapter 6, Sequence
Execution, for more information on the results list.
View Contents
The View Contents command selects the tree view node that corresponds
to the currently selected item in the list view. The list view then displays
the contents of the item. If the tree view is currently closed, it opens to
display the selected node. You use this command to view the subproperties
of local variables.
TestStand User Manual
5-36
ni.com
Chapter 5
Sequence Files
Go Up One Level
The Go Up One Level command selects the next higher level node in the
tree view. The list view displays the contents of the newly selected node.
If you invoke this command when the highest level node is selected in the
tree view, the Sequence File window displays the All Sequences view.
Browse Sequence Context
The Browse Sequence Context command displays a tree view that
contains the names of global variables, local variables, and sequence
parameters you can access from expressions and step modules when the
selected step is running. This command also appears in the View menu of
the sequence editor menu bar. Refer to the View Menu section in Chapter 4,
Sequence Editor Menu Bar, for more information.
Rename
The Rename command allows you to edit the name of the selected local
variable or subproperty.
Propagate to Subsequence
Set the Propagate to Subsequence option to specify that a local variable
appears at run time as a local variable in subsequences that the sequence
calls. The variable continues to propagate as the call chain extends.
Typically, you configure local variables to propagate in order to
automatically pass a set of values to all subsequences that a sequence calls.
Allow Propagation from Caller
Set the Allow Propagation from Caller option to specify which variable
takes precedence when a subsequence defines a variable with the same
name as a variable that a calling sequence propagates. If Allow
Propagation from Caller is not set, TestStand preserves the local variable
in the subsequence. If Allow Propagation from Caller is set, TestStand
replaces the variable in the subsequence with the variable that the caller
propagates.
When a propagated variable replaces an existing sequence variable,
TestStand generates an error if the types of the variables do not match.
Properties
The Properties command displays a dialog box you can use to change the
default value for the selected local variable or subproperty. TestStand sets
the values of the local variables to their default values when the sequence
© National Instruments Corporation
5-37
TestStand User Manual
Chapter 5
Sequence Files
begins executing. If the local variable or subproperty is an array, you use
the Bounds tab in the dialog box to change the array bounds.
Preconditions Dialog Box
TestStand has several features that you can use to control the flow of
execution in a sequence. These include the post actions for a step, the
preconditions for a step, and the Goto step type. You can combine these
features in various ways. For example, you can use the preconditions on a
Goto step to specify when to loop back to an earlier statement. This section
discusses the Preconditions dialog box.
To access the Preconditions dialog box, click the Preconditions button on
the Sequence Properties dialog box or click the Preconditions button on
the Step Properties dialog box. Figure 5-23 shows the Preconditions dialog
box for a sequence.
Figure 5-23. Preconditions Dialog Box for a Sequence
TestStand User Manual
5-38
ni.com
Chapter 5
Sequence Files
The Step Group and Step controls indicate the step to which the
preconditions apply. When you invoke the dialog box from the Sequence
Properties dialog box, you can use these controls to select any step group
and step in the sequence. When you invoke the dialog box from the Step
Properties dialog box, you cannot operate these controls.
The Preconditions list box shows the preconditions of the step. The label
above the list box includes the name of the step. The following items can
appear in the Preconditions list box:
•
Step status condition expression—Step status conditions refer to
the status of other steps in the sequence. In the list box, step status
conditions begin with PASS, NOT PASS, FAIL, NOT FAIL, ERROR, NOT
ERROR, EXECUTED, or NOT EXECUTED, followed by the name of the
step.
•
Arbitrary expression—You can enter an item that contains an
arbitrary expression.
•
AllOf block—Brackets multiple expressions and evaluates to True
only if all the expressions in the block evaluate to True. Each AllOf
block consists of a line containing AllOf and another line containing
End AllOf.
•
AnyOf block—Brackets multiple expression and evaluates to True if
one or more expressions in the block evaluate to True. Each AnyOf
block consists of a line containing AnyOf and another line containing
End AnyOf.
You can nest one or more blocks within another block. A block treats a
nested block as just another expression.
The following buttons appear in the Preconditions dialog box:
•
Cut or Copy—Cuts or copies the entire block that you select on an
AllOf or AnyOf line in the list box. The Cut and Copy buttons dim
when you select an End AllOf or End AnyOf line.
•
Insert New Expression—Inserts an empty arbitrary expression below
the current line in the Preconditions list box.
•
Insert AllOf—Inserts an empty AllOf block below the current line in
the Preconditions list box.
•
Insert AnyOf—Inserts an empty AnyOf block below the current line
in the Preconditions list box.
© National Instruments Corporation
5-39
TestStand User Manual
Chapter 5
Sequence Files
To nest a block within an existing block, select the AllOf or AnyOf line of
the existing block and click the Insert AnyOf or Insert AllOf button.
To add a block at the same level as an existing block, select the End AllOf
or End AnyOf line of the existing block and click the Insert AnyOf or
Insert AllOf button.
When you select an AllOf line, you can use the Change to AnyOf button
to change the block to an AnyOf block. When you select an AnyOf, you can
click the Change to AllOf button to change the block to an AllOf block.
When you select the AllOf line or AnyOf line of a block that contains only
one expression or that is nested within another block, you can use the
Ungroup button to remove the block but keep its contents.
You use the Edit/View Expression text box to view or modify an expression
line in the Preconditions list box. You can enter or modify the expression
manually in the text box. You also can use the Browse button to display an
expression browser dialog box in which you can interactively build an
expression from lists of available variables, properties, and expression
operators. Refer to Chapter 8, Sequence Context and Expressions, for more
information on expressions.
You use the Insert Step Status section of the dialog box to design a step
status expression. You use the ring control and list box to choose a step
group and step in the sequence. You can use the Negate checkbox to negate
the meaning of an expression. The following describes the command
buttons in this section:
•
Insert Step Pass—Inserts an expression that is True if the status for
the most recent execution of the selected step is Passed.
•
Insert Step Fail—Inserts an expression that is True if the status for
the most recent execution of the selected step is Failed.
•
Insert Step Error—Inserts an expression that is True if the status of
the most recent execution of the selected step is Error, which
indicates that a run-time error occurred in the step.
•
Insert Step Executed—Inserts an expression that is True if the status
for the most recent execution of the selected step is anything other than
an empty string.
If, for example, you select the ROM step, enable the Negate checkbox, and
click the Insert Step Pass button, TestStand inserts a line containing NOT
PASS ROM in the list box.
TestStand User Manual
5-40
ni.com
Chapter 5
Sequence Files
Sequence File Globals View
Each sequence file can contain any number of global variables. Figure 5-24
shows the contents of the Sequence File Globals view for an example
sequence, and also shows the ring control where you select this view.
Figure 5-24. Sequence File Globals View for an Example Sequence
Lifetime and Scope of Sequence File Global Variables
The Sequence File Globals control on the Sequence File properties dialog
box specifies the lifetime of the sequence file global variables. The default
setting, Separate File Globals for Each Expression, specifies that each
execution that runs the file creates a separate run-time copy of the global
variables and initializes them to their default values.
You also can specify a Sequence File Globals setting of All Executions
Share the Same File Globals. This setting specifies that the first execution
that runs the sequence file creates a run-time copy of the global variables
and initializes them to their default values. Any other execution that runs
the file concurrently uses the same global variables. When the last
execution that uses the file globals completes, TestStand discards the file
globals.
For either setting, if a sequence file unloads from memory and an execution
later reloads the file, the execution creates a new run-time copy of the file
globals and initializes them to their default values.
© National Instruments Corporation
5-41
TestStand User Manual
Chapter 5
Sequence Files
Any sequence in the file can access the global variables for the file.
A subsequence can access the global variables in the sequence file that
contains the calling sequence. It also can access the global variables in the
process model file and in the client sequence file explicitly, in one of the
following ways:
•
In an expression
•
In a call to the TestStand API
The sequence context contains references to the calling sequence, the main
sequence in the client sequence file, and the process model entry point
sequence. Refer to Chapter 8, Sequence Context and Expressions, for more
information.
Sequence File Globals View Context Menu
To access a context menu, right click the tree view or list view in the
Globals view. The items in the context menu vary depending on the
whether you right click the following sites;
•
A global variable
•
A global variable subproperty
•
The background of the tree view
•
The background of the list view
This section describes the items that the context menu can contain.
TestStand User Manual
5-42
ni.com
Chapter 5
Sequence Files
Insert Global
The Insert Global menu item has a submenu from which you select the
data type for the sequence file global variable you want to insert.
Figure 5-25 shows the Insert Global submenu.
Figure 5-25. Insert Global Submenu
If you want to insert a global variable with a custom data type, you must
create a named data type. You can create a named data type in the Sequence
File Types view of the Sequence File window or in the Type Palette
window. Refer to Chapter 9, Types, for more information on types and type
editing. After you create the named data type, it appears in the Types
submenu of the Insert Global submenu.
If you create an array, an Array Bounds dialog box appears. Refer to the
Specifying Array Sizes section in Chapter 9, Types, for more information on
the Array Bounds dialog box.
View Contents
The View Contents command selects the tree view node that corresponds
to the currently selected item in the list view. The list view then displays
the contents of the item. If the tree view is currently closed, it opens to
display the selected node. You use this command to view the subproperties
of sequence file global variables.
© National Instruments Corporation
5-43
TestStand User Manual
Chapter 5
Sequence Files
Go Up One Level
The Go Up One Level command selects the next higher level node in the
tree view. The list view displays the contents of the newly selected node.
Browse Sequence Context
The Browse Sequence Context command displays a tree view that
contains the names of the station global variables and sequence file global
variables that you can access from expressions and step modules when
sequences in the file are running. This command also appears in the View
menu of the sequence editor menu bar. Refer to the View Menu section in
Chapter 4, Sequence Editor Menu Bar, for more information.
Rename
The Rename command allows you to edit the name of the selected global
variable or subproperty.
Properties
The Properties command displays a dialog box that you can use to change
the default value for the selected global variable or subproperty. TestStand
sets the values of the global variables to their default values when the
sequence begins executing. If the globals variable or subproperty is an
array, you use the Bounds tab in the dialog box to change the array bounds.
TestStand User Manual
5-44
ni.com
Chapter 5
Sequence Files
Sequence File Types View
Sequence files contain the type definitions for every step, property, and
variable that the file contains. You can view the types that a sequence file
contains by selecting Sequence File Types from the sequence file
View ring control.
Figure 5-26 shows the Sequence File Type view for an example
sequence file.
Figure 5-26. Step Types Tab in Sequence File Types View
Refer to Chapter 9, Types, for more information on the types and type
editing.
Comparing and Merging Sequence Files
The TestStand Differ is a graphical tool in the Sequence Editor that enables
you to compare and merge differences between two sequence files. The
TestStand Differ compares the sequence files and presents the differences
in a new window.
To diff two sequence files, first activate the sequence file window for the file
that you want TestStand to designate as the original file. Next, select
Edit»Diff Sequence File With. From the Select Sequence File dialog box,
choose the file for TestStand to compare to the original sequence file. When
displaying differences, TestStand considers this second file to be a modified
version of the original file. Figure 5-27 shows the Differ window that
TestStand opens to display the differences between the original file and the
modified file.
© National Instruments Corporation
5-45
TestStand User Manual
Chapter 5
Sequence Files
Figure 5-27. Differ Window
The tree view at the left side of the Differ window shows a hierarchical view
of the items that differ between the two files. The two list view panes show
the contents of the differing item you select in the tree view. The top list
view pane shows the contents of the selected item in the original file. The
bottom list view pane shows the contents of the selected item in the
modified file.
Any insertions you make appear in green underlined text. Deletions appear
in blue strikethrough text. Differences between the original and modified
files appear in red. Move through the differences using the up and down
arrows or by using the options on the Edit»Diff menu.
TestStand User Manual
5-46
ni.com
Chapter 5
Sequence Files
You can display a context menu by right-clicking in the Differ window.
The items in the context menu vary depending on where you click in the
window. The context menu can contain the following items:
•
Copy Item to File—Copies the selected item to the other file in the
Differ window. You can choose this option only when the selected item
does not exist in the other file.
•
Replace Selected Items in File—Replaces the corresponding items in
the other file with the items you select. You can choose this option
when the selected items exist in both files but are different.
•
Apply Changes to Other File—Applies all changes within the
selected item to the other file. You can choose this option only when
you select a list view item that contains items with changes.
•
Apply Changes from <filename>—Applies the changes in the
selected tree view item from one file to the other.
•
Show Details of Differences—Displays a dialog box that shows the
item name, type of difference, and description of the currently selected
item.
•
Rediff Sequence Files—Recompares the two files. You might want to
use this option if you change a file in the differ such that an item in the
tree view no longer contains differences. Rediffing the files removes
items from the tree view that no longer contain differences.
•
Find Previous Difference—Selects the tree view item for the previous
difference between the two files.
•
Find Next Difference—Selects the tree view item for the next
difference between the two files.
•
Properties—Displays the Properties dialog box for the selected item.
For more information on the Properties dialog box, refer to the
Properties command in the Workspace Window section in Chapter 2,
Sequence Editor Concepts.
© National Instruments Corporation
5-47
TestStand User Manual
6
Sequence Execution
This chapter describes the execution of sequences in TestStand. It also
describes the Execution window in the TestStand sequence editor.
Sequence Editor and Run-Time Operator Interfaces
TestStand comes with a fully functional sequence editor and run-time
operator interfaces. Like the sequence editor, the run-time operator
interfaces allow you start multiple concurrent executions, set breakpoints,
and perform single-step debugging. However, the run-time operator
interfaces do not display sequence variables, sequence parameters, and
step properties, or allow you to use watch expressions.
What is an Execution?
An execution is an object that TestStand creates to contain all the
information that TestStand uses to run your sequence and the subsequences
it calls. When an execution is active, you can start other executions by
running the same sequence again or by running different sequences.
TestStand does not limit the number of executions you can run
concurrently. An execution starts with a single thread but it may launch
additional threads. When you suspend, terminate, or abort an execution,
you stop all threads in that execution but you do not affect threads in other
executions.
Whenever TestStand begins executing a sequence, it makes a run-time copy
of the sequence local variables and the custom properties of the sequence
steps. If the sequence calls itself recursively, TestStand creates a separate
run-time copy of the local variables and custom step properties for each
activation instance of the sequence. Modifications to the values of local
variables and custom step properties apply only to the run-time copy and
do not affect the sequence file in memory or on disk.
For each active execution, TestStand maintains an execution pointer,
that points to the current step, a call stack, and a run-time copy of the
local variables and custom properties for all sequences and steps on the
call stack.
© National Instruments Corporation
6-1
TestStand User Manual
Chapter 6
Sequence Execution
The Execution tab in the Station Options dialog box provides a number of
execution options that control tracing, breakpoints, and result collection.
Refer to the Station Options section in Chapter 4, Sequence Editor Menu
Bar, for more information on the station execution options.
Starting an Execution
You can initiate an execution by launching a sequence through a model
entry point, by launching a sequence directly, or by executing a group of
steps interactively.
Execution Entry Points
You can start execution through an entry point only if a sequence file that
contains a sequence with the name MainSequence occupies the active
window. A list of entry points appears in the Execute menu of the sequence
editor.
Each entry point in the menu represents a separate entry point sequence in
the process model which applies to the active sequence file. When you
select an entry point from the Execute menu, you are actually running an
entry point sequence in a process model file. The entry point sequence, in
turn, invokes the main sequence one or more times.
Execution entry points in a process model give the test station operator
different ways to invoke a main sequence. Entry points handle common
operations such as UUT identification and test report generation. For
example, the default TestStand process model provides two execution entry
points: Test UUTs and Single Pass. The Test UUTs entry point initiates
a loop that repeatedly identifies and tests UUTs. The Single Pass entry
point tests a single UUT without identifying it.
Refer to the Process Models section in Chapter 1, TestStand Architecture
Overview, and to Chapter 14, Process Models, for more information on
process models.
Executing a Sequence Directly
To execute a sequence without using a process model, select the Run
Sequence Name item in the Execute menu, where Sequence Name is the
name of the sequence you are currently viewing. This command executes
the sequence directly, skipping the process model operations such as UUT
identification and test report generation. You can execute any sequence this
TestStand User Manual
6-2
ni.com
Chapter 6
Sequence Execution
way, not only main sequences. Usually, you execute a sequence in this way
to perform unit testing or debugging.
Interactively Executing Steps
You can execute selected steps in a sequence interactively by choosing
Run Selected Steps or Loop Selected Steps from the context menu in the
sequence editor or by clicking the Run Tests or Loop Tests buttons in the
run-time operator interfaces.
In interactive mode, only the selected steps in the sequence execute,
regardless of any branching logic that the sequence contains. The selected
steps run in the order in which they appear in the sequence. However,
TestStand does honor the Run Mode property—force fail, force pass,
or skip—for a selected step.
If you execute steps in a Sequence File window, you initiate the interactive
execution as an independent top-level execution, or root interactive
execution. When you do so, you create a new execution. You can set station
options to control whether the Setup and Cleanup step groups of the
sequence run as part of the root interactive execution. Root interactive
executions do not invoke the process model.
If you execute steps in an Execution window when the execution is
suspended, you initiate the interactive execution as a nested interactive
execution, which is an extension of the suspended execution. In a nested
interactive execution, the selected steps run within the context of the
normal execution.
You can configure whether TestStand evaluates preconditions when
executing interactively by going to Configure»Station Options and
selecting the Evaluate Preconditions in Interactive Mode option on the
Execution tab.
Sequence Editor Execution Window
Operator interfaces usually provide a separate Execution window or view
for each execution that you start. For instance, the sequence editor displays
each execution in a separate window.
The Execution window is divided into several areas. The top half of the
window contains the Steps tab, Context tab, and Report tab. The bottom
half of the window is divided into the Call Stack pane and the Watch
Expression pane. A status bar appears at the bottom edge of the window.
© National Instruments Corporation
6-3
TestStand User Manual
Chapter 6
Sequence Execution
The Threads ring control lists all the threads running in the execution.
TestStand imposes no limit on the number of simultaneous executions or on
the number of threads running in an execution. Each entry in the ring
control contains the name of the active sequence in the call stack for the
thread. When you select a different thread from the ring control, the
contents of the various tabs and panes in the Execution window change to
display the state of the new thread.
Steps Tab
The Steps tab displays a list of the steps in the step group that is currently
executing. Figure 6-1 shows the Steps tab in the Execution window.
Figure 6-1. Steps Tab in the Sequence Editor Execution Window
When execution is suspended at a breakpoint, you can view the steps of any
of the sequences that are active on the call stack. Use the Call Stack pane
to select the active sequence to display on the Steps tab.
TestStand User Manual
6-4
ni.com
Chapter 6
Sequence Execution
Tracing
If tracing is enabled, the sequence editor displays the progress of an
execution by placing a yellow arrow icon to the left of the icon for the
currently executing step on the Steps tab. The arrow icon is called the
execution pointer. When execution suspends at a breakpoint, the Steps tab
displays the execution pointer next to the step that will run when execution
resumes. After each step completes, the Execution window updates the
contents of the Steps tab, the position of the execution pointer, and the
values of any watch expressions in the Watch panel.
If tracing is disabled, the Execution window does not update until execution
suspends at a breakpoint. The Step tab might display no steps at all, or it
might contain the steps and execution pointer that it displayed at the most
recent breakpoint.
Usually, you disable tracing if you want to avoid using computer time to
display the progress of your execution. You use the Tracing Enabled item
in the Execute menu to enable or disable tracing. You also can control
tracing from the Execution tab in the Station Options dialog box.
Debugging
The sequence editor and operator interfaces allow you to set breakpoints,
to step over or step into steps, to step out of sequences, and to set the next
step to execute. You also can terminate execution, abort execution, toggle
tracing, and run or loop on selected steps. In the sequence editor, these
commands are in the Execute menu and the Debug menu. Refer to the
Execute Menu and Debug Menu sections, in Chapter 4, Sequence Editor
Menu Bar, for more information on debugging commands.
Steps Tab Columns
As shown in Figure 6-1, the Steps tab contains the following columns:
•
Step—Displays the name and icon of the step. Click in the space to the
left of the step icon to toggle the breakpoint for the step.
•
Description—Displays a description of the step that varies according
to the type of step and the module adapter that it uses.
•
Status—Displays the value of the status property for the step. If the
step has not yet executed, its status is an empty string. After the step
executes, its status reflects the result of its execution. Possible status
values can vary based on the type of step. Typical values include
Passed, Failed, Done, and Error. Refer to the Step Status section
in this chapter for more information on step status values.
© National Instruments Corporation
6-5
TestStand User Manual
Chapter 6
Sequence Execution
•
Execution Flow—Indicates the properties that the step uses to control
the flow of execution in the sequence. The values that can appear in
this column and their meanings are as follows:
–
Precondition—Indicates that the step has a precondition.
–
Post Action—Indicates that the step has a post action.
–
Loop—Indicates that step is configured to loop.
–
Skip—Indicates that the run mode of the step is Skip.
–
Force Pass—Indicates that the run mode of the step is Force Pass.
–
Force Fail—Indicates that the run mode of the step is Force Fail.
–
New Thread—Indicates that the step calls a subsequence that
runs in a new thread.
–
New Execution—Indicates that the step launches a subsequence
in a new execution.
–
Lock—Indicates that the step acquires a lock before executing
and releases the lock after it completes.
–
Batch—Indicates that the step enters a batch synchronization
section before executing and exits the section after it completes.
Steps Tab Context Menu
When execution is suspended at a breakpoint, you can access a context
menu for the Steps tab by right-clicking the name or icon of a step. The
context menu can contain the following items.
Toggle Breakpoint
The Toggle Breakpoint command sets or clears the breakpoint state for the
selected steps.
Run Mode
The Run Mode menu item displays a submenu from which you can set the
run mode for the selected steps. The following run mode values are
possible.
TestStand User Manual
•
Force Pass—TestStand does not execute the step. Instead, TestStand
sets the status of the step to Passed.
•
Force Fail—TestStand does not execute the step. Instead, TestStand
sets the status of the step to Failed.
6-6
ni.com
Chapter 6
Sequence Execution
•
Skip—TestStand does not execute the step. Instead, TestStand sets the
status of the step to Skipped.
•
Normal—TestStand executes the step normally. This is the default
value.
Set Next Step
The Set Next Step command tells TestStand to start from the selected step
when you resume execution.
Run Selected Steps
The Run Selected Steps command runs the selected steps in interactive
mode.
Loop Selected Steps
The Loop Selected Steps command loops on the selected steps in
interactive mode. Before running the steps, this command displays a dialog
box in which you specify the number of times to loop, and a stop condition
that TestStand evaluates after it executes each step.
Show Step in Context Tab
The Show Step in Context Tab command moves from the Steps tab to the
Context tab and selects the step that you were viewing on the Steps tab.
Usually, you use this command to view the values of the custom properties
of a step after it executes.
Properties
The Properties command displays the Step Properties dialog box for the
selected step. Usually, most controls in the dialog box are disabled, because
you cannot edit most step properties during an execution.
Context Tab
The Context tab displays the sequence context for the sequence invocation
that is currently selected in the Call Stack pane. The sequence context
contains all the variables and properties that the steps in the selected
sequence invocation can access.
You use the Context tab to examine and modify the values of these variables
and properties. You can drag individual variables or properties from the
Context tab to the Watch Expression pane so that you can view changes in
their values while you single-step or trace through the sequence. When
© National Instruments Corporation
6-7
TestStand User Manual
Chapter 6
Sequence Execution
execution completes, the Context tab disappears. Refer to Chapter 8,
Sequence Context and Expressions, for more information on sequence
contexts.
Figure 6-2 shows the Context tab for an example sequence in which
execution is suspended.
Figure 6-2. Context Tab in an Execution Window
The sequence context view contains entries for each step in the sequence.
To locate a particular step on the Context tab, select the Show Step in
Context Tab item from the context menu for a step on the Steps tab.
Context Tab Context Menu
When execution is suspended, you can access a context menu for the
Context tab by right clicking a variable or property. The context menu can
contain the following items.
View Contents
The View Contents command selects the tree view node that corresponds
to the currently selected item in the list view. If the tree view is currently
closed, it opens to display the selected node. You use this command to view
the subproperties of variables and properties.
TestStand User Manual
6-8
ni.com
Chapter 6
Sequence Execution
Refresh
When an execution suspends, other executions that are not suspended can
change the values of station global variables that appear on the Context tab
for the suspended execution. You can use the Refresh command to update
the Context tab so that it displays the current values of the station global
variables.
Object Properties
The Properties command displays a dialog box that you use to change the
current value of the selected variable or property.
Report Tab
The Report tab displays the report for the current execution. When you use
the default process model, the Report tab is empty until execution
completes.
By default, an execution generates a report only when you start the
execution through a model entry point such as Test UUTs or Single
Pass. To set options that control report generation, select
Configure»Report Options. The default process model can generate
reports in either HTML or ASCII text formats.
The Report tab in the sequence editor can display reports in HTML or
ASCII text format. You also can use an external application to view reports
in these or other formats by selecting View»Launch Report Viewer when
an Execution window is active. You use Configure»External Viewers to
specify the external application that TestStand launches to display a
particular report format.
The sequence editor uses the Internet Explorer component to display
HTML reports. If your sequence generates a very large number of results,
this component can take a substantial amount of time to load and display
the report. If the report does not appear in an acceptable amount of time
after the process model generates it, you can use Configure»Report
Options to specify a filter expression that reduces the number of results in
the report. Another way to display a large report quickly is to change the
report format to ASCII text.
When you select the Report tab, TestStand hides the Call Stack and Watch
Expression panes so that it can use the entire Execution window to display
the report. Refer to Chapter 14, Process Models, for more information on
report generation.
© National Instruments Corporation
6-9
TestStand User Manual
Chapter 6
Sequence Execution
Figure 6-3 shows an HTML report for an example sequence.
Figure 6-3. HTML Report for an Example Sequence
TestStand User Manual
6-10
ni.com
Chapter 6
Sequence Execution
Call Stack Pane
Usually, when a step invokes a subsequence, the sequence that contains
the calling step waits for the subsequence to return. The subsequence
invocation is nested in the invocation of the calling sequence. The sequence
that is currently executing is the most nested sequence. The chain of active
sequences that are waiting for nested subsequences to complete is called
the call stack. The last item in the call stack is the most nested sequence
invocation.
The Call Stack pane displays the call stack for the execution thread that is
currently selected in the Thread ring control. A yellow pointer icon appears
to the left of the most nested sequence invocation. The call stack in
Figure 6-4 shows that the Test UUTs model entry is calling the main
sequence in Computer.seq, which in turn is calling the main sequence in
the CPU.seq.
Figure 6-4. Call Stack Pane while Suspended in a Subsequence
When execution suspends, you can select a sequence invocation in the call
stack by clicking its radio button. The Steps tab displays the steps for the
sequence invocation. The Watch Expression pane evaluates its watch
expressions using the sequence context for the selected sequence
invocation. In Figure 6-5, the main sequence from Computer.seq is
selected in the Call Stack pane.
© National Instruments Corporation
6-11
TestStand User Manual
Chapter 6
Sequence Execution
Figure 6-5. Steps Tab Displaying a Sequence Invocation in the Middle of the Call Stack
When the steps view displays the steps for a call stack item that is not the
most nested item, a green pointer icon appears next to the sequence call step
that is waiting to complete.
Watch Expression Pane
The Watch Expression pane displays the values of watch expressions that
you enter. TestStand updates the values in the Watch Expression pane
when execution suspends at a breakpoint. If tracing is enabled, TestStand
also updates the values after executing each step.
Usually, you enter watch expressions to monitor the values of variables and
properties as you trace or single-step through a sequence. You can drag
individual variables or properties from the Context tab to the Watch
Expression pane.
TestStand User Manual
6-12
ni.com
Chapter 6
Sequence Execution
Figure 6-6 shows several example watch expressions in the Watch
Expression pane.
Figure 6-6. Watch Expression Pane
When execution is suspended, you can access a context menu by right
clicking in the Watch Expression pane. The items in the context menu vary
depending on the whether you right click the following sites:
•
A watch expression
•
A watch expression icon
•
The background of the pane
This section describes the items that the context menu can contain.
Edit Expression
The Edit Expression command displays an expression browser dialog box
in which you can edit the selected watch expression.
Add Watch
The Add Watch command inserts an empty watch expression into the pane
and then displays an expression browser dialog box in which you can edit
the new expression.
Modify Value
The Modify Value command displays a dialog box in which you can edit
the value of the selected watch expression. TestStand dims the Modify
Value command if the selected expression does not evaluate to a single
variable or property value. For example, you can modify the value of
Locals.X but not the value of Locals.X + 5.
© National Instruments Corporation
6-13
TestStand User Manual
Chapter 6
Sequence Execution
Refresh
When an execution suspends at a breakpoint, other executions that are not
suspended can change the values of station global variables that a watch
expression refers to. Use the Refresh command to update the Watch
Expression pane so that it displays the current values for watch expressions
that contain station global variables.
Status Bar
Figure 6-7 shows the status bar for an Execution window in the sequence
editor.
Figure 6-7. Execution Window Status Bar
The status bar contains the following four elements arranged from left to
right.
•
Execution Status LED—The LED is green while the execution runs,
red when the execution suspends, and dark gray when the execution
completes.
•
Progress Indicator Bar—Through the TestStand API, a step module
can request that an operator interface program display an indication of
the step’s progress toward completion. Usually, a step module
developer uses this feature if the step takes longer than a few seconds
to complete. The Execution window displays the degree of progress in
the Progress Indicator bar. The default process model also uses the
Progress Indicator bar to display progress while it generates the test
report.
•
Status Message—Through the TestStand API, step modules can
request that an operator interface program display a short message.
The Execution window displays these messages to the right of the
Progress Indicator bar.
Note The <TestStand>\Examples directory contains sample test modules that
demonstrate how to control the Progress Indication Bar and Status Message indicator.
•
TestStand User Manual
Report Location—Each execution has its own test report. The
Execution window displays the location of the test report for the
execution in the rightmost box on the status bar. Usually, the process
model fills in the Report Location with the pathname of the file to
which the model writes the report.
6-14
ni.com
Chapter 6
Sequence Execution
Result Collection
TestStand can automatically collect the results of each step. You can
configure this feature for each step on the Run Options tab of the Step
Properties dialog box. You can disable result collection for an entire
sequence in the Sequence Properties dialog box. You can completely
disable result collection on your computer in the Station Options dialog
box.
Each sequence has a ResultList local variable that is initially an empty
array of container properties. TestStand appends a new container property
to the end of the ResultList array before a step executes. This container
property is called the step result. After the step executes, TestStand
automatically copies the contents of the Result subproperty for the step
into the step result.
Each step type can define different contents for its Result subproperty.
TestStand can append step results that contain Result properties from
different step types to the same ResultList array. When TestStand copies
the Result property for a step to its step result, it also adds information
such as the name of the step and its position in the sequence. For a step that
calls a subsequence, TestStand also adds the ResultList array variable
from the subsequence.
© National Instruments Corporation
6-15
TestStand User Manual
Chapter 6
Sequence Execution
Figure 6-8 shows the result of a Numeric Limit Test step in expanded form
on the Context tab of the Execution window.
Figure 6-8. A Result in a ResultList Array
Through the TestStand API, a code module can request that TestStand
insert additional step properties in the step results for all steps
automatically. A code module also can use the API to insert additional
step result information for a particular step.
TestStand User Manual
6-16
ni.com
Chapter 6
Sequence Execution
Custom Result Properties
Because each step type can have a different set of subproperties under
its Result property, the step result varies according to the step type.
Table 6-1 lists the custom properties that the step result can contain for
steps that use one of the built-in step types.
Table 6-1. Custom Properties in the Step Results for Steps That
Use the Built-In Step Types
Custom Step Property
© National Instruments Corporation
Step Types that Use the Property
Error.Code
All
Error.Msg
All
Error.Occurred
All
Status
All
Common
All
Numeric
NumericLimitTest
PassFail
PassFailTest
String
StringValueTest
ButtonHit
MessagePopup
Response
MessagePopup
ExitCode
CallExecutable
NumPropertiesRead
NI_VariableAndPropertyLoader
NumPropertiesApplied
NI_VariableAndPropertyLoader
ReportText
All
Limits.Low
NumericLimitTest
Limits.High
NumericLimitTest
Comp
NumericLimitTest,
StringValueTest
Measurement
NI_MultipleNumericLimitTest
6-17
TestStand User Manual
Chapter 6
Sequence Execution
Table 6-1 does not include the result properties for IVI step types, Synchronization
step types, or Database step types. For the result properties for the IVI step types, refer to
<TestStand>\Doc\IVIStepTypes.pdf. Refer to Chapter 11, Synchronization Step
Types, and Chapter 18, Databases, for descriptions of the synchronization and database
result properties.
Note
For the NumericLimitTest and the StringValueTest, the Limits.Low,
Limits.High, and Comp properties are not subproperties of the Result
property. Thus, TestStand does not automatically include these properties
in the step result. Depending on options you set, the default process model
uses the TestStand API to include the Limits.Low, Limits.High, and
Comp properties in the step results for NumericLimitTest and
StringValueTest steps that contain these properties.
The Common result subproperty uses the CommonResults custom data
type. The Common property is a subproperty of the Result property for
every built-in step type. Consequently, you can add a subproperty to the
result of every step type by adding a subproperty to the definition of the
CommonResults type.
Be aware that if you modify CommonResults without incrementing the
type version number, you might see a type conflict when you open other
sequence files. These conflicts will include the FrontendCallback.seq
when you are logging in or out.
Standard Result Properties
In addition to copying custom step properties, TestStand also adds a set of
standard properties to each step result. TestStand adds standard result
properties to the step result as subproperties of the TS property. Table 6-2
lists the standard result properties.
Table 6-2. Standard Step Result Properties
Standard Result Property
Description
TS.StartTime
Time at which the step began executing, specifically, the number
of seconds since the TestStand engine initialized.
TS.TotalTime
Number of seconds the step took to execute. This time includes the
time for all step options including preconditions, expressions, post
actions, module loading, and module execution.
TS.ModuleTime
Number of seconds that the step module took to execute.
TS.Index
Zero-based position of the step in the step group.
TestStand User Manual
6-18
ni.com
Chapter 6
Sequence Execution
Table 6-2. Standard Step Result Properties (Continued)
Standard Result Property
Description
TS.StepName
Name of the step.
TS.StepGroup
Step group that contains the step. The value is Main, Setup,
or Cleanup.
TS.Id
A number that TestStand assigns to the step result. The number is
unique with respect to all other step results in the current TestStand
session.
TS.InteractiveExeNum
A number that TestStand assigns to an interactive execution. The
number is unique with respect to all other interactive executions in
the current TestStand session. TestStand adds this property only if
you run the step interactively.
TS.StepType
Name of the step type.
TS.Server
This property contains the name of the server machine on which
the step runs the subsequence it calls. This result property exists
only for sequence call steps that run subsequences on a remote
machine.
TS.StepCausedSequence
Failure
This property exists only if the step fails. The value is True if the
step failure causes the sequence to fail. The value is False if the
step failure does not cause the sequence to fail or if the sequence
has already failed.
Subsequence Results
If a step calls a subsequence or generates a call to a callback sequence,
TestStand creates a special step result subproperty to store the result of the
subsequence. Table 6-3 lists the name of the subproperty for each type of
subsequence call.
Table 6-3. Property Names for Subsequence Results
Result Subproperty Name
Type of Subsequence Call
TS.SequenceCall
Sequence Call
TS.PostAction
Post Action Callback
TS.SequenceFilePreStep
SequenceFilePreStep Callback
TS.SequenceFilePostStep
SequenceFilePostStep Callback
TS.ProcessModelPreStep
ProcessModelPreStep Callback
© National Instruments Corporation
6-19
TestStand User Manual
Chapter 6
Sequence Execution
Table 6-3. Property Names for Subsequence Results (Continued)
Result Subproperty Name
Type of Subsequence Call
TS.ProcessModelPostStep
ProcessModelPostStep Callback
TS.StationPreStep
StationPreStep Callback
TS.StationPostStep
StationPostStep Callback
TS.SequenceFilePreInteractive
SequenceFilePreInteractive Callback
TS.SequenceFilePostInteractive
SequenceFilePostInteractive Callback
TS.ProcessModelPreInteractive
ProcessModelPreInteractive Callback
TS.ProcessModelPostInteractive
ProcessModelPostInteractive Callback
TS.StationPreInteractive
StationPreInteractive Callback
TS.StationPostInteractive
StationPostInteractive Callback
TS.SequenceFilePostResultListEntry
SequenceFilePostResultListEntry Callback
TS.ProcessModelPostResultListEntry
ProcessModelPostResultListEntry Callback
TS.StationPostResultListEntry
StationPostResultListEntry Callback
TS.SequenceFilePostStepRuntimeError
SequenceFilePostStepRuntimeError Callback
TS.ProcessModelPostStepRuntimeError
ProcessModelPostStepRuntimeError Callback
TS.StationPostStepRuntimeError
StationPostStepRuntimeError Callback
TS.SequenceFilePostStepFailure
SequenceFilePostFailure Callback
TS.ProcessModelPostStepFailure
ProcessModelPostFailure Callback
TS.StationPostStepFailure
StationFilePostFailure Callback
TestStand adds the following properties to the subproperty for each
subsequence.
•
SequenceFile —Absolute path of the sequence file that contains the
subsequence.
•
Sequence —Name of the subsequence that the step called.
•
Status—Status of the subsequence that the step called.
•
ResultList —Value of Locals.ResultList for the subsequence
that the step called. This property contains the results for the steps in
the subsequence.
TestStand User Manual
6-20
ni.com
Chapter 6
Sequence Execution
As an example, TestStand adds the following properties to the result of any
step that calls another sequence:
TS.SequenceCall.SequenceFile
TS.SequenceCall.Sequence
TS.SequenceCall.Status
TS.SequenceCall.ResultList
Loop Results
When you configure a step to loop, you can use the Record Result of Each
Iteration option on the Loop tab of the Step Properties dialog box to specify
that TestStand store a separate result for each loop iteration in the result list.
In the result list, the results for the loop iterations come immediately after
the result for the step as a whole.
TestStand adds a TS.LoopIndex numeric property to each loop iteration
result to record the value of the loop index for that iteration. TestStand also
adds the following special loop result properties to the main result for the
step.
•
TS.EndingLoopIndex —Value of the loop index when looping
completes.
•
TS.NumLoops—Number of times the step loops.
•
TS.NumPassed—Number of loops for which the step status is
Passed or Done.
•
TS.NumFailed—Number of loops for which the step status is
Failed.
When you run a sequence using the TestUUTs or SinglePass execution
entry points, the default process model generates the test report by
traversing the results for the main sequence in the client sequence file and
all of the subsequences it calls. Refer to the Process Models section in
Chapter 1, TestStand Architecture Overview, and to Chapter 14, Process
Models, for more information on process models.
© National Instruments Corporation
6-21
TestStand User Manual
Chapter 6
Sequence Execution
Engine Callbacks
TestStand specifies a set of callback sequences that it invokes at specific
points during execution. These callbacks are called engine callbacks.
TestStand defines the name of each engine callback.
Engine callbacks are a way for you to tell TestStand to call certain
sequences before and after the execution of individual steps, before and
after interactive executions, after loading a sequence file, and before
unloading a sequence file. Because the TestStand engine controls the
execution of steps and the loading and unloading of sequence files,
TestStand defines the set of engine callbacks and their names.
The engine callbacks are in three general groups, based on the file in which
the callback sequence appears. You can define engine callback sequences
in normal sequence files, in process model files, and in the
StationCallbacks.seq file.
TestStand invokes engine callbacks in a normal sequence file only when
executing steps in the sequence file or loading or unloading the sequence
file. TestStand invokes engine callbacks in process model files when
executing steps in the model file, steps in sequences that the model calls,
and steps in any nested calls to subsequences. TestStand invokes the engine
callbacks in StationCallbacks.seq whenever TestStand executes steps
on the test station. Table 6-4 shows the different engine callbacks.
Table 6-4. Engine Callbacks
Engine Callback
Where You Define
the Callback
When the Engine
Calls the Callback
SequenceFilePreStep
Any sequence file
Before the engine executes
each step in the sequence
file
SequenceFilePostStep
Any sequence file
After the engine executes
each step in the sequence
file
SequenceFilePreInteractive
Any sequence file
Before the engine begins an
interactive execution of
steps in the sequence file
SequenceFilePostInteractive
Any sequence file
After the engine completes
an interactive execution of
steps in the sequence file
TestStand User Manual
6-22
ni.com
Chapter 6
Sequence Execution
Table 6-4. Engine Callbacks (Continued)
Engine Callback
Where You Define
the Callback
When the Engine
Calls the Callback
SequenceFileLoad
Any sequence file
When the engine loads the
sequence file into memory
SequenceFileUnload
Any sequence file
When the engine unloads
the sequence file from
memory
SequenceFilePostResultList
Entry
Any sequence file
After the engine fills out
the step result for a step in
the sequence file
SequenceFilePostStepRuntime
Error
Any sequence file
After a step in the sequence
file generates a run-time
error
SequenceFilePostStepFailure
Any sequence file
After a step in the sequence
fails
ProcessModelPreStep
Process model file
Before the engine executes
each step in any sequence
that the process model
calls, and each step in any
resulting subsequence calls
ProcessModelPostStep
Process model file
After the engine executes
each step in any sequence
that the process model
calls, and each step in any
resulting subsequence calls
ProcessModelPreInteractive
Process model file
Before the engine begins
interactive execution of
steps in a client sequence
file
ProcessModelPostInteractive
Process model file
After the engine begins
interactive execution of
steps in a client sequence
file
© National Instruments Corporation
6-23
TestStand User Manual
Chapter 6
Sequence Execution
Table 6-4. Engine Callbacks (Continued)
Engine Callback
Where You Define
the Callback
When the Engine
Calls the Callback
ProcessModelPostResultList
Entry
Process model file
After the engine fills out
the step result for a step in
any sequence that the
process model calls or in
any resulting subsequence
calls.
ProcessModelPostStepRuntime
Error
Process model file
After a step generates a
run-time error when the
step is in a sequence that
the process model calls or
in any result subsequence
ProcessModelPostStepFailure
Process model file
After a step fails when the
step is in a sequence that
the process model calls or
in any result subsequence
StationPreStep
StationCallbacks.seq
Before the engine executes
each step in any sequence
file
StationPostStep
StationCallbacks.seq
After the engine executes
each step in any sequence
file
StationPreInteractive
StationCallbacks.seq
Before the engine begins
any interactive execution
StationPostInteractive
StationCallbacks.seq
After the engine completes
any interactive execution
StationPostResultListEntry
StationCallbacks.seq
After the engine fills out
the step result for a step in
any sequence file
StationPostStepRuntimeError
StationCallbacks.seq
After any step generates a
run time error
StationPostStepFailure
StationCallbacks.seq
After any step fails
TestStand User Manual
6-24
ni.com
Chapter 6
Sequence Execution
Note TestStand installs predefined station engine callbacks in the
StationCallbacks.seq file in the <TestStand>\Components\NI\
Callbacks\Station directory. Add your own station engine callbacks in the
StationCallbacks.seq file in the <TestStand>\Components\User\
Callbacks\Station directory.
The following are examples of how you might use engine callbacks:
•
Use the SequenceFileLoad callback to ensure that the configuration
for external devices that the subsequence file uses occurs only once
during execution. Usually, you initialize the devices that a sequence
requires by creating steps in the Setup group for the sequence.
However, if you call the sequence repeatedly, you can move the Setup
steps into a SequenceFileLoad callback for the subsequence file so
that they run only when the sequence file loads.
•
Use the StationPreStep and StationPostStep callbacks to
accumulate statistics on all steps that execute on the test station. You
can inspect the name and types of steps to accumulate data on specific
steps.
Note If you define a SequenceFilePreStep, SequenceFilePostStep,
SequenceFilePreInteractive, or SequenceFilePostInteractive callback
in a model file, the callback applies only to the steps in the model file.
Note You must not define a SequenceFileUnload callback in the
StationCallbacks.seq sequence file. If you make this error, TestStand hangs
when you shut down the TestStand engine.
Step Execution
Depending on options you set, a step performs a number of actions as it
executes. Table 6-5 lists the more significant actions that a step can take,
in the order that the step performs them.
Table 6-5. Order of Actions That a Step Performs
Action Number
Description
Remarks
1
Enter batch synchronization section
If option is set
2
Acquire step lock
If option is set
3
Allocate step result
—
4
Evaluate precondition
—
© National Instruments Corporation
6-25
TestStand User Manual
Chapter 6
Sequence Execution
Table 6-5. Order of Actions That a Step Performs (Continued)
Action Number
Description
Remarks
5
Check run mode
—
6
Load module if not already loaded
—
7
Evaluate Loop Initialization expression
Only if looping
8
Evaluate Loop While expression, skip to action 22
if False
Only if looping
9
Allocate loop iteration result
Only if looping
10
Call Pre Step engine callbacks
—
11
Evaluate Pre expression
—
12
Call Pre Step substeps for step type
—
13
Call module
—
14
Call Post Step substeps for step type
15
Evaluate Post expression
—
16
Evaluate Status expression
—
17
Call Post Step engine callbacks
—
18
Call Post Step failure engine callbacks
Only if loop
iteration fails
19
Fill out loop iteration result
Only if looping
20
Call PostResultListEntry engine callbacks
Only if looping
21
Evaluate Loop Increment expression, return to action 8
Only if looping
22
Evaluate Loop Status expression
Only if looping
TestStand User Manual
6-26
TestStand calls
Post Step substeps
even if the user
code module
generates a
run-time error.
This enables Post
Step substeps to
perform error
handling, if
appropriate.
ni.com
Chapter 6
Sequence Execution
Table 6-5. Order of Actions That a Step Performs (Continued)
Action Number
Description
Remarks
23
Unload module if required
—
24
Update sequence failed state
25
Call Post Step failure engine callbacks
26
Execute post action
—
27
Fill out step result
—
28
Call PostResultListEntry engine callbacks
Only if failed
29
Release step lock
If option is set
30
Exit batch synchronization section
If option is set
Only if step fails
Usually, a step performs only a subset of these actions, depending on the
configuration of the step and the test station. When TestStand detects a
run-time error, it usually proceeds to action 27. If a run-time error occurs in
a loop iteration, TestStand performs action 19 before it performs action 27.
Step Status
Every step in TestStand has a Result.Status property. The status
property is a string that indicates the result of the step execution. Although
TestStand imposes no restrictions on the values to which the step or its code
module can set the status property, TestStand and the built-in step types use
and recognize the values that appear in Table 6-6.
Table 6-6. Standard Values for the Status Property
String Value
Meaning
Source of the
Status Value
Passed
Indicates that the step performed a test that passed
Step or code module
Failed
Indicates that the step performed a test that failed.
Step or code module
Error
Indicates that a run-time error occurred.
TestStand
Done
Indicates that the step completed without setting its
status.
TestStand
© National Instruments Corporation
6-27
TestStand User Manual
Chapter 6
Sequence Execution
Table 6-6. Standard Values for the Status Property (Continued)
String Value
Meaning
Source of the
Status Value
Terminated
Indicates that the step called a subsequence in which
execution terminated. Occurs only for sequence call
steps for which you enable the Ignore Termination
option.
TestStand
Skipped
Indicates that the step did not execute because the run
mode for the step is Skip.
TestStand
Running
Indicates that the step is currently running.
TestStand
Looping
Indicates that the step is currently running in loop
mode.
TestStand
Failures
TestStand considers a step to have failed if the step executes and the step
status is Failed. If you enable the Step Failure Causes Sequence Failure
option on the Run Options tab of the Step Properties dialog box, TestStand
sets the sequence status to Failed when the step fails. When the sequence
returns as Failed, the Sequence Call step also fails. In this way, a step
failure in a subsequence can propagate up through the chain of sequence
call steps.
For most step types, the Step Failure Causes Sequence Failure option is enabled by
default.
Note
You can also control how execution proceeds after a step failure causes a
sequence to fail. To configure a sequence to jump to the Cleanup step group
upon failure, enable the Goto Cleanup on Sequence Failure option in the
Sequence Properties dialog box. By default, this option is disabled.
TestStand User Manual
6-28
ni.com
Chapter 6
Sequence Execution
Run-Time Errors
TestStand generates a run-time error if it encounters a condition that
prevents a sequence from executing. If, for example, a precondition refers
to the status of a step that does not exist, TestStand generates a run-time
error when it attempts to evaluate the precondition. TestStand also
generates a run-time error when a code module causes an access
violation or any other exception. A step or its code module can
explicitly generate a run-time error by setting the value of the
Step.Result.Error.Occurred property to True. Usually, the step or
code module also sets the values of the Step.Result.Error.Msg and
Step.Result.Error.Code properties to indicate the source of the error.
TestStand does not use run-time errors to indicate UUT test failures.
Instead, a run-time error indicates that a problem exists with the testing
process itself and that testing cannot continue. Usually, a code module
reports a run-time error if it detects an error in a hardware or software
resource that it utilizes to perform a test.
When a step causes a run-time error, the step stops executing, and TestStand
sets the status of the step to Error. TestStand also sets the internal status of
the sequence to Error, and execution branches to the Cleanup step group
for the sequence. If the sequence is executing as a subsequence, TestStand
sets the Result.Error.Occurred property of the calling step to True.
TestStand also sets the Result.Error.Code and Result.Error.Msg
properties of the calling step to the values of these properties in the
subsequence step that generated the run-time error. In this way, the run-time
error in a subsequence becomes a run-time error in the step that invokes it.
The result is that TestStand executes the Cleanup steps in all active
sequences and then terminates execution.
However, if you enable the Ignore Run-Time Errors step option for a step
that causes a run-time error, TestStand does not set the internal status of the
sequence that contains the step to Error. Instead, TestStand resets the
Error.Occurred property of the step to False and execution continues
normally with the next step in the sequence. The Result.Status property
in the step that caused the run-time error retains Error as its value.
TestStand allows you to decide interactively how to handle a run-time error.
If a step causes a run-time error and you select Show Dialog in the On
Run-Time Error control on the Execution tab of the Station Options dialog
© National Instruments Corporation
6-29
TestStand User Manual
Chapter 6
Sequence Execution
box, TestStand displays the Run-Time Error dialog box, shown in
Figure 6-9.
Figure 6-9. Run-Time Error Dialog Box
The Run-Time Error dialog box gives you four possible ways to handle the
run-time error.
TestStand User Manual
•
Run Cleanup—Execution proceeds to the Cleanup step group for the
sequence. Run Cleanup is the default action when you have disabled
the Show Dialog On Run-Time Error option.
•
Retry—TestStand runs the step again.
•
Ignore—TestStand does not set the internal status of the sequence to
Error. Instead, TestStand resets the Error.Occurred property of
the step to False and execution continues normally with the next step
in the sequence. The Result.Status property of the step remains set
to Error.
•
Abort Immediately—TestStand stops execution immediately,
without running any cleanup steps.
6-30
ni.com
Chapter 6
Sequence Execution
The dialog box also provides two further options:
•
Break—When you choose the Run Cleanup or Ignore actions and
enable the Break option, TestStand suspends execution at the step that
caused the run-time error. This option dims if you choose Abort
Immediately.
•
Suppress this dialog for the remainder of this execution—This
option prevents the Run-Time Error dialog box from appearing for any
run-time errors that occur later in the execution.
© National Instruments Corporation
6-31
TestStand User Manual
Station Global Variables
7
This chapter describes station global variables and the Station Globals
window.
In TestStand, you can define variables with various scopes. You can define
variables that are local to a sequence, global to a sequence file, and global
to the test station. You can access station global variables from any step,
expression, or code module. Unlike other variables, TestStand saves the
values of global variables from one session to the next. Usually, you use
station global variables to maintain statistics or to represent the
configuration of your test station.
Station Globals Window
You view and edit global variables in the Station Globals window of the
sequence editor. Use the Station Globals menu item in the sequence editor
View menu to access the Station Globals window. Figure 7-1 shows
example variables in the Station Globals window.
Figure 7-1. Station Globals Window
© National Instruments Corporation
7-1
TestStand User Manual
Chapter 7
Station Global Variables
View Ring Control for Station Globals
Use the View ring control at the top right corner of the window to select
which aspect of the station globals to display in the window. You have the
following choices:
•
Globals—Displays the station global variables and their values.
•
Global Types—Displays the named data types that the station global
variables use. The view is empty if no station globals use named data
types. Refer to Chapter 9, Types, for more information on types and
type editing.
Context Menu for the Globals View
To access a context menu, right click a global variable, subproperty, or on
the background area of the view. The context menu can contain the
following items.
Insert Global
The Insert Global menu item has a submenu from which you select the
data type for the global variable you want to insert. Figure 7-2 shows the
Insert Global submenu.
Figure 7-2. Insert Global Submenu
If you want to insert a global variable with a custom data type, you must
create a named data type first. You can create a named data type in the
Global Types view of the Station Globals window, in the Sequence File
Types view of a Sequence File window, or in the Type Palette window.
Refer to Chapter 9, Types, for more information on types and type editing.
After you create the named data type, it appears in the Types submenu of
the Insert Globals submenu.
TestStand User Manual
7-2
ni.com
Chapter 7
Station Global Variables
View Contents
The View Contents command selects the tree view node that corresponds
to the currently selected item in the list view. The list view then displays
the contents of the item. If the tree view is currently closed, it opens to
display the selected node. You use this command to view the subproperties
of global variables.
Go Up One Level
The Go Up One Level command selects the next higher level node in the
tree view. The list view displays the contents of the newly selected node.
Browse Sequence Context
The Browse Sequence Context command displays a tree view that
contains the names of global variables their subproperties you can access
from any expression or step module. This command also appears in the
View menu of the sequence editor menu bar. Refer to the View Menu
section in Chapter 4, Sequence Editor Menu Bar, for more information.
Rename
The Rename command allows you to edit the name of the selected global
variable or subproperty.
Global Variable Properties
The Properties command displays a dialog box that you can use to change
the value of a global variable or one of its subproperties.
Reload Station Globals
The Reload Station Globals command discards the current station globals
and reloads the station globals from disk. Usually, you use this command
to discard edits that you make to the station globals. If you do not reload the
station globals, your edits are saved when you exit the sequence editor. You
can select this command only when no executions are running.
© National Instruments Corporation
7-3
TestStand User Manual
Chapter 7
Station Global Variables
Persistence
The values of station globals persist from one TestStand session to the next.
TestStand stores the station globals in the StationGlobals.ini file in
the <TestStand>\Cfg directory. TestStand loads the station globals from
StationGlobals.ini when the engine initializes, and it saves the station
global variables to StationGlobals.ini when the engine shuts down.
Usually, the engine initializes when you start the sequence editor or an
operator interface program and the shuts down when you exit the sequence
editor or operator interface. When the engine saves the station globals, it
saves their most recent values, and it also saves any additions or deletions
that you made to the list of station globals during the session.
To save the station globals manually in the sequence editor, select
File»Save when the Station Globals window is the active window. You also
can save the station globals to disk in a code module by using the
CommitGlobalsToDisk method in the Engine class of the TestStand API.
When TestStand saves the station globals, TestStand changes the disk date
of StationGlobals.ini only if the station globals in memory differ
from the station globals in the file.
Table 7-1 summarizes the status of station globals in various contexts.
Table 7-1. Status of Station Globals in Various Contexts
Context
Status of
Station Globals
Remarks
Multiple concurrent
executions in the same
TestStand session.
All executions share
the same station
globals.
Station global values are stored in
StationGlobals.ini.
Multiple, concurrent
instances of the
TestStand engine.
Each instance
maintains a separate
copy of the station
globals.
When you start each new instance of the
sequence editor or operator interface, the engine
loads a copy of the station globals from
StationGlobals.ini.
TestStand User Manual
7-4
ni.com
Chapter 7
Station Global Variables
Table 7-1. Status of Station Globals in Various Contexts (Continued)
Context
Status of
Station Globals
Changes to the station
globals by you or your
sequences.
The engine saves the
current state of the
station globals to
StationGlobals.i
ni when the sequence
editor or operator
interface exits.
Remarks
If you make changes to the station globals in two
concurrent sequence editor or operator interface
instances, the instance that exits last might
overwrite the changes that the other instance
saved in StationGlobals.ini. If, when an
instance exits, the engine detects that another
instance modified the file after the current
instance loaded it, then the engine displays a
prompt giving you the choice to overwrite the
StationGlobals.ini or to discard your
changes.
Special TestStand Station Globals
TestStand provides a special-purpose station global variable named TS.
TestStand uses the TS variable to contain special values that it adds as
subproperties. TestStand adds the following special variables:
•
TS.LastUserName —A string property that holds the login name of
the last user to log in.
•
TS.CurrentUser—A property of type User that contains
information on the user that is currently logged in. Refer to the
Verifying User Privileges section in Chapter 12, User Management,
for information on verifying user privileges. TestStand does not save
the TS.CurrentUser property in StationGlobals.ini.
© National Instruments Corporation
7-5
TestStand User Manual
Sequence Context and
Expressions
8
This chapter describes the properties in the TestStand sequence context and
how to use expressions in TestStand.
Sequence Context
Before executing the steps in a sequence, TestStand creates a run-time copy
of the sequence. This allows TestStand to maintain separate local variable
and step property values for each sequence invocation. For each sequence
invocation, TestStand also maintains a sequence context that contains
references to all global variables and to all local variables and step
properties in the active sequence. The contents of a sequence context can
vary depending on the currently executing step.
You implicitly use a sequence context to access variables and step
properties in expressions. You explicitly use a sequence context when you
call the TestStand API to access variables and properties from a step
module. Refer to the Expressions section in this chapter for information on
expressions. For more information on the TestStand API, refer to the
TestStand Programmer Help.
To refer to a subproperty, you use a period to separate the name of the property from
the name of the subproperty. For example, you refer to the CurrentUser subproperty in
the TS subproperty of the StationGlobals property as
StationGlobals.TS.CurrentUser.
Note
© National Instruments Corporation
8-1
TestStand User Manual
Chapter 8
Sequence Context and Expressions
Tables 8-1 through 8-6 list the properties in a sequence context and
describe their contents. Table 8-1 lists the first-level properties. The
subsequent tables list subproperties of these properties.
Table 8-1. First-Level Properties of a Sequence Context
Sequence Context Subproperty
Description
Step
Contains the properties of the currently executing step in
the current sequence invocation. The Step property
exists only while a step executes. The property does not
exist when the execution is between steps, for example, at
a breakpoint.
Locals
Contains the sequence local variables for the current
sequence invocation.
Parameters
Contains the sequence parameters for the current
sequence invocation.
FileGlobals
Contains the sequence file global variables for the current
execution.
StationGlobals
Contains the station global variables for the engine
invocation. TestStand maintains a single copy of the
station globals in memory. Refer to Table 8-2 for the
default contents of the StationGlobals property.
ThisContext
Holds a reference to the current sequence context. You
usually use this property to pass the entire sequence
context as an argument to a subsequence or a step module.
RunState
Contains properties that describe the state of execution in
the sequence invocation. Refer to Table 8-3 for the
contents of the RunState property.
Some of the properties in the sequence context refer to objects that exist
before, and persist after, the current execution. Any modifications you
make to these objects affect all executions in the current TestStand session.
If you save the modifications to disk, they affect future TestStand sessions.
These properties include the following:
TestStand User Manual
•
Station.Globals
•
RunState.InitialSelection
•
RunState.SequenceFile
•
RunState.ProcessModelClient
8-2
ni.com
Chapter 8
Sequence Context and Expressions
Sequence Context Subproperties
This section discusses sequence context subproperties.
StationGlobals
The StationGlobals property object contains the station global
variables for the engine invocation. Each TestStand session maintains a
single copy of the station global variables in memory. Any modifications
you make to a station global property affect all executions in the current
TestStand session and future TestStand sessions. Refer to Chapter 7,
Station Global Variables, for more information on station global variables.
TestStand creates a TS subproperty in the StationGlobals property to hold
the standard station global variables that TestStand defines. Table 8-2
shows the contents of the TS subproperty.
Table 8-2. StationGlobals TS Subproperty in the Sequence Context
Sequence Context Subproperty
Description
Contains the TestStand-specific station globals.
TS
LastUserName
Login name of the user that logged in most recently.
CurrentUser
User object for the user that is currently logged in. The
property does not exist if no user has logged in. Refer to
Chapter 12, User Management, for more information on
the User standard data type.
© National Instruments Corporation
8-3
TestStand User Manual
Chapter 8
Sequence Context and Expressions
RunState
The RunState property object contains properties that describe the state of
execution in the sequence invocation. Table 8-3 shows the subproperties of
the RunState property object.
Table 8-3. RunState Subproperty in the Sequence Context
Sequence Context Subproperty
Description
Engine
Engine object in which the sequence invocation executes.
Refer to the TestStand Programmer Help for more
information on the methods and properties of this object.
Root
Sequence context for the root sequence invocation. If you
initiate an execution using a process model entry point,
the property is the sequence context for the process model
entry point. For example, if you use an entry point from
the default TestStand process model, the Root property is
the sequence context of the Test UUTs or the Single
Pass sequence. If you initiate an execution on a sequence
without using a process model entry point, the Root
property object is the sequence context for the sequence
you run.
Main
Sequence context for the least nested sequence that is not
in a process model. If you initiate an execution using the
TestStand default model entry point, the Main property is
the sequence context of MainSequence. If you initiate an
execution on a sequence without using a process model
entry point, the Main property object is the sequence
context for whichever sequence you run.
ThisContext
Reference to the current sequence context. You usually
use this property to pass the entire sequence context as an
argument to another sequence or a step module.
Caller
Sequence context for the sequence that called the current
sequence. This property does not exist in the root
sequence context.
TestStand User Manual
8-4
ni.com
Chapter 8
Sequence Context and Expressions
Table 8-3. RunState Subproperty in the Sequence Context (Continued)
Sequence Context Subproperty
InitialSelection
Description
Contains references to the non-execution versions of the
steps, sequences, sequence file, and execution that are
selected or active when you start an execution. You
usually use this property in custom Tools menu
commands to operate on the selected objects in a
sequence file. Refer to Table 8-6 for the contents of the
InitialSelection property.
Note: Whenever you make changes to subproperty values
in a Step, Sequence, or SequenceFile object that the
InitialSelection property contains, you modify the
non-execution version of the object. TestStand saves the
modifications when you save the selected sequence file.
Whenever you modify the selected file or the objects it
contains from a code module, you must increment the
SelectedFile.ChangeCount subproperty of
InitialSelection.
Report
Report object for the execution. Refer to the TestStand
Programmer Help for more information on the methods
and properties of Report objects.
Execution
Execution object in which the sequence invocation runs.
Refer to the TestStand Programmer Help for more
information on the methods and properties of Execution
objects.
Thread
Thread object in which the sequence invocation executes.
Refer to the TestStand Programmer Help for more
information on the methods and properties of Thread
objects.
SequenceFile
The SequenceFile object for the sequence invocation.
Refer to the TestStand Programmer Help for more
information on the methods and properties of
SequenceFile objects. Refer to Table 8-4 for the contents
of the SequenceFile property.
Note: TestStand saves any changes you make to property
values of a SequenceFile object when you save the
sequence file.
© National Instruments Corporation
8-5
TestStand User Manual
Chapter 8
Sequence Context and Expressions
Table 8-3. RunState Subproperty in the Sequence Context (Continued)
Sequence Context Subproperty
Description
Sequence
Run-time copy of the Sequence object for the sequence
invocation. The Sequence object contains the parameters,
local variables, and steps for the sequence. Any changes
you make to property values in this object modify only
the execution version of the object. Refer to Table 8-5 for
the contents of the Sequence property.
PreviousStep
Run-time copy of the Step object for the previously
executed step in the sequence invocation. The property
exists only after the first step in a step group executes.
Any changes to property values in this object modify only
the execution version of the object.
Step
Run-time copy of the Step object for the step that is
currently executing. This property does not exist when the
execution pauses between steps, for example, at a
breakpoint. Any changes to property values in this object
modify only the execution version of the object.
NextStep
Run-time copy of the Step object for the step that follows
the currently executing step in the sequence. This
property does not exist during and after the execution of
the last step in a sequence step group. Any changes to
property values in this object modify only the execution
version of the object.
SequenceError
Container that holds the error code, message, and
occurred flag to report to the step that calls the sequence.
ErrorReported
Boolean that indicates whether TestStand sent a BREAK
ON RTE message to the operator interface for the error
that SequenceError stores. Typically, an operator
interface displays a run-time error handler dialog box
when it receives a BREAK ON RTE event. When a
sequence with an error returns, TestStand transfers the
value of ErrorReported to the context of the calling
sequence. This prevents the calling sequence from
generating a duplicate BREAK ON RTE event for the error
that the subsequence returns.
IsProcessModel
Boolean that indicates whether the sequence invocation is
a sequence in the process model.
TestStand User Manual
8-6
ni.com
Chapter 8
Sequence Context and Expressions
Table 8-3. RunState Subproperty in the Sequence Context (Continued)
Sequence Context Subproperty
Description
Tracing
Boolean that indicates whether tracing is active for the
sequence invocation.
SequenceFailed
Boolean that indicates whether the current status of the
sequence invocation is Failed.
StepGroup
String that contains the name of the step group that the
sequence invocation is executing. Can be Main, Setup,
or Cleanup.
CallStackDepth
Zero-based index of the currently executing sequence on
the call stack. If, for example, the call stack contains three
sequence invocations, CallStackDepth is 2. The
sequence call stack includes calls to process model
sequences, including calls to entry points.
PreviousStepIndex
Zero-based index of the previously executed step in the
step group. TestStand sets the property value to -1 before
executing the first step in a sequence step group.
StepIndex
Zero-based index of the currently executing step in the
step group. TestStand sets the value to -1 when the
execution is between steps, such as at a breakpoint.
NextStepIndex
Zero-based index of the step that follows the currently
executing step in the step group. TestStand sets the value
to -1 when executing the last step in a sequence step
group. By modifying the value of this property, you can
specify the step that TestStand executes next.
Note: Changes that you make to this property do not
affect the value of the RunState.NextStep property
object immediately.
LoopIndex
The loop index for the active step in the sequence
invocation. By default, steps that you configure to loop
use this property to store the loop index. The value of the
loop index depends on the looping construct you choose
to use for the step.
LoopNumPassed
Number of iterations that a looping step completes with a
status of Passed or Done.
LoopNumFailed
Number of iterations that a looping step completes with a
status of Failed.
© National Instruments Corporation
8-7
TestStand User Manual
Chapter 8
Sequence Context and Expressions
Table 8-3. RunState Subproperty in the Sequence Context (Continued)
Sequence Context Subproperty
Description
The SequenceFile object for the client sequence of the
process model. This property exists only for executions
that you initiate through a process model entry point.
ProcessModelClient
Note: TestStand saves any changes you make to property
values in the sequence file object when you save the
sequence file.
Boolean that indicates whether the current GUI is a
sequence editor.
IsEditor
RunState.SequenceFile and Other SequenceFile
Objects
Several sequence context subproperties are SequenceFile objects.
The subproperties are the following:
•
RunState.SequenceFile
•
RunState.ProcessModelClient
•
RunState.InitialSelection.SelectedFile
Table 8-4 shows the subproperties of the SequenceFile objects. TestStand
saves any changes that you make to property values in a SequenceFile
object when you save the sequence file. Refer to the TestStand Programmer
Help for more information on the methods and properties of SequenceFile
objects.
Table 8-4. Subproperties of the SequenceFile Objects in the Sequence Context
Sequence Context Subproperty
Description
ChangeCount
The number of changes you have made to the sequence
file object. You must increment this property whenever
you modify other SequenceFile object properties from
a code module. The increment indicates to the sequence
editor that you have changed the sequence file.
LastSavedChangeCount
The value of the ChangeCount property when the
sequence editor last saved the sequence file.
Data
Contains the sequences and file globals in the
sequence file.
TestStand User Manual
8-8
ni.com
Chapter 8
Sequence Context and Expressions
Table 8-4. Subproperties of the SequenceFile Objects in the Sequence Context (Continued)
Sequence Context Subproperty
Description
Seq
Subproperty of Data. Contains an array of all Sequence
objects in the sequence file.
FileGlobalDefaults
Subproperty of Data. Contains the default values for the
global variables in the sequence file.
The absolute pathname of the sequence file.
Path
RunState.Sequence and Other Sequence Objects
Each SequenceFile object in the sequence context contains an array
of Sequence objects in its Data.Seq subproperty. The
RunState.Sequence subproperty of the sequence context is
the Sequence object for the current sequence invocation.
RunState.Sequence is a run-time copy of the
RunState.SequenceFile.Data.Seq array element for the
sequence that is currently executing.
Table 8-5 shows the subproperties of the Sequence objects. Refer to the
TestStand Programmer Help for more information on the methods and
properties of Sequence objects.
Table 8-5. Subproperties of the Sequence Objects in the Sequence Context
Sequence Context Subproperty
Locals
ResultList
Description
Contains the local variables of the sequence. In
RunState.Sequence, the local variables contain
the current values in the sequence invocation. In
nonexecution instances of Sequence objects, the local
variables contain their default values.
In RunState.Sequence, the ResultList local
variable contains an array of step results for the sequence
invocation. ResultList is empty in nonexecution
instances of Sequence objects.
Main
Contains an array of all Step objects in the Main step
group.
Setup
Contains an array of all Step objects in the Setup step
group.
© National Instruments Corporation
8-9
TestStand User Manual
Chapter 8
Sequence Context and Expressions
Table 8-5. Subproperties of the Sequence Objects in the Sequence Context (Continued)
Sequence Context Subproperty
Description
Cleanup
Contains an array of all Step objects in the Cleanup step
group.
Parameters
Contains the parameters of the sequence. In
RunState.Sequence, the parameters contain the values
that the calling sequence passes. In nonexecution
instances of Sequence objects, the parameters contain
their default values.
RunState.Step and Other Step Objects
Each Sequence object in the sequence context contains an array of Step
objects for each step group. The RunState.Step subproperty of the
sequence context is a Step object in the RunState.Sequence Sequence
object. It represents the step that is currently executing.
All Step objects include custom properties including a Result
subproperty, which contains the Error, Status, and Common
subproperties. Refer to Chapter 10, Built-In Step Types, for more
information on the step properties for each of the built-in step types. Refer
to the TestStand Programmer Help for more information on the methods
and properties of Step objects.
The properties of the Step objects in RunState.Sequence contain the
values for the current sequence invocation. The properties of the Step
objects in the other Sequence objects in the sequence context contain their
default values.
RunState.InitialSelection
The RunState.InitialSelection subproperty specifies the set of
steps and sequences, the file, or the execution that is selected or active when
you start a new execution. You usually use this property in sequences that
custom Tools menu commands or process model entry points call.
Table 8-6 lists the subproperties of the InitialSelection.
TestStand User Manual
8-10
ni.com
Chapter 8
Sequence Context and Expressions
Table 8-6. InitialSelection Subproperty in the Sequence Context
Sequence Context Subproperty
Description
SelectedSteps
Contains an array of step objects that were selected
when the execution started. The array is empty for
non-root sequence contexts.
SelectedSequences
Contains an array of sequence objects that were
selected when the execution started. The array is empty
for non-root sequence contexts.
SelectedFile
Specifies the sequence file object for the active
sequence file when the execution started. This property
exists only in the root sequence context when a
sequence file is initially active.
SelectedPropertyObjectFile
Specifies the PropertyObjectFile object for the
active file when the execution started. When the
initially active file is a sequence file, this property is
identical to SelectedFile. This property only exists
in the root sequence context when a file window is
initially active.
SelectedStepGroupByIndex
Contains the index of the step group that was selected
when the execution started. The index values are as
follows:
0—Setup Step Group
1—Main Step Group
2—Cleanup Step Group
This property only exists in the root sequence context.
Execution
© National Instruments Corporation
When you select an existing execution display window
and start a new execution, this property specifies the
execution object for the existing execution that the
window displays. This property exists only in the root
sequence context when an execution window is initially
active.
8-11
TestStand User Manual
Chapter 8
Sequence Context and Expressions
Whenever you make changes to subproperty values in a Step, Sequence, or
SequenceFile object that the RunState.InitialSelection property
contains, you modify the nonexecution version of the object. TestStand
saves the modifications when you save the selected sequence file.
Whenever you modify the selected file or the objects it contains from a code
module, you must increment the ChangeCount property of the
SelectedFile subproperty.
Using the Sequence Context
In expressions, you access the value of a variable or property by specifying
a path from the sequence context to the particular variable or property. For
example, you can set the status of a step using the following expression:
Step.Result.Status = "Passed"
Refer to the Expressions section in this chapter for more information on
using expressions.
During an execution, you can view and modify the values of the properties
in the sequence context from the Context tab of the Execution window. The
Context tab displays the sequence context for the sequence invocation that
is currently selected in the Call Stack pane. You also can monitor individual
variables or properties from the Watch Expression pane. Refer to the
Sequence Editor Execution Window section in Chapter 6, Sequence
Execution, for more information on using the Context tab and Watch
Expression pane of the Execution window.
You can pass a reference to sequence context object to a step module.
In step modules, you access the value of a variable or property by using
PropertyObject methods in the TestStand API on the sequence context.
As with expressions, you must specify a path from the sequence context to
the particular property or variable. Refer to Chapter 13, Module Adapters,
for more information on how to pass the sequence context to a code module
for each adapter. Refer to the TestStand Programmer Help for more
information on accessing the properties in the sequence context from code
modules.
Use View»Browse Sequence Context of the sequence editor menu bar to
access a tree view containing the names of variables, properties, and
sequence parameters that you can access from expressions and step
modules. Refer to the View Menu section in Chapter 4, Sequence Editor
Menu Bar, for more information.
TestStand User Manual
8-12
ni.com
Chapter 8
Sequence Context and Expressions
Expressions
In TestStand, you can use an expression to calculate a new value from the
values of multiple variables or properties. In general, you can use an
expression anywhere you can use a simple variable or property value. The
Statement step type evaluates an expression as a step in a sequence. For
most steps, you can specify a Pre Expression, a Post Expression, and a
Status Expression on the Expressions tab of the Step Properties dialog box.
TestStand executes the pre expression before executing the step module,
and it executes that post expression and status expression after executing
the step module.
In expressions, you can access all variables and properties in the sequence
context that is active when TestStand evaluates the expression. The
following is an example of an expression:
Locals.MidBandFrequency = (Step.HighFrequency +
Step.LowFrequency) / 2
TestStand supports all relevant expression operators and syntax that you
use in C, C++, Java, and Visual Basic. If you are not familiar with
expressions in these standard languages, TestStand also provides an
Expression Browser dialog box that you access by clicking the Browse
button that appears beside the controls that accept expressions.
When you use the Expression Browser dialog box to edit an expression in
a sequence file, you can create variables and parameters without exiting the
dialog box. Right-click on the Locals, Parameters, FileGlobals, or
the StationGlobals item to display a context menu that you can use to
insert a variable or parameter. Right-click on a variable or parameter to
rename, delete, or configure its properties.
© National Instruments Corporation
8-13
TestStand User Manual
Chapter 8
Sequence Context and Expressions
Figure 8-1 shows the Expression Browser dialog box.
Figure 8-1. Variables/Properties Tab of the Expression Browser
The Expression Browser dialog box allows you to interactively build an
expression by selecting from lists of available variables, properties,
operators, and functions. You select variables and properties from the
Variables/Properties tab. You select operators and functions from the
Operators/Functions tab. The Operators/Functions tab contains a
Description text box that shows help text for the currently selected operator
or function. Using the Insert and Replace buttons, you can copy a variable,
property, or operator to the cursor location in the Expression control. Using
the Check Syntax button, you can verify the syntax of the expression in the
Expression control.
TestStand User Manual
8-14
ni.com
Chapter 8
Sequence Context and Expressions
Figure 8-2 shows the Operators/Functions tab of the Expression Browser
dialog box.
Figure 8-2. Operators/Functions Tab of the Expression Browser
© National Instruments Corporation
8-15
TestStand User Manual
Chapter 8
Sequence Context and Expressions
Table 8-7 lists the operators and constant formats you can use in
expressions.
Table 8-7. Expression Operators
Operator Class
Operators in Symbol Form
Arithmetic
The arithmetic symbols include the following items:
+, -, *, /, MOD, %, ++, and --.
Assignment
The assignment symbols include the following items:
=, +=, -=, *=, /=, %=, ^=, &=, and |=.
Comparison
The comparison symbols include the following items:
==, !=, <>, >, >=, <, and <=.
Logical
The logical symbols include the following items:
&&, ||, and !.
Bitwise
The bitwise symbols include the following items:
AND, OR, NOT, XOR, &, |, ~, ^ , >>, and <<.
Constants
The formats for the different types of constants include the following
items:
Nothing
Floating Point
Integer
Hexadecimal Integer
Binary Integer
Boolean
Boolean
String
Empty ActiveX Reference
NAN
IND
INF
Not a number
Indeterminate number
Infinite number
1.23e-4
1234
0x1234efa9
0b11011011
True
False
"1234wxyz"
TestStand User Manual
8-16
ni.com
Chapter 8
Sequence Context and Expressions
Table 8-7. Expression Operators (Continued)
Operator Class
Operators in Symbol Form
Other
Some additional operators include the following items:
{}
Parenthesis—Alter evaluation order
Dot—Property field separator
Brackets—Array subscript
Comma—Expression separator
Conditional—Given a Boolean value, chooses one of
two other expressions to evaluate.
Usage: booleanValue ? expr1 : expr2.
Array Constant
//
’
Single line comment (C++)
Single line comment (Basic)
/* */
Comment (C/C++)
()
.
[]
,
?:
The operand for an array subscript must evaluate to a numeric value, unless
the array contains step or sequence elements. For arrays of step or sequence
elements, the subscript can evaluate to a string value that contains the name
of a step or sequence element in the array. For example,
RunState.Sequence.Main["MyGoto"].
Table 8-8 lists the functions you can call from an expression. Optional
function parameters appear within angle brackets. For descriptions of each
individual parameter, refer to the online help in the Expression Browser
dialog box.
Table 8-8. Function Expression Operators
Function
Description
Array
GetArrayBounds(array, lower, upper)
Retrieves the upper and lower bounds of
an array.
GetNumElements(array)
Returns the number of elements in an
array.
InsertElements(array, index,
numElements)
Inserts new elements into a
one-dimensional array.
RemoveElements(array, index,
numElements)
Removes elements from a
one-dimensional array.
© National Instruments Corporation
8-17
TestStand User Manual
Chapter 8
Sequence Context and Expressions
Table 8-8. Function Expression Operators (Continued)
Function
Description
SetArrayBounds(array, lower, upper)
Changes the bounds of an array.
SetNumElements(array, numElements)
Sets the number of elements in a
one-dimensional array.
Numeric
Abs(number)
Returns the absolute value of a number.
Max(number, number, ...)
Returns the highest number.
Min(number, number, ...)
Returns the lowest number.
Random(low, high)
Returns a random number between low
and high.
Round(number, <option>)
Rounds a number to an integer.
Val(string, <isValid>)
Converts a string to number.
Property
CommentOf(object)
Returns the comment for an object.
NameOf(object)
Returns the name of an object.
PropertyExists("propertyName")
Returns True if the property exists,
False otherwise.
TypeOf(object, <typeDisplayName>)
Returns the type of an object.
String
DelocalizeExpression(expressionString,
<decimalPointOption>)
Converts a localized expression string to
a standard form for evaluation.
Find(string, stringToSearchFor,
<indexToSearchFrom>, <ignoreCase>,
<searchInReverse>)
Searches a string for a substring.
Left(string, numChars)
Retrieves a substring from the left side
of a string.
Len(string)
Returns the number of characters in a
string.
LocalizedDecimalPoint()
Returns the value of the localized
decimal point.
TestStand User Manual
8-18
ni.com
Chapter 8
Sequence Context and Expressions
Table 8-8. Function Expression Operators (Continued)
Function
Description
LocalizeExpression
Converts an expression string to
conform to the localization settings for
the computer.
Mid(string, startIndex,<numChars>)
Retrieves a substring from the middle of
a string.
Replace(string, startIndex,
numCharsToReplace, replacementString)
Replaces the given number of characters
at the specified index with a
replacement string.
ResStr (category, tag,
<defaultString>, <found>)
Retrieves a string from the string
resource files. An alternative name for
this function is GetResourceString.
Right(string, numChars)
Retrieves a substring from the right side
of a string.
SearchAndReplace (string, searchString,
replacementString, <startIndex>,
<ignoreCase>, <maxReplacements>,
<searchInReverse>, <numReplacements>)
Finds and replaces one or more
substrings with a replacement string.
Str(value)
Converts a number or Boolean to a
string.
StrComp("StringA", "StringB",
<compareOption>, <maxChars>)
Compares two strings.
Time
Date(<longFormat>, <year>, <month>,
<monthDay>, <weekDay>,
<timeStampInSeconds>,
<baseTimeIsInitTime>)
Retrieves the current date.
Seconds(<returnSecondsSinceStartup>)
Returns the number of seconds since
you launched the application or the
number of seconds since January 1,
1970.
Time(<24Hr>, <h>, <m>, <s>, <ms>,
<timeStampInSeconds>,
<baseTimeIsInitTime>)
Retrieves the current time.
© National Instruments Corporation
8-19
TestStand User Manual
Chapter 8
Sequence Context and Expressions
Table 8-8. Function Expression Operators (Continued)
Function
Description
Other
AllOf(boolean, ...)
Returns the logical And for any number
of parameters.
AnyOf(boolean, ...)
Returns the logical Or for any number of
parameters.
CheckLimits (value, high, low,
comparisonType, <DoNotCopyToResults>)
Returns Passed if the value is within
the limits. Returns Failed otherwise.
CurrentUserHasPrivilege(string)
Returns True if the current user has the
privilege you specify. You can specify a
property path or a simple property name.
For example, if there is a privilege called
"Develop.SequenceFiles.Save",
the following privileges are equivalent:
Develop.SaveSequenceFiles
SaveSequenceFiles
Evaluate(string)
Returns the value of an expression that
you specify in a string.
FindFile(file, <useCurSeqFileDir>,
<PathToFile>, <promptFlag>,
<searchFlag>, <canceled>)
Attempts to locate the file you specify in
the search directories.
TestStand User Manual
8-20
ni.com
Chapter 8
Sequence Context and Expressions
Table 8-9 summarizes the levels of precedence in expressions.
Table 8-9. Levels of Precedence in Expressions
Expression Type
Operator
Example
primary
Literal Identifier
(expression)
{element1, element2,
...}
3.14 or Locals.String
(Seconds() / 1000)
{1.0, 2.5, 5.0}
postfix
property[index]
function
Locals.Array[25]
Len(Locals.String)
unary
++, --, +, -, ~, !, NOT
++Locals.Number or -3.14
multiplicative
*, /, %, MOD
10 * Locals.Number
additive
+, -
5 - Locals.Number
shift
<<, >>
Locals.Number >> 2
relational
<, >, <=, >=
Locals.Number <= 0.1
equality
==, <>, !=
Locals.Number == 2.0
bitwise AND
&, AND
Locals.Number & 0xFFFF
bitwise exclusive OR
^, XOR
Locals.Number ^ 0xFFFF
bitwise inclusive OR
|, OR
Locals.Number | 0x0008
logical AND
&&
Locals.Bool &&
Step.Result.PassFail
logical OR
||
Locals.Bool ||
Step.Result.PassFail
conditional
? :
Step.Result.PassFail ? 5.0 : 6.0
assignment
=, +=, -=, *=, /=, %=,
&=, ^=, |=, <<=, >>=
locals.number += 2.0
comma
,
Locals.Number1 = 5.0,
Locals.Number2 = 6.0
© National Instruments Corporation
8-21
TestStand User Manual
9
Types
This chapter discusses how you create, modify, and use step types, custom
named data types, and standard named data types in TestStand. This
chapter also describes the Type Palette window.
For an overview of the categories of types, refer to the Step Types and
Standard and Custom Named Data Types sections in Chapter 1, TestStand
Architecture Overview.
Creation, Modification, and Storage of Types
This section describes the windows and views in which you can create,
modify or examine data types and step types. This section also describes
how TestStand stores the definitions for data types and step types.
Where You Create and Modify Types
Table 9-1 describes each graphical interface where you can access data
types and step types: the windows, the views, the contents of a display, and
the corresponding files. Each display presents the types that correspond to
the file that you have open.
Table 9-1. Graphical Interfaces Where you Access Data Types and Step Types
Window
View within
the Window
Contents of
the Display
Corresponding Files
Sequence
File window
Sequence File
Types view
Tabs for the step types,
custom data types, and
standard data types that
the variables and steps in
the sequence file use.
When you save the contents of the Sequence File
window, TestStand writes the definitions of the types to
the sequence file. Refer to Chapter 5, Sequence Files, for
more information on the Sequence File window.
Station
Globals
window
Global Types
view
Tabs for the custom data
types and standard data
types that the station
global variables use.
When you save the contents of the Station Globals
window, TestStand writes the definitions of the types to
the StationGlobals.ini file in the
<TestStand>\Cfg directory. Refer to Chapter 7,
Station Global Variables, for more information on the
Station Globals window.
© National Instruments Corporation
9-1
TestStand User Manual
Chapter 9
Types
Table 9-1. Graphical Interfaces Where you Access Data Types and Step Types (Continued)
Window
View within
the Window
Contents of
the Display
Corresponding Files
User
Manager
window
Types view
Tabs for the custom data
types and standard data
types that the User
objects use.
All Users and User Profiles use the User standard data
type. To customize the User standard data type, add
subproperties to it on the Standard Data Types tab. If any
of these subproperties use custom data types, the custom
data types appear on the Custom Data Types tab. When
you save the contents of the User Manager window,
TestStand writes the definitions to the Users.ini file in
the <TestStand>\Cfg directory. Refer to Chapter 12,
User Management, for more information on the User
Manager window.
Type Palette
window
One view for
each type palette
file.
Tabs for the step types,
custom data types, and
standard data types that
you want to have
available in the sequence
editor at all times.
By dragging a type into a type palette file in the Type
Palette window, you ensure that the type is always
available even when it is not in the Types views of the
User Manager window, the Station Globals window, or
any of the open Sequence File windows. When you save
the Types Palette window, TestStand saves all type
palette files. Typically, type palette files reside in the
<TestStand>\Cfg\TypePalettes directory. Refer to
the Type Palette Window section in this chapter for more
information.
Storage of Types in Files and Memory
For each type that a TestStand file uses, TestStand stores the definition
of the type in the file. You also can specify that a file always saves the
definition for a type, even if it does not currently use the type. Because
many files can use the same type, many files can contain definitions for
the same type. All your sequence files, for example, might contain the
definitions for the Pass/Fail Test step type and the CommonResults
standard data type.
In memory, TestStand allows only one definition for each type. Although
the type can appear in multiple views, only one underlying definition of
the type exists in memory. If you modify the type in one view, it updates in
all views. The Find Type command in the sequence editor View menu
displays a dialog box that contains a list of all types that are currently in
memory. The list identifies the set of files that use each type. For more
information, refer to the View Menu section in Chapter 4, Sequence Editor
Menu Bar.
TestStand User Manual
9-2
ni.com
Chapter 9
Types
If you load a file that contains a type definition and another type definition
of the same name already exists in memory, TestStand verifies that the
two type definitions are identical. If they are not identical, TestStand
informs you of the conflict through the Type Conflict In File dialog box.
Figure 9-1 shows the Type Conflict In File dialog box.
Figure 9-1. Type Conflict In File Dialog Box
You can select one of the definitions to replace the other, or you can rename
one of them so that they can coexist in memory. If you enable the Apply to
All in Sequence File checkbox, TestStand applies the selected option to all
conflicts in the sequence file.
© National Instruments Corporation
9-3
TestStand User Manual
Chapter 9
Types
Using Data Types
You use data types when you insert variables, parameters, or step
properties. Each view in which you can insert a variable, parameter or
property has a context menu with an Insert item. You can use the context
menu items in the views that are listed in the following table.
Table 9-2. Creating Data Type Instances from Context Menus
Name of Context
Menu Item
Location of Context Menu
Item Inserted
Insert Global
Sequence File Globals view of the
Sequence File window
Sequence file global variable
Insert Parameter
Parameters tab of individual sequence
file views in the Sequence File window
Sequence parameter
Insert Local
Locals tab of individual sequence file
views in the Sequence File window
Sequence local variable
Insert Global
Globals view of the Station Globals
window
Station global variable
Insert User
Users view of the User Manager
window
New object with the User data type
Insert Field
Type Palette window and the Types
views in the Sequence File, Station
Globals, or User Manager windows
New element in an existing data
type
Except for the Insert User item, all the context menu items in Table 9-2
give you a submenu from which you can choose a data type. The submenu
includes the following categories of types:
TestStand User Manual
•
One of the simple data types that TestStand defines, including the
Number, Boolean, String, and ActiveX reference data types.
•
A named data type. This submenu includes all the custom named data
types that are currently in the Type Palette window or in the Types view
of the window you are currently editing. The submenu also includes
standard named data types that come with TestStand, such as Error,
Path, and CommonResults. Refer to the Using the Standard Named
Data Types section in this chapter for more information.
•
An array of elements that all have the same data type.
9-4
ni.com
Chapter 9
Types
In the submenu for Insert Parameter, you also can select the Container
type. You cannot add fields to parameters you create with the Container
type. Creating a parameter with the Container type is useful only if you
want to pass an object of any type to the sequence. If so, you must also turn
off type checking for the parameter. If you want to create a parameter with
a complex data type, you must first create the data type in the Sequence File
Types view or the Type Palette window. Then select the data type from the
Types submenu in the Insert Parameter submenu.
Figure 9-2 shows the Insert Local submenu. The submenu includes three
custom data types as examples: Fixture, Subassembly, and
YieldStatistics.
Figure 9-2. Insert Local Submenu
If the submenu does not contain the data type you require, you must create
the data type in the Type Palette window or one of the type views. If the data
type already exists in another window, drag or copy the data type from the
other window to the window you are editing or to the Type Palette window.
© National Instruments Corporation
9-5
TestStand User Manual
Chapter 9
Types
Specifying Array Sizes
When you choose an item from the Array of submenu in an Insert
submenu, the Array Bounds dialog box appears. Figure 9-3 shows the
initial state of the Array Bounds dialog box.
Figure 9-3. Initial State of Array Bounds Dialog Box
The Dimensions String indicator shows a string that describes the array
dimensions. You use the Number of Dimensions numeric control to set the
number of dimensions in the array. The maximum number of dimensions
is 16. The number of controls that appear next to the Lower Bounds and
Upper Bounds labels depends on the setting of the Num Dimensions
control.
You use the Lower Bounds and Upper Bounds controls to set the minimum
and maximum index for each dimension. For example, you can make one
dimension zero-based and another dimension one-based. The Upper
Bounds setting must be greater than or equal to the Lower Bounds setting
for the same dimension. You can calculate the number of elements in each
dimension according to the following formula:
Upper Bounds - Lower Bounds + 1
TestStand User Manual
9-6
ni.com
Chapter 9
Types
Figure 9-4 shows the Array Bounds dialog box with settings for a
three-dimensional array.
Figure 9-4. Array Bounds Dialog Box with Settings for a Three-Dimensional Array
The first and outermost dimension has five elements, with 0 as the
minimum index and 4 as the maximum index. The second dimension has
ten elements, with 1 as the minimum index and 10 as the maximum index.
The third and innermost dimension has three elements, with -1 as the
minimum index and 1 as the maximum index.
After you create a variable, parameter, or property as an array, you can
modify the array bounds by selecting the Properties item in the context
menu for the variable, parameter, or property in the list view. Select the
Bounds tab that now appears in the Properties dialog box to modify the
array bounds.
Dynamic Array Sizing
In TestStand, you can resize an array during execution.
In an expression, you can use the GetNumElements and
SetNumElements functions to obtain and modify the upper and lower
bounds for a one-dimensional array. For multi-dimensional arrays or to
change the number of dimensions in the array, you must use the
GetArrayBounds and SetArrayBounds expression functions. You can
find the documentation for these functions on the Operators tab of the
Expression Browser dialog box. Refer to Chapter 8, Sequence Context and
Expressions, for more information on expressions.
© National Instruments Corporation
9-7
TestStand User Manual
Chapter 9
Types
In a code module, you use the GetDimensions and SetDimensions
methods of the PropertyObject class to obtain or set the upper and lower
bounds of an array or to change the number of dimensions. Refer to the
TestStand Programmer Help for more information.
Empty Arrays
If you want the array to have no elements when you start execution, enable
the Initial Empty checkbox. When you enable the Initial Empty checkbox,
the Upper Bounds control for each dimension dims. Defining an array as
initially empty is useful if you do not know the maximum array size the
sequence requires during execution or if you want to save memory during
the periods of execution when the sequence does not use the array.
Figure 9-5 shows the Array Bounds dialog box with settings for a
three-dimensional array that is initially empty.
Figure 9-5. Array Bounds Dialog Box with an Initially Empty Array
Display of Data Types
The data type of each variable or property you create appears in the Type
column next to the variable or property name. If the data type is an array,
the words Array of appear in the Type column, followed by the data type
of the array elements and the range of each dimension. If the data type is a
named data type, the underlying type appears in the Type column, followed
by the words Instance of Type and the data type name.
TestStand User Manual
9-8
ni.com
Chapter 9
Types
Figure 9-6 shows the variables with different data types on the Locals tab
of a sequence file view.
Figure 9-6. Local Variables with Various Data Types
The following describes the data type of each local variable in Figure 9-6:
•
Count has the Number data type, which is one of the simple data types
that TestStand predefines.
•
Name has the String data type, which is one of the simple data types
that TestStand predefines.
•
IsOk has the Boolean data type, which is one of the simple data types
that TestStand predefines.
•
MaxVolts has the Volts data type, which is a custom data type. In
this example, the Volts data type is an alias for the Number data type.
•
DeviceEnabled is a one-dimensional array of Booleans, with
indexes from 1 to 8.
•
Impedances has the ImpedanceTable data type, which represents a
two dimensional array of numbers.
•
FixtureA has the Fixture data type, which represents a container
that contains multiple fields with different data types.
© National Instruments Corporation
9-9
TestStand User Manual
Chapter 9
Types
•
ParamsList has the TestParamList data type, which represents a
one-dimensional array of elements with the TestParams data type.
The TestParams data type represents a container that contains
multiple fields with different data types.
•
TestClass has the ActiveX reference data type, which is one of the
simple data types that TestStand predefines.
Modifying Data Types and Values
Except for the resizing of arrays, you cannot change the internal structure
of a variable, parameter, or property after you create it. You cannot change
its data type setting, nor can you deviate from the data type. You can,
however, change the contents of the data type itself. Changing the contents
of a data type affects all variables, parameters, and properties that use the
data type. Refer to the Creating and Modifying Data Types section in this
chapter for more information.
You can modify the value of a variable, parameter, or property in the list
view in which you create it. For variables and properties, this value is the
initial value when you start execution or call the sequence. For parameters,
this value is the default value if you do not pass an argument value
explicitly. If the data type is a single-valued data type, such as Number or
Boolean, the value appears in the Value column of the list view. In
Figure 9-6, the values of the first four local variables appear in the Value
column.
Single Values
You modify the value of a single-valued data type by selecting the
Properties item in the context menu for the variable, parameter, or
property in the list view. The Properties dialog box appears. Figure 9-7
shows the Properties dialog box for the Max Volts local variable from
Figure 9-6.
TestStand User Manual
9-10
ni.com
Chapter 9
Types
Figure 9-7. Properties Dialog Box for a Number Local Variable
ActiveX References
If the variable, parameter, or property is an ActiveX reference, you can use
the Properties dialog box to release the reference. You can set the reference
value only from within an expression, a step code module using the
TestStand API, or by calling the TestStand API directly, through the
ActiveX Automation Adapter. TestStand stores the ActiveX reference as
an IDispatch pointer or IUnknown pointer. The value you assign to the
ActiveX reference must be a valid ActiveX pointer. Whenever you assign a
non-zero value to an ActiveX reference, TestStand adds a reference to the
object for as long as the variable, parameter, or property contains that value.
To release the reference to the object, assign the variable, parameter, or
property a new value or the constant Nothing. In addition, TestStand
automatically releases the reference to the object when the variable,
parameter, or property loses its scope. For example, if a sequence local
variable contains a reference to an object, TestStand releases the reference
when the call to the sequence completes.
© National Instruments Corporation
9-11
TestStand User Manual
Chapter 9
Types
Do not release an ActiveX variable by assigning it a value of zero. Instead, assign
the variable a value of Nothing.
Note
Arrays
If the variable, parameter, or property is an array that contains values, you
access the elements of the array in the list view by selecting View Contents
from the context menu. Figure 9-8 shows the contents of the Impedances
array local variable from Figure 9-6.
Figure 9-8. Contents of Array Local Variable in List View
The array indexes appear in the Field column of the list view. You can use
the Properties item in the context menu for each array element to modify
the initial value.
Numeric Value Formats
You can use the Numeric Format dialog box to specify the format that
TestStand uses to display the value of a numeric variable or property. To
display the Numeric Format dialog box, click the Edit Numeric Format
button on the Properties dialog box for a numeric or numeric array variable
or property. Figure 9-9 shows the Numeric Format dialog box.
TestStand User Manual
9-12
ni.com
Chapter 9
Types
Figure 9-9. Numeric Format Dialog Box
The Numeric Format dialog box can contain the following controls:
•
Sample—A sample number to which the dialog box applies the
current format settings. You can enter different numbers to test the
effects of the format settings.
•
Formatted Number—Displays the effect of the format settings on the
sample number.
•
Type—Specifies the numeric format type. You can choose one of the
following options from the ring control: Real, Integer, Unsigned
Integer, Hexadecimal, Octal, or Binary.
•
Number of Fractional Digits—Specifies the number of digits to
display after the decimal point. This control appears only when you set
the Type to Real and do not set the Show Exponent option to
Automatic. If the value to format contains more fractional digits than
this control specifies, the fractional portion of the formatted number
rounds to the specified number of fractional digits. If the value to
format contains fewer fractional digits than this control specifies, the
© National Instruments Corporation
9-13
TestStand User Manual
Chapter 9
Types
Display Trailing Zeros control determines whether to append zeros to
reach the specified number of fractional digits.
TestStand User Manual
•
Maximum Number of Significant Digits—Specifies the maximum
number of significant digits to display. This control appears only when
you set the Type to Real and set the Show Exponent option to
Automatic.
•
Minimum Number of Digits—Specifies the minimum number of
digits to display. This control appears only when you do not set the
Type to Real. If the value to format contains fewer digits than the
minimum, this option prefixes the formatted number with leading
zeros.
•
Minimum Field Width—Specifies the minimum number of
characters in the formatted number. If the number does not contain the
minimum number of characters, TestStand appends spaces before or
after the number, according to the setting of the Align Left control.
•
Sign—Specifies when a sign prefixes the formatted number. You can
choose one of the following options from the ring control: Minus Sign
Only, Plus or Minus Sign, or Space or Minus Sign.
•
Show Exponent—Specifies whether the number appears in scientific
notation. You can choose one of the following options from the ring
control:
–
Yes—Use scientific notation.
–
No—Do not use scientific notation.
–
Automatic—Use the most compact form of notation for the
current value.
•
Display Trailing Zeros—Appends zeros to the fractional portion of
the formatted number if the value to format contains fewer fractional
digits than the number that the Number of Fractional Digits control
specifies. This control applies when the Type is Real and the formatted
number does not contain an exponent.
•
Align Left—Specifies that the formatted number aligns against the left
edge of its field.
•
Fill Width With Leading Zeros—Specifies that empty space before
the number fills with zeros instead of spaces. This control applies only
when you set the Align Left option and set the Type to Real.
•
Show Decimal Point—Specifies that the formatted number includes a
decimal point even when it does not have a fractional portion. This
control applies only when you set the Type to Real and the formatted
number does not contain an exponent.
9-14
ni.com
Chapter 9
Types
•
Show Radix Prefix—Specifies whether a radix prefix precedes
binary, octal, or hex numbers.
•
Use Uppercase Letters—Specifies that radix prefixes, exponent
characters, and hexadecimal digits appear in uppercase.
•
Format—Displays the underlying format code that the dialog box
settings specify.
•
Custom—Enables editing of the underlying format code.
•
Check Format—Checks the validity of an underlying format code
you enter in the Format control.
Containers
If the variable, parameter, or property is a container that contains one or
more fields, you select View Contents from the context menu to display
the fields in the list view. For fields that have values in the Value column,
you use the Properties item in the context menu to examine or modify the
value. For a field that is an array or container, you select View Contents
again to view its elements or fields.
If you want to modify an NI-installed type, you must first enable the Allow Editing
NI Installed Types option on the Preferences tab of the Station Options dialog box.
Note
Using the Standard Named Data Types
TestStand defines standard named data types, such as Path, Error, and
CommonResults. You can add subproperties to the standard data types,
but you cannot delete any of their built-in subproperties.
The Standard Data Types tab in the Type Palette window shows the
standard data types in the selected type palette file. The Standard Data
Types tab in the Station Globals or Sequence File window shows only the
standard data types that the variables, parameters, or properties in the
window use.
© National Instruments Corporation
9-15
TestStand User Manual
Chapter 9
Types
Figure 9-10 shows the Standard Data Types tab of the Type Palette window.
Figure 9-10. Standard Data Types Tab of the Type Palette Window
The Path section and the Error and Common Results section of this
document describe some of the more generally applicable standard data
types.
Path
You use the Path standard data type to store a pathname. The Path data
type stores the pathname as a string.
The variables, parameters, and properties you define using the Path data
type appear in the Edit Paths dialog box that the Paths command in the
View menu displays. You can use the Edit Paths dialog box to view the
pathnames in sequence files and station configuration files and to modify
the directory portion of pathnames you select. This dialog box can be useful
after you copy a sequence file or configuration file from one computer to
another. The Edit Paths dialog box shows all variables, parameters, and
properties that have the Path data type. Refer to the View Menu section in
Chapter 4, Sequence Editor Menu Bar, for more information.
Error and Common Results
TestStand inserts a Results property in every step you create, regardless
of whether you use a built-in step type or a custom step type. The Results
property has at least three subproperties: Error, Status, and
CommonResults.
The Error subproperty uses the Error standard data type. Steps in
TestStand use the Error subproperty to indicate run-time errors. The
Error standard data type is a container that contains three subproperties.
When a run-time error occurs in a step, the step sets the Occurred
subproperty to True, the Code subproperty to a value that indicates that
TestStand User Manual
9-16
ni.com
Chapter 9
Types
source of the error, and the Msg subproperty to a string that describes the
error. You can add more subproperties to the Error standard data type.
In this way, your steps can record extra run-time error information in a
standard way.
The CommonResults standard data type is an object that is initially empty.
By adding subproperties to it, you can add extra result information to all
steps in a standard way.
If you choose to add more subproperties to Error or CommonResults,
newer versions of TestStand retain them for you.
Creating and Modifying Data Types
You create and modify data types in the Sequence File Types view of a
Sequence File window, the Global Types view of the Station Globals
window, and the Type Palette window. You use the Custom Data Types tab
to create and modify custom data types. You use the Standard Data Types
tab to add subproperties to the standard data types. The two tabs are very
similar.
This section discusses creating and modifying custom data types on the Custom
Data Types tab. The same information applies to the Standard Data Types tab.
Note
Custom Data Types Tab Tree and List Views
The Custom Data Types tab contains a tree view and a list view. When you
select the root node of the tree view, the custom data types appear in the list
view.
© National Instruments Corporation
9-17
TestStand User Manual
Chapter 9
Types
Figure 9-11 shows the Custom Data Types tab for an example sequence
file, with the root node selected.
Figure 9-11. Custom Data Types Tab with Root Node Selected
The Custom Data Type column of the list view shows the name of each
custom data type. The Type column shows the underlying data type. For
information on the contents of the Type column, refer to the Display of
Data Types section earlier in this chapter. If the underlying data type is a
single-value type, such as Number or Boolean, the Value column shows the
initial or default value that TestStand applies to all variables, parameters,
and properties you create using the custom data type. The Usage column
shows the files that use the data type. The Comment column shows a
descriptive comment that you can create for the data type.
You can open the nodes in the tree view to show all the subproperties of
each custom data type that is a container or an array of containers. You can
click the plus sign (+) that appears on the left of the tree view to expand a
node. When the node is open, a minus (–) sign appears to the left of the
node. You can click the minus sign to collapse the node.
In Figure 9-11, the tree view is partially open and shows the fields of
the TestParams and Fixture containers and the elements of the
TestPararmsList array. Notice that a plus sign appears to the left of
each element of the TestParamsList array because each element is a
TestParams container. When you view the contents of an array, the list
view displays all the array elements.
TestStand User Manual
9-18
ni.com
Chapter 9
Types
To update the list view to display the contents of the node, select the node
in the tree view. From the list view, you display the contents of an item by
selecting View Contents item from the context menu for the item. To
display the contents of the next highest level, press <Backspace> in either
the tree view or the list view, or select the Go Up 1 Level item from the
context menu in the list view background.
Figure 9-12 shows the Custom Data Types tab with the list view showing
the contents of the Fixture container data type.
Figure 9-12. Custom Data Types Tab Showing the Contents of a Container
Value Field
The list view displays a value in the Value column for any item that has a
single-valued type or single-valued underlying type. When you select the
View Contents command on such an item, its Value field appears in the list
view. Figure 9-13 shows the Custom Data Types tab with the list view
showing the Value field for the Volts custom data type, which uses
Number as its underlying data type.
© National Instruments Corporation
9-19
TestStand User Manual
Chapter 9
Types
Figure 9-13. Custom Data Types Tab Showing the Value Field for a Number
If you double-click or press <Enter> on the Value field in the list view or
select the Modify Value item from the context menu for the Value field,
the Modify Value dialog box appears.
Figure 9-14 shows the Modify Numeric Value dialog box for the Volts
data type.
Figure 9-14. Modify Numeric Value Dialog Box
The value you enter in the dialog box is the initial or default value that all
variables, parameters, or properties you create with the data type use. If any
other variables, parameters, or properties already have the data type, you
can change their initial or default values by enabling the Apply Value to All
Loaded Instances of the Type checkbox.
TestStand User Manual
9-20
ni.com
Chapter 9
Types
Creating a New Custom Data Type
To create a new custom data type, select the root node in the tree view so
that the existing custom data types appear in the list view. Right click the
background of the list view, and select the Insert Custom Data Type item
from the context menu. Figure 9-15 shows the Insert Custom Data Type
submenu that appears.
Figure 9-15. Insert Custom Data Type Submenu
The submenu gives you a set of data types from which to choose an
underlying type. You can select an array of any type, a container, or any of
the simple data types that TestStand defines.
If you select an array type from the submenu, the Array Bounds dialog box
appears. You use the dialog box to specify the array bounds that TestStand
applies initially to each variable, parameter, or property that you create with
the data type. After you create the variable, parameter, or property, you can
change its array bounds on the Bounds tab of the Properties dialog box.
Select the Properties item in the context menu for the variable, parameter,
or property. Refer to the Specifying Array Sizes section earlier in this
chapter for more information on setting the size of an array.
If you select the Container type from the submenu, TestStand creates the
data type without any fields.
When you create new data types, begin your types with a unique ID such as a
company prefix. Using a unique ID helps to prevent name collisions. For example,
NI_InstrumentConfigurationOptions uses NI as a unique ID.
Note
© National Instruments Corporation
9-21
TestStand User Manual
Chapter 9
Types
Adding Fields to Data Types
You can add any number of fields to a data type or data type subproperty
that you create as a container. To add fields to a container property in a new
or existing data type, right click the icon for the data type or a data type
subproperty in the list view, and select the View Contents item from the
context menu. For a new data type, the list view becomes empty. For an
existing data type, the list view displays the fields currently in the data type.
Right click the background of the list view, and select Insert Field item
from the context menu. Figure 9-16 shows the Insert Field submenu that
appears.
Figure 9-16. Insert Fields Submenu
The submenu gives you a set of data types to choose from. You can select
any of the simple data types that TestStand defines, an array of any type,
a container, or a custom or standard named data type.
To cut, copy, paste, or rename fields, use the context menu that appears
when you right click the icon for the field in the list view.
Note If you want to modify a NI installed data type, you must first enable the Allow
Editing NI Installed Types option on the Sequence Editor Options dialog box.
Properties Dialog Box for Custom Data Types
To examine and modify the properties of an existing custom data type,
access the Properties dialog box for the type. Right click the icon for the
data type in the list view, and select the Properties item from the context
menu. The contents of the Properties dialog box vary depending on the
underlying data type.
TestStand User Manual
9-22
ni.com
Chapter 9
Types
Figure 9-17 shows the Properties dialog box for the Volts data type.
Figure 9-17. Properties Dialog Box for a Numeric Data Type
The data type Properties dialog box can contain the following tabs:
General, Bounds, Version, or Struct Passing.
General Tab
The General tab can contain the following controls:
•
© National Instruments Corporation
Value—Specifies the default value that TestStand assigns to all
variables, parameters, and properties you create with the data type. For
variables and properties, this value is the initial value when you start
execution or call the sequence. For parameters, this value is the default
value if you do not pass an argument value explicitly. You can change
the value in each individual variable, parameter, or property after you
9-23
TestStand User Manual
Chapter 9
Types
create it. To assign the value you specify to all existing instances of the
data type, enable the Apply Value to All Loaded Instances of the
Type option. The Value control appears for single-valued data types.
•
Attach to File—Specifies that TestStand saves the data type in the file
regardless of whether any variables, parameters, or properties in the
file currently refer to it. This setting is useful when you design a data
type and save the file before you create the variable, parameter, or
property that uses the data type. When you create a new data type on
the Custom Data Types tab or you copy an existing data type from
another window onto the tab, TestStand automatically enables the
Attach to File option for you.
If you the disable the Attach to File checkbox, TestStand does not save
the data type unless a variable, parameter, or property in the file refers
to it. This setting is useful when, instead of creating or copying the data
type explicitly, you copy a variable, parameter, or property that refers
to the type from another window and the current file does not already
contain the type. In this case, TestStand automatically disables the
Attach to File option for you. If you later delete the variable,
parameter, or property, TestStand also deletes the data type for you.
•
Numeric Format—Displays the Numeric Format dialog box. For
more information, refer to the Numeric Value Formats section in this
chapter.
•
Advanced—Displays the Edit Flags dialog box that contains the
property flags that you can modify in TestStand. Refer to the Property
Flags section in this chapter for more information.
•
Comment—Specifies the default comment that TestStand assigns to
all variables, parameters, and properties you create with the data type.
Bounds Tab
The Bounds tab appears for array data types only. Refer to the Specifying
Array Sizes section earlier in this chapter for more information on setting
the size of an array. If you have already created variables, parameters, or
properties with the data type, you can change their array bounds by
enabling the Apply Bounds to All Loaded Instances of the Type
checkbox.
TestStand User Manual
9-24
ni.com
Chapter 9
Types
Version Tab
The Version tab contains controls that you can use to specify the version of
a type and how TestStand resolves differences between type definitions in
separate files.
•
Version—Use this control to edit the type version number. When you
edit a type, you can increment the version number so that TestStand
does not prompt users to resolve the conflict between the revised type
and older versions of the type that might exist in other files. When
TestStand loads a file that contains a different version of a type than a
currently loaded type, TestStand resolves the conflict by automatically
using the type with the highest version number. Note that you cannot
edit the version of NI step types.
•
Modified—Indicates that you have edited the type since you last set its
version number. Because the type no longer corresponds to the version
number you assigned, TestStand always prompts the user to resolve a
conflict between the type and a differing definition of the type in
another file. Uncheck this control to inform TestStand that the version
number is correct for the current state of the type.
•
Always Prompt User to Resolve the Conflict—Specifies that
TestStand ignores version numbers and always prompts the user to
resolve conflicts between type definitions that differ.
•
Use the Definition that has the Highest Version Number—This
control specifies that TestStand automatically uses the type with the
highest version number when it encounters type definitions that differ.
Struct Passing Tab
You can use the DLL adapter to pass a TestStand variable or property to a
structure parameter in a code module function. The data type of the variable
or property you pass must contain the all the fields that the structure
parameter expects.
There are several ways to format data types fields in the in-memory
representation of a structure parameter. Use the Struct Passing tab to
specify how TestStand formats in memory an instance of a data type that
you pass as a structure. The Struct Passing tab can contain the following
controls.
•
Allow Objects of This Type to be Passed as Structs—Enables you
to pass instances of the data type to structure parameters.
•
Packing—Select the packing options according to the development
environment and compiler settings that you use to create the DLLs you
call.
© National Instruments Corporation
9-25
TestStand User Manual
Chapter 9
Types
Visual C++ and Symantec C++ have a default of 8-byte packing.
LabVIEW, Borland C++ and Watcom C++ have a default of 1-byte
packing. For LabWindows/CVI, the default packing can be either
8-byte or 1-byte, depending upon its compatibility mode. For example,
in Visual C++ compatibility mode, LabWindows/CVI has a default of
8-byte packing. You configure the Packing option for all data types that
specify Default Adapter Packing in the DLL Flexible Prototype
Adapter Configuration dialog box.
•
Property—Use this ring to select a subproperty of the data type in
order to specify its in-memory format. You also can configure the
in-memory format for a data type subproperty in the properties dialog
box for the subproperty.
•
Exclude When Passing Structure—Specifies that TestStand does not
include the selected subproperty in the in-memory representation of
the data type.
•
Type—Displays the data type of the selected subproperty.
•
Store Array As—Appears for array subproperties only. This control
contains the following options:
•
•
–
Embedded Array—The array resides within the in-memory
representation of the data type.
–
Pointer To Array—A pointer to the array resides within the
in-memory representation of the data type.
Store Struct As—Appears for container subproperties only. This
control contains the following options:
–
Embedded Struct—The structure representation of the container
property resides within the in-memory representation of the data
type.
–
Pointer To Struct—A pointer to the structure representation of
the container property resides within the in-memory
representation of the data type.
<Type Ring>—Specifies how to format the subproperty in memory.
The choices vary according to the subproperty type and are the same
as the data passing options you specify for parameters in the DLL
Flexible Prototype Adapter Specify Module dialog box.
Properties Dialog Box for Data Type Fields
To examine and modify the properties for a field of a custom data type,
access the Properties dialog box for the field. To access the fields, select the
View Contents item from the context menu. Select the Properties item
from the context menu for one of the fields. The Properties dialog box for
TestStand User Manual
9-26
ni.com
Chapter 9
Types
a data type field is the same as the Properties dialog box for a custom data
type, except for the following differences:
•
The Properties dialog box for a data type field does not contain the
Attach to File checkbox.
•
The Properties dialog box for a data type field does not contain a
Version tab.
•
The Structure tab on the Properties dialog box for a data type field
allows you to configure the in-memory format of the selected property
only.
A Properties dialog box does not exist for the Value field of a data type.
Instead, you can access the Modify Value dialog box. Refer to the Value
Field section earlier in this chapter for more information on the Modify
Value dialog box.
Property Flags
TestStand includes a set of property flags that you can modify. You can
access the Edit Flags dialog box by clicking on the Advanced button in the
Properties dialog box of a property object. Typically, you only need to
configure property flags when you develop a relatively sophisticated
custom step type. Figure 9-18 shows the Edit Flags dialog box.
Figure 9-18. Edit Flags Dialog Box
© National Instruments Corporation
9-27
TestStand User Manual
Chapter 9
Types
The Edit Flags dialog box allows you to change the values of the property
flags for a property object. The list of flags corresponds to the available
property flag constants in the TestStand API. Checking an item in the
listbox activates the corresponding flag in the object.
The Reset Flags in All Loaded Instances of the Type checkbox is only
visible if you are editing the properties of a type definition. If you select this
option and click on the OK button, all flags in all instances of the type will
be set back to the default values that the type specifies. This option does not
affect type instances that have been saved to disk and are not currently
loaded.
The Property Flags represent the state of the object. You can change the
state of the object by checking or unchecking its Flags in the listbox. For
example, if you check an object’s PropFlags_NotEditable flag, the
object’s property page becomes read-only and the object’s value (if it is a
string, number, etc.) cannot be changed. Each flag is a single bit in a 32-bit
integer value; when you check or uncheck a flag, the New Flags control
shows you what the combined hexadecimal value of all flags is after your
changes. This is the same value that is returned by the API
PropertyObject.GetFlags method. The Old Flags control shows the initial
value of the object’s flags when the dialog was first opened. You can edit
the New Flags control value directly by entering a decimal or hexadecimal
value. If you edit the New Flags control directly, each flag list item reflects
your changes.
The Type Flags button is only visible from the Edit Flags dialog box when
you are editing the properties of a type definition. Click on the Type Flags
button to display the Edit Data Type Flags dialog box, as shown in
Figure 9-19.
TestStand User Manual
9-28
ni.com
Chapter 9
Types
Figure 9-19. Edit Data Type Flags Dialog Box
The Edit Data Type Flags dialog box contains the following listboxes:
•
Type Flags—Flags which are valid only for a property object that is a
type definition. Type Flags do not exist in instances of the type.
•
Instance Default Flags—When TestStand creates a new instance of
the type, the values in this list box determine the initial flag values in
the instance.
•
Type Determines Instance Flags Value—When you set a flag in this
list box, the value of the flag that the Instance Default Flags control
specifies always determines the value of the flag that appears in
instances of the type. In this case, type instances cannot change the
value of the flag.
For a description of each of the property flag constants in the TestStand
API, refer to the Property Flags Constants and the PropertyObjTypeFlags
Constants topics in the TestStand Programmer Help.
© National Instruments Corporation
9-29
TestStand User Manual
Chapter 9
Types
Using Step Types
You use step types when you insert steps in the Main, Setup, and Cleanup
tabs of an individual sequence view in the Sequence File window. The
Insert Step item in the context menu displays a submenu that shows all the
step types that appear in the Type Palette window or in the current sequence
file. This includes step types that come with TestStand and custom step
types that you create.
Figure 9-20 shows the submenu for the Insert Step item. The submenu
includes one custom step type, Custom Transmitter Test.
Figure 9-20. Insert Step Submenu
An icon appears to the left of each step type in the submenu. When you
select a step type, TestStand displays the same icon next to the name of the
new step in the list view. Many step types, such as the Pass/Fail Test and
Action step types, can work with any module adapter. For these step types,
the icon that appears in the submenu is the same as the icon for the module
adapter that you select in the ring control on the tool bar. In Figure 9-20, the
LabVIEW Standard Prototype Adapter is the current adapter, and its icon
appears next to several step types, including Pass/Fail Test and Action. If
you select one of these step types, TestStand uses the LabVIEW Standard
Prototype Adapter for the new step.
Some step types require a particular module adapter and always use the
icon for that adapter. For example, the Sequence Call step type always uses
the Sequence Adapter icon. Other step types, such as Statement and Goto,
do not use module adapters and have their own icons.
TestStand User Manual
9-30
ni.com
Chapter 9
Types
When you select an entry in the submenu, TestStand creates a step using the
step type and module adapter that the submenu entry indicates. After you
insert the step, use the context menu for the step to access the Specify
Module item, and then specify the code module or sequence, if any, that the
step calls. The Specify Module command displays a dialog box that is
different for each adapter. The generic name for the dialog box is the
Specify Module dialog box. Refer to Chapter 13, Module Adapters, for
information on the Specify Module dialog box for each adapter. Table 9-3
shows the dialog boxes for each adapter.
Table 9-3. Adapter Dialog Box Names
Name of Specify Module
Dialog Box in Context
Module Adapter
DLL Flexible Prototype Adapter
Edit DLL Call dialog box
LabVIEW Standard Prototype Adapter
Edit LabVIEW VI Call dialog box
C/CVI Standard Prototype Adapter
Edit C/CVI Module Call dialog box
Sequence Adapter
Edit Sequence Call dialog box
ActiveX Automation Adapter
Edit Automation Call dialog box
HTBasic Adapter
Edit HTBasic Subroutine Call
For each step type, other items can appear in the context menu above
Specify Module. For example, the Edit Limits item appears in the context
menu for Numeric Limit Test steps, and the Edit Pass/Fail Source item
appears in the context menu for Pass/Fail Test steps. The menu item
displays a dialog box in which you modify step properties that are specific
to the step type. This dialog box is called a step-type-specific dialog box.
Refer to Chapter 10, Built-In Step Types, for information on the menu item
for each of the built-in step types.
To modify step properties that are common to all step types, use the
Properties command in the context menu, double-click the step, or press
<Enter> with the step selected. The Step Properties dialog box contains
command buttons to open the Specify Module dialog box and the
step-type-specific dialog boxes. Refer to Chapter 5, Sequence Files, for
more information on the Step Properties dialog box.
© National Instruments Corporation
9-31
TestStand User Manual
Chapter 9
Types
Creating and Modifying Custom Step Types
If you want to change or enhance a TestStand built-in step type, do not edit
the built-in step type or any of its supporting source code modules. Instead,
copy and rename a built-in step type and its supporting modules, and make
the changes to the new files. This practice ensures that a newer installation
of TestStand does not overwrite your customizations. It also makes it easier
for you to distribute your customizations to other users.
When you create new step types, begin your types with a unique ID such as a
company prefix. Using a unique ID will prevent name collision. For example,
NI_PropertyLoader uses NI as a unique ID.
Note
The Step Types tab in the Type Palette window shows all the step types in
the selected type palette file. The Step Types tab in the Sequence File Types
view of the Sequence File window shows only the step types that the steps
in the sequence file use.
Figure 9-21 shows the Step Types tab of the Type Palette window.
Figure 9-21. Step Types Tab of the Type Palette Window
TestStand User Manual
9-32
ni.com
Chapter 9
Types
To insert a new step type, right click the background of the list view and
select Insert Step Type item from the context menu. To copy an existing
step type, select the Copy and Paste items from the context menu of the
step type.
Custom Step Type Properties
You can define any number of custom properties in a step type. Each step
you create with the step type has the custom properties you define.
You can open the nodes in the tree view of the Step Types tab to display all
step types and their custom properties. To display the custom properties of
a step type in the list view, select the node for the step type in the tree view.
To display the subproperties of a custom property in the list view, select the
node for the custom property in the tree view. From the list view, you
display the contents of a step type or property by selecting the View
Contents item from the context menu for the step type or property. To
display the contents of the next highest level, press <Backspace> in either
the tree view or the list view, or select the Go Up 1 Level item from the
context menu in the list view background.
Figure 9-22 shows the custom properties for the Numeric Limits step.
Figure 9-22. Custom Properties of a Step Type
© National Instruments Corporation
9-33
TestStand User Manual
Chapter 9
Types
You add custom properties to a step type in the same way you add fields to
a data type. Refer to the Adding Fields to Data Types section earlier in this
chapter for more information.
Lifetime of Local Variables, Parameters,
and Custom Step Properties
Multiple instances of a sequence can run at the same time. This situation
can occur when you call a sequence recursively or when a sequence runs in
multiple concurrent executions. Each instance of the sequence has its own
copy of the sequence parameters, local variables, and custom properties of
each step. When a sequence completes, TestStand discards the values of the
parameters, local variables, and custom properties.
Built-In Step Type Properties
TestStand defines many properties that are common to all step types.
These are called the built-in step type properties. Some built-in step type
properties exist only in the step type itself. These are called class step type
properties. TestStand uses the class properties to define how the step type
works for all step instances. Step instances do not contain their own copies
of the class properties.
Other built-in step type properties exist in each step instance. These are
called instance step type properties. Each step you create with the step type
has its own copy of the instance properties. TestStand uses the value you
specify for an instance property in the step type as the initial value of the
property in each new step you create.
Normally, after you create a step, you can change the values of its instance
properties. However, when you create a custom step type, you can prevent
users from changing the values of specific instance properties in the steps
they create. For example, you might use the Edit substep of a step type to
set the Status Expression for the step. In that case, you do not want the user
to explicitly change the Status Expression value. TestStand uses this
capability in some of the built-in step types, such as Numeric Limit Test
and String Value Test.
TestStand User Manual
9-34
ni.com
Chapter 9
Types
To examine and modify the values of the built-in properties, select the
Properties item from the context menu for a step type in the list view.
The Step Type Properties dialog box contains the following tabs:
•
General
•
Menu
•
Substeps
•
Default Run Options
•
Default Post Actions
•
Default Loop Options
•
Default Expressions
•
Default Synchronization
•
Disable Properties
•
Code Templates
•
Version
•
Struct Passing
The Default Run Options, Default Post Actions, Default Loop Options,
Default Expressions, and Default Synchronization tabs display instance
properties. These tabs have the same appearance and behavior as the Run
Options, Post Actions, Loop Options, Expressions, and Synchronization
tabs of the Step Properties dialog box for a step instance. Refer to the Step
Group Context Menu section of Chapter 5, Sequence Files, for more
information on the Step Properties dialog box.
Most of the properties in the other tabs are class properties. This section
discusses each of these tabs in detail.
© National Instruments Corporation
9-35
TestStand User Manual
Chapter 9
Types
General Tab
You use the General tab to specify a name, description, and comment
for the step type. You also can specify an icon and a module adapter.
Figure 9-23 shows the General tab of the Step Type Properties dialog box
for the Action step type.
Figure 9-23. Step Type Properties Dialog Box—General Tab
The General tab of the Step Type properties dialog box contains the
following controls:
•
TestStand User Manual
Designate an Icon—Specifies an icon for the step type.
If you enable the checkbox, you can select from a list of icons
that are in the <TestStand>\Components\NI\Icons and
<TestStand>\Components\User\Icons directories. TestStand
displays the icon next to the step names for all steps that use the step
9-36
ni.com
Chapter 9
Types
type. If you disable the checkbox, TestStand displays the icon of the
module adapter for each step. If you can use any module adapter with
the step type, it is best to disable the checkbox.
•
Default Step Name Expression—Specifies a string expression that
TestStand evaluates when you create a new step with the step type.
TestStand uses the value of the expression as the name of the new step.
If a step with the same name already exists in the sequence, TestStand
appends _Copyn to the name to make it unique. If you want to store
the name in a string resource file, you can use the ResStr expression
function to retrieve the name from the file. Storing the name in a string
resource file is useful when you want to display the name in different
languages. Refer to the Creating String Resource Files section in
Chapter 3, Configuring and Customizing TestStand, for more
information.
•
Step Description Expression—Specifies a string expression that
TestStand evaluates whenever it displays the Description field for
a step. TestStand uses the value of the expression as the contents
of the Description field for the step. If you include the
%ModuleDescription macro in a string that you surround with
double quotes, TestStand replaces the %ModuleDescription macro
with text that the module adapter provides that describes the code
module that the step uses.
•
Designate an Adapter—Specifies a single module adapter for the step
type. If you enable the checkbox, all steps you create with the step type
use the module adapter that you designate, regardless of the module
adapter that you select in the sequence editor toolbar.
You can choose from a list of all the TestStand module adapters. If the
step type does not require a module adapter, select <None> from the
module adapter list. When you designate a module adapter, a Specify
Module button appears. Click the Specify Module button if you want
to specify the module adapter call for all steps that you create with the
step type.
If you want to prevent the sequence developer from modifying the call,
enable the Specify Module checkbox on the Disable Properties tab.
Refer to Chapter 13, Module Adapters, for information on the Specify
Module dialog box for each module adapter.
•
© National Instruments Corporation
Advanced—Displays the Edit Flags dialog box that contains the flags
that you can modify in TestStand. Refer to the Property Flags section
of this chapter for more information.
9-37
TestStand User Manual
Chapter 9
Types
•
Attach to File—Causes TestStand to save the step type in the file
regardless of whether the file contains any steps that use the step type.
When you create a new step type or copy an existing step type from
another window, TestStand automatically enables the Attach to File
option for you.
Disable the Attach to File checkbox if you want TestStand to save the
step type only when the file contains a step that uses it. When you copy
a step that uses the step type into the sequence file and the sequence
file does not already contain the step type, TestStand automatically
disables the Attach to File option for you. If you later delete the step,
TestStand also deletes the step type for you.
•
Comment—Specifies text that appears in the Comment field for the
step type in the list view. TestStand copies the comment into each step
you create with the step type. You can change the comment for each
step after you create that step.
Menu Tab
You use the Menu tab to specify the menu item name that appears for the
step type in the Insert Step submenu. The Insert Step submenu appears in
the context menu of individual sequence views in the Sequence File
window. Use the Step Type Menu Editor to configure the organization of
the Insert Step submenu. Refer to the Step Type Menu Editor section in
this chapter for a description of the menu editor.
TestStand User Manual
9-38
ni.com
Chapter 9
Types
Figure 9-24 shows the Menu tab of the Step Type Properties dialog box for
the Action step type.
Figure 9-24. Step Type Properties Dialog Box—Menu Tab
The Menu tab of the Step Type properties dialog box contains the following
controls:
•
Item Name Expression—Specifies an expression for the step type
name that appears in the Insert Step submenu. Note that if you specify
a literal string in this expression control, you must enclose it in double
quotation marks. If you want to use a name from a string resource file,
you can use the ResStr expression function to retrieve the name from
the file. Refer to the Creating String Resource Files section in
Chapter 3, Configuring and Customizing TestStand, for more
information.
•
Group—Indicates the Step Type menu group to which the step type
belongs. Use the Step Type Menu Editor to specify the groups to which
step types belong.
© National Instruments Corporation
9-39
TestStand User Manual
Chapter 9
Types
Substeps Tab
You use the Substeps tab to specify substeps for the step type. You use
substeps to define standard actions, other than calling the step module,
that TestStand performs for all instances of the step type. You implement a
substep through a call to a code module. The code modules you call from
substeps are called substep modules. The substeps for a step type define the
editing and run-time behavior for all step instances of that type. For each
step that uses the step type, TestStand calls the same substep modules
with the same arguments. A sequence developer does not add or remove
substeps or otherwise alter the step type when configuring a particular
step instance. Although you can specify any number of substeps for a step
type, the list of substeps is not a sequence and substeps do not have
preconditions, post actions, or other execution options. The order in which
pre and post substeps execute is the only execution option you specify.
You can specify four categories of substeps for a step type.
TestStand calls the Pre Step substeps before calling the step module. You
might implement a Pre Step substep to retrieve and store measurement
configuration parameters into custom step properties that the step module
can access.
TestStand calls the Post Step substeps after calling the step module. You
might implement a Post Step substep to compare the values that the step
module stores in custom step properties against limit values that the Edit
substep stores in other custom step properties.
The sequence developer can invoke the Edit substeps by selecting the menu
items that appear above the Specify Module item in the context menu
for the step. Usually, an Edit substep displays a dialog box in which the
sequence developer edits the values of custom step properties. For example,
an Edit substep might display a dialog box in which the sequence developer
specifies the high and low limits for a test. The Edit substep might then
store the high- and low-limit values as step properties.
Dialog boxes displayed by the specified Edit substep code module must
be modal. For all dialog boxes except Microsoft Foundation Classes
(MFC) dialog boxes, use the Engine.NotifyStartOfModalDialog and
Engine.NotifyEndOfModalDialog methods of the TestStand API. Refer to
the modal examples in <TestStand>\Examples\ModalDialogs.
TestStand does not call Custom substeps. You can use the TestStand API to
invoke a Custom substep from a test module, operator interface, or other
code module.
TestStand User Manual
9-40
ni.com
Chapter 9
Types
Figure 9-25 shows the Substeps tab of the Step Type Properties dialog box
for the Numeric Limit Test step type.
Figure 9-25. Step Type Properties Dialog Box—Substeps Tab
The Substeps tab can contain the following controls:
•
Adapter—Specifies the adapter for the next substep you insert into the
substep list.
•
<Substep List>—Displays the substeps for the step type. Substeps of
the same category always appear contiguously in the list. Use the
Move Up and Move Down buttons to reorder substeps within a
category. The order of the substeps in the list defines the order in which
Pre and Post substeps execute and the order in which the menu items
© National Instruments Corporation
9-41
TestStand User Manual
Chapter 9
Types
for Edit substeps appear in the context menu of individual sequence
views in the Sequence File window.
•
Add—Displays a menu from which you select the category of substep
to insert into the substep list. You can select from the following
categories of substeps: Pre Substep, Post Substep, Edit Substep, and
Custom Substep.
•
Delete—Deletes the selected substep from the substep list.
•
Specify Module—Displays the Specify Module dialog box for the
selected substep in the substep list. Refer to Chapter 13, Module
Adapters, for more information on the Specify Module dialog box for
each module adapter.
•
Move Up—Moves the selected substep up within the group of
substeps of the same category in the substep list.
•
Move Down—Moves the selected substep down within the group of
substeps of the same category in the substep list.
•
Menu Item Name Expression—Specifies the name of the menu item
that invokes the Edit substep in the context menu of individual
sequence views in the Sequence File window. This control appears
only when you select an Edit substep in the substep list. Note that if
you specify a literal string in this expression control, you must enclose
it in double quotation marks. If you want to use a name from a string
resource file, you can use the ResStr expression function to retrieve
the name from the file. Refer to the Creating String Resource Files
section in Chapter 3, Configuring and Customizing TestStand, for
more information.
Source code is available for many of the substep modules that the built-in
step types use. You can find the source code project files in the
<TestStand>\Components\NI\StepTypes subdirectory. If you want
to use existing step type source code as a starting point for your own step
type, copy the files into the <TestStand>\Components\User\
StepTypes subdirectory and use unique filenames to rename the copies.
When TestStand calls a substep, it does not pass data through the standard structures
and clusters you use with the LabVIEW and C/CVI Standard Prototype Adapters. An
exception is that when a substep returns a run-time error, TestStand sets the step error
properties according to contents of the output error cluster or structure. For all input
cluster/structure values and for all non-error cluster/structure output values, you must use
the sequence context parameter and the TestStand API to access the corresponding step
properties from your substep. For adapters that do not require a standard prototype,
TestStand calls substep code modules the same way it calls other code modules.
Note
TestStand User Manual
9-42
ni.com
Chapter 9
Types
Disable Properties Tab
You can use the Disable Properties tab to prevent the sequence developer
from modifying the settings of built-in instance properties in individual
steps. In this way, you make the settings you specify in the Step Type
Properties dialog box permanent for all step instances.
The tab contains a list of checkboxes. Each checkbox represents one
built-in instance property or a group of built-in instance properties.
When you enable a checkbox, you prevent the sequence developer from
modifying the value of the corresponding property or group of properties.
Figure 9-26 shows the Disable Properties tab of the Step Type Properties
dialog box for the Numeric Limit Test step type.
Figure 9-26. Step Type Properties Dialog Box—Disable Properties Tab
© National Instruments Corporation
9-43
TestStand User Manual
Chapter 9
Types
Most of the checkboxes on the Disable Properties tab apply to a specific
control in the Step Properties dialog box. The following bulleted items
describe two exceptions, the Specify Module checkbox and the
Preconditions checkbox.
•
Specify Module—If you enable this checkbox, the sequence
developer cannot access the Specify Module dialog box on any steps
that use the step type. You can enable the Specify Module checkbox for
step types that always make the same module adapter call. Refer to the
General Tab section earlier in this chapter for information on how to
specify a module adapter call for a step type. For example, the
checkbox is enabled for the Statement step type because Statement
steps do not call code modules.
If you uncheck the Specify Module checkbox but check the Edit
Module Prototype checkbox, a sequence developer can view the
Specify Module dialog box but cannot modify any of the parameter
information in that dialog box.
•
Precondition—If you check this checkbox, a sequence developer
cannot edit preconditions for steps that use the step type.
Code Templates Tab
You use the Code Template tab to associate one or more code templates
with the step type. A code template is a set of source files that contain
skeleton code. The skeleton code serves as a starting point for the
development of code modules for steps that use the step type. TestStand
uses the code template when a sequence developer clicks the Create Code
button on the Source Code tab in the Specify Module dialog box for a step.
TestStand comes with a default code template that you can use for any step
type. You can customize code templates for individual step types. For the
Numeric Limit Test step type, for instance, you might want to include
example code for accessing the high- and low-limit properties in a step.
Templates Files for Different Adapters
Because different module adapters require different types of code modules,
a code template normally consists of one or more source files for each
module adapter. For the default code template, for example, TestStand
comes with one .c file for the DLL Flexible Prototype Adapter, one .c file
for the C/CVI Standard Prototype Adapter, and eight .vi files for the
LabVIEW Standard Prototype Adapter. The multiple .vi files correspond
to the different combinations of parameter options that the sequence
developer can choose in the Edit LabVIEW VI Call dialog box.
TestStand User Manual
9-44
ni.com
Chapter 9
Types
TestStand uses the code template name as the name of a subdirectory
in the <TestStand>\CodeTemplates\NI or <TestStand>\
CodeTemplates\User directory. TestStand stores the source files for the
different module adapters in the subdirectory. TestStand also stores a .ini
file in each subdirectory. The .ini file contains a description string that
TestStand displays for the code template. The subdirectory name for the
default code template is Default_Template.
Code templates for the C/CVI Standard Prototype Adapter always specify
two parameters: a pointer to tTestData structure and a pointer to a
tTestError structure. When TestStand uses a C/CVI template module to
create skeleton code, it validates the function prototype in the template
module against this requirement. TestStand reports an error if the prototype
is incorrect.
Code templates for the LabVIEW Standard Prototype Adapter always
specify Test Data and error out clusters as parameters. The eight
different .vi files for each LabVIEW Standard Prototype Adapter code
template specify various combinations of the Input buffer, Invocation
Information, and Sequence Context parameters. When TestStand uses a
LabVIEW template VI to create skeleton code, it chooses the correct .vi
file to use based on the current settings in the Optional Parameters section
of the Edit LabVIEW VI Call dialog box.
Code templates for the DLL Flexible Prototype Adapter can have any
number of parameters that are compatible with the data types you can
specify on the Module tab of the Edit DLL Call dialog box.
When TestStand uses a code template for a DLL to create skeleton code,
it compares the parameter list in the source file to the parameter
information on the Module tab. If these sets of information do not match,
TestStand prompts the sequence developer to select which prototype to use
for the skeleton code. If the sequence developer chooses to use the
prototype from the template source file, the developer also can request that
TestStand update the Module tab to match the source file. However, the
template source file does not contain sufficient information for TestStand
to update the Value controls for the parameters on the Module tab.
You can specify entries for TestStand to place in the Value controls, as
described in the Using the Code Templates Tab section in this chapter.
TestStand stores this information in the .ini file in the template
subdirectory.
© National Instruments Corporation
9-45
TestStand User Manual
Chapter 9
Types
Creating and Customizing Template Files
You use the Code Templates tab to create a new code template. TestStand
prompts you to specify a subdirectory name and an existing code template
as a starting point. TestStand copies the files for the existing template into
the new subdirectory in the <TestStand>\CodeTemplates\User
directory and changes the names. You must then modify the template files
to customize them. If you do not intend to use a particular adapter module,
you can delete the template files for those adapter modules.
You can customize the template files to include example code that helps the
test developer learn how to access the important custom properties of the
step. The method you use to customize the source files for a code template
can vary based on the module adapter. For example, to show how to obtain
the high- and low-limit properties in a LabVIEW or CVI template for a
Numeric Limit Test step, you might include example calls to the
GetValNumber method of the Property Class in the TestStand API.
Although you can use the GetValNumber method in the template for the
DLL Flexible Prototype Adapter too, you might customize the prototype
for the code module by specifying the high and low limits as value
parameters.
As another example, you might want to show how to return a measurement
value from a code module. In a LabVIEW template, you might show how
to refer to the Numeric Measurement element of the Test Data cluster.
In a CVI code module, you might show how to refer to the measurement
field in the tTestData structure. For the DLL Flexible Prototype Adapter,
you might customize the prototype in the template by specifying the
measurement as a reference parameter.
Multiple Templates Per Step Type
You can specify more than one code template for a step type. For example,
you might want to have code templates that contain example code for
conducting the same type of tests with different types of instruments or data
acquisition boards. When a step type has multiple code templates and the
sequence developer clicks the Create Code button in the Specify Module
dialog box, TestStand prompts the sequence developer to choose from a list
of templates.
TestStand User Manual
9-46
ni.com
Chapter 9
Types
Using the Code Templates Tab
Figure 9-27 shows the Code Templates tab of the Step Type Properties
dialog box for the Numeric Limit Test step type.
Figure 9-27. Step Type Properties Dialog Box—Code Templates Tab
The list box shows the code templates that are currently associated with the
step type. The Description indicator displays the description string for the
currently selected code template. The following command buttons appear
to the right of the list box.
•
© National Instruments Corporation
Create—Creates a new code template. When you click the Create
button, the Create Code Templates dialog box appears.
9-47
TestStand User Manual
Chapter 9
Types
Figure 9-28 shows the Create Code Templates dialog box.
Figure 9-28. Create Code Templates Dialog Box
Enter the subdirectory name for the code template in the New Code
Template Name control. Enter a brief description for the code template
in the New Code Template Description control. Use the Base the New
Template On list box to choose an existing code template for TestStand
to copy.
TestStand User Manual
•
Add—Associates an existing code template with the step type. When
you click the Add button, a dialog box appears in which you can select
from a list of code templates. TestStand generates the list from the set
of subdirectories in the <TestStand>\CodeTemplates\NI and
<TestStand>\CodeTemplates\User directories. If you specify a
code template that is not in the list, the code template subdirectory
must be in the TestStand search directory paths. To customize the
TestStand search directory paths, use the Search Directories
command in the Configure menu of the sequence editor menu bar.
•
Remove—Use this button to disassociate the currently selected code
template from the step type.
•
Edit—Use this button to modify properties of the currently selected
code template. When you click the Edit button, the Edit Code
Template dialog box appears.
9-48
ni.com
Chapter 9
•
Types
Move Up and Move Down—Changes the order of the items in the
code template list. The order of the code templates in the list box is the
order that TestStand uses to display the code templates in the Choose
Code Template dialog box.
Figure 9-29 shows the Edit Code Template dialog box.
Figure 9-29. Edit Code Template Dialog Box
The Edit Code Template dialog box contains the following controls:
•
Description—Sets the description string.
•
Require Sequence Context—Specifies whether the code template
requires that the sequence context be passed. If you check this control,
TestStand completes the following step, depending on the environment
the code template was created in.
–
© National Instruments Corporation
When the sequence developer clicks the Create Code button on the
Source Code tab of the Edit C/CVI Module Call dialog box,
9-49
TestStand User Manual
Chapter 9
Types
TestStand enables the Pass Sequence Context checkbox on the
Module tab.
–
•
When the sequence developer clicks the Create VI on the Source
on the Edit LabVIEW VI Call dialog box, TestStand enables the
Sequence Context ActiveX Pointer checkbox.
Parameter Name/Value Mappings—Specifies default parameter
values to use on the Module tab of the Edit DLL Call dialog box for
the DLL Flexible Prototype Adapter. TestStand applies the default
parameter values when the sequence developer clicks the Create Code
button on the Source Code tab in the Edit DLL Call dialog box.
In a template code module for the DLL Flexible Prototype Adapter,
you can access step properties and sequence variables through the
TestStand API or as parameters to the code module. If you access them
as parameters, the sequence developer must specify the parameter
values on the Module tab of the Edit DLL Call dialog box. The values
that the sequence developer must specify are usually the same for most
step instances. For this reason, it can be worthwhile to specify default
parameter values that TestStand inserts on the Module tab
automatically when the sequence developer clicks the Create Code
button. The Create Code button appears on the Source Code tab that is
located after the Module tab.
The following controls are available in the Parameter Name/Value
Mappings section of the Edit Code Template dialog box:
TestStand User Manual
–
Add—Inserts an empty entry at the end of the list box.
–
Delete—Deletes the currently selected entry in the list box.
–
Parameter Name—Sets the name of a parameter exactly as it
will appear in the parameter list in the template code module.
To specify the return value, use %ReturnValue.
–
Value Expression—Sets the expression that you want TestStand
to insert into the Value control for the parameter on the Module tab
of the Specify Module dialog box for the DLL Flexible Prototype
Adapter, which is called the Edit DLL Call dialog box.
–
Result Action—Selects the value that you want to appear in the
Result Action ring control of the Module tab. The sequence
developer can use the ring control on the Module tab to cause
TestStand to set the Error.Occurred step property to True
automatically when the return value or parameter value after the
call is greater than zero, less than zero, equal to zero, or not equal
to zero.
9-50
ni.com
Chapter 9
–
Types
Set Error.Code to Value—Specifies the state, enabled or
disabled, of the other Set Error.Code to Value checkbox which
exists on the Module tab of the Edit DLL Call dialog box. This
checkbox appears on the Module tab where you enter return
values and reference parameters. Sequence developers can use this
checkbox to cause TestStand to assign the return value or the
output value to the Error.Code step property automatically.
Version Tab
The Version tab for a Step Type Properties dialog box is identical to the
Version tab you use on the Properties dialog box for a custom data type.
Refer to the Version Tab subsection of the Properties Dialog Box for
Custom Data Types section in this chapter for a description of the Version
tab.
Struct Passing Tab
The Struct Passing tab for a Step Type Properties dialog box is identical to
the Struct Passing tab you use on the Properties dialog box for a custom
data type. Refer to the Struct Passing Tab subsection of the Properties
Dialog Box for Custom Data Types section in this chapter for a description
of the Struct Passing tab.
Apply Changes to All Loaded Steps
The changes you make to step properties in the Step Type Properties dialog
box affect the default property values for new step instances you create
from a step type. However, you can use the Apply Changes in this Dialog
to all Loaded Steps of this Type control to specify that the changes you
make also apply to all instances of the step type that are currently in
memory.
View Changes
Use the View Changes button to display a list of the properties you have
changed since you opened the Step Properties dialog box.
View Contents
The View Contents command selects the tree view node for the step. You
use this command to view the custom properties of the step type.
© National Instruments Corporation
9-51
TestStand User Manual
Chapter 9
Types
Other Step Type Editing Features
Combining Step Types
Use the Combine With Step Type item in the step type context menu to
combine the functionality of two step types into a single new step type.
Typically, you use this feature when you find that your sequences
commonly use steps of two different step types together to perform an
operation that would be more convenient to perform with a single step. For
example, you might combine a step type that reads a measurement from a
specialized instrument with the numeric limit test step type in order to read
a measurement and check limits on it in a single step.
Combine With Step Type creates a new step type that has all of the custom
properties and substeps that both step types define. If both step types define
a property with the same name or if the value of an inherent step property
conflicts, Combine With Step Type uses the property or value for the step
from which you initiate the combining operation. Combine With Step
Type is a step type editing tool. You must verify that the source step types
do not use the same properties in conflicting ways and that the order of the
substeps in the combined step type is correct for the behavior you intend.
Figure 9-30 shows the Combine With Step Type item in the step type
context menu.
Figure 9-30. Combine with Step Type Operation
TestStand User Manual
9-52
ni.com
Chapter 9
Types
Step Type Menu Editor
TestStand allows you to use any combination of different type palette files.
Step type developers can use the step type menu editor to ensure that the
Insert Step submenu properly organizes the step types that their type palette
files contain. To display the step type menu editor, select the Step Type
Menu Editor item from the context menu in the Step Types tab. Figure 9-31
shows the step type menu editor.
Figure 9-31. Step Type Menu Editor Dialog Box
The Step Type Menu Editor dialog box contains the following controls:
•
© National Instruments Corporation
Groups and Step Types—Contains all of the step types that appear in
the menu. Steps types reside in groups, and groups appear as folders in
the tree control. Groups do not appear as items in the menu. Instead,
step types that reside in the same group appear together in the menu.
However, you can designate that a group appears as a submenu. In this
case, the contents of the group appear in a submenu within the menu.
You can drag and drop Step types and groups within the tree control to
change the order of appearance of the step types in the menu. When
you drag an item over a group, the group highlights to indicate that you
can insert the item into the group. A line between two items indicates
9-53
TestStand User Manual
Chapter 9
Types
that the item you drag can drop between the items that the line
separates.
•
Preview Menu—Displays a menu that previews the appearance of the
Insert Step submenu.
•
Move Up/Move Down—Changes the relative order of groups or step
types at a particular level in the tree. Use drag and drop to change the
level of an item in the tree.
•
Add Group—Adds a new group to the bottom of the list of groups.
Use drag and drop to move the group within the tree control.
•
Remove Group—Removes the selected group. You can remove a
group only if it is empty.
•
Rename Group—Renames the selected group in the tree control.
Typically, the group name does not appear in the menu. When you
move a type palette file to a new system, TestStand use the group name
to determine when to group step types from the new file in the same
group as existing step types. Step types that specify the same group
name appear together even if the step types reside in different files.
•
Group Settings/Step Type Settings—Changes the appearance of
groups or step types in the menu. Different controls appear depending
on whether you select a group or a step type in the tree.
–
Hide—Removes the selected group or step type from the menu.
–
Separator—Places menu separators around the selected group.
–
Submenu—Causes all step types and subgroups in the selected
group to appear inside a submenu.
•
Submenu Display Name Expression—Specifies an expression that
determines the name of the submenu item if the group appears as a
submenu. If the expression is empty or evaluates to an empty string, the
submenu name defaults to the name of the group.
•
Browse—Click this button to browse for properties and functions to
build the Submenu Display Name Expression.
Type Palette Window
You use the Type Palette window to view and edit Type Palette files. You
use the Type Palette files to store the data types and step types that you want
to be available in the sequence editor at all times. When you create a new
type in the Sequence File Types view of a Sequence File window, the type
does not appear in the Insert Local, Insert Global, Insert Parameter,
Insert Field, and Insert Step submenus in other Sequence File windows.
TestStand User Manual
9-54
ni.com
Chapter 9
Types
To use the type in other sequence files, you can manually copy or drag the
new type from one Sequence File window to another. A better approach is
to copy or drag the new type to the Type Palette window or to recreate it
there. Each type in a Type Palette file appears in the appropriate Insert
submenus in all windows.
Use the Palette ring in the Type Palette window to select the type palette file
that the Type Palette window displays. Figure 9-32 shows the palette ring
in the Type Palette window.
Figure 9-32. Type Palette Window—Palette Ring
When you save the contents of the Types Palette window, TestStand writes
contents of all modified type palette files. Typically, type palette files reside
in the <TestStand>\Cfg\TypePalettes directory.
Use the Customize item in the palette ring to display the Configure Type
Palettes dialog box, as shown in Figure 9-33.
Figure 9-33. Configure Type Palettes Dialog Box
© National Instruments Corporation
9-55
TestStand User Manual
Chapter 9
Types
The Configure Type Palettes dialog box contains the following controls:
•
<Type Palette List>—Displays the type palette files that TestStand
loads in the order that TestStand loads them
•
Create—Creates a new type palette file.
•
Add—Adds an existing type palette file to the list.
•
Remove—Removes the selected file from the list.
•
Move Up/Move Down—Change the order of the type palette files in
the list.
You can distribute step types and data types you create to other
machines by installing your type palette file to the
<TestStand>\Cfg\TypePalettes\ directory. You must prefix the
file names of the type palettes you install with Install_. At startup,
TestStand searches the TypePalettes directory for type palette files with
the Install_ prefix. When TestStand finds a palette file to install whose
base file name is not the same as any existing palette, TestStand removes
the Install_ prefix and adds the palette to the palette list. When
TestStand finds a palette file to install whose base file name is the same as
an existing palette, TestStand merges the types from the install file into the
existing palette file and then deletes the install file.
The Type Palette window contains tabs that display the step types, custom
data types, and standard data types in the selected type palette file.
Typically, you create new types in the MyTypes.ini type palette file or in
a new type palette file that you create.
Note
You can manually copy a type from the Sequence File Types view to a Type palette.
Remember the following tasks when you create new step types in the Type
palette:
TestStand User Manual
1.
Specify the menu item name for a step type on the Menu tab of the step
properties dialog box.
2.
Specify the default name for new steps you create from your type and
the description expression for these steps in the General tab of the step
properties dialog box.
3.
Specify the menu item name (and button name) that invoke the editing
dialog box you (optionally) define for your step type in the Edit Step
section of the Substeps tab on the step properties dialog box.
9-56
ni.com
Chapter 9
Types
The Type Palette window contains tabs for step types, custom data types,
and standard data types. After you install TestStand, the Step Types tab
displays all the built-in step types, the Custom Data Types tab is empty,
and the Standard Data Types tab contains several standard data types.
Table 9-4. Creation of Types
Creation Site
Note
Where TestStand
Stores the Type
Purpose
Type palette
Type palette
Makes the type available to
any Sequence File in the
TestStand development
environment
Sequence File
Types view
Sequence file
Makes the type available in
the sequence file, even when
you move the file to another
computer
You can manually copy a type from the Sequence File Types view to a Type palette.
© National Instruments Corporation
9-57
TestStand User Manual
10
Built-In Step Types
This chapter describes the core set of built-in step types that TestStand
provides. First, the chapter discusses properties and features that all the
built-in step types share. Next, the chapter describes the functionality of
each of the core step types. The chapter groups the step type descriptions
into the following categories:
•
Step types that you can use with any module adapter. Step types such
as the Numeric Limit Test and the String Value Test call any code
module you specify. They also might perform additional actions such
as comparing a value the code module returns with limits you specify.
•
Step types that always use a specific module adapter to call code
modules. The Sequence Call is the only step type in this category.
•
Step types that perform a specific action and do not require you to write
a code module. Step types such as the MessagePopup and the
Statement perform an action that you configure in an editing dialog
box that is specific to the step type.
TestStand also includes sets of application-specific step types. For example,
TestStand provides sets of step types that make it easier control IVI instruments, to
synchronize multiple threads, and to access databases. For more information on these step
types, refer to the following sources: <TestStand>\Doc\IVIStepTypes.pdf,
Chapter 11, Synchronization Step Types, and Chapter 18, Databases.
Note
Overview
This section describes general features of built-in step types.
Custom Properties That Are Common to All Built-In Step Types
Each step type defines its own set of custom properties. All steps that use
the same step type have the same set of custom properties.
© National Instruments Corporation
10-1
TestStand User Manual
Chapter 10
Built-In Step Types
All built-in step types contain certain custom properties. Figure 10-1 shows
the custom step properties that all built-in step types have.
Figure 10-1. Properties That All Steps Contain
The common custom step properties are the following:
•
Step.Result.Error.Occurred is a Boolean flag that indicates
whether a run-time error occurred in the step. TestStand
documentation refers to this property as the error occurred flag.
•
Step.Result.Error.Code is a code that describes the error that
occurred.
•
Step.Result.Error.Msg is a message string that describes the
error that occurred.
•
Step.Result.Status specifies the status of the last execution of the
step, such as Done, Passed, Failed, Skipped, or Error. TestStand
documentation refers to this property as the step status.
•
Step.Result.Common is a placeholder container that you can
customize. To customize the container you modify the
CommonResults standard data type. Refer to the Using Data Types
section in Chapter 9, Types, for more information on standard
TestStand data types.
•
Step.Result.ReportText contains a message string that TestStand
includes in the report. You can set the value of the message string
directly in the code module. In the C/CVI and LabVIEW module
adapters, code modules can set this property by modifying the
corresponding member of the test data structure or cluster. Refer to
Chapter 13, Module Adapters, for more information on the property
assignments that the module adapters automatically perform to and
from step properties.
TestStand User Manual
10-2
ni.com
Chapter 10
Built-In Step Types
Step Status, Error Occurred Flag, and Run-Time Errors
The error occurred flag can become True in the following situations:
•
A run-time error condition occurs, and the code module sets the value
to True.
•
An exception occurs in the code module or at any other time during
step execution.
When a step finishes execution and the error occurred flag is True, the Test
Stand engine responds as follows:
•
Makes no evaluation of post and status expressions for a step. Instead,
TestStand sets the step status to Error.
•
Evaluates the Ignore Run-time Errors step property.
–
If False, TestStand reports the run-time error to the sequence.
–
If True, TestStand continues execution normally after the step.
Before TestStand executes a step, it sets the step status to Running or
Looping. When a step finishes execution and the error occurred flag is
False, the TestStand engine responds as follows: when the step status is
still Looping or Running, TestStand changes the step status to Done.
The step status becomes Passed or Failed only when a code module, a
module adapter, or a step type explicitly sets the step status to Passed or
Failed.
Refer to Chapter 13, Module Adapters, for more information on the
assignments that module adapters make to and from step properties.
Customizing Built-In Step Types
If you want to change or enhance a TestStand built-in step type, do not edit
the built-in step type or any of its supporting source code modules. Instead,
copy and rename the built-in step type and any supporting modules, and
make the changes to these copies. This practice ensures that a newer
installation of TestStand does not overwrite your customizations.
Source code is available for the code modules that the built-in step
types use as substeps. You find the source code project files in the
<TestStand>\Components\NI\StepTypes subdirectory. If you use
these source files as a starting point for step types you create, make your
own copies of these files in the <TestStand>\Components\User\
StepTypes subdirectory and rename them.
© National Instruments Corporation
10-3
TestStand User Manual
Chapter 10
Built-In Step Types
Step Types That You Can Use with Any Module Adapter
TestStand comes with four built-in step types that you can use with any
module adapter: Action, Pass/Fail Test, Numeric Limit Test, and String
Value Test. When you insert a step in a sequence, TestStand binds the step
to the adapter that you select in the ring control on the sequence editor
toolbar. The icon for the adapter appears as the icon for the step. The icons
for the different adapters are as follows:
DLL Flexible Prototype Adapter
C/CVI Standard Prototype Adapter
LabVIEW Standard Prototype Adapter
Sequence Adapter
ActiveX Automation Adapter
HTBasic Adapter
<None>
If you choose <None> for adapter, the step does not call a code module.
To specify the code module that the step calls, you select the Specify
Module item from the step context menu or the Specify Module button on
the Step Properties dialog box. Each step has a Specify Module dialog box
that corresponds to its module adapter. Refer to Chapter 13, Module
Adapters, for more information on the Specify Module dialog box for each
module adapter.
Action
You usually use Action steps to call code modules that do not perform tests
but, instead, perform actions necessary for testing, such as initializing an
instrument. By default, Action steps do not pass or fail. The step type does
not modify the step status. Thus, the status for an Action step is Done or
Error unless your code module specifically sets another status for the step
or the step calls a subsequence that fails. When an action uses the Sequence
Adapter to call a subsequence and the subsequence fails, the sequence
adapter sets the status of the step to Failed.
The Action step type does not define any additional step properties other
than the custom properties that all steps contain.
TestStand User Manual
10-4
ni.com
Chapter 10
Built-In Step Types
Pass/Fail Test
You usually use a Pass/Fail Test step to call a code module that makes its
own pass/fail determination.
After the code module executes, the Pass/Fail Test step type evaluates the
Step.Result.PassFail property. If Step.Result.PassFail is
True, the step type sets the step status to Passed. Otherwise, it sets the step
status to Failed.
The following are the different ways that a code module can set the value
of Step.Result.PassFail:
•
Use the TestStand API to set the value of Step.Result.PassFail
directly in a code module.
•
Pass Step.Result.PassFail as a reference parameter to a
subsequence or code module if you use the Sequence Adapter, the
DLL Flexible Prototype Adapter, or the ActiveX Automation Adapter.
•
The C/CVI and LabVIEW module adapters update the value of
Step.Result.PassFail automatically after calling the code
module. The C/CVI module adapter updates the value of
Step.Result.PassFail based on the value of the result field of
the tTestData parameter that it passes to the C function. The
LabVIEW module adapter updates the value of
Step.Result.PassFail based on the value of Pass/Fail Flag in
the TestData cluster that it passes to the VI. Refer to Chapter 13,
Module Adapters, for more information on the assignments that
module adapters make to and from step properties.
By default, the step type uses the value of the Step.Result.PassFail
Boolean property to determine whether the step passes or fails. To
customize the Boolean expression that determines whether the step passes,
select the Edit Pass/Fail Source item in the context menu for the step or
the Edit Pass/Fail Source button on the Step Properties dialog box.
Figure 10-2 shows the Edit Pass/Fail Source dialog box.
© National Instruments Corporation
10-5
TestStand User Manual
Chapter 10
Built-In Step Types
Figure 10-2. Edit Pass/Fail Source Dialog Box
Figure 10-3 shows the step properties for the Pass/Fail Test step type.
Figure 10-3. Pass/Fail Test Step Properties
The Pass/Fail Test step type defines the following step properties and the
common custom properties.
•
Step.Result.PassFail specifies the Boolean pass/fail flag. Pass is
True, Fail is False. Usually, you set this value in the step module or
with a custom pass/fail source expression.
•
Step.InBuf specifies an arbitrary string that the C/CVI and
LabVIEW module adapters pass to the test in the tTestData structure
or TestData cluster automatically. This property exists to maintain
compatibility with previous test executives. Usually, code modules you
develop for TestStand receive data as input parameters or access data
as properties using the TestStand API.
•
TestStand User Manual
Step.DataSource specifies the Boolean expression that the step
uses to set the value of Step.Result.PassFail. The default value
of the expression is "Step.Result.PassFail", which has the
effect of using the value that the code module sets. You can
customize this expression if you do not want to set the value of
Step.Result.PassFail in the code module. For example, you can
set the data source expression to refer to multiple variables and
properties, such as, RunState.PreviousStep.Result.Numeric
* Locals.Attenuation > 12.
10-6
ni.com
Chapter 10
Built-In Step Types
Numeric Limit Test
You usually use a Numeric Limit Test step to call a code module that
returns a single measurement value. After the code module executes,
the Numeric Limit Test step type compares the measurement value to
predefined limits. If the measurement value is within the bounds of the
limits, the step type sets the step status to Passed. Otherwise, it sets the
step status to Failed.
To customize the type of comparison and limits that TestStand uses to set
the step status, select the Edit Limits item from the step context menu or
click the Edit Limits button on the Step Properties dialog box.
Figure 10-4 shows the Limits tab on the Edit Numeric Limit Test dialog
box.
Figure 10-4. Limits Tab in Edit Numeric Limit Test Dialog Box
The Comparison Type ring control on the Limits tab specifies the type of
comparison the step type performs, if any, to determine the step status.
Table 10-1 lists the available comparison types.
Table 10-1. Numeric Limit Test Comparison Types
Type
Description
EQ
Numeric Measurement = Low Limit
NE
Numeric Measurement != Low Limit
© National Instruments Corporation
10-7
TestStand User Manual
Chapter 10
Built-In Step Types
Table 10-1. Numeric Limit Test Comparison Types (Continued)
Type
Description
GT
Numeric Measurement > Low Limit
LT
Numeric Measurement < Low Limit
GE
Numeric Measurement >= Low Limit
LE
Numeric Measurement <= Low Limit
GTLT
Numeric Measurement > Low Limit and < High Limit
GELE
Numeric Measurement >= Low Limit and <= High Limit
GELT
Numeric Measurement >= Low Limit and < High Limit
GTLE
Numeric Measurement > Low Limit and <= High Limit
No Comparison
TestStand makes no Pass/Fail determination, and sets the status to Passed
automatically.
Depending on the setting of the Comparison Type ring control, the dialog
box displays additional controls in which you enter high and low limits.
You can choose to display the limit values in real, integer, unsigned integer,
hexadecimal, octal, or binary formats. Click the Edit Numeric Format
button to display a dialog box in which you can further customize the
format with which to display the limit values. The format you specify also
controls the format of the limit and the measurement values in the report.
Refer to the Numeric Value Formats section in Chapter 9, Types, for a
description of the numeric format dialog box.
Use the Units control to specify a label that describes the measurement
units for the limits and the value for which the step checks limits. The units
you specify appear in both the report and the result database. The units and
units prefix are for display and documentation purposes and do not scale
the measured value or affect the limit comparison. Use the drop-down rings
adjacent to the units control to select standard units and prefixes. Select the
Short Name item in each ring to toggle between the long and short names
for a unit or prefix.
The <TestStand>\Components\NI\Language\<Language>\Units.ini file
defines the units and prefixes available in the drop-down rings. To redefine the units that
the rings provide, edit a copy of this file that you create in <TestStand>\Components\
Note
User\Language\<Language>\Units.ini.
TestStand User Manual
10-8
ni.com
Chapter 10
Built-In Step Types
A Numeric Limit Test step uses the Step.Result.Numeric property
to store the measurement value. A code module can set the value of
Step.Result.Numeric in the following ways:
•
Use the TestStand API to set the value of Step.Result.Numeric
directly in a code module.
•
Pass Step.Result.Numeric as a reference parameter to a module
you call with the Sequence Adapter, the DLL Flexible Prototype
Adapter, or the ActiveX Automation Adapter.
•
The C/CVI and LabVIEW module adapters update the value of
Step.Result.Numeric automatically after calling the code
module. The C/CVI module adapter updates the value of
Step.Result.Numeric based on the value of the measurement
field of the tTestData parameter that it passes to the C function.
The LabVIEW module adapter updates the value of
Step.Result.Numeric based on the value of Numeric
Measurement in the TestData cluster that it passes to the VI. Refer
to Chapter 13, Module Adapters, for more information on the
assignments that the module adapters automatically makes to and
from step properties.
By default, the step type uses the value of the Step.Result.Numeric
property as the numeric measurement to compare the limits against. To
customize the numeric expression that specifies the measurement data
source, you access the Data Source tab of the Edit Numeric Limit Test
dialog box shown in Figure 10-5.
Figure 10-5. Data Source Tab in the Edit Numeric Limit Test Dialog Box
© National Instruments Corporation
10-9
TestStand User Manual
Chapter 10
Built-In Step Types
You can use the drop-down ring to the right of the Data Source Expression
control to quickly select measurement values in local variables or
properties of previous steps.
Figure 10-6 shows the step properties for the Numeric Limit Test step type.
Figure 10-6. Numeric Limit Test Step Properties
The Numeric Limit Test step type defines the following step properties in
addition to the common custom properties.
•
Step.Result.Numeric specifies the numeric measurement value.
Usually, you set this value in the step module.
•
Step.Limits.High and Step.Limits.Low specify the limits for
the comparison expression.
•
Step.Comp specifies the type of comparison, for example, EQ.
•
Step.Result.Units specifies a label that indicates the unit of
measurement.
•
Step.InBuf specifies an arbitrary string that the C/CVI and
LabVIEW module adapters pass to the test in the tTestData structure
or TestData cluster automatically. This property exists to maintain
compatibility with previous test executives. Usually, code modules that
you develop for TestStand receive data as input parameters or access
data as properties using the TestStand API.
TestStand User Manual
10-10
ni.com
Chapter 10
•
Built-In Step Types
Step.DataSource specifies a numeric expression that the step type
uses to set the value of Step.Result.Numeric. The default value
of the expression is "Step.Result.Numeric", which has the
effect of using the value that the code module sets. You can
customize this expression if you do not want to set the value of
Step.Result.Numeric in the code module.
You can use a Numeric Limit Test without a code module. This practice is
useful when you want to limit-check a value that you already have acquired.
To set up this limit-check, select <None> as the module adapter before you
insert the step in the sequence, and configure Step.DataSource to
specify the value that you already have acquired.
Multiple Numeric Limit Test
Use the Multiple Numeric Limit Test to limit check a set of related
measurements. Although you can use several Numeric Limit Test steps to
limit test a set of related measurements, it can be easier to use the Multiple
Numeric Limit Test step type to check limits for multiple measurements in
a single step.
The Multiple Numeric Limit Test allows you to test limits for any number
of measurements. Each measurement can have independent limits, units,
display format, data source, and comparison type. You configure each
measurement the same way you configure an individual numeric limit test
step. A multiple numeric limit test step passes if all of its measurements
pass. Figure 10-7 shows the editing dialog box for a multiple numeric limit
test.
© National Instruments Corporation
10-11
TestStand User Manual
Chapter 10
Built-In Step Types
Figure 10-7. Edit Multiple Numeric Limit Test Dialog Box
TestStand User Manual
10-12
ni.com
Chapter 10
Built-In Step Types
Figure 10-8 shows the multiple numeric limit test properties.
Figure 10-8. Multiple Numeric Limit Test Properties
The Multiple Numeric Limit Test step type defines the following step
properties in addition to the common custom properties.
•
Step.Result.Measurement is an array that stores the
measurements you configure for the step. Each element of the
measurement array is an instance of the NI_LimitMeasurement data
type. The NI_LimitMeasurement type defines the following fields:
–
Limits.High and Limits.Low specify the limits to which the
step compares the measurement value.
–
Units specifies a label that describes the measurement units for
the limits and the measurement value.
–
Comp specifies the type of comparison, for example, EQ.
–
Data stores the numeric measurement value. The step obtains this
value from the corresponding element in Step.NumericArray
or from the data source you specify.
–
•
Status stores the result of the comparison of the measurement
value with the limits. The result is either Passed or Failed.
Step.DataSource specifies an expression that identifies the numeric
array that provides the data values for all measurements, when you do
not use a separate data source for each measurement.
© National Instruments Corporation
10-13
TestStand User Manual
Chapter 10
Built-In Step Types
•
Step.NumericArray provides a numeric array that is the default data
source that Step.DataSource specifies.
•
Step.UseIndividualDataSources specifies whether the step
stores separate data source expressions for each measurement in the
Step.DataSourceArray. If this property is False, the step obtains
the data values for each measurement from the numeric array that the
Step.DataSource property specifies.
•
Step.DataSourceArray specifies a data source for each
measurement element in the measurement array
Use the Data Source tab on the Edit Multiple Numeric Limit Test dialog
box to specify the data source for each measurement you configure. By
default, the data source is the numeric array property Step.NumericArray.
The code module the step calls can return multiple measurement values in
one operation by setting the value of the Step.NumericArray property. You
also can specify an alternate numeric array from which the step obtains the
measurement values. Figure 10-9 shows the Data Source tab.
Figure 10-9. Multiple Numeric Limit TestData Source Tab with Array Data Source
If you select the Specify a Data Source for Each Measurement option,
the Data Source tab shows the list of measurements. Use the Data Source
Expression control to specify the data source for the selected measurement.
For each measurement, you typically specify values or combinations of
values that you already store in variable or property values. In this case, you
do not call a code module because you are checking the limits of existing
measurement values.
TestStand User Manual
10-14
ni.com
Chapter 10
Built-In Step Types
Figure 10-10. Multiple Numeric Limit TestData Source Tab with Multiple Data Sources
You can use the dropdown ring to the right of the Data Source Expression
control to quickly select measurement values in local variables or
properties of previous steps.
String Value Test
You usually use a String Value Test step to call a code module that returns
a string value. After the code module executes, the String Value Test step
type compares the string that the step obtains to the string that the step
expects to receive. If the string that the step obtains matches the string that
it expects, the step type sets the step status to Passed. Otherwise, it sets the
step status to Failed.
© National Instruments Corporation
10-15
TestStand User Manual
Chapter 10
Built-In Step Types
You can specify the type of comparison that TestStand uses to set the step
status. You also can specify the string that the step expects to receive. To do
so, select the Edit Expected String item in the context menu for the step
or the Edit Expected String button in the Step Properties dialog box.
Figure 10-11 shows the Limits tab on the Edit String Value Test dialog box.
Figure 10-11. Limits Tab in the Edit String Value Test Dialog Box
On the Limits tab, you can specify the expected string and whether the
string comparison is case-sensitive.
A String Value Test step always uses the Step.Result.String property
to store the string value. A code module can directly set the value of
Step.Result.String in the following ways:
•
Use the TestStand API to set the value of Step.Result.String
directly in a code module.
•
Pass Step.Result.String as a reference parameter to a module you
call with the Sequence Adapter, the DLL Flexible Prototype Adapter,
or the ActiveX Automation Adapter.
•
The C/CVI and LabVIEW module adapters update the value of
Step.Result.String automatically, after calling the code module.
The C/CVI module adapter updates the value of
Step.Result.String, based on the value of the
stringMeasurement field of the tTestData parameter that it
passes to the C function. The LabVIEW module adapter updates the
value of Step.Result.String, based on the value of String
Measurement in the TestData cluster that it passes to the VI.
TestStand User Manual
10-16
ni.com
Chapter 10
Built-In Step Types
Refer to Chapter 13, Module Adapters, for more information on the
assignments that the module adapters automatically make to and from
step properties.
By default, the step type uses the value of the Step.Result.String
property as the string value to compare the limits against. To customize the
string expression that specifies the value to compare, you access the Data
Source tab of the Edit String Value Test dialog box shown in Figure 10-12.
Figure 10-12. Data Source Tab in Edit String Value Test Dialog Box
The Data Source tab specifies a data source expression that TestStand
evaluates to obtain the string it compares against the expected string.
Figure 10-13 shows the step properties for the String Value Test step type.
Figure 10-13. String Value Test Step Properties
© National Instruments Corporation
10-17
TestStand User Manual
Chapter 10
Built-In Step Types
The String Value Test step type defines the following step properties in
addition to the common custom properties.
•
•
Step.Result.String specifies the string value. Usually, you set
this value in the step module.
Step.Limits.String specifies the expected string for the string
comparison.
•
Step.Comp specifies the type of comparison, such as Ignore Case.
•
Step.InBuf specifies an arbitrary string that the C/CVI and
LabVIEW module adapters automatically pass to the test in the
tTestData structure or TestData cluster. This property exists to
maintain compatibility with previous test executives. Usually, code
modules that you develop for TestStand receive data as input
parameters or use the TestStand ActiveX API to access data as
properties.
•
Step.DataSource specifies a string expression that the step type
uses to set the value of Step.Result.String. The default value of
the expression is Step.Result.String, which has the effect of
using the value that the code module sets. You can customize this
expression if you do not want to set the value of
Step.Result.String in the code module.
You can use a String Value Test step without a code module. This is useful
to test a string that you already have acquired. To set up this test, select
<None> as the module adapter before you insert the step in the sequence,
and configure Step.DataSource to specify the string you already have
acquired.
Step Types That Work With a Specific Module Adapter
This section describes step types that work with a specific module adapter.
Sequence Call
You use a Sequence Call step to call another sequence in the current
sequence file or in another sequence file. A Sequence Call step always uses
the Sequence Adapter.
You can use the Sequence Adapter with other step types such as Pass/Fail
Test or Numeric Limit Test. Using a Sequence Call step is the same as using
an Action step with the Sequence Adapter, except that the step type sets the
step status to Passed rather than Done when the subsequence succeeds. If
the sequence fails, the sequence adapter sets the sequence call step status to
TestStand User Manual
10-18
ni.com
Chapter 10
Built-In Step Types
Failed. A sequence fails when the status for a step in the sequence is
Failed and you have enabled the Step Failure Causes Sequence Failure
option for the step.
To specify the subsequence that the Sequence Call step executes, select the
Specify Module item in the context menu for the step or click the Specify
Module button on the Step Properties dialog box. Figure 10-14 shows the
Specify Module dialog box for a Sequence Call step.
Figure 10-14. Specify Module Dialog Box for Sequence Call Step
To specify the sequence and the sequence file, you can use literal strings or
expressions that TestStand evaluates at run time.
In the Parameters section of the dialog box, you can specify the values or
expressions to pass for each parameter in the sequence call. For each
parameter, you can choose to use the default value for the parameter rather
than specifying an explicit value.
© National Instruments Corporation
10-19
TestStand User Manual
Chapter 10
Built-In Step Types
Refer to the Sequence Adapter section in Chapter 13, Module Adapters,
for more information on using the Specify Module dialog box for the
Sequence Adapter.
After the sequence call executes, the Sequence Adapter can set the step
status. If the subsequence fails, the adapter sets the step status to Failed.
If a run-time error occurs in the subsequence, the adapter sets the step status
to Error. If the subsequence succeeds, the adapter does not set the step
status. Instead, the Sequence Call step sets the step status to Passed.
The Sequence Call step type does not define any additional step properties
other than the custom properties that are common to all steps.
Step Types That Do Not Use Module Adapters
This section describes step types that do not use module adapters. When
you create an instance of one of these step types, you only use a dialog box
to configure the step. You do not write a code module.
Statement
You use Statement steps to execute expressions. For example, you can use
a Statement step to increment the value of a local variable in a sequence.
To specify the expression for a Statement step, you either select the Edit
Expression item in the context menu for the step or you click the Edit
Expression button in the Step Properties dialog box.
TestStand User Manual
10-20
ni.com
Chapter 10
Built-In Step Types
Figure 10-15 shows the Edit Statement Step dialog box.
Figure 10-15. Edit Statement Step Dialog Box
By default, Statement steps do not pass or fail. If the step cannot evaluate
the expression or if the expression sets Step.Result.Error.Occurred
to True, TestStand sets the step status to Error. Otherwise, it sets the step
status to Done.
The Statement step type does not define any additional step properties other
than the custom properties that are common to all steps.
Message Popup
You use Message Popup steps to display messages to the operator and to
receive response strings from the operator. For example, you can use a
Message Popup step to warn the operator when a calibration routine fails.
To specify the expression for the Message Popup step, select the Edit
Message Settings item in the step context menu for the step or click
the Edit Message Settings button in the Step Properties dialog box.
Figure 10-16 shows the Text and Buttons tab on the Configure Message
Box Step dialog box.
© National Instruments Corporation
10-21
TestStand User Manual
Chapter 10
Built-In Step Types
Figure 10-16. Configure Message Box Step Dialog Box—Text and Buttons Tab
The Title Expression and Message Expression controls specify the text
that the step displays in the pop-up message box. In these two controls, you
can specify literal strings or string expressions that TestStand evaluates at
run time. You also can customize expressions for each button label and
customize the arrangement of the buttons. If you do not specify a label for
a button, the button does not appear in the pop-up message box. The
Default Button ring control selects which button, if any, has <Enter> as its
shortcut key. The Cancel Button ring control selects which button, if any,
has <Esc> as its shortcut key. The Active Control ring control selects one
of the four buttons or the input string as the initially active control.
The Timeout Button selection ring specifies which message box button
activates automatically after a timeout period expires. Use the Time To
Wait control to specify the timeout period in seconds. An example use for
the timeout option is to create a message popup step that displays a
notification message that automatically dismisses itself after a short delay,
in case an operator is not present to acknowledge the message.
TestStand User Manual
10-22
ni.com
Chapter 10
Built-In Step Types
Figure 10-17 shows the Options tab on the Configure Message Box Step
dialog box.
Figure 10-17. Configure Message Box Step Dialog Box—Options Tab
The Options tab contains the following controls:
•
Enable Response Text Box—Specifies whether a string control
appears to prompt the operator for a response.
•
Max Response String Length—Specifies the maximum number of
characters allowed for the string that the user can input. If you do not
want to specify a maximum response string length, enter -1 in this
control.
•
Initial Response String—Specifies the initial string that appears in
the dialog box.
•
Center Dialog—Specifies that the dialog box appears centered in
relation to the screen.
•
Top and Left Coordinate—Specifies a constant dialog box position
or a position that varies according to the values of variables or
properties you use in expressions.
© National Instruments Corporation
10-23
TestStand User Manual
Chapter 10
Built-In Step Types
•
Make Modal—Specifies that a message popup appears modal with
respect to the application. A modal dialog box is a dialog box that you
must dismiss before you can operate other application windows.
After the operator closes the pop-up message box, the step sets the
Step.Result.ButtonHit step property to the one-based index of the
button that the operator selects. The step copies the response string to
Step.Result.Response.
By default, Message Popup steps do not pass or fail. After a step executes,
TestStand sets the step status to Done or Error.
Figure 10-18 shows the step properties for the Message Popup step type.
Figure 10-18. Message Popup Step Properties
TestStand User Manual
10-24
ni.com
Chapter 10
Built-In Step Types
The Message Popup step type defines the following step properties in
addition to the common custom properties.
•
•
Step.Result.ButtonHit contains the one-based index of the
button that the operator selects.
Step.Result.Response contains the response text that the operator
enters.
•
Step.TitleExpr contains the expression for the string that appears
as the title of the pop-up message box.
•
Step.MessageExpr contains the expression for the string that
appears as the text message in the pop-up message box.
•
Step.Button1Label, Button2Label, Button3Label, and
Button4Label specify the expression for the label text for each
button.
•
CenterDialog specifies that the message popup appears in the center
of the screen.
•
Position.Top and Position.Left specify the location of the
message popup when CenterDialog is False.
•
Modal specifies whether the message popup is a modal dialog box.
•
Step.ShowResponse enables the response text box control in the
pop-up message box.
•
Step.MaxResponseLength specifies the maximum number of
characters that the operator can enter in the response text box control.
•
Step.DefaultResponse contains the initial text string that the step
displays in the response text box control.
•
Step.ButtonLocation specifies whether to display the buttons on
the bottom or side of the pop-up message box.
•
•
Step.ActiveCtrl identifies one of the four buttons or the input
string as the active control.
Step.DefaultButton specifies which button, if any, has <Enter> as
its shortcut key.
•
Step.CancelButton specifies which button, if any, has <Esc> as its
shortcut key.
•
Step.TimerButton specifies the index of the button that activates
automatically after a timeout elapses. A value of zero indicates that no
timeout occurs.
•
© National Instruments Corporation
Step.TimeToWait specifies the number of seconds before the button
that Step.TimerButton specifies activates.
10-25
TestStand User Manual
Chapter 10
Built-In Step Types
Call Executable
You use Call Executable steps to launch an application or run a system
command. For example, you can use a Call Executable step to call a system
command to copy files to a network drive.
To specify the executable path, arguments, and options for the Call
Executable step, select the Configure Call Executable item in the context
menu for the step or click the Configure Call Executable button on the
Step Properties dialog box. Figure 10-19 shows the Configure Call
Executable dialog box.
Figure 10-19. Configure Call Executable Dialog Box
The Configure Call Executable dialog box contains the following controls:
TestStand User Manual
•
Executable Path—Specifies an absolute or relative pathname for the
executable.
•
Argument Expression—Specifies an argument to pass to the
executable. You can specify the argument as a literal string or as an
expression that TestStand evaluates at run time.
•
Wait Condition—Specifies whether the step waits for the executable
to exit. The possible values are No Wait, Wait for Exit, and Wait
for Specified Time. If you choose Wait for Specified Time
and the executable process does not exit before the time limit you
specify expires, the step type sets the
Step.Result.Error.Occurred to indicate a run-time error.
10-26
ni.com
Chapter 10
Built-In Step Types
•
Time to Wait—Specifies the time you want the step to wait for the
executable to exit before it indicates a run-time error.
•
Terminate Executable If Step Is Terminated Or Aborted—Causes
the executable process to stop running when the operator terminates or
aborts the execution in TestStand. This option applies only when the
wait condition is Wait For Exit or Wait For Specified Time.
•
Initial Window State—Specifies whether the step launches the
executable as a hidden, normal, minimized, or maximized application,
and whether the application is active initially.
•
Exit Code Status Action—Causes the step type to set the step status
in response to the exit code that the executable returns. You can choose
to set the step status to Failed if the exit code is less than zero, greater
than zero, equal to zero, or not equal to zero.
The final status of a Call Executable step depends on whether the step waits
for the executable to exit. If the step does not wait for the executable to exit,
the step type always sets the step status to Done. If a timeout occurs while
the step is waiting for the executable to exit, the step type sets the status to
Error. If the step waits for the executable to exit and a timeout does not
occur, the step type sets the step status to Done, Passed, or Failed,
depending on the status action you specify in the Exit Code Status Action
ring control. If you set the Exit Code Status Action control to the No Action
option, the step type always sets the step status to Done. Otherwise, you can
choose to set the step status to Passed or Failed based on whether the exit
code is equal to zero, not equal to zero, greater than zero, or less than zero.
Figure 10-20 shows the step properties for the Call Executable step type.
Figure 10-20. Call Executable Step Properties
© National Instruments Corporation
10-27
TestStand User Manual
Chapter 10
Built-In Step Types
The Call Executable step type defines the following step properties and the
common custom properties.
•
Step.Result.ExitCode contains the exit code that the executable
returns.
•
Step.Executable specifies the pathname of the executable to
launch.
•
Step.Arguments specifies the expression for the argument string
that the step passes to the executable.
•
•
Step.WaitCondition specifies whether the step waits for the
executable to exit before completing.
Step.TimeToWait specifies the number of seconds to wait for the
executable to exit.
•
Step.ProcessHandle contains the Windows process handle for the
executable.
•
Step.InitialWindowState specifies whether the executable is
initially active, not active, hidden, normal, minimized, or maximized.
•
Step.TerminateOnAbort specifies whether to terminate the
executable process when the execution terminates or aborts.
•
Step.ExitCodeStatusAction specifies whether to set the step
status using the exit code that the executable returns.
Property Loader
Use the Property Loader step type to dynamically load the values for
properties and variables from a text file, a Microsoft Excel file, or a
database at run time. Refer to the Property Loader section in Chapter 18,
Databases, for more information on the Property Loader step type.
Importing/Exporting Properties
When you edit a sequence file, you can select Tools»Import/Export
Properties to import values from a database, file, or clipboard into step
properties or variables or to export values from step properties or variables
to a database, file, or clipboard. For more information on importing and
exporting properties, refer to the Importing/Exporting Properties section of
Chapter 18, Databases.
TestStand User Manual
10-28
ni.com
Chapter 10
Built-In Step Types
Goto
You use Goto steps to set the next step that the TestStand engine executes.
You usually use a Label Step as the target of a Goto step. Use of a Label
Step allows you to rearrange or delete other steps in a sequence without
having to change the specification of targets in Goto steps.
To specify the Goto step target, select the Edit Destination item from
the step context menu or click the Edit Destination button on the Step
Properties dialog box. Figure 10-21 shows the Edit Goto Step dialog box.
Figure 10-21. Edit Goto Step Dialog Box
The Destination control contains a list of all steps in the step group. The
Destination control lists two additional targets: <Cleanup> allows you to
jump to the Cleanup step group, and <End> allows you to jump directly to
the end of the current step group.
By default, Goto steps do not pass or fail. After a Goto step executes,
TestStand sets the step status to Done or Error.
The Goto step type does not define any additional step properties other than
the custom properties that are common to all steps.
Label
You usually use a Label Step as the target for a Goto step. Use of Label
Steps allows you to rearrange or delete other steps in a sequence without
having to change the specification of targets in Goto steps.
Label steps do not pass or fail. After a Label step executes, the TestStand
engine sets the step status to Done or Error.
© National Instruments Corporation
10-29
TestStand User Manual
Chapter 10
Built-In Step Types
You can edit a Label step to specify a description that appears next to the
Label step name in the Sequence Editor. Figure 10-22 shows the step
properties for the Label step type.
Figure 10-22. Label Step Properties
The Label step type defines the following step property in addition to the
common custom properties.
•
Description specifies a string that appears next to the step name in
the sequence editor.
TestStand User Manual
10-30
ni.com
Synchronization Step Types
11
This section describes step types that you use to synchronize, pass data
between, and perform other operations in multiple threads of an execution
or multiple running executions in the same process. You configure these
steps using dialog boxes. You do not write code modules for these steps.
Synchronization Objects
Most synchronization step types create and control a particular type of
synchronization object. The following is a list of the types of
synchronization objects.
•
Lock—Use a lock to guarantee exclusive access to a resource. For
example, if several execution threads write to a device that does not
have a thread-safe driver, you can use a lock to make sure that only one
thread accesses the device at a time.
•
Semaphore—Use a semaphore to limit access to a resource to a
specific number of threads. A semaphore is similar to a lock, except
that it restricts access to the number of threads that you specify rather
than to just one thread. For example, you can use a semaphore to
restrict access to a communications channel to a limited number of
threads so that each thread has sufficient bandwidth. Typically, you
limit access to a shared resource to only one thread at a time.
Therefore, a typical application uses Locks rather than Semaphores.
•
Rendezvous—Use a rendezvous to make a specific number of threads
wait for each other before they proceed past a location you specify. For
example, if different threads configure different aspects of a testing
environment, you can use a rendezvous to ensure that the none of the
threads proceeds beyond the configuration process until all threads
have completed their configuration tasks.
•
Queue—Use a queue to pass data from a thread that produces it to a
thread that processes it. For example, a thread that performs tests
asynchronously with respect to the main sequence might use a queue
to receive commands from the main sequence.
•
Notification—Use a notification to notify one or more threads when a
particular event or condition occurs. For example, if you display a
© National Instruments Corporation
11-1
TestStand User Manual
Chapter 11
Synchronization Step Types
dialog box in a separate thread, you can use a notification to signal
another thread when the user dismisses the dialog box.
•
Batch—Use a batch to define and synchronize a group of threads.
This is useful when you want to test a group of similar UUTs
simultaneously. You test each UUT in a separate thread, and you use
the Batch Specification step to include the UUT threads in one batch.
You use the Batch Synchronization step to control the interaction of the
UUT threads as they execute the test steps. More specifically, you
place Batch Synchronization steps around one or more test steps to
create a synchronized section. You can configure a synchronized
section so that only one UUT enters the section at a time, no UUTs
enter the section until all are ready, and no UUTs proceed beyond the
section until all are done. This useful when, for a particular test, you
have only one test resource which you must apply to each UUT in turn.
You can also configure a synchronized section to guarantee that only
one thread executes the steps in the section. This is useful for an action
that applies to the entire batch, such as raising the temperature in an
environmental chamber. Having a separate thread for each UUT allows
you to exploit parallelism while enforcing serialization when
necessary. It also allows you to use preconditions and other branching
options so that each UUT has its own flow of execution.
Typically, you do not have to create a batch. The TestStand Batch
process model does this for you. The model uses Batch Specification
steps to group TestSocket execution threads together so that you can
use Batch Synchronization steps to synchronize them in your sequence
file. If you want to create a synchronized section around a single step,
you can do so using the Synchronization tab of the Step Properties
dialog box rather than by using explicit Batch Synchronization steps.
For more information on the Batch process model, refer to the Batch
Model section in Chapter 14, Process Models. For more information
on batch synchronization, refer to the Batch Synchronization section in
this chapter.
Common Attributes of Synchronization Objects
All synchronization objects share the following attributes that you specify
in the step type configuration dialog box.
•
TestStand User Manual
Name—When you create a synchronization object, you can specify a
unique name with a string literal or an expression that evaluates to a
string. If an object with the same name and type already exists, you
create a reference to the existing object. Otherwise you create a
reference to a new synchronization object. By creating a reference to
11-2
ni.com
Chapter 11
Synchronization Step Types
an existing object, you can access the same synchronization object
from multiple threads or executions.
If you specify an empty string as the name for a synchronization
object, TestStand creates an unnamed synchronization object that you
can access only through an ActiveX reference variable. To associate an
unnamed synchronization object with an ActiveX reference variable,
you must select Using ActiveX Reference as the object lifetime.
To access a synchronization object across threads without creating a reference in
each thread, store a reference to the synchronization object in an ActiveX reference
variable and access the object from multiple threads using the variable.
Note
By default, a synchronization object is accessible only from the
operating system process in which you create it. However, you can
make a synchronization object accessible from other processes,
such as multiple instances of an operator interface, by using an
asterisk (*) as the first character in the name. In addition, you
can create a synchronization object on a specific machine
by beginning the name with the machine name, such as
“\\machinename\syncobjectname”. You can then use this
name to access the synchronization object from any machine on your
network. To access synchronization objects on other machines, you
must configure DCOM for the TSAutoMgr.exe server located in the
<TestStand>\bin directory. For instructions on configuring
DCOM, see the Setting up TestStand as a Server for Remote Execution
section in Chapter 13, Module Adapters, which contains instructions
for setting up TestStand as a server for remote execution. Follow the
instructions given for the REngine.exe server but apply them to the
TSAutoMgr.exe server.
When you specify an object on a remote machine using a string constant in a dialog
box expression control, be sure to escape the backslashes and surround the name in quotes.
For example, use “\\\\machinename\\syncobjname” instead of
\\machinename\syncobjname.
Note
All named TestStand synchronization objects share the same name
space. Thus, you cannot have a lock and a queue or other
synchronization objects with the same name. Synchronization object
names are case-insensitive.
•
© National Instruments Corporation
Lifetime—You specify a lifetime for each reference you create to a
synchronization object. The object exists for at least as long the
11-3
TestStand User Manual
Chapter 11
Synchronization Step Types
reference exists. The object can, however, exist longer if another
reference to it has a different lifetime.
The reference lifetime choices are Same as Execution, Same as
Thread, Same as Sequence, or Using ActiveX Reference. If you refer
to your object only by name, then you typically set its reference
lifetime to Same as Execution, Same as Thread, or Same as Sequence.
This guarantees that the object lives as long as the execution, thread, or
sequence in which you create the reference. If you want to explicitly
control the lifetime of the object reference or if you wish to refer to the
object using an ActiveX reference variable, choose the Using ActiveX
Reference option. You can use the ActiveX reference to the object in
place of its name when performing operations on the object.
You can also use the reference from other threads without performing
a Create operation in each thread. An ActiveX reference releases its
object when you set the variable equal to Nothing, when you reuse the
variable to store a different reference, or when the variable goes out of
scope. When the last ActiveX reference to a synchronization object
releases, TestStand disposes of the object.
Some synchronization objects have an operation, such as Lock or
Acquire, for which you also can specify a lifetime. In this case, the
lifetime determines the duration of the operation.
•
Timeout—Most of the synchronization objects can perform one or
more operations that timeout if they do not complete within the
number of seconds you specify. You can specify that TestStand treats
a timeout as an error condition or you can explicitly check for the
occurrence of a timeout by checking the value of the
Step.Result.TimeoutOccurred property.
Synchronization Step Types
Each type of synchronization object has a step type to create and control the
object. The batch synchronization object has two step types, Batch
Specification and Batch Synchronization. For all other synchronization
objects, the name of the step type is the same as the name of the
synchronization object type it controls. The following additional
synchronization step types exist:
TestStand User Manual
•
Wait—Use the Wait step to wait for an execution or thread to complete
or for a time interval to elapse.
•
Thread Priority—Use the Thread Priority step to adjust the operating
system priority of a TestStand thread.
11-4
ni.com
Chapter 11
Synchronization Step Types
To use any synchronization step type, insert a step of that type and select
Configure from the context menu to display the Configuration dialog box.
In the configuration dialog box, select an operation for the step to perform.
You can then specify settings for the operation you select. Some operations
store output values to variables you specify. If the control for an output
value is labeled as an optional output, you can leave the control empty.
The following sections describe the functionality, the configuration dialog
box, and the custom properties of each synchronization step type.
Lock
Use lock steps to ensure that only one thread can access a particular
resource or data item at a time. For example, if you examine and update the
value of a global variable from multiple threads or executions, you can use
a lock to ensure that only one thread examines and updates the variable at
a time. If multiple threads are waiting to lock a lock, they do so in first in
first out (FIFO) order as the lock becomes available.
A thread can lock the same lock an unlimited number of times without
unlocking it. To release the lock, the thread must balance each lock
operation with an unlock operation.
Locks in TestStand have deadlock detection. If all threads using a set of
locks reside on the same machine and all of the locks in that set reside on
that machine as well, TestStand detects and reports a run-time error if
deadlock occurs as a result of those locks and threads. To avoid deadlock,
either always lock a set of locks in the same order in every thread, or lock
all of the locks a thread requires in one Lock operation by specifying an
array of lock names or references. See the Lock Operation section of this
chapter for more information on locking more than one lock at a time.
You can create a lock around a single step using the Synchronization tab of the Step
Properties dialog box rather than by using explicit Lock steps.
Note
Note
TestStand variables and properties are thread safe.
© National Instruments Corporation
11-5
TestStand User Manual
Chapter 11
Synchronization Step Types
Create Operation
To use a lock, you first create a reference to a new or existing lock object.
To create a lock reference, insert a Lock step and select Configure Lock
from the context menu for the step.
Figure 11-1. Create Operation for Lock Step Configuration Dialog Box
The Create operation contains the following controls:
TestStand User Manual
•
Lock Name Expression—Use this control to specify a name for the
synchronization object using a string literal or an expression that
evaluates to a string. Refer to the Common Attributes of
Synchronization Objects section of this document for more
information on synchronization object names.
•
Already Exists—Use this control to specify a location to store a
Boolean value that indicates whether the synchronization object
already exists.
•
Lock Reference Lifetime—Use this control to specify a lifetime for
the reference to the synchronization object.
11-6
ni.com
Chapter 11
Synchronization Step Types
Lock Operation
To use a lock to guarantee that only one thread executes certain steps at a
time, insert a Lock step before the steps you want to protect and configure
it to perform a Lock operation.
Figure 11-2. Lock Operation for Lock Step Configuration Dialog Box
The Lock operation contains the following controls:
•
© National Instruments Corporation
Lock Name or Reference Expression—Use this control to specify
the lock on which to perform the operation. You can specify the lock
by name or by the ActiveX reference you receive when you create the
lock with the Using ActiveX Reference lifetime option. You can
specify multiple locks using either a string array containing the names
of the locks or an ActiveX reference array containing ActiveX
references to the locks. When you specify multiple locks, the Lock
operation attempts to lock all of the locks. If the operation cannot lock
all of the locks, it unlocks the ones it has so far and tries again after a
random delay. This continues until the operation either succeeds in
locking all of the locks or the timeout you specify occurs. When you
lock all of the locks a thread requires in a single Lock operation, you
avoid the possibility of deadlock; however, when you lock more than
11-7
TestStand User Manual
Chapter 11
Synchronization Step Types
one lock at a time, you lose the guarantee of first in first out (FIFO)
ordering of which thread gets to lock a particular lock first.
TestStand User Manual
•
Create If Does Not Exist—Use this control to specify that the
operation automatically creates the lock(s) whose name(s) you specify.
Locks you create with this option have a reference lifetime of Same as
Execution.
•
Lock Operation Lifetime—Use this control to specify how long you
want the thread to lock the lock. Refer to the Common Attributes of
Synchronization Objects section of this document for more
information on lifetime settings. Once the lifetime of the last lock
operation for the owning thread ends, the lock again becomes available
for a thread to lock.
•
Timeout Enabled, Timeout Expression, Timeout Causes
Run-Time Error—Use these controls to specify the timeout behavior
when waiting to acquire the Lock. If a timeout occurs, the property
Step.Result.TimeoutOccurred is set to True.
11-8
ni.com
Chapter 11
Synchronization Step Types
Early Unlock Operation
If you want to release the lock before the lock operation lifetime expires,
insert a Lock step to perform the Early Unlock operation as shown below.
Figure 11-3. Get Early Unlock Operation for Lock Step Configuration Dialog Box
The Early Unlock operation contains the following controls:
•
© National Instruments Corporation
Lock Name or Reference Expression—Use this control to specify
the lock on which to perform the operation. You can specify the lock
by name or by the ActiveX reference you receive when you create the
lock with the Using ActiveX Reference lifetime option.
11-9
TestStand User Manual
Chapter 11
Synchronization Step Types
Get Status Operation
Use the Get Status operation to find out information about an existing lock
or to determine if a particular lock exists as shown below.
Figure 11-4. Get Status Operation for Lock Step Configuration Dialog Box
The Get Status operation contains the following controls:
TestStand User Manual
•
Lock Name or Reference Expression—Use this control to specify
the lock on which to perform the operation. You can specify the lock
by name or by the ActiveX reference you receive when you create the
lock with the Using ActiveX Reference lifetime option.
•
Lock Exists?—Use this control to specify a location to store a
Boolean value that indicates whether the lock exists.
•
Number of Threads Waiting to Lock the Lock—Use this control to
specify a location to store the number of threads waiting to lock the
lock.
11-10
ni.com
Chapter 11
Synchronization Step Types
Step Properties
Figure 11-5 shows the step properties for the Lock step type.
Figure 11-5. Lock Step Properties
The Lock step type defines the following step properties in addition to the
common custom properties.
•
Step.Result.TimeoutOccurred is set to True if the Lock
operation times out. This property exists only if the step is configured
for the Lock operation.
•
Step.NameOrRefExpr contains the Lock Name Expression for the
Create operation and the Lock Name or Reference Expression for all
other lock operations. In the case of the Lock operation, this expression
can optionally specify an array of names or references.
•
Step.LifetimeRefExpr contains the ActiveX Reference
Expression for the lock reference lifetime or lock operation lifetime
when you set either lifetime to Use ActiveX Reference.
•
Step.TimeoutEnabled contains the Timeout Enabled setting for the
Lock operation.
•
Step.TimeoutExpr contains the Timeout Expression, in seconds,
for the Lock operation.
•
Step.ErrorOnTimeout contains the Timeout Causes Run-Time
Error setting for the Lock operation.
•
© National Instruments Corporation
Step.AlreadyExistsExpr contains the Already Exists expression
for the Create operation or the Lock Exists expression for the Get
Status operation.
11-11
TestStand User Manual
Chapter 11
Synchronization Step Types
•
Step.NumThreadsWaitingExpr contains the Number of Threads
Waiting to Lock the Lock expression for the Get Status operation.
•
Step.Operation contains a value that specifies the operation the
step is configured to perform. The valid values are 0 = Create,
1 = Lock, 2 = Early Unlock, 3 = Get Status.
•
Step.Lifetime contains a value that specifies the lifetime setting
to use for the Create operation. The valid values are 0 = Same as
Sequence, 1 = Same as Thread, 2 = Use ActiveX Reference, 3 = Same
as Execution.
•
Step.LockLifetime contains a value that specifies the lifetime
setting to use for the Lock operation. The valid values are 0 = Same
as Sequence, 1 = Same as Thread, 2 = Use ActiveX Reference.
•
Step.CreateIfDoesNotExist contains the Create If Does Not
Exist setting for the Lock operation.
Semaphore
Use Semaphore steps to limit concurrent access to a resource to a specific
number of threads. A semaphore stores a numeric count and allows threads
to increment (release) or decrement (acquire) the count as long as the count
stays equal to or greater than zero. If a decrement would cause the count to
go below zero, the thread attempting to decrement the count blocks until
the count increases. When multiple threads are waiting to decrement a
semaphore, the semaphore unblocks the threads in first in first out (FIFO)
order whenever another thread increments the semaphore count.
A semaphore with an initial count of one behaves like a lock, with one
exception. Like a lock, a one-count semaphore restricts access to a single
thread at a time. Unlike a lock, a thread cannot acquire a one-count
semaphore multiple times without first releasing it after each acquire.
When a thread attempts to acquire the semaphore a second time without
releasing it, the count is zero and the thread blocks. Refer to the Lock
section of this chapter for more information on lock objects.
Create Operation
To use a semaphore, you first create a reference to a new or existing
semaphore object. To create a semaphore reference, insert a Semaphore
step and select Configure Semaphore from the context menu for the step.
TestStand User Manual
11-12
ni.com
Chapter 11
Synchronization Step Types
Figure 11-6 shows the Semaphore Step Configuration dialog box with the
Create operation selected.
Figure 11-6. Create Operation for Semaphore Step Configuration Dialog Box
The Create operation contains the following controls:
•
Semaphore Name Expression—Use this control to specify a unique
name for the synchronization object using a string literal or an
expression that evaluates to a string. Refer to the Common Attributes
of Synchronization Objects section of this document for more
information on synchronization object names.
•
Already Exists—Use this control to specify a location to store a
Boolean value that indicates whether the synchronization object
already exists.
•
Semaphore Reference Lifetime—Use this control to specify a
lifetime for the reference to the synchronization object.
•
Initial Semaphore Count—Use this control to specify the initial
value for the count. This value must be greater than or equal to 0. If you
know that the semaphore already exists, you can leave this setting
© National Instruments Corporation
11-13
TestStand User Manual
Chapter 11
Synchronization Step Types
blank. If the semaphore already exists and you specify an initial count
that differs from the existing initial count, the step reports an error at
run time.
Acquire Operation
Before you access a resource that a semaphore protects you must perform
an Acquire (decrement) operation on the semaphore, as shown below.
Figure 11-7. Acquire Operation for Semaphore Step Configuration Dialog Box
The Acquire operation contains the following controls:
TestStand User Manual
•
Semaphore Name or Reference Expression—Use this control to
specify the semaphore on which to perform the operation. You can
specify the semaphore by name or by the ActiveX reference you
receive when you create the semaphore with the Using ActiveX
Reference lifetime option.
•
Auto Release—Use this control to specify whether to release
(increment) the semaphore automatically when the lifetime you
specify expires.
11-14
ni.com
Chapter 11
Synchronization Step Types
•
Acquire Lifetime—Use this control to specify how long the thread
holds the semaphore after it acquires the semaphore. The thread
releases the semaphore automatically when the lifetime of the acquire
ends. Refer to the Synchronization Objects section of this chapter for
more information on lifetime settings.
•
Timeout Enabled, Timeout Expression, Timeout Causes
Run-Time Error—Use these controls to specify the timeout behavior
when waiting to acquire the semaphore. If a timeout occurs, the
property Step.Result.TimeoutOccurred is set to True.
Release Operation
Use the release operation when you want direct control over the count or if
you use semaphores in a way that requires unmatched increments and
decrements. If you enable Auto Release in the Acquire operation, do not
explicitly release the semaphore using the Release operation.
Figure 11-8. Release Operation for Semaphore Step Configuration Dialog Box
© National Instruments Corporation
11-15
TestStand User Manual
Chapter 11
Synchronization Step Types
The Release operation contains the following controls:
•
Semaphore Name or Reference Expression—Use this control to
specify the semaphore on which to perform the operation. You can
specify the semaphore by name or by the ActiveX reference you
receive when you create the semaphore with the Using ActiveX
Reference lifetime option.
The release operation immediately increments the count for the semaphore.
If you perform the Acquire operation with the Auto Release option enabled,
do not use the Release operation. Typically, you use the Release operation
only on semaphores that require unmatched increments and decrements.
For example, if you create a semaphore with an initial count of zero, all
threads block when they perform an acquire. You can then perform release
operations to release the threads when you are ready.
Get Status Operation
You can use the Get Status operation to obtain information about the
current state of the semaphore as shown below.
Figure 11-9. Get Status Operation for Semaphore Step Configuration Dialog Box
TestStand User Manual
11-16
ni.com
Chapter 11
Synchronization Step Types
The Get Status operation contains the following controls:
•
Semaphore Name or Reference Expression—Use this control to
specify the semaphore on which to perform the operation. You can
specify the semaphore by name or by the ActiveX reference you
receive when you create the semaphore with the Using ActiveX
Reference lifetime option.
•
Semaphore Exists?—Use this control to specify a location to store a
Boolean value that indicates whether the semaphore exists.
•
Number of Threads Waiting to Acquire the Semaphore—Use this
control to specify a location to store the number of threads waiting to
acquire the semaphore.
•
Initial Semaphore Count—Use this control to specify a location to
store the initial semaphore count.
•
Current Count—Use this control to specify a location to store the
current value of the semaphore count.
Step Properties
Figure 11-10 shows the step properties for the Semaphore step type.
Figure 11-10. Semaphore Step Properties
© National Instruments Corporation
11-17
TestStand User Manual
Chapter 11
Synchronization Step Types
The Semaphore step type defines the following step properties in addition
to the common custom properties.
•
Step.Result.TimeoutOccurred is set to True if the Acquire
operation times out. This property exists only if the step is configured
for the Acquire operation.
•
Step.NameOrRefExpr contains the Semaphore Name Expression for
the Create operation and the Semaphore Name or Reference
Expression for all of the other operations.
•
Step.AutoRelease contains a Boolean value that specifies whether
the Acquire operation automatically performs a Release when the
Acquire lifetime expires.
•
Step.LifetimeRefExpr contains the ActiveX Reference
Expression for the semaphore lifetime or acquire lifetime when you set
either lifetime to Use ActiveX Reference.
•
Step.TimeoutEnabled contains the Timeout Enabled setting for the
Acquire operation.
•
Step.TimeoutExpr contains the Timeout Expression, in seconds,
for the Acquire operation.
•
Step.ErrorOnTimeout contains the Timeout Causes Run-Time
Error setting for the Acquire operation.
•
Step.AlreadyExistsExpr contains the Already Exists expression
for the Create operation or the Semaphore Exists expression for the
Get Status operation.
•
Step.InitialCountExpr contains the numeric expression that the
Create operation uses for the initial count of the semaphore.
•
Step.NumThreadsWaitingExpr contains the Number of Threads
Waiting to Acquire the Semaphore expression for the Get Status
operation.
•
Step.Operation contains a value that specifies the operation the
step performs. The valid values are 0 = Create, 1 = Acquire,
2 = Release, 3 = Get Status.
•
Step.Lifetime contains a value that specifies the lifetime setting
for the Create operation. The valid values are 0 = Same as Sequence,
1 = Same as Thread, 2 = Use ActiveX Reference, 3 = Same as
Execution.
•
Step.InitialCountOutExpr contains the Initial Semaphore
Count expression for the Get Status operation.
•
TestStand User Manual
Step.AcquireLifetime contains a value that specifies the lifetime
setting for the Acquire operation. The valid values are 0 = Same as
11-18
ni.com
Chapter 11
Synchronization Step Types
Sequence, 1 = Same as Thread, 2 = Use ActiveX Reference. The
Acquire operation uses this setting only when Step.AutoRelease is
set to True.
•
Step.CurrentCountExpr contains the Current Count expression
for the Get Status operation.
Rendezvous
Use a rendezvous to make threads wait for each other before they proceed
past a location you specify. As each thread performs the rendezvous
operation, it blocks. When the number of blocked threads reaches the total
you specify when you create the rendezvous, the rendezvous unblocks all
its waiting threads and they resume execution.
Create Operation
The rendezvous Create operation is shown below.
Figure 11-11. Create Operation for Rendezvous Step Configuration Dialog Box
The Create operation contains the following controls:
•
© National Instruments Corporation
Rendezvous Name Expression—Use this control to specify a unique
name for the synchronization object using a string literal or an
11-19
TestStand User Manual
Chapter 11
Synchronization Step Types
expression that evaluates to a string. Refer to the Common Attributes
of Synchronization Objects section of this document for more
information on synchronization object names.
•
Already Exists—Use this control to specify a location to store a
Boolean value that indicates whether the synchronization object
already exists.
•
Rendezvous Reference Lifetime—Use this control to specify a
lifetime for the reference to the synchronization object.
•
Number of Threads Per Rendezvous—Use this control to specify
the number of threads that must rendezvous before the step permits the
threads to continue execution past the rendezvous point. This value
must be greater than zero. If you know that the rendezvous already
exists, you can leave this setting blank. If you specify a value different
than the setting in the existing rendezvous, the step reports an error at
run time.
Rendezvous Operation
The primary operation on a rendezvous step is the Rendezvous operation as
shown below.
Figure 11-12. Rendezvous Operation for Rendezvous Step Configuration Dialog Box
TestStand User Manual
11-20
ni.com
Chapter 11
Synchronization Step Types
The Rendezvous operation contains the following controls:
•
Rendezvous Name or Reference Expression—Use this control to
specify the rendezvous on which to perform the operation. You can
specify the rendezvous by name or by the ActiveX reference you
receive when you create the rendezvous with the Using ActiveX
Reference lifetime option.
•
Timeout Enabled, Timeout Expression, Timeout Causes
Run-Time Error—Use these controls to specify a timeout and
timeout behavior when waiting to rendezvous with other threads. If a
timeout occurs, the property Step.Result.TimeoutOccurred is
set to True.
Get Status Operation
You can use the Get Status operation to get information about a
rendezvous’ current state as shown below.
Figure 11-13. Get Status Operation for Rendezvous Step Configuration Dialog Box
The Get Status operation contains the following controls:
•
© National Instruments Corporation
Rendezvous Name or Reference Expression—Use this control to
specify the rendezvous on which to perform the operation. You can
11-21
TestStand User Manual
Chapter 11
Synchronization Step Types
specify the rendezvous by name or by the ActiveX reference you
receive when you create the rendezvous with the Using ActiveX
Reference lifetime option.
•
Rendezvous Exists?—Use this control to specify a location to store a
Boolean value that indicates whether the rendezvous exists.
•
Number of Threads Waiting for Rendezvous—Use this control to
specify a location to store the number of threads waiting on the
rendezvous operation.
•
Number of Threads Per Rendezvous—Use this control to specify a
location to store the number of threads that must rendezvous before the
step permits the threads to continue execution past the rendezvous
point.
Step Properties
Figure 11-14 shows the step properties for the Rendezvous step type.
Figure 11-14. Rendezvous Step Properties
The Rendezvous step type defines the following step properties in addition
to the common custom properties.
•
Step.Result.TimeoutOccurred is set to True if the rendezvous
operation times out. This property exists only if the step is configured
for the rendezvous operation.
•
TestStand User Manual
Step.NameOrRefExpr contains the Rendezvous Name Expression
for the Create operation and the Rendezvous Name or Reference
Expression for other rendezvous operations.
11-22
ni.com
Chapter 11
•
Synchronization Step Types
Step.LifetimeRefExpr contains the ActiveX Reference
Expression for the rendezvous lifetime when you set the lifetime to
Use ActiveX Reference.
•
Step.TimeoutEnabled contains the Timeout Enabled setting for the
rendezvous operation.
•
Step.TimeoutExpr contains the Timeout Expression, in seconds,
for the rendezvous operation.
•
Step.ErrorOnTimeout contains the Timeout Causes Run-Time
Error setting for the rendezvous operation.
•
Step.AlreadyExistsExpr contains the Already Exists expression
for the Create operation or the Rendezvous Exists expression for the
Get Status operation.
•
Step.RendezvousCountExpr contains the Number of Threads Per
Rendezvous expression for the Create operation.
•
Step.NumThreadsWaitingExpr contains the Number of Threads
Waiting for Rendezvous expression for the Get Status operation.
•
Step.Operation contains a value that specifies the operation the
step performs. The valid values are 0 = Create, 1 = Rendezvous,
2 = Get Status.
•
Step.Lifetime contains a value that specifies the lifetime for the
Create operation. The valid values are 0 = Same as Sequence, 1 = Same
as Thread, 2 = Use ActiveX Reference, 3 = Same as Execution.
•
Step.RendezvousCountOutExpr contains the Number of Threads
Per Rendezvous expression for the Get Status operation.
Queue
Use queue steps to synchronize the production and consumption of data
among your threads. A queue has two primary operations, enqueue and
dequeue. Enqueue places a data item on the queue and dequeue removes an
item from the queue. Normally, the enqueue operation blocks when the
queue is full and the dequeue operation blocks when the queue is empty.
If multiple threads block on the same queue operation, the threads unblock
in first in first out (FIFO) order.
Create Operation
To create a reference to a new or existing queue object, insert a Queue step
and select Configure Queue from the context menu for the step.
© National Instruments Corporation
11-23
TestStand User Manual
Chapter 11
Synchronization Step Types
Figure 11-15 shows the Queue Step Configuration dialog box with the
Create operation selected.
Figure 11-15. Create Operation for Queue Step Configuration Dialog Box
The Create operation contains the following controls:
TestStand User Manual
•
Queue Name Expression—Use this control to specify a unique name
for the synchronization object using a string literal or an expression
that evaluates to a string. Refer to the Common Attributes of
Synchronization Objects section of this document for more
information on synchronization object names.
•
Already Exists—Use this control to specify a location to store a
Boolean value that indicates whether the synchronization object
already exists.
•
Queue Reference Lifetime—Use this control to specify a lifetime for
the reference to the synchronization object.
11-24
ni.com
Chapter 11
•
Synchronization Step Types
Maximum Number of Elements—Use this control to specify the
maximum number of items that the queue can store. A value less than
or equal to zero specifies that the queue does not have a maximum
number of elements. If you know that the queue already exists, you can
leave this setting blank. If you specify value different than the
maximum number of elements for the existing queue, the step reports
an error at run time.
Enqueue Operation
Use the Enqueue operation, as shown below, to add new elements to the
queue.
Figure 11-16. Enqueue Operation for Queue Step Configuration Dialog Box
© National Instruments Corporation
11-25
TestStand User Manual
Chapter 11
Synchronization Step Types
The Enqueue operation contains the following controls:
TestStand User Manual
•
Queue Name or Reference Expression—Use this control to specify
the queue on which to perform the operation. You can specify the
queue by name or by the ActiveX reference you receive when you
create the queue with the Using ActiveX Reference lifetime option.
•
New Element to Enqueue—Use this control to specify the data to
insert into the queue. The data can be any type, including a number,
string, Boolean, ActiveX reference, structured type (container), or
arrays of these types. When you dequeue the element you must specify
a location with the appropriate type. By default, the queue stores a
copy of the data you enqueue. However, if you enable the Store by
Reference Instead of by Value option, the enqueue operation stores an
ActiveX reference to the data value instead. When you dequeue this
reference into an ActiveX reference variable, you can access the data
using the TestStand API PropertyObject interface and the ActiveX
Automation Adapter.
•
Insert At—Use this control to specify where to store the new queue
element. The choices are Back of Queue and Front of Queue.
•
Store by Reference Instead of by Value—Use this control to specify
how to store the data you specify in the New Element to Enqueue
control. Enable the option if you want to store an ActiveX reference to
the data. Disable the option if you want to store a copy of the data.
•
If the Queue is Full—Use this control to specify what to do if the
queue is full. The choices are Wait, Discard Front Element, Discard
Back Element, and Do Not Enqueue. If you chose the Wait option, the
thread blocks until the queue is no longer full. All other options return
immediately.
•
Timeout Enabled, Timeout Expression, Timeout Causes
Run-Time Error—Use these controls to specify a timeout and
timeout behavior for when the queue is full. The timeout only applies
if you specify the Wait option for the If the Queue is Full setting. If a
timeout occurs, the property Step.Result.TimeoutOccurred is
set to True.
11-26
ni.com
Chapter 11
Synchronization Step Types
Dequeue Operation
Use the Dequeue operation, as shown below, to remove an element and/or
store the data from an element.
Figure 11-17. Dequeue Operation for Queue Step Configuration Dialog Box
The Dequeue operation contains the following controls:
•
© National Instruments Corporation
Queue Name or Reference Expression—Use this control to specify
the queue on which to perform the operation. You can specify the
queue by name or by the ActiveX reference you receive when you
create the queue with the Using ActiveX Reference lifetime option.
You can specify multiple queues using either a string array containing
the names of the queues, or an ActiveX reference array containing
ActiveX references to the queues. When you specify multiple queues,
11-27
TestStand User Manual
Chapter 11
Synchronization Step Types
the Dequeue operation dequeues an element from the first queue you
specify that has an element available. You can ascertain which queue
the operation dequeues from by using the Which Queue control to
specify a location to store the array offset of the queue.
•
Location to Store Element—Use this control to specify the location
in which to store the queue element. You may leave this control blank
if you do not want to store the data. The type of the location must be
compatible with the data that the element stores. Table 11-1 and
Table 11-2 illustrate the outcomes depending on the type of the data in
the queue and the data type of the storage location. In these tables,
Simple Type refers to a number, string, Boolean, or array of any type,
and Structured Type refers to an instance of a user-defined type where
the root property is a container.
Table 11-1. Dequeue Behaviors for Data You Enqueue by Value
Dequeue
Type—Destination
Enqueue Type (By Value)—Source
Simple Type
Structured Type
ActiveX Reference
Simple Type
If types match,
dequeue copies the
data to the location
you specify. If types
do not match, dequeue
reports a type
mismatch error.
Type mismatch error.
Type mismatch error.
Structured Type
Type mismatch error.
Replaces the property
you specify as the
dequeue location
with a copy of the
structured value that
the queue stores.
Type mismatch error.
ActiveX Reference
Type mismatch error.
Stores an ActiveX
reference to the
structured value that
the queue stores.
Copies the ActiveX
reference the queue
stores to the location
you specify.
TestStand User Manual
11-28
ni.com
Chapter 11
Synchronization Step Types
Table 11-2. Dequeue Behaviors for Data You Enqueue by Reference
Enqueue Type (By Reference)—Source
Dequeue
Type—Destination
Simple Type
Structured Type
ActiveX Reference
Simple Type
If types match,
dequeue copies the
data to the location
you specify. If types
do not match, dequeue
reports a type
mismatch error.
Type mismatch error.
Type mismatch error.
Structured Type
Type mismatch error.
Makes a copy of the
structured value that
the queue stores by
reference, and
replaces the property
you specify as the
dequeue location with
that copy.
Type mismatch error.
ActiveX Reference
Stores an ActiveX
reference to the simple
type as it is stored in
the queue.
Stores an ActiveX
reference to the
structured value that
the queue stores.
Stores an ActiveX
reference to the
ActiveX reference that
the queue stores.
•
Dequeue From—Use this control to specify where in the queue to
dequeue from. The options are Front of Queue and Back of Queue.
•
Remove Element—Use this control to specify whether the operation
removes the element from the queue. If you do not enable this option,
the operation retrieves the value of the element without removing it
from the queue.
•
Which Queue—Use this control to specify a location to store the array
offset of the queue on which the dequeue operation occurs. Typically,
you do not use this control unless you are dequeuing from multiple
queues. See the description for the Queue Name or Reference
Expression control for this operation for more information on
dequeuing with multiple queues.
•
Timeout Enabled, Timeout Expression, Timeout Causes
Run-Time Error—Use these controls to specify a timeout and
timeout behavior when waiting to dequeue an element. If a timeout
occurs, the property Step.Result.TimeoutOccurred is set to
True.
© National Instruments Corporation
11-29
TestStand User Manual
Chapter 11
Synchronization Step Types
Flush Operation
Use the Flush operation, as shown below, to empty the queue and
optionally retrieve all its elements.
Figure 11-18. Flush Operation for Queue Step Configuration Dialog Box
The Flush operation contains the following controls:
TestStand User Manual
•
Queue Name or Reference Expression—Use this control to specify
the queue on which to perform the operation. You can specify the
queue by name or by the ActiveX reference you receive when you
create the queue with the Using ActiveX Reference lifetime option.
•
Location to Store Array of Queue Elements—Use this control to
specify an array property in which to store the elements of the queue.
This output is optional. All queue elements must be of the same data
11-30
ni.com
Chapter 11
Synchronization Step Types
type as the array you specify and no queue element can be an array. The
step reports a run-time error if you specify a value in this control and
the queue items do not meet these conditions.
Get Status Operation
Use the Get Status operation, as shown below, to obtain information about
the current state of a queue.
Figure 11-19. Get Status Operation for Queue Step Configuration Dialog Box
The Get Status operation contains the following controls:
•
© National Instruments Corporation
Queue Name or Reference Expression—Use this control to specify
the queue on which to perform the operation. You can specify the
queue by name or by the ActiveX reference you receive when you
create the queue with the Using ActiveX Reference lifetime option.
11-31
TestStand User Manual
Chapter 11
Synchronization Step Types
TestStand User Manual
•
Queue Exists—Use this control to specify a location to store a
Boolean value that indicates whether the synchronization object exists.
•
Number of Threads Waiting to Enqueue—Use this control to
specify a location to store the number of threads waiting to enqueue
data.
•
Number of Threads Waiting to Dequeue—Use this control to
specify a location to store the number of threads waiting to dequeue
data.
•
Maximum Number of Elements—Use this control to specify a
location to store the maximum number of elements of the queue.
•
Number of Elements—Use this control to specify a location to store
the number of elements in the queue.
•
Location to Store Array of Queue Elements—Use this control to
specify an array property in which to store the elements of the queue.
This feature is optional. If you specify an array property in this control,
all queue elements must be of the same data type as the array you
specify, and no queue element can be an array. The step reports a
run-time error if you specify a value in this control and the queue items
do not meet these conditions.
11-32
ni.com
Chapter 11
Synchronization Step Types
Step Properties
Figure 11-20 shows the step properties for the Queue step type.
Figure 11-20. Queue Step Properties
The Queue step type defines the following step properties in addition to the
common custom properties.
•
Step.Result.TimeoutOccurred is set to True if an Enqueue or
Dequeue operation times out. This property exists only if the step is
configured for the Enqueue or Dequeue operation.
•
Step.NameOrRefExpr contains the Queue Name Expression for the
Create operation and the Queue Name or Reference Expression for all
other operations. In the case of the Dequeue operation, this expression
can specify an array of names or references.
•
Step.LifetimeRefExpr contains the ActiveX Reference
Expression for the queue lifetime when you set the lifetime to Use
ActiveX Reference.
© National Instruments Corporation
11-33
TestStand User Manual
Chapter 11
Synchronization Step Types
•
Step.TimeoutEnabled contains the Timeout Enabled setting for the
Enqueue or Dequeue operation.
•
Step.TimeoutExpr contains the Timeout Expression, in seconds,
for the Enqueue or Dequeue operation.
•
Step.ErrorOnTimeout contains the Timeout Causes Run-Time
Error setting for the Enqueue or Dequeue operation.
•
Step.AlreadyExistsExpr contains the Already Exists expression
for the Create operation or the Queue Exists expression for the Get
Status operation.
•
Step.MaxNumElementsExpr contains the expression that specifies
the maximum number of elements of the queue for the Create
operation.
•
Step.MaxNumElementsOutExpr contains the expression that
specifies where to store the maximum number of elements of the queue
for the Get Status operation.
•
Step.NumThreadsWaitingEnqueueExpr contains the expression
that specifies where to store the number of threads that are waiting to
enqueue for the Get Status operation.
•
Step.NumThreadsWaitingDequeueExpr contains the expression
that specifies where to store the number of threads that are waiting to
dequeue for the Get Status operation.
•
Step.Operation contains a value that specifies the operation the
step performs. The valid values are 0 = Create, 1 = Enqueue,
2 = Dequeue, 3 = Flush, 4 = Get Status.
•
Step.Lifetime contains a value that specifies the lifetime setting for
the Create operation. The valid values are 0 = Same as Sequence,
1 = Same as Thread, 2 = Use ActiveX Reference, 3 = Same as
Execution.
•
Step.NumElementsExpr contains the expression that specifies
where to store the current number of elements in the queue for the Get
Status operation.
•
TestStand User Manual
Step.DataExpr contains the New Element to Enqueue expression
when you configure the step for the Enqueue operation, the Location
to Store Element expression when you configure the step for the
Dequeue operation, and the Location to Store Array of Queue
Elements expression when you configure the step for the Flush or Get
Status operation.
11-34
ni.com
Chapter 11
Synchronization Step Types
•
Step.ByRef contains the Boolean value that specifies whether the
step stores a queue element by ActiveX reference instead of by value
for the Enqueue operation.
•
Step.EnqueueLocation contains a value that specifies the location
to store the queue element for the Enqueue operation. The valid values
are 0 = Front of Queue, 1 = Back of Queue
•
Step.DequeueLocation contains a value that specifies the location
to remove the queue element from for the Dequeue operation. The
valid values are 0 = Front of Queue, 1 = Back of Queue
•
Step.FullQueueOption contains a value that specifies the options
for the If the Queue is Full setting of the Enqueue operation. The valid
values are 0 = Wait, 1 = Discard Front Element, 2 = Discard Back
Element, 3 = Do Not Enqueue.
•
Step.RemoveElement contains a Boolean value that specifies
whether the step removes the element from the queue when it performs
the Dequeue operation.
•
Step.WhichQueueExpr contains the expression that specifies where
to store the array offset of the queue on which the Dequeue operation
occurs.
Notification
Use Notification steps to notify one or more threads when a particular event
or condition has been met. You also can pass data to the threads you notify.
Create Operation
To create a reference to a new or existing notification object, insert a
Notification step and select Configure Notification from the context menu
for the step.
© National Instruments Corporation
11-35
TestStand User Manual
Chapter 11
Synchronization Step Types
Figure 11-21 shows the Notification Step Configuration dialog box with
the Create operation selected.
Figure 11-21. Create Operation for Notification Step Configuration Dialog Box
The Create operation contains the following controls:
TestStand User Manual
•
Notification Name Expression—Use this control to specify a unique
name for the synchronization object using a string literal or an
expression that evaluates to a string. Refer to the Common Attributes
of Synchronization Objects section of this document for more
information on synchronization object names.
•
Already Exists—Use this control to specify a location to store a
Boolean value that indicates whether the synchronization object
already exists.
•
Notification Reference Lifetime—Use this control to specify the
lifetime of the reference to the synchronization object.
11-36
ni.com
Chapter 11
Synchronization Step Types
Set Operation
Use the Set operation to notify one or more threads that an event has
occurred or a condition has been met. When the notification is in a Set state,
Wait operations on the notification succeed immediately. The Set operation
is shown below.
Figure 11-22. Set Operation for Notification Step Configuration Dialog Box
The Set operation contains the following controls:
•
© National Instruments Corporation
Notification Name or Reference Expression—Use this control to
specify the notification on which to perform the operation. You can
specify the notification by name or by the ActiveX reference you
receive when you create the notification with the Using ActiveX
Reference lifetime option.
11-37
TestStand User Manual
Chapter 11
Synchronization Step Types
TestStand User Manual
•
Data Value—Use this control to specify an optional data element to
store with the set state of the notification. Threads that wait on the
notification can then optionally retrieve this data. The data can be
any type, including a number, string, Boolean, ActiveX reference,
structured type (container), or arrays of these types. When you later
wait on the notification, you must store the element into a location with
the appropriate type. By default, the notification stores a copy of the
value. However, if you enable the Store Data by Reference Instead of
by Value option, the operation stores an ActiveX reference to the value
instead. If you later store this reference into an ActiveX reference
variable in the Wait operation, you can access the data using the
TestStand API PropertyObject interface and the ActiveX Automation
Adapter.
•
Store Data by Reference Instead of by Value—Use this control to
specify how to store the data you specify in the Data Value control.
Enable the option if you want to store an ActiveX reference to the
property. Disable the option if you want to store a copy of the data.
•
Auto Clear After Notifying One Thread—Use this control to specify
whether to clear the state of the notification after one thread receives
the notification. Once you clear the state of a notification, subsequent
Wait operations block until you perform another Set operation.
11-38
ni.com
Chapter 11
Synchronization Step Types
Clear Operation
Use the Clear operation, as shown below, to clear the state of a notification
so that subsequent Wait operations block until the next Set operation.
Figure 11-23. Clear Operation for Notification Step Configuration Dialog Box
The Clear operation contains the following controls:
•
© National Instruments Corporation
Notification Name or Reference Expression—Use this control to
specify the notification on which to perform the operation. You can
specify the notification by name or by the ActiveX reference you
receive when you create the notification with the Using ActiveX
Reference lifetime option.
11-39
TestStand User Manual
Chapter 11
Synchronization Step Types
Pulse Operation
Use the Pulse operation to notify one or all currently waiting threads. This
operation differs from the Set operation in that it notifies only threads that
are already waiting when the Pulse operation occurs. Threads that wait on
the notification after a Pulse operation occurs block until you Set or Pulse
the notification again. A Pulse operation places the notification in a Cleared
state, even if the notification was in a Set state before the Pulse operation.
The Pulse operation is shown below.
Figure 11-24. Pulse Operation for Notification Step Configuration Dialog Box
4.
TestStand User Manual
Notification Name or Reference Expression—Use this control to
specify the notification on which to perform the operation. You can
specify the notification by name or by the ActiveX reference you
receive when you create the notification with the Using ActiveX
Reference lifetime option.
11-40
ni.com
Chapter 11
Synchronization Step Types
•
Data Value—Use this control to specify an optional data element to
send with the pulse notification. The data can be of any type (number,
string, Boolean, ActiveX reference, structured type (container), or
arrays of these types). When you later wait on the notification, you
must store the element into a location of an appropriate type. By
default, the notification stores a copy of the data value you specify.
However, if you enable the Store Data by Reference Instead of by
Value option, the operation stores an ActiveX reference to the value
instead. If you later store this reference into an ActiveX reference
variable in the Wait operation, you can access the data using the
TestStand API PropertyObject interface and the ActiveX Automation
Adapter.
•
Store Data by Reference Instead of by Value—Use this control to
specify how to store the data you specify in the Data Value control.
Enable the option to store an ActiveX reference to the property. Leave
the option disabled to store a copy of the data.
•
Notify All/First Waiting Thread/s (If Any)—Use this control to
specify whether to notify all currently waiting threads or just the first
waiting thread.
Wait Operation
Use the Wait operation to wait until you Set or Pulse the notification. If the
notification is already in a Set state, the Wait operation completes
immediately. The Wait operation is shown below.
© National Instruments Corporation
11-41
TestStand User Manual
Chapter 11
Synchronization Step Types
Figure 11-25. Wait Operation for Notification Step Configuration Dialog Box
The Wait operation contains the following controls:
•
TestStand User Manual
Notification Name or Reference Expression (can pass array)—Use
this control to specify the notification on which to perform the
operation. You can specify the notification by name or by the ActiveX
reference you receive when you create the notification with the Using
ActiveX Reference lifetime option. The Wait operation allows you to
specify multiple notifications using either a string array containing the
names of the notifications or an ActiveX reference array containing
ActiveX references to the notifications. When you specify multiple
notifications, the Wait operation waits until you Set or Pulse any of the
notifications in the array. If you Set or Pulse more than one of the
notifications, the Wait operation responds to the notification that
appears first in the array. To ascertain which notification the Wait
operation responds to, use the Which Notification control to specify a
location to store the array offset of the notification.
11-42
ni.com
Chapter 11
•
Synchronization Step Types
Location to Store Data—Use this control to specify a location to store
the notification data. You may leave this control blank if you do not
want to store the data. The type of the location must be compatible with
the data that the notification sends. Table 11-3 and Table 11-4 illustrate
the wait outcome depending on the type of the data and the data type
of the storage location. In these tables, Simple Type refers to a number,
string, Boolean, or array of any type, and Structured Type refers to an
instance of a user-defined type where the root property is a container.
Table 11-3. Wait Behaviors for Data Set or Pulsed by Value
Set or Pulse Data Type (By Value)—Source
Storage
Type—Destination
Simple Type
Structured Type
ActiveX Reference
Simple Type
If the types match, the
step copies the data to
the location you
specify. If the types do
not match, the step
reports a type
mismatch error.
Type mismatch error.
Type mismatch error.
Structured Type
Type mismatch error.
Replaces the property
you specify as the
storage location with a
copy of the structured
value that the
notification stores.
Type mismatch error.
ActiveX Reference
Type mismatch error.
Stores an ActiveX
reference to the
structured value that
the notification stores.
Copies the ActiveX
reference the
notification stores to
the location you
specify.
© National Instruments Corporation
11-43
TestStand User Manual
Chapter 11
Synchronization Step Types
Table 11-4. Wait Behaviors for Data Set or Pulsed by Reference
Set or Pulse Data Type (By Reference)—Source
Storage
Type—Destination
Simple Type
Structured Type
ActiveX Reference
Simple Type
If the types match, the
step copies the data to
the location you
specify. If the types do
not match, the step
reports a type
mismatch error.
Type mismatch error.
Type mismatch error.
Structured Type
Type mismatch error.
Makes a copy of the
structured value the
notification stores by
reference and replaces
the property you
specify as the storage
location with the copy.
Type mismatch error.
ActiveX Reference
Stores an ActiveX
reference to the simple
type that the
notification stores.
Stores an ActiveX
reference to the
structured value that
the notification stores.
Stores an ActiveX
reference to the
ActiveX reference that
the notification stores.
TestStand User Manual
•
Which Notification—Use this control to specify a location to store the
array offset of the notification to which the operation responds.
Typically, you do not use this control unless you wait on multiple
notifications. Refer to description for the Notification Name or
Reference Expression control for this operation for more information
on waiting for multiple notifications.
•
Timeout Enabled, Timeout Expression, Timeout Causes
Run-Time Error—Use these controls to specify a timeout and
timeout behavior when waiting for a notification. If a timeout occurs,
the property Step.Result.TimeoutOccurred is set to True.
11-44
ni.com
Chapter 11
Synchronization Step Types
Get Status Operation
Use the Get Status operation, as shown below, to get information about the
state of the notification object.
Figure 11-26. Get Status Operation for Notification Step Configuration Dialog Box
The Get Status operation contains the following controls:
•
Notification Name or Reference Expression—Use this control to
specify the synchronization object on which to perform the operation.
You can specify the notification by name or by the ActiveX reference
you receive when you create the notification with the Using ActiveX
Reference lifetime option.
•
Notification Exists—Use this control to specify a location to store a
Boolean value that indicates whether the synchronization object exists.
•
Number of Threads Waiting for Notification—Use this control to
specify a location to store a numeric value that corresponds to the
number of threads waiting on the notification.
© National Instruments Corporation
11-45
TestStand User Manual
Chapter 11
Synchronization Step Types
•
Is Set—Use this control to specify a location to store a Boolean value
that indicates whether the notification is in a Set state.
•
Is Auto Clear—Use this control to specify a location to store a
Boolean value that indicates whether the notification clears itself after
one thread receives the notification. The value of this setting is only
meaningful if the notification is in a Set state.
•
Location to Store Data—Use this control to specify a location to store
the notification data, if any. You may leave this control blank if you do
not want to store the data. The type of the location must be compatible
with the data that the notification sends. Refer to the description of the
Location to Store Data control for the Wait operation for more
information about data type compatibility.
Step Properties
Figure 11-27 shows the step properties for the Notification step type.
Figure 11-27. Notification Step Properties
The Notification step type defines the following step properties in addition
to the common custom properties.
•
Step.Result.TimeoutOccurred is set to True if a Wait operation
times out. This property exists only if the step is configured for the
Wait operation.
TestStand User Manual
11-46
ni.com
Chapter 11
Synchronization Step Types
•
Step.NameOrRefExpr contains the Notification Name Expression
for the Create operation and the Notification Name or Reference
Expression for all other operations. In the case of the Wait operation,
this expression can optionally specify an array of names or references.
•
Step.LifetimeRefExpr contains the ActiveX reference expression
for the notification lifetime when you set the lifetime to Use ActiveX
Reference.
•
Step.TimeoutEnabled contains the Timeout Enabled setting for the
Wait operation.
•
Step.TimeoutExpr contains the Timeout Expression, in seconds, for
the Wait operation.
•
Step.ErrorOnTimeout contains the Timeout Causes Run-Time
Error setting for the Wait operation.
•
Step.AlreadyExistsExpr contains the Already Exists expression
for the Create operation or the Notification Exists expression for the
Get Status operation.
•
Step.NumThreadsWaitingExpr contains the expression that
specifies where to store the number of threads that are waiting on the
notification for the Get Status operation.
•
Step.Operation contains a value that specifies the operation the
step is set to perform. The valid values are 0 = Create, 1 = Set,
2 = Clear, 3 = Pulse, 4 = Wait, 5 = Get Status.
•
Step.Lifetime contains a value that specifies the lifetime setting for
the Create operation. The valid values are 0 = Same as Sequence,
1 = Same as Thread, 2 = Use ActiveX Reference, 3 = Same as
Execution.
•
Step.DataExpr contains the Data Value expression for the Set or
Pulse operation, or the Location to Store Data expression for the Wait
or Get Status operation.
•
Step.ByRef contains the Boolean value that specifies whether to
store the data by ActiveX reference instead of by value for a Set or
Pulse operation.
•
Step.WhichNotificationExpr contains the expression that
specifies where to store the array offset of the notification to which the
Wait operation responds.
•
Step.IsSetExpr contains the expression that specifies where to
store the Boolean value that indicates whether the notification is in a
Set state. The Get Status operation uses this expression.
© National Instruments Corporation
11-47
TestStand User Manual
Chapter 11
Synchronization Step Types
•
Step.IsAutoClearExpr contains the expression that specifies
where to store the Boolean value that indicates whether the notification
is configured to auto clear. The Get Status operation uses this
expression.
•
Step.AutoClear contains the Auto Clear setting for the Set
operation.
•
Step.PulseNotifyOpt contains the setting for the Pulse operation
that indicates the threads to which a pulse notification is sent. The valid
values are 0 = Notify First Waiting Thread, 1 = Notify All Waiting
Threads.
Wait
Use Wait steps to wait for an execution or thread to complete or for a time
interval to elapse.
Wait for Time Interval Operation
The Wait for Time Interval operation causes a thread to wait for a duration
you specify. The thread sleeps while it waits and so relinquishes its
processing time to other threads.
Figure 11-28. Wait for Time Interval Operation for Wait Step Configuration Dialog Box
TestStand User Manual
11-48
ni.com
Chapter 11
Synchronization Step Types
The Wait for Time Interval operation contains the following control:
•
Specify the Amount of Time to Wait—Use this control to specify a
numeric expression that indicates the amount of time for the thread to
wait in seconds.
Wait for Time Multiple Operation
Use the Wait for Time Multiple operation of the Wait step type to cause a
thread to wait until the value of the internal timer becomes a multiple of the
time you specify.
Figure 11-29. Wait for Time Multiple Operation for Wait Step Configuration Dialog Box
The Wait for Time Multiple operation contains the following control:
•
Specify the Time Multiple—Use this control to specify a numeric
expression that indicates the time multiple to use to decide how long to
wait.
A common use of the Wait for Time Multiple operation is to force a loop to
cycle at a specific rate.
© National Instruments Corporation
11-49
TestStand User Manual
Chapter 11
Synchronization Step Types
Wait for Thread Operation
Use the Wait for Thread operation to wait for a TestStand thread to finish
executing.
Figure 11-30. Wait for Thread Operation for Wait Step Configuration Dialog Box
The Wait for Thread operation contains the following controls:
TestStand User Manual
•
Specify by Sequence Call—Use this control to specify the thread to
wait for by selecting a sequence call within the same sequence as the
wait step. You can only specify sequence calls that run in a new thread.
•
Specify by ActiveX Reference to Thread—Use this control to
specify the thread to wait for by using an ActiveX reference to the
thread. When you specify the thread with a reference variable, you can
refer to threads that other sequences and executions create.
•
Timeout Enabled, Timeout Expression, Timeout, Causes
Run-Time Error—Use these controls to specify a timeout and
timeout behavior when waiting for the thread to finish executing. If a
timeout occurs, the property Step.Result.TimeoutOccurred is
set to True.
11-50
ni.com
Chapter 11
Synchronization Step Types
Wait for Execution Operation
Use the Wait for Execution operation to wait for the completion of a
TestStand execution.
Figure 11-31. Wait for Execution Operation for Wait Step Configuration Dialog Box
The Wait for Execution operation contains the following controls:
•
Specify by Sequence Call—Use this control to specify the execution
to wait for by selecting a sequence call within the same sequence as the
wait step. You can only specify sequence calls that run in a new
execution.
•
Specify an ActiveX Reference to the Execution—Use this control to
specify an ActiveX reference to the TestStand execution on which to
wait.
•
Timeout Enabled, Timeout Expression, Timeout Causes
Run-Time Error—Use these controls to specify a timeout and
timeout behavior when waiting for an execution. If a timeout occurs,
the property Step.Result.TimeoutOccurred is set to True.
© National Instruments Corporation
11-51
TestStand User Manual
Chapter 11
Synchronization Step Types
Retrieving the Results from Executions and Threads
When the thread or execution completes, the Wait step copies the result
status and error information for the thread or execution to its own status and
error properties. Thus, if a Wait step waits on a sequence that fails, the
status of the wait step is Failed.
The result list entry for a Wait step contains a
TS.AsyncSequenceCall.ResultList property which is the result list
for the thread or execution. You can also access the same result list in the
TS.SequenceCall.ResultList property in the result for the sequence
call step that launches the thread or execution.
Step Properties
Figure 11-32 shows the step properties for the Wait step type.
Figure 11-32. Wait Step Properties
The Wait step type defines the following step properties in addition to the
common custom properties.
•
Step.Result.TimeoutOccurred is set to True if the Wait for
Thread or Wait for Execution operation times out. This property exists
only if the step is configured for one of these operations.
•
Step.TimeoutEnabled contains the timeout enabled setting for the
Wait for Thread or the Wait for Execution operation.
•
Step.ErrorOnTimeout contains the Timeout Causes Run-Time
Error setting for the Wait for Thread or the Wait for Execution
operation.
TestStand User Manual
11-52
ni.com
Chapter 11
Synchronization Step Types
•
Step.ThreadRefExpr contains the thread reference expression for
the Wait for Thread operation when the Step.SpecifyBySeqCall
property is set to False.
•
Step.SeqCallName contains the name of the sequence call step that
creates the thread or execution the step waits for when the
Step.SpecifyBySeqCall property is set to True.
•
Step.SeqCallStepGroupIdx contains the step group of the
sequence call step that creates the thread or execution that the step
waits for when the Step.SpecifyBySeqCall property is set to
True. The valid values are 0 = Setup, 1 = Main, 2 = Cleanup.
•
Step.TimeoutExpr contains the timeout expression, in seconds, for
the Wait for Thread or the Wait for Execution operation.
•
Step.WaitForTarget contains a value that specifies the type of wait
operation the step performs. The valid values are 0 = Time Interval,
1 = Time Multiple, 2 = Thread, 3 = Execution.
•
Step.TimeExpr contains the time expression for the Time Interval or
Time Multiple operation of the step.
•
Step.ExecutionRefExpr contains the expression that evaluates to
a reference to the execution on which the Wait for Execution operation
waits.
•
Step.SpecifyBySeqCall contains the Specify By Sequence Call
setting for the Wait for Thread or the Wait for Execution operation.
Thread Priority
Use the Thread Priority step to boost or lower the priority of a thread so that
it receives more or less CPU time than other threads.
When you use this step you must take care to not starve important threads
of CPU time by boosting the priority of another thread too high. When you
alter a thread priority, it is good practice to save the previous priority value
and restore it once your thread no longer requires the altered priority value.
Be aware that setting a thread to Time Critical priority can cause the user
interface for your application to become unresponsive.
© National Instruments Corporation
11-53
TestStand User Manual
Chapter 11
Synchronization Step Types
Set Thread Priority Operation
Use the Set Thread Priority operation to raise or lower the priority of the
current thread, as shown below.
Figure 11-33. Set Thread Priority Operation for Thread Priority
Configuration Dialog Box
The Set Thread Priority operation contains the following controls:
•
TestStand User Manual
New Thread Priority—Use this control to specify a numeric value
expression that indicates the new priority for the thread. If you specify
the priority as a numeric constant, the name that corresponds to that
priority is shown in the indicator control below this control. Use the
drop-down list for this control to specify a priority constant for one of
the valid priority settings. The valid values are –15 = Idle, –2 = Low,
–1 = Below Normal, 0 = Normal, 1 = Above Normal, 2 = High, and
15 = Time Critical.
11-54
ni.com
Chapter 11
Synchronization Step Types
Get Thread Priority Operation
Use the Get Thread Priority operation, as shown below, to get the current
priority setting for the current thread.
Figure 11-34. Get Thread Priority Operation for Thread Priority
Configuration Dialog Box
The Get Thread Priority operation contains the following controls:
•
© National Instruments Corporation
Location to Store Thread Priority—Use this control to specify a
location to store a numeric value that is the priority setting for the
current thread. When you set the thread priority for a sequence, it is a
good idea to save the previous priority in the Setup step group and
restore the priority in the Cleanup step group.
11-55
TestStand User Manual
Chapter 11
Synchronization Step Types
Step Properties
Figure 11-35 shows the step properties for the Thread Priority step type.
Figure 11-35. Thread Priority Step Properties
The Thread Priority step type defines the following step properties in
addition to the common custom properties.
•
Step.Operation contains a value that specifies the operation the
step is set to perform. The valid values are 0 = Set Thread Priority,
1 = Get Thread Priority.
•
Step.SetPriorityExpr specifies the thread priority expression for
the Set Thread Priority operation.
•
Step.GetPriorityExpr specifies the location to store the thread
priority for the Get Thread Priority operation.
Batch Synchronization
Use Batch Synchronization steps to define sections of a sequence in which
to synchronize multiple threads that belong to one batch. Typically, you use
these steps in a sequence that you execute using the Batch process model.
Synchronized Sections
You use Batch Synchronization steps to define synchronized sections by
placing a step at the beginning and end of a section of steps in a sequence
and specifying an Enter operation for the beginning step and an Exit
operation for the ending step. You must place the Enter and Exit steps in
the same sequence, but you do not have to place them in the same step
group. The three types of synchronized sections are serial section, parallel
TestStand User Manual
11-56
ni.com
Chapter 11
Synchronization Step Types
section, and one-thread-only section. All synchronized sections have the
following properties in common:
•
Each thread in a batch that enters a synchronized section blocks at the
Enter step until all other threads in the batch arrive at their respective
instances of the Enter step.
•
Each thread in a batch that reaches the end of the synchronized section
blocks at the Exit step until all other threads in the batch arrive at their
respective instances of the Exit step.
Serial Sections
You use a serial section to ensure that each thread in the batch executes the
steps in the section sequentially and in the order that you specify when you
create the batch. When all threads in a batch arrive at their respective
instances of an Enter step for a serial section, TestStand releases one thread
at a time in ascending order according to the Order Numbers you assign to
the threads when you add them to the batch using the Batch Specification
step. As each thread reaches the Exit step for the section, the next thread in
the batch proceeds from the Enter step. After all the threads in the batch
arrive at the Exit step, they exit the section together. Refer to the Batch
Specification section in this chapter for more information on Order
Numbers.
Parallel Sections
When all threads in a batch arrive at their respective instances of an Enter
step for a parallel section, TestStand releases all the threads at once. Each
thread that arrives at the Exit step for the section blocks until all threads in
the batch reach that step.
One-Thread-Only Sections
You use a one-thread-only section to specify that only one thread in the
batch executes the steps in the section. Typically, you use this section type
to perform an operation that applies to the batch as a whole such as raising
the temperature in a test chamber. When all threads in a batch arrive at their
respective instances of an Enter step for a one-thread-only section,
TestStand releases only the thread with the lowest Order Number. When
that thread arrives at the Exit step for the section, all remaining threads in
the batch jump from the Enter step to the Exit step, skipping the steps
within the section. The threads in the batch then exit the section together.
© National Instruments Corporation
11-57
TestStand User Manual
Chapter 11
Synchronization Step Types
Mismatched Sections
Sections become mismatched when all threads in a batch are blocked at an
Enter or an Exit operation, but they are not all blocked at the same Enter or
Exit operation. This can occur when a sequence has a conditional flow of
execution due to preconditions, post actions, or other flow control
operations.
When TestStand detects mismatched sections, it handles them as follows:
•
The thread that is at the Enter or Exit step that appears earliest in the
hierarchy of sequences and subsequences proceeds as if all threads in
the batch are at the same step.
•
If multiple Enter and Exit operations are equally early in the hierarchy
of sequences and subsequences, Enter operations proceed first.
Nested Sections
Nesting of sections can occur either within the same sequence or as a result
of calling a subsequence inside of a synchronized section when the
subsequence also contains a synchronized section. When you nest one
section inside another, TestStand honors the inner section if the type of the
outer section is Serial or Parallel. For example, if you nest one serial section
in another serial section, each thread that enters the outer section proceeds
only until the Enter step of the inner section and then waits for the other
threads to reach the same step.
TestStand ignores the inner section if the type of the outer section is
One-Thread-Only.
You can create a synchronized section around a single step using the
Synchronization tab of the Step Properties dialog box rather than by using explicit Batch
Synchronization steps.
Note
Requirements for Using Enter and Exit Operations
TestStand generates a run-time error if your Enter and Exit operations do
not adhere to the following requirements:
TestStand User Manual
•
Each Exit operation must match the most nested Enter operation.
•
A thread cannot reenter a section it is already within.
•
You must exit a section in the same sequence that you enter it.
11-58
ni.com
Chapter 11
Synchronization Step Types
Enter Synchronized Section Operation
Use the Enter Synchronized Section operation to mark the beginning of a
synchronized section and to define the type of synchronization for that
section.
Figure 11-36. Enter Operation for Batch Synchronization Step
Configuration Dialog Box
The Enter operation contains the following controls:
•
Section Name—Use this control to specify a name for the
synchronized section or leave this control blank if you want TestStand
to generate a unique name for you based on the step name.
•
Section Type—Use this control to specify the type of synchronized
section.
•
Timeout Enabled, Timeout Expression, Timeout Causes
Run-Time Error—Use these controls to specify a timeout and
timeout behavior for when a thread must wait at the Enter step. If a
timeout occurs, the property Step.Result.TimeoutOccurred is
set to True.
© National Instruments Corporation
11-59
TestStand User Manual
Chapter 11
Synchronization Step Types
Exit Synchronized Section Operation
Use the Exit Synchronized Section operation to mark the end of a
synchronized section.
Figure 11-37. Exit Operation for Batch Synchronization Step Configuration Dialog Box
The Exit operation contains the following controls:
TestStand User Manual
•
Section Name—Use this control to specify the name of the
synchronized section to exit, or leave this control blank to refer the
most nested section.
•
Timeout Enabled, Timeout Expression, Timeout Causes
Run-Time Error—Use these controls to specify a timeout and
timeout behavior for when a thread must wait at the Exit step. If a
timeout occurs, the property Step.Result.TimeoutOccurred is
set to True.
11-60
ni.com
Chapter 11
Synchronization Step Types
Step Properties
Figure 11-38 shows the step properties for the Batch Synchronization step
type.
Figure 11-38. Batch Synchronization Step Properties
The Batch Synchronization step type defines the following step properties
in addition to the common custom properties.
•
Step.Result.TimeoutOccurred is set to True if an Enter or Exit
operation times out.
•
Step.TimeoutEnabled contains the timeout enabled setting for the
Enter or Exit operation.
•
Step.TimeoutExpr contains the timeout expression, in seconds, for
the Enter or Exit operation.
•
Step.ErrorOnTimeout contains the Timeout Causes Run-Time
Error setting for the Enter or Exit operation.
•
Step.Operation contains a value that specifies the operation the
step performs. The valid values are 0 = Enter Synchronized Section,
1 = Exit Synchronized Section.
•
Step.SectionNameExpr contains the expression that specifies the
name of the section for the Enter or Exit operation.
•
© National Instruments Corporation
Step.SectionType contains a value that specifies the type of section
the Enter operation defines. The valid values are 1 = Serial,
2 = Parallel, 3 = One Thread Only.
11-61
TestStand User Manual
Chapter 11
Synchronization Step Types
Batch Specification
When you write a process model, you can use Batch Specification steps to
define a group of threads where each thread in the group runs an instance
of the client sequence. You define a group so that you can perform batch
synchronization operations on the threads in the group. The TestStand
Batch process model uses Batch Specification steps to create a batch that
contains a thread for each test socket. For more information on the Batch
process model refer to the Batch Model section of Chapter 14, Process
Models. For more information on batch synchronization, see the section on
the Batch Synchronization step type in this chapter.
Create Operation
To create a reference to a new or existing batch object, insert a Batch
Specification step and select Configure Batch Specification from the
context menu for the step.
Figure 11-39. Create Operation for Batch Specification Step Configuration Dialog Box
TestStand User Manual
11-62
ni.com
Chapter 11
Synchronization Step Types
The Create operation contains the following controls:
•
Batch Name Expression—Use this control to specify a unique name
for the synchronization object using a string literal or an expression
that evaluates to a string. Refer to the Common Attributes of
Synchronization Objects section of this document for more
information on synchronization object names.
•
Already Exists—Use this control to specify a location to store a
Boolean value that indicates whether the synchronization object
already exists.
•
Batch Reference Lifetime—Use this control to specify the lifetime of
the reference to the synchronization object.
•
Default Batch Synchronization—Use this control to specify the
default method of batch synchronization to use with the batch object.
This setting affects the per step batch synchronization setting when the
Batch Synchronization setting on the Synchronization tab of a step’s
Step Properties dialog box is set to Use Model Setting or Use Sequence
File Setting and the sequence file’s Batch Synchronization setting is set
to Use Model Setting. Per step batch synchronization treats each step
as if it is within its own synchronized section of the type you specify.
Add Thread Operation
Use the Add Thread operation to add a TestStand thread to your group of
batch threads as shown below.
© National Instruments Corporation
11-63
TestStand User Manual
Chapter 11
Synchronization Step Types
Figure 11-40. Add Thread Operation for Batch Specification Step
Configuration Dialog Box
The Add Thread operation contains the following controls:
TestStand User Manual
•
Batch Name or Reference Expression—Use this control to specify
the batch on which to perform the operation. You can specify the batch
by name or by the ActiveX reference you receive when you create the
batch with the Using ActiveX Reference lifetime option.
•
ActiveX Reference to Thread—Use this control to specify a thread
object to add to the batch. A thread can belong to only one batch at a
time. Adding a thread to a batch removes the thread from its previous
batch, if any. Additionally, when a thread terminates, it removes itself
from the batch.
•
Order Number—Use this control to specify the order in which
threads enter synchronized sections. Threads with a lower order
number enter a synchronized section before threads with a higher order
number.
11-64
ni.com
Chapter 11
Synchronization Step Types
Remove Thread Operation
Use the Remove Thread operation to remove a TestStand thread from a
group of batch threads as shown below.
Figure 11-41. Remove Thread Operation for Batch Specification Step
Configuration Dialog Box
The Remove Thread operation contains the following controls:
•
© National Instruments Corporation
ActiveX Reference to Thread—Use this control to specify the thread
you wish to remove from its batch.
11-65
TestStand User Manual
Chapter 11
Synchronization Step Types
Get Status Operation
You can use the Get Status operation to obtain information about the
current state of the batch as shown below.
Figure 11-42. Get Status Operation for Batch Specification Step
Configuration Dialog Box
The Get Status operation contains the following controls:
TestStand User Manual
•
Batch Name or Reference Expression—Use this control to specify
the batch on which to perform the operation. You can specify the batch
by name or by the ActiveX reference you receive when you create the
batch with the Using ActiveX Reference lifetime option.
•
Batch Exists?—Use this control to specify a location to store a
Boolean value that indicates whether the batch already exists.
•
Number of Threads Waiting at Synchronized Sections—Use this
control to specify a location to store a numeric value that indicates the
number of threads waiting to enter or exit synchronized sections.
11-66
ni.com
Chapter 11
Synchronization Step Types
•
Number of Threads in Batch—Use this control to specify a location
to store the numeric value that is the number of threads that are
currently part of the batch.
•
Default Batch Synchronization—Use this control to specify a
location to store a numeric value that specifies the default method of
batch synchronization that the batch uses.
Step Properties
Figure 11-43 shows the step properties for the Batch Specification step
type.
Figure 11-43. Batch Specification Step Properties
The Batch Specification step type defines the following step properties in
addition to the common custom properties.
•
Step.Operation contains a value that specifies the operation the
step performs. The valid values are 0 = Create, 1 = Add Thread,
2 = Remove Thread, 3 = Get Status.
•
Step.NameOrRefExpr contains the Name expression for the Create
operation and the Name or Reference expression for other batch
operations.
•
Step.Lifetime contains a value that specifies the lifetime for the
Create operation. The valid values are 0 = Same as Sequence,
1 = Same as Thread, 2 = Use ActiveX Reference, 3 = Same as
Execution.
© National Instruments Corporation
11-67
TestStand User Manual
Chapter 11
Synchronization Step Types
•
Step.LifetimeRefExpr contains the ActiveX reference expression
for the batch lifetime when you set the lifetime to Use ActiveX
Reference.
•
Step.AlreadyExistsExpr contains the Already Exists expression
for the Create operation or the Batch Exists expression for the Get
Status operation.
•
Step.ThreadRefExpr contains the ActiveX Reference to Thread
expression for the Add Thread and Remove Thread operations.
•
Step.OrderNumExpr contains the Order Number expression for the
Add Thread operation.
•
Step.NumThreadsWaitingExpr contains the Number of Threads
Waiting at Synchronized Sections expression for the Get Status
operation.
•
Step.NumThreadsInBatchExpr contains the Number of Threads in
Batch expression for the Get Status operation.
•
Step.DefaultBatchSyncExpr contains the Default Batch
Synchronization expression for the Create operation.
•
TestStand User Manual
Step.DefaultBatchSyncOutExpr contains the Default Batch
Synchronization expression for the Get Status operation.
11-68
ni.com
12
User Management
This chapter describes TestStand user management, the User Manager
window, and how to add users and set user privileges.
The TestStand engine maintains a list of users, their login names and
passwords, and their privileges. This capability of the TestStand engine is
called the user manager. TestStand limits the sequence editor and operator
interfaces functionality depending on the privilege settings that the user
manager stores for the user who is currently logged in.
When you launch the sequence editor or any of the operator interfaces that
come with TestStand, they display the Login dialog box by calling the
LoginLogout front-end callback sequence. The LoginLogout sequence
calls the DisplayLoginDialog method of the Engine class, which
displays the actual dialog box.
The User Manager tab of the Station Options dialog box specifies whether
TestStand enforces user privileges and specifies the location of the user
manager configuration file. Refer to the Configure Menu section in
Chapter 4, Sequence Editor Menu Bar, for more information on these
options.
The TestStand User Manager is designed to help you implement policies and
procedures concerning the use of your test station. It is not a security system and it does
not inhibit or control the operating system or third-party applications. You must use the
system-level security features that are available with your operating system to secure your
test station computer against unauthorized use.
Note
User Manager Window
In the TestStand sequence editor, you use the User Manager window to
view and edit the user list and the privileges of each user. To open the User
Manager window, select View»User Manager. In the User Manager
window, use the View ring control at the top right to access the list of users
or to access the list of types that TestStand uses to store user privileges.
© National Instruments Corporation
12-1
TestStand User Manual
Chapter 12
User Management
Users View
To access the list of users, select Users from the View ring control. You
can use this view to add new users or to modify the privileges and other
properties of existing users. Figure 12-1 shows the Users view in the User
Manager window.
Figure 12-1. Users View in the User Manager Window
The Users view has two tabs: User List and Profiles. The User List tab
contains a list of current users. Each entry contains properties that define
the login name, the login password, and the TestStand privileges. TestStand
stores these properties in User containers, which have the User standard
data type.
The Profiles tab contains a list of profiles that you can apply when you
create new users. A profile defines a set of values for the properties in the
User data type. When you create a new user, you can initialize the values
for a new user from a profile. If you make changes to the values in a profile,
your changes do not affect the privileges for users who are already in the
user list. TestStand defines four default profiles: operator, technician,
developer, and administrator.
TestStand User Manual
12-2
ni.com
Chapter 12
User Management
User List Tab
The User List tab contains two panes. The tree view in the left pane allows
you to browse the custom properties for each user. The list view in the right
pane displays the contents of the node you select in the tree view.
The columns in the list view vary according to whether the list view
displays users or user properties. When the list view displays users, the
columns appear as in Figure 12-1. When the list view displays user
properties, the columns appear as in Figure 12-2.
Figure 12-2. User List Tab for Users View
User List Context Menu
A context menu appears when you right click the tree view or list view. The
items in the context menu vary depending on the whether you right click
the following sites:
•
A user
•
A user property
•
The background of the tree view
•
The background of the list view
The User List tab context menu contains the common editing and
navigation commands, and the following additional commands.
© National Instruments Corporation
12-3
TestStand User Manual
Chapter 12
User Management
Insert User
You use the Insert User command to add a new user to the user list.
Figure 12-3 shows the New User dialog box that the command displays.
Figure 12-3. Insert New User Dialog Box
The Login Name and the Password controls specify a case-sensitive login
name and password. You can use the Full Name and Comment controls to
add additional information about the user. The User Profile ring control
selects a profile, which defines an initial set of privilege settings to give
the new user.
TestStand User Manual
12-4
ni.com
Chapter 12
User Management
Properties
You can use the Properties command to edit an existing user or a user
property. Figure 12-4 shows the Edit User dialog box that the command
displays when you invoke it on a user.
Figure 12-4. Edit User Dialog Box
Edit User Type
The Edit User Type command switches from the Users view to the Types
view in the User Manager window and displays the User standard
data type.
Profiles Tab
The Profiles tab contains two panes. The tree view in the left pane allows
you to browse the custom property values for each profile. The list view in
the right pane displays the contents of the item you select in the tree view.
The columns in the list view vary according to whether the list view
displays profiles or profile properties.
© National Instruments Corporation
12-5
TestStand User Manual
Chapter 12
User Management
Figure 12-5 shows the Profiles tab in the Users view.
Figure 12-5. Profile Tab in the Users View
The tree view in Figure 12-5 shows the set of privilege values that each of
the profiles define. The User standard data type defines the set of privilege
properties. The privileges are grouped in categories such as Operate and
Debug. Each profile defines values for each of the privilege settings. Each
user also has these privilege properties. When you create a new user,
TestStand copies the privilege setting values from the profile you choose
and applies them to the new user.
Each group of privileges has a Boolean GrantAll subproperty. When the
GrantAll property is set to True, it overrides the values of each privilege
in the group and any subgroups. If the Boolean is set to False, the privilege
settings are honored.
Profiles Tab Context Menu
To access a context menu, you right click the tree view or list view. The
items in the context menu vary depending on whether you right click the
following sites:
TestStand User Manual
•
A user
•
A user property
12-6
ni.com
Chapter 12
•
The background of the tree view
•
The background of the list view
User Management
The Profiles tab context menu contains the common editing and navigation
commands, and the following additional commands.
Insert Profile
You use the Insert Profile command to add a new profile to the profile list.
Edit User Type
The Edit User Type command switches from the Types view to the Users
view in the User Manager window and displays the User standard data
type.
Types View
To access a list of the types that the User Manager uses, select Types from
the View ring control. You can use this view to add new properties to the
User data type, or to create your own custom data types to add to the
User data type. Figure 12-6 shows the Types view for the User Manager
Window. The Types view has two tabs, Standard Data Types and Custom
Data Types.
Figure 12-6. Types View in the User Manager Window
© National Instruments Corporation
12-7
TestStand User Manual
Chapter 12
User Management
User Standard Data Types
The Standard Data Types tab contains the standard data types that the User
Manager uses. TestStand stores the properties for each user in a User
container, which has the User standard data type.
Figure 12-7 shows the tree view of the User standard data type.
Figure 12-7. User Standard Data Type
Table 12-1 lists the properties in the User data type. Subproperties appear
in the table indented under the properties they belong to. For example, you
reference the Execute subproperty as
User.Privileges.Operate.Execute.
Table 12-1. Description of Subproperties in User Data Type
Subproperty
Description
LoginName
User login name.
Password
Encrypted user login password.
FullName
Descriptive user name.
Privileges.GrantAll
User has all TestStand privileges. When True,
TestStand ignores all specific privilege settings in
the Operate privilege group.
Operate.GrantAll
User can perform all Operate privileges. When
True, TestStand ignores all specific privilege
settings in the Operate privilege group.
Execute
User can initiate an execution.
Terminate
User can terminate an execution.
TestStand User Manual
12-8
ni.com
Chapter 12
User Management
Table 12-1. Description of Subproperties in User Data Type (Continued)
Subproperty
Abort
Debug.GrantAll
Description
User can abort an execution.
User can perform all Debug privileges. When
True, TestStand ignores all privilege settings in the
Debug privilege group.
ControlExecFlow
User can control the flow of execution by setting
breakpoints, single-stepping, and using the Set
Next Step and Run Mode commands.
SinglePass
User can use the Single Pass execution entry point.
RunAnySequence
User can run an individual sequence without using
execution entry points.
RunSelectedTests
User can run selected tests from a sequence using
the Run Selected Steps command.
LoopSelectedTests
User can run selected tests from a sequence in a
loop using the Loop on Selected Steps command.
EditStationGlobals
User can create and modify globals in the Station
Globals Window.
Develop.GrantAll
User can perform all Develop privileges. When
True, TestStand ignores all privilege settings in the
Develop privilege group.
EditSequenceFiles
User can edit sequence files, sequences, and steps.
SaveSequenceFiles
User can save sequence files.
EditWorkspace
User can edit workspaces and projects.
UseSourceControl
User can perform source code control operations.
Configure.GrantAll
EditTypes
© National Instruments Corporation
User can perform all Configure privileges. When
True, TestStand ignores all privilege settings in the
Configure privilege group.
User can create and modify standard data types,
custom data types, and step types.
12-9
TestStand User Manual
Chapter 12
User Management
Table 12-1. Description of Subproperties in User Data Type (Continued)
Subproperty
ConfigEngine
Description
User can configure the engine as follows:
•
Customize the Tools menu.
•
Modify engine files in the Edit Paths dialog box.
•
Modify settings on the Search Directories
dialog box.
•
Modify settings on all tabs of the Station
Options dialog box, except the User Manager
tab.
ConfigAdapter
User can configure adapters in the Adapter
Configuration dialog box.
ConfigApp
User can modify the settings on the Preferences tab
of the Sequence Editor Options dialog box.
ConfigReport
User can modify the settings in the Report Options
dialog box.
ConfigDatabase
User can modify the settings in the Database
Options dialog box.
ConfigModel
User can modify the settings in the Model Options
dialog box.
EditUsers
User can add and modify users in the User Manager
Window and the options on the User Manager tab of
the Station Options dialog box.
EditProcessModelFiles
User can edit process model files.
Adding New Properties and Privileges to the User Data Type
You can add new subproperties to the User data type. For example,
you might want to add an ID string property for each user, or you
might want to add a ConfigHardware Boolean property in the
User.Privilege.Configure group to specify whether a user has
the privilege to configure special hardware on the station.
You also can use the Custom Data Types tab to define your own data types,
which you can then add to the User standard data type. Refer to the Using
Data Types section in Chapter 9, Types, for more information on data types
and editing data types.
TestStand User Manual
12-10
ni.com
Chapter 12
User Management
Verifying User Privileges
This section discusses how to verify that a user has a specific privilege.
Accessing Privilege Settings for the Current User
If you want to verify in an expression that the current user has a specific
privilege, call the CurrentUserHasPrivilege expression function. If
you want to verify the privilege in a code module, call the
CurrentUserHasPrivilege method of the Engine class in the
TestStand API.
When you call the CurrentUserHasPrivilege expression function or
method, you must specify the property name of the privilege as a string
argument. The current user has a privilege if the property is True or if the
GrantAll property in any enclosing privilege group is True. For example,
a user has the privilege to terminate an execution if the
User.Privileges.Configure.Terminate property is True, if the
User.Privileges.Configure.GrantAll property is True, or if the
User.Privileges.GrantAll property is True. The
CurrentUserHasPrivilege function returns True if the current user
has the privilege or you have disabled privilege checking.
You can pass any subset of the property name tree structure to the
CurrentUserHasPrivilege function. For example, you can use either
of the following two expressions to determine whether the current user has
the privilege to terminate an execution:
•
CurrentUserHasPrivilege("Terminate")
•
CurrentUserHasPrivilege("Configure.Terminate")
You can pass "*" as the string argument to CurrentUserHasPrivilege
to determine whether a user is currently logged in. Refer to Chapter 8,
Sequence Context and Expressions, for more information on using
expressions.
The CurrentUserHasPrivilege method behaves identically to the
expression function, except that it takes additional parameters. Refer to the
TestStand Programmer Help for more information.
© National Instruments Corporation
12-11
TestStand User Manual
Chapter 12
User Management
Accessing Privilege Settings for Any User
The TestStand API has methods that allow you to access the privileges of
any user. You use the GetUser method of the Engine class to return a
User object. You can then use the HasPrivilege method in the User
class to inspect the value of a specific privilege. The HasPrivilege
method behaves identically to the CurrentUserHasPrivilege
expression function. Refer to the TestStand Programmer Help for more
information.
TestStand User Manual
12-12
ni.com
13
Module Adapters
This chapter describes the module adapters that come with TestStand.
Overview
The TestStand engine uses a module adapter to invoke the code in a step
module. Each module adapter supports one or more specific types of
code modules. The different types of code modules include TestStand
sequences, LabVIEW VIs, HTBasic subroutines, ActiveX Automation
Objects, C functions in DLLs, and C functions in source files, object files,
or library modules that you create in LabWindows/CVI or other compilers.
A module adapter knows how to load and call a code module, how to pass
parameters to a code module, and how to return values and status from a
code module.
When you edit a step that uses a module adapter, TestStand relies on the
adapter to display a dialog box in which you specify the code module for
the step and also specify any parameters to pass when you invoke the code
module. This dialog box is called the Specify Module dialog box. The
actual title of the dialog box is different for the different adapters.
Table 13-1 lists the names of the various dialog boxes that appear when you
either click the Specify Module button in the Step Properties dialog box or
when you right-click on a step and select the Specify Module menu item.
TestStand stores the name and location of the code module, the parameter
list, and any additional options as properties of the step. TestStand hides
most of these adapter-specific step properties.
If the module adapter is specific to an application development
environment (ADE), the adapter knows how to open the ADE, how to
create source code for a new code module in the ADE, and how to display
the source for an existing code module in the ADE. Some adapters support
stepping into the source code in the ADE while you execute the step from
the TestStand sequence editor.
© National Instruments Corporation
13-1
TestStand User Manual
Chapter 13
Module Adapters
Table 13-1. Specific Names of the Specify Module Dialog Boxes
Module Adapter
Specify Module
Dialog Box That
Appears
Description
ActiveX
Automation
Adapter
Edit Automation
Call dialog box
Allows you to call methods and access the properties
of an ActiveX object.
C/CVI Standard
Prototype Adapter
Edit C/CVI Module
Call dialog box
Allows you to call any C function that has the
TestStand standard C parameter list. The function can
be in an object file, library file, or DLL. It also can be
in a source file when you are using the
LabWindows/CVI development environment and the
source file is part of a LabWindows/CVI project.
DLL Flexible
Prototype Adapter
Edit DLL Call
dialog box
Allows you to call C functions in a DLL with a variety
of parameter types.
LabVIEW
Standard Prototype
Adapter
Edit LabVIEW VI
Call dialog box
Allows you to call any LabVIEW VI that has the
TestStand standard G parameter list.
TestStand
Sequence Adapter
Edit Sequence Call
dialog box
Allows you to call subsequences with parameters.
HTBasic Adapter
Edit HTBasic
Subroutine Call
Allows you to call HTBasic subroutines with no
parameters. TestStand and HTBasic exchange data
using the TestStand API. TestStand supports HTBasic
version 7.2 or later.
TestStand User Manual
13-2
ni.com
Chapter 13
Module Adapters
Configuring Adapters
You can configure some of the module adapters. To configure these
module adapters, select Configure»Adapters from the TestStand main
menu. Figure 13-1 shows the Adapter Configuration dialog box that the
Adapters command displays.
Figure 13-1. Adapter Configuration Dialog Box
The Selected Adapter ring control specifies the module adapter that a new
step you create uses. The selected adapter applies only to step types that can
use any module adapter, such as the Action, Numeric Limit Test, Multiple
Numeric Limit Test, String Value Test, and Pass/Fail Test step types. Refer
to the discussion on the Insert Step command in the Step Group Context
Menu section of Chapter 5, Sequence Files, for more information on how
TestStand uses the selected adapter when you insert a step.
To configure an adapter, select an adapter from the Configurable Adapters
list and click the Configure button. The Configure button displays an
adapter-specific dialog box for configuring the adapter. Refer to the
adapter-specific sections in this chapter for information on the specific
configuration options for each adapter.
© National Instruments Corporation
13-3
TestStand User Manual
Chapter 13
Module Adapters
Source Code Templates
With some module adapters, you can use a source code template to generate
the source code shell for a step module. The template files are different for
each step type and each module adapter. A step type can define multiple
source code templates, each for a particular adapter/step type combination.
Currently, you can use source code templates with only the LabVIEW, the
DLL Flexible Prototype, the C/CVI Standard Prototype Adapters, and the
HTBasic Adapters.
For each module adapter that supports source code templates, the Specify
Module dialog box displays a command button for creating source code for
the step that is based on a template. If more than one template is available
for the adapter/step type combination that you use to create the step, the
adapter prompts you to select from a list of the templates as shown in
Figure 13-2. If only one template is available, the adapter uses that template
without prompting you.
Figure 13-2. Choose Code Template Dialog Box
TestStand comes with default templates for each of the built-in step types.
You can create additional templates for built-in step types. When you create
a new step type, you can create one or more source code templates for it.
Refer to the Using Step Types section in Chapter 9, Types, for more
information on creating source templates for step types.
TestStand User Manual
13-4
ni.com
Chapter 13
Module Adapters
DLL Flexible Prototype Adapter
The DLL Flexible Prototype Adapter allows you to call C functions in a
DLL with a variety of parameter types. You can create the DLL code
module with LabWindows/CVI, Visual C++, or any other ADE that creates
a C-language DLL.
Configuring the DLL Adapter
The DLL Adapter Configuration dialog box contains the following
controls:
•
Show Function Parameters in Function Description—Specifies
that the description for a step displays the function and its parameters.
When you disable the option, the description displays the function and
the DLL name.
•
Default Struct Packing—Specifies how the DLL Adapter packs
structure parameters it passes. Set the packing options to match the
default for structure packing in your DLL development environment.
Specifying a DLL Adapter Module
The Specify Module dialog box for the DLL Flexible Prototype Adapter
is called the Edit DLL Call dialog box. The Edit DLL Call dialog box
contains a Module tab and a Source Code tab. The Module tab specifies
the code module that the adapter executes for the step and specifies
parameter information for the module. The Source Code tab contains
additional information that TestStand requires when you want to create
and edit a code module in another application program.
© National Instruments Corporation
13-5
TestStand User Manual
Chapter 13
Module Adapters
Module Tab
Figure 13-3 shows the Module tab of the Edit DLL Call dialog box.
Figure 13-3. Specify Module Dialog Box for DLL Flexible
Prototype Adapter—Module Tab
The Module tab can contain the following controls:
•
TestStand User Manual
DLL Pathname—Specifies the DLL file that contains the function
that the step calls. You can specify an absolute or relative pathname for
the DLL file. Relative pathnames are relative to the TestStand search
directory paths.
13-6
ni.com
Chapter 13
Module Adapters
You can customize the TestStand search directory paths with the
Search Directories command in the Configure menu of the sequence
editor menu bar.
•
Function—Selects the function in the DLL that the step calls. If the
DLL file contains a type library, the adapter automatically populates
the function ring control with all the function names in the type library.
Otherwise, the adapter reads the DLL file and finds the names of all
functions that the DLL exports. If a DLL type library contains links to
a help file for a function, you can click the ? button to access the help.
•
Calling Convention—Specifies the calling convention of the
function.
•
Edit Prototype—Enables editing of the function prototype. The
adapter clears this control when it reads a function prototype from the
DLL type library. Checkmark the control to enable manual editing of
the function prototype.
•
Parameter—Specifies the data type of the return value of each
parameter.
For each parameter you also specify the value or expression to pass.
If a DLL file contains a type library, the adapter queries the type library
for the parameter list information and displays it in the parameter
section automatically when you select a new function in the Function
ring control. At any time, you can request the adapter to query the type
library for the currently selected function by clicking the Reload
Prototype button. If the DLL does not have type library information,
you must enter parameter information manually.
The Parameter ring control lists a symbolic name for each parameter
and a special entry for the return value. When you select a parameter
in the ring control, the type of controls in the Parameter section change.
To insert or remove parameters, click the New or Delete buttons. To
rearrange the parameter order, select the parameter you want to move
and select the Move Up or Move Down button.
•
© National Instruments Corporation
Category—Specifies a group of data types to list in the DataType
control. The categories include Numeric, String, Array, Object, and
Struct. The Data Type control specifies the data type of the function
parameter.
13-7
TestStand User Manual
Chapter 13
Module Adapters
Numeric Parameters
Table 13-2 shows the Numeric category data types.
Table 13-2. TestStand Numeric Data Types
Numeric Data Type Setting
Equivalent C Data Type
Signed 8-big Integer
char
Unsigned 8-bit Integer
unsigned char
Signed 16-bit Integer
short
Unsigned 16-bit Integer
unsigned short
Signed 32-bit Integer
long
Unsigned 32-bit Integer
unsigned long
32-bit Real Number
float
64-bit Real Number
double
Pass by Value or by Reference
When you select the Numeric category for a parameter, the adapter displays
the Pass control. This control specifies whether TestStand passes the value
of the argument you specify in the Value control, or passes a pointer to the
argument.
If you choose to pass a pointer, the argument you specify in the Value
control must be the name of a station global variable, sequence file global
variable, sequence parameter, sequence local variable, or step property.
When you select the Numeric category for the return value, you can leave
the Value control empty or specify the name of a station global variable,
sequence file global variable, sequence parameter, sequence local variable,
or step property.
You can pass NULL to a pointer parameter of type Number, String, Array, or
Structure by passing an empty ActiveX reference or the constant Nothing. Do not pass the
constant 0.
Note
TestStand User Manual
13-8
ni.com
Chapter 13
Module Adapters
Result Actions
The adapter displays the Result Action ring control and the Set Error.Code
to Value checkbox for return values and parameters you pass by pointer.
Depending on the settings of these controls, TestStand can set the
Error.Occurred and Error.Code properties of the step automatically
based on the value in the numeric argument when the function returns.
You use the Result Action control to configure TestStand to set the
Error.Occurred property to True when the return value or parameter
value after the call is greater than zero, less than zero, equal to zero, or not
equal to zero. You use the Set Error.Code to Value checkbox to request
TestStand to assign the output value of the argument to the Error.Code
property.
Enumeration Parameters
When you select a numeric parameter that accepts an enumerated type from
a DLL that has a type library, the Value Expression control becomes a
combo box from which you can select elements of the enumeration. You
also can enter an enumeration symbol or its corresponding numeric value
directly into the Value Expression control or the Function Call control.
String Parameters
In general, when you use string parameters, use one of the buffer types if
you want the DLL function to be able to change the contents of the
argument in TestStand. Use the C String or Unicode String type if the DLL
function does not modify the argument.
Table 13-3 shows the String category data types.
Table 13-3. TestStand String Data Types
String Data
Type Setting
© National Instruments Corporation
Equivalent C Data Type
C String
const char *
C String Buffer
char[]
Unicode String
const wchar_t * or const unsigned
short *
Unicode String Buffer
wchar_t[] or unsigned short[]
13-9
TestStand User Manual
Chapter 13
Module Adapters
You can pass a string literal, a TestStand string property, or an expression
that evaluates to a string as the value of a string parameter.
If you specify one of the string buffer types, the adapter copies the contents
of the string argument and a trailing zero element into a temporary buffer
before calling the DLL function. You specify the minimum size of the
temporary buffer in the Number of Elements control. If the string value is
longer than the buffer size you specify, the adapter resizes the temporary
buffer so that it is large enough to hold contents of the string argument and
the trailing zero element. After the DLL function returns, TestStand copies
the value that the function writes into the temporary buffer back to the
string argument.
If you specify the C String or Unicode String type, the adapter passes the
address of the actual string directly to the function without copying it to a
buffer. The code module must not change the contents of the string.
Array Parameters
The Array category contains the same data types as the numeric category.
You can specify an array that contains elements that have any numeric type.
TestStand reformats the contents of the numeric array argument into a
temporary array that contains elements that have the data type you select.
You use the Number of Elements control to specify the number of
elements in the temporary array. If the array argument has fewer elements
than the temporary array, the adapter fills the remaining elements in the
temporary array with zeroes. If the array argument has more elements than
the temporary array, TestStand fills the temporary array with the maximum
number of elements that can fit.
If you want the number of elements in the temporary array to always match
the number of elements in the array argument, specify a negative value in
the Number of Elements control. This specification is equivalent to the
following expression:
GetNumElements (arrayArgument)
If you specify a zero value in the Number of Elements control, TestStand
passes the address of a temporary array with no elements to the DLL
function.
When the DLL function returns, TestStand fills the contents of the array
argument with the contents of the temporary array. If the array argument
has fewer elements than the temporary array, TestStand stores only the
number of elements from the temporary array that fit into the array
TestStand User Manual
13-10
ni.com
Chapter 13
Module Adapters
argument. If the array argument has more elements than the temporary
array, TestStand stores all the elements of the temporary array in the array
argument and makes no changes to the remaining elements of the array
argument.
Object Parameters
The Object category includes the ActiveX Automation IDispatch
Pointer, ActiveX Automation IUnknown Pointer, and LabWindows/CVI
ActiveX Automation Handle data types. You can use these types to pass a
reference to a built-in or custom TestStand object to the DLL function. You
also can use these types to pass the value of an ActiveX reference property
to the DLL function.
If you specify an ActiveX reference property as the value of an object
parameter, TestStand passes the value of the property. Otherwise, TestStand
passes a reference to the property object you specify. The DLL function can
use the property object reference in conjunction with the TestStand API to
get and set the values of properties in the object, to add properties to the
object, and so on. Refer to the TestStand API Overview in the TestStand
Programmer Help for more information on using object references in code
modules.
Structure Parameters
You can pass variables and properties that you create with named data
types to function parameters that accept structures. When you create or edit
a data type, you specify whether the type can be a structure argument and
how the type represents itself in memory when you pass it to a structure
parameter.
Editing the Function Call
You can use the various controls in the Module tab to edit the function
name and its argument values. Alternatively, you can use the Function Call
control to directly edit the function name and all of the function arguments
at once. In the Function Call control, edit the call just as you would in a
source code editor. You can use Cut and Paste to edit multiple arguments
or the entire function call. If you enter a different number of arguments than
the function prototype specifies, TestStand displays a prompt that gives
you the option to alter the prototype to match the number of arguments you
specify.
When you make a change in the Function Call control, the Browse, Revert,
and the Accept or Goto Error buttons appear. All other controls dim. Use
© National Instruments Corporation
13-11
TestStand User Manual
Chapter 13
Module Adapters
the Browse control to insert variables, properties, or expression operators
into the Function Call control. Use Goto Error button to highlight a syntax
error in the Function Call control. Use the Accept button to apply the
changes you make in the Function Call control. Use the Revert button the
discard the changes you make in the Function Call control.
The DLL Flexible Prototype Adapter allows you to call functions with variable
argument lists.
Note
Source Code Tab
Figure 13-4 shows the Source Code tab of the Edit DLL Call dialog box.
Figure 13-4. Specify Module Dialog Box for DLL Flexible Prototype
Adapter—Source Code Tab
You can use the Source Code tab to generate the source code for the DLL
function, to edit the source code, and to resolve differences between the
parameter list in the source code and the parameter information on the
Module tab. TestStand can call the step code module even if you do not use
the Source code tab.
Enter the pathname of the source file in the Pathname of Source File
Containing Function control. If you want to create a new source file, you
must enter an absolute pathname. If you are using an existing source file,
you can enter an absolute or relative pathname. Relative pathnames are
relative to the TestStand search directory paths.
To create the source code shell for the function, click the Create Code
button. If the file does not already exist, the adapter creates it. If the file
TestStand User Manual
13-12
ni.com
Chapter 13
Module Adapters
already exists, the adapter appends the function to the end of the file. If the
function already exists in the file, a dialog box gives you the opportunity to
replace the current function or to add the new function shell above the
current function.
If template source code exists for the step type that you use for the step, the
adapter inserts the parameter information from the template source code
into the new function shell. It also uses the template parameter list to
complete the parameter information on the Module tab. If the step type does
not have a code template, TestStand uses the default template for the
adapter. When the Module tab already contains parameter information that
differs from the parameter list in the template, the adapter displays a dialog
box in which you can resolve the conflict.
After the adapter creates the code, it launches the application that is
currently registered on your system for the type of the file, such as
LabWindows/CVI for.c files, and displays the file in the application.
If you already have the source code for the function and you want to edit it,
click the Edit Code button.
When you click the Create Code button and the parameter list of the
function in the source code does not match the parameter information on
the Module tab, the adapter displays a dialog box in which you can resolve
the conflict. You also can click the Verify Prototype button to check for
any conflicts between the source code and the parameter information on the
Module tab.
When the adapter parses the parameter list in the source code, it has to
interpret the parameter declarations. The return value and each parameter
must have one of the numeric, array, or object types discussed earlier in this
chapter. Some C parameter declarations can be ambiguous, as described in
Table 13-4. For example, char * and char [] can each represent either a
null-terminated string or a fixed-size character array.
Table 13-4 indicates how the adapter interprets ambiguous declarations.
Table 13-4. Adapter Interpretation of Ambiguous Declarations
C Data Type in Parameter
Declaration in Source Code
© National Instruments Corporation
Parameter Information
on Module Tab
char *
Type: C String
char []
Type: C String Buffer
Number of Elements: -1
13-13
TestStand User Manual
Chapter 13
Module Adapters
Table 13-4. Adapter Interpretation of Ambiguous Declarations (Continued)
C Data Type in Parameter
Declaration in Source Code
Parameter Information
on Module Tab
char [nnn], where nnn is a
numeric literal
Type: C String Buffer
Number of Elements: nnn
wchar_t *
Type: Unicode String
wchar_t []
Type: Unicode String Buffer
Number of Elements: -1
wchar_t [nnn], where nnn is
Type: Unicode String Buffer
Number of Elements: nnn
a numeric literal
int *
Type: Signed 32-bit integer
Pass: Pointer to value
int []
Type: Array
Data Type: Signed 32-bit integer.
Number of Elements: -1
int [nnn], where nnn is a
Type: Array
Data Type: Signed 32-bit integer
Number of Elements: nnn
numeric literal
The adapter handles the other numeric types in the same way it handles the
signed 32-bit integers.
Debugging DLLs
To debug a DLL, create the DLL with debugging enabled in
LabWindows/CVI or in another ADE. To debug DLLs, you must launch
the sequence editor or run-time operator interface from LabWindows/CVI
or the other ADE. In LabWindows/CVI, you use the Select External
Process command in the Run menu of the Project window to identify the
executable for the sequence editor or run-time operator interface. You then
use the Run command to start the executable.
If you select the Step Into command in TestStand while execution is
currently suspended on a step that calls into a LabWindows/CVI DLL that
you are debugging, LabWindows/CVI breaks at the first statement in the
DLL function.
TestStand User Manual
13-14
ni.com
Chapter 13
Module Adapters
Table 13-5 describes your options for stepping out of a LabWindows/CVI
DLL function that you are debugging.
Table 13-5. Options for Stepping Out of LabWindows/CVI DLL Functions
LabWindows/CVI
Command for Stepping Out
Result in TestStand
Finish Function
Execution of the function. When you
use this command on the last function
in the call stack, TestStand suspends
execution on the next step in the
sequence.
Step Into or Step Over
When you use this command on the
last executable statement of the
function, TestStand suspends
execution on the next step in the
sequence.
Continue
TestStand does not suspend execution
when the function call returns.
Refer to the LabWindows/CVI product manuals for more information on
debugging DLLs in an external process.
Debugging LabVIEW DLLs You Call with the Flexible
DLL Adapter
You must use a LabVIEW operator interface to debug a VI that you build
into a DLL with LabVIEW 6i or later. First, open the operator interface in
the LabVIEW development environment. Before executing the operator
interface, open the VI that represents the DLL function to debug and place
a break point in the diagram of this VI. Next, use the LabVIEW operator
interface to load and execute the sequence file that calls the LabVIEW
DLL. When the sequence step calls the DLL function, LabVIEW stops at
the breakpoint you set in the VI.
Using MFC in a DLL
Microsoft Foundation Class Library (MFC) places several requirements on
DLLs that use the DLL version of the MFC run-time library. If you call
functions in a DLL that use the DLL version of the MFC run-time library,
verify that the DLL meets these requirements. Also, if the DLL uses
© National Instruments Corporation
13-15
TestStand User Manual
Chapter 13
Module Adapters
resources such as dialog boxes, verify that the AFX_MANAGE_STATE macro
appears at the beginning of the function body of each function that you call.
Refer to your MFC documentation for more information.
Loading Subordinate DLLs
TestStand directly loads and runs the DLLs that you specify in the Specify
Module dialog box for the DLL Flexible Prototype Adapter. Most likely,
your code modules call subsidiary DLLs, such as instrument drivers. You
must ensure that the operating system can find and load the subsidiary
DLLs. The operating system searches for the DLLs using the following
search directory precedence.
1.
The directory in which the application resides
2.
The current working directory
3.
Under Windows 98/95, the Windows\System directory. Under
Windows NT and Windows 2000, the Windows\System32 and
Windows\System directories
4.
The Windows directory
5.
The directories listed in the PATH environment variable
LabVIEW Standard Prototype Adapter
The LabVIEW Standard Prototype Adapter allows you to call any
LabVIEW VI that has the specific structure that the adapter requires. The
LabVIEW Standard Prototype Adapter uses a LabVIEW ActiveX server to
run VI code modules. The server can be the LabVIEW development
environment or a LabVIEW-built application that has enabled the
LabVIEW ActiveX server.
LabVIEW Standard Prototype Adapter Module Structure
Code modules for the LabVIEW Standard Prototype Adapter are VIs that
contain a specific set of controls and indicators that you assign to a
connector pane terminal. The controls and indicators must have names and
data types that match the LabVIEW Standard Prototype Adapter parameter
list. TestStand does not require a particular connector pane pattern or that
the controls and indicators be assigned to specific terminals. TestStand
only requires that you assign the controls and indicators to a terminal in the
connector pane of the VI.
TestStand User Manual
13-16
ni.com
Chapter 13
Module Adapters
You usually create new VIs from the Specify Module dialog box for a step
that uses the LabVIEW Standard Prototype Adapter. In this case, TestStand
creates the required controls and automatically assigns them to connector
pane terminals for you.
Before calling a VI, the adapter assigns values from TestStand to the
controls that you wire to the connector pane. After calling the VI, the
adapter copies values from the indicators to properties of the TestStand
step. The adapter copies each value into its corresponding property when
the following conditions are true:
•
The property exists.
•
The VI does not change the value of the property directly, through the
TestStand API.
A VI must contain a Test Data cluster control and an error out cluster
control that is wired to the connector pane. A VI also can contain optional
controls, which include Input Buffer, Invocation Info, and
Sequence Context. The following sections discuss each of the required
and optional VI controls.
Test Data Cluster
The LabVIEW Standard Prototype Adapter must use the Test Data
cluster to return result data from the VI to TestStand. TestStand can use the
data to make a PASS/FAIL determination.
Figure 13-5 shows the Test Data cluster.
Figure 13-5. Test Data Cluster
© National Instruments Corporation
13-17
TestStand User Manual
Chapter 13
Module Adapters
Table 13-6 lists the elements of the Test Data cluster, their types, and
descriptions of how the adapter uses them.
Table 13-6. Test Data Cluster Elements
Name
Type
Description
The test VI sets this element to
indicate whether the test passed.
Valid values are True(PASS) or
False(FAIL). The adapter
copies its value into the
PASS/FAIL Flag
Step.Result.PassFail
property if the property exists.
Numeric measurement that the
test VI returns. The adapter copies
this value into the
Numeric
Measurement
Step.Result.Numeric
property if the property exists.
String
Measurement
String value that the test function
returns. The adapter copies the
string into the
Step.Result.String property
if the property exists.
Report Text
Output message to display in the
report. The adapter copies the
message value into the
Step.Result.ReportText
property if the property exists.
The LabVIEW Standard Prototype Adapter also supports an older version
of the Test Data cluster from the LabVIEW Test Executive product. The
Test Data cluster in the LabVIEW Test Executive does not contain a
Report Text element. Instead, the cluster contains two string elements,
User Output and Comment.
TestStand User Manual
13-18
ni.com
Chapter 13
Module Adapters
Table 13-7 lists these elements of the older Test Data cluster, their types,
and description of how the adapter uses them.
Table 13-7. Old Test Data Cluster Elements from LabVIEW Test Executive
Name
Type
Description
Output message to display in the
report. The adapter copies the
message value into the
Comment
Step.Result.ReportText
property if the property exists.
String value that the test function
returns. The adapter dynamically
creates the step property
Step.Result.UserOutput,
and copies the string value to the
step property.
User Output
Error Out Cluster
TestStand must use the contents of the error out cluster to determine
whether a run-time error has occurred and to take appropriate action, if
necessary. When you create a VI, use the standard LabVIEW error out
cluster, shown in Figure 13-6.
Figure 13-6. Standard Error Out Cluster
© National Instruments Corporation
13-19
TestStand User Manual
Chapter 13
Module Adapters
Table 13-8 lists the elements of the error out cluster, their types, and
descriptions of how the adapter uses them.
Table 13-8. Error Out Cluster Elements
Name
Type
Description
The test VI must set this to True if
an error occurs. The adapter copies
the output value into the
status
Step.Result.Error.Occurred
property if the property exists.
code
The test VI can set this element to a
non-zero value if an error occurs.
source
The test VI can set this element to a
descriptive string if an error occurs.
Input Buffer
You use the Input buffer string control to pass input data directly to the
VI. The LabVIEW Standard Prototype Adapter automatically copies the
contents of the Step.InBuf property to the Input buffer control if the
property exists.
Invocation Information
You use the Invocation Information cluster control to pass additional
information to the VI. Figure 13-7 shows the Invocation Information
control.
Figure 13-7. Invocation Information Cluster
TestStand User Manual
13-20
ni.com
Chapter 13
Module Adapters
Table 13-9 lists the elements of the Invocation Information cluster,
their types, and descriptions of how the adapter assigns a value to each
cluster element.
Table 13-9. Error Out Cluster Elements
Name
Type
Description
Test Name
Contains the name of the step that
invokes the VI.
loop #
Contains the loop count if the step
that invokes the VI is looping on
the step.
Sequence Path
Contains the name and absolute
path of the sequence file that is
running the VI.
UUT Info
Contains the value of the
RunState.Root.Locals.
UUT.SerialNumber property
if the property exists.
Contains the value of the
UUT #
RunState.Root.Locals.
UUT.UUTLoopIndex property
if the property exists.
Sequence Context
You use the Sequence Context control to obtain a reference to the
TestStand sequence context object. You can use the sequence context to
access all the objects, variables, and properties in the execution.
Figure 13-8 shows the Sequence Context control. Refer to the TestStand
Programmer Help for more information on using the sequence context
from a VI.
Figure 13-8. Sequence Context Control
© National Instruments Corporation
13-21
TestStand User Manual
Chapter 13
Module Adapters
Configuring the LabVIEW Standard Prototype Adapter
To run VIs, the LabVIEW Standard Prototype Adapter uses a LabVIEW
ActiveX server. The server can be the LabVIEW development environment
or a LabVIEW-built application that includes the LabVIEW ActiveX
server. You specify which server the adapter uses in the Select Which
LabVIEW ActiveX Server to Use ring control. Figure 13-9 shows the
LabVIEW Adapter Configuration dialog box.
Figure 13-9. LabVIEW Adapter Configuration Dialog Box
You can type in the ProgID of the server to connect to or select one of the
following choices from the ring:
TestStand User Manual
•
LabVIEW—The version of the LabVIEW development environment
you most recently launched. To use LabVIEW to debug test VIs,
you must select this option so that the VIs run in the LabVIEW
development environment.
•
TestStandLVGUIRTS—The LabVIEW operator interface
application. If you use the LabVIEW operator interface, this is the
most efficient choice because it does not launch a separate server
application.
13-22
ni.com
Chapter 13
•
Module Adapters
TestStandLVRTS—TestStand installs a prebuilt executable
with source files for a LabVIEW run-time server in the
<TestStand>\Components\NI\RuntimeServers\LabVIEW
directory tree. TestStand registers this ActiveX server under the
TestStandLVRTS ProgID. This server enables you to run VIs on
machines that do not install a LabVIEW development environment or
other LabVIEW server application. Refer to the Customizing and
Distributing a LabVIEW Run-Time Server section in Chapter 17,
Distributing TestStand, for more information on LabVIEW run-time
servers.
•
BridgeVIEW—The version of the BridgeVIEW development
environment you most recently launched. To use BridgeVIEW to
debug test VIs, you must select this option so that the VIs run in the
BridgeVIEW development environment.
The UUT Information Source section contains the following controls:
•
Expression for UUT Iteration Number—Specifies the expression
that the adapter evaluates at run time to generate a value to pass to the
UUT # element of the Invocation Information cluster.
•
Expression for UUT Serial Number String—Specifies the
expression that the adapter evaluates at run time to generate a value to
pass to the UUT Info element of the Invocation Information
cluster.
The Options section contains the following control:
•
Reserve Loaded VIs for Execution—Specifies that LabVIEW
reserves each VI to run when TestStand loads the VI. When a VI is
reserved for execution, references that it creates during execution
remain valid until the VI is unreserved. VIs that LabVIEW reserves
take less time to call but you cannot edit them in LabVIEW unless you
click the Edit VI button on the Specify Module dialog box or the Edit
Code menu item from the context menu for the calling step.
TestStand unreserves a VI under the following circumstances:
–
When you select File»Unload All Modules from the sequence
editor menu
–
When the VI is unloaded based on sequence file or step unload
options
–
When you open a VI for editing from within TestStand.
The Reserve Loaded VIs for Execution option eliminates the need to
use permanent reference VIs for sharing LabVIEW references
between step modules.
© National Instruments Corporation
13-23
TestStand User Manual
Chapter 13
Module Adapters
You can create a reference in a VI called by one step in a sequence and
then use the reference in another VI. For example, you can create a file
refnum from Open File and use the reference in Read File or Write
File. You must explicitly destroy the LabVIEW reference when you are
done with it; for example, Close File.
A LabVIEW reference exists only as long as the VI that creates it. If
you set the Unload Option for a step that calls a VI to Unload After a
Step Executes or Unload When Precondition Fails, the LabVIEW
references the step creates may be destroyed on completion of the step.
If you do not reserve VIs for execution, you can use the permanent
reference VIs to maintain LabVIEW references between steps. Refer
to the <TestStand>\Examples\AccessingPropertiesAnd
Variables\UsingLabVIEW example for more information.
Specifying a LabVIEW Standard Prototype Adapter Module
The Specify Module dialog box for the LabVIEW Standard Prototype
Adapter is called the Edit LabVIEW VI Call dialog box. Figure 13-10
shows the Edit LabVIEW VI Call dialog box.
Figure 13-10. Specify Module Dialog Box for LabVIEW Standard Prototype Adapter
TestStand User Manual
13-24
ni.com
Chapter 13
Module Adapters
The VI Module Pathname control specifies the path and name of the VI that
the step calls. You can specify an absolute or relative pathname for the file.
Relative pathnames are relative to the TestStand search directory paths. To
customize the TestStand search directory paths, use the Configure»Search
Directories command in the sequence editor menu bar.
The Optional Parameters section contains a checkbox for each of the
optional parameters that you can wire to the connector pane of the VI. The
checkbox controls are Input Buffer, Invocation Info, and Sequence Context
ActiveX Pointer. The Input Buffer control dims if the Step.InBuf
property does not exist for the step you are editing. For example, the Input
Buffer control dims for an Action step.
Normally, when the adapter executes a step that calls a LabVIEW VI, the
adapter does not activate the front panel of the VI. If you want the adapter
to activate the front panel of the VI, enable the Show VI Front Panel When
Called control. The adapter returns the state of the front panel to its original
visibility state after the VI finishes executing.
To create a code shell for the VI, click the Create VI button. If the VI file
that you specify does not already exist, the adapter creates it. If the file
already exists, the adapter prompts you to overwrite the existing file. If a
VI code template file exists for the step type you are using for the step,
the adapter uses the template to create the new VI.
If the VI already exists and you want to edit it, click the Edit Code button.
Debugging a LabVIEW Standard Prototype Adapter Module
To debug a VI while executing the VI from TestStand, you must configure
the adapter to use the LabVIEW development environment as the
LabVIEW server. Here are the two ways you can suspend the execution of
a VI in LabVIEW.
•
Before executing the VI, load the VI into LabVIEW and place it in a
pause state by clicking the Pause icon button.
•
Select the Step Into command in TestStand when execution suspends
on a step that calls into a LabVIEW VI.
© National Instruments Corporation
13-25
TestStand User Manual
Chapter 13
Module Adapters
When LabVIEW suspends a VI, LabVIEW displays the front panel for the
VI as shown in Figure 13-11.
Figure 13-11. Stepping into a LabVIEW VI
A suspended front panel has four icon buttons:
•
Run
•
Return to Caller
•
Abort Execution
•
Pause
From a suspended front panel, you can run the VI multiple times before
returning to the calling TestStand step. To debug the VI, open the VI
diagram and use the standard LabVIEW debug tools. After you finish
debugging the VI, you must click the Return to Caller icon button to
return to the calling step and suspend the execution on the next step. If you
click the Abort Execution icon button, the adapter returns a run-time error
to the calling step. When you abort the VI execution, the adapter sets the
step property Step.Result.Error.Occurred to True. It also sets the
Step.Result.Error.Code and Step.Result.Error.Msg properties
equal to the error that the LabVIEW server returns.
TestStand User Manual
13-26
ni.com
Chapter 13
Module Adapters
C/CVI Standard Prototype Adapter
The C/CVI Standard Prototype Adapter allows you to call any C function
that has the TestStand standard C parameter list. The function can exist in
an object file, library file, or DLL. The function can also exist in a source
file that is located in the project that you are currently using in the
LabWindows/CVI development environment.
C/CVI Standard Adapter Module Prototypes
The C/CVI Standard Prototype Adapter supports two prototypes, a
standard and an extended prototype. TestStand provides the extended
prototype for backward compatibility with the LabWindows/CVI Test
Executive Version 2.0 and earlier. The extended prototype has an
additional string parameter. National Instruments recommends that you
use the standard prototype unless you have a reason not to do so.
The standard prototype is as follows:
void TX_TEST StandardFunc(tTestData *data,
tTestError *error)
The extended prototype is as follows:
int TX_TEST ExtendedFunc(char *params, tTestData *data,
tTestError *error)
These prototypes contain two structure parameters, which the adapter uses
to pass values into and out of the code module. Table 13-10 lists the fields
in the tTestData structure.
Table 13-10. tTestData Structure Member Fields
Field Name
Data Type
In/
Out
Description
result
int
Out
Set by test function to indicate whether
the test passed. Valid values are PASS or
FAIL. The adapter copies its value into
the Step.Result.PassFail property
if the property exists.
measurement
double
Out
Numeric measurement that the test
function returns. The adapter copies this
value into the Step.Result.Numeric
property if the property exists.
© National Instruments Corporation
13-27
TestStand User Manual
Chapter 13
Module Adapters
Table 13-10. tTestData Structure Member Fields (Continued)
Field Name
Data Type
In/
Out
Description
inBuffer
char *
In
For passing a string parameter to a test
function. The adapter copies the
Step.InBuf property value into this
field if the property exists.
outBuffer
char *
Out
Output message to display in the report.
The adapter copies the message value
into the Step.Result.ReportText
property if the property exists.
modPath
char * const
In
Directory path of module that contains
the test function. The adapter sets this
value before executing the code module.
modFile
char * const
In
Filename of module that contains the test
function. The adapter sets this value
before executing the code module.
hook
void *
In
Reserved (no longer used).
hookSize
int
In
Reserved (no longer used).
mallocFuncPtr
tMallocPtr
const
In
Contains a function pointer to malloc,
which a code module must use to allocate
memory for any buffer that it assigns to
the inBuffer, outBuffer, and
errorMessage fields.
freeFuncPtr
tFreePtr
In
Contains a function pointer to free,
which a code module must use to free any
buffers that the inBuffer, outBuffer,
and errorMessage fields point to.
seqContextDisp
struct
IDispatch *
In
Dispatch pointer to the sequence context.
NULL if you choose not to pass the
sequence context.
seqContextCVI
CAObjHandle
In
LabWindows/CVI ActiveX Automation
handle for the sequence context. 0 if you
choose not to pass the sequence context.
TestStand User Manual
13-28
ni.com
Chapter 13
Module Adapters
Table 13-10. tTestData Structure Member Fields (Continued)
Field Name
Data Type
In/
Out
Description
stringMeasurement
char *
Out
String value that the test function returns.
The adapter copies the string into the
Step.Result.String property if the
property exists.
replaceStringFuncPtr
tReplaceStri
ngPtr const
In
Contains a function pointer to
ReplaceString, which a code module
can use to reassign a value to the
inBuffer, outBuffer, and
errorMessage fields. The
ReplaceString prototype is as
follows:
int ReplaceString(
char **destString,
char *srcString)
The function return value is non-zero
if successful.
structVersion
int
In
Structure version number. A test module
can use this value to detect new versions
of the structure.
Use the sequence context to access all the objects, variables, and properties in the
execution. Refer to the TestStand Programmer Help for more information on using the
sequence context from a C/CVI code module.
Note
Table 13-11 lists the fields in the tTestError structure.
Table 13-11. tTestError Structure Member Fields
Data Type
In/
Out
errorFlag
Boolean (int)
Out
The test function must set this value to True
if an error occurs. The adapter copies the
output value into the
Step.Result.Error.Occurred property
if the property exists.
errorLocation
tErrLoc (int)
Out
Reserved (no longer used).
Field Name
© National Instruments Corporation
13-29
Description
TestStand User Manual
Chapter 13
Module Adapters
Table 13-11. tTestError Structure Member Fields (Continued)
Field Name
Data Type
In/
Out
Description
errorCode
int
Out
The test function can set this value to a
non-zero value if an error occurs.
errorMessage
char *
Out
The test function can set this field to a
descriptive string if an error occurs.
Before calling a code module, the adapter assigns values from TestStand to
input fields of the tTestData structure.
After calling the code module, the adapter copies the values of the output
fields of the structures to properties of the step. The adapter copies a value
into a property when the following conditions are true:
•
The property exists.
•
The code module does not change the value of the property directly,
through the TestStand API.
In some cases, the adapter translates the value of a structure field to a
different value in the corresponding property.
Table 13-12 lists all the properties that the Adapter updates and the value
translation, if any, that it makes.
Table 13-12. Step Properties Updated by C/CVI Standard Prototype Adapter
Structure Member
Valid Values that
Tests Can Return
Step.Result
Property
Step Property
Value
result
PASS or FAIL
PassFail
True/False
outBuffer
string value
ReportText
string value
measurement
floating-point
value
Numeric
numeric value
stringMeasurement
string value
String
string value
errorFlag
True or False
Error.Occurred
True/False
errorCode
integer value
Error.Code
numeric value
errorMessage
string value
Error.Msg
string value
TestStand User Manual
13-30
ni.com
Chapter 13
Module Adapters
Example C/CVI Standard Prototype Code Module
When you create a code module for the C/CVI Standard Prototype Adapter,
you must add the <TestStand>\Bin\stdtst.h header file to your
source file. The stdtst.h file includes the type definitions for the
tTestData and tTestError structures. The following is an example
code module that uses the C/CVI standard prototype.
// Simple test example
#include "stdtst.h"
void TX_TEST __declspec(dllexport) FunctionName (tTestData *testData,
tTestError *testError)
{
int error = 0;
// REPLACE THE FOLLOWING WITH YOUR SPECIFIC TEST CODE
// double measurement = 5.0;
// char *lastUserName = NULL;
// testData->measurement = measurement;
// The following code shows how to access the step properties via
// the TestStand API
// if ((error = TS_PropertyGetValString(testData->seqContextCVI, NULL,
//
"StationGlobals.TS.LastUserName", 0, lastUserName)) < 0)
//
goto Error;
Error:
// FREE RESOURCES
// CA_FreeMemory(lastUserName);
// If an error occurred, set the error flag to cause a run-time error
// in TestStand.
if (error < 0)
{
testError->errorFlag = TRUE;
// OPTIONALLY SET THE ERROR CODE AND STRING
// testError->errorCode = error;
// testData->replaceStringFuncPtr(&testError->errorMessage,
//
"A run-time error occurred.");
}
}
© National Instruments Corporation
13-31
TestStand User Manual
Chapter 13
Module Adapters
Specifying a C/CVI Standard Prototype Adapter Module
The Specify Module dialog box for the C/CVI Standard Prototype Adapter
is called the Edit C/CVI Module Call dialog box. To access this dialog box,
click the Specify Module button on the General tab of a Step Properties
dialog box. The Edit C/CVI Module Call dialog box contains a Module tab
and a Source Code tab. The Module tab specifies the code module that the
adapter executes for the step, and the Source Code tab contains additional
information that TestStand requires when you want to create and edit a
code module in LabWindows/CVI.
Figure 13-12 shows the Module tab on the Edit C/CVI Module Call
dialog box.
Figure 13-12. Specify Module Dialog Box for C/CVI Standard
Prototype Adapter—Module Tab
TestStand User Manual
•
Module Type—Selects the type of code module the step calls. The
adapter supports calling functions in C source files, object files,
dynamic link library files, and static library files.
•
Module Pathname—Specifies the pathname of the code module file
that contains the function that the step calls. You can specify an
absolute or relative pathname for the module file. Relative pathnames
13-32
ni.com
Chapter 13
Module Adapters
are relative to the TestStand search directory paths. To customize the
TestStand search directory paths, use the Search Directories
command in the Configure menu of the sequence editor menu bar.
•
Function Name—Selects the function in the code module that the step
calls. The adapter attempts to read the code module file and find the
names of all functions. If the Module Type is not a .c file, the adapter
populates the Function Name ring control with the names of all the
functions the module contains.
•
Standard Prototype and Extended Prototype—Selects the function
prototype for the function. Use the Params String control to specify the
value of the extra parameter for the extended prototype.
•
Pass Sequence Context—Specifies whether the adapter passes a
sequence context to the code module. The adapter passes the sequence
context in the following two forms in the tTestData structure:
–
As an CVI ActiveX Automation handle in the seqContextCVI
field
–
As an ActiveX Automation dispatch pointer in the
seqContextDisp field
Enable the checkbox if you want to call the TestStand API in the code
module or if the code module must pass the sequence context to
another function.
© National Instruments Corporation
13-33
TestStand User Manual
Chapter 13
Module Adapters
Figure 13-13 shows the Source Code tab for the Edit C/CVI Module Call
dialog box.
Figure 13-13. Specify Module Dialog Box for C/CVI Standard
Prototype Adapter—Source Code Tab
You can use the Source Code tab to generate or edit the source code for the
function. You do not have to use the Source code tab in order for TestStand
to be able to call the step code module.
Enter the pathname of the source file in the Pathname of Source File
Containing Function control. If you want to create a new source file, you
must enter an absolute pathname. If you are using an existing source file,
you can enter an absolute or relative pathname. Relative pathnames are
relative to the TestStand search directories.
If the code module is a DLL or static library, you must enter the name of
the LabWindows/CVI project that you use to create the DLL or static
library file. If the code module is an object module, you can specify a
project if you want to.
To create the source code shell for the function, click the Create Code
button. If the source file you specify does not already exist, the adapter
creates it. If the file already exists, the adapter appends the function to the
end of the file. If a source code template file exists for the step type that you
TestStand User Manual
13-34
ni.com
Chapter 13
Module Adapters
are using for the step, the adapter uses the template to create the shell of the
new function. If the project file you specify does not already exist, the
adapter creates it and adds the source file to it.
If you already have the source code for the function, and you want to edit
it, click the Edit Code button.
When you use the Create Code button or the Edit Code button, the adapter
launches a copy of LabWindows/CVI and opens the source file. If you
specify a project file in the Source Code tab, the adapter also opens the
project in LabWindows/CVI. When you use the Create Code button and
the function already exists in the file, a dialog box appears giving you the
choice of replacing the current function or adding the new function shell
above the current function.
Note
You cannot use the Create Code button when you select the Extended Prototype.
Configuring the C/CVI Standard Prototype Adapter
You can specify the test execution mode—in-process or
out-of-process—for the C/CVI Standard Prototype Adapter. When the
adapter runs tests in-process, it executes them in the same process as the
sequence editor or operator interface you are running. When the adapter
runs tests out-of-process, it executes them in an external instance of the
LabWindows/CVI development environment. To specify this option, use
the Adapters command in the Configure menu.
The adapter can launch two different copies of LabWindows/CVI. The
adapter uses one copy to execute test modules. By default, the adapter
opens <TestStand>\AdapterSupport\CVI\tscvirun.prj in
this copy of LabWindows/CVI. You can use the adapter configuration
dialog box to change which project the adapter uses to run test modules.
The adapter uses the other copy of LabWindows/CVI to let you edit the
projects that you use to create DLLs, static libraries, and object files.
© National Instruments Corporation
13-35
TestStand User Manual
Chapter 13
Module Adapters
Figure 13-14 shows the configuration dialog box for the C/CVI Standard
Prototype Adapter.
Figure 13-14. C/CVI Standard Adapter Configuration Dialog Box
Executing Code Modules In-Process
When executing code modules in the same process as the sequence editor
or operator interface, the adapter loads and runs code modules directly,
without using the LabWindows/CVI development environment.
Object and Library Code Modules
When the adapter loads an object or static library file, the
LabWindows/CVI Run-time Engine resolves all external references in the
file. When running tests in-process, the adapter must load the support
libraries that the object file or static library file depends on before it loads
the file. To configure a list of support libraries for the adapter to load,
manually copy the support libraries to the <TestStand>\Adapter
Support\CVI\AutoLoadLibs directory, or click the Configure
Auto-loading of Support Libraries Needed for Linking .objs and .libs
button on the C/CVI Standard Adapter Configuration dialog box. When
you click the Configure Auto-Loading button, the Auto-Load Library
Configuration dialog box appears as shown in Figure 13-15.
TestStand User Manual
13-36
ni.com
Chapter 13
Module Adapters
Figure 13-15. Auto-Load Library Configuration Dialog Box
The Add Default CVI Libraries button searches for an installation of
the LabWindows/CVI development environment and copies the
LabWindows/CVI static library files to the auto-load library directory.
You can click the Browse button to search for files to copy to the auto-load
library directory.
The Delete Selected Files button removes the selected files from the
auto-load library directory.
Source Code Modules
When it executes tests in-process, the module adapter cannot directly
execute code modules that exist in C source files. Instead, the adapter
attempts to find an object file that has the same name. If the adapter finds
the object file, the adapter executes the code in the object file. If the adapter
cannot find the object file, the adapter prompts you to create the object file
in an external version of LabWindows/CVI. If you decline to create the
object module, the adapter reports a run-time error.
© National Instruments Corporation
13-37
TestStand User Manual
Chapter 13
Module Adapters
Debugging a DLL Code Module
When you want to be able to debug code modules that are in-process,
the code modules must exist in DLLs that you enable for debugging in
LabWindows/CVI or in another ADE. To enable debugging, you must
launch the sequence editor or run-time operator interface from
LabWindows/CVI or the other ADE. In LabWindows/CVI, use the Select
External Process command in the Run menu of the Project window to
identify the executable you want to launch. Use the Run command to
launch the executable.
If you select the Step Into command in TestStand while execution is
currently suspended on a step that calls into a LabWindows/CVI DLL that
you are debugging, LabWindows/CVI breaks at the first statement in the
DLL function.
Refer to Table 13-5 to learn about your options for stepping out of a
LabWindows/CVI DLL function that you are debugging.
Refer to the LabWindows/CVI product manuals for more information on
debugging DLLs in an external process.
Executing Code Modules in an External Instance
of LabWindows/CVI
To execute tests in an external instance of LabWindows/CVI, the adapter
launches a copy of LabWindows/CVI and loads an execution server project
in LabWindows/CVI. You can specify the execution server project to load
in the C/CVI Standard Adapter Configuration dialog box. The default
project is <TestStand>\AdapterSupport\CVI\tscvirun.prj.
When a TestStand step calls a function in an object, static library, or DLL
file, the execution server project automatically loads the file and executes
the function in the external instance of LabWindows/CVI.
If you want a TestStand step to call a function in a C source file, you must
include the C source file in the execution server project before you run the
project. Also, you must include in the project all support libraries other than
LabWindows/CVI libraries.
TestStand User Manual
13-38
ni.com
Chapter 13
Module Adapters
Debugging C Source and DLL Code Modules
When the adapter executes tests in an external instance of
LabWindows/CVI, you can debug C source and DLL code modules. To
debug DLL code modules, you must enable the DLL Debugging options
when you create the DLL in LabWindows/CVI. LabWindows/CVI honors
all breakpoints you set in the source files for the DLL project.
When you execute tests in an external instance of LabWindows/CVI, you do not
need to launch the sequence editor or operator interface application from
LabWindows/CVI to debug DLL modules you call with the C/CVI Standard Prototype
Adapter.
Note
If you select the Step Into command in TestStand when execution is
currently suspended on a step that calls into the DLL, LabWindows/CVI
breaks at the first statement in the DLL function.
Refer to Table 13-5 to learn about your options for stepping out of a
LabWindows/CVI DLL function that you are debugging.
Loading Subordinate DLLs
TestStand directly loads and runs the DLLs that you specify in the Specify
Module dialog box for the DLL Flexible Prototype Adapter. Most likely,
your code modules will call subsidiary DLLs, i.e. instrument drivers. You
must ensure that the operating system can find and load the subsidiary
DLLs. The operating system searches for the DLLs using the following
search directory precedence:
1.
The directory in which the application resides
2.
The current working directory
3.
Under Windows 98/95, the Windows\System directory. Under
Windows NT and Windows 2000, the Windows\System32 and
Windows\System directories
4.
The Windows directory
5.
The directories listed in the PATH environment variable
© National Instruments Corporation
13-39
TestStand User Manual
Chapter 13
Module Adapters
Sequence Adapter
The Sequence Adapter allows you to pass parameters when you make a call
to a subsequence. You can call a subsequence in the current sequence file
or in another sequence file, and you can make recursive sequence calls. For
subsequence parameters, you can specify a literal value, pass a variable or
property by reference or by value, or use the default value that the
subsequence defines for the parameter.
Usually, you use the Sequence Call built-in step type to call sequences, but
you can use the Sequence Adapter from any step type that can use module
adapters, such as Pass/Fail Test or Numeric Limit Test. Using a Sequence
Call step is the same as using an Action step with the Sequence Adapter
except that the Sequence Call step sets the step status to Passed instead of
Done if a failure or an error does not occur.
After the sequence call step executes, the Sequence Adapter may set the
step status. If the sequence that the step calls fails, the adapter sets the step
status to Failed. If no runtime error occurs, the adapter does not set the
step status. Depending on the type of step, the resulting status is Done or
Passed. If a run-time error occurs in the sequence, the adapter sets the step
status to Error and sets the Result.Error.Occurred property to True.
The adapter also sets the Result.Error.Code and Result.Error.Msg
properties to the values of the same properties in subsequence step that
generated the run-time error.
You can define the parameters for a sequence on the Parameters tab of the
Sequence File window shown in Figure 13-16.
Figure 13-16. Example Sequence Parameters
The Parameters tab defines each parameter name, its TestStand data type,
its default value, and whether you pass the argument by value or by
TestStand User Manual
13-40
ni.com
Chapter 13
Module Adapters
reference. For more information on sequence file parameters, refer to the
Parameters Tab section in Chapter 5, Sequence Files.
Specifying a Sequence Adapter Module
The Specify Module dialog box for the Sequence Adapter is called the
Edit Sequence Call dialog box. This section describes the controls on the
Edit Sequence Call dialog box, as shown in Figure 13-17.
Figure 13-17. Specify Module Dialog Box for the Sequence
Adapter—Edit Sequence Call Tab
The Specify Module Dialog Box for the Sequence Adapter contains the
following controls:
•
© National Instruments Corporation
Specify Expressions for Pathname and Sequence—Selects whether
you specify the sequence name and the sequence file pathname
through literal strings or through expressions that TestStand evaluates
13-41
TestStand User Manual
Chapter 13
Module Adapters
at run time. When you use literal strings, you enter the actual pathname
of the sequence file in the File Pathname control. When you enable this
option, you cannot use the Use Prototype of Selected Sequence option.
•
Use Current File—Enable this checkbox if you want to call a
sequence in the sequence file that you are currently editing. The File
Pathname or File Path Expression control dims when you enable the
Use Current File checkbox.
•
File Pathname—Specifies the pathname of the sequence file.
•
Sequence—Contains the names of the sequences in the sequence file
you specify. When you use expressions, the File Path Expression and
Sequence Expression controls appear in place of the File Pathname and
Sequence controls. You use these controls to specify the expressions
for the sequence file pathname and the sequence name.
•
Multithreading and Remote Execution—Allows you to specify that
the sequence you call runs in a separate thread, in a separate execution,
or on a remote computer. The ring control contains the following
items:
–
None—Specifies that the sequence you call runs in the current
thread.
–
Run Sequence in a New Thread—Specifies that the sequence
you call runs in a new a thread within the current execution.
Threads in the same execution share the same report and the same
result tree. In addition, all threads in an execution suspend or
terminate when the execution suspends or terminates.
–
Run Sequence in a New Execution—Specifies that the sequence
you call runs in a new execution. Separate executions have
separate reports and result trees. Suspending or terminating an
execution does not affect other executions. Separate executions
also can run under different process models.
–
Run Sequence on Remote Computer—Specifies that the
sequence you call runs on the remote computer you specify. To
execute the sequence remotely, the sequence adapter connects to
an instance of the TestStand Engine on the remote machine.
When you specify that a sequence runs in a new thread or a new execution, the status
of the sequence call is Done or Error and does not depend on the status of the sequence
you call. Although the status of the sequence call is Done or Error, when the
asynchronous sequence completes, it updates the status of the result for the sequence call
in the result list. To determine the status of an asynchronous subsequence from a step in the
calling sequence, use a Wait step to wait for the asynchronous sequence to complete. The
status of the Wait step is the status of the asynchronous sequence.
Note
TestStand User Manual
13-42
ni.com
Chapter 13
Module Adapters
•
Settings—Displays a dialog box in which you configure
multithreading and remote execution settings. The dialog box varies
according to the selection you make in the ring control. For a
description of the available settings, refer to the Multithreading and
Remote Execution Settings section in this chapter.
•
Parameters—Contains the following items:
–
Use Prototype of Selected Sequence—When enabled, updates
the contents of the parameter list box whenever you select a
different sequence from the Sequence ring control. When you
enable Specify Expressions for Pathname and Sequence, you
cannot use this option.
–
Load Prototype—Loads a prototype from a sequence that has the
same parameter list definition as the sequences that the step might
call. You use this button when Specify Expressions for Pathname
and Sequence is enabled.
–
List Box—Displays the parameters that the step passes to the
sequence. For each parameter, the list box shows the name of the
parameter, its TestStand data type, the value the step passes to the
sequence, and whether the step passes the argument by value or by
reference.
The contents of the list box must be consistent with the parameter
definitions in the sequence that the step calls. You must extract the
parameter definitions from the sequence or from another sequence
that has the same parameter list.
–
Use Default—When enabled, the step passes the default value
that the sequence defines for the parameter.
–
Enter Expression—Specifies the value that the step passes for a
parameter. You can specify an expression that TestStand evaluates
at run time. The parameter definition in the sequence determines
whether the step passes the argument by value or by reference.
Although the parameter list that the step uses must be consistent with the
parameter list that the sequence defines, the step can specify fewer
parameters than the sequence specifies. The data types for the parameters
in the step must be compatible with the corresponding parameters in the
sequence. The adapter uses the default values for the parameters that the
step does not pass explicitly.
When you call a sequence on a remote host, you can pass single-valued properties
or arrays of number, Boolean, and string properties. You can pass these properties by value
Note
© National Instruments Corporation
13-43
TestStand User Manual
Chapter 13
Module Adapters
or by reference. You also can pass container properties or ActiveX reference properties to
a remote sequence if the receiving parameter type is an ActiveX reference property.
Multithreading and Remote Execution Settings
Click the Settings button on the Specify Module dialog box to display a
dialog box in which you specify multithreading and remote execution
options. The Multithreading and Remote Execution ring control determines
which dialog box the Settings button displays.
Thread Settings
If you specify that the sequence you call runs in a new thread, the Settings
button displays the Thread Settings dialog box, shown in Figure 13-18.
Figure 13-18. Thread Settings Dialog Box
The Thread Settings dialog box contains the following controls.
TestStand User Manual
•
Automatically Wait for the Thread to Complete at the End of the
Current Sequence—Specifies that the calling sequence waits for the
thread it launches to complete before the calling sequence returns.
•
Initially Suspended—Specifies that TestStand creates the new thread
in a suspended state. You can call the Thread.Resume method in the
TestStand API to start the thread.
•
Store an ActiveX Reference to the New Thread in—Stores a
reference to the new Thread object in the ActiveX reference variable
you specify. You can use this reference in subsequent calls to the
TestStand API. You also can use this reference in a Wait step to wait
for the thread to complete. This control is optional.
13-44
ni.com
Chapter 13
Module Adapters
Execution Settings
If you specify that the sequence you call runs in a new execution, clicking
the Settings button displays the Execution Settings dialog box, shown in
Figure 13-19.
Figure 13-19. Execution Settings Dialog Box
The Execution Settings dialog box contains the following controls.
•
Initially Suspended—Specifies that TestStand creates the new
execution in a suspended state. You can call the Execution.Resume
method in the TestStand API to start the execution.
•
Initially Hidden and Disable Tracing—Specifies that the window for
the new execution is initially hidden and that tracing is initially turned
off.
•
Restartable—Specifies whether the execution can be restarted after it
completes.
•
Close Window when Done—Specifies that the window for the
execution closes when the execution completes.
© National Instruments Corporation
13-45
TestStand User Manual
Chapter 13
Module Adapters
•
•
TestStand User Manual
Wait for Execution to Complete—Specifies whether to wait for the
execution to complete. You can select from the following options in the
ring control.
–
Do not wait—The calling sequence does not wait for the
execution to complete.
–
Before executing next step—The calling sequence waits for the
execution to complete before it executes another step.
–
At end of current sequence—The calling sequence waits for the
execution to complete before the calling sequence returns.
Process Model Option—Specifies which process model the new
execution uses. You can select from the following options in the ring
control:
–
Do not use a process model—The new execution does not run
under a process model.
–
Use process model of specified client file—The execution runs
under the model that the sequence file you call specifies as its
model. If the file you call does not specify a model, the execution
runs under the default station model. When you select this option,
the Edit Sequence Call dialog box allows you to designate which
entry point to call in the process model. Typically, the process
model entry point then calls the MainSequence in the client
sequence file you specify.
–
Use a specific process model—When you select this option, the
controls on the Edit Sequence Call dialog box change to allow you
to specify the process model under which the new execution runs.
You also specify which entry point to call in the process model.
Typically, the process model entry point then calls the
MainSequence in the client sequence file you specify
•
Additional Execution Type Mask Settings—Provides the option of
passing a numeric value that specifies execution mask settings for the
new execution. Refer to the ExecutionTypeMask documentation in the
TestStand Programmer Help for a list of available type mask settings.
The settings you specify in this control are combined with any
execution mask settings that other options on the dialog box require.
•
Store an ActiveX Reference to the new Execution in—Stores a
reference to the new Execution object in the ActiveX reference
variable you specify. You can use this reference in subsequent calls to
the TestStand API. You also can use this reference in a Wait step to wait
for the execution to complete. This control is optional.
13-46
ni.com
Chapter 13
•
Module Adapters
Break on Entry—Suspends execution before executing the first step,
when set to True.
Remote Execution Settings
If you specify that the sequence you call runs on a remote computer,
clicking the Settings button displays the Remote Execution Settings dialog
box, shown in Figure 13-20.
Figure 13-20. Remote Execution Settings Dialog Box
The Remote Execution Settings dialog box contains the following controls.
•
Specify expression for host—Selects whether you specify the remote
host name through literal strings or through expressions that TestStand
evaluates at run time. When you disable the option, you can use the
Browse button to select a remote host name on the network. When you
enable the option, you can use the Browse button to build an
expression.
•
Remote Host—Contains the name of the remote host.
When you specify a sequence file pathname on the Edit Sequence Call tab
and you enable the step for remote execution, TestStand locates the
sequence file according to the type of path, as described in Table 13-13.
© National Instruments Corporation
13-47
TestStand User Manual
Chapter 13
Module Adapters
.
Table 13-13. Path Resolution of Sequence Pathnames for Remotely Executed Steps
Type
of Path
Where Found
When You Edit
Where Found
When You Execute
Example
Relative
In the TestStand
search paths that
you configure on
the client (local)
machine.
In the TestStand search
paths that you
configure on the server
(remote) machine.
Transmit.seq
Absolute
On the client
(local) machine.
On the server (remote)
machine.
C:\Projects\Transmit.seq
Network
On the machine
specified in the
network path.
On the machine
specified in the
network path.
\\Remote\Transmit.seq
When you edit a step in a sequence file on a client and you specify an
absolute or relative path for the sequence file the step calls, TestStand
resolves the path for the sequence file on the client system. When you run
the step on the client, TestStand resolves the path for the sequence file on
the server system.
You have three ways to manage your remote sequence files for remote
execution.
•
Add a common pathname to the search paths for the client and the
server so that each resolves to the same relative pathname.
•
Duplicate the files on your client and server system so that the client
edits an identical file to the file that the server runs.
•
Use absolute paths that specify a mapped network drive or full network
path so that the file that the client edits and the file the server runs are
the same sequence file.
When you execute a remote sequence, you cannot single-step or set
breakpoints in the remote sequence. If you enable tracing, TestStand
updates the status bar with tracing information for the remote sequence.
When a remote sequence executes on a server, the sequence context and call
stack includes only the sequences that run on the remote system. If you
want to access properties from the client sequence context, you must pass
the property objects or their values as parameters to the remote sequence.
You can use the TestStand API to access properties within a property
object.
TestStand User Manual
13-48
ni.com
Chapter 13
Module Adapters
Setting up TestStand as a Server for Remote Execution
If you want TestStand to invoke a sequence on a remote TestStand server
host, you must properly configure the server on the remote system. You
must enable the TestStand server to accept remote execution requests, you
must register the server with the operating system, and you must configure
the Windows system security to allow users to access and launch the server
remotely.
To allow the remote server to accept remote execution requests from a
client machine, you enable the Enable Remote Execution option on the
Remote Execution tab of the Station Options dialog box.
A TestStand server is active while the TestStand application
<TestStand>\bin\rengine.exe runs on a remote system. Each
TestStand client communicates with a dedicated version of the remote
engine application. In Windows 2000/NT, the remote server launches
automatically each time a TestStand client uses the server. In
Windows Me/9x, you must launch the remote server manually, and only
one client can use the server at a time. You can automatically launch the
server by placing a shortcut to the application in the startup folder on the
server system.
Note To exit REngine in Windows Me/9x, select <Ctrl-Alt-Del> to display the Close
Programs dialog box. Select REngine and click on the End Task button.
TestStand automatically registers the server during installation. If you want
to manually register or unregister the server, you can invoke the executable
with the /RegServer and /UnregServer command-line arguments
respectively.
Before a client can communicate with a server, you must configure the
security permissions for the server on the Windows system of the server.
For Windows 2000/NT, you must complete the following steps to configure
the security permissions for the server.
1.
Login using a userid that has administrator privileges.
2.
Run dcomcnfg from the command line, which displays the
Distributed COM Configuration Properties application window.
3.
On the Default Properties tab, verify that the Enable Distributed COM
on this computer option is enabled.
© National Instruments Corporation
13-49
TestStand User Manual
Chapter 13
Module Adapters
4.
On the Applications tab, select TestStand Remote Engine and then
click the Properties button. On the Identity tab of the TestStand
Remote Engine Properties dialog box, verify that the Interactive User
option is selected.
5.
You must give permission to the appropriate users so that they can
access the remote server. You should give access permissions to
everyone and give launch permission to appropriate users. Only users
who have launch permission are able to access the server. You can set
these permissions in one of the following ways:
–
Specify the default security on the Default Security tab of the
Distributed COM Configuration Properties application window.
–
Give individual users access to the server. On the Applications tab,
select TestStand Remote Engine and then click the Properties
button. Use the Security tab of the TestStand Remote Engine
Properties dialog box to configure the permissions for a specific
server.
For Windows Me/9x, you must complete the following steps to configure
the security permissions for the server.
TestStand User Manual
1.
Go to the Access Control tab of the Network Properties dialog box in
the Windows Control Panel, and enable User-level access control.
2.
Run dcomcnfg from the command line, which displays the
Distributed COM Configuration Properties dialog box.
3.
On the Default Properties tab, verify that the Enable Distributed COM
on this Computer option is enabled.
4.
On the Default Security tab, verify that the Enable Remote Connection
option is enabled.
5.
You must give permission to the appropriate users so that they can
access the remote server. You can set these permissions in one of the
following ways:
–
You can specify the default security on the Default Security tab of
the Distributed COM Configuration Properties dialog box.
–
You can give individual users access to the server. To give access,
you select the server name, TestStand Remote Engine, on the
Applications tab and then click the Properties button. On the
Security tab of the TestStand Remote Engine Properties dialog
box, you can add users to a list for access to the server.
13-50
ni.com
Chapter 13
Module Adapters
ActiveX Automation Adapter
The ActiveX Automation Adapter allows you to create ActiveX
Automation class objects and to call methods and access properties of
ActiveX automation objects. When you create an object, you can assign the
object reference to a variable or property for later use in other ActiveX
Automation Adapter steps. When you call methods and access properties,
you can specify an expression for each input and output parameter.
Specifying an ActiveX Automation Adapter Module
The Specify Module dialog box for the ActiveX Automation Adapter is
called the Edit Automation Call dialog box shown in Figure 13-21.
Figure 13-21. Specify Module Dialog Box for ActiveX Automation Adapter
The Edit Automation Call dialog box contains the following controls.
•
© National Instruments Corporation
ActiveX Reference—Specifies a variable or property of type ActiveX
Reference. When a step creates an object, the adapter assigns the
13-51
TestStand User Manual
Chapter 13
Module Adapters
object reference to the variable or property, if specified. Otherwise, the
adapter automatically releases the object reference after executing the
step. If the step does not create an object, but instead calls a method or
accesses a property, the ActiveX Reference control must contain the
value of a valid ActiveX reference that refers to the object on which to
call the method or access the property. You can use the Browse button
to access the Expression Browser dialog box.
•
Automation Server—Specifies the name of the server that the step
uses. The adapter populates the ring control with the list of the ActiveX
automation servers that are registered with Windows. To select a server
from the list, click the ring control, or use the Browse button to load a
type library file from disk for a specific server. TestStand registers the
type library with Windows. If you want the adapter to refresh the list
of registered servers and their type library information, click the
Reload button. You also refresh server type library information when
you select File»Unload All Modules.
•
Object Class—Specifies the name of the server class that the step uses
when it creates or invokes an object of that class. When you select a
server, the adapter populates the Object Class control with a list of
objects defined for that server. The ring control separates the list of
objects into two groups that are separated by a line. The upper group
includes all top-level objects that the adapter can create. The lower
group includes all other objects that the server creates as a result of an
invocation of a method or get property call. If a server type library
contains help strings or links to a help file for a class, click the ? button
to access the help.
•
Create Object—Specifies whether the step creates a new instance of
the object class when the adapter executes the step. When the step
creates an object and you specify a property name in the ActiveX
Reference control, the adapter assigns the value of the object handle to
the property. Otherwise, the adapter automatically releases the object
reference after it executes the step.
Note In the ActiveX Reference control, if you specify an existing ActiveX object such as
Runstate.Engine or Runstate.Sequence, you should not select Create Object. You
should select Create Object only when you want to create a new instance of an object.
When you create an object you can select one of the following options:
–
TestStand User Manual
Create New—Creates a new object and obtains a reference to the
object. If the server application is already running, this option
might or might not launch another copy of the application. The
13-52
ni.com
Chapter 13
Module Adapters
server application decides when to launch multiple copies of
itself.
•
–
Attach to Active—Obtains a reference to an active Application
object.
–
Create From File—Loads an existing object from a file, and
obtain a reference to the object. If the server application is already
running, this option might or might not launch another copy of the
application. The server application decides when to launch
multiple copies of itself. When you make this selection, the dialog
box displays a file selection control and a Browse button. You can
use these controls to specify the path of the file.
–
Remote Host (optional)—Specifies the remote system to create
the object on. This control dims when you select Attach to
Active. Refer to the Setting up TestStand as a Server for Remote
Execution section of this chapter as a guide for configuring a
remote server. Substitute references to the TestStand Remote
Engine with your own ActiveX Automation Server.
–
Specify Expression for Host—Specifies that the Remote Host
control contains an expression that the adapter evaluates at run
time to determine the name of the remote host.
–
Use Step Load/Unload Options to Specify Object Creation
Time and Lifetime—Controls the lifetime of an object the step
creates. If you do not set this option, the step creates the object
when the step begins and the step releases its internal reference to
the object when the step completes. If you set this option, the step
creates the object when the step loads according to its Load option
and holds an internal reference to the object until the step unloads
according to its Unload Option.
Call Method or Access Property—Specifies the class method that
the step invokes or specifies the class property that the step accesses.
The Type control lists the types of access that the server defines for the
selected object class. The options include Call Method, Set Property,
and Get Property. For example, if an object class does not have any
methods, the control does not list the Call Method option.
After you select the type of access, the adapter populates the Member
control with the method or property names that the class defines for the
access type. If a server type library contains help strings or links to a
help file for a method or property, select the ? button to access the help.
© National Instruments Corporation
13-53
TestStand User Manual
Chapter 13
Module Adapters
•
Parameters—Contains the input and output parameters for the
selected method or property. If the selected access type is Get Property,
the control usually contains a single output parameter. If the access
type is Set Property, the control usually contains a single input
parameter. When you call a method, the control can contain any
number of input and output parameters. The Adapter automatically
populates the Value field for parameters that have default values.
To specify an expression for each parameter, you can double-click the
parameter or you can select the parameter and click the Edit button.
When you make this selection, TestStand displays the Edit
<parameter> Value dialog box.
Figure 13-22 shows the Edit <parameter> Value dialog box.
Figure 13-22. Edit <parameter> Value Dialog Box
In the Edit <parameter> Value dialog box, the Type and Direction controls
indicate the ActiveX data type for the parameter and whether the parameter
is input, output, or both. In the Value control you specify the parameter
argument. For input parameters, you must specify a value for the parameter
argument. If an input parameter has a default value, you can click the Use
Default button to instruct the adapter to use the default value that the server
specifies. For optional parameters, you can leave the Value control empty
or you can specify the name of a variable, parameter, or property. If the type
library defines enumeration constants for input parameters, you can select
a constant from the Enumeration Constants control and click the Insert
button to copy the constant name to the expression in the Value control. The
server indicates which input parameters are optional. TestStand marks all
method output parameters as optional.
TestStand User Manual
13-54
ni.com
Chapter 13
Module Adapters
The ActiveX Automation Adapter supports the Variant data types shown in
Table 13-14.
Table 13-14. Variant Data Types Supported by the ActiveX
Automation Adapter
Variant Type
Variant Description
VT_EMPTY
nothing
VT_NULL
SQL-style Null
VT_I2
2-byte signed int
VT_I4
4-byte signed int
VT_R4
4-byte real
VT_R8
8-byte real
VT_CY
currency
VT_DATE
date
VT_BSTR
OLE Automation string
VT_DISPATCH
IDispatch FAR*
VT_ERROR
SCODE
VT_BOOL
True = -1, False = 0
VT_VARIANT
VARIANT FAR*
VT_UNKNOWN
IUnknown FAR*
VT_UI1
unsigned char
VT_ARRAY
SAFEARRAY*
The TestStand ActiveX Automation Adapter does not support the handling
of events that an ActiveX automation server generates.
Running and Debugging ActiveX Automation Servers
TestStand does not Step Into your automation server. To debug an
out-of-process executable server, you must launch the automation server in
the ADE that created the server and then you must independently launch
the sequence editor or run-time operator interface. If you want to debug an
in-process DLL server, you usually launch the sequence editor or run-time
operator interface from the ADE. When you work in Visual Basic, place
© National Instruments Corporation
13-55
TestStand User Manual
Chapter 13
Module Adapters
breakpoints in your automation server source code and select Run»Start
with Full Compile. In TestStand, run the sequence that calls into your
automation server and the execution will automatically break at the
breakpoint that you set in Visual Basic. Refer to your ADE documentation
for more information on debugging ActiveX Automation servers.
Configuring the ActiveX Automation Adapter
When you select to configure the ActiveX Automation Adapter in the
Adapter Configuration dialog box, TestStand displays the Automation
Adapter Configuration dialog box, shown in Figure 13-23.
Figure 13-23. Automation Adapter Configuration Dialog Box
TestStand User Manual
13-56
ni.com
Chapter 13
Module Adapters
The ActiveX Automation Adapter Configuration dialog box contains the
following controls:
•
Use Late Binding—Specifies whether the adapter uses late binding or
early binding. When you specify the module for an Automation step,
TestStand stores the IDs and names of the object and member that the
step calls. During execution, the Automation Adapter must invoke the
ActiveX Automation server and specify which object to create and
which member to call. You can use one of the following methods to
specify to the server what operations to perform on what object.
–
Early Binding—Configures the module adapter to use IDs.
–
Late Binding—Configures the module adapter to use names.
Early binding is more efficient but requires that the IDs for objects
and methods exposed by automation servers do not change. If you
are developing an automation server in an ADE that does not
provide direct control over IDs, National Instruments
recommends that you use late binding during development so
that inadvertent changes to IDs do not invalidate the module
information for the step. When you finish developing your
automation server, uncheck this option and update IDs in the
client sequences. To update the IDs in the client sequences, either
edit the module information for each step that references your
server or run the Tools»Update Automation Identifiers
command on each sequence file that contains Automation steps
that reference your server.
If you are using only a third-party or release version of an
automation server, or if you are developing a server in an ADE
that allows you to control your server’s IDs, National Instruments
recommends that you disable the Use Late Binding option.
When you configure the adapter to use late binding, the
Automation Adapter uses the stored names to determine the
proper IDs to use at run time. The Automation Adapter looks in
the most recent version of the type information for the server.
Servers also can specify type information in different languages
(locales). If the Automation Adapter cannot find a version of the
type information that uses the system default language ID,
it attempts to find type information that uses the English or
Neutral language IDs, in that order.
•
© National Instruments Corporation
Enable Run-Time ActiveX Reference Type Checking—Specifies
that the adapter verifies that the ActiveX Reference you specify in an
Automation Call is a reference to the correct type of object. This option
instructs the adapter to generate a run-time error when you pass an
13-57
TestStand User Manual
Chapter 13
Module Adapters
ActiveX Reference to an incorrect type of object. Disable this option
to improve execution speed.
•
Unload Unused ActiveX Serves After Execution—Specifies that the
Automation Adapter requests the operating system to unload
in-process (DLL) servers after every execution. The operating system
unloads only servers that you are no longer using. Disable this option
to improve execution speed.
•
Show Method Arguments in Step Description—Specifies that the
description for steps that use the Automation Adapter includes the
arguments that steps pass to the methods they call.
•
Show ActiveX Controls When Specifying a Module—Specifies that
the Automation Adapter Specify Module dialog box includes ActiveX
controls in the list of available servers.
Using ActiveX Servers with TestStand
This section discusses using ActiveX servers with TestStand.
Registering a Server
To register an ActiveX Automation server DLL, call the Windows
executable regsvr32.exe, using the DLL pathname as the command-line
argument. To unregister the DLL server, call regsvr32.exe using /u and
the DLL pathname as the command-line argument.
You usually can register an ActiveX Automation server executable by
running the server executable with the /RegServer command-line
argument. To unregister an executable server, call the executable with the
/UnregServer command-line argument.
Visual Basic does not automatically register a server when you build the
server DLL or executable. You must manually register the server as
outlined previously in this section. Visual Basic does temporarily register a
server when you run the server project inside the Visual Basic ADE. When
you complete the debugging session, Visual Basic unregisters the server.
Compatibility Issues with Visual Basic
If you are developing an automation server in an ADE that does not give
you direct control over IDs, you must ensure that the adapter can find the
server identifiers or the names defined in a TestStand step. When you
rebuild an ActiveX Automation server in Visual Basic, you can select one
of three compatibility options. Depending on the level of compatibility and
the changes you make to a project, Visual Basic compiles an appropriate
TestStand User Manual
13-58
ni.com
Chapter 13
Module Adapters
new server, which can contain new identifiers. To specify the level of
compatibility, select the Project Properties command from the Project
menu in Visual Basic. On the Project Properties dialog box, use the radio
buttons in the Version Compatibility section of the Components tab to
select the level of compatibility. Visual Basic has the following
compatibility options.
•
No compatibility—Specifies that when you rebuild a server with this
option, the new server maintains no compatibility with a previously
compiled server. Visual Basic generates new unique identifiers for the
server, and this action prevents any previously compiled client
application that uses early binding from working properly with the
server.
When you use this option to rebuild a server, Visual Basic changes the
IDs that it uses to uniquely identify the type information of the server.
TestStand therefore cannot properly update an Automation Adapter
step regardless of whether you configure the adapter for early or late
binding. National Instruments does not recommend use of this setting
with your TestStand projects.
•
Project compatibility—Causes Visual Basic to maintain the ID
assignments that it uses to uniquely identify the type information for
the server. You usually use this option when you have multiple projects
under development within Visual Basic. The setting is not meant to
assure compatibility with client applications that were not compiled in
Visual Basic and that use early binding. You can use the Project
compatibility option only after you build the server DLL or executable
a first time.
When you use this option to rebuild a server, TestStand can then use
the type information to determine the IDs associated with the names
stored in the step. It is recommended that you configure the
Automation Adapter to use late binding when you create a server and
select this option.
•
Binary compatibility—Causes Visual Basic to maintain the ID
assignments that it uses to identify objects and methods. When you use
this option Visual Basic attempts to maintain compatibility with
compiled client applications that use early binding. If you remove a
member from the server, Visual Basic can no longer maintain binary
compatibility. You can use the Binary compatibility option only after
you build the server DLL or executable a first time.
When you use this option to rebuild a server, TestStand can then use
the IDs stored in the step without accessing the type information at run
time. It is recommended that you configure the Automation Adapter to
use early binding when you create a server and select this option.
© National Instruments Corporation
13-59
TestStand User Manual
Chapter 13
Module Adapters
National Instruments makes the following recommendations regarding use
of the Visual Basic ActiveX Automation server in conjunction with
development of sequences within TestStand. These approaches ensure that
the ActiveX Automation adapter can properly find and invoke the server
after you recompile the server.
•
•
Use the following approach while you develop and debug sequences:
–
Use the Project Compatibility option to rebuild your server in
Visual Basic.
–
Configure the ActiveX Automation Adapter to use late binding.
Use the following approach when the interface for the server is
completely developed and debugged:
–
Use the Binary Compatibility option to rebuild your server in
Visual Basic.
–
Use the Tools»Update Automation Identifiers command to
assign the new server identifiers to the steps.
–
After you properly assign the new server identifiers to the steps,
you can enable the ActiveX Automation Adapter to use early
binding.
For more information on creating and debugging Visual Basic ActiveX
automation servers, refer to your Visual Basic documentation and to the
following Internet document:
Ivo Salmre, “Building, Versioning, and Maintaining Visual Basic
Components,” Microsoft Developer Network, Microsoft Corporation,
February 1998.
HTBasic Adapter
The HTBasic Adapter allows you to call HTBasic subroutines. You do not
pass parameters directly to a subroutine. Instead, the subroutine exchanges
data by calling get or set subroutines contained in an HTBasic CSUB.
These subroutines use the TestStand API to get data from and set data in
TestStand. For more information about using these subroutines, refer to the
Passing Data To and Returning Data From a Subroutine section in this
chapter.
TestStand User Manual
13-60
ni.com
Chapter 13
Module Adapters
Configuring the HTBasic Adapter
Figure 12-21 displays the HTBasic Adapter Configuration dialog box.
Figure 13-24. HTBasic Adapter Configuration Dialog Box
The HTBasic Adapter runs subroutines by communicating with a special
program running in an HTBasic application. An HTBasic application that
runs this program is called the HTBasic server. This server can be the
HTBasic development environment or the HTBasic run-time version. You
specify which server the adapter uses by selecting the appropriate control
in the HTBasic Server to use group of controls.
You can configure the paths to each executable. From the Use HTBasic
Development server ring control, specify the location of the development
version of the HTBasic server. From the Use HTBasic Runtime server
ring control, specify the location of the run-time version of the HTBasic
server.
Use the HTBasic Default Working Directory ring control to specify
where the HTBasic adapter sets the working directory prior to invoking a
subroutine. This setting applies only to HTBasic steps that set the step
Working Directory option to Use adapter default. The ring control has four
choices: Do not change working directory, HTBasic server directory,
Subroutine file directory, and Use specified directory. The default value is
© National Instruments Corporation
13-61
TestStand User Manual
Chapter 13
Module Adapters
Subroutine file directory. You can enable the browse button and edit box
only when you select Use specified directory.
Specifying an HTBasic Adapter Module
The Specify Module dialog box for the HTBasic Adapter is called the Edit
HTBasic Subroutine Call dialog box. The dialog box contains controls to
specify the subroutine file path, subroutine name, and other options.
Figure 12-22. displays the Edit HTBasic Subroutine Call dialog box.
Figure 13-25. Specify Module Dialog Box for HTBasic Adapter
The Subroutine File Pathname control specifies the HTBasic program file
that contains the subroutine the step calls. You can specify an absolute or
relative path name for the HTBasic program file. Relative path names are
relative to the TestStand search directory paths. You can customize the
TestStand search directory paths by selecting Configure»Search
Directories from the menu bar in the sequence editor.
To load and call a subroutine, you must write the subroutine file to disk
using the Store command instead of the Save command. HTBasic is only
able to programmatically load and run subroutines that have been stored.
TestStand User Manual
13-62
ni.com
Chapter 13
Module Adapters
The Subroutine Name control specifies the name of the subroutine the step
calls.
The HTBasic Working Directory group of controls allows you to specify
the options for the adapter to set the working directory of the HTBasic
server prior to invoking the subroutine. You should set this option if your
test code assumes a particular working directory path.
The ring control has five choices: Use adapter default, Do not change
working directory, HTBasic server directory, Subroutine file directory, and
Use specified directory. The default value is Use adapter default. You
enable the browse button and edit box only when you select Use specified
directory.
When the adapter executes a step that calls an HTBasic subroutine, the
adapter does not activate the HTBasic application. If you want the adapter
to activate the HTBasic application, enable the Show HTBasic Application
When Called control.
To create a code shell for a subroutine, click the Create Subroutine button.
If the HTBasic file that you specify does not already exist, the adapter
creates it. If the file already exists, the adapter prompts you to replace the
file. If the HTBasic code template file exists for the step type you selected
for this step, the adapter uses the template to create the new subroutine.
If you want to edit a subroutine that already exists, click the Edit
Subroutine button.
Debugging an HTBasic Adapter Module
To debug an HTBasic subroutine while executing the subroutine from
TestStand, you must configure the adapter to use the HTBasic development
environment as the HTBasic server.
If you select the Step Into command in TestStand when execution is
currently suspended on a step that calls an HTBasic subroutine, HTBasic
displays the HTBasic server window and pauses at the call of the
subroutine. When suspended, you can single step through the subroutine
using Alt-F1. When you have completed debugging a particular
subroutine, you must click the HTBasic Continue button to resume
execution and return control back to TestStand. After you step out of the
subroutine, TestStand suspends execution on the next step in the sequence.
For more information about debugging HTBasic programs, refer to your
HTBasic documentation.
© National Instruments Corporation
13-63
TestStand User Manual
Chapter 13
Module Adapters
Passing Data To and Returning Data From a
Subroutine
TestStand provides a library of CSUB routines that use the TestStand API
to access to TestStand variables and properties from an HTBasic
subroutine. Table 13-15 lists the HTBasic routines for accessing TestStand
properties.
Table 13-15. HTBasic routines for Accessing TestStand Properties
Function Name
TestStand Type
HTBasic Type
Getvalnumber
Number
REAL
Setvalnumber
Number
REAL
Getvalstring
String
STRING
Setvalstring
String
STRING
Getvalboolean
Boolean
INTEGER
Setvalboolean
Boolean
INTEGER
Getvalnumarray
Array of Number
Array of REAL
Setvalnumarray
Array of Number
Array of REAL
Getvalstrarray
Array of String
Array of STRING
Setvalstrarray
Array of String
Array of STRING
For more information about these subroutines, refer to the Using the API in
Different Programming Languages section of the TestStand Programmer
Help.
TestStand User Manual
13-64
ni.com
14
Process Models
This chapter discusses the purpose and usage of the process models that
come with TestStand. It also describes the directory structure that
TestStand uses for process model files and the special capabilities that the
TestStand sequence editor has for editing process model sequence files.
You can better understand the information in this chapter if you have
already read the Process Models section in Chapter 1, TestStand
Architecture Overview, which discusses the purpose of process models,
model callbacks, and entry points, and the relationship between a process
model and a client sequence file. This chapter does not repeat that
information.
TestStand Process Models
Table 14-1 lists the TestStand process models and their respective
sequence files. You can use the process models to control the testing
process on your test station.
Table 14-1. TestStand Process Models
Process Model
Process Model Sequence File
Sequential Model
<TestStand>\Components\NI\Models\
TestStandModels\SequentialModel.seq
Batch Model
<TestStand>\Components\NI\Models\
TestStandModels\BatchModel.seq
Parallel Model
<TestStand>\Components\NI\Models\
TestStandModels\ParallelModel.seq
The Sequential Model is the default TestStand process model. The Batch
and Parallel models have features to help you implement test stations that
test multiple UUTs at the same time.
You can create your own process models or you can modify a copy of a
model TestStand provides.
© National Instruments Corporation
14-1
TestStand User Manual
Chapter 14
Process Models
Features Common to all TestStand Process Models
All process models that TestStand provides identify UUTs, generate test
reports, log results to databases, and display UUT status information. These
process models also allow client sequence files to customize various model
operations by overriding model-defined callback sequences.
Process models provide execution and configuration entry points that you
use to configure model settings and to run client files under the model.
Model entry points typically appear in an application under the Execute and
Configure menus.
The models that TestStand provides have the following execution entry
points:
•
Single Pass—Tests one UUT or a single batch of UUTs without
identifying them.
•
Test UUTs—Tests and identifies multiple UUTs or UUT batches in a
loop.
The models that TestStand provides have the following configuration entry
points:
•
Report Options—Displays a dialog box in which you configure the
location and contents of report files.
•
Database Options—Displays a dialog box in which you configure the
logging of results to database tables.
•
Model Options—Displays a dialog box in which you configure the
number of test sockets and other options related to process models.
The Sequential Model disables this entry point.
When you select the Test UUTs entry to start an execution that continuously tests
UUTs, the execution does not use configuration changes you make to the Report, Database,
or Model options after the execution starts.
Note
Sequential Model
You typically use the Sequential model to test one UUT at a time. Although
you can manually or programmatically run multiple simultaneous
executions under the Sequential model, the Batch and Parallel models offer
more features to facilitate parallel testing. Because the Sequential Model is
the simplest process model, it is the easiest to modify.
TestStand User Manual
14-2
ni.com
Chapter 14
Process Models
Parallel and Batch Models
The Parallel and Batch models make it easier to simultaneously test groups
of similar UUTs. You use the Parallel and Batch models to run the same
test sequence on multiple UUTs at the same time.
For both the Parallel and Batch models, you specify the number of test
sockets in your system in the Model Options dialog box. To display the
Model Options dialog box, shown in Figure 14-1, select Configure»Model
Options.
Figure 14-1. The Model Options Dialog Box
The Model Options dialog box can contain the following controls.
•
Number of Test Sockets—Specifies the number of UUTs that the
system can test simultaneously. The Parallel and Batch process models
launch a separate test sequence execution for each test socket.
When running under a model, a sequence can inspect the value of
RunState.TestSockets.MyIndex to determine the zero-based
index of the test socket on which it is running. The value of
RunState.TestSockets.Count indicates the number of test
sockets in the system.
© National Instruments Corporation
14-3
TestStand User Manual
Chapter 14
Process Models
•
Hide Execution Windows—Specifies that the operator interface
application does not display windows for individual test socket
executions.
•
Tile Execution Windows—Specifies that the operator interface
application arranges test socket execution windows so they do not
overlap.
•
Sequential Batch Mode—Specifies that the model runs test socket
executions one at a time in ascending test socket order. This option is
only applicable to the Batch model.
•
Default Batch Synchronization—Specifies the Batch
Synchronization for sequence files that do not change their Batch
Synchronization setting from the default value of Use Model Setting.
This option is only applicable to the Batch model. Because the default
batch synchronization setting for a step is Use Sequence File Setting
and the default batch synchronization setting for a sequence file is Use
Model Setting, setting the Default Batch Synchronization setting in the
model effectively changes the batch synchronization setting for all
steps that do not specify a non-default setting. Refer to the Batch
Synchronization section of Chapter 11, Synchronization Step Types,
for more information about the batch synchronization settings.
•
Bring UUT Dialog to Front When Status Changes—Specifies that
the UUT dialog box activates whenever a UUT completes testing or
when a test socket execution terminates.
Parallel Model
Use the Parallel model to control multiple independent test sockets. The
parallel model allows you to start and stop testing on any socket at any time.
For example, you might have five test sockets for testing radios. The
parallel model allows you to load a new radio into an open socket while the
other sockets are busy testing other radios.
When you select the Single Pass entry point, the Parallel model launches a
single pass execution for each test socket without prompting for UUT serial
numbers.
TestStand User Manual
14-4
ni.com
Chapter 14
Process Models
When you select the Test UUTs entry point, the Parallel model displays the
Test UUTs dialog box, shown in Figure 14-2.
Figure 14-2. Parallel Model Test UUTs Dialog Box
The Test UUTs dialog box enables you to view the status and control
testing on each test socket in your system. The Test UUTs dialog box can
contain the following controls:
•
Test Socket—Displays the test socket index.
•
UUT Serial Number—Enters a serial number that identifies the UUT
in the test socket.
•
OK—Starts an execution on the test socket. The execution tests UUTs
in a loop until you stop, terminate, or abort.
•
Stop—Stops testing on the test socket. If the test socket is currently
testing a UUT, the test socket stops execution after the current UUT
completes.
© National Instruments Corporation
14-5
TestStand User Manual
Chapter 14
Process Models
•
Next UUT—Acknowledges the completion of the current UUT. After
you press the Next UUT button, you can enter a new UUT serial
number and press OK to start testing the next UUT.
•
View Report—Displays the report for the UUT in the test socket. You
can select whether to view only the report for the current UUT or to
view the entire file that you configure UUT reports for the test socket
to append to.
•
Terminate—Terminates the execution for the test socket.
•
Abort—Aborts the test execution for the test socket. The test sequence
does not run its cleanup steps.
•
Restart—Resumes testing on a test socket you stop, terminate, or
abort. After you press the Restart button, you can enter a new UUT
serial number and press OK to start testing a new UUT.
•
Stop All—Stops testing on all test sockets. Test sockets that are
currently testing UUTs do not stop until their current UUT completes.
•
Terminate All—Terminates the test executions for all test sockets.
•
Abort All—Aborts the test executions for all test sockets. The test
sequences do not run their cleanup steps.
•
Exit—Exits the Test UUTs dialog box. The dialog disables its controls
and does not exit until all test sockets complete testing their current
UUTs.
Batch Model
Use the Batch model to control a set of test sockets that test multiple UUTs
as a group. For example, you might have a set of circuit boards attached to
a common carrier. The Batch model ensures that you start and finish testing
all boards at the same time. The Batch model also provides batch
synchronization features. For example, you can specify that, because a
particular step applies to the batch as a whole, the step runs only once per
batch instead of once for each UUT. The batch model also enables you to
specify that certain steps or groups of steps cannot run on more than one
UUT at a time or that certain steps must run on all UUTs at the same time.
The batch model can generate batch reports that summarize the test results
for the UUTs in the batch.
When you select the Single Pass entry point, the Batch model launches a
single pass execution for each test socket without prompting for UUT serial
numbers.
TestStand User Manual
14-6
ni.com
Chapter 14
Process Models
When you select the Test UUTs entry point, the Batch model displays the
Batch UUT Identification dialog box, shown in Figure 14-3.
Figure 14-3. Batch UUT Identification Dialog Box
The Batch UUT Identification dialog box enables you to specify the UUTs
and test sockets on which to initiate a batch test. The Batch UUT
Identification dialog box can contain the following controls:
•
Batch Serial Number—Identifies the serial number of the batch of
UUTs to test. Leave the control empty if there is no applicable serial
number.
•
Test Socket—Displays the test socket index.
•
UUT Serial Number—Identifies the serial number of the UUT to test
in the test socket.
© National Instruments Corporation
14-7
TestStand User Manual
Chapter 14
Process Models
•
Status Message—Displays the state of the test socket or displays a
prompt.
•
Disable Test Socket—Disables the test socket.
•
Go—Starts testing for the current batch of UUTs. The batch model
runs an instance of the client sequence file in a separate execution for
each test socket.
•
Stop—Exits the dialog box without starting another batch test.
When a UUT batch completes, the Batch model displays the Batch Results
dialog box.
Figure 14-4. Batch Results Dialog Box
TestStand User Manual
14-8
ni.com
Chapter 14
Process Models
The Batch Results dialog box enables you to view the status and reports for
each test socket and UUT when a batch test completes. The Batch Results
dialog box can contain the following controls:
•
Batch Serial Number—Displays a serial number that identifies the
batch of UUTs.
•
View Batch Report—Display the report for the batch. You can select
whether to view the report for the current batch only or to view the
entire file that you configure batch reports to append to.
•
Test Socket—Displays the test socket index.
•
UUT Serial Number—Displays a serial number that identifies the
UUT in the test socket.
•
View Report—Display the report for the UUT in the test socket. You
can select whether to view the report for the current UUT only or to
view the entire file that you configure UUT reports for the test socket
to append to.
•
Status Message—Displays the final status of the UUT.
•
Next Batch—Returns to the Batch UUT Identification dialog box.
Selecting the Default Process Model
To change your default process model, select Configure»Station Options
and click the Model tab. Select a model from the from the Station Model
ring control or click the Browse button and select a process model sequence
file. You also can use the Sequence File Properties dialog box to specify
that a sequence file always uses a particular process model.
Directory Structure for Process Model Files
The TestStand installer places process model files in the
<TestStand>\Components\NI\Models\TestStandModels
directory.
The default process model consists of a process model sequence file and
several supporting sequence files and code modules. The name of the
default process model sequence file is SequentialModel.seq. TestStand
also includes two other process models whose sequence files are
ParallelModel.seq and BatchModel.seq.
© National Instruments Corporation
14-9
TestStand User Manual
Chapter 14
Process Models
For information on the implementation of the process models that
TestStand installs, refer to <TestStand>\Components\NI\Models\
TestStandModels\TestStandProcessModels.pdf.
If you want to modify a TestStand process model, copy the
TestStandModels directory to a new subdirectory under the
<TestStand>\Components\User\Models directory. In the new
directory, rename the process model sequence files and any code module
files. Update the process model sequence file you are customizing to call
the modules with the new file names you select. By placing your
modifications under <TestStand>\Components\User, you ensure that
a newer installation of TestStand does not overwrite your customizations.
The list of search paths in TestStand includes the subdirectories in
<TestStand>\Components\User. Not only do you use the
<TestStand>\Components\User directory to protect your customized
components, you also use it as the staging area for the components that you
include in your own run-time distribution of TestStand.
When you create a custom process model, you must establish your custom
process model sequence file as the process model for the station. You make
this assignment in the Model tab of the Station Options dialog box.
Special Editing Capabilities for Process Model
Sequence Files
The TestStand sequence editor has specific features for creating or
modifying process model sequence files.
If you want TestStand to treat a sequence file as a process model, you must
mark it as a process model file. To do so, select Edit»Sequence File
Properties. In the Sequence File Properties dialog box, select the
Advanced tab. On the Advanced tab, select the Model entry in the Type ring
control.
TestStand User Manual
14-10
ni.com
Chapter 14
Process Models
Figure 14-5 shows the settings on the Advanced tab of the Sequence File
Properties dialog box.
Figure 14-5. Process Model Settings on the Advanced Tab
of the Sequence File Dialog Box
Although you edit a process model sequence file in a regular Sequence File
window, the file has special contents. In particular, some of the sequences
in the files are model entry points, and some are model callbacks. TestStand
maintains special properties for the entry point and callback sequences.
You can specify the values of these properties when you edit the sequences
in a process model file. When you access the Sequence Properties dialog
box for any sequence in a model file, the dialog box contains a Model tab.
Sequence Properties Model Tab
To access the Sequence Properties dialog box, select the Sequence
Properties item from the context menu in a step list of an individual
sequence view, or select the Properties item from the context menu for a
sequence in the All Sequences view. If the sequence file is a process model
file, the dialog box contains a Model tab. The first control on the Model tab
is the Type ring control.
© National Instruments Corporation
14-11
TestStand User Manual
Chapter 14
Process Models
Figure 14-6 shows the pull-down menu for the Type ring control.
Figure 14-6. Type Ring Control in the Sequence Properties Model Tab
The Type ring control lists the different types of sequences that a process
model file can contain. The following sections describe these different
types of sequences.
Normal Sequences
A normal sequence is any sequence other than a callback or entry point. In
a process model file, you use normal sequences as utility subsequences that
the entry points or callbacks call. When you select the Normal entry in the
Types ring control, nothing else appears on the Model tab.
Callback Sequences
Model callbacks are sequences that entry point sequences call and that the
client sequence file can override. By marking sequences in a process model
file as callbacks, you specify the set of process model operations that a
sequence developer can customize. When editing the client file, the
sequence developer can override the callback by selecting Edit»Sequence
File Callbacks. Refer to the Sequence View Context Menu section in
Chapter 5, Sequence Files, for more information on using the Sequence
File Callbacks dialog box.
Some model callbacks have full implementations. For example, the
TestReport callback in the default process model is sufficient to handle
most types of test results. Other model callbacks are merely placeholders
that you override with sequences in the client file. For example, the
MainSequence callback in the model file is a placeholder for the
MainSequence callback in the client file.
When you select the Callback entry in the Type ring control, the Copy Steps
and Locals when Creating an Overriding Sequence checkbox appears. This
checkbox determines TestStand behavior when you click the Add button in
the Sequence File Callbacks dialog box to create an overriding sequence in
the client file. If you enable the checkbox, TestStand copies all the steps and
TestStand User Manual
14-12
ni.com
Chapter 14
Process Models
local variables in the callback sequence in the model file to the callback
sequence that you create in the client file. TestStand always copies the
sequence parameters regardless of the checkbox setting.
Entry Point Sequences
Entry point sequences are sequences that you can invoke from the menus
in the TestStand sequence editor or from an operator interface program.
You can specify two different types of entry points:
•
execution entry point—Runs test programs. Execution entry points
typically call the MainSequence callback in the client file. The
default process model contains two execution entry points: Test UUTs
and Single Pass. By default, execution entry points appear in the
Execute menu. Execution entry points appear in the menu only when
the active window contains a sequence file that has a MainSequence
callback.
•
configuration entry point—Configures a feature of the process model.
Configuration entry points usually save the configuration information
in a .ini file in the <TestStand>\Cfg directory. By default,
configuration entry points appear in the Configure menu. For
example, the default process model contains the configuration entry
point, Config Report Options. The Configure Report Options
entry point appears as Report Options in the Configure menu.
When you select Execution Entry Point or Configuration Entry Point from
the Type ring control, a number of controls appear on the Model tab. The
contents of the Model tab are the same for all types of entry points.
© National Instruments Corporation
14-13
TestStand User Manual
Chapter 14
Process Models
Figure 14-7 shows the contents of the Model tab for the Test UUTs
execution entry point.
Figure 14-7. Model Tab for an Execution Entry Point Sequence
The Model tab for an Execution Entry Point Sequence contains the
following controls:
TestStand User Manual
•
Entry Point Name Expression—Specifies a string expression for the
menu item name of the entry point. If you specify a literal string for
the menu item name, you must enclose it in double quotation marks.
If you want to store the name in a string resource file, you can use the
ResStr expression function to retrieve the name from the file. Refer
to the Expressions section in Chapter 8, Sequence Context and
Expressions, for more information.
•
Entry Point Enabled Expression—Specifies a Boolean expression
that TestStand evaluates to determine whether to enable the menu item
for the entry point. If the expression evaluates to False, TestStand
14-14
ni.com
Chapter 14
Process Models
dims the entry point in the menu. If the expression is empty, the entry
point is enabled in the menu.
•
Menu Hint—Specifies a menu for the entry point. If you leave the
Menu Hint control empty, TestStand uses the default menu for the
entry point type. Click the arrow at the right edge of the control to pull
down a menu that contains the following entries: File, Edit, View,
Execute, Debug, Configure, Window, and Help.
You can enter one or more names directly in the control. If you specify
multiple names, you must separate them with commas. TestStand uses
the first menu name in the list that it can find in the operator interface.
This option is useful if you use multiple operator interfaces that have
different menu names. If TestStand cannot find any menus in the
operator interface with the names that you list in the control, it uses the
default menu for the entry point type.
•
Allow Interactive Execution of Entry Point—Specifies whether you
can invoke the entry point for steps you run interactively.
•
Entry Point Ignores Client File—Prevents the sequence from using
the client file. This option prevents TestStand from preloading the
client sequence file when you run the entry point even if the client
sequence file is set to preload when execution begins. For example, the
Configure Report Options entry point uses this option so that the
Configure»Report Options command is available for you to use even
when TestStand is unable to preload the modules in the active sequence
file.
When you run the entry point, TestStand uses the callback
implementations in the model file regardless of whether the client file
overrides them.
•
Hide Entry Point Execution—Prevents TestStand from displaying an
Execution window for the execution of the entry point. If you enable
this option, you do not see a window for the execution unless a
run-time error or breakpoint occurs.
•
Save Modified Sequence Files Before Execution—Causes TestStand
to save the contents of windows to disk when you invoke the entry
point. If this option is enabled when you run the entry point, TestStand
checks all windows that have pathnames. If one or more windows have
changes that you have not yet saved, TestStand prompts you to save
your changes. If you click Yes, TestStand saves the files.
•
Show Entry Point Only in Editor—Causes the entry point to appear
only in the TestStand sequence editor and not in the run-time operator
interfaces.
© National Instruments Corporation
14-15
TestStand User Manual
Chapter 14
Process Models
TestStand User Manual
•
Show Entry Point for All Windows—Causes the entry point to
appear in the menu regardless of the type of window, if any, that is
currently active. For example, the Configure Report Options
entry point configures the report options for the model and has no
client-specific effects. Thus, you might want to access it from any
window or even when no window is active. When you enable this
option, TestStand dims the remaining two checkboxes.
•
Show Entry Point When Client File Window is Active—Causes the
entry point to appear in the menu when a Sequence File window is the
active window. For example, the execution entry points appear in the
Execute menu only when a sequence file is active.
•
Show Entry Point When Execution Window is Active—Causes the
entry point to appear in the menu when an Execution window is the
active window.
14-16
ni.com
15
Managing Reports
This chapter describes how to manage and use test reports in TestStand.
Implementation of the Test Report Capability
Most of the test report capabilities that this chapter describes are not native
to the TestStand engine or sequence editor. Instead, the default process
model that comes with TestStand implements the test report capabilities.
This approach allows you to customize all aspects of test reports. Refer to
<TestStand>\Components\NI\Models\TestStandProcessModels
.pdf for more information.
If you do not modify or replace the test report implementation in the
process model, you can still customize the contents of test reports using the
Report Options dialog box that the default process model provides. Refer
to the Report Options Dialog Box section in this chapter for more
information.
The default process model relies on the automatic result collection
capability of the TestStand engine to accumulate the raw data for the test
report for each UUT. The TestStand engine can automatically collect the
result of each step into a result list for an entire sequence. The result list for
a sequence contains the result of each step that runs and the result list of
each subsequence call it makes. The default process model calls the main
sequence in the client sequence file to test a UUT. Thus, the result list that
the TestStand engine accumulates for the main sequence contains the raw
data for the test report for the UUT. Refer to the Result Collection section
in Chapter 6, Sequence Execution, for information on automatic result
collection.
© National Instruments Corporation
15-1
TestStand User Manual
Chapter 15
Managing Reports
Using Test Reports
The Test UUTs and Single Pass entry points in the TestStand process
models generate UUT test reports. The Test UUTs entry point generates a
test report and writes it to disk after each pass through the UUT loop. The
Configure»Report Options menu item displays the Report Options dialog
box, where you can set options that determine the contents and format of
the test report and the names and locations of test report files.
In the TestStand sequence editor, the Report tab of the Execution window
displays the report for the current execution. Usually, the Report tab is
empty until execution completes. The default process model can generate
reports in either HTML or ASCII text formats.
The Report tab can display reports in HTML, XML, or ASCII text. You also
can use an external application to view reports in these or other formats by
selecting View»Launch Report Viewer when an Execution window is
active. Use the menu item Configure»External Viewers to specify the
external application that TestStand launches to display a particular report
format.
TestStand User Manual
15-2
ni.com
Chapter 15
Managing Reports
Figure 15-1 shows a test report in HTML text format, as it appears on the
Report tab of an Execution window.
Figure 15-1. HTML Test Report on the Report Tab
© National Instruments Corporation
15-3
TestStand User Manual
Chapter 15
Managing Reports
Figure 15-2 shows a test report in ASCII format as it appears on the Report
tab of an Execution window.
Figure 15-2. ASCII-Text Test Report on the Report Tab
TestStand User Manual
15-4
ni.com
Chapter 15
Managing Reports
Failure Chain in Reports
For UUTs that fail, HTML and Text reports include a failure chain section
in the report header. The first item in the failure chain table shows the step
whose failure causes the UUT to fail. The remaining items show the
sequence call steps through which the execution reaches the failing step. In
HTML reports, each step name in the failure chain is a hyperlink to the
section of the report that displays the result for the step. Figure 15-3 shows
a failure chain in which the failure of the Register step in CPU.seq causes
the UUT to fail when the CPU step in computer.seq calls CPU.seq.
Figure 15-3. Failure Chain in HTML Report
© National Instruments Corporation
15-5
TestStand User Manual
Chapter 15
Managing Reports
Batch Reports
When you use the Batch process model, the model generates a batch report
in addition to a report for each UUT. The batch report summarizes the
results for all the UUTs in the batch. When the report format is HTML, the
batch report provides hyperlinks to each UUT report. Figure 15-4 shows an
example batch report.
Figure 15-4. Example Batch Report
You can use the Report File Pathname tab on the Report Options dialog box
to specify that all batch and UUT reports reside in the same file, that all
reports reside in separate files, or you can select one of several intermediate
configurations. The Report File Pathname tab on the Report Options dialog
box provides a graphical indicator to illustrate how the options you select
affect the names and contents of the report files. Refer to the Report File
Pathname Tab section for more information on the indicators.
Report Options Dialog Box
To access the Report Options dialog box, select Configure»Report
Options.
You can customize the generation of report files in the Report Options
dialog box. When you use the Test UUTs and Single Pass items in the
TestStand User Manual
15-6
ni.com
Chapter 15
Managing Reports
Execute menu, the settings in the Report Options dialog box apply to all
sequences that you run on a station.
When you select the Report Options command, TestStand calls the
Config Report Options entry point in the default process model. Thus,
while the dialog box is active in the sequence editor, the Running tag
appears on the left side of the status bar of the sequence editor window.
The Report Options dialog box contains two tabs: the Contents tab and the
Report File Pathname tab.
Contents Tab
Figure 15-5 shows the Contents tab of the Report Options dialog box.
Figure 15-5. Report Options Dialog Box—Contents Tab
© National Instruments Corporation
15-7
TestStand User Manual
Chapter 15
Managing Reports
The following controls appear on the Contents tab of the Report Options
dialog box:
•
Disable Report Generation—Prevents generation of a test report.
•
Include Step Results—Displays the results of each step. Disable this
checkbox if you want to include only a header for each UUT. The
header indicates whether the UUT passed or failed.
•
Result Filtering Expression—Applies a filtering expression to
determine what steps appear in the report. Specifically, this control
contains an expression that the report generator evaluates for each step
result. The report generator includes the step in the report when the
expression evaluates to True.
You can use any subproperty in the expression but you must you use
Result in place of Step.Result. For example, if you want to
include only failing steps in the report, set the expression to
Result.Status == "Failed". Use the ring control to select
predefined expressions for all steps, only failing steps, or only passing
steps.
•
Include Test Limits—Adds to the report all result properties that
indicate that they contain test limits.
•
Include Measurements—Adds to the report all result properties that
indicate that they contain measurements. When you include
measurements, you can configure the following controls:
–
–
TestStand User Manual
Include Arrays—Specifies whether the report displays
measurement values that are numeric arrays. You can select from
the following options:
•
Do Not Include Arrays—Numeric array values do not
appear in the report.
•
Insert Table—Numeric array values appear in tables.
•
Insert Graph—Numeric array values appear in graphs. This
option is available for HTML reports only.
Filter—Specifies options for limiting the amount of data the array
measurements add to the report. You can select from the following
options:
•
Include All—All numeric array elements appear in the
report.
•
Include Up To Max—The report truncates numeric arrays to
the maximum size in the Max Elements control.
15-8
ni.com
Chapter 15
–
Managing Reports
•
Exclude If Larger Than Max—The report does not display
array measurements that contain more than the number of
elements in the Max Elements control.
•
Decimate If Larger Than Max—The report samples and
displays the specified maximum number of elements from
arrays that contain more than the number of elements in the
Max Elements control.
Max Elements—Specifies the maximum array size that applies to
options you select in the Filter control.
•
Include Execution Times—Adds to the report the time each step
module takes to execute. This information includes the time that the
subsequence, LabVIEW VI, or C function requires to execute. It does
not include the time that the TestStand engine requires to evaluate
preconditions, load the step module, and so on.
•
Append if File Already Exists—Appends the report to the target file,
if the target file already exists. If you disable this option, the report
overwrites the target file. If you create a separate report for each UUT
and you disable this option, the report for each UUT overwrites the
target file, if it already exists.
•
Default Numeric Format—Determines how the report formats
numeric values for which you did not specify a numeric format.
•
Report Format—Specifies the output format of the report file. Use
this ring control to select either a Web Page format (.html) or an
ASCII Text format (.txt).
•
Report Colors—Specifies the colors of the report. This option is only
available when you select the Web Page format.
•
Select a Report Generator for Producing the Report
Body—Contains radio buttons that make TestStand use a sequence or
use a DLL to produce the body of the report. The report body is the
section of the report between the header and footer that contains
individual results for each sequence and step that TestStand called.
In the default TestStand process model, the TestReport callback
determines whether TestStand builds the report body with a sequence
call or with a DLL call.
If you select the sequence report generation option, TestReport calls
the AddReportBody sequence in either ReportGen_txt.seq or
ReportGen_html.seq to build the report body. The sequence report
generator uses a series of sequences with steps that recursively process
the result list for the execution.
© National Instruments Corporation
15-9
TestStand User Manual
Chapter 15
Managing Reports
If you select the DLL report generation option, TestReport calls a
function in the modelsupport.dll to build the report body. The
DLL report generator is a single call into a C-language DLL that
processes the entire result list for the execution before returning. You
can access the project and source code for the LabWindows/CVI-built
DLL. If you select the DLL option, TestStand generates reports faster,
but TestStand does not call ModifyReportEntry callbacks.
Report File Pathname Tab
Figure 15-6 shows the Report File Pathname tab of the Report Options
dialog box.
Figure 15-6. Report Options Dialog Box—Report File Pathname Tab
TestStand User Manual
15-10
ni.com
Chapter 15
Managing Reports
You can specify a fixed pathname to use for all report files, or you can
specify options that the report generator uses to generate report file
pathnames. The Report File Pathname tab of the Report Options dialog box
contains a Generate Report File Path section. This section provides a
graphical indicator to illustrate how the options you select affect the names
and contents of the report files.
The controls that appear on the Report File Pathname tab vary according to
the process model you use. The tab can contain the following controls:
•
Specify Fixed Report File Path—When you select the Specify Fixed
Report File Path radio button, you enable the Report File Path control
in which you can specify a pathname that applies to all report files. You
must specify an absolute pathname. Each report file that the report
generator creates overwrites the previous report file, unless you enable
the Append if File Already Exists option on the Contents tab.
•
Use Temporary File—Enables the control in which you set the
pathname for a temporary report file. The report generator deletes the
file when you close the Execution window. Enable this option when
you do not want to save your test report after you close the Execution
window.
•
Directory—Specifies the directory in which the report generator
writes the report file. In the ring control, you can choose one of the
following options.
•
© National Instruments Corporation
–
Client Sequence File Directory—The directory that contains the
client sequence file. For example, if you choose the Test UUTs
item from the Execute menu when the
d:\Tests\MySeqs\Seq2.seq sequence file is active, the report
generator writes the report file in the d:\Tests\MySeqs
directory.
–
<TestStand Directory>\reports\—The reports subdirectory in
the TestStand directory.
–
Specific Directory—A directory that you specify in the string
control that appears under the ring control. You must enter an
absolute path in the string control.
Base Name—Specifies the base name for the report filename.
Depending on your settings for other options, the report generator
might add text to the base name. Do not include a file extension in
this control.
15-11
TestStand User Manual
Chapter 15
Managing Reports
TestStand User Manual
•
Batch Base Name—Specifies the base name for the batch report file
name. Depending on your settings for other options, the report
generator might add text to the batch base name. Do not include a file
extension in this control. This control is available only when you use
the Batch process model.
•
Prefix Sequence File Name to Report File Name—Adds the base
name of the client sequence file to the beginning of the name you
specify in the Base Name control. For example, if the client file name
is auto.seq and you enter report in the Base Name control,
TestStand names an HTML version of the report
auto_report.html.
•
Add Time and Date to File Name—Appends a string containing the
current time and date in localized format to the base name of the report
file. For example, auto_report.html might become
auto_report[12 47 54 PM][6 24 99].html. You can select
Append Time First, Append Date First, Time Only, or Date Only from
the ring control to specify how the time and date append to the file
name.
•
Force File Name to be Unique—Appends a unique numeric value
to the report file name if the file already exists. For example,
auto_report.html might become auto_report_00002.html.
•
Use Standard Extension for Report Format—TestStand applies the
file format extension that corresponds to the report format you specify
on the Contents tab of this dialog box. Otherwise, you can enter a file
format extension, such as doc in the Extension control. Notice that you
do not include the dot character in your entry.
•
Append UUT Serial Number to Report File Name—Appends the
UUT serial number to the report file name. For example,
auto_report.html might become
auto_report[ABC12345].html. This option causes the report
generator to create a separate file for each UUT.
•
Append Batch Serial Number to UUT Report File
Name—Appends the batch serial number to the UUT report file name.
This option prevents the report generator from storing in the same file
UUT reports from different batches. This control is available only
when you use the Batch process model.
•
Append Test Socket Index to UUT Report File Name—Appends
the test socket index number to the UUT report file name. This option
prevents the report generator from storing in the same file UUT reports
from different test sockets. This control is available only when you use
the Batch or Parallel process model.
15-12
ni.com
Chapter 15
Managing Reports
•
Append Batch Serial Number to Batch Report File
Name—Appends the batch serial number to the batch report file name.
This option prevents the report generator from storing in the same file
batch reports from different batches. This control is available only
when you use the Batch process model.
•
Store UUT Report in Batch Report File—Stores UUT reports in the
same file as the batch report. This control is available only when you
use the Batch process model.
Property Flags that Affect Reports
TestStand provides several flags that affect reporting that you can set
on variables and properties. These flags are IncludeInReport,
IsMeasurement, and IsLimit. The report generator uses these flags to
identify result properties to automatically display in the report. Refer to the
Property Flags section of Chapter 9, Types, for a description of property
flags.
TestStand step types set the IncludeInReport flag on a subset of their
result properties to specify that these properties automatically appear in the
report. TestStand step types also set the IsMeasurement and IsLimit
flags on properties that hold output values or limit values. The report
generator uses these flags to selectively exclude limits or output values
according to the option you select in the Report Options dialog box. If an
array or container property sets a reporting flag, the report generator also
considers the flag to be set for all array elements or subproperties within the
containing object.
When you set the IncludeInReport, IsMeasurement, and IsLimit
flags on result properties in custom step types you create, you cause the
report generator to format the properties into the report. Depending on your
report formatting requirements, you might use these flags to achieve the
report output you want without changing the report generator.
© National Instruments Corporation
15-13
TestStand User Manual
Run-Time Operator Interfaces
16
This chapter describes how to create or customize an operator interface
application. It also describes the various operator interface applications that
come with TestStand. For more information on the architecture and design
of an operator interface, refer to the Writing an Application topic in the
TestStand Programmer Help.
Overview
TestStand includes four full run-time operator interfaces in both source and
executable form, so they are fully customizable. Each run-time operator
interface is a separate application program that uses the TestStand API.
The operator interfaces differ primarily based on the language and ADE in
which each is developed. TestStand includes run-time operator interfaces
developed in LabVIEW, LabWindows/CVI, Visual Basic, and Delphi.
Like the sequence editor, the run-time operator interfaces allow you to start
multiple concurrent executions, set breakpoints, and single-step. Unlike the
sequence editor, however, the run-time operator interfaces do not allow you
to modify sequences, and they do not display sequence variables, sequence
parameters, step properties, and so on.
If you are not an experienced programmer, you might find the source code
for each run-time operator interface somewhat complex. Before you start
attempting to customize the source code for a run-time operator interface,
you should first familiarize yourself with the TestStand API, as follows:
1.
Thoroughly read the TestStand API Overview section in the TestStand
Programmer Help. This section contains an overview of the TestStand
ActiveX Server functionality and discusses how to call the API from
different programming languages. Also familiarize yourself with the
available methods and properties of each object class in the API.
2.
Read the topic Writing an Application in the TestStand Programmer
Help document. The topic describes the architecture and design of an
operator interface.
3.
Review the example projects and source code located in the
<TestStand>\Examples\OperatorInterfaces directory. These
© National Instruments Corporation
16-1
TestStand User Manual
Chapter 16
Run-Time Operator Interfaces
examples illustrate the basic programming requirements for creating
a simple operator interface application that uses the TestStand API.
The first decision you must make is whether you should customize one of
the run-time operator interfaces that TestStand includes, or create your own
application from the ground up. For example, you might want a simple
operator interface application on your production floor that does not allow
you to debug an execution or display the details of an execution that the
TestStand engine is running. Attempting to customize and remove
functionality from a fully functional run-time operator interface application
might be too time consuming. Instead, you can customize one of the
examples in the <TestStand>\Examples\OperatorInterfaces
directory or create your own application from the ground up.
TestStand Run-Time Operator Interfaces
TestStand installs the executable, project, and source files for each
fully functional run-time operator interface in the <TestStand>\
OperatorInterfaces\NI directory tree. If you want to customize one
of these run-time operator interfaces, copy the operator interface project
and source files from the NI subdirectory to the <TestStand>\
OperatorInterfaces\User subdirectory before customizing them.
This practice ensures that a newer installation of TestStand does not
overwrite your customizations. In addition, National Instruments
recommends that you track the changes you make to the operator interface
source so that you can integrate your changes with any enhancements from
future versions of the TestStand run-time operator interfaces.
LabWindows/CVI Run-Time Operator Interface
TestStand installs the executable, project, and source files for the
LabWindows/CVI run-time operator interface in the <TestStand>\
OperatorInterfaces\NI\CVI directory. Table 16-1 lists the files
included in the testexec.prj project file and describes the purpose of
each file.
Table 16-1. Files in the LabWindows/CVI Run-Time Operator Interface Project File
File
Description
cfgfile.c
Contains code to save and restore settings, and the most-recently-used-files
list to a file in the same directory as the executable or project.
cvibmp.c
Contains code to translate icon bitmaps from the Windows bitmap format into
the LabWindows/CVI bitmap format.
TestStand User Manual
16-2
ni.com
Chapter 16
Run-Time Operator Interfaces
Table 16-1. Files in the LabWindows/CVI Run-Time Operator Interface Project File (Continued)
File
Description
data.c
Contains global settings and data that other source modules access. Contains
lists of data about loaded sequence files, executions, icons, and adapters. It
also contains an API to access the lists of data.
engine.c
Contains all the code that accesses the TestStand ActiveX automation server.
Also creates and destroys the records of data for sequence files, executions,
sequences, steps, and so on.
exedisp.c
Contains all the code for updating execution displays. Each execution display
has its own data record for its panel. Many of the functions in this module
access that data record to update settings, data, and display information.
filelist.c
Contains code to maintain, save, and restore the most-recently-used-file list at
the bottom of the File menu.
main.c
Contains the main procedure for the program, and consequently calls the
initialization and cleanup routines for the application. It also contains the
highest-level code for processing the command-line arguments.
maingui.c
Contains all the graphical user interface code that is not specific to the
execution display or sequence display. This includes code to handle the single
window (tab-dialog) setting of the application as well as initialization and
cleanup of the different display components such as the Tools menu. Also, this
file contains all user interface callbacks that are common to both sequence
displays and execution displays. For example, menu item callbacks that are
common to both sequence and execution displays are located in this file.
seqdisp.c
Contains code for updating the sequence display, where you can launch
executions and load and display sequences. The application uses only one
sequence display at a time.
teerror.c,
teerror.h
Contains code to report and display error messages. The header file provides
several useful error-checking macros.
rnstchng.c
Contains run-state change callbacks used to control the flow of UIMessages
from the TestStand engine when suspended at a breakpoint in the source code
for the Operator Interface. Also contains code to clean up properly when
terminating the operator interface prematurely from within
LabWindows/CVI. Use this file for compatibility with LabWindows/CVI
versions earlier than 5.5.
tsapicvi.fp
The TestStand API wrapper functions.
© National Instruments Corporation
16-3
TestStand User Manual
Chapter 16
Run-Time Operator Interfaces
Refer to the file TestStand\OperatorInterfaces\NI\
CVI\readme.doc for any additional information on the
LabWindows/CVI run-time operator interface project.
LabVIEW Run-Time Operator Interface
TestStand installs the executable and source files for the LabVIEW
operator interface in the <TestStand>\OperatorInterfaces\NI\LV
directory. Table 16-2 shows the three top-level VIs in the LabVIEW
Run-Time Operator Interface.
Table 16-2. Top-Level Files in the LabVIEW Run-Time Operator Interface
File
Description
TestStand Runtime Operator
Interface.vi
This VI launches the operator interface by creating a reference to the
TestStand ActiveX automation server and dynamically loads and calls
TestStand - Sequence Display.vi.
TestStand Sequence
Display.vi
This VI displays the Sequence Display window of the operator interface.
Whenever a new execution starts, the hierarchy of the Sequence Display
creates a new instance of TestStand - Execution Display.vi.
TestStand Execution
Display.vi
This VI is the master VI for the Execution Display window of the
operator interface. For every new execution started, with the exception
of executions started during the shutdown procedure, the TestStand Sequence Display.vi hierarchy makes a temporary copy of this VI
and runs it. Depending on whether the execution starts hidden or not, this
VI also opens its own panel.
Refer to the file, <TestStand>\OperatorInterfaces\NI\
LV\readme.doc, for any additional information on the LabVIEW
run-time operator interface VIs.
Building a Standalone Executable
To make an executable version of the LabVIEW run-time operator
interface, load the following script file into the LabVIEW Application
Builder tool and build the application:
<TestStand>\OperatorInterfaces\NI\LV\testexec.bld
The default build script enables the ActiveX server for the resulting application with
the ProgID prefix TestStandLVGUI. You can configure TestStand to use this application
as the LabVIEW server that runs test VIs. Refer to the Configuring the LabVIEW Standard
Prototype Adapter section in Chapter 13, Module Adapters, for more information.
Note
TestStand User Manual
16-4
ni.com
Chapter 16
Run-Time Operator Interfaces
To run the operator interface that you have built, you launch
testexec.exe.
Visual Basic Run-Time Operator Interface
TestStand installs the executable, project, and source files for the Visual
Basic operator interface in the <TestStand>\OperatorInterfaces\
NI\VB directory. Table 16-3 shows the primary files in the Visual Basic
run-time operator interface.
Table 16-3. Top-Level Files in the Visual Basic Run-Time Operator Interface
Files
Description
Forms
AdapterCfg.frm
An implementation of an adapter configuration dialog box
that calls the internal adapter configuration dialog box of
the adapter that the user selects.
DoNothing.frm
A dialog box that immediately unloads itself. Use this
dialog box to make Visual Basic remove any menus that are
displayed when the menus must be dynamically updated
because of a change in the execution state of a sequence
that TestStand is running.
ExeDisplay.frm
The code that implements the execution displays. This file
contains all the callbacks and source code that relate to
maintaining and updating an execution display.
OkBox.frm
A simple text message dialog box that contains a scrollable
text control. Use this dialog box to report error messages.
SeqDisplay.frm
The code that creates the sequence display window. This
file contains all the callbacks and source code that relate to
maintaining and updating the sequence display, as well as
code to start executions.
Splash.frm
The About dialog box.
TermAbortCancel.frm
A dialog box that gives the user the choice of terminating,
aborting, or canceling an execution. This dialog box
appears when a user attempts to close an execution display
of an execution that has not finished running.
© National Instruments Corporation
16-5
TestStand User Manual
Chapter 16
Run-Time Operator Interfaces
Table 16-3. Top-Level Files in the Visual Basic Run-Time Operator Interface (Continued)
Files
Description
Modules
Data.bas
Contains global settings and data that other source modules
access. This module is also responsible for initialization
and cleanup of the LoadedSeqFileList.bas module
and the ExeList.bas module.
ErrorHandler.bas
Contains code for displaying the current error information
contained in the Visual Basic global Err object.
ExeList.bas
Contains code for maintaining a list of execution displays
and their corresponding executions. Also, provides
methods and properties to perform different operations and
get information on the execution displays and their
corresponding executions.
LoadedSeqFileList.bas
Maintains the list of the sequence files that are loaded for
the sequence display. SeqDisplay.frm calls functions in
this module to load and unload sequence files and get
information about the list.
MiscGUI.bas
Contains utility functions that both SeqDisplay.frm and
ExeDisplay.frm use. Also, contains code to start the
login/logout callback and to maintain the Tools menu
items and entry point menu items for the displays.
Class Modules
EntryPointMenu.cls
Contains code for maintaining and updating the menus that
exist for the entry points of a model sequence file. The
Visual Basic run-time operator interface creates instances
of this class for every menu that can contain entry points.
RunLoopEntryPointMenu.cls
Contains code for maintaining and updating the menus for
starting interactive executions with the entry points of a
model sequence file.
WaitCursor.cls
Contains code for displaying a wait cursor for the life of an
object that is created as an instance of this class. When the
object terminates, the cursor returns to its previous state.
SeqFileData.cls
Contains code for a data structure that the operator
interface uses to store information about sequence files,
such as the file date when the file was last loaded.
TestStand User Manual
16-6
ni.com
Chapter 16
Run-Time Operator Interfaces
Refer to the file, <TestStand>\OperatorInterfaces\
NI\VB\readme.doc, for more information on the Visual Basic run-time
operator interface project.
Delphi Run-Time Operator Interface
TestStand installs the executable, project, and source files for the Delphi
operator interface in the <TestStand>\OperatorInterfaces\
NI\Delphi directory. Table 16-4 shows the files in the Delphi run-time
operator interface.
Table 16-4. Top-Level Files in the Delphi Run-Time Operator Interface
Files
Description
Forms
AdapterCfg.dfm
AdapterCfg.pas
An implementation of an adapter configuration dialog box that
calls the internal adapter configuration dialog box of the
adapter that the user selects.
ExeDisplay.dfm
ExeDisplay.pas
The code that implements the execution displays. This file
contains all the callbacks and source code that relate to
maintaining and updating an execution display.
OkBox.dfm
OkBox.pas
A simple text message dialog box that contains a scrollable text
control. Use this dialog box to report error messages.
SeqDisplay.dfm
SeqDisplay.pas
The code that creates the sequence display window. This file
contains all the callbacks and source code that relate to
maintaining and updating the sequence display, as well as code
to start executions.
SplashScreen.dfm
SplashScreen.pas
The About dialog box.
TermAbortCancel.dfm
TermAbortCancel.pas
A dialog box that gives the user the choice of terminating,
aborting, or canceling an execution. This dialog box appears
when a user attempts to close an execution display of an
execution that has not finished running.
Other Source Files
Data.pas
© National Instruments Corporation
Contains global settings and data that other source modules
access. This module is also responsible for initialization and
cleanup of the LoadedSeqFileList.pas module and the
ExeList.pas module.
16-7
TestStand User Manual
Chapter 16
Run-Time Operator Interfaces
Table 16-4. Top-Level Files in the Delphi Run-Time Operator Interface (Continued)
Files
Description
ErrorHandler.pas
Contains code for displaying the current error information.
ExeList.pas
Contains code for maintaining a list of execution displays and
their corresponding executions. This module also provides
methods and properties to perform different operations on and
to get information from the execution displays and their
corresponding executions.
LoadedSeqFileList.pas
Maintains the list of the sequence files that are loaded for the
sequence display. SeqDisplay.pas calls functions in this
module to load and unload sequence files and get information
about the list.
MiscGUI.pas
Contains utility functions that both SeqDisplay.pas and
ExeDisplay.pas use. Also, contains code to start the
login/logout callback and to maintain the Tools menu items
and entry point menu items for the displays.
EntryPointMenu.pas
Contains code for maintaining and updating the menus that
exist for the entry points of a model sequence file. The Delphi
run-time operator interface creates instances of this class for
every menu that can contain entry points.
WaitCursor.pas
Contains code for displaying a wait cursor for the life of an
object that is created as an instance of this class. When the
object terminates, the cursor returns to its previous state.
SeqFileInfo.pas
Contains code for a data structure that the operator interface
uses to store information about sequence files, such as the file
date when the file was last loaded.
Refer to the file, <TestStand>\OperatorInterfaces\NI\Delphi\
readme.doc for more information on the Delphi run-time operator
interface.
Distributing a Run-Time Operator Interface
Refer to Chapter 17, Distributing TestStand, for more information on
distributing the TestStand engine with your customized run-time operator
interface application.
TestStand User Manual
16-8
ni.com
Distributing TestStand
17
This chapter describes how to create an installer for a customized
TestStand engine, how to distribute the TestStand engine with a run-time
operator interface, and how to distribute each type of code module that
TestStand supports. This chapter also describes how to customize and
distribute a LabVIEW run-time server.
Creating a Run-Time TestStand Engine Installation
TestStand provides a wizard that you can use to create a custom installer to
distribute the TestStand engine and components. When you distribute your
operator interface application, you can either install the TestStand engine
separately or customize the operator interface installer to call the installer
for your TestStand engine.
The Installation Wizard is not intended to be used to distribute test sequences and
code modules. For more information on distributing sequence files and code modules, refer
to the Distributing Sequences and Code Modules section in this chapter.
Note
Complete the following steps to create a custom TestStand engine
installation.
1.
© National Instruments Corporation
Launch the wizard by selecting Installation Wizard for the
TestStand Engine from the TestStand program group or by selecting
Tools»Run Engine Installation Wizard from the sequence editor.
Figure 17-1 shows the dialog box for the wizard.
17-1
TestStand User Manual
Chapter 17
Distributing TestStand
Figure 17-1. Opening Dialog Box for the TestStand Engine Installation Wizard
2.
Click the Begin button.
The wizard displays the dialog box shown in Figure 17-2. This dialog
box lists the additional files the wizard includes in the installation
for the TestStand engine. By default, the wizard includes the
<TestStand>\Components\User directory in the custom
installer, which ensures that the installer contains any custom
engine components you create. In addition, the wizard adds the
ToolMenu.ini file from your TestStand station. Refer to Chapter 3,
Configuring and Customizing TestStand, for more information on the
TestStand components that you can customize.
TestStand User Manual
17-2
ni.com
Chapter 17
Distributing TestStand
Figure 17-2. Installation Wizard: Default Components to Include
3.
Click the Customize button to select which additional files the wizard
includes in the installation. When you make this selection, the wizard
displays the Customize Files to Include in Installation dialog box
shown in Figure 17-3.
Figure 17-3. Customize Files to Include in Installation Dialog Box
© National Instruments Corporation
17-3
TestStand User Manual
Chapter 17
Distributing TestStand
4.
Click the Add button to insert new entries in the file list. Click the Edit
and Delete buttons to edit and delete existing entries. When you insert
or edit an entry, the wizard displays the Select Files to Include dialog
box, shown in Figure 17-4.
Figure 17-4. Select Files to Include Dialog Box
TestStand User Manual
5.
Include individual files or include all files that match a filename
containing wildcard characters. When you specify files using wildcard
characters, you can recurse subdirectories, and the resulting
installation maintains the directory structure when distributing these
files to a target system. You use the Relative Path for Destination
control to specify the destination subdirectory of the distributed
TestStand engine where the installation installs the specified files.
6.
When you are finished customizing the files to include in the
installation, click Next to continue. The wizard displays the MDAC
(Microsoft Data Access Components) dialog box shown in
Figure 17-5. You should read the MDAC EULA (End User License
Agreement) before including MDAC in your installation. The default
version of MDAC is 2.5 RTM English, which is the typical
redistribution installation. You can browse for a different version to
include or, if you will not be using any TestStand database
components, you can choose not to include MDAC.
17-4
ni.com
Chapter 17
Distributing TestStand
Figure 17-5. Select MDAC Installer Dialog Box
7.
After you select an MDAC option from the dialog box, click the Next
button. The wizard prompts you to identify the directory that will
contain the installation files. Upon completing the build process, the
wizard creates the following installation files:
•
TSEngine.cab—Compressed file that contains the TestStand
engine files.
•
SetupTSEngine.exe—Setup executable that uncompresses,
installs, and registers the TestStand engine.
Using a Custom TestStand Engine Installation
To invoke the custom TestStand engine installation, run the setup
executable file separately or call it from another installation. The setup
executable supports the following command-line options:
-x
Delete the TSEngine.cab file after installing the
TestStand engine. Instruct the operating system to delete
the SetupTSEngine.exe file after rebooting the target
computer.
-noprompt
Do not prompt during installation.
<path>
Install at specified location; default is c:\TestStand.
© National Instruments Corporation
17-5
TestStand User Manual
Chapter 17
Distributing TestStand
Table 17-1 lists the actions the installer takes depending on whether the
TestStand engine is already installed on a target system and depending on
which command-line options you pass to the setup executable.
Table 17-1. Custom TestStand Engine Installer Actions
Engine
Already
Installed?
-noprompt
<path>
Specified?
Specified?
Installer Actions
No or
different
version
No
No
Prompt to specify install directory. Installer
uses c:\TestStand as default. If a different
version of the engine is already present, the installer
displays a warning to the user and provides the
option of canceling the install.
No or
different
version
No
Yes
Prompt to specify install directory. Installer
uses command-line specified path as default. If a
different version of the engine is already present, the
installer displays a warning to the user and provides
the option of canceling the install.
No or
different
version
Yes
No
No prompt for installation directory. Installer
uses c:\TestStand as the install directory.
No or
different
version
Yes
Yes
No prompt for installation directory. Installer
uses command-line specified path as default.
Yes, same
version
No
Yes/No
Prompt to confirm installation. Installer uses
previously installed location.
Yes, same
version
Yes
Yes/No
No prompt. Installer uses previously installed
location.
Refer to the Distributing your Operator Interface section in this chapter for
recommendations on how to bundle a custom engine installation with a
distribution of your operator interface application.
TestStand User Manual
17-6
ni.com
Chapter 17
Distributing TestStand
Distributing your Operator Interface
Installing the Customized Engine
The following sections explain how to bundle a custom TestStand engine
installation with your distribution kit for LabVIEW, LabWindows/CVI,
Visual Basic, and Delphi.
LabVIEW
You can use the Application Builder in the LabVIEW Professional
Development System to create an installation for your operator interface.
To bundle a custom TestStand engine installation in your LabVIEW
installer, complete the following steps:
1.
2.
Add the SetupTSEngine.exe and TSEngine.cab as support files to
your source files. You can install the files in the installation directory
of your application.
In the Advanced section on the installer tab, select the
SetupTSEngine.exe file in the Run Executable After Installation
section. Specify the -x command-line option to delete the engine
installation files after the executable runs.
LabWindows/CVI
You can use the Create Distribution Kit feature in the LabWindows/CVI
development environment to create an installation for your operator
interface. To bundle a custom TestStand engine installation in your
LabWindows/CVI distribution kit, complete the following steps:
1.
2.
Add the SetupTSEngine.exe and TSEngine.cab files to your
distribution kit. You can install the file in the base installation directory
of your application.
On the Advanced Distribution Kit Options dialog box, select the
SetupTSEngine.exe file in the Executable to Run After Setup
section. Specify the -x command-line option to delete the engine
installation files after the executable runs.
3.
If you want to alter the default message at the end of the installation
of your application to indicate that the TestStand engine installs next,
you can use a custom template file as the installation script. TestStand
includes two custom script files, <TestStand>\Operator
Interfaces\CVI\TestStandCVITemplate.inf and
<TestStand>\OperatorInterface\CVI\TestStandCVI55
© National Instruments Corporation
17-7
TestStand User Manual
Chapter 17
Distributing TestStand
template.inf. These files are based on the LabWindows/CVI
template files you find in <CVI>\Bin\template.inf in
LabWindows/CVI 5.0.1 and LabWindows/CVI 5.5 respectively.
The custom scripts contain an altered ExitSuccess procedure.
Refer to the LabWindows/CVI documentation for more information on
using the Advanced Distribution Kit dialog box of the Create Distribution
Kit feature in LabWindows/CVI.
Visual Basic
You can use the Application Setup Wizard feature in Visual Basic to create
an installation for your operator interface. To bundle a custom TestStand
engine installation in your Visual Basic 6.0 application installation,
complete the following steps:
1.
Update the VisualBasic\SetupKit\Setup1\Setup1.vpb
project to automatically launch SetupTSEngine.exe after
successfully installing your operator interface application. To set up
this behavior, insert code into the Form_Load subroutine in the
Setup1.frm module. You might want to review existing code in the
Setup1.vpb project that calls the AXDIST.EXE and WINT351.EXE
installers dynamically when you include the files in the application
installation.
You cannot use the FsyncShell function to launch the TestStand
engine installer. The FsyncShell function prevents the TestStand
engine installer from running properly. If you want to wait for the
TestStand installer to complete its installation before completing the
application installation, you can use the ShellAndWait function in
the ShellAndWait module that TestStand includes in the
<TestStand>\OperatorInterfaces\VB directory.
If you want to automatically delete the engine installation files after the
executable runs, you can specify the -x command-line option when
you call the TestStand engine installer.
2.
Add the SetupTSEngine.exe and TSEngine.cab files to your
installation. Install the file in the installation directory of your
application.
Refer to the Visual Basic documentation for more information on using the
Application Setup Wizard feature in Visual Basic.
TestStand User Manual
17-8
ni.com
Chapter 17
Distributing TestStand
Delphi
To bundle a custom TestStand engine installation in your Delphi
application installation, use a third party installation package such as
InstallShield or Wise.
Distributing Sequences and Code Modules
This section explains how to distribute sequence files, DLL code modules,
object code modules, static library code modules, LabVIEW test VIs, and
ActiveX automation code modules.
Distributing Sequence Files
For each step in a sequence that calls a code module, TestStand stores the
module name and path as properties of the step. The path can be an absolute
path or a path that is relative to a directory in the TestStand search
directories. When you distribute a sequence file, you also must distribute
the appropriate step modules and their support files onto the target system.
Also, you must ensure that sequence files can locate their step module files
using the TestStand search paths list.
If you distribute a sequence file that contains absolute paths, TestStand
will not find its code modules unless the target system contains a similar
directory structure. National Instruments recommends that you use relative
paths whenever possible. You can configure the directory paths on your
target system so that TestStand finds the code modules of your sequence
files. Select Configure»Search Directories to specify the directory paths
that TestStand searches.
Distributing DLL Code Modules
A DLL file might require that other support DLL files be installed on a
system so that TestStand can properly load the DLL into memory. You
must ensure that you install the appropriate support DLL files on a target
system before running the DLL tests within TestStand.
© National Instruments Corporation
17-9
TestStand User Manual
Chapter 17
Distributing TestStand
Distributing DLLs Called By LabVIEW VIs
Before distributing a VI that calls a DLL, you must determine whether you
want to distribute the DLL to your target machines or whether you expect
the DLL to exist in the DLL search path on your target machines.
In LabVIEW, you use the Call Library Function (CLF) to call a DLL. In the
CLF function, you can reference the DLL by base name (for example,
foo.dll) or you can reference the DLL by absolute path (for example,
c:\MyDirectory\foo.dll).
If you do not want to distribute the DLL, reference the DLL by base name
in the CLF. The Assemble Test VIs tool does not assemble DLLs that you
reference by base name.
If you want to distribute the DLL, reference the DLL by absolute path in
the CLF. The Assemble Test VIs tool saves the DLL to the support files
subdirectory it creates and adjusts the DLL path in the CLF to account for
the new relative locations of the VI and the DLL it calls.
Distributing Object and Static Library Code Modules
When the C/CVI Standard Prototype Adapter loads an object or static
library file, the LabWindows/CVI Run-time Engine attempts to resolve all
external references in the file. When you distribute object or static library
code modules, you must distribute the appropriate support files to the target
system.
When running object or static library code module tests in-process, the
adapter must load the support libraries that the code module depends on
before it loads the code module file. The adapter automatically loads all
support libraries from the <TestStand>\AdapterSupport\CVI\
AutoLoadLibs directory. You must ensure that you copy the appropriate
support files to the parallel directory on a target system. One option is for
you to include the contents of the AutoLoadLibs directory on your
development system in the distribution of the custom TestStand engine.
If you want a TestStand step to call a code module out-of-process in
an external instance of LabWindows/CVI, you must include all support
libraries other than LabWindows/CVI libraries in the project on the target
system.
Refer to the Configuring the C/CVI Standard Prototype Adapter section in
Chapter 13, Module Adapters, for more information on using different
types of code modules with the C/CVI Standard Prototype Adapter.
TestStand User Manual
17-10
ni.com
Chapter 17
Distributing TestStand
Distributing LabVIEW Test VIs
The LabVIEW Standard Prototype Adapter loads and runs VIs using a
LabVIEW ActiveX server. The LabVIEW server can be the LabVIEW
development environment or any LabVIEW-built run-time application
enabled as a LabVIEW ActiveX server. When you distribute a TestStand
test VI, you must ensure that the LabVIEW server can locate all of the VIs
subVIs.
Before distributing your test system components to your target machines, National
Instruments recommends that you test the components together on your development
system. In testing, ensure that your sequences reference your assembled test VIs instead of
your development VIs.
Note
The method you use to guarantee that the LabVIEW server can locate
subVIs depends on how you want to distribute your source VIs. When you
develop your test VI in LabVIEW, you usually save the VI without its
hierarchy. For each subVI reference in a VI, LabVIEW saves the location
of the subVI within the VI. When TestStand requests a LabVIEW server to
load a VI, the server attempts to locate all subVIs in the VI hierarchy. If the
LabVIEW server cannot find the subVI in the expected location that is
stored within the VI, the LabVIEW server searches the VI search path list
as defined in the preferences for the server.
A LabVIEW server reads its search path list from an .ini file with the
same base name as the server application. For example, the LabVIEW
development environment executable LabVIEW.exe uses LabVIEW.ini.
By default, the search path preferences for a LabVIEW server are as
follows:
1.
The directory that contains the top-level VI that the server is opening.
2.
The list of directories containing found subVIs that the LabVIEW
server dynamically builds each time the server loads a VI.
3.
The vi.lib subdirectory in the Library directory for the LabVIEW
server.
4.
The user.lib subdirectory in the Library directory for the LabVIEW
server.
5.
The instr.lib subdirectory in the Library directory for the
LabVIEW server.
Refer to the Search Paths topic in the LabVIEW Online Reference for more
information on the VI Search Path preference.
© National Instruments Corporation
17-11
TestStand User Manual
Chapter 17
Distributing TestStand
The rest of this section describes three options for distributing your VIs.
You might want to use one of these options or a combination of these
options.
Packaging VIs and SubVIs for a Sequence File
TestStand includes a utility in the Tools menu that can save the entire test
VI hierarchy for the sequence files you select. For all steps in sequence files
that use the LabVIEW Standard Prototype Adapter, the utility saves the test
VIs to a single directory and all subVIs, run-time menu files, and external
subroutines to a separate VI library.
If a sequence calls subsequences in other sequence files, the subsequence
files are automatically selected for packaging, except when the
subsequence is specified with a dynamically determined expression.
For a VI that a sequence references with a relative path, the utility recreates
the folder(s) of the relative path within the target directory you specify. In
this case, the utility places the VI in the most nested folder so that the
relative path from the target directory to the VI is the same as the relative
path the sequence file specifies. To run this utility, select the
Tools»Assemble Test VIs for Run-Time Distribution command. The
command displays a dialog box in which you select the sequence files
whose VIs you are packaging. You should select all sequence files that use
LabVIEW VIs. You can choose to remove the diagrams from the VIs you
package.
When you create a run-time distribution kit you must install the VIs and
support VI library that the utility creates on your target system. Also, you
must ensure that sequence files that call the VI tests can locate the files
using the TestStand search paths list on your target system. You can alter
the search path list by selecting Configure»Search Directories.
If your tests call any subVIs dynamically, the packaging utility does not
save the subVIs in the support VI library. You must distribute these
dynamically-called VIs separately.
The VI packager only collects VIs. It does not recompile old versions of LabVIEW
VIs. You should perform a mass compile in LabVIEW before you package your VIs.
Correct any errors in the mass compile before running the packager.
Note
TestStand User Manual
17-12
ni.com
Chapter 17
Distributing TestStand
Distributing VIs by Saving Them without Full
Hierarchy
If you want to maintain your test VIs on a target system as independent
files, and you do not want to resave your VIs with their full hierarchy, you
must distribute all required subVIs and support files to the target system.
Support files include external subroutines, run-time menus, and DLLs. This
requirement includes distributing VIs and VI libraries from the LabVIEW
library subdirectories, that is, vi.lib, user.lib, and instr.lib, and
any other files from additional directories in your search path preferences.
In addition, if you want to maintain multiple LabVIEW servers on your
target system, you must ensure that each LabVIEW server can find any
required subVIs.
For example, if your development system contained a directory structure of
sequences and VIs, you could distribute your VIs as follows:
1.
Duplicate the entire directory structure of sequences and VIs on your
target system. If you do not install the files in the same absolute path,
you must ensure that the sequences and VIs do not contain absolute
paths. For example, a sequence step should call VIs using a relative
path, and VIs should call DLLs using only their base name.
2.
Copy the required subVIs and VI libraries from the library
subdirectories of the LabVIEW development system to the appropriate
library subdirectories of each LabVIEW server. If the target system
already contains a copy of the LabVIEW development environment,
you need to copy only additional files that the target system does not
have. If the target system contains only a LabVIEW run-time server,
you can copy all of the library subdirectories from the development
system to the target system. If the target system contains multiple
LabVIEW servers, you can maintain a single LabVIEW server library
directory by customizing the preferences for each server to reference
to this single library.
If you upgrade the version of LabVIEW on your systems, you must rebuild
all LabVIEW run-time servers with the new version of LabVIEW, mass
compile your test VIs and subVIs, and update your library subdirectories
where appropriate.
© National Instruments Corporation
17-13
TestStand User Manual
Chapter 17
Distributing TestStand
Distributing VIs by Saving Them with Full Hierarchy
LabVIEW allows you to save your VIs with their full hierarchy into a VI
library. This includes saving all subVIs, controls, and external subroutines,
including the ones in vi.lib. You can remove the diagrams from all of the
VIs.
Using this LabVIEW feature, you can resave your test VIs with their full
hierarchy to a new, separate directory image that you can distribute to a
target system. National Instruments does not recommend this method if
your sequence refers to test VIs that are not in VI libraries since you would
need to add the library names to each pathname reference. If your sequence
does refer to test VIs within VI libraries, you must use the same library
names when you save VIs with full hierarchy so that the pathname for the
VI module in the sequence is correct.
To save the full hierarchy for a VI, select File»Save with Options»Custom
Save from within the LabVIEW development environment and select the
following options:
•
To new location - single prompt
•
Save entire hierarchy
•
Include vi.lib files (This selection is necessary only if the target
LabVIEW server is not the LabVIEW development environment.)
•
Include external subroutines
•
Include run-time menus
•
Remove diagrams (This selection is optional.)
To streamline the saving process, you can create a new VI and place all test
VIs on its diagram as subVIs. Then save this VI and its VI hierarchy. With
this process, you do not have to save VIs individually for every VI used
with a sequence. Instead, you perform the saving procedure only once.
If your tests call any subVIs dynamically, you must distribute these
dynamically-called VIs separately.
Distributing ActiveX Automation Code Modules
When the ActiveX Automation Adapter attempts to load an ActiveX
Automation server, the server must be registered with the operating system.
When distributing your ActiveX Automation server code modules, you
must ensure that you properly install and register them on a target system
before using the server from within TestStand.
TestStand User Manual
17-14
ni.com
Chapter 17
Distributing TestStand
Customizing and Distributing a LabVIEW Run-Time
Server
The LabVIEW Standard Prototype Adapter runs VIs using a LabVIEW
ActiveX server. The server can be the LabVIEW development environment
or a LabVIEW-built run-time application enabled as a LabVIEW ActiveX
server through the LabVIEW Application Builder. TestStand requires that
you install a LabVIEW run-time server if your sequences call LabVIEW
VIs.
If you choose to distribute the application version of the LabVIEW
run-time operator interface, it can serve as the LabVIEW ActiveX server
that TestStand uses to run your test VIs. The operator interface that ships
with TestStand has the default ActiveX server name, TestStandGUIRTS.
If you are not distributing a LabVIEW operator interface or installing the
LabVIEW development environment on your target machine(s), TestStand
can use another LabVIEW run-time server to execute your VIs. The
TestStand installation includes a prebuilt LabVIEW run-time server with
source in the <TestStand>\Components\NI\RuntimeServers\
LabVIEW directory. The executable name is TestStandLVRTS.exe and
the ActiveX server name is TestStandLVRTS. If you want to customize
the server, copy all source files from the NI subdirectory to the
<TestStand>\Components\User\RuntimeServers\LabVIEW
subdirectory before you customize the files. This practice ensures that a
newer installation of TestStand does not overwrite your customizations.
Refer to the Configuring the LabVIEW Standard Prototype Adapter section
in Chapter 13, Module Adapters, for more information on configuring
which LabVIEW server TestStand uses.
When distributing a LabVIEW run-time server, you must ensure that the server can
locate all subVIs. Refer to the Distributing LabVIEW Test VIs section for information on
how LabVIEW servers reference subVIs.
Note
© National Instruments Corporation
17-15
TestStand User Manual
Chapter 17
Distributing TestStand
Rebuilding the TestStand LabVIEW Run-Time Server
National Instruments uses a specific version of LabVIEW to build the
LabVIEW run-time server that comes with TestStand. To learn which
LabVIEW version corresponds to your LabVIEW run-time server, refer to
the readme.txt file that is located in the same directory as the executable.
Whenever you save your VIs with a newer version of LabVIEW, you must
rebuild any LabVIEW run-time servers that TestStand uses to execute the
newer VIs. To rebuild or customize the TestStand LabVIEW run-time
server, complete the following steps:
1.
Create a copy of the run-time source files in your User directory
structure. Except for TestStandLVRTS.exe and
TestStandLVRTS.tlb, copy all source files from the following
subdirectory:
<TestStand>\Components\NI\RuntimeServers\LabVIEW
Then paste those source files into the following subdirectory:
<TestStand>\Components\User\RuntimeServers\LabVIEW
2.
In the LabVIEW Application Builder tool, load the version of the
script file, TestStandLVRTS.bld, that is now located in your User
directory structure, and build the application.
Distributing the TestStand LabVIEW Run-Time Server
The TestStand Engine Installation wizard automatically includes the
default NI LabVIEW run-time server with any engine installation. If you
include the <TestStand>\Components\User directory in the custom
engine installation, the wizard also includes any customized version of the
LabVIEW run-time server in the custom engine installation. The resulting
engine installation automatically registers the LabVIEW run-time server
that is located in the NI directory first and then it registers the LabVIEW
run-time server that is located in the User directory. If the version in User
uses the same ProgID, TestStandLVRTS, its registration replaces the
previously registered server in NI.
Before distributing your test system components to your target machines, National
Instruments recommends that you test the components together on your development
system. In testing, ensure that you configure the LabVIEW adapter to use the LabVIEW
ActiveX server that your target machines use.
Note
TestStand User Manual
17-16
ni.com
Chapter 17
Distributing TestStand
To manually distribute the LabVIEW run-time server, you must include
the following files:
•
TestStandLVRTS.exe
•
TestStandLVRTS.tlb
•
data\LVWUtil32.dll
To manually register and unregister the ActiveX server in a LabVIEW
run-time application, launch the executable with the /RegServer or
/Unregserver command-line argument. With this method, the executable
registers or unregisters itself and terminates. You also can register the
server by launching the executable.
You may choose to distribute additional files with the LabVIEW run-time
server that are required to run your code modules. If your application uses
serial port functionality, you must include the serpdrv files from the
LabVIEW development system in the same directory as the executable file.
If your application uses a GPIB or data acquisition board, you must install
the hardware drivers that come with the board.
If your application uses data acquisition functionality with NI-DAQ 6.6 or
earlier, you must copy daqdrv files to the same directory as the executable
file. If your application uses NI-DAQ 6.7 or later, you must copy
lvdaq.dll to the same directory as the executable file.
If you choose to distribute your test VIs to a target system as independent
files, and you do not want to resave your VI libraries with their full
hierarchy, you must also distribute any files required by the test VIs, that is,
files from the vi.lib, user.lib, and instr.lib directories. Refer to
the Distributing VIs by Saving Them without Full Hierarchy section in this
chapter for more information.
Refer to the LabVIEW Application Builder Release Notes documentation
for more information on creating a LabVIEW application that includes the
LabVIEW ActiveX server.
© National Instruments Corporation
17-17
TestStand User Manual
18
Databases
This chapter describes the database features of TestStand. These features
include logging results from an execution to a database. This chapter also
outlines six built-in step types for accessing databases directly from your
test sequences.
This chapter assumes that you have a basic understanding of database
concepts and SQL and that you know how to use your Database
Management System (DBMS) client software.
Database Concepts
This section summarizes key database concepts that you must know when
using databases with TestStand. It also summarizes key Windows features
that TestStand uses to communicate with database management systems.
Databases and Tables
A database is an organized collection of data. You can store data in and
retrieve data from a database. Although the underlying details vary on how
a database stores its internal data, most modern Database Management
Systems (DBMS), also known as database servers, store data in table form.
Tables contain records, also known as rows. Each row consists of fields,
also known as columns. Every table in a database must have a unique name,
and every column within a table must have a unique name. Each column in
a table has a data type. The available data types vary depending on the
DBMS.
© National Instruments Corporation
18-1
TestStand User Manual
Chapter 18
Databases
You can use database tables to store many different types of data.
Table 18-1 shows an example table. The table contains columns for the Unit
Under Test (UUT) number, a step name, a step result, and a measurement.
The order of the data in the table is not important. Ordering, grouping, and
other manipulations of the data occur when you retrieve the data from the
table.
Table 18-1. Example Database Table
UUT_NUM
STEP_NAME
RESULT
MEAS
20860B456
TEST1
PASS
0.5
20860B456
TEST2
PASS
(NULL)
20860B123
TEST1
FAIL
0.1
20860B789
TEST1
PASS
0.3
20860B789
TEST2
PASS
(NULL)
A row can contain an empty column value, which means that the specific
cell contains a NULL value, also referred to as a SQL Null value.
You use a SQL SELECT command, also known as a query, to retrieve
records from a database. The result of a query often is called a record set
or SQL statement data. The data you receive does not necessarily reflect the
entire contents of any particular table in the database. For instance, you
might retrieve only selected columns and rows from one table, or you might
retrieve data that is a combination of the contents of multiple tables. The
query defines the contents and order of the data. You can refer to each
column you retrieve by the name of the column or by a one-based number
that refers to the order of the column in the query.
Database Sessions
Database operations occur within a database session. A simple session
consists of the following steps:
TestStand User Manual
1.
Connect to the database.
2.
Open database tables.
3.
Fetch data from and store data to the open database tables.
4.
Close the database tables.
5.
Disconnect from the database.
18-2
ni.com
Chapter 18
Databases
TestStand has a built-in step type for each of the five steps in a simple
database session. The step types include Open Database, Open SQL
Statement, Data Operation, Close SQL Statement, and Close Database.
Refer to the Built-In Database Step Types section later in this chapter for
more information on these step types. Refer to Structured Query Language
(SQL) section later in this chapter for a complete list of SQL commands.
Microsoft ADO, OLE DB, and ODBC Database Technologies
To access data within a database, you typically use some type of database
client technology, preferably one that provides a uniform interface to
different database systems. Microsoft has integrated several database
interface technologies into the Windows operating system. TestStand uses
ActiveX Data Objects (ADO) as its database client technology. Microsoft
built ADO on top of the Object-linking and Embedding Database
(OLE DB). Applications that use ADO, such as TestStand, use the
OLE DB interfaces indirectly. The OLE DB layer interfaces to databases
directly through a specific OLE DB provider for the DBMS or through a
generic Open Database Connectivity (ODBC) provider, which interfaces
to a specific ODBC driver for the DBMS. Figure 18-1 shows the high-level
relationships between TestStand and components of the Windows database
technologies.
© National Instruments Corporation
18-3
TestStand User Manual
Chapter 18
Databases
Process Model
Sequence
TestStand
Engine
Database
Logger
Main
Sequences
Database
Steps
ADO
OLE DB
OLE DB Providers
Access
Provider
SQL Server
Provider
Oracle Server
Provider
ODBC
Provider
Future
Providers
ODBC
Drivers
Access
MDB Files
SQL
Server
Oracle
Server
Flat File
Database
???
Figure 18-1. Microsoft Windows Database Technologies
Refer to the Microsoft Web site at http://www.microsoft.com/data/
for more information on database technologies for Windows operating
systems.
TestStand User Manual
18-4
ni.com
Chapter 18
Databases
Data Links
Before you can access data from a database within TestStand, you must
provide specific connection information. This connection information
is called a data link. In a data link, you can specify various kinds of
information, such as the server on which the data resides, the database or
file that contains the data, the user ID, and the permissions to request when
connecting to the data source.
For example, to connect to a Microsoft SQL Server database, you can
specify the OLE DB provider for SQL Server, a server name, a database
name, and a user ID and password. To connect to a Microsoft Access
database, you can specify the OLE DB provider for ODBC and an ODBC
data source name. The ODBC data source name specifies which ODBC
driver to use, the database file (.mdb), and an optional user ID and
password. You can define ODBC data source names in the
ODBC Administrator in the Windows Control Panel.
A connection string is a string version of the connection information
required to open a session to a database. TestStand allows you to build a
connection string using a data link dialog box. The data link dialog box and
the information that the connection string specifies vary depending on the
OLE DB provider.
For example, a connection string for a Microsoft SQL Server database
might contain the following:
Provider=SQLOLEDB.1;Integrated Security=SSPI;Persist
Security Info=True;
User ID=guest;Initial Catalog=pubs;Data
Source=SERVERCOMPUTER
You can store the contents of a connection string in a file with a .udl
extension. This file is referred to as a Microsoft Data Link (.udl) file.
You can create a data link file by right-clicking in Windows Explorer and
selecting New»Text Document. Rename the file extension to .udl.
Right-click on the file and select Open to display the Data Link Properties
dialog box. Refer to the Using Data Links section later in this chapter for
more information on specifying data links.
© National Instruments Corporation
18-5
TestStand User Manual
Chapter 18
Databases
Database Logging Implementation
The database logging capability in TestStand is not native to the TestStand
engine or sequence editor. The default process model that comes with
TestStand contains sequences that implement the logging features. You can
customize any portion of the database logging sequences. Refer to the
Special Editing Capabilities for Process Model Sequence Files section in
Chapter 14, Process Models, for more information on customizing the
default process model.
The default process model relies on the automatic result collection
capability of the TestStand engine to accumulate the raw data to log to
a database for each UUT. The TestStand engine can collect the results of
each step into a result list for an entire sequence automatically. The result
list for a sequence contains the result of each step it runs and the result list
of each subsequence call it makes. The default process model calls the main
sequence in the client sequence file to test a UUT. Thus, the result list that
the TestStand engine accumulates for the main sequence contains the raw
data to log to a database for the UUT. Refer to the Result Collection section
in Chapter 6, Sequence Execution, for more information on automatic
result collection.
The Test UUTs and Single Pass entry points in the TestStand process
models log the raw results to a database. The Test UUTs entry point logs
results after each pass through the UUT loop.
The Configure»Database Options menu item displays the Database
Options dialog box where you can set the following options:
•
Specify the data link to which TestStand logs results.
•
Specify the database schema that TestStand uses. A schema contains
the SQL statements, table definitions, and TestStand expressions to
instruct TestStand how to log results to a database. TestStand includes
a set of predefined schemas, at least one for each supported DBMS.
You can create new schemas that log results to tables you define.
•
Specify various filtering options to limit the amount of data that
TestStand logs.
For more information on the Database Options dialog box, refer to the
Database Options Dialog Box section later in this chapter.
You can also customize or replace any portion of the database logging
sequences. Refer to the Special Editing Capabilities for Process Model
Sequence Files section in Chapter 14, Process Models, for more
information on customizing the default process model.
TestStand User Manual
18-6
ni.com
Chapter 18
Databases
Using Database Logging
Before you use the default process model to log results to a database, you
must do the following:
1.
Decide to which DBMS you want TestStand to log the results. By
default, TestStand supports Microsoft Access, Microsoft SQL Server,
and Oracle. If you decide to use another DBMS, refer to the Adding
Support for Other Database Management Systems section later in this
chapter.
2.
Make sure you have installed the appropriate client DBMS software
that is required to communicate with the DBMS. You must decide
whether to use an ODBC driver or a specific OLE DB provider for your
DBMS. Microsoft Access and Microsoft SQL Server require you to
install only an ODBC driver or OLE DB provider. TestStand installs
the Microsoft MDAC components, which include providers for
Microsoft Access and SQL Server. Most Oracle ODBC drivers and
OLE DB providers require that you install Oracle Client also. Refer to
the <TestStand>\Doc\readme.txt for more information on
suggested providers, versions of ODBC drivers, and client DBMS
software.
3.
Create the default database tables in a database in your DBMS.
TestStand comes with SQL script files for creating and deleting the
default database tables that the default schemas require. These script
files are located in the <TestStand>\Components\NI\Model\
TestStandModel\Database directory. For example, the Access
Create Generic Recordset Result Tables.sql file contains
SQL commands to create the default tables for Access. The Access
Drop Result Tables.sql file contains SQL commands to delete
the default tables.
TestStand installs an example Microsoft Access database, TestStand
Results.mdb, in the <TestStand>\Components\NI\Model\
TestStandModel\Databases directory.
For more information on creating the default database tables using a
SQL script file, refer to the Database Viewer section later in this
chapter. Refer to the TestStand Database Result Tables section later in
this chapter for more information on the default table schema that the
process model uses.
© National Instruments Corporation
18-7
TestStand User Manual
Chapter 18
Databases
4.
Use the Database Options dialog box to enable database logging and
to define a data link and schema for the default process model to use.
Refer to the next section, Database Options Dialog Box, for more
information on the Database Options dialog box, and refer to the Using
Data Links section later in this chapter for more information on
defining data links.
Database Options Dialog Box
You access the Database Options dialog box by selecting
Configure»Database Options. In the Database Options dialog box, you
can customize the logging of results to a database. The settings you choose
in the Database Options dialog box apply to all executions that use the
Test UUTs and Single Pass entry points.
When you select Configure»Database Options, TestStand executes the
Config Database Options entry point in the default process model.
Thus, while the dialog box is active in the sequence editor, the Running
message appears on the left side of the status bar.
The Database Options dialog box contains the following tabs: Logging
Options, Data Link, Schemas, Statements, and Columns/Parameters.
TestStand User Manual
18-8
ni.com
Chapter 18
Databases
Logging Options Tab
Figure 18-2 shows the Logging Options tab of the Database Options dialog
box.
Figure 18-2. Database Options Dialog Box—Logging Options Tab
The Logging Options tab contains the following controls:
•
Disable Database Logging—Enable this option if you do not want
TestStand to log data to a database.
•
Include Execution Times—Enable this option if you want to log the
time that each step module takes to execute. This is the time that the
subsequence, LabVIEW VI, or C function takes to execute.
•
Include Step Results—Enable this option if you want to log the
results of each step. Disable this option if you want to include only
information on each UUT that you test. Refer to the TestStand
Database Result Tables section later in this chapter for more
information on what UUT information TestStand logs to the database.
© National Instruments Corporation
18-9
TestStand User Manual
Chapter 18
Databases
•
Include Measurements—Enable this option if you want to log the
measurement values that steps acquire. The default schemas
recognizes specific step properties as containing values to log. These
include properties such as Result.Numeric, Result.String, and
Result.Measurement. For the Numeric Limit Test built-in step
type, Result.Numeric contains the numeric measurement the step
acquires. For the String Value Test built-in step type, Result.String
contains the measurement value the step returns in string form. For the
Multiple Numeric Limit step type, Result.Measurement[].Data
contains the numeric measurements the step acquires.
•
Include Test Limits—Enable this option if you want to log values that
step types use as test limits. The default schemas recognize specific
step properties as containing test limits. These properties include
Limit.Low, Limit.High, Limit.String, and Comp. The Numeric
Limit Test compares the measurement value it acquires against
Limit.Low, Limit.High, or both, and uses Comp to select the type of
comparison to make. The String Value Test compares the string it
acquires against Limit.String and uses Comp to indicate whether to
ignore the case in the comparison.
•
Result Filtering Expression—Specifies which step results appear in
the database. You do so by specifying an expression that the database
logger evaluates for each step result. The database logger includes the
step in the database if the expression evaluates to True. You can use
any subproperty in the Result property of the step, but you must use
Logging.StepResult in place of Step.Result. For example, if
you want to include only failing steps in the database, set the
expression to Logging.StepResult.Status == "Failed". You
can use the menu ring to the right of the control to select predefined
expressions for all steps, only failing steps, or only passing steps. You
can open the Expression Browser to build the expression by selecting
the Browse button.
Data Link Tab
The Data Link tab specifies the data link information that the process model
requires to connect to a database and to log data. Figure 18-3 shows the
Data Link tab of the Database Options dialog box.
TestStand User Manual
18-10
ni.com
Chapter 18
Databases
Figure 18-3. Database Options Dialog Box—Data Link Tab
The Data Link tab contains the following controls:
•
Database Management System—Specifies the name of the DBMS to
which you want to log data. Because of the different requirements of
each DBMS, TestStand might log data to each DBMS differently.
TestStand supports Oracle, Microsoft Access, and Microsoft SQL
Server by default. You can use the menu ring to the right of the control
to select one of these names. Refer to the Adding Support for Other
Database Management Systems section later in this chapter for more
information. Currently, the default TestStand schemas do not reference
the value specified by this control.
•
Connection String Expression—Specifies the connection string
expression that TestStand uses to open a data source to log results to.
The Connection String control requires a string expression, that the
TestStand process model evaluates at run time. The expression can be
a literal value or a string you build using variables or properties. If the
value is a string literal, you must encapsulate the string value with
quotes ("").
© National Instruments Corporation
18-11
TestStand User Manual
Chapter 18
Databases
You can update the contents of the Connection String control in any of
the following ways:
–
Browse—Edits a connection string expression in an Expression
Browser dialog box.
–
View—Launches the Database Viewer application and opens the
connection string within the viewer. Refer to the Database Viewer
section in this chapter for more information on using the Database
Viewer application.
–
Build—Allows you to construct the connection string using the
Data Link Properties dialog box. Refer to the Data Link
Properties Dialog Box section later in this chapter for more
information.
–
Use .udl File—Allows you to select a Microsoft Data Link (.udl)
filename as the connection string. The text in the data link file
specifies the connection string. When you select a Microsoft Data
Link file, TestStand updates the Connection String control with
the name of the file, as in the following example:
"FILE NAME=C:\\Program Files\\Common Files\\System\\
OLE DB\\Data Links\\Access.udl"
•
Load .udl File—Allows you to select a Microsoft Data Link (.udl)
filename and import the connection string from the file to the control.
•
Save .udl File—Allows you to specify a Microsoft Data Link (.udl)
filename and export the connection string from the control to the file.
Schemas Tab
The Schemas tab specifies the database schemas available and the default
schema that the TestStand process model uses. A schema defines how
TestStand logs results to a database. A schema consists of a list of
statements and each statement consists of a list of columns. Figure 18-4
shows the Schemas tab of the Database Options dialog box.
TestStand User Manual
18-12
ni.com
Chapter 18
Databases
Figure 18-4. Database Options Dialog Box—Schemas Tab
The Schemas tab contains the following controls:
•
Schemas—Contains a list of schemas. When you select a schema, the
Schema section displays the settings for the selected item. You can
specify the default schema that the TestStand process model uses by
enabling the checkbox for the selected schema.
You can use the Duplicate and Delete buttons to copy and delete items
from the list. You can use the up and down arrow buttons to control the
order of the items in the list.
•
Reload NI Schemas—Reloads all the default NI schemas that
TestStand installs.
•
Name—Specifies the name of the schema.
•
Allow Editing of Schema—Enables controls that edit the schema.
To ensure that the installers for newer versions of TestStand do not overwrite your
schema customizations, use the Duplicate button to copy an NI schema. Make your
Note
© National Instruments Corporation
18-13
TestStand User Manual
Chapter 18
Databases
changes to the new copy of the schema and enable the checkbox next to the new schema to
make it the default.
Statements Tab
The Statements tab defines the data that TestStand logs. Statements define
the type of results the schema operates on and the conditions that must be
true before TestStand logs the results. Statements also define the database
action to perform. In addition, statements specify what database columns
or parameters to log and the TestStand expressions to evaluate to determine
the column or parameter values. Figure shows the Statements tab of the
Database Options dialog box.
Figure 18-5. Database Options Dialog Box—Statements Tab
The Statements tab contains the following controls:
•
TestStand User Manual
Statements—Contains a list of statements for the schema specified on
the Schemas tab. When you select a statement, the Statement section
displays the settings for the selected item.
18-14
ni.com
Chapter 18
Databases
You can use the New, Cut, Copy and Paste buttons to edit the contents
of the list control. You can use the up and down arrow buttons to
control the order of the items in the list.
•
Name—Edits the name of the statement. Typically, the statement name
has the same name as the database table to which it logs data.
•
Type—Specifies the type of statement. You can select one of the
following options:
–
Recordset—Specifies that the statement returns a recordset. For
the columns defined on the Columns tab, TestStand inserts a new
record into the recordset. You would typically use an SQL
SELECT command that returns a recordset with this option.
–
Command—Specifies that TestStand executes a command for
each result that applies to the statement. For each column defined
on the Columns tab, TestStand creates a parameter. This type of
statement is called a parameterized statement. For input
parameters, TestStand assigns the column value to the parameter
before executing the statement. For output parameters, TestStand
retrieves the parameter value after executing the statement. You
would typically usa an SQL INSERT command that contains the
question mark “?” keyword to specify the parameters.
–
Stored Procedure—Specifies that TestStand executes a stored
procedure for each result that applies to the statement. For each
column defined on the Columns tab, TestStand creates a
parameter. For input parameters, TestStand assigns the column
value to the parameter before executing the statement. For output
parameters, TestStand retrieves the parameter value after
executing the statement. Stored procedures also can return a value
in addition to output parameters.
•
Command Text—Specifies the text of a command that the statement
issues against the data link. This is typically an SQL SELECT or SQL
INSERT statement, but it can be any type of command statement that
the database provider recognizes, including stored procedure calls.
•
Apply To—Specifies the class of results on which the statement
operates. You can choose one of the following options from the ring
control:
© National Instruments Corporation
–
UUT Result—TestStand applies the statement once per UUT.
–
Step Result—TestStand applies the statement to each step result.
–
Step Result Subproperty—TestStand applies the statement to
each subproperty of a step result.
18-15
TestStand User Manual
Chapter 18
Databases
•
Types to Log—Specifies the data types of results for which the
statement applies. For step results, the type must be the name of a
TestStand step type. For step result subproperties, the type must be the
name of a TestStand data type. This option does not apply to a UUT
Result. Leave the control empty to instruct TestStand to not require any
type matching.
•
Expected Properties—Specifies the properties that must exist before
TestStand applies the statement to a particular result. Leave the control
empty to instruct TestStand not to require any expected properties.
•
Precondition—Specifies an expression that must evaluate to True
before TestStand applies the statement to a particular result. Leave the
control empty to instruct TestStand to not apply a precondition.
•
Cursor Type—Specifies the type of server or client cursor for the
statement. You can choose one of the following options from the ring
control:
•
TestStand User Manual
–
Unspecified—Do not specify a cursor type.
–
Dynamic—Additions, changes, and deletions by other users are
visible, and all types of movement through the set of records are
allowed.
–
Static—Additions, changes, and deletions by other users are not
visible.
–
Forward Only—Identical to a static cursor except that you can
only scroll forward through records. This option improves
performance when you want to make a single pass through a set of
records.
–
Keyset—Similar to dynamic cursor, except that you cannot see
records that other users add. Records that other users delete are
inaccessible from your set of records. Data changes by other users
within records are visible.
Cursor Location—Specifies where the data source maintains cursors
for a connection. You can choose one of the following options from the
ring control:
–
Server—Uses cursors the data provider supplies. These cursors
are sometimes very flexible and allow for additional sensitivity to
reflect changes that other users make to the actual data.
–
Client—Uses client-side cursors that a local cursor library
supplies. Local cursor engines often allow many features that
driver supplied cursors do not.
18-16
ni.com
Chapter 18
•
Databases
Lock Type—Specifies when the data source locks a record. You can
choose one of the following options from the ring control.
–
Unspecified—Do not specify a lock type.
–
Read Only—You cannot alter the data in a record.
–
Pessimistic—The provider does what is necessary to ensure
successful editing of the records, usually by locking records at the
data source immediately upon editing.
–
Optimistic—The provider locks records only when you send the
data back to the database.
–
Batch Optimistic—Required for batch updates.
Columns/Parameters Tab
The Columns/Parameters tab specifies the columns or parameters that
TestStand logs for each result for which the statement applies. For
recordset statements, TestStand expects the recordset to return the specified
column names, and the order of the columns in the list control is arbitrary.
For command statements, TestStand creates a parameter for each item in
the list. Depending on whether the parameter is an input or an output
operation, TestStand will set or get the value, respectively. The name of the
parameter is arbitrary, but the parameter list order must match the required
parameters for the statement. Figure 18-6 shows the Column/Parameters
tab of the Database Options dialog box.
© National Instruments Corporation
18-17
TestStand User Manual
Chapter 18
Databases
Figure 18-6. Database Options Dialog Box—Columns/Parameters Tab
The Columns/Parameters tab contains the following controls:
•
Columns/Parameters—Contains a list of columns or parameters for
the statement specified on the Statements tab. When you select a
column or parameter, the Column/Parameter section displays the
settings for the selected item. For parameterized statements, the order
of the parameters in the list must correspond to the required parameters
for the statement.
You can use the New, Cut, Copy, and Paste buttons to edit the
elements of the list control. You can use the up and down arrow buttons
to control the order of the items in the list.
•
TestStand User Manual
Name—Edits the name of the column or parameter. For recordset
statements, the name must match a column in the returned recordset.
For parameterized statements, the name is arbitrary.
18-18
ni.com
Chapter 18
Databases
•
Type—Specifies the data type of the column or parameter value. You
can choose one of the following options from the ring control: Small
Integer, Integer, Float, Double Precision, String, Boolean, Binary, or
Date/Time, GUID.
•
Size—Specifies the maximum number of bytes that TestStand writes
to or reads from a column or parameter. If the column does not have a
size limitation, you can specify 0 to instruct TestStand to write or read
the entire value.
•
Direction—Specifies whether the column or parameter is an input or
output value. You can select one of the following options:
–
Input—Indicates that TestStand writes the column value or
parameter to the database.
–
Output—Indicates that TestStand retrieves the column value or
parameter from the database.
–
Input/Output—Indicates that TestStand writes and retrieves the
column value or parameter.
–
Return Value—Indicates that TestStand retrieves the parameter
value as a return value from the database.
•
Expected Properties—Specifies the properties that must exist before
TestStand assigns or retrieves a value for the column or parameter.
Leave the control empty to instruct TestStand to not require any
expected properties.
•
Precondition—Specifies an expression that must evaluate to True
before TestStand assigns or retrieves a value for the column or
parameter. Leave the control empty to instruct TestStand to not apply
a precondition.
•
Expression—Specifies an expression that the column or parameter
evaluates to obtain the input value to log or the variable property
location to store the output value retrieved.
•
Format—Specifies how to convert a string value when assigning a
string to a column. You usually use this control when writing to a
column of type Date/Time or Currency. Refer to the Format Strings
section in this chapter for more information.
© National Instruments Corporation
18-19
TestStand User Manual
Chapter 18
Databases
•
Primary Key—Enable this control to specify that the database column
is a primary key. The values in a primary key column must be unique.
–
–
•
Type—Specifies how TestStand obtains a unique primary key
value to assign to a new record. You can choose one of the
following options from the ring control:
•
Auto Generated/Counter—TestStand requests the value
that the database assigns to the new record.
•
Store GUID Value—TestStand generates a unique string
value. The database column type must be GUID or String and
must be at least 36 bytes for string.
•
Get Value from Statement—TestStand obtains the value
from the statement you specify.
Command Text—Specifies the text of a command that the
statement issues against the data link to obtain the primary key
value. You use this control only when you select Get Value from
Statement in the type ring. The statement must return the value in
a recordset that contains a single column with one record.
Foreign Key—Enable this control to specify that the database column
is a foreign key. A foreign key is a column that references a primary
key in a table.
–
Statement—Select the statement that contains the primary key
column in which the foreign key references. TestStand
automatically assigns the primary key value to the column or
parameter.
Logging Property in the Sequence Context
When the database logger starts, it creates a temporary property name
Logging in the sequence context in which the database logger evaluates
expressions. The Logging property contains subproperties that provide
information about database settings, process model data structures, and the
results that the logger processes. As logging processes the result list, the
logger updates subproperties of Logging to refer to the UUT result, step
result, and the step result subproperty the logger is processing. You can
reference the Logging subproperties in the precondition and value
expressions that you specify for statements and column values. Figure 18-7
shows the subproperties for the Logging property.
TestStand User Manual
18-20
ni.com
Chapter 18
Databases
Figure 18-7. Subproperties of the Logging Property
The following describes each subproperty of the Logging property.
•
UUTResult—Contains the UUT result that the logger is processing. If
the logger is processing a step or a subproperty, this property holds the
UUT result that contains the step result or subproperty.
•
StepResult—Contains the step result that the logger is processing.
If the logger is processing a subproperty, this property holds the step
result that contains the subproperty. If the logger is processing a UUT
result, this property contains the result of the sequence call in the
process model that calls the MainSequence in the client file.
•
StepResultProperty—Contains the subproperty of the step result
that the logger is processing. If the logger is not processing a
subproperty, this property does not exist.
•
ExecutionOrder—Contains a numeric value that the logger
increments after it processes each step result.
•
StartDate—Specifies the date on which the UUT test began. This
property is an instance of the DateDetails custom data type.
•
StartTime—Specifies the time at which the UUT test began. This
property is an instance of the TimeDetails custom data type.
•
UUT—Specifies the serial number, test socket index, and other
information about the unit under test. This property is an instance of
the UUT custom data type.
•
DatabaseOptions—Contains the process model database settings
you configure in the Database Options dialog box. This property is an
instance of the DatabaseOptions custom data type.
•
StationInfo—Specifies the station ID and the login name. This
property is an instance of the StationInfo custom data type.
The TestStand process model files define the structure of the
DatabaseOptions, DateDetails, TimeDetails, UUT, and StationInfo custom
data types that the logging properties use.
© National Instruments Corporation
18-21
TestStand User Manual
Chapter 18
Databases
TestStand Database Result Tables
This section describes the default table schemas that TestStand uses. This
section also outlines how to modify existing schemas or create new
schemas.
Default TestStand Table Schema
The default TestStand database schema require the following tables in your
database:
•
UUT_RESULT
•
STEP_RESULT
•
STEP_SEQCALL
•
STEP_PASSFAIL
•
STEP_CALLEXE
•
STEP_MSGPOPUP
•
STEP_PROPERTYLOADER
•
STEP_STRINGVALUE
•
MEAS_NUMERICLIMIT
•
MEAS_IVI_WAVE
•
MEAS_IVI_WAVEPAIR
•
MEAS_IVI_SINGLEPOINT
The UUT_RESULT table contains information on each UUT that
TestStand tests. The STEP_RESULT table contains information on each
step that TestStand executes while testing each UUT. The other table names
with the prefix “STEP” contain information for each specific step type. The
table names with the prefix “MEAS” contain information on sub results
that TestStand logs for a step type.
Each table contains a primary key column ID. The data type of the column
is Number, String, or GUID, depending on the selected schema. Each table
might contain foreign key columns. The data types of the columns must
match the primary key that the data types reference.
TestStand User Manual
18-22
ni.com
Chapter 18
Databases
Table 18-2 lists the name, data type, and description of each column in the
UUT_RESULT table.
Table 18-2. UUT_RESULT Table Schema
Column Name
Data Type
Description
ID
Primary Key
Unique value that identifies each entry in the table.
For Access and SQL Server, the default process model
assumes that this column increments automatically.
For Oracle, the default process model uses an Oracle
SQL sequence to generate a unique number.
STATION_ID
String
Station ID, usually the computer name.
BATCH_SERIAL_NUMBER
String
Serial number of the Batch. Only applies to executions
that use the batch process model.
TEST_SOCKET_INDEX
Number
Test socket for the UUT. Only applies to executions
that use the parallel or batch process models.
UUT_SERIAL_NUMBER
String
Serial number of the UUT.
USER_LOGIN_NAME
String
Login name of the user who tested the UUT.
START_DATE_TIME
Date-time
Time and date at which the UUT test began executing.
EXECUTION_TIME
Number
Number of seconds the UUT test took to execute.
UUT_STATUS
String
Status of the UUT test.
UUT_ERROR_CODE
Number
Error code, if the UUT test status is Error.
UUT_ERROR_MESSAGE
String
Error message, if the UUT test status is Error.
Table 18-3 lists the name, data type, and description of each column in the
STEP_RESULT table.
Table 18-3. STEP_RESULT Table Schema
Column Name
Data Type
Description
ID
Primary Key
Unique value that identifies each entry in the table.
For Access and SQL Server, the default process model
assumes that this column increments automatically.
For Oracle, the default process model uses an Oracle
SQL sequence to generate a unique number.
UUT_RESULT
Foreign Key
UUT ID from the UUT_RESULT table that associates
the step result with a UUT.
© National Instruments Corporation
18-23
TestStand User Manual
Chapter 18
Databases
Table 18-3. STEP_RESULT Table Schema (Continued)
Column Name
Data Type
Description
STEP_PARENT
Foreign Key
ID of the parent sequence call step result, if the step is
a step in a subsequence.
STEP_NAME
String
Name of the step.
STEP_TYPE
String
Name of the step type.
STATUS
String
Status of the step.
REPORT_TEXT
String
Report text of the step.
ERROR_CODE
Number
Error code, if the step status is Error.
ERROR_MESSAGE
String
Error message, if the step status is Error.
MODULE_TIME
Number
Number of seconds the step module took to execute.
TOTAL_TIME
Number
Number of seconds the step took to execute, including
module execution and all step options, such as
preconditions, expressions, post-actions, and module
loading.
NUM_LOOPS
Number
Number of loops the step executed, if any.
NUM_PASSED
Number
Number of loops the step returned a status of Passed,
if any.
NUM_FAILED
Number
Number of loops the step returned a status of Failed,
if any.
ENDING_LOOP_INDEX
Number
The loop index after executing the ending loop.
LOOP_INDEX
Number
The value of the loop index for an iteration of the step.
INTERACTIVE_EXENUM
Number
Number that TestStand assigns to an interactive
execution. The number is unique with respect to all
other interactive executions in the current TestStand
session. TestStand adds this property only if you run
the step interactively.
STEP_GROUP
String
Step group that contains the step. The value is
“Main”, “Setup”, or “Cleanup”.
STEP_INDEX
Number
Zero-based position of the step in the step group.
ORDER_NUMBER
Number
The order in which the step executed within the
execution.
TestStand User Manual
18-24
ni.com
Chapter 18
Databases
Table 18-4 lists the name, data type, and description of each column in the
STEP_CALLEXE table. The default TestStand schemas log subproperties
of the Call Executable step into this table.
Table 18-4. STEP_CALLEXE Table Schema
Column Name
Data Type
Description
ID
Primary Key
Unique value that identifies each entry in the table.
STEP_RESULT
Foreign Key
Step ID from the STEP_RESULT table that associates
the result with a step.
EXIT_CODE
Number
The exit code of the executable.
Table 18-5 lists the name, data type, and description of each column in the
STEP_MSGPOPUP table. The default TestStand schemas log
subproperties of the Message Popup step into this table.
Table 18-5. STEP_MSGPOPUP Table Schema
Column Name
Data Type
Description
ID
Primary Key
Unique value that identifies each entry in the table.
STEP_RESULT
Foreign Key
Step ID from the STEP_RESULT table that associates
the result with a step.
BUTTON_PRESSED
Number
The button that was pressed.
RESPONSE
String
The response, if one exists.
Table 18-6 lists the name, data type, and description of each column in the
STEP_PASSFAIL table. The default TestStand schema logs subproperties
of the Pass/Fail Test step into this table.
Table 18-6. STEP_PASSFAIL Table Schema
Column Name
Data Type
Description
ID
Primary Key
Unique value that identifies each entry in the table.
STEP_RESULT
Foreign Key
Step ID from the STEP_RESULT table that associates
the result with a step.
PASS_FAIL
Boolean
If the step is a Pass/Fail step, whether the step passed
or failed.
© National Instruments Corporation
18-25
TestStand User Manual
Chapter 18
Databases
Table 18-7 lists the name, data type, and description of each column in the
STEP_STRINGVALUE table. The default TestStand schema logs
subproperties of the String Value Test step into this table.
Table 18-7. STEP_STRINGVALUE Table Schema
Column Name
Data Type
Description
ID
Primary Key
Unique value that identifies each entry in the table.
STEP_RESULT
Foreign Key
Step ID from the STEP_RESULT table that associates
the result with a step.
STRING_VALUE
String
The value of the string that the module returned.
STRING_LIMIT
String
The string against which TestStand compares the
string that the module returns.
Table 18-8 lists the name, data type, and description of each column in the
STEP_PROPERTYLOADER table. The default TestStand schema logs
subproperties of the Property Loader step into this table.
Table 18-8. STEP_PROPERTYLOADER Table Schema
Column Name
Data Type
Description
ID
Primary Key
Unique value that identifies each entry in the table.
STEP_RESULT
Foreign Key
Step ID from the STEP_RESULT table that associates
the result with a step.
NUM_PROP_READ
Number
The number of property or variable values read from
the file or database.
NUM_PROP_APPLIED
Number
The number of property or variable values applied
from the file or database to the sequence file.
TestStand User Manual
18-26
ni.com
Chapter 18
Databases
Table 18-9 lists the name, data type, and description of each column in the
STEP_SEQCALL table. The default TestStand schema logs subproperties
of the Sequence Call step into this table.
Table 18-9. STEP_SEQCALL Table Schema
Column Name
Data Type
Description
ID
Primary Key
Unique value that identifies each entry in the table.
STEP_RESULT
Foreign Key
Step ID from the STEP_RESULT table that associates
the result with a step.
SEQUENCE_NAME
String
The name of the sequence that was called.
SEQUENCE_FILE_PATH
String
The path to the sequence file.
Table 18-10 lists the name, data type, and description of each column in the
MEAS_NUMERICLIMIT table. The default TestStand schema logs the
measurements of the Numeric Limit Test step and the Multiple Numeric
Limit Test step into this table.
Table 18-10. MEAS_NUMERICLIMIT Table Schema
Column Name
Data Type
Description
ID
Primary Key
Unique value that identifies each entry in the table.
STEP_RESULT
Foreign Key
Step ID from the STEP_RESULT table that associates
the result with a step.
NAME
String
The name of the measurement.
COMP_OPERATOR
String
The comparison operator for the step.
HIGH_LIMIT
Number
The high limit for the step comparison.
LOW_LIMIT
Number
The low limit for the step comparison.
UNITS
String
A label that describes the units for the measurement.
DATA
Number
The value of the numeric measurement that the
module returned.
STATUS
String
The status of the numeric limit comparison.
© National Instruments Corporation
18-27
TestStand User Manual
Chapter 18
Databases
Table 18-11 lists the name, data type, and description of each column in the
MEAS_SINGLEPOINT table. The default TestStand schema logs the
measurements of the IVI steps into this table.
Table 18-11. MEAS_SINGLEPOINT Table Schema
Column Name
Data Type
Description
ID
Primary Key
Unique value that identifies each entry in the table.
STEP_RESULT
Foreign Key
Step ID from the STEP_RESULT table that associates
the result with a step.
TYPE
Number
The type of measurement.
CHANNEL
String
The channel name for the measurement.
DATA
Number
The value of the numeric measurement that the
module returned.
Table 18-12 lists the name, data type, and description of each column in the
MEAS_WAVE table. The default TestStand schema logs the measurements
of the IVI steps into this table.
Table 18-12. MEAS_WAVE Table Schema
Column Name
Data Type
Description
ID
Primary Key
Unique value that identifies each entry in the table.
STEP_RESULT
Foreign Key
Step ID from the STEP_RESULT table that associates
the result with a step.
TYPE
Number
The type of measurement.
CHANNEL
String
The channel for the step comparison.
INITIALX
Number
The offset to the first point in the waveform.
DELTAX
Number
The offset between the points in the waveform.
DATA
Binary
The waveform for the numeric measurement that the
module returned.
TestStand User Manual
18-28
ni.com
Chapter 18
Databases
Table 18-13 lists the name, data type, and description of each column in the
MEAS_WAVEPAIR table. The default TestStand schema logs the
measurements of the IVI steps into this table.
Table 18-13. MEAS_WAVEPAIR Table Schema
Column Name
Data Type
Description
ID
Primary Key
Unique value that identifies each entry in the table.
STEP_RESULT
Foreign Key
Step ID from the STEP_RESULT table that associates
the result with a step.
TYPE
Number
The type of measurement.
CHANNEL
String
The channel name for the measurement.
INITIALX
Number
The offset to the first point in the waveforms.
DELTAX
Number
The offset between the points in the waveforms.
DATA0
Binary
The first waveform for the numeric measurement that
the module returned.
DATA1
Binary
The second waveform for the numeric measurement
that the module returned.
The default TestStand database schemas assume that result tables conform
to the above table definitions. If you want to modify the table schema, you
must alter the tables in your database and create a new schema using the
Database Options dialog box. Refer to the Database Options Dialog Box
section for more information on using the Database Options dialog box.
Creating the Default Result Tables
The TestStand logging feature requires that you create the database tables
in a database for your DBMS. TestStand includes the Database Viewer
application for viewing data in a database table, editing table information,
and executing SQL commands. You can use Database Viewer to create the
default result tables that the schema requires. To use the Database Viewer
application, you must have previously set up the DBMS server and any
required DBMS client software.
TestStand comes with SQL script files for creating and deleting database
tables that the default schemas require. TestStand installs these script files
in the <TestStand>\Components\NI\Model\TestStandModel\
Database directory. For example, the Access Generic Recordset
Create Result Tables.sql file contains SQL commands to create the
© National Instruments Corporation
18-29
TestStand User Manual
Chapter 18
Databases
default tables for Access. The Access Drop Result Tables.sql file
contains SQL commands to delete the default tables.
For more information on creating the default database tables using a SQL
script file, refer to the Database Viewer section later in this chapter. Refer
to the TestStand Database Result Tables section earlier in this chapter for
more information on the default schemas. Refer to the Using Data Links
section later in this chapter for more information on configuring your
system to access your DBMS.
Adding Support for Other Database Management Systems
By default, TestStand supports Oracle, Microsoft SQL Server, and
Microsoft Access. TestStand supports these DBMS in the following ways:
•
TestStand includes schemas for each DBMS, and each schema
conforms to the default database tables. You can review the default
schemas in the Database Options dialog box.
•
You can create result tables for the default table schema for
each DBMS by using the SQL script files located in the
<TestStand>\Components\NI\Model\TestStandModel\
Database directory.
If you want to add support for another DBMS, you must create a new
schema in the Database Options dialog box. You can use the Duplicate
button on the Schemas tab to copy an existing schema and then customize
its statements and column and parameter settings to work with the new
DBMS.
You also can create new script files for your new DBMS by completing the
following steps:
1.
Create new script files in the <TestStand>\Components\User\
Model\TestStandModel\Database directory. It is a good idea to
include the name of the DBMS in the filename.
2.
Enter the SQL commands for creating and deleting your DBMS tables
to the new script files. Refer to any of the SQL database syntax files
that TestStand provides for an example.
For example, the SQL database syntax file for Oracle result tables
might contain the following commands:
CREATE TABLE UUT_RESULT
(
ID
NUMBER
UUT_SERIAL_NUMBER
CHAR (255),
USER_LOGIN_NAME
CHAR (255),
TestStand User Manual
18-30
PRIMARY KEY,
ni.com
Chapter 18
START_DATE_TIME
EXECUTION_TIME
UUT_STATUS
UUT_ERROR_CODE
UUT_ERROR_MESSAGE
Databases
DATE,
NUMBER,
CHAR (255),
NUMBER,
CHAR (255)
)
/
CREATE SEQUENCE SEQ_UUT_RESULT START WITH 1
/
CREATE FUNCTION UUT_RESULT_NEXT_ID RETURN NUMBER IS
X NUMBER;
BEGIN
SELECT SEQ_UUT_RESULT.NextVal INTO X FROM DUAL;
RETURN X;
END;
/
Notice that TestStand uses three separate commands, each separated
by the ‘/’ character, to create the UUT RESULT table in Oracle.
You use a similar syntax for deleting tables. For example, the SQL
script file for Oracle might contain the following commands for
deleting result tables:
DROP TABLE STEP_RESULT
/
DROP SEQUENCE SEQ_STEP_RESULT
/
DROP FUNCTION STEP_RESULT_NEXT_ID
/
Database Viewer
TestStand includes the Database Viewer application for viewing data in a
database, editing table information, and executing SQL commands. The
Database Viewer application, DatabaseView.exe, is located in the
following directory: <TestStand>\Components\NI\Tools\
DatabaseView.
© National Instruments Corporation
18-31
TestStand User Manual
Chapter 18
Databases
Figure 18-8 shows the Database Viewer main window.
Figure 18-8. Database Viewer Main Window
The Database Viewer displays the following three types of windows:
•
Data Link Window—Contains a tree view of the tables that are
defined for the data link. The list view displays the contents of the
currently selected node in the tree view. The Catalog control lists the
available catalogs defined by the DBMS. The Schema control lists the
available schemas defined by the DBMS.
You can display a context menu by right-clicking on the window. The
items in the context menu vary depending on whether you right-click
on a node in the tree view, on an entry in the list view, or on the
background area. The context menu can contain the following items:
TestStand User Manual
–
View Data—Opens in the Database Viewer a new Data View
window with the contents of the table. You can access this
command on a table node in the tree view of the Data Link
window.
–
Add Table—Creates a new table in the DBMS.
18-32
ni.com
Chapter 18
–
Drop Table—Deletes a table from the DBMS.
–
Add Column—Adds a new column to a table.
–
Drop Column—Deletes a column from a table.
Databases
•
Execute SQL Window—Contains a SQL Commands control and a
SQL History control. You can enter SQL commands in the SQL
Commands control and execute its contents by selecting the Go icon
button. You can load SQL script files by clicking on the Open File icon
button. Use the Clear icon button to delete the contents from the SQL
Commands control.
•
Data View Window—Contains a grid display of the data returned
from a SQL command. Database Viewer automatically opens a new
Data View window when you use the View Data context menu
command on a table node in the tree view of the Data Link window
or when you issue a SQL command that returns a recordset.
The status bar at the bottom of the main window displays the status for
executing commands.
Menus
The Database Viewer menu bar contains commands that apply to all
windows and commands that apply to specific windows. This section
contains descriptions of the menu items in the menu bar.
File Menu
The File menu contains the following commands:
•
Open—Opens a database file such as a Microsoft Access database file
(.mdb) or opens a data link by selecting a Microsoft Data Link (.udl)
filename.
•
New Data Link—Opens a data link by constructing a connection
string using the Data Link Properties dialog box. Refer to the Data
Link Properties Dialog Box section later in this chapter for more
information.
•
New Execute SQL Window—Opens an Execute SQL window. This
command is available only after you open a data link.
•
Close—Closes an open window.
•
Exit—Closes the current viewer session. The application closes all
open windows automatically.
Just below the Exit command on the File menu, TestStand provides a list
of the most recently used data link files.
© National Instruments Corporation
18-33
TestStand User Manual
Chapter 18
Databases
Options Menu
The Options menu can contain the following items.
•
Edit Data—Allows you to edit the contents of a table. This control
applies to the Data View window.
•
Viewer Options—Displays the Viewer Options dialog box which
allows you to customize the behavior of the application.
•
Database Options—Displays the Database Options dialog box.
SQL Menu
The SQL menu is available only when an Execute SQL window is active.
The SQL menu has the following commands:
•
Execute—Executes SQL commands in the SQL Commands control in
the active Execute SQL window.
•
Stop—Stops the execution of SQL commands.
•
Load From File—Imports the contents of a text file into the SQL
Commands control in the active Execute SQL window.
•
Clear—Deletes the contents from the SQL Commands control in the
active Execute SQL window.
Windows Menu
The Windows menu has the following commands:
•
Refresh—Updates the contents of a Data Link View window or a Data
View window.
•
Cascade—Arranges all open windows so that each title bar is visible.
•
Tile—Arranges all open windows in smaller sizes to fit next to each
other.
•
Arrange Icons—Arranges all minimized windows at the bottom of
the main window.
Using Data Links
TestStand requires you to define a data link when you specify the database
where TestStand logs results, or when you use the database step types.
TestStand uses the Windows Data Link Properties dialog box to build a
data link connection string.
The following sections describe the Data Link Properties dialog box and
the Windows ODBC Administrator.
TestStand User Manual
18-34
ni.com
Chapter 18
Databases
Data Link Properties Dialog Box
You can display the Data Link Properties dialog box when you create or
edit a connection string for a data link. You use the Data Link Properties
dialog box to specify initialization properties for your OLE DB provider.
This section describes the four tabs of the Data Link Properties dialog box.
Provider Tab
Use the Provider tab to select the appropriate OLE DB provider for the type
of data you want to access. Figure 18-9 shows the Provider tab for the Data
Link Properties dialog box.
Figure 18-9. Data Link Properties Dialog Box—Provider Tab
© National Instruments Corporation
18-35
TestStand User Manual
Chapter 18
Databases
Typically, a provider communicates with a specific DBMS such as Oracle
or SQL Server. The Microsoft OLE DB Provider for ODBC Drivers allows
you to use any ODBC driver. Some providers have limited functionality.
Refer to the <TestStand>\Doc\readme.txt for information on
suggested providers, versions of ODBC drivers, and client DBMS
software. The following recommendations are a summary of the contents
in the readme.txt file:
•
To communicate with Access, use the Microsoft Jet 4.0 OLE DB
Provider.
•
To communicate with SQL Server, use the Microsoft OLE DB
Provider for SQL Server.
•
To communicate with Oracle, use the Microsoft OLE DB Provider
from Oracle.
You can use the Help button to display the online help for this tab.
TestStand User Manual
18-36
ni.com
Chapter 18
Databases
Connection Tab
Use the Connection tab to specify how to connect to your data using the
selected OLE DB provider. The contents of the Connection tab vary for
each OLE DB provider. Figure 18-10 shows the contents of the Connection
tab of the Data Link Properties dialog box when you select the Microsoft
OLE DB Provider for ODBC drivers.
Figure 18-10. Data Link Properties Dialog Box—Connection Tab
You can use the Help button to display the online help for this tab.
If the connection requires a password, you must save the password in the connection
string by checking the Allow Saving Password control.
Note
If you want to use the Microsoft OLE DB Provider for ODBC drivers to connect to
an ODBC data source, you must first configure a data source name within the ODBC
Administrator. Refer to the Using the ODBC Administrator section later in this chapter for
more information on defining ODBC data source names.
Note
© National Instruments Corporation
18-37
TestStand User Manual
Chapter 18
Databases
Advanced Tab
Use the Advanced tab to view and set other initialization properties for your
data. Figure 18-11 shows the Advanced tab of the Data Link Properties
dialog box. For more information on advanced initialization properties,
refer to the documentation that you receive with the OLE DB provider.
Figure 18-11. Data Link Properties Dialog Box—Advanced Tab
You can use the Help button to display the online help for this tab.
TestStand User Manual
18-38
ni.com
Chapter 18
Databases
All Tab
Use the All tab to view and edit all the initialization properties that are
available for the selected OLE DB provider. The available properties vary
depending on the OLE DB provider that you select. Figure 18-12 shows the
All tab of the Data Link Properties dialog box.
Figure 18-12. Data Link Properties Dialog Box—All Tab
You can use the Help button to display the online help for this tab.
Using the ODBC Administrator
To access databases through the ODBC standard, you must have an ODBC
driver for each database system you use. Each ODBC driver must register
itself with the operating system when you install it. You also must define
and name data sources in the ODBC Administrator in the Windows
Control Panel. When you do so, you typically specify information such as
a server, a database, and additional database-specific options. You can
define one or more data sources for each ODBC driver.
© National Instruments Corporation
18-39
TestStand User Manual
Chapter 18
Databases
You can display the ODBC Administrator by going to your Windows Start
menu and selecting Start»Settings»Control Panel and double clicking on
the ODBC icon in your Windows Control Panel. Figure 18-13 shows the
ODBC Data Source Administrator dialog box.
Figure 18-13. ODBC Data Source Administrator Dialog Box—User DSN Tab
The ODBC Data Source Administrator dialog box lists all the registered
ODBC data sources. The dialog box has three tabs for defining data
sources.
•
User DSN—Allows you to define data sources that are visible only to
you.
•
System DSN—Allows you to define data sources for all users.
•
File DSN—Allows you to set the ODBC Administrator to store the
data source definitions in a directory that you specify.
For the User DSN and System DSN tabs, the ODBC Administrator stores
the data source definitions in the Windows System Registry. You can use
the Add or Configure buttons on these tabs to display a driver-specific
dialog box in which you can configure a new or an existing data source. The
system then saves the configuration for the data source in the Registry or as
a file.
TestStand User Manual
18-40
ni.com
Chapter 18
Databases
You can use the Help button to display the online help for any tab in the
ODBC Data Source Administrator Dialog Box.
Figure 18-14 shows an example driver-specific dialog box for Microsoft
Access 97.
Figure 18-14. ODBC Microsoft Access 97 Setup Dialog Box
You can view the available drivers for your system on the Drivers tab of the
ODBC Data Source Administrator dialog box. Figure 18-15 shows the
Microsoft Access Driver highlighted on the Drivers tab.
© National Instruments Corporation
18-41
TestStand User Manual
Chapter 18
Databases
Figure 18-15. ODBC Data Source Administrator Dialog Box—Drivers Tab
Third-Party ODBC Database Drivers
Because the database features of TestStand comply with the ODBC
standard, you can use any ODBC-compliant database drivers. TestStand
does not install any ODBC database drivers. DBMS vendors and
third-party developers offer their own drivers. Refer to your vendor
documentation for information on registering your specific database
drivers with the ODBC Administrator.
The TestStand CD-ROM contains the LabVIEW SQL Toolkit and the
LabWindows/CVI SQL Toolkit. If you install either toolkit, the toolkit may install
third-party ODBC drivers. You cannot redistribute the database driver files the SQL Toolkit
includes without purchasing a run-time license. Contact National Instruments for more
information on redistributing database driver files.
Note
Example Data Link and Result Table Setup for Microsoft Access
This section outlines an example of how to set up a TestStand data link to
a Microsoft Access database file (.mdb) to log results using the default
process model. The example uses the Microsoft Jet OLE DB provider.
TestStand User Manual
18-42
ni.com
Chapter 18
Databases
Database Options—Specifying a Data Link and
Schema
To configure the database logging options complete the following steps:
1.
Launch the sequence editor and log in as Administrator.
2.
Select Configure»Database Options to display the Database Options
dialog box. The Logging Options tab is active.
3.
Enable database logging by removing the checkmark next to the
Disable Database Logging option.
4.
Click on the Data Link tab of the Database Options dialog box and
select Access from the ring control for the Database Management
System option.
5.
Click on the Build button. The Data Link Properties dialog box
appears.
6.
Select the Microsoft Jet 4.0 OLE DB Provider item on the Provider
tab of the Data Link Properties dialog box.
7.
Click on the Next button. The Connection tab becomes active.
8.
On the Connection tab, click on the Browse button to the right of the
Select or Enter a Database Name control to display the Select Access
Database dialog box.
9.
Using the Select Access Database dialog box, find your Microsoft
database file (.mdb) and click on Open to select the file.
10. On the Data Link Properties dialog box, click on the Test Connection
button to verify that you properly entered the required information.
11. Click on OK to close the Data Link Properties dialog box.
12. Notice that the Connection Sting control on the Database Options
dialog box now contains a literal string expression version of the data
link connection string.
Database Viewer—Creating Result Tables
To create the default result tables in your database, complete the following
steps:
1.
© National Instruments Corporation
If you are continuing from the steps in the immediately preceding
section, skip to step 2. Otherwise, complete the following:
a.
Launch the sequence editor and log in as Administrator.
b.
Select Configure»Database Options to display the Database
Options dialog box. The Logging Options tab is active.
c.
Click on the Data Link tab of the Database Options dialog box.
18-43
TestStand User Manual
Chapter 18
Databases
2.
Select View to open the data link in the Database Viewer application.
This step requires that the Connection String control contains a valid
expression.
3.
Select File»New Execute SQL Window to open an Execute SQL
window.
4.
Select SQL»Load From File command and select the Access
Create Generic Recordset Result Tables.sql file in the
<TestStand>\Components\NI\Models\TestStandModel\
Database directory. Notice that the SQL Command control contains
a set of SQL commands for creating the default result tables.
5.
Select SQL»Execute command to create the default result tables.
Review the results of the SQL commands in the SQL History control.
Make sure the tables are created successfully.
6.
Click on the Data Link window and select the Window»Refresh
command to view the tables.
After completing the preceding steps, any execution you launch with
the TestUUTs or Single Pass entry point automatically logs its results to
the database.
Built-In Database Step Types
TestStand includes six built-in steps that you can use to communicate with
a database. The step type names and the descriptive names include the
following:
•
NI_OpenDatabase—Open Database
•
NI_CloseDatabase—Close Database
•
NI_OpenSQLStatement—Open SQL Statement
•
NI_CloseSQLStatement—Close SQL Statement
•
NI_DataOperation—Data Operation
•
NI_PropertyLoader—Property Loader
A simple sequence of database steps might include the following steps:
TestStand User Manual
1.
Connect to the database using the Open Database step.
2.
Issue a SQL query on tables in the database using the Open SQL
Statement step.
3.
Create new records, then get and update existing records using Data
Operation steps.
18-44
ni.com
Chapter 18
4.
Close the SQL query using the Close SQL Statement step.
5.
Close the database connection using the Close Database step.
Databases
Use the Property Loader step type to import property and variable values
from a file or database during an execution.
The following sections describe how to interactively access your database
to configure a database step type and describes each database step type,
including the step type edit dialog boxes and the custom step properties.
Using the Select Data Link Dialog Box
When you edit a database step, the Edit dialog box might have to access the
database so it can display a list of available tables in the database or a list
of columns in a table. To assist you, TestStand allows you to define a set of
data links that you can reuse whenever you edit a database step. A data link
typically includes a name of a server, a name of a database, a user ID, and
a password. Whenever you edit a database step, you can select a predefined
data link to speed up your development.
For example, when you edit an Open SQL Statement step, you typically
must build a SQL statement. If you select a predefined data link, the Build
SQL Select Statement dialog box can automatically populate the Table and
Column controls with a list of valid names, as shown in Figure 18-16.
© National Instruments Corporation
18-45
TestStand User Manual
Chapter 18
Databases
Figure 18-16. Build SQL Select Statement Dialog Box
You can define a new data link by selecting the Select Data Link button on
the edit dialog boxes for the database step types. Figure 18-17 shows the
Select Data Link dialog box.
Figure 18-17. Select Data Link Dialog Box
TestStand User Manual
18-46
ni.com
Chapter 18
Databases
The Select Data Link dialog box lists the currently defined data links. When
you select a data link, TestStand attempts to open a connection to the data
source. If TestStand successfully opens the data link, TestStand leaves the
connection open for later use. The Select Data Link dialog box has the
following options:
•
Selected Data Link is Open—Indicates whether a connection is open
for the currently selected data link. You can manually close an open
connection by unchecking the control while the data link is selected.
•
New or Edit—You can create new data links or edit existing data links
by using the New or Edit buttons, respectively. The New and Edit
buttons display the Edit Data Link dialog box, as shown in
Figure 18-18.
Figure 18-18. Edit Data Link Dialog Box
The Edit Data Link dialog box contains the following controls:
© National Instruments Corporation
–
Data Link Name—Specifies a name for the data link. TestStand
displays this name in the list control on the Select Data Link
dialog box.
–
Connection String—Specifies the connection information for the
data link. The string specifies the data source and options to use
when opening the data source. The contents of the string can
include the name of the server where the data resides, the database
or file that contains the data, and the user ID and permissions to
use when connecting to the data source.
18-47
TestStand User Manual
Chapter 18
Databases
–
Find File—Allows you to select a Microsoft Data Link file
(.udl). A data link file specifies the connection string. When you
select a Microsoft Data Link file, TestStand updates the
Connection String control with the pathname of the file.
–
Build—Allows you to construct a connection string using the
Data Link Properties dialog box.
•
Remove—Removes existing data links from the list. Select a name
from the list and click on the Remove button.
•
View—Launches the Database Viewer application and opens the
connection string within the viewer. Refer to the Database Viewer
section earlier in this chapter for more information on using the
Database Viewer application.
Open Database
Use the Open Database step type to open a database for use in TestStand.
An Open Database step returns a database handle that you can use to open
SQL statements.
TestStand User Manual
18-48
ni.com
Chapter 18
Databases
Data Link Tab
The Data Link tab specifies the information TestStand requires to connect
to a database. Figure 18-19 shows the Data Link tab of the Edit Open
Database dialog box.
Figure 18-19. Edit Open Database dialog box—Data Link Tab
The Data Link tab contains the following controls:
•
Select Data Link—Selects a predefined data link from a list. When
you select a data link, TestStand updates the Connection String control
on the Data Link tab with its value. Refer to the Using Data Links
section earlier in this chapter for more information on predefining data
links.
•
Database Handle—Specifies the name of a variable or property of
type Number that the value of the database is assigned to. You can use
the Browse button to display the Expression Browser dialog box.
•
Connection String—Specifies the connection string TestStand uses to
open the data source. The Connection String control requires a string
expression that TestStand evaluates at run time. The expression can be
© National Instruments Corporation
18-49
TestStand User Manual
Chapter 18
Databases
a literal value or a string you build using variables or properties. If the
value is a string literal, you must encapsulate the string value with
quotes ("").
You can update the contents of the Connection String control as
follows:
–
Browse—Allows you to edit a connection string expression in an
Expression Browser dialog box.
–
View—Launches the Database Viewer application and opens the
connection string within the viewer. Refer to the Database Viewer
section earlier in this chapter for more information on using the
Database Viewer application.
–
Find File—Selects a Microsoft Data Link (.udl) filename as the
connection string. When you select a Microsoft Data Link file,
TestStand updates the Connection String control with the name of
the file, as in the following:
"FILE NAME=C:\\Program Files\\Common Files\\ System\\OLE
DB\\Data Links\\Access.udl"
–
Build—Constructs a connection string using the Data Link
Properties dialog box. Refer to the Data Link Properties Dialog
Box section later in this chapter for more information.
You can use the Help button to display the online help for this tab.
Custom Properties
The Open Database step type defines the following step properties in
addition to the common custom properties:
•
Step.ConnectionString specifies a string expression that contains
the name of the data link to open.
•
Step.DatabaseHandle specifies the numeric variable or property
that the value of the opened database handle is assigned to.
Close Database
Use the Close Database step to close the database handle that you obtain
from an Open Database step. It is a good idea to place Close Database steps
in Cleanup step groups.
TestStand User Manual
18-50
ni.com
Chapter 18
Databases
Figure 18-20 shows the Edit Close Database dialog box.
Figure 18-20. Edit Close Database Dialog Box
The Edit Close Database dialog box contains a single control, Database
Handle. This control specifies the name of the variable or property that
contains the database handle that is to be closed. The variable or property
is of the Number data type. After closing the database handle, the step
assigns a value of zero to the variable or property.
Custom Properties
The Close Database step type defines the following step property in
addition to the common custom properties:
•
Step.DatabaseHandle specifies the name of the variable or
property that contains the open database handle that is to be closed.
The variable or property is of the Number data type.
TestStand does not automatically close open database handles. You must call a
Close Database step for your open handles. If you abort an execution, you must exit the
Note
© National Instruments Corporation
18-51
TestStand User Manual
Chapter 18
Databases
application process that loaded the TestStand engine to guarantee that TestStand frees all
database handles. Selecting Unload All Modules does not close the handles.
Open SQL Statement
After you open a database, you typically select a set of data in the database
to work with. You use the Open SQL Statement step type to select this data.
After you open a SQL statement, you can perform multiple operations on
that data set using Data Operation steps. An Open SQL Statement step
returns a statement handle that you can use in Data Operation steps.
SQL Statement Tab
Figure 18-21 shows the SQL Statement tab of the Edit Open SQL
Statement dialog box.
Figure 18-21. Edit Open SQL Statement dialog box—SQL Statement Tab
The SQL Statement tab contains the following controls:
•
TestStand User Manual
Database Handle (Number)—Specifies the name of the variable or
property that contains the database handle you obtain from an Open
18-52
ni.com
Chapter 18
Databases
Database statement. The variable or property is of the Number data
type.
•
Statement Handle (Number)—Specifies a variable or property to
which the step assigns the value of the SQL statement handle.The
variable or property is of the Number data type. If you leave the control
blank, the step automatically releases the SQL statement handle after
executing the step.
•
SQL Statement—Specifies the SQL statement that the step opens.
You can specify the SQL statement as a literal string or as an
expression that TestStand evaluates at run time. You can use the Build
button to construct the SQL statement. Refer to the Structured Query
Language (SQL) section later in this chapter for more information. You
cannot use the Build button to edit an existing SQL statement
expression.
•
Number of Records Selected—Specifies a variable or property to
which the step assigns the number of records that the SQL statement
returns. The variable or property is of the Number data type.
•
Build—Opens the Build SQL Select Statement dialog box where you
can construct a SQL select statement. Figure 18-22 shows the Build
SQL Select Statement dialog box.
Figure 18-22. Build SQL Select Statement Dialog Box
© National Instruments Corporation
18-53
TestStand User Manual
Chapter 18
Databases
The Build SQL Select Statement dialog box contains the following
controls:
–
Data Link Name—Indicates the name of the data link to use to
populate the Table and Column ring controls. You must use the
Select Data Link button to select a predefined data link from a
list. When you select a data link, TestStand automatically updates
the Table and Column ring controls in the Add/Remove Columns
section. Refer to the Using Data Links section earlier in this
chapter for more information on predefining data links.
–
Add/Remove Columns—Select the tables and columns to
include in the SQL SELECT statement. TestStand populates the
Table ring control with the tables that the selected data link
defines. When you select a table in the Table ring control,
TestStand populates the Column ring control with a list of all
columns in the table. If you want to select all columns in the SQL
statement, choose the * item in the Column control.
You can use the Add button to insert the selected table and column
into the Table and Column list control. You can remove an item
from the list control by selecting the item you want to delete and
clicking on the Remove button. You can reorder the items in the
list control by selecting an item and clicking on the up or down
arrow buttons.
–
Where Clause—Specifies a SQL WHERE clause to include in the
SQL SELECT statement. You can specify a literal string or an
expression that TestStand evaluates at run-time. Refer to the
Structured Query Language (SQL) section later in this chapter for
an overview of SQL commands.
You can use the Browse button for each control to display an Expression
Browser dialog box. You can use the Help button to display the online help
for this tab.
Advanced Tab
The Advanced tab of the Edit Open SQL Statement dialog box specifies
optional attributes that TestStand can set when opening a SQL statement.
In most cases, the database defines default values for each attribute. When
you select the Use Default option, the step does not set the attribute. Some
databases do not support all the attributes in the dialog box.
TestStand User Manual
18-54
ni.com
Chapter 18
Databases
Figure 18-23 shows the Advanced tab of the Edit Open SQL Statement
dialog box.
Figure 18-23. Edit Open SQL Statement Dialog Box—Advanced Tab
The Advanced tab contains the following controls:
•
Page Size in Records—Specifies the number of records in a page.
•
Max Records to Select—Specifies the maximum number of records
the connection returns from the data source.
•
Command Timeout—Specifies the number of seconds TestStand
waits for a command to execute.
•
Cache Size—Specifies the number of records the connection
maintains in a memory buffer and how many records the connection
retrieves at one time.
•
Cursor Type—Specifies the type of cursor for the SQL statement. In
the ring control, you can choose one of the following options:
–
© National Instruments Corporation
Dynamic—Additions, changes, and deletions by other users are
visible, and all types of movement through the set of records are
allowed.
18-55
TestStand User Manual
Chapter 18
Databases
•
•
•
•
TestStand User Manual
–
Static—Additions, changes, or deletions by other users are not
visible.
–
Forward Only—Identical to a static cursor except that you can
only scroll forward through records. This improves performance
when you want to make a single pass through a set of records.
–
Keyset—Similar to a dynamic cursor except that you cannot see
records that other users add. Records that other users delete are
inaccessible from your set of records. Data changes by other users
within records are visible.
Cursor Location—Specifies where the data source maintains cursors
for a connection. In the ring control, you can choose one of the
following options:
–
Server—Uses cursors the data provider supplies. These cursors
are sometimes very flexible and allow for additional sensitivity to
reflect changes that other users make to the actual data.
–
Client—Uses client-side cursors that a local cursor library
supplies. Local cursor engines often allow many features that
driver-supplied cursors might not.
Marshal Options—Specifies how modified data is written back to the
server. In the ring control, you can choose one of the following options:
–
Write All Records—All records are written back to the server.
–
Write Modified Records Only—Only modified data is written
back to the server.
Lock Type—Specifies when the data source locks a record. In the ring
control, you can choose one of the following options:
–
Read Only—You cannot alter the data in a record.
–
Pessimistic—The provider does what is necessary to ensure
successful editing of the records, usually by locking records at the
data source immediately upon editing.
–
Optimistic—The provider locks records only when you put the
data back to the database.
–
Batch Optimistic—This type is required for batch updates.
Command Type—Specifies how Microsoft ADO interprets the SQL
statement. In the ring control, you can choose one of the following
options:
–
Unknown—ADO attempts to determine the command type.
–
Text—SQL statement or, for some providers, a command string
in the provider’s command language.
18-56
ni.com
Chapter 18
Databases
–
Table—Used for a table name.
–
Stored Procedure—Specifies a call to a stored procedure.
You can use the Help button to display the online help for this tab.
Custom Properties
The Open SQL Statement step type defines the following step properties in
addition to the common custom properties:
•
Step.PageSize specifies the number of records in a page for the
SQL statement.
•
Step.CommandTimeout specifies the amount of time in seconds
TestStand waits when attempting to issue a command to the open
database connection.
•
Step.CacheSize specifies the cache size for the SQL statement.
•
Step.MaxRecordsToSelect specifies the maximum number of
records the SQL statement can return.
•
Step.CursorType specifies the cursor type that the SQL statement
uses.
•
Step.CursorLocation specifies where the data source maintains
cursors for a connection.
•
Step.MarshalOptions specifies the marshal options for the
updated records in the SQL statement.
•
Step.LockType specifies the lock type for the records the SQL
statement selects.
•
Step.CommandType specifies the command type of the SQL
statement.
•
Step.DatabaseHandle specifies the name of the variable or
property that contains the database handle with which you open the
SQL statement.
•
Step.StatementHandle specifies the numeric variable or property
that the value of the SQL statement handle is assigned to.
•
Step.SQLStatement specifies a string expression that contains a
SQL command.
•
© National Instruments Corporation
Step.NumberOfRecordsSelected specifies the numeric variable
or property to which the step assigns the number of records the SQL
statement returns.
18-57
TestStand User Manual
Chapter 18
Databases
Close SQL Statement
Use the Close SQL Statement step to close a SQL statement handle that you
obtain from an Open SQL Statement step. It is a good idea to place Close
SQL Statement steps in Cleanup step groups.
Figure 18-24 shows the Edit Close SQL Statement dialog box.
Figure 18-24. Edit Close SQL Statement Dialog Box
The Edit Close SQL Statement dialog box contains a single control,
Statement Handle (Number). This control specifies the name of the variable
or property of type Number that contains which statement handle that is to
be closed. After closing the statement handle, the step assigns a value of
zero to the variable or property.
TestStand User Manual
18-58
ni.com
Chapter 18
Databases
Custom Properties
The Close SQL Statement step type defines the following step property in
addition to the common custom properties:
•
Step.StatementHandle specifies the name of the variable or
property of type Number that contains the SQL statement handle that
is to be closed.
TestStand does not automatically close open SQL statement handles. You must call
a Close SQL Statement for your open handles. If you abort an execution, you must exit the
application process that loaded the TestStand engine to guarantee that TestStand frees all
database handles. Selecting Unload All Modules does not close the handles.
Note
Data Operation
You use the Data Operation step type to perform operations on a SQL
statement that you open with an Open SQL Statement step. With the Data
Operation step, you can fetch new records, retrieve values from a record,
modify existing records, create new records, and delete records.
© National Instruments Corporation
18-59
TestStand User Manual
Chapter 18
Databases
Record/Operation Tab
Figure 18-25 shows the Record/Operation tab of the Edit Data Operation
dialog box.
Figure 18-25. Data Operation Dialog Box—Record/Operation Tab
The Record/Operation tab contains the following controls:
TestStand User Manual
•
Statement Handle (Number)—Specifies the name of the variable or
property of type Number that contains the SQL statement handle on
which to operate.
•
Record to Operate On—Specifies whether the step operates on the
current record, fetches a new record, or creates a new record. The ring
control contains the following options:
–
New—Create a new record and operate on this new record.
–
Current—Operate on a record you previously fetched or created.
–
Next—Fetch the next record for the SQL statement.
18-60
ni.com
Chapter 18
•
Databases
–
Previous— Fetch the previous record for the SQL statement.
–
Index—Fetch the record with the index you specify in the Record
Index control.
Record Index— Contains a literal numeric value or a numeric
expression that TestStand evaluates at run time.
If the first operation you execute on a SQL statement is a Fetch Next, the operation
returns the first record, not the second.
Note
•
•
Operation—Specifies the operation the step performs on the selected
record. The ring control contains the following options:
–
Fetch—No operation is performed on this record.
–
Set—Sets the values of the selected record. The Column List
Source control contains the name of a variable or property that
lists the assignments the step performs. You specify the
assignments in the Column Values tab. Refer to the Column
Values Tab section later in this chapter for more information. You
must issue a Put operation to update the selected record with any
pending change to its values.
–
Get—Gets the values from the selected record. The Column List
Source control contains the name of a variable or property that
lists the assignments the step performs. You specify the
assignments in the Column Values tab. Refer to the Column
Values Tab discussion later in this section for more information.
–
Put—Updates the selected record with any pending changes to its
values.
–
Delete—Deletes the selected record from the database.
–
Set and Put—Equivalent to a Set followed by a Put.
Column List Source—Specifies the name of the variable or property
in which to store the list of mappings between SQL columns and
TestStand variables or properties. The Column List Source variable or
property must be an array of type DatabaseColumnValue.
You can use the Browse button to display an Expression Browser dialog
box for a control that contains a TestStand expression. You can use the Help
button to display the online help for this tab.
© National Instruments Corporation
18-61
TestStand User Manual
Chapter 18
Databases
Column Values Tab
The Column Values tab of the Edit Data Operations dialog box applies only
to Get, Set, and Set and Put operations that you perform in a Data Operation
step. You can use the Column Values tab to specify the mapping between
SQL columns and TestStand variables and properties. For a Get operation,
a mapping between a column and variable or property instructs TestStand
to assign the column value to the variable or property. For a Set operation,
a mapping between a column and a variable or property instructs TestStand
to assign the value of the variable or property to the column. The Column
List Source control on the Record/Operation tab specifies a variable or
property that stores this mapping.
Figure 18-26 shows the Column Values tab of the Edit Data Operation
dialog box.
Figure 18-26. Data Operation Dialog Box—Column Values Tab
TestStand User Manual
18-62
ni.com
Chapter 18
Databases
The Column Values tab contains the following controls:
•
Data Link Name—Contains the name of a data link to open and
query. The dialog box uses the data link to populate the ring control
that contains column names. You can use the Select Data Link button
to select a predefined data link from a list. Refer to the Using Data
Links section earlier in this chapter for more information on
predefining data links.
•
SQL Statement—Specifies the SQL Statement the dialog box uses to
populate the ring control that contains column names. The SQL
Statement ring control contains a list of the Open SQL Statement steps
in the current sequence file. TestStand can populate the Column Name
(Number) ring control only if the selected SQL statement step uses a
string literal or a valid expression.
•
Column Values—Specifies the mappings of column names to
variables or properties. The list control displays the mappings. The
Column Name/Number, Values, and Format String controls specify
the settings for the currently selected mapping. You can use the New,
Cut, Copy, and Paste buttons to create a new item in the list, remove
items from the list, and rearrange the items in the list. You can use the
Browse button to display an Expression Browser dialog box.
•
Column Name/Number, Values and Format String controls must
contain valid expressions that TestStand evaluates at run time. To refer
to a column by its order in the SQL statement, enter a one-based
number without surrounding quotes in the Column Name/Number
field.
When the Data Operation step performs a Get operation, the Value
control must contain the name of a variable or property. When the Data
Operation step performs a Put operation, the Value control can contain
a literal value or an expression that TestStand evaluates at run time.
The Format String control specifies how to convert a string value
when assigning a string expression to a column or when assigning the
value of a column to a string variable or property. Typically, you use
this control when getting or setting data from a column that is of the
date-time or currency type. Refer to the Format Strings section later in
this chapter for a list of format strings.
You can use the Help button to display the online help for this tab.
© National Instruments Corporation
18-63
TestStand User Manual
Chapter 18
Databases
Custom Properties
The Data Operation step type defines the following step properties in
addition to the common custom properties:
•
Step.StatementHandle specifies a string expression that contains
the name of the SQL statement to operate on.
•
Step.RecordToOperateOn specifies the record to operate on.
Valid values include:
0 - New
1 - Current
2 - Next
3 - Previous
4 - Index
•
Step.RecordIndex specifies the index of the record to operate on
when Step.RecordToOperateOn is set to fetch a specific index.
•
Step.Operation specifies the operation to perform on the record.
Valid values include:
0 - Fetch only
1 - Set
2 - Get
3 - Put
4 - Delete
5 - Set and Put
•
Step.SQLStatement specifies the SQL statement that the Edit Data
Operation dialog box uses to populate the ring controls that contain
column names.
TestStand User Manual
•
Step.ColumnListSource specifies the name of the variable or
property that stores the column-to-variable or column-to-property
mappings. The variable or property must be an array of type
DatabaseColumnValue. By default, the value is
Step.ColumnList.
•
Step.ColumnList specifies the column-to-variable or
column-to-property mapping to perform on a Get or Set operation.
The property must be an array of type DatabaseColumnValue.
18-64
ni.com
Chapter 18
Databases
The DatabaseColumnValue custom data type contains the following
subproperties:
–
ColumnName specifies the name of the column from which to get
a value or to which to assign a value.
–
ColumnNumber specifies the number of the column in the SQL
statement.
–
Data specifies the variable or property to which TestStand assigns
the column value or the expression that TestStand evaluates and
assigns to the column.
–
FormatString specifies an optional format string for dates,
times, and currencies. Use the empty string ("") if you want to use
the default format. Refer to the Format Strings section later in this
chapter for a description of valid format strings.
–
WriteNull specifies whether to write NULL to the column
instead of the value in the Data expression property.
–
Status indicates the error code returned for the Get or Set
operation.
You cannot encapsulate your data operations within a transaction. Transactions are
not available in the current version of TestStand database step types.
Note
Property Loader
Use the Property Loader step type to dynamically load the values for
properties and variables from a text file, a Microsoft Excel file, or a DBMS
database at run time. For example, you can develop a common sequence
that can test two different models of a cellular phone, where each model
requires unique limit values for each step. If you use step properties to hold
the limit values, you can include a Property Loader step in the sequence to
load the correct limit values into the step properties.
You usually place a Property Loader step in the Setup step group of a
sequence. In this way, the Property Loader step initializes the property and
variable values before the steps in the Main step group execute.
© National Instruments Corporation
18-65
TestStand User Manual
Chapter 18
Databases
Loading From File
The source of file-based values can be a tab-delimited text file (.txt), a
comma-delimited text file (.csv), or an Excel file (.xls). The data is in a
table format. The following is an example of a tab-delimited limits file with
one data block specified by starting and ending markers.
Start Marker
<Step Name>
Limits.Low
Limits.High
Voltage at Pin A
9.0
11.0
Voltage at Pin B
8.5
9.5
Self Test Output
Limits.String
"SYSTEM OK"
<Locals>
Variable Value
Count
100
<FileGlobals>
Variable Value
Count
99
<StationGlobals>
Variable Value
Power_On
False
End Marker
For the step name section the row names are step names and the column
headings are the names of step properties. Not all columns apply to each
row. Each row has values only for the columns that define properties that
are actually in the step for the row. For variable sections each row specifies
the name of the property and its corresponding value. Starting and ending
data markers designate the bounds of the table. A data file can contain more
than one block of data.
You can use the Importing/Exporting Properties command in the Tools
menu to export property and variable data in the appropriate table format.
Refer to the Importing/Exporting Properties section later in this chapter.
TestStand User Manual
18-66
ni.com
Chapter 18
Databases
Properties Tab
Figure 18-27 shows the Properties tab of the Edit Property Loader dialog
box, when you select File in the Data Location control.
Figure 18-27. Edit Property Loader Dialog Box—Properties Tab
The Properties tab contains the following additional controls:
•
Properties List Source—Specifies the name of the variable or
property in which to store the property mappings the step performs.
The variable or property must be an array of type
DatabasePropertyMapping.
•
Properties—Specifies the mapping of column names to variables or
properties that the step loads. The section contains two lists of
variables and properties. The first list contains the properties and
variables that are available but not selected. The second list contains
the properties and variables you select.
© National Instruments Corporation
18-67
TestStand User Manual
Chapter 18
Databases
You can move a single property from one list to the other by clicking
on the single arrow buttons. The double arrow buttons move all
properties from one list to the other. The Limits button moves all limit
properties to the Selected list.
•
Property Name—Displays the currently selected property in the
Selected list control. For array element properties, you must edit the
property name to specify the array index.
You can use the Help button to display the online help for this tab.
Source Tab
Figure 18-28 shows the Source tab of the Edit Property Loader dialog box,
when you select File in the Data Location control.
Figure 18-28. Edit Property Loader Dialog Box—Source Tab
TestStand User Manual
18-68
ni.com
Chapter 18
Databases
On the Source tab, select a specific file, or specify a string expression that
TestStand evaluates at run time for the file pathname. You must also select
a file format. Valid formats are tab-delimited text (.txt), comma-delimited
text (.csv), and Excel file (.xls).
The Start of Data Marker control specifies the string that designates the
beginning of a block of data. The End of Data Marker control specifies the
string that designates the end of a block of data. You can specify literal
strings for the beginning and ending markers, or you can specify string
expressions that TestStand evaluates at run time. The marker strings must
appear in the first column of the file. If you specify an empty expression
("") for the starting and ending markers, the step type assumes that the file
contains a single block of data.
A Property Loader step ignores all rows that begin with the string you
specify in the Skip Rows that Begin With control. This feature is useful
when the limits file includes comment lines.
Disable the First Row of Data Specifies Step Property for Each Column
option if you do not want to include the step property names for each
column as the first row of each data block in the limits file. If you disable
this option, you must use the Specify Column to Step Property Mapping
text box to specify the list of property names. Separate the property names
with commas, as in the following example:
Limits.Low, Limits.High, Limits.String
You can use the Help button to display the online help for this tab.
Loading From Database
The source of database values is a recordset returned from an Open SQL
Statement step. The SQL statement recordset is in a table format where
each row pertains to a particular sequence step or to a variable scope, as
shown in Table 4. The column headings are the names of properties in the
steps or variable scopes. Not all columns apply to each row. Each row has
values only for the columns that define properties or variables that are
actually in the step or variable scope for the row.
© National Instruments Corporation
18-69
TestStand User Manual
Chapter 18
Databases
Table 18-14. Example Data for Property Loader Step
LIMITS_
HIGH
LIMITS_
LOW
LIMITS_
STRING
POWER_ON
COUNT
Voltage at Pin A
9
11
—
—
—
Phone Test.seq
Voltage at Pin B
8.5
9.5
—
—
—
Phone Test.seq
Self Test Output
—
—
"SYS OK"
—
—
Phone Test.seq
<Locals>
—
—
—
—
100
Phone Test.seq
<File Globals>
—
—
—
—
99
Phone Test.seq
<Station Globals>
—
—
—
False
—
Phone Test.seq
Frequency at Pin A
100,000
10,000
—
—
—
Frequency Test.seq
Frequency at Pin B
90,000
9,000
—
—
—
Frequency Test.seq
—
—
"OK"
—
—
Frequency Test.seq
STEPNAME
Self Test Output
SEQUENCE
NAME
For database sources, the Property Loader step can filter the data that the
SQL statement returns so that you load values only from rows that contain
specific column values. This is equivalent to the start and end markers when
importing values from a file. For example, in Table 18-14 you can load the
rows only for rows where the SEQUENCE NAME field contains the value,
Phone Test.seq.
You can use the Importing/Exporting Properties command in the Tools
menu to export property and variable data to your database table. Refer to
the Importing/Exporting Properties section in this chapter.
TestStand User Manual
18-70
ni.com
Chapter 18
Databases
Properties Tab
Figure 18-29 shows the Properties tab of the Edit Property Loader dialog
box, when you select Database in the Data Location control.
Figure 18-29. Property Loader Dialog Box—Properties Tab
The Properties tab contains the following controls:
•
Data Link Name—Contains the name of the data link that the dialog
box uses to populate the Step Name Column ring control and to create
columns. You can use the Select Data Link button to select a
predefined data link from a list. Refer to the Using Data Links section
earlier in this chapter for more information on predefining data links.
•
Statement Handle (Number)—Specifies the name of the variable or
property that contains the SQL statement handle the step uses to import
values at run time. The variable or property is of the Number data type.
© National Instruments Corporation
18-71
TestStand User Manual
Chapter 18
Databases
•
SQL SELECT Statement—Specifies the SQL statement the dialog
box uses at edit time to create columns and populate ring controls that
contain column names. The SQL SELECT Statement ring control
contains a list of the Open SQL Statement steps in the current sequence
file. TestStand can populate the ring controls only if the selected SQL
statement step uses a string literal or an expression that is valid at edit
time.
•
Step Name Column—Specifies the name of the SQL statement
column that contains the names of the sequence steps and variable
scopes that define the rows of data.
•
Properties List Source—Specifies the name of the variable or
property in which to store the property mappings the step performs.
The variable or property must be an array of type
DatabasePropertyMapping.
•
Properties—Specifies the mapping of column names to variables or
properties that the step loads. The section contains two lists of
variables and properties. The first list contains the properties and
variables that are available but not selected. The second list contains
the properties and variables you select.
You can move a single property from one list to the other by clicking
on the single arrow buttons. The double arrow buttons move all
properties from one list to the other. The Limits button moves all limit
properties to the Selected list.
TestStand User Manual
•
Property Name—Displays the currently selected property in the
Selected list control.
•
Column Name/Number—Specifies the name or index of the column
from which the step loads the property.
•
Append data type to column name—Specifies whether TestStand
automatically appends the name of the data type of a property to the
column name for a property when you select a property from the
Available list.
•
Max size for column names—Specifies the maximum number of
characters for a column name. Many databases limit the size of a
column name. Use the ring control to select the limit for any DBMS
TestStand supports by default.
•
Create Columns—Displays the Create Columns dialog box.
TestStand automatically populates the dialog box with the list of
column names that you have selected but that the SQL statement does
not return. You typically use the Create Columns dialog box, shown in
Figure 18-30, to add new columns to a database table for any newly
selected properties.
18-72
ni.com
Chapter 18
Databases
You can use the Browse button to display an Expression Browser dialog
box for a control that contains a TestStand expression.
Figure 18-30 shows the Create Columns dialog box.
Figure 18-30. Create Columns Dialog Box
The Create Columns dialog box contains the following controls:
•
Data Link Name—Contains the name of the data link to create
columns with. You can use the Select Data Link button to select a
predefined data link from a list. Refer to the Using Data Links section
earlier in this chapter for more information on predefining data links.
•
Columns—Contains the column names that you selected in the Edit
Property Loader dialog box but that are not in the specified SQL
statement.
•
Table—Specifies the table in which to create the checked columns.
•
Data Type—Specifies the column data type.
•
Parameters—Specifies any parameter information for the data type.
For example, you can specify a size limit for a character data type by
entering a number in the Parameters control.
•
Create Columns—Creates columns for the checked items in the
Columns list control.
© National Instruments Corporation
18-73
TestStand User Manual
Chapter 18
Databases
Filtering Tab
The Filtering tab of the Edit Property Loader dialog box allows you to filter
the data the SQL statement returns so that you load values only from rows
that contain specific column values. Figure 18-31 shows the Filtering tab
of the Property Loader dialog box, when you select Database in the Data
Location control.
Figure 18-31. Property Loader Dialog Box—Column Values Tab
The Filtering tab contains the following controls:
TestStand User Manual
•
Column List Source—Specifies the name of the variable or property
in which to store the list of column value comparisons. The variable or
property must be an array of type DatabaseColumnValue.
•
Only import rows that match the specified column
values—Specifies whether the step loads only the rows that match the
specific column values. When you uncheck this control, the Column
Values section is dimmed.
18-74
ni.com
Chapter 18
Databases
•
Column Values—Specifies the columns values that each row must
match. The Column Name/Number, Values, and Format String
controls specify the settings for the currently selected mapping. You
can use the New, Cut, Copy, and Paste buttons to create a new item in
the list, remove items from the list, and rearrange the items in the list.
•
Column Name/Number, Values and Format String controls must
contain valid expressions that TestStand evaluates at run time. To refer
to a column by its order in the SQL statement, enter a one-based
number without surrounding quotes in the Column Name/Number
field.
The Format String control specifies how to convert a string value
when comparing a column value to a string expression. Typically, you
use this control when comparing data from a column that is of the
date-time or currency type. Refer to the Format Strings section later in
this chapter for a list of format strings.
•
Create Columns—Displays the Create Columns dialog box.
TestStand automatically populates the dialog box with the list of any
column names that you specify and that the SQL statement does not
return. You typically use the Create Columns dialog box to add new
columns to a database table. Refer to the Properties Tab discussion
earlier in this section for more information about using the Create
Columns dialog box.
You can use the Browse button to display an Expression Browser dialog
box for a control that contains a TestStand expression.
You can use the Help button to display the online help for this tab.
Custom Properties
The Property Loader step type defines the following step properties in
addition to the common custom properties:
•
Step.Result.NumPropertiesRead indicates the total number of
values that the step loaded from the file or database.
•
Step.Result.NumPropertiesApplied indicates the total number
of values the step assigned to properties or variables. If this number is
less than Step.Result.NumPropertiesRead, the step was unable
to update properties or variables.
•
© National Instruments Corporation
Step.ColumnListSource specifies the name of the variable or
property that stores the list of column comparisons you use to filter the
rows in a database recordset. The variable or property must be an array
of type DatabaseColumnValue. By default, the value is
Step.ColumnList.
18-75
TestStand User Manual
Chapter 18
Databases
•
Step.ColumnList specifies the column comparisons TestStand
makes on a recordset before loading its values into properties. This
property must be an array of type DatabaseColumnValue.
The DatabaseColumnValue custom data type contains the following
subproperties:
–
–
ColumnName specifies the name of the column on which to
perform the comparison.
ColumnNumber indicates the number of the column in the
recordset.
–
Data specifies the expression that TestStand evaluates at run time
to compare against the column value.
–
FormatString specifies an optional format string for dates,
times, and currencies. Use an empty string ("") if you want to use
the default format. Refer to the Format Strings section later in this
chapter for a description of valid format strings.
–
WriteNull is not used.
–
Status is not used.
•
Step.PropertiesListSource specifies the name of the variable or
property that stores the list of variables and properties into which to
load data. The variable or property must be an array of type
DatabasePropertyMapping. By default, the value is
Step.PropertiesList.
•
Step.PropertiesList specifies the list of variables and properties
in which to load data. The list must be an array of type
DatabasePropertyMapping. Each element of the array defines a
mapping between the source data and a TestStand variable or property.
The DatabasePropertyMapping custom data type contains the
following subproperties:
–
PropertyName specifies the name of the property or variable to
assign a value to.
–
PropertyType specifies the scope of the property or variable,
such as step, local, file global, or station global.
Valid values include:
0 - Step
1 - Local
2 - File Global
3 - Station Global
TestStand User Manual
18-76
ni.com
Chapter 18
–
Databases
DataType specifies the TestStand type of the property.
Valid values include:
1 - Boolean
2 - Number
3 - String
–
ColumnName specifies the name of the column from which to get
the value.
•
Step.Database.SQLStatementHandle specifies the name of the
variable or property that contains the SQL statement handle the step
uses at run time to load values.
•
Step.Database.SQLStatement specifies the SQL statement the
Edit Property Loader dialog box uses to populate ring controls that
contain column names.
•
Step.Database.StepNameColumn specifies the name of the
column in the recordset that contains the names of the steps and
variable scopes that define the rows of data.
•
Step.Database.AppendTypeName specifies whether TestStand
appends the data type name of the property to the column name when
selecting a property from the available list.
•
Step.Database.MaxColumnSize specifies the maximum number
of characters for a column name.
•
Step.Database.FilterUsingColumnList specifies whether the
step loads only the rows that match the specific column value.
•
Step.File.Path specifies a literal pathname for the data file.
•
Step.File.DecimalPoint specifies the type of decimal point the
file uses.
•
Step.File.UseExpr specifies whether to use Step.File.Path or
Step.File.FileExpr for the pathname of the data file.
•
Step.File.FileExpr specifies a pathname expression that
TestStand evaluates at run time.
•
Step.File.Format specifies the type of delimiters in the file and the
file type. The possible values are Tab, Comma, or Excel.
•
Step.File.Start.MarkerExpr specifies the expression for the
starting marker.
•
Step.File.EndMarkerExpr specifies the expression for the ending
marker.
•
Step.File.Skip specifies the string that, when it appears at the
beginning of a row, causes the step type to ignore the row.
© National Instruments Corporation
18-77
TestStand User Manual
Chapter 18
Databases
•
Step.File.MapColumnsUsingFirstRow specifies whether the
first row of each data block in the data file contains the names of the
step properties into which the step loads the property values.
•
Step.File.ColumnMapping specifies the names of the properties
into which the step loads the values if
Step.File.MapColumnsUsingFirstRowisFalse.
Importing/Exporting Properties
When you edit a sequence file, you can select Tools»Import/Export
Properties to import values from a database, file, or clipboard into step
properties or variables or to export values from step properties or variables
to a database, file, or clipboard. The Import/Export Properties command
displays the Import/Exports Properties dialog box. The dialog box contains
three tabs when you have set the Data Location ring control to Database:
Source/Destination, Properties, and Additional Columns.
In addition to the three tabs, the Import/Export Properties dialog box
contains the following controls:
•
Export—Exports the properties and variables you specify on the
Properties tab and Additional Columns tab. The ring control to the left
of the Export button specifies whether to create new rows in the
database or file, or to overwrite any previously written rows for the step
or variable group. For databases, if the Additional Columns tab
specifies column values that match an existing record, only the records
that match these specified values are overwritten.
•
Import—Imports the properties and variables you specify on the
Properties tab and Additional Columns tab.
•
Done—Closes the Import/Export Properties dialog box.
Source/Destination Tab
The Source/Destination tab specifies from where TestStand imports data or
to where TestStand exports data. The Data Location control allows you to
specify that TestStand imports/exports data to the clipboard, a file, or a
database.
TestStand User Manual
18-78
ni.com
Chapter 18
Databases
Importing/Exporting Using Files or Clipboard
When you select file or clipboard as the location, the Import/Export
Properties dialog box appears as shown in Figure 18-32.
Figure 18-32. Import/Export Properties Dialog Box—Source/Destination Tab for File
The source of the file-based values can be a tab delimited text file (.txt),
a comma delimited text file (.csv), or an Excel file (.xls). The data is in
a table format, as shown below:
Start Marker
<Step Name>
Limits.Low
Limits.High
Voltage at Pin A
9.0
11.0
Voltage at Pin B
8.5
9.5
Self Test Output
Limits.String
“SYSTEM OK”
<Locals>
Variable Value
Count
100
<FileGlobals>
Variable Value
Count
99
© National Instruments Corporation
18-79
TestStand User Manual
Chapter 18
Databases
<StationGlobals>
Variable Value
Power On
False
End Marker
For the step name section, the row names are step names and the column
headings are the names of step properties. Not all columns apply to each
row. Each row has values only for the columns that define properties that
are actually in the step for the row. For variable sections, each row specifies
the name of the property and its corresponding value. Starting and ending
data markers designate the bounds of the table. A data file can contain more
than one block of data. The following is an example of a tab delimited limits
file with one data block specified by starting and ending markers.
The Source/Destination tab for file or clipboard locations contain the
following controls:
•
File Location—Specifies the file location. This control is dimmed
when you select clipboard as the location.
•
Format—Specifies the file or clipboard data format. The file format
can be tab delimited text (.txt), comma delimited text (.csv), or
Excel file (.xls). The clipboard format can be tab delimited text
(.txt) or comma delimited text (.csv).
•
Decimal Point—Specifies the decimal point setting TestStand uses to
import and export properties.
•
Start of Data Marker—Specifies a string that designates the
beginning of a block of limit data. The marker string must appear at the
beginning of a row.
•
End of Data Marker—Specifies the string that designates the end of
a block of limit data. The marker string must appear at the beginning
of a row.
•
Skip Rows That Begin With—Causes the import/export command to
ignore all rows that begin with the string that you specify in the Skip
Rows that Begin With control. This feature is useful when the file
includes comment lines.
•
First Row of Data Specifies Step Property for Each
Column—Defines the step property names for each column as the first
row of each data block in the file. If you disable this option, you must
use the Specify Column to Step Property Mapping text box to specify
the list of property names. Separate the property names with commas,
as in the following example:
Limits.Low,Limits.High,Limits.String
TestStand User Manual
18-80
ni.com
Chapter 18
Databases
When you select databases as the location, the Import/Export Properties
dialog box appears with an Additional Columns tab. The
Source/Destination tab is shown in Figure 18-33.
Figure 18-33. Import/Export Properties Dialog Box—Source/Destination Tab
for Databases
The Source/Destination tab for database location contains the following
controls:
•
Data Link Name—Contains the name of the data link the dialog box
uses to import and to export. You can use the Select Data Link button
to select a predefined data link from a list. Refer to the Using Data
Links section earlier in this chapter for more information on
predefining data links.
•
SQL Statement—Specifies the SQL statement the dialog box uses to
import and export property and variable values. The SQL statement
must return a recordset that includes the column names that you
specify.
•
Build—Allows you to construct the SQL statement. Refer to the SQL
Statement Tab section earlier in this chapter for more information on
© National Instruments Corporation
18-81
TestStand User Manual
Chapter 18
Databases
the Build SQL Select Statement. You cannot use the Build button to
edit an existing SQL statement expression.
You can use the Browse button to display the Expression Browser dialog
box. You can use the Help button to display the online help for this tab.
Properties Tab
Figure 18-34 shows the Properties tab of the Import/Export Properties
dialog box.
Figure 18-34. Import/Export Properties Dialog Box—Properties Tab
The Properties tab contains the following controls:
TestStand User Manual
•
Sequence—Selects the sequence to which to import values or from
which to export values.
•
Step Name Column—Specifies the name of the column in the SQL
statement that contains the names of the sequence steps and variable
scopes that define the rows of data. This control applies only to
importing and exporting using a database. You can use the Browse
button to display the Expression Browser dialog box.
18-82
ni.com
Chapter 18
•
Databases
Properties—Specifies the names of variables and properties to import
or export and the column names to use for them. The section contains
a list of available variable and properties and a list of variables and
properties that you select.
You can move a single property from one list to the other by clicking
on the single arrow buttons. The double arrow buttons move all
properties from one list to the other.
•
Property Name—Displays the currently selected property in the
Selected list control. For array element properties, you must edit the
property name to specify the array index.
•
Column Name—Specifies the name of the column where the step
imports or exports the property. This control applies only to importing
and exporting using a database.
•
Append data type to column name—Specifies whether TestStand
automatically appends the name of the data type of a property to the
column name for a property when you select a property from the
available list. This control applies only to importing and exporting
using a database.
•
Max size for column names—Specifies the maximum number of
characters for a column name. Many databases limit the size of a
column name. Use the ring control to select the limits for the DBMS
TestStand supports by default. This control applies only to importing
and exporting using a database.
•
Create Columns—Displays the Create Columns dialog box.
TestStand automatically populates the dialog box with the list of any
column names you specify and that the SQL statement does not return.
You typically use the Create Columns dialog box to add new columns
to a database table. Refer to Properties Tab discussion earlier in this
section for more information on using the Create Columns dialog box.
This control applies only to importing and exporting using a database.
You can use the Help button to display the online help for this tab.
Additional Columns Tab
When you export to a database, the Additional Columns tab defines the set
of column values that TestStand writes to the database for each record.
When you import from a database, the tab defines the column values that a
record must match before TestStand loads values from the record.
© National Instruments Corporation
18-83
TestStand User Manual
Chapter 18
Databases
Figure 18-35 shows the Additional Columns tab of the Import/Export
Properties dialog box.
Figure 18-35. Import/Export Properties Dialog Box—Additional Columns Tab
The checkbox at the top of the tab enables the controls on the Additional
Columns tab. The Additional Columns tab contains the following controls:
•
Column Values—Specifies the mappings of column names to
variables or properties. The list control displays the mappings. The
Column Name/Number, Values, and Format String controls specify
the settings for the currently selected mapping. You can use the New,
Cut, Copy, and Paste buttons to create a new item in the list, remove
items from the list, and rearrange the items in the list.
•
Column Name/Number, Values, and Format String controls must
contain valid expressions that TestStand evaluates at run time.
When you export values, the Value control can contain a literal value
or an expression that TestStand evaluates at run time. When importing
values, the Value control must contain the name of a variable or
property.
TestStand User Manual
18-84
ni.com
Chapter 18
Databases
The Format String control specifies how to convert a string value
when comparing a column value to a string expression. Typically, you
use this control when comparing data from a column that is of the
date/time or currency type. Refer to the Format Strings section later in
this chapter for a list of format strings.
•
Create Columns—Displays the Create Columns dialog box.
TestStand automatically populates the dialog box with the list of any
column names you specify and that the SQL statement does not return.
You typically use the Create Columns dialog box to add new columns
to a database table. Refer to Properties Tab discussion earlier in this
section for more information on using the Create Columns dialog box.
You can use the Browse button to display an Expression Browser dialog
box for a control that contains a TestStand expression. You can use the Help
button to display the online help for this tab.
Structured Query Language (SQL)
The Structured Query Language (SQL) is a widely supported standard for
database access. You can use SQL commands to manipulate the rows and
columns in database tables. The following list describes some of the most
useful SQL commands:
•
CREATE TABLE—Creates a new table, specifying the name and data
type for each column.
•
SELECT—Retrieves all rows in a table that match specific conditions.
•
INSERT—Adds a new record to the table. You can then assign values
for the columns.
•
UPDATE—Changes values in specific columns for all rows that match
specific conditions.
•
DELETE—Deletes all rows that match specific conditions.
The rest of this section lists and explains the SQL commands, objects,
clauses, operators, and functions.
© National Instruments Corporation
18-85
TestStand User Manual
Chapter 18
Databases
SQL Commands
Table 18-15 lists the SQL commands you can use with the Open SQL
Statement step.
Table 18-15. SQL Commands
SQL Command
Syntax
Description
Example
CREATE TABLE
CREATE TABLE table
name (column def,
column def,...)
Creates a new
database table.
CREATE TABLE
testres (uut_num
char(10) NOT
NULL, meas1
NUMBER (10,2)
meas2 NUMBER
(10,2))
DELETE
DELETE [from] table
name [WHERE clause]
Removes rows from a
database table. The
WHERE clause selects
specific rows to
delete.
DELETE testres
WHERE meas1 < 0.0
DROP TABLE
DROP [TABLE]
table_name
Removes a database
table.
DROP TABLE
testres
INSERT
INSERT [into]
table_name [options]
[(col_name,
col_name,...)]
VALUES
(expr, expr...)
Creates a new record
and places data values
into its columns. The
VALUES clause
specifies the values.
INSERT testres
(uut_num, meas1,
meas2) VALUES
(2860C890, 0.4,
0.6)
TestStand User Manual
18-86
ni.com
Chapter 18
Databases
Table 18-15. SQL Commands (Continued)
SQL Command
Syntax
Description
Example
SELECT
SELECT [DISTINCT]
{* | col_expr,
col_expr...} FROM
{from clause} [WHERE
clause] [GROUP BY
{group clause}}]
[HAVING {having
clause}] [UNION
[ALL] (SELECT...)]
[ORDER BY
{order_clause,...}]
[FOR UPDATE OF
{col_expr,...}]
Query that specifies
columns from tables.
SELECT uut_num,
meas1 FROM
testres WHERE
meas1 < 0 ORDER
BY uut_num DESC
UPDATE
UPDATE table_name
[options] SET
col_name = expr,...
[WHERE clause]
Sets columns in
existing rows to new
values.
UPDATE testres
SET meas2 =
(meas1 + 0.1)
WHERE meas1 < 0
SQL Objects
Table 18-16 lists SQL objects, which are the building blocks for SQL
statements.
Table 18-16. SQL Objects
Object
Description
Examples
table_name
Describes the target table name of the
operation. For file-based databases, can
include full path.
Testres
c:\db\testres.dbf
col_name
Refers to a column in a table. Some
databases restrict the length of column
names.
uut_num
meas1
col_expr
Specifies a single column name or a
complex combination of column names,
operators, and functions.
uut_num
meas1 + meas2
LOWER(uut_num)
sort_expr
Any column expression.
data_type
Specifies the data type of a column.
© National Instruments Corporation
—
18-87
CHAR (30) NUMBER
(10.5)
TestStand User Manual
Chapter 18
Databases
Table 18-16. SQL Objects (Continued)
Object
Description
Examples
constraint
Constrains the contents of a column.
NOT NULL
column_defn
Describes a column to create in a new table.
Consists of col_name, data_type, and
(optional) constraint.
uut_num CHAR(10) NOT
NULL meas1 NUMBER
(10.5)
char_expr
Any expression that yields a character
data type.
'PASSED'
STR(42.6, 10, 2)
date_expr
Any expression that yields a date
data type.
DATE()
num_expr
Any expression that yields a number
data type.
meas1 + meas2
logical_expr
Any expression that yields a logical data
type.
—
expr
Any expression.
—
SQL Clauses
Table 18-17 lists the types of clauses you can use in SQL statements.
Table 18-17. SQL Clauses
Name/Syntax
Applicable
Commands
Description
Examples
FROM table_name
[options] [table
alias]
SELECT
DELETE
Specifies table name.
Can be a full pathname
for file-based databases.
SELECT * FROM
testres
WHERE expr1
comparison_oper
expr2
[logical_oper
expr3
comparison_oper
expr4]...
SELECT
DELETE
UPDATE
Specifies conditions that
apply to each row in the
table to determine an
active set of rows.
SELECT * FROM
testres WHERE meas1
< 0.0 and meas2 >
1.0
GROUP BY col_expr
{col_expr,...}
SELECT
Combines records that
have identical values in
multiple columns and
orders rows by groups.
SELECT * FROM
testres GROUP BY
meas1
TestStand User Manual
18-88
ni.com
Chapter 18
Databases
Table 18-17. SQL Clauses (Continued)
Applicable
Commands
Name/Syntax
Description
Examples
HAVING expr1
comparison_oper
expr2
SELECT used
with GROUP BY
Specifies which
grouped records are
displayed.
SELECT * FROM
testres GROUP BY
uut_num HAVING meas1
< 0
ORDER BY
{sort_expr [DESC
| ASC]}...
SELECT
Specifies row order in
the active set of rows.
SELECT * FROM
testres ORDER BY
uut_num DESC
FOR UPDATE OF
col_name
[col_name...]
SELECT
Locks columns in
selected rows for
updates or deletion.
SELECT * FROM
testres FOR UPDATE
OF meas1, meas2
SQL Operators
Table 18-18 lists the operators you can use in SQL statements.
Table 18-18. SQL Operators
Operator Class and
Operators
Description
Examples
Constants
'' ""
{}
.T. .F.
Numeric constant
Character constant
Date-time constant
Logical constant
1234, 1234.5678
'PASSED', “CVI”
{2/8/60},{16:59:59}
.T., .F.
Operator precedence
Sign
Multiply/divide
Add/subtract
Exponentiation
(meas1 + meas2) * (meas3 - meas4)
- meas1
meas1 * meas2, meas1 / meas2
meas1 + meas2, meas1 - meas2
meas1 ** power, meas1 ^ 2
Concatenate (keep trailing
blanks)
Concatenate (drop trailing
blanks)
'keep ' + 'space' (result: 'keep space')
Numeric
()
+ * /
+ ** ^
Character
+
-
© National Instruments Corporation
18-89
'drop ' - 'space' (result: 'dropspace')
TestStand User Manual
Chapter 18
Databases
Table 18-18. SQL Operators (Continued)
Operator Class and
Operators
Description
Examples
Comparison
=
<>
>=
<=
IN
Equal
Not equal
Greater than or equal
Less than or equal
Contained in the set()
[NOT] IN
ANY, ALL
BETWEEN
EXISTS
[NOT] LIKE
[NOT] NULL
Compare with list of rows
Within value range
Existence of at least one
row
Character pattern match
Empty
WHERE meas1 = meas2
WHERE meas1 <> meas2
WHERE meas1 >= meas2
WHERE meas1 <= meas2
WHERE uut_num IN
('2860A123','2860A1234')
WHERE result NOT IN ('FAILED',
'RETEST')
WHERE uut_num = ANY (SELECT...)
WHERE meas1 BETWEEN 0.0 AND 1.0
WHERE EXISTS (SELECT...)
WHERE uut_num LIKE 'TEK%'
WHERE uut_num NOT NULL
Date
Add/subtract
testdate + 5 {result: new date}
testdate - {2/8/60}
(result:number of days)
()
Precedence
NOT
AND
OR
Negation
And
Or
WHERE (res1 AND res2) OR (res3
AND res4)
WHERE NOT (uut_num IN
(SELECT...))
WHERE meas1 < 0.0 AND meas2 > 1.0
WHERE meas1 < 0.0 OR meas2 < 1.0
+ -
Logical
Set
UNION
Set of all rows from all
individual distinct queries
SELECT ... UNION SELECT...
All columns
Count of all rows
Only non-duplicate rows
SELECT * FROM testres
SELECT COUNT(*) FROM testres
SELECT DISTINCT FROM...
Other
*
COUNT(*)
DISTINCT
TestStand User Manual
18-90
ni.com
Chapter 18
Databases
SQL Functions
Table 18-19 lists the functions you can use in SQL statements.
Table 18-19. SQL Functions
Function
Description
ROUND(num_expr1,
num_expr2)
num_expr1 rounded to num_expr2 decimal places.
CHR(num_expr)
Character having ASCII value num_expr.
LOWER(char_expr)
Change all characters in char_expr to lower case.
LTRIM(char_expr)
Strip leading spaces from char_expr.
LEFT(char_expr)
Leftmost character of char_expr.
RIGHT(char_expr)
Rightmost character of char_expr.
SPACE(num_expr)
Construct a string with num_expr blanks.
IFF(logical_expr,
True_Value, False_Value)
Return True_Value if logical_expr is true, otherwise
return False_Value.
STR(num_expr, width
[prec])
Converts num_expr to string of width characters with
optional prec fractional digits.
STRVAL(expr)
Converts any expr to a character string.
TIME()
Returns time of day as a character string.
LEN(char_expr)
Number of characters in char_expr.
AVG(column_name)
(must be numeric column)
Average of all non-NULL values in column_name.
COUNT(*)
Number of rows in table.
MAX(col_expr)
Maximum value of col_expr.
MIN(col-expr)
Minimum value of col_expr.
MAX(num_expr1, num_expr2)
Maximum of num_expr1 and num_expr2.
MIN(num_expr1, num_expr2)
Minimum of num_expr1 and num_expr2.
SUM(col_expr)
Sum of values in col_expr.
© National Instruments Corporation
18-91
TestStand User Manual
Chapter 18
Databases
Table 18-19. SQL Functions (Continued)
Function
DTOC(date_expr,
fmt_value[,
separator_char])
Description
Convert date_expr to character string using fmt and
optional separator_char.
fmt_values are:
0: MM/DD/YY
1: DD/YY/MM
2: YY/MM/DD
10: MM/DD/YYYY
11: DD/MM/YYYY
12: YYYY/MM/DD
USERNAME()
Returns name of current user (not supported by all
databases).
MOD(num_expr1, num_expr2)
Remainder of num_expr1 divided by num_expr2.
MONTH(date_expr)
Returns month from date_expr as a number.
DAY(date_expr)
Returns day from date_expr as a number.
YEAR(date_expr)
Returns year from date_expr as a number.
POWER(num_expr1,
num_expr2)
Returns num_expr1 raised to num_expr2 power.
INT(num_expr)
Returns integer part of num_expr.
NUMVAL(char_expr)
VAL(char_expr)
Converts char_expr to a number. If char_expr is not a
valid number, returns zero.
DATE()
TODAY()
Returns today’s date.
DATEVAL(char_expr)
Converts char_expr to a date.
CTOD(char_expr, fmt)
Converts char_expr to date format using fmt template.
TestStand User Manual
18-92
ni.com
Chapter 18
Databases
Format Strings
Format strings consist of symbols that describe how a value should be
formatted. Table 18-20 shows some example format strings. The symbols
used in these examples are described later in this section.
Table 18-20. Example Format Strings
Format String
Value
Formatted Value
mm/dd/yy
Mar 14, 1995
03/14/95
dd.mm.yy
Mar 14, 1995
14.03.95
'Stephen Hawkins, born'
Mmmm d, yyyy
Mar 14, 1995
Stephen Hawkins, born
March 14, 1995
hh:mm:ss
3:47:42 PM
15:47:42
hh:mm:ss AM/PM
3:47:42 PM
03:47:42 PM
$#,##0.00
210.6
$210.60
$#,##0.00;($#,##0.00)
210.6
−156.20348
$210.60
($156.20)
GN
153
1.875
153
1,875
0[S/1000]
12567
199
12
0
Date/Time Format Strings
Date/time format strings control which parts of the date or time are
converted or retrieved, the order of the parts, and how the months and days
are abbreviated. Table 18-21 lists the symbols you can use in date/time
format strings.
Table 18-21. Symbols for Date/Time Format Strings
Symbol
Description
Example Output
m
Month as number without leading zero.
12, 5
mm
Month as number with leading zero, if applicable.
12, 05
mmm
Month as three-letter abbreviation, lowercase.
mar
© National Instruments Corporation
18-93
TestStand User Manual
Chapter 18
Databases
Table 18-21. Symbols for Date/Time Format Strings (Continued)
Symbol
Description
Example Output
Mmm
Month as three-letter abbreviation, initial cap.
Mar
MMM
Month as three-letter abbreviation, uppercase.
MAR
mmmm
Month as full name, lowercase.
march
Mmmm
Month as full name, initial cap.
March
MMMM
Month as full name, uppercase.
MARCH
d
Day of the month as number without leading zero.
25, 5
dd
Day of the month as number with leading zero, if
applicable.
25, 05
ddd
Day of the month as three-letter abbreviation, lowercase.
tue
Ddd
Day of the month as three-letter abbreviation, initial cap.
Tue
DDD
Day of the month as three-letter abbreviation, uppercase.
TUE
dddd
Day of the month as full name, lowercase.
tuesday
Dddd
Day of the month as full name, initial cap.
Tuesday
DDDD
Day of the month as full name, uppercase.
TUESDAY
yy
Last two digits of year.
60
yyyy
Four-digit year.
1960
h
Hour of the day, without leading zero (use am/pm symbol
for 12-hour style).
12, 5
hh
Hour of the day, with leading zero (use am/pm symbol for
12-hour style).
12, 05
i (or m)
Minute of the hour, without leading zero.
57, 5
ii (or mm)
Minute of the hour, with leading zero.
57, 05
s
Second of the minute, without leading zero.
57, 5
ss
Second of the minute, with leading zero.
57, 05
ss.ssssss
Second of the minute with fractional seconds (up to six
‘s’ symbols after the decimal point).
57.123456
am/pm
“am” or “pm” string, lowercase (forces 12-hour clock).
am
TestStand User Manual
18-94
ni.com
Chapter 18
Databases
Table 18-21. Symbols for Date/Time Format Strings (Continued)
Symbol
Description
Example Output
AM/PM
“AM” or “PM” string, uppercase (forces 12-hour clock).
AM
a/p
“a” or “p” string (forces 12-hour clock).
a
A/P
“A” or “P” string, uppercase (forces 12-hour clock).
A
/ - . : , <space>
Output the character.
\<character>
Output the character following the ‘\’ character.
\U\T\C is UTC
"<string>"
Output the string.
“UTC” is UTC
—
'<string>'
GD
General format for dates is The Short Date Format in the
International section of the Windows Control Panel.
—
Note: Do not combine other format symbols with GD
except [US].
GDT
General format for dates with times. The Time Format in
the Regional Settings section of the Windows Control
Panel is appended to the Short Date Style. This is the
default if no format string is given.
—
Note: Do not combine other format symbols with GDT
except [US].
GL
General long format for dates. The Long Date Style in the
Regional Settings section of the Windows Control Panel.
—
Note: Do not combine other format symbols with GL
except [US].
GLT
General long format for dates with times. The Time Style
in the Regional Settings section of the Windows Control
Panel is appended to the Long Date Format.
—
Note: Do not combine other format symbols with GLT
except [US].
© National Instruments Corporation
18-95
TestStand User Manual
Chapter 18
Databases
Table 18-21. Symbols for Date/Time Format Strings (Continued)
Symbol
GT
Description
Example Output
General format for time. The Time Style in the Regional
Settings section of the Windows Control Panel.
—
Note: Do not combine other format symbols with GT.
[US]
Combine with GD, GDT, GL, GLT, or GT to override the
Regional Settings section of the Windows Control Panel
and use the United States defaults instead.
—
Numeric Format Strings
You can use numeric format strings to format numbers in a variety of
ways. Numeric formats can have one or two sections separated by a
semicolon. For formats with one section, use the same format for positive
and negative numbers. For formats with two sections, use the second
section as the format for negative numbers. Table 18-22 lists the symbols
you can use in numeric format strings.
Table 18-22. Symbols for Numeric Format Strings
Symbol
Description
$
Outputs the currency string from the Regional Settings section of the Windows
Control Panel.
.
Outputs the decimal point character from the Regional Settings section of the
Windows Control Panel.
,
Outputs the thousands separator character from the Regional Settings section of
the Windows Control Panel.
#
Outputs a digit. If there is no digit in the position, outputs nothing.
0
Outputs a digit. If there is no digit in the position, outputs a zero.
?
Outputs a digit. If there is no digit in the position, outputs a space.
%
Outputs the value as a percent. The value is multiplied by 100, and the '%'
character is output.
e-
Outputs in scientific notation, shows exponent sign only if negative.
e+
Outputs in scientific notation, always shows exponent sign.
E+ E-
Outputs uppercase analogs of e+ and e-.
TestStand User Manual
18-96
ni.com
Chapter 18
Databases
Table 18-22. Symbols for Numeric Format Strings (Continued)
Symbol
- + (),
Description
Outputs the character.
<space>
\<character>
Outputs the character following the '\' character.
"<string>"
Outputs the string.
'<string>'
GN
General format for numbers. This is the default if no format string is given.
Note: You can combine GN only with symbols that are enclosed in brackets,
such as [US].
GF
General fixed format for numbers from the Regional Settings section of the
Windows Control Panel.
Note: You can combine GF only with symbols that are enclosed in brackets,
such as [US].
GC
General currency format for numbers from the Regional Settings section of the
Windows Control Panel.
Note: You can combine GC only with symbols that are enclosed in brackets,
such as [US].
[S/n]
Scales (divides) the number by a power of 10 before output. n must be a power
of 10.
[S*n]
Scales (multiplies) the number by a power of 10 before output. n must be a power
of 10.
[US]
Ignores the information in the Regional Settings section of the Windows Control
Panel. Substitutes the United States defaults instead.
© National Instruments Corporation
18-97
TestStand User Manual
Technical Support Resources
A
Web Support
National Instruments Web support is your first stop for help in solving
installation, configuration, and application problems and questions. Online
problem-solving and diagnostic resources include frequently asked
questions, knowledge bases, product-specific troubleshooting wizards,
manuals, drivers, software updates, and more. Web support is available
through the Technical Support section of ni.com
NI Developer Zone
The NI Developer Zone at ni.com/zone is the essential resource for
building measurement and automation systems. At the NI Developer Zone,
you can easily access the latest example programs, system configurators,
tutorials, technical news, as well as a community of developers ready to
share their own techniques.
Customer Education
National Instruments provides a number of alternatives to satisfy your
training needs, from self-paced tutorials, videos, and interactive CDs to
instructor-led hands-on courses at locations around the world. Visit the
Customer Education section of ni.com for online course schedules,
syllabi, training centers, and class registration.
System Integration
If you have time constraints, limited in-house technical resources, or other
dilemmas, you may prefer to employ consulting or system integration
services. You can rely on the expertise available through our worldwide
network of Alliance Program members. To find out more about our
Alliance system integration solutions, visit the System Integration section
of ni.com
© National Instruments Corporation
A-1
TestStand User Manual
Appendix A
Technical Support Resources
Worldwide Support
National Instruments has offices located around the world to help address
your support needs. You can access our branch office Web sites from the
Worldwide Offices section of ni.com. Branch office Web sites provide
up-to-date contact information, support phone numbers, e-mail addresses,
and current events.
If you have searched the technical support resources on our Web site and
still cannot find the answers you need, contact your local office or National
Instruments corporate. Phone numbers for our worldwide offices are listed
at the front of this manual.
TestStand User Manual
A-2
ni.com
Glossary
Prefix
Meaning
Value
m-
milli-
10 –3
k-
kilo-
10 3
M-
mega-
10 6
A
abort
To stop an execution without running any of the Cleanup step groups in the
sequences on the call stack run. When you abort an execution, no report
generation occurs.
active window
The window that user input affects at a given moment. The title of an
active window is highlighted.
ActiveX
(Microsoft ActiveX)
Set of Microsoft technologies for reusable software components. Formerly
called OLE.
ActiveX control
A reusable software component that adds functionality to any compatible
ActiveX control container.
ActiveX Automation
Adapter
See Adapter.
ActiveX reference
property
A container of information that maintains a reference to an ActiveX object.
TestStand maintains the value of the property as an IDispatch or
IUnknown pointer.
ActiveX server
Any executable code that makes itself available to other applications
according to the ActiveX standard. ActiveX implies a client/server
relationship in which the client requests objects from the server and asks
the server to perform actions on the objects.
© National Instruments Corporation
G-1
TestStand User Manual
Glossary
Adapter
A service of the TestStand engine that steps use to invoke code in another
sequence or in a code module. The adapter knows the type of the code
module, how to call it, and how to pass parameters to it.
The following Adapters are available: DLL Flexible Prototype Adapter,
LabVIEW Standard Prototype Adapter, C/CVI Standard Prototype
Adapter, and ActiveX Automation Adapter. The general name for all the
specific adapters is module adapter.
administrator
A user profile that usually contains all privileges for a test station.
Application
Development
Environment (ADE)
A programming environment such as LabVIEW, LabWindows/CVI, or
Microsoft Visual C, in which you can create test modules and run-time
execution operator interfaces.
Application
Programming
Interface (API)
A set of classes, methods, and properties that you use to control a specific
service, such as the TestStand engine.
array property
A property that contains an array of single-valued properties of the same
type.
ASCII
American Standard Code for Information Interchange.
B
binding
See early binding and late binding.
block diagram
Pictorial description or representation of a program or algorithm. In
LabVIEW, the block diagram that consists of executable icons called nodes
and wires that carry data between the nodes, is the source code for the VI.
The block diagram resides in the Diagram window of the VI.
breakpoint
An interruption in the execution of a program.
built-in property
A property that all steps or sequences contain. An example is the step run
mode property. TestStand normally does not display these properties in the
sequence editor, although it lets you modify some of them through dialog
boxes.
built-in step type
property
A property that is common to all steps of the same type. A built-in step
type property is either a class step type property or an instance step type
property.
TestStand User Manual
G-2
ni.com
Glossary
button
A dialog box item that, when selected, executes a command associated
with the dialog box.
C
C/CVI Standard
Prototype Adapter
See Adapter.
checkbox
An input control in a dialog box that allows you to toggle between
two possible options.
class
Defines a list of methods and properties that you can use with respect to the
objects that you create as instances of that class. A class is like a data type
definition except that it applies to objects rather than variables.
class step type
property
A built-in step property that exists only in the step type itself. TestStand
uses these properties to define how the step type works for all step
instances. Step instances do not contain their own copies of class
properties.
client sequence file
A sequence file that contains the main sequence that a process model
invokes to test a UUT. Each client sequence file contains a sequence called
MainSequence. The process model defines what is constant about your
testing process, whereas the client sequence file defines the steps that are
unique to the different types of tests you run.
clipboard
A temporary storage area the operating system uses to hold data that you
cut, copy, or delete from a work area.
cluster
A set of ordered, unindexed data elements in LabVIEW of any data type
including numeric, Boolean, string, array, or cluster. The elements must be
all controls or all indicators.
code module
A program module, such as a Windows Dynamic Link Library (.dll) or
LabVIEW VI (.vi), that contains one or more functions that perform a
specific test or other action. The module adapters in TestStand call many
types of code modules.
code template
A source file that contains skeleton code. The skeleton code serves as a
starting point for the development of code modules for steps that use a
particular step type.
© National Instruments Corporation
G-3
TestStand User Manual
Glossary
configuration
entry point
A sequence in the process model file that configures a feature of the process
model. Configuration entry points usually save configuration information
in a .ini file in the TestStand\cfg directory. By default, configuration
entry points appear in the Configure menu. For example, the default
process model contains the configuration entry point Config Report
Options. The Config Report Options entry point appears as Report
Options in the Configure menu.
connector
Part of a LabVIEW VI or function node that contains its input and output
terminals, through which data passes to and from the node.
container property
A property that contains no values, and typically contains multiple
subproperties. Container properties are analogous to structures in C/C++
and to clusters in LabVIEW.
context menu
Menus that appears when you right-click an object. The menu items that
appear pertain to that object specifically.
control
An input and output device in a panel or window in which you enter data or
make a setting.
control flow
The sequential order of instructions that determines execution order.
custom named
data type
custom property
A data type that you define and name. For example, you might create a
Transmitter data type that contains subproperties such as number of
channels, NumChannels, and power level, PowerLevel.
A property that you define in a step type. Each step you create with the step
type has its own copy of the custom property. TestStand uses the value that
you specify for the custom property in the step type as the initial value of
the property in each new step you create. Normally, after you create a step,
you can change the value of the property in the step.
D
developer
A user profile that usually contains all privileges associated with operating,
debugging, and developing sequences and sequence files, but excludes
configuration of user privileges, report options, and database options.
dialog box
A user interface in which you specify additional information for the
completion of a command.
TestStand User Manual
G-4
ni.com
Glossary
DLL
dynamic link library
DLL Flexible
Prototype Adapter
See Adapter.
E
early binding
Setting that causes the ActiveX Automation Adapter to use IDs to
specify to automation servers what operations to perform on objects.
See late binding.
Edit substep
A substep that the engine calls when a developer or user edits the step. You
invoke the substep with the menu item that appears in the context menu
above Specify Module. The Edit substep displays a dialog box in which the
sequence developer edits the values of custom step properties. For example,
the Edit Limits item appears in the context menu for Numeric Limit test
steps, and the Edit Pass/Fail Source item appears in the context menu for
Pass/Fail test steps.
engine
A module or set of modules that provide an API for creating, editing,
executing, and debugging sequences. A sequence editor or run-time
execution operator interface uses the services of a test executive engine.
engine callback
A sequence that TestStand invokes at specific points during execution.
You use engine callbacks to tell TestStand to call certain sequences before
and after the execution of individual steps, before and after interactive
executions, after loading a sequence file, and before unloading a sequence
file.
entry point
A sequence in the process model file that TestStand displays as a menu
item, such as Test UUTs, Single Pass, and Report Options.
error occurred flag
A Boolean flag, Step.Result.Error.Occurred, that indicates whether
a run-time error occurred in a step.
execution
An object that contains all the information TestStand needs to run a
sequence, its steps, and any subsequences it calls. Typically, the TestStand
sequence editor creates a new window for each execution.
© National Instruments Corporation
G-5
TestStand User Manual
Glossary
execution entry point
A sequence in a process model that runs tests against a UUT. Execution
entry points call the MainSequence callback in the client sequence file.
The default process model contains two execution entry points: Test UUTs
and Single Pass. By default, execution entry points appear in the
Execute menu. Execution entry points appear in the menu only when the
active window contains a sequence file that has a MainSequence callback.
Execution window
A window in the sequence editor or operator interface that displays the
steps that an execution runs. When execution is suspended, the execution
window displays the next step to execute and provides single-stepping
options. In the sequence editor you also can view variables and properties
for any active sequence context in the call stack.
expression
A formula that calculates a new value from the values of multiple variable
or properties. In expressions, you can access all variables and properties in
the sequence context that is active when TestStand evaluates the expression.
The following is an example of an expression:
Locals.MidBandFrequency = (Step.HighFrequency +
Step.LowFrequency) / 2
F
front-end callback
A common sequence that the sequence editor and run-time operator
interfaces call. Front-end callbacks allow multiple applications to share the
same implementation for a specific operation. TestStand installs the
sequence file FrontEndCallback.seq, which contains the front-end
callback sequence, LoginLogout.
front-end callback
sequence file
A sequence file that contains front-end callbacks. TestStand installs the
sequence file FrontEndCallback.seq, which contains the front-end
callback sequence, LoginLogout.
front panel
The interactive user interface of a LabVIEW VI. Modeled from the front
panel of physical instruments, it is composed of switches, slides, meters,
graphs, charts, gauges, LEDs, and other controls and indicators.
TestStand User Manual
G-6
ni.com
Glossary
G
global variable
TestStand defines two types of globals: sequence file globals and station
globals. Sequence file globals are accessible by any sequence or step in the
sequence file. Station globals are accessible by any sequence file loaded on
the station. The values of station global variables are persistent across
different executions and even across different invocations of TestStand.
GUI
See run-time operator interface.
H
hex
hexadecimal
highlight
The way in which input focus appears on a TestStand screen.To move the
input focus onto an item.
I
IDispatch pointer
A pointer to an interface that exposes objects, methods, and properties to
Automation programming tools and other applications.
in-process
When executable code runs in the same process space as the client, in other
words, an ActiveX server in a dynamic-link library (DLL).
instance step type
property
A built-in step property that exists in each step instance. Each step that you
create with the step type has its own copy of the property. TestStand uses
the value you specify for an instance property in the step type as the initial
value of the property in each new step that you create. Normally, after you
create a step, you can change the values of its instance properties.
interactive mode
When you run steps by selecting one or more steps in a sequence and
choosing the Run Selected Steps or Loop Selected Steps items in the
context menu or menu bar. The selected steps in the sequence execute,
regardless of any branching logic that the sequence contains. The selected
steps run in the order in which they appear in the sequence.
IUnknown pointer
An interface, provided by all ActiveX objects, that enables you to control
the lifetime and obtain other interfaces of an object.
© National Instruments Corporation
G-7
TestStand User Manual
Glossary
K
kill
To stop a running, terminating, or aborting execution by terminating the
thread of the execution without any cleanup of memory. This action can
leave TestStand in an unreliable state.
L
LabVIEW
Laboratory Virtual Instrument Engineering Workbench. A program
development application based on the programming language G and used
commonly for test and measurement purposes.
LabVIEW Standard
Prototype Adapter
See Adapter.
late binding
Setting that causes the ActiveX Automation Adapter to use names to
specify to a server what operations to perform on objects. See early binding.
list box
A control that displays a list of possible choices.
local variable
A property of a sequence that holds a value or additional subproperties.
Only a step within the sequence can directly access the property value.
M
main sequence
The sequence that initiates the tests on a UUT. The process model invokes
the main sequence as part of the overall testing process. The process model
defines what is constant about your testing process, whereas main
sequences define the steps that are unique to the different types of tests
you run.
MB
Megabytes of memory.
menu bar
Horizontal bar that contains names of main menus.
method
Performs an operation or function on an object.
MFC
Microsoft Foundation Class Library
model callback
A mechanism that allows a sequence file to customize the default behavior
of a sequence in the process model.
TestStand User Manual
G-8
ni.com
Glossary
model sequence file
A special type of sequence file that contains process model sequences.
The sequences within the model sequence file direct the high-level
sequence flow of an execution when you test a UUT.
module adapter
A component that the TestStand engine uses to invoke code in another
sequence or in a code module from another ADE, such as LabVIEW. When
the adapter invokes code in a code module, the adapter knows how to call
the code module and how to pass parameters to it.
N
named data type
A type of variable or property that you give a unique name. The data type
usually contains multiple subproperties thus creating an arbitrarily complex
data structure. All variables or properties that use the data type have the
same data structure, but the values they contain can differ.
nested interactive
execution
When you run steps interactively from an execution window for a normal
execution that is suspended at a breakpoint. You can run steps only in the
sequence and step group in which execution is suspended. The selected
steps run within the context of the normal execution.
normal execution
When you start an execution in the sequence editor by selecting the Run
Sequence Name item or one of the process model entry points from the
Execute menu, where Sequence Name is the name of the sequence that you
are running.
normal sequence file
Any sequence file containing sequences that test UUTs.
numeric property
A 64-bit floating-point value in the IEEE 754 format.
O
object
A service that an ActiveX server makes available to clients.
operator
A user profile that usually contains all privileges associated with operating
a test station, but excludes debugging of sequence executions, editing of
sequence files, and configuration of user privileges, station options, report
options, and database options.
operator interface
See run-time operator interface.
out-of-process
When executable code does not run in the same process space as the client,
such as an ActiveX server in an executable.
© National Instruments Corporation
G-9
TestStand User Manual
Glossary
P
pop-up menus
See context menu.
post actions
Actions that TestStand takes depending on the pass/fail status of the step or
a custom condition that the engine evaluates after executing a step. Post
actions allow you to execute callbacks or jump to other steps after executing
the step.
Post Step substep
A substep that the engine invokes after calling a step module. A Post Step
substep might call a code module that compares the values the step module
stored in step properties against limit values that the Edit substep stored in
other step properties.
Pre Step substep
A substep that the engine invokes before calling the step module. For
example, a Pre Step substep might call a code module that retrieves
measurement configuration parameters and stores them into step properties
for use by the step module.
preconditions
A set of conditions for a step that must be true for TestStand to execute the
step during the normal flow of execution in a sequence.
process model
A series of operations before and after a test executive executes the
sequence that performs the tests. Common operations include identifying
the UUT, notifying the operator of pass/fail status, generating a test report,
and logging results.
property
A container of information, which stores and maintains a setting or attribute
of an object. A property can contain a single value, an array of values of the
same type, or no value at all. A property also can contain any number of
subproperties. Each property has a name.
property-array
property
A property containing a value that is an array of subproperties of a single
type. In addition to the array of subproperties, property-array properties can
contain any number of subproperties of other types.
R
reference count
Information that each ActiveX object uses to keep track of the number of
things that reference it. This allows the object to determine when to free the
resources it uses.
reference property
See ActiveX reference property.
TestStand User Manual
G-10
ni.com
Glossary
resource string
Text strings stored in an external file so that you can alter the strings
without directly altering the application.
root interactive
execution
When you run selected steps from a Sequence File window in an
independent execution. Root interactive executions do not invoke process
models.
RTF
rich text format
run mode
The mode in which you execute a step, such as normal, skip, force pass,
or force fail.
run-time error
An error condition that forces an execution to terminate. When the error
occurs while running a sequence, TestStand jumps to the Cleanup step
group, and the error propagates to any calling sequence up through to the
top-level sequence.
run-time operator
interface
A program that provides a graphical user interface (GUI) for executing
sequences on a production station. Sometimes the sequence editor and
run-time operator interfaces are different aspects of the same program.
RunState
Contains properties that describe the state of execution in the sequence
invocation. Refer to Table 8-3, RunState Subproperty in the Sequence
Context, for the contents of the RunState property.
S
s
seconds
sequence
A series of steps that you specify for execution in a particular order.
Whether and when a step is executed can depend on the results of previous
steps.
SequenceContext
A TestStand object that contains references to all global variables and all
local variables and step properties in active sequences. The contents of the
sequence context changes depending on the currently executing sequence
and step.
sequence editor
A program that provides a graphical user interface for creating, editing, and
debugging sequences.
sequence file
A file that contains the definition of one or more sequences.
© National Instruments Corporation
G-11
TestStand User Manual
Glossary
single-valued property
A property that contains a single value. TestStand has four types of these
properties: Number properties, String properties, Boolean properties, and
ActiveX reference properties.
source code template
A set of source files that contain skeleton code, which serves as a starting
point for the development of code modules for steps. TestStand uses the
source code template when a sequence developer clicks the Create Code
button on the Source Code tab in the Specify Module dialog box for a step.
SQL Null
An empty column in a row in a database table.
standard named
data type
A data type that TestStand defines and names. You can add subproperties
to the standard data types, but you cannot delete any of their built-in
subproperties. The standard named data types are Path, Error, and
CommonResults.
station
A complete TestStand test implementation that operators, developers,
and administrators use to perform tests.
station callback
sequence file
A sequence file that contains the station callback sequences. Station
callbacks run before and after the engine executes each step in any normal
or interactive execution.
station globals
Variables that are persistent across different executions and even across
different invocations of the sequence editor or run-time operator interfaces.
The TestStand engine maintains the value of station global variables in a
file on the run-time computer.
station model
A process model that you select to use for all sequence files for a station.
The TestStand installation program establishes SequentialModel.seq
as the default station model file. You use the Station Options dialog box to
select a different station model.
step
Any action, such calling a test module to perform a specific test, that you
can include within a sequence of other actions.
step group
A set of steps in a sequence. A sequence contains the following groups of
steps: Setup, Main, and Cleanup. When TestStand executes a sequence, the
steps in the Setup group execute first, the steps in the Main group execute
next, and the steps in the Cleanup group execute last.
step module
The code module that a step calls.
step property
A property of a step.
TestStand User Manual
G-12
ni.com
Glossary
step result
A container property that contains a copy of the subproperties from the
Result property of a step and additional execution information such as the
name of the step and its position in the sequence. TestStand automatically
creates a step result as each step executes and places the step result into a
result list that TestStand uses to generate its reports.
step status
A string value that indicates the status of a step in an execution. Every step
in TestStand has a Result.Status property. Although TestStand imposes
no restrictions on the values to which the step or its code module can set the
status property, TestStand and the built-in step types use and recognize a
predefined set of values.
step type
A component that defines a set of custom step properties and standard
behavior for each step of that type. All steps of the same type have the same
properties, but the values of the properties can differ. Step types define their
standard behaviors using substeps.
step-type-specific
dialog box
A dialog box that step types display when you invoke their Edit substep.
The dialog box lets you modify step properties that are specific to the step
type. You invoke the dialog box with the menu item that appears in the
context menu above Specify Module. For example, the Edit Limits item
appears in the context menu for Numeric Limit test steps, and the Edit
Pass/Fail Source item appears in the context menu for Pass/Fail test steps.
subsequence
A sequence that another sequence calls. You specify a subsequence call as
a step in the calling sequence.
substep
Actions that a step type performs for a step other than calling the step
module. You define a substep by selecting an adapter and specifying a
module call. TestStand defines three different types of substeps: Edit
substep, Pre Step substep, and Post Step substep.
substep module
The code module that a Edit, Pre Step, or Post Step substep calls.
T
technician
A user profile that usually contains all privileges associated with operating,
and debugging sequences and sequences files, but excludes editing of
sequence files and configuration of user privileges, station options, report
options, and database options.
© National Instruments Corporation
G-13
TestStand User Manual
Glossary
template
See code template.
terminal
Object or region on a LabVIEW VI node through which data passes.
terminate
To stop an execution by halting the normal execution flow and running all
the Cleanup step groups in the sequences on the call stack.
test executive engine
See engine.
test module
A code module that performs a test.
ThisContext
Holds a reference to the current sequence context. You usually use this
property to pass the entire sequence context as an argument to a
subsequence or a step module. See also SequenceContext.
U
Unit Under Test (UUT)
The device or component that you are testing.
user manager
The component of the TestStand engine that maintains a list of users, their
login names and passwords, and their privileges. You can access the user
manager from the User Manager window in the sequence editor.
V
variables
Properties that you can freely create in certain contexts. You can have
variables that are global to a sequence file or local to a particular sequence.
You also can have station global variables.
variables window
A window that shows the values of all the currently active variables or
properties.
variant
Data type that can hold any defined type of data.
VI
Virtual instrument.
VI library
Special file of type .LLB that contains a collection of related VIs for a
specific use.
TestStand User Manual
G-14
ni.com
Glossary
W
watch window
A window that shows the values of user-selectable variables and
expressions that are currently active.
window
A working area that supports specific tasks related to developing and
executing programs.
wire
Tool used in LabVIEW to define data paths between source and sink
terminals.
© National Instruments Corporation
G-15
TestStand User Manual
Index
A
specifying in Edit Automation Call dialog
box, 13-51 to 13-55
ActiveX Reference control,
13-51 to 13-52
Automation Server control, 13-52
Call Method or Access Property
section, 13-53
Create Object control, 13-52 to 13-53
Object Class control, 13-52
Parameters control, 13-54
using with TestStand, 13-58 to 13-60
compatibility issues with Visual
Basic, 13-58 to 13-60
registering servers, 13-58
variant data types supported (table), 13-55
ActiveX Automation code modules,
distributing, 17-14
ActiveX Data Objects (ADO), 18-3
ActiveX Reference to Thread control
Add Thread operation, 11-64
Remove Thread operation, 11-65
ActiveX references, modifying, 9-11
Adapter Configuration dialog box, 13-3
adapters. See module adapters.
Adapters command, Configure menu, 3-3, 4-35
Add control, Customize Tool Menu
dialog box, 4-42
Add/Remove Columns control, Build SQL
Select Statement dialog box, 18-54
Add Thread operation, Batch Specification
step, 11-63 to 11-64
ActiveX Reference to Thread control, 11-64
Batch Name or Reference Expression
control, 11-64
illustration, 11-63 to 11-64
Order Number control, 11-64
Add Watch command, Watch Expression
pane, 6-13
Abort control, Parallel Model Test UUTs
dialog box, 14-6
Abort (no cleanup) command, Debug
menu, 4-19
Abort All control, Parallel Model Test UUTs
dialog box, 14-6
Abort All (no cleanup) command, Debug
menu, 4-20
Abort Immediately option, Run-Time Error
dialog box, 6-30
aborting execution, 1-26
Acquire operation, Semaphore step
Acquire Lifetime control, 11-15
Auto Release control, 11-14
illustration, 11-14
Semaphore Name or Reference
Expression control, 11-14
Timeout Causes Run-Time Error
control, 11-15
Timeout Enabled control, 11-15
Timeout Expression control, 11-15
Action steps, 10-4
ActiveX Automation Adapter, 13-51 to 13-60
configuring, 13-56 to 13-58
Automation Adapter Configuration
dialog box (figure), 13-56
Enable Run-time ActiveX Reference
Type Checking, 13-57 to 13-58
Show ActiveX Controls When
Specifying a Module, 13-58
Show Method Arguments in Step
Description, 13-58
Unload Unused ActiveX Servers After
Execution, 13-58
Use Late Binding control, 13-57
running and debugging servers,
13-55 to 13-56
© National Instruments Corporation
I-1
TestStand User Manual
Index
Already Exists control, Create operation
Batch Specification step, 11-63
Lock step, 11-6
Notification step, 11-36
Queue step, 11-24
Rendezvous step, 11-20
Semaphore step, 11-13
AnyOf block, Preconditions dialog box, 5-39
Append data type to column name control
Properties tab, Import/Export Properties
dialog box, 18-83
Properties tab, Property Loader dialog
box, 18-72
Application Development Environment
(ADE), 1-2
Arbitrary expression, Preconditions dialog
box, 5-39
architecture of TestStand. See TestStand
architecture overview.
Argument Expression control, Configure Call
Executable dialog box, 10-26
Arguments control, Customize Tool Menu
dialog box, 4-43
arithmetic operators (table), 8-16
Array Bounds dialog box
array sizing, 9-6 to 9-7
empty arrays, 9-8
array function operators (table), 8-17 to 8-18
Array of submenu, 9-6
Array parameters, specifying for DLL Flexible
Prototype Adapter, 13-10 to 13-11
arrays
array property, 1-10
dynamic array sizing, 9-7 to 9-8
empty arrays, 9-8
modifying values, 9-12
specifying array sizes, 9-6 to 9-7
Assemble Test VIs for Run-time Distribution
command, Tools menu, 4-40
assignment operators (table), 8-16
Additional Columns tab, Import/Export
Properties dialog box, 18-83 to 18-85
Column Name/Number control, 18-84
Column Values control, 18-84
Create Columns control, 18-85
Format String control, 18-84 to 18-85
illustration, 18-84
Value control, 18-84
ADO (ActiveX Data Objects), 18-3
Advanced tab
Data Link Properties dialog box, 18-38
Sequence File Properties dialog
box, 5-8 to 5-9, 14-11
Advanced tab, Edit Open SQL Statement
dialog box, 18-54 to 18-57
Cache Size control, 18-55
Command Timeout control, 18-55
Command Type control, 18-56 to 18-57
Cursor Location control, 18-56
Cursor Type control, 18-55 to 18-56
illustration, 18-55
Lock Type control, 18-56
Marshal Options control, 18-56
Max Records to Select control, 18-55
Page Size in Records control, 18-55
Align Left control, Numeric Format
dialog box, 9-14
All Sequences view context menu, 5-3 to 5-5
Browse Sequence Context command, 5-3
Insert Sequence command, 5-3
Open Sequence command, 5-3
Rename command, 5-3
Sequence File Callbacks
command, 5-10 to 5-11
Sequence File Properties
command, 5-6 to 5-9
Sequence Properties command, 5-3 to 5-5
View Contents command, 5-3
All tab, Data Link Properties dialog
box, 18-39
AllOf block, Preconditions dialog box, 5-39
TestStand User Manual
I-2
ni.com
Index
Batch Results dialog box, 14-8 to 14-9
Batch Serial Number control, 14-9
illustration, 14-8
Next Batch control, 14-9
Status Message control, 14-9
Test Socket control, 14-9
UUT Serial Number control, 14-9
View Batch Report control, 14-9
View Report control, 14-9
Batch Serial Number control
Batch Results dialog box, 14-9
Batch UUT Identification dialog
box, 14-7
Batch Specification step, 11-62 to 11-68
Add Thread operation, 11-63 to 11-64
ActiveX Reference to Thread
control, 11-64
Batch Name or Reference Expression
control, 11-64
illustration, 11-63 to 11-64
Order Number control, 11-64
Create operation, 11-62 to 11-63
Already Exists control, 11-63
Batch Name Expression
control, 11-63
Batch Reference Lifetime
control, 11-63
Default Batch Synchronization
control, 11-63
illustration, 11-62
Get Status operation, 11-66 to 11-67
Batch Exists? control, 11-66
Batch Name or Reference Expression
control, 11-66
Default Batch Synchronization
control, 11-67
illustration, 11-66
Number of Threads in Batch
control, 11-67
Attach to File control, General tab
custom data type Properties dialog
box, 9-24
Step Type Properties dialog box, 9-38
attributes of synchronization
objects, 11-2 to 11-4
lifetime, 11-3 to 11-4
name, 11-2 to 11-3
timeout, 11-4
Auto Clear After Notifying One Thread, Set
operation, Notification step, 11-38
Auto Increment Sequence File Version option,
Preferences tab, 4-28
Auto Release control, Acquire operation,
Semaphore step, 11-14
Auto-Load Library Configuration dialog
box, 13-37
automatic result collection. See result
collection.
Automatically Login Windows System User
option, User Manager tab, 4-31
B
Backup Sequence Files When Resaving in
Older or Newer Format option, Sequence
Editor Options dialog box, 4-21
Batch Exists? control, Get Status
operation, 11-66
Batch model, 14-6 to 14-9
Batch Results dialog box, 14-8 to 14-9
Batch UUT Identification dialog
box, 14-7 to 14-8
overview, 14-6
Batch Name Expression control, Create
operation, 11-63
Batch Name or Reference Expression control
Add Thread operation, 11-64
Get Status operation, 11-66
Batch Reference Lifetime control, Create
operation, 11-63
© National Instruments Corporation
I-3
TestStand User Manual
Index
Go control, 14-8
illustration, 14-7
Status Message control, 14-8
Stop control, 14-8
Test Socket control, 14-7
UUT Serial Number control, 14-7
bitwise operators (table), 8-16
Bounds tab, custom data types Properties
dialog box, 9-24
Break command, Debug menu, 4-19
Break All command, Debug menu, 4-19
Break on First Step command, Execute
menu, 4-17
Break option
Post Actions tab, 5-26
Run-Time Error dialog box, 6-31
Breakpoint option, Run Options tab, 5-23
breakpoints
enabling/disabling, 4-22
toggling, 5-17
Browse Sequence Context command
All Sequences view context menu, 5-3
Globals View context menu, 7-3
Locals tab context menu, 5-37
Parameters tab context menu, 5-33
Sequence File Globals view context
menu, 5-44
Step Group context menu, 5-19
View menu, 4-13 to 4-14
Build control
Source/Destination tab, Import/Export
Properties dialog box, 18-81
SQL statement tab, Edit Open SQL
Statement dialog box, 18-53 to 18-54
Build SQL Select Statement dialog box
Add/Remove Columns control, 18-54
Data Link Name control, 18-54
illustration, 18-53
Where Clause control, 18-54
Number of Threads Waiting at
Synchronized Sections
control, 11-66
Remove Thread operation
ActiveX Reference to Thread
control, 11-65
illustration, 11-65
step properties, 11-67 to 11-68
batch synchronization object, 11-1 to 11-2
Batch Synchronization step, 11-56 to 11-61
Enter Synchronized Section
operation, 11-59
illustration, 11-59
Section Name control, 11-59
Section Type control, 11-59
Timeout Causes Run-Time Error
control, 11-51
Timeout Enabled control, 11-44
Timeout Expression control, 11-44
Exit Synchronized Section
operation, 11-60
Exit operation requirements, 11-58
illustration, 11-60
Section Name control, 11-60
Timeout Causes Run-Time Error
control, 11-60
Timeout Enabled control, 11-60
Timeout Expression control, 11-60
requirements for using Enter and Exit
operations, 11-58
step properties, 11-61
synchronized sections, 11-56 to 11-58
mismatched sections, 11-58
nested sections, 11-58
one-thread-only section, 11-57
parallel sections, 11-57
serial sections, 11-57
Batch UUT Identification dialog
box, 14-7 to 14-8
Batch Serial Number control, 14-7
Disable Test Socket control, 14-8
TestStand User Manual
I-4
ni.com
Index
built-in step properties
definition, 1-11
sequence properties, 1-17
step type properties, 9-34 to 9-35
types and capabilities of step
properties, 1-11 to 1-12
built-in step types, 10-1 to 10-30. See also
Step Type Properties dialog box; step types.
any module adapter, 10-4 to 10-18
Action steps, 10-4
Numeric Limit Test, 10-7 to 10-11
Pass/Fail Test, 10-5 to 10-6
String Value Test, 10-15 to 10-18
common custom properties, 10-1 to 10-2
customizing, 10-3
error occurred flag, 10-3
module adapter not used, 10-20 to 10-30
Call Executable, 10-26 to 10-28
Goto, 10-29
Label, 10-29 to 10-30
Message Popup, 10-21 to 10-25
Property Loader, 10-28
Statement, 10-20 to 10-21
run-time errors, 10-3
specific module adapters, 10-18 to 10-20
Sequence Call, 10-18 to 10-20
step status, 10-3
built-in database step types, 18-44 to 18-78
Close Database, 18-50 to 18-52
Close Database step type
custom properties, 18-51 to 18-52
Edit Close Database dialog
box, 18-51
Close SQL Statement, 18-58 to 18-59
Close SQL Statement step type
custom properties, 18-59
Edit Close SQL Statement dialog
box, 18-58
Data Operation, 18-59 to 18-65
Data Operation step type
Column Values tab, Edit Data
Operation dialog box,
18-62 to 18-63
custom properties, 18-64 to 18-65
Record/Operation tab, Edit Data
Operation dialog box,
18-60 to 18-61
Open Database, 18-48 to 18-50
custom properties, 18-50
Data Link tab, 18-49 to 18-50
Open SQL Statement, 18-52 to 18-57
Open SQL statement step type
Advanced tab, Edit Open SQL
Statement dialog box,
18-54 to 18-57
custom properties, 18-57
SQL statement tab, Edit Open SQL
Statement dialog box,
18-52 to 18-54
overview, 18-44 to 18-45
Property Loader, 18-65 to 18-78
Property Loader dialog box
Filtering tab, 18-74 to 18-75
Properties tab, 18-71 to 18-73
using Select Data Link dialog
box, 18-45 to 18-48
© National Instruments Corporation
C
Call Executable steps, 10-26 to 10-28
Configure Call Executable dialog
box, 10-26 to 10-27
properties (figure), 10-27
step properties defined, 10-28
Call sequence option, Post Actions tab, 5-26
Call Stack pane, Execution
window, 6-11 to 6-12
I-5
TestStand User Manual
Index
loading subordinate DLLs, 13-39
prototypes, 13-27 to 13-30
step properties updated (table), 13-30
tTestData structure member fields
(table), 13-27 to 13-29
tTestError structure member fields
(table), 13-29 to 13-30
specifying in Edit C/CVI Module Call
dialog box, 13-32 to 13-35
Module tab, 13-32 to 13-33
Source Code tab, 13-34 to 13-35
Check Out Source Files When Edited option,
Source Control tab, 4-33
Check Type option, Parameters tab context
menu, 5-34
Check User Privileges option, User Manager
tab, 4-31
Choose Code Template dialog box, 13-4
class step type properties, 9-34
clauses, SQL, 18-88 to 18-89
Cleanup tab, step groups, 5-11
Clear operation, Notification step
illustration, 11-39
Notification Name or Reference
Expression control, 11-39
client sequence file, 1-18
Close command, File menu, 4-2
Close Completed Execution Displays
command, Window menu, 4-44
Close Completed Execution Displays on
Execution option, Sequence Editor Options
dialog box, 4-21
Close Database step type, 18-50 to 18-52
custom properties, 18-51 to 18-52
Edit Close Database dialog box, 18-51
Close SQL Statement step type,
18-58 to 18-59
custom properties, 18-59
Edit Close SQL Statement dialog
box, 18-58
callback sequences, 1-23 to 1-25
callback types (table), 1-23
displaying
in Callbacks dialog box, 5-10 to 5-11
with Sequence File Callbacks
command, 4-6 to 4-7
engine callbacks, 1-24
front-end callbacks
customizing, 3-10
overview, 1-24 to 1-25
model callbacks
customizing, 3-10 to 3-11
defining, 1-19
overview, 1-19
purpose and use, 14-12
restrictions on SequenceFileLoad and
SequenceFileUnload callbacks,
5-10 to 5-11
Sequence Properties Model
tab, 14-12 to 14-13
Callbacks dialog box, 5-10 to 5-11
Calling Convention control, Module tab, Edit
DLL Call dialog box, 13-7
Cascade command, Window menu, 4-44
Category control, Module tab, Edit DLL Call
dialog box, 13-7
C/CVI Standard Prototype Adapter,
13-27 to 13-39
Configuration dialog box (figure), 13-36
configuring, 13-35 to 13-39
example code module, 13-31
executing code modules in external
instance, 13-38 to 13-39
debugging C source and DLL code
modules, 13-39
executing code modules in-process,
13-36 to 13-38
debugging DLL code module, 13-38
object and library code modules,
13-36 to 13-37
source code modules, 13-37
TestStand User Manual
I-6
ni.com
Index
Record/Operation tab, Edit Data
Operation dialog box, 18-61
Column Name control, Properties tab,
Import/Export Properties dialog box, 18-83
Column Name/Number control
Additional Columns tab, Import/Export
Properties dialog box, 18-84
Column Values tab, Edit Data Operation
dialog box, 18-63
Filtering tab, Property Loader dialog
box, 18-75
Properties tab, Property Loader
dialog box, 18-72
Column Values control
Additional Columns tab, Import/Export
Properties dialog box, 18-84
Column Values tab, Edit Data Operation
dialog box, 18-63
Filtering tab, Property Loader dialog
box, 18-75
Column Values tab, Edit Data Operation
dialog box, 18-62 to 18-63
Column Name/Number control, 18-63
Column Values control, 18-63
Data Link Name control, 18-63
Format String control, 18-63
illustration, 18-62
SQL Statement control, 18-63
Values control, 18-63
columns, in databases, 18-1
Columns control, Create Columns dialog
box, 18-73
combining step types, 9-52
Command control, Customize Tool Menu
dialog box, 4-42
Command Text control, Statements tab, 18-15
Command Timeout control, Advanced tab,
Edit Open SQL Statement dialog box, 18-55
Command Type control, Advanced tab, Edit
Open SQL Statement dialog box,
18-56 to 18-57
Close Tree View command, Step Group
context menu, 5-18
code modules
definition, 1-1
executing in external instance,
13-38 to 13-39
debugging C source and DLL code
modules, 13-39
executing in-process, 13-36 to 13-38
debugging DLL code module, 13-38
object and library code modules,
13-36 to 13-37
source code modules, 13-37
code templates
creating, 3-11, 9-46
customizing, 9-46
multiple templates per step type, 9-46
source code templates
for module adapters, 13-4
for step types, 1-14
template files for different adapters,
9-44 to 9-45
Code Templates tab, Step Type Properties
dialog box, 9-44 to 9-51
Add button, 9-48
Create button, 9-47 to 9-48
Create Code Templates dialog box, 9-48
Edit button, 9-48
Edit Code Template dialog
box, 9-49 to 9-51
illustration, 9-47
Move Down button, 9-49
Move Up button, 9-49
overview, 9-44
Remove button, 9-48
Collapse control, Customize Tool Menu
dialog box, 4-42
Column List Source control
Filtering tab, Property Loader dialog
box, 18-74
© National Instruments Corporation
I-7
TestStand User Manual
Index
Time to Wait control, 10-27
Wait Condition control, 10-26
Configure menu, 3-2 to 3-3, 4-20 to 4-36
Adapters command, 3-3, 4-35
Database Options command, 3-3, 18-6,
18-8
External Viewers command, 3-3, 4-35
Model Options command, 3-3, 4-36
Report Options command, 3-3, 4-35
Search Directories command, 3-2,
4-34 to 4-35
Sequence Editor Options command,
4-20 to 4-21
Station Options command, 3-2,
4-21 to 4-33
Configure Message Box Step dialog box
Options tab, 10-23 to 10-24
Text and Buttons tab, 10-22
Configure Type Palettes dialog
box, 9-55 to 9-56
connection string, in data links, 18-5
Connection String control
Data Link tab, Open Database step type,
18-49 to 18-50
Edit Data Link dialog box, 18-47 to 18-48
Connection String Expression control, Data
Link tab, 18-11 to 18-12
Connection tab, Data Link Properties dialog
box, 18-37
constants operators (table), 8-16
containers
container properties, 1-10
modifying values, 9-15
context menus
All Sequences view context
menu, 5-3 to 5-5
Context tab context menu, 6-8 to 6-9
creating data type instances
(table), 9-4 to 9-5
Differ window, 5-47
Globals View context menu, 7-2 to 7-3
Comment control
General tab
custom data type Properties dialog
box, 9-24
Step Properties dialog box, 5-20
Step Type Properties dialog box, 9-38
Sequence File Properties dialog box, 5-8
Sequence Properties dialog box, 5-5
CommonResults standard data
type, 9-16 to 9-17
comparing and merging sequence
files, 5-45 to 5-47
comparison operators (table), 8-16
Components directory, 3-4 to 3-6
customizing, 3-4 to 3-6
subdirectories (table), 3-5 to 3-6
configuration. See also customizing
TestStand.
ActiveX Automation Adapter,
13-56 to 13-58
C/CVI Standard Prototype Adapter,
13-35 to 13-39
DLL Flexible Prototype Adapter, 13-5
HTBasic Adapter, 13-61 to 13-62
LabVIEW Standard Prototype Adapter,
13-22 to 13-24
module adapters, 13-3
TestStand, 3-1 to 3-3
Configure menu, 3-2 to 3-3
sequence editor startup
options, 3-1 to 3-2
configuration entry points, 14-13
Configure Call Executable dialog box,
10-26 to 10-27
Argument Expression control, 10-26
Executable Path control, 10-26
Exit Code Status Action control, 10-27
Initial Window State control, 10-27
Terminate Executable If Step Is
Terminated Or Aborted control, 10-27
TestStand User Manual
I-8
ni.com
Index
Parameters control, 18-73
Table control, 18-73
Create operation
Batch Specification step, 11-62 to 11-63
Already Exists control, 11-63
Batch Name Expression
control, 11-63
Batch Reference Lifetime
control, 11-63
Default Batch Synchronization
control, 11-63
illustration, 11-62
Lock step
Already Exists control, 11-6
illustration, 11-6
Lock Name Expression control, 11-6
Notification step, 11-35 to 11-36
Already Exists control, 11-36
illustration, 11-36
Notification Name Expression
control, 11-36
Notification Reference Lifetime
control, 11-36
Queue step, 11-23 to 11-25
Already Exists control, 11-24
illustration, 11-24
Maximum Number of Elements
control, 11-24
Queue Name Expression
control, 11-24
Queue Reference Lifetime
control, 11-24
Rendezvous step, 11-19 to 11-20
Already Exists control, 11-20
illustration, 11-19
Rendezvous Name Expression
control, 11-19 to 11-20
Semaphore step, 11-12 to 11-14
Already Exists control, 11-13
illustration, 11-13
Locals tab context menu, 5-35 to 5-38
Parameters tab context menu,
5-32 to 5-34
Profiles tab context menu, 12-6 to 12-7
purpose and use, 2-4
Sequence File Globals view context
menu, 5-42 to 5-44
Step Group context menu, 5-15 to 5-31
Steps tab context menu, 6-6 to 6-7
User List context menu, 12-3 to 12-5
Workspace window, 2-10 to 2-13
Context tab, Execution window, 6-7 to 6-9
Context tab context menu, 6-8 to 6-9
Properties command, 6-9
Refresh command, 6-9
View Contents command, 6-8
controlling sequences flow. See sequence flow,
controlling.
conventions used in manual, iv
copy, cut, and paste capabilities, sequence
editor screen, 2-4
Copy button, Preconditions dialog box, 5-39
Copy command, Edit menu, 4-4
Copy Item to File option, Differ window, 5-47
Create Code Templates dialog box, 9-48
Create Columns control
Additional Columns tab, Import/Export
Properties dialog box, 18-85
Create Columns dialog box, 18-73
Filtering tab, Property Loader dialog
box, 18-75
Properties tab, Import/Export Properties
dialog box, 18-83
Properties tab, Property Loader dialog
box, 18-72 to 18-73
Create Columns dialog box
Columns control, 18-73
Create Columns control, 18-73
Data Link Name control, 18-73
Data Type control, 18-73
illustration, 18-73
© National Instruments Corporation
I-9
TestStand User Manual
Index
Version tab, 9-25
Always Prompt User to Resolve the
Conflict control, 9-25
Modified control, 9-25
Use the Definition that has the
Highest Version Number
control, 9-25
Version control, 9-25
Custom Data Types tab tree and list
views, 9-17 to 9-20
creating and modifying custom data
types, 9-17 to 9-20
list view, 9-18 to 9-19
tree view, 9-18
Value field, 9-19 to 9-20
custom named data types, 1-10
custom properties. See also step properties.
built-in step types, 10-1 to 10-2
Close Database step type, 18-51 to 18-52
Close SQL Statement step type, 18-59
custom step type properties, 9-33 to 9-34
Data Operation step type, 18-64 to 18-65
definition, 1-11
lifetime of custom step properties, 1-16,
5-31
Open Database step type, 18-50
Op