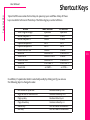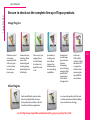
1
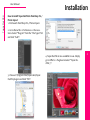
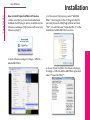
Topaz DeJPEG
v3.0
User Manual
Topaz DeJPEG
User Manual
Contents
I. Installation
A. How to Install
B. Entering Your Key
C. Host-Specific Installation
1. Paint Shop Pro / Photo Impact
2. Irfanview
3
3
3
4
5
II. Introduction
A. JPEG Artifacts
1. Causes of JPEG Artifacts?
2. Consquences of JPEG Artifacts?
3. DeJPEG vs DeNoise
B. Topaz DeJPEG
1. About Topaz DeJPEG
2. New Features
6
6
6
6
6
6
8
III. Work Area
A. Interface
B. Preview
C. Presets
1. Applying Presets
2. Refresh Preset Previews
3. Presets Menu
4. Deleting Presets
5. Sharing Presets
6. Importing / Exporting Presets
D. Snapshots
E. Preview Navigator
9
10
12
12
12
13
13
13
14
15
15
IV. Menu & Settings
A. Menu
1. Preferences
2. Check for Updates
3. Enter Key
16
16
16
17
4. User’s Guide
5. Technical Support
6. Online Resources
7. About
8. Share (presets)
17
17
17
17
17
V. Settings & Parameters
A. Main
1. Reduce Artifacts
2. Smooth Color
3. Sharpen
4. Sharpen Radius
B. Advanced
1. Luma Noise
2. Color Noise
3. Color Edge Radius
4. Edge Threshold
5. Saturation
6. Add Grain
C. Color Viewing Modes
1. Normal
2. Luma
3. Color
D. Resetting Parameters
18
18
18
18
18
19
19
19
19
19
19
19
19
19
19
19
19
VI. Work Flow
A. Sample Project
20
VII. Additional Resources
A. Frequently Asked Questions
B. Glossary
C. Shortcut Keys
D. Company Info
24
26
28
29
2
Topaz DeJPEG
User Manual
Installation
Topaz DeJPEG is a Photoshop plug-in, which
means that it won’t run by itself and requires a
compatible host program.
To Install
1. Close Photoshop or other image editing program if you are using it.
2. Open the Topaz DeJPEG zip file, double-click
on the Topaz DeJPEG installer, and then follow
the on-screen instructions.
Mac Dmg Windows Zip
3. Your Topaz plug-ins will automatically be installed into your Photoshop plug-ins folder.
4. After the installation, you will need to enter
your license or trial key.
Important: To install the product on a second
computer, you will need to download DeDPEG
and then enter your same license key.
Entering Your Key
Entering your trial key allows you to save your
projects and print them during your evaluation
period. Entering your license key allows you to
do the same, but without any time limitations.
1. Start by opening up an image in Photoshop.
2. Go to Filters -> Topaz Labs -> DeJPEG ->
Menu... -> Enter Key...
3. You can then copy and paste or type your key in.
Host-Specific Installation
In Windows, Topaz DeJPEG is supported by
most all host applications that support Photoshop plug-ins. This includes Photoshop Elements,
Paint Shop Pro, Painter, and Irfanview, although
there are other host programs that may also
support it. Topaz DeJPEG is not supported by
Google Picaso.
To install DeJPEG in either Paint Shop Pro, Photo
Impact, or Irfranview first download Topaz DeJPEG to the default location. Then, to install into
each program, follow the host-specific instructions on the next page.
3
Topaz DeJPEG
User Manual
Installation
How to install Topaz DeJPEG in Paintshop Pro /
Photo Impact
1. First launch PaintShop Pro / Photo Impact.
2. Go to Menu file -> Preferences -> File Locations. Select “Plug-ins” from the “File Types” list
and click “Add”.
4. Topaz DeJPEG is now available to use. Simply
go to Effects -> Plugins and select “Topaz DeJPEG 3”.
3. Choose C:\Program Files\Topaz Labs\Topaz
DeJPEG plug-ins and click “OK”.
4
Topaz DeJPEG
User Manual
How to install Topaz DeJPEG in Irfranview
1. Make sure that you have downloaded and
installed the 8bf plug-in add-on, available on the
Irfanview webpage. (http://www.software.com/
irfanview-plugin)
Installation
3. In the screen that pops up, select “Add 8BF
filters” and navigate to the C:\Program Files\Topaz Labs\Topaz DeJPEG\Plugins folder and click
“OK”. You will then see “Topaz DeJPEG 3” in the
Available/Loadable 8BF Filters section.
5
2. Open Irfanview and go to Image -> Effects ->
Adobe 8BF filters.
4. To use Topaz DeJPEG in the future, simply go
to Image -> Effects> Adobe 8BF filters again and
select “Topaz DeJPEG 3”.
Topaz DeJPEG
User Manual
Introduction
JPEG Artifacts
What Are JPEG Compression Artifacts?
JPEG compression artifacts are random and
unwanted problems caused by compressing
an image. Most often, JPEG artifacts appear in
photographs as blocks, dots, and fringes. They
are also referred to as “checker-boarding” and
“mosquito noise”. To see if your images have JPEG artifacts because of
compression, zoom in on them and
look for areas with checkerboard patterns, mosquito noise, fuzziness, reduced detail,
reduced clarity, or uneven color.
What Causes JPEG Compression Artifacts?
JPEG compression artifacts are caused by the
lossy compression that occurs when you save an
image as a JPEG. JPEG images can be saved at
different levels of compression. Using a higher
compression produces a lower-quality image
and smaller file size and using a lower compression produces a higher-quality image and larger
file size.
Consequences of JPEG Compression Artifacts
JPEG compression is popular because it reduces
file sizes and allows for increased storage, but
6
comes with some unwanted and
typically irreversible side effects. It is a
lossy form of compression, and as a result,
image quality is lost and artifacts appear in the
image. The quality that is lost from compression
cannot be restored and will continue to diminish
in quality every time you edit and save the JPEG.
The presence of artifacts creates a visually unpleasant image with checkerboarding patterns,
reduced image detail, and reduced clarity.
Topaz DeJPEG
User Manual
Introduction
Why can’t I Use a Noise Reduction Program to
Remove JPEG Compression Artifacts?
Generally, noise reduction algorithms are not
effective at removing JPEG artifacts caused by
lossy compression methods. Ph0toshop does
provide a basic JPEG artifact remover. However,
it is not as effective as Topaz DeJPEG, which
specializes in reducing mosquito noise, discoloration, and fuzziness.
Topaz DeJPEG
7
Before Topaz DeJPEG 3.0
About Topaz DeJPEG
Topaz DeJPEG is a Photoshop plug-in that uses
a recent breakthrough in image processing
technology to eliminate the problems caused by
JPEG image compression. It is the optimal way
to fix JPEG compression artifacts.
Most digital images are stored as JPEGs because
they store high quality in a small file size. However, this convenience comes at a price: JPEG
compression artifacts. If an image is highlycompressed, these JPEG artifacts, which may
include mosquito noise, checkerboarding, and
edge artifacts, become obvious and may affect
the image quality.
After Topaz DeJPEG 3.0
Topaz DeJPEG
User Manual
Topaz DeJPEG uses sophisticated algorithms
that allow the user to quickly and effectively improve an image without spending a lot of time
tweaking settings or making adjustment layers.
It also includes several built-in presets that serve
as starting points for many images.
The primary functions of Topaz DeJPEG are:
Topaz DeJPEG reduces lossy JPEG compression artifacts while retaining great image detail,
offering you, the user, unprecedented control
over the clarity of your photos.
2. Optimally remove JPEG artifacts like checkerboarding and mosquito noise.
Lossy Compression Circle
1. Provide customers with the best quality in
JPEG compression artifact reduction – period.
Remove the most artifacts and keep the most
detail possible in photos.
3. Clarify original image detail and preserve image integrity.
4. Fix fuzziness and image blur caused by JPEG
compression.
5. Sharpen color edge, even for high-quality
JPEG images.
Lossless Compression Circle
New DeJPEG Features
Topaz DeJPEG 3.0 features the powerful noise
reduction capabilities found in DeNoise and
teams it up with faster processing time, incredible detail retention, and extensive smoothing
and sharpening capabilities, as well as detail
preservation, detail recovery, and multiple color
noise views - allowing you to focus in on the precise type of noise that you want to correct.
8
Topaz DeJPEG
User Manual
Work Area
Interface
Although the Topaz DeJPEG interface may look intimidating at first glance, don’t worry: it’s actually
quite simple and easy to use. You’ll be a pro after experimenting for a bit. In order to make sense
of the function of each of the various controls, we have divided the interface into five sections:
2. Presets
Provides
“snapshots”
of accessible
pre-defined
parameter
settings
2
1
9
3. Menu
Enables user
settings and
contains other
options
4
4. Settings and Parameters
Controls the editing using sliders
to adjust the various effects
1. Preview
Displays the processed
preview of the image
5
3
5. Preview Navigator
Allows for navigation of
the image preview areas
Topaz DeJPEG
User Manual
Work Area
Preview Section
The Preview section is the big image on the topright that shows you the processed preview of
the image. To pan the preview image, click and
hold the left mouse button on the preview image and drag it around. When you let go of the
mouse button, the new portion of the image will
be processed and displayed.
10
To compare the filtered and un-filtered images,
click and hold the “View Original Image” button
to switch to the unfiltered image. Letting go of
the button will switch back to the filtered image.
You can also use SPACE bar to switch back
and forth between your filtered and unfiltered image in the preview window.
Work Area
Topaz DeJPEG
User Manual
11
“Ctrl +” and “Ctrl –” keys zoom in and out of
the image, just like in Photoshop. You can use
the arrow keys to adjust the value of the slider
that is currently selected. A complete list of the
shortcut keys can be found in the Shortcut Keys
section later in this manual.
You can zoom in and out of the preview image
by clicking the “+”, or “-” buttons below the
preview image, and you can resize the window,
as well. The “100%” button will zoom to 100%
view. The zoom feature does not allow previews
under 100%.
Photoshop and other host software support many
image modes, such as Grayscale, RGB, LAB, CMYK,
etc. Images can also be 8, 16, or 32 bits per channel.
Topaz DeJPEG supports both 8 bits per channel and
16 bits per channel. Topaz DeJPEG supports RGB
mode only. To work on black-and-white images,
first convert them to RGB mode.
Topaz DeJPEG
User Manual
Presets
Presets are a great way to speed up and simplify
the whole process of using Topaz DeJPEG.
Presets are set previews with previously defined
settings that you can recall and reapply at any
time.
We’ve included some presets for you and, although they won’t work for every single photograph, they serve as excellent starting points for
your own customized tweaking.
Applying Presets
Applying a previously defined preset is easy and
intuitive. Simply clicking on a preset will change
all the settings in Topaz DeJPEG to match those
in the selected preset. To get the exact results
you want, though, you may still want to go
through the tabs and adjust the parameters.
You can also view presets in List mode.
“ Just click the Preset… button and
select “Toggle list/Thumbnail’. The plug-in
will also load more quickly since there are no
thumbnails that need to be updated.
Work Area
Refresh Preset Previews
Click the “Refresh” button to position the preview presets to where your main Topaz DeJPEG
preview is located. If you navigate through the
preview to a certain location within your image and then press the “Refresh” button, each
preset preview thumbnail will be repositioned
to display that section of image, and zoom in accordingly, as well.
12
Topaz DeJPEG
User Manual
Work Area
The Presets Menu
Sometimes, it’s convenient to be able to define
presets and save your settings for later use.
To do this, first adjust the Topaz DeJPEG parameters until you’re satisfied with the result.
Then, click on the “Presets. . .” button and click
“Save…”.
Deleting Presets
If you’d like to delete a preset, use the “Delete...” option with your desired preset selected.
Enter a preset name and optional description
and click “OK”. Note that if the name you’ve
entered is the same as the name of a preset
you’ve already defined, instead of creating a
new preset, Topaz DeJPEG will just override the
first one.
Your preset will be automatically saved as a new
file with a “.tpp” extension and will show up in
the Topaz DeJPEG Presets menu, where its preview is immediately generated. To apply it later,
just click it like you would any other preset.
Please Note: Default presents cannot be overriden or deleted.
Sharing Presets
Feel free to share your saved presets by emailing them to your friends and having them put it
into their Topaz DeJPEG Presets folder.
Saved presets are located in the Topaz DeJPEG
“Presets” folder:
C:\Program Files\Topaz Labs\Topaz DeJPEG 3\Presets unless you’ve opted to install Topaz DeJPEG
into a different directory.
Mac users have this folder at HD/Library/ApplicationSupport/TopazLabs/DeJPEG3/Presets.
13
Topaz DeJPEG
User Manual
Importing and Exporting Presets
To import a preset file, click the “Presets. . .”
button, and then select “Import. . .”.
Work Area
To import a preset file directly from the Internet,
click the “Import from Internet…” button and
paste in the exact URL in which the preset file is
located.
14
This will open up a “Browse” box to import a
saved preset from your computer into Topaz
DeJPEG. This is useful if you have downloaded
a preset file that you’d like to use.
To export the preset file to a certain location,
click “Export”. You can then share this file with
other users who may then import it.
You can use the export feature to share your favorite DeJPEG presets with friends on Facebook
Flickr, and Twitter. For more details see page 17.
You can also follow Topaz Labs on :
Facebook: http://www.facebook.com/pages/
Topaz-Labs/19955996369
Flickr: http://www.flickr.com/groups/topaz/
Twitter: www.twitter.com/topazlabs
Topaz DeJPEG
User Manual
Work Area
Snapshots
New in Topaz DeJPEG v3.0 is the “Snapshots”
feature. You’ll find it on the bottom left hand
corner under the Presets panel.
The “Snapshots” feature gives you a quick way
to create up to two snapshots of your settings
to compare without having to save presets. For
example, if you wanted to compare how two
different settings would look on an image, you
could simply save both settings as different
snapshots and compare the two without having
to save, apply, and then delete presets.
To use “Snapshots”, simply click “Snap 1” or
“Snap 2” to save your current settings into
memory. Clicking “Recall 1” or “Recall 2” applies the saved settings to the image in the same
way a preset does. Please note that snapshots
are deleted if you exit out of the current Topaz
DeJPEG window because they are meant to help
you in the current Topaz DeJPEG session only.
15
Preview Navigator
The Preview Navigator allows you to see what
region of the image you are viewing. You can
also pan your image in the Preview section by
“grabbing” the red box in the navigator and
dragging it to the desired area of the image.
Topaz DeJPEG
User Manual
Menu & Settings
Menu
You can access Topaz DeJPEG’s menu by clicking on the “Menu…” button in the bottom-right
corner of the filter.
“Enable pop-up help” gives reminders and tips
when you hover your mouse over certain areas
of the filter. Turn this off if you find that these
pop-ups are impeding your work.
“Pan preview faster” affects the panning speed
of the Topaz DeJPEG preview.
Every setting in the Preference window of Topaz
DeJPEG is saved for future use. To change one
of these preferences, simply access this menu
again.
Preferences
Brings up a menu where you can change your
pop-up help and pan settings.
Check for Updates
Select this to check if you have the most current
version of DeJPEG. Topaz DeJPEG will let you
know if there is a new version available.
Please note that the “Disable multi-processor
support” option only applies to Mac users.
16
Topaz DeJPEG
User Manual
Enter Key
Select this to enter a license key or trial key for
Topaz DeJPEG.
Menu & Settings
Share / Copy Settings to Clip Board
Use this button to automatically generate forum
or e-mail-friendly text of your current settings
(copied to your clipboard). This can be useful for
when you want to share your current settings
but don’t want to deal with saving and exporting presets.
17
User’s Guide
Select it to bring up this user manual.
Technical Support
Brings you to the Topaz Labs technical support
page.
Online Resources
Brings you to the Topaz DeJPEG homepage to
view video tutorials and suggestions.
About
Shows your current version of Topaz DeJPEG
and lists the Topaz Labs homepage.
Topaz DeJPEG
User Manual
Settings & Parameters
Topaz DeJPEG has two settings tabs and a total
of 10 parameters to help you achieve optimal
image results.
Main
The Main tab contains the parameters: Suppress
Noise, Recover Details, Clean, and Reduce Blur.
Reduce Blockiness
Smooth Color
Sharpen
Sharpen Radius
Reduce Artifacts
This is the main parameter in this filter. A higher
value removes more JPEG artifacts but may soften the image. A good rule of thumb is to start
small and work up to strike the perfect balance
between artifact removal and edge integrity.
Smooth Color
This parameter smoothes out the color in the
image. A higher value provides a smoother
color, but you may lose detail if you make the
value to high.
Sharpen
This parameter sharpens the image’s edges in
order to compensate for some of the image
softening caused by JPEG artifact removal. This
parameter works in conjunction with the Sharpen Radius parameter.
Sharpen Radius
This changes the edge size of sharpening, which
is measured in pixels. This value adjusts how
large the edges to be sharpened are. Use a
larger value for more blurred areas, and a
smaller value for less blurred areas.
For most users, “Reduce Artifacts” is the only
feature you will need to use when editing images
with minor JPEG artifacts.
Be sure to not overuse it or you will lose edge
sharpness.
More advanced users may also want to make
some adjustments in the Advanced tab.
18
Settings & Parameters
Topaz DeJPEG
User Manual
Advanced
The Advanced tab contains the parameters:
Luma Noise, Color Noise, Color Edge Radius,
Edge Threshold, Saturation and Add Grain.
Luma Noise
Clr Edge Radius
Saturation
Color Noise
Edge Threshold
Add Grain
Saturation
Increases saturation and evens out color to compensate for color loss due to artifact reduction.
Add Grain
Adds monochrome grain to the image in order
to make it look more natural.
Color Viewing Modes
19
Luma Noise
Reduces noise in the luminance (“black-andwhite”) channel.
Color Noise
Reduces noise in the color channels.
Color Edge Radius
Increases the sharpness of the color edge. Use
this to recall lost color detail.
Edge Threshold
Sets the threshold above which the color edge will
be enhanced. Use it to change the strength of the
edge definition.
Normal
Shows the regular image.
Luma
Shows the brightness in an image (the “black”
and “white” or achromatic portion of the image).
Color
Shows the color components of the image.
Resetting Parameters
You can reset parameters to
their default at any time using
the “Reset” buttons.
Work Flow
Topaz DeJPEG
User Manual
Sample Project
In this section we are going to walk you through
a sample project step-by-step to help you become more familiar with the DeJPEG program.
We will be using this photo for our example. You
can notice the JPEG artifact reduction and detail
enhancement in the “Before” and “After” shots
left. In the following pages, we will show you
how to achieve these optimal results with your
own photos in just a few steps. Let’s get started!
1. Open an image file.
2. Create a duplicate layer of your image. Rightclick on your image layer in Layers and select
“Duplicate Layer”. You can also achieve this by
selecting your image layer and dragging it down
to the “New Layer” icon.
Before DeJPEG
Enable the “Auto-Bright” feature to brighten the
image for better viewing of artifacts in dark areas.
After DeJPEG
20
Topaz DeJPEG
User Manual
3. To begin working on your image, go to Filters
->Topaz Labs ->Topaz DeJPEG 3
4. Click on the preview and drag it around until
you find an area that you like. If you want, you
can go to “Preferences...” and check “Pan preview faster” to move the image around more
quickly on the screen.
Work Flow
6. You should be in the “Normal” color mode.
Switch to the “Luma” color mode.
This is the black-and-white color mode that
enables you to see the image without color
artifacts.
21
5. If you want to choose a default preset, scroll
through the panel on the right side of the
screen. To select it, double-click on it and the
sliders will automatically adjust to the pre-defined settings and parameters.
It is a good idea to start off in this mode and
then progress to the “Color” mode in order to
see the effects of your adjustments most clearly.
Work Flow
Topaz DeJPEG
User Manual
7. In “Luma” mode, go to the “Reduce
Blockiness”slider under the Main tab and adjust
it to a level where you are satisfied. Since a higher value may soften the edges, it’s a good idea
to start with a small value and slowly increase it.
That way, you can be sure that you sufficiently
remove artifacts while preserving edge integrity.
Reduce Blockiness
Smooth Color
9. Let’s work on color next.
Switch to the “Color” mode.
Sharpen
22
Sharpen Radius
8. Then move to “Sharpen.” If you find that you
have lost some edge detail by reducing blockiness, you can move this slider up to recover it.
Use it with “Sharpen Radius” to control edge
harshness. Higher levels are good especially for
blurred areas.
Your image should now be free of JPEG artifacts. To modify any additional aspects of the
image, proceed with the next steps.
The best way to get great-looking images is to experiment with
the filter until you’re satisfied. Despite the number of sliders and
settings, getting a great result is easier than you might think!
If you find that the color in your image is a little
uneven, adjust the “Smooth Color” slider to
clean these areas.
10. Then switch over to the Advanced tab.
If you find that there is noise in your image,
you can reduce it by using the “Luma Noise”
and “Color Noise” sliders. First, switch back to
Work Flow
Topaz DeJPEG
User Manual
“Luma” mode and apply the “Luma Noise” adjustment. Then, return to “Color” and apply the
“Color Noise” adjustment until you are satisfied.
This will help clear up a noisy image.
Luma Noise
Clr Edge Radius
Saturation
Color Noise
Edge Threshold
Add Grain
value of 0.05.
14. Switch back to the “Normal” mode and
make any final adjustments that you need.
When you are satisfied with your settings, click
“OK” and Topaz DeJPEG will process your image.
23
11. Now, still in “Color” mode, you can improve
color edge detail, by going to “Clr Edge Radius”
and raising the value of that slider. Use it along
with “Edge Threshold” to set the strength of
the edge definition.
12. Color can also sometimes be weakened in
the artifact reduction process. You can fix this
by going to “Saturation” and raising the value of
this slider to recover some color and balance out
the saturation in the image.
13. Finally, you can add in some grain to make
the final image look a little bit more natural with
the “Add Grain” slider. This is set at a default
Now you should have an artifact-free image!
Please visit the Topaz DeJPEG website at
http://www.topazlabs.com/dejpeg for video
tutorials, and tips and tricks!
Topaz DeJPEG
User Manual
Frequently Asked Questions
“I need a Topaz DeJPEG trial key.”
Visit http://www.topazlabs.com/downloads
for a trial key. Please check your Spam folder,
because Spam filters sometimes filter out the
automated e-mail.
If you need more time to evaluate, please e-mail
us at [email protected] for an extended
trial key.
“I can’t find Topaz DeJPEG in the Photoshop
Filters menu.”
If you’re using Windows:
1. Go to C:\Program Files\Topaz Labs\Topaz DeJPEG 3\Plugins. Right-click the file
“tldejpeg3.8bf” and click “Copy”.
2. Go to your Photoshop Plug-Ins folder, usually
located at C:\Program Files\Adobe\Adobe
Photoshop CSx\Plug-Ins. First, delete anything
currently there that has to do with Topaz DeJPEG. This includes any folder that might be labeled “TopazDeJPEG” or any tldenoise3.8bf file.
After doing that, right-click on any empty space
and click “Paste”.
3. Quit and restart Photoshop and Topaz DeJPEG will appear in your Filters menu. You will
have to open up an image to be able to use
Topaz DeJPEG.
If you’re using Mac:
1. Go to /Library/Application Support/Topaz Labs/
DeNoise 3/Plugins and right-click
Topaz_dejpeg3.plugin. Click “Copy”.
2. Go to Applications/Adobe Photoshop CSx/
Plug-Ins (or wherever your Photoshop Plug-Ins
folder is located). Delete any current Topaz DeJPEG files. Afterwards, right-click on any
empty spot and paste the Topaz_dejpeg3.plugin
file into the Photoshop Plug-Ins folder.
3. Quit and restart Photoshop and Topaz DeJPEG will appear in your Filters menu. You will
have to open up an image to be able to use
Topaz DeJPEG.
“I can’t see the Topaz presets!”
This is probably because your presets file is not
readable. To check on Mac, go to “/Library/Application Support/Topaz Labs/DeJPEG 3” and
right-click the folder called “Presets”. Make sure
everyone has at least Read access to the folder.
You’ll also need Write access if you want to save
presets.
You’ll also want to make sure that Topaz is
installed in the default folder, or the presets will
not show up or save.
24
Topaz DeJPEG
User Manual
Frequently Asked Questions
“What are the limitations of the trial version of
your software?”
The only limit on the trial versions of the Topaz
plug-ins is time. The free trial versions are designed to enable you to experience the full functionality of our plug-ins for a 30-day trial period.
After the trial period is up, you will only be able
to use the Topaz software by purchasing it. You
will then receive a license key to activate the
plug-in, and the trial version will automatically
become the full version with no time limitations.
“My Topaz DeJPEG 3 key doesn’t work!”
There are a couple of reasons why Topaz DeJPEG might think your upgraded key is invalid.
“If I use the 30-day trial version, will I need to
uninstall the trial version before I upgrade to a
full version?”
Second, make sure that you have the latest version of Topaz DeJPEG. If you open Photoshop
and go to Filters->Topaz Labs, the DeJPEG item
should say Topaz DeJPEG 3 instead of just Topaz
DeJPEG. If not, download and install the latest
version of the software here: http://www.topazlabs.com/downloads.
No, the Topaz trial software is designed to be
unlocked to become the full version simply by
entering a license key. The full license key will be
e-mailed to you immediately after you purchase
the software.
“Where do I enter my key?”
To enter your key, open up an image in Photoshop. Then go to Filters -> Topaz Labs -> DeJPEG3 -> Menu... -> Enter key... You can then
copy & paste or type your key in.
First, make sure that you actually have the
upgraded key. It will be in the format “xxxxxxxxxxxx-xxxxxx-xxxxxx-xxxxxx” and will be all
numbers in 30 digits in five groups of six (no
letters). If you don’t have this upgraded key,
visit http://www.topazlabs.com/dejpegkey.php
to get it.
Third, make sure that as you’re entering the key,
there is nothing in the space beforehand. This
means clicking, pressing “Ctrl-A”, and hitting
“Delete” to make sure that absolutely nothing is
in that field before you paste in the key.
If it doesn’t work when you copy and paste, try
typing it out, and vice versa.
25
Topaz DeJPEG
User Manual
Achromatic - Without color.
Algorithm – Any bit of code or programming that defines a
process.
Auto-brightening – Temporary visual setting that brightens
the preview image, allowing noise to become more visible.
Brightness will not be permanently applied to image.
Blur - Make or become unclear or less distinct.
Clean Color – A parameter that controls the amount of color
noise to reduce.
Checkerboarding – A type of distortion that shows up as
abnormally large pixel blocks in the image; tends to show
up in areas with lots of information; usually only occurs with
highly-compressed images.
Chroma - Purity or intensity of color.
CMYK – Cyan, magenta, yellow, and black. A color model
commonly used for 4-color printing by printers to define and
mix all of the colors they are capable of outputting.
Glossary
Compression Artifacts – Fuzziness or distortion in a compressed image or sequence of video images caused by lossy
compression, i.e., into a JPEG format.
Download – The process of transmitting or transferring data
from one device to another.
Edge Artifacts – The “ringing” artifacts or distortions found
around image edges.
Export – Outbound data transfer in a format that can be used
by other programs.
Grain –Lightly speckled noise that is used to apply a more
natural look to an image.
Image - An array of pixels that make up a digital picture.
Image Compression - the application of data compression on
digital images, most often into JPEG; can be lossy or lossless;
lossy compression methods, especially when used at low-bit
rates, introduce compression artifacts because data is lost.
The most common form of image compression for photographs is JPEG.
Color channel – The visual component of a color digital image
that represents all the pixels in that picture made up of a
specific primary color. For example, in a typical digital photo,
the primary colors of red, green and blue (from the RGB color
model) create all the colors in that photo, which may be represented by three color channels, each of red, green, or blue.
Import – Inbound data transfer into a file or document.
Color Noise – A type of digital noise in which color edges are
blurred or the image is unevenly colored and filled with spots.
Lossless Compression - A reversible way of reducing the size
of data while preserving it.
ISO – The amount of sensitivity of a digital camera sensor. A
higher ISO enables faster shutter speeds and / or better performance in low light, but is more susceptible to experiencing
increased noise.
26
Topaz DeJPEG
User Manual
Glossary
Lossy Compression - An irreversible way of reducing the size
of data by approximating it.
it to a printer, or do any number of other manipulations or
edits.
Luma - The brightness in an image (the “black” and “white”
or achromatic portion of the image). Luma represents the
achromatic image without any color, while chroma components represent the color information.
Plug-in - Computing (of a module or software) able to be
added to a system to give extra features or functions.
Noise – Visible effects of interference in an image from a
digital camera, often appearing as random colored dots
sprinkled throughout the image, or uneven coloration in what
should be smoothly-colored areas. It is most likely to show up
in the darker or shadowed areas of an image. Noise can be an
undesirable effect that detracts from overall image quality or
something you can choose to create artistically.
Pan and zoom – A useful function that allows users to magnify the captured image in the preview and then, by using
the cursor, to move or pan around the image. Typically “pan
and zoom” allows users to magnify the image 2x or 4x. By
magnifying the images and zeroing in on a specific section,
you can see details not visible when the entire image is sized
to fit the preview.
Parameter - A numerical or other measurable factor forming
one of a set that defines a system or sets the conditions of its
operation.
Photo-editing or Imaging software – Programs in which you
can alter your photos and / or create digital images. Depending on the software, you can improve exposure, color, and
other attributes of your picture, paint on it, add type, apply
special effects, remove noise, resize it, combine it with other
pictures, prepare it for e-mail or posting on the web, output
Preset – A pre-defined combination of parameters and settings that are saved into a folder within Topaz DeNoise 3.
Topaz provides default presets. Thumbnails of the presets are
located on the panel at the left of the user interface.
Preview - Shows the processed preview of the image. The
Preview section is the big image on the top-right. It usually
displays only a portion of the actual image.
RAW image – An image file format that contains untouched,
“raw” pixel information straight from the digital camera’s
sensor. It has yet to translate the information in each pixel
into the full color information, so this format offers more control over how the final JPEG or TIFF image is generated. Topaz
DeNoise works best on RAW images.
Reduce Blur – An de-blur function that uses de-convolution
technology rather than simple sharpening techniques.
RGB – Red, Green, Blue. The color model that is used in digital
cameras and by computer monitors.
Shadow - A dark area or shape produced by a body coming
between rays of light and a surface.
Smoothing - To make a surface more regular or consistent;
free from perceptible projections, lumps, or indentations.
27
Shortcut Keys
Topaz DeJPEG
User Manual
Topaz DeJPEG uses some shortcut keys to speed up your workflow. Many of these
keys are similar to those in Photoshop. The following keys work at all times.
Action View Original Image
Recall Snapshot 1
Recall Snapshot 2
Capture Snapshot 1
Capture Snapshot 2
Reset Current Tab
Reset All
Zoom to Fit
Zoom to 100%
Zoom In
Zoom Out
MAC Shortcut Spacebar
CMD-1
CMD-2
ALT-1
ALT-2
CMD-R
CMD-ALT-R
CMD-0CTRL-0
CMD-ALT-0
+ or CMD - +
- or CMD - - PC Shortcut
Spacebar
CTRL-1
CTRL-2
ALT-1
ALT-2
CTRL-R
CTRL-ALT-R
CTRL-0
CTRL-ALT-0
+ or CTRL - +
- or CTRL - -
In addition, if a parameter slider is selected (usually by clicking on it) you can use
the following keys to change its value:
Left arrow or up arrow
Right arrow or down arrow
Page up key Page down key
Home Key End Key
Reduce value by 0.01
Increase value by 0.01
Reduce Value by 0.1
Increase value by 0.1
Set the value to minimum
Set the falue to maximum
28
Topaz DeJPEG
User Manual
Contact Information
Topaz Labs LLC
5001 Spring Valley Road
Suite 400 East
Dallas, TX 75244
Phone: 972.383.1588
Fax: 866. 876.1393
Technical Support
http://topazlabs.com/support/
[email protected]
For more information
[email protected]
Topaz Labs LLC, a privately owned company in Dallas, Texas, focuses on developing advanced
video and image enhancement technology. With today’s widespread use of digital still cameras,
digital video cameras, and HDTV, the need for high-quality digital images and videos has greatly
increased. Topaz Labs’ mission is to bring practical state-of-the-art image and video enhancement technology to both professionals and consumers.
Copyright © 2009 Topaz Labs, LLC. All rights reserved. http://www.topazlabs.com
29
User Manual
Topaz DeJPEG
Be sure to check out the complete line up of Topaz products.
Image Plug-ins
Ultimate control
over image
exposure, detail,
and color gives
you the power
to make your
photos pop.
Advanced noise
reduction filters
noise while
maximizing and
retaining image
detail simply and
effortlessly.
Takes any of your
regular photos
and effortlessly
turn them into
beautiful works
of art.
Specializes in
creating crisp
and stylized
images. Also
features extensive smoothing
capabilities.
Specializes in
overall image
improvement.
Features
sharpening,
reconstructing,
enlarging, highquality noise
removal and
JPEG artifact
damage tools.
Advanced
JPEG artifact
reduction filters
eliminate JPEG
compression
artifacts while
preserving image detail like
never before.
Video Plug-ins
Easily and efficiently capture video
frames and significantly increase
their quality and resolution with this
standalone Windows application.
Increase video quality with this suite
of video enhancement filters utilizing
super-resolution technology.
Go to http://www.topazlabs.com/downloads to get your 30-day free trial!
30