1
WILCOM M
Converting AS/400
Spool Files into
Spreadsheet format - and
Transmitting as Email
Attachments
Document Version: 001005
ã Copyright 2000
Wilkinson Computer Services Pty Ltd
www.wilkinson.com.au
1. Overview
This WilComm facility will automatically perform these operations:
1. Convert an AS/400 spool file into a Comma Separated Variable (CSV) format file,
(complete with column headings and control over data selection), and optionally;
2. Send the CSV file as an attachment to an email. A number of methods of obtaining an
address from the spool text are provided - either the actual address, or via a lookup facility.
Benefit – The recipient of the email can simply double-click on the attachment
and the file will open in their associated spreadsheet program, eg: MS Excel.
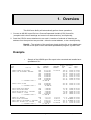
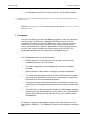
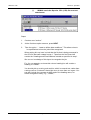
Example
•
Sample of the AS/400 spool file report to be converted and emailed as a
spreadsheet file -
04/28/99
C. D.
CUST
NBR
N A M E
100093 LAURIE M MILLIGAN
101017 JOE OR BEVERLY ROWLAND
** CUSTOMER TOTAL **
102029 LIZZIE ALTAR
** CUSTOMER TOTAL **
102293
102337
102381
102425
EDNA RUTH
DESSA MAE
MR OR MRS
THOMAS G.
CARTER
MEIER
GUS I. BALDWIN
KLINE
3054
1047
1052
3091
3092
3273
3148
3274
3275
3276
CURRENT
BALANCE
26,297.84
10,000.00
10,000.00
10,000.00
10,000.00
10,000.00
10,000.00
10,000.00
70,000.00
B A L A N C E
Branch: Oodnadatta
ORIGINAL
ACCR.
BALANCE
INT.
RATE
23,968.40
10,000.00
10,000.00
20,000.00
1665
2908
3142
2667
2992
5,000.00
5,000.00
4,000.00
5,000.00
10,000.00
15,000.00
M D BEDWELL
3201
ELMA N BICKFORD
63
ANITA M OR EDWARD L STEELMAN
25
DR. OR MRS. B.D. WILSON
3257
3202
** CUSTOMER TOTAL **
2,277.19
1,878.56
14,021.16
11,000.00
12,980.39
23,980.39
** CUSTOMER TOTAL **
104097
104141
104317
104933
CD
NBR
T R I A L
Page 1-1
2,192.39
6,902.32
8,791.80
12,500.00
NEXT
DATE
130.59
232.40
232.40
126.55
126.55
232.40
275.73
232.40
.07250
.07250
.07250
.07450
.07450
.07250
.07400
.07250
07/18/90
07/17/90
07/17/90
09/10/90
09/10/90
07/17/90
06/28/90
07/17/90
232.40
232.40
.07250 07/17/90
.07250 07/17/90
157.00
14.38
129.00
58.08
130.93
.07300
.07500
.07900
.08000
.08100
06/07/90
07/29/90
06/15/90
09/21/90
09/15/90
27.25 .07800 09/18/90
9.73 %.00000 07/16/90
162.11 %.00000 05/15/90
316.76 .07350 06/21/90
151.59 .07750 09/19/90
Wilkinson Computer Services
WilComm CSV
Section 1: Overview
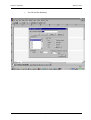
•
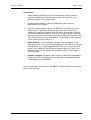
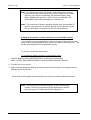
An email similar to the following is sent to the recipient:
Wilkinson Computer Services
Page 1-2
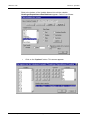
Section 2: Overview
WilComm CSV
•
When the attached file is double-clicked, it opens as a spreadsheet as
follows:
You may note some format changes, e.g. the cents have been omitted. These
changes are deliberate.
Page 1-3
Wilkinson Computer Services
2. Operation
Summary of operational steps, once job is set up -
1st Step
The WilPrint module prints the spool file to the Windows spooler, using the
Generic /Text only printer driver.
During this print step, the desired print lines are converted into CSV format (by
a command executed during the forms merge) and written to a disk file in the
NT spooler. As there is no printer connected to this spooler, the file will remain
there until we access it in the 2nd Step.
If no emailing is required:
If you wish to make use of the CSV file locally and have no need to send it via
email, this is the end of processing. The CSV file will be found in the directory
named: C:\WinNT\System32\Spool\Printers. It will have a file name
similar to 00001.SPL. The extension of “.SPL” means “spool”. The highest
file number there will be the most recently created file.
Use Explorer to alter the file extension from “.SPL” to “.CSV” then double-click
on the file to open it with your favourite spreadsheet program.
2nd Step
WilMail picks up the CSV file from the Spooler, obtains the email address and
emails it with a ‘cover sheet’, as a text attachment.
The address for the email must be extractable from within the spool text either as an exact address, or via a lookup.
Page 2-1
Wilkinson Computer Services
WilComm CSV
Section 2: Operation
How to Set Up a New Job 1. Plan the spreadsheet layout:
Decide on the desired column layout for your spreadsheet. We suggest that
you print a page of the AS/400 report and (working from left to right) mark
each column that you wish to include in the CSV file, with “A”, “B”, “C” etc,
being the columns you want to put the text into on a spreadsheet. Keep this
sheet handy for when you “map” this data into the spreadsheet’s Column A,
Column B etc, using the WilComm Field Mapper program.
2. Create a new “form” for this job and personalise it:
During the installation of WilComm, a general purpose CSV template form
named “CSV Master.f3t” will have been placed in the default forms directory
“Program Files\Wilkinson\WilComm Universal\F3Forms\Forms”. Start the
WilComm Forms Designer program and open this form “CSV Master.f3t”.
•
Use “Save As” to make a copy of this form and name the new form
according to your CSV job. For the example that we will now work
through, which is a report named “C.D. Trial Balance”, we will use the
name: “CSV CD Trial Balance.f3t”.
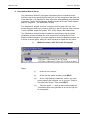
3. Specify column headings, report name and email address
•
With the newly copied form named “CSV CD Trial Balance.f3t” open in
Forms Designer, select Edit/Edit Variables to display the list of form
variables that are set up in the supplied master CSV form. (Tip: For fast
access to Edit Variables, simply press ALT/E then E again).
Wilkinson Computer Services
Page 2-2
Section 2: Operation
WilComm CSV
•
You will see the following:
Page 2-3
Wilkinson Computer Services
WilComm CSV
Section 2: Operation
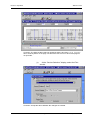
Slide to the bottom of the Variable Names list until the variable:
Headings+ReportName+EmailAddress appears. Select it as follows:
•
Click on the “Options” button. This screen appears:
Wilkinson Computer Services
Page 2-4
Section 2: Operation
WilComm CSV
Specifying the “Headings+ReportName+EmailAddress”
information
You will notice that the input field named: “Variable value is equal to:” is
highlighted and has been pre-loaded with some values.
Note:The final values in this field will be used as the first record of the
CSV file. When the CSV file is “opened”, they become the column
headings of the spreadsheet.
Explanation of “Headings+ReportName+EmailAddress”
values
There are three sets of values:
1. Headings (“Col_A”, “Col_B”, etc )
You may leave these headings as they are, but it is generally preferable to
replace them with more meaningful headings to personalise your spreadsheet
column names.
Steps to personalise the spreadsheet with column headings
(i)
Tip:
Press the HOME key to bring “Col_A” into view.
Be careful, as there is no Undo key for this particular
operation! If you accidentally delete some default
codes, you can open the CSV Master.F3T form, and
copy/paste from there.
(ii) Type the new heading for your first column on top of the text: “Col_A”.
Take care to retain the pair of enclosing quotes.
(iii) Continue this process with “Col_B”, then “Col_C”, etc, until you have
specified all your desired column headings by replacing the default
headings.
(iv) Delete any of the unused default headings, ie: if the last heading you
replace is “Col_J”, you should delete all the text from: +c+ "Col_K"
Page 2-5
Wilkinson Computer Services
WilComm CSV
Section 2: Operation
… to … "Col_Z". Take care not to delete the items that follow the
"Col_Z".
(v) You might end up with a completed string that looks like this:
"CustNbr" +c+ "Customer Name"
"Report: " + ReportName
+c+
… (etc) …
"Email: "
+c+
+
"TOFG" +c+
EmailAddress
This would be converted as follows, and become the first record of the CSV file:
CustNbr,Customer Name, …
BALANCE,Email: Oodnadatta
(etc)
…
,TOFG,Report: C.D. TRIAL
Note:Ensure you do not disturb the pattern of the “ +c+ “ codes. These
are important to ensure that the forms macro will function. (The “+”
is a joiner code that instructs the merge process to join the text
string that occurs before the “+” with the text string that follows. The
“c” is a comma code that simply gets replaced by a comma during
the merge). If you accidentally delete a “+” or a “c” you can just type
it back in.
2. Report Name ("Report: " + ReportName)
•
The text string: "Report: "
This instructs WilComm to place the word “Report: ” in the CSV file, at the
right hand end of the first line (which is the heading line). The WilComm
Pickup function (in the Distribution Wizard is set up to look for the word “Email:
” as its anchor-point when locating the email address. Please see next item.
•
The text string: + ReportName
This instructs WilComm to place the report name into the first line of the output
CSV file, straight after the word “Report: “. You will be able to specify the line
and column numbers for extracting this report name from the print page, in the
Field Mapper. This is explained in a separate User Guide.
Examples of the report name, as it might be output on the first line of the CSV
file:
(i)
Report: 24680
(The above is an example of having extracted a string that is an invoice
number, or;
(ii)
Report: C.D. TRIAL BALANCE
(In this example, part of the page heading text was extracted for use as the
report name).
Wilkinson Computer Services
Page 2-6
Section 2: Operation
WilComm CSV
Note that for better appearances, there is a single space between the word
“Report: “ and the start of the address. This is a minor point, but is relevant
when specifying the addressing setup in the Distribution Wizard.
3. Email Address ("Email: " +
•
EmailAddress)
The text string: "Email: "
This instructs WilComm to place the word “Email: ” in the CSV file, at the right
hand end of the first line (which is the heading line). The WilComm addressing
function (in the Distribution Wizard is set up to look for the word “Email: ” as its
anchor-point when locating the email address. Please see next item.
•
The text string: +
EmailAddress
This instructs WilComm to place the email address (or look-up key) into the
first line of the CSV file, straight after the word “Email: “. You will be able to
specify the line and column numbers for extracting the email address or lookup key from the print page, in the Field Mapper. This is explained in a
separate User Guide.
Two examples of the email addresses, as it might be output on the first line of
the CSV file:
i. Email: Oodnadatta
(The above is an example of extracting a string that will be used to look
up the mail address from the WilComm Address Book), or;
ii. Email: [email protected]
(In this example, the actual email address was available in the page text,
so it has been extracted).
Note that for better appearances, there is a single space between the word
“Email: “ and the start of the address. This is a minor point, but is relevant
when specifying the addressing setup in the Distribution Wizard.
4. Save the changes:
When finished, click OK to save the changes to:
“Headings+ReportName+EmailAddress” and revert to the “Edit variables for a
form” screen. If you do not need to alter the lines per page setting (see next
item), click OK and return to the main Forms Designer screen. Save the form
and exit the Forms Designer program.
Page 2-7
Wilkinson Computer Services
WilComm CSV
Section 2: Operation
Note:If you get this message:
Note:
… this would suggest that the pattern of “+” and “c” has
been upset, ie: among the strings of “ +c+ “ there is a missing “ +
“ or a missing “ c “ etc. Correct the error and try again until you can
properly save your work.
5. Adjust number of lines per page:
By default, WilComm will output 55 lines in the CSV file for each spool page
processed. If the maximum number of detail lines on your report pages is less
than 55, the CSV file will contain one or more blank lines at the bottom of
every page. E.g. if your report has 50 detail lines, there will be 5 blank lines
per page.
This may be quite acceptable to you, in which case there is no need to make
any adjustment - just move ahead to item 6.
Wilkinson Computer Services
Page 2-8
Section 2: Operation
WilComm CSV
You can avoid unwanted blank lines by altering a form setting (via the Forms
Designer) so that it equals the correct lines per page for your report. If the
“Edit variables for a form” screen is not currently displayed, ensure the correct
form is open, and then use Edit/Edit Variables to display it.
Select the variable named “DetailLine”. You will see in the lower right hand
corner, a field labelled “Repeating variable with a maximum of 55 values”.
You must alter this figure to equal the number of detail lines in your report.
E.g. if your report has 50 detail lines, enter 50 in place of 55.
When this is done, click OK to save the changes and revert to the main Forms
Designer screen. Save the form and exit the Forms Designer program.
6. Create the form variables file (xxx.F3X)
Use Windows Explorer to create a copy of the file “CSV Master.F3X” which
is also installed in the …\F3Forms\Forms directory. Name the copy to be the
same name as your new CSV job, but with an extension of “.F3X”, eg: “CSV
CD Trial Balance.f3x”.
Note:This “CSV Master.f3x” file has been specially prepared to perform
the CSV process. It is important to use the supplied file rather than
creating it in the manner of a normal form.
Page 2-9
Wilkinson Computer Services
WilComm CSV
Section 2: Operation
•
Use Notepad to edit the first record in this file, which initially contains:
C:\Program Files\Wilkinson\WilComm Universal\F3Forms\Forms\CSV
Master.f3t
Replace “CSV Master.F3T” with the name of your file, e.g. “CSV CD Trial
Balance.f3t”.
7. Field Mapper
You are now ready to use the Field Mapper program to “map” the report text
into the columns in WilComm’s standard CSV form layout (the one you
created for this job by copying CSV Master.f3t). These columns are simply
named Col_A, Col_B etc. We are able to use just these generic column
names, as WilComm will output the personalised column headings that you
set up in step 2 above, directly into the first record in the CSV file. Your
spreadsheet program will then use these to personalise the job.
The Field Mapper allows you to easily specify:
•
Exactly what text is to be extracted from the page, and into which
spreadsheet column it is to be placed.
•
The report’s page and column headings can either be included or
excluded.
•
Whole columns of data can be re-arranged, omitted or duplicated.
•
The minus sign that typically trails a numeric field to indicate a negative
value may be re-positioned in front of the numeric field, to comply with
requirements of some spreadsheet programs.
•
Conditional printing logic allows selection of text based on various and
multiple tests, including global presence/absence checks, boolean tests
etc.
•
If the CSV file is to be automatically emailed, the Field Mapper program
is used to map the email address (or a key field for use in the WilComm
address book lookup) from the page text to the form variable named:
EmailAddress.
For details on using the Field Mapper, please refer to the WilComm Forms
User Manual, Chapter 3 - The Mapping Procedure, after reading the following
note.
Wilkinson Computer Services
Page 2-10
Section 2: Operation
WilComm CSV
Please Note:
•
When reading the WilComm Forms User Manual, where it makes a
distinction between the WilComm Server Vsn 2.5 and Vsn 3.x, you
should follow the Vsn 3.x instructions.
•
Please read all chapters in this User Manual to gain a general
appreciation of the system.
•
The main function that you will use is “Defining a Field Map entry for a
Table Column”. Basically, you will just drag over the first column of
sample text, and then release the mouse button. A drop-down list of all
the form’s variables will appear. Click on the variable “Col_A”. What this
does is place all the lines of text for this first column into Column A of the
CSV file, and hence into the spreadsheet. This process is then repeated
for the second column, and so on.
•
Email Address: You must identify a string of text somewhere on the
page that can be used to get an email address. It can either be an actual
email address (e.g. “[email protected]”) or a string to be used
to look up an address in the WilComm Address Book (e.g. “New York
Branch”). Drag over the desired text string and map it to the variable
“EmailAddress”.
•
Detailed examples: Numerous print screens of the major Field Mapper
setups for the CD Trial Balance job are included in an addendum titled
“Field Mapper Setup Examples”.
Now you are ready to create your Field Map file. Please do this now, and then
return to the next item.
Page 2-11
Wilkinson Computer Services
WilComm CSV
Section 2: Operation
8. Distribution Wizard Set-up:
The Distribution Wizard is a program that allows jobs to be defined to the
WilComm server by specifying how each job is to be recognised, then how it is
to be dealt with. It is important to have a general understanding of the facilities
it provides. To gain this knowledge, please read the WilComm Forms System
Manual, Chapter 4 - The Distribution Wizard.
Two Distribution Wizard “sections” must be set up for each CSV job. One
section that gets WilPrint to create a CSV file in the PC Spooler, and a second
in which WilMail sends the Spooler .SPL (CSV) file as a text attachment.
The Distribution Wizard file that is loaded on the WilComm server via the
installation process contains two such sections for handling the CD Trial
Balance Report example. The major aspects of these are described below, via
a series of screen prints, with just a brief narrative to explain the key items.
(i)
WilPrint creates a CSV file in the PC Spooler.
Steps:
Wilkinson Computer Services
(i)
Create a new “section”.
(ii)
At the first two option screens, press NEXT.
(iii)
At the “Set Attribute Conditions” screen, you may
wish to specify the formtype, etc of your job. (Refer to
the main User Guide). Then press NEXT.
(iv)
Take the option - “ I want to define data conditions”.
This allows rules to be specified as to how the job can
be recognised.
Page 2-12
Section 2: Operation
WilComm CSV
Comment: The data condition that was applied is that the text string: “C. D. T R I A L”
has to exist anywhere on the page. We know this text occurs on each of the pages in
our spool file.
(v)
At the “Service Selection” display, select the Print
service.
Comment: Accept the above defaults. No changes are needed.
Page 2-13
Wilkinson Computer Services
WilComm CSV
Section 2: Operation
(vi)
Wilkinson Computer Services
Press the Address tab. Choose “Pre Defined Printer
Name” and pick the Generic / Text Only printer driver.
This printer driver must be installed on the PC, and in
the Printer Properties, the Port for this printer must be
set to “File”. Other default settings for the printer may be
left as is, as they do not matter. If this printer driver is
not currently installed, please do so now from your NT
installation disk. In case this is not at hand, the
necessary files may be found on the WilComm CD in
the file “…\Utilities\Generic Text Only Prt Drvr.Zip”.
Page 2-14
Section 2: Operation
WilComm CSV
(vii)
Press the Form tab. Fill in the prompts as follows:
Form Name: From the drop-down list, select the form you created in step 2.
Field Map Name: From the drop-down list, select the field map you created in
step 7.
Resolution: Any setting is OK.
Orientation: Must be Landscape
Comment: The above display has been completed correctly for our example CSV
task.
This completes the Distribution Wizard setup for the first step, whereby
WilPrint will create a CSV file in the NT Spooler.
Page 2-15
Wilkinson Computer Services
WilComm CSV
Section 2: Operation
(ii)
WilMail sends the Spooler .SPL (CSV) file as a text
attachment.
Steps:
1.
Create a new “section”.
2.
At the first three option screens, press NEXT.
3.
Take the option - “ I want to define data conditions”. This allows rules to
be specified as to how the job will be recognised.
When setting this up, bear in mind that the file that is being processed is
the CSV file that was created in step 1. Therefore the first record will
contain the “Headings and Email Address” details as specified in step 1.
We use our knowledge of this layout to recognise the job.
E.g. for our example, we know this column heading line will contain a
heading of “CDNbr”.
You should pick on a string such as this, which is unusual text, rather than
a string such as “Customer” that might occur in more than one report. You
can also include the commas at either end of the heading name, for
further recognition clarity, e.g. “,CDNbr,”.
Wilkinson Computer Services
Page 2-16
Section 2: Operation
WilComm CSV
Comment: This data condition will filter out any jobs that contain the string “,CDNbr,”
anywhere on the page. We could pin it down more by specifying that this search string
must occur on line 1 or line 2, but the time taken to find it anywhere on the page is so
fast it does not matter!
4. At the “Service Selection” display, select the Email service.
Page 2-17
Wilkinson Computer Services
WilComm CSV
Section 2: Operation
You will be at the General Tab. For the “Email Format” options, select “Email
the file as a CSV attachment”. This ensures that the attached file is given a file
extension of ”.CSV”.
Select the Address tab.
We can choose either Floating Address or Look-up Address, depending on
whether in the 1st step (WilPrint) we extracted an actual email address, or a
key to be used for a table lookup.
Look-up Address: In our example case, we extracted a key, so we have
selected Look-up Address. Next we select Details:
The Look-up address reference string” that we wish to use is “floating”, to the
extent that we are not certain in which column it starts in the CSV file that we
will be analysing. So we select “Floating”.
Wilkinson Computer Services
Page 2-18
Section 2: Operation
WilComm CSV
If the whole CSV file is to be sent to the address that is resolved for the first
page, check the option at the foot of this display. If some pages are to be sent
to a different destination, leave it un-checked.
Click on Details…
We can now specify the area in the CSV from which the reference string is to
be extracted. We do this by first specifying an anchor point, then saying how
many characters to the left or right, and how many lines up or down (or on the
same line), WilComm is to look for the string to be extracted. Bear in mind that
here we are not extracting the actual e-mail address, but a string to be used to
look up the e-mail address in the WilComm Address Book.
In our example case, we search for the string “,Email:” as the anchor point.
We know that the reference string (which is the Branch name “Oodnadatta”)
starts just one space after the colon in the word “Email: “. By counting the
spaces we know that the “O” of Oodnadatta start in the 8th position on the
same line and on the right of the start of “,Email:”. (The comma at the start of
“,Email:” is position zero). Here is the right hand end of the text line:
… ,Email: Oodnadatta
Page 2-19
Wilkinson Computer Services
WilComm CSV
Section 2: Operation
So, we have filled in the example parameters as follows:
Comment: Regarding the width of the addressing area, this should be set high enough
as to cater for the largest field that might be encountered. Thirty five has been entered
in the example. Trailing blanks will not cause any problem in the look-up process.
Address Book. Ensure that you have an entry in the WilComm Address Book
for each lookup key that WilComm is likely to find in the CSV file. You can
easily import entries into this Address Book by using Tools / Import
Customer entries. This enables the contents of other databases to be
imported as CSV files.
Wilkinson Computer Services
Page 2-20
Section 2: Operation
WilComm CSV
For our example job, we created an address for the Oodnadatta branch office
as follows:
Run the example file:
You may wish to run the example job through your WilComm system so as to
create the CSV file, and email it to yourself. To prepare for this, you must
create an entry for Oodnadatta in the Address Book as per the above, but with
your own email address rather than WilliamS@major_bank.com.
Page 2-21
Wilkinson Computer Services
WilComm CSV
Section 2: Operation
Floating Address:
If, in the 1st step (WilPrint), you had extracted an actual email address, such
as “[email protected]”, you would select “Floating Address” in the
Address panel below:
After clicking on Details, we are able to specify the rules for WilComm to pick
out the actual email address from the page text. See the “Floating Address”
screen below.
Wilkinson Computer Services
Page 2-22
Section 2: Operation
WilComm CSV
Let us assume that this text appears at the right hand end of the text line:
,Email: [email protected]
Comment: The method of filling in these parameters is the same as for
completing the “Floating reference string” in the preceding item. The only
difference is that here, we are specifying where the actual email address is
located, rather than a string that will be used as a key to look up the address.
Page 2-23
Wilkinson Computer Services
WilComm CSV
Section 2: Operation
Sample
This is typical of a CSV file layout as written into the Windows spooler by the
first step (WilPrint). The second step (WilMail) automatically picks up this file
and sends it as a text attachment to an email.
“Left hand side” of the records:
“Right hand side”:
You may wish to run the example CSV CD Trial Balance job as a trial. Please
contact your WilComm Reseller for instructions.
Wilkinson Computer Services
Page 2-24
Section 2: Operating Notes
WilComm CSV
3. Operating Notes
This dialog screen will display when WilPrint processes the first job. It is a
normal message when using this Generic / Text Only printer driver. Do not
reply to this message. Keep it displayed so that it acts as a “door opener”,
allowing following print jobs to be processed by WilComm.
Simply re-run your first job through WilPrint again, and it (and all subsequent
jobs) will be processed properly through this step.
You will see messages similar to these in the WilComm Server’s logging
window:
Moving transaction file 00004.SPL from:\WINNT\System32\Spool\Printers
to ...
Can't move the transaction file -- DLL error: 32
This is a result of the above Printers Folder error message. It is only a warning
from WilComm that it cannot pick up the spool file (because it has the above
dialog box open). This warning can be safely ignored.
Each CSV job that is processed will create an entry in the printer queue for the
Generic / Text Only printer. These entries should be periodically removed by
clicking the printer icon on the task bar, then selecting Printer /Purge Print
Documents. This will avoid having to answer each of the Printers Folder error
messages, once for each print job. The purge step will remove all jobs except
the very first, which will only be cleared when the dialog box is answered with
a Cancel option. This can be done when the PC is to be shut down.
Page 3-25
Wilkinson Computer Services
WilComm CSV
Section 2: Operating Notes
Note: The Spooler into which the Generic Text printer driver prints its
jobs must not have other printer drivers also printing thru the same
Spooler. If this rule is not followed, the second WilComm step,
where WilMail picks up all the *.SPL files from the Spooler, will
collect all the print jobs including those it should not!
Note: The remedy is to create a separate spooler from the standard NT
spooler. We could call it a “private” spooler. Such a spooler can be
set up via RegEdit. Instructions for this are included below..
Setting up a separate “private” spooler to the normal NT spooler
If you require to print an application’s output to a spooler that does not have
other printed output passing through it, you can create a “private spooler”. This
will be quite separate to the standard NT spooler.
To do this, follow these instructions.
To override the default location for one specific printer
1. Start the Registry Editor (REGEDT32.EXE), and find the following key:
HKEY_LOCAL_MACHINE\SYSTEM\CurrentControlSet\Control\Print\Printers.
2. Find the key for the printer.
3. Add a new SpoolDirectory setting, and as its value provide the path to the spool directory
that this printer should use.
The change in the Registry takes effect after you stop and restart the Spooler service.
Note: Once you set up a “private” spooler, all print files from the
Generic /Text Only printer driver will be directed to a specific
directory such as: C:\WilComm-NT-Print-Spooler-A.
Wilkinson Computer Services
Page 3-26