1
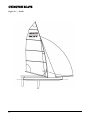
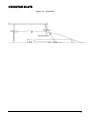
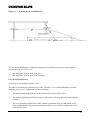
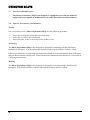
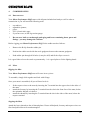
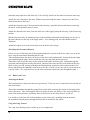
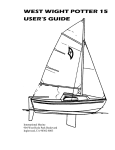
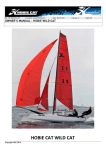
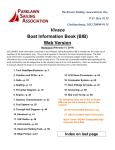
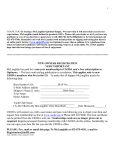
OVINGTON BOATS INDEX Page No 1. INTRODUCTION 2 2. SPECIFICATION AND DRAWINGS 3 3. SAFETY INFORMATION 3.1 Design Category 3.2 Loading 3.3 Safety Equipment 3.4 Capsize Recovery 3.5 Air Tank 3.6 Man Overboard Prevention and Recovery 3.7 Use of Outboard Engine 3.8 Towing, Anchoring and Mooring 6 6 6 7 7 8 8 10 10 4. COMMISSIONING 4.1 Preparation 4.2 Mast 4.3 Boom and Vang 4.4 Hoisting Sails 4.5 Completion 11 11 11 12 14 14 5. SAILING HINTS 5.1 Introduction 5.2 Sheeting the Sails 5.3 Sitting Positions 5.4 Tacking 5.5 Gybing 5.6 Golden Rules 16 16 16 16 16 17 17 6. TUNING GUIDE 6.1 Rig Tension 6.2 Mainsail Downhaul (Cunningham) 6.3 Vang 6.4 Outhaul 6.5 Foils 18 18 18 18 18 18 7. MAINTENANCE 7.1 Boat Care 7.2 Sail Care 19 19 19 8. WARRANTY 21 Total number of pages 21 1 OVINGTON BOATS 1. INTRODUCTION Congratulations on choosing a Musto Performance Skiff from Ovington Boats. ( www. mustoskiff.com ) This manual has been compiled to help you to operate your craft with safety and pleasure. It contains details of the craft, the equipment supplied or fitted, its systems and information on its operation and maintenance. Please read it carefully and familiarise yourself with the craft before using it. If this is your first craft, or you are changing to a type of craft you are not familiar with, for your own comfort and safety, please ensure that you obtain handling and operating experience before assuming command of the craft. Your dealer or national sailing federation or yacht club will be pleased to advise you of local sea schools, or competent instructors. Please keep this manual in a secure place, and hand it over to the new owner if you sell the craft. From all at Ovington Boats, Happy Racing! EC DECLARATION OF CONFORMITY TO DIRECTIVE 94/25/CE I declare that the craft described as: Musto Performance Skiff complies with the following Standards: ISO/DIS 9094-1, ISO 10087, ISO 10240, ISO/DIS 11192, ISO/CD 11812, ISO/DIS 12215-1, ISO/DIS 12215-4, ISO/DIS 12217-3, 1SO/DIS 14945, ISO/CD 15085. Signed____________________________________ Chris Turner Managing Director 2 Date__________________ (The date does not indicate the date of manufacture) OVINGTON BOATS 2. SPECIFICATION AND DRAWINGS Identification Hull Identification Number (HIN): G B O V B Record the HIN of your boat in the space above – it is moulded into the starboard side of the transom. Dimensions Length Overall (LOA) 1: Waterline Length (LWL): Beam: Draft2: Air draft3: Displacement, Light Craft Condition: Towing Weight inc trailer & covers: Maximum upwind Sail Area: Maximum downwind Sail Area: 4.55 m 4.26 m 1.35 m / 2.35m 1.1 m 7.06m 82.5 kg 180 kg 11.8 m2 27.3 m2 14.93ft 13.98ft 4.43ft / 7.71ft 3.61ft 23.16ft 181.88 lb 396 lb 1270ft2 294 ft2 Notes: 1 Gennaker pole retracted. 2 Draft measured with centreboard down. 3 Air draft is distance from water surface to top of mast, excluding any windex. 3 OVINGTON BOATS Figure 2.1 : Profile 4 OVINGTON BOATS Figure 2.2 : Deck Plan 5 OVINGTON BOATS 3. SAFETY INFORMATION 3.1 DESIGN CATEGORY The Musto Performance Skiff is a Design Category C boat. The definition of this design category is: Design Category: C – ‘Inshore’ Description of Use: Designed for voyages in coastal waters, large bays, estuaries, lakes and rivers. Wind Force (Beaufort scale): Up to, and including 6 Significant Wave Height, H1/3: Up to, and including 2m The Musto Performance Skiff complies with this design category, subject to: The crew having suitable skill and experience. Satisfactory construction and maintenance of the boat and equipment. Users of this boat are advised that: All crew should receive suitable training. The boat should not carry more than the maximum load. Bilge water should be kept to a minimum. Stability is reduced by any weight added high up. 3.2 LOADING The maximum recommended load for the Musto Performance Skiff is 160 kg and the maximum number of persons that it can carry is two. The breakdown of the maximum load is: Load item Maximum, kg Crew, 2 persons 155 Personal effects 5 Manufacturer’s maximum recommended load 160 The minimum crew weight recommended for capsize recovery is 70 kg. 6 OVINGTON BOATS 3.3 SAFETY EQUIPMENT It is your responsibility to ensure that all necessary safety equipment is obtained and that it is on board and readily accessible while the boat is in operation. 3.4 CAPSIZE RECOVERY Risk of Capsize The capsize is an inevitable part of small boat sailing and the Musto Performance Skiff is no different in that respect. As a racing craft, there is a high likelihood of capsize if the Musto Performance Skiff is sailed to its limits. You should practice capsize recovery until you are totally familiar with it. Capsize Recovery Technique Should you capsize your Musto Performance Skiff : if the gennaker is up, it should be doused, and the mainsheet un-cleated. if the boat inverts, it should be pulled onto its side so that the rig is horizontal. This can be done by simply standing on a wing and pulling on the centreboard. It sometimes helps to pull it up with the aid of the wind. After that there are basically two situations to recover from: when the rig is lying on the water, pointing downwind; when the rig is lying on the water, pointing upwind. Both methods may take some practice, but they are proven methods to continue sailing after a capsize. Rig Pointing Downwind You should be on the centreboard. Use the gennaker sheets if necessary to pull boat upright. When the boat gets to about 45 degrees, you should climb in, either over or between the wing tube. Endeavour to get hold of the tiller and mainsheet as soon as possible. 7 OVINGTON BOATS Rig Pointing Upwind This is quite often the position the boat ends up in, especially if time has been spent getting the gennaker down or recovering from the inverted situation. You should be on the centreboard, holding onto the gennaker sheets and using them as the righting line. As you start to right the boat, the wind will help. As the mast tip leaves the water, you should then climb into the boat in front of the shroud, walk across the boat in front of the mast to the new windward side to prevent the boat capsizing to the opposite side. With the helm on the new windward side the boat is ready to sail off straight away. Minimum Crew Weight The Musto Performance Skiff can be recovered from a capsize by a single competent sailor of minimum weight of 70kg. This has been demonstrated during the testing of the Musto Performance Skiff for its certificate of conformity. 3.5 AIR TANK The Musto Performance Skiff is equipped with an air tank to provide buoyancy in the event of capsize or swamping. The air tank is formed by the hull and deck mouldings and consequently the following points should be noted: ! Do not puncture the air tank. ! If the air tank is punctured, do not use the boat until the air tank is properly repaired. If in doubt, contact Ovington Boats for a repair procedure. ! If adding any fittings to the boat, ensure that any fasteners that penetrate the air tank are suitably sealed to keep the tank watertight. 3.6 MAN OVERBOARD PREVENTION AND RECOVERY Working Deck and Handholds The working deck of the Musto Performance Skiff, which is intended to be occupied afloat, is the whole boat from its aft end to 500mm forward of the area on which the mast is stepped, as shown in Figure 3.1 8 OVINGTON BOATS Figure 3.1 : Working Deck and Handholds The designated handholds covering this working deck, which have been tested for strength in accordance with ISO 15085, are: the aluminium wing to deck join ( Aft ) the aluminium wing to deck join ( Forward ) Crew Overboard Recovery To recover a crew member from the water: The MPS is designed to be sailed by one person. Therefore it is recommended that you ensure adequate safety cover is in attendance before launching. The helm should bring the boat just downwind of the person in the water. The helm should balance the boat using a combination of body weight movement and sail pressure. The crew should board the boat via the windward gunwhale using a combination of the following handholds: the windward shroud, the trapeze wire and the foot/grab rails in the bottom of the boat. 9 OVINGTON BOATS 3.7 USE OF OUTBOARD ENGINE ! The Musto Performance Skiff is not designed or equipped for use with an outboard engine and is not capable of modification to be safely used with an outboard motor. 3.8 TOWING, ANCHORING AND MOORING Towing If it is necessary to tow a Musto Performance Skiff, use the following procedure: Secure the towing line around the base of the mast. Fully raise or remove the centreboard. Stay at the tiller. In the event of loss of the rudder, sit aft. Anchoring The Musto Performance Skiff is not designed or equipped for anchoring and this should not normally be attempted. You should remain in control of the boat at all times when it is afloat. If there is no alternative to anchoring, the anchor line should be secured around the base of the mast and you should remain with the boat. If the boat must be abandoned when anchored, it is best left in a fully capsized position. Mooring The Musto Performance Skiff is not designed or equipped for mooring and this should not be attempted. You should remain in control of the boat at all times when it is afloat. 10 OVINGTON BOATS 4. COMMISSIONING 4.1 PREPARATION Your Musto Performance Skiff comes with all parts included and ready to sail. In order to commission it, you will need the following tools: ! screwdriver; adjustable spanner; pliers; PVC (electrician's) tape; if you have one, an ISP rig tension gauge. Do not use a knife to cut through packaging and boxes containing boats, parts and fittings - you may damage the contents. Before rigging your Musto Performance Skiff, fit the rudder stock as follows: Remove the R-clip from the rudder pin. Position the rudder stock with the stock gudgeons between the transom gudgeons. Push rudder pin through all 4 holes (it may be stiff) and fit the clip to secure it. It is a good idea to leave the stock on permanently – it is a good place to fit the lighting board. 4.2 MAST Rigging the Mast Your Musto Performance Skiff mast will come in two pieces. To assemble, simply slide together and lock with fixings. Once your mast is assembled, all you will need to do is: fit the trapeze wires to the mast by inserting the T-terminal into the upper slots in the sides of the mast. attach the forestay by inserting the T-terminal into the slot in the front face of the mast, below the spinnaker halyard exit sheave. attach the shrouds by inserting the T-terminal into the slot in the sides of the mast, below the trapeze terminal. Stepping the Mast Attach the lower shrouds to the aft shroud plates. Ensure all halyards, forestay and trapeze wires are fitted and pulled down clear and untangled. 11 OVINGTON BOATS Stand the mast adjacent to the mast step. Lift vertically, and locate the mast heel into the mast step. Attach the lower shrouds to the mast. Whilst one person holds the mast.( Always leave the lower shrouds attached to the boat. ) Attach the forestay to the U bolt mounted on the forestay / gennaker throat, and tension removing the slack. At this point the mast is secure. Attach the shrouds to the boat. Take the slack out of the rigging using the forestay, to the desired rig tension. Measure the mast rake, by attaching a tape to the main halyard shackle and hoisting it to the top of the mast. Measure to the top of the upper pintle. ( As a starting point, the rake should measure 7000mm ) Attach the trapeze wire to the elastic that exits the holes in the wings. Threading the Gennaker Halyard Ensure you tie off the hoist end of the gennaker halyard to a point on the lower mast, so you do not loose it up the mast whilst threading the tail end. Take the halyard from the front exit sheave of the lower mast and thread it forward under the chute sock and through the pulley that is attached to the rope that pulls the bowsprit out. Thread the rope aft past the mast on the starboard side under all other ropes, feeding through the cleat and associated guide and flip flop block, and from there take the line to the adjacent flip flop block on the port side, passing it through the floating block attached to elastic between these two blocks and then up the spinnaker chute sock to the bow. Finally, tie the rope off so you do not loose it up the chute. ( It is a good idea to use the tiller extension to push the rope through the chute. ) 4.3 BOOM AND VANG Attaching the Boom The boom attaches with a pin at the lower gooseneck. Take care not to scratch the boat with the aft end of the boom. Thread the mainsheet through the ratchet block on the deck, ensuring the ratchet is operating in the correct direction. Take it through the aft boom pulley down to the pulley on the strop and back up to the forward boom block, and finally back to the becket on the strop where it is tied off. It is useful to tie the free end of the mainsheet to the elastic line extending from the transom, the spinnaker halyard passes through the block that is attached to this elastic. Vang and Vang Control The vang strut (kicking strap) is made up of two components. 12 OVINGTON BOATS The sickle shaped lever stays attached to the mast at all times. The forward end of the lever fits to the mast in the same way as the boom does. The two parallel beams are permanently attached to the bracket on the top of the boom. The vang control line passes from the pulley attached to the mast heel and through the block and becket 255mm up from the base. It then passes through the block attached to the end of the sickle lever, and finally back to the becket on the block attached to the mast. 13 OVINGTON BOATS 4.4 HOISTING SAILS Rigging the Gennaker Shackle the two ratchet blocks to the eyes port and starboard 1m aft of the shroud points, ensuring that these are operating in the correct direction, and that you pass the sheets outside all rigging, except the trapeze lines. Un-flake the gennaker on the port side of the foredeck. Attach the halyard to head of sail, the tack line to the tack and the sheets to the clew. Take the downhaul line from the chute mouth and thread it through the lower eye in the sail from starboard to port, then up to the upper tie off point and secure. From inside the boat, pull the gennaker down through the chute, being careful not to snag it on the trolley. Thread the port sheet through the port ratchet and thread the starboard sheet inside the halyard around the forestay and through the starboard ratchet. Once again, look up to make sure none of the lines are twisted. Attaching and Hoisting the Mainsail If your sail numbers are loose, see separate notes on where and how to fix them. Unroll the mainsail on a flat surface. Make sure the battens are in very tight and tie them off. Roll the sail back up again and place it on the boat. Position the boat with its head to wind. Attach the mainsail halyard to the head of sail using the provided shackle, feed the sail into the mast track and pull the sail up, using the halyard line exiting low down on the mast. Place the large webbing loop on the clew over the end of the boom and tie the outhaul to the clew eye. Fully hoist the sail. Attach the two components of the vang lever together, engaging the cut out notch of the sickle onto the cross bolt of the two arms attached to the boom. Wrap the two sides of the tack envelope around the mast and boom, and zip down halfway from the top. Coil up the tail ends of the mainsail and place in the Velcro bag on the inside of the envelope. On the bottom of the envelope are two webbing loops, these should be used to attach the two cunningham swivel hook pulleys that have the blue rope through them. Attach the lower tack strap and tension to prevent excess load on the zip. 4.5 COMPLETION Fitting the Centreboard and Rudder Both the centreboard and the rudder blade are daggerboards. The rudder simply slides into the top of the stock, and is pushed down as the boat leaves the beach. The centreboard fits in the same way, neither should be forced - make sure you have the angle correct and they will slide firmly into place. Both blades may be very tight in their housing when they are new. Taping 14 OVINGTON BOATS You are now almost ready to sail! But first, tape up all shackles and clevis pins and anything that looks as if it could snag the gennaker. 15 OVINGTON BOATS 5. SAILING HINTS 5.1 INTRODUCTION Firstly, the Musto Performance Skiff is a skiff – it will feel different. A light fast planing skiff needs one or two different techniques from those used in sailing more conventional boats. It will soon come with practice and is not only great fun but also very rewarding. Here are a few tips. 5.2 SHEETING THE SAILS The mainsail has to be constantly worked and adjusted to suit the wind and balance the boat. Use the sails to balance the boat before you move, ie, when a lull comes, sheet the sail in first before you dive into the boat to try and balance it. The Musto Performance Skiff is fast – sail it fast. Find the line upwind that will give the best performance. Don’t luff hard to de-power upwind, but feather gently and ease the mainsail. The Musto Performance Skiff is a very light boat and will stop if luffed hard in a gust. The boat is more stable when at speed and less so when stationary – keep the sail sheeted and the boat moving. Keep some sheet tension on the mainsail when going downwind with the gennaker flying – this helps support the rig, but more importantly it keeps the boat speed up. When a gust comes – bear away under it. If you let the mainsail out, the power goes and you will roll in backwards. The boat is light, so all you have to do is pull the tiller towards you and go faster, easing the gennaker sheet as you go. In the lulls, luff up a little to keep the speed on and the apparent wind strength up, bending your knees if you are trapezing. 5.3 SITTING POSITIONS The Musto Performance Skiff has a fast planing hull. In light winds keep the weight forward moving aft as the wind increases. 5.4 TACKING Move into the boat and disconnect the trapeze hook, this is best done by de-powering. To do this luff slightly or ease the sail. 16 OVINGTON BOATS The tiller extension should be passed around the back of the boat. Stand up and face forwards, place the tiller extension down on the new windward deck, sit down on the new side and then change hands. Facing forwards all the time enables the helm to say in control of where he is going. Reattach to the trapeze on the new tack. 5.5 GYBING The key to a successful gybe is speed – therefore the sails must be kept pulling and set at all times. Assuming you are on the wire and moving at full speed: Bear away and ease the mainsheet a little to enable you to come into the boat. Once you are in, un-hook and pull the slack out of the windward gennaker sheet. Bear away in a wide arc, steering the boat onto the new gybe. A useful tip here is to place the tiller extension on the new side of the boat. Cross the boat and sheet the gennaker onto the new side as soon as possible, getting on the wire if practical. Allowing the boom to flip onto the new gybe. With practice, Gybing in the strongest wind is both fast safe and a really satisfying thrill. 5.6 GOLDEN RULES After a capsize, ensure you get to the tiller as soon as possible to gain control of the boat. Never let the mainsail fully out in a gust when sailing downwind with the gennaker up. Steer the boat to the gusts and lulls, adjusting the gennaker accordingly. Always ease off the kicker before going downwind. Do not gybe in strong winds with excessive kicker on, otherwise undue strain will be put on the mast. When recovering from a capsize get sailing straight away. Go into the gybe fast and flat in a wide arc. Avoid jumping into the mainsail during a capsize. Tie a stop knot in the mainsheet at a point that prevents the boom from hitting the two sets of shrouds. 17 OVINGTON BOATS 6. TUNING GUIDE 6.1 RIG TENSION 30 (ISP) on shrouds. The forestay may become slack when flying the gennaker. 6.2 MAINSAIL DOWNHAUL (CUNNINGHAM) Pull the mainsail downhaul just enough to remove the worst horizontal creases in light airs, pulling further down progressively as the boat becomes overpowered. 6.3 VANG Apply enough tension to the vang to help take some of the load out of the mainsheet. Ensure tension is eases before bearing off downwind. 6.4 OUTHAUL Keep the outhaul tight at all times, except in light winds and choppy seas, when easing it a centimetre or two will help power through the waves. 6.5 FOILS Keep the foils down at all times. 18 OVINGTON BOATS 7. MAINTENANCE 7.1 BOAT CARE Follow these tips to keep your Musto Performance Skiff in good condition: Dry out your boat whenever possible. Undo the drainage bung in the transom and hatches whenever the boat is left on shore. Wash off any salt water with fresh water to avoid corrosion and mould. Although the ropes and pulleys have light loads on them, they are used at very high speeds. Regularly inspect fittings for burn-outs and chafe. Always repair minor damage at once, before it develops into a major repair! 7.2 SAIL CARE Introduction Good racing sails today are expensive items and yet it is surprising how many people are prepared to neglect or even mistreat such vital equipment. The rules for correct sail care are simple and take little time, so follow these tips and avoid prematurely ruined sails. After Racing Once ashore, sea sailors should wash there sails in fresh water to remove the salt. Inland and sea sailors should make the effort to dry them as soon as possible. Since there is no quicker way to ruin sails than to leave them flapping on a mast, they are better dried by simply laying them out flat on the ground or spreading them over the boat. In wet weather, sails can be dried at home by spreading them over the floor of the house overnight! Rolling or Folding As soon as the sails are dry, and particularly if they have had to be put away temporarily when wet, correct rolling or folding is essential. The modern racing sail is best kept rolled in a long bag, but this is not always possible. If folding is absolutely necessary, mainsails should be ‘flaked’ down in folds parallel to the foot, with the battens removed of course. All creasing should be shaken out and the sail then rolled from the boltrope end. Foresails should be treated similarly except that the leech is kept in line in the flaking operation to allow the luff wire to take a more gentle line. Once again the sail is then rolled from the luff. Do not allow any fold or crease across a window especially in cold weather. 19 OVINGTON BOATS Gennakers Gennakers can be folded like a bed sheet by putting the two leeches together and then folding the centre fold in line with the leech. Halve the sail once more in the same way and then roll from the head. If the sails are correctly rolled or folded from being put away at the weekend, they will emerge the following week smooth and free of all but the minimum marks. Cleaning Use only warm water to wash sails – never hot water. Use only household soap to sponge away marks, never strong detergents. Oil marks are best removed with triclorethylene or mechanic’s hand cleaner. Never send your sails to the cleaners. They can be kept clean by removing marks as they are collected. Repairing Send your sails back to your sailmaker for a check over, preferably in the autumn, not in the spring. They will carry out small repairs and correct any ‘wear and tear’. Use the loft which cut the sails to carry out any major repairs that may be needed – they have the best chance of getting the shape in the repaired sail correct. Finally Modern day cloths are often very hard, this is a necessary part of the design of a fast sail. However, this does mean the sail needs extra care if creasing and those 'little white score marks' are to be kept to a minimum. These little marks and scores cannot always be avoided and they are inevitable as the sail is used: they do not affect the performance or the strength of the sail, but are more a cosmetic and ageing character. Once again, avoid at all costs leaving your sails flapping in the dinghy park. Nothing ruins a sail so quickly especially spinnakers! 20 OVINGTON BOATS 8. WARRANTY 1. This warranty is given in addition to all rights given by statute or otherwise. 2. Ovington Boats warrants all boats and component parts manufactured by it to be free from defects in materials and workmanship under normal use and circumstances, and the exercise of prudent seamanship, for a period of twelve (12) months from the date of commissioning by the original owner. The owner must exercise routine maintenance and care. 3. This warranty does not apply to defects in surface coatings caused by weathering or normal use and wear. 4. This warranty does not apply if the boat has been altered, modified, or repaired without prior written approval of Ovington Boats. Any changes to the hull structure, deck structure, rig or foils without the written approval of Ovington Boats will void this warranty. 5. The use of the boat for commercial purposes shall void this warranty. 6. Warranty claims for materials or equipment not manufactured by Ovington Boats can be made directly to the relevant manufacturer. Ovington Boats warrants that these parts were installed correctly and according to the instructions provided by the manufacturer. 7. Warranty claims shall be made to Ovington Boats as soon as practicable and, in any event, within 28 days upon discovery of a defect. No repairs under warranty are to be undertaken without written approval of Ovington Boats 8. Upon approval of a warranty claim, Ovington Boats may, at its expense, repair or replace the component. In all cases, the replacement will be equal in value to the original component. 9. Due to the continuing evolution of the marine market, Ovington Boats reserves the right to change the design, material, or construction of its products without incurring any obligation to incorporate such changes in products already built or in use. 21 OVINGTON BOATS REVISION SHEET – DO NOT COPY OR BIND Rev 22 Date Description