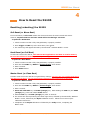
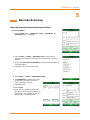
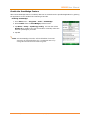
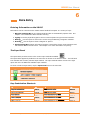
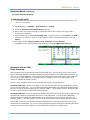
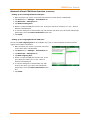
1
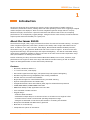
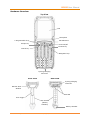
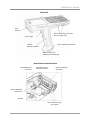
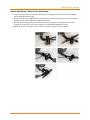
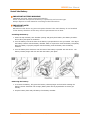
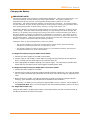
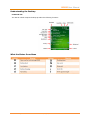
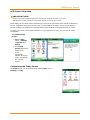
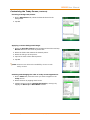
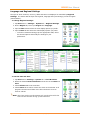
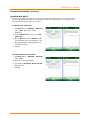
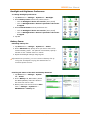
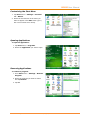
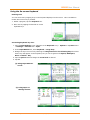
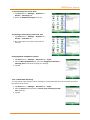
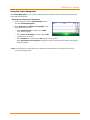
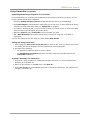
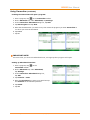
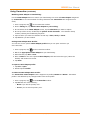
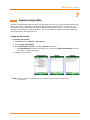
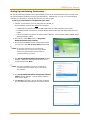
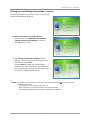
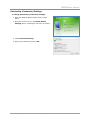
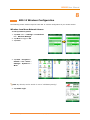
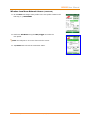
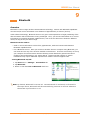
XG105 User Manual Version 1 August, 2012 XG105 User Manual Contents 1 2 Introduction CH–PG 4 CH–PG About the Janam XG105 1–1 1–1 Resetting (rebooting) the XG105 Soft Reset (or Warm Boot) 4–1 Features Hardware Overview 1–2 Hard Reset (or Cold Boot) 4–1 Master Reset (or Clean Boot) 4–1 Getting Started CH–PG Unpack Your Janam XG105 2–1 Recommended Host Computer Requirements 2–1 5 Janam XG105 SDK 3 How to Reset the XG105 4–1 Barcode Scanning CH–PG Barcode Scanning Demonstration and Setup 5–1 Enable the ScanWedge Feature 5–2 Update Your Desktop Software 2–1 Attach the Handstrap to the XG105 2–2 Attach the Stylus Tether to the Stylus 2–2 Entering Information on the XG105 6–1 Attach the Stylus Tether to the Handstrap 2–3 The Input Panel 6–1 Key-Combination Shortcuts 6–1 Install the Battery 2–4 Using the On-screen Keyboard 6–2 Charging the Battery 2–5 Using the Block Recognizer 6–4 Turn the XG105 On 2–6 Using the Letter Recognizer 6–5 Understanding the Desktop 2–7 Using Transcriber 6–6 What the Status Icons Mean 2–7 Setting up the Janam XG105 CH–PG Locate Important Controls and Components 3–1 LCD Screen Calibration 3–2 Customizing the Today Screen 3–2 Language and Regional Settings 3–3 Owner Information 3–5 Password Protection 3–6 Backlight and Brightness Preferences 3–8 Battery Power 3–8 Button Assignment and Scrolling Speed 3–9 Volume Adjustment 3–9 Enable Sounds and Notifications 3–10 Device Name 3–10 Customizing the Start Menu 3–11 Opening Applications 3–11 Removing Applications 3–11 Device Locked/Unlocked 3–12 Keymap Preference 3–12 Janam Technologies LLC 6 7 8 Data Entry CH–PG Synchronizing Data CH–PG Create a User Profile 7–1 Setting Up and Deleting Partnerships 7–2 Partnership (Connection) Settings 7–4 802.11 Wireless Configuration CH–PG Wireless Local Area Network Access 9 10 Bluetooth 8–1 CH–PG Overview 9–1 Making a Bluetooth Device Visible 9–2 Bluetooth Partnerships 9–2 Bluetooth Beam 9–4 Bluetooth Virtual COM Ports Overview 9–5 Regulatory and Maintenance CH–PG Regulatory and Safety Approvals 10–1 FCC and Canadian Compliance 10–1 XG Series RF Terminals with 802.11 and Bluetooth 10–1 Battery Warning 10–4 Version 1, August, 2012 Contents―1 XG105 User Manual 1 Introduction Janam’s XG Series has been optimized to meet the unique requirements of mobile workers in warehouses, distribution centers, loading docks and other operating venues where rugged gun-shaped mobile computers are deployed. While its center-weighted ergonomic design makes it uniquely balanced and light, the XG105 is a powerful workhorse that delivers state-of-the-art computing performance in an exceptionally rugged package. Designed for the work at hand, the XG105 delivers superior performance and flexibility at a great price. About the Janam XG105 The XG105 has a light, sleek, highly-functional form factor for intensive barcode scanning. Its unique center-weighted ergonomics, with battery located in the handle, make it light and balanced in the hand. It features a 3.7” Color TFT color, VGA display, Marvell XScale PXA320 624MHz processor, robust 802.11 b/g or a/b/g Summit WLAN radio with Cisco’s CCX v4 support. It has an extra-wide keypad area with large, well-spaced keys and superior backlighting. The XG105 meets IP64 sealing requirements, withstands multiple 6’ drops to concrete on all sides across a wide temperature range and 2,000 tumbles in a rotating test chamber. Further enhancing its value, the XG105 features Motorola’s SE965, best-in-class, miniature, highperformance scan engine for both close-range and distance barcode scanning as well as reliable capture of damaged barcodes or those obscured by shrinkwrap. Features ― Microsoft® Windows® Mobile 6.1 ― 3.7” Color TFT color, VGA display ― Extra-wide keypad area with large, well-spaced keys and superior backlighting ― Emulator keypads insuring compatibility with existing installations ― Vibrator alert for successful scan feedback ― Bright-LED tail lights for visual feedback during overhead scanning ― Superior audio performance and VOIP-ready ― Integrated Electronic Article Surveillance (EAS) tags for enhanced asset protection ― 256MB DDR SDRAM, 256MB NAND Flash ROM ― NAND flash backup of OS, applications and user data ― User accessible microSD card slot ― Rugged design: ‒ Sealed to IP64 standards ‒ Withstands multiple drops to a concrete surface on all sides from a height of 6 feet ‒ Functions across a wide environmental operating temperature range ‒ Designed to withstand no less than 2,000 tumbles in a rotating test chamber ― Enterprise-class WLAN with WPA security protocols ― Bluetooth v2.0 connectivity ― Comprehensive system of accessories Janam Technologies LLC Version 1, August, 2012 1―1 XG105 User Manual Hardware Overview Top View LCD Microphone 2 Programmable keys LED Indicators Escape key Power On/Off Function key Control key Navigation keys Syncing/Charging Connector Front View Rear View Syncing/Charging Connector Barcode Scan Window Rear LED Scan Trigger Gun Handle (Battery Chamber) Battery Chamber Janam Technologies LLC Version 1, August, 2012 1―2 XG105 User Manual Side View Scan Window Upper Handstrap Connectors (left and right side) Scan Trigger Lower Handstrap Connector Handle/ Battery Chamber Base of Battery & Battery Release Plunger Rear-Bottom Sectional View microSD Memory Card Door MicroSD Memory Card Door Screws Syncing/Charging Connector Upper Handstrap Connectors Speaker Rear Indicator Lights (Tail Lights) Janam Technologies LLC Version 1, August, 2012 1―3 XG105 User Manual Bottom View Battery Speaker (on bottom housing) Battery Lock Battery Chamber microSD Card Slot Compartment Rear LED Indicators Janam Technologies LLC Version 1, August, 2012 1―4 XG105 User Manual 2 Getting Started Unpack Your Janam XG105 Make sure you have the following: ― Janam XG105 mobile computer ― Janam authorized battery ― Handstrap ― Stylus ― Stylus tether ― Charging accessory (one or more of the following power/connection kits ordered/packaged separately): ‒ Janam Single-slot cradle kit ‒ Janam Four-slot cradle kit ‒ Janam USB cable with AC adapter ‒ Janam Serial cable with AC adapter Recommended Host Computer Requirements ― Windows-compatible host computer ― Microsoft® Windows® 7, Windows XP or Windows 2000 operating system ― 100 MB of available hard disk space ― One available serial or USB port ― Keyboard and mouse Janam XG105 SDK The Janam XG Series Software Development Kit enables programmers to develop applications for Janam XG Series rugged mobile computers running the Microsoft Windows Mobile 6.1 operating system. It contains details and instructions for developing applications that access Janam XG Series libraries, including scanning, imaging and hardware utilities. The development kit, which can be downloaded from Janam’s Partnerzone site (login required), is designed for use with Microsoft Windows Mobile SDK and Visual Studio 2005/2008 development environment. Update Your Desktop Software Confirm that the host computer has the latest version of Microsoft ActiveSync or Windows Mobile Device Center software intended for use with the host computer’s operating system, e.g. Windows 7, XP or 2000. For additional ActiveSync information and downloads, please visit the Microsoft Mobile Device Center at: http://support.microsoft.com/kb/931937 and http://support.microsoft.com/kb/915152. Janam Technologies LLC Version 1, August, 2012 2―1 XG105 User Manual Attach the Handstrap to the XG105 1. Insert the long-looped end of the handstrap through either the left- or right-side upper handstrap connector (at the back of the handheld*). 2. Insert the metal spring closure hook (the other opposite end of the handstrap) through the loop previously pushed through the upper handstrap connecter in Step 1. 3. Pull the entire length of the handstrap through the loop, securing one end of the handstrap to either rear hand strap connector. 4. Clip the metal spring closure hook to the lower handstrap connector (near the base of the gun handle*). * For related illustrations see Chapter 1. Attach the Stylus Tether to the Stylus 1. Insert one looped end of the stylus tether through the opening at the top of the stylus. 2. Insert the opposite end of the stylus tether through the first looped end. 3. Pull the entire length of the stylus tether including the silver grommet all the way through the loop to secure the tether to the stylus. Janam Technologies LLC Version 1, August, 2012 2―2 XG105 User Manual Attach the Stylus Tether to the Handstrap 1. Insert the loop of the free end of the stylus tether through either of the slits in the handstrap push-button adjustment slider. 2. Insert the stylus (now attached to the stylus tether) through the stylus tether’s loop that comes through the slit on the push-button adjustment slider. 3. Pull the entire length of the stylus tether and the stylus tether’s silver grommet all the way through the loop to secure the stylus tether to the handstrap’s adjustment slider. 4. When not in use, the stylus can be inserted in the stylus sleeve on the handstrap. Janam Technologies LLC Version 1, August, 2012 2―3 XG105 User Manual Install the Battery IMPORTANT BATTERY WARNING! CAUTION: Use only Janam-approved batteries. There is the risk of explosion if battery is replaced by an incorrect type. Always dispose of used batteries according to the instructions. IMPORTANT NOTE! **WARNING** DO NOT turn the device on/press the power button if the main battery is not installed in the battery chamber as this may result in permanent loss of data. Installing the battery: 1. Insert the top of battery into chamber opening and gently slide battery into battery chamber. Do not force past point of resistance. 2. Turn the battery so that the base of the battery is perpendicular to the gun handle. This aligns the battery notches with the battery chamber which is required to insert the battery completely. Once the battery is properly aligned with the handle, press the battery into the battery chamber. 3. Turn the battery base clockwise until the base of the battery is parallel with the device. The battery release plunger will click and lock the battery into place. Removing the battery: 1. To remove the battery, fully press the battery release plunger and hold while rotating the battery counter-clockwise until it stops (battery base will be perpendicular to device gun handle). 2. Grip the battery base and pull battery from battery chamber. Janam Technologies LLC Version 1, August, 2012 2―4 XG105 User Manual Charging the Battery IMPORTANT NOTE! The Janam XG105 relies upon two rechargeable batteries. The first is the primary 7.4v cylindrical battery housed within the device gun handle. The primary battery is supplemented by an internal, rechargeable backup battery which is not user serviceable. The internal backup battery serves two key functions. It supplies power for the retention of data during replacement of the primary battery and provides shortterm operational power if the primary battery’s charge falls below 7%. The backup battery is charged at comparatively low current, requiring 72 hours for an initial charge. Until the internal backup battery is fully charged and even though the primary 7.4v battery may indicate full charge, the device cannot maintain user data if the main battery’s charge is exhausted or the battery is removed. The initial 72-hour charge time for the backup battery is required prior to first use or after a full drain of the backup battery. After the initial charge and during normal use, the internal backup battery’s charge is maintained by the primary battery. Complete drain of the backup battery will occur when: ― The primary battery is removed and the device relies solely upon the backup battery to sustain operation for 15 minutes or more. ― The primary battery’s charge drops below 7% (the backup battery will support continued function for up to 15 minutes). To charge the battery using the USB or Serial Cable: 1. Connect the power supply to the USB or serial cable. 2. Connect snap-on end of USB or serial cable to syncing/charging connector at the bottom of device, making sure the JANAM logo on the connector faces up. 3. Insert appropriate AC adapter and plug in the power supply. Use only easily accessible wall outlets that are well within reach of the length of supplied power cable. To charge the battery using the Single-Slot or Four-Slot Cradle: 1. Connect the power supply to the cradle. 2. Connect the line cord to the power supply and plug the power supply into a 110-120v AC outlet. Use only easily accessible wall outlets that are well within reach of the length of supplied power cable. 3. Place the device in cradle. The LED will illuminate to confirm connection (orange indicates charging, green indicates fully charged and red indicates a fault condition). 4. The primary 7.4v battery is fully charged in approximately 5 hours. However, and as stated in the Important Note above, the initial charge of the internal backup battery requires 72 hours. For Single-Slot Cradle only: Charge a spare battery by placing the battery in the spare battery well with connectors lined up. An LED will illuminate to confirm connection. Janam Technologies LLC Version 1, August, 2012 2―5 XG105 User Manual Charging a Spare Battery in Single-Slot Cradle Spare Battery Well or Four-Slot Battery Charger 1. Insert and slide the battery into the charging slot as shown. 2. Press down and forward with index finger to fully seat the battery. 3. The LED will illuminate to confirm connection (orange indicates charging, green indicates fully charged and red indicates a fault condition). 4. The battery is fully charged in approximately 5 hours. Turn the XG105 On IMPORTANT NOTE! DO NOT turn the device on/press the power button if the main battery is not installed in the battery chamber as this may result in permanent loss of data. With fully charged batteries installed, press the red power button located on the keypad to the right of the up/down/left/right arrow keys. The first time the device is turned on, calibrate the screen using the stylus. To calibrate, simply follow the on-screen instructions and remember to save your settings. IMPORTANT NOTE! Always use the supplied stylus for tapping or making strokes on screen. DO NOT use a pen, pencil or any other object on the touch screen. Note: If your XG105 came pre-loaded with a custom software application, a welcome utility may not appear. If this happens, follow the on-screen instructions. Janam Technologies LLC Version 1, August, 2012 2―6 XG105 User Manual Understanding the Desktop Command bar: The XG105 mobile computer desktop provides the following functions. What the Status Icons Mean Janam Technologies LLC Version 1, August, 2012 2―7 XG105 User Manual 3 Setting up the Janam XG105 Locate Important Controls and Components 1. Power button ― Pressing the (red) power button turns the handheld computer on and off. When powered on, the XG105 returns to the screen last displayed when powered off. 2. Use the Backlight to illuminate the screen in low-light conditions. ― For 52-key Keypad: Press Orange (Function) key and then press “Z” key to turn display backlight on/off. ― For 42-key Keypad: Press Orange (Function) key and then press “N” key to turn display backlight on/off. 3. Use the Keylight to illuminate the keypad. ― For 52-key Keypad: Press Orange (Function) key and then press “X” key to turn Keylight on/off. ― For 42-key Keypad: Press Orange (Function) key and then press “M” key to turn Keylight on/off. 4. microSD Card Slot (located under microSD card cover) ― To access microSD Card Slot: a. Remove the 2 cover screws using a Phillips (cross head) screwdriver. b. Remove the cover and insert a microSD card into the slot. c. Replace card slot cover. Do not over-tighten screws. 5. Syncing/Charging Connector Connects your XG105 to a PC via syncing/charging USB cable or Janam cradle. Janam Technologies LLC Version 1, August, 2012 3―1 XG105 User Manual LCD Screen Calibration IMPORTANT NOTE! Always use the supplied stylus for tapping or making strokes on screen. DO NOT use a pen, pencil or any other object on the touch screen. Initial startup of the Janam XG105 launches on-screen setup instructions which include a calibration screen. Calibration aligns the internal circuitry of the handheld computer with its touch-sensitive screen, enabling the handheld to accurately detect stylus tapping of selected elements or actions. If, during use, there is a noticeable decrease in stylus response accuracy, the unit may be easily recalibrated. To recalibrate the screen: 1. Tap the Start menu > Settings > System tab > Screen. 2. Select Align Screen button and follow the onscreen instructions, tapping the screen where indicated by the crosshair symbol. Customizing the Today Screen The Today screen can be customized by tapping Start menu > Settings > Today. Janam Technologies LLC Version 1, August, 2012 3―2 XG105 User Manual Customizing the Today Screen (continued) Choosing a background/theme: 1. On the Appearance tab, select the desired theme for the background. 2. Tap ok. Applying a custom background image: 1. Select the Use this picture as the background check box and tap Browse button to view a list of picture files. 2. Select the folder that contains the desired picture. 3. Select the file type of the picture. 4. Tap the file name of the desired picture. 5. Tap ok. Note: Pictures can affect the readability of text on the Today screen. Selecting and changing the order of Today screen appearance: 1. On the Items tab, select the items you want to appear on the Today screen. 2. Select functions by tapping check boxes. 3. Change function order by tapping the function, moving it by tapping the Move Up or Move Down buttons. Janam Technologies LLC Version 1, August, 2012 3―3 XG105 User Manual Language and Regional Settings The style in which numbers, currency, dates and times are displayed is controlled by Regional Settings. The Janam XG105 ships with regional, language and input settings, pre-set to English (United States). To change Regional Settings: 1. Tap Start menu > Settings > System tab > Regional Settings. 2. On the Region tab, select your Region and Language. 3. Tap the Time tab and select the time display options you prefer. 4. Tap the Date tab and select the date display options you prefer. ― To further customize settings, tap the appropriate tabs, select the desired options and modify the settings to your preferences. To set the time and date: 1. Tap Start menu> Settings > System tab > Clock & Alarms. 2. Select the desired Home Time Zone and set the correct Date and Time. 3. Choose Alarms tab to set reminders. 4. Choose More tab to add or remove the clock on the title bar in all programs and the sound alarm even when the device is set to silent or vibrate. Note: The time setting on the XG105 will synchronize with the time on the host PC during synchronization. Janam Technologies LLC Version 1, August, 2012 3―4 XG105 User Manual To set the time and date for an alternate (Visiting) location: 1. Tap Start menu > Settings > System tab > Clock & Alarms. 2. Tap Visiting. 3. Select the desired time zone and set the correct Date and Time. Owner Information To enter Owner Information: 1. Tap Start menu > Settings > Personal tab > Owner Information. 2. Select the Identification tab and enter the Owner Information. To display Owner Information on the Today screen: 1. Tap Start menu > Settings > Personal tab > Owner Information. 2. On the Options tab, select the Identification information check box. Janam Technologies LLC Version 1, August, 2012 3―5 XG105 User Manual Owner Information (continued) The Additional Text option allows you to display messages such as "Reward if Found." To apply Additional Text: 1. On the Options tab, select the Notes check box. 2. On the Notes tab, enter the additional text. Password Protection To set a password: 1. Tap Start menu > Settings > Personal tab > Lock. 2. Select the Prompt if device unused for check box and select the option from the dropdown menu. Note: It is recommended that the “Prompt if device unused” time strike a practical balance between security and convenience. 3. In the Password type box, select the type of password you would like to use – Simple PIN or Strong alphanumeric. Enter the password and key in the same password for confirmation. ― Simple PIN (Personal Identification Number) passwords contain only numeric characters and must be at least 4 characters in length. In addition, overly simplistic sequences such as “1234, “1111”, etc. will be rejected as unsafe. ― Strong alphanumeric passwords must include at least 7 characters, 3 of which must be a combination of uppercase letters, lowercase letters, numerals or punctuation. Examples: Upc4003 UPC?4003 4. On the Hint tab, enter a phrase to help you remember your password. The hint displays after the wrong password is entered four times. 5. Tap ok. You will be prompted to enter your password the next time you turn on your Janam XG105. Janam Technologies LLC Version 1, August, 2012 3―6 XG105 User Manual Password Protection (continued) IMPORTANT NOTE! Each time a wrong password is entered, the time the device takes to respond will get longer and longer until the device appears to be not responding. If you forget your password, you must reset your device. To change your password: 1. Tap Start menu > Settings > Personal tab > Lock. Enter your current password. 2. In the Password box, enter your new password. 3. On the Hint tab, enter a phrase to help you remember your new password. The hint displays after a wrong password is entered four times. 4. Tap ok. To remove password protection: 1. Tap Start menu > Settings > Personal tab > Lock. 2. Enter your current password. 3. Un-check the Prompt if device unused for check box. 4. Tap ok. Janam Technologies LLC Version 1, August, 2012 3―7 XG105 User Manual Backlight and Brightness Preferences To change backlight preferences: 1. Tap Start menu > Settings > System tab > Backlight. 2. Select Battery Power tab and set preferences for: ― Turn off Backlight if device not used for [time period] ― Turn on Backlight when a button is pressed or the screen is tapped. 3. Select External Power and set preferences for: ― Turn off Backlight if device not used for [time period] ― Turn on Backlight when a button is pressed or the screen is tapped. 4. Tap ok. Battery Power Extending battery life: 1. Tap Start menu > Settings > System tab > Power. 2. On the Advanced tab, specify when your device turns off to conserve battery power. For optimum conservation, specify 3 minutes or less. Default value is 1 minute. 3. Adjust the backlight settings using keypad. Tip: Whenever practical, you can conserve battery life by using the AC adapter to plug the XG105 into an external power source. Checking the status of the main and backup batteries: 1. Tap Start menu > Settings > System tab > Power. 2. On the Battery tab, Main Battery status and Backup Battery status are shown in bar chart from 0% to 100%. 3. Battery status can also be found in Start menu > Settings > System tab > XG105 Panel > Battery tab. Janam Technologies LLC Version 1, August, 2012 3―8 XG105 User Manual Button Assignment and Scrolling Speed To program buttons: 1. Tap Start menu > Settings > Personal tab > Buttons > Program Buttons tab. 2. First, select a button from the list, then assign a program from the dropdown menu to that button. To adjust the speed for scrolling: 1. Tap Start menu > Settings > Personal tab > Buttons > Up/Down Control tab. 2. Do one of the following: ― Under Delay before first repeat, move the slider to shorten or lengthen the time that elapses before scrolling begins. ― To change the time it takes to scroll from one item to the next, under Repeat rate, move the slider to adjust the speed. Volume Adjustment 1. Tap the speaker icon located on the top command bar. 2. Move the indicator up or down to adjust volume. 3. Tap off to turn volume off completely. 4. Tap on the screen background to close the popup and return to the Settings > Personal tab. 5. Alternatively, use the keypad to adjust the volume. ― On 52-key keypad, use the <Func + H> keys for volume up and <Func + M> keys for volume down. ― On 42-key keypad, use the <[F4 + D]> keys for volume up and the <[F4 + H]> keys for volume down. Janam Technologies LLC Version 1, August, 2012 3―9 XG105 User Manual Enable Sounds and Notifications 1. Tap Start menu > Settings > Personal tab > Sounds & Notifications > Sounds tab. 2. Tap or select the Events and Programs to enable sounds. 3. Select the Notifications tab to assign notifications to specific events. 4. Select the Event in the dropdown menu, tap Play sound checkbox and choose sound. 5. Tap ok. Device Name Your XG105's name (which may already be assigned) is used to identify the device in the following situations: ― Synchronizing with a PC ― Connecting to a network ― Restoring information from a backup IMPORTANT NOTE! If you synchronize multiple devices with the same PC, each device must have a unique name. Changing the device name: 1. Tap Start menu > Settings > System tab > About. 2. Tap the Device ID tab. 3. Enter a name. The device name must begin with a letter, consist of letters from A to Z, numbers from 0 to 9 and cannot contain spaces. Use the underscore character to separate words. Janam Technologies LLC Version 1, August, 2012 3―10 XG105 User Manual Customizing the Start Menu 1. Tap Start menu > Settings > Personal tab > Menus. 2. Select the check boxes of the items you want to appear in the Start menu (up to, but not more than seven items). Opening Applications To open an application: 1. Tap Start menu > Programs. 2. Select the application you want to open. Removing Applications To remove a program: 1. Go to Start menu > Settings > Remove Program. 2. Select the program you want to delete and tap Remove. 3. Tap ok. Janam Technologies LLC Version 1, August, 2012 3―11 XG105 User Manual Device Locked/Unlocked To lock the device: 1. Tap Start menu > Today. 2. Tap Device unlocked. The lock icon will change to a closed lock. Note: When the device is locked, neither the on-screen keyboard nor the physical keypad will accept user input. To unlock the device: 1. At the bottom of the Today screen, tap Unlock. 2. Tap Unlock again. Keymap Preference To change Keymap preference: 1. Tap Start > Settings > Control Panel. 2. Tap XG105 Panel icon. 3. Select Keymap tab. 4. Depending upon your keypad configuration, select either 52-Key or 42-Key. 5. Select one of the default keypad files or one that is preloaded by your installed application. 6. Tap ok. Janam Technologies LLC Version 1, August, 2012 3―12 XG105 User Manual 4 How to Reset the XG105 Resetting (rebooting) the XG105 Soft Reset (or Warm Boot) In most situations, a soft reset restarts the device and saves all stored records and entries. However, any data that has not been saved will be lost during a soft reset. To perform a Soft Reset: 1. Check to make sure that a fully-charged battery is properly installed. 2. Press trigger and ESC key at the same time, then release. 3. The Janam logo will appear followed by the Microsoft® Windows Mobile screen. Hard Reset (or Cold Boot) A hard reset restores the XG105, and removes ALL applications and data in volatile memory. Be sure that all data is backed up before performing a hard reset. To perform a Hard Reset: 1. Check to make sure that a fully-charged battery is properly installed. 2. Press and hold CTRL key, BKSP key and the trigger, then release. 3. Wait 5 seconds. 4. Press Power button. Master Reset (or Clean Boot) A master reset returns the XG105 to original factory settings, removing ALL user-installed applications and data from the device. Be sure that all data is backed up before performing a clean boot. To perform a Master Reset: 1. Check to make sure that a fully-charged battery is properly installed. 2. Press and hold CTRL key, BKSP key and the trigger, then release. 3. Wait 5 seconds. 4. Press and hold CTRL key and FUNC (Orange) key. While holding the CTRL key and FUNC (Orange) key, press and release Power button. 5. Release CTRL key and FUNC (Orange) key after 10 seconds. 6. The XG105 will reboot presenting the Janam logo screen, followed by the Microsoft® Windows Mobile screen, followed by the Stylus calibration screen. Follow the on-screen stylus calibration instructions. 7. Completion of the Stylus calibration is followed by the Today screen, completing the Master reset. Janam Technologies LLC Version 1, August, 2012 4―1 XG105 User Manual 5 Barcode Scanning Barcode Scanning Demonstration and Setup To run the demo: 1. Tap the Start menu > Programs > Scan > ScanDemo. The ScanDemo menu will appear. 2. Tap the Menu > Setup > Hardware Test to review all the functions of the scanner and determine if everything is working properly. 3. Select (tap) each item individually to verify that all hardware is working properly. 4. Tap ok to return to the main demo. 5. Select Menu > Setup > Symbology Config. 6. Tap Enable All to enable every type of barcode or manually select the type of barcode you need. 7. Tap ok to save. 8. Select Scan 9. Point the scan window at a barcode, and press the barcode scan trigger on the XG105. The example results will display after a successful scan. Janam Technologies LLC Version 1, August, 2012 5―1 XG105 User Manual Enable the ScanWedge Feature When the ScanWedge feature is enabled, data can be entered into the specified application by opening the application on the handheld and scanning a barcode. Enabling ScanWedge: 1. Go to Start menu > Programs > Scan > ScanWedge. 2. Select Enable from the ScanWedge pull-down menu. 3. Tap Menu > Setup > Symbology Config. You can then select Enable all to enable every type of barcode or manually select the barcode symbologies you need. 4. Tap ok. Note: The ScanWedge function will be disabled if manual scanning is initiated either by a command API or by using the Janam Barcode Test Program. Janam Technologies LLC Version 1, August, 2012 5―2 XG105 User Manual 6 Data Entry Entering Information on the XG105 Information can be entered into the Janam XG105 handheld computer in a variety of ways: 1. Barcode scanning Scan one-dimensional barcodes to automatically capture data. See Chapter 5 for information about barcode scanning. 2. Typing Use the physical keypad or the on-screen keyboard to type text and numbers. 3. Writing Use the stylus to write on the screen using handwriting recognition software. 4. Drawing Use the stylus to draw a diagram or picture. 5. Synchronizing Exchange information between a PC and the device using ActiveSync and the Windows Mobile Device Center. See Chapter 7 for more information on syncing. The Input Panel The Input Panel provides access to the various input methods available. The Input Panel appears by default on the menu bar as shown at the bottom center. The left-hand icon indicates the currently selected input method. The input method selector arrow to the right opens the menu of additional available input methods. To show or hide the Input Panel, tap the Input Panel icon on the menu bar. Icon Indicates the selected input method is: On-screen keyboard Letter recognizer or block recognizer Transcriber (if available) Key-Combination Shortcuts To Tap To Tap Copy the selected text CTRL+C Undo the last action CTRL+Z Cut the selected text CTRL+X Redo the last action CTRL+Y Paste the text CTRL+V Make the selected text bold CTRL+B Close a program CTRL+Q Make the selected text italic CTRL+I Open a new file CTRL+N Make the selected text underlined CTRL+U Janam Technologies LLC Version 1, August, 2012 6―1 XG105 User Manual Using the On-screen Keyboard Entering text: You can enter text by tapping keys on the keyboard displayed on the screen. This is available in modes where text entry is possible. 1. Within a program, tap the Keyboard icon. 2. Enter text by tapping the desired on-screen keyboard keys. Increasing keyboard key size: 1. Tap the Input Selector arrow (adjacent to the Keyboard icon) > Options or tap Start menu > Settings > Personal tab > Input. 2. In the Input Method list, select Keyboard > Large keys. 3. Enlarge the keys even more by selecting the Use gestures for the following keys check box. Fewer keys will appear on the keyboard, but you can do gestures for Space, Backspace, Enter and Shift + Key. 4. Tap the Options tab and change the zoom level as desired. 5. Tap ok. (a) Using Input Selector arrow: (b) Using Input on Settings screen: Janam Technologies LLC Version 1, August, 2012 6―2 XG105 User Manual To use ClearType for screen text: 1. Tap Start menu > Settings > System tab > Screen > ClearType tab. 2. Select the Enable ClearType check box. Increasing or decreasing screen text size: 1. Tap Start menu > Settings > System tab > Screen > Text Size tab. 2. Move the slider to increase or decrease the text size. Changing Word Completion Options: 1. Tap Start menu > Settings > Personal tab > Input. 2. Tap the Word Completion tab, select the Suggest words when entering text check box and specify the settings. 3. Tap ok. Turn on Automatic Scrolling: You can change input settings so that scrolling occurs automatically when the text entered reaches the bottom of the screen. 1. Tap Start menu > Settings > Personal tab > Input. 2. Tap the Options tab and select the Scroll upon reaching the last line check box. 3. Tap ok. Janam Technologies LLC Version 1, August, 2012 6―3 XG105 User Manual Changing input panels: 1. The default on-screen keyboard presents a standard Alpha keyboard configuration. 2. To switch to the expanded Numeric keyboard, tap the 123 key in the upper left corner of the Alpha keyboard. 3. To select the International keyboard, tap on áü key in the lower left corner of the Alpha keyboard. Alpha Numeric International Using the Block Recognizer Use a single stroke to write letters, numbers, symbols and punctuation, which are converted into typed text. Block recognizer is available only when text entry is possible. Entering text using Block Recognizer: 1. From a program, tap the Input Selector arrow adjacent to the keyboard icon and select Block Recognizer. 2. Write characters, numbers and symbols in the designated writing area. ― Enter letters by writing in the abc (left) area of the box. ― Enter numeric characters by writing in the 123 (right) area of the box. ― Enter symbols and punctuation by tapping in either area of the box, followed by writing the desired character. Tip: For help with writing characters with Block Recognizer, tap the question mark near the writing area. Janam Technologies LLC Version 1, August, 2012 6―4 XG105 User Manual Using the Letter Recognizer With Letter Recognizer, you can write individual letters, numbers and punctuation and have them converted into typed text. Entering text using Letter Recognizer: 1. From a program, tap the Input Selector arrow and then Letter Recognizer. 2. Write characters, numbers and symbols in the designated writing area. ― Enter capital letters by writing in the ABC (left) area of the box. ― Enter lower case letters by writing in the abc (middle) area of the box. ― Enter numbers by writing in the 123 (right) area of the box. ― Enter punctuation and symbols by tapping in either area of the box and then writing the desired character. Tip: For help with writing characters with Letter Recognizer, tap the question mark near the writing area. Janam Technologies LLC Version 1, August, 2012 6―5 XG105 User Manual Using Transcriber Transcriber works transparently in the background of programs that accept user input. Starting Transcriber: 1. Start a program such as Word Mobile. 2. Tap the Input Panel icon at the bottom center of the screen and tap the Input Selector arrow. 3. Tap Transcriber. The Transcriber Intro screen appears. 4. Tap ok to close the Transcriber Intro screen. Showing or hiding the Transcriber toolbar: The Transcriber toolbar, which appears at the bottom of the screen when Transcriber is open, provides easy access to several tools, including enter, space and backspace buttons and left and right arrow buttons. From a program, tap the Transcriber icon at the bottom of the screen. Tap To Open the options dialog box, where you can set options such as writing direction, text entry and shorthand Open letter shapes, where you can set your personal writing styles to maximize recognition Use the on-screen keyboard to quickly enter numbers, punctuation and other symbols Change the Character Recognition mode • a mode. This is the default for optimum handwriting recognition • 123 mode. Numbers and some letters are allowed and the calculator is activated • A mode. All letters are automatically capitalized If you are in A or 123 mode, recognition returns automatically to the default mode once you lift the stylus. Insert a space at the cursor Insert a paragraph return at the cursor Move the cursor one space to the left Move the cursor one space to the right Move the cursor one space back and erase existing text Open the transcriber Help Janam Technologies LLC Version 1, August, 2012 6―6 XG105 User Manual Using Transcriber (continued) Setting Transcriber startup options: 1. From a program, tap on the Transcriber toolbar. 2. On the Quick Settings tab, set any of the following options: ― In Recognition, the language Transcriber recognizes Standard English (default). ― In Writing Direction, tap the picture that most closely represents the angle at which you write on your device. For example, if your writing slants to the left, tap the second option. ― Select the Intro screen check box to display the short introductory screen when Transcriber first opens. ― Select the Sound check box to turn on Transcriber sounds. Setting Transcriber text entry options: 1. From a program, tap on the Transcriber toolbar. 2. On the Inking tab, set any of the following options: ― Adjust the Recognition Delay slider. ― Select the Add space after check box to add a space after each word that Transcriber recognizes. ― Under Pen, choose the line width and color for handwriting. ― Tap Match Letter Shapes to your writing to open the Letter Shapes feature where you can train Transcriber to recognize your handwriting. Writing with Transcriber: Transcriber allows you to write in cursive, print or a combination of both. 1. Within a program, position the cursor where you want text to appear. 2. Use the stylus to write anywhere on the screen. The writing will be converted to text shortly after you lift the stylus from the screen. Using the Transcriber Calculator: 1. From a program, tap is selected. on the Transcriber toolbar until 123 2. Write the equation. If you write 2+2=, Transcriber returns 2+2=4. Matching Letter Shapes to handwriting: 1. From a program, tap on the Transcriber toolbar. 2. On the Inking tab, tap Match Letter Shapes to your writing. 3. At the bottom of the Letter Shapes screen, tap the character you want to explore. 4. At the top of the screen, double-tap the picture of this character. 5. The character slowly redraws, showing the handwriting sequence. 6. Tap how often you write the character in that way: Often, Rarely or Never. 7. Tap ok. Janam Technologies LLC Version 1, August, 2012 6―7 XG105 User Manual Using Transcriber (continued) Optimizing handwriting recognition for Transcriber: If Transcriber does not recognize your handwriting as accurately or quickly as you'd like, you can further optimize handwriting recognition. ― Select the writing direction picture that best matches the slant of your handwriting. ― Use Letter Shapes to eliminate letter shapes that you do not use or to learn methods of writing characters that will make them easier for Transcriber to recognize. ― Try writing in another format. If you have been printing, try writing cursive, or if you have been writing in both cursive and print, try printing alone. ― Adjust the speed at which Transcriber returns text after you write. ― Add a User Dictionary that contains special terms you may be using such as medical or legal terms. You can also verify that you are using your letter shapes User Profile. Editing text using Transcriber: 1. From a program, draw a line across the text you want to edit. After you lift the stylus from the screen, the line will disappear and the selected text will be highlighted. 2. Do either of the following: ― Use gestures to capitalize letters or insert a space. ― Use handwriting recognition alternates to quickly correct text and add words to the Transcriber dictionary. Creating a dictionary for Transcriber: 1. On your PC, use a program such as Notepad and type each term you want to include in the dictionary on a separate line. 2. When you are finished, on the File menu, click Save As. 3. In the Save as type box, select All Files and enter a name for the file using a .dct extension (for example, mydictionary.dct). Janam Technologies LLC Version 1, August, 2012 6―8 XG105 User Manual Using Transcriber (continued) Creating Shorthand for entering words: on the Transcriber toolbar. 1. From a program, tap 2. On the Advanced tab, under Shorthand, tap Settings. 3. In the Transcriber: Shorthand dialog box, tap Add. 4. Tap Text expansion and tap Next. 5. Write the Shorthand you want to use, entering the replacement text to display. 6. Tap Finish; then tap ok. Using the Transcriber keyboard: From a program, tap on the Transcriber toolbar. The keyboard remains visible until you tap the button again. Tip: To reposition the keyboard, tap and hold the title bar and drag to the desired location. With no text selected, you can also open the keyboard by doing this gesture. Janam Technologies LLC Version 1, August, 2012 6―9 XG105 User Manual Using Transcriber (continued) Creating Shorthand that will open a program: 1. From a program, tap on the Transcriber toolbar. 2. On the Advanced tab, under Shorthand, tap Settings. 3. In the Transcriber: Shorthand dialog box, tap Add. 4. Tap Run Program and tap Next. 5. Write the shorthand text you want to use; then select the program you want Transcriber to run when you write the shorthand. 6. Tap Finish 7. Tap ok. IMPORTANT NOTE! The next time you write the Shorthand text, the appropriate program will open. Setting up Shorthand functions: 1. From a program, tap Transcriber toolbar. on the 2. On the Advanced tab, under Shorthand, tap Settings. 3. In the Transcriber: Shorthand dialog box, tap Add. 4. Tap Function > Next. 5. Write the Shorthand you want to use and then tap the Function the shorthand represents. 6. Tap Finish 7. Tap ok. Janam Technologies LLC Version 1, August, 2012 6―10 XG105 User Manual Using Transcriber (continued) Using Handwriting Recognition alternates: 1. From a program, draw a line across the word you want to correct or add to the dictionary. 2. After you lift the stylus, the line will disappear and the word will be highlighted. 3. Do the quick correct gesture. 4. On the alternates menu, do one of the following: ― To correct the selected word, tap the word you want to replace it with. ― To add the selected word to the dictionary, tap Add to Dictionary. Using gestures in Transcriber: Use quick strokes of the stylus to edit your text. Use Enter, Space and Tab gestures to insert Returns, Spaces or Tabs (respectively.) Do To Insert a paragraph return at the cursor. The horizontal portion of the gesture must be at least two times longer than the vertical portion. Insert a space at the cursor. The horizontal portion of the gesture must be at least two times longer than the vertical portion. Move the cursor one space back and erase any text. Do the gesture by drawing a line right to left. Open the menu of alternative words if a word is selected or the on-screen transcriber keyboard if no text is selected. Do the gesture by drawing a line straight down and back up. Change the capitalization of the selected letter, word or block of text. Do the gesture by drawing a line straight up. Undo the last action. Do the gesture by drawing a line straight up and back down. Copy the selected text. Do the gesture by drawing a line from left to right and back. Cut the selected text. Do the gesture by drawing a line from right to left and back. Paste copied or cut text. Do the gesture by drawing a line from the lower left of the screen diagonally up toward the right and back down to the right. Insert a tab. The horizontal portion of the gesture must be at least two times longer than the vertical portion. Tip: You can also use the enter, space and backspace buttons on the Transcriber toolbar. Janam Technologies LLC Version 1, August, 2012 6―11 XG105 User Manual Using Transcriber (continued) Matching Letter Shapes to handwriting: Use the Letter Shapes feature to match your handwriting to a series of Letter Shapes recognized by Transcriber or to learn methods of writing characters that Transcriber will recognize more easily. 1. From a program, tap on the Transcriber toolbar. 2. On the Inking tab, tap Match Letter Shapes to your writing. 3. At the bottom of the Letter Shapes screen, tap the Character you want to explore. 4. At the top of the screen, double-tap the picture of this character. The character slowly redraws, showing the handwriting sequence. 5. Tap how often you write the character in that way: often, rarely or never. 6. Tap ok when you are finished. Saving Letter Shapes User Profile: You can save a user-specific Letter Shapes profile that you can open each time you use Transcriber. 1. From a program, tap on the Transcriber toolbar. 2. Match the appropriate Letter Shapes to your handwriting. 3. When finished, tap File > Save. 4. Enter a name for the user-specific Letter Shapes profile and select the type (.LSS is the default) and location for the file. 5. Tap Save. To open a Letter Shapes profile: 1. Tap File > Open. 2. Double-tap the Profile. To select a Letter Shapes User Profile: The Transcriber Letter Shapes feature supports two profiles, Master and Guest. The Master profile is not affected by any changes made to the Guest profile. 1. From a program, tap on the Transcriber toolbar. 2. Tap File and one of the following: ― Master if you are the primary user. ― Guest if you are not the primary user. Janam Technologies LLC Version 1, August, 2012 6―12 XG105 User Manual Using Transcriber (continued) Adding a dictionary to a device: To add a dictionary to your device, the PC and the device must be connected and synchronized. 1. On the PC, open ActiveSync and click Explore. 2. Copy the dictionary file (a file with a .dct extension) to the Dictionaries folder on your device. 3. On the device, open a program and select Transcriber as the input method. If the Transcriber Intro screen appears, tap ok to close it. 4. On the Transcriber toolbar, tap . On the Advanced tab, under Dictionaries, tap Settings. 5. In the Transcriber: Dictionaries list, select the check box next to the new dictionary and tap ok. The dictionary is now ready for use by Transcriber. Changing the text input method: Depending on your preference, you can use the on-screen keyboard or a handwriting recognition feature such as Block Recognizer, Letter Recognizer and Transcriber to enter text in programs. 1. Tap Start menu > Settings > Personal tab > Input. 2. On the Input method tab, select Block Recognizer, Letter Recognizer or Transcriber. 3. Tap ok. Tip: You can also change the text input method from within a program by tapping the input selector arrow and tapping an input method. Block recognizer Use a single stroke to write letters, numbers, symbols and punctuation which are then converted into typed text. Use gestures to enter return and backspace. Keyboard Tap keys on the keyboard displayed on the screen to enter text. Letter recognizer Write individual letters, numbers and punctuation which are converted into typed text. Transcriber Write in cursive, print or mixed handwriting (consisting of both cursive and print) and convert your writing into typed text. Janam Technologies LLC Version 1, August, 2012 6―13 XG105 User Manual 7 Synchronizing Data Microsoft® Windows Mobile Device Center and ActiveSync allow you to synchronize data between and XG105 and your PC. ActiveSync and Windows Mobile Device Center share many similarities. This User Guide includes screenshots and setup for Windows Mobile Device Center. The user experience should be virtually the same with ActiveSync. If you need additional assistance, please contact the JanamCare Service and Support Center. Create a User Profile To create a user profile: 1. Tap Start menu > Settings > Personal tab. 2. Select Owner Information. 3. Enter Identification, Notes and display Options information. ― Tap Identification information check box only if you prefer Owner Information to be the first screen to appear at start up. 4. Tap ok to save changes. Identification Notes Options Note: You can load data into the XG105 without associating the data with a user name. Janam Technologies LLC Version 1, August, 2012 7―1 XG105 User Manual Setting Up and Deleting Partnerships An XG105 partnership enables you to automatically synchronize selected XG105 files at startup when all synchronization conditions are met (see Note below). Alternatively, you can run synchronization manually (on command); copying only the files you want to sync. To set up a partnership to automatically sync files: 1. Connect your XG105 to your PC and power the XG105 on. Synchronization requires any one of the following: − A USB cable connected to a Janam USB Cradle with the XG105 docked in the cradle. − An Ethernet cable connected to a Janam RS232 Serial Cradle with the XG105 docked in the cradle. − A direct connection between the XG105 and the host PC, using a Janam USB or RS232 Serial Syncing/Charging Cable. 2. On your PC, select Start menu > Programs > Windows Mobile Device Center. 3. At the Microsoft Mobile Device Center Home screen (on your PC), click Set up your device to proceed. Note: It may be necessary to occasionally reactivate the unit from its sleep mode during the partnership set up and/or synchronization process. 4. The Set Up Windows Mobile Partnership window appears. Select the data types that you want to synchronize and tap Next. Note: The Files checkbox must be selected to synchronize files which were created on the XG105. 5. The Set Up Windows Mobile Partnership (Device name) window appears. Use the default name or enter a new name. 6. Tap Set Up to proceed. Set Up will start, followed by synchronization between the PC and the XG105. Janam Technologies LLC Version 1, August, 2012 7―2 XG105 User Manual Setting up and Deleting Partnerships (continued) The Windows Mobile Device Center screen on your PC will indicate synchronization progress. To add/remove files to/from the device: 1. Select (mouse over) Mobile Device Settings > Change content sync settings on the PC’s Windows Mobile screen. 2. The Change content sync settings window appears. Click the checkboxes of the desired file categories and click Save. Clicking Save will initiate file synchronization automatically. Sync verification is provided as the time of the last sync, displayed at the bottom-left of the host PC’s Windows Mobile screen. Note: Automatic synchronization will then take place whenever all of the following conditions are met: ― The XG105 is connected to the host PC. ― Data selected for synchronization has been changed. ― The Windows Mobile Device Center application is started. Janam Technologies LLC Version 1, August, 2012 7―3 XG105 User Manual Partnership (Connection) Settings To change partnership (connection) settings: 1. Open the Windows Mobile Device Center control panel. 2. Move the mouse icon over the Mobile Device Settings option, revealing the sub-menu of options. 3. Click Connection Settings. 4. Apply your preferences and click OK. Janam Technologies LLC Version 1, August, 2012 7―4 XG105 User Manual Partnership (Connection) Settings (continued) To end a partnership: 1. Unplug the USB cable from the PC to break the ActiveSync connection. 2. Open the Windows Mobile screen on the PC. 3. Click Mobile Device Settings and click End a partnership from the pop-up screen. 4. From the resulting End a partnership screen, select the partnership to be deleted and click the End partnership button. 5. Click Yes on the resulting confirmation screen. ― If there is a Synchronized Files folder, a Confirm Folder Deletion screen will appear. Tap Yes to proceed. Note: You will need to re-establish a partnership when you reconnect the XG105 to your PC. Janam Technologies LLC Version 1, August, 2012 7―5 XG105 User Manual 8 802.11 Wireless Configuration The following section outlines steps for basic 802.11 wireless configuration of your Janam XG105. Wireless Local Area Network Access To set up network profile: 1. Tap Start menu > Settings > Connections tab > Wireless Manager 2. Tap Wi-Fi to toggle it ON. 3. Tap Done. 4. Tap Start > Programs > Summit > scu or Start > Settings > System tab > Wi-Fi Note: By default, Active Profile is set to “ThirdPartyConfig”. 5. Tap Admin Login. Janam Technologies LLC Version 1, August, 2012 8―1 XG105 User Manual Wireless Local Area Network Access (continued) 6. Enter the password SUMMIT, using all UPPERCASE letters. 7. Tap OK. 8. Tap Profile tab and double tap Scan button to search for nearby AP’s. 9. Select the desired network and tap Configure button to set the network profile, e.g. SOFTWARE 10. Tap Yes button to complete the new profile configuration. Janam Technologies LLC Version 1, August, 2012 8―2 XG105 User Manual Wireless Local Area Network Access (continued) 11. On the Main tab change active profile to the new profile created in the last step, e.g. SOFTWARE 12. Perform a Soft Reset using the ESC/Trigger to invoke the new profile. Note: See Chapter 4 for more about device resets. 13. Tap Status tab to check the connection status. Janam Technologies LLC Version 1, August, 2012 8―3 XG105 User Manual 9 Bluetooth Overview Bluetooth is a short-range wireless communications technology. Devices with Bluetooth capabilities can send and/or receive information over distances of approximately 10 meters (30 feet). Unlike infrared technology, Bluetooth does not rely upon uninterrupted line-of-sight positioning of the devices between which information is being exchanged. Thus, you can send information to or receive information from another Bluetooth-capable device, even if the two devices are located in different rooms, as long as they are within range. Bluetooth can be used to: ― Send or receive information such as files, appointments, tasks and contact cards between Bluetooth-capable devices. ― Use a Bluetooth service. Once you connect to another device or computer using Bluetooth, you can locate and use any of the services available on that device. There are several ways to set up your computer for wireless access and the following section details the general instructions needed to set up Bluetooth on your Janam XG105. Please note that complex or custom installations may require additional expertise from Janam’s technical support team. Turning Bluetooth On/Off: 1. Tap Start menu > Settings > Connections tab. 2. Tap Bluetooth. 3. Select or clear the Turn on Bluetooth check box. Note: By default, Bluetooth is turned off. Once Bluetooth is activated, as directed in the steps above, Bluetooth will be automatically powered on and off whenever the XG105 is powered on or off. Janam Technologies LLC Version 1, August, 2012 9―1 XG105 User Manual Making a Bluetooth Device Visible When set to do so, Bluetooth-capable devices can, detect other Bluetooth devices and attempt to establish a partnership (sometimes referred to as a pairing), exchange information with it or use a Bluetooth service. To make the XG105’s Bluetooth function visible: 1. Tap Start menu > Settings > Connections tab. 2. Tap Bluetooth. 3. Select the Turn on Bluetooth check box. 4. Select the Make this device visible to other devices check box. Tip: If you want to disable the XG105’s Bluetooth visibility to other Bluetooth-capable devices, uncheck the Make this device visible to other devices check box. Bluetooth Partnerships A partnership is a relationship that you create between your XG105 and another Bluetooth device to securely exchange information. Creating a partnership involves entering the same Bluetooth Passcode on both devices. Once a partnership is created, the paired devices need only have Bluetooth turned on and within range to exchange information; they do not need to be visible. You need only create a partnership once between two devices. Once partnered, the devices can exchange information without re-entering the Passcode. Creating a Bluetooth partnership: 1. Ensure that the two devices are turned on, visible and within range. 2. Tap Start menu > Settings > Connections tab. 3. Tap Bluetooth > Devices tab > Add new device. ― Your XG105 searches for other Bluetooth-enabled devices and displays them in the list. 4. Tap the name of the device to be paired and tap Next. 5. In Passcode, if you want to use a Passcode (recommended for enhanced security), enter an alphanumeric Passcode between 1 and 16 characters and tap Next. Otherwise, leave the Passcode blank and tap Next. 6. Enter the same Passcode on the other device. Janam Technologies LLC Version 1, August, 2012 9―2 XG105 User Manual Bluetooth Partnerships (continued) To accept a Bluetooth partnership: 1. Ensure that your XG105 is turned on, visible and within close range. 2. When prompted to accept a partnership with the device that is sending the relationship request, tap Yes. 3. If a Passcode is requested, enter an alphanumeric Passcode between 0 and 16 characters in Passcode and tap Next. Note: Using a Passcode provides enhanced security. In addition, you must enter the same Passcode that was entered on the device requesting the partnership. To rename a Bluetooth partnership 1. Tap Start menu > Settings > Connections tab. 2. Tap Bluetooth > Devices tab. 3. Tap the partnership to be renamed. A pop-up menu appears. Select Edit. 4. Enter a new name for the partnership and tap Save. Janam Technologies LLC Version 1, August, 2012 9―3 XG105 User Manual Bluetooth Partnerships (continued) To delete a Bluetooth partnership: 1. Tap Start menu > Settings > Connections tab. 2. Tap Bluetooth > Devices tab. 3. Tap and hold the partnership you want to end. Select Delete from the pop-up menu. 4. Tap Yes to confirm. Bluetooth Beam To send files via Bluetooth: 1. Tap and hold on the file you want to send to the receiving device. 2. From the pop-up menu that appears, select Beam File. 3. Nearby Bluetooth devices are displayed on the list. 4. Tap on the targeted device to beam the file. • • • • • Janam Technologies LLC Version 1, August, 2012 9―4 XG105 User Manual Bluetooth Beam (continued) To receive a Bluetooth beam: IMPORTANT NOTE! The XG105 will not detect and notify you of incoming Bluetooth beams unless you set it up as follows: 1. Tap Start menu > Settings > Connections tab > Beam. 2. Select the Receive all incoming beams check box. 3. Ensure that your device is turned on, visible and within close range of the device that is beaming the information. 4. When prompted with “You are receiving data. To stop receiving, press Cancel”, tap Hide to continue or no action to continue. If you want to reject the beamed information, then tap Cancel. 5. A message will ask “Do you want to save “filename” to your device?”. Tap Yes to receive the information and store it in the XG105 \My Documents folder. • • • Bluetooth Virtual COM Ports Overview Some programs can connect only through a serial (COM) port. This can be true even if the device itself is Bluetooth-enabled. To make it possible for such programs to use a Bluetooth connection, you must set up a virtual COM port. Once created, this virtual port can be used like any other COM port. You can use a virtual COM port for programs that, for example, connect to a GPS receiver or to connect to a Bluetooth enabled printer. Here are some examples of how to use incoming and outgoing virtual COM ports. Outgoing COM port: You have a program on your device that cannot use Bluetooth directly but can print to a serial (COM) port. You can create a Bluetooth partnership with a Bluetooth-enabled printer and then set up an outgoing COM port (for example, COM 1). The program can then send print data to COM 1, which reaches the Bluetooth-enabled printer. Incoming COM port: You have a Bluetooth-enabled GPS receiver and your device has a GPS tracking program that expects to receive GPS data over a serial (COM) port. You can create a Bluetooth partnership with the Bluetooth-enabled GPS receiver and then set up an incoming COM port (for example, COM 2). The GPS program can then send data to COM 2, which reaches the GPS receiver. Even if both your device and another Bluetooth-enabled device contain programs that need to use serial ports to communicate, you can set up the appropriate virtual incoming and outgoing COM ports on each device so that the programs can use a Bluetooth connection to communicate. Janam Technologies LLC Version 1, August, 2012 9―5 XG105 User Manual Bluetooth Virtual COM Ports Overview (continued) Setting up an incoming Bluetooth COM port: 1. Make sure that your device is currently connected to the other device via Bluetooth. 2. Tap Start menu > Settings > Connections tab. 3. Tap Bluetooth > COM ports tab. 4. Tap New Incoming Port. 5. Select a numbered COM port from the list. If the port cannot be created, it is in use. Select a different numbered port. 6. To use this COM port to communicate only with devices with which your device has a Bluetooth partnership, select the Secure Connection check box. 7. Tap Finish. Setting up an outgoing Bluetooth COM port: The list item new outgoing port will be available only if one or more Bluetooth-connected devices support serial (COM) connections. 1. Make sure that your device is currently connected to the other device via Bluetooth. 2. Tap Start menu > Settings > Connections tab. 3. Tap Bluetooth > COM ports tab. 4. Tap New Outgoing Port. 5. Select a numbered COM port from the list. If the port cannot be created, it is in use. Select a different numbered port. 6. To use this COM port to communicate only with devices with which your device has a Bluetooth partnership, select the Secure Connection check box. 7. Tap Finish. Janam Technologies LLC Version 1, August, 2012 9―6 XG105 User Manual 10 Regulatory and Maintenance Regulatory and Safety Approvals The CE mark on the product indicates that the system has been tested to and conforms with the provisions noted within the 2004/108/EC Electromagnetic Compatibility Directive. For further information, please contact: Janam Technologies 100 Crossways Park West, Suite 105 Woodbury, NY 11797 Janam Technologies shall not be liable for use of our product with equipment (i.e., power supplies, personal computers, etc.) that is not CE marked and does not comply with the Low Voltage Directive. FCC and Canadian Compliance XG Series mobile computers meet or exceed all applicable standards and have been manufactured to the highest level of quality. To see the specific labels associated with RF terminals configurations, visit www.janam.com. Warning: Changes or modifications to this unit not expressly approved by the party responsible for compliance could void the user authority to operate the equipment. XG Series RF Terminals with 802.11 and Bluetooth RF, regulatory and safety approvals: Parameter RF approvals U.S.A. Canada European Community Australia Specification FCC Part 15 Subpart C RSS-210 issue 7:2007 annex 8 EN 300 328 v1.7.1:2006 AS/NZS 4268:2003+A1 :2005+A2 :2006 This device complies with Part 15 of the FCC Rules. Operation is subject to the following two conditions: (1) this device may not cause harmful interference; and (2) this device must accept any interference received, including interference that may cause undesired operation. This equipment has been tested and found to comply with the limits for a Class B digital device, pursuant to Part 15 of the FCC Rules. These limits are designed to provide reasonable protection against harmful interference in a residential installation. This equipment generates, uses and can radiate radio frequency energy and, if not installed and used in accordance with the instructions, may cause harmful interference to radio communications. Janam Technologies LLC Version 1, August, 2012 10―1 XG105 User Manual XG Series RF Terminals with 802.11 and Bluetooth (continued) However, there is no guarantee that interference will not occur in a particular installation. If this equipment does cause harmful interference to radio or television reception, which can be determined by turning the equipment off and on, the user is encouraged to try to correct the interference by one or more of the following measures: ― Reorient or relocate the receiving antenna. ― Increase the separation between the equipment and receiver. ― Connect the equipment to an outlet on a circuit different from that to which the receiver is connected. ― Consult the dealer or an experienced radio/TV technician for help. If necessary, the user should consult the dealer or an experienced radio/television technician for additional suggestions. The user may find the following booklet helpful: “Something about Interference.” This is available at local FCC regional offices. Janam is not responsible for any radio or television interference caused by unauthorized modifications of this equipment or the substitution or attachment of connective cables and equipment other than those specified by our company. The correction is the responsibility of the user. Use only shielded data cables with this system. This device and its antenna must not be co-located or operating in conjunction with any other antenna or transmitter. To maintain compliance with the FCC RF exposure guidelines for body-worn operation, do not use accessories that contain metallic components other than what is specified by the manufacturer. This Class B digital apparatus complies with the Canadian ICES-003. Cet appareil numerique de la Class B est conforme a la norm NMB-003 du Canada. Operation is subject to the following two conditions: (1) this device may not cause interference, and (2) this device must accept any interference, including interference that may cause undesired operation of the device. L’utilisation de ce dispositif est autorisée seulement aux deux conditions suivantes : (1) il ne doit pas produire de brouillage, et (2) l’utilisateur du dispositif doit être prêt à accepter tout brouillage radioélectrique reçu, même si ce brouillage est susceptible de compromettre le fonctionnement du dispositif. To prevent radio interference to the licensed service, this device is intended to be operated indoors and away from windows to provide maximum shielding. Equipment (or its transmit antenna) that is installed outdoors is subject to licensing. Janam Technologies LLC Version 1, August, 2012 10―2 XG105 User Manual Regulatory and Safety Approvals Parameter R&TTE Australia Specification EN 300 328 v1.7.1:2006 EN 301 489-1 v1.8.1:2005 EN 301 489-17 v1.2.1:2002 EN 60950-1:2006 EN 50392:2004 AS/NZS CISPR 22:2006 This product is marked with in accordance with the Class II product requirements specified in the R&TTE Directive, 1999/5/EC. The equipment is intended for use throughout the European Community. Its authorization for use in France is restricted as follows. PAN European Frequency Range: 2.402-2.480 GHz Restrictions in France: Indoor use: Maximum power (EIRP*) of 100 mW for the 2400-2483.5 MHz band. Outdoor use: Maximum power (EIRP*) of 100 mW for the 2400-2454 MHz band and maximum power (EIRP*) of 10 mW for the 2454-2483.5 MHz band. Other Electrically Powered Devices The radio in the XG Series terminal operates on the same frequency band as a microwave oven. Therefore, if you use a microwave within range of the device you may notice performance degradation in your wireless network. However, both your microwave and your wireless network will continue to function. Care and Cleaning of Terminals When needed, clean the scan window and the LCD display with a clean, non-abrasive, lint-free cloth. The terminal can be cleaned with a damp cloth. For European Community users Janam Technologies complies with Directive 2002/96/EC of THE EUROPEAN PARLIAMENT AND OF THE COUNCIL OF 27 January 2003 on waste electrical and electronic equipment (WEEE). Waste electrical and electronic equipment (WEEE) information This product has required the extraction and use of natural resources for its production. It may contain hazardous substances that could impact health and the environment if not properly disposed of. In order to avoid the dissemination of those substances in our environment and to diminish the pressure on the natural resources, we encourage you to use the appropriate take-back systems for product disposal. Those systems will reuse or recycle most of the materials of the product you are disposing in a sound way. The crossed out wheeled bin symbol informs you that the product should not be disposed of along with municipal waste and invites you to use the appropriate separate take-back systems for product disposal. If you need more information on the collection, reuse and recycling of these systems, please contact your local region’s waste administration. You may also contact your supplier for more information on the environmental performances of this product. Janam Technologies LLC Version 1, August, 2012 10―3 XG105 User Manual Battery Warning CAUTION RISK OF EXPLOSION IF BATTERY IS REPLACED BY AN INCORRECT TYPE DISPOSE OF USED BATTERIES ACCORDING TO THE INSTRUCTIONS Use only batteries approved by Janam for use in specific Janam products and charge batteries using only chargers or cradles approved by Janam for use with the mobile computer and battery being charged. Use only conveniently accessible wall outlets that are easily reached with the length of charger or cradle’s supplied power cable. Janam charging accessories provide an easy and effective means of charging Janam devices and Janam-approved batteries optimally. Chargers, cradles and other Janam accessories are available from Janam-authorized dealers. For additional information, visit www.janam.com. GENERAL INFORMATION 1. Read all instructions and warnings before using the Janam charger or cradle. 2. Please retain this and all other related instructions for future reference. WARNING 1. Do not open the charger or cradle. No user-serviceable parts are inside. Neither Janam chargers nor cradles are user-serviceable. 2. Do not use the charger or cradle if any damage or cracking of the charger’s enclosure is discovered. A damaged charger or cradle should be properly disposed of. 3. Do not permit conductive (metallic) materials to come into contact with the output terminals of the charging device. Doing so can create a unsafe short-circuit conditon and/or damage the charger. 4. Janam chargers and cradles are for indoor use only and must not be exposed to moisture or be placed where liquid may spill. 5. Janam chargers and cradles are designed expressly for use only with the Janam mobile computers and rechargable batteries specified for use with them. Do not use this or any Janam charger or cradle for other purposes. OPERATING NOTES 1 Chargers: Insert the output plug of the charger to the mobile computer before plugging the charger into an AC power outlet. Cradles: Dock the mobile computer and/or place spare rechargable batteries in the cradle before plugging the cradle’s power supply into an AC power outlet. 2. Always unplug the charger or cradle from the AC power outlet when not in use. 3. Ensure that your local power supply system complies with the technical data of the charger or cradle. Janam Technologies LLC Version 1, August, 2012 10―4


![FLM HD18 [v08]](http://vs1.manualzilla.com/store/data/005664321_1-9e0d84f2b9cac33a4ebfb5904f0dafa1-150x150.png)