1
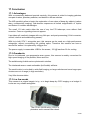
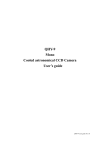
The QHY6 CCD camera
and CCDCap v2.6.2
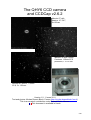
Messier 57 with
Newton 10’’ f/4.7,
6x120 sec
Messier 36 with vintage
Pentacon 135mm f/2.8
photolens, 1 x 120 sec
Messier 82 and 81, 135mm
f/2.8, 3 x 120 sec
Version 1.2, 11 mars 2011
Text and photos: Nicolas Dupont-Bloch, France (http://nicolas.dupontbloch.free.fr)
This is an amateur contribution under General Public Licence.
This document is available in french
1/16
1
2
3
4
5
6
Summary ......................................................................................................................3
Specifications ...............................................................................................................3
Software installation......................................................................................................3
Power supplies .............................................................................................................4
Connectors and adaptors .............................................................................................4
CCDCap V2.6.2 acquisition software............................................................................5
6.1
Camera selection...................................................................................................5
6.2
Resolution, binning, VBE/NVBE, High Speed .......................................................5
7 Histogram .....................................................................................................................7
8 Oher options .................................................................................................................9
8.1
High Speed............................................................................................................9
8.2
Auto Preview Resume ...........................................................................................9
8.3
Hot/Cold Pixels ......................................................................................................9
8.4
Horizontal Flip and Vertical Flip .............................................................................9
8.5
Negative Image .....................................................................................................9
8.6
Histogram / Autocontrast and Histogram / Stretch Histogram ...............................9
9 Gain and Offset ..........................................................................................................10
10
Square pixels ..........................................................................................................10
11
Focus ......................................................................................................................10
12
Reticles ...................................................................................................................11
13
Image acquisition ....................................................................................................11
13.1 Image format .......................................................................................................11
13.2 BMP image acquisition ........................................................................................11
13.3 FIT image acquisition ..........................................................................................12
13.4 Sequence capture ...............................................................................................12
13.5 Script ...................................................................................................................13
14
Humidity and cleaning.............................................................................................14
15
Can this camera be used for planetary imaging? ....................................................14
16
Interesting links and softwares ................................................................................15
17
Conclusion ..............................................................................................................16
17.1 Advantages .........................................................................................................16
17.2 Disadvantages.....................................................................................................16
17.3 In a few words .....................................................................................................16
I apologize for my english !
Please report mistakes and improvements to n.dupontbloch (at) free.fr
The ruler on 1st page is in centimeters
2/16
1 Summary
This cooled, 16-bit CCD camera is suited for long-exposure, deep-sky imaging on a
budget, and for autoguiding with its in-built ST-4 port. The sensor has a low noise and a
good sensitivy to H-Alpha. Since this camera and its associated acquisition software are
delivered with little documentation, here is a basic user's manual about the hardware,
setup basics, software, and some tips.
2 Specifications
-
Sensor Sony ICX 259 AL monochrome, interline, interlaced, EXView HAD CCD
0.4 Mpixels (752 x 582), pixel size 6.5 x 6.25 µm, chip size 6x4.96mm
Quantum efficiency 65% at 560nm, 55% at 650nm
binning 1x1, 2x2
anti-blooming –115dB
exposure from 1/1000 sec, unlimited, electronic shutter
16-bit converter
noise 7-10 electrons (at normal speed 600kpixels/sec)
Peltier cooling, ∆ = -25°C
USB 2.0, image transfer 600kpixels/sec (< 1 second), 6Mp/s for preview
in-built ST-4 autoguider port
size 60x60x45mm
weight 275g
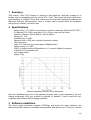
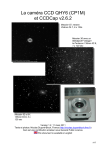
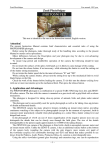
Spectral sensitivity (source: Sony datasheet)
Note the well-balanced curve of the spectral sensivity and a good response at the red,
Halpha wavelength (656 nm) emitted by nebulae. In addition, it has a small but nonneglictible near-infrared (NIR) imaging capability.
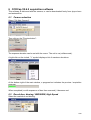
3 Software installation
The driver, image acquisition software (CCDCap) and plugins for other softwares, are
delivered with the camera, or available at astrosoft.be and qhyccd.com. The driver must be
3/16
installed prior to connecting the camera. I noticed no trouble at all during this very simple
installation.
4 Power supplies
-
12V, from 0.65 to 2 amperes for fan and cooling, if long exposures are planned.
USB for the sensor and to transfer images to the computer, with or without cooling.
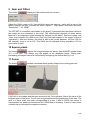
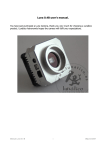
5 Connectors and adaptors
1 = cooling power supply (AC adaptor delivered with the camera)
2 = USB to transfer images to the computer
3 = RJ12 cable to autoguider port of the mount
A green LED indicates wether the camera is beeing acquiring an image. The cooler power
supply cable is rather rigid and tend to unplug, therefore it has to be secured by a wire
attached to one of the screws of the fan grid.
The camera also comes with:
- a removable 1¼-inch adaptor
- a T2 thread (M42 x 0.75)
- a filter thread (M28.5 x 0.5)
An optional 2-inch adaptor is available.
4/16
6 CCDCap V2.6.2 acquisition software
This software is delivered with the camera, or can be downloaded freely from qhyccd.com
and astrosoft.be.
6.1
Camera selection
Select "0.4 Mpix Camera".
Then click on the "Preview button":
The exposure duration can be set with the cursor. The unit is ms (milliseconds).
A right click on the circled, "+" symbol displays a list of maximum durations:
At the bottom right of the main window, a progress bar indicates the preview / acquisition
progress:
When completed (or with exposures of less than a second), it becomes red.
6.2
Resolution, binning, VBE/NVBE, High Speed
Select the resolution and binning:
5/16
"2x2" is the binning mode: pixels (photosites) are grouped by 4 (2x2) and act as a single,
4x more sensitive pixel. The resolution and the image size are divided by 4, the field of
view is unchanged. This is extremely usefull to detect and center a faint object like a
galaxy. The 2x2 binning can also been used to quickly acquire color images with RGB
filters (or other filters) to add the colors to a black and white, full resolution ("1x1") image.
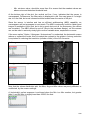
When the object is in the field, select "1x1" for full resolution and nominal sensitivity. Here
is the first mystery: VBE means "Venetian Blind Effect". VBE and NVBE refer to different
modes of image processing between its reading and its displaying in CCDCap, because
the sensor is "interline".
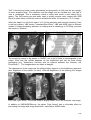
This cropped image is in "1x1 VBE":
This one is in "1x1 NVBE":
The sensitivity seems to be greater in "NVBE", but a grid of lines is superimposed to the
image. Note that this artifact depends on the brightness and can be fixed during
processing (e.g. "deinterlace" function) with an external software like Fitswork, Iris,
PhotoShop… The images above are taken at daylight.
The appearance of the image and its artifacts highly depend on the brightness (exposure
time, brightness of the subject, f/d ratio). With low brightness, at the evening, the images
become closer:
Left: VBE, right: NVBE. The NVBE image is slightly finest:: this is an unaltered, raw image.
In addition to VBE/NVBE/Binning, the option "High Speed" has a noticeable effect on
previewing the image and image acquisition, especially in NVBE mode.
6/16
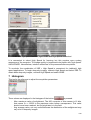
Left: NVBE and High speed checked, right: NVBE and High Speed unchecked.
It is convenient to select High Speed for focusing, but this requires more system
ressources of the computer. The image quality is (supposed to be) better with "high speed"
UNCHECKED. Nevertheless, interline artifact has to be processed after acquisition.
To conclude, the combination of VBE + High Speed is convenient for (relatively) high
speed applications. To begin deep-sky imaging, uncheck High Speed and select VBE. To
obtain beter deep-sky images, uncheck High Speed and select NVBE.
7 Histogram
This tool is the reference to adjust the acquisition parameters.
Three values are displayed in the histogram if the button
-
-
is pressed.
Max: maximum value of enlightment. The A/D converter of this camera is 16 bits,
that means 216 = 65535 is the maximum value before overexposure. This value
should never been reached, but if a bright star is in the field.
Avg: average value, not very usefull because the distribution of the enlightment may
vary a lot in deep-sky images.
7/16
-
Min: minimum value, should be more than 0 to ensure that the weakest values are
above noise and detection threshold level.
At the bottom right of the plot, the vertical red line, if any, indicates that the sensor is
overexposed. Furthermore, the Max value is displayed in red. One can ignore it if a bright
star is in the field, but most values should be located near the center of the plot.
Since the sensor is interline and has an efficient antiblooming (ABG) capability, an
overexposure will not propagate to next pixels. The ABG is extremely useful to obtain good
images if aesthetics is the goal, but is not a good choice at all for photometry (the values
are uncertain). The ABG cannot be set off (due to the hardware design), so this camera
can not be used to seriously study light curves of variable stars, exoplanets or novae.
If the menu option "Option / Histogram / Autocontrast" is unchecked, the horizontal cursors
reduce or expand the levels; this is to adapt the contrast to the subject. A strong reduction
is equivalent to reducing the resolution (number of bits) of the A/D converter.
Soft image:
Strongly contrasted image:
Note that the values distribution plot, the Max, Avg and Min values are poorly affected, or
unaffected, by the cursors settings.
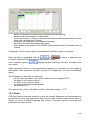
A (technically) perfect exposure is achieved when the Min is a little number, but greater
than 0, and the Max is slightly less than 65565, like that:
8/16
The Max value is now displayed in green. In such conditions, the cursors may be used to
conveniently adapt the contrast of the image displayed to the contrast of the subject.
These settings affects both the saved image and the displayed image.
8 Oher options
Click on the menu options:
8.1
High Speed
This has been previously discussed; it is usefull while previewing but should be unchecked
for acquisitions.
8.2
Auto Preview Resume
If checked, returns to the preview mode after acquisition.
8.3
Hot/Cold Pixels
If checked, removes hot and cold pixels. Usefull in some cases, but perhaps not very
reliable. Nevertheless, hot and cold pixels can be correctly removed are cleanly removed
with an external software (e.g. DeepSkyStacker) with dark subtraction and median
stacking. This processing, which is standard for all CCD cameras, is not explained in this
document.
8.4
Horizontal Flip and Vertical Flip
Help to center the field when compared to a sky map. Simultaneous H and V flip can
simulate a rotation of the camera when adjusting the field of view.
8.5
Negative Image
Inverts black and white. Human eye is more able to distinguish black faint shades on a
white background. Very usefull to detect galaxies and nebulae while previewing and
centering. This operates on both preview and saved images.
8.6
Histogram / Autocontrast and Histogram / Stretch Histogram
Expand, in two slightly different ways, the distribution of low and high values. They act on
both displayed and saved BMP images, but very few on saved FIT images. These two
options can be combined. They are usefull to detect a faint object in preview, and to
ensure that most values are above noise and below saturation. The "Autocontrast"
disables the cursors of the "Histogram / Statistics" plot of the main windows.
9/16
9 Gain and Offset
This button
displays a little window with two cursors:
Adjust the GAIN cursor to 60, then perfectly cover the camera / optics with a cap so the
sensor receives no light. Uncheck the menu "Option" / "High speed" and select the menu
"Resolution" / "1x1 NVBE".
The OFFSET is a constant value added to the signal. It garantees that the lowest values of
the image are not concealed in the noise. The offset setting depends on each sensor
because of tiny dispersion while building the sensors (on the wafer). Start the cooling, wait
10mn, then increase the offset from 0 until very little light appear in the image (a kind of
"light black"). After the dealers, the offset is said to be correct between 100 and 120 (for
this camera); mine is set to 100. The GAIN can be adjusted during acquisition; 60 is a
good value to start.
10 Square pixels
The button
resizes the image because the sensor has ALMOST square pixels
(6.5 x 6.25 µm). This affects only the aspect of the displayed image. During postprocessing, the aspect can to be corrected by multiplying the vertical size by 1.04.
11 Focus
The button
creates a windows which greatly helps to focus during preview:
A left click in the image sets the area zoomed in the Focus window. Max is the value of the
brightest pixel of this area. The 3D plot at right represents the brightness of the area. The
goal is to have a tall, thin peak corresponding to a star. If Max is 65535, the sensor is
overexposed, the peak is truncated and the FWHM has no meaning. In such a case, select
a fainter star or decrease the exposure duration.
10/16
If the check box "Absolute display" is unchecked, the peak height is not proportional to the
MAX, but it is more visible if the star is rather faint.
The FWHM (for Full Width at Half Maximum) is the measurement of the peak width at half
its height; that is an extremely convenient way to know how a star is in focus. The unit is
pixels. The FWHM should be as small as possible. For deep-sky imaging with usual
turbulence, a FWHM of 4 is normal for an intermediatly bright star.
A fine image depends on both the FWHM and the sampling (in arcseconds per pixel). With
a small telelens, e.g. 135mm, a star with a FWHM of 3 is rather quare. With a 1000mm
focal length, a star with a FWHM of 4 is rounded, more natural.
If an electric focuser is connected, the software can remotly control it through the ASCOM
protocol. If no ASCOM motofocuser is connected, theses buttons remain effectless
(grayed).
12 Reticles
These buttons
display two kinds of mutually exclusive reticles. The
first may help to manually center a star if the camera is used as a manual autoguider, i.e. it
acts like a reticled eyepiece. The second helps to center the subject in the field. The
reticles are only visible on the screen, not in the saved images.
13 Image acquisition
13.1 Image format
CCDCap is able to save an image in two flavours:
- BMP (for BitMaP) is a Windows image file format. It contains 255 gray levels
since this camera is black and white, but a BMP can contains color information in
3x8 bits for Red, Green and Blue.
- FIT (= FITS, for Flexible Image Transport System), a file format designed by the
NASA and Goddard Space Flight Center for astronomical purposes. Extremely
pregnant, it can contain multidimensional arrays, information on row and columns,
and a text description. The FITS format is used for institutional equipments (Hubble
Space Telescope, Subaru, Spitzer space telescope…) and amateur astronomy.
Numerous softwares et freewares can manipulate FIT files (DeepSkyStacker,
Fitswork, Iris…). The NASA provides viewers, manipulation software and
extensions for Windows, Unix, PhotoShop... See http://fits.gsfc.nasa.gov.
13.2 BMP image acquisition
This is the simpliest way to save an image, either a preview or a long-exposure
acquisition. Select the menu File / Save as BMP:
Then choose a directory and enter the file name.
11/16
13.3 FIT image acquisition
This option does not work with a preview image. The first setting is the exposure duration
in the "sequence capture" frame:
A left click on
display a list of duration units: milliseconds or seconds.
Then click on the value ("10" here) and enter a new one if necessary.
A right click on the little
button displays a liste of maximum durations.
The combination of the unit and maximum duration allow to choose between 1ms and
10,000 seconds. A deep-sky, long exposure requires the cooling device and the fan to be
active (with A/C adaptor plugged) in order to reduce the noise in the image.
Now click on
which becomes
when the image is
beeing acquiring. At the bottom of the main window, a progress bar indicates the
.
completion:
When completed, the image can be saved with menu option "Capture Files" / "Snapshot
(FIT)":
13.4 Sequence capture
CCDCap is able to automatize a sequence of captures. Although this feature is not
documented, it is simple and usefull. Click on
and an array is displayed:
12/16
-
Mode: a clickable list to chose the acquisition mode and binning.
duration: exposure duration in milliseconds.
Count: the number of images to automatically acquire while the astronomer is in the
living room, drinking liters of coffee.
File prefix: the beginning of the images files names.
File suffix: the end of the images files names.
Filter: seems to be related to an ASCOM motorized filter wheel. Not tested, mine is
manual.
If necessary, Use the arrows keys of the keyboard to shift the array in its window.
, on
When the array is completed, click on
be saved, loaded and cleared with the appropriate buttons.
Here is another mystery:
very usefull.
to cancel. A sequence can
displays an error message, and does not seem to be
While acquiring a sequence, the progress bar indicates the completion of each image (if
the duration of the exposures exceed 1 second). The images are, of course, automatically
saved.
The file names are built with five elements:
- the file name entered in menu option "Capture Files / Snapshot (FIT)"
- the prefix in the sequence array
- the suffix in the sequence array
- an automatically incremented number
- the extension .FIT
The result will be : prefix + file name + suffix + automatic number + ".FIT".
13.5 Script
CCDCap is able to interpret scripts to control the camera. Absolutely no documentation is
provided at this time, but qhyccd.com has a forum which includes some entries about it.
Scripts are close to BASIC language and include, of course, specific commands and
parameters for each camera.
13/16
14 Humidity and cleaning
In case of EXTREME humidity, insert a silicagel bag through the hole on the side of the
camera. This hole is closed by a rubber cap. Appropriate silicagel bags can be purchased
from the camera's dealer.
The sensor is protected by a glass window. If grease is on the window, Sony
recommend to gently clean it with ethyl alcohol and a cotton bud. The sensor is
surrounded by a piece of foam which hangs the cotton. Teezers and a brush can help to
remove the remaining cotton fluff, but this is tedious.
Dust can be removed with an air blower.
Never touch the electric parts because they are very sensitive to static discharges.
15 Can this camera be used for planetary imaging?
Since the ICX 259 AL sensor is "interlaced", it reads odd then even lines. This takes a
while, wherein the atmospheric turbulence (and the telescope vibrations) can result in a
little motion or geometric disturbance of the subject. Therefore, the first and second half
images, acquired in two passes, are slightly different. In other terms, an interlaced sensor
is unable to acquire fast motion images, like a planet with a long focal length.
Note: "interlaced" is not to be confused with "interline". Interline refers to the insertion,
betwen the photosensitive lines, of lines dedicated to fast transfer of the image lines to the
converter. This is in opposition to reading all the matrix (Full Frame Transfer). Interline is
used by both "interlaced" sensors (for broadcast video cameras), and "progressive scan"
sensors (for high velocity images and TVHD). "Progressive scan" sensors are able to
transfer the image quickly; each pixel can be adressed separately, and, most important,
the lines are read in the correct order.
For example, the Sony ICX 285 AL is "interline progressive scan" while the ICX 259 AL
is simply "interline". What is not said in the datasheet (technical reference documentation
from the manufacturer) is that the ICX 259 AL is interlaced, because it is primarily intended
for non-TVHD, CCIR video cameras which are always interlaced. Nevertheless, regarding
its qualities, using it in a deep-sky camera is absolutely relevant.
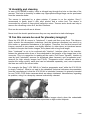
Left: shaky camera, right, steady camera. These images clearly show the undesirable
effect of an interlaced sensor with short exposures on high motion subjects.
14/16
These images (high magnification, zoomed) are separated by a few seconds. At left, the
turbulence is more important. The turbulence shifted odd and even lines during the twotime reading process of the interlaced sensor.
This can also affect deep-sky, long exposure images if the telescope is not perfectly
steady (shaky tripod, weak mount, wind), if the focal is too long, or if there is noticeable
turbulence. But, in this case, this undesirable phenomena is wiped out by the blurring
effect of the light accumulation on neighbour pixels.
To conclude, such a camera is not suited for planetary imaging, except for some peculiar
applications:
- short-exposure, medium focal length, wide-field imaging of the Moon, with limited
resolution (but high contrast).
- large solar prominences with limited magnification.
- Near infra-red, medium exposure duration imaging, with limited magnification and a
rock-stable mount, for Jupiter and Saturn which generously span 40 to 45
arcseconds.
- short-focal and wide-field imaging of the satellites of a planet.
16 Interesting links and softwares
www.m42optic.fr (importer and dealer with active support)
www.qhyccd.com (manufacturer / support forum)
astrosoft.be (CCDcap, drivers and plugins)
qhy.narod.ru (QHY6capture)
freenet-homepage.de/JDierks/ (FitsWork)
deepskystacker.free.fr/ (DeepSkyStacker)
www.astrosurf.com/~buil/iris/iris.htm (Iris)
fits.gsfc.nasa.gov (FITS info, plugins, softwares)
www.stark-labs.com/ (PHDGuiding)
www.guidemaster.de/ (GuideMaster)
15/16
17 Conclusion
17.1 Advantages
With a conveniently balanced spectral sensivity, this camera is suited to imaging galaxies,
compact clusters, planetary nebulae, and details in diffuse nebulae.
The NIR sensitivity allow to begin the exploration of new views of deep-sky objects (carbon
stars, multispectral imaging), mid-duration exposures at limited magnification of Jupiter
and Saturn in invisible wavelentghs.
The small, 1/3 inch matrix allow the use of any low F/D telescope, even without field
corrector. Coma or vignetting does not appear.
It provides soft, aesthetic images with very little pre- and post-processing (16-bit converter,
cooled, interline and antiblooming sensor).
With its in-built ST-4 autoguider port, this camera can be used as a high-performance
autoguider, without re-centering the guiding optics. Therefore this camera can have a
second life wether it is replaced by a bigger one.
The power supply is reasonable: USB for the sensor, 12V @ less then 2A for cooling.
17.2 Drawbacks
Due to its interlaced, non-progressive-scan sensor, this camera is weakly convenient for
high-speed imaging of the planets, Moon and Sun.
The antiblooming forbids serious photometric studies.
The interlaced sensor create noticeable (but fixable) artifacts.
The small matrix is not suited to wide-field imaging, so large nebulae and some large open
clusters are out of range (in high resolution).
Very little documentation.
17.3 In a few words
This camera is a unique bargain to try, or to begin deep-sky CCD imaging on a budget. It
is also an very reliable autoguider.
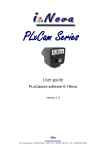
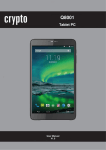
The CP1M / QHY6 with a 135 f/2.8
photolens and a manuel filter wheel.
16/16