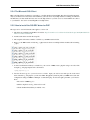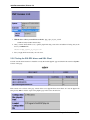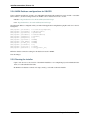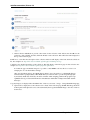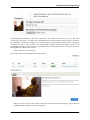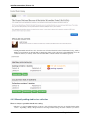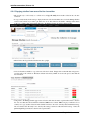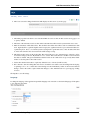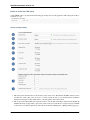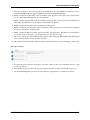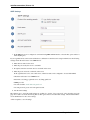
1
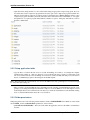
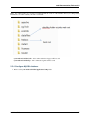
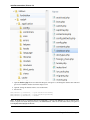
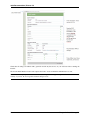
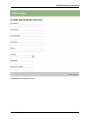
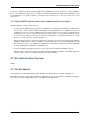
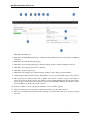
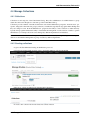
nada Documentation
Release 4.0
IHSN
February 07, 2014
Contents
i
ii
nada Documentation, Release 4.0
NADA is an open source microdata cataloging system, complaint with the Data Documentation Initiative (DDI) and
Dublin Core’s RDF metadata standards. It serves as a portal for researchers to browse, search, compare, apply for
access, and download relevant census or survey datasets, questionnaires, reports and other information.
Project home page: http://www.ihsn.org/nada
Documentation topics:
Contents
1
nada Documentation, Release 4.0
2
Contents
CHAPTER 1
Requirements
NADA requires PHP and a MySQL database at minimum.
1.1 PHP requirements
The minimum required version is PHP 5.2 but we strongly recommend that you use PHP 5.3 or 5.4. The following
PHP extensions are required for NADA:
• xsl
• xml
• mbstring
• mysql or sqlsrv
Note: See section on PHP configurations for configuring your server for NADA.
1.2 Web Server requirements
• Apache 2.x
• IIS 6/7.x
1.3 Supported Databases
• MySQL 5.x
• Microsoft SQL Server with fulltext support
3
nada Documentation, Release 4.0
4
Chapter 1. Requirements
CHAPTER 2
Installation guide
2.1 Requirements
NADA requires PHP and a MySQL database at minimum.
2.1.1 PHP requirements
The minimum required version is PHP 5.2 but we strongly recommend that you use PHP 5.3 or 5.4. The following
PHP extensions are required for NADA:
• xsl
• xml
• mbstring
• mysql or sqlsrv
Note: See section on PHP configurations for configuring your server for NADA.
2.1.2 Web Server requirements
• Apache 2.x
• IIS 6/7.x
2.1.3 Supported Databases
• MySQL 5.x
• Microsoft SQL Server with fulltext support
2.2 Installation
2.2.1 Download the latest NADA
• Download a copy of the NADA 4 software from the IHSN: http://ihsn.org/nada
5
nada Documentation, Release 4.0
• Open and extract (unzip) the files to your local hard drive using an appropriate compression program. If you do
not already have such a compression program there are many open source compression programs available. For
Windows use the built-in compression software wizard or alternatively the 7-ZIP File Manager which is a free
compression program. On Linux systems the same tasks can be achieved from the command line, or once again,
through the use of a separate program. Mac OSX has a number of options - third party, and built-in, as well as
from the command line.
2.2.2 Setup application folder
• Copy the files to a folder in the web server root folder. If installing on a localhost - for example the computer
currently being working on – then copy and paste (or move) the files into the root folder (or a sub-folder) of the
web server. If, however, the server is running on a remote host (such as an ISP), then this process will involve
the use of a FTP client program or file manager from the ISP’s Cpanel.
Note: The folder name chosen will in many cases become the URL for the catalog. Examples for a folder name might
be – data, microdata, catalog etc.
• The root folder is located in different places depending upon the operating system/distribution and web server
package you are using and it might be called htdocs, httpd, or www. On Windows servers this might be located
in the inetpub directory and on Linux in the /var directory. Consult the documentation for the distribution being
used or contact the ISP if unsure where the root web folder is.
2.2.3 Folder permissions
Change the permissions for the following folders and their contents to READ/WRITE and on Windows servers make
sure the IUSR_ user has read/write/delete permissions on these folders:
• your-nada-web-folder/datafiles – this is the folder where the application will store the DDI‘s, documentation
and data.
6
Chapter 2. Installation guide
nada Documentation, Release 4.0
Note: For added security, it is strongly recommended that the location of the datafiles directory be changed after
installation to a location outside your web root structure.
• your-nada-web-folder/cache – this is where cached web pages will be stored
• your-nada-web-folder/logs – this is where the log files will be stored
2.2.4 Configure MySQL database
1. Browse to the your-nada-web-folder/application/config folder.
2.2. Installation
7
nada Documentation, Release 4.0
1. Open the database.php file in a text editor like Notepad or Notepad ++, and change the database user name and
password to match the database user name and password.
2. Optional: change the database name to use another name.
3. Save the file.
$db[’default’][’username’] = "your-database-username";
$db[’default’][’password’] = "your-database-password";
$db[’default’][’database’] = "nada4"
Note: Do NOT use the root username and password (MySQL) or SA Account (MSSQL) on your production server.
Create a separate user name and password for your NADA database. This can be done either from your Cpanel or
from PhpMyadmin, MySQL Workbench.
8
Chapter 2. Installation guide
nada Documentation, Release 4.0
2.2.5 Create database user account
The goal being to avoid using Root for your NADA configuration.
1. From the command line type:
mysql -u root -p
2. Enter your root password you setup when installing MySQL.
3. Now create a database for the NADA – in this example we call the database nada
mysql> CREATE DATABASE nada;
4. Now create a user who can access the new nada database and give the user only the rights necessary to run the
NADA.
mysql> GRANT SELECT, INSERT, UPDATE, DELETE, CREATE, DROP, INDEX, ALTER, CREATE TEMPORARY TABLES
5. ‘yourpassword’ can be anything you choose. ‘nada’ is the name of the database the user gets access to. ‘localhost’ is the location which gets access to your database.
Note: Remember this password, you will need it to configure your NADA installer!
6. Then exit MySQL console by typing exit.
mysql> exit
2.2.6 Running the installer
Open web browser to the location of the NADA installation. For example: http://your-domain/nada-folder-name, or
localhost/nada-folder-name.
2.2. Installation
9
nada Documentation, Release 4.0
Check that all settings are marked with a green tick and fix any that are not on your webserver before running the
installer.
Click on the Install Database button and complete the form to create an initial Site Administrator account.
Note: create a complex password at least 12 characters long with some uppercase, punctuation and numbers to aid
security of your site. Do not forget this username and password!
10
Chapter 2. Installation guide
nada Documentation, Release 4.0
Congratulations: Launch the new site
2.2. Installation
11
nada Documentation, Release 4.0
2.3 Installing NADA using Microsoft SQL Server
2.3.1 PHP database drivers (sqlsrv)
The new Microsoft SQL drivers for PHP are called SQLSRV and provide native support for connecting to a Microsoft
SQL Server database. The drivers have been tested with NADA for SQL Server 2008 and 2012.
The drivers are available for download from here: http://www.microsoft.com/en-us/download/details.aspx?id=20098
2.3.2 NADA Microsoft SQL Requirements
To use Microsoft SQL Server database for NADA, it is recommended to use SQL Server 2008, or later, with Full-Text
support enabled. The full-text engine provides faster search than the normal SQL search.
The default installation of SQL Server does not include the Full-Text engine, so before continuing on to installing
NADA, please make sure you have full-text installed on your database server.
2.3.3 Download drivers
Microsoft provides two versions of the SQLSRV drivers namely version 2.0 and 3.0. NADA has only been tested with
version 2.0 but should work with version 3.0. Requirements for using the drivers:
• Windows 7, Windows Server 2008 R2, Windows Server 2008 Service Pack 2, Windows Vista Service Pack 2
• PHP 5.3.6 or PHP 5.4. For information about downloading and installing PHP, visit PHP on Windows
(http://windows.php.net).
• Microsoft SQL Server 2012 Native Client available in the SQL Server 2012 Feature Pack. (This is needed if
database and web server are on different machines)
• Any edition of SQL Server 2005 or later.
12
Chapter 2. Installation guide
nada Documentation, Release 4.0
2.3.4 The Microsoft SQL Client
Microsoft SQL Client is required for connecting to your SQL database using NADA. The client is installed automatically if your database is hosted on the same machine as your web server. If your SQL database is running on a different
machine then you must install the latest version of the SQL Client on your web server to ensure NADA can connect
to your database. See section on installing Microsoft SQL Client.
2.3.5 How to install the SQLSRV driver for PHP
The steps are for version 2.0 but the same applies to version 3.0
1. The drivers are available from the Microsoft website: http://www.microsoft.com/downloads/en/details.aspx?FamilyID=80e4491324b4-4113-8807-caae6cf2ca05
2. Download the drivers and run the setup file.
3. The setup file will extract a number of .dll files to your PHP extension folder.
4. Browse to the PHP extension folder E.g. c:phpext.Notice there are multiple dll files included all referencing
_sqlsrv.
1. To find out which driver library is suitable for your version of PHP, create a php file using a text editor like
Notepad e.g. info.php and place this code inside it:
<?php phpinfo(); ?>
2. Save the file and copy it to your web server root folder. Open your web browser and type the location and
name of the file e.g. info.php into your browser URL. The phpinfo() function prints your PHP version and other
configuration settings for PHP. For Example: localhost/info.php. To select the right sqlsrv DLL, you’ll need to
know:
• The version of PHP. E.g. 5.3
• Which compiler is used e.g. either VC9 or VC6
• Check whether Thread Safety is enabled or not.
2.3. Installing NADA using Microsoft SQL Server
13
nada Documentation, Release 4.0
1. With the above values you would choose the file: php_sqlsrv_53_nts_vc9.dll
ts=Thread safety nts=Non-thread safety
2. Once you know which dll file to use, open the php.ini file using a text editor and add the following entry at the
end of your PHP.INI file.
extension=php_sqlsrv_53_nts_vc9.dll
3. Save your php.ini file and restart your web server.
2.3.6 Testing the SQLSRV drivers and SQL Client
To make sure the driver/extension is installed correctly. Reload the phpinfo page and check if the extension SQLSRV
is listed on the page.
If the extension is not listed on the page, recheck if the correct php.ini file has been edited. To locate the php.ini file
being used by PHP look at the output of the phpinfo page in the section shown below.
14
Chapter 2. Installation guide
nada Documentation, Release 4.0
This step is only required if SQL Server is not on the same server as your web server. To check if the SQL Client is
already installed or not, follow the steps below:
1. Open Control Panel, Administrative Tools on your server
2. Open ODBC and switch to the tab “Drivers”
2.3.7 Download the Microsoft SQL Client
Note: The instructions here are provided for Microsoft SQL Server 2008, if are running on a later version of Microsoft
SQL Server, the latest drivers can be obtained from the Microsoft website. The installation steps are the same.
The SQL Client is available from the Microsoft website from here:
us/download/details.aspx?id=16978
http://www.microsoft.com/en-
Download the appropriate package for the system being used i.e. (32bit/64bit) and run the installer to install the client.
Once the client is installed, restart your computer and check again from ODBC above to confirm that the client has
been installed.
2.3. Installing NADA using Microsoft SQL Server
15
nada Documentation, Release 4.0
2.3.8 NADA Database configurations for SQLSRV
Create a database and the user account to use with NADA beforehand. The permissions need to include - create/alter
tables, indexes. ( See the following reference from Microsoft for instructions on how to do this.
• Database - http://msdn.microsoft.com/en-us/library/ms186312.aspx
• User - http://msdn.microsoft.com/en-us/library/aa337545.aspx
Open the nada database configuration file /your-nada-folder/application/config/database.php file and look for the following lines:
$db[’sqlsrv’][’hostname’]
$db[’sqlsrv’][’username’]
$db[’sqlsrv’][’password’]
$db[’sqlsrv’][’database’]
$db[’sqlsrv’][’dbdriver’]
$db[’sqlsrv’][’dbprefix’]
$db[’sqlsrv’][’pconnect’]
$db[’sqlsrv’][’db_debug’]
$db[’sqlsrv’][’cache_on’]
$db[’sqlsrv’][’cachedir’]
$db[’sqlsrv’][’char_set’]
$db[’sqlsrv’][’dbcollat’]
=
=
=
=
=
=
=
=
=
=
=
=
"localhost\sqlexpress";
"db-user-name";
"password";
"nada-database";
"sqlsrv";
"";
FALSE;
FALSE;
FALSE;
"";
"utf8";
"utf8_general_ci";
Fill in the database connection settings for the database created for NADA.
Save the changes.
2.3.9 Running the installer
• Open a web browser to the location of the NADA installation. For example:http://your-domain/nada-foldername, or localhost/nada-folder-name.
• If the Microsoft database connection is setup correctly, you should see the nada installer.
16
Chapter 2. Installation guide
nada Documentation, Release 4.0
• Check that all settings are marked with a green tick and fix any that are not on your webserver before running
the installer.
• Click on the Install Database button and complete the form to create an initial Site Administrator account.
Note: Create a complex password of atleast 12 characters long with some uppercase, punctuation and numbers to aid
security of your site. Do not forget this username and password!
2.3. Installing NADA using Microsoft SQL Server
17
nada Documentation, Release 4.0
Congratulations: Launch the new site
18
Chapter 2. Installation guide
nada Documentation, Release 4.0
2.4 PHP settings
2.4.1 Finding the correct PHP.INI
To make sure you are editing the correct PHP.INI settings file, create a PHP file (e.g. info.php) in your nada website
folder with the following contents:
<?php phpinfo(); ?>
Open the phpinfo page in your web browser and you should see output similar to below screenshot. Edit the php.ini
file displayed by the setting Loaded Configuration File.
2.4. PHP settings
19
nada Documentation, Release 4.0
20
Chapter 2. Installation guide
nada Documentation, Release 4.0
2.4.2 File upload limits
By default PHP allows uploads of 2MB which could be a problem if you have large DDIs and external resource files.
To change the settings:
1. Edit the php.ini file in notepad and look for the setting upload_max_filesize
2. The line should look like:
; Maximum allowed size for uploaded files.
; http://php.net/upload-max-filesize
upload_max_filesize = 2M
3. Change it to the required file upload limit per your needs
upload_max_filesize = 50M
4. There is another setting that MUST be changed as well for the file upload limits to work. Look for the configuration post_max_size and change it to match the value for upload_max_filesize:
post_max_size = 50M
2.4.3 TimeZone settings
This is for setting the timezone for your application. To findout what is the correct timezone for your website, go to
http://php.net/manual/en/timezones.php and find your country/city.
Example:
date.timezone = "America/New_York"
2.4.4 Increase page execution/timeout
This setting controls the maximum execution time of a page in seconds.
max_execution_time = 300
2.4.5 Increase PHP memory limit
It controls the memory available to PHP scripts.
memory_limit = 128M
2.4.6 Enable/disable PHP extensions
NADA requires the following PHP extensions:
• xsl
• mbstring
• mysql or sqlsrv
To enable XSL extension, add this line:
2.4. PHP settings
21
nada Documentation, Release 4.0
extension=php_xsl.dll
To enable mbstring:
extension=php_mbstring.dll
2.5 Configure Captcha
By default NADA version 4.1 comes with image captcha and user does not need to make any changes to use image
captcha. To use Google Captcha please follow the steps given below:
1. Open application/config/captcha.php in editor
2. Change line number 12 as shown in below image
3. Click on above URL to generate Public and Private key URL: http://www.google.com/recaptcha/whyrecaptcha
4. Click on sign up now
5. Sign in using your Gmail account
6. After signed in you will have to enter your URL (Domain URL)
22
Chapter 2. Installation guide
nada Documentation, Release 4.0
7. Click on “enable globel key for all domain
8. Click on Create Key button
9. Copy public key and private key from Google Captcha website and inserte it on line number 51 and 52 respectively as shown in below image
10. To check the Google catpcha configuration go to register page and look for image as shown in below URL
highlighted in Red suqare
2.5. Configure Captcha
23
nada Documentation, Release 4.0
2.6 Email configurations
For the NADA to function correctly it is important that this step be completed.
Many of the functions within the NADA – such as registration and applying for access to datasets require that the
NADA be able to send emails to users.
1. Login to your NADA as an administrator
2. Go to Site administration, click on the Settings menu and choose “Settings”
24
Chapter 2. Installation guide
nada Documentation, Release 4.0
C Find the section “SMTP settings”
4. If the PHP/web server is configured to send email using PHP’s MAIL function, select the first option and don’t
fill in anything else.
If your organization has a mail server and has have a dedicated account that can be setup for NADA, use the following
settings: Check the radio button “Use SMTP Server”
5. Enter the host name for the server
6. Enter the port used by the server to send mail
7. If required, enter the user name used to send mail on the server
8. Enter the password used to send mail on the server
If the organization does not own a mail server, a Gmail account can be configured to be used with NADA.
• Check the radio button “Use SMTP Server”
• Host name: ssl://smtp.googlemail.com or ssl://smtp.gmail.com
• SMTP port: 465
• Account username: [email protected]
• Account password: password for the gmail account
Test the email settings
The quickest way to test if the email settings are working is to use the “forgot password” option from the user login
page.
• Click on forgot password
2.6. Email configurations
25
nada Documentation, Release 4.0
• Enter the administrator or any other accounts email address.
• Check to the email account the mail was sent to.
• If no mail is received the settings are wrong and need to be corrected.
26
Chapter 2. Installation guide
CHAPTER 3
Upgrading from previous versions
3.1 Upgrade from NADA 3
For users with an existing NADA 3.x catalog an upgrade script is included that will update your NADA 3.x database
to NADA 4.x. The process involves modifying your NADA 3.x database and thus carries some risks. The script will
add new tables to the NADA 3.x database. All user accounts and survey information will be retained by the upgrade.
Important: Backup the NADA 3.x database before doing anything!!
1. Follow the instructions on page 4 and set up a folder in the web root containing the NADA 4 files.
2. Edit the database.php file as instructed in the section above: NADA database configurations for MySQL.
3. Instead of entering a new database name, user account name and password -fill in the details of the existing
NADA 3.x database.
Note: These can be found by looking at the existing NADA 3.x database.php file and entering the settings into the
NADA 4 database.php file.
4. Save the file.
5. Navigate to the URL for the NADA4 site: Example: http://your-nada-site/nada4/index.php/nada4_upgrade
6. The following page loads:
27
nada Documentation, Release 4.0
Take note of the warnings and make any necessary corrections before clicking the “Upgrade database to NADA 4”
button.
Warning: This step makes changes to your nada 3 database that are not undo-able so make sure you do make a database
backup before this step.
Click on the “Upgrade database to NADA 4” button and wait for the page to reload. The output of the page will look
something like below:
The script will print number of messages about failed table updates. This does not mean the script failed to upgrade.
It just means some of the updates were not needed on your version of NADA 3. Different versions of NADA have
different numbers of fields in the database and the upgrade script tries to fix the missing fields for all these different
versions of NADA. If the existing NADA 3 database already has that field then it reports it as an error.
You can ignore the error messages that include the wording “Duplicate column name” or “Duplicate entry”.
Verify the database upgrade. Open the NADA catalog page by going to http://[your-nada4-site]/index.php/catalog
page and verify all studies from NADA 3 are listed.
3.1.1 Linking your NADA 3 data files to NADA 4
The upgrade script has only upgraded the database. It is now necessary to tell the NADA4 where to locate the datafiles
that were uploaded to the original NADA 3 site.
There are two options available:
Option 1: Copy the datafiles folder from NADA 3 to NADA 4. This works best if you have only a few studies and the
datafiles folder size is small enoughto be moved easily from one location to another.
Option 2: If it is not possible to easily move the datafiles folder from NADA 3 to NADA 4, you can tell NADA 4 the
location of the datafiles without moving the files. Here are the steps:
• Use your NADA 3 administrator login credentials to login to your new NADA 4 site.
• Click on Site administration in the top right corner of the screen.
• Go to the “Settings” menu and click on the “Settings” sub-menu.
• Under Site configurations, expand the “Survey Catalog Settings” section
28
Chapter 3. Upgrading from previous versions
nada Documentation, Release 4.0
• For the setting “Catalog folder”, enter the relative or full path to where the NADA 3 datafiles folder is located.
For example, if the nada3 datafiles are located on c:/nada3/datafiles, enter that path here.
• Save the configurations by clicking on the update button. If now errors are shown then you have successfully
updated the folder path.
• Check your new NADA 4 site to make sure the migration was successful
– Check the user administration page from site administration to make sure the users from the nada3 site
were migrated.
– Check the “Data Catalog” page and view the studies by clicking on the study title to make sure the study
information pages are correct.
– Check the site menus are the same as the NADA 3 site.
3.1.2 Refresh DDI
In NADA 4, more information is stored in the database from the DDI than in the NADA 3. To bring all these new
fields into the imported studies it is necessary to refresh the DDI’s. The refresh DDI feature in NADA updates the
database with metadata from the DDI without having re-uploading the DDIs. To update the metadata for all studies in
your catalog:
• Open the following NADA 4 URL in your browser:
http://[your-nada-4-site]/index.php/admin/catalog/batch_refresh
• Select all studies
• Click on the “Refresh DDI” button
3.1.3 Transferring ownership
NADA 4 has a collection management feature. When studies are imported from the NADA3 catalog into NADA4 they
are put into a collection called DEFAULT. They need to be moved from this default system collection to the Central
Data Catalog of the NADA4.
To do this:
• Go login to the Site Administration and navigate to the Studies, Manage Studies, Central Data Catalog page
3.1. Upgrade from NADA 3
29
nada Documentation, Release 4.0
• Select all the studies by ticking the check boxes next to each study on the right.
• Click on the dropdown menu and select Transfer owner
• From the Transfer study owner page: Select Central Data Catalog and then click transfer.
30
Chapter 3. Upgrading from previous versions
nada Documentation, Release 4.0
3.1.4 Updating the Site theme/template
You cannot use your NADA3 template in NADA4 without making some changes. Here are general guidelines but
steps may differ depending on your nada site template.
• Copy your NADA3 template to the NADA4 themes folder.
• Edit the [nada4-root]/config/template.php following the steps below:
• Look for the setting “theme_name”, by default it is set to ”wb”:
• Change “wb” to the theme name you want to use. Theme name is the folder name you copied to
[NADA4]/themes/[your-site-theme] from your nada3 site.
• Save the file.
NB: The template may need some adjusting to run properly on the new NADA 4 site. This will involve editing
the layout.php and other template files within the template folder which is now located in the NADA 4 themes
folder.
3.2 Migrate MySQL to Microsoft SQL
TODO
3.2. Migrate MySQL to Microsoft SQL
31
nada Documentation, Release 4.0
32
Chapter 3. Upgrading from previous versions
CHAPTER 4
User manual
4.1 Overview and core concepts
4.1.1 About NADA
NADA is a web-based cataloging application that allows for the creation of portals that allows users to browse, search,
compare, apply for access, and download relevant census or survey information.
It was originally developed to support the establishment of national survey data archives. The application is used by a
diverse and growing number of national, regional, and international organizations. NADA, as with other IHSN tools,
uses the Data Documentation Initiative (DDI), XML-based international metadata standard.
4.1.2 Concepts
CENTRAL DATA CATALOG
The default catalog created when a NADA instance is installed is the Central Data Catalog. All studies uploaded to the
NADA are visible, searchable and accessible from the Central Data Catalog. For many institutions the Central Data
Catalog will remain the only catalog in their NADA instance. For some institutions being able to divide the contents
of the Central Data Catalog into more refined collections will be desirable.
COLLECTIONS
Collections are sub categories of the Central Data Catalog. They allow administrators of a NADA instance to group
studies into what can be thought of as sub-catalogs of the Central Data Catalog. This has a number of benefits
both from the user and the administrator perspective. From the users’ perspective, being able to filter and view
groups (collections) of studies that logically belong together makes finding what they are looking for easier. From the
administrators’ perspective, the ability to create collections of studies that may logically belong together facilitates the
ability to decentralize the management of each collection of studies to specific administrators (for example collections
can be managed by different departments in an institution).
NOTE: The creation of collections will in general only be useful and necessary for large catalogs or for catalogs that
desire more decentralized management of groups of studies by different departments.
STUDIES
Studies are carried out to gather more knowledge about a subject. Studies may gather information from a number of
different sources in order to answer the questions asked. The information gathered for a study will, in the context of
33
nada Documentation, Release 4.0
NADA catalogs, usually come from either a census or a surveys. It is therefore not uncommon to hear the terms survey
and study used interchangeably when listening to people talk about their NADA catalog.
METADATA
Metadata are data about the data. They are not the actual data collected from the survey, but rather the information that
describes the survey process and the data. The NADA uses the Data Documentation Initiative (DDI) – ddialliance.org
– standard for the presentation of metadata for each study. The DDI document (which is an XML document) is
prepared outside the NADA application either manually or using a tool like the Nesstar Publisher – nesstar.com – and
then imported into the NADA. The detailed information about the survey is searchable down to the variable level for
each survey in the catalog.
DATA ACCESS TYPES
The NADA allows for the level of access to datasets for studies to be controlled at the study level. In other words the
level of restriction can differ from study to study and can be defined on a scale ranging from direct access, with no
restrictions, to no access. Briefly the available access types are:
• Data not available - data are not available for this study.
• Direct Access Data Files - data shared under this policy can be downloaded without any restrictions. The user
is not required to be logged into the site and no personal information is collected on the person downloading the
data.
• Public Use Data Files - data shared under this policy requires that the user be logged in and registered on the
site before they are able to download the data. The user is required to agree to a terms of use of the data and the
application keeps records of who downloads the data.
• Licensed Data Files - data shared under this policy requires that the user be logged in and registered on the site.
Users are also required to fill in and submit a detailed application form listing their reasons for wanting access
to the data. Once the user submits the application form the system informs the system administrator that an
application has been made. In order for the person to get access to the data the system administrator needs to
review the application and approve it.
• Data available in an Enclave - under this policy no data is shared through the application. Users submit an
application to access the data at a secure facility physically located on the premises of the data producer or a
facility nominated by the data producer.
• Data available from external repository – The NADA allows for studies and their metadata to be listed in a
NADA catalog but for a link to be created to another site when the data for that study are available elsewhere.
CITATIONS
Citations are references that can be included at the study level which point to published works that have used the data
from a particular study. In many cases this will be a reference to a Journal Article, Working paper, Newspaper article
etc. Such resources are useful to researchers who are interested in seeing how the data have been used before. They
are also a good way of showing the funders of surveys that the data are being used for policy and research purposes
and thus are an indicator of some of the impact a study has had.
USERS
Users in the NADA can be defined according to three broad groups: * General Users – this is the normal user who
registers on a NADA site from the user interface. This user type has no access to the site administration. It is required
to register as a user when accessing public use and licensed data types. * Site Administrators (unlimited) – this user
34
Chapter 4. User manual
nada Documentation, Release 4.0
has access to all functions and all collections within the Site Administration. System wide access. * Limited Administrators – these administrators have access to a limited set of functions within the Site Administration. Examples would
be an administrator of a specific collections, or licensed survey reviewer for all or only some collections, or report
generator etc.
4.1.3 Why do NADA administrators need to understand these concepts?
Understanding these concepts is important as it:
• Is critical to understanding the new permissions, and administrator types introduced in NADA 4. Administrators
are now able to create collections within their NADA’s and assign different roles to administrators and more
granular levels of access to catalog administration at the collection level. It is now possible, for example to have
administrators who’s ‘powers’ range from being able to manage all parts of a collection’s administration down
to ones with more restrictive access such as ones whose only function is as licensed survey reviewer, or report
generator, or catalog reviewer, or citation manager. etc.
• Ensures that the correct level of permissions and access is assigned to users based on security policies within the
institution. Unlike previous versions of NADA, not all users who have access to the Site Administration need
have the level of access of an “unlimited site administrator”. This limits security risks associated with having
too many “unlimited site administrators” managing a site.
• Assists in assigning an appropriate data access type to data based on institutional distribution polices.
• Makes it easier to explain more clearly to institutional managers what the capabilities of the NADA application
are and to advise on how to best manage the allocation of responsibilities.
4.2 Site Administration Overview
TODO
4.3 The Dashboard
After logging in to the Site Administration with administrator credentials the user is taken to the dashboard.
The Dashboard provides a quick glance summary for administrators to get an overall picture of what has been happening on the site as well as what pending tasks are outstanding for the administrator.
4.2. Site Administration Overview
35
nada Documentation, Release 4.0
1. Menu link to the Dashboard
2. Menu link to the Study Management pages, submenus include: Manage Studies, Licensed requests and Manage
Collections
3. Menu link to the citations management pages
4. Menu link to the User management pages, submenus include: All users, Add user and Impersonate User
5. Menu link to create menu pages for the site frontend
6. Menu link to generate usage reports
7. Menu Link to the settings pages, submenus include: Settings, Coutries, Regions and Vocabularies
8. Useful navigation links, submenus include: Change Password, Log out, Catalog Home, Data catalog, Citations
9. This section lists all collections in the catalog. Within each collection a summary is given of the number of
studies along with diagnostics related to the number of studies publishedunpublished, missing questionnaires,
data access types set but with no data attached as well as some buttin links to Manage the collections, studies,
users and a History of changes made to the collection
10. Provides a summary of users, registrations and number of users currently logged in.
11. Show how many pages are being cached on the site with a link to clear the cache if need be.
12. Show a list of recently added or updated studies. Clicking on a study in the list takes you to the page to manage
that study.
36
Chapter 4. User manual
nada Documentation, Release 4.0
4.4 Manage Collections
4.4.1 Collections
Collections are sub categories of the Central Data Catalog. They allow administrators of a NADA instance to group
studies into what can be thought of as sub-catalogs of the Central Data Catalog.
Collections provide a number of benefits both from the user and the administrator perspective. From the users’ perspective, being able to filter and view groups (collections) of studies that logically belong together makes finding what
they are looking for easier. From the administrators’ perspective, the ability to create collections of studies that may
logically belong together facilitates the ability to decentralize the management of each collection of studies to specific
administrators (for example collections can be managed by different departments in an institution).
Note: The creation of collections will in general only be useful and necessary for large catalogs or for catalogs that
desire more decentralized management of groups of studies by different departments.
4.4.2 Creating collections
• Login to the Site administration using an administrator password.
• Collections are managed and created by going to the Studies, Manage collections menu link.
• There are no collections defined in the default NADA 4 installation.
• To create a new collection click on the Create new collection button.
4.4. Manage Collections
37
nada Documentation, Release 4.0
1. Under Collection Identification, provide a short name for the collection. This will become the URL for the
collection so pick carefully. For Title, fill in the fill title for the collection. This will be the name displayed at
the top of the collection page.
B. Fill in a 3 or four line short description of the collection. This text will display on the front end in the collections
list. For examples see: http://microdata.worldbank.org/index.php/contributing-catalogs
C. Fill in a more detailed description of the collection. This will display on the About page for that collection. For
example see: http://microdata.worldbank.org/index.php/catalog/dhs/about
To format the page and include images it is possible to enter HTML code into this box: below is an
example piece of code that includes an image.
<img src=”files/dhs-fp-01.jpg” alt=”Health Surveys Image” class=”about-photo”> <h2> Health Surveys
Collection</h2> <p align=”justify”>The Health Surveys collection aims to provide frequent high quality and timely health data needed by the decision makers when designing public health programs.</p>
<p>Health surveys provide useful information on health status and health consumption and their determinants.</p>
Copy any images to be displayed into the NADA “files” folder on your server .. image:: ../images/thumbnil-image.png
4. Upload a file to display next to the collection as it is listed on the collection page. NOTE: This image should be
82 X 82 pixels. If the upload does not work automatically then copy the thumbnail image to the “files” folder as
shown above.
38
Chapter 4. User manual
nada Documentation, Release 4.0
E. The Weight field determines in what order collections are shown in the collection list. 0,1,2,3 etc. The Select
collection type drop-down is a system value to distinguish between collections that should be viewed as internal to
the organization or external. For example, some collections may be made up entirely of studies from an organization
outside the host catalog. These collections can be designated as external. The Section dropdown allows for the
categorization as either a collection based on a specialized collection (like health) or based on a regional breakdown.
Selecting Publish – publishes the collection.
• Click on Submit to save the changes.
To view the results click on the Preview link on the far right:
• The new collection now also shows in the collection list on the Central Catalog About page (this is where the
thumbnail and short description fields are displayed).
4.4. Manage Collections
39
nada Documentation, Release 4.0
• Visiting the Dashboard will now also show the new collection listed below the Central Data Catalog. With a
number of green buttons as shortcut links to manage the studies on the collection, assign administrators for the
collection, a history of activity on the collection and a link to edit the collection as in the steps above.
4.4.3 Manually adding studies to a collection
There are 2 ways to get studies into the new catalog:
• The first is to upload a DDI and all its resources to the collection in the same way as described in the earlier
section – Uploading a Study. Except instead of choosing Central Catalog chose the collection you want to
40
Chapter 4. User manual
nada Documentation, Release 4.0
upload the study to.
• Click on the Add Study button and upload a DDI and RDF and all your resources as described in the earlier
section – Uploading a Study
• Once a study is added in this way it displays in the Manage Studies list. Notice that the collection summary
field shows that the study belongs to (is Owned By) the DHS collection (this was the Short name defined in the
example when the Health Surveys Collection was created).
All studies uploaded to collections will automatically be added to the Central Data Catalog in order to build a common
search portal for all studies.
4.4. Manage Collections
41
nada Documentation, Release 4.0
4.4.4 Copying studies from one collection to another
• The second way to add a study to a collection is to Copy the study from another collection into the new
collection.
• To copy a study already in the catalog to display in the new collection first make sure to be in the Manage Studies
section for the collection you want to put studies into. To do this either use the Studies – Manage studies menu
on the top or simply click on the Switch link next to the Manage Studies [Collection Title] heading.
• Then Click on the Copy Studies blue button at the top right.
• A list of all studies available to copy to the new collection is listed. Simply click on the Link button in green to
copy the study to the collection. The button will turn red and say Unlink. To reverse the process and click the
now red button.
• Going back to the Manage Studies page for the collection will show the newly copied studies in the collection
list. Also note that the Collection field now indicated DHS next to Central. DHS is in grey to indicate it is not
owned (it is a copy) by that collection and the Central is in blue to show it is owned by the Central Data Catalog.
Also note that because the study is not owned by this catalog it cannot be edited from this catalog – hence the
publishunpublish green button is absent for the copied studies
42
Chapter 4. User manual
nada Documentation, Release 4.0
4.4.5 Turning on the collection filter
The final step after creating the first collection is to enable the collection filter option in the Settings menus under Site
Configurations – Survey catalog settings
4.4.6 Transferring study ownership
In the previous examples mention was made of studies uploaded to a catalog being owned by that catalog. There may
be cases where transferring the ownership from one catalog to another will be desirable. This will become clearer
in the next section on user roles but for now the next steps show how transferring ownership from one collection to
another can be done.
• Transferring ownership from one collection to another has to be done by the owner of the collection and from
the collection it is currently owned by.
• To transfer ownership Go to the Manage Studies screen and select the study to be transferred. Open up the Edit
Study page by clicking on the study Title.
• On the right hand side of the screen click on the Transfer study owner link.
4.4. Manage Collections
43
nada Documentation, Release 4.0
• Select the collection to transfer from the dropdown box.
• Click Transfer
• Note: that when looking the study summary for the transferred study the Collection field now shows the study
to belong (owned by) to the DHS collection and not Central anymore. Also note the option to Publish and
unpublish is now active.
• To transfer ownership of a large number of studies all at once - from the Manage Studies page – select the studies
to be transferred (tick them in the box left of each study) and then from the top Batch Actions drop down, select
Transfer owner – then apply.
44
Chapter 4. User manual
nada Documentation, Release 4.0
4.5 Manage Studies
There are 2 Options to get studies into the new catalog:
4.5.1 Option 1:
• The first is to upload a DDI and all its resources to the collection in the same way as described in the earlier
section – Uploading a Study. Except instead of choosing Central Catalog chose the collection you want to
upload the study to.
• Click on the Add Study button and upload a DDI and RDF and all your resources as described in the earlier
section – Uploading a Study
• Once a study is added in this way it displays in the Manage Studies list. Notice that the collection summary
field shows that the study belongs to (is Owned By) the DHS collection (this was the Short name defined in the
example when the Health Surveys Collection was created).
• Also, note that the new study also appears in the Central Data Catalog
All studies uploaded to collections will automatically be added to the Central Data Catalog in order to build a common
search portal for all studies.
4.5. Manage Studies
45
nada Documentation, Release 4.0
4.5.2 Option2:
Copying studies from one collection to another
• The second way to add a study to a collection is to Copy the study from another collection into the new collection.
• To copy a study already in the catalog to display in the new collection first make sure to be in the Manage Studies
section for the collection you want to put studies into. To do this either use the Studies – Manage studies menu
on the top or simply click on the Switch link next to the Manage Studies [Collection Title] heading.
• Then Click on the Copy Studies blue button at the top right.
• A list of all studies available to copy to the new collection is listed. Simply click on the Link button in green to
copy the study to the collection. The button will turn red and say Unlink. To reverse the process and click the
now red button.
• Going back to the Manage Studies page for the collection will show the newly copied studies in the collection
list. Also note that the Collection field now indicated DHS next to Central. DHS is in grey to indicate it is not
owned (it is a copy) by that collection and the Central is in blue to show it is owned by the Central Data Catalog.
Also note that because the study is not owned by this catalog it cannot be edited from this catalog – hence the
publishunpublish green button is absent for the copied studies
4.6 Managing Licensed Requests
Datasets that are assigned the Access Type Licensed require approval from the NADA administrator before the user
can get access to the data files. From the site administration there are a number of ways to see if any licensed requests
have been received.
• Go to the dashboard. Pending requests show up as red in the catalog quicj summary section. Clicking on this
link goes to the Licensed Survey Requests management page.
• Or go to the Studies link on the top menu and select Licensed Requests from the submenu.
46
Chapter 4. User manual
nada Documentation, Release 4.0
The link shows a page with a list Licensed Requests received. The status column indicated the Pending requests.
• Click on the Edit link for to process a request.
The Request information tab shows a summary of the information provided by the applicant.
• To Approve or Deny or request further information for the request. Click on the Process tab.
4.6. Managing Licensed Requests
47
nada Documentation, Release 4.0
• Select Approve to approve the request. (other options include Deny as well as Request more information from
the applicant).
• Select the files that the user will be authorized to download – it is also possible to enter a maximum number of
downloads and expiry date for downloads.
• Enter any comments to be sent to the applicant
• Select Notify user by email to notify them that the application has been processed.
• Select Update.
• The remaining tabs:
– Communicate - provides a means to ask for more information from the applicant
– Monitor – allows the administrator to see when and how many times the applicant downloaded the
data
– Forward Request – provides a means to forward the request to another person for review.
4.7 Manage Citations
The Citations section is where bibliographic references can be added for publications that use any of the studies in the
catalog. These citations can be linked to particular studies in the catalog and are displayed to the users of the system
in the study information view of the relevant study.
Citations are added from the Citations menu.
48
Chapter 4. User manual
nada Documentation, Release 4.0
• To add a citation - click on All citations then click on the Add New Citation button at the top right.
• Compete the form including the indication as to whether the citation should be published or not.
• Then expand the Related studies link to tell the system which studies the citation “belongs” to.
• Click on the Attach studies link. This reveals a list of all studies in the catalog.
• Select the relevant studies by clicking on the green Select button.
• Click on the apply filter button to save the changes. The study now appears in the related studies box.
• Click on the submit button to save the citation.
• Note: the flag, keywords and notes fields can be used by administrators to place extra notes only visible to other
administrators that might prove useful when there is uncertainty about a citations appropriateness or accuracy.
• It is also possible to import citations in common citation formats such as BibTex and EndNote (RIS).
• To do this use the Import Citations link from the top menu
4.7. Manage Citations
49
nada Documentation, Release 4.0
• Paste the BibTex or RIS text into the form and then at the bottom of the screen click on Attach studies to link
the citation to a particular study in the catalog.
• The citation now appears in the citation list as well as on the study information page for the relevant studies.
50
Chapter 4. User manual
nada Documentation, Release 4.0
4.8 Managing Users and account types
Users in the NADA can be defined according to three broad groups:
General Users– this is the normal user who registers on a NADA site from the user interface. This user type has
no access to the site administration. It is required to register as a user before being granted access to public use and
licensed data types.
Site Administrators (unlimited) – this user has access to all functions and all collections within the Site Administration. System wide access.
Limited Administrators – these administrators have access to a limited set of functions within the Site Administration. Examples would be an administrator of a specific collections, or licensed survey reviewer for all or only some
collections, or report generator, or citation manager etc.
4.8.1 Creating User accounts
User accounts can be created in two ways:
1. A General User account can be created by a user directly from the register screen from the login link on the user
interface of the application.
The user created by this process has no access to the site administration. This account can only be used to apply and
gain access to public and licensed datasets.
2. A user account can also be created by a Site Administrator.
• To do this login as a Site Administrator
• Go to the site administration section of the application.
4.8. Managing Users and account types
51
nada Documentation, Release 4.0
• Select Users – Add user from the top menu.
• Fill in the information for the user in the form and be sure to mark the account status as Active. Then click the
Create button.
52
Chapter 4. User manual
nada Documentation, Release 4.0
4.8. Managing Users and account types
53
nada Documentation, Release 4.0
• Note that the user always starts off as a General User with no access permissions to the Site Administration. The
user group column displays as empty for users with only general user accounts.
• To see a list of all users in the system go to the Users – All Users menu item at the top of the screen.
• Note: the new users created have no User group assigned (they are general users). Also note the Actions column
on the far right. From these links an account can be edited (including changing the password and blocking an
account), deleted and Permissions managed for the account.
4.8.2 Managing User Account Permissions
User accounts permissions can be only be set and changed by a Site Administrator. To change the permissions for an
account:
• Click on the Permissions link next to the account to be changed. All accounts start of as General users accounts
• To change this user to a full site administrator who will have full system wide access to all parts and functions
of the NADA administration select the Site administrators (full access) option and tick the admin box as well.
Click update to save the changes.
54
Chapter 4. User manual
nada Documentation, Release 4.0
4.8.3 Collection level administrators
• To create a user who only has permissions to administer studies or administration functions for a particular
collection. Select Site administrators (limited access)
4.8. Managing Users and account types
55
nada Documentation, Release 4.0
• It is then necessary to assign a role to this new limited administrator account. To create a limited access administrator for a particular collection – select Site administrators (limited access) and then select Collection
administrators. Notice: The form expands to reveal a list of collections in the system.
• Select the appropriate level of access that this account will have for this collection. In the example below an
administrator is being created who can manage only licensed requests for the collection – Health Surveys. This
account will not be able to upload or publish studies. The account will only be able to process licensed requests
for the collection – Health Surveys.
56
Chapter 4. User manual
nada Documentation, Release 4.0
Other levels of access for Site administrators (limited access) – Collection administrators include:
1. Accounts that are given full access to manage studies
2. Accounts that are given access to upload studies but not publish them
3. Accounts that are limited to reviewing studies.
4.8.4 Global level Limited access accounts
Other types of limited access accounts include:
1. Accounts that can only view system reports at a global level.
2. Accounts that can only access the citations section and manage citations
3. Accounts that can only access the Licensed Request management system – at the global level for all collections.
4.8. Managing Users and account types
57
nada Documentation, Release 4.0
Impersonating a user
The system includes a function that allows a Site Administrator to impersonate (take on the role) a user created in
the system. This is a useful testing tool when creating users and assigning permissions. It essentially allows the
administrator to take on the role of another user temporarily.
• To access the Impersonate User feature go to the Users – Impersonat user menu at the top of the screen
• A list of users to impersonate is shown.
• Select the user to impersonate and click on the impersonate button.
• The dashboard view for the impersonated user now shows
58
Chapter 4. User manual
nada Documentation, Release 4.0
• Note in the example above the account being impersonated is a Limited Account administrator with rights only
to manage licensed requests for the Health Surveys Collection. Note that all other dashboard menus are either
hidden or clicking on any other function other than manage studies results in an access denied message.
• This is a good way to test if the roles assigned to a user account have the expected results.
• To exit the impersonate mode and return to the Site Administrator role – Click on the top right menu and select
Exit impersonate mode.
4.8.5 The Reviewer Limited access account
Sometimes it is desirable for catalog administrators to allow certain users to see a collection before it is published but
without granting access to the site administration functions.
This is useful for getting feedback on the correctness of information on collections or studies before publishing.
To do this:
• First create an account for the user or get the user to create an account by using the register form on the login
screen.
• Then edit the permissions for that user selecting Site Administrator (limited access) – Collection administrator
• Then for the appropriate collection select Reviewer and click update to save the changes
4.8. Managing Users and account types
59
nada Documentation, Release 4.0
• The newly created reviewer account user can now view all studies in a collection even if the study or collection
is unpublished.
4.9 Manage Site Pages and Menus
The NADA has a small content management component that allows for the creation of menu pages to appear on the
user interface.
• Examples of menus that might be useful for users of the site might be: A page dealing with the dissemination
policies of the organization or perhaps a page with contact information for the information.
New menu items and pages can be created via the Menu- All pages menu link at the top of the Site Administration
page.
60
Chapter 4. User manual
nada Documentation, Release 4.0
• Select All pages from the menu.
• To add a new page click on the Add New Page button
• Give the page a Title in the Title field
• Clicking in the URL field will automatically suggest a name for the page in the URL
• Enter the contents for the page in the Body section. Plain text or HTML is accespted by this field.
• Then indicate if the page should be published or not in the Publish dropdown
• The Weight field tells the NADA in what order this menu item should display. E.g. 0 would be first, 1 second
and 2 third.
• Click on Update to save the changes.
• View the changes from the user interface: In this Example a Contact Us page was created.
• It is also possible from the Menu Management screen to add a menu link that links to an existing page on another
site (rather than creating a page itself).
• To change the order in which the menu items display on the user interface, use the Reorder Menu button on the
Menu Management screen.
4.9. Manage Site Pages and Menus
61
nada Documentation, Release 4.0
4.10 The Site Settings Page
All settings for the application are controlled via the Settings menu at the top of the Site Administration page. There
are seven main settings sections: See screenshot below.
4.10.1 General Settings
1. Type the Title of the site here: This will become the front page title of the NADA site. In this case the Title is
NADA
62
Chapter 4. User manual
nada Documentation, Release 4.0
2. The footer text can be changed in this field. This displays at the bottom of your site page.
3. The initial page that loads when a user visits the NADA site can be set here. In this case the catalog page is set
to open by default.
4. The name of the webmaster can be set here. This is the name that will be used in system emails sent to users.
5. Enter the webmaster email address here. This should be the address that will be used in communication with
users. Typically this is a general enquiries email set up by the organization and not a personal email address for
a particular person. Note: to avoid mail systems rejecting mail as spam make sure to enter an address here that
is on the same domain as the server used in the email settings at setup.
6. This field sets the location of the Cache folder. The cache folder stores pre- generated pages of the site to allow
for faster browsing by the user. By default it is set to ./cache. This can be moved to another location if desired
but must be writable. The green tick indicates that the folder can be found and is set up correctly. Enter either
relative or absolute paths to the folder location.
7. Set the time that the Cache takes to expire. By default it is set to 2 hours (in milli seconds).
8. If it is desired to turn off caching then select no here. Sometimes it is useful to turn off caching when developing
or updating a site so as to ensure that content changes become immediately visible on the front-end without
having to wait for the cache to expire and the new changes to show. Turn this back on to speed up page loading
for users.
Click update to save all settings.
Language
To change the language of the application expand the language section and choose the desired language. Click update
to save and apply the setting.
4.10. The Site Settings Page
63
nada Documentation, Release 4.0
Enable or disable the HTML editor
A basic HTML editor is provided in the menu and page creating section of the application. This setting allows this to
be turned on or off.
Survey catalog settings
1. This is the folder where the files for the study are stored on the server. This includes the DDI, eternal resources
and data files. This folder can be moved to a location outside the web root as described in the installation
instructions in Chapter 1. Enter either relative or absolute paths to the folder location.
2. This is the folder where DDI’s can be placed in order to use the bulk study import function in the NADA. In
NADA3 files had to be physically copied to this folder on the server, but this is no longer necessary in NADA
4. Files can now be directly uploaded to this folder from the Site Administration – Manage Studies page page.
64
Chapter 4. User manual
nada Documentation, Release 4.0
3. Select the vocabulary to use for the topic filter. By default this is set to the CESSDA classification as recommended in the IHSN templates supplied at IHSN.org for the Nesstar Metadata Publisher.
4. Enable or disable the Country filter on the user interface search page here. If the catalog only contains studies
for one country then turning this filter off is recommended.
5. Enable or disable the Topic filter on the user interface search page here. If no topics have been defined in the
DDI’s being uploaded then it is recommended to turn this filter off (disable).
6. Enable or disable the Year filter on the user interface search page here.
7. Enable or disable the Collection filter on the user interface search page here. If no collections have been defined
then it is recommended to disable this filter.
8. Enable or disable the Data access filter on the user interface search page here. This filter is not needed if there
are very few studies in the catalog or if all studies hare set to the same access type.
9. This section controls the order in which the filters appear on the search page. Enter numbers here that rank the
order of the filters in the order they should be displayed.
10. This setting determines how many studies are displayed by default to the user on the search page – catalog view.
Site Login settings
1. To require that users login before being able to access the website set this option to Requires all users to login
to access the website.
2. Determined how long a user will stay logged in. After this time the user will be automatically logged out.
3. Sets the minimum length for passwords created by the users at registration or for manual user creation.
4.10. The Site Settings Page
65
nada Documentation, Release 4.0
SMTP Settings
1. If the PHP/web server is configured to send email using PHP’s MAIL function, select the first option and don’t
fill in anything else.
If your organization has a mail server and has have a dedicated account that can be setup for NADA, use the following
settings: Check the radio button “Use SMTP Server”
2. Enter the host name for the server
3. Enter the port used by the server to send mail
4. If required, enter the user name used to send mail on the server
5. Enter the password used to send mail on the server
If the organization does not own a mail server, a Gmail account can be configured to be used with NADA.
• Check the radio button “Use SMTP Server”
• Host name: ssl://smtp.googlemail.com or ssl://smtp.gmail.com
• SMTP port: 465
• Account username: [email protected]
• Account password: password for the gmail account
6. Test the email settings
The quickest way to test if the email settings are working is to use the “forgot password” option from the user login
page. If no mail is received when doing this test then go back and correct the mail settings. Check with the ISP or
server administrator for the correct settings.
*Click on update to save all settings
66
Chapter 4. User manual
nada Documentation, Release 4.0
4.10.2 Dashboard setting
Provides a means to automatically have content loaded into the dashboard via an RSS feed from a site. The default
setting is set to receive updates and news from the IHSN website.
4.10. The Site Settings Page
67
nada Documentation, Release 4.0
68
Chapter 4. User manual
CHAPTER 5
Indices and tables
• genindex
• modindex
• search
69