1
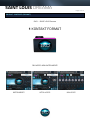
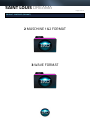
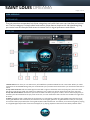
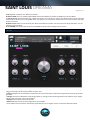
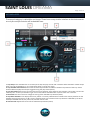
SAINT LOUIS DREAMA Page 2 of 12 END USER LICENCE AGREEMENT (EULA) Do not use or install the product, software and sound ware and all contents, If you do not agree with these following conditions. By installing or using this product, you are accepting this agreement. The License Agreement (‘‘EULA’’) of Saint Louis Dreama (‘‘Product’’) is the contractual conditions between you and EKO1. LICENSE AND PROTECTION 1. License Grant EKO1 grants to you and only you, subject to the following terms and conditions, a non-exclusive, nontransferable right to use each authorized copy of the enclosed Product. This Product is the property of EKO1 and is licensed to you only for use as part of a musical performance, live or recorded. This license expressly forbids resale or other distribution of these sounds, sound ware, and all contents included in the Product or their derivatives, either as they exist on disc, reformatted for use in another digital sampler, or mixed, combined, filtered, resynthesized or otherwise edited, for use as sounds, multisounds, samples, multisamples, wavetables, soundsets, programs or patches in a sampler, microchip, computer, Hardware, software, game console or any sample playback device. You cannot sell the Product content or give it away for use by others in their sampling or sample playback devices. In the event EKO1 terminates this agreement due to your breach, you agree to return the original and all other copies of the software and documentation to EKO1. EKO1 reserves all rights not expressly granted to you. 2. Protection of product, sounds and sound ware You agree to take all reasonable steps to protect this Product and any accompanying documentation from unauthorized copying or use. You agree not to modify this Product to circumvent any method or means adopted or implemented by EKO1 to protect against or discourage the unlicensed use of copying of this Product. 3. Ownership Ownership of, and title to, the enclosed digitally recorded sounds (including any copies) are and will be held by EKO1. Copies are provided to you only to enable you to exercise your rights under the license. Only this license is purchased by you. 4. Term This agreement is effective from the date you open this package, and will remain in full force until termination. This agreement will terminate if you break any of the terms or conditions of this agreement. Upon termination you agree to destroy and return to EKO1 all copies of this Product and accompanying documentation. 5. Restrictions Except as expressly authorized in this agreement, you may not rent, sell, lease, sublicense, distribute, transfer, copy, reproduce, display, modify or time share the enclosed Product or documentation. ©2014 EKO1, all rights reserved. All trademarks are the property of their respective owners SAINT LOUIS DREAMA Page 3 of 12 TABLE OF CONTENTS Product Contents (Format)............................................................................................................................... 4 The Kontakt Library ....................................................................................................................................... 6 Contents ............................................................................................................................................................. 6 System Requirements ................................................................................................................................... 6 Installation ......................................................................................................................................................... 6 Running The Library ...................................................................................................................................... 6 User Interface .................................................................................................................................................... 7 Instruments ................................................................................................................................................... 7 Main Tab ............................................................................................................................................................ 7 FX Tab ............................................................................................................................................................. 8 Kits and Loops ................................................................................................................................................ 10 Mix Loops ..................................................................................................................................................... 11 Acknowledgements ........................................................................................................................................ 12 SAINT LOUIS DREAMA Page 4 of 12 PRODUCT CONTENTS (FORMAT) EKO1 - SAINT LOUIS Dreama 1 KONTAKT FORMAT DELIVERS 3 NEW INSTRUMENTS INSTRUMENTS KITS & LOOPS MIX LOOPS SAINT LOUIS DREAMA PRODUCT CONTENTS (FORMAT) 2 MASCHINE 1&2 FORMAT 3 WAVE FORMAT Page 5 of 12 SAINT LOUIS DREAMA Page 6 of 12 THE KONTAKT LIBRARY CONTENTS • 99 Kontakt instruments in NKI format. • 1600+ samples • Original user interface and advanced scripting SYSTEM REQUIREMENTS • Full version of Kontakt 5.3.1 + • 2.7GB disk space INSTALLATION SAINT LOUIS Dreama is supplied as a downloadable archive (zip) file. This is a compressed folder that you can open using the built in tools on your computer. Open the file by double clicking on it. Inside you will find all the files needed to use SAINT LOUIS Dreama. Simply copy these to a new folder on the hard drive where you store your samples. For top performance it is recommended to keep sample libraries on a different drive to that of the OS and program files. RUNNING THE LIBRARY Once inside Kontakt, open the file tab in the browse window on the left-hand side and select the folder on your hard drive where you installed the library. A list of the instruments in this folder will appear in the lower window. Double click the NKI you wish to use and Kontakt will load it. If you can’t see the browse window you will need to click the ‘Browse’ button in the top menu bar to display it. You can also make use of Kontakt’s Quick Load feature to make it even easier to load sample libraries into Kontakt: Please refer to the Kontakt user manual for more information. SAINT LOUIS DREAMA Page 7 of 12 USER INTERFACE INSTRUMENTS The instruments are separated into three categories, each with their own user interface and control set. The first category is simply called instruments, these have a simple multi-tab interface giving you control over the samples and access to several built in signal processors and effects. MAIN TAB 1.Preset menu: From here you can select many of the different presets available for each instrument. When you make changes to the local ADSR settings they are remembered by the preset and are saved when you save the Kontakt instrument. 2. Poly voice count box: Left click and drag the mouse left or right to choose the amount of polyphony the instrument has when in polyphonic mode. For instance by selecting 2 only a maximum of two notes will sound at any one time. 3. Poly and mono buttons: Use these to put the instrument into either polyphonic mode, in which case the polyphony is limited by the value selected in the poly voice count box, or mono mode where the instrument is limited to a single note at a time. 4. Glide: The glide control is used when the instrument is in monophonic mode, this control determines the amount of time a glide between two notes takes, increase the knob for a higher glide time. To glide between notes you must play one note and then play another (the one to glide to) within 300 milliseconds. This allows you to achieve a glide by playing in a fingered legato style where notes are overlapped, or by playing separate notes with a short delay between them. SAINT LOUIS DREAMA Page 8 of 12 5. EQ: A global 3 band EQ. This affects all presets. 6. Master ADSR: This is a standard global ADSR control that affects all presets in addition to the local ADSR. 7. Velocity Curve: Use these buttons to change the velocity curve of the instrument. This affects how the instrument will respond to the velocity of incoming MIDI notes. The graphics on the buttons indicate the curve that the button will apply to the instrument. 8. Master Filter: Global hi pass and low pass filters that affect all presets. Use the controls to adjust the filters’ cut-off frequency and resonance. 9. Local ADSR: Use these knobs to set the local ADSR envelope. These settings are per preset. FX TAB • Color: Adjusts the range of the flanger effect. Lower values sweep the effect toward the higher end of the flanging range, while larger values sweep toward the lower end. • Unisson: Adjusts the phase difference between the two LFOs that drive the left and right stereo channels of the flanger effect. • Flanger: Controls the feedback of the flanger effect by routing the processed signal back to the effect’s input. Higher values create a sharper, more intense effect. • Spread: Sets the width of the stereo field. • Reverb: Adjusts the output of the algorithmic reverb effect. Drive: Determines the amount of distortion applied to the sound. Higher values increase the distortion effect. SAINT LOUIS DREAMA Page 9 of 12 • Bits: Determines the sound’s resolution in bits. Lower values cause a stronger ‘lo-fi’ effect. Choose 8 bit to emulate old drum machines, or 4 bit to get a video game effect. • Rotator: Controls the strength of the rotator effect. Turn fully clockwise to hear the rotating speakers only. • Delay: Sets the output of the delay effect. SAINT LOUIS DREAMA Page 10 of 12 KITS AND LOOPS The second category is called Kits and Loops. These have a very similar interface to the instruments so only the unique controls will be detailed here. 1. Loop tempo: This indicates the current tempo the loop will play back at and is linked to either Kontakt’s master tempo when running as standalone, or your host tempo when running as a plugin. 2. Loop element mute buttons: Click these blue LED style buttons to enable or disable components of the loop. These buttons affect the playback of loops triggered using the play button (see 3). 3. Loop play button: Press once to start continuous loop playback, press again to stop playback. This button can be automated by a CC. To set up automation right-click on the button and select learn CC, then move a CC controller. 4. Pitch knob: Use this control to change the tuning of the selected loop element (see 5). 5. Key switch indicator: This displays which key switch is currently selected and is linked to the red key switches on the Kontakt keyboard, and keys C1 to B1. The key switches allow you to select which loop element is affected by the Drum Kit Amp Env ADSR controls, the pitch knob, and the volume knob. 6. Volume knob: Adjusts the volume of the selected loop element (see 5). SAINT LOUIS DREAMA Page 11 of 12 MIX LOOP The third and final category of NKIs are called mix loop. These have a different interface to the instruments and kits and loops and the functionality is very straightforward. 1. Loop element status: Different patches are made up of different loop elements. This blue LED indicates if the loop element is active in this patch. 2. Loop tempo: This indicates the tempo the loop will play back at and is linked to either Kontakt’s master tempo when running as standalone, or your host tempo when running as a plugin. 3. Loop play button: Press once to start continuous loop playback, press again to stop playback. This button can be automated by a CC. To set up automation, right-click on the button and select learn CC, then move a CC controller. 4. Volume: Controls the volume of a particular loop element. 5. Mute: Allows you to mute or un-mute a loop element. 6. Global effects: Drive determines the amount of distortion applied to the sound. Rotator controls the rotator effect’s strength. Reverb sets the algorithmic reverbs mix going to the main output. Filter adjusts the cut-off frequency of a low pass filter, the blue LED button next to the filter knob can be used to enable or disable the filter 7. Solo: Allows you to solo or un-solo a loop element. 8. Filter and Pitch: The filter knob controls the cut-off frequency of a high pass filter for the loop element. The pitch knob controls the tuning of the loop element. CREDITS & THANKS Produced by EKO1 Sound Design I Construction Kits EKO1 Team Jo Capo Kent Eric K-Roz Management I Programing I Integration UI Glyn L Software I Scripting David H Product Design I GUI design I graphic design Eric K-Roz Creative Concept EKO1 Thanks : Jo Capo Production, OBFL (Guitoo), Jerry Petit-Frere, D.E.C, Franya Ruiz


![ManyGuitar user manual [november 2005]](http://vs1.manualzilla.com/store/data/005861536_1-a0b937985b357a67600aa3c9a5e7e46a-150x150.png)