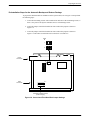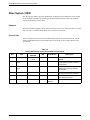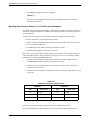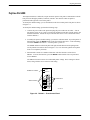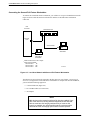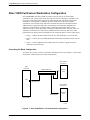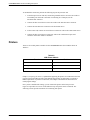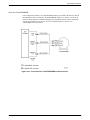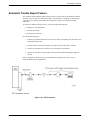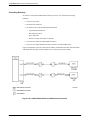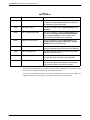
1
AREA CODE CHANGE Please note that the area code for Paradyne Corporation in Largo, Florida has changed from 813 to 727. For any Paradyne telephone number that appears in this manual with an 813 area code, dial 727 instead. COMSPHERE 6800 SERIES NETWORK MANAGEMENT SYSTEM INSTALLATION AND MAINTENANCE GUIDE Document No. 6800-A2-GN22-30 January 1997 NOTE This document supports Release 4.2 or greater of 6800 Series NMS. COMSPHERE 6800 Series Network Management System COMSPHERE 6800 Series Network Management System Installation and Maintenance Guide 6800-A2-GN22-30 4th Edition (January 1997) Changes and enhancements to the product and to the information herein will be documented and issued as a new release to this manual. Warranty, Sales, and Service Information Contact your sales or service representative directly for any help needed. For additional information concerning warranty, sales, service, repair, installation, documentation, or training, use one of the following methods: • Via the Internet: Visit the Paradyne World Wide Web site at http://www.paradyne.com • Via Telephone: Call our automated call system to receive current information via fax or to speak with a company representative. — Within the U.S.A., call 1-800-870-2221 — International, call 813-530-2340 Trademarks All products and services mentioned herein are the trademarks, service marks, registered trademarks or registered service marks of their respective owners. Printed on recycled paper COPYRIGHT 1997 Paradyne Corporation. All rights reserved. This publication is protected by federal copyright law. No part of this publication may be copied or distributed, transmitted, transcribed, stored in a retrieval system, or translated into any human or computer language in any form or by any means, electronic, mechanical, magnetic, manual or otherwise, or disclosed to third parties without the express written permission of Paradyne Corporation, 8545 126th Avenue North, P.O. Box 2826, Largo, Florida 33779-2826. Paradyne Corporation makes no representation or warranties with respect to the contents hereof and specifically disclaims any implied warranties of merchantability or fitness for a particular purpose. Further, Paradyne Corporation reserves the right to revise this publication and to make changes from time to time in the contents hereof without obligation of Paradyne Corporation to notify any person of such revision or changes. A January 1997 6800-A2-GN22-30 Safety Instructions Important Safety Instructions 1. Read and follow all warning notices and instructions marked on the product or included in the manual. 2. This product is intended to be used with a three-wire grounding type plug - a plug which has a grounding pin. This is a safety feature. Equipment grounding is vital to ensure safe operation. Do not defeat the purpose of the grounding type plug by modifying the plug or using an adaptor. Prior to installation, use an outlet tester or a voltmeter to check the ac receptacle for the presence of earth ground. If the receptacle is not properly grounded, the installation must not continue until a qualified electrician has corrected the problem. If a three-wire grounding type power source is not available, consult a qualified electrician to determine another method of grounding the equipment. 3. Slots and openings in the cabinet are provided for ventilation. To ensure reliable operation of the product and to protect it from overheating, these slots and openings must not be blocked or covered. 4. Do not allow anything to rest on the power cord and do not locate the product where persons will walk on the power cord. 5. Do not attempt to service this product yourself, as opening or removing covers may expose you to dangerous high voltage points or other risks. Refer all servicing to qualified service personnel. 6. General purpose cables are provided with this product. Special cables, which may be required by the regulatory inspection authority for the installation site, are the responsibility of the customer. 7. When installed in the final configuration, the product must comply with the applicable Safety Standards and regulatory requirements of the country in which it is installed. If necessary, consult with the appropriate regulatory agencies and inspection authorities to ensure compliance. 8. A rare phenomenon can create a voltage potential between the earth grounds of two or more buildings. If products installed in separate buildings are interconnected, the voltage potential may cause a hazardous condition. Consult a qualified electrical consultant to determine whether or not this phenomenon exists and, if necessary, implement corrective action prior to interconnecting the products. In addition, if the equipment is to be used with telecommunications circuits, take the following precautions: – – – – – – 6800-A2-GN22–30 Never install telephone wiring during a lightning storm. Never install telephone jacks in wet locations unless the jack is specifically designed for wet locations. Never touch uninsulated telephone wires or terminals unless the telephone line has been disconnected at the network interface. Use caution when installing or modifying telephone lines. Avoid using a telephone (other than a cordless type) during an electrical storm. There may be a remote risk of electric shock from lightning. Do not use the telephone to report a gas leak in the vicinity of the leak. January 1997 B COMSPHERE 6800 Series Network Management System Notices ! ! ! ! ! ! ! ! ! C January 1997 6800-A2-GN22-30 Table of Contents Preface Objectives and Reader Assumptions . . . . . . . . . . . . . . . . . . . . . . . . . . . Abstract . . . . . . . . . . . . . . . . . . . . . . . . . . . . . . . . . . . . . . . . . . . . . . . . . Documentation Conventions . . . . . . . . . . . . . . . . . . . . . . . . . . . . . . . . . Related Documents . . . . . . . . . . . . . . . . . . . . . . . . . . . . . . . . . . . . . . . . xi xii xii xii 1. Introduction Overview . . . . . . . . . . . . . . . . . . . . . . . . . . . . . . . . . . . . . . . . . . . . . . . . 1-1 Selecting A Site . . . . . . . . . . . . . . . . . . . . . . . . . . . . . . . . . . . . . . . . . . . 1-5 Contents List . . . . . . . . . . . . . . . . . . . . . . . . . . . . . . . . . . . . . . . . . . . . . 1-6 2. Preparing the Processors Overview . . . . . . . . . . . . . . . . . . . . . . . . . . . . . . . . . . . . . . . . . . . . . . . . Altos System 5000 Host . . . . . . . . . . . . . . . . . . . . . . . . . . . . . . . . . . . . . Optional Host Upgrade Packages . . . . . . . . . . . . . . . . . . . . . . . . . . . . . Optional Host Upgrade Procedures . . . . . . . . . . . . . . . . . . . . . . . . . . . . Altos System 5000 UIP . . . . . . . . . . . . . . . . . . . . . . . . . . . . . . . . . . . . . Altos System 15000 . . . . . . . . . . . . . . . . . . . . . . . . . . . . . . . . . . . . . . . . EISA Configuration Utility . . . . . . . . . . . . . . . . . . . . . . . . . . . . . . . . . . Full-Feature Workstation . . . . . . . . . . . . . . . . . . . . . . . . . . . . . . . . . . . . 2-2 2-3 2-8 2-14 2-21 2-30 2-46 2-51 3. Preparing the Printers Overview . . . . . . . . . . . . . . . . . . . . . . . . . . . . . . . . . . . . . . . . . . . . . . . . Fujitsu DL5600 . . . . . . . . . . . . . . . . . . . . . . . . . . . . . . . . . . . . . . . . . . . Fujitsu DL3400 . . . . . . . . . . . . . . . . . . . . . . . . . . . . . . . . . . . . . . . . . . . Fujitsu DL3600 . . . . . . . . . . . . . . . . . . . . . . . . . . . . . . . . . . . . . . . . . . . Fujitsu DX2300 . . . . . . . . . . . . . . . . . . . . . . . . . . . . . . . . . . . . . . . . . . . C.ITOH C-240 . . . . . . . . . . . . . . . . . . . . . . . . . . . . . . . . . . . . . . . . . . . . Network Printers . . . . . . . . . . . . . . . . . . . . . . . . . . . . . . . . . . . . . . . . . . 6800-A2-GN22-30 January 1997 3-1 3-2 3-5 3-8 3-12 3-17 3-19 i COMSPHERE 6800 Series Network Management System 4. Connecting the Components Overview . . . . . . . . . . . . . . . . . . . . . . . . . . . . . . . . . . . . . . . . . . . . . . . . System Console . . . . . . . . . . . . . . . . . . . . . . . . . . . . . . . . . . . . . . . . . . . Altos 5000 Full-Feature Workstation Configuration . . . . . . . . . . . . . . . Altos 15000 Full-Feature Workstation Configuration . . . . . . . . . . . . . . Basic-Feature Workstation . . . . . . . . . . . . . . . . . . . . . . . . . . . . . . . . . . . Printers . . . . . . . . . . . . . . . . . . . . . . . . . . . . . . . . . . . . . . . . . . . . . . . . . . Data Communications Equipment . . . . . . . . . . . . . . . . . . . . . . . . . . . . . External Systems . . . . . . . . . . . . . . . . . . . . . . . . . . . . . . . . . . . . . . . . . . Netview/PC . . . . . . . . . . . . . . . . . . . . . . . . . . . . . . . . . . . . . . . . . . . . . . Automatic Trouble Report Feature . . . . . . . . . . . . . . . . . . . . . . . . . . . . Accumaster Integrator . . . . . . . . . . . . . . . . . . . . . . . . . . . . . . . . . . . . . . Analysis Network Management System . . . . . . . . . . . . . . . . . . . . . . . . StarKeeper Network Management System . . . . . . . . . . . . . . . . . . . . . . Bytex UMS . . . . . . . . . . . . . . . . . . . . . . . . . . . . . . . . . . . . . . . . . . . . . . 4-2 4-3 4-4 4-10 4-14 4-18 4-22 4-35 4-43 4-45 4-46 4-50 4-54 4-56 5. Loading and Restoring Software Overview . . . . . . . . . . . . . . . . . . . . . . . . . . . . . . . . . . . . . . . . . . . . . . . . Network Preinstallation Preparation . . . . . . . . . . . . . . . . . . . . . . . . . . . Inserting the Software Media . . . . . . . . . . . . . . . . . . . . . . . . . . . . . . . . . UNIX Software for the Host Processor . . . . . . . . . . . . . . . . . . . . . . . . . Installing the MPX Software on the Altos 15000 . . . . . . . . . . . . . . . . . Release 4.2 NMS Software . . . . . . . . . . . . . . . . . . . . . . . . . . . . . . . . . . Unix Software for the UIP . . . . . . . . . . . . . . . . . . . . . . . . . . . . . . . . . . . UIP Software . . . . . . . . . . . . . . . . . . . . . . . . . . . . . . . . . . . . . . . . . . . . . Full-Feature Workstation Software . . . . . . . . . . . . . . . . . . . . . . . . . . . . Basic-Feature Workstation Software . . . . . . . . . . . . . . . . . . . . . . . . . . . Installing the Analysis Gateway Option (5000 Systems Only) . . . . . . . Setting Data Rates . . . . . . . . . . . . . . . . . . . . . . . . . . . . . . . . . . . . . . . . . 5-2 5-4 5-6 5-6 5-19 5-21 5-41 5-50 5-59 5-86 5-90 5-100 6. System Start-Up and Shutdown Overview . . . . . . . . . . . . . . . . . . . . . . . . . . . . . . . . . . . . . . . . . . . . . . . . Starting UNIX on the Host . . . . . . . . . . . . . . . . . . . . . . . . . . . . . . . . . . Starting the NMS Application Program . . . . . . . . . . . . . . . . . . . . . . . . . Shutting Down the NMS Application Program . . . . . . . . . . . . . . . . . . . Shutting Down UNIX on the Host . . . . . . . . . . . . . . . . . . . . . . . . . . . . . Starting UNIX on the UIP . . . . . . . . . . . . . . . . . . . . . . . . . . . . . . . . . . . Starting the UIP Application Program . . . . . . . . . . . . . . . . . . . . . . . . . . Shutting Down the UIP Application Program . . . . . . . . . . . . . . . . . . . . Shutting Down UNIX on the UIP . . . . . . . . . . . . . . . . . . . . . . . . . . . . . 6-1 6-2 6-2 6-5 6-7 6-8 6-8 6-9 6-10 7. Performing Migration Overview . . . . . . . . . . . . . . . . . . . . . . . . . . . . . . . . . . . . . . . . . . . . . . . . Introduction To Migrating Databases . . . . . . . . . . . . . . . . . . . . . . . . . . Release 1 Database Migration . . . . . . . . . . . . . . . . . . . . . . . . . . . . . . . . Release 2 Database Migration . . . . . . . . . . . . . . . . . . . . . . . . . . . . . . . . Release 3.0/3.1 Database Migration . . . . . . . . . . . . . . . . . . . . . . . . . . . Release 4.0/4.1 Database Migration . . . . . . . . . . . . . . . . . . . . . . . . . . . ii January 1997 7-1 7-2 7-3 7-16 7-25 7-33 6800-A2-GN22-30 Table of Contents 8. Running Diagnostics Overview . . . . . . . . . . . . . . . . . . . . . . . . . . . . . . . . . . . . . . . . . . . . . . . . SDX Diagnostic Program . . . . . . . . . . . . . . . . . . . . . . . . . . . . . . . . . . . StarLAN 10 NAU Diagnostic Program . . . . . . . . . . . . . . . . . . . . . . . . . IPC-900 Diagnostic Program (for Altos 5000 Systems Only) . . . . . . . . IPC-1600 Diagnostic Program . . . . . . . . . . . . . . . . . . . . . . . . . . . . . . . . Emulex DCP-286i Diagnostic Program (for Altos 5000 Systems Only) . . . . . . . . . . . . . . . . . . . . . . . . . . . . . . Emulex DCP/MUXi Diagnostic Program . . . . . . . . . . . . . . . . . . . . . . . 8-1 8-2 8-4 8-5 8-9 8-12 8-13 Appendices A. B. C. 6800-A2-GN22-30 Modem Settings . . . . . . . . . . . . . . . . . . . . . . . . . . . . . . . . . . . . . . . A-1 Adapter and Cable Identification . . . . . . . . . . . . . . . . . . . . . . . . . . B-1 Maintaining Multiplexers . . . . . . . . . . . . . . . . . . . . . . . . . . . . . . . . C-1 January 1997 iii List of Figures Figure 1-1 1-2 2-1 2-2 2-3 2-4 2-5 2-6 2-7 2-8 2-9 2-10 2-11 2-12 2-13 2-14 2-15 2-16 2-17 2-18 2-19 2-20 2-21 2-22 2-23 2-24 2-25 2-26 2-27 2-28 2-29 3-1 3-2 3-3 3-4 3-5 3-6 3-7 3-8 6800-A2-GN22-30 Page 6800 Series NMS Showing Configuration of all Ports and UIP . . . . . . . . . . . . . . . . High Capacity 6800 Series NMS Showing Configuration of all Ports and Two UIPs . . . . . . . . . . . . . . . . . . . . . . . . . . . . . . . . . . . . . . . . . . . . . . . . . . . . . . . . . . System 5000 — Cover Fasteners . . . . . . . . . . . . . . . . . . . . . . . . . . . . . . . . . . . . . . . . System 5000 — Disengaging Cover Locking Pins . . . . . . . . . . . . . . . . . . . . . . . . . . Integral Ethernet Card . . . . . . . . . . . . . . . . . . . . . . . . . . . . . . . . . . . . . . . . . . . . . . . . Second and Third Hard Disk Jumper Settings . . . . . . . . . . . . . . . . . . . . . . . . . . . . . . IPC-900 — Switch and Jumper Locations . . . . . . . . . . . . . . . . . . . . . . . . . . . . . . . . . Emulex DCP-286i — Switch and Jumper Locations . . . . . . . . . . . . . . . . . . . . . . . . DCP/MUXi Card . . . . . . . . . . . . . . . . . . . . . . . . . . . . . . . . . . . . . . . . . . . . . . . . . . . . Altos 5000 Disk Bay . . . . . . . . . . . . . . . . . . . . . . . . . . . . . . . . . . . . . . . . . . . . . . . . . System 5000 — Expansion Slots . . . . . . . . . . . . . . . . . . . . . . . . . . . . . . . . . . . . . . . . Emulex DCP/MUCi — Circuit Card and Cable Assembly . . . . . . . . . . . . . . . . . . . . 16-Port Cabinet Assembly . . . . . . . . . . . . . . . . . . . . . . . . . . . . . . . . . . . . . . . . . . . . . 80-Pin Headers P3 and P4 Connector Identification . . . . . . . . . . . . . . . . . . . . . . . . . IPC-1600 Ports Cabinet Assembly . . . . . . . . . . . . . . . . . . . . . . . . . . . . . . . . . . . . . . IPC-1600 — Switch and Jumper Locations and Settings . . . . . . . . . . . . . . . . . . . . . System 15000 — Removing the Top Cover . . . . . . . . . . . . . . . . . . . . . . . . . . . . . . . System 15000 — Removing the Side Panel . . . . . . . . . . . . . . . . . . . . . . . . . . . . . . . System 15000 — Removing the Front Panel . . . . . . . . . . . . . . . . . . . . . . . . . . . . . . . Altos 15000 Main Processor Card and MPX . . . . . . . . . . . . . . . . . . . . . . . . . . . . . . . Altos 15000 Motherboard and Bus Connectors . . . . . . . . . . . . . . . . . . . . . . . . . . . . . Altos 15000 Showing the Hard Disk Bay . . . . . . . . . . . . . . . . . . . . . . . . . . . . . . . . . Altos 15000 Memory Board and Memory Modules . . . . . . . . . . . . . . . . . . . . . . . . . System 15000 — Expansion Slots . . . . . . . . . . . . . . . . . . . . . . . . . . . . . . . . . . . . . . . System 15000 — Top Cover Locking Pins . . . . . . . . . . . . . . . . . . . . . . . . . . . . . . . . Boot Menu . . . . . . . . . . . . . . . . . . . . . . . . . . . . . . . . . . . . . . . . . . . . . . . . . . . . . . . . . Main Menu . . . . . . . . . . . . . . . . . . . . . . . . . . . . . . . . . . . . . . . . . . . . . . . . . . . . . . . . . Configure Computer Menu . . . . . . . . . . . . . . . . . . . . . . . . . . . . . . . . . . . . . . . . . . . . EtherLink II Card Jumper Settings . . . . . . . . . . . . . . . . . . . . . . . . . . . . . . . . . . . . . . Proteon p1392 Card . . . . . . . . . . . . . . . . . . . . . . . . . . . . . . . . . . . . . . . . . . . . . . . . . . NAU Memory Jumper Locations and Settings . . . . . . . . . . . . . . . . . . . . . . . . . . . . . DL5600 — Front Control Panel . . . . . . . . . . . . . . . . . . . . . . . . . . . . . . . . . . . . . . . . DL3400 — Front Control Panel . . . . . . . . . . . . . . . . . . . . . . . . . . . . . . . . . . . . . . . . DL3400 — SETUP Mode Opening Menu . . . . . . . . . . . . . . . . . . . . . . . . . . . . . . . . . DL3600 — Front Control Panel . . . . . . . . . . . . . . . . . . . . . . . . . . . . . . . . . . . . . . . . DL3600 — SETUP Mode Opening Menu . . . . . . . . . . . . . . . . . . . . . . . . . . . . . . . . . DX2300 — Memory and Serial Interface Card Access . . . . . . . . . . . . . . . . . . . . . . . DX2300 — Memory Card Settings . . . . . . . . . . . . . . . . . . . . . . . . . . . . . . . . . . . . . . DX2300 — Serial Interface Card Settings (9600 Baud) . . . . . . . . . . . . . . . . . . . . . . January 1997 1-3 1-4 2-5 2-6 2-7 2-9 2-10 2-12 2-13 2-15 2-16 2-17 2-19 2-20 2-21 2-26 2-32 2-33 2-34 2-35 2-36 2-38 2-39 2-42 2-44 2-47 2-48 2-48 2-51 2-53 2-55 3-2 3-5 3-6 3-9 3-10 3-12 3-13 3-15 v COMSPHERE 6800 Series Network Management System Figure 4-1 4-2 4-3 4-4 4-5 4-6 4-7 4-8 4-9 4-10 4-11 4-12 4-13 4-14 4-15 4-16 4-17 4-18 4-19 4-20 4-21 4-22 4-23 4-24 4-25 4-26 4-27 4-28 5-1 5-2 5-3 5-4 5-5 5-6 5-7 5-8 5-9 5-10 6-1 6-2 6-3 6-4 6-5 7-1 7-2 7-3 7-4 7-5 7-6 7-7 7-8 vi Page Altos System 5000 — Display Unit, Keyboard, and Mouse Ports . . . . . . . . . . . . . . Altos System 15000 — Display Unit, Keyboard, and Mouse Ports . . . . . . . . . . . . . Local Area Network with Second Full-Feature Workstation . . . . . . . . . . . . . . . . . . Network Hub Unit . . . . . . . . . . . . . . . . . . . . . . . . . . . . . . . . . . . . . . . . . . . . . . . . . . . Local Area Network with UIP . . . . . . . . . . . . . . . . . . . . . . . . . . . . . . . . . . . . . . . . . . Local Area Network with Additional Full-Feature Workstations . . . . . . . . . . . . . . . Altos 15000 Basic Local Area Network Configuration . . . . . . . . . . . . . . . . . . . . . . . Altos 15000 Configuration for Additional Full-Feature Workstations . . . . . . . . . . . Altos 15000 Cascaded Network Hub Units . . . . . . . . . . . . . . . . . . . . . . . . . . . . . . . . Basic-Feature Workstation Configurations . . . . . . . . . . . . . . . . . . . . . . . . . . . . . . . . Basic-Feature Workstation Configurations . . . . . . . . . . . . . . . . . . . . . . . . . . . . . . . . Printer Connections . . . . . . . . . . . . . . . . . . . . . . . . . . . . . . . . . . . . . . . . . . . . . . . . . . Daisy Chain . . . . . . . . . . . . . . . . . . . . . . . . . . . . . . . . . . . . . . . . . . . . . . . . . . . . . . . . Local Control Channel Connections . . . . . . . . . . . . . . . . . . . . . . . . . . . . . . . . . . . . . Remote Control Channel Connections . . . . . . . . . . . . . . . . . . . . . . . . . . . . . . . . . . . . Connections for 719 NETWORKER to Host Processor . . . . . . . . . . . . . . . . . . . . . . Connections for Two Local ACCULINK Multiplexers . . . . . . . . . . . . . . . . . . . . . . . Connections for One Local ACCULINK Multiplexer and One 719 NETWORKER . . . . . . . . . . . . . . . . . . . . . . . . . . . . . . . . . . . . . . . . . . . . . . Connections for One Local ACCULINK Multiplexer . . . . . . . . . . . . . . . . . . . . . . . . External Systems Connections . . . . . . . . . . . . . . . . . . . . . . . . . . . . . . . . . . . . . . . . . . Netview/PC Connection . . . . . . . . . . . . . . . . . . . . . . . . . . . . . . . . . . . . . . . . . . . . . . . ATR Connection . . . . . . . . . . . . . . . . . . . . . . . . . . . . . . . . . . . . . . . . . . . . . . . . . . . . . ACCUMASTER Integrator Local Connection via UAI and File Export . . . . . . . . . ACCUMASTER Integrator Remote Connection . . . . . . . . . . . . . . . . . . . . . . . . . . . . ANALYSIS 6510/5605 AND 5600 Local Connection . . . . . . . . . . . . . . . . . . . . . . . ANALYSIS 6510/5605 and 5600 Remote Connection . . . . . . . . . . . . . . . . . . . . . . . StarKeeper Connection . . . . . . . . . . . . . . . . . . . . . . . . . . . . . . . . . . . . . . . . . . . . . . . Bytex UMS Connection . . . . . . . . . . . . . . . . . . . . . . . . . . . . . . . . . . . . . . . . . . . . . . . Cartridge Tape Drive . . . . . . . . . . . . . . . . . . . . . . . . . . . . . . . . . . . . . . . . . . . . . . . . . System 5000 Boot Menu (Installing UNIX on Host Computer) . . . . . . . . . . . . . . . . Installation Procedure Menu (Installing UNIX on Host Computer) . . . . . . . . . . . . . Hardware Configuration Menu (Installing UNIX on Host Computer) . . . . . . . . . . . AT&T Paradyne NMS Parameters Menu . . . . . . . . . . . . . . . . . . . . . . . . . . . . . . . . . System 5000 Boot Menu (Installing UNIX on UIP) . . . . . . . . . . . . . . . . . . . . . . . . . Installation Procedure Menu (Installing UNIX on UIP) . . . . . . . . . . . . . . . . . . . . . . Hardware Configuration Menu (Installing UNIX on UIP) . . . . . . . . . . . . . . . . . . . . ANALYSIS Selection Menu . . . . . . . . . . . . . . . . . . . . . . . . . . . . . . . . . . . . . . . . . . . ANALYSIS Selection Menu (for Changing 6510 Parameters) . . . . . . . . . . . . . . . . . Network Management System Menu . . . . . . . . . . . . . . . . . . . . . . . . . . . . . . . . . . . . . FFW Login Window . . . . . . . . . . . . . . . . . . . . . . . . . . . . . . . . . . . . . . . . . . . . . . . . . 6800 Series NMS Tasks Menu Window . . . . . . . . . . . . . . . . . . . . . . . . . . . . . . . . . . Manager Window . . . . . . . . . . . . . . . . . . . . . . . . . . . . . . . . . . . . . . . . . . . . . . . . . . . . Network Management System Menu . . . . . . . . . . . . . . . . . . . . . . . . . . . . . . . . . . . . . AT&T Paradyne NMS Parameters Menu (Release 1 Database Migration) . . . . . . . . Original Menu Showing Selected Type (r1) . . . . . . . . . . . . . . . . . . . . . . . . . . . . . . . AT&T Paradyne NMS Parameters Menu (Release 2 Database Migration) . . . . . . . . Original Menu Showing Selected Type (r2) . . . . . . . . . . . . . . . . . . . . . . . . . . . . . . . AT&T Paradyne NMS Parameters Menu (Release 3.0/3.1 Database Migration) . . . Original Menu Showing Selected Type (r3) . . . . . . . . . . . . . . . . . . . . . . . . . . . . . . . AT&T Paradyne NMS Parameters Menu (Release 4.0 Database Migration) . . . . . . Original Menu Showing Selected Type (R4) . . . . . . . . . . . . . . . . . . . . . . . . . . . . . . . January 1997 4-3 4-4 4-6 4-7 4-8 4-9 4-10 4-12 4-13 4-15 4-16 4-19 4-23 4-24 4-26 4-29 4-30 4-31 4-32 4-36 4-43 4-45 4-46 4-48 4-51 4-52 4-54 4-56 5-6 5-7 5-8 5-9 5-29 5-41 5-42 5-43 5-94 5-97 6-2 6-4 6-4 6-5 6-8 7-9 7-10 7-19 7-21 7-27 7-29 7-35 7-37 6800-A2-GN22-30 Table of Contents Figure 8-1 8-2 8-3 8-4 8-5 C-1 C-2 C-3 C-4 C-5 6800-A2-GN22-30 Page Boot Menu . . . . . . . . . . . . . . . . . . . . . . . . . . . . . . . . . . . . . . . . . . . . . . . . . . . . . . . . . SDX Main Menu . . . . . . . . . . . . . . . . . . . . . . . . . . . . . . . . . . . . . . . . . . . . . . . . . . . . StarLAN IRQ Strapping . . . . . . . . . . . . . . . . . . . . . . . . . . . . . . . . . . . . . . . . . . . . . . Port-to-Port Connections . . . . . . . . . . . . . . . . . . . . . . . . . . . . . . . . . . . . . . . . . . . . . . Dip Switch Settings for Memory Address . . . . . . . . . . . . . . . . . . . . . . . . . . . . . . . . . Power Connections for 740 Multiplexers without Expansion Shelf . . . . . . . . . . . . . Power Connections for 740 Multiplexers with Expansion Shelf . . . . . . . . . . . . . . . . Power Connections for 745 Multiplexers . . . . . . . . . . . . . . . . . . . . . . . . . . . . . . . . . 4336 Power Supply for 740 Multiplexers . . . . . . . . . . . . . . . . . . . . . . . . . . . . . . . . . 4336 Power Supply Connection for 745 Multiplexers . . . . . . . . . . . . . . . . . . . . . . . January 1997 8-2 8-3 8-4 8-8 8-9 C-3 C-4 C-5 C-6 C-7 vii Table of Contents List of Tables Table 1-1 2-1 2-2 2-3 2-4 2-5 2-6 2-7 2-8 2-9 2-10 3-1 3-2 3-3 3-4 3-5 3-6 3-7 4-1 4-2 5-1 5-2 5-3 6-1 6-2 A-1 B-1 C-1 6800-A2-GN22-30 Page Processor Configurations . . . . . . . . . . . . . . . . . . . . . . . . . . . . . . . . . . . . . . . . . . . . . . Altos 5000 Factory- and Field-Installable Circuit Cards . . . . . . . . . . . . . . . . . . . . . . DCP/MUXi — I/O Address Switch Settings . . . . . . . . . . . . . . . . . . . . . . . . . . . . . . . Altos 5000 UIP Factory- and Field-Installable Circuit Cards . . . . . . . . . . . . . . . . . . Altos 5000 UIP Conversion Matrix . . . . . . . . . . . . . . . . . . . . . . . . . . . . . . . . . . . . . . Altos 15000 Factory- and Field-Installable Circuit Cards . . . . . . . . . . . . . . . . . . . . . IPC-1600 — Memory Switch Settings (DSI) . . . . . . . . . . . . . . . . . . . . . . . . . . . . . . DCP-MUXI — I/O Address Switch Settings . . . . . . . . . . . . . . . . . . . . . . . . . . . . . . Configuration Files . . . . . . . . . . . . . . . . . . . . . . . . . . . . . . . . . . . . . . . . . . . . . . . . . . Token Ring I/O Address Switch Setting . . . . . . . . . . . . . . . . . . . . . . . . . . . . . . . . . . 6386/25 Circuit Cards to Be Removed . . . . . . . . . . . . . . . . . . . . . . . . . . . . . . . . . . . DL3600 — MENU1 Settings . . . . . . . . . . . . . . . . . . . . . . . . . . . . . . . . . . . . . . . . . . . DL3600 — HARDWARE Settings . . . . . . . . . . . . . . . . . . . . . . . . . . . . . . . . . . . . . . Memory Card DIP Switch Settings . . . . . . . . . . . . . . . . . . . . . . . . . . . . . . . . . . . . . . Serial Interface Card Settings Switches 1—5 . . . . . . . . . . . . . . . . . . . . . . . . . . . . . . Serial Interface Card Settings Switches 6—8 . . . . . . . . . . . . . . . . . . . . . . . . . . . . . . C.ITOH C-240 Setting Changes . . . . . . . . . . . . . . . . . . . . . . . . . . . . . . . . . . . . . . . . Printer Functions Printout . . . . . . . . . . . . . . . . . . . . . . . . . . . . . . . . . . . . . . . . . . . . . Cascaded Hub Cable Modifications . . . . . . . . . . . . . . . . . . . . . . . . . . . . . . . . . . . . . . NMS Printer Models . . . . . . . . . . . . . . . . . . . . . . . . . . . . . . . . . . . . . . . . . . . . . . . . . Altos 5000 Basic Network Configuration Parameters . . . . . . . . . . . . . . . . . . . . . . . . Altos 15000 Basic Network Configuration Parameters . . . . . . . . . . . . . . . . . . . . . . . NMS Parameters Menu — Options . . . . . . . . . . . . . . . . . . . . . . . . . . . . . . . . . . . . . . Host Processor Start-Up, Reset, and Shutdown Modifications . . . . . . . . . . . . . . . . . UIP Start-Up and Shutdown . . . . . . . . . . . . . . . . . . . . . . . . . . . . . . . . . . . . . . . . . . . Modem Hardware and Configuration Option Switch Settings . . . . . . . . . . . . . . . . . Adapter and Cable Identification . . . . . . . . . . . . . . . . . . . . . . . . . . . . . . . . . . . . . . . . NMS Commands . . . . . . . . . . . . . . . . . . . . . . . . . . . . . . . . . . . . . . . . . . . . . . . . . . . . January 1997 1-2 2-4 2-13 2-22 2-27 2-30 2-40 2-41 2-46 2-52 2-54 3-10 3-11 3-14 3-16 3-16 3-17 3-18 4-14 4-18 5-4 5-5 5-29 6-1 6-1 A-2 B-1 C-10 ix Preface Objectives And Reader Assumptions The COMSPHERE 6800 Series Network Management System Installation and Maintenance Guide provides detailed instructions for installing and maintaining new network management systems, and for migrating from existing Release 1, 2, 3.x, or 4.1 6800 Series NMS systems to the Release 4.2 6800 Series NMS. This guide was written to assist technical personnel at customer sites and Paradyne service technicians. Abstract This guide is organized into the following chapters and appendices: Chapter 1. Introduction. This chapter provides an overview of the COMSPHEREr 6800 Series NMS hardware and software components, describes site selection, and provides a contents list of the hardware and software supported by the 6800 Series NMS. Chapter 2. Preparing the Processors. This chapter identifies the Altos System 5000 and System 15000 internal circuit cards and slots, their field upgrade packages, and procedures for installation. It also provides information and procedures for running configuration utility programs. Chapter 3. Preparing the Printers. This chapter provides information for configuring and connecting printers supported by the NMS. Chapter 4. Connecting the Components. This chapter provides information and procedures for connecting the external NMS components to the host and, if present, to the User Interface Processor (UIP). Chapter 5. Loading and Restoring Software. This chapter provides procedural information for installing the required software for the host processor, User Interface Processor (UIP), full-feature workstations, and basic-feature workstations. Chapter 6. System Start-up and Shutdown. This chapter provides procedural information for starting and shutting down UNIXr on the host, the NMS applications program, the User Interface Processor (UIP) application program, and UNIX on the User Interface Processor (UIP). Chapter 7. Performing Migration. This chapter provides procedural information for migrating previous NMS release databases to Release 4.2 of the 6800 Series NMS. 6800-A2-GN22-30 January 1997 xi COMSPHERE 6800 Series Network Management Systems Chapter 8. Running Diagnostics. This chapter provides information on how to use the diagnostic programs that are shipped with the NMS. These diagnostic programs are used to detect and solve hardware problems in the Altos System 5000, the Altos System 15000, and in the circuit cards installed in these systems. Appendix A. Modem Settings. This appendix describes the settings for hardware and software configuration of modems connecting remote NMS devices. Appendix B. Adapter and Cable Identification. This appendix provides information for each adapter/cable descriptions, usage descriptions and pin information for each cable and adapter described in this guide. Appendix C. Maintaining Multiplexers. This appendix provides information on general troubleshooting procedures, command port failure recovery, event port failure recovery, and external systems port failure recovery. Documentation Conventions The following convention has been used throughout this document. Typeface This typeface indicates messages that appear on the screen. Related Documents Contact your sales representative to order additional product documentation. The following documents contain information pertinent to the installation process. xii 305-910 AT&T Intelligent Ports Card Model 900 (IPC-900) User’s Guide 305-920 AT&T Intelligent Ports Card Model 1600 (IPC-1600) User’s Guide 999-100-292 AT&T 2224-CEO Modem User’s Guide 999-100-432 StarLAN 10 Network PC NAU Installation Guide 6500-A2-GA21 ANALYSIS 6510 Automated Network Management System Reference Manual 6510-A2-GN31 Network Management Workstation User’s Guide 6800-A2-GB20 COMSPHERE 6800 Series Network Management System Communications Products Support Configuration Guide 6800-A2-GB21 COMSPHERE 6800 Series Network Management System Multiplexer Management and Configuration Guide 6800-A2-GB30 COMSPHERE 6800 Series Network Management System Core Command Reference Manual January 1997 6800-A2-GN22-30 Preface 6800-A2-GB31 COMSPHERE 6800 Series Network Management System Communications Products Support Command Reference Manual 6800-A2-GB33 COMSPHERE 6800 Series Network Management System 3270 Terminal Emulation Option Supplement 6800-A2-GE26 COMSPHERE 6800 Series Network Management System User’s/ System Administrator’s Guide 690-23502-002 Altos System 5000 Owner’s Guide 690-25428-002 Altos System 10000/15000 Owner’s Guide B-69292 F/I Rev. D Fujitsu DX2300/2400 Printers User’s Manual (Type F) B-69337 Rev. A Fujitsu DL5600 Dot Matrix Printer User’s Manual B-69431 Rev. C Fujitsu DL3300/3400 Printers User’s Manual PT1050954-00 Rev. C DCP/MUXi Installation Guide PT1050956-00 Rev. A DCP 286-i Installation Guide E1-300 34H C-240/245 User’s Manual 62FH 5009E-02 Fujitsu DL3600 User’s and Programmer’s Manual 42-040295-00 Rev. C ProNet – 4/16 Network Interface Cards User Guide 6800-A2-GN22-30 January 1997 xiii Introduction 1 Overview . . . . . . . . . . . . . . . . . . . . . . . . . . . . . . . . . . . . . . . . . . . . . . . . . . . . 1-1 Selecting a Site . . . . . . . . . . . . . . . . . . . . . . . . . . . . . . . . . . . . . . . . . . . . . . . . 1-5 Contents List . . . . . . . . . . . . . . . . . . . . . . . . . . . . . . . . . . . . . . . . . . . . . . . . . . 1-6 Overview The COMSPHEREr 6800 Series Network Management System (NMS) manages Analog Private Line (APL) modems, switched network modems, Data Service Units (DSUs), and ACCULINK multiplexers. The Release 4.2 NMS provides two areas of improvement over previous releases: increased database and workstation capacity and a new feature set. The current software release is available on two hardware platforms: the Altos System 5000 and the Altos System 15000. The fundamental difference between the two platforms is that both the capacity enhancements and the new feature set are available on the Altos 15000 platform and only the new features are available on the Altos 5000 platform. The Altos 5000 platform is nearly identical to the hardware configuration seen in Release 3.1 and Release 4.1. Basic optional differences are the Token Ring Local Area Network (LAN) support, third hard disk drive support for automatic database backup and restore, and support for 16 control channels with a second DCP-MUXi card. The Altos 15000 platform consists of a multiprocessor and two mandatory User Interface Processors (UIPs). This hardware configuration allows a larger number of simultaneous users, workstations, and devices than previous releases. The configuration also supports the new feature set. Table 1-1 shows the configurations for the five processors. The differences among the processors include the type of LAN which they use to communicate among host, UIP, and full-feature workstations, and the availability of the optional feature packages. Communication with the basic-feature workstations is done through the serial ports on the processors. 6800-A2-GN22-30 January 1997 1-1 COMSPHERE 6800 Series Network Management System Table 1-1 Processor Configurations Altos 15000 Host Altos 5000 Host with Ethernet Altos 5000 UIP with Ethernet 1 UIP (optional) Ethernet Network Ethernet Network 16 Control Channel package 16 Control Channel package (optional)1 — 16 Control Channel package (optional)1 — — ANALYSIS NMS Package (optional)1 — ANALYSIS NMS package (optional) 1 — — 3270 Emulation package (optional)1 — 3270 Emulation package (optional)1 — — Ethernet Network Serial Port Upgrade package (optional)2 1 UIP (optional) Altos 5000 UIP with Token Ring 2 UIP — — Altos 5000 Host with Token Rink Token Ring Network — — Token Ring Network Serial Port Upgrade package (optional) SNMP Trap Export package (optional) SNMP Trap Export package (optional) — SNMP Trap Export package (optional) — Database Customization packages (optional) Database Customization packages (optional) — Database Customization packages (optional) — Workstations: 24 full-feature 18 basic-feature Workstations: with UIP — 6 full-feature 11 basic-feature without UIP — 2 full-feature 3 basic-feature — Workstations: with UIP — 6 full-feature 11 basic-feature without UIP — 2 full-feature 3 basic-feature — AutoBackup package AutoBackup package (optional) — AutoBackup package (optional) — NOTES: Packages and features not marked as optional are required. Altos 5000 UIP is used with both the Altos 5000 and Altos 15000 host. It is optional with the 5000. Two UIPs are required with the 15000 Workstation configurations are the maximum number allowed. The NMS requires a minimum of one full-feature workstation attached to the host. 1 The 16 Control Channel package cannot be installed on the Altos System 5000 in conjunction with either or both of the ANALYSIS or 3270 Emulation packages. 2 The Serial Port Upgrade package must be installed on UIP #1 to support 18 basic-feature workstations when the host is an Altos System 15000. Figure 1-1 shows a host processor and UIP for the System 5000. Figure 1-2 shows a System 15000 host with two System 5000 UIPs. 1-2 January 1997 6800-A2-GN22-30 Introduction Service Restoration Control Unit VT100 Emulation (AT&T Mail) Alert Log Printer (or NetView PC) Monitor SNA Host Keyboard Mouse ACCULINK Multiplexer ACCULINK Multiplexer Command and Event Interface I P C 1 6 0 0 Automatic Trouble Report Interface UAI/AMI Alarms System Controller DCX Multiplexer Service Restoration Control Unit VT100 Emulation D C P 2 8 6 ANALYSIS NMS E T H E R N E T T O K E or N D C P R I N G M U X i ALTOS SYSTEM 5000 (Host) – PARALLEL * AMI File Export (UUCP) 839A Dial Backup E M U L E X S V G A SERIAL Alert Transport, Printer Requests, Cut-through Port I P C 9 0 0 * System Printer Modem Control Channels 1–8 Second Card Channels 9 – 16 (optional) System Printer Full-Feature Workstations Service Restoration Control Unit NETWORK HUB UNIT VT100 Emulation (AT&T Mail) Network Printer Print Server Monitor Keyboard Basic-Feature Workstations 839A Dial Backup System Controller DCX Multiplexer Basic-Feature Workstations Mouse I P C 1 6 0 0 T O E K T E H E or N R N R E I T N G ALTOS SYSTEM 5000 (UIP) PARALLEL SERIAL S V G A SERIAL 839A Dial Backup System Controller DCX Multiplexer Service Restoration Control Unit * Compatible with a single DCP/MUXi only (8 control channels) 494-13051b-04 VT100 Emulation Figure 1-1. 6800 Series NMS Showing Configuration of all Ports and UIP 6800-A2-GN22-30 January 1997 1-3 COMSPHERE 6800 Series Network Management System Service Restoration Control Unit VT100 Emulation (AT&T Mail) Alert Log Printer (or NetView PC) Monitor Keyboard Mouse ACCULINK Multiplexer I P C ACCULINK Multiplexer Command and Event Interface E T H E R N E T 1 6 0 0 Automatic Trouble Report Interface UAI/AMI Alarms D C P ALTOS SYSTEM 15000 (Host) – M U X i PARALLEL S V G A SERIAL AMI File Export (UUCP) 839A Dial Backup System Printer System Controller DCX Multiplexer System Printer Service Restoration Control Unit Full-Feature Workstations Modem Control Channels 1 – 16 VT100 Emulation Network Printer Print Server NETWORK HUB UNIT Service Restoration Control Unit ROUTER – Maximum of 24 Full-Feature Workstations VT100 Emulation (AT&T Mail) HUB Monitor 839A Dial Backup System Controller DCX Multiplexer – Maximum of 15 Network Printers Keyboard Mouse Basic-Feature Workstations I P C 1 6 0 0 E T H E R N E T Basic-Feature Workstations ALTOS SYSTEM 5000 (UIP) S V G A Full-Feature Workstation – Maximum of 18 Basic-Feature Workstations PARALLEL SERIAL SERIAL ROUTER 839A Dial Backup System Controller HUB DCX Multiplexer Service Restoration Control Unit Print Server Monitor Keyboard Mouse VT100 Emulation Network Printer Full-Feature Workstations E T H E R N E T ALTOS SYSTEM 5000 (UIP) S V G A PARALLEL SERIAL SERIAL 494-14444-02 Figure 1-2. High Capacity 6800 Series NMS Showing Configuration of all Ports and Two UIPs 1-4 January 1997 6800-A2-GN22-30 Introduction Selecting A Site Select a site that provides easy access for cabling to the network and also provides adequate work area for the system operators. The site should meet the following environmental conditions: • Temperature: +40°F to +90°F (+5°C to +32°C) • Humidity: 20% to 80% (noncondensing) • Power: Input voltage range is determined by a voltage selection switch on the rear panel of the chassis. The switch can be set manually to either 115 Vac or 230 Vac. Power output: 395 watts for System 5000 Power output: 420—500 watts for System 15000 Power supply fuse type (internal only) rating: 10A/250V • Physical Specifications: — Altos System 5000 Height: 26.5 inches (67.3 cm) Width: 8 inches (20.3 cm) Depth: 19 inches (48.3 cm) Weight: 75 lbs. — Altos System 15000 Height: 26.5 inches (67.3 cm) Width: 16 inches (40.6 cm) Depth: 19 inches (48.3 cm) Weight: 90 lbs. 6800-A2-GN22-30 January 1997 1-5 COMSPHERE 6800 Series Network Management System Contents List The following hardware and software are supported by the 6800 Series NMS. Host (Altos System 15000) Four 16 Mb ECC memory modules Three 520 Mb SCSI-II hard disk drives 150 Mb SCSI cartridge tape drive 3.5 inch floppy drive VGA controller card Ethernet Interface IPC-1600 ports card Two DCP/MUXi cards PS/2 mouse AT keyboard Host (Altos System 5000/33) Eight 4 Mb SIMMs Two 520 Mb SCSI hard disk drives 150 Mb SCSI cartridge tape drive 3.5 inch floppy disk drive VGA controller card Ethernet Interface IPC-1600 ports card DCP/MUXi card PS/2 mouse AT keyboard 1-6 January 1997 6800-A2-GN22-30 Introduction User Interface Processor Altos System 5000/33 Processor Eight 4 Mb SIMMs for UIP with System 5000 host Twelve 4 Mb SIMMs for UIP with System 15000 host One 520 Mb SCSI hard disk drive 150 Mb SCSI cartridge tape drive 3.5 inch floppy disk drive VGA controller card Ethernet Interface PS/2 mouse AT keyboard Optional Components AT&T IPC-900 (required for ANALYSIS NMS support on Altos 5000 host only) AT&T IPC-1600 (required for serial interface support on the Altos 5000 UIP only) Emulex DCP-286i (required for 3270 Terminal Emulation support on Altos 5000 host only) Proteonr Token Ring EISA Network Interface Card (for Altos 5000 host and UIP processors, replacing Ethernet Interface) Proteonr Token Ring ISA Network Interface Card (for Altos full-feature workstations replacing Ethernet interface) Emulex DCP/MUXi card (for additional eight control channels on Altos 5000 host processor) NMS Application Software 6800 NMS Application Software Release 4.2, Volumes 1–7 ACCULINK Network Management Software Release 4.3, Volumes 1–2 PTF Host and UIP Software Release 4.2.1 License Agreements NMS License Agreement Online Serial Number Card 4GL Serial Number Card 6800-A2-GN22-30 January 1997 1-7 COMSPHERE 6800 Series Network Management System User Documentation (in addition to this manual) COMSPHERE 6800 Series Network Management System Core Command Reference Manual COMSPHERE 6800 Series Network Management System Communications Products Support Configuration Guide COMSPHERE 6800 Series Network Management System Multiplexer Management and Configuration Guide COMSPHERE 6800 Series Network Management System User’s/System Administrator’s Guide COMSPHERE 6800 Series Network Management System Communications Products Support Command Reference Manual COMSPHERE 6800 Series Network Management System Multiplexer Command Reference Manual COMSPHERE 6800 Series Network Management System Command Quick Reference Guide COMSPHERE 6800 Series Network Management System 3270 Terminal Emulation Option Manual COMSPHERE 6800 Series Network Management System Reports and Trouble Tracking Customization Guide 3Com EtherLink II/16 TP and EtherLink II/16 Adapter Guide Full-Feature Workstations Altos 486DX/33 processor (Ethernet Hub Unit required to support) Altos SX/20 or any 386 processor supported by users of previous NMS releases which may include: • One StarLAN 10 Network Access Unit (optional for users of previous NMS releases) Basic-Feature Workstations Altos 486DX, Altos SX/20, or any processor supported by the previous NMS releases as follows: • AT&T 6386SX/EL, 6386/SX, 6386 WGS, 6286 WGS, 6312 WGS, 6300 WGS with associated software Printers System Printers: Fujitsu DL5600, DL3400, or DL3600 Alert Log Printer: Fujitsu DX2300, C.ITOH C-240 Automatic Trouble Report Printer: Fujitsu DX2300, C.ITOH C-240 Local Copy Printer: C.ITOH C-240 1-8 January 1997 6800-A2-GN22-30 Preparing the Processors Overview . . . . . . . . . . . . . . . . . . . . . . . . . . . . . . . . . . . . . . . . . . . . . . . . . . . . Altos System 5000 Host . . . . . . . . . . . . . . . . . . . . . . . . . . . . . . . . . . . . . . . . . Hardware . . . . . . . . . . . . . . . . . . . . . . . . . . . . . . . . . . . . . . . . . . . . . . . . . . Circuit Cards . . . . . . . . . . . . . . . . . . . . . . . . . . . . . . . . . . . . . . . . . . . . . . . Opening the System 5000 Host . . . . . . . . . . . . . . . . . . . . . . . . . . . . . . . . . Preinstallation Checks for the Integral Ethernet Card . . . . . . . . . . . . . . . . Optional Host Upgrade Packages . . . . . . . . . . . . . . . . . . . . . . . . . . . . . . . . . . Preinstallation Steps for the Automatic Backup and Restore Package . . . Preinstallation Steps for the ANALYSIS NMS Package . . . . . . . . . . . . . . Preinstallation Steps for the 3270 Terminal Emulation Package . . . . . . . . Preinstallation Steps for the 16 Control Channel Package . . . . . . . . . . . . Preinstallation Checks for the Token Ring Card . . . . . . . . . . . . . . . . . . . . Optional Host Upgrade Procedures . . . . . . . . . . . . . . . . . . . . . . . . . . . . . . . . Installing the Third Hard Drive in the System 5000 . . . . . . . . . . . . . . . . . Installing Circuit Cards in the System 5000 . . . . . . . . . . . . . . . . . . . . . . . Installing the Octopus Cable Assembly . . . . . . . . . . . . . . . . . . . . . . . . . . Connecting the Ethernet Card to the Network . . . . . . . . . . . . . . . . . . . . . Converting Host Processor R3.x to R4.2 . . . . . . . . . . . . . . . . . . . . . . . . . . Closing the System 5000 . . . . . . . . . . . . . . . . . . . . . . . . . . . . . . . . . . . . . . Installing the 16-Port Cabinet Assembly . . . . . . . . . . . . . . . . . . . . . . . . . . Altos System 5000 UIP . . . . . . . . . . . . . . . . . . . . . . . . . . . . . . . . . . . . . . . . . Circuit Cards . . . . . . . . . . . . . . . . . . . . . . . . . . . . . . . . . . . . . . . . . . . . . . . Opening the Altos 5000 UIP . . . . . . . . . . . . . . . . . . . . . . . . . . . . . . . . . . . Installing Additional Memory on the System 5000 . . . . . . . . . . . . . . . . . Preinstallation Checks for the Integral Ethernet Card . . . . . . . . . . . . . Optional UIP Upgrade Packages . . . . . . . . . . . . . . . . . . . . . . . . . . . . . . . . Preinstallation Steps for the IPC-1600 Upgrade Card . . . . . . . . . . . . . . . . Preinstallation Checks for the Token Ring Card . . . . . . . . . . . . . . . . . . . . Optional UIP Upgrade Procedures . . . . . . . . . . . . . . . . . . . . . . . . . . . . . . Converting Altos 5000 Processors to Release 4.2 UIPs . . . . . . . . . . . . . . UIP Conversion Procedures . . . . . . . . . . . . . . . . . . . . . . . . . . . . . . . . . Connecting the Ethernet Card to the Network . . . . . . . . . . . . . . . . . . . . . Closing the Altos 5000 UIP . . . . . . . . . . . . . . . . . . . . . . . . . . . . . . . . . . . . Installing the 16-Port Cabinet Assembly . . . . . . . . . . . . . . . . . . . . . . . . . . Altos System 15000 . . . . . . . . . . . . . . . . . . . . . . . . . . . . . . . . . . . . . . . . . . . . Hardware . . . . . . . . . . . . . . . . . . . . . . . . . . . . . . . . . . . . . . . . . . . . . . . . . . Circuit Cards . . . . . . . . . . . . . . . . . . . . . . . . . . . . . . . . . . . . . . . . . . . . . . . Opening the System 15000 . . . . . . . . . . . . . . . . . . . . . . . . . . . . . . . . . . . . Installing the MPX Processor . . . . . . . . . . . . . . . . . . . . . . . . . . . . . . . . . . Installing the Second and Third Hard Disks on the System 15000 . . . . . . Preinstallation Steps for the Second and Third Hard Disks on the System 15000 . . . . . . . . . . . . . . . . . . . . . . . . . . . . . . . . . . . . . . . . . . . Installing the Second and Third Hard Disks in the System 15000 . . . . . . Installing Additional Memory on the System 15000 . . . . . . . . . . . . . . . . Preinstallation Steps for the IPC-1600 Card on the System 15000 . . . . . . Preinstallation Steps for the DCP-MUXi Cards on the System 15000 . . . Installing Circuit Cards in the System 15000 . . . . . . . . . . . . . . . . . . . . . . Closing the System 15000 . . . . . . . . . . . . . . . . . . . . . . . . . . . . . . . . . . . . . Running CMOS Setup on the Altos 15000 . . . . . . . . . . . . . . . . . . . . . . . . EISA Configuration Utility . . . . . . . . . . . . . . . . . . . . . . . . . . . . . . . . . . . . . . . Changing the Token Ring Configuration . . . . . . . . . . . . . . . . . . . . . . . . . 6800-A2-GN22-30 January 1997 2 2-2 2-3 2-3 2-4 2-5 2-7 2-8 2-9 2-10 2-11 2-13 2-14 2-14 2-14 2-15 2-17 2-18 2-18 2-18 2-19 2-21 2-21 2-22 2-22 2-24 2-25 2-26 2-27 2-27 2-27 2-28 2-28 2-28 2-29 2-30 2-30 2-30 2-31 2-35 2-37 2-37 2-38 2-39 2-40 2-41 2-42 2-43 2-45 2-46 2-50 2-1 COMSPHERE 6800 Series Network Management System Full-Feature Workstation . . . . . . . . . . . . . . . . . . . . . . . . . . . . . . . . . . . . . . Preinstallation Checks for the EtherLink II Card . . . . . . . . . . . . . . . . . Installation of the Token Ring Network Interface Card . . . . . . . . . . . . Switching off the Cache on 486DX . . . . . . . . . . . . . . . . . . . . . . . . . . . Migrating Host Processor Release 1 or 2 to Full-Feature Workstation Full-Feature Workstation . . . . . . . . . . . . . . . . . . . . . . . . . . . . . . . . . . . 2-51 2-51 2-52 2-53 2-54 2-57 Overview Release 4.2 of the 6800 Series Network Management System supports two processors, the Altos 15000 and Altos 5000. The Altos 15000 can serve only as an NMS host processor while the Altos 5000 can serve as both host processor and User Interface Processor (UIP). Most of the internal components required by the NMS in the Altos 5000 processor − as well as all the software − have been installed prior to shipment, leaving very little installation to be performed at the customer’s location. • This chapter opens with a description of the internal components and circuit cards. It then: • Describes the various upgrade packages that the customer can choose to install in both processors. • Explains how to configure the strap settings on the circuit cards that are part of each upgrade package. • Provides step-by-step instructions for opening the processors, locating the expansion slots, installing the circuit cards, and closing the processors. • Provides detailed information for converting processors from previous NMS releases to run with Release 4.2. • Explains how to run the EISA Configuration Utility, which matches the processor’s resources with the requirements of the circuit cards that were just installed. Hardware conversion information includes retrofitting Release 1, 2, and/or 3.x host processors as full-feature workstations and converting 6386 basic-feature workstations to full-feature workstations. After the database information has been transferred, the original 6800 Series R1, R2, or R3.x NMS hardware system can be disassembled and the individual components used as part of a Release 4.2 6800 Series NMS. For example, any basic-feature workstation in Release 2 6800 Series NMS can be disconnected from the original system and reconnected to the Release 4.2 6800 Series NMS. System printers can be similarly reused. The fault log printer used in these previous releases can be reconnected to a Release 4.2 6800 Series NMS alert log printer port to provide alert printing capabilities. (For instructions on hardware connection of these components refer to Chapter 4, Connecting the Components.) Depending on the release, some host processors can also be reused. The Release 1 and Release 2 6800 Series NMS host processors (6386/25 processors) can be converted to full-feature workstations or basic-feature workstations and used with a Release 4.2 6800 Series NMS. The Release 1 COMSPHERE 6830 processors (including the 3B2/600 host, the 6386/25 UIP, 6386 network monitor unit) can be returned for a customer credit applied towards the Release 4.2 6800 Series NMS. 2-2 January 1997 6800-A2-GN22-30 Preparing the Processors Any 6386-based full-feature workstation used in a Release 1 or a Release 2 6800 Series NMS system can be loaded with Release 4.2 6800 Series NMS full-feature workstation software and can be connected to the customer’s Release 4.2 6800 Series NMS. Additionally, any 6386-based basic-feature workstation can be converted to a full-feature workstation with installation of an upgrade kit. Any PC-based basic-feature workstation used in the Release 1 6800 Series NMS can be loaded with Release 4.2 basic-feature workstation software and can be connected to the customer’s Release 4.2 NMS. Altos System 5000 Host The Altos System 5000 is based on the Extended Industry Standard Architecture (EISA) bus, and features an Intel i80486 central processing unit operating at a clock speed of 33 Mhz. The following sections describe the hardware and circuit cards that are installed in the System 5000 when it is shipped to the customer. Hardware The System 5000 that is shipped to the customer has been configured specifically to serve as a host processor. NOTE Install the single-ended termination connector packaged with the System 5000 into the connector labeled Expansion A on the back of the processor. 6800-A2-GN22-30 January 1997 2-3 COMSPHERE 6800 Series Network Management System Circuit Cards Table 2-1 indicates the location of the standard and optional circuit cards that can be installed in the host processor. Table 2-1 Altos 5000 Factory- and Field-Installable Circuit Cards Slot 1 2-4 Memory Address IRQ Base I/O — — 1000 —101F Controls the hard disk(s), floppy disk and cartridge tape drives. Integral Ethernet — 10 1CD0 —1CD2 Optional. Supports connection to User Interface Processor, Full-Feature Workstation. Incompatible with Token Ring card. Card I/O Address Description 2 IPC-900 D2000 — D3FFF 5 2B0 —2BF Optional. Supports ANALYSIS cut-through. Host only. 3 Video Controller A0000 — C7FFF — 46E8,3B0 —3DF Provides VGA-level graphics. 4 Emulex DCP/ MUXi DC000 — DFFFF — 33C — 33F Provides eight control channels that can be used to monitor modem and DSU networks. Host only. 5 Emulex DCP/ MUXi D8000 — DBFFF — 23C — 23F Optional. Provides additional eight control channels to monitor modem and DSU networks. Host only. 6 Proteon ProNet Token Ring Card 7 8 — 10 — Emulex DCP-286i 6A0000 — 6BFFFF 9 27C — 27F Optional. Supports 3270 Terminal Emulation. Host only. IPC-1600 E10000 — E1FFFF 11 110 — 11F Provides 16 serial ports. January 1997 Optional. Provides support for Token Ring local area network communication with UIPs and Full-Feature Workstations. Incompatible with Integral Ethernet. 6800-A2-GN22-30 Preparing the Processors Opening the System 5000 Host To open the Altos System 5000 and install the memory and circuit cards, you will need a # 2 Phillips screwdriver and a .25I nut driver. Once you have these tools, perform the following steps: CAUTION 1. Make sure the ac power cord is not connected to the System 5000 before opening the computer and attempting to perform any field installation activity. 2. To prevent static discharges that may damage the hardware, wear a ground strap or otherwise ground yourself to the chassis before opening the computer and installing any circuit cards. 0 1 1. Using the # 2 Phillips screwdriver, loosen the two screw-type fasteners (locking pins) that secure the cover to the chassis. The fasteners are located on the rear panel near the right side edge, as shown in Figure 2-1. Screw-type Locking Pins 491-13841 Figure 2-1. System 5000 — Cover Fasteners 6800-A2-GN22-30 January 1997 2-5 COMSPHERE 6800 Series Network Management System 2. Slide the cover towards the rear about one-half inch to disengage the locking pins, as shown in Figure 2-2. 0 1 3. Lift the cover from the chassis and set it aside. 491-13842 Figure 2-2. System 5000 — Disengaging Cover Locking Pins 2-6 January 1997 6800-A2-GN22-30 Preparing the Processors Preinstallation Checks for the Integral Ethernet Card The Integral Ethernet Card is installed at the factory but the user should check that the settings on the card are properly configured. 1. Check the jumper settings on the Ethernet card. Confirm that the 7-pin dip jumper is set between U7 and U8 to set the card for Thick net transmission (see Figure 2-3). 2. Be sure that the Ethernet card is properly seated in the slot above Slot 1 and the cable is connected to the J5 and J1 pin clusters. J5 J1 U7 U8 U9 THICK THIN 493-14255 Figure 2-3. Integral Ethernet Card 6800-A2-GN22-30 January 1997 2-7 COMSPHERE 6800 Series Network Management System Optional Host Upgrade Packages There are several optional features that the customer can elect to add to the NMS. These features require the installation of the following Field Upgrade packages at the customer’s location: ANALYSIS NMS Package The ANALYSIS NMS package provides cut-through to the ANALYSIS 5600, 5605, and 6510 network management systems. To communicate with these systems, an AT&T Intelligent Ports Card Model 900 (IPC-900) must be installed in the host processor. 3270 Emulation Package The 3270 Emulation package permits a full-feature or basic-feature workstation connected to the Altos System 5000 host processor to emulate a 3270 terminal and communicate with a Systems Network Architecture (SNA)-based processor. 16 Control Channel Package A second DCP/MUXi circuit card for the Altos System 5000 host processor is supported. This card provides an additional eight control channels for connecting control devices. Token Ring Package The Token Ring package provides support for customers with sites where there is an existing Token Ring Local Area Network. The Token Ring, thus, would operate in place of the default Ethernet transport layer and support SNMP trap importation and cut-through to X11 R4 applications. No preinstallation actions are needed for the Token Ring Network Interface Card (NIC), but you must install the driver software and run the EISA Configuration Utility (ECU). Automatic Backup and Restore Package The Automatic Backup and Restore package provides support for automatically backing up and restoring all the NMS database files and directories on a scheduled frequency. This package requires the installation of a third hard disk on the host. This feature provides the capability to maintain a “hot spare” system ready to run at short notice. The ANALYSIS NMS, the 3270 Emulation, and the 16 Control Channel packages for the Altos System 5000 require the installation of circuit cards in the host processor. The following sections describe each upgrade package and explain how to configure the strap settings on the circuit cards and third hard disk. For instructions on installing the circuit cards, see the section entitled Optional Host Upgrade Procedures. NOTE The 16 Control Channel package cannot be installed on the Altos System 5000 in conjunction with either or both of the ANALYSIS or 3270 Emulation packages. The Automatic Backup and Restore package consists of both hardware and software installation. The hardware installation requires installing a third 520 Mb hard disk on the Altos 5000 host processor with preinstallation steps as well as actually installing the physical drive in the Altos 5000 disk bay. The software portion of this package is documented in the section, Formatting the Third Hard Disk, in Chapter 5. 2-8 January 1997 6800-A2-GN22-30 Preparing the Processors Preinstallation Steps for the Automatic Backup and Restore Package To prepare the third hard disk for installation on the System 5000, refer to Figure 2-4 and perform the following steps: 1. Locate the terminating resistor socket marked CN6 and remove the terminating resistor, if there is one present. The System 5000 does not use a terminating resistor. 2. Locate the jumper switch block marked as CHN1 and set the jumpers as shown in Figure 2-4. 3. Locate the jumper switch block marked as CHN7 and set the jumpers as shown in Figure 2-4. The CHN7 switch block must set the drive’s SCSI ID to 2. SCSI ID 1 2 CNH7 Power Connection CNH1 Data Connection CNH6 494-14505-01 Terminating Resister Socket (must be empty) Figure 2-4. Second and Third Hard Disk Jumper Settings 6800-A2-GN22-30 January 1997 2-9 COMSPHERE 6800 Series Network Management System Preinstallation Steps for the ANALYSIS NMS Package To configure the IPC-900, refer to Figure 2-5 and follow the instructions below. 1. Set the DIP switch labeled SW1 to the I/O address 2B0. 2. Set the DIP switch labeled SW2 to the memory address D2000. 3. Set the IRQ jumper to IRQ 5. 4. Follow the instructions under Optional Host Upgrade Procedures to install the IPC-900 card in Slot 2. 5. When you have installed all cards in the processor, you must run the EISA Configuration Utility (ECU) to configure the System 5000’s resources to match all circuit cards in the system. For instructions on how to run the ECU, refer to the section, EISA Configuration Utility. 6. You must load the ANALYSIS Gateway software as described in Chapter 5, Loading and Restoring Software. IRQ 5 14 SW1 Input/Output Starting Address Switch (SW1) Controller Memory Starting Address Switch (SW2) 1 2 3 4 5 6 7 8 ON OFF 7 SW2 Interrupt Request (IRQ) Level Jumper Set to 5 1 2 3 4 5 6 7 8 ON OFF 2B0 D2000 491-11591a-01 Push Switch to the Indicated Position: Figure 2-5. IPC-900 — Switch and Jumper Locations 2-10 January 1997 6800-A2-GN22-30 Preparing the Processors Preinstallation Steps for the 3270 Terminal Emulation Package This upgrade package consists of an Emulex DCP-286i card, and an “octopus” cable assembly that splits the signal from the board to four individual circuits. To configure the DCP-286i card, refer to Figure 2-6 and perform the following steps: 1. Set the DIP switch labeled SW1 to the I/O address 27C. 2. Set the IRQ to 9 by positioning the jumper on the jumper pair labeled 2 on block J6. Block J6 is on the main card, near the card edge connector below the bottom of the childboard. Setting the jumper for IRQ 2 is the same as setting the IRQ to 9. 3. Change the settings on block J4 shown in Figure 2-6 to set the local processor block enable jumper to disable. Move the jumper from block J4 Pins 5 and 3 to Pins 3 and 1. 4. Change the settings on jumper DEF to select 128K window size. Move the jumper from the E and F pins to the D and E pins. No other jumper changes are required, but you should confirm that the jumpers on the board match those in Figure 2-6. 5. Follow the instructions under Optional Host Upgrade Procedures to install the DCP-286i card in Slot 7 and to connect the octopus cable assembly. 6. When you have installed all cards in the processor, you must run the ECU to configure the System 5000’s resources to match all circuit cards in the system. For instructions on how to run the ECU, refer to the section EISA Configuration Utility. 7. Refer to the COMSPHERE 6800 Series Network Management System 3270 Terminal Emulation Option Manual for instructions for loading the software. 6800-A2-GN22-30 January 1997 2-11 COMSPHERE 6800 Series Network Management System Figure 2-6. Emulex DCP-286i — Switch and Jumper Locations 2-12 January 1997 6800-A2-GN22-30 Preparing the Processors Preinstallation Steps for the 16 Control Channel Package To prepare the DCP/MUXi card for installation in the System 5000 host processor, refer to Figure 2-7 and perform the following steps: E39 E 46 E 47 E 3 8 E48 E37 E 44 E45 E E36 E33 E32 E31 30 E 29 E28 E 3 5 E34 E43 SW1 E42 E3 E1 E2 E 4 1 E40 494-14511-01 Figure 2-7. DCP/MUXi Card 1. Remove two jumpers on the card, one at position E32-E33 (interrupt request) and the other at position E37-E38 (transparent mode interrupt). You may store a jumper for future use, such as running diagnostics, by placing it on one pin only. 2. Verify that all other jumpers on the card are in the factory default positions. 3. Verify that the I/O address is set on the card at block SW1 as shown in Table 2-2. Table 2-2 DCP/MUXi — I/O Address Switch Settings SWI Description DCP/MUXi Control Channels 9—16 6800-A2-GN22-30 January 1997 1 2 3 4 on on on off 2-13 COMSPHERE 6800 Series Network Management System 4. When you have installed all cards in the processor, you must run the EISA Configuration Utility to configure the System 5000’s resources to match the requirements of this circuit card. For instructions, refer to the section, EISA Configuration Utility. Preinstallation Checks for the Token Ring Card The Proteon P1990 plus Network Interface Card requires no jumper or switch settings on the card. All settings are configured using the EISA Configuration Utility. Optional Host Upgrade Procedures Once you have obtained the appropriate field upgrade package and configured the cards, you are ready to install the circuit cards in the host processor. The following sections explain how to do this. Installing the Third Hard Drive in the System 5000 To physically install the third hard disk drive in the System 5000 chassis (refer to Figure 2-8), perform the following steps: 1. Attach the 3.5I mounting brackets to the side of the disk drive. 2. Slide the drive into the chassis and attach the 50-pin SCSI bus cable using the next connector available on the cable. 3. Attach the 5-pin power connector to the disk drive. 4. Insert the screws through the mounting bracket into the front of the chassis. Secure the drive in the chassis. 2-14 January 1997 6800-A2-GN22-30 Preparing the Processors Cartridge Tape Drive Floppy Disk Drive 3rd Hard Drive 494-14506 Figure 2-8. Altos 5000 Disk Bay Installing Circuit Cards in the System 5000 The System 5000 contains eight EISA expansion slots. Figure 2-9 shows the position of all the expansion cards within the System 5000 host processor. Each card should be installed in a specific slot. Table 2-1 gives the proper slot assignments for each card for the host processor. To insert the circuit cards into a slot, perform the following steps: 1. Locate the eight EISA slots inside the System 5000 (see Figure 2-9). 2. Take the first circuit card you intend to install and locate the proper slot for that card (see Table 2-1). 3. Remove the slot cover screw and the slot cover for the slot in which you intend to install the card. Save the screw for later in this procedure. Save the slot cover in case the circuit card is removed in the future. 6800-A2-GN22-30 January 1997 2-15 COMSPHERE 6800 Series Network Management System Bracket Holding Screw Base I/O Boards VGA Controller DCP/MUXi IPC 1600 Memory Controller Memory Card 491-13843 Figure 2-9. System 5000 — Expansion Slots 4. Each EISA slot has a connector with two rows of pins. Slide the circuit card in the guides so that its connector fits into the EISA connector down to the second row of pins. 5. Push once to engage the first row of pins and then again to engage the second row. 6. Repeat this procedure for each circuit card you intend to install. 7. When you have installed all circuit cards, secure each card’s metal bracket to the chassis. 8. When you have installed all circuit cards, you must run the EISA Configuration Utility. See the section, EISA Configuration Utility, for instructions. 2-16 January 1997 6800-A2-GN22-30 Preparing the Processors Installing the Octopus Cable Assembly Every host system contains an Emulex DCP/MUXi card. If the 16 Control Channel Package is installed, two Emulex DCP/MUXi cards are present. An external octopus cable assembly must be attached to the card at the customer site. Attach the 50-pin connector of the octopus cable to the connector on the back of the DCP/MUXi card and lock into place. Figure 2-10 shows the DCP/MUXi and the octopus cable assembly. Figure 2-10. Emulex DCP/MUCi — Circuit Card and Cable Assembly 6800-A2-GN22-30 January 1997 2-17 COMSPHERE 6800 Series Network Management System Connecting the Ethernet Card to the Network The Integral Ethernet card used on most NMS processors requires additional equipment before it can be connected to the Local Area Network (LAN). Connect an Allied Telesis 210T transceiver to the Ethernet card’s AUI connector using a 15-pin Ethernet extender. Connect the transceiver to the LAN’s network hub unit. Converting Host Processor R3.x to R4.2 The Altos 5000 processor used as a host with 6800 Release 3.x can be migrated as a host under Release 4.2 by performing the following steps: 1. Backup the Release 3.x user data. 2. Power off the Altos 5000 processor. 3. If a StarLAN card is present, remove it. Replace the slot cover. 4. Ensure that the Ethernet card is properly configured: a. Remove the Ethernet card from the unnumbered slot above Slot 1. b. Check the jumpers at U7 & U8 (See Figure 2-3) to be sure that the card is configured for THICK NET. c. Replace the Ethernet card being sure that it is properly seated in its original slot above Slot 1. d. Connect the cable to the J5 and J1 pin clusters. 5. If the 6800 host processor is to be used with SNMP Manager cut-through, replace the STB Powergraph video card with an ERGO 1 Mb video card, if not already installed. 6. If the 6800 host processor has a DCP286i (3270 Emulation card), reconfigure that card to change the IRQ from 10 to 9 (see Figure 2-6). 7. Replace all processor covers, power up the Altos 5000, and follow the steps for installing the UNIX operating system and NMS Release 4.2 software indicated in Chapter 5, Loading and Restoring Software. Closing the System 5000 At this point, all the necessary hardware and circuit cards should be installed in the 6800 Series NMS. The next step in the installation process is to run the EISA Configuration Utility to configure the internal resources of the System 5000 to match the circuit cards you just installed. However, before you can run this program, you must close the System 5000 and attach the power cable, monitor, mouse and keyboard. To do this, perform the following steps: 1. Slide the cover towards the front of the chassis about one-half inch to engage the locking pins. 2. Using the # 2 Phillips screwdriver, tighten the two screw-type fasteners that secure the cover to the chassis. The fasteners are located on the rear panel near the right side edge (see Figure 2-1). 2-18 January 1997 6800-A2-GN22-30 Preparing the Processors Installing the 16-Port Cabinet Assembly If you installed an IPC-1600 card in Slot 8 of the host, you will have to connect the card to a 16-port cabinet assembly device that is shipped with the card. To do this, perform the following steps: 1. Locate the two 80-conductor ribbon cables and the 16-port cabinet assembly, as shown in Figure 2-11. 2. Carefully thread the ends of the ribbon cables marked P3 and P4 through the card slot opening. 3. Connect the cable marked P3 for Ports 9 through 16 to header P3. Connect the cable marked P4 for Ports 1 through 8 to header P4. The connectors are keyed for proper alignment with the 80-pin headers on the card, as shown in Figure 2-12. Make sure that the retaining clips are properly secured. 4. Carefully pass the excess ribbon cable through the slot opening until the IPC-1600 can be plugged into expansion Slot 8. 1 2 3 4 5 6 7 8 9 10 11 12 13 14 15 16 Right Side Wire Frame Mounting Slots Ground Lug (16) Cable P3 (Ports 9 – 16) P4 Connects to P4 Cable P3 (Ports 9 – 16) P3 Connects to P3 Cable P4 (Ports 1 – 8) Turned 180 Degrees to Show Connectors 491-13022 Figure 2-11. 16-Port Cabinet Assembly 6800-A2-GN22-30 January 1997 2-19 COMSPHERE 6800 Series Network Management System P3 or P4 80-Pin Header Pin 1 Pin 40 Pin 41 Lead 1 Identifier Pin 80 IPC-1600 Circuit Card 16-Port Ribbon Cable Assembly Cable P4 Connects to P4 (Ports 1 – 8) Cable P3 Connects to P3 (Ports 9 – 16) 491-13023 Figure 2-12. 80-Pin Headers P3 and P4 Connector Identification 5. Locate a convenient area to place the cable assembly unit close to the host processor so that the ports are easily accessible for connecting devices. The cabinet must be located within about seven cable feet, the length of the fanout module cable assembly, of the host computer. The cabinet can be installed on the floor or table, or wall mounted. 6. Route the ribbon cables behind the wire-frame assembly of the cabinet with the “lead 1” identifiers to the left as shown in Figure 2-13. The connectors on the fanout module and the ribbon cables are keyed for proper alignment. Be sure the retaining clips are properly secured when connecting the ribbon cables to the fanout module. 7. Connect the ribbon cable nearest the front of the wire-frame assembly to the fanout module connector for Ports 9 through 16. Next, connect the other ribbon cable for Ports 1 through 8. 8. The fanfold module snaps into the wire-frame assembly from the front of the assembly (see Figure 2-13). Put the slot on the left side of the fanout module over the wire tab on the left side of the wire-frame assembly. Next, slide the right side of the fanfold module into the wire-frame assembly until the two slots on the right of the module engage with the wire tabs. 2-20 January 1997 6800-A2-GN22-30 Preparing the Processors Figure 2-13. IPC-1600 Ports Cabinet Assembly Altos System 5000 UIP The Altos 5000 User Interface Processor (UIP) can connect to either an Altos 5000 or 15000 host. The UIP memory configurations are different depending on which is the host processor (see Table 2-4). The Altos 5000 UIP can be configured with an IPC-1600 Serial Ports card and/or a Proteon P1990plus Token Ring Network Interface Card. The Token Ring card is optional and replaces the Integral Ethernet card on the Altos 5000 UIP. The IPC-1600 Serial Ports card is conditionally optional. That is, it is required on the first UIP of an Altos 15000 NMS but is optional on an Altos 5000 NMS. Circuit Cards Table 2-3 shows the location of the standard and optional circuit cards when installed in the Altos System 5000 UIP. 6800-A2-GN22-30 January 1997 2-21 COMSPHERE 6800 Series Network Management System Table 2-3 Altos 5000 UIP Factory- and Field-Installable Circuit Cards Slot 1 Memory Address IRQ Base I/O — — 1000—101F Controls the hard disk(s), floppy disk and cartridge tape drives. Integral Ethernet — 10 1CD0—1CD2 Supports connection to host, fullfeature workstations. Incompatable with Token ring card. – 46E8,3B0—3DF Provides VGA-level graphics. — 10 — Optional. Provides support for Token Ring local area network communication with hosts and fullfeature workstations. Incompatible with Integral Ethernet. E10000—E1FFFF 11 110—11F Optional. Provides 16 serial ports. Card 3 Video A0000—C7FFF 6 Proteon ProNet Token Ring Card 8 IPC-1600 I/O Address Description * The IPC-1600 is required on UIP-1 with Altos 15000 host. Opening the Altos 5000 UIP The procedures for opening the System 5000 UIP are the same as for the System 5000 host. Refer to the section, Opening the System 5000 Host, for precise instructions. Installing Additional Memory on the System 5000 The UIP shipped with Release 4.2 has 32 megabytes of memory. If that UIP is connected to an Altos 15000 host, it requires an additional 16 megabytes. Upgrading from a prior release of NMS may also require additional memory to be installed (see Table 2-4). To upgrade the memory on the Altos 5000 UIP, you must have a Single Inline Memory Module (SIMM) package, part no. 555-24231-003, which contains four 4 megabyte SIMMs. Converting from prior NMS releases may require more than one SIMM package. Install the additional SIMMs, one SIMM in each of the four memory banks on the card, immediately next to those SIMMs already installed. If the SIMMs are not adjacent to each other in each bank or a memory bank has no SIMMs installed, the processor cannot power up properly. To install the memory on the UIP, perform the following steps: 1. If the processor is running, stop the NMS processes and shut down UNIX by following the steps in the applicable sections of Chapter 6, System Start-up and Shutdown. 2. When the message Safe to power off appears, power down the processor using the on/off switch. 3. Remove the side cover, exposing the installed boards. 2-22 January 1997 6800-A2-GN22-30 Preparing the Processors 4. Remove the memory board by unscrewing the hold-down screw on the board in memory Slot 0 located at the bottom of the processor; gently pull the board until it is free of the slot. Place the board on a flat surface with its memory plug facing you. 5. Each of the four memory banks on the board should already have a memory SIMM installed in the first and second positions. Install each of the new 4 megabyte SIMMs as follows: a. Hold the SIMM over the SIMM socket on the memory board with the SIMM’s “key notch” located at the bottom and facing opposite the memory plug. This is the only way the SIMM can fit into the socket. b. Firmly press the SIMM into the socket. c. When the SIMM is seated properly in the socket, tilt it back with the pegs showing through the guide holes; press firmly until it snaps into place with the plastic arms on each side of the socket holding it securely. CAUTION If any difficulty is encountered in fitting the SIMM into the socket, getting the guide pegs into the guide holes on the SIMM, or snapping the plastic arms securely in place, you may have the SIMM facing the wrong direction, or it may be the wrong part. 6. Reinstall the memory board into memory Slot 0 in the processor from which it was removed by gently pushing it back until it is firmly seated in the slot. 7. Screw the hold-down screw back into the processor. 8. Replace the processor side cover, tighten down the screws, and power on the processor with the on/off switch. 9. When the system boots, the following messages appear: Invalid configuration information - please run SETUP program Select [1] to boot from Hard Disk Select [2] to boot from Floppy Select [3] to boot from Tape Select [4] to enter BIOS setup Enter option: TYPE: 4 6800-A2-GN22-30 January 1997 2-23 COMSPHERE 6800 Series Network Management System 10. The following messages appear: Errors have been found during the power on self test in your computer. The errors were: Incorrect configuration data in CMOS Memory size in CMOS invalid SETUP will attempt to correct these errors through auto configuration. Hit any key to continue. PRESS: Enter 11. The main SETUP screen appears. PRESS: Esc The system reboots. 12. At the prompt, Boot . . turn off the machine. Preinstallation Checks for the Integral Ethernet Card The Integral Ethernet card is installed at the factory but the user should check that the settings on the card are properly configured. 1. Check the jumper settings on the Ethernet card. Confirm that the 7-pin dip jumper is set between U7 and U8 to set the card for Thick net transmission (see Figure 2-3). 2. Be sure that the Ethernet card is properly seated in the unnumbered slot above Slot 1 and the cable is connected to the J5 and J1 pin clusters. 2-24 January 1997 6800-A2-GN22-30 Preparing the Processors Optional UIP Upgrade Packages Several optional packages can be added to the Altos System 5000 User Interface Processor (UIP). These packages are installed at the customer’s location. Serial Port Upgrade Package for the UIP The AT&T Intelligent Ports Card Model 1600 (IPC-1600) provides the UIP with 16 extra serial ports to connect to basic-feature workstations or external devices. These ports are housed in an external cable assembly device that connected to the IPC-1600 card. If the customer has a large network, this package may be a necessity. This package is optional for a UIP connected to an Altos 5000 host. An IPC-1600 must be installed on the first UIP which is connected to an Altos 15000. This installation is performed at the customer site. Token Ring Package The Token Ring package provides support for customers with sites where there is an existing Token Ring Local Area Network. The Token Ring package replaces the standard Ethernet transport layer and supports SNMP trap importation and cut-through to X11 R4 applications. No preinstallation actions are needed for the Token Ring Network Interface Card, but you must install the driver software and run the EISA Configuration Utility. 6800-A2-GN22-30 January 1997 2-25 COMSPHERE 6800 Series Network Management System Preinstallation Steps for the IPC-1600 Upgrade Card To configure the IPC-1600 card, refer to Figure 2-14 and perform the following steps: 1. On the bank labeled DS1, set the memory address to E10000 with switches 1 through 8. 2. On the bank labeled DS1, set the I/O address to 110 with switches 9 through 11. 3. On the bank labeled DS2, set the IRQ to 11 with switches 1 through 8. 4. On the jumper labeled J1, check that the jumper is on Pins 2 and 3 to set the local program memory to 16 kb. 5. Follow the instructions under Field Upgrade Procedures to install the IPC-1600 card in Slot 8 of the UIP. 6. Once you have installed the card, you must run the EISA Configuration Utility to configure the System 5000’s resources to match the requirements of this circuit card. For instructions, see the section entitled EISA Configuration Utility. 7. You must reload the UIP software to specify that the IPC-1600 has been installed (see Chapter 5, Loading and Restoring Software, for details). Ribbon Cable Connections P3 (Ports 9 – 16) and P4 (Ports 1 – 8) Local Program Memory Size Select Jumper (J1) DS1 DS2 J1 P3 DS1 ON OFF 11 10 9 8 7 6 5 4 3 2 1 P4 DS2 ON OFF 8 7 6 5 4 3 2 1 Push Switch to the Indicated Position: IRQ 11 110 PIN 1 E10000 491-13021-02 Figure 2-14. IPC-1600 — Switch and Jumper Locations and Settings 2-26 January 1997 6800-A2-GN22-30 Preparing the Processors Preinstallation Checks for the Token Ring Card The Proteon P1990 plus Network Interface Card requires no jumper or switch settings on the card. All settings are configured using the EISA Configuration Utility. Optional UIP Upgrade Procedures Once you have obtained the desired field upgrade package and prepared it for installation, you can then install the circuit card(s) in the UIP. The procedures for installing circuit cards in the UIP are the same as those for installing in the Altos System 5000 host processor. Refer to the sections, Installing Circuit Cards in the System 5000 and Closing the System 5000. Converting Altos 5000 Processors to Release 4.2 UIPs Altos 5000 processors from previous releases of NMS can be converted to UIPs for Release 4.2 NMS. The steps taken depend on what use the System 5000 had under the previous NMS and how it will be used with Release 4.2. Table 2-4 describes the major actions to be taken when converting a “Source” system to a 4.2 UIP. Table 2-4 Altos 5000 UIP Conversion Matrix Target System Source System 4.2 UIP Connected To Altos 5000 Host R3.1 Altos 5000 host with 32 Mb and StarLan R3.1 Altos 5000 UIP with 16 Mb and StarLan R4.1 Altos 5000 host with 32 Mb and Ethernet R4.1 Altos 5000 UIP with 32 Mb and Ethernet 6800-A2-GN22-30 4.2 UIP Connected To Altos 15000 Host N/A Add 16 Megabytes memory Remove StarLan card and check Integral Ethernet card Add 16 Megabytes memory Remove StarLan card and check Integral Ethernet card Add 32 Megabytes memory Remove StarLan card and check Integral Ethernet card N/A Add 16 Megabytes memory Add 16 Megabytes memory No changes required. January 1997 2-27 COMSPHERE 6800 Series Network Management System UIP Conversion Procedures The following steps describe the actions to be taken in converting an Altos 5000 host processor from a previous release of NMS to Release 4.2: 1. Backup the previous release database and user files. 2. Power off the Altos 5000 processor and remove the processor covers. 3. Remove the DCP-286i (3270 Emulation package), IPC-900 (ANALYSIS NMS package), and DCP-MUXi (16 Control Channel package) cards, if any of them are installed in the processor. The DCP-MUXi can be reused in the new host processor. The DCP-286i and IPC-900 can only be used in an Altos 5000 host. 4. If an IPC-1600 card is present and it is being transferred to the host processor, remove it now. If an IPC-1600 card is present and is being used in the UIP, do not remove it or modify it. The strap settings are correct. 5. If a StarLAN NAU card is present, remove it from the processor. Check the Integral Ethernet card referring to the sections, Preinstallation Checks for the Integral Ethernet Card and Connecting the Ethernet Card to the Network. 6. Upgrade the memory as indicated in Table 2-4. Refer to the section, Installing Additional Memory on the System 5000 UIP. 7. Replace all processor covers, reboot and run the EISA Configuration Utility, and follow the steps for installing the UNIX operating system and the UIP Release 4.2 software as indicated in Chapter 5, Loading and Restoring Software. Connecting the Ethernet Card to the Network The Integral Ethernet card used on most NMS processors requires additional equipment before it can be connected to the Local Area Network (LAN). Connect an Allied Telesis 210T transceiver to the Ethernet card’s AUI connector using a 15-pin Ethernet extender. Connect the transceiver to the LAN’s network hub unit. Closing the Altos 5000 UIP The procedures for closing the Altos 5000 UIP are the same as those for the 5000 host. Refer to the section, Closing the System 5000, for precise instructions. 2-28 January 1997 6800-A2-GN22-30 Preparing the Processors Installing the 16-Port Cabinet Assembly If you installed an IPC-1600 card in Slot 8 of the UIP, you will have to connect the card to a 16-port cabinet assembly device that is shipped with the card. To do this, perform the following steps: 1. Locate the two 80-conductor ribbon cables and the 16-port cabinet assembly, as shown in Figure 2-11. 2. Carefully thread the ends of the ribbon cables marked P3 and P4 through the card slot opening. 3. Connect the cable marked P3 for Ports 9 through 16 to header P3. Connect the cable marked P4 for Ports 1 through 8 to header P4. The connectors are keyed for proper alignment with the 80-pin headers on the card, as shown in Figure 2-12. Make sure that the retaining clips are properly secured. 4. Carefully pass the excess ribbon cable through the slot opening until the IPC-1600 can be plugged into expansion Slot 8. 5. Locate a convenient area to place the cable assembly unit close to the host processor so that the ports are easily accessible for connecting devices. The cabinet must be located within about seven cable feet, the length of the fanout module cable assembly, of the host computer. The cabinet can be installed on the floor or table, or wall mounted. 6. Route the ribbon cables behind the wire-frame assembly of the cabinet with the “lead 1” identifiers to the left as shown in Figure 2-13. The connectors on the fanout module and the ribbon cables are keyed for proper alignment. Be sure the retaining clips are properly secured when connecting the ribbon cables to the fanout module. 7. Connect the ribbon cable nearest the front of the wire-frame assembly to the fanout module connector for Ports 9 through 16. Next, connect the other ribbon cable for Ports 1 through 8. 8. The fanfold module snaps into the wire-frame assembly from the front of the assembly (see Figure 2-13). Put the slot on the left side of the fanout module over the wire tab on the left side of the wire-frame assembly. Next, slide the right side of the fanfold module into the wire-frame assembly until the two slots on the right of the module engage with the wire tabs. 6800-A2-GN22-30 January 1997 2-29 COMSPHERE 6800 Series Network Management System Altos System 15000 The Altos System 15000 is based on the EISA bus, featuring two Intel i80486 processors running at a clock speed of 50 Mhz. The following section describes the hardware and circuit cards that may be installed in the System 15000. Hardware The System 15000 is shipped to the customer with the processor, three memory modules, two hard disks, one CPU, two Emulex DCP/MUXi cards, and one IPC-1600 card. Circuit Cards Table 2-5 indicates the location of the standard and optional circuit cards installed in the System 15000. Preinstallation checks for the Ethernet card are the same for the System 15000 as for the System 5000. Table 2-5 Altos 15000 Factory- and Field-Installable Circuit Cards Card Slot 2-30 Memory Address IRQ I/O Address Description 2 IPC-1600 F00000—F0FFFF (15m) 11 110—11F Provides 16 serial ports. Field installed. 4 Emulex DCP/ MUXi DC000—DFFFF — 33C—33F Provides eight control channels that monitor modem and DSU networks. Field installed. 5 Emulex DCP/ MUXi D8000—DBFFF — 23C—23F Provides a second set of eight control channels for monitoring networks. Field installed. 6 ECA — 10 6C80—6CAF Supports Ethernet connection to the UIP and the full-feature workstation. 8 SCSI Controller — 14 8C80—8CAF Controls the hard disk(s), floppy disk, and cartridge tape drive. 9 Video 9 3B0—3DF (Multiple) Provides VGA-level graphics. A0000—C7FFF January 1997 6800-A2-GN22-30 Preparing the Processors Opening the System 15000 CAUTION 1. Make sure the ac power cord is not connected to the System 15000 before opening the computer and attempting to perform any field installation activity. 2. To prevent static discharge that may damage the hardware, wear a ground strap or otherwise ground yourself to the chassis before opening the computer and installing any circuit cards. To open the Altos System 15000 and install circuit cards, perform the following steps: 1. Slide the top cover towards the rear of the chassis approximately .75I, as shown in Figure 2-15, until the locking pins on the underside of the cover disengage. Lift the cover straight up and set it aside. 6800-A2-GN22-30 January 1997 2-31 COMSPHERE 6800 Series Network Management System 494-14500-01 Figure 2-15. System 15000 — Removing the Top Cover 2. Slide the right-hand side cover upwards about 1I and swing the cover outwards pivoting on the rear edge, as shown in Figure 2-16. 3. Disengage the rear edge of the right side cover and lift it from the chassis and set it aside. 4. Remove the left side cover by lifting it by the fingerhold built into the top portion of the cover and set the cover aside. 5. Open the door on left front of the chassis and remove the two Phillips-head screws just inside the hinge (see Figure 2-17). Save the screws for later. 6. Disengage the door spring from the pin on the lower pivot of the door hinge. 7. Remove the left side cover by lifting it by the fingerhold built into the top portion of the cover and set the cover aside. 2-32 January 1997 6800-A2-GN22-30 Preparing the Processors 1. Panel slides up 1" 2. Panel swings out 494-14501 Figure 2-16. System 15000 — Removing the Side Panel 6800-A2-GN22-30 January 1997 2-33 COMSPHERE 6800 Series Network Management System 494-14581 Figure 2-17. System 15000 — Removing the Front Panel 2-34 January 1997 6800-A2-GN22-30 Preparing the Processors Installing the MPX Processor The Altos 15000 supports up to four 486/50 modules. These modules are attached to the main processor card (see Figure 2-18) which plugs into S-bus slots on the motherboard (see Figure 2-19). The Altos 15000 is shipped with one processor present. The second CPU module must be installed at the customer site. The Altos 15000 has four S-bus slots next to the ten general purpose slots. These S-bus slots are the four unnumbered slots at the front of the Altos 15000 system unit. These slots hold the CPU board and memory boards and each slot is limited to a particular type of board. S-bus Slot 1 is the front-most slot and contains the CPU board holding both CPUs. S-bus Slot 4 is the fourth slot in from the front and contains the memory board (see Figure 2-19). Prior to installing the MPX, you must have the following parts: • Intel486t DX CPU-CACHE Module • Five hexagonal separator posts approximately 7/16I long • Three hexagonal nuts 1/8I in diameter • Five Phillips-head screws approximately 3/16I long J5 J1 J2 J2 494-14507-01 Figure 2-18. Altos 15000 Main Processor Card and MPX 6800-A2-GN22-30 January 1997 2-35 COMSPHERE 6800 Series Network Management System Main Processor Card Slot Memory Board Slot 1 2 3 4 S-bus Slots 494-14508-01 Figure 2-19. Altos 15000 Motherboard and Bus Connectors To install the MPX module, perform the following steps: 1. Using a Phillips screwdriver, remove the screw from the card’s metal bracket. Save the screw for later use. Gently disengage the card’s bus connectors from S-bus Slot 1 and slide the card out of the chassis. 2. On the MPX module (see Figure 2-18), screw two separator posts into the top middle and top right holes in the card. Attach the remaining three separator posts to the top left, bottom left, and bottom right holes on the MPX module using the hexagonal nuts provided. 3. Make sure that the jumper at J5 (see Figure 2-18) on the main processor card is placed on Pins 2 and 3 to indicate that two CPUs are present. 4. Position the MPX module with its connector mating with the J2 connector (see Figure 2-18) on the main processor card and press firmly until the connector is fully seated. 2-36 January 1997 6800-A2-GN22-30 Preparing the Processors 5. From the other side of the main processor card, attach the MPX module to the main processor card using the Phillips-head screws. 6. Slide the main processor card into its original slot in the chassis and press firmly until the card is fully seated. 7. Attach the main processor card metal bracket to the chassis with the saved screw. Installing the Second and Third Hard Disks on the System 15000 Installation of the second and third hard disks on the System 15000 consists of three parts: • Preinstallation – setting and verifying switches on the drive • Installing the drive in the System 15000 chassis • Formatting the disk and establishing the file systems The first two parts are documented in the following sections. The last part is described in the section, Formatting the Third Hard Disk in Chapter 5. The second hard disk is automatically formatted as part of installing UNIX. Preinstallation Steps for the Second and Third Hard Disks on the System 15000 To prepare the second and third hard disks for installation on the System 15000, refer to Figure 2-4 and perform the following steps: 1. Locate the terminating resistor socket marked as CN6 and remove the terminating resistor, if there is one present. The System 15000 does not use a terminating resistor. 2. Locate the jumper switch block marked as CHN1 and set the jumpers as shown in Figure 2-4. 3. Locate the jumper switch block marked as CHN7 and set the jumpers as shown in Figure 2-4. The CHN7 switch block sets the drive’s SCSI ID. The second hard disk must have an ID of 1; the third must be 2. 6800-A2-GN22-30 January 1997 2-37 COMSPHERE 6800 Series Network Management System Installing the Second and Third Hard Disks in the System 15000 To physically install the second and third hard disks in the System 15000 chassis, refer to Figure 2-20 and perform the following steps for each disk: 1. Attach the 3.5I mounting brackets to the side of the disk. 2. Slide the drive into the chassis and attach the SCSI bus ribbon cable using the next connector available on the cable to the 50-pin connector on the drive. 3. Attach the power connector to the 4-pin connector on the drive. 4. Push the drive into the chassis until it is fully seated and the mounting brackets lock in the chassis. 3rd Hard Drive 2nd Hard Drive 1st Hard Drive 494-14509-01 Figure 2-20. Altos 15000 Showing the Hard Disk Bay 2-38 January 1997 6800-A2-GN22-30 Preparing the Processors Installing Additional Memory on the System 15000 Running the NMS requires 64 Mb of memory on the System 15000. The 15000 comes with one 16-Mb module installed. Three additional 16-Mb modules must be installed on the memory board (see Figure 2-21). NOTE If all four memory modules are not available or working, you may, on a temporary emergency basis, have to use fewer than four. The memory banks must be filled in sequence starting with Bank 1 upwards. Bank 3 Bank 1 Bank 4 Bank 2 494-14510 Figure 2-21. Altos 15000 Memory Board and Memory Modules To install the three memory modules, refer to Figure 2-21 and perform the following steps: 1. Using a Phillips screwdriver, remove the memory board from S-bus Slot 4 by unscrewing the board’s metal bracket from the chassis and sliding the board out. Save the screw for later. 2. Position each memory module with the connector just meeting the pins on the board. Be careful not to bend any pins. Press firmly until the module is properly seated. 6800-A2-GN22-30 January 1997 2-39 COMSPHERE 6800 Series Network Management System NOTE The memory module can be installed in two possible ways. The correct way does not interfere with either the metal bracket on the board or any other memory module. If you have any such contact between modules or with the metal bracket, gently remove the module, reverse it and reinstall. 3. Slide the memory board into the slot from which it came ensuring that the board’s connectors are firmly seated in the bus slots. 4. Using the saved screw, reattach the memory board’s metal bracket to the chassis. Preinstallation Steps for the IPC-1600 Card on the System 15000 To configure the IPC-1600 card, refer to Figure 2-14 and perform the following steps: 1. On the bank labeled DS2, set the IRQ to 11 with switches 1 through 8. 2. On the bank labeled DS1, set the I/O address to 110 with switches 9 through 11. 3. On the bank labeled DS1, set the memory address to F00000 (see Table 2-6) with switches 1 through 8. Table 2-6 IPC-1600 — Memory Switch Settings (DSI) Switches 8 7 6 5 ON OFF 2-40 X X X January 1997 4 3 2 1 X X X X X 6800-A2-GN22-30 Preparing the Processors 4. On the jumper labeled J1, check that the jumper is on Pins 2 and 3 to set the local program memory to 16 Kb. 5. Follow the instructions under Installing Circuit Cards in the System 15000 to install the IPC-1600 card in Slot 2 of the System 15000. Preinstallation Steps for the DCP-MUXi Cards on the System 15000 To prepare the DCP-MUXi cards for installation on the System 15000, refer to Figure 2-7 and perform the following steps: 1. Remove two jumpers from each card, the first at position E32-E33 (interrupt request) and the second at position E37-E38 (transparent mode interrupt). You may store a jumper for future use, such as running diagnostics, by placing it on one pin only. 2. Verify that all other jumpers on the cards are as shown in Figure 2-7. 3. On the block SW1, set the I/O addresses as shown in Table 2-7. Table 2-7 DCP-MUXI — I/O Address Switch Settings 1 2 3 4 DCP-MUXI #1 (Slot 4) on on off off DCP-MUXI #2 (Slot 5) on on on off Description 4. Follow the instructions under Installing Circuit Cards in the System 15000 to install the DCP-MUXi cards in Slots 4 and 5 of the System 15000. 6800-A2-GN22-30 January 1997 2-41 COMSPHERE 6800 Series Network Management System Installing Circuit Cards in the System 15000 The System 15000 contains eight EISA expansion slots. Figure 2-22 shows the position of all the expansion slots within the System 15000 processor chassis. Each card should be installed in a specific slot. Table 2-5 gives the proper slot assignment for each card. Slot Cover Screw IPC-1600 First DCP/MUXi Second DCP/MUXi ECA Card Video Card 494-14502-01 Figure 2-22. System 15000 — Expansion Slots To insert the circuit cards into a slot, perform the following steps: 1. Locate the EISA slots inside the System 15000 (see Figure 2-22). 2. Take the first circuit card you intend to install and locate the proper slot for that card (see Table 2-5). 3. Using a Phillips screwdriver, remove the slot cover screw and the slot cover for the slot in which you intend to install the card. Save the screw for later. Save the slot cover in case the card is removed in the future. 2-42 January 1997 6800-A2-GN22-30 Preparing the Processors 4. Slide the circuit card in the guides so that its connector fits into the EISA connector. 5. Press firmly but carefully to engage the connector pins. 6. Repeat this procedure for each circuit card you intend to install. 7. When you have installed all circuit cards, secure the card’s metal bracket to the chassis with the screw saved from Step 3. Closing the System 15000 When all the necessary hardware and circuit cards are installed in the Altos System 15000, the EISA Configuration Utility (ECU) must be run to configure the internal resources of the processor to match the circuit cards physically installed. Before running the ECU, you must close the System 15000 and attach the power cable, monitor, mouse, and keyboard. To close the System 15000, perform the following steps: 1. Replace the front cover ensuring that the top and side clips are properly engaged. 2. Re-connect the door spring to the pin at the bottom of the door hinge. 3. Reattach the two Phillips-head screws inside the door hinge. 4. Replace the left side cover. 5. Hook the right side cover rear edge around the end of the chassis with the cover at about a 30-degree angle out from the chassis. 6. Swing the right side cover inward towards the chassis and slide it down until the bottom edge locks in place. 7. Place the top cover on the chassis, making sure that the locking pins on the cover underside are positioned in the locking slots. Slide the cover towards the front of the chassis until the locking pins (see Figure 2-23) engage. NOTE The Altos System 15000 will not power on unless the top cover is fully engaged. 6800-A2-GN22-30 January 1997 2-43 COMSPHERE 6800 Series Network Management System Top Cover Locking Pins 494-14503 Figure 2-23. System 15000 — Top Cover Locking Pins 2-44 January 1997 6800-A2-GN22-30 Preparing the Processors Running CMOS Setup on the Altos 15000 Once the circuit cards are configured and installed, the system date and time and memory ranges for add-on cards should be set. This procedure requires the system to be restarted using the following steps: 1. Power on the system and repeatedly PRESS: Ctrl-Alt-Esc 2. The BIOS Setup Utility menu appears. Using the ↓↑ keys, select System Configuration Setup and PRESS: Enter PRESS: Page Down 3. Page 1 of the System Configuration will appear. Using the ↓↑ keys, select the correct date and time. 4. Page 2 of the System Configuration appears. At the bottom of the page is a field, Memory 0F00000H:0FFFFFFH. Using the ← / → keys, change the value System to Add-on Card. PRESS: Esc 5. A confirmation box appears; to save the CMOS data, PRESS: Enter 6. The main BIOS Setup Utility menu appears. PRESS: Esc 7. The system automatically reboots. 6800-A2-GN22-30 January 1997 2-45 COMSPHERE 6800 Series Network Management System EISA Configuration Utility The EISA Configuration Utility (ECU) is a program that is shipped with the 6800 NMS Applications software package and used to configure the System 5000 and System 15000 so that their resources match the requirements of the circuit cards you installed. The ECU is shipped on a floppy disk with separate disks for the System 5000 host, System 15000 host, and UIP. To ensure that these cards function properly, you must run this program as soon as you have finished installing the cards in either the host or the UIP. NOTE To run the ECU, you must connect the display unit, keyboard, and mouse. For instructions, turn to the section entitled System Console in Chapter 4, Connecting the Components. The EISA Configuration Disk contains the ECU program and configuration files. These configuration files describe all the circuit cards that could be installed on the Altos System 5000 or System 15000. Table 2-8 shows the names of the configuration files depending on the type of processor you have and the type of network connected to the processor. Table 2-8 Configuration Files Diskette Title 6800 NMS ECU 6800 UIP ECU 6800 NMS ECU (15000) Processor Network Type File Name System 5000 Host Ethernet 68005E.SCI System 5000 Host Token Ring 68005T.SCI System 5000 UIP Ethernet 68005EU.SCI System 5000 UIP Token Ring 68005TU.SCI System 15000 Ethernet 680015.SCI NOTE " " ! " " # " # " " # 2-46 January 1997 6800-A2-GN22-30 Preparing the Processors The EISA Configuration Disk is a bootable disk. To run the program, you will need to boot the processor with this disk. To do this, perform the following steps: 1. Insert the EISA Configuration Disk into the floppy disk drive. Turn the power switch to the ON position. (If the RESET/RUN switch is not in the RUN position, turn the key clockwise until it is in the RUN position.) The system begins to boot. If you are running the ECU on a System 15000, go to Step 3. The system briefly displays the following message: Press spacebar to interrupt autoboot NOTE You have approximately 10 seconds to press the spacebar to interrupt the autoboot sequence and allow booting from the floppy disk. Failure to do this within the 10-second window allows the system to start up from the hard disk and requires a reboot. 2. Immediately press the spacebar. The boot menu appears, as shown in Figure 2-24. TYPE: 2 to select boot from floppy. Select Select Select Select [1] [2] [3] [4] to to to to boot from hard disk boot from floppy boot from tape enter BIOS setup Enter option: 491-13836 Figure 2-24. Boot Menu 3. Press any key to dismiss the EISA logo and display the Welcome screen. Then, PRESS: Enter to display the Main Menu. It is shown in Figure 2-25. 6800-A2-GN22-30 January 1997 2-47 COMSPHERE 6800 Series Network Management System Main Menu Learn about configuring your computer Configure computer Set date and time Exit from this utility 491-13837 Figure 2-25. Main Menu 4. Use the ↓ key to highlight Configure computer and PRESS: Enter The Configure Computer Menu displays, as shown in Figure 2-26. Configure Computer Copy configuration (CFG) files Configure computer-basic method Configure computer-advanced method Return to the main menu 494-13838-01 Figure 2-26. Configure Computer Menu 5. Use the ↓ key to highlight Configure computer-advanced method and PRESS: Enter The Configuration files are loaded and verified. The program then presents a screen showing your current configuration. PRESS: Alt + s (for “System”) 6. Use the ↓↑ keys to highlight Open and PRESS: Enter 2-48 January 1997 6800-A2-GN22-30 Preparing the Processors The following messages appear. Current configuration information will be lost if you continue. Select <Ok> to continue or select <Cancel> to return to previous screen 7. Select <Ok> using the → / ← keys and PRESS: Enter A list of configuration files appears. Refer to Table 2-8 for possible file names and applicable configurations. 8. Use the ↓↑ keys to select the proper configuration file and PRESS: Enter The following messages appear. Loading configuration files Please wait . . . The maximal configuration of circuit card descriptions and settings will be automatically loaded. Use the ↓↑ keys to review the cards in the loaded configuration. Delete any cards that you do not have installed on the system. To delete a card configuration, highlight the card description on the screen using the ↓↑ keys and press the Delete key. 9. To verify that all resources have been correctly configured: PRESS: Alt + v (for “view”) PRESS: r (for “Resources”) to display the Resource Map. This display lists the settings for each component of the system. Use the ↓↑ keys to scroll through the Resource Map and verify that all appropriate settings are correct. Refer to Table 2-1 for Altos 5000 host, Table 2-3 for Altos 5000 UIP, and Table 2-5 for Altos 15000 host. If the settings are correct, PRESS: Enter PRESS: Alt +s (for “System”) PRESS: x (for “exit”) to exit. Select Save configuration and exit by pressing the s key when prompted. Reboot the system to allow the new settings to take effect. Remove the EISA Configuration Disk from the floppy drive and store it safely. NOTE At any time in running the ECU, you may reload the configuration file, which contains the correct settings and begin again the process of deleting those circuit card descriptions which are not installed. To do this, press Alt + s (for “System”) and go to Step 6. 6800-A2-GN22-30 January 1997 2-49 COMSPHERE 6800 Series Network Management System Changing the Token Ring Configuration The Token Ring package configuration can be changed using the ECU to specify 4 Mbps speed and/or shielded cable. You should execute the ECU normally and follow the steps specified above through Step 8. Continue with the following steps: 1. To view all configured resources and display the Detailed Slot Map: PRESS: Alt + v TYPE: d 2. The Detailed Slot Map lists the setting for each component of the system. Use the ↓↑ keys to scroll down to Slot 6 to see the Token Ring card configuration and to highlight the Interrupt field values. PRESS: Enter 3. A Change Function Menu appears. Use the ↓↑ keys to select IRQ 10 Edge Triggered. PRESS: Enter 4. The Detailed Slot Map again appears. Use the keys to highlight the Speed field values. PRESS: Enter 5. A Change Function Menu appears. The speed is set to 16 Mbps. Use the ↓↑ keys to select 4 Mbps if your LAN runs at this speed. PRESS: Enter 6. The Detailed Slot Map again appears. Use the ↓↑ keys to highlight the Media Type field values. PRESS: Enter 7. A Change Function Menu appears. The Media Type is set to unshielded. Use the keys to select Shielded (STP) cable if that cable type has been physically connected from the Token Ring card to the Multi-Access Unit (MAU). PRESS: Enter 8. To exit from this configuration function, PRESS: Alt + Enter TYPE: x Select Save configuration and exit by pressing the s key. 9. The following message appears. Your configuration has been saved. If you need to change any switch or jumper setting or install any boards and options, turn off your computer and do so right now. If not, Press [Enter] to reboot (restart) your system. PRESS: Enter The system reboots. 2-50 January 1997 6800-A2-GN22-30 Preparing the Processors Full-Feature Workstation Preinstallation Checks for the EtherLink II Card The 3COM EtherLink II Card is installed at the factory for workstations from Paradyne but the user should check that the settings on the card are properly configured. 1. Check the jumper settings on the EtherLink II card (see Figure 2-27). Confirm that: a. The I/O Base Address jumper at J3 is set to 300. b. The Memory Address jumper at J3 is set to C8000. c. The Data Mode jumper at J5 is set to 16 bit transmission. 2. Be sure that the EtherLink II card is properly seated. I/O BASE 300 310 330 350 250 280 2A0 2E0 MEMORY J3 DISABLE C8000 CC000 D8000 DC000 8 16 J5 DATA MODE 493-14256 Figure 2-27. EtherLink II Card Jumper Settings 6800-A2-GN22-30 January 1997 2-51 COMSPHERE 6800 Series Network Management System Installation of the Token Ring Network Interface Card To install the optional ProNet p1392 Network Interface card (NIC) in the full-feature workstation, refer to Figure 2-28 and perform the following steps: 1. Power down the workstation. 2. Remove the workstation’s cover; follow the manufacturer’s instructions to expose the internal circuit cards. 3. Remove the 3COM EtherLink II card or any other network interface card(s) that may already be installed in the workstation. 4. Ensure that the p1392 on-board switches for the I/O address are in the factory default positions as indicated by Table 2-9. 5. Insert the ProNet Model p1392 NIC into the selected slot. Make sure that the card is firmly seated in the bus interface slot. 6. Secure the card in the processor using the saved screw. 7. Replace the workstation’s cover. 8. Attach the unshielded twisted pair (UTP) cable to the RJ45 port on the installed ProNet NIC. 9. Attach the other end of the cable to the site’s MAU. Table 2-9 Token Ring I/O Address Switch Setting 2-52 Switches I/O Address 1 2 3 4 5 6 0A20 ON ON ON ON ON ON January 1997 6800-A2-GN22-30 Preparing the Processors 494-14512 Figure 2-28. Proteon p1392 Card Switching off the Cache on 486DX If the 486DX full-feature workstation has not been configured at the factory with its cache switched off, you may notice the following symptoms: • The movement of any windows appears to be jittery or choppy when dragged by the mouse. • When running NMS R3.1, at initial start-up the screen comes up but the keyboard is locked and unusable. The 486DX cache may be switched off using the BIOS Setup Utility which is resident in the workstation’s processor firmware. Starting with the 486DX powered off, perform the following steps: 1. Power on the workstation’s processor and immediately press Ctrl-Alt-Esc. 2. The BIOS Setup Utility window/menu will appear. Using the ↓↑ keys, select System Configuration Setup and PRESS: Enter 3. Page 1 of the Utility will appear; to get to Page 2 PRESS: Page Down 4. Page 2 will appear. Using the ↓ key, move the cursor until it reaches the line labeled System Cache. Using → will cause the field value to toggle between on and off. Set the value to off. PRESS: Esc 5. A confirmation box will appear. To save the CMOS data, PRESS: Enter 6800-A2-GN22-30 January 1997 2-53 COMSPHERE 6800 Series Network Management System 6. The Main BIOS Setup Utility menu will appear. PRESS: Esc 7. The system will automatically reboot. Follow the standard procedures for starting up a full-feature workstation. Migrating Host Processor Release 1 or 2 to Full-Feature Workstation The AT&T 6386/25 used as the 6820 Release 1 and Release 2 host processor can be converted to a full-feature workstation in Release 4.2 NMS. The conversion procedures for both host processors are nearly identical. To convert the host processor into a full-feature workstation, perform the following tasks: • Remove unnecessary circuit cards from the processor • Install a 3COM 3C503 EtherLink II card or StarLAN 10 Network Access Unit circuit card • Low-level format the hard disk • Load MS-DOS, X-One, and the full-feature workstation software • Install the Paradise Windows Accelerator video card Below is a step-by-step procedure for the host processor conversion. This procedure assumes the reuse of the StarLAN NAU card. See Chapter 2, Preparing the Processors, for details regarding installation of a 3COM 3C503 EtherLink II card. 1. Open the 6386/25 computer. The procedure is described in detail in Chapter 2 of the COMSPHERE 6820 NMS Installation and Maintenance Guide. 2. Identify the circuit cards that must be removed from the 6386/25. Table 2-10 shows all cards that must be removed. 3. Remove each of the cards by removing the chassis screw and gently lifting up the two ends of the card. Table 2-10 6386/25 Circuit Cards to Be Removed Release 2 Release 1 Slot Circuit Card Slot Circuit Card 3 IPC-900 2 IPC-900 5 IPC-900 5 DCP-286i 6 DCP-286i 6 IPC-900/IPC-1600 Check Slot 3 to determine if there is a StarLAN 10 NAU installed in the 6386/25. Remove and appropriately option the StarLAN 10 NAU card. Follow the instructions below. 2-54 January 1997 6800-A2-GN22-30 Preparing the Processors NOTE Before optioning the NAU, check the faceplate to determine if this version of the NAU has a Link Integrity Function Switch. If it does, move the switch to the enabled position. If the StarLAN NAU does not have a Link Integrity Function Switch, you must replace the NAU with an EtherLink II card. For more information, refer to the StarLAN 10 Network PC NAU Installation Guide. Figure 2-29 shows the jumper locations and settings for the NAU. To implement the setting and install the StarLAN 10 PC NAU, perform the following steps: 1. Use the default IRQ setting of 2 (J12). 2. Use the default I/O address setting of 360—367 (J3). 3. Set the RAM address to C8000—C8FFF, Pins 2 & 3 (J6). 4. Set the RAM size to 16 kb (J5). 5. Insert the card into Slot 3. 6. Insert the appropriately configured StarLAN 10 NAU into Slot 3 and secure with the chassis screw. 7. Insert the Paradise Windows Accelerator video card in the first available slot and secure with a chassis screw. Confirm that all SW1 switches are in the OFF position. 8. Close the 6386/25 computer cover and reconnect monitor and keyboard cables. 9. Insert the Customer Test disk that comes with the 6386/25. This disk will be used to reformat the hard disk. 10. Start the 6386/25 and the computer will boot from the Customer Test disk. The Customer Diagnostics introduction screen is displayed. PRESS: Enter J5 J1 J13 J6 J3 P2 J14 SPARES J11 J12 491-11704a Figure 2-29. NAU Memory Jumper Locations and Settings 6800-A2-GN22-30 January 1997 2-55 COMSPHERE 6800 Series Network Management System The Customer Test main menu appears. 11. Use the ↓ key to highlight Disk Utilities. PRESS: Enter The Disk Utility Menu appears. A table is displayed indicating the physical characteristics of the disk. The disk utility program is automatically run measuring the characteristics of the disk drive. As each option is measured it turns from blue to yellow. 12. Use the ↓ key to highlight Low Level Format. PRESS: Enter The Low Level Format option may be hidden. If it is shown, use the ↓ key to highlight it and PRESS: Enter If it is not shown, PRESS: Ctrl + Alt + f to redraw the menu with the Low Level Format option, and then use the ↓ key to select it. The Low-Level Format screen appears and displays the following message: !!!WARNING!!! DESTRUCTIVE HARD DISK Tests specified: Data will be DESTROYED on HARD DISK #1. Press <Alt-F5> to continue. Press [ESC] to abort. 13. To prepare the hard disk for full-feature workstation use, PRESS: Alt + F5 NOTE The cylinder fields should be incrementing at one cylinder per second. The entire format operation should take about 20 minutes. 14. When the formatting is complete, PRESS: Esc to return to the original Customer Test main menu. 15. Use the ↓ key to highlight Exit The Program. A window displays the message: Want to QUIT? Remove the Customer Test disk and select Yes. 2-56 January 1997 6800-A2-GN22-30 Preparing the Processors 16. The system will automatically reboot. The 6386/25 is now ready for full-feature workstation software installation. 17. Load the MS-DOS operating system and the workstation software as detailed in Chapter 5, Loading and Restoring Software. Full-Feature Workstation Any 6386-based AT&T computer or the Altos 386 SX/20 that was previously used as a full-feature workstation in Release 1, 2, 3.x, or 4.x can be used as a full-feature workstation for Release 4.2. NOTE A 6286 AT&T computer cannot be converted to a full-feature workstation for Release 4.2. To migrate a Release 1, 2, 3.x, or 4.x full-feature workstation to run under NMS Release 4.2, perform the following steps: 1. If the full-feature workstation is running, PRESS: Ctrl-break (This brings you to DOS) 2. Power off the full-feature workstation and remove the processor cover. 3. If the processor already has a video card connected to the processor bus, you must remove it first. Then, install the Paradise Windows Accelerator video card. 4. If you do not have a StarLAN NAU card with Link Integrity which you will use for connecting to the 10BaseT network, you must either replace that card with a StarLAN card which does have the Link Integrity option or remove the StarLAN card and replace it with a 3COM EtherLink II card. If you wish to retain the StarLAN card, be sure that the Link Integrity switch is set to enabled. If you choose to install the 3COM EtherLink II card, follow the steps in the section Preinstallation Steps for the EtherLink II card. 5. If you are upgrading an AT&T 6386/SX WGS, AT&T 6386/SX EL, or Altos 386SX/20, you must upgrade the memory in the processor to a maximum of 4 megabytes. AT&T 6386/SX WGS – Install 2 SIMMs (2 Mbytes) carefully into Bank 1 (location U18) on the system board ensuring that the SIMMs are locked into place. AT&T 6386/SX EL – Install 1 SIMM (1 Mbyte) carefully into Bank 1 (location J22) and 1 SIMM (1 Mbyte) into Bank 1 (location J23) on the system board ensuring that the SIMMs are locked into place. Altos 386SX/20 – Remove all adapter cards to expose the system memory section on the system board. Install 1 SIMM (1 Mbyte) carefully into Bank 1 (location U22) and 1 SIMM (1 Mbyte) into Bank 1 (location U42) on the system board ensuring that the SIMMs are locked into place. 6800-A2-GN22-30 January 1997 2-57 COMSPHERE 6800 Series Network Management System 6. Replace all covers. 7. Connect either the StarLAN NAU or the EtherLink II card to the network HUB using one of the following cables: a. 035-0116-2531 25i b. 035-0116-5031 50i c. 035-0116-9031 100i d. 035-0116-9931 200i 8. Power up the workstation and follow the steps for installing MS-DOS and the NMS full-feature workstation software in Chapter 5, Loading and Restoring Software. 2-58 January 1997 6800-A2-GN22-30 Preparing the Printers Overview . . . . . . . . . . . . . . . . . . . . . . . . . . . . . . . . . . . . . . . . . . . . . . . . . . . . Fujitsu DL5600 . . . . . . . . . . . . . . . . . . . . . . . . . . . . . . . . . . . . . . . . . . . . . . . . Fujitsu DL3400 . . . . . . . . . . . . . . . . . . . . . . . . . . . . . . . . . . . . . . . . . . . . . . . . Fujitsu DL3600 . . . . . . . . . . . . . . . . . . . . . . . . . . . . . . . . . . . . . . . . . . . . . . . . Fujitsu DX2300 . . . . . . . . . . . . . . . . . . . . . . . . . . . . . . . . . . . . . . . . . . . . . . . C.ITOH C-240 . . . . . . . . . . . . . . . . . . . . . . . . . . . . . . . . . . . . . . . . . . . . . . . . Network Printers . . . . . . . . . . . . . . . . . . . . . . . . . . . . . . . . . . . . . . . . . . . . . . . Configuring Network Printers . . . . . . . . . . . . . . . . . . . . . . . . . . . . . . . . . . Remote Printing with the UNIX SCO/S5R4 Print Spooler . . . . . . . . . Remote Printing with the BSD UNIX Print Spooler . . . . . . . . . . . . . . 3 3-1 3-2 3-5 3-8 3-12 3-17 3-19 3-19 3-19 3-21 Overview There are four types of printers that can be used with the COMSPHERE 6800 Series NMS. These printers, and the functions they serve, are briefly summarized below: • Fujitsu DL5600. The Fujitsu DL5600 is intended to serve as the NMS system printer. The function of the system printer is to print out copies of reports, command results, and screen information. It has both serial and parallel interfaces. • Fujitsu DL3400. The Fujitsu DL3400 can be used instead of the DL5600 as the system printer. It has a parallel interface. • Fujitsu DL3600. The Fujitsu DL3600 replaces the DL3400 and can be used in place of the DL5600 as the system printer. It has a parallel interface. • Fujitsu DX2300. The Fujitsu DX2300 can be used as either the alert log printer or dedicated ATR (Automatic Trouble Report) printer. The alert log printer prints out the alerts sent from devices monitored by the NMS. The dedicated ATR printer prints out the automatic trouble reports that are sent to the Paradyne technical assistance center. It has a serial interface. • C.ITOH C-240. The C.ITOH C-240 replaces the Fujitsu DX2300 as the alert log printer or dedicated ATR (Automatic Trouble Report) printer. The alert log printer prints out the alerts sent from devices monitored by the NMS. The dedicated ATR printer prints out the automatic trouble reports that are sent to the Paradyne technical assistance center. It has serial and parallel interfaces. Additionally the C.ITOH C-240 can be used as a local copy printer. For more information, refer to the COMSPHERE 6800 Series Network Management System Local Copy Printer Support Feature, Document Number 6800-A2-GZ47. Before the printers can be connected to the host processor, some of their default settings must be modified to satisfy NMS requirements. The pages that follow explain how to do this. (For instructions on connecting these printers to the host processor, see Chapter 4, Connecting the Components.) 6800-A2-GN22-30 January 1997 3-1 COMSPHERE 6800 Series Network Management System Fujitsu DL5600 The Fujitsu DL5600 is a multicolor dot matrix printer. To modify its default settings, you use the buttons on the front control panel. This panel is shown in Figure 3-1. The following procedure explains how to use the front control panel to modify the settings: 1. Remove the printer from its carton, connect the power cable to the printer, plug the power cable into an outlet, and turn the printer’s power on. (For detailed instructions, consult the Fujitsu DL5600 Dot Matrix Printer User’s Manual that comes with the machine.) 2. Once the printer has been powered on, you can modify its settings. To do this, you must first put the printer in SETUP mode. Press the RESET and ONLINE buttons at the same time. The message SETUP MODE will appear in the display area of the front control panel. This message is then replaced by the message FUNCTN:SEL.MENU 3. SETUP mode consists of a number of functions. The first function is referred to as MENU1. To access this function, press the FF button. The message MENU1 will appear in the display area. The MENU1 function consists of 22 individual printer settings. These settings are shown below along with the correct value for each setting (these values are correct for both serial and parallel connections to the host processor). Figure 3-1. DL5600 — Front Control Panel 3-2 January 1997 6800-A2-GN22-30 Preparing the Printers QUALITY :LETTER FONT :COMPRSD CHAR-W :NORMAL CHAR-H :NORMAL CHAR SP :10 CPI LINE SP :6 LPI EMULATE :DPL24C ATTRIB :NONE PAGE LG :11.0 IN COLOR :BLACK LFT-END :1 COLM TOP-MRG :1 LINE LANGUGE :USA CHR-SET :SET 1 GRPH-LF :IBM-GPH PRF-SKP :NO-SKIP WIDTH :13.6 IN ZEROFNT :NO-SLSH DC3-CDE :ENABLE CR-CODE :CR ONLY LF-CODE :LF & CR RGHTEND :WRAP 4. To show the first setting in the display area, press the LF button. To show each additional setting, press the LF button repeatedly. Each time you press the button, an additional setting will appear in the display area. Scroll through all 22 settings and compare the values with the values shown above. If any of the values on the printer do not match these values, change them accordingly. The following explains how to do this: a. Press the LF button until the setting you want to change is shown in the display area. b. Press the RESET button to display the first value that is valid for this setting. Press RESET repeatedly to display each additional valid value. The value that is asterisked is the one currently selected. c. When the value you want is displayed, press LF to select that value and return you to the MENU1 function. 6800-A2-GN22-30 January 1997 3-3 COMSPHERE 6800 Series Network Management System 5. When you have changed all necessary MENU1 settings, you are ready to access the second SETUP function — HARDWARE. To do this, press the FF button again. The message HARDWARE will appear in the display area. The HARDWARE function consists of 13 individual printer settings. These settings are shown below, along with the correct value for each setting (only eight of the settings apply to a parallel connection). SETTING SERIAL PARALLEL SPEED :NORMAL :NORMAL PPR-OUT :DETECT :DETECT PRT-DIR :BI-DIR :BI-DIR BUZZER :ON :ON WORD-LG :8 BIT :8 BIT BUFFER :8KBYTE :8KBYTE FEEDER :NONE :NONE INTRFCE :SERIAL :PARALLEL FORMAT :8NONE 1 BAUD-RT :9600 PROTOCOL :XON/XOF DSR :IGNORE DUPLEX :FULL 6. Follow the procedure described in Step 4 to scroll through the HARDWARE settings and compare them to the correct settings shown above. If any of the settings are incorrect, follow the procedure in Step 4 to change them. 7. Once the MENU1 and HARDWARE settings are correct, you must save them (if you do not save them, your selections will be lost when the printer’s power is turned off). To do this, press the FF button until the message FUNCTN:SAVE appears in the display area. Then press the RESET button. The message SAVING NOW!! will appear, followed by the message FUNCTN:SAVE 8. The modified settings have now been saved in the printer’s memory. Press the ONLINE button to return the printer to the ONLINE mode. The message ONLINE:READY will appear in the display area. 3-4 January 1997 6800-A2-GN22-30 Preparing the Printers Fujitsu DL3400 The Fujitsu DL3400 is a multicolor, 24-pin dot matrix printer. This printer communicates with the host processor through a parallel (Centronics) interface. The interface cable receptacle is positioned at the right rear corner of the printer. To modify the default settings, you use the buttons on the front control panel. This panel is shown in Figure 3-2. To modify the default settings, perform the following steps: 1. Connect the power cable to the printer and plug the power cable into an outlet — but do not turn the power on yet. Load 13.5 inch-wide continuous form paper into the printer. (For detailed instructions, consult the Fujitsu DL3300/3400 Printer User’s Manual that comes with the machine.) 2. To modify the printer’s default settings, you must be in SETUP mode. To put the printer in SETUP mode, press the MODE button on the front control panel and — while continuing to hold the MODE button down — turn the printer’s power on. The MODE indicator on the front panel will light, and the SETUP mode opening menu will be printed. This menu is shown in Figure 3-3 (to view the menu, pull the clear plastic front cover completely forward). 3. SETUP mode consists of a number of functions. The first function is referred to as MENU1. To access this function, press the MODE button until the cursor is positioned next to MENU1. The MENU1 function consists of 22 individual printer settings. These settings are shown below, along with the correct value for each setting. POWER POWER On Indicator PAPER OUT ONLINE Status Indicators Pushbuttons LETTER FONT1 MENU1 FF DRAFT FONT2 MENU2 LF MODE 492-12819-02 Figure 3-2. DL3400 — Front Control Panel 6800-A2-GN22-30 January 1997 3-5 COMSPHERE 6800 Series Network Management System Figure 3-3. DL3400 — SETUP Mode Opening Menu 4. To print the first setting, press the FF button. To print each additional setting, press the FF button repeatedly. Each time you press the button, an additional setting will be printed. Print all 22 settings and compare the values with the values shown below. If any of the values on the printer do not match, change them accordingly. The following explains how to do this: a. The value that is underlined is the default. To change the default, press the MODE button until the cursor is positioned on the value you want to replace the default. b. Press the LF button to select that value. The printer will draw a line under the value, indicating selection, and move the cursor to the next setting. c. Repeat this procedure for each setting that needs to be changed. 3-6 January 1997 6800-A2-GN22-30 Preparing the Printers QUALITY :LETTER FONT :COUR 10 CHR-WIDE :NORMAL CHR-HIGH :NORMAL CHAR SPC :10CPI LINE SPC :6LPI EMULATE :DPL24C ATTRIB :NONE PAGE LG :11INCH COLOR :AUTOSEL LEFT-END :1COLM TOP-MRGN :1LINE LANGUGE :USA CHAR-SET :SET2 GRAPH-LF :IBM-GPH PERFRATN :NO-SKIP WIDTH :13.6INCH ZEROFONT :NO-SLASH DC3-CODE :ENABLE CR-CODE :CR-ONLY LF-CODE :LF&CR RGHTEND :WRAP 5. When you have changed all necessary MENU1 settings, you are ready to access the second SETUP function — HARDWARE. To do this, press the MODE button until the cursor is positioned next to HARDWARE. The HARDWARE function consists of six individual printer settings. These settings are shown below, along with the correct value for each setting. 6800-A2-GN22-30 PPR-OUT :DETECT PRNT-DIR :BI-DIR BUZZER :ON WORD-LG :8-BIT BUFFER :8KBYTE FEEDER :NONE January 1997 3-7 COMSPHERE 6800 Series Network Management System 6. Follow the procedure described in Step 4 to print the HARDWARE settings and compare them to the correct settings shown above. If any of the settings are incorrect, follow the procedure in Step 4 to change them. 7. Once the MENU1 and HARDWARE settings are correct, you must save them (if you do not save them, your selections will be lost when the printer’s power is turned off). To do this, a. Press the ONLINE button to return the main function menu. b. Press the MODE button until the cursor is positioned next to SAVE/END. c. Press the FF button to save your selections and exit the SETUP mode. 3-8 January 1997 6800-A2-GN22-30 Preparing the Printers Fujitsu DL3600 The Fujitsu DL3600 is a multicolor, 24-pin dot matrix printer. The printer communicates with the host processor through a parallel (Centronics) interface; the interface receptacle is positioned at the right rear corner of the printer. Modifying the default printer settings requires use of the front control panel buttons. This panel is shown in Figure 3-4. To modify the default settings, perform the following steps: 1. Connect the power cable to the printer and plug the power cable into an outlet. DO NOT SWITCH ON THE POWER YET. Load continuous form paper into the printer. (For detailed instructions, consult the Fujitsu DL3600 User’s and Programmer’s Manual that comes with the printer.) 2. Put the printer in SETUP mode by pressing and holding down the MODE button and switching the printer’s power on. The SETUP mode menu will be printed as shown in Figure 3-5. To view the menu fully, pull the clear plastic cover over the roller completely forward. 3. SETUP mode consists of a number of functions. The first function, MENU1, consists of 21 individual printer settings. These settings along with their correct values are specified in Table 3-1. The red cursor on the plastic print guide is positioned under the current function. Other functions may be selected by repeatedly pressing the MODE button. To begin changing the settings of a particular function, press the FF button. Select the MENU1 function by pressing the MODE button until the red cursor is positioned under the printed MENU1 tag. Figure 3-4. DL3600 — Front Control Panel 6800-A2-GN22-30 January 1997 3-9 COMSPHERE 6800 Series Network Management System Figure 3-5. DL3600 — SETUP Mode Opening Menu Table 3-1 DL3600 — MENU1 Settings Setting 3-10 Correct Value <EMULATE> DPL24C+ <FONT> COUR 10 <QUALITY> LETTER <PITCH> 10 CPI <LINE SP> 6 LPI <CHAR-W> NORMAL <CHAR-H> NORMAL <ATTRIB> NONE <PAGE LG> 11.0 IN <COLOR> AUTOSEL <LFT-END> 1 COLM <TOP-MRG> 1 LINE <LANGUGE> USA <CHR-SET> SET 2 <PRF-SKP> NO-SKIP <WIDTH> 13.6 IN <ZEROFNT> NO-SLSH <DC3-CDE> ENABLE <CR-CODE> CR ONLY <LF-CODE> LF & CR <RGHTEND> WRAP January 1997 6800-A2-GN22-30 Preparing the Printers 4. Upon pressing the FF button, the first MENU1 setting will print along with its optional values. The default value will have a short line printed beneath the left-hand portion of the value. Press the MODE button to move the red cursor under the various values to be selected. Press the FF button to select the value to be used for that particular setting. The printer will underline that value and print the next setting and its values. 5. When “< ==END== >” is printed, you are ready to exit from changing the MENU1 settings. Press the ONLINE button at this time to exit and return to the Function Menu. 6. When you have checked or changed all the MENU1 settings, select the HARDWRE function from the Function Menu by pressing the MODE button until the red cursor is positioned under the printed HARDWRE tag. Then select that function by pressing the FF button. Table 3-2 shows the settings and correct values for the HARDWRE function. 7. When “< ==END== >” is printed, you are ready to exit from changing the HARDWRE settings. Press the ONLINE button at this time to exit and return to the Function Menu. 8. To exit SETUP mode, position the red cursor under SAVE&END and press the FF button. Table 3-2 DL3600 — HARDWARE Settings Correct Value Setting 6800-A2-GN22-30 <PPR-OUT> DETECT <PRT-DIR> BI-DIR <BUZZER> ON <WORD-LG> 8 BIT <BUFFER> 8KBYTE <FEEDER> REAR January 1997 3-11 COMSPHERE 6800 Series Network Management System Fujitsu DX2300 The Fujitsu DX2300 is a dot matrix printer that communicates with the host processor through a serial interface. Modifying its default settings is done directly on the memory and serial interface cards. To modify the default settings, perform the following steps: 1. Remove the printer from its carton and set it on a flat surface. 2. Loosen the card cover bolt, and then move the paper release lever forward and remove the card cover, as shown in Figure 3-6. 3. Locate the memory card and serial interface card. The memory card is found in the second slot of the printer card chassis and the serial interface card in the first slot. Figure 3-6. DX2300 — Memory and Serial Interface Card Access 3-12 January 1997 6800-A2-GN22-30 Preparing the Printers 4. The memory card contains an emulator mode switch and two DIP switches. Figure 3-7 shows the location of the card in the printer and indicates the various switch settings. To modify the emulator mode switch and the DIP switches, perform the following steps: a. Set the emulator mode switch to Type F (see Figure 3-7). b. Set the DIP switches to the positions indicated in Figure 3-7. Table 3-3 also indicates the setting of each switch, as well as each switch’s function. Figure 3-7. DX2300 — Memory Card Settings 6800-A2-GN22-30 January 1997 3-13 COMSPHERE 6800 Series Network Management System Table 3-3 Memory Card DIP Switch Settings DIP Switch 1 DIP Switch 2 3-14 Switch Setting 1 OFF Standard characters (10 CPI) 2 ON Slashed zero 3 OFF Paper out detect 4 OFF Data input buffer 5 OFF 11-inch paper selected 6 ON Language selection 7 ON Language selection 8 ON Language selection 1 ON Online with power on 2 OFF Cut sheet feeder disabled 3 ON Skip over perforation 4 ON Line feed with carriage return January 1997 Function 6800-A2-GN22-30 Preparing the Printers 5. The serial interface card contains a single DIP switch. Figure 3-8 shows the location of the card in the printer and indicates the DIP switch settings for 9600 baud. Figure 3-8. DX2300 — Serial Interface Card Settings (9600 Baud) 6800-A2-GN22-30 January 1997 3-15 COMSPHERE 6800 Series Network Management System Table 3-4 shows the correct settings for the first five DIP switches and indicates the function performed by each switch. Table 3-4 Serial Interface Card Settings Switches 1—5 Switch Setting Function 1 ON XON/XOFF protocol 2 OFF 8-bit data length 3 OFF Parity OFF 4 OFF Parity ODD 5 OFF 1 stop bit Switches 6 through 8 are used to set the communications speed of the printer. Table 3-5 shows the correct switch setting for each speed. Table 3-5 Serial Interface Card Settings Switches 6—8 Switch Speed 6 7 8 9600 ON ON OFF 4800 ON OFF ON 2400 ON OFF OFF 1200 OFF ON ON 6. Replace the card cover, screwing the retaining bolt in and locking the paper release lever. 3-16 January 1997 6800-A2-GN22-30 Preparing the Printers C.ITOH C-240 The C.ITOH C-240 is a dot matrix printer that communicates with the host processor through a serial interface. Five functions must be modified to properly communicate with the host processor. Table 3-6 provides the information for modifying these functions. The NMS Status in the table is the setting to which the given function will be changed. Table 3-6 C.ITOH C-240 Setting Changes Function No. Function Menu No. Default Status Menu No. NMS Status 01 EMULATION 01 IBM PRO PRINTER XL 02 EPSON FX-800 18 SKIP PERFORMANCE 02 INVALID 01 VALID 22 TEAR OFF 02 VALID (1SEC) 01 INVALID 28 INTERFACE 01 PARALLEL 02 SERIAL 29 PROTOCOL 01 READY/BUSY 02 XON/OFF To modify printer functions, perform the following steps: 1. While holding down the FM button, press the POWER button on the right side of the printer to turn on the power. When you release the FM button, the SET UP mode is selected. All the current function settings are printed, then FUNC. NO. 01 is printed. 2. Press the LF button the appropriate number of times to select the function you want to change. The NLQ-1 lamp is on. 3. Press the FM button. MENU Select mode is selected. No printing occurs. The NLQ-2 lamp turns on. 4. Press the LF button to select the appropriate MENU NO. For example, with the SKIP PERFORATION function, you would press the LF button once to select 01 (VALID). 5. Press the FM button to return to Function Select Mode. Repeat Steps 2 through 5 as many times as needed to cycle through the functions and their associated menu items. When all changes required as indicated by Table 3-6 have been entered, go to Step 6. 6. Press the ENTER button. This exits the SET UP mode and returns the printer to the normal printing mode state. No printing occurs. 6800-A2-GN22-30 January 1997 3-17 COMSPHERE 6800 Series Network Management System The printer functions should be set as shown in Table 3-7. Table 3-7 Printer Functions Printout Function No. 3-18 Function Menu No. Status 01 EMULATION 01 EPSON FX-800 02 FORM LENGTH 12 11 inches 03 LINE SPACING 01 1/6 inches 04 LINE LENGTH 03 80 CHARACTERS 05 CHARACTER PITCH 01 10CPI 06 12 CPI FONT SELECTION 02 FAST FONT 07 FONT SELECTION 01 DATA PROCESSING 08 NLQ-2 SELECTION 01 LETTER GOTHIC 09 POWER ON 01 ON LINE 10 QUIET MODE 02 INVALID 11 AUTOLOADING 02 OFF LINE 12 PRINT DIRECTION 02 BI-DIRECTIONAL (DP) 13 BUFFER FULL 01 LINE FEED 14 LINE FEED ON CR__CODE 02 INVALID 15 CARRIAGE RETURN ON LINE FEED 02 INVALID 16 CAN-CODE 01 VALID 17 PAPER EMPTY SENSOR 01 VALID 18 SKIP PERFORATION 01 VALID 19 ZERO CHARACTER 01 NOT SLASHED 20 SELECTION OF RAM 01 PRINT BUFFER 21 ASF 01 NOT INSTALLED 22 TEAR OFF 01 INVALID 23 IBM CHARACTER SET 01 SET 1 24 EPSON CHARACTER SET 01 ITALIC 1 (CODE ENABLE) 25 EPSON INTERNATIONAL CHA. SET 01 AMERICAN 26 SELECT-IN SIGN. 02 INVALID 27 AUTOFEED-XT SIGN. 02 INVALID 28 INTERFACE 02 SERIAL 29 PROTOCOL 02 XON/XOFF 30 BAUD RATE 06 9600 31 DATA LENGTH 01 8 BITS 32 PARITY 01 NONE 33 STOP BIT 01 1 34 CTS SIGNAL 01 INVALID January 1997 6800-A2-GN22-30 Preparing the Printers Network Printers The 6800 Series NMS supports the system printing function over a TCP/IP network to remotely located printer servers. Further information regarding this feature can be found by referring to the COMSPHERE 6800 Series Network Management System User’s/System Administrator’s Guide. Configuring Network Printers This feature supports those printer types that are already supported as local system printers with the restriction that network printers must not be named printer0, printer1, or printer2. These names are reserved for printers directly connected to the host processor. You must define the remote printer to the UNIX operating system before sending print jobs from NMS to the newly defined network printer. To configure the UNIX Remote Line Printing (RLP) feature, you must change the parameters of the RLP on the 6800 host. Before beginning, determine which type of UNIX system is being run on the remote printer server (UNIX SCO/S5R4 or BSD UNIX). Follow the appropriate procedures below. Remote Printing with the UNIX SCO/S5R4 Print Spooler To establish the remote printer connections with a printer server running UNIX SCO/S5R4, perform the following steps: 1. Logon to the NMS host as root and TYPE: sysadmsh PRESS: Enter 2. The System Administrator menu appears. Using the ← / → keys, select Printers and PRESS: Enter 3. Select Configure and PRESS: Enter 4. Select Add and PRESS: Enter 5. The printer addition table appears. You must fill in the fields as follows: Printer name=[ local name for remote printer ] Comment=[ optional text ] Class name=[ blank ] Use printer interface=[ Existing ] Name of interface=[ network ] Connection=[ Direct ] Device Name=[ /dev/null ] Device=[ Hardwired ] Require banner=[no] Fill in the applicable fields and press return after each field. Press return for empty fields, too, and be sure that the entire form is completed. 6800-A2-GN22-30 January 1997 3-19 COMSPHERE 6800 Series Network Management System 6. When all fields are completed and after a message appears in the highlighted line, PRESS: Esc to return to the Printer Configuration menu and PRESS: Esc 7. Select Schedule and PRESS: Enter Select Accept and PRESS: Enter TYPE: local name for remote printer PRESS: Enter PRESS: Esc 8. At the Printers Schedule menu, select Enable and PRESS: Enter TYPE: local name for remote printer PRESS: Enter PRESS: Esc 9. Exit from sysadmsh by PRESS: Esc (twice) select Quit and PRESS: Enter 10. Open the file /usr/spool/lp/remote for edit and add the following line: aaaa: /usr/spool/lp/bin/rlpcmd bbbb /usr/bin/lp – d cccc Where: aaaa is the local name of the remote printer. bbbb is the name of the remote printer server. cccc is the name of the remote printer on the remote printer server. NOTE The variables aaaa and cccc can be, but do not have to be, the same name. 3-20 January 1997 6800-A2-GN22-30 Preparing the Printers 11. Add the following line to the NMS host processor’s /etc/hosts file for each remote printer server processor with one or more remote printers: IP-address remote_host_name Where: IP-address is the internet address of the NMS host processor. remote_host_name is the official name of the remote printer server processor. NOTE Be sure that the NMS host processor name is entered into the /usr/spool/lp/.rhosts and /etc/hosts files on the remote processor. The entry in the /etc/hosts file is in the form: IP_address local_host_name The entry in the /usr/spool/lp/.rhosts file is in the form: local_host_name Remote Printing with the BSD UNIX Print Spooler To establish the remote printer connections with a printer server running BSD UNIX, perform the following steps: 1. Logon to the NMS host as root and TYPE: mkdev rlp PRESS: Enter NOTE The command mkdev rlp can only be run ONCE. Running the command more than once will result in an incorrect lp configuration requiring a complete reinstallation of the UNIX system on that processor. If remote line printing has already been installed, a message appears with the prompt: Do you wish to continue? TYPE: n PRESS: Enter TYPE: rlpconf PRESS: Enter and go to Step 3. 6800-A2-GN22-30 January 1997 3-21 COMSPHERE 6800 Series Network Management System 2. The following message appears: Installing Remote Line Printing Creating directories /usr/lpd/remote and /usr/spool and file /etc/printcap Saving lp, cancel and lpstat commands to /usr/lpd/remote Installing remote, lp, cancel and lpstat commands to /usr/bin 3. The system then prompts: Do you want to change the remote printer description file /etc/printcap (y/n)? TYPE: y PRESS: Enter 4. The system displays the following: Remote Printing Configuration Enter information for remote printers or local printers accepting remote print jobs. Please enter the printer name (q to quit): TYPE: remote printer name PRESS: Enter 5. The system prompts: Is remote_printer a remote printer or a local printer (r/l)? TYPE: r PRESS: Enter 6. The system prompts: Please enter the name of the remote host that remote_printer is attached to: TYPE: remote printer server name PRESS: Enter 7. The system prompts for confirmation: Printer remote_printer is attached to host remote_host Is this correct? (y/n) TYPE: y (if the configuration is correct) PRESS: Enter 3-22 January 1997 6800-A2-GN22-30 Preparing the Printers The system then prompts: Would you like this to be the system default printer? (y/n) TYPE: n PRESS: Enter The following messages appear: Make sure that your host name appears in remote_host’s /etc/hosts equiv or /etc/hosts.lpd file. Make sure that remote_printer appears in remote_host’s /etc/printcap file Make sure that remote_printer has a spool directory on remote_host Putting remote_printer in printer description file and creating spool dir Updating LP information . . . done Updating /usr/spool/lp/default . . . done The system then prompts as in Step 4. If you have more remote printers to configure, go to Step 4. 8. If all remote printers have been configured, TYPE: q PRESS: Enter 9. Add the following line to the local processor’s /etc/hosts file for each remote printer server processor with one or more remote printers: IP-address remote_host_name Where: IP-address is the internet address of the NMS host processor. remote_host_name is the official name of the remote printer server processor. NOTE Remember that you must run rlpconf on the remote host to enter the name of the printer in that system’s /etc/printcap file. Ensure that the NMS host processor name is included in the remote processor’s /etc/hosts.lpd and /etc/hosts files. The entry in the /etc/hosts file is in the form: IP_address local_host_name The entry in the /etc/hosts.lpd file is in the form: local_host_name 6800-A2-GN22-30 January 1997 3-23 Connecting the Components Overview . . . . . . . . . . . . . . . . . . . . . . . . . . . . . . . . . . . . . . . . . . . . . . . . . . . . System Console . . . . . . . . . . . . . . . . . . . . . . . . . . . . . . . . . . . . . . . . . . . . . . . Altos 5000 Full-Feature Workstation Configuration . . . . . . . . . . . . . . . . . . . Connecting the Second Full-Feature Workstation . . . . . . . . . . . . . . . . . . . Connecting the Third Full-Feature Workstation . . . . . . . . . . . . . . . . . . . . Connecting the Fourth, Fifth, and Sixth Full-Feature Workstations . . . . . Altos 15000 Full-Feature Workstation Configuration . . . . . . . . . . . . . . . . . . Connecting the Basic Configuration . . . . . . . . . . . . . . . . . . . . . . . . . . . . . Connecting Additional Full-Feature Workstations . . . . . . . . . . . . . . . . . . Cascading Network Hub Units . . . . . . . . . . . . . . . . . . . . . . . . . . . . . . . . . Basic-Feature Workstation . . . . . . . . . . . . . . . . . . . . . . . . . . . . . . . . . . . . . . . Connecting a Local Altos 486DX/33, an Altos SX/20, or an AT&T 6386 SX/EL . . . . . . . . . . . . . . . . . . . . . . . . . . . . . . . . . . . . . . . . Connecting a Local AT&T 6286 or 6386 . . . . . . . . . . . . . . . . . . . . . . . . . Connecting a Remote Altos 486DX/33, an Altos SX/20, or an AT&T 6386 SX/EL . . . . . . . . . . . . . . . . . . . . . . . . . . . . . . . . . . . . . . . . . . Connecting a Remote AT&T 6286 or 6386 . . . . . . . . . . . . . . . . . . . . . . . . Printers . . . . . . . . . . . . . . . . . . . . . . . . . . . . . . . . . . . . . . . . . . . . . . . . . . . . . . Connecting a Local System Printer . . . . . . . . . . . . . . . . . . . . . . . . . . . . . . DL3400/DL3600 . . . . . . . . . . . . . . . . . . . . . . . . . . . . . . . . . . . . . . . . . DL5600 . . . . . . . . . . . . . . . . . . . . . . . . . . . . . . . . . . . . . . . . . . . . . . . . Connecting a Remote System Printer . . . . . . . . . . . . . . . . . . . . . . . . . . . . Connecting an Alert Log Printer . . . . . . . . . . . . . . . . . . . . . . . . . . . . . . . . DX2300 . . . . . . . . . . . . . . . . . . . . . . . . . . . . . . . . . . . . . . . . . . . . . . . . C-240 . . . . . . . . . . . . . . . . . . . . . . . . . . . . . . . . . . . . . . . . . . . . . . . . . . Connecting the Dedicated Automatic Trouble Report Printer . . . . . . . . . Data Communications Equipment . . . . . . . . . . . . . . . . . . . . . . . . . . . . . . . . . Connecting Modems and DSUs . . . . . . . . . . . . . . . . . . . . . . . . . . . . . . . . Using a Hubbing Device . . . . . . . . . . . . . . . . . . . . . . . . . . . . . . . . . . . Connecting Locally . . . . . . . . . . . . . . . . . . . . . . . . . . . . . . . . . . . . . . . Connecting Remotely . . . . . . . . . . . . . . . . . . . . . . . . . . . . . . . . . . . . . . Connecting ACCULINK Multiplexers . . . . . . . . . . . . . . . . . . . . . . . . . . . Configuration Options . . . . . . . . . . . . . . . . . . . . . . . . . . . . . . . . . . . . . Connection Procedures . . . . . . . . . . . . . . . . . . . . . . . . . . . . . . . . . . . . . External Systems . . . . . . . . . . . . . . . . . . . . . . . . . . . . . . . . . . . . . . . . . . . . . . Connecting a Local System Controller . . . . . . . . . . . . . . . . . . . . . . . . . . . Connecting a Remote System Controller . . . . . . . . . . . . . . . . . . . . . . . . . Connecting a Local Dial Backup Control Unit . . . . . . . . . . . . . . . . . . . . . Connecting a Remote Dial Backup Control Unit . . . . . . . . . . . . . . . . . . . Connecting a Local Service Restoration Control Unit . . . . . . . . . . . . . . . Connecting a Remote Service Restoration Control Unit . . . . . . . . . . . . . . Connecting a Local DCX Multiplexer . . . . . . . . . . . . . . . . . . . . . . . . . . . Connecting a Remote DCX Multiplexer . . . . . . . . . . . . . . . . . . . . . . . . . . Connecting a Computer System Requiring VT100 Emulation . . . . . . . . . Connecting Locally . . . . . . . . . . . . . . . . . . . . . . . . . . . . . . . . . . . . . . . Connecting Remotely . . . . . . . . . . . . . . . . . . . . . . . . . . . . . . . . . . . . . . NetView/PC . . . . . . . . . . . . . . . . . . . . . . . . . . . . . . . . . . . . . . . . . . . . . . . . . . Connecting Locally . . . . . . . . . . . . . . . . . . . . . . . . . . . . . . . . . . . . . . . . . . Connecting Remotely . . . . . . . . . . . . . . . . . . . . . . . . . . . . . . . . . . . . . . . . Automatic Trouble Report Feature . . . . . . . . . . . . . . . . . . . . . . . . . . . . . . . . . 6800-A2-GN22-30 January 1997 4 4-2 4-3 4-4 4-6 4-8 4-8 4-10 4-10 4-11 4-12 4-14 4-16 4-17 4-17 4-17 4-18 4-19 4-19 4-20 4-20 4-20 4-20 4-21 4-21 4-22 4-22 4-23 4-24 4-26 4-26 4-28 4-32 4-35 4-37 4-37 4-38 4-38 4-39 4-39 4-40 4-40 4-41 4-41 4-42 4-43 4-43 4-44 4-45 4-1 COMSPHERE 6800 Series Network Management System ACCUMASTER Integrator . . . . . . . . . . . . . . . . . . . . . . . . . . . . . . . . . . . . . . Connecting Locally . . . . . . . . . . . . . . . . . . . . . . . . . . . . . . . . . . . . . . . . . . Connecting Remotely . . . . . . . . . . . . . . . . . . . . . . . . . . . . . . . . . . . . . . . . ANALYSIS Network Management System . . . . . . . . . . . . . . . . . . . . . . . . . . Connecting Locally . . . . . . . . . . . . . . . . . . . . . . . . . . . . . . . . . . . . . . . . . . Connecting the ANALYSIS 6510/5605 . . . . . . . . . . . . . . . . . . . . . . . . Connecting the ANALYSIS 5600 . . . . . . . . . . . . . . . . . . . . . . . . . . . . Connecting Remotely . . . . . . . . . . . . . . . . . . . . . . . . . . . . . . . . . . . . . . . . Connecting the ANALYSIS 6510/5605 . . . . . . . . . . . . . . . . . . . . . . . . Connecting the ANALYSIS 5600 . . . . . . . . . . . . . . . . . . . . . . . . . . . . StarKeeper Network Management System . . . . . . . . . . . . . . . . . . . . . . . . . . . Connecting Locally . . . . . . . . . . . . . . . . . . . . . . . . . . . . . . . . . . . . . . . . . . Connecting Remotely . . . . . . . . . . . . . . . . . . . . . . . . . . . . . . . . . . . . . . . . Bytex UMS . . . . . . . . . . . . . . . . . . . . . . . . . . . . . . . . . . . . . . . . . . . . . . . . . . . Connecting the Host Processor to the Bytex UMS . . . . . . . . . . . . . . . . . . Connecting the UIP to the Bytex UMS . . . . . . . . . . . . . . . . . . . . . . . . . . . 4-46 4-46 4-48 4-50 4-50 4-51 4-51 4-52 4-53 4-53 4-54 4-54 4-55 4-56 4-57 4-58 Overview This chapter provides step-by-step instructions for connecting the following components to the host processor and/or, when appropriate, to the UIP. • The system console • Full-Feature workstations (connected through a TCP/IP local area network to the host processor or UIP) • Basic-feature workstations (connected to either the host processor or UIP) • Three types of printers (connected to the host processor) — System printer — Alert log printer — Dedicated Automatic Trouble Report (ATR) printer • Data communications equipment (connected to the host processor) — COMSPHERE 3400/4400 Series Model 2 APL modems — COMSPHERE 3600 Series Data Service Units — COMSPHERE 3800 Series DDD modems — COMSPHERE 3900 Series APL modems — DATAPHONE II APL and DDD modems — DATAPHONE II DSUs — ACCULINK multiplexers • External systems (connected to either the host processor or UIP) — DATAPHONE II System Controller 300/400 — DATAPHONE II 839A Dial Backup Unit — Paradyne 4400 Series Service Restoration Carrier — Paradyne 840/850 DCX multiplexers — Computer systems requiring VT100 emulation 4-2 January 1997 6800-A2-GN22-30 Connecting the Components • NetView/PC (connected to the host processor) • Automatic Trouble Report feature (connected to the host processor) • ACCUMASTER Integrator (connected to the host processor) • ANALYSIS Network Management System (connected to the host processor) • StarKeeperNetwork Management System (connected to the host processor) • Bytex Unity Management System (UMS) (connected to the host processor) • COMSPHERE SNMP Manager (connected to a TCP/IP Network) System Console The console consists of a VGA display unit, a standard 101-key keyboard, and a mouse. These are all attached to ports that are located on the rear panel. Figure 4-1 indicates the exact location of each port on the rear panel of the Altos System 5000. 0 1 Figure 4-2 indicates the exact location of each port on the interior top panel of the System 15000. COM2 Mouse Keyboard COM1 Base I/O Board LPT1 Port AGC (Video) Board Display Unit 491-13855 Figure 4-1. Altos System 5000 — Display Unit, Keyboard, and Mouse Ports 6800-A2-GN22-30 January 1997 4-3 COMSPHERE 6800 Series Network Management System Mouse Keyboard 1 2 3 4 5 6 7 8 9 10 Display Unit 494-14504-01 Figure 4-2. Altos System 15000 — Display Unit, Keyboard, and Mouse Ports Altos 5000 Full-Feature Workstation Configuration A COMSPHERE 6800 Series NMS on an Altos System 5000 can have from one to six full-feature workstations. The first full-feature workstation is the display unit and keyboard that comes with the Altos System 5000. This display unit and keyboard serve as both console on the host processor and a full-feature workstation. NOTE Users of previous releases of NMS should refer to the Full-Feature Workstation section of Chapter 2 when setting up full-feature workstations which previously used StarLAN as the means of connecting full-feature workstations. NOTE This connection process describes the standard TCP/IP Ethernet configuration. On the Altos System 5000 an alternative network configuration is also supported. Token Ring cards can be inserted in the host, UIP, and full-feature workstation for Token Ring support. The configuration rules that follow apply to this alternative hardware configuration as well. 4-4 January 1997 6800-A2-GN22-30 Connecting the Components If the customer wants to install additional full-feature workstations, this will have to be done via a local area network. Up to five workstations can be connected to the network — for a total of six. The connection process is done in three stages, depending on how many workstations the customer ultimately installs. The following explains: • Stage 1 — Connect a Second Full-Feature Workstation. To connect a second full-feature workstation, you must perform the following activities: — Connect the network hub unit to the Ethernet card in the host processor using an AUI adapter. — Install a 3COM 3C503 EtherLink II card in the full-feature workstation (may be factory or field installed) — see Chapter 2, Preparing the Processors, for more details. — Connect the full-feature workstation to the network hub unit. • Stage 2 — Connect a Third Full-Feature Workstation. To connect a third full-feature workstation, you will need to connect a User Interface Processor (UIP) to the network hub unit. The display unit and keyboard on the UIP will serve as both UIP console and full-feature workstation. • Stage 3 — Connect the Fourth, Fifth, and Sixth Full-Feature Workstations. The UIP that serves as the third full-feature workstation will also support the fourth, fifth, and sixth full-feature workstations, if they are added. These workstations are connected to the network hub and are supported by the UIP. 6800-A2-GN22-30 January 1997 4-5 COMSPHERE 6800 Series Network Management System Connecting the Second Full-Feature Workstation To connect the second full-feature workstation, you will have to set up a TCP/IP Ethernet network. Figure 4-3 shows what this network will look like with the second full-feature workstation connected. Host Processor Network Hub Unit Ethernet Card 035-0116-5031* 035-0116-5031 EtherLink II Card Full-Feature Workstation Console/ Full-Feature Workstation * Cable 035-0116-5031 is 50' in length. Other lengths available: 035-0116-2531 25' 035-0116-9031 100' 035-0116-9931 200' 494-13899a-02 Figure 4-3. Local Area Network with Second Full-Feature Workstation The Ethernet circuit card must be activated in the host processor (see Chapter 2, Preparing the Processors) to support the second full-feature workstation. To complete the network installation, you will need the following equipment: • A network hub unit (Figure 4-4) • Two modular cables (035-0116-5031) • AUI adapter NOTE ALL devices on the network must have link integrity enabled. If any part of the network is reusing StarLAN equipment, these StarLAN devices must have link integrity switches and you must set link integrity to enabled. Any older StarLAN network equipment which does not have the link integrity option switch must be replaced. 4-6 January 1997 6800-A2-GN22-30 Connecting the Components Allied Telesis CentreCOM™ MR810T 1 PORT 2 3 4 5 6 7 8 ACTIVITY COLLISION POWER PORT OK IEEE 802.3 10 BASE T 8 PORT MICRO REPEATER WITH AUI RECEIVE 8 7 6 5 4 3 2 1 x x x x x x x x Allied Telesis CentreCOM™ MR810T IEEE 802.3 10 BASE T MICRO REPEATER WITH AUI 493-14257 Figure 4-4. Network Hub Unit Once you have this equipment assembled, perform the following steps: 1. Connect the network hub unit power cord to a non-switched outlet. 2. Connect the AUI adapter to the Ethernet card on the host processor. 3. Connect one end of a 035-0116-5031 cable to the AUI adapter. 4. Connect the other end of a 035-0116-5031 cable to a port on the network hub unit. 5. Connect one end of a 035-0116-5031 cable to the jack on the EtherLink II card in the full-feature workstation. 6. Connect the other end of the 035-0116-5031 cable to a port on the network hub unit. NOTE To ensure that the TCP/IP network operates efficiently, always use the shortest cord possible to connect each device to the network hub unit. 6800-A2-GN22-30 January 1997 4-7 COMSPHERE 6800 Series Network Management System Connecting the Third Full-Feature Workstation To connect a third full-feature workstation, you will need to connect a UIP to the network hub unit that you installed to connect the second full-feature workstation. The display unit and keyboard on the UIP will serve as the third full-feature workstation. Figure 4-5 shows what the network will look like with the UIP connected and serving as third full-feature workstation. To connect the UIP to the network hub unit, you will need a modular cable (035-0116-5031). Perform the following steps: 1. Connect the AUI adapter to the Ethernet card on the UIP. 2. Connect one end of the 035-0116-5031 cable to the jack on the AUI adapter. 3. Connect the other end of the 035-0116-5031 cable to a port on the network hub unit. Host Processor Network Hub Unit Ethernet Card User Interface Processor 035-0116-5031 035-0116-5031 Console/ Full-Feature Workstation Ethernet Card Console/ Full-Feature Workstation 035-0116-5031 EtherLink II Card Full-Feature Workstation 494-13900a-02 Figure 4-5. Local Area Network with UIP 4-8 January 1997 6800-A2-GN22-30 Connecting the Components Connecting the Fourth, Fifth, and Sixth Full-Feature Workstations To install a fourth, fifth, and sixth full-feature workstation, you will have to connect each workstation to the network hub. Figure 4-6 shows what the network will look like with the additional workstations. To connect the fourth, fifth and/or sixth full-feature workstations, you will need one modular cable (035-0116-5031) for each workstation. When you have this equipment, perform the following steps: 1. Connect one end of the 035-0116-5031 cable to the jack on the EtherLink II card in a full-feature workstation, as shown in Figure 4-6. 2. Connect the other end of the 035-0116-5031 cable to a port on the network hub unit. 3. Repeat this procedure for each of the other two full-feature workstations, if necessary. Host Processor Network Hub Unit Ethernet Card User Interface Processor 035-0116-5031 035-0116-5031 Ethernet Card Console/ Full-Feature Workstation Console/ Full-Feature Workstation 035-0116-5031 EtherLink II Card Full-Feature Workstation 494-13900a-02 Figure 4-6. Local Area Network with Additional Full-Feature Workstations 6800-A2-GN22-30 January 1997 4-9 COMSPHERE 6800 Series Network Management System Altos 15000 Full-Feature Workstation Configuration The COMSPHERE 6800 Series NMS on an Altos 15000 can have up to 24 full-feature workstations. The system console on the host cannot be used as a full-feature workstation. The basic Altos 15000 configuration supports two UIPs and both UIPs can double as full-feature workstations. Consequently, by definition, the Altos 15000 comes with two full-feature workstations. You can add as many full-feature workstations to the network hub and connect additional hubs to support the upper limit of workstations. The maximum configuration of full-feature workstations has seven full-feature workstations configured to the host, three configured to UIP-1, and 14 full-feature workstations configured to UIP-2. The host, UIPs, and full-feature workstations are connected via an Ethernet local area network. The Altos 15000 platform does not support token ring applications. The connection process is done is three stages: • Stage 1 – Connect the Altos 15000 host to the two Altos 5000 UIPs via a network hub. • Stage 2 – Connect up to four additional dedicated full-feature workstations to the network hub. • Stage 3 – Connect additional network hub units to the first hub to support the full 24 full-feature workstation limit. Connecting the Basic Configuration To connect the two UIPs, you have to establish a TCP/IP Ethernet network. Figure 4-7 shows what this network would look like for an Altos 15000 platform. User Interface Processor 1 Host Processor Network Hub Unit Ethernet Card Altos 5000 ECA 035-0116-5031 User Interface Processor 2 035-0116-5031 Ethernet Card Altos 15000 Altos 5000 494-14582 Figure 4-7. Altos 15000 Basic Local Area Network Configuration 4-10 January 1997 6800-A2-GN22-30 Connecting the Components The Ethernet circuit card must be activated in the host processor to support the two UIPs. Running the EISA Configuration Utility, as indicated in Chapter 2, activates the card. To complete the network installation, you need the following equipment: • A network hub unit (see Figure 4-4) • Three modular cables (part number 035-0116-5031) • Three AUI adapters NOTE ALL devices on the network must have link integrity enabled. If any part of the network is reusing StarLAN equipment, those StarLAN devices must have link integrity switches and you must set link integrity to enabled. Any older StarLAN network equipment which does not have the link integrity option switch must be replaced. Once you have this equipment assembled, perform the following steps: 1. Connect the network hub unit power cord to a non-switched outlet. 2. Connect the AUI adapters to the Ethernet cards on the host processor and the two UIPs. 3. Connect one end of an 035-0116-5031 cable to each AUI adapter. 4. Connect the other end of each 035-0116-5031 cable to a port on the network hub unit. NOTE To ensure that the TCP/IP network operates efficiently, always use the shortest cord possible to connect each device to the network hub unit. Connecting Additional Full-Feature Workstations To connect additional workstations, you need to connect a dedicated workstation to the network hub unit. The display units and keyboards on the two UIPs serve as the first two full-feature workstations. Figure 4-8 shows what the network looks like with five dedicated full-feature workstations. To connect the full-feature workstations to the network hub unit, you need a modular cable (part number 035-0116-5031). Perform the following steps: 1. Connect one end of the 035-0116-5031 cable to the EtherLink II card in the full-feature workstation. 2. Connect the other end of the 035-0116-5031 cable to a port on the network hub unit. 6800-A2-GN22-30 January 1997 4-11 COMSPHERE 6800 Series Network Management System Host Processor Network Hub Unit User Interface Processor 1 Ethernet Card ECA 035-0116-5031 Altos 5000 Console/ Full-Feature Workstation User Interface Processor 2 Altos 15000 035-0116-5031 Full-Feature Workstation Ethernet Card EtherLink II Card Altos 5000 Full-Feature Workstation Full-Feature Workstation Full-Feature Workstation EtherLink II Card EtherLink II Card Console/ Full-Feature Workstation Full-Feature Workstation EtherLink II Card EtherLink II Card 494-14583 Figure 4-8. Altos 15000 Configuration for Additional Full-Feature Workstations Cascading Network Hub Units If more than seven full-feature workstations are required, you must cascade multiple hub units. Figure 4-9 shows what one network hub unit looks like with two cascaded hubs connected to it. Four hub units are required to support 24 full-feature workstations. 4-12 January 1997 6800-A2-GN22-30 Connecting the Components User Interface Processor 1 Network Hub Unit Host Processor Ethernet Card Console/ Full-Feature Workstation ECA Altos 5000 User Interface Processor 2 Altos 15000 035-0116-5031 Full-Feature Workstation Ethernet Card Console/ Full-Feature Workstation Altos 5000 EtherLink II Card Modified Cable 035-0116-5031 Network Hub Unit Full-Feature Workstation Full-Feature Workstation EtherLink II Card EtherLink II Card 035-0116-5031 Full-Feature Workstation Full-Feature Workstation EtherLink II Card EtherLink II Card 035-0116-5031 Full-Feature Workstation Full-Feature Workstation EtherLink II Card EtherLink II Card 035-0116-5031 Full-Feature Workstation EtherLink II Card Full-Feature Workstation EtherLink II Card Full-Feature Workstation Full-Feature Workstation EtherLink II Card EtherLink II Card 494-14584 Figure 4-9. Altos 15000 Cascaded Network Hub Units 6800-A2-GN22-30 January 1997 4-13 COMSPHERE 6800 Series Network Management System To connect a cascaded hub, you must modify a modular cable (part number 035-0116-5031). Alter the cable by making the changes indicated in Table 4-1. Table 4-1 Cascaded Hub Cable Modifications Connects To End 1 TD+ (Pin 1) RD+ (Pin 3) TD– (Pin 2) RD– (Pin 6) RD+ (Pin 3) TD+ (Pin 1) RD– (Pin 6) TD– (Pin 2) The modified cable is used to connect the network hubs together. After connecting one end of the modified cable to a port in the first network hub, connect the other end to a port in the second hub. Then, for each full-feature workstation, perform the following steps: 1. Connect one end of the 035-0116-5031 cable to the EtherLink II card in the full-feature workstation. 2. Connect the other end of the 035-0116-5031 cable to a port on the network hub unit. Basic-Feature Workstation Basic-feature workstations can be connected to the host processor or UIP, either locally or remotely over private or switched lines. On the Altos 5000 platform, the host processor can support up to three basic-feature workstations. If the UIP is installed, eight more workstations or up to a total of eleven basic-feature workstations can be supported. On the Altos 15000 platform, the host processor supports six basic-feature workstations and UIP-1 can support twelve basic-feature workstations to a total of eighteen basic-feature workstations. NOTE The 6800 Series NMS supports the AT&T 6386 and 6286 models as basic-feature workstations. Refer to Chapter 1, Introduction, for a complete model list. The host processor supports up to three basic-feature workstations. The fourth basic-feature workstation, if it is to be used simultaneously, must be connected to the UIP. To support additional basic-feature workstations from the UIP, the optional IPC-1600 card may be required. Figure 4-10 shows this configuration. 4-14 January 1997 6800-A2-GN22-30 Connecting the Components Host Processor Basic-Feature Workstations IPC-1600 Card Network Hub Unit User Interface Processor Basic-Feature Workstations 493-13902a-01 IPC-1600 Card Figure 4-10. Basic-Feature Workstation Configurations 6800-A2-GN22-30 January 1997 4-15 COMSPHERE 6800 Series Network Management System Figure 4-11. Basic-Feature Workstation Configurations The following sections explain how to make the connections shown in Figure 4-11. Connecting a Local Altos 486DX/33, an Altos SX/20, or an AT&T 6386 SX/EL To connect an Altos 486DX/33, an Altos SX/20, or an AT&T 6386 SX/EL as a local basic-feature workstation, perform the following steps: 1. Connect the grounded end of the 035-0153-0031 cable to one of the following ports on either the host processor or the UIP: – COM1/COM2 port: use the 002-0054-0031 connector – IPC-1600: connect directly to port 2. Connect the other end of the 035-0153-0031 cable to the 002-0047-0031 connector. 3. Connect the 002-0047-0031 connector to the 9-pin serial connector on the basic feature workstation. 4-16 January 1997 6800-A2-GN22-30 Connecting the Components Connecting a Local AT&T 6286 or 6386 To connect an AT&T 6286 or 6386 as a local basic-feature workstation, perform the following steps: 1. Connect the grounded end of the 035-0153-0031 cable to one of the following ports on either the host processor or the UIP: – COM1/COM2 port: use the 002-0054-0031 connector – IPC-1600: connect directly to port 2. Connect the other end of the 035-0153-0031 cable to the 002-0052-0031 connector. 3. Connect the 002-0052-0031 connector to the 25-pin serial connector on the basic-feature workstation. Connecting a Remote Altos 486DX/33, an Altos SX/20, or an AT&T 6386 SX/EL To connect an Altos 486DX/33, an Altos SX/20, or an AT&T 6386 SX/EL at a remote location, you will need two DCE devices with the following characteristics: • Asynchronous • Full-duplex • Flow control ON • Bit rates of 1200, 2400, 4800 or 9600 bps To establish the connection, perform the following steps at the processor end: 1. At the host processor or UIP end, connect the grounded end of a 035-0153-0031 cable to an available port on the IPC-1600 card. If connecting to a COM port, use the 002-0054-0031 connector. 2. Connect the other end of the 035-0153-0031 cable to the 002-0039-0031 connector. 3. Connect the 002-0039-0031 connector to the local DCE device. 4. At the remote end, connect one end of the 035-0149-2531 cable to the remote DCE device. 5. Connect the other end of the 035-0149-2531 cable to the workstation 25-pin serial connector on the basic-feature workstation. Connecting a Remote AT&T 6286 or 6386 To connect an AT&T 6286 or 6386 at a remote location, you will need two DCE devices with the following characteristics: • Asynchronous • Full-duplex • Flow control ON • Bit rates of 1200, 2400, 4800 or 9600 bps 6800-A2-GN22-30 January 1997 4-17 COMSPHERE 6800 Series Network Management System To establish the connection, perform the following steps at the processor end: 1. At the host processor or UIP end, connect the grounded end of a 035-0153-0031 cable to an available port on the IPC-1600 card. If connecting to a COM port, use the 002-0054-0031 connector. 2. Connect the other end of the 035-0153-0031 cable to the 002-0039-0031 connector. 3. Connect the 002-0039-0031 connector to the local DCE device. 4. At the remote end, connect one end of the 835-3564-2511 cable to the remote DCE device. 5. Connect the other end of the 835-3564-2511 cable to the workstation 25-pin serial connector on the basic-feature workstation. Printers There are five model printers available for the COMSPHERE 6800 Series NMS as shown in Table 4-2. Table 4-2 NMS Printer Models Function Model System Printer Fujitsu DL5600 or DL3400/DL3600 Alert Log Printer Fujitsu DX2300 or C.ITOH C-240 Dedicated Automated Trouble Report Printer Fujitsu DX2300 or C.ITOH C-240 Chapter 3, Preparing the Printers, explained that preparing the printers for connection to the host processor involved modifying some of the default strap settings on each printer to conform to NMS requirements. If you have not done this, read Chapter 3 and follow the instructions for modifying the settings. Once you have modified the settings, you can connect the printers to the host processor. Figure 4-12 provides an overview of the different ways each printer can be connected. The following sections provide instructions for connecting each printer. 4-18 January 1997 6800-A2-GN22-30 Connecting the Components Figure 4-12. Printer Connections Connecting a Local System Printer The local system printer can be either the Fujitsu DL5600 or DL3400/DL3600. Follow the appropriate procedure below. DL3400/DL3600 The DL3400/DL3600 is a parallel printer that can only be connected to the LPT1 port on the host processor. 1. Connect the 25-pin connector of the 035-0155-0031 cable to the LPT1 parallel port on the host processor. Secure the connection with the captive screws. 2. Connect the other end of the 035-0155-0031 cable to the matching Centronics port on the DL3400. Use the spring clips to secure the connection. 6800-A2-GN22-30 January 1997 4-19 COMSPHERE 6800 Series Network Management System DL5600 The DL5600 offers both serial and parallel connections. It can be connected to any available port on the host processor. If you use the parallel port, follow the instructions shown above under DL3400/DL3600. 1. Connect the grounded end of the 035-0153-0031 cable directly to an available port on the IPC-1600 card. To use the COM port, you must first connect the 035-0153-0031 cable to the 002-0054-0031 connector. 2. Connect the other end of the 035-0153-0031 cable to the 002-0040-0031 connector. 3. Connect the 25-position end of the 002-0040-0031 connector to the RS-232 serial port on the printer. Connecting a Remote System Printer Only the DL5600 can be connected remotely. It requires connection to a serial port on the IPC-1600 card in the host processor. Two 2224CEO DDD modems are also required. To establish the connection, perform the following steps: 1. At the host processor end, connect the grounded end of the 035-0153-0031 cable to an available serial port on the IPC-1600 card. 2. Connect the other end of the 035-0153-0031 cable to the 002-0039-0031 connector. 3. Connect the 002-0039-0031 connector to the local modem. 4. Connect one 2224CEO DDD modem to the Network Channel Terminating Equipment (NCTE). Option the modem appropriately. 5. At the printer end, connect one end of the 835-5783-0011 cable to the serial port on the DL5600. 6. Connect the other end of the 835-5783-0011 cable to the remote modem. 7. Connect the modem to the NCTE. Option the modem appropriately. See Appendix A, Modem Settings, for information on optioning the 3810, 38811, 3820, or 2224CEO modems. Connecting an Alert Log Printer DX2300 The Fujitsu DX2300 can be connected to the COM1 or COM2 serial ports or to an available serial port on the IPC-1600 card in the host processor. To establish the connection, perform the following steps: 1. Connect the grounded end of the 035-0153-0031 cable to an available port on the IPC-1600 card in the host processor. Use the 002-0054-0031 connector if you are connecting to a COM port on the host processor. 4-20 January 1997 6800-A2-GN22-30 Connecting the Components 2. Connect the other end of the 035-0153-0031 cable to the 002-0040-0031 connector. 3. Connect the 002-0040-0031 connector to the RS-232 serial port on the DX2300. C-240 The C.ITOH C-240 can be connected to the COM1 or COM2 serial ports or to an available serial port on the IPC-1600 card in the host processor. Perform the following steps to connect this printer: 1. Connect the grounded end of the 035-0152-0031 cable to an available port on the IPC-1600 card in the host processor. Use the 002-0054-0031 connector if you are connecting to a COM port on the host processor. 2. Connect the other end of the 035-0153-0031 cable to the 002-0040-0031 connector. 3. Connect the 002-0040-0031 connector to the RS-232 serial port on the back of the C-240 printer. Connecting the Dedicated Automatic Trouble Report Printer The Automatic Trouble Report (ATR) feature is primarily used to send alert reports to the Paradyne technical assistance center. The dedicated ATR printer can be used locally if the customer requires a duplicate copy of alert reports. This local printer is the Fujitsu DX2300 or C.ITOH C-240. The diagram in Figure 4-12 illustrates the dedicated ATR printer connection. To set up the dedicated ATR printer, perform the following steps. 1. Connect the grounded end of the 035-0153-0031 cable to an available port on the IPC-1600 card in the host processor. 2. Connect the other end of the 035-0153-0031 cable to the 002-0039-0031 connector. 3. Connect the 002-0040-0031 connector to the serial port of the dedicated ATR printer. Refer to Appendix A, Modem Settings, for information on optioning the 3810, 38811, 3820, or 2224CEO modems. 6800-A2-GN22-30 January 1997 4-21 COMSPHERE 6800 Series Network Management System Data Communications Equipment This section explains how to connect the following data communications equipment to the host processor. • DATAPHONE II modems, DSUs, and multiplexers • COMSPHERE modems and DSUs • ACCULINK multiplexers There are two ways to connect these devices to the host processor: • To connect modems and DSUs, use the control channels on the DCP/MUXi network monitor card(s) that was installed in the host processor. • To connect multiplexers, use the serial ports on the IPC-1600 card in the host processor. The modems and DSUs connect to the system using the control channels on the DCP/MUXi network monitor cards. The Altos 5000 platform comes with a single DCP/MUXi which supports eight control channels. An optional DCP/MUXi can be added for sixteen control channel support. Each control channel can connect up to 256 control devices and each control device monitors the health and status of its own network. A control channel can be collocated with the host processor or it can be remotely located via switched or private lines. The devices that can be connected to a control channel are categorized by service class: • Analog Private Line (APL) — Individual or carrier-mounted modems connected to a control channel • Digital Data Service (DDS) — Individual or carrier-mounted DSUs connected to a control channel • Direct Distance Dialing (DDD) — Individual or carrier-mounted switched network modems connected to a control channel The ACCULINK multiplexers connect directly to the host processor via the serial ports on the IPC-1600 card. The following sections explain how to connect modems, DSUs, and ACCULINK multiplexers. Connecting Modems and DSUs The following devices all connect to the control channels on the DCP/MUXi card in the host processor: • COMSPHERE 3400/4400 Series Model 2 APL modems • COMSPHERE 3600 Series DSUs • COMSPHERE 3800 Series DDD modems • COMSPHERE 3900 Series APL modems • DATAPHONE II APL and DDD modems • DATAPHONE II DSUs 4-22 January 1997 6800-A2-GN22-30 Connecting the Components Standalone COMSPHERE devices require a hubbing device to connect to the control channels. This is explained in the following section. All of these devices can be connected to the control channels, either locally or remotely. The two sections following the description of the hubbing device explain how to connect these devices to the control channels, both locally and remotely. Using a Hubbing Device For connection to a control channel, the COMSPHERE standalone devices must be equipped with the hubbing device. The hubbing device permits multiple devices to be daisy chained together. The hubbing device is not required for carrier-mounted devices. Figure 4-13 shows an example of a control channel daisy chain. To chain together COMSPHERE standalone devices to a control channel, perform the following steps: 1. To start the daisy chain, connect the control channel to the modular jack marked CCIN/DCOUT on the hubbing device connected to the first device. 2. To extend the daisy chain to the other devices, connect the cable from the CCOUT/DCIN jack on the first hubbing device to the CCIN/DCOUT jack on the hubbing device connected to the next device. 3. Continue to daisy chain devices in this manner, as necessary. You can daisy chain up to 256 devices in a single control channel. DATAPHONE II and COMSPHERE devices can be daisy chained together on the same control channel by connecting the CC-OUT jack on the DATAPHONE II modem chain to the CCIN/DCOUT jack on the COMSPHERE hubbing device with an 035-0106-0531 cord or by connecting the CCOUT/DCIN jack on the COMSPHERE hubbing device to the CC-IN jack on the DATAPHONE II modem with an 035-0107-0531 cord. Control Channel from Host Computer CCOUT CCOUT CCIN CCIN CCIN CCOUT HUBBING DEVICE HUBBING DEVICE HUBBING DEVICE COMSPHERE DEVICE COMSPHERE DEVICE COMSPHERE DEVICE 493-13906-01 Figure 4-13. Daisy Chain 6800-A2-GN22-30 January 1997 4-23 COMSPHERE 6800 Series Network Management System Connecting Locally Figure 4-14. Local Control Channel Connections The diagram in Figure 4-14 illustrates local connections to the control channels. 4-24 January 1997 6800-A2-GN22-30 Connecting the Components Materials Required To connect COMSPHERE 3400/4400 Series Model 2 APL modems, COMSPHERE 3600 Series DSUs, COMSPHERE 3800 Series DDD modems, COMSPHERE 3900 Series APL modems, DATAPHONE II APL and DDD modems, and DATAPHONE II DSUs, you will need the following materials: • 002-0025-0031 adapter (for a modem chain beginning with a Model 2 modem) • 035-0145-5031 cable (for a modem chain beginning with a Model 2 modem or for a 4000 Series Intelligent Communications Carrier (ICC) or 3000 Series Carrier) • 035-0154-0031 cable (for a modem chain beginning with a DATAPHONE II modem) • 835-3564-2511 cable (for a modem chain beginning with a DATAPHONE II modem) • 5506-06 hubbing device for 3400 Model 2 modems • 3600-F3-300 hubbing device for 3600/3800/3900 Series devices Connection Procedures For a modem chain beginning with a COMSPHERE 3400 Series, 3600 Series, or 3800 Series devices, perform the following steps: 1. Connect the 002-0025-0031 adapter to one of the connectors on the octopus cable attached to the DCP/MUXi card in the host processor. 2. Connect the 035-0145-5031 cable to the 002-0025-0031. 3. Connect the other end of the 035-0145-5031 cable to the CCIN/DCOUT jack of the hubbing device attached to the COMSPHERE device. For a modem chain beginning with a DATAPHONE II modem, perform the following steps: 1. Connect the 835-3564-2511 cable to one of the connectors on the octopus cable attached to the DCP/MUXi card in the host processor. 2. Connect the other end of the 835-3564-2511 cable to the 035-0154-0031 cable. 3. Connect the other end of the 035-0154-0031 cable to the CC-IN jack of the DATAPHONE II modem. For either a 4000 Series ICC housing 4400 Series Model 2 modems or a 3000 Series Carrier housing 3600 Series DSUs, 3800 Series DDD modems, or 3900 Series APL modems, perform the following steps: 1. Connect the 002-0025-0031 adapter to one of the connectors on the octopus cable attached to the DCP/MUXi card in the host processor. 2. Connect the 035-0145-5031 cable to the 002-0025-0031 adapter. 3. Connect the other end of the 035-0145-5031 cable to the CCIN jack on the carrier. When connecting carriers together in a chain, use the 035-0109-0031 cable. 6800-A2-GN22-30 January 1997 4-25 COMSPHERE 6800 Series Network Management System Figure 4-15. Remote Control Channel Connections Connecting Remotely The diagram in Figure 4-15 illustrates remote connections to the control channels. Materials Required To connect COMSPHERE 3400, 3800, and 3900 Series modems and 3600 Series DSUs, DATAPHONE II APL and DDD modems, and DSUs, you will need the following materials: • An 035-0147-5031 cable (DB25 male to DB25 female) • Two DCE devices with the following characteristics: — Asynchronous — Full-duplex — Flow control ON — Bit rate of 1200 bps • An 035-0184-5031 cable (DB25 male to CC10 female) • An 035-0185-5031 cable (DB25 male to 6-position modular) 4-26 January 1997 6800-A2-GN22-30 Connecting the Components Connection Procedures To connect APL and DDD modems and DSUs remotely to the host processor, perform the following steps at the host processor end: 1. Connect the 035-0147-5031 cable to the octopus cable attached to the DCP/MUXi card in the host processor. 2. Connect the other end of the 035-0147-5031 cable to the local DCE device. Perform the following steps at the remote end when connecting to a COMSPHERE device: 1. Connect the 035-0185-5031 cable to the CCIN/DCOUT jack on the hubbing device. When connecting to a 4000 Series ICC or a 3000 Series Carrier, use the CCIN jack on the carrier. 2. Connect the other end of the 035-0185-5031 cable to the remote DCE device. Perform the following steps at the remote end when connecting to a DATAPHONE II APL or DDD modem or DSU: 1. Connect the 035-0184-5031 cable to the CC-OUT jack on the device. 2. Connect the other end of the 035-0184-5031 cable to the remote DCE device. Materials Required To connect a 4400 Series Analog Private Line modem with the Poll-Only Trib feature to the host processor, you need the following materials: • Two 035-0185-5031 cables (25-pin male to 6-pin modular) • A 4400-F1-59 871A adapter (6-pin female to 6-pin female) Connection Procedures To connect a 4400 Series APL modem with the Poll-Only Trib feature, perform the following steps: 1. Connect the 25-pin connector end of the 035-0185-5031 cable to the octopus cable attached to the DCP/MUXi card in the host processor. 2. Connect the other end of the 035-0185-5031 cable to the 871A adapter. 3. Connect the 6-pin end of the second 035-0185-5031 cable to the 871A adapter. 4. Connect the 25-pin end of the second 035-0185-5031 cable to the CC IN of the 4400 Series APL modem. Ensure that the connection from the modem with the Poll-Only Trib feature runs from the DC OUT of that modem to the CC IN of the device(s) to be polled. Set the address of any such polled device(s) one level lower than the Poll-Only tributary. Ensure that the modem using the Poll-Only Trib feature is optioned as a tributary modem. You must add the addresses of the device(s) you want to poll to the Poll-Only Trib’s DC poll list by accessing the PLIST menu from the LOCAL menu on the SDCP connected to the Poll-Only Trib. 6800-A2-GN22-30 January 1997 4-27 COMSPHERE 6800 Series Network Management System Connecting ACCULINK Multiplexers The NMS provides the following two forms of network management support for ACCULINK multiplexer products: • Alert management • Command support The alert management feature permits the NMS to report alarms and events from the multiplexers. The command feature allows the NMS to send tests and commands to the multiplexer and display the results on the host processor. Configuration Options This section explains how to connect the ACCULINK multiplexers and the 719 NETWORKER to the host processor. Three serial ports are required for multiplexer communication: • Event Port — All multiplexer network events and alarms are directed to this port. When the events and alarms enter the host processor, they are selectively filtered for display as alerts. • External Systems Port — This port permits access to the internal menus of individual multiplexers via the 6800 Series NMS’s external cut-through feature. This provides the user with a transparent interface to the menus and allows the same user interaction that is available when a terminal is directly connected to the network administration port (NAP) of a multiplexer. • Command Port — The 6800 Series NMS commands are transmitted from the host processor to the multiplexer network, and the network results are received by the 6800 Series NMS via this port. The ports can be connected either to a NAP on an ACCULINK 74x multiplexer or a channel port on a 719 NETWORKER. The port connection requirements permit five basic configurations. These are explained below. 4-28 January 1997 6800-A2-GN22-30 Connecting the Components One Local 719 NETWORKER If the configuration includes a 719 NETWORKER running ACCULINK 3.K firmware, then all three NMS ports can be connected to the NETWORKER (Figure 4-16). Earlier versions of the firmware do not support the command language and consequently must be used in conjunction with the ACCULINK 74x (see the One Local ACCULINK Multiplexer and One 719 NETWORKER section for details). Figure 4-16. Connections for 719 NETWORKER to Host Processor 6800-A2-GN22-30 January 1997 4-29 COMSPHERE 6800 Series Network Management System Two Local ACCULINK Multiplexers Each 74x multiplexer has two NAPs. Consequently, if two local 74x multiplexers are used, all three multiplexer ports can connect to any three of the four available NAPs. The NAPs are then individually configured to provide transmission compatibility. Figure 4-17 shows the connections for two local ACCULINK multiplexers. Host Processor Event Port External Systems Port 035-0153-0031 NAP Port 1 NAP Port 2 035-0153-0031 ACCULINK MUX Command Port 035-0153-0031 IPC-1600 Card NAP Port 1 NAP Port 2 ACCULINK MUX = 002-0039-0031 Connector = 002-0021-0031 Connector 493-13909-01 Figure 4-17. Connections for Two Local ACCULINK Multiplexers 4-30 January 1997 6800-A2-GN22-30 Connecting the Components One Local ACCULINK Multiplexer and One 719 NETWORKER If only one 74x multiplexer is present at the local site, a 719 NETWORKER can be used to multiplex the alert and cut-through information over a single supervisory data link (SDL). The alert and cut-through connections enter the 719 NETWORKER via channel ports. The SDL exits the 719 NETWORKER through a link and connects to one of the 74x NAPs. The second NAP is devoted to the command port. Each multiplexer port on the 74x and 719 NETWORKER must be software configured. Figure 4-18 shows the connections for one local ACCULINK multiplexer and one 719 NETWORKER. Host Processor 719 NETWORKER Event Port 035-0153-0031 Channel Link Channel External Systems Port Command Port 835-3564-0011 035-0153-0031 035-0153-0031 IPC-1600 Card NAP Port 1 NAP Port 2 ACCULINK MUX = 002-0039-0031 Connector 493-13910-02 = 002-0021-0031 Connector Figure 4-18. Connections for One Local ACCULINK Multiplexer and One 719 NETWORKER 6800-A2-GN22-30 January 1997 4-31 COMSPHERE 6800 Series Network Management System One Local ACCULINK Multiplexer For users with small networks, a single local 74x multiplexer may be sufficient. The event and command ports are directly connected to the two NAPs. Multiplexer menu access is not essential; nearly all of the functionality built into the multiplexer menu system is available through 6800 Series NMS commands. If users need to access the internal menu system of the multiplexer, they can connect a terminal to a 74x NAP. Figure 4-19 shows the connections for one local ACCULINK multiplexer. Host Processor Event Port 035-0153-0031 External Systems Port Command Port NAP Port 1 NAP Port 2 ACCULINK MUX 035-0153-0031 IPC-1600 Card = 002-0021-0031 Connector 493-13911-01 Figure 4-19. Connections for One Local ACCULINK Multiplexer Connection Procedures This section explains how to make the various connections required to implement the four configurations described above. Connecting the 74x Multiplexer to the Host Processor To connect a 74x multiplexer to the host processor, you must connect to one NAP on the 74x. A NAP can be configured as either a Supervisory NAP or an Event Datagram NAP. The Supervisory NAP connects to the external systems port on the host processor and the Event Datagram NAP connects to the command and event ports. The 6800 Series Network Management System Multiplexer Management and Configuration Guide (6800-A2-GB48) explains how to configure multiplexer ports as either a supervisory NAP or Event Datagram NAP. The following procedures explain how to connect each of these NAPs. 4-32 January 1997 6800-A2-GN22-30 Connecting the Components Connecting an External Systems Port To connect a Supervisory NAP on the 74x multiplexer to the external systems port on the host processor, you will need the following materials: • 035-0153-0031 cable • 002-0039-0031 connector To establish the connection, perform the following steps: 1. Connect the 035-0153-0031 cable to the IPC-1600 port that is configured as the external systems port. 2. Connect the other end of the 035-0153-0031 cable to a 002-0039-0031 connector. 3. Connect the 002-0039-0031 connector to the NAP on the 74x multiplexer that has been configured as the Supervisory NAP. Connecting an Event or Command Port To connect an Event Datagram NAP on the 74x multiplexer to the event or command port on the host processor, you will need the following materials: • Two 035-0153-0031 cables • Two 002-0021-0031 connectors To establish the connection, perform the following steps: 1. Connect 035-0153-0031 cables to the IPC-1600 ports that are configured as the event port and the command port. 2. Connect the other end of each 035-0153-0031 cable to the 002-0021-0031 connector. 3. Connect one 002-0021-0031 connector to the NAP on the 74x multiplexer configured as the command port. 4. Connect the other 002-0021-0031 connector to the NAP on the 74x multiplexer configured as the event port. Connecting the Current Version 719 NETWORKER The 719 NETWORKER can connect to the host processor one of two ways, depending on the version of the firmware. To determine the firmware configuration, connect a VT100 terminal to Channel 0 and power up. If the banner displays ACCULINK 3.K or higher, the NETWORKER can support all three ports. If the banner displays an earlier version number, the 719 networker cannot support the command port. In this case, a 74x multiplexer must be used with the 719 Networker. Connecting an External Systems Port To connect the 719 NETWORKER, you will need the following materials: • 035-0153-0031 cable • 002-0039-0031 connector 6800-A2-GN22-30 January 1997 4-33 COMSPHERE 6800 Series Network Management System To connect a 719 NETWORKER to the host processor, perform the following steps: 1. Connect the 035-0153-0031 cable to the IPC-1600 port that is configured as the external systems port. 2. Connect the 002-0021-0031 connector to the 035-0153-0031 cable. 3. Connect the 002-0021-0031 connector to any unused data channel port on the 719 NETWORKER. Connecting an Event or Command Port To connect an event port or command port on the 719 NETWORKER to the host processor, you will need the following materials: • Two 035-0153-0031 cables • Two 002-0021-0031 connectors To establish the connection perform the following steps: 1. Connect 035-0153-0031 to the IPC-1600 port that is configured as the event or command port. 2. Connect 002-0021-0031 to 035-0153-0031. 3. Connect the 002-0021-0031 to an unused data channel port on the 719 NETWORKER. Connecting the Earlier Version 719 NETWORKER To connect the pre-3.K version of the 719 NETWORKER, the following materials are required. • Two 035-0153-0031 cables • 002-0039-0031 connector • 002-0021-0031 connector To connect the 719 NETWORKER to the host processor, perform the following steps. 1. Connect one end of the 035-0153-0031 cable to the IPC-1600 port that is configured as the event port. 2. Connect the other end of the 035-0153-0031 cable to the 002-0021-0031 connector. 3. Connect the 002-0021-0031 connector to any unused data channel port on the 719 NETWORKER. 4. Connect one end of the other 035-0153-0031 cable to the IPC-1600 port that is configured as the external systems port. 5. Connect the other end of the 035-0153-0031 cable to a 002-0039-0031 connector. 6. Connect the 002-0039-0031 connector to an unused data channel port on the 719 NETWORKER. 4-34 January 1997 6800-A2-GN22-30 Connecting the Components To support the command port, connect the 719 NETWORKER to the 74x multiplexer as follows. Connecting the 719 NETWORKER to the 74x Multiplexer The connection between the 74x multiplexer and the 719 NETWORKER serves as the external supervisory data link (SDL) for transmitting alert and supervisory information between the network and the host processor. This is only used when a pre-3.K version of the 719 NETWORKER is used with the 74x multiplexer. To connect a 719 NETWORKER to a 74x multiplexer, you will need an 835-5783-0011 cable. To establish the connection, perform the following steps: 1. Connect one end of the 835-5783-0011 cable to an available NAP on the 74x multiplexer. 2. Connect the other end of the 835-5783-0011 cable to any unused data link on the 719 NETWORKER. External Systems This section explains how to establish cut-throughs to the following external systems: • DATAPHONE II System Controller 300/400 • DATAPHONE II 839A Dial Backup Unit • Paradyne 4400 Series Service Restoration Carrier • Paradyne 840 and 850 DCX Multiplexers • Computer systems requiring VT100 terminal emulation • SNMP Manager connected through Ethernet Figure 4-20 illustrates the above connections to the IPC-1600 card located in either the host processor or the UIP. 6800-A2-GN22-30 January 1997 4-35 COMSPHERE 6800 Series Network Management System Figure 4-20. External Systems Connections 4-36 January 1997 6800-A2-GN22-30 Connecting the Components Connecting a Local System Controller The instructions that follow apply to the DATAPHONE II System Controller as well as the ACCULINK Network Manager. To connect a local System Controller, you will need the following materials: • 035-0153-0031 cable • 002-0039-0031 connector • 002-0051-0031 connector • 035-0152-0031 cable To establish the cut-throughs, perform the following steps: 1. Connect the grounded end of the 035-0153-0031 cable to the next available port on the IPC-1600 card in the host processor or in the UIP. 2. Connect the other end of the 035-0153-0031 cable to the 002-0039-0031 connector. 3. Connect the 002-0039-0031 connector to the 002-0051-0031 connector. 4. Connect one end of the 035-0152-0031 cable to the 002-0051-0031 connector. 5. Connect the other end of the 035-0152-0031 cable to one of the user ports on the System Controller or ACCULINK Network Manager. Connecting a Remote System Controller To connect a remote System Controller or an ACCULINK Network Manager to the host processor, you will need the following materials: • 035-0153-0031 cable • 002-0039-0031 connector • Two DCE devices with the following characteristics: — Asynchronous — Full-duplex — Flow control ON — Bit rates of 1200, 2400, 4800, 9600, 19,200 bps • 002-0050-0031 connector • 035-0152-0031 cable To establish the connection, perform the following steps at the processor end: 1. Connect the grounded end of the 035-0153-0031 cable to an available port on the IPC-1600 card in the host processor or the UIP. 2. Connect the other end of the 035-0153-0031 cable to the 002-0039-0031 connector. 3. Connect the 002-0039-0031 connector to one of the local DCE devices. 6800-A2-GN22-30 January 1997 4-37 COMSPHERE 6800 Series Network Management System Perform the following steps at the remote end: 1. Connect the grounded end of the 035-0152-0031 cable to one of the user ports on the System Controller or ACCULINK Network Manager. 2. Connect the other end of the 035-0152-0031 cable to the 002-0050-0031 connector. 3. Connect the 002-0050-0031 connector to the DCE device. See Appendix A, Modem Settings, for more information on optioning 3810, 3811, 3820, or 2224CEO modems for this application. Connecting a Local Dial Backup Control Unit To connect a local 839A DBU, you will need the following materials: • 035-0153-0031 cable • 002-0039-0031 connector To establish the connection, perform the following steps: 1. Connect the grounded end of the 035-0153-0031 cable to an available port on the IPC-1600 card in the host processor or the UIP. 2. Connect the other end of the 035-0153-0031 cable to the 002-0039-0031 connector. 3. Connect the 002-0039-0031 connector to the terminal port of the 839A DBU Control Unit. Connecting a Remote Dial Backup Control Unit To connect a remote 839A DBU, you will need the following materials: • 035-0153-0031 cable • 002-0039-0031 connector • Two DCE devices with the following characteristics: — Asynchronous — Full-duplex — Flow control ON — Bit rates of 1200, 2400, 4800, and 9600 bps • 035-0151-0031 cable To connect a remote DBU, perform the following steps at the processor end: 1. Connect the grounded end of the 035-0153-0031 cable to an available port on the IPC-1600 card in the host processor or the UIP. 2. Connect the other end of the 035-0153-0031 cable to the 002-0039-0031 connector. 3. Connect the 002-0039-0031 connector to the local DCE devices. 4-38 January 1997 6800-A2-GN22-30 Connecting the Components Perform the following steps at the remote end: 1. Connect one end of the 035-0151-0031 cable to the terminal port of the 839A DBU Control Unit. 2. Connect the other end of the 035-0151-0031 cable to the DCE device. See Appendix A, Modem Settings, for more information on optioning 3810, 3811, 3820, or 2224CEO modems for this application. Connecting a Local Service Restoration Control Unit To connect a local Service Restoration Control Unit (SRCU), you will need the following materials: • 035-0153-0031 cable • 002-0039-0031 connector • 002-0032-0031 connector • 035-0152-0031 cable To establish the connection, perform the following steps: 1. Connect the grounded end of the 035-0153-0031 cable to an available port on the IPC-1600 card in the host processor or UIP. 2. Connect the other end of the 035-0153-0031 cable to the 002-0039-0031 connector. 3. Connect the 002-0039-0031 connector to the 002-0032-0031 connector. 4. Connect one end of the 035-0152-0032 cable to the 002-0032-0031 connector. 5. Connect the other end of the 035-0152-0032 cable to the TERM IN port on the SRCU. Connecting a Remote Service Restoration Control Unit To connect a remote Service Restoration Control Unit (SRCU), you will need the following materials: • 035-0153-0031 cable • 002-0039-0031 connector • Two DCE devices with the following characteristics: — Asynchronous — Full-duplex — Flow control ON — Bit rate of 9600 bps • 002-0032-0031 connector 6800-A2-GN22-30 January 1997 4-39 COMSPHERE 6800 Series Network Management System • 25-position null modem connector • 035-0152-0031 cable To establish the connection, perform the following steps at the processor end: 1. Connect the grounded end of the 035-0153-0031 cable to an available port on the IPC-1600 card in the host processor or UIP. 2. Connect the other end of the 035-0153-0031 cable to the 002-0039-0031 connector. 3. Connect the 002-0039-0031 connector to one of the local DCE devices. Perform the following steps at the remote end: 1. Connect the grounded end of the 035-0152-0031 cable to the TERM IN port on the SRCU. 2. Connect the other end of the 035-0152-0031 cable to the 002-0032-0031 connector. 3. Connect the 002-0032-0031 to the null modem connector. 4. Connect the null modem connector to the remote DCE device. See Appendix A, Modem Settings, for further information on optioning 3810, 3811, 3820, or 2224CEO modems for this application. Connecting a Local DCX Multiplexer To connect a local 840/850 DCX multiplexer, you will need the following materials: • 035-0153-0031 cable • 002-0040-0031 connector To establish the connection, perform the following steps: 1. Connect the grounded end of the 035-0153-0031 cable to an available port on the IPC-1600 card in the host processor or UIP. 2. Connect the other end of the 035-0153-0031 cable to the 002-0040-0031 connector. 3. Connect the 002-0040-0031 connector to the MIU attached to the DCX multiplexer. Connecting a Remote DCX Multiplexer To connect a remote DCX multiplexer, you will need the following materials: • 035-0153-0031 cable • 002-0039-0031 connector 4-40 January 1997 6800-A2-GN22-30 Connecting the Components • Two DCE devices with the following characteristics: — Asynchronous — Full-duplex — Flow control ON — Bit rates of 1200, 2400, 4800, 9600, 19,000 bps (the 19,000 bps rate requires the presence of a soft channel card [SC-1]) • 835-5783-0011 cable To establish the connection, perform the following steps at the processor end: 1. Connect the grounded end of the 035-0153-0031 cable to an available port on the IPC-1600 card in the host processor or UIP. 2. Connect the other end of the 035-0153-0031 cable to the 002-0039-0031 connector. 3. Connect the 002-0039-0031 connector to the local DCE. Perform the following steps at the remote end: 1. Connect one end of the 835-5783-0011 cable to the remote DCE. 2. Connect the other end of the 835-5783-0011 cable to the MIU attached to the DCX multiplexer. See Appendix A, Modem Settings, for more information on optioning 3810, 3811, 3820, or 2224CEO modems for this application. Connecting a Computer System Requiring VT100 Emulation The purpose of VT100 terminal emulation is to allow a workstation connected to the host processor or UIP to emulate the standard Digital Equipment Corporation (DEC) VT-100t terminal via a cut-through interface. Connecting Locally Since this connection depends on the device you are connecting to, you will need the following materials: • 035-0153-0031 cable • 002-0040-0031 connector • 002-0052-0031 connector To establish the connection, perform the following steps: 1. Connect the grounded end of the 035-0153-0031 cable to an available port on the IPC-1600 card in the host processor or UIP. 6800-A2-GN22-30 January 1997 4-41 COMSPHERE 6800 Series Network Management System 2. Depending on the application, connect the other end of the 035-0153-0031 cable to the 002-0040-0031 (male) or 002-0052-0031 (female) connector. 3. Connect the 002-0040-0031 or 002-0052-0031 connector to the terminal port of the computer system requiring VT100 terminal emulation. Connecting Remotely To connect a remote computer system requiring VT100 terminal emulation, you will need the following materials: • 035-0153-0031 cable • 002-0039-0031 connector • Two DCE devices with the following characteristics: — Asynchronous — Full-duplex — Flow control ON — Bit rates of 1200, 2400, 4800, 9600, 19,200 bps • 835-5783-0011 cable (depending upon the computer system you are connecting to, you may need an 835-3564-2511 cable, which is male to female, instead of the 835-5783-0011 cable, which is male to male) To establish the connection, perform the following steps at the processor end: 1. Connect the grounded end of the 035-0153-0031 cable to an available port on the IPC-1600 card in the host processor or UIP. 2. Connect the other end of the 035-0153-0031 cable to the 002-0039-0031 connector. 3. Connect the 002-0039-0031 connector to the local DCE. Perform the following steps at the remote end: 1. Connect the male end of the 835-5783-0011 or the 835-3564-2511 cable to the remote DCE. 2. Connect the male end of the 835-5783-0011 or the female end of the 835-3564-2511 cable to the terminal port of the computer system requiring VT100 terminal emulation. 4-42 January 1997 6800-A2-GN22-30 Connecting the Components Netview/PC Alerts can be exported to the NetView PC. If this option is chosen, your system cannot be configured with an alert log printer. The diagram in Figure 4-21 illustrates the connection. You can connect a NetView/PC either locally or remotely. The following sections explain. Connecting Locally To connect to a local NetView/PC, you will need the following materials: • 035-0153-0031 cable • 002-0052-0031 connector To establish the connection, perform the following steps: 1. Connect the grounded end of the 035-0153-0031 cable to an available port on the IPC-1600 card in the host processor. 2. Connect the other end of the 035-0153-0031 cable to the 002-0052-0031 connector. 3. Connect the 002-0052-0031 connector to the serial port on the NetView/PC. Figure 4-21. Netview/PC Connection 6800-A2-GN22-30 January 1997 4-43 COMSPHERE 6800 Series Network Management System Connecting Remotely To connect a remote NetView/PC to the host processor, you will need the following materials: • 035-0153-0031 cable • 002-0039-0031 connector • Two DCE devices with the following characteristics: — Asynchronous — Full-duplex — Flow control ON — Bit rates of 1200, 2400, 4800, 9600 bps • 835-3564-2511 cable To establish the connection, perform the following steps at the host processor end: 1. Connect the grounded end of a 035-0153-0031 cable to an available port on the IPC-1600 card in the host processor. 2. Connect the other end of the 035-0153-0031 cable to the 002-0039-0031 connector. 3. Connect the 002-0039-0031 connector to the local DCE device. Perform the following steps at the remote end: 1. Connect one end of the 835-3564-2511 cable to the serial port on the NetView/PC. 2. Connect the other end of the 835-3564-2511 cable to the remote DCE devices. 4-44 January 1997 6800-A2-GN22-30 Connecting the Components Automatic Trouble Report Feature The Automatic Trouble Report (ATR) feature provides a remote printer at the Paradyne technical assistance center to print user-defined alert reports. The customer is responsible for connecting a 2224CEO or 3810 modem to the ATR port. The diagram in Figure 4-22 illustrates the ATR connection. To connect the ATR to the host processor, you will need the following items. • 2224CEO or 3810 dial modem • 035-0153-0031 cable • 002-0039-0031 connector Perform the following steps: 1. Connect the grounded end of the 035-0153-0031 cable to an available port on the IPC-1600 card in the host processor. 2. Connect the other end of the 035-0153-0031 cable to the 002-0039-0031 connector. 3. Connect the 002-0039-0031 connector to the 2224CEO or 3810 modem. 4. Connect the 2224CEO or 3810 modem to the Network Channel Terminating Equipment (NCTE). Refer to Appendix A, Modem Settings, for information on optioning 3810, 3811, 3820, or 2224CEO modems for this application. Figure 4-22. ATR Connection 6800-A2-GN22-30 January 1997 4-45 COMSPHERE 6800 Series Network Management System ACCUMASTER Integrator You can connect the ACCUMASTER Integrator either locally or remotely. Figures 4-23 and 4-24 illustrate the connections. The following explains. Connecting Locally To connect a local ACCUMASTER Integrator (Figure 4-23) to the host processor, you will need the following materials: • Three 035-0153-0031 cables • Three 002-0040-0031 connectors Figure 4-23. ACCUMASTER Integrator Local Connection via UAI and File Export 4-46 January 1997 6800-A2-GN22-30 Connecting the Components To establish the file export connection that will provide device profile, site profile and facility profile information, perform the following steps: 1. Connect the grounded end of the 035-0153-0031 cable to the IPC-1600 port that is configured for file export. 2. Connect the other end of the 035-0153-0031 cable to the 002-0040-0031 connector. 3. Connect the 002-0040-0031 connector to the appropriate port on the ACCUMASTER Integrator. To establish the UAI connection that will transmit alarms, perform the following steps: 1. Connect the grounded end of the 035-0153-0031 cable to the IPC-1600 port that is configured for UAI. 2. Connect the other end of the 035-0153-0031 cable to the 002-0040-0031 connector. 3. Connect the 002-0040-0031 connector to the appropriate port on the ACCUMASTER Integrator. To establish the ACCUMASTER cut-through connection that is used by the Integrator operator to cut through to the 6800 Series NMS, perform the following steps: 1. Connect the grounded end of the 035-0153-0031 cable to the IPC-1600 port that is configured as a remote terminal. 2. Connect the other end of the 035-0153-0031 cable to the 002-0040-0031 connector. 3. Connect the 002-0040-0031 connector to the appropriate port on the ACCUMASTER Integrator. 6800-A2-GN22-30 January 1997 4-47 COMSPHERE 6800 Series Network Management System Connecting Remotely To connect a remote ACCUMASTER Integrator (Figure 4-24) to the host processor, you will need the following materials: • Three 035-0153-0031 cables • Three 002-0039-0031 connectors • Two DCE devices with the following characteristics: — Asynchronous — Full-duplex — Flow control ON — Bit rates of 1200, 2400, 4800, 9600 bps • Three 835-5783-0011 cables Figure 4-24. ACCUMASTER Integrator Remote Connection 4-48 January 1997 6800-A2-GN22-30 Connecting the Components To establish the file export connection, perform the following steps at the host processor end: 1. Connect the grounded end of the 035-0153-0031 cable to the IPC-1600 port that is configured for file export. 2. Connect the other end of the 035-0153-0031 cable to the 002-0039-031 connector. 3. Connect the 002-0039-0031 connector to the local DCE device. To establish the UAI connection, perform the following steps at the host processor end: 1. Connect the grounded end of the 035-0153-0031 cable to the IPC-1600 port that is configured for the UAI. 2. Connect the other end of the 035-0153-0031 cable to the 002-0039-031 connector. 3. Connect the 002-0039-0031 connector to the local DCE device. To establish the ACCUMASTER cut-through connection, perform the following steps at the host processor end. 1. Connect the grounded end of the 035-0153-0031 cable to the IPC-1600 port that is configured for remote terminal. 2. Connect the other end of the 035-0153-0031 cable to the 002-0039-031 connector. 3. Connect the 002-0039-0031 connector to the local DCE device. Perform the following steps to connect the three remote DCE devices to the ACCUMASTER Integrator. 1. Connect one end of the 835-5783-0011 cable to the appropriate port of the ACCUMASTER Integrator. 2. Connect the 835-5783-0011 cable to the remote DCE device. 6800-A2-GN22-30 January 1997 4-49 COMSPHERE 6800 Series Network Management System Analysis Network Management System This section explains how to connect the Paradyne ANALYSIS Network Management System to the host processor. This feature is only supported on the Altos 5000 platform. An IPC-900 card installed in the host processor provides the cut-through access to the ANALYSIS NMS. This is a dedicated IPC-900 card that is installed solely for ANALYSIS purposes. It has eight user-configurable ports. Port 1 is used to connect to the first ANALYSIS NMS. This port will handle alerts, cut-throughs, printer assignments and upload of device information. The other seven ports on the IPC card are available for connection to up to five other ANALYSIS Network Management Systems. You can connect the ANALYSIS NMS either locally or remotely. The following sections explain. NOTE The port configuration on the ANALYSIS NMS must also be defined. This is done on the ANALYSIS NMS and is not discussed in this document. For more information, see the ANALYSIS 6510 Automated Network Management System Reference Manual. The ANALYSIS software must be Version 6.1. In addition, the NMS software must be activated and the ANALYSIS NMS must be configured into the system. Instructions for both these tasks can be found in Chapter 5, Loading and Restoring Software. Connecting Locally To connect a local ANALYSIS NMS to the host processor, you will need the following materials: • 035-0153-0031 cable • 002-0040-0031 connector (for ANALYSIS 6510/5605) • A 002-0053-0031 connector (for ANALYSIS 5600) Figure 4-25 illustrates a local connection for both the ANALYSIS 6510/5605 and ANALYSIS 5600 NMS. The following sections explain how to connect both systems locally. 4-50 January 1997 6800-A2-GN22-30 Connecting the Components Figure 4-25. ANALYSIS 6510/5605 AND 5600 Local Connection Connecting the ANALYSIS 6510/5605 To connect a local ANALYSIS 6510/5605 to the host processor, perform the following steps: 1. Connect the grounded end of the 035-0153-0031 cable to a port on the IPC-900 card. 2. Connect the other end of the 035-0153-0031 cable to the 002-0040-0031 connector. 3. Connect the 002-0040-0031 connector to Port 1 on the ANALYSIS 6510/5605. Connecting the ANALYSIS 5600 To connect a local ANALYSIS 5600 to the host processor, perform the following steps: 1. Connect the grounded end of the 035-0153-0031 cable to a port on the IPC-900 card. 2. Connect the other end of the 035-0153-0031 cable to the 002-0053-0031 connector. 3. Connect the 002-0053-0031 connector to Port 1 on the ANALYSIS 5600. 6800-A2-GN22-30 January 1997 4-51 COMSPHERE 6800 Series Network Management System Connecting Remotely To connect a remote ANALYSIS NMS to the host processor, you will need the following materials: • 035-0153-0031 cable • 002-0039-0031 connector • Two DCE devices with the following characteristics: — Asynchronous transmission — Full-duplex operation — Flow control ON — Bit rates of 1200, 2400, 4800, or 9600 bps • 835-5783-0011 cable (for ANALYSIS 6510/5605) • 835-4613-2511 cable and 002-0019-0031 connector (for ANALYSIS 5600) Figure 4-26 illustrates a remote connection for both the ANALYSIS 6510/5605 and ANALYSIS 5600 NMS. The following sections explain how to connect both systems remotely. Figure 4-26. ANALYSIS 6510/5605 and 5600 Remote Connection 4-52 January 1997 6800-A2-GN22-30 Connecting the Components Connecting the ANALYSIS 6510/5605 To connect a remote ANALYSIS 6510/5605 to the host processor, perform the following steps at the remote end: 1. Connect one end of the 835-5783-0011 cable to Port 1 on the ANALYSIS 6510/5605. 2. Connect the other end of the 835-5783-0011 cable to the DCE device. Perform the following steps at the host computer end: 1. Connect the gronded end of the 035-0153-0031 cable to a port on the IPC-900 card dedicated for ANALYSIS use. 2. Connect the other end of the 035-0153-0031 cable to the 002-0039-0031 connector. 3. Connect the 002-0039-0031 connector to the DCE device. Connecting the ANALYSIS 5600 To connect a remote ANALYSIS 5600 to the host processor, perform the following steps at the remote end: 1. Connect the 002-0019-0031 connector to Port 1 on the ANALYSIS 5600. 2. Connect the end of the 835-4613-2511 cable marked Terminal to the 002-0019-0031 connector. 3. Connect the end of the 835-4613-2511 cable marked Controller to the DCE device. Perform the following steps at the host processor end: 1. Connect the grounded end of the 035-0153-0031 cable to a port on the IPC-900 card. 2. Connect the other end of the 035-0153-0031 cable to the 002-0039-0031 connector. 3. Connect the 002-0039-0031 connector to the DCE device. 6800-A2-GN22-30 January 1997 4-53 COMSPHERE 6800 Series Network Management System StarKeeper Network Management System This section explains how to connect the StarKeeper NMS to the host processor for cut-through operation. Figure 4-27 illustrates a local connection for the StarKeeper NMS. You can connect the StarKeeper NMS either locally or remotely. Connecting Locally To connect a local StarKeeper NMS to the host processor, you will need the following materials: • 035-0153-0031 cable • 002-0039-0031 connector • 002-0051-0031 connector • 035-0152-0031 cable Figure 4-27. StarKeeper Connection 4-54 January 1997 6800-A2-GN22-30 Connecting the Components To establish the connection, perform the following steps: 1. Connect the grounded end of the 035-0153-0031 cable to an available port on the IPC-1600 card in the host processor. 2. Connect the other end of the 035-0153-0031 cable to the 002-0039-0031 connector. 3. Connect the 002-0039-0031 connector to the 002-0051-0031 connector. 4. Connect one end of the 035-0152-0031 cable to the 002-0051-0031 connector. 5. Connect the other end of the 035-0152-0031 cable to the terminal port on the StarKeeper. Connecting Remotely To connect a remote StarKeeper NMS to the host processor, you will need the following materials: • Two 035-0153-0031 cables • Two 002-0039-0031 connectors • Two DCE devices with the following characteristics: — Asynchronous — Full-duplex — Flow control ON — Bit rates of 1200, 2400, 4800, 9600 bps • Two 002-0050-0031 connectors • Two 035-0152-0031 cables To establish the connection, perform the following steps at the host processor end: 1. Connect the grounded end of te 035-0153-0031 cable to an available port on the IPC-1600 card in the host processor. 2. Connect the other end of the 035-0153-0031 cable to the 002-0039-031 connector. 3. Connect the 002-0039-0031 connector to the local DCE devices. Perform the following steps at the remote end: 1. Connect one end of the 035-0152-0031 cable to the terminal port of the StarKeeper. 2. Connect the other end of the 035-0152-0031 cable to the 002-0050-0031 connector. 3. Connect the 002-0050-0031 connector to the remote DCE devices. 6800-A2-GN22-30 January 1997 4-55 COMSPHERE 6800 Series Network Management System Bytex UMS This section explains how to connect the Bytex UMS to the NMS host processor or the User Interface Processor (UIP). The UIP connection is restricted to cut-through only. To connect the Bytex Switch to the host processor or UIP, you will need the following materials: • 035-0153-0031 10-pin modular to 10-pin modular cable • 002-0039-0031 ACU/MODEM adapter Figure 4-28 illustrates the connection for both the host processor and UIP to the Bytex UMS for either the Bytex alerts or cut-through. Connecting the Host Processor to the Bytex UMS To connect a host processor to the Bytex UMS, perform the following steps: 1. Connect the grounded end of the 035-0153-0031 cable to a port on the IPC-1600 card. 2. Connect the other end of the 035-0153-0031 cable to the 002-0039-0031 ACU/MODEM adapter. 3. Connect the 002-0039-0031 ACU/MODEM adapter to a port on the Bytex UMS. Figure 4-28. Bytex UMS Connection 4-56 January 1997 6800-A2-GN22-30 Connecting the Components Connecting the UIP to the Bytex UMS To connect a UIP to the Bytex UMS, perform the following steps: 1. Connect the grounded end of the 035-0153-0031 cable to a port on the IPC-1600 card. 2. Connect the other end of the 035-0153-0031 cable to the 002-0039-0031 ACU/MODEM adapter. 3. Connect the 002-0039-0031 ACU/MODEM adapter to a port on the Bytex UMS. NOTE The connection to the UIP must be used only for cut-through. 6800-A2-GN22-30 January 1997 4-57 Loading and Restoring Software Overview . . . . . . . . . . . . . . . . . . . . . . . . . . . . . . . . . . . . . . . . . . . . . . . . . . . . Order of Installation . . . . . . . . . . . . . . . . . . . . . . . . . . . . . . . . . . . . . . . . . Network Preinstallation Preparation . . . . . . . . . . . . . . . . . . . . . . . . . . . . . . . . Base Network Configuration . . . . . . . . . . . . . . . . . . . . . . . . . . . . . . . . . . . Customized Network Configuration . . . . . . . . . . . . . . . . . . . . . . . . . . . . . Inserting the Software Media . . . . . . . . . . . . . . . . . . . . . . . . . . . . . . . . . . . . . UNIX Software for the Host Processor . . . . . . . . . . . . . . . . . . . . . . . . . . . . . Installing the MPX Software on the Altos 15000 . . . . . . . . . . . . . . . . . . . . . . Release 4.2 NMS Software . . . . . . . . . . . . . . . . . . . . . . . . . . . . . . . . . . . . . . . Installing the NMS Software . . . . . . . . . . . . . . . . . . . . . . . . . . . . . . . . . . . Formatting the Third Hard Disk . . . . . . . . . . . . . . . . . . . . . . . . . . . . . . . . Initializing the NMS Database . . . . . . . . . . . . . . . . . . . . . . . . . . . . . . . . . Network Configuration of NMS Host . . . . . . . . . . . . . . . . . . . . . . . . . . . . Installing Token Ring Software on the NMS Host/UIP . . . . . . . . . . . . . . Configuring the Token Ring Network on the 5000 Host/UIP . . . . . . . . . . UNIX Software for the UIP . . . . . . . . . . . . . . . . . . . . . . . . . . . . . . . . . . . . . . UIP Software . . . . . . . . . . . . . . . . . . . . . . . . . . . . . . . . . . . . . . . . . . . . . . . . . Network Configuration of NMS UIP . . . . . . . . . . . . . . . . . . . . . . . . . . . . Installing Token Ring Software on the UIP . . . . . . . . . . . . . . . . . . . . . . . . Configuring the Token Ring Network on the UIP . . . . . . . . . . . . . . . . . . . Full-Feature Workstation Software . . . . . . . . . . . . . . . . . . . . . . . . . . . . . . . . . Installing MS-DOS . . . . . . . . . . . . . . . . . . . . . . . . . . . . . . . . . . . . . . . . . . Installing the GrafPoint X-One Software Package with EtherLink II Card . . . . . . . . . . . . . . . . . . . . . . . . . . . . . . . . . . . . . . . . . . Installing the NMS Full-Feature Workstation Application Software with EtherLink II Card . . . . . . . . . . . . . . . . . . . . . . . . . . . . . . Installing GrafPoint X-One Software Package with a StarLAN 10 NAU Installing the NMS Full-Feature Workstation Application Software with StarLAN 10 NAU . . . . . . . . . . . . . . . . . . . . . . . . . . . . . . Installing the Token Ring Software on the Full-Feature Workstation . . . . Network Configuration of Full-Feature Workstation . . . . . . . . . . . . . . . . Configuring Full-Feature Workstation with a Router Network . . . . . . . . . Installing Full-Feature Workstation Software on a Sun Workstation . . . . . . . . . . . . . . . . . . . . . . . . . . . . . . . . . . . . . . . . . . . . . . . Generic X-Terminal . . . . . . . . . . . . . . . . . . . . . . . . . . . . . . . . . . . . . . . . . . Basic-Feature Workstation Software . . . . . . . . . . . . . . . . . . . . . . . . . . . . . . . Installing MS-DOS . . . . . . . . . . . . . . . . . . . . . . . . . . . . . . . . . . . . . . . . . . Installing Microsoft Windows . . . . . . . . . . . . . . . . . . . . . . . . . . . . . . . . . . Installing NMW Software . . . . . . . . . . . . . . . . . . . . . . . . . . . . . . . . . . . . . Installing the ANALYSIS Gateway Option (5000 Systems Only) . . . . . . . . . Installation . . . . . . . . . . . . . . . . . . . . . . . . . . . . . . . . . . . . . . . . . . . . . . . . . Configuration . . . . . . . . . . . . . . . . . . . . . . . . . . . . . . . . . . . . . . . . . . . . . . . Adding a 6510 to the 6800 Series NMS . . . . . . . . . . . . . . . . . . . . . . . . Changing 6510 Parameters . . . . . . . . . . . . . . . . . . . . . . . . . . . . . . . . . Removing a 6510 Configuration . . . . . . . . . . . . . . . . . . . . . . . . . . . . . Setting Data Rates . . . . . . . . . . . . . . . . . . . . . . . . . . . . . . . . . . . . . . . . . . . 6800-A2-GN22-30 January 1997 5 5-2 5-3 5-4 5-4 5-5 5-6 5-6 5-19 5-21 5-21 5-26 5-28 5-30 5-35 5-36 5-41 5-40 5-54 5-58 5-58 5-59 5-60 5-60 5-68 5-70 5-76 5-78 5-82 5-83 5-85 5-86 5-86 5-87 5-88 5-88 5-90 5-90 5-93 5-95 5-97 5-99 5-100 5-1 COMSPHERE 6800 Series Network Management System Overview This chapter describes how and when to install the required software for the host processor, User Interface Processor (UIP), full-feature workstations and basic-feature workstations. 6800 NMS Application Software This package is installed in the host processor during system manufacture for the Altos 5000 platform. Installation of this software on the 15000 platform must be done at the customer site. Additionally, you may also need to reload the application software to recover from a hard disk failure, or when upgrading to a different release. MPX Multiprocessing Software This software is installed on the Altos 15000 host processor to support the multiple 486 processors and must be done at the customer site for both new and existing 15000 platforms. You may need to reload this software when recovering from a hard disk failure. 6800 UIP Application Software This software is loaded on the User Interface Processor (UIP) during system manufacture. You will need to reload and reconfigure it when you are adding the optional IPC-1600 card to the UIP. You may also need to reload this software to recover from a hard disk failure, or when upgrading to a different release. PTF Software This software is loaded at the customer site. It includes PTF 4.2.1 which provides an update for existing NMS and UIP applications and ACCULINK Network Manager (ANM) 4.3.0 which provides ACCULINK multiplexer support. First load the NMS/UIP Application and then follow the installation instructions in the respective software abstracts to load these two PTFs. Full-Feature Workstation Software This software is loaded at the time of manufacture for workstations supplied by Paradyne. You will need to load this software into any system (i.e., a Release 2 host) you are converting into a full-feature workstation. The NMS supports three types of workstations: Sun, 386/486 processors, or any generic X-terminal which can run the X11 R4 windowing software. You also need to reload the full-feature workstation software to recover from a hard disk failure, or when upgrading software, such as changing X-DOS software to X-One software. Basic-Feature Workstation Software This software is loaded at the time of manufacture. You may need to reload it to recover from a hard disk failure or when upgrading software. 5-2 January 1997 6800-A2-GN22-30 Loading and Restoring Software Order of Installation The order of software package installation is important. The typical NMS installation is an upgrade from a pre-existing 6800 Series NMS. To properly install the NMS on the host processor for a site already running a previous release of the NMS, follow the order of general steps defined below: 1. Backup the existing database. 2. Load the seven volume set of 6800 NMS Application software (Release 4.2). 3. Load the PTF base software (Release 4.2.1). 4. Optionally, load any required peripheral software packages for the Altos 5000 platform. • ANALYSIS Gateway Option • 3270 Terminal Emulation • Token Ring Option 5. Run the migration procedure using the backed up existing database. 6. Backup the new migrated database. 7. Load the ACCULINK Network Manager Application software (Release 4.3.0). 8. Restore the migrated database. First-time installation order is simpler. To properly install th NMS on the host processor for the first time, follow the order of general steps defined below: 1. Load the seven volume set of 6800 NMS Application software (Release 4.2). 2. Load the PTF base software (Release 4.2.1). 3. Optionally, load any required peripheral software packages for the Altos 5000 platform. • ANALYSIS Gateway Option • 3270 Terminal Emulation • Token Ring Option 4. Load the ACCULINK Network Manager Application software (Release 4.3.0). 6800-A2-GN22-30 January 1997 5-3 COMSPHERE 6800 Series Network Management System Network Preinstallation Preparation The NMS host processor, user interface processor (UIP), and full-feature workstations communicate over a local area network which requires some consideration and preparation prior to installing the various NMS software packages. Each processor must have, in addition to the TCP/IP software, both a node name and an inter-processor (IP) address assigned to it. Also, each processor must know the node names and IP addresses of the other processors with which it must communicate. The names and IP addresses are stored in a “hosts” file on each processor. On the 5000 platform, there are two methods of configuring the local area network, basic and custom. The basic method provides a simple, predefined set of node names and IP addresses which match the addresses established when the processors are put together at the factory. The custom configuration method allows the individual installing the NMS to set his/her own node names and IP addresses according to the standards of the particular site. On the 15000 platform, the custom method of installation is required. Basic Network Configuration For the 5000 platform, the 6800 NMS software is distributed with a basic network configuration which is intended for those users who have a configuration of host, UIP, and/or full-feature workstations which were configured at the factory and do not have a pre-existing local area network to which the NMS will be connected. The basic network configuration uses the default parameters indicated in Table 5-1. If the NMS software including TCP/IP is being installed on site, the network configuration parameters must be entered by the installer. To facilitate the network configuration of the processors, the 6800 NMS software comes with pre-configured files that can be copied into the “hosts” file for the NMS host processor, UIP, and full-feature workstations. These files contain the default parameters. At the end of the installation of the NMS software the user simply copies the supplied files to the proper “hosts” file to utilize the basic configuration. Table 5-1 Altos 5000 Basic Network Configuration Parameters IP Address Processer 5-4 Node Name 6800 NMS host processor 1.1.1.1 unix 6800 UIP 1.1.1.2 uip-1 1st full-feature workstation 1.1.1.3 ws1 2nd full-feature workstation 1.1.1.4 ws2 3rd full-feature workstation 1.1.1.5 ws3 4th full-feature workstation 1.1.1.6 ws4 January 1997 6800-A2-GN22-30 Loading and Restoring Software Customized Network Configuration Where the NMS will be installed at a site with an existing local area network, the Network Administrator there may require that the NMS node names and IP addresses follow the standards of that site. This custom installation is also required for the Altos 15000. If the NMS has not been factory installed, the node names and IP addresses can be set during the normal NMS installation procedures. For processors where the NMS software has been factory installed, the host and UIP processors can be modified using netconfig, a program designed for just this purpose. On full-feature workstations the GrafPoint X-One software must be reinstalled following the instructions in this chapter and setting the IP address at the proper point in the installation process. For the 15000 platform, the IP address and node names must be entered via one custom method. If one existing local area network is not a constraint, the values in Table 5-2 should be entered. Table 5-2 Altos 15000 Basic Network Configuration Parameters IP Address Processer 6800 NMS host processor 1.1.1.1 unix 6800 UIP 1 1.1.1.2 uip-1 6800 UIP 2 1.1.1.3 uip-2 1st full-feature workstation 1.1.1.4 ws1 2nd full-feature workstation 1.1.1.5 ws2 . . . 24th full-feature workstation 6800-A2-GN22-30 Node Name . . . 1.1.1.27 January 1997 . . . ws24 5-5 COMSPHERE 6800 Series Network Management System Figure 5-1. Cartridge Tape Drive Inserting the Software Media The host processor and UIP have both a cartridge tape drive and floppy disk drive. The cartridge tape drive is shown in Figure 5-1. UNIX Software for the Host Processor To install the UNIX Operating System on the host computer’s hard disk, you need the following software: • A floppy disk labeled 6800 NMS Application Volume 1 • A floppy disk labeled 6800 NMS Application Volume 2 • A cartridge tape labeled 6800 NMS Application Volume 3 • A floppy disk labeled 6800 NMS Application Volume 4 • A cartridge tape labeled 6800 NMS Application Volume 5 WARNING When reloading the software on a system that was previously active, you must backup the databases. Loading UNIX software destroys all user data on the hard disk. Refer to the COMSPHERE 6800 Series Network Management System User’s/System Administrator’s Guide for information on backing up the databases. 5-6 January 1997 6800-A2-GN22-30 Loading and Restoring Software NOTE If the system fails to respond to keystrokes at any point during the installation procedure, it is necessary to power down the processor, wait approximately 60 seconds, power up the processor, and resume the installation at the point you left off. When you have these items, perform the following steps: 1. Insert the Volume 1 diskette in the floppy disk drive. Turn on the processor and make sure the RESET key is in the RUN position. The processor begins the boot process and runs through its internal memory checks. When booting a System 15000, several status messages appear, ending with a BOOT: prompt. Proceed to Step 4. When booting a System 5000, the following message appears: Press space bar to interrupt autoboot NOTE If an error message about memory appears, ignore it and continue the procedure. 2. PRESS: the spacebar immediately and the menu in Figure 5-2 appears: NOTE If this menu does not appear, you missed the time-out window. You will need to restart the procedure. Select Select Select Select [1] [2] [3] [4] to to to to boot from Hard Disk boot from Floppy boot from Tape enter BIOS setup Enter Option: 492-13954 Figure 5-2. System 5000 Boot Menu (Installing UNIX on Host Computer) 6800-A2-GN22-30 January 1997 5-7 COMSPHERE 6800 Series Network Management System 3. TYPE: 2 (no Enter necessary) Several status messages appear, followed by the prompt: Boot : 4. To begin the automatic boot process, PRESS: Enter Several status messages appear followed by: Insert Volume 2 Floppy and Volume 3 Cartridge Tape and press <Return> 5. Remove the Volume 1 floppy and insert the required floppy and tape, then PRESS: Enter Several status messages appear, followed by the menu in Figure 5-3: This is a completely automated installation procedure. The following options are available: 1. Install the Operating System 2. Exit Installation Please enter your choice [1-2]: 494-13955-01 Figure 5-3. Installation Procedure Menu (Installing UNIX on Host Computer) 5-8 January 1997 6800-A2-GN22-30 Loading and Restoring Software Please specify Hardware Configuration: 1. Hardware configuration I (Single hard disk - UIP) 2. Hardware configuration II (Two or more hard disks - NMS HOST) 3. Exit Installation Please enter your choice [1-3]: 494-13956-02 Figure 5-4. Hardware Configuration Menu (Installing UNIX on Host Computer) 6. To proceed, TYPE: 1 PRESS: Enter The menu in Figure 5-4 appears (on a 5000 platform, Item 2. reads as follows: Hardware Configuration II (two hard disks — NMS Host): 7. For the host computer, TYPE: 2 PRESS: Enter If you are loading an Altos System 15000, the system prompts: Enter the SCSI Host Adapter number of the hard disk [0–1] or type \‘q’ to quit: TYPE: 0 PRESS: Enter On both 5000 and 15000 platforms, the system sets the operating system environment, configures the hard disk, creates a UNIX partition, and divides the partition into file systems and swap space. These processes take about fifteen minutes. When this is complete, the following message appears: Altos UNIX System V Operating System Serialization When prompted, use the seral number and activation key included with the Altos System V Operating System distribution Enter your serial number or enter q to quit: TYPE: the UNIX serial number (found on the Serial Number card attached to the Release Notes) PRESS: Enter 6800-A2-GN22-30 January 1997 5-9 COMSPHERE 6800 Series Network Management System 8. The following message appears: Enter your activation key or enter q to quit: TYPE: the UNIX activation key (found on the Serial Number card attached to the Release Notes) PRESS: Enter NOTE If either the serial number or activation key is entered incorrectly, the system will prompt you again for the information. If you quit at either of these steps, you will have to start the installation process from the beginning. Once the correct serial number and activation key are entered, the system completes the base UNIX installation and displays the following message: Choose Password You can choose whether you pick a password, or have the system create one for you. 1. Pick a password 2. Pronounceable password will be generated for you Enter choice (default is 1): TYPE: 1 PRESS: Enter 9. The system prompts: New password: TYPE: your chosen password PRESS: Enter 10. The system prompts: Re-enter new password: TYPE: your chosen password again PRESS: Enter 5-10 January 1997 6800-A2-GN22-30 Loading and Restoring Software The system will display several status messages followed by: Installation and configuration of the Altos/SCO UNIX System V Operating System is now complete. Remove the Filesystem (Volume 2) floppy and the Cartridge tape (Volume 3) AFTER the system is shutdown, and press <Return> to restart the system. ** Safe to Power Off ** -or ** Press Any Key to Reboot ** CAUTION Do not remove the boot floppy or tape until the Press Any Key to Reboot prompt is displayed. 11. Remove both the floppy disk and the cartridge tape. PRESS: any key to reboot the system. The system auto-boots; on a System 5000, do not press the spacebar to interrupt auto-boot. The following prompt appears: Boot : PRESS: Enter INIT: SINGLE USER MODE Type CONTROL-d to proceed with normal startup, (or give root password for system maintenance): NOTE You have approximately 10 seconds to type the root password and press the Enter key to select system maintenance. Failure to do so within the 10-second window will load to normal start-up. If this occurs, a reboot is necessary. 12. To go into the system maintenance mode: TYPE: root password PRESS: Enter 13. Insert the 6800 NMS Application Volume 4 floppy disk and 6800 NMS Application Volume 5 cartridge tape. 14. At the # prompt, TYPE: installpkg PRESS: Enter 6800-A2-GN22-30 January 1997 5-11 COMSPHERE 6800 Series Network Management System The system prompts for the tape and floppy and asks: Strike ENTER when ready or ESC to stop PRESS: Enter 15. After the disk and tape are read, the following message appears: Done reading tape... 16. The system continues: TCP/IP Runtime Serialization Enter your serial number or enter q to quit: CAUTION The serial number and activation key entered must be unique across all TCP/IP nodes on the network to which the host is connected. The TCP/IP daemon will shut down for both nodes having equal serial number or activation keys. TYPE: serial number from distribution package PRESS: Enter The system prompts: Enter your activation key or enter q to quit TYPE: activation key PRESS: Enter Several status messages appear and the system then prompts: Enter the system node name or enter return to use [unix]: NOTE If you plan to use the default network configuration, you must enter unix as the system node name and 1.1.1.1 as the internet address. PRESS: Enter to accept the default node name, or TYPE: system node name PRESS: Enter The following messages appear: TCP/IP Configuration Complete. Altos TCP/IP Runtime installation complete. The system displays the currently configured chains and then the following menu: 5-12 January 1997 6800-A2-GN22-30 Loading and Restoring Software Available options: 1. Add a chain 2. Remove a chain 3. Reconfigure an element in a chain q. Quit Select option: TYPE: 1 PRESS: Enter The system displays the top-level chain descriptions and prompt: Select top level of chain to Add or q to quit: TYPE: 1 (for altos\Mtcp) PRESS: Enter The system prompts: Select next level of chain to Add or q to quit: TYPE: n PRESS: Enter Where: n is 5 on Altos 5000 platform 6 on Altos 15000 platform The system prompts for confirmation: Add chain altos_tcp -> aaa (y/n): TYPE: y PRESS: Enter Where: aaa is en0 on Altos 5000 platform enc00 on Altos 15000 platform The following messages appear: Adding altos_tcp -> aaa Enable aaa driver If you are installing an Altos 5000 host, go to Step 19. Otherwise, the following messages appear: ALTOS ETHERNET CHANNEL ADAPTER SETUP This utility is used to setup the ECA board device driver. You may install or display the driver configuration. To install the ECA driver or change the driver configuration, there are several parameters that you must supply. These are listed as follows: a. The number of ECA boards installed in the system b. The EISA slot number of each ECA board c. The Interrupt Number (IRQ), shared among all ECA boards 6800-A2-GN22-30 January 1997 5-13 COMSPHERE 6800 Series Network Management System Before you continue you should make sure that your boards are correctly configured for the settings you are choosing. If you wish to go back and reconfigure your boards (using the EISA Configuration Utility Diskette) or read the ECA documentation, answer “n” to the next question. Do you want to continue? (y/n) TYPE: y PRESS: Enter 17. The following menu appears: ALTOS ETHERNET CHANNEL ADAPTER SETUP 1. Install the ECA driver 2. Disable th ECA driver 3. Change current ECA configuration 4. Display current ECA configuration q. Quit Enter Selection: TYPE: 4 PRESS: Enter 18. The following message appears: Current ECA driver configuration: Total ECA boards configured: 1 Board Slot IRQ I/OAddrRange 0 1 6 – 10 – 6c80\N6caf – Interface enc00,enc01 disabled Press <Enter> to continue: Verify that the displayed IRQ for Board 0 is 10 and the interface contains “enc00”, then: PRESS: Enter The menu from Step 17 appears again. TYPE: q PRESS: Enter 19. The system prompts: Installing ALTOS TCP/IP over aaa 5-14 January 1997 6800-A2-GN22-30 Loading and Restoring Software Enter the internet address of this interface: Where: aaa is en0 on Altos 5000 platform enc00 on Altos 15000 platform TYPE: internet address in the form nnn.nnn.nnn.nnn PRESS: Enter The system prompts: Enter the netmask for this interface (default: 255.255.0.0): NOTE Consult your System Administrator to determine whether to specify a net mask, a broadcast address, or DOMAIN name different from the default. Choose the default when using the basic network configuration as described in the Network Pre-Installation Preparation section. PRESS: Enter The system prompts: Does the interface use a broadcast address of all 1’s? (y/n) (default:y): PRESS: Enter The system prompts: Enter the broadcast address for this interface (default: nnn.nnn.255.255): NOTE The displayed default shows the first two levels of the IP address you have just entered. The default above for broadcast address assumes the use of the basic network configuration parameters. PRESS: Enter The system asks for verification of the previously entered values: Internet Address: Netmask: Broadcast Address: 20. If the values are not correct, respond n. The system again requests entry from the Internet Address. If the values are correct, TYPE: y PRESS: Enter The system prompts: 6800-A2-GN22-30 January 1997 5-15 COMSPHERE 6800 Series Network Management System Enter DOMAIN name for “node name” or enter return to use [net.COM]: Where: node name is the name of the system on which you are installing. PRESS: Enter The system prompts: 32 Pseudo ttys are currently configured, do you want to: 1. Add Pseudo tty 2. Remove Pseudo tty Select an option of enter q to quit [q]: TYPE: 1 PRESS: Enter The system prompts: How many pseudo ttys you want to be created or enter return to use [67]: PRESS: Enter The system displays the currently configured chains again followed by the Available options menu: TYPE: q PRESS: Enter The system prompts to relink the kernel: Do you want to relink the kernel now? TYPE: n PRESS: Enter 21. The system now begins the branding of INFORMIX and displays the following message: INFORMIX BRANDING PROCEDURE This process brands the Informix ONLINE 4.1 package and the 4GL Run-time package. Please have ready the 11 character serial number, and the 6 character serial number key for this installation. The serial number and serial number key can be found on the OnLine Serial Number card shipped with the 6800 NMS Application software. Strike ENTER when ready PRESS: Enter 5-16 January 1997 6800-A2-GN22-30 Loading and Restoring Software 22. The system displays the following prompt: Enter the 11-character serial number (for example RDS# 9999999) exactly as it appears on the media: TYPE: the INFORMIX serial number key PRESS: Enter 23. The system displays the following message: Enter the 6-character serial number key exactly as it appears on the registration form: TYPE: the INFORMIX serial number key PRESS: Enter 24. The system displays the following prompt asking for verification of the numbers entered. For example, You have entered # # # # # # # # # # # for the serial number and # # # # # # for the serial number key. Are they correct? [yn]: If the information is correct, TYPE: y PRESS: Enter If the information is incorrect, TYPE: n PRESS: Enter 25. If you entered n, the system prompts you for the information once more. Once the correct information has been entered, the INFORMIX OnLine and 4GL Runtime packages are branded and the following message is displayed: Branding of INFORMIX files completed Setting password for user: informix Password change is forced for informix Choose password You can choose whether you pick a password, or have the system create one for you. 1. Pick a password 2. Pronounceable password will be generated for you Enter choice (default is 1): TYPE: 1 PRESS: Enter 6800-A2-GN22-30 January 1997 5-17 COMSPHERE 6800 Series Network Management System The system prompts: New password: TYPE: your chosen password PRESS: Enter The system prompts: Re-enter new password: TYPE: your chosen password again PRESS: Enter 26. The system now rebuilds the kernel and installs devices. As this transpires, the following message appears: The UNIX Operating System will now be rebuilt. This will take a few minutes. Please wait. Root for this system build is /. Once the kernel has been rebuilt, the following prompt appears: Do you want this kernel to boot by default? (y/n): TYPE: y PRESS: Enter 27. The system will back up the old UNIX and install the new one. When this is done, the following message appears: Do you want the kernel environment rebuilt? (y/n): TYPE: y PRESS: Enter 28. The installation process is now complete. The following message appears: The kernel has been rebuilt. Shutdown and reboot the system. The installation of the 6800 NMS APPLICATION VOLUME 5 is now complete. 29. Remove the floppy disk and cartridge tape. 30. At the prompt: TYPE: cd / PRESS: Enter If you are loading an Altos 5000 system, go to Step a. If you are loading an Altos 15000 system, go to Step b. a. For an Altos 5000 system, enter the following command to reboot in multi-user mode: TYPE: shutdown -g0 -y -i6 PRESS: Enter 5-18 January 1997 6800-A2-GN22-30 Loading and Restoring Software The system prompts: INIT: Single User Mode Type CONTROL-d to proceed with normal startup, (or give root passwrd for system maintenance) PRESS: Cntl-d When the login prompt appears, the procedure on the Altos 5000 is complete. b. For an Altos 15000 system, enter the following command to reboot in single user mode: TYPE: shutdown -g0 -y -i1 PRESS: Enter The system prompts: INIT: New run level: S INIT: Single User Mode Type CONTROL-d to proceed with normal startup, (or give root passwrd for system maintenance) PRESS: Cntl-d When the login prompt appears, the procedure on the Altos 15000 is complete. Installing the MPX Software on the Altos 15000 This section describes how to install the Altos MPX Multiprocessing software on the Altos System 15000 host processor. Skip this section if you are installing on an Altos 5000. To install the MPX software, perform the following steps: 1. At the system prompt, TYPE: cd /usr/MPX PRESS: Enter TYPE: ./installMPX PRESS: Enter 2. Use the ↓↑ keys to highlight Install and PRESS: Enter 3. Use the ↓↑ keys to highlight A New Product and PRESS: Enter 4. The system prompts you whether to install all or part of the software. Use the ↓↑ keys to highlight Entire Product and PRESS: Enter 6800-A2-GN22-30 January 1997 5-19 COMSPHERE 6800 Series Network Management System 5. The system prompts for Distribution Floppy Volume 1. Insert the Altos/SCO MPX Supplement floppy disk in the floppy drive. Use the ↓↑ keys to highlight Continue and PRESS: Enter 6. The system prompts again for Altos MPX Multiprocessing Floppy Volume 1. The floppy is already in the drive so you can ignore this prompt. Use the ↓↑ keys to highlight Continue and PRESS: Enter 7. The system prompts, Enter your Altos MPX serial number: TYPE: your serial number (provided in the Altos MPX software package) PRESS: Enter 8. The system prompts, Enter your Altos MPX activation key: TYPE: your activation key (provided in the Altos MPX software package) PRESS: Enter 9. The system asks, Do you wish to create a new kernel now (y/n)? TYPE: y PRESS: Enter PRESS: Enter (to continue) 10. The system will prompt, Press any key to continue ... PRESS: Enter 11. Use the → / ← keys to highlight Quit and PRESS: Enter 12. The system prompts for confirmation of the Quit request. Use the → / ← keys to highlight Yes and PRESS: Enter The system prompts: Please remove the “Altos/SCO MPX Supplement” floppy, if it’s still in the floppy drive, and press Enter to continue... Remove the floppy from the drive and PRESS: Enter 5-20 January 1997 6800-A2-GN22-30 Loading and Restoring Software The system confirms the following: Altos/SCO Multi-Processor Extensions (MPX) has been loaded. You must reboot the system before MPX will be active. Once you have rebooted, you can verify that multiple processors are working by logging in as root and typing “uname-X”, and looking for the “NumCPU” field. It should say, “NumCPU=2”. This means the system is using 2 CPUs. Please type “init 6” to reboot the system. 13. When the UNIX prompt, #, appears: TYPE: init 6 PRESS: Enter The system automatically reboots. Release 4.2 NMS Software This section explains how to install the Release 4.2 Network Management System (NMS) application program on an Altos System 5000 or Altos System 15000 computer. You must install the software in multi-user mode. To install the 6800 NMS Application Software on the host processor’s hard disk, you need the following: • A floppy disk labeled 6800 NMS Application Volume 6 • A cartridge tape labeled 6800 NMS Application Volume 7 Installing the NMS Software To install the NMS Software, perform the following steps: 1. At the unix login, TYPE: root (enter password, if any) NOTE The system cannot be installed from any other user login. 2. Set the system date and time by entering the command date MMDDhhmmyy where MM is the month, DD the day, hh the hour (24-hour system), mm the minute, and yy the last two digits of the year (this is optional). 6800-A2-GN22-30 January 1997 5-21 COMSPHERE 6800 Series Network Management System 3. Set the proper time zone by entering the command /etc/tz The system asks: Are you in North America? (y/n) TYPE: y (as appropriate) PRESS: Enter The system displays a list of time zones for the specified continent and prompt: Enter the number that represents your time zone or enter q to quit: TYPE: the number of the appropriate time zone PRESS: Enter The system asks: Does daylight saving time (summer time) apply at your location? (y/n) TYPE: y or n (as appropriate to your location) PRESS: Enter 4. You are now ready to execute the installpkg command and begin the installation process. To do this, TYPE: installpkg PRESS: Enter The installation program prompts you to insert a floppy disk into the disk drive and press Enter. 5. Insert the disk labeled 6800 NMS Application Volume 6 into the floppy drive and the tape labeled 6800 NMS Application Volume 7 into the tape drive. PRESS: Enter A series of status messages appears showing that the installation program is reading and processing the contents of the floppy disk. 6. The following message appears: Installing NMS Release 4.2. 7. At this point, the installation program will check for the existence of a previous release of the NMS. If a previous release of NMS is found, the system prompts regarding how to remove it. If an active workstation is found, the system prompts regarding how to remove it. 5-22 January 1997 6800-A2-GN22-30 Loading and Restoring Software 8. Create a password for the support login. The system prompts you for password information. The default is help85. This is the standard password that should be used. Installing the support login. 1. Pick your own password 2. Pronounceable password will be generated for you. To pick your own password: TYPE: 1 PRESS: Enter The system prompts for a new password. TYPE: help85 PRESS: Enter TYPE: help85 PRESS: Enter 9. Create a password for the admin login. You can choose your own password for the login or let the installation program generate one for you. The default is osffw1. PRESS: Enter The system prompts for a new password. Enter the default or choose a new password. TYPE: the password you want PRESS: Enter TYPE: the same password again PRESS: Enter 10. Create a password for the ffw login. You can choose your own password for the login or let the installation program generate one for you. The default is no password. PRESS: Enter The system prompts for a new password. Choose to enter your own password, TYPE: the password you want PRESS: Enter TYPE: the same password again PRESS: Enter 6800-A2-GN22-30 January 1997 5-23 COMSPHERE 6800 Series Network Management System 11. Create a password for the nms login. You can choose your own password for the login or let the installation program generate one for you. The default is startmenu. PRESS: Enter The system prompts for a new password. Enter the default or choose a new password. TYPE: the password you want PRESS: Enter TYPE: the same password again PRESS: Enter A message then appears telling you that the preinstallation phase of the installation is complete. 12. At this point, you are ready to begin the actual installation of the Release 4.2 software. The system displays the following prompt. Insert the cartridge tape containing the NMS system files. Type “install” when ready or “q” to quit: Ignore the request to insert the tape. You have already inserted Volume 6 and Volume 7. TYPE: install PRESS: Enter The installation begins. It will take about ten minutes. As the installation ensues, a series of status messages appears on your screen indicating the specific installation and post-installation activity that is currently taking place. 13. After the NMS database summary tables have been created, the installation program will prompt: How many UIPs do you have (0, 1, or 2): TYPE: n Where: n is the number of UIPs connected to the NMS. The possible values of n are 0, 1, or 2. PRESS: Enter The program prompts for the UIP system name with uip-1 as the default name. TYPE: the name of the first UIP PRESS: Enter The system prompts for confirmation. TYPE: y PRESS: Enter If more than one UIP is to be configured, the following message appears: Enter the name of UIP2 [uip-2] TYPE: the name of the second UIP PRESS: Enter 5-24 January 1997 6800-A2-GN22-30 Loading and Restoring Software The system prompts for confirmation. TYPE: y PRESS: Enter NOTE If you plan to use the default network configuration on an Altos 5000 System, you must enter uip-1 as the uip name. A series of additional messages appears indicating that the kernel files are being updated, the configuration file created, and the full-feature workstation installed. The following message appears: Do you wish to have the screen-saver capability (y/n) [n] TYPE: y (for an automatic time-out of the CRT) PRESS: Enter or TYPE: n (for a continuous display) PRESS: Enter The installation program displays a message indicating that the post-installation phase of the installation is complete. 14. At this point, the operating system is rebuilt. When this is complete, you will be asked whether you want the kernel to boot by default. To indicate yes, TYPE: y PRESS: Enter A second prompt appears, asking whether you want the kernel environment rebuilt. TYPE: y PRESS: Enter A message appears indicating the installation is complete. If you installed the 5000 System, proceed to Step a. If you installed the 15000 System, proceed to Step b. a. For the 5000 system, you must shutdown and reboot the system to activate the kernel. To do this, remove the floppy disk and cartridge tape, and TYPE: cd / PRESS: Enter TYPE: shutdown -g0 -y -i6 PRESS: Enter The system will reboot. 6800-A2-GN22-30 January 1997 5-25 COMSPHERE 6800 Series Network Management System b. For the 15000 system, you must shutdown and power off. Then, power on to activate the kernel. To do this, remove the floppy disk and cartridge tape, and TYPE: cd / PRESS: Enter TYPE: shutdown -g0 -y -i0 PRESS: Enter When the system prompts: ** Safe to Power Off ** - or ** Press Any Key to Reboot ** Rotate the key counterclockwise 1/4 turn to the vertical SWITCHED OFF position. Wait at least 45 seconds for the processor to power down. Then, rotate the switch clockwise 1/4 turn to the RUN position. The system will reboot. Formatting the Third Hard Disk On host processors with the Automatic Backup and Restore package, you must format the third hard disk required by that package. The Automatic Backup and Restore package is always present on the Altos 15000 host. To format the third hard disk, perform the following steps: 1. After rebooting the processor, when the following message appears: Type (CONTROL-d) to proceed with normal startup (or give root password to enter system maintenance): TYPE: root password PRESS: Enter 2. At the UNIX system prompt, TYPE: cd /usr/nms/adm PRESS: Enter TYPE: ./install3hda PRESS: Enter NOTE If the disk has already been installed and formatted, the following message appears: The 3rd hard disk is already installed. Skip the remaining steps and proceed to Step 5. 5-26 January 1997 6800-A2-GN22-30 Loading and Restoring Software For 5000 systems only, if the third hard disk is not installed, the following prompt appears: Do you want to install a 3rd hard disk? (y/n/q): TYPE: y PRESS: Enter To terminate disk formatting at this point, type n or q and go to Step 5. For 5000 and 15000 systems, the following message appears: Installing the 3rd hard disk. Please wait . . . When this portion of the formatting process is complete, the system automatically reboots. 3. Re-enter system maintenance mode when the following message appears: Type (CONTROL-d) to proceed with normal startup (or give root password to enter system maintenance): TYPE: root password PRESS: Enter 4. At the UNIX system prompt, TYPE: cd /usr/nms/adm PRESS: Enter TYPE: ./install3hdb PRESS: Enter The formatting process is complete when the following message appears: The software installation of the 3rd hard disk is complete. 5. Return to multi-user mode: TYPE: cd / PRESS: Enter TYPE: shutdown -g0 -y -i6 PRESS: Enter The system automatically reboots. 6800-A2-GN22-30 January 1997 5-27 COMSPHERE 6800 Series Network Management System Initializing the NMS Database CAUTION This action destroys the database. Do not initialize the database unless this is a first-time installation. To install the 4.2 Release for the first time, you must create and initialize the NMS database. To do this, perform the following steps: 1. TYPE: root NOTE You cannot initialize the database from any other login. PRESS: Enter TYPE: root password PRESS: Enter 2. Once you are logged in, TYPE: cd /usr/nms/adm PRESS: Enter Then, TYPE: ./installDb PRESS: Enter NOTE Do not reboot the system after executing InstallDb. The initialization parameters will be lost. Rebooting should be done after the 6800 has been started up for the first time. 5-28 January 1997 6800-A2-GN22-30 Loading and Restoring Software The menu in Figure 5-5 appears: AT&T Paradyne NMS Parameters: 1 2 3 4 Initialize ONLINE Partition Initialize NMS Database Include Migration Data Rebuild NMS Database Indices n n n n cont To Continue quit To abort 497-13957-01 Figure 5-5. AT&T Paradyne NMS Parameters Menu Table 5-3 gives a short explanation of each NMS parameter and the appropriate value for each. Table 5-3 NMS Parameters Menu — Options Explanation Option 1. Initialize ONLINE Partition Enter y for every new installation. Initializing a partition that already has data in it will result in the loss of that data. (However, loading UNIX has already deleted the database information.) 2. Initialize NMS Database Enter y. 3. Include Migration Data This permits you to migrate data from earlier releases. Refer to Chapter 7, Performing Migration, for more detailed instructions. 4. Rebuild NMS Database Indices Enter y. 3. The following message appears: If you wish to modify the NMS parameters Enter number (1,2,3,4, cont or quit): 4. Sequentially enter options 1, 2, and 4. For each option, perform the following: TYPE: y PRESS: Enter 6800-A2-GN22-30 January 1997 5-29 COMSPHERE 6800 Series Network Management System NOTE When you enter “y” for any of the options, you will erase all existing data. If you do not want to erase the data, enter “q” to quit. If migrating from a previous NMS release (1.x, 2.0, 3.x, 4.1): TYPE: 3 PRESS: Enter The system responds: Do you wish to include migration data from a previous NMS (y/n) [n]: TYPE: y PRESS: Enter If installing a new system or reloading the Release 4.2: TYPE: n PRESS: Enter 5. To execute the selected options: TYPE: cont PRESS: Enter When complete, the UNIX prompt appears. Network Configuration of NMS Host The NMS host requires information on other processors it must communicate with on the network. This information is stored in a file, /etc/hosts, which must contain the name of each processor and its associated IP address. While logged in as root, you must do the following: 1. If using the basic network configuration and the defaults provided: TYPE: cp /etc/nms.basic /etc/hosts PRESS: Enter Go to step 5. 2. If customizing the network configuration to connect to an existing Ethernet network: TYPE: vi /etc/hosts PRESS: Enter If the NMS host will be connected to a UIP, add the IP address and processor name to the /etc/hosts file in the format: nnn.nnn.nnn.nnn uip-name Where: nnn is a number from 1 to 255 and uip-name is the name of the UIP. 5-30 January 1997 6800-A2-GN22-30 Loading and Restoring Software Add the IP addresses and names of all workstations that the host will be directly communicating with in the format: nnn.nnn.nnn.nnn ffw-name Where: nnn is a number from 1 to 255 inclusive and ffw-name is the name of the full feature workstation processor. NOTE For the 15000 platform, the division of full-feature workstations among the three processors should be: Host Uip-1 Uip-2 7 3 14 Configurations with lower numbers of full-feature workstations should retain equivalent ratios among the processors for best performance. Save your changes, then exit vi. TYPE: vi $HOME/.rhosts PRESS: Enter Add the names of all workstations connected to the host processor, one name to a line. Save these changes and exit vi. NOTE If a full-feature workstation is to communicate with the UIP, do not put that workstation’s IP address and processor name in the host’s /etc/hosts or .rhosts files. 3. To change the IP address of a host already configured at the factory: TYPE: netconfig PRESS: Enter 6800-A2-GN22-30 January 1997 5-31 COMSPHERE 6800 Series Network Management System The system displays the following menu: Available options: 1. Add a chain 2. Remove a chain 3. Reconfigure an element in a chain q. Quit Select option: TYPE: 2 PRESS: Enter The system displays the current chains, including the following: 2. altos_tcp -> aaa Select a chain to remove: Where: aaa is en0 for System 5000 enc00 for System 15000 TYPE: 2 PRESS: PRESS: Enter The system prompts for confirmation: Remove altos_tcp -> aaa (y/n) : TYPE: y PRESS: Enter The chain is removed; the existing chains are redisplayed followed by the menu of available options. You need to reestablish the chain that was just removed. TYPE: 1 PRESS: Enter The system displays the top-level chain descriptions and prompt: Select top level of chain to Add or q to quit: TYPE: 1 (for altos_tcp) PRESS: Enter The system prompts: Select next level of chain to Add or q to quit: TYPE: appropriate number for aaa PRESS: Enter 5-32 January 1997 6800-A2-GN22-30 Loading and Restoring Software The system prompts for confirmation: Add chain altos_tcp -> aaa (y/n): TYPE: y PRESS: Enter The system displays status messages and then request: Please enter the following information in order to configure en0 Enter the internet address of this interface: TYPE: internet address in the form nnn.nnn.nnn.nnn Where: nnn is an integer from 1 to 255 PRESS: Enter The system prompts: Enter the netmask for this interface (default: 255.255.0.0): NOTE Consult your System Administrator to determine whether to specify a net mask, a broadcast address, or DOMAIN name different from the default. Choose the default when using the basic network configuration as described in the Network Pre-Installation Preparation section. PRESS: Enter The system prompts: Does the interface use a broadcast address of all 1’s? (y/n) (default:y): PRESS: Enter The system prompts: Enter the broadcast address for this interface (default: nnn.nnn.255.255): PRESS: Enter The system asks for verification of the previously entered values: Interface Address: Netmask: Broadcast Address: Are these values correct? (y/n): 6800-A2-GN22-30 January 1997 5-33 COMSPHERE 6800 Series Network Management System If the values are not correct, respond n. The system again requests entry from the Internet Address. If the values are correct, TYPE: y PRESS: Enter The system prompts: Enter DOMAIN name for “node name” or enter return to use [net.COM]: Where: node name is the name of the system on which you are installing. PRESS: Enter The system prompts: 99 Pseudo ttys are currently configured; do you want to: 1. Add Pseudo tty 2. Remove Pseudo tty Select an option of enter q to quit [q]: TYPE: q PRESS: Enter The system displays: TCP/IP Configuration Complete followed by the Available Options Menu. You should: TYPE: q PRESS: Enter The system prompts: Do you want to relink the kernel now: TYPE: y PRESS: Enter Do you want this kernel to boot by default? (y/n)? TYPE: y PRESS: Enter Do you want the kernel environment rebuilt? (y/n): TYPE: y PRESS: Enter The following messages appear to complete this process: The kernel has been successfully linked and installed. To activate it, reboot your system. 5-34 January 1997 6800-A2-GN22-30 Loading and Restoring Software TYPE: cd / PRESS: Enter TYPE: shutdown -g0 -y -i6 PRESS: Enter The command will shutdown and reboot the system. Installing Token Ring Software on the NMS Host/UIP The Token Ring package is an optional feature that can only be installed on an Altos 5000 platform. Do not proceed with this procedure unless the Token Ring LAN feature was purchased. To install the Token Ring software on the NMS host processor or UIP, perform the following steps: 1. At the # prompt, initiate a shutdown and automatic reboot by entering the following commands: TYPE: cd / PRESS: Enter TYPE: shutdown -g0 -y -i6 PRESS: Enter The system reboots; at the following message: Type (CONTROL-d) to proceed with normal startup (or give root password to enter system maintenance): TYPE: root password PRESS: Enter 2. When the UNIX root prompt (#) appears: TYPE: custom PRESS: Enter 3. The custom installation menu displaying “Products Currently Installed” appears. The command Install should be highlighted at the top of the screen. If it is not, use the ↓↑ keys to highlight it and PRESS: Enter 4. The product selection menu appears. Using the ↓↑ keys, select A New Product and PRESS: Enter 5. The install option menu appears. Select Entire Product and PRESS: Enter 6. Insert the Token Ring Host/UIP Application floppy into the floppy drive when instructed to by the custom installation procedure and PRESS: Enter 6800-A2-GN22-30 January 1997 5-35 COMSPHERE 6800 Series Network Management System NOTE Messages indicating that the link kit is only partially installed may be ignored. Press Enter if required to by such messages. 7. The system asks you to insert the requested volume. Do not remove the Token Ring Host/UIP Application floppy; leave it in the floppy disk drive and PRESS: Enter 8. When all files are read, the following screen appears: Executing Proteon ProNet-4/16 LLI RapiDriver Disk Init Script Installing the pro driver After installing the Proteon ProNet-4/16 LLI RapiDriver Disk, please use netconfig or mkdev <driver> to add drivers into your system. Press return to continue . . . PRESS: Enter 9. The system prompts: Press any key to continue . . . PRESS: Enter 10. The Products Currently Installed menu appears: TYPE: q 11. Using the ↓↑ keys, select yes to exit the custom install procedure. 12. Remove the floppy disk from the drive, remain in system maintenance mode, and continue the installation of the Token Ring feature with the section, Configuring the Token Ring Network on the Host/UIP. Configuring the Token Ring Network on the 5000 Host/UIP To configure the network for the installed Token Ring card on an Altos 5000 processor, perform the following steps: 1. At the UNIX prompt: TYPE: netconfig PRESS: Enter 5-36 January 1997 6800-A2-GN22-30 Loading and Restoring Software 2. The currently configured chains and the following options menu appears: Available options: 1. Add a chain 2. Remove a chain 3. Reconfigure an element in a chain q. Quit Select option: TYPE: 2 PRESS: Enter 3. The list of the currently configured chains reappears; the chain altos_tcp–>en0 appears in the list for the existing Ethernet driver in the TCP/IP kernel configuration. TYPE: 2 PRESS: Enter 4. The system prompts for confirmation: Remove altos_tcp−>en0 (y/n): TYPE: y PRESS: Enter 5. The options menu from Step 2 appears again TYPE: 1 PRESS: Enter 6. The system displays the top-level chain descriptions and prompts: Select top level of chain to Add or q to quit: TYPE: 1 PRESS: Enter 7. The system prompts: Select next level of chain to Add or q to quit: TYPE: 17 (for pro0 for the Proteon 4/16 Token Ring Rapidriver, board 0) PRESS: Enter 8. The system prompts for confirmation: Add chain altos_tcp-pro0 (y/n): TYPE: y PRESS: Enter 6800-A2-GN22-30 January 1997 5-37 COMSPHERE 6800 Series Network Management System 9. A menu of Proteon board types appears with p199x as the default. The Rapidriver supports the following Proteon ProNet-4/16 boards: On ISA machines: p139x boards (p1390, p1391,p1392) On MC machines: p189x boards (p1890, p1892) On EISA machines: p1990 board plus the ISA boards Enter board family (p139x p199x) [p199x] or \‘q’ to quit: PRESS: Enter 10. The system prompts for the card slot number. The following p199x boards have been found in your machine: Slot Model Description 6 p1990 base=6000, irq=10, cable: utp, ring speed: 16 Current pro driver slot assignment: none Enter slot number (6) or ‘q’ to quit: TYPE: 6 (the slot number where the NIC is physically installed) PRESS: Enter 11. The system prompts: Restrict OSI and TCPIP broadcasts to the local ring? (y/n) or ‘q’ to quit: PRESS: Enter NOTE Consult your Network Administrator to determine if values other than the default are to be entered for the Internet address, netmask, broadcast address, and DOMAIN name. The following steps assume that the defaults are used except where otherwise required. 12. The system prompts: Please enter the following information in order to configure pro0 Enter the internet address of this interface: TYPE: internet address in the form nnn.nnn.nnn.nnn Where: nnn is a number from 1 to 255. PRESS: Enter 13. The system prompts: Enter the netmask for this interface (default: 255.255.0.0): PRESS: Enter 5-38 January 1997 6800-A2-GN22-30 Loading and Restoring Software 14. The system prompts: Does the interface use a broadcast address of all 1’s? (y/n) (default:y): PRESS: Enter 15. The system prompts: Enter the broadcast address for this interface (default: nnn.255.255.255): PRESS: Enter 16. The system asks for verification of the previously entered values: Interface Address: Netmask: Broadcast Address: Are these values correct? (y/n): If the values are not correct, respond n. The system returns to Step 12. If the values are correct, TYPE: y PRESS: Enter 17. The system prompts: Enter DOMAIN name for “node name” or enter return to [net.COM]: PRESS: Enter (to select net.com) 18. The system prompts: nn Pseudo ttys are currently configured; do you want to: 1. Add Pseudo tty 2. Remove Pseudo tty Select an option or enter q to quit [q]: If nn is 99, sufficient pseudo ttys are already configured. TYPE: q PRESS: Enter Go to Step 20. 19. If nn is less than 99, TYPE: 1 PRESS: Enter TYPE: xx Where: xx is a number sufficient to raise the total pseudo ttys to 99. PRESS: Enter 6800-A2-GN22-30 January 1997 5-39 COMSPHERE 6800 Series Network Management System 20. The netconfig options menu described in Step 2 appears: TYPE: q PRESS: Enter 21. The system prompts: Do you want to relink the kernel now? TYPE: y PRESS: Enter The system prompts: Do you want this kernel to boot by default? (y/n): TYPE: y PRESS: Enter The system prompts: Do you want the kernel environment rebuilt? (y/n): TYPE: y PRESS: Enter 22. The relinking of the kernel and rebuilding of the kernel environment takes several minutes. Then, the following messages appear followed by the UNIX prompt: The kernel have been successfully relinked and installed. To activate it, reboot your system. Setting up new kernel environment At the # prompt: TYPE: shutdown -y -g0 -i6 PRESS: Enter 23. The system shuts down and reboots with the new configuration. 5-40 January 1997 6800-A2-GN22-30 Loading and Restoring Software Unix Software for the UIP To install the UNIX Operating System on the UIP’s hard disk, you need the following software: • A floppy disk labeled 6800 UIP Application Volume 1 • A floppy disk labeled 6800 UIP Application Volume 2 • A cartridge tape labeled 6800 UIP Application Volume 3 • A floppy disk labeled 6800 UIP Application Volume 4 • A cartridge tape labeled 6800 UIP Application Volume 5 With these items, perform the following steps: 1. Turn on the UIP and make sure the RESET key is in the RUN position. The UIP begins the boot process and runs through its internal memory checks. When the memory check is over, the following message appears: Press space bar to interrupt autoboot NOTE If an error message about memory appears, ignore it and continue the procedure. PRESS: the spacebar immediately The menu in Figure 5-6 appears: Select Select Select Select [1] [2] [3] [4] to to to to boot from Hard Disk boot from Floppy boot from Tape enter BIOS setup Enter Option: 492-13954 Figure 5-6. System 5000 Boot Menu (Installing UNIX on UIP) NOTE If this menu does not appear you missed the time-out window. You must restart the procedure. 6800-A2-GN22-30 January 1997 5-41 COMSPHERE 6800 Series Network Management System 2. Insert the 6800 UIP Application Volume 1 floppy disk and TYPE: 2 (no Enter necessary) Several status messages appear, followed by the prompt shown below: Boot : 3. To begin the automatic boot process, PRESS: Enter Several status messages appear, followed by: Insert Volume 2 floppy and Volume 3 Cartridge tape and press <Return> 4. Insert the required floppy and tape and PRESS: Enter Several status messages appear, followed by the menu in Figure 5-7: This is a completely automated installation procedure. The following options are available: 1. Install the Operating System 2. Exit the Installation Please enter your choice [1-2]: 492-13955 Figure 5-7. Installation Procedure Menu (Installing UNIX on UIP) 5. To proceed, TYPE: 1 PRESS: Enter 5-42 January 1997 6800-A2-GN22-30 Loading and Restoring Software The menu in Figure 5-8 appears: Please specify Hardware Configuration: 1. Hardware configuration I (Single hard disk - UIP) 2. Hardware configuration II (Two hard disks - NMS HOST) 3. Exit Installation Please enter your choice [1-3]: 492-13956 Figure 5-8. Hardware Configuration Menu (Installing UNIX on UIP) 6. For the UIP, TYPE: 1 PRESS: Enter In response, the system sets the operating system environment, configures the hard disk, creates a UNIX partition, and divides the partition into file systems and swap space. When this is complete, the following message appears: Altos UNIX System V Operating System Serialization When prompted, use the serial number and activation key included with the Altos System V Operating System distribution Enter your serial number or enter q to quit TYPE: the UNIX serial number (found on the Serial Number card attached to the Release Notes) PRESS: Enter 7. The following message appears: Enter your activation key or enter q to quit TYPE: the UNIX activation key (found on the Serial Number card attached to the Release Notes) PRESS: Enter NOTE If either the serial number or activation key is entered incorrectly, the system prompts you again for the information. If you quit at either of these steps, you must start the installation process from the beginning. 6800-A2-GN22-30 January 1997 5-43 COMSPHERE 6800 Series Network Management System 8. Once the correct serial number and activation key are entered, the system completes the base UNIX installation and displays the following message: Please assign a password for super-user account, “root” You can choose whether you pick a password or have the system create one for you: 1. Pick a password 2. Pronounceable password will be created for you Enter choice (default is 1): TYPE: 1 PRESS: Enter 9. The system prompts: New password: TYPE: your chosen password PRESS: Enter The system prompts: Re-enter new password: TYPE: your chosen password again PRESS: Enter The system displays several status messages followed by: Installation and configuration of the Altos/SCO UNIX System V Operating System is now complete. Remove the filesystem (Volume 2) floppy and the cartridge tape (Volume 3) after the system is shutdown and press <RETURN> to restart the system. ** Safe to Power Off ** -or ** Press Any Key to Reboot ** CAUTION Do not remove the boot floppy or tape until the Press Any Key to Reboot prompt is displayed. Remove both the floppy disk and the cartridge tape. PRESS: any key to reboot the system. The system auto-boots; do not press the spacebar to interrupt auto-boot. The following prompt appears: Boot : PRESS: Enter 5-44 January 1997 6800-A2-GN22-30 Loading and Restoring Software INIT: SINGLE USER MODE Type CONTROL-d to proceed with normal startup, (or give root password for system maintenance): 10. For system maintenance mode: TYPE: root password PRESS: Enter NOTE You have approximately 10 seconds to press the Enter key to select system maintenance. Failure to do so within the 10-second window defaults the system to normal start-up. If this occurs, a reboot is necessary. 11. Insert the 6800 UIP Application Volume 4 floppy disk and 6800 UIP Application Volume 5 cartridge tape. 12. At the # prompt, TYPE: installpkg PRESS: Enter The system prompts for the tape and floppy and prompt: Strike enter when ready or Esc to stop PRESS: Enter 13. After the disk and tape are read, the following message appears: Done reading tape... TCP/IP Runtime Serialization Enter your serial number or enter q to quit CAUTION The serial number and activation key entered must be unique across all TCP/IP nodes on the network to which the UIP is connected. The TCP/IP daemon will shut down for both nodes having equal serial number or activation keys. TYPE: serial number from distribution package PRESS: Enter The system prompts: 6800-A2-GN22-30 January 1997 5-45 COMSPHERE 6800 Series Network Management System Enter your activation key or enter q to quit TYPE: activation key PRESS: Enter The system prompts: Enter the system node name or enter return to use [unix]. NOTE To use the default network configuration, you must enter uip-1 as the system node name and 1.1.1.2 as the internet address. TYPE: system node name PRESS: Enter The following messages appear: TCP/IP Configuration Complete. Altos TCP/IP Runtime installation complete. The system displays the currently configured chains and then the following menu: Available options: 1. Add a chain 2. Remove a chain 3. Reconfigure an element in a chain q. Quit Select option: TYPE: 1 PRESS: Enter The system displays the top-level chain descriptions and prompt: Select top level of chain to Add or q to quit: TYPE: 1 (for altos_tcp) PRESS: Enter The system prompts: Select next level of chain to Add or q to quit: TYPE: 5 (for en0) PRESS: Enter The system prompts for confirmation: Add chain altos_tcp -> en0 (y/n): TYPE: y PRESS: Enter 5-46 January 1997 6800-A2-GN22-30 Loading and Restoring Software The following messages appear: Adding altos_tcp -> en0 Enable en0 driver Installing ALTOS TCP/IP over en0 Please enter the following information in order to configure en0 The system prompts: Enter the internet address of this interface TYPE: internet address in the form nnn.nnn.nnn.nnn Where: nnn is an integer from 1 to 255 PRESS: Enter The system prompts: Enter the netmask for this interface (default: 255.255.0.0): NOTE Consult your System Administrator to determine whether to specify a net mask, a broadcast address, or DOMAIN name different from the default. Choose the default when using the basic network configuration as described in the Network Pre-Installation Preparation section. PRESS: Enter The system prompts: Does the interface use a broadcast address of all 1’s? (y/n) (default:y): PRESS: Enter The system prompts: Enter the broadcast address for this interface (default: nnn.nnn.255.255): NOTE The displayed default shows the first two levels of the IP address you have just entered. The default above for broadcast address assumes the use of the basic network configuration parameters. PRESS: Enter The system asks for verification of the previously entered values: Interface Address: Netmask: Broadcast Address: 6800-A2-GN22-30 January 1997 5-47 COMSPHERE 6800 Series Network Management System 14. If the values are not correct, respond n. The system again requests entry of the Internet Address. If the values are correct, TYPE: y PRESS: Enter The system prompts: Enter DOMAIN name for ”node name” or enter return to use [net.COM]: Where: node name is the name of the system on which you are installing. PRESS: RETURN The system prompts: 32 Pseudo ttys are currently configured; do you want to: 1. Add Pseudo tty 2. Remove Pseudo tty Select an option of enter q to quit [q]: TYPE: 1 PRESS: Enter The system prompts: How many pseudo ttys you want to be created or enter return to use [67]: PRESS: RETURN The system displays the currently configured chains again followed by the Available options menu: TYPE: q PRESS: Enter The system prompts to relink the kernel: Do you want to relink the kernel now? TYPE: n PRESS: Enter 15. The system then prompts: Is there an IPC1600 card installed in the system? [y/n]: If the optional IPC-1600 card providing additional serial ports is installed in the UIP, TYPE: y PRESS: Enter If the optional IPC-1600 card is not installed in the UIP, TYPE: n PRESS: Enter 5-48 January 1997 6800-A2-GN22-30 Loading and Restoring Software For a negative response, the following message appears: The IPC-1600 ports card software driver will be removed from the system. Continue? [y/n]: To continue, TYPE: y PRESS: Enter 16. The system now rebuilds the kernel and installs device names. As this transpires, the following message appears: The kernel will now be rebuilt. This will take a few minutes. Please wait. Root for this system build is /. Once the kernel is rebuilt, the following prompt appears: Do you want this kernel to boot by default? (y/n): TYPE: y PRESS: Enter 17. The system back up the old UNIX and installs the new one. When this is done, the following message appears: Do you want the kernel environment rebuilt? (y/n): TYPE: y PRESS: Enter 18. The installation process is now complete. The following message appears: The kernel has been rebuilt. Shutdown and reboot the system. The installation of the 6800 NMS Application Volume 5 is now complete. 19. Remove the floppy disk and cartridge tape. 20. At the # pompt, to initiate a shutdown and automatically reboot the system, enter the following commands: TYPE: cd / PRESS: Enter TYPE: shutdown -g0 -y -i6 PRESS: Enter If no further action is taken, the system boots up in multi-user mode. To speed up the process, PRESS: Ctrl-d when prompted for normal start-up. 6800-A2-GN22-30 January 1997 5-49 COMSPHERE 6800 Series Network Management System UIP Software The section describes the steps to install the UIP software into the Altos System 5000. The UNIX software must be installed before the UIP software is installed. If adding the optional IPC-1600 card to the UIP, you need to reload the UNIX and UIP software (refer to the earlier section on loading the UNIX Software for the UIP.) NOTE If the UIP was previously installed and active, you must first stop it via the uip login, then select Option 2, Stop the System, from the NMS Main Menu. To install the UIP software, you need the floppy disk labeled 6800 UIP Application Volume 6 and the tape labeled 6800 UIP Application Volume 7. 1. At the UIP login, TYPE: root PRESS: Enter NOTE The system cannot be installed from any other user login. 2. Set the system date and time by entering the command date MMDDhhmmyy where MM is the month, DD the day, hh the hour (24-hour system), mm the minute, and yy the last two digits of the year (this is optional). 3. Set the proper time zone by entering the command /etc/tz The system prompts: Are you in North America? (y/n) TYPE: y (as appropriate) PRESS: Enter The system displays a list of time zones for the area, North America if you answered y to the question above, and prompt: Enter the number that represents your time zone of enter q to quit: TYPE: the number of the appropriate time zone PRESS: Enter 5-50 January 1997 6800-A2-GN22-30 Loading and Restoring Software The system prompts: Does daylight saving time (summer time) apply at your location? (y/n) TYPE: y or n (as appropriate to your location) PRESS: Enter 4. Execute the installpkg command and begin the installation process: TYPE: installpkg PRESS: Enter The installation program prompts you to insert a floppy disk into the disk drive and press Enter. 5. Insert the disk labeled 6800 UIP Application Volume 6 into the floppy drive and the 6800 UIP Application Volume 7 into the tape drive, then PRESS: Enter A series of status messages confirms that the installation program is reading and processing the contents of the floppy disk. NOTE If the UIP is active, an error message appears indicating that the software cannot be installed. 6. At this point, the installation program checks for the existence of a previous release of the UIP (if this is the first time UIP is being installed on this System 5000, you may skip this step and go directly to Step 5.). If the system finds a previous release and the UIP system is active, the system terminates the installation and issues a message telling you to stop the UIP and then re-execute installpkg. 7. If the installation program finds a previous release of the UIP that is inactive, the system continues with the installation and check for active workstations. If one is found, the system displays a message indicating this and asks you if you want to continue. To continue, you have to terminate the active workstation. There are active workstations. Do you wish to continue? (y/n) [y]: TYPE: y PRESS: Enter To terminate the installation instead of the active workstation, enter n instead. Finally, the installation program prompts you to remove the previous release. To remove it and proceed with the installation. The UIP has been previously installed. The existing UIP will be removed if you continue. Do you wish to continue (y/n)? TYPE: y PRESS: Enter 6800-A2-GN22-30 January 1997 5-51 COMSPHERE 6800 Series Network Management System To terminate the installation and leave the previous version intact, enter n instead. 8. Create a password for the support login. The system prompts you for password information. The default password is help85. This is the standard password that should be used. Installing the support login. 1. Pick your own password. 2. Pronounceable password will be generated for you. To pick your own password, TYPE: 1 PRESS: Enter A message describing acceptable passwords appears, followed by the prompt for the new password. Use the password help85. TYPE: help85 PRESS: Enter TYPE: help85 PRESS: Enter 9. Create a password for the admin login. You can choose your own password for the login or let the installation program generate one for you. The system default is osffw1. PRESS: Enter A message describing acceptable passwords appears, followed by the prompt for the new password. At the prompt, if you choose to enter your own password, TYPE: the password you want PRESS: Enter TYPE: the same password again PRESS: Enter 10. Create a password for the ffw login. You can choose your own password for the login or let the installation program generate one for you. The system default is no password. PRESS: Enter A message describing acceptable passwords appears, followed by the prompt for the new password. To choose the default, press Enter when prompted for a new password. At the prompt, if you choose to enter your own password, TYPE: the password you want PRESS: Enter TYPE: the same password again PRESS: Enter 5-52 January 1997 6800-A2-GN22-30 Loading and Restoring Software 11. Create a password for the uip login. You can choose your own password for the login or let the installation program generate one for you. The system default is startmenu. PRESS: Enter A message describing acceptable passwords appears, followed by the prompt for the new password. To enter your own password, TYPE: the password you want PRESS: Enter TYPE: the same password again PRESS: Enter A message then appears telling you that the preinstallation phase of the installation is complete. 12. When the preinstallation is completed, you are ready to begin the actual installation of UIP software. The installation program prompts you to install the cartridge tape containing the UIP files. The required floppy and cartridge tape have previously been inserted into the drives. TYPE: install PRESS: Enter The installation takes about five minutes. As the installation proceeds, a series of status messages appear indicating specific installation activity that is taking place. After the message Building NMS fonts... appears, you are prompted as follows: What is the name of the NMS HOST machine? TYPE: the name of the NMS host processor (unix is the default). PRESS: Enter The status messages indicate that the installation is proceeding and that the operating system is being rebuilt. 13. The following message appears: Do you wish to have the screen-saver capability (y/n) [n] TYPE: y (for an automatic time-out of the CRT) PRESS: Enter or TYPE: n (for a continuous display) PRESS: Enter 6800-A2-GN22-30 January 1997 5-53 COMSPHERE 6800 Series Network Management System 14. The following system prompt appears: Do you want this kernel to boot by default? (y/n): TYPE: y PRESS: Enter to proceed. 15. When the prompt Do you want the kernel environment rebuilt? (y/n) appears, TYPE: y PRESS: Enter A message appears indicating when the installation is complete. To shut down and reboot the system, TYPE: cd / PRESS: Enter TYPE: shutdown -g0 -y -i6 PRESS: Enter This command will shutdown and reboot the system. Then, remove the tape and floppy disk. Network Configuration of NMS UIP The NMS UIP requires information on other processors it will communicate with on the network. This information is stored in a file, /etc/hosts, which must contain the name of each processor and its associated IP address. While logged in as root, you must do the following: 1. If using the basic network configuration and the defaults provided: TYPE: cp /etc/uip.basic /etc/hosts PRESS: Enter Go to Step 5. 2. If customizing the network configuration to connect to an existing 10BaseT network: TYPE: vi /etc/hosts PRESS: Enter 3. Add the IP address and NMS host processor name to the /etc/hosts file in the format: nnn.nnn.nnn.nnn host-name Where: nnn is a number from 1 to 255 inclusive and host-name is the name of the NMS host processor. 5-54 January 1997 6800-A2-GN22-30 Loading and Restoring Software 4. Add the IP addresses and names of all workstations that the UIP will be directly communicating with in the format: nnn.nnn.nnn.nnn ffw-name Where: nnn is a number from 1 to 255 inclusive and ffw-name is the name of the full-feature workstation processor. NOTE For the 15000 platform, the division of full-feature workstations among the three processors should be: Host Uip-1 Uip-2 7 3 14 Configurations with lower numbers of full-feature workstations should retain equivalent ratios among the processors for best performance. 5. While still logged in as root, TYPE: vi $HOME/.rhosts PRESS: Enter Add the names of all workstations connected to the UIP, one name to a line. Save these changes and exit vi. NOTE If a full-feature workstation is to communicate with the NMS host, do not put that workstation’s IP address and processor name in the UIP’s /etc/hosts file. 6. To change the IP address of a UIP already configured at the factory: TYPE: netconfig PRESS: Enter The system displays the following menu: Available options: 1. Add a chain 2. Remove a chain 3. Reconfigure an element in a chain q. Quit Select option: TYPE: 2 PRESS: Enter 6800-A2-GN22-30 January 1997 5-55 COMSPHERE 6800 Series Network Management System The system displays the current chains including the following: 2. altos_tcp -> en0 Select a chain to remove: TYPE: 2 PRESS: Enter The system prompts for confirmation: Remove altos_tcp -> en0 (y/n): TYPE: y PRESS: Enter The chain is removed; the existing chains are redisplayed followed by the menu of available options. You need to reestablish the chain that was just removed. TYPE: 1 PRESS: Enter The system displays the top-level chain descriptions and prompt: Select top level of chain to Add or q to quit: TYPE: 1 (for altos_tcp) PRESS: Enter The system prompts: Select next level of chain to Add or q to quit: TYPE: 5 (or appropriate number for en0) PRESS: Enter The system prompts for confirmation: Add chain altos_tcp -> en0 (y/n): TYPE: y PRESS: Enter The system displays status messages and then requests: Please enter the following information in order to configure en0 Enter the internet address of this interface: TYPE: internet address in the form nnn.nnn.nnn.nnn Where: nnn is an integer from 1 to 255 PRESS: Enter The system prompts: Enter the netmask for this interface (default: 255.255.0.0): 5-56 January 1997 6800-A2-GN22-30 Loading and Restoring Software NOTE Consult your System Administrator to determine whether to specify a net mask, a broadcast address, or DOMAIN name different from the default. Choose the default when using the basic network configuration as described in the Network Pre-Installation Preparation section. PRESS: Enter The system prompts: Does the interface use a broadcast address of all 1’s? (y/n) (default:y): PRESS: Enter The system prompts: Enter the broadcast address for this interface (default: nnn.nnn.255.255): PRESS: Enter The system prompts for verification of the previously entered values: Interface Address: Netmask: Broadcast Address: Are these values correct? (y/n): If the values are not correct, respond n. The system again requests entry of the Internet Address. If the values are correct, TYPE: y PRESS: Enter The system prompts: Enter DOMAIN name for “node name” or enter return to use [net.COM]: Where: node name is the name of the system on which you are installing. PRESS: Enter The system prompts: 99 Pseudo ttys are currently configured; do you want to: 1. Add Pseudo tty 2. Remove Pseudo tty Select an option of enter q to quit [q]: TYPE: q PRESS: Enter The system displays: TCP/IP Configuration Complete 6800-A2-GN22-30 January 1997 5-57 COMSPHERE 6800 Series Network Management System followed by the Available Options Menu. You should: TYPE: q PRESS: Enter The system prompts: Do you want to relink the kernel now: TYPE: y PRESS: Enter Do you want this kernel to boot by default? (y/n): TYPE: y PRESS: Enter Do you want the kernel environment rebuilt? (y/n): TYPE: y PRESS: Enter The following messages appear to complete this process: The kernel has been successfully rebuilt and installed. To activate it, reboot your system. TYPE: cd / PRESS: Enter TYPE: shutdown -g0 -y -i6 PRESS: Enter The command will shutdown and reboot the system. Installing Token Ring Software on the UIP To install this package on a UIP, please refer to the earlier section, Installing Token Ring Software on the NMS Host/UIP. Configuring the Token Ring Network on the UIP To configure the network on a UIP with the Token Ring package, please refer to the earlier section, Configuring the Token Ring Network on the 5000 Host/UIP. 5-58 January 1997 6800-A2-GN22-30 Loading and Restoring Software Full-Feature Workstation Software A full-feature workstation is a desktop computer running the full-feature workstation application software and connected to either the 6800 Series NMS host computer or UIP by means of a local area network. This workstation may be the Altos 486DX/33, the Altos SX/20 which was running under a previous release of NMS, a Sun workstation running the UNIX Operating System, or a generic X-terminal. The Altos 386 SX20 requires a total of 4 megabytes of memory. The 486DX/33 has 4 megabytes of memory installed at the factory but requires the insertion of the following line in the CONFIG.SYS file: DEVICE=C:\/DOS\/EMM386.EXE 2048 M4 The Paradise Windows Accelerator Video card has been tested with the GrafPoint X-One package. The Altos 386 SX20 internal video card is incompatible with the GrafPoint X-One package and must be replaced. The mouse pointer speed may need to be adjusted according to the user’s preferences. To accomplish this, perform the following steps once X-One is installed and running. 1. PRESS: Alt-SysRq 2. The X-One main menu appears; use the ↓↑ keys to select the Setup menu item. 3. The Setup menu appears; select Mouse... 4. The Mouse Settings window appears. Click the sensitivity level up to increase the mouse speed or click the level down to reduce the speed. To exit from the Mouse Settings window, click on the exit/quit button at the top right of the window. 5. Click the right mouse button on the window’s top bar and choose quit from the pull- down menu. NOTE You can also convert the 6820 NMS host processor to a full-feature workstation for the 6800 Series NMS. See Chapter 7, Performing Migration, for details. There are many different configurations for the NMS full-feature workstation. Among the most frequently used configurations are a 386-based or 486-based processor using an EtherLink II card, a 386-based or 486-based processor using a StarLAN 10 NAU card, or the same processors using a Proteon Token Ring card. This section contains multiple independent procedures. These procedures must be combined to complete the installation of the full-feature workstation. The lists below show which procedures must be combined for the different LAN configurations. 6800-A2-GN22-30 January 1997 5-59 COMSPHERE 6800 Series Network Management System EtherLink II Configuration • Installing MS-DOS • Installing the GrafPoint X-One software package with EtherLink II card • Installing the NMS full-feature workstation application software with EtherLink II card • Network configuration of full-feature workstation StarLAN 10 NAU Configuration • Installing MS-DOS • Installing the GrafPoint X-One software package with a StarLAN 10 NAU • Installing the NMS full-feature workstation application software with StarLAN 10 NAU • Network configuration of full-feature workstation Token Ring Configuration • Installing MS-DOS • Installing the GrafPoint X-One software package with a StarLAN 10 NAU • Installing the NMS full-feature workstation application software with StarLAN 10 NAU • Installing the Token Ring software on the full-feature workstation • Network configuration of full-feature workstation Installing MS-DOS A full-feature workstation requires the MS-DOS Operating System. For workstations supplied by Paradyne, the workstation software is initially loaded at the factory. You may have to reload this software because of hard disk failure or system upgrade. When reloading, it is advisable to reformat the hard disk before installing the software. To reformat, create a bootable disk by using the format /s command. Then copy the format command (found on the MS-DOS Operating System disk) onto the bootable disk. Boot the system from the bootable disk and execute the format command on the hard disk. Once the hard disk has been reformatted, remove the rebootable disk and locate the three MS-DOS Version 5.0 disks labeled Setup, Disk 1, and Disk 2. NOTE If upgrading a full-feature workstation, you can use MS-DOS 3.30a. Reformat the disk and load MS-DOS with the command insl/dos. Use the following procedures to install MS-DOS. 1. Insert the disk labeled 1 of 3 into Drive A and turn on the power to the computer. 5-60 January 1997 6800-A2-GN22-30 Loading and Restoring Software 2. The Welcome screen appears. PRESS: Enter 3. The screen displays the default settings for Date/Time, Country, Keyboard and Install to Hard Disk. Change the defaults, if necessary. PRESS: Enter 4. The screen displays two setup options (Install to C:\DOS and Run Shell on start up – Yes). Change the second option so that the shell will not run at start-up. Follow the instructions displayed on the screen. PRESS: Enter 5. A new screen displays a graph indicating the percentage of information transferred from the floppy disk to the hard disk. When prompted remove Disk 1 and insert Disk 2. PRESS: Enter 6. When prompted, remove Disk 2 and insert Disk 3. PRESS: Enter 7. When prompted, remove Disk 3. PRESS: Enter The system reboots; MS-DOS 5.0 is installed and running. Installing the GrafPoint X-One Software Package with EtherLink II Card To install the GrafPoint X-One Server program and associated software, perform the following steps: 1. Insert the GrafPoint X-One Installation disk into the drive and TYPE: A:install PRESS: Enter 2. The system prompts: Enter the floppy drive to use [A:]: PRESS: Enter 3. The system prompts: Enter the destination drive to use [C:]: PRESS: Enter 4. The system prompts: Enter the destination directory to use [\/XONE]: PRESS: Enter 6800-A2-GN22-30 January 1997 5-61 COMSPHERE 6800 Series Network Management System If the directory, \XONE, does not exist, the system prompts: The directory C:\XONE does not exist. OK to create it? (y/n) [y] PRESS: Enter 5. The system asks a series of questions to which you should reply as follows: Do you wish to install the fonts (y/n)? [n]: TYPE: y PRESS: Enter The system prompts: Do you wish to install the standard set of fonts, including ‘MISC’ and ‘75DPI’ (y/n): [y] PRESS: Enter Do you wish to install the 100DPI fonts (y/n)? [n] TYPE: y PRESS: Enter Do you wish to install the OpenWindows fonts: (y/n)? [n] TYPE: y PRESS: Enter Do you wish to install the DecWindows fonts: (y/n)? [n] TYPE: y PRESS: Enter Do you wish to install the TGRAF fonts: (y/n)? [n] TYPE: y PRESS: Enter Do you wish to install the Kanji fonts: (y/n)? [n] TYPE: y PRESS: Enter Make sure the X-ONE disk labeled ‘Install’ is in the floppy drive Press ENTER to continue or ‘q’ to Quit PRESS: Enter 6. After some time marked by a line of dots on the screen, the system prompts: Insert the X-ONE disk Labeled ‘Fonts Disk 1’ Press ENTER to continue or ‘q’ to Quit Remove X-One Install disk, insert requested disk, and PRESS: Enter 5-62 January 1997 6800-A2-GN22-30 Loading and Restoring Software 7. After some time marked by a line of dots on the screen, the system prompts: Insert the X-ONE disk Labeled ‘Fonts Disk 2’ Press ENTER to continue or ‘q’ to Quit Remove Fonts Disk 1, insert requested disk, and PRESS: Enter 8. After another period also marked by the line of dots on the screen, the following messages appear: All files successfully installed The following should be placed in your autoexec.bat file SET XONEDIR=C:\/XONE SET DOS4G=quiet Would you like X-One to add this to your autoexec.bat file (y/n)? [y]: PRESS: Enter 9. The system prompts: Ready to execute setup Press any key to continue PRESS: Enter 10. The system prompts: X-One Setup Utility Press any key to continue PRESS: Enter 11. The system prompts: Select Mouse type 1. Mouse type device (pre-loaded driver) 2. Microsoft serial mouse 3. Logitech serial mouse 4. Mouse Systems serial mouse Enter selection or ‘q’ to Quit [1]: TYPE: 1 PRESS: Enter 12. The system prompts: Would you like to use the graphics board configuration detected by Xsetup (y/n)? [y]: PRESS: Enter 6800-A2-GN22-30 January 1997 5-63 COMSPHERE 6800 Series Network Management System Select graphics mode 1. 640x480 displayed in 816x640 virtual space 16 colors 2. 640x480 16 colors 3. 640x480 displayed in 640x816 virtual space 16 colors 4. 640x480 displayed in 1088x480 virtual space 16 colors 5. 800x600 16 colors 6. 640x480 256 colors 7. 800x600 256 colors 8. . . . Enter Selection or ‘q’ to Quit [15]: TYPE: 7 PRESS: Enter Select Monitor Size 1. 11 inch 2. 14 inch 3. 15 inch 4. 16 inch 5. 17 inch 6. 19 inch 7. 21 inch 8. other Enter selection of ‘q’ to Quit [1]: TYPE: appropriate number PRESS: Enter 13. The system then prompts: Please verify settings: Mouse settings ... Graphics Info Graphics board settings... Monitor settings ... Are these settings correct (y/n/q)? [y] 14. If these settings are not correct, TYPE: n PRESS: Enter The system starts again at Step 10. 15. If the settings are correct, PRESS: Enter 5-64 January 1997 6800-A2-GN22-30 Loading and Restoring Software 16. The system responds: Settings saved the file “C:\/XONE\/hardware.cfg”. Press any key to continue PRESS: Enter 17. The system prompts: Xsetup will need to copy the graphics driver ‘vga256.dvr’ from the X-One diskette to the C:\/XONE directory. Insert the disk labeled ‘Install’ in drive A: Press ENTER to continue or ‘q’ to Quit 18. Insert the proper disk and PRESS: Enter 19. The system responds: 1 file extracted from archive Press any key to continue PRESS: Enter 20. The system prompts: Select Network configuration 1. Grafpoint’s own builtin TCP/IP 2. Beame and Whiteside BW-TCP 3. FTP Software’s PC/TCP version 2.05 4. FTP Software’s PC/TCP version 2.1 or later 5. Sun Microsystem’s PC/NFS ver’s 3.5-3.9 6. Sun Microsystem’s PC/NFS ver. 4.0 or later 7. Woolongong’s Pathway TCP Enter Selection or ‘q’ to Quit [1]: PRESS: Enter 21. The system then prompts: Select Network Interface . . . 4. 3COM 3C503 (Etherlink II) Enter selection or ‘q’ to Quit: TYPE: 4 PRESS: Enter 6800-A2-GN22-30 January 1997 5-65 COMSPHERE 6800 Series Network Management System Select connector type 1. Thin net 2. External Transceiver (thick net) Enter selection or ‘q’ to Quit [1]: TYPE: 1 PRESS: Enter Enter I/O Address in hex [300]: TYPE: 300 PRESS: Enter NOTE If you are using basic network configuration, check the IP address in Table 5-1. Otherwise, consult with your System Administrator to ensure entering the correct IP address. Enter this system’s IP address: TYPE: IP address in format “xxx.xxx.xxx.xxx” where xxx is a number from 1 to 255 inclusive PRESS: Enter NOTE Consult with Network Administrator to verify correct subnet mask. Enter a subnet mask[255.0.0.0] PRESS: Enter 22. The system prompts: Would you like to specify your gateway entries now (y/n/q)? [n]: PRESS: Enter Would you like to add a name server (y/n)? [n]: PRESS: Enter If a HOSTS file does not exist, please specify the path where it will reside: (Default=C:\/XONE\/HOSTS) PRESS: Enter 5-66 January 1997 6800-A2-GN22-30 Loading and Restoring Software 23. The system prompts: Please verify settings Transport: Interface: Connector I/O Address: IP Address: Subnet mask: Hosts file path: Are these settings correct (y/n/q)? [y] PRESS: Enter 24. If the settings are not correct, TYPE: n PRESS: Enter The system returns to Step 21. 25. If the settings are OK: PRESS: Enter 26. The system responds: Settings saved in file “C:\/XONE\/tcp.cfg” Press any key to continue ... PRESS: Enter 27. The system prompts: Xsetup will need to copy the network driver ‘tcpnet.exe’ from the XONE diskette to the C:XONE directory Insert the disk labeled ‘Install’ in drive A: Press Enter to continue of ‘q’ to Quit PRESS: Enter 28. The system prompts: XSetup will need to copy some additional files to go with your network files Press any key to continue ... PRESS: Enter Searching archive for files. Please wait ... Press any key to continue ... PRESS: Enter X-One Setup is now finished 6800-A2-GN22-30 January 1997 5-67 COMSPHERE 6800 Series Network Management System Create a HOSTS file that has the same name as the one you specified, before you start X-One. See the Installation & Operation Guide for more details X-One Install Complete Press any key to continue ... PRESS: Enter Installing the NMS Full-Feature Workstation Application Software with EtherLink II Card A special program is provided to help you install the full-feature workstation application software on your Altos 486DX/33, Altos SX/20 or a 386-based processor. To install the software, perform the following steps: 1. Turn on your system. Insert your working copy of the disk labeled 6800 FFW Application Volume 1 into Drive A. 2. At the C> prompt, TYPE: cd C:\/XONE PRESS: Enter TYPE: a:install PRESS: Enter The current directory should be “\XONE” If current directory is not “\XONE” Please break out of the installation by typing Ctrl-C Press any key to continue PRESS: Enter 3. The system displays many messages including the following significant ones: Loading fonts Loading configuration script Loading packet driver For further information on installation and startup Please refer to the C:\/XONE\/README file. Installation Completed. 4. Determine if the workstation connects to the host or a UIP (either uip-1 or uip-2). 5-68 January 1997 6800-A2-GN22-30 Loading and Restoring Software NOTE For the 15000 platform, the division of full-feature workstations among the three processors should be: Host Uip-1 Uip-2 7 3 14 Configurations with lower numbers of full-feature workstations should retain equivalent ratios among the processors for best performance. 5. If the workstation is connected to a UIP and while still in the XONE directory: TYPE: copy UIP.CFG XONE.CFG PRESS: Enter TYPE: edit XONE.CFG PRESS: Enter The DOS editor displays the XONE.CFG file. You should look for the line which starts with CONN_COMMAND and change WSNAME to the name of the workstation. Look for the line beginning with CONN_HOST and change NMSUIP to the name of the UIP machine. 6. If the workstation is connected to an NMS host and while still in the XONE directory: TYPE: copy HOST.CFG XONE.CFG PRESS: Enter TYPE: edit XONE.CFG PRESS: Enter The DOS editor displays the XONE.CFG file. You should look for the line which starts with CONN_COMMAND and change WSNAME to the name of the workstation. Look for the line beginning with CONN_HOST and change NMSHOST to the name of the host machine. 7. Reboot the processor to ensure that all changed parameters are properly loaded. 6800-A2-GN22-30 January 1997 5-69 COMSPHERE 6800 Series Network Management System Installing GrafPoint X-One Software Package with a StarLAN 10 NAU To install the GrafPoint X-One Server when a StarLAN NAU card will be used, perform the following steps: 1. Insert the GrafPoint X-One Installation disk into the drive and TYPE: A:install PRESS: Enter 2. The system prompts: Enter the floppy drive to use [A:]: PRESS: Enter 3. The system prompts: Enter the destination drive to use [C:]: PRESS: Enter 4. The system prompts: Enter the destination directory to use [\/XONE]: PRESS: Enter If the directory, \XONE, does not exist, the system prompts: The directory C:\XONE does not exist. OK to create it? (y/n) [y] PRESS: Enter 5. The system asks a series of questions to which you should reply as follows: Do you wish to install the fonts (y/n)? [n]: TYPE: y PRESS: Enter The system prompts: Do you wish to install the standard set of fonts, including ‘MISC’ and ‘75DPI’ (y/n): [y] PRESS: Enter Do you wish to install the 100DPI fonts (y/n)? [n] TYPE: y PRESS: Enter Do you wish to install the OpenWindows fonts: (y/n)? [n] TYPE: y PRESS: Enter 5-70 January 1997 6800-A2-GN22-30 Loading and Restoring Software Do you wish to install the DecWindows fonts: (y/n)? [n] TYPE: y PRESS: Enter Do you wish to install the TGRAF fonts: (y/n)? [n] TYPE: y PRESS: Enter Do you wish to install the Kanji fonts: (y/n)? [n] TYPE: y PRESS: Enter Make sure the X-ONE disk labeled ‘Install’ is in the floppy drive Press ENTER to continue or ‘q’ to Quit PRESS: Enter 6. After some time marked by a line of dots on the screen, the system prompts: Insert the X-ONE disk Labeled ‘Fonts Disk 1’ Press ENTER to continue or ‘q’ to Quit Remove X-One Install disk, insert requested disk, and PRESS: Enter 7. After some time marked by a line of dots on the screen, the system prompts: Insert the X-ONE disk Labeled ‘Fonts Disk 2’ Press ENTER to continue or ‘q’ to Quit Remove Fonts Disk 1, insert requested disk, and PRESS: Enter 8. After another period also marked by the line of dots on the screen, the following messages appear: All files successfully installed The following should be placed in your autoexec.bat file SET XONEDIR=C:\XONE SET DOS4G=quiet Would you like X-One to add this to your autoexec.bat file (y/n)? [y]: PRESS: Enter 9. The system responds: Ready to execute setup Press any key to continue PRESS: Enter 6800-A2-GN22-30 January 1997 5-71 COMSPHERE 6800 Series Network Management System 10. The system responds: X-One Setup Utility Press any key to continue PRESS: Enter 11. The system prompts: Select Mouse type 1. Mouse type device (pre-loaded driver) 2. Microsoft serial mouse 3. Logitech serial mouse 4. Mouse Systems serial mouse Enter selection or ‘q’ to Quit [1]: TYPE: 1 PRESS: Enter 12. The system prompts: Would you like to use the graphics board configuration detected by Xsetup (y/n)? [y]: PRESS: Enter Select graphics mode 1. 640x480 displayed in 816x640 virtual space 16 colors 2. 640x480 16 colors 3. 640x480 displayed in 640x816 virtual space 16 colors 4. 640x480 displayed in 1088x480 virtual space 16 colors 5. 800x600 16 colors 6. 640x480 256 colors 7. 800x600 256 colors 8. . . . Enter selection or ‘q’ to Quit [15]: TYPE: 7 PRESS: Enter Select Monitor Size 1. 11 inch 2. 14 inch 3. 15 inch 4. 16 inch 5. 17 inch 6. 19 inch 7. 21 inch 8. other Enter selection of ‘q’ to Quit [1]: 5-72 January 1997 6800-A2-GN22-30 Loading and Restoring Software TYPE: appropriate number PRESS: Enter 13. The system prompts: Please verify settings: Mouse settings ... Graphics Info Graphics board settings ... Monitor settings ... Are these settings correct (y/n/q)? [y] 14. If these settings are not correct, TYPE: n PRESS: Enter The system starts again at Step 10. 15. If the settings are correct, PRESS: Enter 16. The system responds: Settings saved the file “C:\XONE\hardware.cfg”. Press any key to continue PRESS: Enter 17. The system prompts: Xsetup need to copy the graphics driver ‘vga.dvr’ from the X-One diskette to the C:\XONE directory. Insert the disk labeled ‘Install’ in drive A: Press ENTER to continue or ‘q’ to Quit 18. Insert the proper disk and PRESS: Enter 19. The system responds: 1 file extracted from archive Press any key to continue PRESS: Enter 6800-A2-GN22-30 January 1997 5-73 COMSPHERE 6800 Series Network Management System 20. The system prompts: Select network configuration 1. Grafpoint’s own built-in TCP/IP 2. FTP Software’s PC/TCP 3. Sun Microsystem’s PC/NFS ver’s 3.5—3.9 4. Beame and Whiteside BW-TCP 5. Woolongong’s Pathway TCP Enter selection of ‘q’ to Quit [1]: PRESS: Enter 21. The system then prompts: Select Network Interface . . . 9. Packet Driver Enter selection or ‘q’ to Quit: TYPE: 9 PRESS: Enter Will you be using more than one Network board in your machine with more than one packet driver loaded (y/n/q)? [n]: PRESS: Enter NOTE If you are using basic network configuration, check the IP address in Table 5-1. Otherwise, consult with your System Administrator to ensure entering the correct IP address. Enter this system’s IP address: TYPE: IP address in format “xxx.xxx.xxx.xxx” where xxx is a number from 1 to 255 inclusive PRESS: Enter NOTE Consult with Network Administrator to verify correct subnet mask. Enter a subnet mask [255.0.0.0]: PRESS: Enter 5-74 January 1997 6800-A2-GN22-30 Loading and Restoring Software 22. The system asks: Would you like to specify your gateway entries now (y/n/q)? [n]: PRESS: Enter Would you like to add a name server (y/n)? [n]: PRESS: Enter If a HOSTS file does not exist, please specify the path where it will reside: (Default=C:\XONE\HOSTS) PRESS: Enter 23. The system prompts: Please verify settings Transport: Interface: IP Address: Subnet mask: Hosts file path: Are these settings correct (y/n/q)? [y] PRESS: Enter 24. If the settings are not correct, TYPE: n PRESS: Enter The system returns to Step 20. 25. If the settings are OK: PRESS: Enter 26. The system responds: Xsetup will need to copy the network driver ‘tcpnet.exe’ from the XOne diskette to the C: XONE directory Insert the disk labeled ‘Install’ in drive A Press ENTER to continue or ‘q’ to Quit Insert the diskette labeled Install and PRESS: Enter The system displays various messages, including: file extracted from archive Press any Key to continue . . . Xsetup will need to copy some additional files to go with your network files. 6800-A2-GN22-30 January 1997 5-75 COMSPHERE 6800 Series Network Management System Press any Key to continue . . . PRESS: Enter The system displays various messages, including 5 files extracted Press any Key to continue . . . PRESS: Enter The following message appears: X-One install complete Press any Key to continue . . . PRESS: Enter Installing the NMS Full-Feature Workstation Application Software with StarLAN 10 NAU A special program is provided to help you install the full-feature workstation application software on your Altos 486DX/33, Altos SX/20 or a 386-based processor. To install the software when you are using the StarLAN 10 NAU, perform the following steps: 1. Turn on your system. Insert your working copy of the disk labeled 6800 FFW Application Volume 1 into Drive A. 2. At the C> prompt, TYPE: cd C:\XONE PRESS: Enter TYPE: a:install PRESS: Enter The current directory should be “\XONE” If current directory is not “\XONE” Please break out of the installation by typing Ctrl-C Press any key to continue PRESS: Enter 3. The system displays many messages including the following significant ones: Loading fonts Loading configuration script Loading packet driver For further information on installation and startup Please refer to the C:\XONE\README file. Installation Completed. 5-76 January 1997 6800-A2-GN22-30 Loading and Restoring Software NOTE For the 15000 platform, the division of full-feature workstations among the three processors should be: Host Uip-1 Uip-2 7 3 14 Configurations with lower numbers of full-feature workstations should retain equivalent ratios among the processors for best performance. 4. If the workstation is connected to the NMS host processor and while still in the XONE directory: TYPE: copy HOST.CFG XONE.CFG PRESS: Enter 5. If the workstation is connected to an NMS UIP and while still in the XONE directory: TYPE: copy UIP.CFG XONE.CFG PRESS: Enter 6. TYPE: edit XONE.CFG PRESS: Enter The DOS editor displays the XONE.CFG file. You should look for the line which starts with CONN_COMMAND and change WSNAME to the name of the workstation. Look for the line beginning with CONN_HOST and change NMSHOST to the name of the host machine if you are connected to the host or to the name of the UIP machine if you are connected to the UIP. Save the file and exit the editor. 7. If not installing the Token Ring package, do the following steps. If you are installing the Token Ring package, continue with the next section, Installing the Token Ring Software on the Full-Feature Workstation. TYPE: cd . . PRESS: Enter TYPE: edit autoexec.bat PRESS: Enter The DOS editor displays the file. At the end of the file add the following line: C:\XONE\PACKET\STARTPKT Save the file and exit the editor program. 8. Reboot the processor to ensure that all changed parameters are properly loaded. 6800-A2-GN22-30 January 1997 5-77 COMSPHERE 6800 Series Network Management System Installing the Token Ring Software on the Full-Feature Workstation The GrafPoint X-One server software must be installed prior to the installation of any software on the full-feature workstation. X-One must be configured for use with a packet driver. For more information, please refer to the section Installing GrafPoint X-One Software Package with a StarLAN 10 NAU. To install the NIC driver and LAN support program, perform the following steps: 1. Power up the full-feature workstation and insert the Proteon distribution floppy, labeled p5025 ProNet – 4/16 Diag & Drvrs for P139x NIC, into the floppy drive. TYPE: a:install a: c: PRESS: Enter 2. The system displays the following: The program will now make a directory on your hard disk named PROINST and copy several files including the documentation files to that directory from the distribution diskette. The Proteon Installation, Configuration, and Diagnostic Program will then be run from your hard disk. DO NOT REMOVE THE PROTEON DISTRIBUTION DISKETTE UNTIL YOU ARE ASKED TO DO SO. Press any key to continue . . . PRESS: Enter 3. The installation program and files are copied to the workstation’s hard disk. This process takes several minutes. When the installation banner appears, the system prompts: Press any key to continue . . . PRESS: Enter 4. The installation function selection menu appears: Select a Function Configure/Install NIC and NetWare Drivers Run Proteon Diagnostic Program Install Proteon LAN Support Program Microsoft LAN Manager Driver Installation Instructions IBM LAN Server Driver Installation Instructions View ReadMe File X – eXit Install Using the ↓↑ keys, select Install Proteon LAN Support Program and PRESS: PRESS: Enter 5. The system prompts for temporary space; accept the default, C:PTEMP, and PRESS: PRESS: Enter 6. The Proteon LAN Support Setup screen appears: Proteon LAN Support Setup 5-78 January 1997 6800-A2-GN22-30 Loading and Restoring Software The Setup Program prepares your system with Proteon LAN Support Program device drivers. The necessary CONFIG.SYS statements are automatically created in a file called CONFIG.LSP Setup allows you to update your CONFIG.SYS file. Each screen contains instructions for configuring your software and hardware. To accept Setup’s default, press ENTER. To change Setup’s default, type over the default value. You can use ESCAPE at any time to return to a previous screen. You may use CNTL-C to exit Setup at major decision points. Press ENTER to continue . . . PRESS: Enter 7. The system prompts for a destination directory; accept the default, C:\PROTEON, and PRESS: Enter 8. The system prompts: Will you be running a 3270 Program? Using the ↓↑ keys, select no and PRESS: Enter 9. The system prompts: Will you be running a NETBIOS application? Using the ↓↑ keys, select no and PRESS: Enter The system displays a confirmation window for all values selected. You have made the following selections: LSP software directory C:\PROTEON 3270 Application Usage: No NETBIOS Application Usage: No Satisfied with your selections? Press ENTER to continue; ESCAPE to change selections If any value is not correct, PRESS: Esc The system requests entry again, starting from Step 7. If the values are correct, PRESS: Enter 6800-A2-GN22-30 January 1997 5-79 COMSPHERE 6800 Series Network Management System 10. Instructions for selection of values for the Proteon board then appear. If you are using a p189x or p199x board, you must configure the board using the system’s reference disk. If you are using a p139x board, command line options are used to configure the iobase, interrupt vector, etc. This utility will help you by editing these command line options into the config.sys file for you. Press ENTER to continue; ESCAPE to go back to previous selections. To continue, PRESS: Enter 11. The selection menu for board type appears: Select the type of board you are using. p139x – p1390,p1391, or p1392 p189x – p1890 or p1892 p199x – p1990 Using the ↓↑ keys, select p139x – p1390,p1391, or p1392 and PRESS: Enter 12. The system prompts for the Interrupt Vector with a default of 5. PRESS: Enter 13. The system prompts for the DMA Channel with a default of 5. PRESS: Enter 14. The system prompts for the Base I/O Address with a default of 0A20. PRESS: Enter 15. The system prompt for transmission speed. Use the ↓↑ keys to select either 4 Mbps or 16 Mbps, depending on the speed of any existing Token Ring network or the site standard, and PRESS: Enter 16. The system prompts for the type of cable you are using. Use the ↓↑ keys to select either UTP for unshielded twisted pair or STP for shielded twisted-pair, depending on whether you have installed the RJ45 cable or the Token Ring coaxial cable, and PRESS: Enter 17. A confirmation window appears for the preceding selected values and the system prompts: Satisfied with your selections? Press ENTER to continue; ESCAPE to change selections 5-80 January 1997 6800-A2-GN22-30 Loading and Restoring Software If they are not correct, press Esc; the system requests entry again, starting with Step 12. If the values entered are correct, PRESS: Enter 18. The system displays statements for the CONFIG.SYS file. The statements appear as follows: device=C:\PROTEON\proarb.sys device=C:\PROTEON\pro16eul.sys /B 0a20 /I 5 /D 5 /S nn The above file C:\PROTEON\CONFIG.LSP has been created for your convenience and future reference. It contains the necessary config.sys statements to run the LSP software. Press ENTER to continue; ESCAPE to change previous selections Where: nn is the selected transmission speed, 4 Mbps or 16 Mbps To accept them, PRESS: Enter 19. The system prompts: Select action of LSP statements Add to your config.sys No action Replace your config.sys Use the ↓↑ keys to select Add to your config.sys and PRESS: Enter 20. The system displays the following confirmation. LSP Software Setup Completed Press ENTER to continue . . . PRESS: Enter 21. The Installation Function Selection Menu appears as in Step 4. To exit the install procedure, TYPE: x 22. The system prompts: Are you sure you want to exit the Installation Program? TYPE: y The DOS prompt appears. 23. Insert the floppy disk labeled “Token Ring FFW Application” in the floppy disk drive and TYPE: a:install PRESS: Enter 24. The following installation instructions appear on the screen. 6800-A2-GN22-30 January 1997 5-81 COMSPHERE 6800 Series Network Management System The Token Ring Packet Driver installation requires the XONE Xserver software package by GrafPoint to be installed on this processor before install the Token Ring Packet Driver. Press the Ctrl key and the letter ‘C’ (Ctrl-C) to exit or Press any key to continue . . . PRESS: Enter 25. The following message appears, About to add the files IBMTOKEN.COM and STARTPKT.BAT to C:\XONE\PACKET directory Press the Ctrl key and the letter ‘C’ (Ctrl-C) to exit or Press any key to continue . . . PRESS: Enter 26. The following message appears: About to add the line – C:\XONE\PACKET\STARTPKT to the AUTOEXEC.bat file Press the Ctrl key and the letter ‘C’ (Ctrl-C) to exit or Press any key to continue . . . PRESS: Enter 27. The system displays the following confirmation: The line has been appended to C:\AUTOEXEC.bat ** Remember to reboot the processor for these changes to take effect. End of Token Ring Packet Driver Installation 28. Press the reset button to reboot the full-feature workstation. At the end of the boot process, the message IBMTOKEN – initialization complete appears, signifying that the NIC has initialized, opened, and inserted itself into the ring correctly. Network Configuration of Full-Feature Workstation The NMS full-feature workstation needs to know about the other processors on the network that it will communicate with. This information is stored in a file, \XONE\HOSTS, which must contain the name of each processor and its associated IP address. To configure the full-feature workstation for proper communication on the LAN, you must do the following: 1. If using the basic network configuration for the Altos 5000 platform supplied with the NMS: TYPE: COPY \XONE\WS.BAS \XONE\HOSTS PRESS: Enter Stop here. There are no further steps in the basic network configuration process. 5-82 January 1997 6800-A2-GN22-30 Loading and Restoring Software 2. If configuring any Altos 15000 or customizing your network configuration for an Altos 5000, or connecting to an existing LAN, consult your Network Administrator for valid IP address information and perform the following steps: TYPE: EDIT \XONE\HOSTS PRESS: Enter 3. Add the IP address and NMS host processor name to the \XONE\HOSTS file in the format: nnn.nnn.nnn.nnn host-name Where: nnn is a number from 1 to 255 inclusive and host-name is the name of the NMS host processor. 4. If the full-feature workstation is to communicate with a UIP, add the IP address and UIP name to the \XONE\HOSTS file in the format: nnn.nnn.nnn.nnn host-name Where: nnn is a number from 1 to 255 inclusive and host-name is the name of the NMS host processor. NOTE For the 15000 platform, the division of full-feature workstations among the three processors should be: Host Uip-1 Uip-2 7 3 14 Configurations with lower numbers of full-feature workstations should retain equivalent ratios among the processors for best performance. Configuring Full-Feature Workstation with a Router Network Full-feature workstations can be configured and used over a LAN using routers. To configure full-feature workstations on such a LAN, you need the following information: • IP address of the router port connected to the host or UIP and a name for that port • IP address of the router port connected to the full-feature workstation and a name for that port • IP address of the full-feature workstation and a name for the full-feature workstation The names for the router ports and the full-feature workstation can be arbitrarily determined, but must be unique within the NMS. Once you have the information above, perform the following steps: 1. Log on as root on the host or UIP, whichever is to connect to the full-feature workstation. 6800-A2-GN22-30 January 1997 5-83 COMSPHERE 6800 Series Network Management System 2. Using the vi editor, add the IP address and the name of the router port connected to the host or UIP to the /etc/hosts file in the format: nnn.nnn.nnn.nnn port_name Where: nnn is a number from 1 to 255 inclusive. port_name is the name of the router port. 3. Using the vi editor, add the following line at the bottom of the /etc/rc2 file: route add default port_name 1 Where: port_name is the name of the router port. 4. The command change in Step 3 takes effect when the host or UIP is rebooted. If you want it to take effect immediately, TYPE: route add default port_name 1 Where: port_name is the name of the router port. PRESS: Enter 5. On the full-feature workstation, edit the \/X-ONE\/HOSTS file and add the IP address and name of both the router port to which the full-feature workstation is connected and the router port to which the NMS host or UIP is connected in the format: nnn.nnn.nnn.nnn port_name Where: nnn is a number from 1 to 255 inclusive. port_name is the name of the router port. 6. On the full-feature workstation, edit the \/X\/ONE\/TCP.CFG file and set up the default route for the remote port to which the full-feature workstation is connected and the local port to which the NMS host or UIP is connected. Add the following lines: name=remote_port_name ; gateway=1 name=local_port_name ; gateway=2 Where: remote_port_name is the name of the router port to which the full-feature workstation is connected. local_port_name is the name of router port to which the NMS host or UIP is connected. Be sure that there is a space both before and after the semicolon. 5-84 January 1997 6800-A2-GN22-30 Loading and Restoring Software Installing Full-Feature Workstation Software on a Sun Workstation The full-feature workstation software is installed on the Sun Workstation after you have ensured that both Sun/OS and OpenWindows are properly installed and running. You must follow the steps below: 1. Place the NMS Application Disk in the floppy drive and login as “root” TYPE: cd /usr PRESS: Enter TYPE: cpio -icvd < /dev/fd0 PRESS: Enter 2. When the files have been copied from the floppy disk, TYPE: cd nms PRESS: Enter TYPE: configure PRESS: Enter 3. The system prompts: Do you want StartUp configured for a server? (y/n) (allows automatic connections to host oh startup) TYPE: y PRESS: Enter 4. The system prompts: Please enter node name of host where NMS has been loaded: TYPE: (node name of NMS host machine) PRESS: Enter 5. The system prompts: Please enter the node name of the UIP where NMS has been loaded: If a UIP has been configured on the NMS, TYPE: (node name of UIP) PRESS: Enter Otherwise, PRESS: Enter 6. The system displays the following message: The StartUp and StartUpUIP files have been copied to /usr/bin TYPE: eject PRESS: Enter 6800-A2-GN22-30 January 1997 5-85 COMSPHERE 6800 Series Network Management System 7. Remove the floppy disk from the disk drive. Generic X-Terminal This full-feature workstation is intended to be workstation hardware defined by the user which can run MS-DOS Version 5.0 and either the GrafPoint X-One software product or another manufacturer’s X11 R4 server package. To allow the 6800 NMS Interface to display on the generic X-terminal, the fonts are distributed in “BDF” format. They must be converted to the “SNF” format. Each X-server package must have a program to accomplish that conversion in order to complete the installation process. An example for an MS-DOS based machine follows: 1. Insert the floppy disk containing the BDF font files in the disk drive: TYPE: COPY A:\font\*.* C:FONTS PRESS: Enter 2. When the files are completely copied, TYPE: cd C:FONTS PRESS: Enter TYPE: BDFTOSNF PRESS: Enter 3. The system translates the font files into a format ready for use by the NMS application software. Remove the font file floppy from the disk drive. Basic-Feature Workstation Software The basic-feature workstation application software runs on an Altos 486DX/33, an Altos SX/20, or an approved AT&T workstation (for a complete list see Chapter 1). The Network Management Workstation (NMW) software package executes under the Microsoft Windows operating environment (Release 3.0 running in Real Mode). You will need to install the following software programs on the basic-feature workstation. • MS-DOS Release 5.0 • Microsoft Windows Release 3.0 • NMW Software The following sections provide the installation instructions for each of these three software programs. 5-86 January 1997 6800-A2-GN22-30 Loading and Restoring Software Installing MS-DOS A full-feature workstation requires the MS-DOSr operating system, which comes with the workstation software. The workstation software is initially loaded at the manufacturer. You may have to reload this software because of hard disk failure or system upgrade. When reloading, it is advisable to reformat the hard disk before installing the software. To reformat, create a bootable disk by using the format /s command. Then copy the format command (found on the MS-DOS Operating system disk) onto the bootable disk. Boot the system from the bootable disk and execute the format command on the hard disk. Once the hard disk has been re-formatted, remove the rebootable disk and locate the two MS-DOS disks labeled Install and Operating System. Use the following procedures to install MS-DOS. 1. Insert the disk labeled 1 of 2 into Drive A and turn on the power to the computer. 2. The Welcome screen appears. PRESS: Enter 3. The screen displays the default settings for Date/Time, Country, Keyboard and Install to Hard Disk. Change the defaults, if necessary. PRESS: Enter 4. The screen displays two setup options (Install to C:\/DOS and Run Shell on start up – Yes). Change the second option so that the shell will not run at start-up. Follow the instructions displayed on the screen. PRESS: Enter 5. A new screen displays a graph indicating the percentage of information transferred from the floppy disk to the hard disk. When prompted remove Disk 1 and insert Disk 2. PRESS: Enter 6. When prompted, remove Disk 2. PRESS: Enter The system reboots; MS-DOS 5.0 is installed and running. 6800-A2-GN22-30 January 1997 5-87 COMSPHERE 6800 Series Network Management System Installing Microsoft Windows Microsoft Windows provides a window-based interface for the NMW software. You cannot run the NMW software unless Windows is first installed. A copy of Windows Version 3.0 is provided with the NMW. The following steps explain how to install Microsoft Windows on the hard disk of a basic-feature workstation. Be sure you have installed MS-DOS before attempting to install Windows. 1. Turn the computer’s power on. 2. At the C> prompt: TYPE: a: PRESS: Enter to make Drive A the active drive. 3. Insert Disk 1 in Drive A and TYPE: setup PRESS: Enter to run the setup program. 4. Follow the instructions on the screen to install windows. Do not change the computer or mouse type. Use the default hardware configuration selected by the installation program. Installing NMW Software The NMW software package is the application program that enables your Altos or AT&T workstation to operate as a basic-feature workstation. The following steps explain how to install NMW. Be sure you have installed MS-DOS and Windows software before you attempt to install NMW. NOTE Installing the NMW software requires a knowledge of certain basic MS-DOS concepts such as path and AUTOEXEC.BAT file. If you are not familiar with these concepts, read the relevant sections in the MS-DOS User’s Guide before attempting to install NMW. 1. Turn the computer’s power on. 2. At the C> prompt, TYPE: md \nmw PRESS: Enter to create a directory named NMW. 5-88 January 1997 6800-A2-GN22-30 Loading and Restoring Software 3. Make the NMW directory the current directory. To do this, TYPE: cd \nmw PRESS: Enter 4. Locate the NMW program disk and insert it into Drive A. 5. Copy the NMW program files from the disk in Drive A to the hard disk (Drive C). To do this, at the C> prompt, TYPE: copy a:\nmw PRESS: Enter 6. Return to the root directory. To do this, TYPE: cd \ PRESS: Enter 7. In the AUTOEXEC.BAT file, add a path statement or modify its existing path statement to include the NMW directory created in Step 2. If you do not have an AUTOEXEC.BAT file, you must create one and enter the path in it that includes the NMW directory. To perform either task, • Use an available text editor such as EDIT or EDLIN to create a new AUTOEXEC.BAT file or modify an existing AUTOEXEC.BAT file. • Use the text editor to enter the following line in the AUTOEXEC.BAT file. path=c:\nmw or add c:\nmw to an existing path= variable 8. Once you have created a path with the NMW directory in it, you must execute the AUTOEXEC.BAT file to allow the new path to take effect. To do this, TYPE: autoexec PRESS: Enter 9. To run the NMW program, TYPE: win /r nmw PRESS: Enter 6800-A2-GN22-30 January 1997 5-89 COMSPHERE 6800 Series Network Management System Installing the Analysis Gateway Option (5000 Systems Only) The ANALYSIS Gateway Option is supported by hardware and software. The IPC-900 serial card must be installed in the host processor to support the physical link between the 6800 Series NMS and the ANALYSIS NMS (see Chapter 2 for installation instructions). The software that supports the ANALYSIS Gateway is embedded in the NMS application program loaded on the host processor. The following procedure to initialize this software is presented in three stages. The first stage involves installing and activating the software. The second stage involves configuring the software with system parameters. The third stage involves setting complimentary data rates on both the 6800 Series NMS and the ANALYSIS NMS. If, for any reason, the NMS application program must be reinstalled, the installation of the ANALYSIS Gateway must be repeated. Installation The installation procedure must begin with the NMS application stopped. Shut down the NMS application as described in Chapter 6. The UNIX system remains active after the NMS shutdown with a login prompt displayed. NOTE To cancel the installation at any time during the procedure, press the Esc key. 1. Login, move to the installation directory, and initiate the installation program. At the login prompt, TYPE: root PRESS: Enter The system prompts: Password: TYPE: root password PRESS: Enter TYPE: cd /usr/nms/RNMS/Install/A6510 PRESS: Enter TYPE: ./Install PRESS: Enter 2. The install script scans for th availability of interrupts, I/O addresses, and memory addresses. The system displays the message: Installing NMS Multiple ANALYSIS 6510 support.... Searching for available interrupts... Searching for available starting addresses.... Searching for available starting controller memory addresses... 5-90 January 1997 6800-A2-GN22-30 Loading and Restoring Software 3. After the searches are complete, the system displays the message: Confirm The current system configuration will support only 1 IPC-900 board. If installation continues, 1 board will be configured. Strike ENTER when ready or ESC to stop. To continue, PRESS: Enter 4. The system prompts for the values to configure the IPC-900 card: Please enter the following system configuration information for IPC-900 board; The available interrupt(s) for the IPC-900 Board are: IRQ 2 IRQ 3 (default) IRQ 5 IRQ 10 IRQ 15 Type the interrupt number and strike the ENTER key or type Q to cancel installation. Striking ENTER alone will select the default. For the IRQ, TYPE: 5 PRESS: Enter NOTE The list of available IRQs as well as the I/O addresses and memory addresses is determined dynamically. Depending on the boards installed in the host, the IRQ, I/O and memory, output may vary. However, the installer should always enter the values listed in this install script. 5. The system prompts for the value of the starting I/O address: Please enter the following system configuration information for the IPC-900 board: The available starting I/O address for the IPC-900 Board are: Starting I/O address: 2A0 Starting I/O address: 2B0 . . . Starting I/O address: 3E0 6800-A2-GN22-30 January 1997 5-91 COMSPHERE 6800 Series Network Management System Type the starting I/O address and strike the ENTER key or type Q to cancel installation. Striking the ENTER alonewill select the default. For the starting I/O address, TYPE: 2B0 PRESS: Enter 6. The system prompts for the starting memory address: Please enter the following system configuration information for the IPC-900 Board: The available starting controller memory addresses for the IPC-900 Board are : A0000 default A2000 A4000 A6000 A8000 AA000 AC000 B8000 BA000 BC000 BE000 C0000 AE000 B0000 B2000 B4000 B6000 C2000 C4000 C6000 C8000 CA000 CC000 CE000 D0000 D6000 E0000 E2000 E4000 E6000 E8000 D2000 D4000 EA000 EC000 EE000 Type the starting controller memory address and strike the ENTER key or type Q to cancel installation. Striking the ENTER alone will select the default. For the Starting memory address, TYPE: D2000 PRESS: Enter 7. The system displays the following information before seeking verification: ********************************************** Board Configuration: Ports Card Type = IPC-900 Interrupt number = 5 I/O ports Starting address = 2B0 Controller Memory Starting address = D2000 ********************************************** Is this configuration acceptable? (y or n) If these values are correct, indicate yes as follows: TYPE: y PRESS: Enter If the values are incorrect, indicate no as follows: TYPE: n PRESS: Enter to reenter the values. 8. At this point, the installation script modifies some system configuration files and rebuilds the UNIX operating system. This takes a few minutes. 5-92 January 1997 6800-A2-GN22-30 Loading and Restoring Software 9. The system displays the following prompt: Do you want the kernel to boot by default? (y/n): TYPE: y PRESS: Enter 10. The system displays the following prompt: Do you want the kernel environment rebuilt? (y/n): TYPE: y PRESS: Enter 11. Shut down and reboot the system: TYPE: cd / PRESS: Enter TYPE: shutdown -g0 -y -i6 The command will shutdown and reboot the system. NOTE If you are migrating a database to Release 4.2, you must perform the migration before configuring your ANALYSIS network on NMS. Configuration After the ANALYSIS Gateway software is installed, the NMS application program must be started, and then the configuration data can be entered. After the data is entered, the NMS system must be rebooted. 1. After the ANALYSIS Gateway software is initialized the UNIX # prompt appears. At this prompt, TYPE: su \M nms PRESS: Enter 2. The Network Management System Menu appears. Select Start the system, TYPE: 1 PRESS: Enter 3. When prompted to continue, PRESS: Enter 6800-A2-GN22-30 January 1997 5-93 COMSPHERE 6800 Series Network Management System 4. The Network Management System Menu appears. TYPE: 11 PRESS: Enter 5. The UNIX login prompt appears. TYPE: ffw PRESS: Enter 6. When the NMS login screen appears, logon as admin. 7. Select Utilities from the Tasks menu and then, select UNIX from Utilities menu. A UNIX window appears. 8. At the UNIX $ prompt, TYPE: /usr/nms/RNMS/bin/DCE/config6510 PRESS: Enter 9. After reading the database, the system displays an ANALYSIS Selection menu (Figure 5-9). The letter n represents the number of ANALYSIS systems already installed. Maximum ANALYSIS 6510s supported = 6 n Analysis 6510(s) already installed Do you wish to: 1. 2. 3. 4. Add a 6510 to the system Remove a 6510 from the system Change a 6510's parameters Exit program Enter a number from 1-4... 492-13958-01 Figure 5-9. ANALYSIS Selection Menu 5-94 January 1997 6800-A2-GN22-30 Loading and Restoring Software Adding a 6510 to the 6800 Series NMS The following procedure provides information on adding a 6510 configuration to the 6800 Series NMS. 1. To add a new 6510, you must enter a name, a port number, and a count of local terminals. Begin by selecting the appropriate entry. TYPE: 1 PRESS: Enter 2. The system prompts for the name of the system to be added. Any combination of lowercase letters, digits, hyphens, and dots (.) may be entered. Enter Analysis 6510 name, 15 characters max... TYPE: ANALYSIS name PRESS: Enter This name displays on the 6800 Series NMS user interface as the ANALYSIS external system. 3. After entry of the system name, the system prompts for the IPC-900 port that will be used to interface with the ANALYSIS NMS. Select port number from list [1,2,3,4,5,6,7,8]... TYPE: IPC-900 port number PRESS: Enter 4. After the port number is selected, the system prompts for the number of 6510 terminals attached to the ANALYSIS controller. How many local terminals (1 — 6) are configured on this 6510?... TYPE: the number of terminals physically connected to the ANALYSIS NMS PRESS: Enter 6800-A2-GN22-30 January 1997 5-95 COMSPHERE 6800 Series Network Management System NOTE The total number of local terminals configured determines the number of 6800 Series NMS cut-through sessions to an individual ANALYSIS NMS. The following rules apply: NUMBER OF LOCAL TERMINALS NUMBER OF CUT-THROUGHS ALLOWED 5 1 2—6 6 — number of local terminals On the ANALYSIS side, you will be asked as a part of the syssetup procedure to enter the number of permitted cut-throughs. It is important that you enter the same number during that procedure as is calculated in this step. For example, assume you have two local terminals attached to your ANALYSIS NMS. Enter 2 in this step and the config6510 program will determine that four cut-through sessions are permitted (6 minus 2 = 4). On the ANALYSIS NMS side, you should enter 4 when prompted by the syssetup program for the number of cut-through sessions. (For additional information, refer to the ANALYSIS 6510 Automated Network Management System Reference Manual). 5. The system prompts you to confirm the information entered in the previous steps. Is the information correct [y or n, q to quit]? TYPE: y (if the displayed information is correct) PRESS: Enter 6. The database is updated and your selection is confirmed with the following message: Please wait... “system name” added to system where system name is the name entered in Step 2. 7. To exit the configuration process, TYPE: 4 PRESS: Enter 8. To add more 6510 configurations, return to Step 1. 5-96 January 1997 6800-A2-GN22-30 Loading and Restoring Software 9. After the requested ANALYSIS controller(s) is added, the system displays the following message: Do you wish to see a system summary? ( y or n)... If you respond with y (yes), the system displays a list in the following format: System Name CC Name Port # # Cut-Throughs “name” a1 “value” “value” “name2” a2 “value2” “value” Please note! For the changes you have made to take effect, the NMS system must be shut down and then restarted. 10. Program execution is completed and the system displays the UNIX prompt. You must shut down the NMS system and reboot the host computer. See Chapter 6 for detailed instructions on how to reset the host computer. Changing 6510 Parameters The following procedure provides information on changing the parameters for an existing 6510. 1. The ANALYSIS Selection menu (Figure 5-10) is displayed on your screen. The letter n represents the number of ANALYSIS 6510’s already configured. Maximum ANALYSIS 6510s supported = 6 n Analysis 6510(s) already installed Do you wish to: 1. 2. 3. 4. Add a 6510 to the system Remove a 6510 from the system Change a 6510's parameters Exit program Enter a number from 1-4... 492-13958-01 Figure 5-10. ANALYSIS Selection Menu (for Changing 6510 Parameters) To change the parameters for an existing 6510, TYPE: 3 PRESS: Enter 6800-A2-GN22-30 January 1997 5-97 COMSPHERE 6800 Series Network Management System 2. The system displays the following message: Please select the 6510. 1. “System name” 2. Cancel operation Enter a number from 1 to 7 depending on the number of 6510’s configured already. TYPE: number of the system to be changed PRESS: Enter 3. The system prompts you to change the ANALYSIS name, port number, and the number of local terminals on the ANALYSIS NMS. The current parameters display in brackets ([]). The following message appears: Enter Analysis 6510 name, 15 characters max [“system name”]... TYPE: the new system name PRESS: Enter Select port number from list [[1],2,3,4,5,6,7,8]... TYPE: the new port number PRESS: Enter How many local terminals (1 — 6) are configured on this 6510 [“value”]?... TYPE: the new number of local terminals PRESS: Enter 4. The system displays the information entered in Step 3 and prompts you for confirmation. You have entered the following information: ANALYSIS 6510 name = “name” Port Number = “value” Number of local terminals = “value” Is the information correct [y or n, q to quit]?... TYPE: y (or n if the information is not correct) PRESS: Enter If you enter n (no), the three prompts shown in Step 3 are displayed again enabling you to enter information. If you enter y (yes), the following message appears. parameters successfully changed 5. The ANALYSIS Selection menu appears. For additional changes, return to Step 1. To exit the procedure, TYPE: 4 PRESS: Enter 5-98 January 1997 6800-A2-GN22-30 Loading and Restoring Software 6. When asked to display the system summary, TYPE: n PRESS: Enter 7. Reset the host computer. Refer to Chapter 6, System Start-up and Shutdown. Removing a 6510 Configuration The following procedure provides information on removing a 6510 configuration from the 6800 Series NMS database. 1. The ANALYSIS Selection menu (Figure 5-11) is displayed on your screen. The letter n represents the number of ANALYSIS 6510’s already configured. To remove a 6510 configuration from the 6800 Series NMS database. TYPE: 2 PRESS: Enter 2. The system displays the following message: Warning! The following steps will be taken if you continue. 1. The 6510 support software in the 6800 NMS will be stopped. 2. All Historic Alert records and Trouble Tickets for the 6510 and its devices will be deleted from the NMS database. 3. All Facility Profiles having the 6510 or its devices at both endpoints (point-to-point circuits) will be deleted. 4. NOTE! Facility Profiles and bridging devices related to multipoint circuits will NOT be deleted. Do you wish to continue? (y or n)... TYPE: y PRESS: Enter 3. The following message appears: Please select the 6510 1. “System name” 2. Cancel operation Enter a number from 1 to 7 depending on the number of 6510’s already configured TYPE: number of the system to be removed PRESS: Enter 6800-A2-GN22-30 January 1997 5-99 COMSPHERE 6800 Series Network Management System 4. The following counter appears: Elapsed Time 00:00:00 The counter increments every five seconds. During this procedure, the keyboard is locked and you cannot stop the removal. For large ANALYSIS network configurations, the removal may take longer than one hour. When the process is completed, the following message appears: “System name” removed from the system 5. The ANALYSIS Selection menu appears again (see Step 1 for menu). To remove additional 6510’s, return to Step 1. To exit the procedure, TYPE: 4 PRESS: Enter 6. When asked to display the system summary, TYPE: 4 PRESS: Enter 7. Reset the host computer. For additional information, refer to Chapter 6, System Start-up and Shutdown. Setting Data Rates The default data rate for the physical link between the 6800 Series NMS and the ANALYSIS NMS is 9600 bps. This rate may be changed as follows. • For the ANALYSIS controller, run syssetup following the procedures in the ANALYSIS 6510 Automated Network Management System Reference Manual. For the 6800 Series NMS, edit the port configuration for the port connecting the ANALYSIS controller using the Edit Port Configuration (edpc) command. In the input form for the edpc command change the number in the speed field. Changing the number in this field changes the data rate. The initial data rate is 9600. Valid data rates are 1200, 2400, 4800, and 9600. The recommended data rate for local connections is 9600 bps. For remote connections, the recommended data rate is the highest rate of your data communications equipment. If an invalid rate is entered, the system uses the initial rate set. CHANGES IN RATES DO NOT TAKE EFFECT UNTIL THE SYSTEM STOPS AND NMS IS RESTARTED. YOU MUST RESET THE ANALYSIS NMS FOR THE CHANGES TO TAKE EFFECT. 5-100 January 1997 6800-A2-GN22-30 System Start-Up and Shutdown Overview . . . . . . . . . . . . . . . . . . . . . . . . . . . . . . . . . . . . . . . . . . . . . . . . . . . . Starting UNIX on the Host . . . . . . . . . . . . . . . . . . . . . . . . . . . . . . . . . . . . . . . Starting the NMS Application Program . . . . . . . . . . . . . . . . . . . . . . . . . . . . . Shutting Down the NMS Application Program . . . . . . . . . . . . . . . . . . . . . . . Shutting Down UNIX on the Host . . . . . . . . . . . . . . . . . . . . . . . . . . . . . . . . . Starting UNIX on the UIP . . . . . . . . . . . . . . . . . . . . . . . . . . . . . . . . . . . . . . . Starting the UIP Application Program . . . . . . . . . . . . . . . . . . . . . . . . . . . . . . Shutting Down the UIP Application Program . . . . . . . . . . . . . . . . . . . . . . . . Shutting Down UNIX on the UIP . . . . . . . . . . . . . . . . . . . . . . . . . . . . . . . . . . 6 6-1 6-2 6-2 6-5 6-7 6-8 6-8 6-9 6-10 Overview This chapter provides the start-up, reset, and shutdown procedures for the host processor and the UIP. As shown in Table 6-1 and Table 6-2, each procedure involves a two-step process. Table 6-1 Host Processor Start-Up, Reset, and Shutdown Modifications Host Reset Host Start-up Host Shutdown Step 1: Start UNIX Step 1: Shut Down NMS Step 1: Shut Down NMS Step 2: Start NMS Step 2: Start NMS Step 2: Shut Down UNIX Table 6-2 UIP Start-Up and Shutdown UIP Start-Up 6800-A2-GN22-30 UIP Shutdown Step 1: Start UNIX Step 1: Shut Down UIP Step 2: Start UIP Step 2: Shut Down UNIX January 1997 6-1 COMSPHERE 6800 Series Network Management System Starting UNIX on the Host To start the UNIX operating system, perform the following steps: 1. With the RESET key in the RUN position, turn on the power switch on the host processor. The UNIX system will proceed to boot, and as it boots it will display a series of self-check and diagnostic messages on the console screen. After these messages have displayed, the following message will appear: Type CONTROL-d to proceed with normal start-up, (or give root password for system maintenance): 2. To select normal start-up, press the Ctrl and d keys simultaneously. 3. The boot process will continue. When the system has fully booted, the login prompt will appear on your screen. Starting the NMS Application Program Once UNIX has been started, you can start the NMS application program. To do so, perform the following steps: 1. At the login: prompt, TYPE: nms PRESS: Enter 2. In response, the Password: prompt will appear. TYPE: the NMS password (the default password is startmenu) PRESS: Enter The Network Management System Menu is displayed, as shown in Figure 6-1. Network Management System Select: 1) Start the system 2) Stop the system 3) System status 4) Backup system database 5) Restore system database 6) Enable/Disable auto start 7) Change password 8) Download modem firmware file 9) Shutdown UNIX 10) Install PTF 11) Return to Console login Enter Number [1,2,3,4,5,6,7,8,9,10,11]: 491-13839 Figure 6-1. Network Management System Menu 6-2 January 1997 6800-A2-GN22-30 System Start-Up and Shutdown 3. To select Start the system, TYPE: 1 PRESS: Enter The following message displays, indicating that the NMS start-up was successful: Starting the AT&T Paradyne NMS system, Please wait... Performing database error check... Database error check is continuing, please wait... Database error check has been completed. The AT&T Paradyne NMS system has been successfully started. Press RETURN to continue 4. To continue, you have to redisplay the Network Management System Menu (Figure 6-1). To do this, PRESS: Enter 5. With the Network Management System Menu displayed, TYPE: 11 PRESS: Enter to select Return to Console login. The unix login: prompt will appear. 6. At the unix login: prompt, TYPE: ffw PRESS: Enter 7. The system will prompt you for the full-feature workstation (FFW) password. The default is no password (merely press Enter). TYPE: the FFW password PRESS: Enter The following message displays: Welcome to Altos SCO Unix System V/386 Release 3.2 followed by the FFW Login window, as shown in Figure 6-2. 6800-A2-GN22-30 January 1997 6-3 COMSPHERE 6800 Series Network Management System Figure 6-2. FFW Login Window 8. With the Login window displayed and the cursor in the Login: field, TYPE: admin PRESS: Enter The cursor will jump to the Password: field. TYPE: the admin password (the default password is admin1) PRESS: Enter The 6800 Series NMS Tasks menu window displays, as shown in Figure 6-3. Figure 6-3. 6800 Series NMS Tasks Menu Window 9. The 6800 Series NMS Tasks window is really a menu. Select Manager by pointing to it with the mouse and clicking the button. The Main Menu for the 6800 Series NMS is displayed in the Manager window. The Manager window is shown in Figure 6-4. 6-4 January 1997 6800-A2-GN22-30 System Start-Up and Shutdown Figure 6-4. Manager Window 10. Check the system date and time and change them if necessary. TYPE: sdt PRESS: Enter The Set Date/Time command is sdt. It will prompt you for the correct date and time. Enter them in the proper format (MM-DD-YY and HH:MM:SS) and PRESS: Enter The results of the Set Date/Time (sdt) command appear on a results form. For information on the other tasks listed in the 6800 Series NMS Tasks menu window (Figure 6-3), see the COMSPHERE 6800 Series Network Management System User’s/System Administrator’s Guide. Shutting Down the NMS Application Program To shut down the NMS application program, perform the following steps: 1. On the full-feature workstation, point the mouse at the Logoff command button and click the mouse button. Verify that you want to log off by clicking on Yes. All windows close and the Login window appears. Press the right mouse button and select Quit. Select OK. 2. The login: prompt appears. 3. Point the mouse at the gray screen and click the mouse button. The Workspace menu appears. Highlight Quit with the mouse and then point to OK and click the mouse button. 6800-A2-GN22-30 January 1997 6-5 COMSPHERE 6800 Series Network Management System 4. To proceed with the shutdown, TYPE: nms PRESS: Enter The system will prompt you to enter the NMS password. TYPE: the NMS password (the default is startmenu) PRESS: Enter The Network Management System Menu (Figure 6-1) displays. 5. To select Stop the system, TYPE: 2 PRESS: Enter A list of all running NMS processes displays, followed by the message: They will be shut down? (y/n) [n]: 6. In response, TYPE: y PRESS: Enter The following message displays: Shutting down the AT&T Paradyne NMS... . . . The AT&T Paradyne NMS has been shutdown. Press RETURN to continue 7. To continue, PRESS: Enter The Network Management System Menu (Figure 6-1) will be displayed. You can use this menu to restart the NMS application (option 1) or to shut down UNIX and power down the system (option 9). 6-6 January 1997 6800-A2-GN22-30 System Start-Up and Shutdown Shutting Down UNIX on the Host Once the NMS application program has been shut down, you can shut down UNIX and power down the entire system. The following procedure explains how to do this: 1. The Network Management System Menu (Figure 6-1) displays. TYPE: 9 PRESS: Enter to select Shutdown UNIX. The following message displays: Are you sure you want to shut down UNIX? (y/n): 2. To proceed with the shutdown, TYPE: y PRESS: Enter NOTE Do not shut off the power until the message shown in Step 3 is displayed. Indicating that it is safe to power off. The system displays the following message: Shutting down UNIX. You may turn the power off once UNIX has been shutdown. Shutdown started (date/time) Broadcast message from root (console) on unix (date and time) THE SYSTEM IS BEING SHUTDOWN NOW ! ! ! Log off now or risk your files being damaged. NOTE The following message is broadcast across the system to alert other users of the impending shutdown. 3. When the following message displays, either power the system down, or press any key to reboot the system. **Safe to Power Off** - or **Press Any Key to Reboot** 6800-A2-GN22-30 January 1997 6-7 COMSPHERE 6800 Series Network Management System Starting UNIX on the UIP To start the UNIX operating system, perform the following steps. 1. With the RESET key in the RUN position, turn on the power switch on the System 5000. The UNIX system will proceed to boot, and as it boots it will display a series of self-check and diagnostic messages on the console screen. After these messages have displayed, the following message displays: Type CONTROL-d to proceed with normal start-up (or hit return for system maintenance): 2. To select normal start-up, press the Ctrl and d keys simultaneously. 3. The boot process will continue. When the system has fully booted, the login prompt displays on your screen. Starting the UIP Application Program Once UNIX has been started, you can start the UIP application program. To do so, perform the following steps: 1. At the login prompt: TYPE: uip PRESS: Enter 2. In response, the password prompt displays. TYPE: the UIP password (the default UIP password is startmenu) PRESS: Enter The Network Management System Menu displays (Figure 6-5). Network Management System Select: 1) 2) 3) 4) 5) Start the system Stop the system Shutdown UNIX Install PTF Return to Console login Enter number [1,2,3,4,5]: 494-13959-01 Figure 6-5. Network Management System Menu 6-8 January 1997 6800-A2-GN22-30 System Start-Up and Shutdown 3. To select Start the system, TYPE: 1 PRESS: Enter The following message displays: The [UIP] start facility has been successfully added to the system. The [UIP] will be started automatically, please wait... Although the UIP is active, it only becomes functional if the NMS host is active. If the host is not active, the UIP will wait until the NMS host becomes active. The following message displays: Press RETURN to continue PRESS: Enter 4. The Network Management System Menu displays. At this point the UIP is active and functional if the NMS host is active (up and running). TYPE: 5 PRESS: Enter to select Return to Console Login. 5. At the login prompt, TYPE: ffw PRESS: Enter The system prompts for password. TYPE: the full-feature workstation password PRESS: Enter The welcome message appears followed by the FFW Login window (see Figure 6-2). Shutting Down the UIP Application Program To shut down the UIP application program, perform the following steps: 1. The Network Management System Menu displays. To begin shutdown, select Stop the system. TYPE: 2 PRESS: Enter 2. The following message displays: There are [UIP] processes running, The processes will be shut down please wait... The [UIP] facility has been removed. 6800-A2-GN22-30 January 1997 6-9 COMSPHERE 6800 Series Network Management System 3. The system will prompt you to continue. Press RETURN to continue PRESS: Enter 4. The Network Management System Menu displays. At this point the UIP application program has been stopped but the UNIX operating system continues to run. Shutting Down UNIX on the UIP Once the UIP application program has been shut down, you can shut down UNIX and power down the entire system. To do so, perform the following steps: 1. The Network Management System Menu displays. Select Shutdown UNIX: TYPE: 3 PRESS: Enter The following message displays: UNIX will now be shutdown? (y/n): 2. To proceed with the shutdown, TYPE: y PRESS: Enter 3. The system displays the following message: You may turn the power off once UNIX has been shutdown. Do not shut off the power until the message shown in Step 4 displays, indicating that it is safe to power off. 4. The system displays the following message: Shutdown started (date/time) Broadcast message from root (console) on uip-1 (date/time) THE SYSTEM IS BEING SHUT DOWN!!! Log off now or risk your files being damaged. NOTE This message is broadcast across the system to alert other users of impending shutdown. 5. When the following message displays, either power down the system or press any key to reset the system. Safe to Power Off - or Press Any Key to Reboot. 6-10 January 1997 6800-A2-GN22-30 Performing Migration Overview . . . . . . . . . . . . . . . . . . . . . . . . . . . . . . . . . . . . . . . . . . . . . . . . . . . . Introduction to Migrating Databases . . . . . . . . . . . . . . . . . . . . . . . . . . . . . . . Release 1 Database Migration . . . . . . . . . . . . . . . . . . . . . . . . . . . . . . . . . . . . Databases Migrated . . . . . . . . . . . . . . . . . . . . . . . . . . . . . . . . . . . . . . . . . . Cleaning Up the Database . . . . . . . . . . . . . . . . . . . . . . . . . . . . . . . . . . . . . Backing Up the Database . . . . . . . . . . . . . . . . . . . . . . . . . . . . . . . . . . . . . Migrating the Database . . . . . . . . . . . . . . . . . . . . . . . . . . . . . . . . . . . . . . . Checking the Migrated Database . . . . . . . . . . . . . . . . . . . . . . . . . . . . . . . . Data Integrity Verification . . . . . . . . . . . . . . . . . . . . . . . . . . . . . . . . . . Profile Data Changes and Corrections . . . . . . . . . . . . . . . . . . . . . . . . . Release 2 Database Migration . . . . . . . . . . . . . . . . . . . . . . . . . . . . . . . . . . . . Databases Migrated . . . . . . . . . . . . . . . . . . . . . . . . . . . . . . . . . . . . . . . . . . Cleaning Up the Database . . . . . . . . . . . . . . . . . . . . . . . . . . . . . . . . . . . . . Backing Up the Database . . . . . . . . . . . . . . . . . . . . . . . . . . . . . . . . . . . . . Migrating the Database . . . . . . . . . . . . . . . . . . . . . . . . . . . . . . . . . . . . . . . Checking the Migrated Database . . . . . . . . . . . . . . . . . . . . . . . . . . . . . . . . Release 3.0/3.1 Database Migration . . . . . . . . . . . . . . . . . . . . . . . . . . . . . . . . Databases Migrated . . . . . . . . . . . . . . . . . . . . . . . . . . . . . . . . . . . . . . . . . . Cleaning Up the Database . . . . . . . . . . . . . . . . . . . . . . . . . . . . . . . . . . . . . Backing Up the Database . . . . . . . . . . . . . . . . . . . . . . . . . . . . . . . . . . . . . Migrating the Database . . . . . . . . . . . . . . . . . . . . . . . . . . . . . . . . . . . . . . . Checking the Migrated Database . . . . . . . . . . . . . . . . . . . . . . . . . . . . . . . . Release 4.0/4.1 Migration . . . . . . . . . . . . . . . . . . . . . . . . . . . . . . . . . . . . . . . . Databases Migrated . . . . . . . . . . . . . . . . . . . . . . . . . . . . . . . . . . . . . . . . . . Cleaning Up the Database . . . . . . . . . . . . . . . . . . . . . . . . . . . . . . . . . . . . . Backing Up the Database . . . . . . . . . . . . . . . . . . . . . . . . . . . . . . . . . . . . . Migrating the Database . . . . . . . . . . . . . . . . . . . . . . . . . . . . . . . . . . . . . . . Checking the Migrated Database . . . . . . . . . . . . . . . . . . . . . . . . . . . . . . . . 7 7-1 7-2 7-3 7-3 7-4 7-7 7-8 7-13 7-13 7-14 7-16 7-16 7-17 7-17 7-19 7-24 7-25 7-25 7-26 7-26 7-26 7-32 7-33 7-33 7-34 7-34 7-34 7-40 Overview This chapter provides procedural information on NMS database migration to Release 4.2 of the COMSPHERE 6800 Series Network Management System. Database migration allows Release 1, Release 2, Release 3.x, and Release 4.x NMS network configuration and fault information to be transferred automatically to the Release 4.2 NMS. This database migration procedure will eliminate the need to reenter database information into a new Release 4.2 NMS. The migration procedure used is dependent on the original NMS software release. The procedures for migrating Release 1 NMS, Release 2, Release 3.x, and Release 4.x NMS are described in detail in this chapter. 6800-A2-GN22-30 January 1997 7-1 COMSPHERE 6800 Series Network Management System NOTE Database migration from a System Controller to Release 4.2 NMS is still possible but is outside the intent of this document. Contact your Field Service Representative for assistance in migrating from a System Controller. CAUTION If you are migrating from a host whose name is not unix or a UIP whose name is not uip-1, you must reinstall both UNIX and NMS on those processors. When reinstalling, you must specify the name(s) from the previous NMS. The NMS database contains the name of the processor, host or UIP, from which it received an alarm or alert. The name of the database must match the name(s) of the processor(s) currently connected to the NMS. Introduction To Migrating Databases The following sections explain how to migrate the NMS database from each of the following systems to Release 4.2 of the COMSPHERE 6800 Series NMS: • COMSPHERE 6800 Series NMS (6820 or 6830) Release 1 • COMSPHERE 6800 Series NMS (6820) Release 2 • COMSPHERE 6800 Series NMS Release 3.x • COMSPHERE 6800 Series NMS Release 4.x Although the specific procedures vary for each of these migration paths, the overall methodology is the same, and entails these four activities: 1. Cleaning up the database 2. Backing up the database 3. Migrating the database 4. Checking the migrated database The remaining sections of this chapter provide detailed instructions for performing these activities for each migration path. 7-2 January 1997 6800-A2-GN22-30 Performing Migration NOTE If there are any 741 nodes in your network, you must know the node number before executing the migration procedure. If you do not know which nodes are 741 nodes, execute the Hardware Module Summary (hms) command to each 740 configured node in your network; this command causes a node to identify itself. Release 1 Database Migration When a customer migrates the database from the Release 1 NMS to the Release 4.2 6800 Series NMS, all device profile and historical alarm information is transferred to the appropriate databases. Facility profiles are automatically generated for multiplexers based on device profile, link profile, and node connectivity information. Site profiles are automatically created based on site name and location information in the earlier device profiles. Channel group tables are also transferred. However, trouble tickets and routines are not transferred. The following features were supported by Release 1 but are not supported by Release 4.2: • The ability to increase the font size of the Network Control window • Doubleclicking on windows to enlarge font size • Multiple profile edits • Search device profile • The ability to place trouble tickets and database report commands within routines Databases Migrated NOTE The customer should perform the clean up procedure prior to Paradyne upgrading to the System 5000 hardware. It is the customer’s responsibility to verify the accuracy of the database prior to the migration. The following databases will be migrated: • The device profile database • The link profile database (profiles are migrated to facility profiles in this process) • The site profile database (profiles are automatically created based on information found in migrated device profiles) • The historical faults database (migration of faults data may be bypassed via a user-controlled option) • The node connectivity table and channel group information 6800-A2-GN22-30 January 1997 7-3 COMSPHERE 6800 Series Network Management System The following databases will not be migrated: • Port configuration database • User profile databases • Routines and scheduler databases • Trouble tickets The databases that are not migrated must be manually entered into the Release 4.2. For this purpose, print a hard copy of user profiles, routines, schedules, and trouble tickets that need to be migrated. Cleaning Up the Database A number of device profile fields in the source NMS database should be checked before migration. If the data in these fields is inaccurate, incomplete, or in a format not suitable for migration, the impact may be multiple omissions or inaccuracies in the Release 4.2 database. An additional concern is that many fields are converted to a single case (either lower- or uppercase). Field values that differ only in the case may create unintentional redundancies. As a result, a field or an entire record may be discarded. Such impacts can be corrected following migration by editing or creating Release 4.2 profiles. However, eliminating potential problems beforehand will minimize effort and contribute to a smoother transition to Release 4.2. The following fields require specific attention: Device Address • This field is required in Release 4.2 for all migrated device profiles. • All letters are converted to lowercase. • All other characters except numbers, periods, hyphens, and slashes, are deleted. • Only one profile will be accepted for a given address. Later occurrences of the same address will cause the profile to be discarded (although a warning message will be displayed). Device Name • This field is required in Release 4.2 and must be unique. • All letters are converted to lowercase. • All other characters except numbers, periods, and hyphens, are converted to hyphens, and any successive hyphens are converted to a single hyphen. • If no device name exists, a name containing the device type and a unique number is generated automatically. • If the same device name appears in more than one record, the first record is migrated without changes, and a unique device name is generated for successive records of the same name (although a warning message is displayed). 7-4 January 1997 6800-A2-GN22-30 Performing Migration Device Model • All letters are converted to uppercase. • All characters except numbers, periods, and hyphens, are converted to hyphens, and successive hyphens are converted to a single hyphen. Serial Number • All letters are converted to lowercase. • All characters except numbers, periods, and hyphens, are converted to hyphens, and successive hyphens are converted to a single hyphen. Circuit Name • If two devices are connected, they should have the same circuit name. This allows facility profiles to be created for connections, which causes the connections to be displayed on the network map. Site Name • A site name can contain any character except the following: – Space – Asterisk (*) – Comma (,) – Question Mark (?) – Hyphen (-) – Exclamation Mark (!) – Quotation Mark (‘‘) – Back slash (\) • All letters are converted to lowercase. • All other characters except numbers, periods, and hyphens, are converted to hyphens, and successive hyphens are converted to a single hyphen. • The site name should be spelled uniformly in all profiles and special attention should be given to the use of spaces and hyphens. Otherwise, more than one site profile may be created for the same site. For example: HoustonTX becomes houstontx Houston, TX becomes houston-tx Houston Tex becomes houston-tex • Distinct site names should be used whenever devices have different site contact phone numbers, or are to be positioned at different locations on the network map. Using the same site name in such instances will result in only one phone number being migrated, and only one site being created and displayed on the network map. 6800-A2-GN22-30 January 1997 7-5 COMSPHERE 6800 Series Network Management System • If a site name is not found, one will be generated using the significant data from the site contact phone number. If this data is unavailable, the device will be mapped to an unknown site. Site Contact Phone • The country code (if present), area code, and local exchange portion of the phone number determine the positioning of the site on the Release 4.2 network map. Standard area codes and local exchange information should therefore be used in all phone numbers. If the area code and/or local exchange information is missing or invalid, the site will be positioned, together with all other such sites, at the ‘‘unnamed’’ location. Sites having 800 area codes will also be placed at the unnamed location. • A leading 1 in the phone number is not necessary and will be ignored. • The country code for the United States (001) is assumed by default so that U.S. numbers do not need to be specified in international format. • International phone numbers that were correctly interpreted by the Release 1 network map (i.e., the devices appeared at the correct location) already conform to the required format for Release 4.2 and require no modification. • In all other cases, format international numbers as follows: — Precede the entire phone number with a pound sign (#) to identify it as an international number. — Follow this with a contiguous sequence of digits comprised of the international country code and, if it exists, the city code. No non-digits (spaces, hyphens, letters) should appear between the country and city codes. (Refer to the International Dial Codes section of the COMSPHERE 6800 Series Network Management System User’s/System Administrator’s Guide for a list of country and city codes.) — If additional digits are entered following the country and city code, they must be preceded by a non-digit to delimit them from the above. For example: The United Kingdom has the country code 44, and Belfast has the city code 232 (country and city codes vary in length). A device located in Belfast could be correctly positioned via any of the following phone numbers: #44232 #44232-555-1212 (the hyphen is the delimiter) #44232 555-1212 (the space is the delimiter) However, the following examples would be incorrect: #44 232 (city and country codes are not contiguous) #44-232-555-1212 (same as above) #44232555-1212 (delimiter is missing after city and country codes) 7-6 January 1997 6800-A2-GN22-30 Performing Migration • In the Release 4.2 database, the first three digits of the 44232 combination are placed in the country code field, and the remainder are placed in the city code field. The country and city codes for Belfast would appear in the Release 4.2 site profiles as 442 and 32 rather than 44 and 232. However, this does not cause an error in site placement. Although these fields can be revised in the site profile after migration, there is no technical need to do so. • Except for the delimiters described above, non-digits in the phone number are ignored. Backing Up the Database For both the 6830 and 6820 NMS, the data to be migrated is downloaded to a cartridge tape using the Release 1.0 NMS database backup utility. This data is then uploaded to the Release 4.2 6800 Series NMS via this backup cartridge tape. Data transfer is nondestructive; no data on the source NMS is modified or deleted. Perform the following steps to backup the database: 1. With the Network Management System menu displayed on the Release 1 NMS console, select Copy/Restore Data. The Copy/Format/List/Restore menu appears. 2. Select Copy Databases to Removable Medium. To do this, TYPE: c PRESS: Enter The User Data: Copy menu appears. 3. Select All of the Above Databases. To do this, TYPE: 1 PRESS: Enter The User Data: Copy Medium Selection menu appears. NOTE Although not all databases are migrated to the Release 4.2 6800 Series NMS, for archival purposes, all databases are backed up. Once the backup process is completed, choose the List Databases Stored on Removable Medium option on the User Data: Copy/Format/List/Restore menu for a printed listing of what is contained on the backup tape. 4. Select cartridge tape as the storage medium. To do this, TYPE: c PRESS: Enter The User Data: Copy Cartridge Tape Selection menu appears. 6800-A2-GN22-30 January 1997 7-7 COMSPHERE 6800 Series Network Management System 5. Insert a quarter-inch data cartridge into the tape drive, then TYPE: y PRESS: Enter to begin the copying process. Messages are displayed as databases are copied from the hard disk to the cartridge tape. 6. Write-protect the tape. Migrating the Database Following physical transfer, data is translated to the values and internal representations which are consistent with the Release 4.2 database schema. The translated data is then used to populate the following Release 4.2 databases: • Device Profile • Site Profile • Facility Profile • Historical Alerts In addition to INFORMIX data, files created by the Release 1 multiplexer application are migrated without translation for use in Release 4.2. This multiplexer data does not correspond to any INFORMIX tables. To migrate the existing Release 1 database to the Release 4.2 NMS, perform the following steps: NOTE The NMS application must not be running. 1. At the Console Login: prompt, TYPE: root PRESS: Enter 2. From the pound sign (#) prompt, TYPE: ksh /usr/nms/adm/installDb PRESS: Enter The AT&T Paradyne NMS Parameters menu (Figure 7-1) appears: 7-8 January 1997 6800-A2-GN22-30 Performing Migration AT&T Paradyne NMS Parameters: 1 2 3 4 Initialize ONLINE Partition Initialize NMS Database Include Migration Data Rebuild NMS Database Indices n n n n cont To Continue quit To abort If you wish to modify the NMS parameters Enter number (1,2,3,4,cont or quit): 492-13960 Figure 7-1. AT&T Paradyne NMS Parameters Menu (Release 1 Database Migration) 3. The INFORMIX OnLine partition has not been initialized since NMS installation, TYPE: 1 PRESS: Enter to select Initialize ONLINE Partition. The following message appears: Do you wish to initialize the ONLINE partition? (y/n) [n]: 4. To initialize the partition, TYPE: y PRESS: Enter A warning will appear. To proceed, PRESS: Enter 5. All user-created NMS databases must be initialized in preparation for migration. TYPE: 2 PRESS: Enter to select Initialize NMS Database. The following message appears: Do you wish to initialize the NMS database (y/n) [n]: 6. To initialize the NMS database, TYPE: y PRESS: Enter The following message appears: WARNING: Initializing the NMS database will replace it with default values. Hit <Enter> to continue or <q> to quit: 6800-A2-GN22-30 January 1997 7-9 COMSPHERE 6800 Series Network Management System 7. To continue with the migration process, PRESS: Enter 8. If there is a database from Release 1 to be converted to Release 4.2 format, TYPE: 3 PRESS: Enter to select Include Migration Data. The following message appears: Do you wish to include migration data from a previous NMS? (y/n) [n]: 9. To proceed, TYPE: y PRESS: Enter The following message appears: Enter the previous NMS type (sc, r1, r2, r3, r3.1, r4, r4.1): 10. Enter the appropriate type, TYPE: r1 PRESS: Enter The original menu (Figure 7-2) appears with the selected type in parentheses after Option 3: AT&T Paradyne NMS Parameters: 1 2 3 4 Initialize ONLINE Partition Initialize NMS Database Include Migration Data (r1) Rebuild NMS Database Indices y y y y cont To Continue quit To abort If you wish to modify the NMS parameters Enter number (1,2,3,4,cont or quit): 494-13960a-01 Figure 7-2. Original Menu Showing Selected Type (r1) 11. To rebuild the NMS data base indices, TYPE: 4 PRESS: Enter 7-10 January 1997 6800-A2-GN22-30 Performing Migration 12. To continue, TYPE: y PRESS: Enter 13. To continue, TYPE: c PRESS: Enter The following message appears: xxxx Data Base Initialization xxxx followed by several console messages indicating the initialization of the INFORMIX OnLine. Once completed, the following message appears: xxxx Data Base Initialization Completed xxxx followed by several console messages indicating the start-up of database servers. Once completed, the following message appears: Beginning Migration Procedures Device data will be migrated from the previous NMS Do you also wish to migrate fault data (y or n)? [y]. 14. To transfer historical fault data or to skip fault transfer, TYPE: y or n PRESS: Enter The following message appears: Enter the previous NMS type (sc300, sc400, 6820r1, 6830r1, restore): 15. Enter the previous NMS type, TYPE: 6820r1 or 6830r1 PRESS: Enter The following message appears: Insert the migration cartridge tape containing the Backup data you downloaded before upgrading your NMS. Please enter ‘‘ready’’ when done: 16. Insert the backup cartridge tape into the Release 4.2 6800 NMS host computer. Then, TYPE: ready PRESS: Enter The following message appears: Data Upload Completed Successfully You may now remove the cartridge tape. Save it for a backup. Please enter ‘‘ready’’ when done: 6800-A2-GN22-30 January 1997 7-11 COMSPHERE 6800 Series Network Management System 17. Remove the backup cartridge tape, label it, and store it in a secure place. To continue, TYPE: ready PRESS: Enter As the migration process proceeds, the system displays status messages at various stages reporting the progress of the migration to that point. 18. You will now be queried for 741 multiplexer node numbers as follows: In order to migrate the Multiplexer device profiles accurately, please provide the node numbers for all 741 Multiplexers. Please enter a node number or ‘‘done’’ to end the list: 19. List all 741 multiplexer node numbers supported by the NMS and PRESS: Enter after each one. When the list is complete (or if there are none), TYPE: done PRESS: Enter After migration completes, the following message appears: Now rebuild the NMS database indices. 20. When the pound sign (#) prompt appears, TYPE: exit PRESS: Enter to return to the Console Login: prompt. 21. At the Console Login: prompt, TYPE: nms PRESS: Enter TYPE: The nms password (the default is startmenu) PRESS: Enter The Release 4.2 6800 Series NMS menu appears. 22. To continue, TYPE: 1 PRESS: Enter to select Start the System. The following message appears: Starting the AT&T Paradyne NMS system. Please wait... 7-12 January 1997 6800-A2-GN22-30 Performing Migration The system performs database error checking and then starts the NMS. When the start-up is complete, the following message appears: The AT&T Paradyne NMS system has been successfully started. Press RETURN to continue 23. To continue, PRESS: Enter The Release 4.2 6800 Series NMS menu appears. 24. To return to the Console Login: prompt, TYPE: 11 PRESS: Enter 25. At the Console Login: prompt, TYPE: nms PRESS: Enter TYPE: The full-feature workstation password (the default is no password; just press Enter) PRESS: Enter The NMS application is brought up and the NMS login window appears. Checking the Migrated Database Following NMS start-up the integrity of the migrated data should be verified. The following procedures may be executed for that purpose. Data Integrity Verification To verify the integrity of the migrated data, perform the following steps. 1. Bring up the System Management window and execute the Create Network Map (crnm) command. Refer to the COMSPHERE 6800 Series Network Management System Core Command Reference Manual for details on all commands. 2. Following completion of the Create Network Map (crnm) command, bring up the network map window and inspect the network map visually. NOTE Circuit names and device addresses are not displayed on the Release 4.2 network map. Device names and site names are displayed. 6800-A2-GN22-30 January 1997 7-13 COMSPHERE 6800 Series Network Management System 3. Execute the Display Device Profile (dsdp) command to verify profiles for three devices. Verify the accuracy of the information. 4. Execute the Display Site Profile (dssp) command to examine profiles for three sites. Verify the accuracy of the information. 5. Execute the Display Facility Profile (dsfp) command to examine facility profiles associated with three devices. 6. If the ACCULINK Network Manager (ANM) is installed, execute the List Facility Profile (lsfp) command, selecting T1 for the facility type and m2/* for Device(s). Compare the screen results with a hard copy output from the List Node Connectivity (lsnc) command on the source system. 7. If ANM is installed, execute the Hardware Module Summary (hms) command on three ACCULINK devices. 8. Execute the Device Health Status (dhs) command on available device types, e.g., three DATAPHONE II devices, and three COMSPHERE devices. 9. Run Alert History reports to list Historical Alerts using the Detailed Alert Report (dar) and Alert Report Summary (ars) commands. 10. When the migration is complete, execute the Edit Alert Monitoring State (edams) command to turn on polling. NMS will then automatically acquire the current feature packages/versions for the multiplexer network, if ANM is installed. Profile Data Changes and Corrections The Edit Profile commands, Edit Site Profile (edsp), Edit Device Profile (eddp), Edit Facility Profile (edfp), and the Identity (id) command provide mechanisms for changing or correcting the migrated data. The following is a list of changes to consider: 1. When migration completes successfully, the messages sent to the console can be reviewed to take note of any warning messages as follows: cd /usr/tmp pg migrate.err pg migrate.out The above files are eventually deleted by the NMS. The warning messages indicate any significant deletions or modifications of profiles or fields. You should determine if corrective action is necessary. 2. If 3600 Series DSUs are managed by the NMS, the Release 4.2 network commands for these devices will fail if the Model Number field is not populated. This can be done automatically via an Identity (id) command, in which the update device profile option is selected. An Identity (id) command can be executed globally (e.g., to update all devices on one or more control channels). However, a global command affecting a large number of devices may take hours to complete. If only a few of the affected devices are 3600 Series DSUs, manually updating these profiles via the Edit Device Profile (eddp) command may be quicker. 7-14 January 1997 6800-A2-GN22-30 Performing Migration 3. Changes to site profiles are frequently needed because site data is extracted from device profiles fields which may be inaccurate or incomplete. The results may be the following: • Multiple site names (and profiles) for a single site. Corrective Action: use the Edit Device Profile (eddp) command to use a single site name for all devices at a given location. Then delete the site profile using the Delete Site Profile (dlsp) command for all other site names no longer used at that location. • Sites positioned at the unnamed site due to an invalid site contact phone number. Corrective Action: using the network map, examine the object list at the unnamed site. These sites can be repositioned using the Edit Site Profile (edsp) command to provide correct city code and country code data (or latitude/longitude data). When all site profiles have been updated, run the Create Network Map (crnm) command. Then bring up a new network map. The sites will appear repositioned. 4. Run the Facility Inventory Report (fir) or the List Facility Profile (lsfp) command to list facilities having the facility types mayexist. The mayexist cases result from ambiguous information about connections between devices. Facility profiles which do not correspond to actual existing facilities may be removed using the Delete Facility Profile (dlfp) command. 5. Run the List Device Profile (lsdp) command to list unmanaged device profiles having the device type bridge. Bridges are created automatically by the migration utility to describe a multipoint circuit. They are assumed to be colocated with the upstream device, while they may actually be located elsewhere. • Obtain a list of multipoint bridges run the List Device Profile (lsdp) command to select devices having the device type bridge. • To obtain a list of facilities connected to bridges, run a Facility Inventory Report (fir) or a List Facility Profile (lsfp) command to search for facility types ctrltobr (control to bridge) or brtotrib (bridge to tributary). • Use the Edit Device Profile (eddp) command to correct the site location for those bridges that are not colocated with the control modem. Facility profiles having these bridges as endpoints will be automatically updated to reflect the change in site name. • If a bridge does not actually exist, use the Edit Facility Profile (edfp) command to edit all facility profiles associated with the tributaries. The facilities to be edited can be selected by locating the bridge on the network map and clicking on each facility connected to it. The Edit Facility Profile (edfp) command can be activated directly from the network map via the menu presented for each facility. For each facility connected to a tributary device, update the Device Name or Device Address field for the bridge endpoint to show the actual control modem instead. Then use the Delete Facility Profile (dlfp) command to delete the facility connecting the control modem to the bridge. 6. Device names are displayed on the Release 4.2 network map rather than addresses. You may wish to edit device profiles to incorporate the device address into the name. If there is no device name, the system will assign one. 6800-A2-GN22-30 January 1997 7-15 COMSPHERE 6800 Series Network Management System 7. Facility names are displayed on the Release 4.2 network map rather than circuit names, since facilities are physical entities whereas circuits are logical entities. (For multiplexer devices, circuit names, when available, are used for the facility name.) To make circuit information more visible, you may wish to edit the facility profiles using the Edit Facility Profile (edfp) command to incorporate the circuit name into the facility name. Alternatively, the circuit name may be entered into the comments field of the facility profile. 8. Devices colocated with the unnamed site may be repositioned by editing the city/country codes or the latitude and longitude fields in the device profile and specifying a site name. 9. Device, site, and facility profiles may be edited to add or modify any other information. 10. After modifying site or connectivity information, execute the Create Network Map (crnm) command. When this completes, update the network map display by closing and recreating the network map window. Release 2 Database Migration When a customer migrates from a Release 2 6820 NMS to a Release 4.2 6800 Series NMS, all device profiles, site profiles, facility profiles, vendor profiles, historical alerts, trouble tickets, user profiles and user groups, filter values, and channel group tables are transferred. Databases Migrated NOTE The customer should perform the cleanup procedure prior to Paradyne upgrading to the Altos 5000 host hardware. It is the customer’s responsibility to verify the accuracy of the database prior to the migration. The following databases will be migrated: • Device Profiles • Vendor Profiles • Site Profiles • Facility Profiles • User Profiles • System Configuration Data • External System Configuration Data • Workstation Data • Filter Values • Alert Monitoring States • Alert Colors and Alert Group Attributes 7-16 January 1997 6800-A2-GN22-30 Performing Migration • ATR Phone Directories • Historic Alerts • Network Summary Categories and Labels • Trouble Tickets • Port Configuration NOTE User-specified information associated with the unnamed site will not be migrated from Release 2 to Release 4.2. The user must re-enter any such information after the migration is complete. The following databases will not be migrated: • The active alerts database will not be migrated because the Release 4.2 NMS generates up-to-date active alert data at system start-up • Routines • Network Control Task scheduled items • Network Control Task results queue • Alert Driven Routines • Reports/Trouble Tickets customized with 4GL or SQL Cleaning Up the Database Since the databases not migrated were drastically redesigned in Release 3.1, the customer should print a hard copy of routines and scheduled items to assist in recreating these items, if necessary. For scheduled items, perform the List Schedule Items (lssi) command to assist in rebuilding them. For facility profiles, facility types and ACCULINK validation, perform the List Facility Profile (lsfp) command. For Trouble/Inventory Reports and Trouble Tickets that have been customized, back up the files and copy them to a removable medium. Backing Up the Database The data to be migrated to the Release 4.2 6800 Series NMS is downloaded to a cartridge tape using the backup utility provided on a Release 4.2 migration diskette. The data is then uploaded to Release 4.2 via a cartridge tape and the migration utility of Release 4.2. Data transfer is nondestructive; no data on the source NMS is modified or deleted. Use the following procedure to backup the Release 2 database: 1. TYPE: cd /usr/nms/adm PRESS: Enter 2. Insert the Release 4 migration floppy disk into the Release 2 host processor. 6800-A2-GN22-30 January 1997 7-17 COMSPHERE 6800 Series Network Management System 3. TYPE: cpio -ic </dev/rdsk/f0 PRESS: Enter 4. When the command is completed, TYPE: ksh ./migBackup PRESS: Enter The following message appears: ******DATABASE BACKUP FOR MIGRATION STARTED*** Check for database index errors before performing backup ? (y/n) y 5. Perform the following: TYPE: y PRESS: Enter The following message appears: Continue with backup? (y/n) y 6. To proceed, TYPE: y PRESS: Enter The following message appears: Please insert cartridge tape. Type <c> to continue or <q> to quit and then press Enter. 7. Insert the blank data cartridge tape, TYPE: c PRESS: Enter to continue. The following message appears: *******DATABASE BACKUP FOR MIGRATION COMPLETED******* 8. Remove the tape and label it R2 Database Backup for Migration. 7-18 January 1997 6800-A2-GN22-30 Performing Migration Migrating the Database To migrate the existing Release 2 database to the Release 4.2 NMS, perform the following steps: NOTE The NMS application must not be running. 1. At the Console Login: prompt, TYPE: root PRESS: Enter 2. At the pound sign (#) prompt, TYPE: ksh /usr/nms/adm/installDb PRESS: Enter The AT&T Paradyne NMS Parameters menu (Figure 7-3) appears: AT&T Paradyne NMS Parameters: 1 2 3 4 Initialize ONLINE Partition Initialize NMS Database Include Migration Data Rebuild NMS Database Indices n n n n cont To Continue quit To abort If you wish to modify the NMS parameters Enter number (1,2,3,4,cont or quit): 492-13960 Figure 7-3. AT&T Paradyne NMS Parameters Menu (Release 2 Database Migration) 3. If the INFORMIX OnLine partition has not been initialized since NMS installation, TYPE: 1 PRESS: Enter to select Initialize ONLINE Partition. The following message appears: Do you wish to initialize the ONLINE partition? (y/n) [n]: 4. To initialize the partition, TYPE: y PRESS: Enter A warning will appear. To proceed, PRESS: Enter 6800-A2-GN22-30 January 1997 7-19 COMSPHERE 6800 Series Network Management System 5. All user-created NMS databases must be initialized in preparation for migration. TYPE: 2 PRESS: Enter to select Initialize NMS Database. The following message appears: Do you wish to initialize the NMS database (y/n) [n]: 6. To initialize the NMS database, TYPE: y PRESS: Enter The following message appears: WARNING: Initializing the NMS database will replace it with default values. Hit <Enter> to continue or <q> to quit: 7. To continue with the migration process, PRESS: Enter 8. If there is a database from Release 2 to be converted to Release 4.2 format, TYPE: 3 PRESS: Enter to select Include Migration Data. The following message appears: Do you wish to include migration data from a previous NMS? (y/n) [n]: 9. To proceed, TYPE: y PRESS: Enter The following message appears: Enter the previous NMS type (sc, r1, r2, r3, r3.1, r4, r4.1): 10. Enter the appropriate type, TYPE: r2 PRESS: Enter 7-20 January 1997 6800-A2-GN22-30 Performing Migration The original menu (Figure 7-4) appears with the selected type in parentheses after Option 3: AT&T Paradyne NMS Parameters: 1 2 3 4 Initialize ONLINE Partition Initialize NMS Database Include Migration Data (r2) Rebuild NMS Database Indices y y y n cont To Continue quit To abort If you wish to modify the NMS parameters Enter number (1,2,3,4,cont or quit): 492-13963 Figure 7-4. Original Menu Showing Selected Type (r2) 11. To rebuild the NMS database indices, TYPE: 4 PRESS: Enter 12. To continue, TYPE: y PRESS: Enter 13. To continue, TYPE: c PRESS: Enter The following message appears: xxxx Data Base Initialization xxxx followed by several console messages indicating the initialization of the INFORMIX OnLine. Once completed, the following message appears: xxxx Data Base Initialization Completed xxxx The database migration consists of files/directories used with the INFORMIX database and the INFORMIX database itself. followed by this query: Do you wish to migrate faults data (y or n)? [n]. 6800-A2-GN22-30 January 1997 7-21 COMSPHERE 6800 Series Network Management System 14. To transfer fault data or to skip fault data transfer, TYPE: y or n PRESS: Enter The following message appears: Do you wish to migrate trouble ticket data (y or n)? [n]. 15. To transfer trouble ticket data or to skip trouble ticket data transfer, TYPE: y or n PRESS: Enter The following message appears: Do you wish to migrate results queue (y or n)? [n]. 16. To transfer the results queue, or to skip results queue transfer, TYPE: y or n PRESS: Enter The following message appears: Please insert tape labeled \‘R2 Database Backup for Migration’: Enter c to continue or q to quit. 17. Insert the backup data cartridge tape into the Release 4.2 6800 NMS host computer. Then, TYPE: c PRESS: Enter As the migration process proceeds, the system displays status messages at various stages reporting the progress of the migration to that point. 18. You will now be queried for 741 multiplexer node numbers as follows: Please provide the node numbers for all 741 multiplexers. Please enter a node number or ‘‘done’’ to end the list: 19. List all 741 multiplexer node numbers supported by the NMS and PRESS: Enter after each one. When the list is complete (or if there are none), TYPE: done PRESS: Enter The following message appears: Now rebuild the NMS database indices. 7-22 January 1997 6800-A2-GN22-30 Performing Migration 20. When the pound sign (#) prompt appears, TYPE: exit PRESS: Enter to return to the Console Login: prompt. 21. At the Console Login: prompt, TYPE: nms PRESS: Enter TYPE: The nms password (the default is startmenu) PRESS: Enter The Release 4.2 6800 NMS Main Menu appears. 22. To continue, TYPE: 1 PRESS: Enter to select Start the System. The following message appears: Starting the AT&T Paradyne NMS system. Please wait... The system performs database error checking and then starts the NMS. When the start-up is complete, the following message appears: The AT&T Paradyne NMS system has been successfully started. Press RETURN to continue 23. To continue, PRESS: Enter The Release 4.2 6800 Series NMS Main Menu appears. 24. To return to the Console Login: prompt, TYPE: 11 PRESS: Enter 25. At the Console Login: prompt, PRESS: nms PRESS: Enter TYPE: The full-feature workstation password (the default password is no password; just press Enter) PRESS: Enter The NMS application is brought up and the NMS login window appears. 6800-A2-GN22-30 January 1997 7-23 COMSPHERE 6800 Series Network Management System Checking the Migrated Database Following NMS start-up, the integrity of the migrated data should be verified. The following procedures may be executed for that purpose. 1. Bring up the System Management window and execute the Create Network Map (crnm) command. Refer to the COMSPHERE 6800 Series Network Management System Core Command Reference Manual for details on all commands. 2. Following completion of the Create Network Map (crnm) command, bring up the network map window and inspect the network map visually. NOTE Circuit names and device addresses are not displayed on the Release 4.2 network map. Device names and site names are displayed. 3. Execute the Display Device Profile (dsdp) command to verify profiles for 3 devices. Verify the accuracy of the information. 4. Execute the Display Site Profile (dssp) command to examine profiles for 3 sites. Verify the accuracy of the information. 5. Execute the Display Facility Profile (dsfp) command to examine facility profiles associated with three devices. 6. If ACCULINK Network Manager (ANM) is installed, execute the List Facility Profile (lsfp) command, selecting T1 for the facility type and m2/* for Device(s) if multiplexers are attached to the NMS. Compare the screen results with a hard copy output from the List Node Connectivity (lsnc) command on the source system. 7. If ANM is installed, execute the Hardware Module Summary (hms) command on three multiplexer devices. 8. Execute the Device Health Status (dhs) command on available device types, e.g., three DATAPHONE II devices, three COMSPHERE devices, and three ANALYSIS devices. 9. Run Alert History reports to list Historical Alerts using the Detailed Alert Report (dar) and Alert Report Summary (ars) commands. 10. If user group permissions have been customized, use the SQL Customization Package to examine the command_view table. Correct any incomplete migration of data and account for the new capabilities of Release 4.2, specifically, that all Network Control commands can now have customized user group levels. Likewise, if alert text or alert group names have been customized, redo the customization after the migration is completed. 11. When the migration is completed, execute the Edit Alert Monitoring State (edams) command to turn on polling. NMS will then automatically acquire the current feature packages/versions for the multiplexer network, if ANM is installed. 7-24 January 1997 6800-A2-GN22-30 Performing Migration 12. The Edit Profile commands, Edit Site Profile (edsp), Edit Device Profile (eddp), Edit Facility Profile (edfp), and the Identity (id) command provide mechanisms for changing or correcting the migrated data. When migration completes successfully, the messages sent to the console can be reviewed to take note of any warning messages as follows: cd /usr/tmp pg migdbload.log pg migrestore.log Release 3.0/3.1 Database Migration When a customer migrates from a Release 3.0 or Release 3.1 6800 Series NMS to a Release 4.2 6800 Series NMS, all device profiles, site profiles, vendor profiles, historical alerts, trouble tickets, user profiles and user groups, filter values, and channel group tables are transferred. Databases Migrated The following databases will be migrated: • Device Profiles • Vendor Profiles • Site Profiles • Facility Profiles • User Profiles • System Configuration Data • External System Configuration Data • Workstation Data • Filter Values • Alert Monitoring States • Alert Colors and Alert Group Attributes • ATR Phone Directories • Historic Alerts • Network Summary Categories and Labels • Trouble Tickets • Routines • Alert Driven Routines • Port Configuration • Scheduled items 6800-A2-GN22-30 January 1997 7-25 COMSPHERE 6800 Series Network Management System The following databases will not be migrated: • Reports/Trouble Tickets customized with 4GL or SQL • The active alerts database will not be migrated as the Release 4.2 NMS generates up-to-date active alert data at start-up Cleaning Up the Database To ensure that those databases not migrated are rebuilt, the customer should back up any customized Trouble Tickets and Trouble/Inventory Reports to a removable medium. Backing Up the Database The NMS database must be backed up to a cartridge tape prior to migrating it from Release 3.0/3.1 to Release 4.2: 1. From the 6800 NMS Main Menu, select Backup system database and follow the steps for performing a System Database Backup as indicated in Chapter 4 of the COMSPHERE 6800 Series Network Management System User’s/System Administrator’s Guide. 2. When the backup is complete and the 6800 NMS Main Menu is displayed, select Restore system database and follow the steps for performing a System Database Restore as specified in Chapter 4 of the COMSPHERE 6800 Series Network Management System User’s/System Administrator’s Guide. This action will ensure that the tape produced by the backup in Step 1 is readable as the process of migration will destroy the existing 3.0/3.1 database on disk. 3. Do not proceed with the Migration until you have a valid, readable Backup. Migrating the Database NOTE The NMS application must not be running. To migrate the NMS database, perform the following steps: 1. At the Console Login: prompt, TYPE: root PRESS: Enter 2. At the Password: prompt, TYPE: root password PRESS: Enter 7-26 January 1997 6800-A2-GN22-30 Performing Migration 3. At the pound sign (#) prompt, TYPE: ksh /usr/nms/adm/installDb PRESS: Enter The AT&T Paradyne NMS Parameters menu (Figure 7-5) appears. AT&T Paradyne NMS Parameters: 1 2 3 4 Initialize ONLINE Partition Initialize NMS Database Include Migration Data Rebuild NMS Database Indices n n n n cont To Continue quit To abort If you wish to modify the NMS parameters Enter number (1,2,3,4,cont or quit): 492-13960 Figure 7-5. AT&T Paradyne NMS Parameters Menu (Release 3.0/3.1 Database Migration) 4. If the INFORMIX OnLine partition has not been initialized since NMS installation, TYPE: 1 PRESS: Enter to select Initialize ONLINE Partition. The following message appears: Do you wish to initialize the ONLINE partition? (y/n) [n]: 5. To initialize the partition, TYPE: y PRESS: Enter A warning will appear. To proceed, PRESS: Enter 6. All user-created NMS databases must be initialized in preparation for migration. TYPE: 2 PRESS: Enter to select Initialize NMS Database. The following message appears: Do you wish to initialize the NMS database (y/n) [n]: 6800-A2-GN22-30 January 1997 7-27 COMSPHERE 6800 Series Network Management System 7. To initialize the NMS database, TYPE: y PRESS: Enter The following message appears: WARNING: Initializing the NMS database will replace it with default values. Hit <Enter> to continue or <q> to quit: 8. To continue with the migration process, PRESS: Enter 9. The menu shown in Figure 7-5 will appear. If there is a database from Release 3.0 or 3.1 to be converted to Release 4.2 format, TYPE: 3 PRESS: Enter to select Include Migration Data. The following message appears: Do you wish to include migration data from a previous NMS? (y/n) [n]: 10. To proceed, TYPE: y PRESS: Enter The following message appears: Enter the previous NMS type (sc, r1, r2, r3, r3.1, r4, r4.1): 11. Enter the appropriate type, TYPE: r3 or r3.1 as appropriate PRESS: Enter 7-28 January 1997 6800-A2-GN22-30 Performing Migration The original menu (Figure 7-6) appears with the selected type in parentheses after Option 3: AT&T Paradyne NMS Parameters: 1 2 3 4 Initialize ONLINE Partition Initialize NMS Database Include Migration Data (r3) Rebuild NMS Database Indices y y y n cont To Continue quit To abort If you wish to modify the NMS parameters Enter number (1,2,3,4,cont or quit): 493-13960b Figure 7-6. Original Menu Showing Selected Type (r3) 12. To rebuild the NMS database indices, TYPE: 4 PRESS: Enter 13. To continue, TYPE: y PRESS: Enter 14. To continue, TYPE: c PRESS: Enter The following message appears: xxxx Data Base Initialization xxxx followed by several console messages indicating the initialization of the INFORMIX OnLine. Once completed, the following message appears: xxxx Data Base Initialization Completed xxxx xxxxxxxxxxxxxxxxStarting Database migrationxxxxxxxxxxxx The database restore consists of files/directories used with the INFORMIX database and the INFORMIX database itself. To perform a database restore, the NMS system must not be running. Checking NMS system, please wait ... Please insert tape labeled ’Database Files/Directories Backup’. Type \‘c’ to continue or \‘q’ to quit and then press Enter. 6800-A2-GN22-30 January 1997 7-29 COMSPHERE 6800 Series Network Management System 15. Insert the proper tape in the cartridge drive and TYPE: c PRESS: Enter The following messages appear: Checking files/directories, please wait ... Removing old files/directories, please wait ... Restoring files/directories, please wait ... Restore of files/directories completed. Please remove tape and insert the tape containing the INFORMIX database backup. 16. Remove the tape labeled ‘‘Database Files/Directories Backup’’ and insert the INFORMIX database backup tape in the cartridge drive. The system prompts: Press [Return] to continue PRESS: Return Select the following options under the INFORMIX menu: • Archive • Restore The system will ask a series of questions; respond accordingly. The system will prompt: Do you have another level of tapes to restore? (y/n) TYPE: n PRESS: Enter 17. The system will prompt: Is there a logical log tape to restore? (y/n) TYPE: n PRESS: Enter When the base INFORMIX menu appears, select Exit Now rebuild the NMS database indices. 18. When the pound sign (#) prompt appears, TYPE: exit PRESS: Enter to return to the Console Login: prompt. 7-30 January 1997 6800-A2-GN22-30 Performing Migration 19. At the Console Login: prompt, TYPE: nms PRESS: Enter TYPE: The nms password (the default is startmenu) PRESS: Enter The Release 4.2 6800 NMS Main Menu appears. 20. To continue, TYPE: 1 PRESS: Enter to select Start the System. The following message appears: Starting the AT&T Paradyne NMS system. Please wait... The system performs database error checking and then starts the NMS. When the start-up is complete, the following message appears: The AT&T Paradyne NMS system has been successfully started. Press RETURN to continue 21. To continue, PRESS: Enter The Release 4.2 6800 NMS Main Menu appears. 22. To return to the Console Login: prompt, TYPE: 11 PRESS: Enter 23. At the Console Login: prompt, TYPE: nms PRESS: Enter TYPE: The full-feature workstation password PRESS: Enter The NMS application is brought up and the NMS login window appears. 6800-A2-GN22-30 January 1997 7-31 COMSPHERE 6800 Series Network Management System Checking the Migrated Database Following NMS start-up, the integrity of the migrated data should be verified. The following procedures may be executed for that purpose. 1. Bring up the System Management window and execute the Create Network Map (crnm) command. Refer to the COMSPHERE 6800 Series Network Management System Core Command Reference Manual for details on all commands. 2. Following completion of the Create Network Map (crnm) command, bring up the network map window and inspect the network map visually. NOTE Circuit names and device addresses are not displayed on the Release 4.2 network map. Device names and site names are displayed. 3. Execute the Display Device Profile (dsdp) command to verify profiles for three devices. Verify the accuracy of the information. 4. Execute the Display Site Profile (dssp) command to examine profiles for three sites. Verify the accuracy of the information. 5. Execute the Display Facility Profile (dsfp) command to examine facility profiles associated with three devices. 6. If the ACCULINK Network Manager (ANM) is installed, execute the List Facility Profile (lsfp) command, selecting T1 for the facility type and m2/* for Device(s). Compare the screen results with a hard copy output from the List Facility Profile (lsfp) command on the source system. 7. If the ANM is installed, execute the Hardware Module Summary (hms) command on three multiplexer devices. 8. Execute the Device Health Status (dhs) command on available device types, e.g., three DATAPHONE II devices, three COMSPHERE devices, and three ANALYSIS devices. 9. Run Alert History reports to list Historical Alerts using the Detailed Alert Report (dar) and Alert Report Summary (ars) commands. 10. If user group permissions have been customized, use the SQL Customization Package to examine the command_view table. Correct any incomplete migration of data and account for the new capabilities of Release 4.2, specifically, that all Network Control commands can now have customized user group levels. Likewise, if alert text or alert group names have been customized, redo the customization after the migration is completed. 11. When the migration is completed, execute the Edit Alert Monitoring State (edams) command to turn on polling. NMS will then automatically acquire the current feature packages/versions for the multiplexer network, if ANM is installed. 7-32 January 1997 6800-A2-GN22-30 Performing Migration 12. The Edit Profile commands, Edit Site Profile (edsp), Edit Device Profile (eddp), Edit Facility Profile (edfp), and the Identity (id) command provide mechanisms for changing or correcting the migrated data. When migration completes successfully, the messages sent to the console can be reviewed to take note of any warning messages as follows: cd /usr/tmp pg initdb.log pg restorelog Upon completion of the migration script, perform the following: • Shutdown the NMS and restart it. • Turn polling on again with the edams command. • If your NMS has ANALYSIS systems connected and you wish to change or add systems, perform the configuration steps now as specified in the Configuration section. • Backup the 4.2 database onto new cartridge tapes. Release 4.0/4.1 Database Migration When a customer migrates from a Release 4.0 or Release 4.1 6800 Series NMS to a Release 4.2 6800 Series NMS, all device profiles, site profiles, vendor profiles, historical alerts, trouble tickets, user profiles and user groups, filter values, and channel group tables are transferred. Databases Migrated The following databases will be migrated: • Device Profiles • Vendor Profiles • Site Profiles • Facility Profiles • User Profiles • System Configuration Data • External System Configuration Data • Workstation Data • Filter Values • Alert Monitoring States • Alert Colors and Alert Group Attributes • ATR Phone Directories • Historic Alerts • Network Summary Categories and Labels • Trouble Tickets • Routines 6800-A2-GN22-30 January 1997 7-33 COMSPHERE 6800 Series Network Management System • Alert Driven Routines • Port Configuration • Scheduled Items The following databases will not be migrated: • Reports/Trouble Tickets customized with 4GL or SQL • The active alerts database will not be migrated as the Release 4.2 NMS generates up-to-date active alert data at start-up Cleaning Up the Database To ensure that those databases not migrated are rebuilt, the customer should back up any customized Trouble Tickets and Trouble/Inventory Reports to a removable medium. Backing Up the Database The NMS database must be backed up to a cartridge tape prior to migrating it from Release 4.0 to Release 4.2: 1. From the 6800 NMS Main Menu, select Backup system database and follow the steps for performing a System Database Backup as indicated in Chapter 4 of the COMSPHERE 6800 Series Network Management System User’s/System Administrator’s Guide. 2. When the backup is complete and the 6800 NMS Main Menu is displayed, select Restore system database and follow the steps for performing a System Database Restore as specified in Chapter 4 of the COMSPHERE 6800 Series Network Management System User’s/System Administrator’s Guide. This action will ensure that the tape produced by the backup in Step 1 is readable as the process of migration will destroy the existing 4.0 database on disk. 3. Do not proceed with the Migration until you have a valid, readable Backup. Migrating the Database NOTE The NMS application must not be running. To migrate the NMS database, perform the following steps: 1. At the Console Login: prompt, TYPE: root PRESS: Enter 7-34 January 1997 6800-A2-GN22-30 Performing Migration 2. At the Password: prompt, TYPE: root password PRESS: Enter 3. At the pound sign (#) prompt, TYPE: ksh /usr/nms/adm/installDb PRESS: Enter The AT&T Paradyne NMS Parameters menu (Figure 7-7) appears. AT&T Paradyne NMS Parameters: 1 2 3 4 Initialize ONLINE Partition Initialize NMS Database Include Migration Data Rebuild NMS Database Indices n n n n cont To Continue quit To abort If you wish to modify the NMS parameters Enter number (1,2,3,4,cont or quit): 492-13960 Figure 7-7. AT&T Paradyne NMS Parameters Menu (Release 4.0 Database Migration) 4. If the INFORMIX OnLine partition has not been initialized since NMS installation, TYPE: 1 PRESS: Enter to select Initialize ONLINE Partition. The following message appears: Do you wish to initialize the ONLINE partition? (y/n) [n]: 5. To initialize the partition, TYPE: y PRESS: Enter A warning will appear. To proceed, PRESS: Enter 6800-A2-GN22-30 January 1997 7-35 COMSPHERE 6800 Series Network Management System 6. All user-created NMS databases must be initialized in preparation for migration. TYPE: 2 PRESS: Enter to select Initialize NMS Database. The following message appears: Do you wish to initialize the NMS database? (y/n) [n]: 7. To initialize the NMS database, TYPE: y PRESS: Enter The following message appears: WARNING: Initializing the NMS database will replace it with default values. Hit <ENTER> to continue or <q> to quit: 8. To continue with the migration process, PRESS: Enter 9. The menu shown in Figure 7-8 will appear. If there is a database from Release 4.0 to be converted to Release 4.2 format, TYPE: 3 PRESS: Enter to select Include Migration Data. The following message appears: Do you wish to include migration data from a previous NMS? (y/n) [n]: 10. To proceed, TYPE: y PRESS: Enter The following message appears: Enter the previous NMS type (sc, r1, r2, r3, r3.1, r4, r4.1): 11. Enter the appropriate type, TYPE: r4 PRESS: Enter 7-36 January 1997 6800-A2-GN22-30 Performing Migration The original menu (Figure 7-8) appears with the selected type in parentheses after Option 3: AT&T Paradyne NMS Parameters: 1 2 3 4 Initialize ONLINE Partition Initialize NMS Database Include Migration Data (R4) Rebuild NMS Database Indices y y y n cont To Continue quit To abort If you wish to modify the NMS parameters Enter number (1,2,3,4,cont or quit): 493-13960b-01 Figure 7-8. Original Menu Showing Selected Type (R4) 12. To rebuild the NMS database indices, TYPE: 4 PRESS: Enter 13. To continue, TYPE: y PRESS: Enter 14. To continue, TYPE: c PRESS: Enter The following message appears: xxxx Data Base Initialization xxxx followed by several console messages indicating the initialization of the INFORMIX OnLine. Once completed, the following message appears: xxxx Data Base Initialization Completed xxxx xxxxxxxxxxxxxxxxStarting Database migrationxxxxxxxxxxxx The database restore consists of files/directories used with the INFORMIX database and the INFORMIX database itself. To perform a database restore, the NMS system must not be running. Checking NMS system, please wait ... Please insert tape labeled ’Database Files/Directories Backup’. Type \‘c’ to continue or \‘q’ to quit and then press Enter. 6800-A2-GN22-30 January 1997 7-37 COMSPHERE 6800 Series Network Management System 15. Insert the proper tape in the cartridge drive and TYPE: c PRESS: Enter The following messages appear: Checking files/directories, please wait ...Removing old files/directories, please wait ... Restoring files/directories, please wait ... Restore of files/directories completed. Please remove tape and insert the tape containing the INFORMIX database backup. 16. Remove the tape labeled ‘‘Database Files/Directories Backup’’ and insert the INFORMIX database backup tape in the cartridge drive. The system prompts: Press [Return] to continue PRESS: Return Select the following options under the INFORMIX menu: • Archive • Restore The system will ask a series of questions; respond accordingly. The system will prompt: Do you have another level of tapes to restore? (y/n) TYPE: n PRESS: Enter 17. The system will prompt: Is there a logical log tape to restore? (y/n) TYPE: n PRESS: Enter When the base INFORMIX menu appears, select Exit Now rebuild the NMS database indices. 18. When the pound sign (#) prompt appears, TYPE: exit PRESS: Enter to return to the Console Login: prompt. 7-38 January 1997 6800-A2-GN22-30 Performing Migration 19. At the Console Login: prompt, TYPE: nms PRESS: Enter TYPE: The nms password (the default is startmenu) PRESS: Enter The Release 4.2 6800 NMS Main Menu appears. To continue, TYPE: 1 PRESS: Enter to select Start the System. The following message appears: Starting the AT&T Paradyne NMS system. Please wait... The system performs database error checking and then starts the NMS. When the start-up is complete, the following message appears: The AT&T Paradyne NMS system has been successfully started. Press RETURN to continue 20. To continue, PRESS: Enter The Release 4.2 6800 NMS Main Menu appears. 21. To return to the Console Login: prompt, TYPE: 11 PRESS: Enter 22. At the Console Login: prompt, TYPE: nms PRESS: Enter TYPE: The full-feature workstation password PRESS: Enter The NMS application is brought up and the NMS login window appears. 6800-A2-GN22-30 January 1997 7-39 COMSPHERE 6800 Series Network Management System Checking the Migrated Database Following NMS start-up, the integrity of the migrated data should be verified. The following procedures may be executed for that purpose. 1. Bring up the System Management window and execute the Create Network Map (crnm) command. Refer to the COMSPHERE 6800 Series Network Management System Core Command Reference Manual for details on all commands. 2. Following completion of the Create Network Map (crnm) command, bring up the network map window and inspect the network map visually. NOTE Circuit names and device addresses are not displayed on the Release 4.2 network map. Device names and site names are displayed. 3. Execute the Display Device Profile (dsdp) command to verify profiles for three devices. Verify the accuracy of the information. 4. Execute the Display Site Profile (dssp) command to examine profiles for three sites. Verify the accuracy of the information. 5. Execute the Display Facility Profile (dsfp) command to examine facility profiles associated with three devices. 6. If the ACCULINK Network Manager (ANM) is installed, execute the List Facility Profile (lsfp) command, selecting T1 for the facility type and m2/* for Device(s). Compare the screen results with a hard copy output from the List Facility Profile (lsfp) command on the source system. 7. If ANM is installed, execute the Hardware Module Summary (hms) command on three multiplexer devices. 8. Execute the Device Health Status (dhs) command on available device types, e.g., three DATAPHONE II devices, three COMSPHERE devices, and three ANALYSIS devices. 9. Run Alert History reports to list Historical Alerts using the Detailed Alert Report (dar) and Alert Report Summary (ars) commands. 10. If user group permissions have been customized, use the SQL Customization Package to examine the command_view table. Correct any incomplete migration of data and account for the new capabilities of Release 4.2, specifically, that all Network Control commands can now have customized user group levels. Likewise, if alert text or alert group names have been customized, redo the customization after the migration is completed. 11. When the migration is completed, execute the Edit Alert Monitoring State (edams) command to turn on polling. NMS will then automatically acquire the current feature packages/versions for the multiplexer networks, if ANM is installed. 7-40 January 1997 6800-A2-GN22-30 Performing Migration 12. The Edit Profile commands, Edit Site Profile (edsp), Edit Device Profile (eddp), Edit Facility Profile (edfp), and the Identity (id) command provide mechanisms for changing or correcting the migrated data. When migration completes successfully, the messages sent to the console can be reviewed to take note of any warning messages as follows: cd /usr/tmp pg initdb.log pg restorelog Upon completion of the migration script, perform the following: • Shutdown the NMS and restart it. • Turn polling on again with the edams command. • If your NMS has ANALYSIS systems connected and you wish to change or add systems, perform the configuration steps now as specified in the Configuration section. • Backup the 4.2 database onto new cartridge tapes. 6800-A2-GN22-30 January 1997 7-41 Running Diagnostics Overview . . . . . . . . . . . . . . . . . . . . . . . . . . . . . . . . . . . . . . . . . . . . . . . . . . . . SDX Diagnostic Program . . . . . . . . . . . . . . . . . . . . . . . . . . . . . . . . . . . . . . . . StarLAN 10 NAU Diagnostic Program . . . . . . . . . . . . . . . . . . . . . . . . . . . . . IPC-900 Diagnostic Program (for Altos 5000 Systems Only) . . . . . . . . . . . . IPC-1600 Diagnostic Program . . . . . . . . . . . . . . . . . . . . . . . . . . . . . . . . . . . . Emulex DCP-286i Diagnostic Program (for Altos 5000 Systems Only) . . . . Emulex DCP/MUXi Diagnostic Program . . . . . . . . . . . . . . . . . . . . . . . . . . . . 8 8-1 8-2 8-4 8-5 8-9 8-11 8-12 Overview This chapter explains how to use the diagnostic programs that are shipped with the NMS. These programs are used to detect and solve hardware problems in the Altos 5000 and 15000 systems and the circuit cards (both required and optional) that are installed in it. Each system comes with a series of built-in diagnostics. These programs, known as the Power On Self Test (POST), are run automatically every time the systems are turned on and detect certain hardware failures, missing equipment, and configuration errors. If any problems are detected, a message displays indicating the nature of the malfunction. These power-up tests, however, have only limited diagnostic capabilities. Therefore, Altos also provides a diagnostic program to identify hardware failures that cannot be detected by the power-up tests. This program, called the SDX Diagnostic, consists of a series of system confidence tests that check the operation and configuration of the machine’s internal components. You should run this program any time you suspect a problem in the system’s hardware. In addition, a diagnostic diskette is shipped with each of the circuit cards installed in each system. You should run these programs any time you suspect a problem with a particular circuit card. The following sections provide step-by-step instructions for running these programs. 6800-A2-GN22-30 January 1997 8-1 COMSPHERE 6800 Series Network Management System SDX Diagnostic Program To run this program, you need the disk entitled SDX – System 5000 or SDX – System 10000/ 15000 that is shipped with the Altos 5000 or 15000, respectively. Perform the following steps. Before running this test, shut down UNIX and move the RESET/RUN key to the RESET position. (Refer to Chapter 6 of this manual for the shutdown procedure for both the Altos 5000 and Altos 15000 systems.) The Altos 5000 and Altos 15000 systems do not have the same power-up procedure. This difference is accommodated in Step 1. 1. For the Altos 15000 system, insert the disk labeled SDX – System 10000/15000 and power on the system. To do this, move the RESET/RUN key on the front panel clockwise from RESET to RUN. The SDX program loads, showing several rows of c’s and d’s on the screen. When the SDX Main Menu appears, as shown in Figure 8-2, proceed to Step 4. For the Altos 5000 system, insert the disk entitled SDX – System 5000 into the floppy drive and move the RESET/RUN key on the front panel clockwise from RESET to RUN (if the Altos 5000 system is turned off, move the power switch on the rear panel to the ON position instead). The system runs through its normal power sequence and displays the following message: Press spacebar to interrupt autoboot 2. PRESS: the spacebar immediately The Boot Menu appears, as shown in Figure 8-1. Select Select Select Select [1] [2] [3] [4] to to to to boot from hard disk boot from floppy boot from tape enter BIOS setup Enter option: 491-13836 Figure 8-1. Boot Menu 3. Select Option 2 to boot from the floppy. The SDX program will load. As this happens, several rows of c’s and d’s will appear on the screen, followed by the SDX Main Menu, as shown in Figure 8-2. 8-2 January 1997 6800-A2-GN22-30 Running Diagnostics ACS Main Menu: R: U: S: H: X: Main Menu (SDX) Version Vx.xx Run system confidence tests Utility programs Display test summary Display error history Exit System Diagnostic Executive (SDX) ***Enter Command and Press <Retn> 494-13840-01 Figure 8-2. SDX Main Menu 4. To run the system confidence tests, TYPE: r PRESS: Enter The following message appears: If there is a tape drive present, insert the tape cartridge and hit a <CR> to continue. 5. Insert a blank cartridge tape and PRESS: Enter The test sequence will start. The tests will take several minutes. To stop an individual test at any time, PRESS: Esc When the tests finish, the system displays: Do you wish to review summary again (y/n): TYPE: y The System Confidence Tests Summary is displayed. PRESS: Enter for subsequent pages. All the tests are pass/fail. If any of the tests report Failed instead of Passed, you have a hardware problem. If after rebooting either system and running the SDX program again, an identical failure occurs, contact your service representative. (For a list of the SDX confidence tests, see your Altos System Owner’s Guide.) After you return the program to the Main Menu, you can exit SDX. However, first remove the SDX diskette and cartridge tape. Then, TYPE: x PRESS: Enter (to exit) PRESS: any key (to reboot) The system automatically reboots. 6800-A2-GN22-30 January 1997 8-3 COMSPHERE 6800 Series Network Management System StarLAN 10 NAU Diagnostic Program To test the StarLAN 10 NAU, you need the disk entitled StarLAN 10 Network NAU Diagnostics that is shipped with the card. To run this diagnostic program, you must power down the Altos System 5000, remove the StarLAN 10 NAU and reset the jumper settings for IRQ 3 as shown in Figure 8-3, and replace the board. Once you have this disk, perform the following steps: Figure 8-3. StarLAN IRQ Strapping 1. Move the RESET/RUN key on the front panel clockwise to the RUN position to reboot the System 5000 (if the System 5000 is turned off at this point, move the power switch on the rear panel to the ON position instead). The System 5000 will run through its normal power-up sequence and display the following message: Press spacebar to interrupt autoboot 2. PRESS: the spacebar immediately The Boot Menu displays (see Figure 8-1). 3. Insert the disk entitled StarLAN 10 Network NAU Diagnostics into the floppy drive and select Option 2 to boot from the floppy. 4. The diagnostic program will execute automatically. It will check the strap settings (I/O address, memory address, memory size and memory) to determine if the card is configured properly. 5. When the diagnostic has completed, press any key to exit the program and remove the disk from the floppy drive. Power down the processor and remove the StarLAN 10 NAU. Move the IRQ setting from 3 back to the default 2. (See the section entitled Field Upgrade Packages in Chapter 2, Preinstallation Steps for the StarLAN 10 NAU, for the correct strap settings.) Replace the card and power up the processor. 8-4 January 1997 6800-A2-GN22-30 Running Diagnostics IPC-900 Diagnostic Program (for Altos 5000 Systems Only) The IPC-900 diagnostic consists of three tests. These tests can only be run under the MS-DOS operating system. Therefore, you will have to boot the System 5000 with MS-DOS, create a bootable disk, copy the diagnostics onto the bootable disk, and reboot the system with the newly created diagnostic disk. However, you only have to do this once, after which you can save the new disk and use it whenever you have to run the diagnostic. To accomplish all this, you need a bootable disk containing the MS-DOS files, a blank disk, and the disk entitled Intelligent Ports Card MS-DOS Device Drivers and Diagnostics Version 3.09 that is shipped with the card. Before you begin, you must format the blank floppy diskette using the SDX diskette. To accomplish this, boot from the SDX and enter u. Then enter 1 and insert the blank diskette. This formats the diskette. Return to the Main Menu and exit, then remove the SDX diskette. 1. Move the RESET/RUN key on the front panel clockwise to the RUN position to reboot the System 5000 (if the System 5000 is turned off at this point, move the power switch on the rear panel to the ON position instead). The System 5000 will run through its normal power-up sequence and display the following message: Press spacebar to interrupt autoboot 2. PRESS: the spacebar immediately The Boot Menu appears (see Figure 8-1). 3. Insert the bootable disk containing MS-DOS and select Option 2 to boot from the floppy. 4. Once the system boots, you are ready to format the blank disk and transfer the system files onto the disk so that it can be used to boot the System 5000. To do this, at the A>: prompt, TYPE: format a: /s PRESS: Enter The system displays the following prompt: Insert new diskette for Drive a: and strike enter when ready 5. Remove the MS-DOS disk, insert the blank disk into the floppy drive, and PRESS: Enter The system formats the disk and transfers the system files to it. When complete, the system displays the following prompt: Format complete, format another? 6. TYPE: n PRESS: Enter With the newly formatted disk still in the drive, boot the system. If the format was successful, the system prompts you for the date and time. PRESS: Enter 6800-A2-GN22-30 January 1997 8-5 COMSPHERE 6800 Series Network Management System 7. You are now ready to copy the IPC-900 diagnostic onto the newly formatted disk. To copy the diagnostic device drivers and programs, at the A>: prompt: TYPE: copy a:*.* b:*.* a. The system prompts you to insert a disk in the drive. Insert the disk entitled Intelligent Ports Card MS-DOS Device Drivers and Diagnostics Version 3.09 into the drive and PRESS: Enter b. The system will eventually prompt you to insert a disk in Drive B. Remove the diagnostic disk, insert the newly formatted disk into the same drive, and PRESS: Enter Steps a and b will alternate until the entire disk has been copied. 8. You now have to create a config.sys file to allow the IPC device drivers to be automatically loaded when the system is booted. To do this, at the A:> prompt, TYPE: copy con: config.sys The cursor will advance to the next line and await input. At this point, whatever you type on the keyboard will be put into a buffer and then written to a file named config.sys. Enter the following lines into the config.sys file TYPE: device=ipc.drv /2B0,D2000,0 buffers = 10 files=20 and PRESS: Enter after each line. When complete, PRESS: <F6> PRESS: Enter to signal end of input; ^ Z will appear on the display. 9. With the newly created diagnostic disk in the drive, boot the system to load the device drivers. At the Boot Menu (Figure 8-1) select Option 2 to boot from the floppy. During reboot you should see messages referring to the driver for the IPC-900. (For more detailed information, refer to the AT&T Intelligent Ports Card Model 900 (IPC-900) User’s Guide.) 8-6 January 1997 6800-A2-GN22-30 Running Diagnostics 10. There are three tests that you should run. The first test involves outputting two ASCII data patterns to a terminal or printer connected to one of the serial I/O ports on the IPC-900. To run this test, you need a terminal or printer, a 035-0153-0031 cable, and a 002-0040-0031 or 002-0052-0031 connector. Once you have this equipment, perform the following steps: a. Using the 035-0153-0031 cable and the 002-0040-0031 or 002-0052-0031 connector, connect the terminal or printer to a port on the IPC-900. b. To output the first ASCII data pattern, TYPE: COPY TEST.PAT SIOx Where: SIOx can be SIO1 through SIO8, representing Ports 1 through 8. PRESS: Enter c. To output the second ASCII data pattern, TYPE: COPY LONGTEST.PAT SIOx Where: SIOx can be SIO1 through SIO8, representing Ports 1 through 8. PRESS: Enter d. The tests will take 3–4 minutes to run. When they are finished, you will be returned to the MS-DOS operating system. 11. The second test is a port to port data transfer validation test. The diagnostic program sends a data pattern out of one port to a second port on the same IPC-900 (the two ports must have the same configuration). The received pattern is then compared with the original pattern to identify errors. To run this test, you need a 002-0040-0031 or 002-0052-0031 connector, a 002-0039-0031 or 002-0053-0031 connector, and two 035-0153-0031 cables. Once you have this equipment, perform the following steps: a. Connect one end of one of the 035-0153-0031 cables to the transmitting port (SIOx) on the IPC-900, and connect the other end of the cable to the 002-0039-0031 or 002-0053-0031 connector, as shown in Figure 8-4. b. Connect one end of the second 035-0153-0031 cable to the receiving port (SIOy) on the IPC-900, and connect the other end of the cable to the 002-0040-0031 or 002-0052-0031 connector. c. Connect the 002-0039-0031 or 002-0053-0031 connector to the 002-0040-0031 or 002-0053-0031 connector to link the two ports. 6800-A2-GN22-30 January 1997 8-7 COMSPHERE 6800 Series Network Management System Figure 8-4. Port-to-Port Connections d. To run the test, TYPE: SPIOTEST SIOx SIOy Where: SIOx represents the ID number of the transmitting port and SIOy represents the ID number of the receiving port. PRESS: Enter e. When the test is finished, you will be returned to the MS-DOS operating system. If the system hangs while running this test, you will have to reboot. Then, check to see that the driver is properly installed and the cabling is correct. 12. The third diagnostic tests the transmit circuit of a particular serial port. If the previous test produced a negative result, you can use this test to determine the functionality of the transmit circuit. To run this test, you must have a terminal connected to a port, as described in the first test. Once you have this, perform the following steps: a. To run the test, TYPE: CTEST SIOx Where: SIOx is the ID number of the transmitting port. PRESS: Enter b. When the test is finished, you will be returned to the MS-DOS operating system. 8-8 January 1997 6800-A2-GN22-30 Running Diagnostics IPC-1600 Diagnostic Program The IPC-1600 diagnostic consists of six tests which can be run on either the Altos 5000 or Altos 15000 systems. These tests can only be run under the MS-DOS operating system. Thus, for either system, you must boot the system with MS-DOS, create a bootable disk, copy the diagnostics onto the bootable disk, and reboot the system with the newly created diagnostic disk. However, you only have to do this once, after which you can save the disk and use it whenever you have to run the diagnostic. Before you run this diagnostic, you must power down the system, remove the IPC-1600 card and reset the dip switch settings for the memory address. Be sure to note the original setting before changing the address. You must return the address to its original setting for normal operation. Set the address for A0000 as shown in Figure 8-5 and replace the board. To create a a new diagnostic disk, you need a bootable disk containing the MS-DOS operating system, a blank unformatted disk, and the disk containing the IPC-16000 diagnostic program. The Altos 5000 and Altos 15000 systems do not have the same power-up procedure. This difference is accommodated in Step 1. Ribbon Cable Connections P3 (Ports 9 – 16) and P4 (Ports 1 – 8) Local Program Memory Size Select Jumper (J1) DS1 DS2 J1 P3 P4 PIN 1 DS1 ON OFF 1110 9 8 7 6 5 4 3 2 1 Push Switch to the Indicated Position: 492-13021a 110 Memory Address A0000 Figure 8-5. Dip Switch Settings for Memory Address 6800-A2-GN22-30 January 1997 8-9 COMSPHERE 6800 Series Network Management System 1. For the Altos 15000 system, insert the bootable disk containing MS-DOS and power on the system. To do this, power on the system using the power switch on the back of the unit. Proceed to Step 4. For the Altos 5000 system, power on the system using the power switch on the back of the unit. The System 5000 will run through its normal power-up sequence and display the following message: Press spacebar to interrupt autoboot 2. PRESS: the spacebar immediately The Boot Menu appears (see Figure 8-1). 3. Insert the bootable disk containing MS-DOS and select Option 2 to boot from the floppy. 4. Once the system boots, you are ready to format the blank disk and transfer the system files onto the disk so that it can be used to boot the system. To do this, at the A>: prompt, TYPE: format a: /s PRESS: Enter The system displays the following prompt: Insert new diskette for Drive a: and strike enter when ready 5. Remove the MS-DOS disk, insert the blank disk into the floppy drive, and PRESS: Enter The system formats the disk and transfers the system files to it. When complete, the system displays the following prompt: Format complete, format another? 6. TYPE: n PRESS: Enter With the newly formatted disk still in the drive, boot the system. If the format was successful, the system prompts you for the date and time. PRESS: Enter 7. You are now ready to copy the IPC-900 diagnostic onto the newly formatted disk. To copy the diagnostic device drivers and programs, at the A>: prompt: TYPE: copy a:*.* b:*.* a. The system prompts you to insert a disk in the drive. Insert the disk entitled Intelligent Ports Card MS-DOS Device Drivers and Diagnostics Version 3.09 into the drive and PRESS: Enter b. The system will eventually prompt you to insert a disk in Drive B. Remove the diagnostic disk, insert the newly formatted disk into the same drive, and PRESS: Enter Steps a and b will alternate until the entire disk has been copied. 8-10 January 1997 6800-A2-GN22-30 Running Diagnostics 8. You now have to create a config.sys file to allow the IPC device drivers to be automatically loaded when the system is booted. To do this, at the A:> prompt, TYPE: copy con: config.sys The cursor will advance to the next line and await input. At this point, whatever you type on the keyboard will be put into a buffer and then written to a file named config.sys. Enter the following lines into the config.sys file TYPE: device=ipc16dos.sys buffers = 10 files=20 and PRESS: Enter after each line. When complete, PRESS: <F6> PRESS: Enter to signal end of input; ^ Z will appear on the display. 9. With the newly created diagnostic disk in the drive, boot the system to load the device drivers. For the Altos 5000 (Figure 8-1) select Option 2 at the Boot Menu to boot from the floppy. For the Altos 15000, no further action is needed to reboot. During reboot you should see messages referring to the driver for the IPC-1600. (For more detailed information, refer to the AT&T Intelligent Ports Card Model 1600 (IPC-1600) User’s Guide.) 10. To execute the diagnostic tests TYPE: ipc16dia PRESS: Enter The IPC Diagnostics screen appears. 11. You have to enter the correct I/O address, memory address, and interrupt request (IRQ) in the appropriate fields on the IPC-1600 Diagnostic screen. For a valid IRQ and I/O address, refer to Table 2-1 (for 5000 host) and Table 2-5 (for 15000 host). Use the memory address A0000. Once you have selected the I/O address, memory address, and IRQ, the names of the six tests are displayed on the screen. 12. To run a test, enter the number of the test. As you can see, this screen keeps a record of the number of times each test was executed, the number of times each test passed, and the number of times each test failed. (For additional details about the tests, refer to the AT&T Intelligent Ports Card Model 1600 (IPC-1600) User’s Guide.) 13. When you have finished running all appropriate diagnostics, PRESS: Esc to terminate the program. 6800-A2-GN22-30 January 1997 8-11 COMSPHERE 6800 Series Network Management System 14. Power down the processor and remove the IPC-1600 card. Reset the memory address from A0000 to its original setting as shown in Figure 2-14 for an Altos 5000 or Table 2-6 for an Altos 15000. Replace the card and power-up the processor. Emulex DCP-286i Diagnostic Program (for Altos 5000 Systems Only) To run the diagnostic program that comes with the Emulex DCP-286i card, you need the disk entitled DCP286i Diag Disk Rev A that is shipped with the card and a bootable MS-DOS disk. With these items, perform the following steps: 1. Move the RESET/RUN key on the front panel clockwise to the RUN position to reboot the System 5000 (if the System 5000 is turned off at this point, move the power switch on the rear panel to the ON position instead). The System 5000 will run through its normal power-up sequence and display the following message: Press spacebar to interrupt autoboot 2. PRESS: the spacebar immediately The Boot Menu displays (see Figure 8-1). 3. Insert the bootable MS-DOS disk into disk drive and select Option 2 to boot from the floppy. 4. Once the System 5000 has booted, insert the disk entitled DCP286i Diag Disk Rev A into the disk drive and TYPE: DCPDIAG2 PRESS: Enter The diagnostic’s Main Menu displays, with the highlight positioned on the option Run. 5. To run the program, PRESS: Enter When the program finishes, the system returns to the Main Menu. 6. To exit the program and return to MS-DOS, highlight Exit and PRESS: Enter 8-12 January 1997 6800-A2-GN22-30 Running Diagnostics Emulex DCP/MUXi Diagnostic Program The diagnostic program that comes with the Emulex DCP/MUXi card allows isolation of the diagnostic test to four areas of card operation. Selection of any one of these test areas causes a submenu to display with additional selections that test only a specific function of that card area. To run the diagnostic program that comes with the Emulex DCP/MUXi card, you need the disk entitled DCPMUXI Diagnostic that is shipped with the card and a bootable MS-DOS disk. With these items, you can perform the diagnostic program. If UNIX is running, shut down UNIX using the Shutdown procedure in Chapter 6. The Altos 5000 and Altos 15000 systems do not have the same power-up procedure. This difference is accommodated in Step 1. 1. For the Altos 15000 system, insert the bootable disk containing MS-DOS and power on the system. To do this, move the RESET/RUN key on the front panel clockwise from RESET to RUN. Proceed to Step 4. For the Altos 5000 system, insert the bootable MS-DOS disk into the disk drive and move the RESET/RUN key on the front panel clockwise to the RUN position to reboot the System 5000 (if the System 5000 is turned off at this point, move the power switch on the rear panel to the ON position instead). The System 5000 will run through its normal power-up sequence and display the following message: Press spacebar to interrupt autoboot 2. PRESS: the spacebar immediately The Boot Menu appears (see Figure 8-1). 3. Select Option 2 to boot from the floppy. 4. Once the system has booted, insert the disk entitled DCPMUXi Diag Disk into disk drive and TYPE: dcpdiagm PRESS: Enter The Main Menu is displayed. 5. Select the Modify option and PRESS: Enter The Configuration Menu is displayed. 6. Select the Control address option and PRESS: Enter 7. Select the appropriate address and PRESS: Enter For valid addresses, see Table 2-1 (5000 host) or Table 2-5 (15000 host); both are in Chapter 2. NOTE Only one EMULEX DCP/MUXi card can be tested at a time. Do not mix parameters from two cards. 6800-A2-GN22-30 January 1997 8-13 COMSPHERE 6800 Series Network Management System 8. Select Start Address and PRESS: Enter 9. Select the Correct Window size/address combination and PRESS: Enter Addresses are listed in Table 2-1 (for 5000 host) and Table 2-5 (for 15000 host). (All window sizes for the EMULEX DCP/MUXi cards are 16KB.) The Select Window Size menu is displayed. 10. Select 16KB and PRESS: Enter 11. Exit the configuration menu and return to the Main Menu: PRESS: Esc 12. Select Run and PRESS: Enter NOTE The EMULEX DCP/MUXi diagnostics automatically test to see if the local processor can interrupt the host. The EMULEX DCP/MUXi cards are configured without using interrupts. The diagnostics will erroneously flag this as an error. This is not an error, so ignore the error message. 13. The system prompts: Local processor did not interrupt host --> FAIL ***Pausing on error ---> Type any key to continue: PRESS: Enter 14. When the diagnostics are completed, the system prompts: Type any key to proceed. PRESS: Enter The Main Menu is displayed. To test a second EMULEX DCP/MUXi card or to repeat the test, return to Step 5. Otherwise, continue. 15. Select Exit and PRESS: Enter 16. At the DOS prompt, remove the floppy disk and PRESS: Ctrl + Alt + Del to reboot the system or run the next DOS-based diagnostics program. 8-14 January 1997 6800-A2-GN22-30 Modem Settings Overview . . . . . . . . . . . . . . . . . . . . . . . . . . . . . . . . . . . . . . . . . . . . . . . . . . . . 3810, 3811, and 3820 Modems . . . . . . . . . . . . . . . . . . . . . . . . . . . . . . . . . 2224-CEO Modem . . . . . . . . . . . . . . . . . . . . . . . . . . . . . . . . . . . . . . . . . . Configuring 3810, 3811, and 3820 Modems . . . . . . . . . . . . . . . . . . . . . . . . . Hardware Option Settings for the 2224-CEO . . . . . . . . . . . . . . . . . . . . . . . . . Software Configuration Option Parameters for the 2224-CEO . . . . . . . . . . . Locking Option Changes . . . . . . . . . . . . . . . . . . . . . . . . . . . . . . . . . . . . . . . . A A-1 A-1 A-1 A-1 A-2 A-3 A-4 Overview 3810, 3811, and 3820 Modems The 3810, 3811, and 3820 modems provide a user friendly diagnostic control panel (DCP) for configuration. Please see the section Configuring 3810 Modems in this appendix to configure these modems. 2224-CEO Modem The 2224-CEO modem has both hardware option switches and software configuration option parameters that control its operation. This appendix describes the recommended settings for both hardware and software options. Use this information as general guidelines. Different values are possible, and other modems may be used. Configuring 3810, 3811, and 3820 Modems To configure 3810, 3811, and 3820 modems, perform the following steps at both the host and remote ends of the modem pair. 1. Select Configure from DCP using the right arrow key. 2. Select Factory using the right arrow key. 3. If the modem is used for ATR, select UNIX dial using the right arrow key. If the modem is used for remote workstation access, select Async dial using the right arrow key. 4. Select Edit (F1). 6800-A2-GN22-30 January 1997 A-1 COMSPHERE 6800 Series Network Management Systems 5. Select DTE Interface. 6. Select Async DTE_rate using the F1 key. 7. Using the right arrow key, select the rate that matches what was set in the port configuration on the NMS. 8. Verify the Error Control Mode is set to V.41/MNP of Buffer. 9. Press Double Arrow Up to save settings. 10. The LCD prompts: Save Straps? Yes — No. 11. Press F1 for Yes and F1 again for Active. If using 3830 modems, use your DTE interface to set the modem options as indicated in the above steps. Hardware Option Settings for the 2224-CEO The 2224-CEO modem has eight hardware option switches accessible from the front panel. The option switch bank S1 is located under a cover near the left end of the front panel, to the right of the speaker grill. To access the switches, slide the cover upwards. The option switches should be set UP (U) (Disable) or DOWN (D) (Enable) as indicated in Table A-1 (o7 and o51 are software configuration options discussed in the next section). Table A-1 Modem Hardware and Configuration Option Switch Settings S1-1 S1-2 S1-3 S1-4, 5&6 S1-7 S1-8 o7 o51 ATR NMS end Remote end Remote terminal D U D D D D U D D DUD DUD DUD D U D D D D y y n y y y Remote Terminal NMS end Remote end U D D D U D DUD DUD U D D D y n y y Cut-through (SC, DBU) NMS end Remote end D U D D D D DUD DUD D U D D n y y y Cut-through NMS end (specific for DCX) Remote end D D D D D D DUD DUD D D D D n y y n Remote System Printer Both ends D D D DUD U D y y Modem Used For A-2 January 1997 o58 n y 6800-A2-GN22-30 Modem Settings NOTE The factory default setting for all switches is down. After option switches are set, the reset switch (also located behind the cover) must be pressed. The significant switch settings are as follows: S1-1 D: CTS and CD follow DTR. U: CTS and CD follow EIA RS-232-C standard. S1-2 D: Option changes enabled. U: Option changes disabled. S1-3 D: Enter command mode with carriage return. U: Enter commands with at or atz sequence. S1-4, 5, & 6 Control speed and mode. The setting DUD for these three switches is 2400 bps asynchronous operation. See the documentation packed with the modem for other values. S1-7 D: Modem interprets commands sent by DTE (modem dialerenabled). U: Modem ignores data from the DTE (modem dialer disabled). S1-8 D: Enables the auto-test function. U: Disables the auto-test function. Software Configuration Option Parameters for the 2224-CEO After the hardware option switches are set, a terminal should be connected to the modem so that the following software configuration option parameters can be set: • For all modems, TYPE: atzo12=y PRESS: Enter twice • For all modems, TYPE: atzo34=1 PRESS: Enter twice • Depending on the value (y or n) in column o7 of Table A-1, TYPE: atzo7=y or atzo7=n PRESS: Enter twice • Depending on the value (y or n) in column o51 of Table A-1, 6800-A2-GN22-30 TYPE: atzo51=y or atzo51=n PRESS: Enter twice January 1997 A-3 COMSPHERE 6800 Series Network Management Systems • Depending on the value (y or n) in column o58 of Table A-1, TYPE: atzo58=y or atzo58=n PRESS: Enter twice The software configuration option parameter meanings are as follows: o7 (o7=y or o7=n) Automatic answer enabled (yes or no). o12 (o12=y) Transparent Data mode (should be enabled). o34 (o34=1) Operate as standard modem without error control. o51 (o51=y or o51=n) CTS controlled by RTS (yes or no). o58 (o58=y or o58=n) Modem ignores DTR (yes or no). Locking Option Changes After the software configuration option parameters have been set, hardware switch S1-2 should be changed from D to U to lock the options so that they cannot be changed. A-4 January 1997 6800-A2-GN22-30 Adapter and Cable Identification B Overview . . . . . . . . . . . . . . . . . . . . . . . . . . . . . . . . . . . . . . . . . . . . . . . . . . . . B-1 Overview Table B-1 provides adapter/cable descriptions, usage descriptions and pin information for each cable and adapter described in this guide. All adapters and cables are identified in numeric sequence by their part number. NOTE In Table B-1 the connector part number information includes the previous cable identifier information. This information is to be used for crossreference purposes only. Only cables that meet the latest National Electric Code (NEC) and/or Canadian Electric Code (CEC) requirements may be used. Table B-1 (1 of 10) Adapter and Cable Identification Part Number/ Feature Number Part#: 002-0019-0031 (female gender changer) Feature#: 6821-F1-017 6821-F1-516 6821-F1-531 6821-B1-133 6821-B1-135 6800-A2-GN22-30 Description 25-pin female to 25-pin female gender changer Usage For remote connection of ANALYSIS 5600 to 6800. Connects Port 1 of an ANALYSIS 5600 to a 835-4613-2511 cable. Also used in migration of System Controller database and in control channel upgrades. January 1997 Pin Diagram Pin-to-pin B-1 COMSPHERE 6800 Series Network Management Systems Table B-1 (2 of 10) Adapter and Cable Identification Part Number/ Feature Number Description Usage Pin Diagram Part#: 002-0021-0031 (10-position multiplexer adapter) Feature#: 6821-F1-503 10-pin modular jack to 25-pin Sub D female For 719 NETWORKER and/or 740/745 multiplexer connection to event and command ports on 6800. Connects to an 035-0153-0031 cable. 10-pin 25-pin 1– – – – – – – – – 6 3<–– 2 < – – – – – – – – > 22 4 < – – – – – – – – > 20 5<––––––––>7 6<––––––––>3 7<––––––––>2 8<––––––––>5 9<––––––––>4 10 < – – – – – – – – > 1 Part #: 002-0025-0031 (873A) Feature#: 6821-F1-513 6-pin modular cable to 25-pin Sub D female Connects control channel to any Model 2 device. 25-pin 6-pin 2<––––––––>5 3<––––––––>3 4<––––––––>1 5<––––––––>2 7<––––––––>4 Part #: 002-0032-0031 (355AF connector) Feature #: 6821-F1-526 8-pin modular jack to 25-pin Sub D female 4400 Series SRC to 6800 connection. Connects to 035-0152-0031 cable. 8-pin 25-pin 5<––––––––>3 2<––––––––>2 3 < – – – – – – – – > 20 2<––––––––>8 –>6 –>5 1 < – – – – – – – – > 22 4<––––––––>7 Part #: 002-0037-0031 (8-position terminal/ printer adapter) Feature #: 6821-F1-531 25-pin male Sub D cable to 8-pin keyed modular jack Used in System Controller database migration. 8-pin 25-pin 1<––––––––>1 2<––––––––>4 3<––––––––>3 4<––––––––>8 5<––––––––>2 6 < – – – – – – – – > 20 7<––––––––>7 8<––––––––>5 B-2 January 1997 6800-A2-GN22-30 Adapter and Cable Identification Table B-1 (3 of 10) Adapter and Cable Identification Part Number/ Feature Number Part #: 002-0039-0031 (10-position male ACU/ MODEM adapter) Feature #: 6821-F1-506 6821-F1-526 6821-F1-530 6800-A2-GN22-30 Description 10-pin keyed modular jack to 25-pin male Sub D Usage Pin Diagram System Printer: For remote 10-pin 25-pin system printer connection to 1<––––––––>6 6800, connects 2 < – – – – – – – – > 22 035-0153-0031 cable to local 3<––––––––>8 2224-CEO DDD modem. 4 < – – – – – – – – > 20 Workstations: For remote 5<––––––––>7 basic-feature workstation 6<––––––––>3 connection to 6800. Connects 7<––––––––>2 035-0153-0031 cable to local 8<––––––––>5 DCE. 9<––––––––>4 ANALYSIS: Remote 10 < – – – – – – – – > 1 ANALYSIS 6510/5605/5600 connection to 6800. Connects 035-0153-0031 cable to local DCE. Bytex Switch: Connects 035-0153-0031 cable to Bytex port. NetView PC: Remote IBM NetView PC connection to 6800. Connects 035-0153-0031 cable to local DCE interface ATR Connection: Remote connection of ATR Line Printer to 6800. Connects 035-0153-0031 to local 2224-CEO DDD modem. External Systems: Connects to Series 700 multiplexers. For local and remote connection of System Control, SRC, 839A, DCX Multiplexer, Bytex UMS, and computer systems requiring VT100 Terminal Emulation. ACCUMASTER/ Integrator StarKeeper: Connects 035-0153-0031 to local and remote applications. January 1997 B-3 COMSPHERE 6800 Series Network Management Systems Table B-1 (4 of 10) Adapter and Cable Identification Part Number/ Feature Number Description Usage Pin Diagram Part #: 002-0040-0031 (10-position terminal/printer adapter) Feature #: 6821-B1-133 6821-B1-135 6821-F1-524 6821-F1-010 10-pin male Sub D to 8-pin modular jack Printers: Local connection of 10-pin 25-pin alert log printer, or dedicated –>6 ATR or system printer to 6800. 3 < – – – – – – – – > 20 Connects an 035-0153-0031 4<––––––––>8 cable to the printer. 5<––––––––>7 DCX Multiplexers: For local 6<––––––––>2 connection to 6800. Connects 7<––––––––>3 MIU to 035-0153-0031 cable. 8<––––––––>4 VT 100: For local connection 9<––––––––>5 to 6800. Connects computer 10 < – – – – – – – – > 1 system requiring VT100 terminal emulation to 035-0153-0031 cable. ANALYSIS: For local ANALYSIS 6510/5605 Port 1 connection to Port 1 on dedicated IPC-900 card. Connects ANALYSIS to 035-0153-0031 cable. Part #: 002-0047-0031 (8-position female ACU/MODEM adapter) Feature #: 6831-B1-506 6831-B1-508 6831-F1-531 6831-F1-010 25-pin male Sub D to 8-pin modular jack External Systems: Remote connection of System Controller to 6800. Connects 035-0152-0031 cable to remote DCE. ACCUMASTER Integrator/Starkeeper: Remote connection to 6800. Connects 035-0152-0031 cable to remote DCE. 10-pin 25-pin 1<––––––––>6 2<––––––––>9 3<––––––––>4 4<––––––––>1 5<––––––––>5 6<––––––––>3 7<––––––––>2 8<––––––––>7 9<––––––––>8 Part #: 002-0050-0031 (8-position female ACU/MODEM adapter) Feature #: 6831-F1-506 6831-F1-508 6831-F1-531 6831-F1-010 25-pin male Sub D to 8-pin modular jack External Systems: Remote connection of System Controller to 6800. Connects 035-0152-0031 cable to remote DCE. ACCUMASTER Integrator/ StarKeeper: Remote connection to 6800. Connects 035-0152-0031 cable to remote DCE. 25-pin 8-pin 1<––––––––>1 2<––––––––>3 3<––––––––>5 4<––––––––>8 5<––––––––>2 7<––––––––>7 8<––––––––>6 20 < – – – – – – – – > 4 B-4 January 1997 6800-A2-GN22-30 Adapter and Cable Identification Table B-1 (5 of 10) Adapter and Cable Identification Part Number/ Feature Number Description Usage Pin Diagram Part #: 002-0051-0031 (8-position female terminal/printer adapter) Feature #: 6831-F1-501 6831-F1-531 25-pin female Sub D to 8-pin modular jack Local System Controller or ACCUMASTER Integrator/ StarKeeper connection to 6800. Connects 035-0152-0031 cable from System Controller to an 002-0039-0031 connector. Connects 035-0152-0031 cable from ACCUMASTER Integrator/StarKeeper to an 002-0039-0031 connector. 25-pin 8-pin 1<––––––––>1 3<––––––––>3 2<––––––––>5 5<––––––––>8 4<––––––––>2 7<––––––––>7 20 < – – – – – – – – > 6 8<––––––––>4 Part #: 002-0052-0031 (10-position female terminal/printer adapter) Feature #: 6821-F1-501 6821-F1-524 25-pin female Sub D to 10-pin modular jack Workstations: Connects 035-0153-0031 cable to basic-feature workstation. IBM NetView/PC: Connects local IBM PC to 035-0153-0031 cable. VT100 Emulation: Connects 035-0153-0031 cable. 25-pin 10-pin 6<– 20 < – – – – – – – – > 3 8<––––––––>4 7<––––––––>5 2<––––––––>6 3<––––––––>7 4<––––––––>8 5<––––––––>9 1 < – – – – – – – – > 10 Part #: 002-0053-0031 10-position female ACU/MODEM adapter) Feature #: 6821-F1-010 6821-F1-504 25-pin female Sub D to 10-pin keyed modular jack ANALYSIS: Local connection of ANALYSIS 5600 to 6800. Connects Port 1 of ANALYSIS 5600 to an 035-0153-0031 cable. 25-pin 10-pin 6<––––––––>1 22 < – – – – – – – – > 2 8<––––––––>3 20 < – – – – – – – – > 4 7<––––––––>5 3<––––––––>6 2<––––––––>7 5<––––––––>8 4<––––––––>9 1 < – – – – – – – – > 10 Part #: 002-0054-0031 Feature #: 6800-B1-100 6800-F1-020 6800-B1-150 6800-F1-150 9-pin female Sub D to 10-pin keyed modular jack Connects basic-feature workstations or printers to the COM ports of the Altos System 5000. 10-pin 9-pin 1<––––––––>6 2<––––––––>9 3<––––––––>1 4<––––––––>4 5<––––––––>5 6<––––––––>2 7<––––––––>3 8<––––––––>8 9<––––––––>7 Part #: 002-0065-0031 25-pin to 25-pin SLIDE LATCH ADAPTER AUI EXTENDER for host and UIP processors. pin-to-pin 6800-A2-GN22-30 January 1997 B-5 COMSPHERE 6800 Series Network Management Systems Table B-1 (6 of 10) Adapter and Cable Identification Part Number/ Feature Number Description Usage Pin Diagram Part #: 035-0105-0031 (M6AY) Feature #: 6821-F1-517 25-pin male Sub D to 10-pin female control channel connector Remote connection of DPII, APL, DDD modem or DSU to remote DCE. 25-pin 10-pin 1<––––––––>1 2<––––––––>4 3<––––––––>3 7<––––––––>5 –>9 8<––––––––>7 4<––––––––>8 9<– 20 < – Part #: 035-0106-0531 (M6BK) Feature #: 6821-F1-518 6-pin modular jack to 10-pin male control channel connector Connects control channel to remote Model 2 device when used with 035-0184-5031. 6-pin 10-pin 1<––––––––>7 2<––––––––>8 3<––––––––>4 4<––––––––>6 –>9 5<––––––––>3 6 < – – – – – – – – > 10 Part #: 035-0116-2531 (DW8A-DE) Feature #: 6831-F1-521-2531 = 25‘ 6831-F1-520-5031 = 50‘ 6831-F1-522-9031 =100‘ 6831-F1-5239931 =200‘ 8-pin modular jack to 8-pin modular jack Connects StarLAN NAU in 8-pin 8-pin 6820 to Network Hub Unit. 8<––––––––>1 Connects Network Hub Unit to 7<––––––––>2 full-feature workstation. 6<––––––––>3 5<––––––––>4 4<––––––––>5 3<––––––––>6 2<––––––––>7 1<––––––––>8 Part #: 035-0145-5031 (M6BJ) Feature #: 6821-F1-513 6-pin modular plug to 6-pin modular plug Connects any Model 2 modem or 4000 Series carrier to control channel. B-6 January 1997 pin-to-pin 6800-A2-GN22-30 Adapter and Cable Identification Table B-1 (7 of 10) Adapter and Cable Identification Part Number/ Feature Number Description Usage Pin Diagram Part #: 035-0147-5031 (M6BC/M4BB) Feature #: 6821-F1-519 6821-F1-518 25-pin male Sub D to 25-pin female Sub D Connects control channel to DCE device for remoting CC connections. 25-pin 25-pin 1<––––––––>1 2<––––––––>2 3<––––––––>3 4<– 5<– 6<– 8<– –>9 20 < – – > 20 7<––––––––>7 Part #: 035-0149-2531 (serial cable for SX/EL) Feature #: 6821-F1-507 9-pin DB9 female to 25-pin male Sub D serial cable Connects remote basicfeature workstation to its DCE interface. 25-pin 9-pin 2<––––––––>3 3<––––––––>2 4<––––––––>7 5<––––––––>8 6<––––––––>6 7<––––––––>5 8<––––––––>1 20 < – – – – – – – – > 4 22 < – – – – – – – – > 9 Part #: 035-0151-0031 (M8W) Feature #: 6821-F1-510 6821-B1-133 6821-B1-135 25-pin male Sub D to 25-pin male Sub D null modem cable Connects an 839A DBU control unit to a remote DCE. Connects a local alert log printer to a serial port. 25-pin 25-pin 1<––––––––>1 2<––––––––>3 3<––––––––>2 4<––––––––>8 7<––––––––>7 8<––––––––>4 17 < – – – – – – – – > 24 24 < – – – – – – – – > 17 6800-A2-GN22-30 January 1997 B-7 COMSPHERE 6800 Series Network Management Systems Table B-1 (8 of 10) Adapter and Cable Identification Part Number/ Feature Number Description Usage Pin Diagram 8-pin 8-pin 1<––––––––>8 2<––––––––>7 3<––––––––>6 4<––––––––>5 5<––––––––>4 6<––––––––>3 7<––––––––>2 8<––––––––>1 Part #: 035-0152-0031 (8-position modular cable) Feature #: 6821-B1-133 6821-B1-135 6821-F1-501 6821-F1-524 6831-F1-010 6831-B1-111(011) 6831-F1-501 6831-F1-503 6831-F1-506 6831-F1-530 6831-F1-531 8-pin to 8-pin modular cable System Controller: Local and remote System Controller connection to 6800. Connects local SC to an 002-0051-0031 connector; connects remote SC to 002-0050-0031 connector. SRC: Local and remote SRC connection to 6800. Connects local SRC or remote to an 002-0032-0031 connector. ACCUMASTER Integrator/ StarKeeper: Local and remote ACCUMASTER Integrator/StarKeeper connection to 6800. Connects local ACCUMASTER Integrator/StarKeeper to an 002-0051-0031 connector; connects remote ACCUMASTER Integrator/ StarKeeper to an 002-0050-0031 connector. Part #: 035-0153-0031 (10-position modular cable) 10-pin modular to 10-pin modular cable Used in any serial connection to an IPC card. Part #: 035-0154-0031 (M6BC) Feature #: 6821-F1-512 25-pin female Sub D jack to 10-pin female control channel connector Local DATAPHONE II, APL, DDD modem, DSU connection to 6800. Connects DCE device to 835-3564-2511 cable. 6820 to 035-011-0731 cable (to local DCE). B-8 January 1997 25-pin 10-pin 1<––––––––>1 2<––––––––>3 3<––––––––>4 4<––––––––>7 5<––––––––>8 7<––––––––>6 –>9 6<– 8<– 20 < – 6800-A2-GN22-30 Adapter and Cable Identification Table B-1 (9 of 10) Adapter and Cable Identification Part Number/ Feature Number Description Usage Pin Diagram Part #: 035-0155-0031 Pec 2724-89G (parallel cable) Feature #: 6821-B1-135 6821-B1-235 6821-B1-136 6821-B1-236 6821-B1-134 6821-B1-234 Centronics Connector to 25-pin male Sub D Connects system printer to the parallel port on the 6820. Part #: 035-0184-5031 (M6AY) Feature #: 6821-F1-517 6821-F1-518 25-pin male Sub D to 10-pin female control channel connector Connects control channel to remote DPII devices or to Model 2 devices when used with 035-0106-0531 25-pin 10-pin 1<––––––––>1 2<––––––––>4 3<––––––––>3 7<––––––––>5 –>9 8<––––––––>8 4<––––––––>7 9<– 20 < – Part #: 035-0185-5031 (M6AY/M6BK) Feature #: 6821-F1-518 6-pin modular jack to 25-pin male Sub D Connects control channel to remote Model 2 devices 6-pin 25-pin 1<––––––––>4 2<––––––––>8 3<––––––––>2 4<––––––––>7 5<––––––––>3 –>9 – > 20 Part #: 835-3564-2511 (M25A) Feature #: 6831-F1-502 6821-F1-507 6821-F1-512 25-pin male Sub D to 25-pin female Sub D Workstations: Connects Pin-to-pin remote basic-feature workstation to its remote DCE interface. NetView/PC: Connects remote NetView PC to its DCE interface. DATAPHONE II: Connects local DATAPHONE to control channel. 74x Multiplexers: Connects 719 to 74x for multiplexer network interface. 6800-A2-GN22-30 January 1997 B-9 COMSPHERE 6800 Series Network Management Systems Table B-1 (10 of 10) Adapter and Cable Identification Part Number/ Feature Number Description Usage Pin Diagram Part #: 835-4613-2511 (Paradyne terminal/ controller cable) Feature #: 6821-F1-516 25-pin male Sub D to 25-pin male Sub D cable Connects remote DCE interface to ANALYSIS 5600 via an 002-0019-0031 connector. See ANALYSIS documentation for pinouts. Part #: 835-4949-0311 8-pin modular cable Daisy chains ANALYSIS hubbing devices. Pin-to-pin Part #: 835-5783-0011 (M25B) 25-pin male Sub D to 25-pin male Sub D cable Printers: Connects the Pin-to-pin remote system printer to the remote 2224-CEO DDD modem. DCX Multiplexers: Connects remote DCX multiplexer’s MIU to DCE device. ANALYSIS: Connects ANALYSIS 6510/5605 to DCE device. VT 100: Connects computer system requiring VT 100 terminal emulation to the DCE device. B-10 January 1997 6800-A2-GN22-30 Maintaining Multiplexers Overview . . . . . . . . . . . . . . . . . . . . . . . . . . . . . . . . . . . . . . . . . . . . . . . . . . . . General Troubleshooting Procedures . . . . . . . . . . . . . . . . . . . . . . . . . . . . . . . Command Port Failure . . . . . . . . . . . . . . . . . . . . . . . . . . . . . . . . . . . . . . . . . . Multiplexer Problems . . . . . . . . . . . . . . . . . . . . . . . . . . . . . . . . . . . . . . . . NAP Speed . . . . . . . . . . . . . . . . . . . . . . . . . . . . . . . . . . . . . . . . . . . . . . . . Event Port Failure . . . . . . . . . . . . . . . . . . . . . . . . . . . . . . . . . . . . . . . . . . . . . . Faulty Connections . . . . . . . . . . . . . . . . . . . . . . . . . . . . . . . . . . . . . . . . . . . . . Software Configuration Errors . . . . . . . . . . . . . . . . . . . . . . . . . . . . . . . . . . . . Event Log Printer Problems . . . . . . . . . . . . . . . . . . . . . . . . . . . . . . . . . . . . . . External Systems Port Failure . . . . . . . . . . . . . . . . . . . . . . . . . . . . . . . . . . . . . C C-1 C-1 C-2 C-2 C-8 C-9 C-9 C-9 C-11 C-11 Overview This appendix explains how to identify and resolve communications problems between the NMS and the multiplexers it monitors. Communications between the NMS and the multiplexers takes place via the following three ports on the host processor: • Command Port. The command port handles two-way communication. Some of its activities include transporting commands to the nodes and permitting polling. • Event Port. The event port handles one-way communication. This port receives events from the multiplexers. • External Systems Port. This port is dedicated to the multiplexer external systems (cut-through) interface. This appendix begins with a discussion of some general hardware troubleshooting procedures that you should follow. It then provides procedures for detecting and solving specific problems associated with each of the three ports. General Troubleshooting Procedures Whenever a communications problem occurs, you should use the following general procedure: 1. Check the hardware connections. 2. Check the multiplexer for problems. 3. Check the host processor and IPC-1600 card for problems (see Chapter 8, Running Diagnostics for detailed instructions). 6800-A2-GN22-30 January 1997 C-1 COMSPHERE 6800 Series Network Management Systems Always begin troubleshooting by checking the hardware connections. Make a visual inspection of the hardware connections to ensure that: • The host processor power supply is plugged in and the ac outlet is on. • The multiplexer power supply is plugged in and the ac outlet is on. • The multiplexer is connected to the appropriate port on the host processor. Command Port Failure Communication between the command port and a multiplexer can fail because of hardware problems in the multiplexer or because of an incorrect network administration port (NAP) speed. Multiplexer Problems The NMS will issue the following alert if the cables to the command port are disconnected, power to the multiplexer control processor is lost, or the control processor is no longer operational: pollpf: Multiplexer polling port is down The frequent display of this alert may indicate that the multiplexer is continually resetting itself and a multiplexer hardware problem exists. NOTE If other cards (for example, the channel card) fail, you will continue to receive alarms and the network will not be disrupted. Beyond the first node, communication will be handled routinely by the network. In general, this alert is reported only when communication to the first node is lost. When you receive this alert, you should perform the following steps: 1. Check the hardware connections, as described in the section entitled General Troubleshooting Procedures. 2. Check the multiplexer communication connection between the node and the host processor. To check the link to the first node, send out a nondisruptive command such as the Hardware Module Summary (hms) command. If the connection is broken, the following message will be displayed: Cannot communicate with the network — check NMS connection to network 3. If the connection between the node is made and the problem persists, check the control processor’s LED display. Your configuration may consist of a single control processor, or it may have dual or redundant control processors. Each processor will have its own LED display. C-2 January 1997 6800-A2-GN22-30 Maintaining Multiplexers If the multiplexer control processor experiences faults, its LED display will indicate the nature of the fault (if possible). For example, if the LED reads 333, the control processor is performing diagnostics. To identify a fault, read the rightmost digit of the LED display for the control processor card or cards. The codes correspond to status conditions, and are described in Steps 4, 5, 6, and 7. CAUTION In the following procedures where you are instructed to check power connections, you should make a visual inspection only. To avoid electrical shock, be sure to turn off power to the multiplexer before you examine any power connection. 4. If the control processor’s LED display is blank, perform the following steps: a. Make sure the control processor is secure in its shelf slot. b. Check the power distribution connections. Figures C-1 and C-2 show the locations of these connections on the 740 multiplexer (both with and without the expansion shelf). Figure C-3 shows the location of these connections on the 745 multiplexer. c. Check the power supply monitor and control connections. Refer to Figure C-1, C-2, or C-3 for the connections appropriate to your multiplexer. d. Check the 4336 power supply monitor and control connections. Refer to Figure C-4 or C-5. If one of these power supplies has failed, the light on the front of the 4336 power supply may be flashing. Power Distribution Connection J1 power switch AC fuse P11 power connections P12 Power Monitor and Control Connection J1 power 490-11631 Figure C-1. Power Connections for 740 Multiplexers without Expansion Shelf 6800-A2-GN22-30 January 1997 C-3 COMSPHERE 6800 Series Network Management Systems Bus Expansion Power Distribution Connection J1 power switch AC fuse P11 P12 power connections Power Monitor and Control Connection J1 power Power Distribution Connection J1 power switch AC fuse P11 power connections P12 Power Monitor and Control Connection J1 power 490-11632 Figure C-2. Power Connections for 740 Multiplexers with Expansion Shelf C-4 January 1997 6800-A2-GN22-30 Maintaining Multiplexers Power Distribution Connection J1 power switch AC fuse P11 P12 power connections Power Monitor and Control Connection J1 power 490-11633 Figure C-3. Power Connections for 745 Multiplexers 6800-A2-GN22-30 January 1997 C-5 COMSPHERE 6800 Series Network Management Systems Optional Shelf Slots 1 2 3 4 5 6 7 8 9 10 11 12 13 14 15 16 17 18 19 20 21 22 23 24 4 3 3 2 C 4 3 3 2 C 4 3 3 6 R E D U N D A N T 4 8 3 0 4 8 3 0 R E D U N D A N T Power Supply for Shelf Slots 1-8 (common modules) 4 3 4 0 4 3 4 2 4 3 4 8 4 3 4 6 Power Supply for Shelf Slots 9-14 Redundant Power Supply Power Supply for Shelf Slots 15-19 Power Supply for Shelf Slots 20-24 491-11634-01 Figure C-4. 4336 Power Supply for 740 Multiplexers C-6 January 1997 6800-A2-GN22-30 Maintaining Multiplexers Optional Shelf Slots 1 2 3 4 5 6 7 8 9 10 11 12 13 14 15 16 17 18 19 20 21 22 23 24 4 3 3 2 D 4 3 3 2 D R E D U N D A N T 4 3 3 6 4 8 3 0 4 8 5 0 R E D U N D A N T Power Supply for Shelf Slots 1-8 (common modules) 4 3 6 0 Power Supply for Shelf Slots 9-14 Redundant Power Supply Power Supply for Shelf Slots 15-19 Power Supply for Shelf Slots 20-24 491-11635-01 Figure C-5. 4336 Power Supply Connection for 745 Multiplexers 6800-A2-GN22-30 January 1997 C-7 COMSPHERE 6800 Series Network Management Systems 5. If the control processor’s LED display shows a 2, perform the following steps: NOTE If this is a dual- or redundant-control processor configuration, the impact of this failure is less damaging. Even so, perform the following steps to correct the fault as soon as possible. a. Check the control processor configuration using the Display Multiplexer Components Configuration (dsmcc) command. If the control processor was taken out-of-service due to failed diagnostics, go to the next step. b. Check the alerts for a control processor failure. The alerts display on the network monitor or network map. 6. If the control processor’s display shows a 9, make sure that the control processor’s Enable/Disable switch is set to Enable. If the switch is set correctly, the control processor may have failed or its fuse may have blown. Contact your service technician for assistance. Refer to your multiplexer service manual for ordering information. 7. If the control processor’s LED display shows a lowercase t followed by a two-digit trouble code, this indicates a sanity fault. If the trouble code remains after a power-up or a reset, write down the code and contact your service technician. For information on these codes, refer to your 740 or 745 ACCULINK Multiplexer Service Manual, as appropriate. NAP Speed If a command is sent to the first node and the following alert is issued, Node XXX: No response received within an acceptable time — try again later. check the NAP speed. Communication cannot occur if the NAP speed is incorrect. To check the NAP speed, do one of the following: • If you are using a 74x multiplexer, check the NAP configuration at the multiplexer and change it, if necessary. • If you are using a 719 NETWORKER, at the ASCII terminal connected to the 719, check the configuration via the 719 menu. C-8 January 1997 6800-A2-GN22-30 Maintaining Multiplexers Event Port Failure Failures associated with the event port are usually caused by faulty connections or software configuration errors. Software configuration errors may also cause event log printer problems. Faulty Connections When there is a problem with the connection to the event port, the following alert is issued: evtpf: Multiplexer event port is down When this alert appears, perform the following steps: 1. Check the hardware connections, as described in the section entitled General Hardware Procedures. 2. Check the NAP speed. Communication cannot occur if the NAP speed is incorrect. To check the NAP speed, do one of the following: • If you are using a 74x multiplexer, check the NAP configuration at the multiplexer and change it, if necessary. • If you are using a 719 NETWORKER, at the ASCII terminal connected to the 719, check the configuration via the 719 menu. Once the problem is fixed, the alert will automatically clear. If the alert remains, the NMS may have to be brought down and restarted. Software Configuration Errors NOTE Before checking the software configuration, check the NAP speed. If the NAP speed is incorrect, you may not receive an alert. See Step 2 in the section entitled Faulty Connections for instructions. If incorrect values have been introduced for event log 2 via the terminal interface, or the Change Node Configuration Parameters (chncp) command has been run with incorrect information, a loss of alerts can occur. Determine if changes have been made to event log 2 by accessing the interface. Use the Change Node Configuration Parameters (chncp) command to change incorrect values on the node(s) for event log 2. The other items to check are the device profiles, alert monitoring state and filtering settings on the NMS. Use the commands described in Table C-1. 6800-A2-GN22-30 January 1997 C-9 COMSPHERE 6800 Series Network Management Systems Table C-1 NMS Commands Command Name Function dsdp Display Device Profile Use this command to check the System Polling field. It must be set to mux poll to permit the multiplexer to be monitored for alerts and events. eddp Edit Device Profile Use this command to set the System polling field to mux poll. dsams Edit Alert Monitoring State Use this command to check the Polling state field. It must be set to polling, polling and asynch reporting, or asynch polling for control channel m2 to detect faults associated with the multiplexer. edams Display Processing Filter Use this command to set the Polling state field to polling, polling and asynch reporting, or asynch polling on for control channel m2. dspf Display Alert Monitoring State Use this command to display the processing filter value for each alert group of the device type specified. edpf Edit Processing Filter Use this command to change the value of the filters that define an active alert. dsdf Display Display Filter Use this command to display the display filter value for each alert group of the device type specified. eddf Edit Display Filter Use this command to change the value of the filters that define the alerts that will display on the network map, network monitor, and network summary. You should also check the Edit User Selection Criteria (edusc) command to see if the alerts you are interested in are configured for display on your individual monitor. If you have verified that all connections and software configuration entries are correct, and that the multiplexer hardware is functioning, you should check the host processor for failure. C-10 January 1997 6800-A2-GN22-30 Maintaining Multiplexers Event Log Printer Problems You may also be expecting alarms at the event log printer, but not receiving them. The software configuration must accurately reflect the node (device) to which the alarm cable is connected. Use the Display Node Configuration Parameters (dsncp) command, and select either Event log 1 configuration or Event Log 3 configuration. Enter the name or number of the node and check the entries in the following fields: • Event log printer node name. Check the name of the node to which the event log printer is connected. • Event log printer node number. Check the number of the node to which the event log printer is connected. • Group. Check the number of the network administration port (NAP) or the group that contains the channel on a 719 NETWORKER to which the 6800 Series NMS is connected. • Events sent to Event Log Printer. Check the status of the event type. Only event types designated active are sent to the NMS. If values are incorrect in any of these fields, correct the entries using the Change Node Configuration Parameters (chncp) command. External Systems Port Failure You may encounter a communication problem when you try to connect to a multiplexer using the External Systems task. This type of problem is not identified by an alert. To resolve the problem, perform the following steps: 1. Check the hardware connections, as described in the section entitled General Troubleshooting Procedures above. 2. Make sure the external system name you used to open the cut-through connection is an external system configuration for the Series 700 multiplexer. Run the Edit External System Configuration (edesc) command and check for your external system name entry. If it is not a type of Series 700, correct it. 3. If the external system name is Series 700, and the problem persists, check the port group number. The group number identifies an associated group of ports. This number must coincide with the group number of the port that is used to communicate with the multiplexer. Run the Edit Port Configuration (edpc) command and check the entry for your group. The xx-yy designates the actual port that is used on the IPC card. 4. If the problem still persists, check the NAP speed. Communication cannot occur if the NAP speed is incorrect. To check the NAP speed, do one of the following: • If you are using a 74x multiplexer, check the NAP configuration at the multiplexer and change it, if necessary. • If you are using a 719 NETWORKER, at the ASCII terminal connected to the 719, check the configuration via the 719 menu. If, having done all this, the problem has not been solved, check the host processor for problems associated with IPC-1600 card (see Chapter 8, Running Diagnostics). 6800-A2-GN22-30 January 1997 C-11