1
MH Corbin HDM Software
User’s Manual
Version 9.2.8
PUBLISHED BY
M.H. Corbin, Inc.
8355 Rausch Drive
Plain City, OH 43064
Phone: 800-380-1718
Visit our Internet pages at http://www.mhcorbin.com/
© M.H. Corbin, Inc.
No part of this document may be reproduced in any form or by any means, electronic or mechanical (including photocopying), nor
may its contents be communicated to a third party without prior written permission of the copyright holder.
This material is subject to copyright protection, with all copyrights retained by M.H. Corbin, Inc. and its individual partners. All
rights reserved. Any logos and/or product names are trademarks of M.H. Corbin, Inc. or its individual partners. The reproduction,
transfer, distribution or storage of information contained in this document in any form without the prior written consent of M.H.
Corbin, Inc. is strictly prohibited. All specifications — technical included — are subject to change without notice.
MH Corbin HDM User’s Manual ____________________________________________ v9.2.8
Table of Contents
1 INTRODUCTION ....................................................................................................................................................1
1.1 SYSTEM REQUIREMENTS .....................................................................................................................................1
1.2 UPGRADING SOFTWARE.......................................................................................................................................1
1.3 SCOPE ..................................................................................................................................................................1
2 GETTING STARTED .............................................................................................................................................2
2.1 THE TRAFFIC STUDY CYCLE ................................................................................................................................ 2
2.2 MH CORBIN PORTABLE TRAFFIC COUNTER BATTERY LIFE ................................................................................2
2.3 THE HDM APPLICATION .....................................................................................................................................2
2.4 CONFIGURATION ..................................................................................................................................................5
2.5 CONNECTING MH CORBIN PORTABLE TRAFFIC COUNTER ..................................................................................6
2.6 DISPLAYING STUDY DATA...................................................................................................................................7
3 REFERENCE GUIDE ........................................................................................................................................... 10
3.1 MENU ................................................................................................................................................................ 10
3.1.1 Application Menu ..................................................................................................................................... 10
3.1.2 Catalog Menu .......................................................................................................................................... 17
3.1.3 Study Menu .............................................................................................................................................. 21
3.1.4 Device Menu ............................................................................................................................................ 28
3.1.5 Utilities Menu .......................................................................................................................................... 34
3.1.6 Help Menu................................................................................................................................................ 35
3.2 REPORTS ............................................................................................................................................................ 36
3.2.1 Date/Time/Volume/Average Speed/Temperature Report ......................................................................... 36
3.2.2 Date/Time/Volume/Average Headway Report ......................................................................................... 36
3.2.3 Time/Class Report .................................................................................................................................... 36
3.2.4 Time/Speed Report ................................................................................................................................... 36
3.2.5 Class/Volume Report ............................................................................................................................... 36
3.2.6 Average Speed by Class Report ............................................................................................................... 36
3.2.7 Summary Report....................................................................................................................................... 37
3.2.8 [Raw] Volume Report .............................................................................................................................. 37
3.2.9 [Raw] Class Report.................................................................................................................................. 37
3.2.10 Environmental Report .............................................................................................................................. 37
3.3 GRAPHS ............................................................................................................................................................. 37
3.3.1 Speed/Volume Graph ............................................................................................................................... 37
3.3.2 Time/Volume Graph ................................................................................................................................. 37
3.3.3 Gap/Time Graph ...................................................................................................................................... 37
3.3.4 Vehicle Percentage Graph ....................................................................................................................... 37
3.3.5 Class/Volume Graph ................................................................................................................................ 38
4 APPENDIX ............................................................................................................................................................. 39
4.1 MAINTENANCE TIPS: ......................................................................................................................................... 39
4.2 STUDY FINISH (F CODES): ................................................................................................................................. 40
4.2.1 F0 – Start-Up State .................................................................................................................................. 41
4.2.2 F1 – Normal Termination ........................................................................................................................ 41
4.2.3 F11 – Waiting for Start Time ................................................................................................................... 41
4.2.4 F13 – In Progress .................................................................................................................................... 42
4.2.5 F14 – Empty Battery ................................................................................................................................ 42
4.2.6 F15 – Memory Full .................................................................................................................................. 43
5 FREQUENTLY ASKED QUESTIONS ............................................................................................................... 44
M.H. Corbin, Inc. ____________________________________________________________ i
MH Corbin HDM User’s Manual ____________________________________________ v9.2.8
6 TROUBLESHOOTING ........................................................................................................................................ 49
7 SOFTWARE LICENSE AGREEMENT ............................................................................................................. 51
M.H. Corbin, Inc. ____________________________________________________________ ii
MH Corbin HDM User’s Manual _______________________________________ v9.2.8
1 Introduction
Welcome to MH Corbin HDM. This software is designed to be used with NC97, NC100, NC200
and NC300 portable traffic counters. HDM is used to:
Program traffic counters to conduct traffic studies
Read study results from traffic counters
Analyze traffic study results
Display traffic study results as reports and graphs
Organize and manage traffic studies
1.1 System Requirements
O/S (both 32 and 64 bit): Windows XP, Vista, 7, 8
Processor: 900+ MHz
Memory: Minimum 128MB
Disk Space : 100 MB of free disk space for program installation. Additional space will be
required for storing traffic studies.
1.2 Upgrading Software
When upgrading software, always back up existing catalogs (MDB files) containing your studies.
New version of the software may need to make changes to the data files created by previous
versions of the application. This can present a problem if you decide to go back to previous
software version.
When upgrading or reinstalling HDM always uninstall your existing version before installing the
new one.
NOTE: HDM 9 data files are not compatible with HDM 8 data files.
1.3 Scope
This manual describes functionality of the HDM software. Windows or PC specific functions
such as setting the default printer, file management, using mapped drives are not addressed in
this manual.
M.H. Corbin, Inc. ____________________________________________________________ 1
MH Corbin HDM User’s Manual _______________________________________ v9.2.8
2 Getting Started
2.1 The Traffic Study Cycle
The traffic study cycle consists of a few steps that have to be taken to successfully conduct the
traffic study. Those steps are:
Charging the traffic counter.
Using HDM software to program the study (see Device -> Program Study menu item
below).
Placing the counter on the roadway and letting it conduct the study.
Using HDM software to read study data (see Device -> Read Study menu item below).
Using HDM software to view/analyze study data using HDM reports.
2.2 MH Corbin Portable Traffic Counter Battery Life
When trying to communicate to the MH Corbin portable traffic counter it’s very important to
have the device with the sufficiently charged battery. Please connect the device to the charging
cable and then to the mains power and charge it for a few hours before attempting to read the
study. When programming the device it’s very important to have the device fully charged. The
charging cable for the NC300/200/100 devices provides LED (light emitting diode) feedback
about charging status. When charging these type of counters make sure that the battery charger
LED stays Red for sufficient amount of time. The Green LED simply means that the device is no
longer accepting the electrical charge.
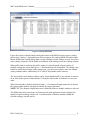
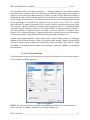
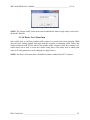
2.3 The HDM Application
HDM can be launched by clicking on its icon in the Windows Programs list (Start -> All
Programs -> MH Corbin -> HDM). HDM main application window (see figure below) consists
of application menu, Catalogs and Studies area and the status bar.
M.H. Corbin, Inc. ____________________________________________________________ 2
MH Corbin HDM User’s Manual _______________________________________ v9.2.8
Figure 1: The HDM Main Window
The application’s main menu contains the following entries: Application, Catalog, Study,
Device, Utilities and Help. The Catalog and Study submenus can also be invoked as popup
menus when user right-clicks in the Catalogs or Studies windows. Menu items in these menus
get enabled or disabled depending on the contents and selection status in those windows.
Below the application’s main menu there is Catalogs and Studies area. The window on the left
hand side is called the Catalogs window. This window lists any currently opened catalogs (MDB
database files) that contain roadway studies. The window on the right hand side is called the
Studies window. This window lists all the studies contained within the selected catalog(s).
NOTE: You may have a number of catalogs listed in the Catalogs window but only the studies
contained in the selected catalog(s) will be displayed in the Studies window.
The columns in Catalogs and Studies windows can be resized by dragging vertical dividers
between column headers and repositioned (Studies window only) by dragging and dropping
column header. The Catalogs and Studies windows can also be resized by dragging the vertical
divider that is located between them. The positions of the vertical divider as well as column sizes
and positions are saved to HDM configuration file (HDM.ini) between application sessions.
TIP: If you don’t want to see certain fields in the Studies windows, move them to the right side
of the window or size them down to nothing.
M.H. Corbin, Inc. ____________________________________________________________ 3
MH Corbin HDM User’s Manual _______________________________________ v9.2.8
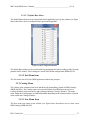
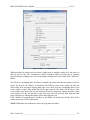
Figure 2: Catalogs and Studies
Figure above shows opened Sample catalog that comes with HDM. In order to open a catalog
please select Catalog -> Open menu item, then navigate to the catalog (MDB) file and hit Open
button. HDM Open Catalog dialog allows to open multiple selected catalogs as well. Every time
some catalog is opened it will be added to the bottom of the catalogs list in the Catalogs window.
When traffic study is read from the traffic counter it is placed into the selected catalog. If
multiple catalogs are selected the Device -> Read menu item will be disabled. The catalog is not
limited to studies from a single traffic counter type. As can be seen in figure above the Sample
catalog contains studies conducted by NC97 and NC200 portable traffic counters.
The list of studies in the Studies window can be sorted alphabetically by any column. In order to
do so click on the specific column header. Clicking the same header second time reverses sort
order.
When selected study is double-clicked (or Study -> View Reports/Graphs menu item is chosen)
the reports/graphs window is displayed with the first report generated.
NOTE: The View Reports/Graphs menu item is disabled whenever multiple studies are selected.
The HDM status bar located at the very bottom of the main application window displays the
number of opened catalogs (in this case 1) and the number of studies contained within the
selected catalog(s) (in this case10).
M.H. Corbin, Inc. ____________________________________________________________ 4
MH Corbin HDM User’s Manual _______________________________________ v9.2.8
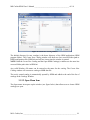
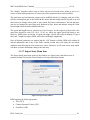
2.4 Configuration
HDM has a number of configuration pages that can be accessed via Application -> Properties
menu. The most important of them are Communications and Localization.
The Communications page allows users to configure serial port settings for accessing portable
traffic counters (see figure below).
Figure 3: Communications Settings Window
The Manual Port Settings list always displays all available serial ports. This list is static
and is populated only when the page gets opened. It can be refreshed by pressing the
Refresh button which is handy whenever USB interface cable is used (if connected while
the Communications page is open). Selecting an entry in this lists tells HDM to use it to
communicate to traffic counters.
The “Use any port that has connected counter” checkbox tells HDM to perform automatic
serial port lookup when instructed to read or program a counter. If this checkbox is
checked HDM will try opening every serial port available on the system and detecting
connected traffic counter. If connected counter is found the serial port number is noted
and used in further communication attempts.
For more details on Communications Settings window please see Reference Guide
section.
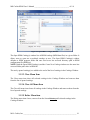
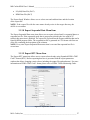
The Localization Settings window allows users to select specific locale settings such as
the Language file, Measurement units, Date and Time formats, etc. (see figure below).
M.H. Corbin, Inc. ____________________________________________________________ 5
MH Corbin HDM User’s Manual _______________________________________ v9.2.8
Figure 4: Localization Settings Window
Although internally HDM uses English/Imperial measurement units it can display data in either
English/Imperial or Metric measurement units. If Metric measurement units are selected the
conversion is applied to all speed, length and temperature fields within HDM application. The
Speed Units Format controls how Metric speed units are labeled: either Kph or Kmh.
The Date and Time Format fields control how dates and times are display across the HDM
application. For more information on the formatting strings please see the Reference Guide
section.
The Language dropdown allows choosing a specific HDM language file that contains labels for
all HDM user interface (UI) elements. For more information on HDM language files see the
Reference Guide section.
2.5 Connecting MH Corbin Portable Traffic Counter
Before you can use HDM to manage your traffic counter, you must connect portable traffic
counter to the computer. The NC300, NC200/100 portable traffic counters use either serial or
USB interface cable. The NC97 devices use serial cable with the IP-10 adaptor. Both serial
interface cables can be connected to the USB port using M.H. Corbin approved USB-to-Serial
adaptor.
M.H. Corbin, Inc. ____________________________________________________________ 6
MH Corbin HDM User’s Manual _______________________________________ v9.2.8
Figure 5: MH Corbin Traffic Counters and Connectors
When the connection between the computer and the NC300/200/100 device is established
user can observe flashing green and red LEDs (Light Emitting Diodes) inside of the
interface cable housing. The NC97 interface cable does not have this functionality but red
LED of the IP-10 adaptor is a good indicator that HDM is attempting to “talk” to the
counter.
NOTE: When using USB data cable please make sure to install data cable driver. It can
either be downloaded from MH Corbin website (http://www.mhcorbin.com) or found in
the Drivers subdirectory in HDM program folder once the application is installed.
2.6 Displaying Study Data
HDM allows to view traffic study data in 10 different reports and 5 different graphs:
REPORTS
Date/Time/Volume/Average Speed/Temperature
Date/Time/Volume/Average Headway
Time/Class
Time/Speed
Class/Volume
Average Speed by Class
Summary
[Raw] Volume
[Raw] Class
Environmental
GRAPHS
Speed/Volume
Time/Volume
Gap/Time
Vehicle Percentage
Class/Volume
Table 1: Reports and Graphs
M.H. Corbin, Inc. ____________________________________________________________ 7
MH Corbin HDM User’s Manual _______________________________________ v9.2.8
As was mentioned before reports and graphs can be accessed by double-clicking any
study or by selecting it and choosing “Study -> View Reports/Graphs” menu item. This
brings up the Reports window with the first generated report. Other reports and graphs
can be accessed via the menu within the Reports window (see figure below). The
Environmental Report gets enabled only if study environmental data is present. That is
the case for all NC300 studies that were programmed with HDM v9.2.7 and later.
Figure 6: Summary Report
Reports can be either exported to common file formats, such as *.pdf or printed for easy
distribution. To do so please click the Export or Print icon (on the top left of the Reports
window) and follow the prompts. Placing the mouse cursor over any element (button,
M.H. Corbin, Inc. ____________________________________________________________ 8
MH Corbin HDM User’s Manual _______________________________________ v9.2.8
icons, etc.) of the Reports window will display the tooltip with the description of that
element.
M.H. Corbin, Inc. ____________________________________________________________ 9
MH Corbin HDM User’s Manual _______________________________________ v9.2.8
3 Reference Guide
This section is a detailed reference guide of the HDM software. It includes references of HDM
menu, Catalogs window, Studies window and Reports window.
3.1 Menu
This section of user manual follows the order of menu items as they appear in HDM software.
3.1.1 Application Menu
The Application menu contains other menus and menu items that control and deal with
application configuration and behavior.
3.1.1.1 Properties Menu
The Properties menu contains other menus and menu items that control and deal with application
configuration.
3.1.1.1.1 Vehicle Categories Menu Item
The Vehicle Categories menu item opens up the window (see figure below) that allows to
configure 4 classifications of vehicles and the lengths for vehicles of that category.
Figure 7: Vehicle Length Properties
As can be seen in figure above the categories are: Passenger Vehicles (0 to 18 feet), Vans and
Pickups (19 to 24 feet), Busses and Trucks (25 to 36 feet) and Tractor Trailers (37 to 80 feet).
M.H. Corbin, Inc. ____________________________________________________________ 10
MH Corbin HDM User’s Manual _______________________________________ v9.2.8
The user can specify any name for a category. By changing the upper limits of each category, the
user can map specific length readings into the classification. User entries are not validated. Users
are responsible for ensuring that classification ranges do not overlap.
3.1.1.1.2 Communications Manu Item
The Communications menu item opens up the window (see figure below) that allows user choose
a specific serial port that will be used to communicate to portable traffic counters.
Figure 8: Communications
The Communications Settings window will list all available serial ports on the system. To
choose a specific port, please select one from the list. When using USB interface cable it needs
to be plugged in to the system to be seen by HDM.
NOTE: If the serial port is present on the system but currently in use by some other application
HDM will list that port with the note “In Use” next to the name. Such port can still be selected
but it will result in an error when attempted to communicate to the portable traffic counter.
The “Refresh” button allows user to refresh the list of ports. This is useful when the USB
interface cable is connected to the system while Communications Settings window is visible.
The “Use any port that has connected counter” check box when checked tells HDM to perform
serial port discovery (based on currently connected device) prior to each read/program attempt.
The last used (thus selected) port is checked first speeding up discovery procedure. This
functionality is very handy when using multiple serial ports to access different counters or when
USB interface cable is being used since unplugging and plugging back USB cable sometimes
results in the change of serial port.
NOTE: Make sure a traffic counter is connected to the computer before attempting to
communicate to it whenever “Use any port that has connected counter” is checked.
M.H. Corbin, Inc. ____________________________________________________________ 11
MH Corbin HDM User’s Manual _______________________________________ v9.2.8
3.1.1.1.3 Localization Menu Item
The Localization menu item opens up the window (see figure below) that allows users to specify
certain locale settings.
Figure 9: Localization Settings Window
The “Measurement Units” dropdown allows users to specify how speed, length and temperature
data is displayed across the HDM application. Internally HDM uses English/Imperial
measurement units which is also a default value.
The “Speed Units Format” allows users to choose the speed data label. This label is displayed in
some HDM windows and in traffic study reports.
The “Date Format” and “Time Format” fields control how dates and times are display across the
HDM application. The formatting strings are comprised of separate fields with their specific
meaning:
MM - Display month as a number with a leading zero (01-12).
MMM - Display month as an abbreviation (Jan-Dec).
MMMM - Display month as a full month name (January-December).
yy - Display year as a 2-digit number (00-99).
yyyy - Display year as a 4-digit number (1000-9999).
d - Display day as a number without a leading zero (1-31).
dd - Display day as a number with a leading zero (01-31).
h - Display hours as a number without a leading zero (1-12/23 depending on AM/PM or a/p presence).
hh - Display hours as a number with a leading zero (01-12/23 depending on AM/PM or a/p presence).
mm - Display minutes as a number with a leading zero (01-59).
ss - Display seconds as a number with a leading zero (01-59).
AM/PM - Display time in 12 hour clock.
a/p - Display time in 12 hour clock.
The “Language” dropdown is populated with the contents (files) of the HDM Languages folder
and allows users to specify which HDM language file should be used when resolving labels for
all HDM user interface (UI) elements. All labels in HDM application are assigned a specific
label identifiers. Upon startup HDM application loads selected HDM language file (HLF) and
M.H. Corbin, Inc. ____________________________________________________________ 12
MH Corbin HDM User’s Manual _______________________________________ v9.2.8
resolves identifiers to actual strings that are displayed to the user. If selected HLF file cannot be
found HDM will display label identifiers.
NOTE: Changing selected language in the Language dropdown will require restarting of HDM
application.
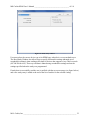
3.1.1.1.4 Study Menu Item
The Study menu item opens up the window (see figure below) that allows user to change certain
study programming validation parameters and study data retrieval filters.
Figure 10: Study Settings Window
The “Warn if the study being programmed starts in more…” field allows users to specify the
maximum number of days that the study can be programmed in advance. The value of this field
M.H. Corbin, Inc. ____________________________________________________________ 13
MH Corbin HDM User’s Manual _______________________________________ v9.2.8
is used for validation of study start date/time only and if exceeded will result in the warning
messages during study programming.
The “Do not allow programming of a study if it starts in less than…” field allows users to specify
the minim number of minutes that the study can be programmed in advance. The value of this
field is used for validation of study start date/time only and if the study being programmed
violates this value the programming attempt will be stopped with an error message.
The data filters allow users to filter out certain (unwanted) vehicle records. The selected data
filters are applied during new study creation process (when reading study from the device or
deriving new study) and only for studies that have every vehicle information (studies generated
with NC200/300 portable traffic counters). To enable any data filter please check the appropriate
checkbox next to the filter name and specify filter specific value (in the picture above only Speed
Limit, Maximum Length and Reverse Vehicles filters are enabled). These settings are
application-wide and are preserved between HDM sessions. Note that most filters do not remove
records but mark them as unclassified (vehicle event detected but speed and length could not be
determined). That way vehicle record is not counted towards the bins but it is still counted
towards the total number of vehicles for the period and for the study. Currently HDM
implements the following data filters:
Speed Limit filter. This filter unclassifies (sets Advice Code value to 128 thus excluding
the record from the bins) sequential records that have speed value greater than posted
speed limit value of the study plus the specified filter value. E.g. if the posted speed limit
value of the study was set to 55 mph and the specified filter value was set to 30 all
vehicles with speed greater than 85 mph will be unclassified.
Maximum Speed filter. This filter unclassifies (sets Advice Code value to 128 thus
excluding the record from the bins) sequential records that have speed value greater than
the specified filter value. E.g. if the filter value was set to 100 all vehicles with speed
greater than 100 mph will be unclassified.
Minimum Speed filter. This filter unclassified (sets Advice Code value to 128 thus
excluding the record from the bins) sequential records that have speed value smaller than
the specified filter value. E.g. if the filter value was set to 15 all vehicles with speed less
than 15 mph will be unclassified.
Maximum Length filter. This filter unclassifies (sets Advice Code value to 128 thus
excluding the record from the bins) sequential records that have length value greater than
the specified filter value. E.g. if the filter value was set to 120 all vehicles with length
greater than 120 feet will be unclassified.
Minimum Length filter. This filter unclassifies (sets Advice Code value to 128 thus
excluding the record from the bins) sequential records that have length value smaller than
the specified filter value. E.g. if the filter value was set to 8 all vehicles with length less
than 8 feet will be unclassified.
Reverse Vehicles filter. This filter unclassifies (sets Advice Code value to 128 thus
excluding the record from the bins) sequential reverse vehicle records (those having
Advice Code value equal 4).
M.H. Corbin, Inc. ____________________________________________________________ 14
MH Corbin HDM User’s Manual _______________________________________ v9.2.8
Reverse Vehicles Removal filter. This filter removes sequential reverse vehicles (those
having Advice Code value equal 4) that way excluding them not only from bins but also
from totals.
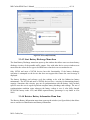
3.1.1.1.5 Reports Menu Item
The Reports menu item opens up the window (see figure below) that allows users to change
settings that apply to reports and graphs and select specific reports and graphs for batch printing.
Figure 11: Reports Batch Printing Settings Window
The batch printing of the reports is done by selecting multiple studies and selecting Study ->
Batch Print menu item.
The “Display reverse vehicle count” checkbox tells HDM to display reverse vehicle counts when
generating traffic study reports.
M.H. Corbin, Inc. ____________________________________________________________ 15
MH Corbin HDM User’s Manual _______________________________________ v9.2.8
The “Speeding vehicles percentage calculation…” checkbox changes the way HDM calculates
percentages in the summary report. The values that are affected by this setting are percentage of
vehicles over the speed limit and percentage of vehicles over the 55 mph. When the checkbox is
unchecked the total of the bin that the speed in question fall into is counted towards the total for
the percentage. If the checkbox is checked the total of that bin is not counted towards the total
for the percentage. For example if the speed bins were set as 0-9, 10-19, 20-29, 30 > and the
speed limit was 25 mph the percentage of the vehicles would be calculated using totals of bins
20-29 and 30 > when the checkbox is unchecked and using total of bin 30 > when the checkbox
is checked. The percentage of vehicles over 55 mph would be calculated using total of bin 30 >
when the checkbox is unchecked and it would be 0 when the checkbox is checked. That’s
because if we exclude the bin that 55 mph speed falls into we don’t have any bins left that have
vehicles greater than 55 mph and thus the total for the percentage calculation is 0.
“Reports and graphs orientation” section allows user to choose which (portrait or landscape)
template will be used for the report. When “Use default printer settings” option is selected HDM
will check default printer configuration to determine report orientation. The “Portrait” option
tells HDM to use portrait report template and “Landscape” option tells HDM to use landscape
report template.
3.1.1.1.6 Fonts Menu Item
The Fonts menu item opens up the window (see figure below) that allows user to select font that
will be used across HDM application.
Figure 12: Font Window
NOTE: The font selection does not affect certain HDM user interface (UI) elements such as
menus, title bars of windows, standard (e.g. File Open) dialogs, etc.
M.H. Corbin, Inc. ____________________________________________________________ 16
MH Corbin HDM User’s Manual _______________________________________ v9.2.8
3.1.1.1.7 Default Bins Menu
The Default Bins submenu items (Speed Bins and Length Bins) open up the window (see figure
below) that allows user to configure default speed and length bins.
Figure 13: Bins Configuration Window
The default bins settings can be used instead of programmed bins when reading a study from the
portable traffic counter. These settings are stored in the HDM configuration (HDM.ini) file.
3.1.1.2 Exit Menu Item
The Exit menu item will close HDM application without any prompts.
3.1.2 Catalog Menu
The Catalog menu contains menu items that deal with functionality related to HDM Catalogs
(MDB data files). The Catalog menu can be invoked either from HDM main menu or as a
Catalogs Window context menu (by right clicking within the Catalogs Window). The menu
items within the Catalog menu are enabled/disabled depending on the contents and the selection
status within the Catalogs Window.
3.1.2.1 New Menu Item
The New menu item opens up the window (see figure below) that allows user to create a new
HDM catalog (MDB data file).
M.H. Corbin, Inc. ____________________________________________________________ 17
MH Corbin HDM User’s Manual _______________________________________ v9.2.8
Figure 14: Create New Catalog Window
The default directory for new catalogs is the home directory of the HDM application (HDM
program folder). The Create New Catalog window will then save last accessed folder path to
HDM configuration file (HDM.ini) and will use it next time the window is opened.
NOTE: Both the Create New Catalog and the Open HDM Catalog(s) windows use the same last
accessed folder path value in HDM.ini.
Any valid Windows file name can be entered as the name for the catalog. The Create New
Catalog window will create new catalog as MDB data file.
The newly created catalog is automatically opened by HDM and added to the end of the list of
catalogs in the Catalogs Window.
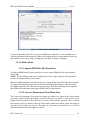
3.1.2.2 Open Menu Item
The Open menu item opens up the window (see figure below) that allows user to choose HDM
catalog(s) to open.
M.H. Corbin, Inc. ____________________________________________________________ 18
MH Corbin HDM User’s Manual _______________________________________ v9.2.8
Figure 15: Open HDM Catalog(s) Window
The Open HDM Catalog(s) window lists all HDM catalogs (MDB data files) in a given folder. It
allows users to open one or multiple catalogs at once. The Open HDM Catalog(s) window
defaults to HDM program folder and once used saves last accessed directory path to HDM
configuration file (HDM.ini).
NOTE: Both the Open HDM Catalog(s) and the Create New Catalog windows use the same last
accessed folder path value in HDM.ini.
The newly opened catalog(s) are added to the end of the list of catalogs in the Catalogs Window.
3.1.2.3 Close Menu Item
The Close menu item closes all selected catalogs in the Catalogs Window and removes them
from the list of opened catalogs.
3.1.2.4 Close All Menu Item
The Close All menu item closes all catalogs in the Catalogs Window and removes them from the
list of opened catalogs.
3.1.2.5 Delete Menu item
The Delete menu item closes, removes from the list and destroys all selected catalogs in the
Catalogs Window.
M.H. Corbin, Inc. ____________________________________________________________ 19
MH Corbin HDM User’s Manual _______________________________________ v9.2.8
3.1.2.6 Merge Menu Item
The Merge menu item opens up the window (see figure below) that allows user to merge any
selected catalogs from the Catalogs Window into a single catalog.
Figure 16: Merge Catalogs Window
When catalogs are merged all studies from the source (selected) catalogs are copied into a
destination catalog. The Merge Catalogs Window allows user either to choose already opened
HDM catalog (from the Select Destination Catalog dropdown) or to create a new catalog to serve
as destination catalog by using “Add New” button. The destination catalog can also be a source
catalog in which case all other source (selected) catalogs will be merged to it.
In order to use HDM Catalog Merge functionality please first select any number of catalogs to be
merged (source catalogs) in the Catalogs Window and then click on the Catalog -> Merge menu
item to bring up the Merge Catalogs Window for selecting destination catalog for merge
operation.
If a new destination catalog is selected it is automatically opened and added to the end of the list
of opened catalogs in the Catalogs Window.
3.1.2.7 Print Study List Menu Item
The Print Study List menu item opens up the window (see figure below) containing report of all
the studies listed in the Studies Window.
M.H. Corbin, Inc. ____________________________________________________________ 20
MH Corbin HDM User’s Manual _______________________________________ v9.2.8
Figure 17: Catalog Listing Window
3.1.2.8 Compact and Repair Menu Item
From time to time HDM catalogs need to be compacted and/or repaired. If you are having
problems seeing studies in opened catalogs consider using this menu item. This menu item works
exactly as Compact and Repair function in Microsoft Access. Only selected catalog entries in the
Catalogs Window will be compacted and repaired.
3.1.3 Study Menu
The Study menu contains menu items that deal with functionality related to traffic studies. The
Study menu can be invoked either from HDM main menu or as a Studies Window context menu
(by right clicking within the Studies Window). The menu items within the Studies menu are
enabled/disabled depending on the contents and the selection status within the Studies Window.
M.H. Corbin, Inc. ____________________________________________________________ 21
MH Corbin HDM User’s Manual _______________________________________ v9.2.8
3.1.3.1 View Reports/Graphs Menu Item
The View Reports/Graphs menu item opens up the Reports Window (see figure below) with
generated first report for selected single study.
Figure 18: Reports Window
The Reports Window provides a convenient control and navigation toolbar as well as
preview pane where the report/graph is displayed. This window also has Reports and
Graphs menu that allows switching between different HDM reports and graphs.
3.1.3.2 Combined Reports Menu Item
The Combined Reports menu item opens up the Reports Window with generated first combined
report for selected multiple studies.
M.H. Corbin, Inc. ____________________________________________________________ 22
MH Corbin HDM User’s Manual _______________________________________ v9.2.8
3.1.3.3 Delete Menu Item
The Delete menu item allows user to delete selected studies. Upon selecting one or more desired
studies and choosing this menu item user will be presented with the confirmation message and
given affirmative confirmation HDM will destroy selected studies also removing their entries
from the Studies Window.
3.1.3.4 Edit Menu Item
The Edit menu item allows user to edit selected study header information. Upon selecting desired
study and choosing this menu item user will be presented with the Edit Study window (see figure
below). Edit menu item is only enabled for a single selected study and disabled otherwise.
Figure 19: Edit Study Window
NOTE: Changing study information does not affect study vehicle and bin data. In order to
trigger application of data filters please use Derive New study functionality.
3.1.3.5 Change AADT Factor Menu Item
The Change AADT Factor menu item opens up the window (see figure below) that allows user
to change AADT Factor for selected single study. The HDM uses AADT Factor when
calculating AADT during report generation. The AADT Factor allows to scale AADT number up
or down. The default AADT Factor value is 1.0.
M.H. Corbin, Inc. ____________________________________________________________ 23
MH Corbin HDM User’s Manual _______________________________________ v9.2.8
Figure 20: Change AADT Factor Window
NOTE: The Change AADT Factor menu item is enabled only when a single study is selected in
the Studies Window.
3.1.3.6 Derive New Menu Item
Once traffic study is read from portable traffic counter it is stored in the selected catalog. HDM
does not allow editing original study data with the exception of changing AADT Factor. But
studies conducted with NC200 and NC300 portable traffic counters (since they contain every
vehicle data) can be used to create new studies using Derive New menu item at which point
some or all study parameters can be changed (see figure below).
NOTE: The Derive New menu item is disabled for studies conducted by NC97 counters.
M.H. Corbin, Inc. ____________________________________________________________ 24
MH Corbin HDM User’s Manual _______________________________________ v9.2.8
Figure 21: Derive New Study Window
When deriving new studies user can select a single study or multiple studies to be the source of
data for the new one. The “Destination Catalog” dropdown allows selecting any of currently
opened catalogs or adding a new one or opening an existing one by the means of the “Add New”
button.
The “Remove overlapping data” checkbox is enabled only when more than one study is used as a
source for the new one. When it is checked it tells HDM to order source studies by time (the
oldest study first) and when merging them into a new study skip any overlapping data in case
source studies overlap. This means that all the data from the first study will be taken; if the
second study starts before the first one finishes HDM will assume the starting date/time of the
second study to be the end date/time of the first study and will take only data from that time
range. Merging any subsequent studies will be done the same way.
If the “Remove overlapping data” checkbox is not HDM will simply take all data from all the
studies and merge it into a single study.
NOTE: HDM does not perform any checks for gaps between studies.
M.H. Corbin, Inc. ____________________________________________________________ 25
MH Corbin HDM User’s Manual _______________________________________ v9.2.8
The “Studies” dropdown allows user to choose one out of selected source studies to serve as a
source of initial study parameters. Of course any of the parameters then can be modified.
The study start and end date/time ranges can be modified directly by changing each part of the
field by selecting that part of the field with the mouse and then using numeric keypad or up and
down arrows to change values (such as year, month, day, hours, and minutes). The end date/time
can also be changed by specifying study duration in days, hours and minutes using the fields
located right below the study end date/time box.
The speed and length bins are specified as a list of ranges. As they appear in figure above the
speed bins should be read 0-10, 10-15, 15-20, etc. where the upper speed bin setting is not
inclusive. HDM allows specifying 14 speed bin ranges (which will result in defining 15 speed
bins) and 7 length bin ranges (which will result in defining 8 length bins).
Once all desired parameters are entered and the “OK” button is clicked, HDM will validate all
entered information and if any of the fields contains invalid entry will notify the user about
validation error allowing the user to enter new values. Otherwise it will create a new study which
will show up in the destination catalog as the last entry.
3.1.3.7 Export Study Menu Item
The Export Study menu item opens up the window (see figure below) that allows user to
produce the data file from the selected study in a few provided data formats.
Figure 22: Export Study Window
HDM supports the following formats:
Text (TXT)
Comma Separated Values (CSV)
Gold River (GR)
M.H. Corbin, Inc. ____________________________________________________________ 26
MH Corbin HDM User’s Manual _______________________________________ v9.2.8
LP (Old) Data File (DAT)
HDM Data File (DAT)
The Export Study Window allows user to select start and end date/time and the location
of the export file.
NOTE: If the export file with the same name already exists in the target directory, the
old file is overwritten
3.1.3.8 Export Sequential Data Menu Item
The Export Sequential Data menu item allows user to export selected study’s sequential data to a
sequential.txt file. If the sequential study data is not present (which is the case with NC97
studies) this menu item is disabled. The export file is placed into the Export subfolder that can be
found in HDM program folder. The sequential.txt file is generated in CSV format with first row
of the file containing the description of the columns.
NOTE: Every time Export Sequential Data menu item is executed the sequential.txt file is
overwritten.
3.1.3.9 Export HTV Menu Item
The Export HTV menu item allows user to export selected study using Expanded FHWA TMG
Card 3 Format (HTV). Before exporting data user is presented with the export parameters
window that allows changing certain values (including the output file path and name). For more
information on FHWA TMG Card 3 format please refer to FHWA Traffic Monitoring Guide.
Figure 23: Export HTV window
M.H. Corbin, Inc. ____________________________________________________________ 27
MH Corbin HDM User’s Manual _______________________________________ v9.2.8
3.1.3.10 Batch Print Menu Item
The Batch Print menu item generates user specified (via Application - > Properties ->
Reports) reports and graphs for selected studies and sends them to the default printer. If
the default printer is not selected on the computer running HDM the printer selection
dialog is presented to the user.
3.1.4 Device Menu
The Device menu items deal with portable traffic counter control.
3.1.4.1 Program Study Menu Item
The Program Study menu item should be used to program study to portable traffic counter. Once
selected it will bring the window (see figure below) that will allow user to set up study
parameters and after clicking “Program” button program the study to the device.
M.H. Corbin, Inc. ____________________________________________________________ 28
MH Corbin HDM User’s Manual _______________________________________ v9.2.8
Figure 24: Setup Study Window
When programming the study user has to tell HDM which device the study will be programmed
to in order for HDM to use correct device access method. HDM will remember this value and
will use it next time any of device control windows (e.g. Study Setup, Study Read, etc.) are
opened.
Next step in setting up a study is specifying study start and end date/time. The start date/time
settings fields are self-explanatory. The end date/time is specified by using start date/time and
adding the duration of the study to it. Setup Study Window will display end date/time in a
separate (read-only) field.
M.H. Corbin, Inc. ____________________________________________________________ 29
MH Corbin HDM User’s Manual _______________________________________ v9.2.8
NOTE: When programming study to the traffic counter, HDM will synchronize the date and
time of the counter with the date and time of your computer. If the time on the computer is not
correct the time on the counter will not be correct either.
The binning period determines the interval at which binning will be conducted as well as
environmental information will be captured. Depending on the device type there is a maximum
number of periods that can be specified for the duration of the study. The HDM will check this
number when programming the device and will notify the user about the error in case this
maximum number is exceeded. You can check the maximum number of periods for each device
type by clicking on the clock icon next to the binning period dropdown.
The Roadway Location Information fields are self-explanatory. These fields are optional.
The speed and length bins are used to bin study data. Please use the push button to the right of
the bins grid to open bins editing dialog.
Once the Program button is clicked HDM will try to communicate to the traffic counter and
program the study. It will prompt the user to connect the traffic counter and once programming
has been successfully completed – to disconnect the traffic counter. In case of an error the
“Operation Failed…” error message will be displayed in the pop up window.
The Setup Study Window contains menu that allows users to save and load study setup
information as well as to specify additional NC97 device specific programming options.
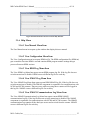
3.1.4.1.1 Configuration -> Load Menu Item
The Configuration -> Load menu item of the Setup Study Window allows user to load study
setup configuration previously saved using Configuration -> Save or Configuration -> Save As
menu items.
3.1.4.1.2 Configuration -> Save Menu Item
The Configuration -> Save menu item of the Setup Study Window saves all user entered values
into the HDM study programming information (HPS) file. If the Configuration -> Save As menu
item was used earlier the settings are saved into the file specified during that save operation.
Otherwise Default.hps file is used and can be found in HDM program folder.
3.1.4.1.3 Configuration -> Save As Menu Item
The Configuration -> Save As menu item of the Setup Study Window saves all user entered
values into the HDM study programming information (HPS) file allowing user to specify the file.
Subsequent Configuration -> Save operations use the file that was specified during Configuration
-> Save As invocation.
3.1.4.1.4 NC-97 Specific Menu
There are three NC97 device specific features that may be either enabled or disabled using this
menu. If an option is enabled, it will be displayed with a check mark next to the option.
M.H. Corbin, Inc. ____________________________________________________________ 30
MH Corbin HDM User’s Manual _______________________________________ v9.2.8
Otherwise the feature is disabled. When you program a NC97 traffic counter, any feature
enabled (checked) on this menu will be enabled on the device you program. The features are:
Reverse Vehicle Count Enabled
Assume Free Flowing Traffic
Verification Transmitter ON
Toggle the options by clicking on them. A checked option is enabled. Unchecked items are not
enabled. Remember, these settings only apply to the NC97. The only time HDM will attempt to
set the selected features is when a NC97 is being programmed.
3.1.4.1.4.1 Reverse Vehicle Count Enabled Menu Item
This menu item when enabled instructs device to count reverse vehicles (i.e., include vehicles
that traverse the unit in the opposite direction).
3.1.4.1.4.2 Assume Free Flowing Traffic
This menu item when enabled puts the NC97 device in a mode where it assumes that the
majority of traffic passing over the unit will be free flowing versus stop-and-go. This setting
allows the unit to make some basic assumptions about traffic patterns and helps to filter out
anomalies.
3.1.4.1.4.3 Verification Transmitter ON
This menu item instructs the NC97 device to transmit wirelessly verification messages during the
preparation period and during the first several minutes of the study. If you are not using this
feature, be sure to disable it when programming NC97 counters to increase battery life during the
study.
3.1.4.2 Read Study Menu Item
The Read Study menu item opens up the window (see figure below) that allows user to read
traffic study from the portable traffic counter.
NOTE: The Read Study menu item is enabled only when a single catalog is selected (which
becomes destination catalog for the study).
M.H. Corbin, Inc. ____________________________________________________________ 31
MH Corbin HDM User’s Manual _______________________________________ v9.2.8
Figure 25: Read Study Window
User must select the correct device type to let HDM know what device access method to use.
The Read Study Window also allows user to specify different bin settings (through use of
extended bin settings) when reading traffic data for devices that supports every vehicle records
(NC300/200 devices). That way read data is binned using extended bin settings and not the
settings specified when the study was programmed.
If study data is successfully read the user is notified with the success message (see figure below)
and a new study entry is added to the end of the list of studies for the selected catalog.
M.H. Corbin, Inc. ____________________________________________________________ 32
MH Corbin HDM User’s Manual _______________________________________ v9.2.8
Figure 26: Successfully Read Study
3.1.4.3 Start Battery Discharge Menu Item
The Start Battery Discharge menu item opens up the window that allows user to activate battery
discharge circuitry of the portable traffic counter. Line with other device access windows user
must select the correct device type to let HDM know what device access method to use.
Only NC300 and most of NC200 devices have this functionality. If the battery discharge
activation is attempted on the device that does not support this feature the error message is
displayed.
The battery discharge and recharge cycle has nothing to do with the lithium-ion battery
maintenance. The NC300 and most of NC200 devices have a circuitry for determining battery
capacity. Sometimes this circuitry gets out of synchronization with the battery. Only in those
specific cases the user is urged to perform complete battery discharge and recharge. The out of
synchronization condition exists whenever the battery voltage is over 4 volts (fully charged
NC300/200 battery reads 4.2V) and HDM reported battery percentage is way under or over
100%.
3.1.4.4 Retrieve Battery Information Menu Item
The Retrieve Battery Information menu item opens up the window (see figure below) that allows
user to read device identification and battery information.
M.H. Corbin, Inc. ____________________________________________________________ 33
MH Corbin HDM User’s Manual _______________________________________ v9.2.8
Figure 27: Counter Battery Status Window
User must select the correct device type to let HDM know what device access method to use.
After the successful read attempt the window will display the device serial number, the device
type and the device battery status (voltage and percentage of charge remaining).
3.1.5 Utilities Menu
3.1.5.1 Import HDM Data File Menu Item
The Import HDM Data File menu item allows user to import HDM data file which contains
traffic study.
NOTE: The Read Study menu item is enabled only when a single catalog is selected (which
becomes destination catalog for the study).
Whenever HDM reads the study from the device it writes all data into a DAT file and stores that
file in the Download directory which can be found in HDM program folder. After successful
read HDM imports the file which results in a new study. Thus these data files can be imported
into HDM at any other time using Import HDM Data File functionality.
3.1.5.2 Convert Measurement Units Menu Item
The Convert Measurement Units menu item opens up window (see figure below) that presents
user with a simple diagram providing a conversion from feet to meters or from meters to feet.
Simply slide the pointer to the known feet or meters value and the converted value is shown.
More precise values are shown at the top of the window and nearest whole values are shown as
pop ups by left clicking the cursors. The range of conversion is limited from 0 to 120 feet
consistent with the expected lengths of vehicles.
M.H. Corbin, Inc. ____________________________________________________________ 34
MH Corbin HDM User’s Manual _______________________________________ v9.2.8
Figure 28: Measurement Units Conversion Utility Window
3.1.6 Help Menu
3.1.6.1 User Manual Menu Item
The User Manual menu item opens up the window that display this user manual.
3.1.6.2 View Configuration Menu Item
The View Configuration menu item opens HDM.ini file. The HDM configuration file (HDM.ini)
gets created the first time HDM is run and contains HDM program runtime settings that get
preserved between HDM sessions.
3.1.6.3 View HDM Log Menu Item
The View HDM Log Menu Item opens current HDM program log file. If the log file does not
exist the menu item is disabled. HDM creates a different log file for each day.
3.1.6.4 View NMAPI Log Menu Item
The View NMAPI Log Menu Item opens current HDM NMAPI log file. If the log file does not
exist the menu item is disabled. The NMAPI component is responsible for communications with
NC200 and NC300 counters. Thus any errors while accessing those counters will be logged in
this log file. NMAPI creates a different log file for each day.
3.1.6.5 View NMAPI Communications Log Menu Item
The View NMAPI Communications Log Menu Item opens current HDM NMAPI
communications log file. If the log file does not exist the menu item is disabled. The NMAPI
component is responsible for communications with NC200 and NC300 counters. The NMAPI
communications log contains all the data bytes sent to and received from the counter. NMAPI
creates a different log file for each day.
M.H. Corbin, Inc. ____________________________________________________________ 35
MH Corbin HDM User’s Manual _______________________________________ v9.2.8
3.1.6.6 About Menu Item
The About menu item opens up the window that contains information about HDM application.
3.2 Reports
This section lists all reports provided by HDM software. All reports and graphs begin
with a title and summary information. For reports, this is followed by boxes with the
column headers.
3.2.1 Date/Time/Volume/Average Speed/Temperature Report
The Date/Time/Volume/Average Speed/Temperature report provides detailed
information on a period by period basis. Information included in this report consists of
volume, average speed for the period, and road temperature. Summaries are provided for
the day and the study.
3.2.2 Date/Time/Volume/Average Headway Report
The Date/Time/Volume/Average Headway report shows the volume and average
headway for each period in the study. A study summary is provided.
3.2.3 Time/Class Report
The Time/Class report shows the number of vehicles that were classified by length of
vehicle for each period and class with totals. An hourly summary and study summary is
provided.
3.2.4 Time/Speed Report
The Time/Speed report shows the number of vehicles that were classified by speed of
vehicle for each period and class with totals. An hourly summary and study summary is
provided.
3.2.5 Class/Volume Report
The Time/Class report shows the number of vehicles that were classified by length of
vehicle for each period and class with totals. A percentage of peak traffic is calculated for
each period. An hourly summary and study summary is provided.
3.2.6 Average Speed by Class Report
The Average Speed by Class report provides the average speed for each class for each
period of the report. The average speed per period is provided along with a daily and
study summary.
M.H. Corbin, Inc. ____________________________________________________________ 36
MH Corbin HDM User’s Manual _______________________________________ v9.2.8
3.2.7 Summary Report
The Summary report provides a plain text report summarizing all the information
obtained by the traffic study. Summary reports were designed to meet management
reporting needs.
3.2.8 [Raw] Volume Report
The [Raw] Volume report counts all vehicles detected by the traffic counter. Occupancy
is not calculated in this release. A study summary is provided.
3.2.9 [Raw] Class Report
The [Raw] Class report provides the raw classification bins for each period in the study.
A total for each length class is provided.
3.2.10 Environmental Report
The Environmental report is available only for studies conducted using NC300 counter
that were programmed with HDM v9.2.7 or later. The report provides roadway
temperature information as well as voltage and magnetic sensor values of the counter.
The information is captured at the end of each period during the study.
3.3 Graphs
HDM graphs are simply reports with graphical component displays. All of the
functionality for reports applies to graphs as well.
3.3.1 Speed/Volume Graph
The Speed/Volume graph shows the volume of classified vehicles within each speed class
for the study. Actual counts are provided below the graphical display.
3.3.2 Time/Volume Graph
The Time/Volume study shows the volume of vehicles counted for each hour or period
(whichever is greater) for a given day.
3.3.3 Gap/Time Graph
The Gap/Time study shows the average gap time in seconds for each hour or period
(whichever is greater) for a given day. If the average gap time is 5 seconds, then an
average of 12 cars per minute were counted by the traffic counter.
3.3.4 Vehicle Percentage Graph
The Vehicle Percentage graph illustrates the percentage of vehicles that fall into each
length class. The actual count is also provided.
M.H. Corbin, Inc. ____________________________________________________________ 37
MH Corbin HDM User’s Manual _______________________________________ v9.2.8
3.3.5 Class/Volume Graph
The Class/Volume report displays the volume of vehicles classified by length. A
summary is provided after the graph.
M.H. Corbin, Inc. ____________________________________________________________ 38
MH Corbin HDM User’s Manual _______________________________________ v9.2.8
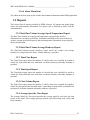
4 Appendix
This appendix covers various topics not otherwise related to the specific functionality of
the user interface.
4.1 Maintenance Tips:
(NC300/200/100 devices) Keep the unit plugged into the charger when not in use. It will
not overcharge.
(NC97 devices) Replace the battery in the IP-10A with a new 9-volt battery once a
month. A low battery in the IP-10A causes communication problems. When no
communication can be established with the device, check another device for
communication as well. If more than one traffic counter fails to communicate, it may be
the IP-10A’s battery is the source. To be safe, replace the IP-10A’s battery often if you
use it frequently. If you do not use it frequently, change it the next time you use it,
especially at the beginning of the season after sitting for an extended period of time. If
you have a voltmeter, use it to check the battery voltage. If the battery is below 8 volts it
should not be used in the IP10-A.
Charge traffic counters for a FULL 12 HOURS before programming. The red LED on
the charger indicates charging of the battery. The green LED on the charger indicates that
the battery is not being charged. It does not indicated fully charged battery. Thus when
charging the battery make sure the charger LED turns red and stays that way for some
time before turning green.
IMPORTANT: When charging the device, always plug the connector into the traffic
counter before plugging the AC adapter into the wall socket. When disconnecting the
traffic counter from the charger, always remove the AC adapter from the wall socket
before disconnecting the traffic counter from the charger.
Do not charge the NC97 and NC200/100 device after the unit has been programmed for a
study. This will cause an interrupt in the program and shut down the traffic counter
before the study begins. The NC300 devices can be charged at any time.
If you are placing the unit on roads that may be exposed to liquids containing high salt
concentrations, place tape over the communications pins or place the device in a plastic
bag. Highly conductive liquids reaching the programming pins can cause the unit to
terminate the study. This is especially true in areas where Magnesium Chloride is used.
Magnesium Chloride can also react with aluminum housing of the device and cause
damage to the housing. Winter deployment of a traffic counter is risky and not
recommended. Snow Plow blades ride on the road surface and will dislodge the unit and
potentially damage it.
M.H. Corbin, Inc. ____________________________________________________________ 39
MH Corbin HDM User’s Manual _______________________________________ v9.2.8
Clean the communications pins if you notice a buildup of corrosion on and around the
programming pins of the unit. Corrosion can cause failed communication.
If no communication can be established when reading the device after a study, charge it
for at least 15 minutes (or until the NC300/200/100 battery charging light is green), and
try again.
When installing a traffic counter, make sure that the road surface is level and clear of
debris. The road is not a friendly environment for electronics. The aluminum housing
protects the electronic circuitry inside the housing. The aluminum housing is very strong
and includes a water tight seal. It is important that the shape of the housing is not altered
by the force of tires striking the unit. On a flat surface, the force of impact is evenly
distributed. If the unit is installed on an uneven surface, the force of the impact is not
evenly distributed. If enough force is applied, the housing may be bent to the contour of
the road. If the housing is bent, the watertight seal may be lost. Once this happens, water
will eventually enter the unit and start to damage the circuit board. A unit securely
installed on a flat area of the road using the protective cover is the best protection against
damage.
4.2 Study Finish (F Codes):
All MH Corbin traffic counter keep track of their own current processing state. The unit
will transition through several states as it is programmed, prepares for a study, begins and
concludes a study. When you read the contents of the unit, one of the values returned
from the unit is its current state. In general, at the end of a study you are expecting to see
a “F1” state which denotes the normal termination of an active study. This state will be
retained in the unit until you program it again when it will again transition through
several states until a study is completed.
Status Codes are displayed to you when you are reading the unit or importing a .dat file. The
code associated with the study may indicate that some type of error occurred during the study
process. Because the only time the Status Code is important is when it indicates some type of
Failure, it is typically referred to as a Failure code. These codes are merely displayed by the
HDM program, they are internal to the unit and do not indicate a problem with the HDM
software. The following list shows the possible Codes that can be generated by a unit during a
study:
o
o
o
o
o
o
F0 – Start-up State (memory is clear)
F1 – Normal Termination
F11 – Waiting for start time
F13 – In Progress
F14 – Empty Battery
F15 – Memory Full
M.H. Corbin, Inc. ____________________________________________________________ 40
MH Corbin HDM User’s Manual _______________________________________ v9.2.8
4.2.1 F0 – Start-Up State
The F0 state will be seen very seldom by a user, it means that the unit has been initialized
and no study state is currently being tracked. This might be a code that you see if you
receive a new unit that has been initialized prior to shipment.
4.2.2 F1 – Normal Termination
This status indicates that a study has been completed. The study began on the start date
and was concluded on the end date as programmed by the user.
4.2.3 F11 – Waiting for Start Time
The F11 state indicates that the unit was successfully programmed and is waiting for the start
time to be reached. If you read the unit at any point prior to the start time, this is the status code
that will be reported. If you intentionally read the study before the start time then this code is the
expected result. If you read the contents prior to the study start time there will not be any study
data to download from the unit.
There are times when this status is reported but it is not the expected result. Here are some of the
known ways that this type of status code can be received unexpectedly:
Possible Causes/Solutions:
The date/time on the computer used to program the unit was not correct. The unit clock
is synchronized to the clock of your personal computer during the programming session.
You must ensure that the year, month, day and time on your personal computer are
accurate. If the date/time on your computer is off by one day, the traffic counter might
either begin the study before you get it onto the road or possibly still be waiting to begin
the study when you retrieve it.
Traffic counter was not programmed at least 30 minutes in advance. MH Corbin traffic
counters need some warm-up time before they can conduct a traffic study. Failure to give
the unit time to adjust itself to the conditions present in the study area can cause
unexpected results.
You failed to remove the programming cable when instructed, or plugged it back in to the
serial cable before the study commenced. Once the unit has been programmed, you must
unplug it from the programming cable. The unit is constantly checking for input voltages
on the serial interface. If it detects voltages, it must assume that a user is initiating a
communications session. When a session is initiated, the unit closes down the study.
Once you finish programming the unit, do not plug it into the serial interface until
you have removed it from the road and the study has finished.
If you are experiencing repeated F11 failures, please contact MH Corbin customer service for
further assistance. Repeated status codes of this type may indicate a problem with the unit’s
internal clock or a problem with serial communications circuitry.
M.H. Corbin, Inc. ____________________________________________________________ 41
MH Corbin HDM User’s Manual _______________________________________ v9.2.8
4.2.4 F13 – In Progress
An F13 error occurs when the unit is interrupted during a study. Possible causes:
Programming errors.
Component failure due to road damage.
High concentration of road salt causing conductivity between the pins.
The unit could have been dislodged from the road.
Communicating with the unit before the end time of the study.
If you receive an F13 error and the unit shows no sign of physical damage, follow the steps
below:
Reprogram the unit for a 15-minute study. Be sure to check that the start and end times
are correct. The device will be set to match the time on your PC clock. If you try to
communicate with the unit before the end time, you will receive the F13 error.
Place the unit on your desk for the duration of the study. Be careful not to allow any
metal to come in contact with the pins. Do not charge the unit after programming a
study. This will cause the unit to shut down.
Wait a few minutes after the end time and download the results from the traffic counter.
If the study runs to completion, recharge the unit and program for your next study.
If you receive the same error message, check the Current.dat file for the failure code and
contact MH Corbin customer service.
4.2.5 F14 – Empty Battery
An F14 status indicates that during the study, the battery voltage dropped below normal
operating range. To preserve the data already collected the traffic counter will shut down.
Possible Causes/Solutions:
Charge the device for 12 hours prior to programming the unit or for the NC300/200/100
units, until the green LED is lit. This will ensure that the device is at optimal battery
level for your study.
Check the battery voltage prior to programming the device. The HDM software offers a
way to check the battery voltage under the Device menu.
If a study will be longer than 48 to 72 hours, set the period for reporting data to at least
60 minutes. The smaller the period, the more battery life you use because the unit must
format and store the data at the end of each period, which requires more battery power. If
you use a 60-minute period, you will use less battery life than if you were using a 1minute or 15-minute period.
M.H. Corbin, Inc. ____________________________________________________________ 42
MH Corbin HDM User’s Manual _______________________________________ v9.2.8
If the device cannot be charged to full battery capacity, the unit may require repair or
battery replacement. Contact MH Corbin customer service.
4.2.6 F15 – Memory Full
An F15 status indicates that the memory capacity was reached while running the study. The unit
had no more room to store study data and the study was ended.
Possible Causes/Solutions:
High volumes of traffic.
Small reporting periods for a long study.
Interference in the magnetic field surrounding the traffic counter that kept the unit awake.
To avoid receiving this error, follow the steps below:
If you are programming for an extended study, such as five to seven days, use a period
length of at least 60 minutes. This will allow the traffic counter to store more data while
using a smaller portion of the memory.
If you are placing the device on a heavily traveled road, consider using two traffic
counters and joining the studies together. The second traffic counter would need to be
programmed to begin at the same time that the first one would end. This would allow
you to accomplish the study without exceeding the memory limits of the unit.
Changes in the magnetic field surrounding the traffic counter can cause the unit to
register extremely high counts. AC Power lines, construction generators, or underground
power lines can cause such changes. If you suspect that there may be a problem with AC
interference, try moving the device to a different location for another study. If the unit
still fails due to memory failure, contact MH Corbin customer service.
M.H. Corbin, Inc. ____________________________________________________________ 43
MH Corbin HDM User’s Manual _______________________________________ v9.2.8
5 Frequently Asked Questions
What does the term "Occupancy" mean?
Occupancy is the percentage of time during the collection period when vehicles were directly
over the unit. If you conducted a study with one minute periods and your occupancy was
reported at 10%, vehicles were directly overtop the unit for six seconds. Occupancy is affected
by both vehicle volume and speed. At higher speeds, vehicles are only over the unit for a
fraction of a second. At slower speeds the same vehicle could be over the unit for several
seconds.
What is the 85th percentile and how is it calculated?
The eighty-fifth percentile is a calculation used by traffic departments and agencies as a means
of determining a normal range of vehicle speeds. If one hundred vehicles pass through the
location, the function would rank the speeds from lowest to highest. The speed of the 85th
vehicle would then constitute the 85th percentile. Many agencies post speed limits at the 85th
percentile as opposed to the average speed. The average speed separates the fastest 50% and
slowest 50% of motorists in a normal speed distribution. In other words, the average speed is
typically the 50th percentile speed. Most motorists travel at about the same speeds, so setting the
speed limit at the 85th percentile legalizes the vast majority of motorists. About 70% of motorists
travel in a 10-mph grouping (called the "pace"), which generally covers all but the fastest 15%
and slowest 15%. If the speed limit were set at the average speed, only 50% of motorists would
be legalized.
Calculation:
TotalVehicles = Number of Vehicles in all bins
Over85% = Sum of Bins until the bin equals or exceeds 85%
SpeedofBin = SpeedBin Speed when 85% is equaled or exceeded
SpeedofNextBin = SpeedBin Speed after 85%
SpeedBinCounts = SpeedBin Count when 85% is equaled or exceeded
85%OfTotal = 85% of Total Vehicles
85thPercentile = SpeedofNextBin - [ (Over85% - 85%OfTotal) * (SpeedofNextBin SpeedofBin) ]
Example:
SpeedBinCounts
SpeedBins 9 10 15 20 25 30 35 40 45 50 55 60 65 70 71
Counts
6 10 32 40 10 2 0 0 0 0 0 0 0 0 0
TotalVehicles = 100
85% of 100 = 85
Over85% = 88 (including speed of 20)
SpeedofBin = 20
SpeedofNextBin = 25
SpeedBinCounts = 40
85thPercentile = ( 25 ) - [ ( 88 - 85 ) / ( 40 ) * ( 25 - 20 ) ]
M.H. Corbin, Inc. ____________________________________________________________ 44
MH Corbin HDM User’s Manual _______________________________________ v9.2.8
Why is my 85th percentile N/A?
An 85th percentile value of “N/A” means that the eighty-fifth highest speed value fell in the top
speed bin that you defined. The top bin has a minimum value, but no true maximum value. In
order for the 85th percentile to be calculated there needs to be a minimum and maximum value
assigned to the bin. When you are doing studies specifically to determine the 85th percentile,
make sure that your speed bins are setup so that less than fifteen percent of the traffic will be in
the top bin. If you ran your study with a NC300 or NC200 counter, use the “derive new study”
function to set speed bins with higher values.
How is the Average Speed calculated?
The average speed is calculated by taking the median (center value) for each speed bin
multiplied by the vehicle count for each speed bin. The result is then divided by the total number
of classified vehicles. Exception: Vehicle counts in the last bin are multiplied by the bin value.
No valid center point can be applied to this bin calculation.
NOTE: The center value is calculated by taking the value in the current bin and the value of the
next bin. For example, if the second bin range is (10 to 14), the median of 10 to 15 is used.
Why are volume counts sometimes different then the classified counts?
When MH Corbin traffic counter detects a vehicle it will register a vehicle count. If the speed
and length of the vehicle can be determined, the unit will register the vehicle speed and vehicle
length and increment the appropriate bin counts based on the bin settings established by the user.
In cases where a vehicle is detected but speed and length cannot be determined, the vehicle count
is the only incremented value. This is the basic cause of the difference between volume counts
and classified counts.
Speed and length measurements depend on mathematical calculations being made by the
unit as a vehicle passes over it. MH Corbin traffic counter has a detection zone around
the unit where two sensors measure disturbances to amplified magnetic fields. The
circuitry then filters, enhances and applies electronic gain to the detected disturbances.
Essentially, magnetic disturbances produced by the ferrous metal in a vehicle passing
through the sensing zone are registered by two matching sensing circuits. Each sensors
output is aligned so that a correlation can be performed on the two sources of input. The
spacing between the two sensors is tightly controlled during manufacturing so that the
time it takes for the vehicle to traverse both sensor can be determined with a high level of
accuracy. There are times when the magnetic disturbance measured by the two
independent sensors is not consistent. In some cases this is due to vehicles changing
speed while the vehicle passes over the sensors. A vehicle traversing the unit in a
diagonal direction while changing lanes is another potential classification error. Another
source of classification problem is experienced when a vehicle has an abnormal
construction. Logging trucks typically have a long trailer that is basically a narrow metal
beam. This type of vehicle is very difficult to classify correctly for the device using VMI
sensors. The likelihood that entire length of the narrow metal beam will be detected is
slim and the likelihood that the logging truck will either be counted only or classified as a
much smaller vehicle is high. All sensing technologies currently employed for traffic
M.H. Corbin, Inc. ____________________________________________________________ 45
MH Corbin HDM User’s Manual _______________________________________ v9.2.8
counting applications have their limitations. A small
percentage of anomalies should be anticipated when using
any type of traffic counters. In general, set your studies up
to run for at least a twenty four hour period. Over this
period of time, the statistical significance of an anomaly is
greatly diminished.
The angle that a vehicle passes over the unit can also be affected by how you align the
unit on the road. Place the unit in a straight section of roadway where vehicles are not in
the act of navigating turns or curves.
Align the unit so that vehicles will traverse the unit in the same direction as the arrows
visible on the top of the units housing. Do not align the unit so that the arrows point at
oncoming traffic, have the arrows pointing the same direction as the traffic.
Placing the unit at an angle, (relative to the flow of traffic) can impact the product’s
performance. If traffic were traversing this document from bottom to top, ideal
orientation to traffic is shown to the left. The absolute worst orientation is as shown to
the right. At a 90 Degree angle to traffic flow, oncoming vehicles are detected by both
sensors at the same time. The vehicle’s speed is undeterminable.
If the unit is not correctly aligned with traffic flow when installed, the calculations used
to determine speed are affected. The Cosine of the angle deviating from true traffic flow
becomes a permanent bias. For best accuracy, (in terms of speed and length
measurements), straight areas of roadway where motorists are not dramatically changing
speeds is optimal.
What is AADT and AADT factor?
AADT stands for Annual Average Daily Traffic. Calculating the AADT is the process of
normalizing the volume counts obtained by a traffic study to represent a full twenty-four hour
day. The AADT Factor is a numeric multiplier to be applied to the study. The AADT Factor is
typically assigned by state and federal agencies based on the results of long term count estimates.
If your agency does not require that you normalize volumes using adjustment factors for
seasonal, day of the week or other criteria, use 1.0 as the AADT factor. This applies no
additional adjustment to the volume except for the basic determination of a normalized twentyfour hour volume calculation. AADT volume will always be a representation of twenty-four hour
period of normalized traffic. The AADT count is determined based on raw count. Any vehicle
detected by the unit regardless of classification is included.
What is Period?
The study period is an interval of time that the unit will use for accumulating volume and traffic
statistics. Each time the interval is met, the unit will store traffic statistics. If you specify a five
minute period, a traffic frame will be created and stored by the unit every 300 seconds. The
period has a direct relation on the amount of memory allocated for a study. Make sure that the
collection period is short enough to give you the detail you need, but long enough to be sure the
unit will be able to store the whole study in memory.
What is the difference between Raw Count and Classified Count?
The Raw Count includes ALL vehicles detected by the unit. The Classified Count includes only
the count of vehicles that were classified by speed and length. If the vehicle’s speed and length
M.H. Corbin, Inc. ____________________________________________________________ 46
MH Corbin HDM User’s Manual _______________________________________ v9.2.8
could not be determined, the vehicle is Unclassified which means reflected in the Raw Count,
but not reflected in the Classified Count.
I have a lot of studies in my catalog. How can I organize them?
HDM lets you open multiple catalogs at the same time. This makes it easy for you to organize
your studies into smaller groups. Remember you can sort the studies displayed by clicking on
the field name in the Study Window. The studies in the currently selected catalogs will be sorted
by that field. Clicking the same field again reverses the sort order (ascending or descending).
How far in advance can I program a traffic counter?
HDM will allow you to select the maximum number of days before deployment. HDM will
allow you to set your threshold to a maximum of 28 days. This maximum threshold was set for
select customers with highly specialized units. There are very few cases where this much lead
time is actually necessary or desired. Remember that the unit is consuming battery while it is
waiting for the programmed start date and time. You should program the unit as close to the
start date and time as is possible so that you are not unnecessarily consuming battery capacity. If
you are conducting studies of a duration that comes close to the maximum battery capacity of the
unit, you should fully charge the unit and program it to commence the study within hours, not
days. A lead time of one day is sufficient in almost all cases for getting the units to the location
to be deployed.
For how many days can I program a traffic counter?
The number of days that a study can last depends on the volume of traffic, the period length, and
the battery voltage. A high volume road with a period of 1 minute will not last more than a day
or two. To maximize the number of days in a study, increase the period and ensure that the
batteries are fully charged. Check your user manual for specifications on your particular traffic
counter. See the device programming section for more information.
The NC300 and NC200/100 counters have a fail-safe mechanism in it that stops the study when
the battery gets too low. Program the study for an unreasonable amount of days if you wish (say
a 31 day study). Pick it up within a day or two after the study was to end and you will still get all
of the data up until the time that the battery voltage dropped to an unacceptable level.
How long should I charge the MH Corbin traffic counter?
NC300 and NC200/100: Charge the battery until the LED on the cable turns green for a full
charge. The battery will not over-charge, so you don’t have to watch it closely. The simplest way
to maintain operational readiness is to always plug in the charger when the unit is not
programmed for a study.
Older models: MH Corbin traffic counter should be charged for a full 12 hours before the unit is
deployed. The unit needs 12 hours to get a full charge. If you charge the device for less than 12
hours the voltage might read OK but it will not last long.
What is the best way to install a traffic counter?
You can refer to our online Installation Guide that uses our Protective Cover. The hard rubber
Protective Cover is the recommended method of installation because it is quick, easy and
provides the protection that will give your traffic counter a long service life.
M.H. Corbin, Inc. ____________________________________________________________ 47
MH Corbin HDM User’s Manual _______________________________________ v9.2.8
If MH Corbin traffic counter is left under water, will it be damaged?
As long as the device maintains a water-tight seal it should be fine. The pin holes are sealed from
the inside so moisture should not penetrate the unit. Before reading the study please ensure that
the pin holes are clean and dry.
If your unit is damaged, contact the MH Corbin customer support for an RMA. Follow the
instructions in the Operations Manual when installing your units on the roadway. The best way
to prevent damage is to not subject the unit’s enclosure to uneven pressures. Avoid areas of the
roadway where the surface is pocked, jagged or extremely uneven. Pieces of asphalt or concrete
jutting up from the surface should be avoided when selecting the area of placement. If a
vehicle’s tire traverses the installed unit, the unit is pushed downward by the impact. When the
unit is installed on a normal area of the road surface, the force is evenly distributed with no ill
effects. If the unit is installed on top of an extrusion, the extrusion becomes a single point of
impact and a potential source of damage.
Is the data collection at extreme temperatures as accurate as within normal ranges?
The sensors have been tested in environmental chambers at temperatures ranging from -30 °C to
+75 °C (-22 °F to +167 °F). The MH Corbin traffic counters were accurate throughout.
Why do I have counts in my highest speed bin when I know for a fact that no one goes
that fast?
If the vehicle passes over only a small portion of the traffic counters detection zone the counter
will “see” it as a fast going long vehicle. Typically such vehicle records will have speeds above
100 mph. HDM displays data as it was collected by the counter and leaves filtering out of such
records up to the user. The filtering out is done by setting data filters in HDM (Application ->
Properties -> Study menu item) before new study is read from the counter or before new study is
derived from one or more existing studies.
M.H. Corbin, Inc. ____________________________________________________________ 48
MH Corbin HDM User’s Manual _______________________________________ v9.2.8
6 Troubleshooting
NC97 Traffic counter communication failure:
Check the cables and IP adapter.
Ensure everything is connected properly.
The red light on the IP adapter should be illuminated.
If the red light on the IP is not illuminated when using the device:
o You may have the wrong Com port selected.
o The IP adapter may need a new battery.
o Try performing the same operation one more time.
Traffic counter is reading very high car counts and the speeds are wrong:
MH Corbin traffic counter use magnetic fields to measure car counts and car speeds. AC current
will also register on the device. This may result in huge car counts and speeds. The best solution
is to move the device and try again. Take a look around and make sure there are no electrical
boxes on the side of the road or power lines overhead. If you can’t see anything, the power lines
may be buried. Run a series of short studies (15 minutes) up or down the road until you find a
spot where there is no interference.
The study status is WAITING or F11:
The traffic counter started the study but never finished the warm-up.
Did you pick the device up too early?
o The interface cable was unplugged after acknowledging the prompt to disconnect the
device. Please make sure you disconnect the device and only then dismiss the prompt
window.
o View the header and check the Start Time. You may have picked up the unit during its
magnetic warm-up time.
o The unit has a hardware problem. Program a 10-minute study and place it on your desk
for the duration of the study. Read the study once it has completed. All counts should
be 0, but the study should conclude successfully. If this does not work, contact your
distributor or MH Corbin customer service.
The study status is In Progress or F13:
The traffic counter did not complete its study. It shut down before the programmed End Time.
Usually the data up to this point is OK, but it did not run the full time. Sometimes this indicates
a hardware problem. Sometimes the reason is obvious, such as the unit sustained damage or
came loose from the road.
When there is no obvious reason, the unit may have a hardware problem. Program a 10-minute
study and place it on your desk for the duration of the study. Read the study once it has
completed. All counts should be 0, but the study should conclude successfully. If this does not
work, contact your distributor or MH Corbin customer service.
The study status is Empty Battery of F14 :
M.H. Corbin, Inc. ____________________________________________________________ 49
MH Corbin HDM User’s Manual _______________________________________ v9.2.8
The battery in the traffic counter dropped below the minimum allowed by the program. To
protect the memory, the device turned itself off. The study up to this point is OK, and the data
can be used. Make sure you re-charge this device for a full 24 hours before using it again. No
harm is done to the unit when this happens. You might check the length of the study against the
table of the battery life in the traffic counter manual and ensure the device can actually run long
enough to complete the study.
The study status is Memory Full of F15:
The memory of the traffic counter is full and the program shut down to preserve the data
to this point. The data read is OK.
M.H. Corbin, Inc. ____________________________________________________________ 50
MH Corbin HDM User’s Manual _______________________________________ v9.2.8
7 Software License Agreement
M.H. CORBIN, INC.
MH Corbin HDM Software Package, SOFTWARE LICENSE AGREEMENT
READ THIS LICENSE AGREEMENT (“LICENSE”) CAREFULLY BEFORE ACCESSING,
DOWNLOADING AND/OR USING THE SOFTWARE AND RELATED
DOCUMENTATION, IF ANY, (COLLECTIVELY, “SOFTWARE”). THIS LICENSE
CONSTITUTES A LEGALLY BINDING AGREEMENT BETWEEN YOU AND M.H.
CORBIN, INC. (“LICENSOR” OR “MH CORBIN”). IF YOU ACCESS, DOWNLOAD OR
USE THIS SOFTWARE, INCLUDING BY INSTALLING OR REQUESTING THE
INSTALLATION OF THE SOFTWARE, YOU ARE DEEMED TO HAVE ACCEPTED
THIS LICENSE AND AGREE TO BE BOUND BY ITS TERMS. IF YOU DO NOT
AGREE TO THE TERMS OF THIS LICENSE, YOU ARE NOT AUTHORIZED TO
ACCESS, DOWNLOAD AND/OR USE THIS SOFTWARE. THIS LICENSE
REPRESENTS THE COMPLETE AGREEMENT CONCERNING THE SOFTWARE, AND IT
SUPERSEDES ANY PRIOR AGREEMENT, REPRESENTATION, OR UNDERSTANDING
BETWEEN THE PARTIES.
1. Product. The Software means a single copy, in object code format, of the MH Corbin HDM
Software Package used with or to control MH Corbin equipment and created by MH Corbin
for use on a single computer. Licensor has the right, at any time and without notice, to
change or discontinue the availability of the Software or of any aspect, component or feature
thereof. Licensor may add value to and/or enhance the performance of the Software. Any
improvements, updates, new versions, new releases, fixes, error corrections, enhancements,
revisions, or changes (collectively, “Modifications”) to the Software are also included in the
definition of Software and are covered by this License.
2. Grant. This Software is licensed, not sold, to you by Licensor. Licensor grants to you, and
you hereby accept, a nonexclusive limited right to access, obtain, download, install, and use a
copy of this Software only for the purpose of operating, collecting data from, and controlling
MH Corbin equipment that you possess. You are not permitted, under this License, to copy,
distribute, make generally available, sublicense or transfer, in any manner, in whole or in
part, the Software, except as otherwise provided herein. You are authorized to make one
copy of the Software only for archival purposes and for no other purposes. The Software is
the subject of U.S. and international copyright laws and treaties and of this License. All
notices included in the Software shall remain intact and unaltered and shall be included on all
copies of the Software that you make. Licensor specifically reserves all rights and interests
not expressly granted in this License.
3. Restrictions. You may not copy, modify, alter, change, create derivative works or incorporate
this Software with any other software, products, services or systems, except as authorized
herein. You may not rent, lease, loan, time share, license, disclose, disseminate, distribute or
otherwise make accessible or available or network the Software to any third party. You agree
not to reverse engineer, decompile or disassemble the Software. If you breach any term or
condition of this License, this License shall immediately terminate and you shall immediately
M.H. Corbin, Inc. ____________________________________________________________ 51
MH Corbin HDM User’s Manual _______________________________________ v9.2.8
erase the Software and any copies thereof, from all computers and devices on which the
Software has been installed and immediately cease any further use or possession of the
Software.
4. Term and Consideration. This License is effective upon your acceptance of this License as
demonstrated by your accessing, downloading and/or using the Software, and shall continue
in effect unless earlier terminated due to your breach or entering into another agreement with
Licensor for so long as you or your successor continues to possess MH Corbin equipment
that may be operated or controlled by the Software. You agree that, in the event and at such
time as you no longer own any MH Corbin equipment that may be controlled by the
Software, or in the event of other termination, you shall immediately erase the Software and
any copies thereof from all computers and devices on which the Software has been installed
and immediately cease any further use or possession of the Software.
5. Disclaimers and Limited Warranty. THE SOFTWARE IS PROVIDED “AS IS” AND
LICENSOR DISCLAIMS ANY AND ALL WARRANTIES AND CONDITIONS,
EXPRESS OR IMPLIED, INCLUDING BUT NOT LIMITED TO, ANY WARRANTIES
OF NONINFRINGEMENT, THE IMPLIED WARRANTIES AND CONDITIONS OF
MERCHANTABILITY OR FITNESS FOR A PARTICULAR PURPOSE OF THE
SOFTWARE. LICENSOR DOES NOT WARRANT THAT THE SOFTWARE IS FREE OF
CLAIMS FOR INFRINGEMENT, THAT THE FUNCTIONS CONTAINED IN THE
SOFTWARE WILL MEET YOUR REQUIREMENTS, OR THAT IT IS SUITABLE FOR
ANY LICENSED APPLICATION. FURTHER, LICENSOR DOES NOT WARRANT
THAT THE OPERATION OF THE SOFTWARE WILL BE UNINTERRUPTED OR
ERROR-FREE, THAT IT IS FREE OF ANY OMISSION, INACCURACY, DEFECT,
COMPUTER VIRUS, OR OTHER OPERATIONAL OR PERFORMANCE PROBLEM,
OR THAT DEFECTS IN THE SOFTWARE WILL BE CORRECTED. YOU WILL BE
RESPONSIBLE FOR ADEQUATELY SAFEGUARDING (SUCH AS BY BACKING UP)
YOUR DATA AND OTHER SOFTWARE USED IN CONJUNCTION WITH THE
SOFTWARE. LICENSOR ASSUMES NO LIABILITY FOR ANY CORRUPTION,
ERASURE, MISHANDLING, OR THE LIKE OF YOUR DATA OR OTHER SOFTWARE.
NO ORAL OR WRITTEN INFORMATION OR ADVICE GIVEN BY LICENSOR OR AN
AUTHORIZED LICENSOR REPRESENTATIVE SHALL CREATE A WARRANTY OR
IN ANY WAY INCREASE THE SCOPE OF THIS WARRANTY. SOME
JURISDICTIONS DO NOT ALLOW THE EXCLUSION OF IMPLIED WARRANTIES,
SO THE ABOVE EXCLUSION MAY NOT APPLY TO YOU. ADDITIONALLY, YOU
ACKNOWLEDGE RECEIVING NO WARRANTY, EXPRESS OR IMPLIED, FROM
ANY THIRD PARTY, INCLUDING THE OWNER OF THE SOFTWARE, AS TO THE
SOFTWARE OR THIS LICENSE.
6. Limitation of Liability. THE DISCLAIMER OF WARRANTIES RECITED ABOVE IS
FOR THE PURPOSE OF LIMITING LICENSOR’S LIABILITY FOR ANY DAMAGES
OR HARM SUFFERED BY YOU OR A THIRD PARTY, WHETHER FOR BREACH OF
CONTRACT, AN ACTION IN TORT (INCLUDING STRICT LIABILITY),
NEGLIGENCE, INFRINGEMENT, OR UNDER ANY OTHER CAUSE OF ACTION.
LICENSOR SHALL NOT BE HELD LIABLE FOR ANY SUCH CLAIMS OR ACTIONS,
M.H. Corbin, Inc. ____________________________________________________________ 52
MH Corbin HDM User’s Manual _______________________________________ v9.2.8
AND THE RISK OF HARM FROM THE FOREGOING RESTS ENTIRELY WITH YOU.
FURTHER, IN NO EVENT WILL LICENSOR BE LIABLE FOR ANY DAMAGES,
INCLUDING, WITHOUT LIMITATION, INCIDENTAL, SPECIAL, INDIRECT,
PUNITIVE OR CONSEQUENTIAL DAMAGES, INCLUDING WITHOUT LIMITATION,
LOST PROFITS OR REVENUES OR LOSS OF BUSINESS ARISING OUT OF OR
RELATING TO THE USE OF OR INABILITY TO USE THE SOFTWARE EVEN IF
LICENSOR HAS BEEN INFORMED OF THE POSSIBILITY OF SUCH LOSSES. SOME
JURISDICTIONS DO NOT ALLOW SUCH LIMITATION OF DAMAGES, SO THE
ABOVE EXCLUSION MAY NOT APPLY TO YOU. IN NO EVENT SHALL
LICENSOR’S LIABILITY TO YOU FOR ANY CLAIM OF DAMAGES, LOSSES AND
CAUSES OF ACTIONS WHETHER IN CONTRACT, TORT (INCLUDING LICENSOR’S
OWN NEGLIGENCE), INFRINGEMENT, OR UNDER ANY OTHER LEGAL THEORY
(INCLUDING STRICT LIABILITY) EXCEED THE PURCHASE/LICENSE PRICE OF
THE SOFTWARE. YOU ACKNOWLEDGE THAT THE FOREGOING CONSTITUTES
YOUR SOLE AND EXCLUSIVE REMEDY FOR BREACH BY LICENSOR OF THIS
LICENSE OR ANY WARRANTIES MADE HEREUNDER.
7. Damages for Breach. In the event of breach of any of the proprietary rights or interests,
Licensor shall be entitled to pursue all appropriate legal and equitable relief and shall be
entitled to recover, in addition to any other relief granted, reasonable attorney fees and
expenses of litigation.
8. Third Party Software. To the extent any software or other technology that is owned by a
third party is accessed or used in combination with the Software, you shall be obligated to
obtain a license or rights to such third-party software or technology before Software access,
delivery, or use and you assume the entire responsibility and liability therefore, including any
associated costs and expenses. Licensor shall not be obligated to obtain on your behalf any
rights or licenses to such third-party software or technology.
9. Export Law Assurances. You agree to comply with all applicable export laws, including
those of the jurisdiction in which the Software was obtained.
10. U.S. Government Restricted Rights. The Licensed Program is "Restricted Computer
Software" as that term is defined in Clause 55.227-19 of the Federal Acquisition Regulations
("FAR") and is "Commercial Computer Software" as that term is defined in Subpart 227.401
of the Department of Defense Federal Acquisition Regulation Supplemental ("DFARS"). If
the Licensed Program is supplied to the Department of Defense ("DoD"), it is classified as
"Commercial Computer Software" and the Government is acquiring only "restricted rights"
in the Licensed Program and its documentation as that term is defined in Clause 252.2277013 of the DFARS. If the Licensed Program is supplied to any unit or agency of the United
States Government other than the DoD, the Government's rights in it and its documentation
will be as defined in Clause 55.227-7013. Where the terms and conditions of this Software
License Agreement conflict in any manner with the FAR or DFARS, the terms and
conditions specified herein shall take precedence.
M.H. Corbin, Inc. ____________________________________________________________ 53
MH Corbin HDM User’s Manual _______________________________________ v9.2.8
11. Controlling Law and Severability. This License shall be governed by the laws of the State of
Ohio and of the United States of America, notwithstanding the application of the conflict of
laws, the application of which is expressly excluded, and all disputes arising out of this
License shall be adjudicated in the competent courts of Ohio in Columbus. If for any reason
a court of competent jurisdiction finds any provision, or portion thereof, to be unenforceable,
the remainder of this License shall continue in full force and effect. The failure of Licensor
to enforce any rights granted herein or to take action against you in the event of any breach
hereunder shall not be deemed a waiver by Licensor as to subsequent enforcement of rights
or subsequent actions in the event of future breaches. In the event there is any type of
purchase order or other commercial transaction agreement, and such document conflicts with
this License, the terms of this License shall prevail. Any application of the United Nations
Convention on Contracts for the International Sales of Goods is expressly excluded and does
not apply to the terms of this License.
12. Support, Maintenance, Releases. Licensor shall not be obligated to provide you with any
support, consulting or maintenance for the Software under this License. Licensor, further,
shall not be obligated to provide you with any Modifications or any additional documentation
under this License. In the event that Licensor, at its sole discretion, provides Modifications,
the terms and conditions of this Agreement shall apply to both the Modifications and the
modified Software. Licensor reserves the right to modify any part of the Software, including
source code, object code and database schemas without notice. Licensor, further, shall not be
obligated to make the Software, including source code, object code and database schemas
backwards compatible with previous Software versions.
13. Transfer. You shall not transfer, assign or hypothecate, in whole or in part, this License or
any rights or obligations hereunder.
14. Intellectual Property. Licensor represents and you agree that the Software, including source
code, object code and database schemas, is confidential and proprietary to Licensor. All
confidentiality and proprietary notices, including but not limited to copyright notices
displayed on the Software, shall remain intact and unaltered and shall be included on any
documents, media, printouts, visualizations, or on any other electronic or tangible
expressions associated with, related to, or derived from the Software. You acknowledge that
Licensor has the full right, title, and interest in and to all associated, related, and resultant
intellectual property, which includes but is not limited to patents, trade secrets, trademarks,
or copyrights, including any and all derivative works thereof, to the Software and
Modifications. You acknowledge that the licensing of the Software does not grant to you,
either implicitly or explicitly, a license to any patent, copyright, trademark, or other
intellectual property interest.
M.H. Corbin, Inc. ____________________________________________________________ 54
www.mhcorbin.com