1
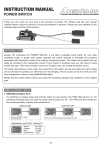
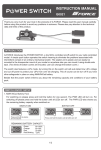
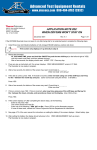
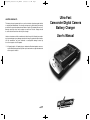
I-9200_Manual_20080313:I-9200_Manual
3/13/2008
3:33 PM
Page 2
LIMITED WARRANTY:
This battery charger is guaranteed for one year from the date of purchase against defects
in materials and workmanship. If the charger develops such a defect during the warranty
period it will be repaired or replaced at manufacturer's option. This warranty does not cover
damage caused by misuse and everyday wear and tear. Defective chargers should
be returned to the dealer from which they were bought.
Under no circumstances will the manufacturer be liable for any of the following: loss or damage to personal property; any damage caused to the charger by repair attempts not authorized by manufacturer; any other incidental or consequential damages caused by
the user or improper use of this product.
*** Hi-Capacity and the Hi-Capacity logo are trademarks. Brand and product names are
used for identification purposes only and may be trademarks or registered trademarks
of their respective holders.
I-9200
20080313
Ultra-Fast
Camcorder/Digital Camera
Battery Charger
User’s Manual
I-9200_Manual_20080313:I-9200_Manual
3/13/2008
3:33 PM
Page 4
This charger is for rechargeable NiMH, NiCad and Li-Ion batteries ONLY! Inserting any
other batteries may damage the device, destroy the batteries and/or cause injury to the
user.
4. Attach your camcorder or digital camera battery onto the base charger unit or onto the
appropriate adapter plate and make sure the battery contacts connect with the contact
pins. Make sure that the latching on your battery slides completely under the tabs on the
charger plate. If the battery is properly connected, the red charging light (CHG) will stay
lit, indicating that the battery is charging. If the battery does not begin charging, remove
the barrel-plug from the back of the charger then re-insert the plug. To ensure that the
battery and the charger are properly connected, remove the battery from the charger and
reattach.
CAUTION:
5. When the green “ Full” indicator light is lit the battery is fully charged.
PLEASE READ THE INFORMATION AND FOLLOW ALL INSTRUCTIONS
CAREFULLY BEFORE USING THIS PRODUCT.
IMPORTANT WARNING:
•
•
•
•
•
•
•
•
•
Always unplug the charger when not in use.
Always unplug your charger from the power source before cleaning.
Discontinue use if any of the wires or plugs are broken, frayed or damaged.
Do not use, place or store the charger where it may come into contact with water
or moisture.
Do not use in a car when it is unattended or in direct sunlight.
Do not short-circuit the metal contacts of the battery or charger.
Do not disassemble, deform or reconstruct any part of the charger.
Use this charger only with the AC adapter and car cord included.
It is not necessary to discharge a NiMH and NiCad battery prior to charging.
OPERATING INSTRUCTIONS:
1.To charge additional types of camcorder and digital camera batteries, simply attach the
appropriate adapter plate onto the base charger unit. Line up the notch on the plate
with the tab on the base (Fig A). Push down on the plate while sliding the plate to the
right (Fig B, C).
6. In order to maximize the capacity of NiMH and NiCad batteries they should be
occasionally discharged. This can easily be done with the charger’ s discharge function.
Place the battery on the charger and press the button on the face of the charger base.
The battery will first discharge and this will be indicated by the yellow light (DIS) coming
on. After the battery is discharged it will automatically switch to charge mode until it is
completely charged.
IMPORTANT NOTES:
1. This charger has built-in smart circuitry that enables it to detect the battery voltage
automatically. The advanced charging technology used in this device makes it safe to
leave your battery in the charger after it is fully charged. However, to prolong the
operating life of the AC adapter and avoid unnecessary power consumption, it is
recommended that you do not leave the battery in the charger for extended periods of
time.
2. All batteries will naturally discharge themselves over time even if they are not in use. To
prolong their service life, it is recommended that you do not let a battery sit idle for more
than two months without recharging. If your battery has been sitting idle for an
extended period of time, be sure to recharge your battery before use.
Fig C
Fig B
Fig A
2. To remove the adapter plate from base charger unit, push down on the top of the plate
(Fig D) while sliding the plate to the left (Fig E).
3. The AC adapter, charger and battery will get warm during the charging process. This
is normal.
4. If the charger does not charge the batteries, check to see if the battery is dead, faulty or
worn out. All rechargeable batteries will eventually wear out after being used for a
certain number of cycles.
5. Always keep metal contacts on both charger and battery clean by wiping the surfaces
with a clean, dry cloth.
Fig D
Fig E
6. Remove your batteries from the digital camera or camcorder after use. These devices
will continue to drain a small current from your battery even if they are turned off.
3. Connect the barrel-plug end of the AC adapter or DC car cord into the back of the
charger and the other end into a standard AC outlet or the cigarette lighter receptacle of
a vehicle. The red charging light (CHG) of the charger will appear as soon as the
charger unit is connected to a power source. The symbol indicates the charger is ready
for use.
www.Hi-Capacity.com - I-9200
Ultra-Fast Camcorder/Digital Camera Battery Charger - User’ s Manual