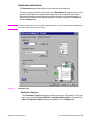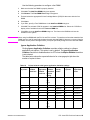
1
software
technical
reference
hp LaserJet 9000mfp
hp LaserJet 9000mfp
software technical reference
(c) Copyright Hewlett-Packard Company,
2002
All Rights Reserved. Reproduction,
adaptation, or translation without prior written
permission is prohibited, except as allowed
under the copyright laws.
Version 1, March 2002
Warranty
Trademark Credits
The information contained in this document
is subject to change without notice.
Adobe, Acrobat, PostScript, and the Acrobat
logo are either registered trademarks or
trademarks of Adobe Systems Incorporated
in the United States and/or other countries/
regions.
Hewlett-Packard makes no warranty of any
kind with respect to this information.
HEWLETT-PACKARD SPECIFICALLY
DISCLAIMS THE IMPLIED WARRANTY OF
MERCHANTABILITY AND FITNESS FOR A
PARTICULAR PURPOSE.
Hewlett-Packard shall not be liable for any
direct, indirect, incidental, consequential, or
other damage alleged in connection with the
furnishing or use of this information.
Arial is a U.S. registered trademark of the
Monotype Corporation.
AutoCAD (TM) is a U.S. trademark of
Autodesk, Inc.
Java (TM) is a U.S. trademark of Sun
Microsystems, Inc.
HP-UX Release 10.20 and later and P-UX
RElease 11.00 and later (in both 32- and 64bit configurations) on all HP 9000 computers
are Open Group UNIX95 branded products.
Microsoft (R), MS-DOS (R), Windows (R),
and Windows NT (R) are U.S. registered
trademarks of Microsoft Corporation.
Netscape and Netscape Navigator are
trademarks or registered trademarks of
Netscape Communications, Inc.
TrueType (TM) is a U.S. trademark of Apple
Computer, Inc.
UNIX (R) is a registered trademark of the
Open Group.
Table of Contents
List of tables
List of figures
1 Purpose and Scope
Introduction . . . . . . . . . . . . . . . . . . . . . . . . . . . . . . . . . . . . . . . . . . . . . . . . . . . . . . . . . . . . . . . . . . . 13
HP LaserJet 9000mfp . . . . . . . . . . . . . . . . . . . . . . . . . . . . . . . . . . . . . . . . . . . . . . . . . . . . . . . . . . . 14
2 Software Description
Introduction . . . . . . . . . . . . . . . . . . . . . . . . . . . . . . . . . . . . . . . . . . . . . . . . . . . . . . . . . . . . . . . . . . .
Supported operating systems . . . . . . . . . . . . . . . . . . . . . . . . . . . . . . . . . . . . . . . . . . . . . . . . . . . . .
Technology background information . . . . . . . . . . . . . . . . . . . . . . . . . . . . . . . . . . . . . . . . . . . . . . . .
HP LaserJet user documentation . . . . . . . . . . . . . . . . . . . . . . . . . . . . . . . . . . . . . . . . . . . . . . .
Adobe Acrobat Reader . . . . . . . . . . . . . . . . . . . . . . . . . . . . . . . . . . . . . . . . . . . . . . . . . . . . .
HP LaserJet guides. . . . . . . . . . . . . . . . . . . . . . . . . . . . . . . . . . . . . . . . . . . . . . . . . . . . . . . .
HP LaserJet product printing-system installation notes . . . . . . . . . . . . . . . . . . . . . . . . . . . .
HP LaserJet product printing-system release notes . . . . . . . . . . . . . . . . . . . . . . . . . . . . . . .
Other HP LaserJet documents . . . . . . . . . . . . . . . . . . . . . . . . . . . . . . . . . . . . . . . . . . . . . . .
Bidirectional communication . . . . . . . . . . . . . . . . . . . . . . . . . . . . . . . . . . . . . . . . . . . . . . . . . . .
Driver Autoconfiguration . . . . . . . . . . . . . . . . . . . . . . . . . . . . . . . . . . . . . . . . . . . . . . . . . . . . . .
Printer Status and Alerts . . . . . . . . . . . . . . . . . . . . . . . . . . . . . . . . . . . . . . . . . . . . . . . . . . . . . .
Remote firmware update. . . . . . . . . . . . . . . . . . . . . . . . . . . . . . . . . . . . . . . . . . . . . . . . . . . . . .
Determining the current level of firmware . . . . . . . . . . . . . . . . . . . . . . . . . . . . . . . . . . . . . . .
Downloading the new firmware from the HP Web site . . . . . . . . . . . . . . . . . . . . . . . . . . . . .
Downloading the new firmware to the product . . . . . . . . . . . . . . . . . . . . . . . . . . . . . . . . . . .
Remote firmware update for Windows systems . . . . . . . . . . . . . . . . . . . . . . . . . . . . . . . . . .
Windows 95, Windows 98, and Windows Me. . . . . . . . . . . . . . . . . . . . . . . . . . . . . . . . . . .
Remote firmware update for UNIX systems:. . . . . . . . . . . . . . . . . . . . . . . . . . . . . . . . . . . . .
Remote firmware update using FTP on a direct network connection . . . . . . . . . . . . . . . . . .
Using HP Web JetAdmin to download the firmware to the product . . . . . . . . . . . . . . . . . . .
Printer messages during firmware upgrade . . . . . . . . . . . . . . . . . . . . . . . . . . . . . . . . . . . . .
Troubleshooting a firmware update . . . . . . . . . . . . . . . . . . . . . . . . . . . . . . . . . . . . . . . . . . .
HP Web Access . . . . . . . . . . . . . . . . . . . . . . . . . . . . . . . . . . . . . . . . . . . . . . . . . . . . . . . . . . . .
Information tab . . . . . . . . . . . . . . . . . . . . . . . . . . . . . . . . . . . . . . . . . . . . . . . . . . . . . . . . . . .
Device status . . . . . . . . . . . . . . . . . . . . . . . . . . . . . . . . . . . . . . . . . . . . . . . . . . . . . . . . . . . .
Configuration information . . . . . . . . . . . . . . . . . . . . . . . . . . . . . . . . . . . . . . . . . . . . . . . . . . .
Links to off-printer solutions . . . . . . . . . . . . . . . . . . . . . . . . . . . . . . . . . . . . . . . . . . . . . . . . .
Settings tab . . . . . . . . . . . . . . . . . . . . . . . . . . . . . . . . . . . . . . . . . . . . . . . . . . . . . . . . . . . . . .
Remote printer configuration. . . . . . . . . . . . . . . . . . . . . . . . . . . . . . . . . . . . . . . . . . . . . . . . .
Networking tab . . . . . . . . . . . . . . . . . . . . . . . . . . . . . . . . . . . . . . . . . . . . . . . . . . . . . . . . . . .
Configuration . . . . . . . . . . . . . . . . . . . . . . . . . . . . . . . . . . . . . . . . . . . . . . . . . . . . . . . . . . .
Security . . . . . . . . . . . . . . . . . . . . . . . . . . . . . . . . . . . . . . . . . . . . . . . . . . . . . . . . . . . . . . .
Diagnostics . . . . . . . . . . . . . . . . . . . . . . . . . . . . . . . . . . . . . . . . . . . . . . . . . . . . . . . . . . . . .
Network settings. . . . . . . . . . . . . . . . . . . . . . . . . . . . . . . . . . . . . . . . . . . . . . . . . . . . . . . . .
Configurable e-mail alerts . . . . . . . . . . . . . . . . . . . . . . . . . . . . . . . . . . . . . . . . . . . . . . . . . . .
Digital sending . . . . . . . . . . . . . . . . . . . . . . . . . . . . . . . . . . . . . . . . . . . . . . . . . . . . . . . . . . . . .
Configuring HP Digital Send from the control panel . . . . . . . . . . . . . . . . . . . . . . . . . . . . . . .
Software Technical Reference
15
15
16
16
16
16
17
17
17
18
19
20
26
26
26
26
27
27
28
28
28
29
30
31
32
32
33
33
34
34
35
35
35
35
35
37
37
38
3
Sending to e-mail . . . . . . . . . . . . . . . . . . . . . . . . . . . . . . . . . . . . . . . . . . . . . . . . . . . . . . . . . . 38
Foreign Interface Harness . . . . . . . . . . . . . . . . . . . . . . . . . . . . . . . . . . . . . . . . . . . . . . . . . . . . . 39
E-mail command and response . . . . . . . . . . . . . . . . . . . . . . . . . . . . . . . . . . . . . . . . . . . . . . . . . 39
Euro character . . . . . . . . . . . . . . . . . . . . . . . . . . . . . . . . . . . . . . . . . . . . . . . . . . . . . . . . . . . . . . 40
Printing-system components . . . . . . . . . . . . . . . . . . . . . . . . . . . . . . . . . . . . . . . . . . . . . . . . . . . . . . 40
Printing system and installer . . . . . . . . . . . . . . . . . . . . . . . . . . . . . . . . . . . . . . . . . . . . . . . . . . . 40
CD browser for Windows systems . . . . . . . . . . . . . . . . . . . . . . . . . . . . . . . . . . . . . . . . . . . . . 40
Installer features. . . . . . . . . . . . . . . . . . . . . . . . . . . . . . . . . . . . . . . . . . . . . . . . . . . . . . . . . . . 42
Installable components . . . . . . . . . . . . . . . . . . . . . . . . . . . . . . . . . . . . . . . . . . . . . . . . . . . . . . . 43
Printer drivers . . . . . . . . . . . . . . . . . . . . . . . . . . . . . . . . . . . . . . . . . . . . . . . . . . . . . . . . . . . . . 43
PCL 5e, PCL 6, and PS drivers . . . . . . . . . . . . . . . . . . . . . . . . . . . . . . . . . . . . . . . . . . . . . . 43
Windows 3.1x driver versions . . . . . . . . . . . . . . . . . . . . . . . . . . . . . . . . . . . . . . . . . . . . . . . 43
Windows 95, 98, Me, NT 4.0, 2000, and XP driver versions . . . . . . . . . . . . . . . . . . . . . . . . 43
Macintosh and Macintosh-compatible system driver versions . . . . . . . . . . . . . . . . . . . . . . . . 43
AutoCAD driver versions . . . . . . . . . . . . . . . . . . . . . . . . . . . . . . . . . . . . . . . . . . . . . . . . . . . . 44
Additional driver availability . . . . . . . . . . . . . . . . . . . . . . . . . . . . . . . . . . . . . . . . . . . . . . . . . . 44
Macintosh components . . . . . . . . . . . . . . . . . . . . . . . . . . . . . . . . . . . . . . . . . . . . . . . . . . . . . 44
Additional productivity tools . . . . . . . . . . . . . . . . . . . . . . . . . . . . . . . . . . . . . . . . . . . . . . . . . . 45
HP Web Registration . . . . . . . . . . . . . . . . . . . . . . . . . . . . . . . . . . . . . . . . . . . . . . . . . . . . . . 45
Optional software. . . . . . . . . . . . . . . . . . . . . . . . . . . . . . . . . . . . . . . . . . . . . . . . . . . . . . . . . 45
HP Web JetAdmin. . . . . . . . . . . . . . . . . . . . . . . . . . . . . . . . . . . . . . . . . . . . . . . . . . . . . . . 45
3 Driver features
PCL 6 and PCL 5e driver features . . . . . . . . . . . . . . . . . . . . . . . . . . . . . . . . . . . . . . . . . . . . . . . . . . 47
Help system . . . . . . . . . . . . . . . . . . . . . . . . . . . . . . . . . . . . . . . . . . . . . . . . . . . . . . . . . . . . . . . . 47
What's this? Help . . . . . . . . . . . . . . . . . . . . . . . . . . . . . . . . . . . . . . . . . . . . . . . . . . . . . . . . . . 47
Context-sensitive Help . . . . . . . . . . . . . . . . . . . . . . . . . . . . . . . . . . . . . . . . . . . . . . . . . . . . . . 47
Constraint messages . . . . . . . . . . . . . . . . . . . . . . . . . . . . . . . . . . . . . . . . . . . . . . . . . . . . . . . 48
Bubble Help . . . . . . . . . . . . . . . . . . . . . . . . . . . . . . . . . . . . . . . . . . . . . . . . . . . . . . . . . . . . . . . . 49
Quick Sets . . . . . . . . . . . . . . . . . . . . . . . . . . . . . . . . . . . . . . . . . . . . . . . . . . . . . . . . . . . . . . . 50
Factory Defaults . . . . . . . . . . . . . . . . . . . . . . . . . . . . . . . . . . . . . . . . . . . . . . . . . . . . . . . . . 51
Custom Quick Sets . . . . . . . . . . . . . . . . . . . . . . . . . . . . . . . . . . . . . . . . . . . . . . . . . . . . . . . 51
HP LaserJet Multifunction Finisher Quick Sets . . . . . . . . . . . . . . . . . . . . . . . . . . . . . . . . . . 51
Document Options . . . . . . . . . . . . . . . . . . . . . . . . . . . . . . . . . . . . . . . . . . . . . . . . . . . . . . . . . 52
Print on Both Sides option . . . . . . . . . . . . . . . . . . . . . . . . . . . . . . . . . . . . . . . . . . . . . . . . . . 53
Flip Pages Up . . . . . . . . . . . . . . . . . . . . . . . . . . . . . . . . . . . . . . . . . . . . . . . . . . . . . . . . . . . 53
Booklet Printing . . . . . . . . . . . . . . . . . . . . . . . . . . . . . . . . . . . . . . . . . . . . . . . . . . . . . . . . . . 54
Activating booklet printing . . . . . . . . . . . . . . . . . . . . . . . . . . . . . . . . . . . . . . . . . . . . . . . . . 55
Selecting a booklet cover . . . . . . . . . . . . . . . . . . . . . . . . . . . . . . . . . . . . . . . . . . . . . . . . . 56
Staple option . . . . . . . . . . . . . . . . . . . . . . . . . . . . . . . . . . . . . . . . . . . . . . . . . . . . . . . . . . . . 56
Stapling a document . . . . . . . . . . . . . . . . . . . . . . . . . . . . . . . . . . . . . . . . . . . . . . . . . . . . . 57
Fold/Saddle Stitch . . . . . . . . . . . . . . . . . . . . . . . . . . . . . . . . . . . . . . . . . . . . . . . . . . . . . . . . 58
Saddle-stitching a booklet or folding a single sheet . . . . . . . . . . . . . . . . . . . . . . . . . . . . . 59
Pages per Sheet . . . . . . . . . . . . . . . . . . . . . . . . . . . . . . . . . . . . . . . . . . . . . . . . . . . . . . . . . 59
Print Quality . . . . . . . . . . . . . . . . . . . . . . . . . . . . . . . . . . . . . . . . . . . . . . . . . . . . . . . . . . . . . . 60
Graphics Settings group box . . . . . . . . . . . . . . . . . . . . . . . . . . . . . . . . . . . . . . . . . . . . . . . . 62
Output Settings group box . . . . . . . . . . . . . . . . . . . . . . . . . . . . . . . . . . . . . . . . . . . . . . . . . . 62
Resolution . . . . . . . . . . . . . . . . . . . . . . . . . . . . . . . . . . . . . . . . . . . . . . . . . . . . . . . . . . . . . 62
Resolution Enhancement technology . . . . . . . . . . . . . . . . . . . . . . . . . . . . . . . . . . . . . . . . 62
Scale Patterns (WYSIWYG) . . . . . . . . . . . . . . . . . . . . . . . . . . . . . . . . . . . . . . . . . . . . . . . 63
Print all Text as Black . . . . . . . . . . . . . . . . . . . . . . . . . . . . . . . . . . . . . . . . . . . . . . . . . . . . 63
Edge-to-Edge Printing. . . . . . . . . . . . . . . . . . . . . . . . . . . . . . . . . . . . . . . . . . . . . . . . . . . . 63
Font Settings group box . . . . . . . . . . . . . . . . . . . . . . . . . . . . . . . . . . . . . . . . . . . . . . . . . . . 63
EconoMode . . . . . . . . . . . . . . . . . . . . . . . . . . . . . . . . . . . . . . . . . . . . . . . . . . . . . . . . . . . . . 63
Effects tab features . . . . . . . . . . . . . . . . . . . . . . . . . . . . . . . . . . . . . . . . . . . . . . . . . . . . . . . . . . 64
ZoomSmart . . . . . . . . . . . . . . . . . . . . . . . . . . . . . . . . . . . . . . . . . . . . . . . . . . . . . . . . . . . . . . 64
Print Document On: setting . . . . . . . . . . . . . . . . . . . . . . . . . . . . . . . . . . . . . . . . . . . . . . . . . 65
Scale to Fit option . . . . . . . . . . . . . . . . . . . . . . . . . . . . . . . . . . . . . . . . . . . . . . . . . . . . . . . . 65
4
Software Technical Reference
% of Normal Size option . . . . . . . . . . . . . . . . . . . . . . . . . . . . . . . . . . . . . . . . . . . . . . . . . . .
Watermarks. . . . . . . . . . . . . . . . . . . . . . . . . . . . . . . . . . . . . . . . . . . . . . . . . . . . . . . . . . . . . .
Current Watermarks . . . . . . . . . . . . . . . . . . . . . . . . . . . . . . . . . . . . . . . . . . . . . . . . . . . . . .
Watermark Message . . . . . . . . . . . . . . . . . . . . . . . . . . . . . . . . . . . . . . . . . . . . . . . . . . . . .
Message Angle. . . . . . . . . . . . . . . . . . . . . . . . . . . . . . . . . . . . . . . . . . . . . . . . . . . . . . . . . .
Font Attributes . . . . . . . . . . . . . . . . . . . . . . . . . . . . . . . . . . . . . . . . . . . . . . . . . . . . . . . . . .
Name . . . . . . . . . . . . . . . . . . . . . . . . . . . . . . . . . . . . . . . . . . . . . . . . . . . . . . . . . . . . . . . .
Color . . . . . . . . . . . . . . . . . . . . . . . . . . . . . . . . . . . . . . . . . . . . . . . . . . . . . . . . . . . . . . . .
Shading . . . . . . . . . . . . . . . . . . . . . . . . . . . . . . . . . . . . . . . . . . . . . . . . . . . . . . . . . . . . . .
Size . . . . . . . . . . . . . . . . . . . . . . . . . . . . . . . . . . . . . . . . . . . . . . . . . . . . . . . . . . . . . . . . .
Default settings . . . . . . . . . . . . . . . . . . . . . . . . . . . . . . . . . . . . . . . . . . . . . . . . . . . . . . . .
Paper tab features . . . . . . . . . . . . . . . . . . . . . . . . . . . . . . . . . . . . . . . . . . . . . . . . . . . . . . . . . .
Printer image. . . . . . . . . . . . . . . . . . . . . . . . . . . . . . . . . . . . . . . . . . . . . . . . . . . . . . . . . . . . .
All Pages. . . . . . . . . . . . . . . . . . . . . . . . . . . . . . . . . . . . . . . . . . . . . . . . . . . . . . . . . . . . . . . .
Other Pages . . . . . . . . . . . . . . . . . . . . . . . . . . . . . . . . . . . . . . . . . . . . . . . . . . . . . . . . . . . . .
Back Cover . . . . . . . . . . . . . . . . . . . . . . . . . . . . . . . . . . . . . . . . . . . . . . . . . . . . . . . . . . . . . .
Size is: . . . . . . . . . . . . . . . . . . . . . . . . . . . . . . . . . . . . . . . . . . . . . . . . . . . . . . . . . . . . . . . . .
Custom.... . . . . . . . . . . . . . . . . . . . . . . . . . . . . . . . . . . . . . . . . . . . . . . . . . . . . . . . . . . . . . . .
Name drop-down menu . . . . . . . . . . . . . . . . . . . . . . . . . . . . . . . . . . . . . . . . . . . . . . . . . . . .
Dynamic command button . . . . . . . . . . . . . . . . . . . . . . . . . . . . . . . . . . . . . . . . . . . . . . . . . .
Width and height controls . . . . . . . . . . . . . . . . . . . . . . . . . . . . . . . . . . . . . . . . . . . . . . . . . . .
Custom width and height control limits . . . . . . . . . . . . . . . . . . . . . . . . . . . . . . . . . . . . . . . . .
Paper and envelope icons . . . . . . . . . . . . . . . . . . . . . . . . . . . . . . . . . . . . . . . . . . . . . . . . .
Measurement Units button . . . . . . . . . . . . . . . . . . . . . . . . . . . . . . . . . . . . . . . . . . . . . . . . . .
Close button . . . . . . . . . . . . . . . . . . . . . . . . . . . . . . . . . . . . . . . . . . . . . . . . . . . . . . . . . . . . .
Source Is: . . . . . . . . . . . . . . . . . . . . . . . . . . . . . . . . . . . . . . . . . . . . . . . . . . . . . . . . . . . . . . .
Type Is: . . . . . . . . . . . . . . . . . . . . . . . . . . . . . . . . . . . . . . . . . . . . . . . . . . . . . . . . . . . . . . . . .
Printer image. . . . . . . . . . . . . . . . . . . . . . . . . . . . . . . . . . . . . . . . . . . . . . . . . . . . . . . . . . . . .
Destination Features . . . . . . . . . . . . . . . . . . . . . . . . . . . . . . . . . . . . . . . . . . . . . . . . . . . . . . .
Hardware configuration and availability of Job Retention options . . . . . . . . . . . . . . . . . . . .
Configuring the printer driver for a printer hard disk . . . . . . . . . . . . . . . . . . . . . . . . . . . . . . .
Job retention modes . . . . . . . . . . . . . . . . . . . . . . . . . . . . . . . . . . . . . . . . . . . . . . . . . . . . . . .
Off. . . . . . . . . . . . . . . . . . . . . . . . . . . . . . . . . . . . . . . . . . . . . . . . . . . . . . . . . . . . . . . . . . . .
Quick Copy . . . . . . . . . . . . . . . . . . . . . . . . . . . . . . . . . . . . . . . . . . . . . . . . . . . . . . . . . . . . .
Proof and Hold . . . . . . . . . . . . . . . . . . . . . . . . . . . . . . . . . . . . . . . . . . . . . . . . . . . . . . . . . .
Using a PIN for Private Job and Stored Job. . . . . . . . . . . . . . . . . . . . . . . . . . . . . . . . . . . .
Private Job . . . . . . . . . . . . . . . . . . . . . . . . . . . . . . . . . . . . . . . . . . . . . . . . . . . . . . . . . . . . .
Stored Job . . . . . . . . . . . . . . . . . . . . . . . . . . . . . . . . . . . . . . . . . . . . . . . . . . . . . . . . . . . . .
Document identifiers used in Job Retention . . . . . . . . . . . . . . . . . . . . . . . . . . . . . . . . . . . . .
User Name . . . . . . . . . . . . . . . . . . . . . . . . . . . . . . . . . . . . . . . . . . . . . . . . . . . . . . . . . . . . .
Job Name . . . . . . . . . . . . . . . . . . . . . . . . . . . . . . . . . . . . . . . . . . . . . . . . . . . . . . . . . . . . . .
Using Job Retention options when printing. . . . . . . . . . . . . . . . . . . . . . . . . . . . . . . . . . . . . .
Releasing stored jobs at the printer . . . . . . . . . . . . . . . . . . . . . . . . . . . . . . . . . . . . . . . . . . .
Deleting a print job . . . . . . . . . . . . . . . . . . . . . . . . . . . . . . . . . . . . . . . . . . . . . . . . . . . . . . . .
Output Bin Options . . . . . . . . . . . . . . . . . . . . . . . . . . . . . . . . . . . . . . . . . . . . . . . . . . . . . . . .
Options . . . . . . . . . . . . . . . . . . . . . . . . . . . . . . . . . . . . . . . . . . . . . . . . . . . . . . . . . . . . . . . . .
Printer image. . . . . . . . . . . . . . . . . . . . . . . . . . . . . . . . . . . . . . . . . . . . . . . . . . . . . . . . . . . . .
Copies. . . . . . . . . . . . . . . . . . . . . . . . . . . . . . . . . . . . . . . . . . . . . . . . . . . . . . . . . . . . . . . . . .
Orientation . . . . . . . . . . . . . . . . . . . . . . . . . . . . . . . . . . . . . . . . . . . . . . . . . . . . . . . . . . . . . .
Image rotation versus stapling . . . . . . . . . . . . . . . . . . . . . . . . . . . . . . . . . . . . . . . . . . . . . .
About. . . . . . . . . . . . . . . . . . . . . . . . . . . . . . . . . . . . . . . . . . . . . . . . . . . . . . . . . . . . . . . . . . .
Driver extensions . . . . . . . . . . . . . . . . . . . . . . . . . . . . . . . . . . . . . . . . . . . . . . . . . . . . . . . . .
Paper handling options . . . . . . . . . . . . . . . . . . . . . . . . . . . . . . . . . . . . . . . . . . . . . . . . . . . .
Duplexing unit . . . . . . . . . . . . . . . . . . . . . . . . . . . . . . . . . . . . . . . . . . . . . . . . . . . . . . . . . . . .
Mopier enabled . . . . . . . . . . . . . . . . . . . . . . . . . . . . . . . . . . . . . . . . . . . . . . . . . . . . . . . . . . .
MFP Module . . . . . . . . . . . . . . . . . . . . . . . . . . . . . . . . . . . . . . . . . . . . . . . . . . . . . . . . . . . . .
Tray 1 installed . . . . . . . . . . . . . . . . . . . . . . . . . . . . . . . . . . . . . . . . . . . . . . . . . . . . . . . . . . .
Optional Paper Destinations . . . . . . . . . . . . . . . . . . . . . . . . . . . . . . . . . . . . . . . . . . . . . . . . .
Optional Paper Sources . . . . . . . . . . . . . . . . . . . . . . . . . . . . . . . . . . . . . . . . . . . . . . . . . . . .
Software Technical Reference
65
66
67
68
68
68
68
68
68
69
69
69
69
70
71
71
72
73
74
74
75
76
76
76
77
77
78
78
79
80
80
80
80
81
81
81
81
82
82
82
83
83
83
84
84
84
84
85
86
86
88
89
91
91
91
91
91
92
92
5
Other Options . . . . . . . . . . . . . . . . . . . . . . . . . . . . . . . . . . . . . . . . . . . . . . . . . . . . . . . . . . . . . 93
Storage. . . . . . . . . . . . . . . . . . . . . . . . . . . . . . . . . . . . . . . . . . . . . . . . . . . . . . . . . . . . . . . . . . 93
Printer Memory. . . . . . . . . . . . . . . . . . . . . . . . . . . . . . . . . . . . . . . . . . . . . . . . . . . . . . . . . . . . 93
Fonts . . . . . . . . . . . . . . . . . . . . . . . . . . . . . . . . . . . . . . . . . . . . . . . . . . . . . . . . . . . . . . . . . . . 94
Ignore Application Collation . . . . . . . . . . . . . . . . . . . . . . . . . . . . . . . . . . . . . . . . . . . . . . . . . . 95
Automatic Configuration . . . . . . . . . . . . . . . . . . . . . . . . . . . . . . . . . . . . . . . . . . . . . . . . . . . . . 96
Printer image . . . . . . . . . . . . . . . . . . . . . . . . . . . . . . . . . . . . . . . . . . . . . . . . . . . . . . . . . . . . . 96
Configuring the trays . . . . . . . . . . . . . . . . . . . . . . . . . . . . . . . . . . . . . . . . . . . . . . . . . . . . . . . 98
Windows PS driver features . . . . . . . . . . . . . . . . . . . . . . . . . . . . . . . . . . . . . . . . . . . . . . . . . . . . . . 99
PS 3 Emulation support for the HP LaserJet product . . . . . . . . . . . . . . . . . . . . . . . . . . . . . . . . 99
Page Setup tab features . . . . . . . . . . . . . . . . . . . . . . . . . . . . . . . . . . . . . . . . . . . . . . . . . . . 100
Advanced tab features . . . . . . . . . . . . . . . . . . . . . . . . . . . . . . . . . . . . . . . . . . . . . . . . . . . . 101
Job Retention tab features . . . . . . . . . . . . . . . . . . . . . . . . . . . . . . . . . . . . . . . . . . . . . . . . . . 102
Off . . . . . . . . . . . . . . . . . . . . . . . . . . . . . . . . . . . . . . . . . . . . . . . . . . . . . . . . . . . . . . . . . . . 102
Quick Copy . . . . . . . . . . . . . . . . . . . . . . . . . . . . . . . . . . . . . . . . . . . . . . . . . . . . . . . . . . . . 102
Proof and Hold. . . . . . . . . . . . . . . . . . . . . . . . . . . . . . . . . . . . . . . . . . . . . . . . . . . . . . . . . . 103
Private Job and Stored Job) . . . . . . . . . . . . . . . . . . . . . . . . . . . . . . . . . . . . . . . . . . . . . . . 103
PIN . . . . . . . . . . . . . . . . . . . . . . . . . . . . . . . . . . . . . . . . . . . . . . . . . . . . . . . . . . . . . . . . . 103
Private Job . . . . . . . . . . . . . . . . . . . . . . . . . . . . . . . . . . . . . . . . . . . . . . . . . . . . . . . . . . . 103
Stored Job. . . . . . . . . . . . . . . . . . . . . . . . . . . . . . . . . . . . . . . . . . . . . . . . . . . . . . . . . . . . 103
Device Settings tab features . . . . . . . . . . . . . . . . . . . . . . . . . . . . . . . . . . . . . . . . . . . . . . . . 104
HP LaserJet software CD-ROM . . . . . . . . . . . . . . . . . . . . . . . . . . . . . . . . . . . . . . . . . . . . . . . . . . . 105
In-box file layout . . . . . . . . . . . . . . . . . . . . . . . . . . . . . . . . . . . . . . . . . . . . . . . . . . . . . . . . . . . . 105
HP LaserJet software CD-ROM, Windows partition. . . . . . . . . . . . . . . . . . . . . . . . . . . . . . . 105
Directory structure . . . . . . . . . . . . . . . . . . . . . . . . . . . . . . . . . . . . . . . . . . . . . . . . . . . . . . . 105
HP LaserJet software CD-ROM, Macintosh Partition. . . . . . . . . . . . . . . . . . . . . . . . . . . . . . 105
Availability and fulfillment . . . . . . . . . . . . . . . . . . . . . . . . . . . . . . . . . . . . . . . . . . . . . . . . . . . . . 105
In-box CD-ROMs . . . . . . . . . . . . . . . . . . . . . . . . . . . . . . . . . . . . . . . . . . . . . . . . . . . . . . . . . 105
9000mfp Web ordering . . . . . . . . . . . . . . . . . . . . . . . . . . . . . . . . . . . . . . . . . . . . . . . . . . . 106
Web deployment . . . . . . . . . . . . . . . . . . . . . . . . . . . . . . . . . . . . . . . . . . . . . . . . . . . . . . . . . 106
Printing-system software . . . . . . . . . . . . . . . . . . . . . . . . . . . . . . . . . . . . . . . . . . . . . . . . . . 107
Printer firmware . . . . . . . . . . . . . . . . . . . . . . . . . . . . . . . . . . . . . . . . . . . . . . . . . . . . . . . . . 107
Standalone drivers. . . . . . . . . . . . . . . . . . . . . . . . . . . . . . . . . . . . . . . . . . . . . . . . . . . . . . . 107
Operating system driver bundles . . . . . . . . . . . . . . . . . . . . . . . . . . . . . . . . . . . . . . . . . . . . 107
Point-and-print bundles . . . . . . . . . . . . . . . . . . . . . . . . . . . . . . . . . . . . . . . . . . . . . . . . . . . 107
Other operating systems . . . . . . . . . . . . . . . . . . . . . . . . . . . . . . . . . . . . . . . . . . . . . . . . . . 107
Software component availability. . . . . . . . . . . . . . . . . . . . . . . . . . . . . . . . . . . . . . . . . . . . . . 108
Software component localization . . . . . . . . . . . . . . . . . . . . . . . . . . . . . . . . . . . . . . . . . . . . . 109
4 Installing Windows printing system components
Introduction. . . . . . . . . . . . . . . . . . . . . . . . . . . . . . . . . . . . . . . . . . . . . . . . . . . . . . . . . . . . . . . . . . . 113
System Requirements . . . . . . . . . . . . . . . . . . . . . . . . . . . . . . . . . . . . . . . . . . . . . . . . . . . . . . . . . . 113
Windows 3.1x. . . . . . . . . . . . . . . . . . . . . . . . . . . . . . . . . . . . . . . . . . . . . . . . . . . . . . . . . . . . . . 113
Windows 95, 98, Me, NT 4.0, 2000, and XP . . . . . . . . . . . . . . . . . . . . . . . . . . . . . . . . . . . . . . 113
Windows 95, 98, Me, NT 4.0, 2000, and XP . . . . . . . . . . . . . . . . . . . . . . . . . . . . . . . . . . . . . . . . . 114
Font support . . . . . . . . . . . . . . . . . . . . . . . . . . . . . . . . . . . . . . . . . . . . . . . . . . . . . . . . . . . . . . . 114
Basic fonts . . . . . . . . . . . . . . . . . . . . . . . . . . . . . . . . . . . . . . . . . . . . . . . . . . . . . . . . . . . . . . 114
Default Fonts . . . . . . . . . . . . . . . . . . . . . . . . . . . . . . . . . . . . . . . . . . . . . . . . . . . . . . . . . . . . 114
Installation instructions. . . . . . . . . . . . . . . . . . . . . . . . . . . . . . . . . . . . . . . . . . . . . . . . . . . . . . . 119
General installation for Windows 95, 98, Me, NT 4.0, 2000, and XP OSs . . . . . . . . . . . . . . 119
Installing from the printing system CD-ROM . . . . . . . . . . . . . . . . . . . . . . . . . . . . . . . . . . . 119
Installing from a network or from downloaded files . . . . . . . . . . . . . . . . . . . . . . . . . . . . . . 119
Detailed Windows installation . . . . . . . . . . . . . . . . . . . . . . . . . . . . . . . . . . . . . . . . . . . . . . . . . 119
Typical Installation dialog box sequence . . . . . . . . . . . . . . . . . . . . . . . . . . . . . . . . . . . . . . . 120
Custom installation . . . . . . . . . . . . . . . . . . . . . . . . . . . . . . . . . . . . . . . . . . . . . . . . . . . . . . . . 141
Product registration (HP WebReg) . . . . . . . . . . . . . . . . . . . . . . . . . . . . . . . . . . . . . . . . . . . 143
Customization Utility for Windows . . . . . . . . . . . . . . . . . . . . . . . . . . . . . . . . . . . . . . . . . . . . 153
Silent installer . . . . . . . . . . . . . . . . . . . . . . . . . . . . . . . . . . . . . . . . . . . . . . . . . . . . . . . . . . 154
6
Software Technical Reference
Customized silent installer . . . . . . . . . . . . . . . . . . . . . . . . . . . . . . . . . . . . . . . . . . . . . . . .
Command-line silent install . . . . . . . . . . . . . . . . . . . . . . . . . . . . . . . . . . . . . . . . . . . . . . .
Driver-only installation. . . . . . . . . . . . . . . . . . . . . . . . . . . . . . . . . . . . . . . . . . . . . . . . . . . . .
Point and Print installation for Windows 95, 98, Me, NT 4.0, 2000, and XP . . . . . . . . . . . .
Setting a default printer. . . . . . . . . . . . . . . . . . . . . . . . . . . . . . . . . . . . . . . . . . . . . . . . . . . . . .
Windows 3.1x . . . . . . . . . . . . . . . . . . . . . . . . . . . . . . . . . . . . . . . . . . . . . . . . . . . . . . . . . . . . . . . .
Printer support . . . . . . . . . . . . . . . . . . . . . . . . . . . . . . . . . . . . . . . . . . . . . . . . . . . . . . . . . . . .
Installing printer drivers on Windows 3.1x . . . . . . . . . . . . . . . . . . . . . . . . . . . . . . . . . . . . . . .
154
154
155
156
157
157
157
157
5 Installation and removal for
non-Windows operating systems
Introduction . . . . . . . . . . . . . . . . . . . . . . . . . . . . . . . . . . . . . . . . . . . . . . . . . . . . . . . . . . . . . . . . . .
System Requirements . . . . . . . . . . . . . . . . . . . . . . . . . . . . . . . . . . . . . . . . . . . . . . . . . . . . . . . . . .
Macintosh . . . . . . . . . . . . . . . . . . . . . . . . . . . . . . . . . . . . . . . . . . . . . . . . . . . . . . . . . . . . . . . .
IBM OS/2 . . . . . . . . . . . . . . . . . . . . . . . . . . . . . . . . . . . . . . . . . . . . . . . . . . . . . . . . . . . . . . . .
Macintosh . . . . . . . . . . . . . . . . . . . . . . . . . . . . . . . . . . . . . . . . . . . . . . . . . . . . . . . . . . . . . . . . . . .
Macintosh component descriptions. . . . . . . . . . . . . . . . . . . . . . . . . . . . . . . . . . . . . . . . . . . . .
HP LaserJet PPDs . . . . . . . . . . . . . . . . . . . . . . . . . . . . . . . . . . . . . . . . . . . . . . . . . . . . . . .
PDEs (Mac OS X) . . . . . . . . . . . . . . . . . . . . . . . . . . . . . . . . . . . . . . . . . . . . . . . . . . . . . . . .
HP LaserJet Utility . . . . . . . . . . . . . . . . . . . . . . . . . . . . . . . . . . . . . . . . . . . . . . . . . . . . . . .
Installation notes . . . . . . . . . . . . . . . . . . . . . . . . . . . . . . . . . . . . . . . . . . . . . . . . . . . . . . . . .
Online Help . . . . . . . . . . . . . . . . . . . . . . . . . . . . . . . . . . . . . . . . . . . . . . . . . . . . . . . . . . . . .
HP Auto Setup Utility . . . . . . . . . . . . . . . . . . . . . . . . . . . . . . . . . . . . . . . . . . . . . . . . . . . . .
Screen fonts . . . . . . . . . . . . . . . . . . . . . . . . . . . . . . . . . . . . . . . . . . . . . . . . . . . . . . . . . . . .
Font support . . . . . . . . . . . . . . . . . . . . . . . . . . . . . . . . . . . . . . . . . . . . . . . . . . . . . . . . . . .
Installing the Macintosh printing system . . . . . . . . . . . . . . . . . . . . . . . . . . . . . . . . . . . . . . . . .
To install the HP LaserJet printer software for Macintosh OS . . . . . . . . . . . . . . . . . . . . . . . .
Uninstalling the Macintosh printing system. . . . . . . . . . . . . . . . . . . . . . . . . . . . . . . . . . . . . . .
In-box disk layout . . . . . . . . . . . . . . . . . . . . . . . . . . . . . . . . . . . . . . . . . . . . . . . . . . . . . . . .
Folders and files added through installation of the HP LaserJet software (Macintosh OS) . .
Macintosh (Macintosh OS) installation . . . . . . . . . . . . . . . . . . . . . . . . . . . . . . . . . . . . . . . . . .
Main Install dialog box sequence . . . . . . . . . . . . . . . . . . . . . . . . . . . . . . . . . . . . . . . . . . . .
Printer setup using AppleTalk Chooser . . . . . . . . . . . . . . . . . . . . . . . . . . . . . . . . . . . . . . .
HP LaserJet Screen Fonts Installer dialog box sequence . . . . . . . . . . . . . . . . . . . . . . . . .
IBM OS/2 Warp 3.0 and greater . . . . . . . . . . . . . . . . . . . . . . . . . . . . . . . . . . . . . . . . . . . . . . . . . .
OS/2 installation instructions. . . . . . . . . . . . . . . . . . . . . . . . . . . . . . . . . . . . . . . . . . . . . . . . . .
Installing a printer in OS/2 when printer object is missing . . . . . . . . . . . . . . . . . . . . . . . . .
Installing a printer in OS/2 with pre-existing printer object on desktop . . . . . . . . . . . . . . . .
Font support . . . . . . . . . . . . . . . . . . . . . . . . . . . . . . . . . . . . . . . . . . . . . . . . . . . . . . . . . . . . . .
Changing a printer driver in the printer object. . . . . . . . . . . . . . . . . . . . . . . . . . . . . . . . . . . . .
Changing the printer properties . . . . . . . . . . . . . . . . . . . . . . . . . . . . . . . . . . . . . . . . . . . . . . .
Changing the job properties . . . . . . . . . . . . . . . . . . . . . . . . . . . . . . . . . . . . . . . . . . . . . . . . . .
159
159
159
159
159
159
160
160
160
160
160
160
160
161
163
164
164
164
164
165
165
170
171
173
173
173
174
175
176
176
177
6 Engineering Detail
Introduction . . . . . . . . . . . . . . . . . . . . . . . . . . . . . . . . . . . . . . . . . . . . . . . . . . . . . . . . . . . . . . . . . .
Digital Sending Config Applet . . . . . . . . . . . . . . . . . . . . . . . . . . . . . . . . . . . . . . . . . . . . . . . . . . . .
General tab . . . . . . . . . . . . . . . . . . . . . . . . . . . . . . . . . . . . . . . . . . . . . . . . . . . . . . . . . . . . . . .
Send to E-mail tab . . . . . . . . . . . . . . . . . . . . . . . . . . . . . . . . . . . . . . . . . . . . . . . . . . . . . . . . .
Advanced E-mail Settings. . . . . . . . . . . . . . . . . . . . . . . . . . . . . . . . . . . . . . . . . . . . . . . . . .
Addressing tab . . . . . . . . . . . . . . . . . . . . . . . . . . . . . . . . . . . . . . . . . . . . . . . . . . . . . . . . . . . .
Advanced Network Addressing Settings . . . . . . . . . . . . . . . . . . . . . . . . . . . . . . . . . . . . . . .
Preferences tab. . . . . . . . . . . . . . . . . . . . . . . . . . . . . . . . . . . . . . . . . . . . . . . . . . . . . . . . . . . .
Log tab . . . . . . . . . . . . . . . . . . . . . . . . . . . . . . . . . . . . . . . . . . . . . . . . . . . . . . . . . . . . . . . . . .
About tab. . . . . . . . . . . . . . . . . . . . . . . . . . . . . . . . . . . . . . . . . . . . . . . . . . . . . . . . . . . . . . . . .
E-mail Servers That Function as SMTP Gateways. . . . . . . . . . . . . . . . . . . . . . . . . . . . . . . . .
Exchange 5.5 . . . . . . . . . . . . . . . . . . . . . . . . . . . . . . . . . . . . . . . . . . . . . . . . . . . . . . . . . . .
Exchange 2000 . . . . . . . . . . . . . . . . . . . . . . . . . . . . . . . . . . . . . . . . . . . . . . . . . . . . . . . . . .
Software Technical Reference
179
179
180
181
182
183
185
186
187
188
188
188
188
7
Sendmail . . . . . . . . . . . . . . . . . . . . . . . . . . . . . . . . . . . . . . . . . . . . . . . . . . . . . . . . . . . . . . . 188
Qmail . . . . . . . . . . . . . . . . . . . . . . . . . . . . . . . . . . . . . . . . . . . . . . . . . . . . . . . . . . . . . . . . . . 189
Lotus Domino (Notes) . . . . . . . . . . . . . . . . . . . . . . . . . . . . . . . . . . . . . . . . . . . . . . . . . . . . . 189
SMTP Gateway Verification . . . . . . . . . . . . . . . . . . . . . . . . . . . . . . . . . . . . . . . . . . . . . . . . . . . 189
Telnet to Port 25. . . . . . . . . . . . . . . . . . . . . . . . . . . . . . . . . . . . . . . . . . . . . . . . . . . . . . . . . . 189
Procedure. . . . . . . . . . . . . . . . . . . . . . . . . . . . . . . . . . . . . . . . . . . . . . . . . . . . . . . . . . . . . . . 189
Lightweight Directory Access Protocol. . . . . . . . . . . . . . . . . . . . . . . . . . . . . . . . . . . . . . . . . . . 190
Common Abbreviations for LDAP Attributes . . . . . . . . . . . . . . . . . . . . . . . . . . . . . . . . . . . . 190
E-mail Servers that support LDAP . . . . . . . . . . . . . . . . . . . . . . . . . . . . . . . . . . . . . . . . . . . . 190
Media attributes . . . . . . . . . . . . . . . . . . . . . . . . . . . . . . . . . . . . . . . . . . . . . . . . . . . . . . . . . . . . . . . 190
Paper-source commands . . . . . . . . . . . . . . . . . . . . . . . . . . . . . . . . . . . . . . . . . . . . . . . . . . . . . 190
Media types and sizes . . . . . . . . . . . . . . . . . . . . . . . . . . . . . . . . . . . . . . . . . . . . . . . . . . . . . . . 191
PCL 5e and PCL 6 custom paper sizes . . . . . . . . . . . . . . . . . . . . . . . . . . . . . . . . . . . . . . . . . . 195
Paper Type commands . . . . . . . . . . . . . . . . . . . . . . . . . . . . . . . . . . . . . . . . . . . . . . . . . . . . . . 197
Printer Status and Alerts. . . . . . . . . . . . . . . . . . . . . . . . . . . . . . . . . . . . . . . . . . . . . . . . . . . . . . . . . 198
HP product models and drivers that support Printer Status and Alerts . . . . . . . . . . . . . . . . . . 198
8
Software Technical Reference
List of tables
Table 1. Bidirectional communication support in various operating systems . . . . . . . . . . . . . . . . 18
Table 2. Default alerts selection state for connection type . . . . . . . . . . . . . . . . . . . . . . . . . . . . . . . 25
Table 3. Update messages . . . . . . . . . . . . . . . . . . . . . . . . . . . . . . . . . . . . . . . . . . . . . . . . . . . . . . 29
Table 4. Troubleshooting a firmware update . . . . . . . . . . . . . . . . . . . . . . . . . . . . . . . . . . . . . . . . . 30
Table 5. Troubleshooting a firmware update failure . . . . . . . . . . . . . . . . . . . . . . . . . . . . . . . . . . . . 30
Table 6. Page orientation . . . . . . . . . . . . . . . . . . . . . . . . . . . . . . . . . . . . . . . . . . . . . . . . . . . . . . . . 53
Table 7. Selected paper size . . . . . . . . . . . . . . . . . . . . . . . . . . . . . . . . . . . . . . . . . . . . . . . . . . . . . 54
Table 8. HP LaserJet 9000mfp EconoMode settings . . . . . . . . . . . . . . . . . . . . . . . . . . . . . . . . . . 63
Table 9. Name drop-down menu text strings . . . . . . . . . . . . . . . . . . . . . . . . . . . . . . . . . . . . . . . . 75
Table 10. Custom width and height limits for the HP LaserJet 9000mfp . . . . . . . . . . . . . . . . . . . . 76
Table 11. Close dialog box text strings . . . . . . . . . . . . . . . . . . . . . . . . . . . . . . . . . . . . . . . . . . . . . 77
Table 12. Long edge stapling . . . . . . . . . . . . . . . . . . . . . . . . . . . . . . . . . . . . . . . . . . . . . . . . . . . . . 87
Table 13. Short edge stapling . . . . . . . . . . . . . . . . . . . . . . . . . . . . . . . . . . . . . . . . . . . . . . . . . . . . 88
Table 14. Printer behavior with Ignore Application Collation settings . . . . . . . . . . . . . . . . . . . . . . 95
Table 15. CD-ROM versions . . . . . . . . . . . . . . . . . . . . . . . . . . . . . . . . . . . . . . . . . . . . . . . . . . . . 106
Table 16. Software component availability for HP LaserJet 9000 product . . . . . . . . . . . . . . . . . . 108
Table 17. Software component localization . . . . . . . . . . . . . . . . . . . . . . . . . . . . . . . . . . . . . . . . . 109
Table 18. Default Fonts . . . . . . . . . . . . . . . . . . . . . . . . . . . . . . . . . . . . . . . . . . . . . . . . . . . . . . . . 114
Table 19. Additional PS 3 fonts . . . . . . . . . . . . . . . . . . . . . . . . . . . . . . . . . . . . . . . . . . . . . . . . . . 116
Table 20. Choose Setup Language dialog box text strings . . . . . . . . . . . . . . . . . . . . . . . . . . . . . 120
Table 21. Setup dialog box text strings . . . . . . . . . . . . . . . . . . . . . . . . . . . . . . . . . . . . . . . . . . . . 121
Table 22. Welcome dialog box text strings . . . . . . . . . . . . . . . . . . . . . . . . . . . . . . . . . . . . . . . . . . 122
Table 23. HP Software License Agreement dialog box text strings . . . . . . . . . . . . . . . . . . . . . . . 123
Table 24. Web Update dialog box text strings . . . . . . . . . . . . . . . . . . . . . . . . . . . . . . . . . . . . . . . 124
Table 25. Type of Connection dialog box text strings . . . . . . . . . . . . . . . . . . . . . . . . . . . . . . . . . 125
Table 26. Select Port dialog box text strings . . . . . . . . . . . . . . . . . . . . . . . . . . . . . . . . . . . . . . . . 126
Table 27. Network Setup dialog box text strings . . . . . . . . . . . . . . . . . . . . . . . . . . . . . . . . . . . . . 128
Table 28. Network Printer Configuration dialog box text strings . . . . . . . . . . . . . . . . . . . . . . . . . 129
Table 29. Identify Printer dialog box text strings . . . . . . . . . . . . . . . . . . . . . . . . . . . . . . . . . . . . . 131
Table 30. Specify Network Path dialog box text strings . . . . . . . . . . . . . . . . . . . . . . . . . . . . . . . . 132
Table 31. Set Network Communication Mode dialog box text strings . . . . . . . . . . . . . . . . . . . . . 133
Table 32. Printer Model dialog box text strings . . . . . . . . . . . . . . . . . . . . . . . . . . . . . . . . . . . . . . 134
Table 33. Installation Type dialog box text strings . . . . . . . . . . . . . . . . . . . . . . . . . . . . . . . . . . . . 136
Table 34. Printer Name dialog box text strings . . . . . . . . . . . . . . . . . . . . . . . . . . . . . . . . . . . . . . 137
Table 35. Printer Sharing dialog box text strings . . . . . . . . . . . . . . . . . . . . . . . . . . . . . . . . . . . . . 139
Table 36. Finish dialog box text strings . . . . . . . . . . . . . . . . . . . . . . . . . . . . . . . . . . . . . . . . . . . . 140
Table 37. Exit Setup dialog box text strings . . . . . . . . . . . . . . . . . . . . . . . . . . . . . . . . . . . . . . . . . 141
Table 38. Custom Installation dialog box text strings . . . . . . . . . . . . . . . . . . . . . . . . . . . . . . . . . . 143
Table 39. Hewlett-Packard’s Electronic Registration text strings . . . . . . . . . . . . . . . . . . . . . . . . . 145
Table 40. Welcome to Hewlett-Packard’s Registration dialog box text strings . . . . . . . . . . . . . . 146
Table 41. Hewlett-Packard’s Electronic Registration dialog box text strings (1 of 3) . . . . . . . . . . 148
Table 42. Hewlett-Packard’s Electronic Registration dialog box text strings (2 of 3) . . . . . . . . . . 150
Table 43. Hewlett-Packard’s Electronic Registration dialog box text strings (3 of 3) . . . . . . . . . . 151
Table 44. Exiting registration text strings . . . . . . . . . . . . . . . . . . . . . . . . . . . . . . . . . . . . . . . . . . . 153
Table 45. Windows servers with Windows clients . . . . . . . . . . . . . . . . . . . . . . . . . . . . . . . . . . . . 156
Table 46. hp LaserJet for Macintosh installer splash screen dialog box text strings . . . . . . . . . . 165
Table 47. HP LaserJet Installer dialog text strings (easy install) . . . . . . . . . . . . . . . . . . . . . . . . . 166
Table 48. HP LaserJet Installer dialog text strings (custom install) . . . . . . . . . . . . . . . . . . . . . . . 168
Table 49. Installing dialog text strings . . . . . . . . . . . . . . . . . . . . . . . . . . . . . . . . . . . . . . . . . . . . . 169
Software Technical Reference
9
Table 50. Installation successful dialog text strings . . . . . . . . . . . . . . . . . . . . . . . . . . . . . . . . . . . . 169
Table 51. Important! dialog box text strings . . . . . . . . . . . . . . . . . . . . . . . . . . . . . . . . . . . . . . . . . . 170
Table 52. How do I select my printer? dialog text strings . . . . . . . . . . . . . . . . . . . . . . . . . . . . . . . 171
Table 53. HP LaserJet Screen Fonts splash screen dialog text strings . . . . . . . . . . . . . . . . . . . . 171
Table 54. HP LaserJet Screen Fonts installer dialog text strings (1 of 2) . . . . . . . . . . . . . . . . . . . 172
Table 55. HP LaserJet Screen Fonts installer dialog text strings (2 of 2) . . . . . . . . . . . . . . . . . . . 172
Table 56. Installation was successful dialog text strings . . . . . . . . . . . . . . . . . . . . . . . . . . . . . . . . 173
Table 57. Paper source commands for the HP LaserJet 9000mfp product . . . . . . . . . . . . . . . . . . 191
Table 58. Supported features and attributes . . . . . . . . . . . . . . . . . . . . . . . . . . . . . . . . . . . . . . . . . 191
Table 59. Input-device supported sizes for the HP LaserJet 9000mfp product . . . . . . . . . . . . . . . 192
Table 60. Supported media sizes — duplexing unit, 3000-Sheet Stacker,
and 3000-Sheet Stapler/Stacker . . . . . . . . . . . . . . . . . . . . . . . . . . . . . . . . . . . . . 193
Table 61. Supported media sizes — HP Multifunction Finisher . . . . . . . . . . . . . . . . . . . . . . . . . 194
Table 62. PCL 5e and PCL 6 custom paper sizes . . . . . . . . . . . . . . . . . . . . . . . . . . . . . . . . . . . . . 195
Table 63. Input-device supported media . . . . . . . . . . . . . . . . . . . . . . . . . . . . . . . . . . . . . . . . . . . . 196
Table 64. Output-device supported media . . . . . . . . . . . . . . . . . . . . . . . . . . . . . . . . . . . . . . . . . . 196
Table 65. HP Multifunction Finisher supported media . . . . . . . . . . . . . . . . . . . . . . . . . . . . . . . . . . 197
Table 66. Paper-type commands . . . . . . . . . . . . . . . . . . . . . . . . . . . . . . . . . . . . . . . . . . . . . . . . . 197
Table 67. Printer Status and Alert driver support . . . . . . . . . . . . . . . . . . . . . . . . . . . . . . . . . . . . . 198
10
List of tables
Software Technical Reference
List of figures
Figure 1. Printer Status and Alert icons. . . . . . . . . . . . . . . . . . . . . . . . . . . . . . . . . . . . . . . . . . . . . 22
Figure 2. Printer Status and Alert window . . . . . . . . . . . . . . . . . . . . . . . . . . . . . . . . . . . . . . . . . . . 23
Figure 3. Refresh Rate option . . . . . . . . . . . . . . . . . . . . . . . . . . . . . . . . . . . . . . . . . . . . . . . . . . . . 24
Figure 4. Documents Alert option . . . . . . . . . . . . . . . . . . . . . . . . . . . . . . . . . . . . . . . . . . . . . . . . . 25
Figure 5. Device Status . . . . . . . . . . . . . . . . . . . . . . . . . . . . . . . . . . . . . . . . . . . . . . . . . . . . . . . . . 32
Figure 6. Configuration page. . . . . . . . . . . . . . . . . . . . . . . . . . . . . . . . . . . . . . . . . . . . . . . . . . . . . 33
Figure 7. Configure Device . . . . . . . . . . . . . . . . . . . . . . . . . . . . . . . . . . . . . . . . . . . . . . . . . . . . . . 34
Figure 8. Networking tab . . . . . . . . . . . . . . . . . . . . . . . . . . . . . . . . . . . . . . . . . . . . . . . . . . . . . . . . 36
Figure 9. Configurable Alerts. . . . . . . . . . . . . . . . . . . . . . . . . . . . . . . . . . . . . . . . . . . . . . . . . . . . . 37
Figure 10. Installation CD browser main screen . . . . . . . . . . . . . . . . . . . . . . . . . . . . . . . . . . . . . . 41
Figure 11. A typical constraint message with an OK button . . . . . . . . . . . . . . . . . . . . . . . . . . . . . 48
Figure 12. A property page with Bubble Help icons . . . . . . . . . . . . . . . . . . . . . . . . . . . . . . . . . . . 49
Figure 13. The default appearance of the Finishing tab . . . . . . . . . . . . . . . . . . . . . . . . . . . . . . . . 50
Figure 14. Document Options group box - stapler only installed. . . . . . . . . . . . . . . . . . . . . . . . . . 52
Figure 15. Document Options group box - duplexing unit only installed . . . . . . . . . . . . . . . . . . . . 52
Figure 16. The Document Options group box - stapler and duplexing unit . . . . . . . . . . . . . . . . . . 53
Figure 17. Activating booklet printing . . . . . . . . . . . . . . . . . . . . . . . . . . . . . . . . . . . . . . . . . . . . . . 55
Figure 18. Selecting booklet printing type . . . . . . . . . . . . . . . . . . . . . . . . . . . . . . . . . . . . . . . . . . . 56
Figure 19. Stapling a document . . . . . . . . . . . . . . . . . . . . . . . . . . . . . . . . . . . . . . . . . . . . . . . . . . 57
Figure 20. Stapling options . . . . . . . . . . . . . . . . . . . . . . . . . . . . . . . . . . . . . . . . . . . . . . . . . . . . . . 58
Figure 21. Saddle-stitching a booklet . . . . . . . . . . . . . . . . . . . . . . . . . . . . . . . . . . . . . . . . . . . . . . 59
Figure 22. Page-order preview images . . . . . . . . . . . . . . . . . . . . . . . . . . . . . . . . . . . . . . . . . . . . . 60
Figure 23. Print Quality Details dialog box showing Best Quality settings . . . . . . . . . . . . . . . . . . 61
Figure 24. Print Quality Details dialog box showing 600 dpi settings . . . . . . . . . . . . . . . . . . . . . . 62
Figure 25. Effects tab . . . . . . . . . . . . . . . . . . . . . . . . . . . . . . . . . . . . . . . . . . . . . . . . . . . . . . . . . . 64
Figure 26. Preview images - Legal on Letter; Scale to Fit off (left) and on (right) . . . . . . . . . . . . . 65
Figure 27. Watermark Details dialog box . . . . . . . . . . . . . . . . . . . . . . . . . . . . . . . . . . . . . . . . . . . 67
Figure 28. Paper tab . . . . . . . . . . . . . . . . . . . . . . . . . . . . . . . . . . . . . . . . . . . . . . . . . . . . . . . . . . . 70
Figure 29. Other Pages mini-tab . . . . . . . . . . . . . . . . . . . . . . . . . . . . . . . . . . . . . . . . . . . . . . . . . . 71
Figure 30. Back Cover mini-tab. . . . . . . . . . . . . . . . . . . . . . . . . . . . . . . . . . . . . . . . . . . . . . . . . . . 72
Figure 31. Custom Paper Size dialog box. . . . . . . . . . . . . . . . . . . . . . . . . . . . . . . . . . . . . . . . . . . 73
Figure 32. Destination tab . . . . . . . . . . . . . . . . . . . . . . . . . . . . . . . . . . . . . . . . . . . . . . . . . . . . . . . 79
Figure 33. Basics tab. . . . . . . . . . . . . . . . . . . . . . . . . . . . . . . . . . . . . . . . . . . . . . . . . . . . . . . . . . . 85
Figure 34. About This Driver dialog box . . . . . . . . . . . . . . . . . . . . . . . . . . . . . . . . . . . . . . . . . . . . 89
Figure 35. Configure tab . . . . . . . . . . . . . . . . . . . . . . . . . . . . . . . . . . . . . . . . . . . . . . . . . . . . . . . . 90
Figure 36. More Configuration Options dialog box . . . . . . . . . . . . . . . . . . . . . . . . . . . . . . . . . . . . 93
Figure 37. Configure Font DIMMs dialog box . . . . . . . . . . . . . . . . . . . . . . . . . . . . . . . . . . . . . . . . 94
Figure 38. Driver NT Forms tab. . . . . . . . . . . . . . . . . . . . . . . . . . . . . . . . . . . . . . . . . . . . . . . . . . . 97
Figure 39. Page Setup tab . . . . . . . . . . . . . . . . . . . . . . . . . . . . . . . . . . . . . . . . . . . . . . . . . . . . . 100
Figure 40. Advanced tab . . . . . . . . . . . . . . . . . . . . . . . . . . . . . . . . . . . . . . . . . . . . . . . . . . . . . . . 101
Figure 41. Job Retention tab . . . . . . . . . . . . . . . . . . . . . . . . . . . . . . . . . . . . . . . . . . . . . . . . . . . . 102
Figure 42. Device Settings tab . . . . . . . . . . . . . . . . . . . . . . . . . . . . . . . . . . . . . . . . . . . . . . . . . . 104
Figure 43. Choose Setup Language dialog box . . . . . . . . . . . . . . . . . . . . . . . . . . . . . . . . . . . . . 120
Figure 44. Setup dialog box . . . . . . . . . . . . . . . . . . . . . . . . . . . . . . . . . . . . . . . . . . . . . . . . . . . . 121
Figure 45. Welcome dialog box. . . . . . . . . . . . . . . . . . . . . . . . . . . . . . . . . . . . . . . . . . . . . . . . . . 121
Figure 46. HP Software License Agreement dialog box . . . . . . . . . . . . . . . . . . . . . . . . . . . . . . . 122
Figure 47. Web Update dialog box . . . . . . . . . . . . . . . . . . . . . . . . . . . . . . . . . . . . . . . . . . . . . . . 123
Figure 48. Type of Connection dialog box. . . . . . . . . . . . . . . . . . . . . . . . . . . . . . . . . . . . . . . . . . 125
Figure 49. Select Port dialog box . . . . . . . . . . . . . . . . . . . . . . . . . . . . . . . . . . . . . . . . . . . . . . . . 126
Software Technical Reference
11
Figure 50.
Figure 51.
Figure 52.
Figure 53.
Figure 54.
Figure 55.
Figure 56.
Figure 57.
Figure 58.
Figure 59.
Figure 60.
Figure 61.
Figure 62.
Figure 63.
Figure 64.
Figure 65.
Figure 66.
Figure 67.
Figure 68.
Figure 69.
Figure 70.
Figure 71.
Figure 72.
Figure 73.
Figure 74.
Figure 75.
Figure 76.
Figure 77.
Figure 78.
Figure 79.
Figure 80.
Figure 81.
Figure 82.
Figure 83.
Figure 84.
Figure 85.
Figure 86.
12
List of figures
Network Setup dialog box . . . . . . . . . . . . . . . . . . . . . . . . . . . . . . . . . . . . . . . . . . . . . . 127
Network Printer Configuration dialog box . . . . . . . . . . . . . . . . . . . . . . . . . . . . . . . . . . 129
Identify Printer dialog box (1 of 2) . . . . . . . . . . . . . . . . . . . . . . . . . . . . . . . . . . . . . . . . 130
Identify Printer dialog box (2 of 2) . . . . . . . . . . . . . . . . . . . . . . . . . . . . . . . . . . . . . . . . 130
Specify Network Path dialog box. . . . . . . . . . . . . . . . . . . . . . . . . . . . . . . . . . . . . . . . . 132
Set Network Communication Mode dialog box . . . . . . . . . . . . . . . . . . . . . . . . . . . . . . 133
Printer Model dialog box . . . . . . . . . . . . . . . . . . . . . . . . . . . . . . . . . . . . . . . . . . . . . . . 134
Installation Type dialog box . . . . . . . . . . . . . . . . . . . . . . . . . . . . . . . . . . . . . . . . . . . . . 135
Printer Name dialog box . . . . . . . . . . . . . . . . . . . . . . . . . . . . . . . . . . . . . . . . . . . . . . . 137
Printer Sharing dialog box . . . . . . . . . . . . . . . . . . . . . . . . . . . . . . . . . . . . . . . . . . . . . . 138
Finish dialog box . . . . . . . . . . . . . . . . . . . . . . . . . . . . . . . . . . . . . . . . . . . . . . . . . . . . . 140
Exit Setup dialog box. . . . . . . . . . . . . . . . . . . . . . . . . . . . . . . . . . . . . . . . . . . . . . . . . . 141
Components dialog box, Custom Installation . . . . . . . . . . . . . . . . . . . . . . . . . . . . . . . 142
Hewlett-Packard’s Electronic Registration dialog box . . . . . . . . . . . . . . . . . . . . . . . . . 144
Welcome to Hewlett-Packard’s Registration dialog box . . . . . . . . . . . . . . . . . . . . . . . 146
Hewlett-Packard’s Electronic Registration dialog box (1 of 3). . . . . . . . . . . . . . . . . . . 147
Hewlett-Packard’s Electronic Registration dialog box (2 of 3). . . . . . . . . . . . . . . . . . . 149
Hewlett-Packard’s Electronic Registration dialog box (3 of 3). . . . . . . . . . . . . . . . . . . 151
Exiting registration! dialog box . . . . . . . . . . . . . . . . . . . . . . . . . . . . . . . . . . . . . . . . . . 152
hp LaserJet for Macintosh installer splash screen dialog box . . . . . . . . . . . . . . . . . . . 165
HP LaserJet Installer dialog box (easy install) . . . . . . . . . . . . . . . . . . . . . . . . . . . . . . 166
HP LaserJet Installer dialog box (custom install) . . . . . . . . . . . . . . . . . . . . . . . . . . . . 167
Installing dialog box . . . . . . . . . . . . . . . . . . . . . . . . . . . . . . . . . . . . . . . . . . . . . . . . . . . 169
Installation was successful dialog box. . . . . . . . . . . . . . . . . . . . . . . . . . . . . . . . . . . . . 169
Important! dialog box. . . . . . . . . . . . . . . . . . . . . . . . . . . . . . . . . . . . . . . . . . . . . . . . . . 170
How do I select my printer? dialog box . . . . . . . . . . . . . . . . . . . . . . . . . . . . . . . . . . . . 170
HP LaserJet Screen Fonts splash screen dialog box . . . . . . . . . . . . . . . . . . . . . . . . . 171
HP LaserJet Screen Fonts installer dialog box . . . . . . . . . . . . . . . . . . . . . . . . . . . . . . 172
Installation was successful dialog box. . . . . . . . . . . . . . . . . . . . . . . . . . . . . . . . . . . . . 173
Digital Sending Config Applet — General tab . . . . . . . . . . . . . . . . . . . . . . . . . . . . . . . 180
Digital Sending Config Applet — Send to E-mail tab . . . . . . . . . . . . . . . . . . . . . . . . . 181
Digital Sending Config Applet - Advanced E-mail Settings . . . . . . . . . . . . . . . . . . . . . 182
Digital Sending Config Applet — Addressing tab . . . . . . . . . . . . . . . . . . . . . . . . . . . . 183
Digital Sending Config Applet - Advanced Network Addressing Settings . . . . . . . . . . 185
Digital Sending Config Applet — Preferences tab. . . . . . . . . . . . . . . . . . . . . . . . . . . . 186
Digital Sending Config Applet — the Log tab . . . . . . . . . . . . . . . . . . . . . . . . . . . . . . . 187
Digital Sending Config Applet — The About tab . . . . . . . . . . . . . . . . . . . . . . . . . . . . . 188
Software Technical Reference
1
Purpose and Scope
Introduction
This Software Technical Reference (STR) provides information and troubleshooting tips
for the printing system software for the HP LaserJet 9000mfp.
This document is prepared in an electronic format to serve as a quick-reference tool for
Customer Care Center (CCC) agents, support engineers, system administrators,
management information systems (MIS) personnel, and HP LaserJet product end-users,
as appropriate.
The following information is included in this technical reference:
descriptions of drivers and platforms with system modifications
l
procedures for installing and uninstalling software components
l
descriptions of problems that can arise while using the product, and known solutions
to those problems
l
descriptions of known software issues and workarounds
A description of the product model or models described in this STR is provided below.
The printing system software for each product model accommodates the differences
between models.
l
Note
Bundle configurations might vary among geographic regions.
Software Technical Reference
Introduction 13
HP LaserJet 9000mfp
HP LaserJet 9000mfp. This model (model number C8523A) comes with 128 megabytes
(MB) random access memory (RAM), expandable to 384 MB; an HP JetDirect print
server; copying, HP Digital Sending Software (version 3.0), and wide-format printing
capabilities; an enhanced input/output (EIO) network card and EIO hard drive; a 100sheet multipurpose tray; two 500-sheet input trays (trays 2 and 3); a 2000-sheet input tray
4; a duplexing unit (for printing on both sides of paper); and one of three optional paperhandling devices: a 3000-sheet stacker, a 3000-sheet stapler/stacker, or a multifunction
finisher.
The HP LaserJet 9000mfp belongs to the HP LaserJet 9000 Series of printers. The
behavior of other models in the series is occasionally described in this document. The
other models are:
l
l
l
l
HP LaserJet 9000, with 64 MB RAM
HP LaserJet 9000n, with 64 MB RAM, HP JetDirect print server, Enhanced Input
Output (EIO) network card, and multi-purpose paper tray (Tray 1)
HP LaserJet 9000dn, with 64 MB RAM, HP JetDirect print server, EIO network card,
and multi-purpose paper tray (Tray 1), and duplex printing accessory
HP LaserJet 9000hns, with 64 MB RAM, HP JetDirect print server, EIO network card,
and multi-purpose paper tray (Tray 1), duplex printing accessory 2,000-sheet paper
feeder (Tray 4), and HP 3,000-sheet stacker/stapler
14 1 Purpose and Scope
Software Technical Reference
2
Software Description
Introduction
The product comes with software and installers for Microsoft (R) Windows (R) and Apple
Computer, Inc., Macintosh systems. UNIX (R) and OS/2 systems are supported and are
available through the Web. For specific information about a system's installer, drivers, and
components, locate the section that corresponds to that system.
Supported operating systems
The following operating systems (OSs) support the HP LaserJet printing-system software,
including standard printer command language (PCL) drivers and PostScript (R) (PS)
emulation drivers. Windows OSs support a full-featured configuration of the HP LaserJet
product; other OSs support varying levels of functionality.
l
l
l
l
l
l
l
l
Note
Windows 3.1x (PCL 6 and PCL 5e) for the HP LaserJet 9000 multifunction printer
(mfp) product is supported through the use of the HP LaserJet 8100 printer drivers.
The HP LaserJet 8150 driver supports PS.
Windows 95 and Windows 98.
Windows Millennium Edition (Me).
Windows NT (R) 4.0 (Service packs 3 through 6).
Windows 2000 (Service packs 1 and 2).
Windows XP Professional and Windows XP Home Edition (Windows XP).
IBM OS/2 2.0 or later.
Mac OS 7.5.3 or later (supports PS).
The HP LaserJet PCL 5e and PCL 6 drivers and the HP LaserJet PS drivers necessary for Windows
3.1x systems are included on the HP LaserJet compact disc - read-only memory (CD-ROM) that came
with the product.
Software Technical Reference
Introduction 15
Technology background information
This section addresses the following topics:
l
l
l
l
l
l
l
l
l
l
"HP LaserJet user documentation" in HP LaserJet user documentation
"Bidirectional communication" in Bidirectional communication
"Driver Autoconfiguration" in Driver Autoconfiguration
"Printer Status and Alerts" in Printer Status and Alerts
"Remote firmware update" in Remote firmware update
"HP Web Access" in HP Web Access
"Digital sending" in Digital sending
"Foreign Interface Harness" in Foreign Interface Harness
"E-mail command and response" in E-mail command and response
"Euro character" in Euro character
HP LaserJet user documentation
Adobe Acrobat Reader
The HP LaserJet software CD-ROM includes Adobe (R) Acrobat (R) Reader version
5.0 for viewing online documentation. When you click any of the documentation links
in the HP LaserJet software CD browser, the installer scans the system for an
installed Portable Document Format (PDF) reader. If the installer cannot find a reader,
the installer presents the option to install the Adobe Acrobat Reader.
Note
Adobe Acrobat Reader 4.0 or later is required to view the documents on the HP LaserJet software CD
browser.
HP LaserJet guides
On the CD-ROM that came with the product, the HP LaserJet 9000mfp start, MFP
start, MFP poster, and introduce guides are supplied in Adobe Acrobat Reader PDF
files for viewing on your computer.
You can either view the guides from the HP LaserJet CD browser or install them on
your system. To install the online start and introduce guides for the HP LaserJet
9000mfp, select the printer documentation check box during a Custom Installation.
The guides are installed in the Manuals folder on the target system.You can also
choose to install the guides later.
In accordance with the Americans with Disabilities Act (ADA),Hewlett-Packard
provides a screen-readable version of the HP LaserJet 9000mfp use guide on the HP
Web Site at http://www.hp.com/support/lj9000.
The online HP LaserJet 9000mfp use guide is available at the http://www/hp.com/
support/lj9000 Web site.
16 2 Software Description
Software Technical Reference
HP LaserJet product printing-system installation notes
The HP LaserJet 9000 Series Printing System Installation Notes are available on the
HP LaserJet software CD-ROM. The installation notes (filename READ9000.WRI for
the HP LaserJet 9000mfp ) contain important information about product features,
instructions for installing the printing-system software, and technical assistance. You
can either view the file from the HP LaserJet software CD browser, or install it on your
system. To view this text file from the HP LaserJet 9000 software CD browser, click
printer documentation, and then click installation. When you have the file open in
Notepad, you can click File, and then click Save As to save a copy of the file to
another location. To install the file, select the printer documentation check box
during a Custom Installation. You can also choose to install the file later. The HP
LaserJet Printing System Installation Notes are installed in the HewlettPackard\LaserJet 9000 folder on the target system for the HP LaserJet 9000mfp
product.
HP LaserJet product printing-system release notes
The Hewlett-Packard LaserJet 9000mfp Printing System Release notes, a readme
text file with late-breaking information, is available on the HP LaserJet software CDROM. This readme file (filename README.TXT) contains an overview of the printingsystem software components, late-breaking information, and other technical
assistance. You can either view the file from the HP LaserJet software CD browser, or
you can install it on your system. To view this text file from the HP LaserJet software
CD browser, click printer documentation, and then click release notes. When you
have the file open in Notepad, you can click File, and then click Save As to save a
copy of the file to another location. To install the file, select the printer
documentation check box during a Custom Installation. You can also choose to
install the file later. The HP LaserJet Printing System Release notes are installed in
the Hewlett-Packard\LaserJet 9000 folder on the target system.
For late-breaking information about known issues and workarounds, visit the Web at
the following Uniform Resource Locator (URL) address:
http://www.hp.com/go/lj9000_software
Other HP LaserJet documents
Guides for accessories and optional input trays and output bins are also available as
Adobe Acrobat PDF files. You can view these documents from the HP LaserJet
software CD browser by clicking accessories documentation and then clicking the
name of the guide you wish to view. To install the file, select the accessories
documentation check box during a Custom Installation. The following guides are
available:
•
•
•
•
•
•
HP 2000-sheet input (optional tray 4) install guide (click 2000-sheet feeder guide)
HP Duplex Printing Accessory install guide (click duplexer guide)
HP multipurpose (tray 1) install guide (click multipurpose tray guide)
HP Jetdirect Administrator's Guide (click hp jetdirect guide)
HP 3000-Sheet Stapler/Stacker Use Guide (click stacker/stapler guide)
HP Multifunction Finisher Guide (click multifunction finisher guide)
Software Technical Reference
Technology background information 17
Bidirectional communication
Bidirectional communication is the product’s ability to respond to data inquiries from the
computer and report back information, such as what type of print media is available or
what accessories are connected to the printer. If a product does not have this capability
(that is, if it has no bidirectional mode), it can only accept commands from the host and
cannot report information back.
Driver Autoconfiguration and Printer Status and Alerts use bidirectional communications
software. The Typical Installation installs Driver Autoconfiguration in supported
environments that contain the bidirectional software. Use Custom Installation when you
do not want these features.
Bidirectional communication depends upon your network operating system and the
method used to connect your printer to the network.
The following table provides information about the operating systems and network
environments that support bidirectional communication.
Table 1.
Bidirectional communication support in various operating systems
Connection
type
Windows
95
Windows
98
Windows
Me
Windows
NT 4.0
Windows
2000
Windows
XP (32-bit
only)
Macintosh
TCP/IP2
X
X
X
X
X
X
X
IPX/SPX3
X
X
X
X
X
X
TCP/IP
(HP)
X
X
X
X
X
X
X
X
X
X
X
X
X
X
Direct
Connect1
Network
Port
Jetdirect
Standard
TCP/IP
(MS4)
IPX/SPX
(HP)
X
X
X
LPR
AppleTalk
Novell
4
NetWare
4.x
Microsoft
Share
X
X
Bindery
queue
X
X
X
X
X
X
NDS5
queue
X
X
X
X
X
X
Bindery
queue
X
X
X
X
X
X
NDS
queue
X
X
X
X
X
X
Windows
95, 98, or
Me host
TCP/IP
X
X
X
X
X
X
IPX/SPX
X
X
X
X
X
X
Windows
NT 4.0,
2000, or
XP6 host
TCP/IP
X
X
X
X
X
X
IPX/SPX
X
X
X
X
X
X
LPR
X
X
X
X
X
X
NetWare
5.x
X
18 2 Software Description
X
X
Software Technical Reference
1
Not supported
Transmission control protocol/Internet protocol
3Internet packet exchange/sequences packet exchange
4
Bidirectional functionality is supported only with the client software from Novell. It is not supported with Microsoft Client
Service for Netware.
5Novell Directory Services
6
Printer Status and Alerts is not installed when the share computer is running Terminal Server.
2
Driver Autoconfiguration
The HP LaserJet PCL 6 and PCL 5e drivers for Windows feature bidirectional
communication technology which, in supported network environments, provides
automatic discovery and driver configuration for printer accessories at the time of
installation or later, if needed. Some accessories that are supported by Driver
Autoconfiguration are duplexing unit, optional paper trays, font dual inline memory
modules (DIMMs), and the hard drive.
If the network environment supports bidirectional communication, the installer presents
Driver Autoconfiguration as an installable component by default for a Typical Installation,
and as an optional installable component for a Custom Installation. The Driver
Autoconfiguration component installs the bidirectional communication software. If the
installation environment does not support bidirectional communication, the Driver
Autoconfiguration option does not appear during installation. However, installed drivers
will be configured automatically in accordance with the HP printer bundle selected during
installation of the printing-system software.
Parallel, USB, and other direct connections do not support bidirectional communication.
Therefore, Driver Autoconfiguration is not available with those types of connections.
When other printing systems are installed, direct-connect bidirectional communication
might be possible, although performance might not be optimal.
Driver Autoconfiguration works in four ways:
l
l
In environments that support bidirectional communication, the computer
communicates with the product, determines the physical configuration, and then
configures the driver accordingly.
If the configuration of the HP LaserJet product changes after installation, the driver
can be automatically updated with the new configuration in environments that support
bidirectional communication. For example, if the base printer model is installed and an
optional duplexing unit is added later, you can automatically configure the duplexing
unit in the driver by clicking the Update Now button on the driver's Configuration tab.
The Update Now button activates the HP Network Registry Agent (HPNRA) and
triggers the driver to recheck the registry for new information. The HPNRA
automatically updates the registry and changes the configuration information that
appears on the Configuration tab in the Printer folder.
Software Technical Reference
Technology background information 19
Note
The bidirectional communication software necessary for the two methods of Driver Autoconfiguration
described above is included in a Typical Installation when installing a network printer in supported
environments. The feature is also a selectable option for a Custom Installation.
l
l
In environments that do not support bidirectional communication, the driver
automatically configures options based on the HP LaserJet product bundle selected
during the installation of the printing-system software. For example, if the HP LaserJet
9000dnis selected, the driver automatically configures the optional duplexing unit.
There is no communication between the computer and the product. Therefore,
configuration is based solely on the definition of the printer bundle. Using the same
example, if the HP LaserJet 9000dnis selected during installation, the duplexing unit is
configured in the driver whether or not the optional duplexing unit is physically
present.
Enterprise Autoconfiguration (EAC) is a version of bidirectional communication that
provides autoconfiguration functionality for an Add Printer Wizard installation (when
you do not use autoselect). An Add Printer Wizard installation that includes EAC is
identical to other Add Printer installations, except that when installation is complete,
the driver for the supported product is configured with the same settings as the
physical configuration of the device. Configuration occurs without user interaction.
This also occurs if you do not select Driver Autoconfiguration during installation using
a printing software CD-ROM.
If bidirectional communication software has been installed previously, EAC will not be
activated, and the Add Printer Wizard uses the pre-existing bidirectional
communication to configure the printer. If bidirectional communication software has
not been installed, EAC configures the driver to match the device configuration, which
it detects automatically. EAC is active only as needed to use the autoconfiguration
utility, and is then shut off. The files required to install EAC remain on the user's
system.
No EAC is available for the HP LaserJet 9000mfp product if it is using Windows 95,
Windows 98, or Windows Me. It is supported in Windows NT 4.0 for the PCL 5e and
PCL 6 drivers, version 4.3.2.178 or later, and in Windows 2000 and Windows XP for
the PCL 5e and 6 drivers, version 4.3.2.167 or later.
Printer Status and Alerts
The HP LaserJet printing-system software includes a utility called Printer Status and
Alerts that you can use to monitor print jobs and printer status from the desktop. The
Printer Status and Alerts feature provides printer and job status information such as
printing history, job progress, toner and paper levels, and consumables and supplies
reorder information, and presents a simulated view of the product control panel. This
utility offers several options for configuring pop-up windows to view the status of the
printer and of individual print jobs.
Printer Status and Alerts is a selectable component of Custom Installation. To install
Printer Status and Alerts, choose Custom Installation and select the appropriate check
box.
These features are available for printers connected to a network that supports
bidirectional functionality. The Printer Status and Alerts feature cannot be installed over
infrared (IR), parallel, or serial ports. See “Bidirectional communication.”
20 2 Software Description
Software Technical Reference
Windows NT 4.0, Windows 2000, and Windows XP do not support Printer Status and
Alerts with terminal servers. In Windows 95, only Internet Explorer 4.0 or later supports
printer status. Also, for Windows 95, the Microsoft Winsock2 patch must first be installed.
To download the Microsoft Winsock2 patch, go to http://www.microsoft.com/windows95/
downloads/contents/WUAdminTools/S_WUNetworkingTools/W95Sockets2/Default.asp.
For other operating systems, the computer must have Internet Explorer version 4.1 or
later installed. To check the version number, open Internet Explorer, click Help, and then
click About Internet Explorer. The version number is reported as “Version:
5.50.XXXX.XXXX.”
HP Printer Status and Alerts communicates with the printer only during an active print job
to minimize network traffic.
The following restrictions apply to HP products that use Printer Status and Alerts:
l
l
l
l
l
l
l
l
For Device Status (printer icons in the status window), the computer must have
Internet Explorer version 4.72.X or later installed. To find the version number, open
Internet Explorer and click Help, then click About Internet Explorer. No Internet
Explorer is necessary for getting status about jobs for network-connected printers.
Internet Explorer can be installed after installing Printer Status and Alerts.
On a few applications, such as Microsoft Excel and Seagate Crystal Reports, multiple
copies of the same document show up in the Printer Status and Alerts window as
separate jobs. This is because these applications actually send each copy as a
separate job.
For the JAWS for Windows screen reader, the computer must have Internet Explorer
version 5.0 or later installed. To find the version number, open Internet Explorer and
click Help, then click About Internet Explorer. Version 5.0 is reported as Version
5.00.X or later. No Internet Explorer is necessary for getting status about jobs for
network-connected printers. Internet Explorer can be installed after installing Printer
Status and Alerts.
When renaming a driver, job and device status will not be tracked until the computer is
restarted.
Drivers added after Printer Status and Alerts is installed are not recognized until the
computer is restarted.
Clicking the Cancel button in the Printer Status and Alerts window will not always
cancel a job. This button sends a cancel request to the printer, but if the job has
already been processed, it might not be possible to cancel the job (this is commonly
the case with smaller jobs).
The installation software does not allow the user to install Printer Status and Alerts
over a direct connection, such as a parallel connection. If Printer Status and Alerts is
tracking a networked product that is subsequently switched to an LPT port, the utility
will not be able to track jobs or get device status for that product.
When using Printer Status and Alerts with Microsoft printer sharing, the following
items apply:
• The Microsoft patch “Vredir” is required if you want to use Printer Status and Alerts
on a Windows 95, Windows 98, or Windows Me computer for a printer that has
been shared directly from a computer with Windows NT 4.0, Windows 2000, or
Windows XP installed. Failure to install the patch could cause an intermittent blue
screen to appear on the client computer.
Software Technical Reference
Technology background information 21
• For Microsoft shared products, the host system must have either Printer Status
and Alerts or the HP Driver Autoconfiguration option from the HP installer on the
computer. Load Printer Status and Alerts on the computer sharing the printer
before loading Printer Status and Alerts on the client computer.
• For Windows 95, Windows 98, and Windows Me client computers that have Printer
Status and Alerts installed, installing a printer using the Point and Print method will
not activate Printer Status and Alerts.
When the Printer Status and Alerts feature is installed, a status icon in the form of a
printer is included in the Windows system tray in the lower-right corner of the screen. The
printer icon remains unchanged until you send a print job to the HP LaserJet product.
When you send a print job, the icon changes to alert you to the status of the print job.
Eight icons exist in this feature. The eight icons in the following illustration show current
job status. Neither the Receiving nor the Waiting icon ever shows up in the Systray.
When the print job is in a receiving or waiting state, the Printing icon appears in the
Systray.
Figure 1.
Printer Status and Alert icons
22 2 Software Description
Software Technical Reference
Double-click the status icon to open the Printer Status and Alerts window, shown in the
following illustration.
Figure 2.
Printer Status and Alert window
Note
The appearance on the screen varies according to the HP LaserJet product and its configuration.
The Printer Status and Alerts window consists of two panes. The left pane shows icons for
the available products, an icon for each current print job in progress, and an Options
icon. The right pane provides information based on what is selected in the left pane.
Software Technical Reference
Technology background information 23
Click a product icon in the left pane to view information about the product and supplies or
to view a history of recent print jobs. The following product information is available:
l
l
l
l
Printer Status shows a replica of the product control panel that indicates the current
status of the HP LaserJet product.
Supplies shows information about the percentage of print-cartridge life remaining.
Media provides information about paper-handling devices and the status of each
device. For example, this section of the window shows the level of media present in
each input device, as well as the status of output devices. This section also provides
information about the type and size of media loaded in each input device.
Capabilities provides information about such things as installed trays, paper-handling
devices, and disk storage. Click a print job icon to see information about the progress
and status of the print job. Click the Options icon to select options for configuring popup status windows that contain document alerts and to set the refresh rate for showing
printer status information.
Figure 3.
Refresh Rate option
Note
The appearance of the screen varies according to the HP LaserJet product and its configuration.
There are six settings for the refresh rate. The default setting is in the center, halfway
between Less Often and More Often.
The Less Often setting specifies the least frequent update intervals, which have minimal
impact on network traffic. The More Often setting updates the status more frequently, but
also has the most impact on traffic. The Never setting disables the job-status monitoring
mechanism for the selected printer. If the refresh rate for a given printer is set to Never,
then subsequent jobs sent to that printer will not appear in the Printer Status and Alerts
window. If the Never setting is selected when the scope control is set to All Printers, then
all job-status monitoring will be disabled. However, even when job-status monitoring is
disabled, you can still open the status window and view the product status panels.
Changes to the refresh rate settings affect any subsequent jobs submitted to the affected
printer. Existing jobs that are already being processed have a fixed refresh rate which was
determined (according to the setting in the Refresh Rate panel) when the job was
submitted.
24 2 Software Description
Software Technical Reference
The Alerts options panel has controls to determine when the Printer Status and Alerts
window automatically appears for each printer that has an icon in the Left pane. The drop
down menu provides a list of available printers for which to make the selection. An option
for all printers is included as the default selection. Each of the three, four, or five available
selections, depending on the printer connection type, causes the Printer Status and Alerts
window to automatically appear when that alert condition arises.
The availability of each alert option and the default selection varies depending on
connection type. The following table shows the default state of the alerts panel as it
relates to connection type.
Table 2.
Default alerts selection state for connection type
Connection type Alerts (first two
options)
Printer warning
condition
Toner low
Printer error condition
All printers
Selected and activated
Selected and activated
Selected and activated
Selected and activated
Direct connect
Selected and activated
Selected and activated
Selected and activated
Selected and activated
Network
Selected and activated
Selected and activated
Unselected and grayed
out
Selected and activated
Printers that are involved with at least one active print job are queried for job status
periodically according to the Status Check Rate setting.If an error or a warning condition
is detected, the Printer Status and Alerts window will automatically appear according to
the Alerts options.
Note
Depending upon the options you select, information in the status window changes for each job printed,
each job completed, and each warning condition detected.
Figure 4.
Documents Alert option
Note
The appearance of the screen varies according to the HP LaserJet product and its configuration.
Software Technical Reference
Technology background information 25
Remote firmware update
The HP LaserJet product and optional paper-handling devices feature a remote firmware
update capability. The method for downloading remote firmware updates from the http://
www.hp.com/go/lj9000_firmware Web site is similar to that used to download the latest
printing-system software and printer drivers.
The Web site features an “E-mail me when new software is available” link, an option that
sends e-mail when a new version of printer firmware is available. Also, if you used HP
WebReg to register your HP LaserJet product, HP will send you notification of firmware
releases.
The process for remotely upgrading printer firmware involves three steps:
Step 1 Determine the current level of firmware installed on the HP LaserJet 9000mfp.
Step 2 Go to the http://www.hp.com/go/lj9000_firmware Web site and download the
latest firmware.
Step 3 Download the new firmware to the product.
Determining the current level of firmware
Use the touch-screen graphical display on the control panel to determine the current
level of firmware installed on the product:
Step 1
Go to the product control panel and touch the Menu tab.
Step 2
Touch INFORMATION on the control-panel display.
Step 3
Touch PRINT CONFIGURATION on the control-panel display.
Step 4
Look in the configuration page section marked “Device Information” for
the Firmware Datecode. The firmware date code will look something like
this:
03/14/2002 03.002.0
Downloading the new firmware from the HP Web site
The .RFU (remote firmware update) file and an associated readme file are packaged
together as a self-extracting .EXE file. For detailed instructions about how to
download the .EXE file, see the http://www.hp.com/go/lj9000_firmware Web site.
Downloading the new firmware to the product
You can send an .RFU update to a printer as long as the printer is in “ready” state; the
printer will wait for all input/output (I/O) channels to become idle before cycling power.
Note
If the firmware update involves a change in the format of nonvolatile random-access memory (NVRAM),
any menu settings changed from the default settings will return to default settings, and must be changed
again if the user wants settings different from the defaults.
The elapsed time for an update depends on the I/O transfer time, as well as the time
that it takes for the printer to reinitialize. The I/O transfer time depends on a number of
things, including the speed of the host computer sending the update, the I/O method
(Fast InfraRed Connect [FIR], parallel, or network). The reinitialization time will
depend on the specific hardware configuration of the printer, such as the number of
enhanced input/output (EIO) devices installed, the presence of external paperhandling devices, and the amount of memory installed.
26 2 Software Description
Software Technical Reference
If the remote firmware update process is interrupted before the firmware update is
complete, the HP LaserJet 9000mfp is equipped with fully functional backup copy of
firmware. The message RESEND UPGRADE appears on the product control panel.
Finally, any print jobs ahead of the .RFU job in the queue will be printed before the
update is processed.
Note
The printer automatically power cycles after processing the update.
Remote firmware update for Windows systems
If the printer is shared on the network, then the following command can be issued
from a command prompt or MS-DOS window:
copy /b FILENAME \\<SHARENAME>\<PRINTERNAME>
where FILENAME is the name of the .RFU file, <SHARENAME> is the name of the
computer from which the printer is being shared, and <PRINTERNAME> is the printer
share name (do not type the angle brackets).
The message ONE FILE COPIED SUCCESSFULLY appears on the computer
screen.
The MFP control panel will alternately display RECEIVING UPGRADE and
PERFORMING UPGRADE. The download takes several minutes. Please be patient.
At the end of the download, the message PROCESSING JOB appears on the control
panel.
The printer will automatically power cycle after processing the update. The message
READY will appear on the control panel.
The download is now complete.
Print a configuration page and compare the Firmware Datecode line with the value
previously shown. The value on that line should have increased.
If the printer is connected through a local port, then the .RFU file can be sent directly
to the printer with a COPY command from a command prompt or MS-DOS (R)
window. At the command prompt, follow the steps below for your operating system.
Windows 95, Windows 98, and Windows Me
From a command prompt or MS-DOS (R) window type the following command:
Mode lpt1:,,p
Note
If the printer is attached to a parallel port other than LPT1, then substitute the proper LPT port number
in the Mode command.
The response you receive should be similar to these examples:
> LPT1 Not Rerouted
> Infinite retry on parallel printer time-out
The .RFU file can now be sent directly to the printer with a COPY command from a
command prompt or MS-DOS (R) window:
copy /b FILENAME PORTNAME
where FILENAME is the name of the .RFU file and PORTNAME is the name of the
appropriate printer port (such as LPT 1).
Software Technical Reference
Technology background information 27
Remote firmware update for UNIX systems:
Any method that delivers the .RFU file to the printer will work, including:
$cp /home/yourmachine/FILENAME/dev/parallel
where /home/yourmachine/FILENAME contains the .RFU file.
Remote firmware update using FTP on a direct network connection
If your HP LaserJet product uses a direct network connection, you can use file transfer
protocol (FTP) to update your HP LaserJet firmware. Complete the following steps.
Step 1
Note
Take note of the TCP/IP address on the EIO X JetDirect page (this is the
second page of the Configuration Page printout. To print a configuration
page, see “Determining the current level of firmware”).
Before connecting to the printer, make sure that the printer is not in Power Save Mode. Also make
sure that any error messages are cleared from the control panel display.
Step 2
Open a DOS command window on your computer.
Step 3
Type FTP <TCP/IP PRINTER ADDRESS> (for example, if the TCP/IP
address is 192.168.0.90, type FTP 192.168.0.90).
Step 4
Press ENTER on the keyboard.
Step 5
When prompted for user name and password, press ENTER for each.
Step 6
Type BIN at the > prompt.
Step 7
Press ENTER.
Step 8
Type:
put <path>
where <path> is the location where the .RFU file was downloaded from
the Web. For example, type:
PUT
C:\LJ9000\lj9000FW.RFU
and then press ENTER.
The download process begins and the firmware is updated on the printer. The printer
automatically power cycles off and on again to activate the update. This can take
about five minutes. Let the process finish without further interaction with the printer or
computer.
Step 9
When the printer power-cycles on and READY appears on the control
panel display, close the MS-DOS command window (type BYE, and then
press ENTER. Type EXIT, and then press ENTER). The firmware
update is complete.
Using HP Web JetAdmin to download the firmware to the product
This procedure requires that Web JetAdmin version 6.5 or later be installed. Complete
the following steps to update a single printer through HP Web JetAdmin after
downloading the .RFU file from the HP Web site.
Step 1
Start HP Web JetAdmin.
Step 2
Type the TCP/IP address or IP hostname of the printer in the Quick
Device Find field, and then click Go. The printer Status window appears.
Step 3
Locate the Update button. You might need to click the right arrow on the
toolbar to locate this button.
28 2 Software Description
Software Technical Reference
Step 4
Click Update.
Step 5
When prompted for the type of update to perform, click Update Printers,
and then click Continue.
Step 6
Under Upload new firmware image:, click Browse to locate the .RFU
file you downloaded from the http://www.hp.com/go/lj9000_firmware
Web site, depending on the product.
Step 7
Click Upload to move the .RFU file from your hard drive to the HP Web
JetAdmin server.
Step 8
Refresh the browser.
Step 9
Select the .RFU file from the Select new firmware version: drop-down
menu.
Step 10 Click Update Firmware. HP Web JetAdmin sends the selected .RFU file
to the printer.
Also, HP Web JetAdmin 6.5 can be used to perform multiple or unattended
installations.
Step 1
Start HP Web JetAdmin.
Step 2
Create a device group. A simple way to do this is:
a. Click Devices on the 1. Choose: drop-down menu.
b. Click Device Model from the 2. Filter: drop-down menu.
c. In the 3. Criteria (Optional): field, type your model number
(for example, "9000" [without quotation marks]).
d. Click Go.
Step 3
In the Device List, select the printers you want to include in the group
and click Create Group.
Step 4
When prompted, type a name for the new device group, and then click
OK.
Step 5
Click Update.
Step 6
When prompted for the type of update to perform, click Update Printers,
and then click Continue.
Step 7
From the list of HP Devices, select the printers to be updated, or click
Select All.
Step 8
Click Update to install the new firmware.
Printer messages during firmware upgrade
The printer shows three messages during a normal update process:
Table 3.
Update messages
Printer message
Explanation
RECEIVING UPGRADE
This message appears from the time the printer
recognizes the beginning of an .RFU update
until the time the printer has verified the validity
and integrity of the .RFU update.
Software Technical Reference
Technology background information 29
Table 3.
Note
Update messages (continued)
Printer message
Explanation
PERFORMING UPGRADE
This message appears while the printer is
actually reprogramming the firmware.
WAIT FOR PRINTER TO
REINITIALIZE
This message appears from the time the printer
has finished reprogramming until the printer
reinitializes.
To verify that the firmware update succeeded, print a new configuration page from the product control
panel and verify that the firmware datecode shown on the configuration page is the same as the
datecode of the .RFU file you downloaded to the printer.
Troubleshooting a firmware update
The following table lists causes and results of possible interruptions to the firmware
update.
Table 4.
Troubleshooting a firmware update
Cause
Result
Job was cancelled from product
control panel
No update has occurred
Break in I/O stream during send (for No update has occurred
example, parallel cable removed)
Power cycle occurred during
RECEIVING UPGRADE
No update has occurred
Power cycle occurred during
UPGRADING PRINTER
Resend update
Power cycle occurred during WAIT Update has been completed
FOR PRINTER TO REINITIALIZE
Print jobs sent to the product while an update is in process do not interrupt the update.
The following table lists possible reasons for the failure of a remote firmware update
and the corrective action to take for each situation.
Table 5.
Troubleshooting a firmware update failure
Reason for firmware update
failure
Corrective action
.RFU file is corrupted
The printer recognizes that the file
is corrupted and rejects the update.
Download the image from the http://
www.hp.com/go/lj9000_firmware
Web site again and send the new
file to the printer.
30 2 Software Description
Software Technical Reference
Table 5.
Note
Troubleshooting a firmware update failure (continued)
Reason for firmware update
failure
Corrective action
Wrong printer model contained in
.RFU file
The printer recognizes the model
mismatch and rejects the update.
Download the correct image from
the http://www.hp.com/go/
lj9000_firmware Web site and send
it to the printer.
Upgrade was interrupted
See the previous table in this
section.
Flash hardware failure occurred
Although it is extremely unlikely,
the device might have a hardware
failure. Call technical support to
address the problem.
All HP LaserJet products ship from the factory with the latest available firmware version installed in a
backup partition on the EIO hard disk. If a remote firmware update fails, the printer can use the backup
firmware to restart the printer. You can then attempt the remote firmware update again.
HP Web Access
The HP Web Access feature, also known as the embedded Web server (EWS), contains
the following components:
Embedded virtual machine for Java (TM) applications
l
Web pages
l
storage space
HP Web Access provides a simple, easy-to-use solution for one-to-one printer
management. In offices with a limited number of printers, remote management of printing
devices can be accomplished without installing any management software, such as
HP Web JetAdmin. The only requirement is that the management console have a
supported Web browser.
l
In environments with a larger number of printers, where one-to-one management is
impractical, HP Web Access and HP Web JetAdmin work together to provide scalable
remote printer management. HP Web JetAdmin is used for consolidated management
tasks, where operations are performed on a selected set of printers instead of on
individual printers. For such environments, HP has provided hooks between HP Web
Access and HP Web JetAdmin so that Web Access features can be configured on
multiple printers in one operation. For example, the security password for HP Web
Access can be set on a population of printers simultaneously.
For additional information and a copy of the HP Embedded Web Server for HP LaserJet
Printers guide, go to the http://www/hp.com/support/lj9000 Web site.
To view information about the printer using HP Web Access, open a supported Web
browser and type in the printer IP address or host name. The IP address and host name
for the printer are listed under “Protocol Information” on the EIO Jetdirect page. To print a
copy of this page from the printer control-panel display, see the instructions for printing a
configuration page in the “Determining the current level of firmware” section. You also can
view information about an installed HP Jetdirect print server by clicking the Networking
tab in the HP Web Access window.
Software Technical Reference
Technology background information 31
Information tab
HP Web Access offers the following additional features. To view the information, click
on the items in menu on the left of the HP Web Access Information tab:
• Device Status. This page provides current status information about your product.
• Configuration Page. Configuration settings for your product are available on this
page.
• Supplies Status. This page provides information about the print cartridge and the
total pages printed, and the serial number of the product.
• Event Log. This page provides information about reported printer errors.
• Usage Page. This page provides information about product usage.
• Device Information. This page shows device information, such as the product
TCP/IP address and serial number.
• Control Panel. This page shows the layout of the control panel.
Device status
If a printer problem exists, status information (such as whether the printer is online or
the toner is low) is available through your Web browser linked directly to the printer.
You can view this information without physically going to the printer to identify the
status. The following illustration shows how this information is presented on the
printer's Web page.
Figure 5.
Device Status
32 2 Software Description
Software Technical Reference
Configuration information
The HP LaserJet printer configuration page is available remotely through HP Web
Access. The HP Web Access configuration page provides configuration information
about the product in the same way as the configuration page printed from the printer.
The following illustration shows an example of a configuration page viewed remotely
through HP Web Access.
Figure 6.
Configuration page
Links to off-printer solutions
Links within the home page of HP Web Access provide an easy way to locate
information or complete tasks.
• HP Instant Support (TM). This link connects you to a set of dynamic web
resources that will help you solve specific problems and determine additional
services that may be available for your device. Specific status and configuration
information about the product is retained and directed to the “Solve a Problem”
Web site. This site offers targeted support content and messages to help resolve
problems as quickly as possible.
• Order Supplies link. Information about the printer cartridge is linked to an ordering
page where you can order print cartridges quickly and easily from the chosen
reseller.
• Product Support. This link connects you with an HP product support page from
which you can search for information, contact the HP customer care home page, or
find additional resources for your product.
Software Technical Reference
Technology background information 33
Settings tab
The options on the left of the Settings tab are as follows:
•
•
•
•
•
•
•
•
•
Configure Device
Alerts
Email
Security
Other Links
Device Information
Language
Time Services
Digital Sending
Remote printer configuration
Printer configuration information can be obtained through a Web browser by opening
the printer HP Web Access page and changing any of the basic configuration
information on the Settings tab. Security and password controls provide management
information system managers with the level of control required within their
environments. The following illustration shows an example of printer options that can
be configured remotely.
Figure 7.
Configure Device
Some configuration tasks cannot be performed remotely because printed pages must
be examined.
34 2 Software Description
Software Technical Reference
Networking tab
The menu on the left of the screen contains other networking options under three
categories: configuration, security, and diagnostics.
Configuration
•
•
•
•
Network Settings
Other Settings
Support Info
Select Language
Security
•
•
•
•
•
Admin Password
SSL/TLS
SNMPv3
Telnet
Access Control
Diagnostics
•
•
•
•
Network Statistics
Protocol Info
Configuration Page
Refresh Rate
Network settings
The following illustration shows the Network Settings option on the HP Web
Access Networking tab. From this screen, you can enable and configure the
following network services:
•
•
•
•
Software Technical Reference
TCP/IP
IPX/SPX
AppleTalk
DLC/LLC
Technology background information 35
• SNMP
Figure 8.
Networking tab
36 2 Software Description
Software Technical Reference
Configurable e-mail alerts
The printer can automatically send e-mail alerts about printer problems or job status to
specified e-mail addresses. For example, if toner is low, the printer can notify the
person responsible for ordering or changing the cartridge. If there is a printer failure,
an e-mail alert can be sent directly to the person responsible for fixing the problem.
These e-mail alerts can be configured to be sent to any device that can accept e-mail,
such as digital phones, pagers, and personal digital assistants. In large environments,
administrators can route e-mail addresses to list-servers or URLs for expanded
notification.
Figure 9.
Configurable Alerts
Digital sending
hpwa_settings_01_alerts_9000mfp_020311
Use the HP MFP Digital Sender embedded solution that is included with the HP LaserJet
MFP to send scanned color or black and white documents to e-mail as a .PDF, .JPEG,
.TIF, or .MTIF file. The HP LaserJet MFP scans, compresses, and sends the page scans
to the configured mail server.
The digital sending solution is a standard offering for the HP LaserJet MFPs.
Settings can be configured either at the control panel or by using the Digital Sending
Config Applet with a Web browser.
Software Technical Reference
Technology background information 37
Use the control panel to configure basic settings, and use the configuration applet for
access to all available settings.
Configuring HP Digital Send from the control panel
Go to the product control panel and press CONFIGURE DEVICE, press SENDING,
and then press E-MAIL.
The following options are available (press the down arrow to see any options that are
not visible on the screen):
Scan Preference. You can choose either BLACK AND WHITE or COLOR.
File Type. Files can be transmitted to an e-mail address in any of these file formats:
Portable Document Format (PDF)
Tagged image file format (TIFF)
Multipage TIFF file format (M-TIFF)
Joint Photographic Experts Group (JPEG)
Find Send Gateways. This option uses the same algorithm as the Find Settings
button in the Addressing tab of the Digital Sending Config Applet.
Simple Mail Transfer Protocol (SMTP) Gateway. Type the IP address of the e-mail
gateway, using the right and left arrows to move between the fields. Domain Name
Service names (for example, company.com) are not supported.
Lightweight Directory Access Protocol (LDAP) Gateway. Type the IP address of
the e-mail gateway, using the right and left arrows to move between the fields.
Domain Name Service names (for example, company.com) are not supported.
Test Send Gateways. This option uses same algorithm as the Find Server button on
the Send to E-mail tab in the Digital Sending Config Applet.
Sending to e-mail
To scan and send a document to e-mail, follow these steps:
Step 1
Place your original document face-down on the scanner glass.
Step 2
If your original matches the default settings (mixed text and graphics,
default media size, standard resolution, single-sided), proceed to the
next step. Otherwise, navigate to the Settings field on the touch screen
of the control panel. Here you can select document parameters for color
(the options are Black and White or Color) and for file type (the options
are PDF, TIFF, M-TIFF, or JPEG).
Step 3
Touch Send Options on the touch screen of the product control panel.
The Send Options box replaces the Copy Settings box.
Step 4
Touch E-mail.
Step 5
Touch From: and, using the pop-up keyboard, type your e-mail address.
The From: field must be filled to proceed.
Step 6
Using the same method, type the names of any CC: (copy) and BCC:
(blind copy) recipients, and type the subject of your e-mail in the
Subject: field.
Step 7
Touch OK.
Step 8
Press the Start button.
38 2 Software Description
Software Technical Reference
Step 9
When sending is complete, remove the original document from the
scanner glass.
Additional digital sending services are available with the HP MFP Digital Sending
Software, version 3. These additional services are send-to-fax, send-to-folder, sendto-application, and Windows NT authentication.
Foreign Interface Harness
The Foreign Interface Harness (FIH) provides a portal on the HP LaserJet product for
third-party job accounting vendors to gain access to copy data for the HP LaserJet
9000mfp product
E-mail command and response
The HP LaserJet product can send e-mail messages directly. However, you must
configure e-mail information to initiate this capability. One use for this feature is to send
diagnostic information to solve a printer problem. An e-mail sent to the printer requests
configuration information. The printer automatically sends that information back to the
service provider. In many cases, the problem can be identified quickly and solved
remotely. For more information about e-mail command and response, see the HP
Embedded Web Server for HP LaserJet Printers guide.
To configure your product to send e-mails, follow these steps:
Step 1 Take note of your product’s TCP/IP address on the EIO X JetDirect page (this
is the second page of the Configuration Page printout. To print a configuration
page, see “Determining the current level of firmware”.)
Step 2 Launch your web browser.
Step 3 In the Address: or Go to: field, type the TCP/IP address assigned to the
product (for example, 192.168.0.20) or the host name (for example: http://
myprinter). The HP Web Access home page appears.
Step 4 From the top of the HP Web Access screen, click Device.
Step 5 On the navigational bar on the left, click Alerts.
Step 6 Under Notification Recipients, click Edit List1.
Step 7 Under Add Recipient Address, type your e-mail address (for example,
“[email protected]”).
Step 8 Click Apply.
Step 9 Click Back to return to the Alerts page.
Step 10 Under Select Events, click Media Path.
Step 11 Select the List1 check box next to CLOSE DRAWERS/DOORS/COVERS.
Step 12 Click Apply. A screen stating that your selections have been accepted should
appear. Click OK.
Step 13 In the SMTP Server: field under Outgoing Mail, type the TCP/IP address (for
example, 192.168.0.201).
Step 14 In the Domain Name: field under Outgoing Mail, type the domain name.
Step 15 Click Apply.
Step 16 Click Security.
Software Technical Reference
Technology background information 39
Step 17 Under Security, select the Outgoing Mail check box.
Step 18 Click Apply.
Step 19 To test the configuration, open the top cover of the product, then go to your
computer and verify that you have received an e-mail message from the
product.
Euro character
The euro is the name for the currency of the European Union (EU). Use of this unit was
launched on January 1, 1999. The euro has changed the way business is conducted in
Europe and has affected every company and industry in the world. It is vital that
companies understand and prepare for the changes the euro brings.
This HP LaserJet product includes euro characters for each of the internal fonts. The
printer can print the euro character in the Windows 95, Windows 98, Windows Me,
Windows NT 4.0, Windows 2000, and Windows XP operating systems. Hewlett-Packard
is committed to maximizing document portability through supporting and promoting eurosymbol standards.
Printing-system components
Printing system and installer
CD browser for Windows systems
In previous versions of the printing-system software, the installer was started by
locating and running the SETUP.EXE file. For the Microsoft Windows environment
(Windows 95, Windows 98, Windows Me, Windows NT 4.0, Windows 2000, and
Windows XP), the HP LaserJet software CD-ROM provides an interactive CD browser
that you can not only use to install the printer drivers and related components, but also
to gain access to online product registration, user documentation, a customization
utility, Adobe Acrobat Reader software, and optional HP software.
The HP LaserJet software CD browser or printing-system installer does not support
Windows 3.1x. To install the PCL 6, PCL 5e, or PS printer drivers for Windows 3.1x,
use the Printer Manager function on the Windows 3.1x control panel.
A readme file for the Windows 3.1x printing system is available in the root directory of
the HP LaserJet software CD-ROM. The path is: [root]/[languages]/DRIVERS/WIN3X
40 2 Software Description
Software Technical Reference
The following illustration shows the main screen of the printing system software CD
browser, which appears when you insert the printing software CD-ROM in your CDROM drive.
Figure 10.
Installation CD browser main screen
The product software CD browser contains the following options for the HP LaserJet
product. The text that follows each option listed below is approximately the same text
that appears when you put the cursor on the option button.
Note
The options on your product may vary.
install printer - This wizard guides you through the installation of your HP LaserJet
printing system. Only the necessary software will be installed.
register product - This option can be used to register your HP LaserJet product now
and to receive the following information at no cost:
• notification of driver updates
• technical support updates
• news about emerging technologies
printer documentation - This option can be used to view the HP LaserJet 9000mfp
documentation. The documents are:
•
•
•
•
•
start guide
introduce guide
MFP introduce guide
MFP poster
release notes
Software Technical Reference
Printing-system components 41
accessories documentation - View the HP LaserJet 9000mfp documentation for the
following accessories:
•
•
•
•
•
•
Note
2000-sheet feeder guide
duplexer guide
multipurpose tray guide
hp jetidirect guide
stacker/stapler guide
multifunction finisher guide
For systems that do not have Adobe Acrobat Reader 4.0 (or later) installed, you will be given the option
to download that software. Clicking any of the links to documentation that is provided in the Adobe
Acrobat PDF file format opens a dialog box from which you can install Adobe Acrobat Reader software
from the HP LaserJet software CD browser.
customization utility — This utility can be used to create a custom software installer
for the HP LaserJet product that can then be copied to other media, such as a local
hard drive or a network drive.
optional software — To increase productivity and get the most out of your HP
LaserJet product, view a list of optional software available for installation. The The hp
web jetadmin option is available for the HP LaserJet 9000mfp.
Installer features
The common installer is designed to provide a simple and consistent installation
method for the product line. The common installer is available for the Windows 95,
Windows 98, Windows Me, Windows NT 4.0, Windows 2000, and Windows XP
operating systems.
This HP LaserJet product features a new common installer. This new installer offers
the following features:
• The HP LaserJet software CD-ROM features a CD browser. See "CD browser for
Windows systems."
• Acrobat Reader 5.0 is automatically installed.
• The installer is Web-enabled, providing access to the HP Web site for the latest
software components and drivers.
• Network connection is integrated so that you can install drivers and connect to a
network printer in a single process.
• The selection dialog box sets the operating-system language as the default
language (for Windows 95, Windows 98, Windows Me, Windows NT 4.0, Windows
2000, and Windows XP only). Although system language is sensed automatically,
you can use the installer to select any of the languages on the HP LaserJet
software CD.
• The installer includes the HP LaserJet Uninstaller Utility.
• Product registration is available using the Web and e-mail.
• The Customization Utility is available on the CD browser.
All of the Windows system components are installed by using the HP LaserJet
printing-system installer. The installer automatically senses your language of choice
and your operating system. It offers selections for each printer model. You can select
the type of installation you prefer: Typical Installation or Custom Installation.
42 2 Software Description
Software Technical Reference
If you have an Internet connection, the installer will sense the connection and provide
you with the ability to connect to the HP Web site to download the latest printingsystem software.
The installer compares the versions of the software components on the HP LaserJet
software CD-ROM to those on the HP Web site. If newer versions are on the HP Web
site, the installer downloads them.
Installable components
This section provides information about the various installable components available
either with the HP LaserJet software CD-ROM or from the HP Web site.
Printer drivers
The printing system for the HP LaserJet product includes the following printer drivers.
PCL 5e, PCL 6, and PS drivers
The PCL 5e, PCL 6, and PS drivers are included with the HP LaserJet software
CD-ROM. The PCL 5e and PCL 6 drivers feature a graphical user interface that
has a shared look and feel.
All three drivers provide access to the printer paper-handling and print-quality
features, such as Edge-to-Edge Printing, and Printing All Text as Black. The PS
driver, however, supports Edge-to-Edge Printing, but not Printing All Text as
Black.
Windows 3.1x driver versions
PCL 5e and PCL 6 support for Windows 3.1x is provided by using the HP LaserJet
8100 printer drivers for the HP LaserJet 9000mfp product. These drivers are
available on the HP LaserJet software CD-ROM in the WIN3X directory. An HP
LaserJet 8100 PS printer description (PPD) provides PS support for the HP
LaserJet 9000mfp product.
For printer driver version numbers, go to the following URL:
http://www.hp.com/go/lj9000_software
Windows 95, 98, Me, NT 4.0, 2000, and XP driver versions
PCL 5e and PCL 6 support for Windows 95, Windows 98, Windows Me, Windows
NT 4.0, Windows 2000, and Windows XP operating systems is provided by using
the HP LaserJet 9000 printer drivers for the HP LaserJet 9000mfp product. The
HP LaserJet 9000 PS printer description (PPD) provides PS support for the HP
LaserJet 9000mfp.
For printer driver version numbers, go to the following URL:
http://www.hp.com/go/lj9000_software
Macintosh and Macintosh-compatible system driver versions
The HP LaserJet printing solution for Macintosh is composed of the Apple LaserWriter
driver, which is provided with the operating system, and HP-created PPD files. The
driver uses these files to determine the features and PS commands that the printer
supports. Bidirectional support in AppleTalk and USB connections allows
autoconfiguration of the software. The installable components are:
Software Technical Reference
Printing-system components 43
•
•
•
•
•
•
•
•
•
the HP LaserJet Installer for Mac OS 8 and Mac OS 9.
the HP LaserJet Installer for Mac OS X.
the HP LaserJet Screen Fonts Installer.
SYSTEM/EXTENSIONS/PRINTER DESCRIPTIONS (for Mac OS 8 and Mac OS
9).
LIBRARY/PRINTERS/PPDS/CONTENTS/RESOURCES/LANGUAGE.LPROJ (for
Mac OS X).
the HP LaserJet Utility, an HP printer utility installed in the HP LaserJet folder of
Macintosh operating systems 8 and 9. It provides configuration and management
support for PS and PCL printers.
online Help, an HTML-based printer and utility help that can be viewed through a
browser or the Macintosh OS Help Center.
the HP Auto Setup Utility, installed in the Startup Items folder of Mac OS 8 and later
versions. It provides assistance to set up the new printer, then moves itself to
Trash.
installation notes.
AutoCAD driver versions
Printer drivers to support AutoCAD (TM) in MS-DOS, 16-bit Windows, and 32-bit
Windows operating environments are available on the Web at the following URL:
http://www/hp.com/support/lj9000
These AutoCAD drivers are supported:
• AutoCAD 10, 11, and 12 for MS-DOS version 4.1b
• AutoCAD 13 and 14 for Windows version 4.1b
• AutoCAD 2000 and 2000LT - HP Windows driver
Additional driver availability
Additional drivers are available from your Hewlett-Packard distributor or from the http:/
/www.hp.com/go/lj9000_software Web site. These drivers are:
• IBM OS/2 drivers.
• UNIX/HP-UX/Linux driver sample scripts.
Go to http://www.hp.com/go/linux for further information about Linux drivers.
Macintosh components
• HP LaserJet PPDs for past projects
• ColorSync profiles
• Screen fonts
44 2 Software Description
Software Technical Reference
Additional productivity tools
HP Web Registration
You can use this component to register your HP LaserJet product on the HP Web
site or through e-mail. After you have successfully installed the software, the
installer prompts you to register your HP LaserJet product. Also, you can gain
access to HP Web Registration from the HP LaserJet software CD browser by
clicking Register Product. You can choose to complete the online registration at
that time or later. If you want to register your product later, click WebReg from the
HP LaserJet 9000 program group when you decide to complete your registration.
Optional software
The HP LaserJet software CD browser provides links to download and install HP
Web JetAdmin as optional software.
HP Web JetAdmin
HP Web JetAdmin allows you to manage HP Jetdirect connected printers
within your intranet using a browser. HP Web JetAdmin is a browser-based
management tool and should be installed only on the network administrator’s
computer. It can be installed and run on a variety of systems:
When installed on a host server, any client can use HP Web JetAdmin through
a supported Web browser (such as Microsoft Internet Explorer 4.x or Netscape
Navigator 4.x or later) by browsing to the HP Web JetAdmin host. HP Web
JetAdmin 6.2 and later have the following features:
•
•
•
•
•
•
•
•
task-oriented user interface, providing configurable views for network
managers
customizable user profiles that can be customized to let network
administrators include only the function viewed or used
routing of instant e-mail notification of hardware failure, low supplies, and
other printer problems to different people
remote installation and management from anywhere by using only a
standard Web browser
advanced automatic discovery of peripherals on the network without
manually entering each printer into a database
simple integration into enterprise-management packages
capacity to find peripherals based on parameters such as IP address, color
capability, and model name
capacity to organize peripherals into logical groups, with an option that
provides virtual office maps for easy navigation
The HP LaserJet software CD browser provides a link to the HP Web site
(http://www.hp.com/go/webjetadmin) to download the latest version of the HP
Web JetAdmin software. Click Optional Software from the CD-ROM browser,
and then click hp web jetadmin. HP Web JetAdmin is available for the
following network operating environments:
•
•
•
•
Software Technical Reference
Microsoft Windows 2000
Microsoft Windows NT 4.0
HP-UX 10.20 and 11.x
Sun Solaris 2.5, 2.6, and 7
Printing-system components 45
•
•
46 2 Software Description
Red Hat Linux 7.1
SuSE Linux 7.1
Software Technical Reference
3
Driver features
PCL 6 and PCL 5e driver features
This section describes the options available on each tab of the PCL 6 and PCL 5e driver
interfaces.
Note
The Windows 3.1x Print dialog box does not contain a Properties button to open the HP LaserJet
printer driver settings dialog boxes. Use the Print Setup command in the File menu to gain access to
the settings dialog boxes, and then click Print.
Help system
The HP LaserJet PCL 6 and PCL 5e drivers include a full-featured Help system to provide
assistance with printing and configuration options.
What's this? Help
In Windows 95, Windows 98, Windows Me, Windows NT 4.0, Windows 2000, and
Windows XP, "What's this?" Help is supported. To use "What's this?" Help:
• Right-click a control and click What's this?, and a pop-up Help window appears.
• Click the ? button at the upper-right corner of the frame, next to the X, to change
the cursor to an arrow with a question mark. Use this special cursor to select a
control, and the pop-up Help window for that feature appears.
• Press the F1 key, and the Help window for the currently selected control appears.
Context-sensitive Help
Press the Help button on a driver tab or in a dialog box, and context-sensitive Help
appears.
Software Technical Reference
PCL 6 and PCL 5e driver features 47
Constraint messages
Constraint messages are unsolicited messages that appear in response to specific
actions you take. These messages alert you to selections that are illogical or
impossible given the capabilities of the product or the current settings of other
controls. For example, if you click Print on Both Sides and then change the paper
type to transparencies, a message appears asking you to resolve this conflict.
Figure 11.
A typical constraint message with an OK button
Whenever a constraint message appears with OK and Cancel buttons, the
interpretation of the buttons is as follows:
• Clicking OK accepts the change that was just made, and the driver then resets the
conflicting control to a setting that is compatible with the new value.
• Clicking Cancel rejects the change that was just made, setting the control back to
its previous value.
48 3 Driver features
Software Technical Reference
Bubble Help
Bubble Help features a graphical icon resembling a cartoon speech bubble with a small i
in it, representing the international symbol for information. The following illustration shows
Bubble Help icons on a driver tab.
Figure 12.
A property page with Bubble Help icons
The bubble typically appears next to a disabled control, although it can also accompany
an enabled control if there is an important note concerning its use. Moving the pointer
over the bubble changes the arrow to a gloved hand, which indicates that the area
underneath the pointer is selectable. When the bubble is selected by using either the
mouse or the keyboard, a message box appears with a brief explanation about why the
control is disabled and what can be done to enable it. If the control is not disabled, the
message is a tip or a precaution to be aware of when using that particular feature.
Software Technical Reference
PCL 6 and PCL 5e driver features 49
Finishing tab features
The Finishing tab is the default tab shown when you click Document Defaults… for the
driver or a software application.
Figure 13.
The default appearance of the Finishing tab
The options in the Print Quality group box might vary, depending on your HP LaserJet
product. For the HP LaserJet 9000mfp, the second option is 600 dpi, and the
EconoMode selection indicates that you can save toner only with genuine HP print
cartridges.
The Finishing tab contains three group boxes:
Quick Sets
Document Options
Print Quality
l
l
l
Quick Sets
This group box is present on each tab for the driver. Quick sets are either preset or
user-defined printing specifications (such as paper size, pages per sheet, and so on).
50 3 Driver features
Software Technical Reference
Factory Defaults
The default setting is Factory Defaults. The driver also provides a quick set for
printing the use guide (User’s Guide).
Custom Quick Sets
When you change any of the default settings on the Finishing tab or any of the
other tabs, the name in the Quick Set drop-down menu dynamically changes to
Untitled. If you want to save this configuration as a quick set, highlight the word
Untitled, type the name you want for your new quick set, and click Save. Quick
sets are saved in the system registry. To delete a quick set, select it from the dropdown menu and click Delete.
HP LaserJet Multifunction Finisher Quick Sets
The HP LaserJet Multifunction Finisher is an optional accessory for the
HP LaserJet 9000mfp. It provides stacking capacity for up to 1000 sheets of
printmedia, stapling of as many as 50 sheets of paper per document, and folding
and saddle stitching of booklets that contain up to 10 sheets of paper.
If the driver is configured to support the HP LaserJet Multifunction Finisher, four
additional booklet Quick Sets will appear. Unlike Factory Defaults, User's
Manual and the booklet Quick Sets can be deleted. These drivers can store a
maximum of ten user-defined Quick Sets on a particular system. If you attempt to
save too many, a message box appears that reads, "There are too many Quick
Sets defined. Please delete some before adding new ones."
Note
The preset Quick Sets, User's Manual, and booklet count as five towards the Quick Set limit of ten.
The preset booklet quick sets are:
• Booklet on Letter. Settings: Print on Both Sides ON, left binding, image size half
letter, Paper size letter, destination Booklet Bin, finishing option Fold/Saddle
Stitch.
• Booklet on 11x17. Settings: Print on Both Sides ON, left binding, image size
letter, Paper size 11x17, destination Booklet Bin, finishing option Fold/Saddle
Stitch.
• Booklet on A4. Settings: Print on Both Sides ON, left binding, image size half
A4, Paper size A4, destination Booklet Bin, finishing option Fold/Saddle Stitch.
• Booklet on A3. Settings: Print on Both Sides ON, left binding, image size A4,
Paper size A3, destination Booklet Bin, finishing option Fold/Saddle Stitch.
Software Technical Reference
PCL 6 and PCL 5e driver features 51
Document Options
The Document Options group box dynamically sizes itself and positions controls to
reflect HP LaserJet product configuration options that affect the Document Options
controls. Three configurations are possible, depending on whether a duplexing unit or
stapler, or both, are installed.
Figure 14.
Document Options group box - stapler only installed
Figure 15.
Document Options group box - duplexing unit only installed
52 3 Driver features
Software Technical Reference
Figure 16.
The Document Options group box - stapler and duplexing unit
Print on Both Sides option
The default setting for the Print on Both Sides option is OFF (not selected). Print
on Both Sides is not available when:
• Type is: on the Paper tab is set to transparency, cardstock, or labels.
• Paper Size is anything except Letter, Legal, A3, A4, A5, B4, B5 (Japanese
Industry Standard, or JIS), Executive, 11 x 17, or custom sizes greater than or
equal to 148 mm by 210 mm (5.8 inches by 8.3 inches) and less than or equal
to 312 mm by 470 mm (12.3 inches by 18.5 inches).
When Paper Size is set to Letter, Legal, or A4, clicking Print on Both Sides
makes the Flip Pages Up and Booklet Printing options available. The default for
both of these options is OFF.
Flip Pages Up
The Flip Pages Up check box, enabled only when Print on Both Sides is
selected, is used to specify the duplex-binding option. The following table
demonstrates the results of selecting this box, depending upon the paper
orientation.
Table 6.
Page orientation
Orientation
Flip Pages Up selected
Flip Pages Up not selected
Portrait
Short-edge binding
Long-edge binding
Landscape
Long-edge binding
Short-edge binding
The preview document image shows a spiral binding along either the left or the top
edge of the page to indicate how the pages will be flipped when Print on Both
Sides is selected. Also, a folded-over corner appears in the lower-right portion of
the preview image with an arrow that points in the direction that the page is
flipped.
Software Technical Reference
PCL 6 and PCL 5e driver features 53
Booklet Printing
The Booklet Printing drop-down menu, visible when Print on Both Sides is
selected, offers eight choices, two of which are based on the current paper size.
The list contains the items with the following structure:
• Off
• [paper size] (Left Binding)
• [paper size] (Right Binding)
where [paper size] depends on the paper size set on the Paper tab. The following
table shows the appropriate entries in the Booklet Printing drop-down menu for
each selected paper size.
Table 7.
Selected paper size
Paper size selected
Entries in Booklet Printing
Drop-down menu
Letter
Off
Letter (Left Binding)
Letter (Right Binding)
Legal (Left Binding)
Legal (Right Binding)
11 x 17 (Left Binding)
11 x 17 (Right Binding)
B4 (JIS) (Left Binding)
B4 (JIS) (Right Binding)
Legal
Off
Legal (Left Binding)
Legal (Right Binding)
A4
Off
A4 (Left Binding)
A4 (Right Binding)
A3 (Left Binding)
A3 (Right Binding)
B4 (JIS)
B4 (JIS) (Left Binding)
B4 (JIS) (Right Binding)
Booklet printing is disabled when the following paper sizes are selected:
Executive, A3, A5, B4, B5, 11 by 17, and envelopes and postcards of any size.
The Booklet Printing drop-down menu appears only when:
•
•
•
•
•
54 3 Driver features
Print on Both Sides is selected.
Percent of Normal Size (on the Effects tab) is 100.
Pages per Sheet is 1.
Paper Size is Letter, Legal, A4, or B4 (JIS).
Print Document On: (on the Effects tab) is not selected.
Software Technical Reference
If any except the first of these conditions is not met, a Bubble Help appears next to
Booklet Printing to tell you why it is disabled.
Activating booklet printing
Note
The following instructions apply only to PCL drivers. Booklet Printing is supported by HP PS
(PostScript) driver for Windows 95, Windows 98, Windows Me, Window NT 4.0, Windows 2000, or
Windows XP through applications that provide booklet printing configuration settings.
Step 1 Click File, click Print, and then click Properties.
Figure 17.
Activating booklet printing
Software Technical Reference
PCL 6 and PCL 5e driver features 55
Step 2 Click the Finishing tab. On the drop-down menu, select Print on
Both Sides and Booklet Printing Type.
Figure 18.
Selecting booklet printing type
Selecting a booklet cover
The booklet cover must be the same size as the inside sheets.
Step 1 Click File, click Print, and then click Properties.
Step 2 Click the Paper tab, then select the Use different paper for first
page check box.
Step 3 Click the First Page tab. On the Size is:, Source is:, and Type is:
menus, select the size, source, and type settings for your cover.
Step 4 Click the Other Pages tab. On the Size is:, Source is:, and Type is:
menus, select the size, source, and type settings for the inside sheets
of your print job.
Step 5 Click the Back Cover tab. The back cover, if there is one, must be the
same size as the booklet cover and the inside sheets. The No back
cover is the default setting. If your print job has a back cover that
uses the same source and type settings you selected in the First
Page tab, select Use the first page source. If not, select Use an
alternate source, and then select the back-cover settings in the
Source is:, and Type is: menus.
Staple option
The Staple option is available on the HP LaserJet 9000mfp for all media sizes
when the HP Multifunction Finisher or 3000-Sheet Stapler/Stacker is installed.
Use the Size is: option on the Paper tab to select the media size.
56 3 Driver features
Software Technical Reference
Stapling a document
Step 1 Click File, click Print, and then click Properties.
Step 2 Click the Finishing tab.
Step 3 Select the Staple check box.
Figure 19.
Stapling a document
Software Technical Reference
PCL 6 and PCL 5e driver features 57
Click One Staple or Two Staples to modify the staple quantity.
Figure 20.
Stapling options
Fold/Saddle Stitch
The Fold/Saddle Stitch option is available on the Finishing tab when
HP Multifunction Finisher is selected in the Optional Paper Destination dropdown menu of the Configuration tab.
58 3 Driver features
Software Technical Reference
Saddle-stitching a booklet or folding a single sheet
The procedure is the same for saddle-stitching a booklet or folding a single
sheet:
Step 1 Click File, click Print, and then click Properties.
Step 2 Click the Finishing tab.
Step 3 Select the Fold/Saddle Stitch check box. This will ensure that the
document is folded.
Figure 21.
Saddle-stitching a booklet
Pages per Sheet
The Pages per Sheet drop-down menu provides six settings: 1 (default), 2, 4, 6,
9, and 16. If you type another value into the box (for example, 3), the control will
round the value entered to the nearest valid value (in this example, 4).
Related controls that are indented beneath the Pages per Sheet edit box are
Print Page Borders and a drop-down menu for selecting the page order.
Print Page Borders sets a line around each page image on a printed sheet to
help visually define the borders of each logical page.
There are four options for page order:
• Right, then Down
• Down, then Right
Software Technical Reference
PCL 6 and PCL 5e driver features 59
• Left, then Down
• Down, then Left
The preview document image changes to reflect alterations in these settings, as
shown by the examples in the following illustration.
Figure 22.
Page-order preview images
1
2 pages per sheet
2
4 pages per sheet
3
6 pages per sheet
4
9 pages per sheet, with Print Page Borders selected
5
9 pages per sheet, with Down, then Right page order selected
6
16 pages per sheet
Print Quality
The HP LaserJet printer driver Print Quality group box provides options that control
resolution, graphics settings, and font settings. The group box includes the following
options:
• Best Quality (settings predefined)
• 600 dpi (settings predefined)
• Custom (automatically selected when any changes are made to Best Quality or
600 dpi )
• EconoMode (the default setting is OFF).
The Print Quality group box also includes a Details button. Clicking this button opens
the dialog box. The Print Quality Details dialog box provides options for various
print-quality settings. If you select either Best Quality or 600 dpi and then change the
default settings in the Print Quality Details dialog box, the selected option in the
Print Quality group box of the Finishing tab automatically changes to Custom.
60 3 Driver features
Software Technical Reference
The following illustration shows sample default settings for Best Quality. The menu
on your HP LaserJet product might vary.
Figure 23.
Print Quality Details dialog box showing Best Quality settings
Software Technical Reference
PCL 6 and PCL 5e driver features 61
The following illustration shows the default settings on the Print Quality Details tab
for 600 dpi.
Figure 24.
Print Quality Details dialog box showing 600 dpi settings
Graphics Settings group box
The Graphics Settings group box includes two options for Complex Graphics.
Use these options to determine which method to use for managing memory for
print jobs. Use HP MEt (Memory Enhancement technology) is the default
selection. This is the best choice unless you are receiving printer memory-error
messages. If you receive such error messages, change this setting to Use More
Memory to complete the current print job. Then, change the setting back to the
default: Use HP MEt.
Output Settings group box
The Output Settings group box contains controls for selecting Resolution and
Resolution Enhancement technology (REt).
Resolution
The resolution settings for the HP LaserJet 9000mfpare:
•
•
600 dpi
FastRes 1200
Resolution Enhancement technology
The HP LaserJet product supports Resolution Enhancement technology (REt).
The REt feature is a default setting, but you can choose to turn it off.
62 3 Driver features
Software Technical Reference
Scale Patterns (WYSIWYG)
The Scale Patterns (WYSIWYG) feature is implemented to address the moiré
effect created when certain applications encounter certain patterns. Use this
feature to turn off the pattern scaling. What you lose is WYSIWYG with
patterns, but the printed result might look better. The feature works only with
programs that use vector hatch patterns. This option is on by default.
Print all Text as Black
Print all Text as Black is off by default. When selected, this option causes the
driver to print all text as black regardless of the original document text color. By
design, however, white text remains white, as a fail-safe method of printing
reverse typeface against a dark background. This setting does not affect
graphic images on the page. Print all Text as Black remains selected only for
the current print job. When the current print job is completed, Print all Text as
Black is automatically turned off.
Edge-to-Edge Printing
Edge-to-Edge Printing is off by default. When it is selected, you can use this
option to increase the default printable area to within 2 mm (0.08 inch) of the
edge of the selected media. This setting remains selected only for the current
print job. When the current print job is completed, the Edge-to-Edge Printing
default is automatically turned off.
Font Settings group box
In the Font Settings group box, the only available option is Send TrueType as
Bitmaps, which provides a safety net for applications that cannot easily use
TrueType fonts for special graphic purposes, such as shading, rotation, or
slanting.
EconoMode
The EconoMode check box turns this toner-saving feature on and off
independently of the other Print Quality tab settings. When this check box is
selected, the preview image lightens to reflect the expected effect of this feature.
The EconoMode option, when selected, works only with genuine HP print
cartridges. Even if the option is selected, it does not work with third-party print
cartridges. The option is off by default.
The EconoMode option can also be activated from the product control panel. If the
Economode setting on the product control panel is on, the display panel setting
overrides the setting on the printer driver Print Quality tab. If the Economode
setting on the product control panel is off, then the setting on the printer driver
Print Quality tab overrides the control-panel display setting, except as noted in
the following table.
Table 8. HP LaserJet 9000mfp EconoMode settings
Driver setting for HP cartridge
print job
Front panel
settings
Actual result for
print job
ON
Yes
ON
ON
ON
No
OFF
OFF
OFF
Yes
ON
ON
Software Technical Reference
PCL 6 and PCL 5e driver features 63
Table 8. HP LaserJet 9000mfp EconoMode settings (continued) (continued)
Driver setting for HP cartridge
print job
Front panel
settings
Actual result for
print job
OFF
No
OFF
OFF
ON
Yes
OFF
ON
OFF
Yes
OFF
OFF
Effects tab features
The Effects tab is used to create unique paper effects such as scaling and watermarks.
Figure 25.
Effects tab
ZoomSmart
The ZoomSmart group box includes features that scale the image on the page, either
by specifying a numeric percentage or by specifying a scale change to a different
paper size. ZoomSmart handles scale transformations.
64 3 Driver features
Software Technical Reference
Print Document On: setting
Use Print Document On: to format the document for one paper size and then
print the document on a different paper size, with or without scaling the page
image to fit the new paper size.
The Print Document On: control is disabled by any of the following conditions:
• Percent of Normal Size is not 100.
• Pages per Sheet (on the Finishing tab) is not 1.
• Booklet Printing (on the Finishing tab) is ON.
When Print Document On: is selected, the drop-down menu shows the media
sizes on which you can print. The list contains all standard media sizes supported
by the selected media source and any custom sizes that you have created (if the
currently selected media source is manual, auto, or any tray). When Print
Document On: is selected, Scale to Fit is automatically selected.
Scale to Fit option
The Scale to Fit option specifies whether each formatted document page image is
scaled to fit the target paper size. By default, Scale to Fit is selected when Print
Document On: is selected. If the setting is turned off, then the document page
images will not be scaled, and are instead centered at full size on the target paper.
If the document size is larger than the target paper size, then the document image
is clipped. If it is smaller, then it is centered within the target paper. The following
illustration shows preview images for a document formatted for Legal paper with
the Print Document On: option selected, and the target size specified as Letter.
Figure 26.
Preview images - Legal on Letter; Scale to Fit off (left) and on (right)
When the size for which the document is formatted (that is, the logical size) differs
from the target size, the preview image uses a dashed gray line to show the
boundaries of the logical page in relation to the target page size.
% of Normal Size option
The % of Normal Size option provides a slider bar for scaling the percentage
setting. The default setting in the entry box is 100 percent of normal size. Normal
size is defined as the paper size selected within the driver or what the driver
receives from the application (if the application does not negotiate paper size with
the driver). The driver will scale the page by the appropriate factor and send it to
the printer.
The limits of the range are from 25 percent to 400 percent, and any values outside
the range are clipped to those limits as soon as the focus is removed from the
control (that is, when the TAB key is pressed or another control is selected).
Software Technical Reference
PCL 6 and PCL 5e driver features 65
Any change to the scale also changes the page preview, which increases or
decreases from the top-left corner of the preview.
The slider bar controls the scale directly. The value in the edit box changes as the
scroll bar indicator is dragged, and the preview image is updated to the new image
scale. Each click on the scroll bar arrows increases or decreases the scale by one
percent. Each click on the slider bar affects the scale by 10 percent.
You cannot achieve an exact value by dragging the scroll bar indicator at the
default Windows resolution; use the scroll bar indicator to approximate the desired
value, and then use the scroll bar arrows to refine the value.
The following settings disable % of Normal Size:
• Print Document On: is selected.
• Pages per Sheet is not 1.
• Booklet Printing is ON.
Watermarks
Use the Watermarks feature to choose a watermark, create your own custom
watermarks (text only), or edit an existing watermark. The following watermarks are
preset in the driver:
•
•
•
•
(none)
Confidential
Draft
SAMPLE
The drop-down menu shows alphabetically sorted watermarks that are currently
available on the system, plus the string "(none)", which indicates that no watermark is
selected. This is the default setting. Any watermark selected from this list appears in
the preview image.
When First Page Only is selected, the watermark is printed only on the first page of
the document. The First Page Only check box is disabled when the current
watermark selection is "(none)".
Watermarks are applied to logical pages. For example, when Pages per Sheet is set
to “4” and First Page Only is turned off, four watermarks appear on the physical page
(one on each logical page).
66 3 Driver features
Software Technical Reference
Click Edit, and the Watermark Details dialog box appears.
Figure 27.
Watermark Details dialog box
The dialog box shows a preview image and provides options for creating new
watermark and controlling the message angle and font attributes.
Click OK to accept all changes made in the Watermark Details dialog box. However,
clicking Cancel does not cancel all changes. If you make changes to a watermark,
and then select a different watermark or click New, all changes made to the previous
watermark are saved, and only the current, unsaved changes can be canceled.
Current Watermarks
The Current Watermarks group box contains a list of available watermarks, both
predefined watermarks made available in the driver and any new watermarks you
have created. To create a new watermark, click New. The new watermark
appears in the Current Watermarks list and in the Watermark Message edit box
as “Untitled” until you name it. To name the new watermark, type the selected
watermark text in the Watermark Message edit box. To delete a watermark,
select the watermark in the Current Watermarks list and click Delete.
Note
You can have no more that 30 watermarks in the Current Watermarks list at one time. When the limit
of 30 watermarks is reached, the New button is disabled, and a Bubble Help appears that explains
why the button is disabled and how to enable it.
Software Technical Reference
PCL 6 and PCL 5e driver features 67
To edit an existing watermark, select the watermark in the Current Watermarks
list. If you change the Watermark Message for that watermark, you are, in effect,
creating a new watermark.
Watermark Message
The Watermark Message is also the name that identifies the watermark in the
Current Watermarks list, except when more than one watermark has the same
message. For example, you might want several different watermarks with the
message DRAFT, each with a different font or size. When this occurs, the string is
appended with a space, a pound sign, and a number (for example, Draft #2).
When a number is added, the number two is used first, but if the resulting name is
also in the list, then the number increases until the name is unique.
Message Angle
Use the controls in the Message Angle group box to print the watermark in a
diagonal, horizontal, or angle (custom) orientation to the page's text. The default is
Diagonal. All three settings automatically center the watermark string within the
page; the selection of a particular setting affects only the angle of the string
placement. Diagonal places the text along a line that spans the lower-left to
upper-right corners of the page.
Font Attributes
Use controls in the Font Attributes group box to change the font and the color,
shading, size, and style of the font.
Name
The Name drop-down menu lists TrueType (TM) fonts that are currently
installed on the system.
Color
For the HP LaserJet 9000mfp, the only Color: selection is Gray.
Shading
The following range of shades is available from the Shading drop-down menu:
•
•
•
•
•
•
•
•
•
Lightest
Very Light
Light
Medium Light
Medium
Medium Dark
Dark
Very Dark
Darkest
These values represent the intensity of the color selected in the Color attribute.
68 3 Driver features
Software Technical Reference
Size
Font sizes from 1 to 999 points are available from the Size menu. The default
point size is language-dependent. The choice of regular, bold, italic, and bold
italic is available from the Style drop-down menu.
Default settings
The default settings for new watermarks are Arial (R) font, Gray color, Very
Light shading, 150 points, and Regular style. The default settings for preset
watermarks are Arial font, Gray color, Very Light shading, and Bold style.
The default point size for preset watermarks is language-dependent, and
varies.
Paper tab features
Use the Paper tab to specify the size, type, and source of the media, as well as to define
a custom paper size. If you want to, you can indicate different paper-selection choices for
the first page and back cover of the document.
The first group box in the upper-left portion of the Paper tab view is Quick Sets. This
feature is described in the “Finishing tab features” section. Any change to the Quick Sets
group box that is made on the Paper tab affects the group box on the Finishing tab and
on the Destination tab, and vice versa—they are all one and the same control.
Printer image
The bitmap image in the lower-right portion of the Paper tab represents the current
physical configuration of the printer and corresponds to its configuration data, either
obtained automatically through bidirectional communication or configured manually. It
should look the same as the image that appears in the same location on the
Destination tab and the Configure tab.
On the Paper tab, the printer image contains hot spots where you can select a paper
source. When the pointer moves over a hot spot, the arrow reverts to the gloved hand
used in the Bubble Help, the preview image, and other areas. The current paper
source, whether selected from the drop-down menu or from a printer-image hot spot,
is highlighted in bright green on the printer bitmap. The following points are worth
noting:
• Auto Select does not have a corresponding area to highlight in the printer image.
• Selecting Manual Feed, Tray 1, Tray 2, Tray 3, or Tray 4 in the drop-down
menu highlights the corresponding part in the printer image.
• Selecting the area that represents tray 1, 2, 3, or 4 in the bitmap will always select
the corresponding tray in the Source Is: option. Manual Feed, which is available
from the Source is: option, cannot be selected by selecting the bitmap.
• On the Paper tab, only input trays have printer-image hot spots and can be
highlighted. Output bins must be selected from the Destination tab.
Software Technical Reference
PCL 6 and PCL 5e driver features 69
Note
The printer image shown in the following illustration might differ from your HP LaserJet product,
depending on the model number and accessory devices.
Figure 28.
Paper tab
All Pages
The controls on this mini-tab are contained in an All Pages mini-tab. As the name
implies, this means that the settings specified on that mini-tab apply to all pages of the
document. However, when you select the Use different paper for first page check
box, the All Pages mini-tab is replaced by three mini-tabs. These three mini-tabs are:
• First Page, which contains the same controls as All Pages
• Other Pages, which contains different controls, as noted in the following sections
• Back Cover, which also contains different controls, as noted in the following
sections
70 3 Driver features
Software Technical Reference
Other Pages
Use the Other Pages mini-tab to select an alternative media type or source for the
pages that follow the first page of a document. The choices and defaults for Source
is: and Type is: are the same as for First Page.
Figure 29.
Other Pages mini-tab
Back Cover
Use this feature to include a blank back cover on a document, or include a back cover
from a paper source different from that used for the remainder of the document. Use
the Back Cover mini-tab allows to select an alternative media source (or the same
source as First Page) from which a blank page is drawn and placed after the final
page of the body of the document. The mini-tab contains three option buttons and two
drop-down menus. The three option buttons are:
• No back cover
• Use the first page source
• Use an alternate source:
The two drop-down menus, which become available when Use an alternate source:
is selected, are:
• Source is:
• Type is:
No back cover is selected as the default, with the drop-down Source is: and Type
is: selection boxes disabled. Clicking Use an alternate source activates the dropdown menus. The drop-down menu value defaults to the same source as that chosen
for the First Page mini-tab. Clicking Use the first page source changes the dropdown value to match the first page, if necessary, but the drop-down menus remain
inactive.
Back Cover is available only when the Print on Both Sides check box is selected and
the Booklet Printing: drop-down menu (both these options are on the Finishing tab)
is set on Off.
Software Technical Reference
PCL 6 and PCL 5e driver features 71
When the Back Cover mini-tab is active, clicking No back cover deactivates the
drop-down menus, but does not change their value. No Bubble Help is available for
the inactive drop-down menus. The settings revert to defaults when Use different
paper for first page is selected again.
Figure 30.
Back Cover mini-tab
Size is:
This feature actually functions as two controls: a drop-down menu that contains all the
supported media sizes (including any user-defined custom sizes) and a text label that
indicates the dimensions of the selected size.
Moving the pointer over the text label causes the arrow to change to a gloved hand,
which indicates that the area beneath the pointer is selectable. Clicking here toggles
the units of measure between inches and millimeters, offering the same options on the
dimensions label in the preview image. Selecting a new size from the drop-down
menu updates the media-dimensions text label as well as the preview image.
Changing the orientation (on the Basics tab) also updates the dimensions text label.
Size can be specified only for the first page or for all pages. On the Other Pages and
Back Cover mini-tabs, the Size is: drop-down menu does not appear because the
media size must be consistent for all pages of the job. Certain applications can
override this command and specify different media sizes within a single document.
Any change in the media size selection causes the Booklet Printing feature to be
turned off.
72 3 Driver features
Software Technical Reference
Custom...
The Custom Paper Size dialog box appears when you click the Custom... button on
the Paper tab. The following illustration shows the initial appearance of the Custom
Paper Size dialog box.
Figure 31.
Custom Paper Size dialog box
When the Custom Paper Size dialog box appears, the drop-down menu in the Name
group contains one of two things, depending upon the current paper size selection in
the Paper tab:
• If the paper size selection is a previously defined custom size, then the drop-down
menu contains the name of that custom size.
• If the paper size selection is a standard paper size, then the drop-down menu
shows the default name Untitled for a custom paper size.
Note
In Windows 95, Windows 98, and Windows Me, the custom paper-size entry and storage are casesensitive. For example, the names “Big” and “BIG” can coexist. However, in Windows NT 4.0, Windows
2000, and Windows XP, the custom paper-size entry is case-sensitive. Therefore, “Big” and “BIG”
cannot coexist.
The new name is compared only against the list of user-defined custom paper-size
names, and not against the standard paper-size names.
The complete set of titles for this button and the specific characteristics that determine
its title and capabilities are discussed in the dynamic command button section.
Software Technical Reference
PCL 6 and PCL 5e driver features 73
Name drop-down menu
The Name drop-down menu displays the name of the last selected custom paper size.
Use the Name drop-down menu to type new names for custom paper sizes and to
select from the list of currently defined custom paper sizes.
The name displayed in the Name drop-down menu is one of three things, depending
upon the following conditions:
• If a saved custom paper size has been selected from the drop-down menu and the
other controls in the dialog box have not been changed since then, the Name dropdown menu displays the name of the last selected custom paper size.
• If the width or height controls have been changed since a custom size was selected
or saved, or if a saved paper size has just been deleted, then the Name drop-down
menu displays the default name of Untitled.
• If a new name has been typed into the Name drop-down menu for the purpose of
saving a new size or renaming an existing size, then that new name will remain in
the drop-down menu display until a saved custom paper size has been selected
from the drop-down menu.
If you type a new name into the Name drop-down menu, but then do not click the
Save button, you should be able to change the width and height values without losing
the name. However, if a saved paper-size name is selected from the drop-down
menu, any unsaved name or size values are lost without warning, and replaced by the
values of the selected custom paper size.
Dynamic command button
The button located to the right of the Name drop-down menu has three possible
labels: Save, Delete, and Rename.
• Save is the button title whenever the height and width values have been changed
since the last save or since the selection of an existing custom paper size. Clicking
the button causes the name in the Name drop-down menu to be compared against
each of the saved names. If a duplicate is found, a dialog box appears, asking if it is
okay to replace the existing item. If you click Yes, the old item is updated with the
new values. If you click No, the driver returns to the Custom Paper Size dialog
box, where you can type a different name.The new name is compared only against
the list of user-defined custom paper names, and not against the standard papersize names. Whenever the command button has the Save title, it is the default
button.
• Delete is the button title whenever the name of an existing (previously saved)
custom paper size appears in the Name drop-down menu, such as immediately
after selecting an item from the drop-down menu or clicking the Save button.
Clicking the Delete button causes the saved custom paper size to be deleted, after
which the Name drop-down menu changes to Untitled, the height and width
controls are unchanged, and the button title changes to Save.
• Rename is the button title when you type something into the Name drop-down
menu after selecting an existing custom paper size from the drop-down menu. If no
duplicate is found, the name of the stored custom paper size changes to match the
contents of the Name drop-down menu. Whenever the command button has the
Rename title, it is also the default button.
The following table illustrates the relationships between the Name drop-down menu,
the command button, and the actions that take users from one state to another.
74 3 Driver features
Software Technical Reference
Table 9.
Name drop-down menu text strings
State Drop-down
Button Action
menu contents label
Next
state
1
Click Save
3
Type something into the Name drop-down menu
2
Change the width or height values
1
Select a saved item from the drop-down menu
3
Click Save
3
Type something into the Name drop-down menu
2
Change the width or height values
2
Select a saved item from the drop-down menu
3
Click Delete
1
Type something into the Name drop-down menu
4
Change the width or height values
1
Select a saved item from the drop-down menu
3
2
3
4
Untitled
Save
<user-typed text> Save
<name of saved
item>
Delete
<user-typed text> Rename Click Rename (when the name is unique)
3
Click Rename (when the name is a duplicate)
4
Type something into the Name drop-down menu
4
Change the width or height values
2
Select a saved item from the drop-down menu
3
Width and height controls
The width and height values can be changed either by typing numeric strings into the
edit boxes, or by selecting the up and down arrows.
Any entry that is greater than the maximum limits of the width and height control is
rounded down to the maximum valid entry, while any entry that is smaller than the
minimum limits of the width and height control is rounded up to the minimum valid
entry. See “Custom width and height control limits.”
If units are in millimeters, the custom paper-size range minimum is the limit rounded
up to the nearest whole millimeter. The custom paper-size range maximum is the limit
rounded down to the nearest whole millimeter. Any non-numerical entry reverts to the
last valid entry. Width and height entries are validated when the focus has changed.
The resolution of each control is one millimeter or one-tenth of an inch, depending
upon the current measurement units. Clicking the up and down arrows increases or
decreases the current value by the increment amount (within the allowed range of
values). The computer determines the rate at which the values change.
Unit indicator labels change dynamically to indicate inches or millimeters, depending
upon the measurement units the driver is currently using. To change measurement
units, click the Measurement Units button.
Software Technical Reference
PCL 6 and PCL 5e driver features 75
Custom width and height control limits
The minimum paper size for the HP LaserJet 9000mfp is 98 mm by 191 mm (3.87
inches by 7.5 inches) and the maximum is 297 mm by 450 mm (11.7 inches by 17.7
inches). The following table summarizes paper size limits for each paper-handling
device.
Table 10.
Custom width and height limits for the HP LaserJet 9000mfp
Media source or paper
handling accessory
Minimum size width by height
Maximum size width by height
Tray 1 (multi-purpose)
98 mm by 191 mm
312 mm by 470 mm
(3.9 inches by 7.5 inches)
(12.28 inches by 18.46 inches)
148 mm by 210 mm
297 mm by 432 mm
(3.9 inches by 7.5 inches)
(11.7 inches by 17.0 inches)
148 mm by 210 mm
297 mm by 432 mm
(3.9 inches by 7.5 inches)
(11.7 inches by 17.0 inches)
182 mm by 210 mm
297 mm by 432 mm
(7.17 inches by 8.27 inches)
(11.7 inches by 17.0 inches)
98 mm by 191mm
312 mm by 470 mm
(3.9 inches by 7.5 inches)
(12.28 inches by 18.46 inches)
3000-Sheet Stacker
face-up bin
98 mm by 191mm
312 mm by 470 mm
(3.9 inches by 7.5 inches)
(12.28 inches by 18.46 inches)
3000-Sheet Stacker
face-down bin
148 mm by 210 mm
312 mm by 470 mm
(3.9 inches by 7.5 inches)
(12.28 inches by 18.46 inches)
3000-Sheet Stapler/Stacker
face-up bin
98 mm by 191 mm
312 mm by 470 mm
(3.9 inches by 7.5 inches)
(12.28 inches by 18.46 inches)
3000-Sheet Stapler/Stacker
face-down bin
148 mm by 210 mm
312 mm by 470 mm
(3.9 inches by 7.5 inches)
(12.28 inches by 18.46 inches)
Multifunction Finisher
98 mm by 191 mm
191 mm by 470 mm
(3.9 inches by 7.5 inches)
(7.5 inches by 18.46 inches)
Tray 2
Tray 3
2000-sheet HCI Tray 4
Duplex printing accessory
Paper and envelope icons
The paper and envelope icons visually define width and height.
Measurement Units button
Like the dynamic command button previously described, the Measurement Units
button is also multi-titled, although its function is always to toggle the unit of
measurement between standard (inches) and metric (millimeters) units of
measurement.
76 3 Driver features
Software Technical Reference
Close button
The Close button closes the Custom Paper Size dialog box according to the logic in
the table below. In all cases, any custom paper sizes successfully saved (and not
renamed or deleted) while the dialog box is open will remain in the paper size list in
the Paper tab. The following table lists options that appear when you click the Close
button.
Table 11.
Close dialog box text strings
If the drop-down menu
contains …
And the button says …
Then it will do this when the
Close button is clicked
Untitled
Save
The dialog box closes, but you lose
the changes that were not saved.
The current paper size remains the
same as it was when the Custom
button was selected.
<user-typed text>
Save
The dialog box closes, but you lose
the changes that were not saved.
The current paper size remains the
same as it was when the Custom
button was selected.
<name of saved item>
Delete
The dialog box closes, and the
current paper size is set to that
which was last displayed in the
drop-down menu.
<user-typed text>
Rename
The dialog box closes, but you lose
the changes that were not saved.
The current paper size remains the
same as it was when the Custom
button was selected.
Source Is:
The Source Is: drop-down menu shows the input trays available according to
Configure tab settings. The list contains:
•
•
•
•
•
•
Auto Select
Manual Feed
Tray 1 (if installed)
Tray 2
Tray 3
Tray 4 (if installed)
The default setting is Auto Select, which allows the printer firmware to select the
media source. Any optional paper trays that are installed through the Configure tab
are also shown here.
Software Technical Reference
PCL 6 and PCL 5e driver features 77
If a conflict exists among paper source, size, or type, and you choose to keep the
conflicting settings, the settings are processed in the following order: paper size,
paper type, and paper source.
For information about media types and sizes, see "Media attributes".
Type Is:
The Type Is: drop-down menu shows all the paper types supported by the
HP LaserJet product, as well as any user-defined types created by a printer
administrator. The default setting is Auto Select, which allows the application to
select the paper type.
No mechanism exists for manually adding custom paper types from the driver.
Custom sizes can be added only by using the bidirectional communication
mechanism, so they must already exist in the printer when the bidirectional query
occurs. If bidirectional communication is enabled, then the information returned is an
updated list of paper types. If bidirectional communication is not enabled, then the
driver looks for custom paper types saved from a previous bidirectional
communication query, and uses those. Otherwise, no custom paper types are
available through the driver.
The standard types that appear in the lists are:
•
•
•
•
•
•
•
•
•
•
•
•
Auto select
Bond
Cardstock
Color
Labels
Letterhead
Plain
Preprinted
Prepunched
Recycled
Rough
Transparency
For more information about media types and sizes, see “Media attributes”.
Printer image
The bitmap image in the lower-right portion of the Paper tab screen represents the
current physical configuration of the printer according to the driver configuration data
(obtained automatically through bidirectional communication, or configured manually
through the driver). It should have the same appearance as the image in the same
location on the Destination tab and the Configure tab.
On the Paper tab, the printer image contains hot spots for selecting a media
source(tray 2, tray 3, or tray 4). When the pointer moves over a hot spot, the arrow
reverts to the gloved hand used in the Bubble Help, the preview image, and other
areas. The current media source is highlighted in a bright green color on the printer
bitmap.
78 3 Driver features
Software Technical Reference
Destination tab features
The Destination tab provides options for job retention and output bins.
The printer image in the lower-right portion of the Destination tab represents the current
physical configuration of the printer and corresponds to its configuration data, either
obtained automatically through bidirectional communication or configured manually. It
should look the same as the image that appears in the same location on the Paper tab
and the Configure tab.
Note
The printer image shown in the illustration might differ from your HP LaserJet product, depending on
the model number and accessory devices.
Figure 32.
Destination tab
Destination Features
The Destination Features group box provides controls for Job Retention. This group
box is only visible if Printer Hard Disk or Job Retention Enabled is selected in the
More Configuration Options dialog box available on the Configure tab.
Software Technical Reference
PCL 6 and PCL 5e driver features 79
Hardware configuration and availability of Job Retention options
The HP LaserJet 9000mfpis equipped with a hard disk to accommodate the following
Job Retention options:
•
•
•
•
Proof and Hold
Private Job
Quick Copy
Stored Job
Configuring the printer driver for a printer hard disk
If the print driver on your computer is not yet configured to use the hard disk, follow
these steps:
Note
These steps must be completed for each driver.
Step 1 Double-click the My Computer icon. This opens the My Computer window.
Step 2 Open the Printers window.
Step 3 Right-click the printer icon. This opens a drop-down menu. Click Properties.
The Properties dialog box appears.
Step 4 Click the Configure tab.
Step 5 Click Other Options.
Step 6 Under Storage, click the Printer Hard Disk check box.
Step 7 Close all dialog boxes by clicking OK.
Your PCL printer driver is now configured to use the hard disk and Job Retention
features of your HP LaserJet product.
Job retention modes
Note
The Job Retention feature is not supported under Windows 3.1x.
Using the HP LaserJet product's Job Retention feature, you can store documents at
the printer and then control the printing of these documents using the printer control
panel. This feature is intended to provide greater flexibility, convenience, security, and
cost savings.
Once the Job Retention feature has been enabled, you can access its features in the
Destination tab of the printer driver.
The HP LaserJet product offers the following Job Retention options:
Off
This option turns the Job Retention feature off (it is disabled), which means the
print job will not be stored in the printer.
80 3 Driver features
Software Technical Reference
Quick Copy
This option is available only when a printer hard disk is installed. Quick Copy
stores a copy of a printed job on the hard disk, and allows you to print additional
copies of a print job using the control panel. The number of quick-copy print jobs
that can be stored in the printer is set from the printer control panel.
Note
The printer configuration can be set to hold a maximum of 50 quick-copy or proof-and-hold jobs. The
number is set on the printer control panel in the Configuration menu, and the default is 32. When this
preset limit is reached, a newer document will overwrite the oldest. Also, a document that has the
same user and job name as one already stored on the hard disk will overwrite the existing document.
Quick-copy jobs are deleted if the printer's power is removed.
Proof and Hold
This option stores the print job on the printer hard disk, and prints only the first
copy of the job, allowing you to check the first copy. If the document prints
correctly, you can print the remaining copies of the print job from the printer control
panel. The number of proof-and-hold print jobs that can be stored in the printer is
set from the printer control panel.
Using a PIN for Private Job and Stored Job
The Private Job and Stored Job options can be secured by a four-digit personal
identification number (PIN). This number must be entered in the printer control
panel before it prints the job.
The box labeled PIN is usually inactive. Selecting Private Job or Stored Job
along with Require PIN to Print activates the PIN box. The Stored Job/PIN
coupling has a PIN restriction of four ASCII numeric characters (ASCII 0-30
through 0-39). If you enter non-numeric characters, they are removed
immediately. If you enter more than four characters, the characters past the fourth
are truncated. The field temporarily allows fewer than four digits in the string, but
when the edit field loses focus, the zeroes pad the left end until there are exactly
four digits. The default initialized value for the PIN is 0000 for Private Job and
Stored Job with Require PIN to Print checked.
Private Job
This option allows you to send a print job directly to the printer memory. Selection
of Private Job activates the PIN field.The print job can be printed only after you
enter a PIN in the printer control panel. After the job is printed, the printer removes
the job from the printer memory. This feature is useful when you are printing
sensitive or confidential documents you do not want to leave in an output bin after
printing. Private Job stores the print job on the hard disk.
Once released for print, the private job is immediately deleted from the printer. If
more copies are needed, it will be necessary to reprint the job from the application.
If you send a second private job to the printer with the same user name and job
name as an existing private job (and you have not released the original job for
printing), the second job will overwrite the older job, regardless of the PIN. Private
jobs are deleted if power to the printer is removed.
Software Technical Reference
PCL 6 and PCL 5e driver features 81
Stored Job
This option is available only when a printer hard disk is installed. Stored Job
allows you to send a print job directly to the printer hard disk. The print job will be
stored in the printer as if it is an electronic file cabinet. After the print job is stored
in the printer's hard disk, you can print the job from the printer control panel.
Nothing will be printed until the job is requested from the printer control panel.
The job remains stored on the printer until it is deleted or overwritten by a
document with the same user and job names. Stored jobs remain on the printer
hard disk when power is interrupted. Use this feature for forms and other common
or shared documents.
A stored job can be handled in two ways, as either a private or a public job. A
private stored job allows you to send a print job directly to the printer memory and
can be printed only after you enter a PIN in the printer control panel. (You can set
the PIN in the Print dialog box.) After the job is printed, the job remains in the
printer memory and can be printed again from the printer control panel. This
feature is useful when you are printing sensitive or confidential documents you do
not want to leave in an output bin after printing. Private mode is initiated by clicking
the Require PIN to Print check box. In this mode, a PIN entry at the control panel
is required to release the job.
The box labeled PIN is usually inactive. The Require PIN to Print option is
activated if you click Stored Job. If selected, you must enter a PIN to make the
stored job private.
Note
A private stored job is not the same as a private job (see above). Private jobs are deleted from the
printer memory after they are printed. Private stored jobs are retained in the printer memory after
printing, but require that a PIN be entered each time they are printed.
Document identifiers used in Job Retention
When you use a Job Retention feature, your document is identified in the printer
control panel by user name and job name.
User Name
The User Name edit box allows you to identify the job at the printer control panel.
When the driver is first installed (or when Factory Defaults Quick Set is
selected), this string initializes to the empty string (““), but the dialog box detects
this condition and replaces the string with your login name in Windows 95,
Windows 98, Windows Me, Windows NT 4.0, Windows 2000, and Windows XP. It
replaces it with “Untitled” in Windows 3.1x. Restrictions for the User Name field
are described below.
82 3 Driver features
Software Technical Reference
Job Name
The Job Name is used for specifying a name to identify the job on the printer
control panel. When the driver is installed, or when the Factory Defaults Quick
Set is selected, this string is initialized to the empty string (" "), but the dialog box
will detect this condition and replace the string with "Untitled". Restrictions for the
Job Name field are described below.
The Job Name and the User Name fields can contain no more than 16 characters
each, and are limited to A through Z and 0 through 9, because the name is
displayed on the printer control panel. If you try to enter a lowercase character, it
automatically shifts to uppercase. If you try to enter a character with an ASCII
code of less than 32 or greater than 126 characters, the character is removed from
the edit field, along with all characters that follow it. If you try to enter more than 16
characters, any character beyond 16 is truncated. When the dialog box is closed,
or the edit box loses focus, an empty string is replaced with “Untitled”. In those
languages for which “Untitled” cannot be translated without the use of invalid
characters, the driver uses a string of three dashes. The acceptable characters for
job name and user name vary for each operating system. The string must be
displayable on the printer control panel.
Using Job Retention options when printing
You can use Job Retention options in the Destination tab of the printer driver.
Note
The printer driver installed on your computer must be configured to use the Job Retention features.
See the "Configuring the printer driver for a printer hard disk" section.
1
Click Print from the software application. The Print dialog box appears.
2
Click Properties. The Properties dialog box appears.
3
Click the Destination tab to display the destination options.
4
Click Job Retention on the drop-down menu under Destination Features.
5
Click Options. The Job Retention Options dialog box appears.
You can then select one of the Job Retention options described above by clicking the
appropriate option button.
Note
These instructions are specific to the Windows 95, Windows 98, Windows Me, Windows NT 4.0,
Windows 2000, and Windows XP environments using the latest available PCL 6 and PCL 5e drivers.
While the basic concepts of Job Retention are the same for PS print jobs, there are significant
differences in the driver user interface. Also, there are some limitations in naming and PIN selection.
Releasing stored jobs at the printer
Once you send a print job using Job Retention, you can release the job to print using
the printer control panel.
Step 1
Touch Menu to enter the menus.
Step 2
Touch RETRIEVE JOB, and then press the Select button.
Step 3
Touch your job name and press the Select button.
Step 4
Touch PRINT (The PRINT selection might have an icon next to it
indicating that the job is locked. If so, type the PIN number and then
touch the job name.
Software Technical Reference
PCL 6 and PCL 5e driver features 83
Deleting a print job
Sometimes it is necessary to delete a print job from the printer memory or hard disk.
This can be done from the printer control panel.
Step 1
Touch Menu to enter the menus.
Step 2
Touch RETRIEVE JOB, and then press the select button.
Step 3
Touch your job name and press the select button.
Step 4
Touch DELETE (The DELETE selection might have an icon next to it
indicating that the job is locked. If so, type the PIN number and then
touch the job name.
Output Bin Options
The Output Bin Options group box contains a drop-down menu that lets you select
from a list of configured output bins. Only output bins configured on the Configure tab
appear in this drop-down menu.
Depending upon the bundle and the driver configurations, the HP LaserJet 9000mfp
offers the following optional output devices:
• Optional 3000-sheet stapler/stacker. This single 3000-sheet stacking device
accommodates up to 3,000 sheets of Letter-sized and A4-sized paper, or up to
1,500 sheets of 11-inch by 17-inch and A3 paper. It provides multi-position stapling
for up to 50 sheets of paper per document.
• Optional 3000-sheet stacker. This single 3000-sheet stacking device
accommodates up to 3,000 sheets of Letter-sized and A4-sized paper, or up to
1,500 sheets of 11-inch by 17-inch and A3 paper.
• Optional Multifunction Finisher. This booklet printing device creates booklets and
stapled documents in a variety of sizes.
Options
The Options drop-down menu is inactive. This setting can be used to enable nonHP paper-handling devices.
Printer image
The bitmap image in the lower-right portion of the Destination tab screen represents
the current physical configuration of the printer according to the driver configuration
data (obtained automatically through bidirectional communication, or configured
manually through the driver). It should have the same appearance as the image in the
same location on the Paper tab and the Configure tab.
On the Destination tab, the printer image contains hot spots for selecting an output
bin. When the pointer moves over a hot spot, the arrow reverts to the gloved hand
used in the Bubble Help, the preview image, and other areas. The current output bin is
highlighted in a bright green color on the printer bitmap.
Note
On the Destination tab, only output bins have hot spots and can be highlighted; source trays must be
selected from the Paper tab.
84 3 Driver features
Software Technical Reference
Basics tab features
The Basics tab provides options for setting the number of copies to be printed and for the
orientation of the print job. It also lets you retrieve information about the driver.
Figure 33.
Basics tab
Copies
The Copies feature allows you to specify the number of copies to print.
The number of copies you request appears in the Copies box. You can select the
number by typing in the box or by using the up and down arrows to the right of the edit
box. Valid entries are numbers from 1 to 32000 for the HP LaserJet 9000mfp. The
copies value will not advance from the maximum number (32000) to 1 when the up
arrow is used, or change from 1 to the maximum number (32000) when the down
arrow is used. Invalid entries into the edit box (such as non-numerical input, numbers
less than 1 or greater than the maximum allowed) are changed to the last valid value
entered when you click on another group box or leave the Basics tab. The default
number of copies is 1.
Software Technical Reference
PCL 6 and PCL 5e driver features 85
Because applications can also be used to set the desired number of copies, conflicts
between the application and the driver can arise. In most cases, the application and
the driver communicate, so that the number of copies set in one location (such as the
application) will appear in the other (such as the driver). For some applications, this
communication does not take place, and the copies values are treated independently.
For these applications, setting 10 copies in the application and then setting 10 copies
in the driver will result in 100 copies (10 x 10) being printed. It is recommended to set
the number of copies in the application, wherever possible.
Orientation
Orientation refers to the layout of the image on the page, and does not affect the
manner in which media is fed into the printer. You can specify the orientation of the
print job. The three available orientations are portrait, landscape, and rotated. The
default orientation is portrait.
The three orientation options have these configurations:
• Portrait. The top edge of the document is the shorter edge of the paper.
• Landscape. The top edge of the document is the longer edge of the paper.
• Rotated. Rotated is a form of landscape or portrait in which the image is rotated
180 degrees. This setting is useful for printing envelopes and when using some
third-party paper-handling devices.
Orientation can toggle between portrait and landscape by left-clicking the preview
image. If you check Rotation, there is no change in the preview image.
Image rotation versus stapling
The following matrix shows two examples for long-edge feed (for example, Letter
size) and short-edge feed (for example, Legal, 11 x 17 size). All options are shown
in the table, even though the driver does not show them (for example, portrait and
rotated PCL 5e). "Not available" means that the stapling option simply is not
possible (for example, an angled staple in an opposite corner-in such a case, the
device puts a straight staple in the opposite corner).
Table cells marked in yellow are defined as "hard to read," and the driver shows a
warning. This table shows the "short edge" twice because papers that are
narrower than Legal size cannot be stapled using the Angled option.
86 3 Driver features
Software Technical Reference
Orientation
Duplex
Simplex
Paper Size
Long edge
Portrait
Rotated
Simplex
Letter
Long edge
Portrait
Print Both
Side(booklet)
Letter
ABC
1
ABC
1
ABC
1
Letter
ABC
2
ABC
3
ABC
2
ABC
3
ABC
3
Portrait
2 staples
ABC
1
ABC
2
Long edge
1 staple
ABC
3
Feed direction
Long edge stapling
ABC
2
Table 12.
3 staples
6 staples
Same side as two
staples
Same side as two
staples
Same side as two
staples
Same side as two
staples
Same side as two
staples
Same side as two
staples
Same side as two
staples
Same side as two
staples
Same side as two
staples
Same side as two
staples
Same side as two
staples
Same side as two
staples
Same side as two
staples
Same side as two
staples
Same side as two
staples
Same side as two
staples
Same side as two
staples
Same side as two
staples
Same side as two
staples
Same side as two
staples
Same side as two
staples
Same side as two
staples
Angled
Custom
ABC
1
ABC
1
Not available
ABC
2
ABC
3
ABC
2
ABC
3
Portrait
Rotated
Flip Page Up
(tablet)
Letter
Long edge
Landscape
Print Both Side
(booklet)
Long edge
Landscape
Rotated
Print Both Side
(booklet)
Letter
Long edge
Landscape
Flip Pages Up
(tablet)
Letter
Long edge
Landscape
Rotated
Flip Pages Up
(tablet)
Letter
ABC
1
ABC
1
Letter
Letter
ABC
2
ABC
3
ABC
3
ABC
2
ABC
2
ABC
3
ABC
3
ABC
3
ABC
2
ABC
2
ABC
2
ABC
3
ABC
3
ABC
3
ABC
2
ABC
2
Letter
ABC
1
Not available
Not available
Not available
ABC
2
ABC
3
Not available
ABC
3
ABC
2
Not available
Not available
ABC
3
Simplex
ABC
1
ABC
2
Long edge
Landscape
Rotated
ABC
3
Landscape
Software Technical Reference
Simplex
ABC
2
Long edge
ABC
1
Not available
ABC
3
Long edge
ABC
3
Letter
ABC
2
Flip Pages Up
(tablet)
ABC
2
Portrait
ABC
3
Long edge
ABC
2
Letter
ABC
2
Print Both Side
(Booklet)
ABC
3
Portrait
Rotated
ABC
2
Long edge
ABC
3
Not available
PCL 6 and PCL 5e driver features 87
Orientation
Duplex
Simplex
Paper Size
Long edge
Portrait
Rotated
Simplex
Letter
Long edge
Portrait
Print Both
Side(booklet)
Letter
ABC
1
ABC
1
ABC
1
Letter
ABC
2
ABC
3
ABC
2
ABC
3
ABC
3
Portrait
2 staples
ABC
1
ABC
2
Long edge
1 staple
ABC
3
Feed direction
Short edge stapling
ABC
2
Table 13.
3 staples
6 staples
Same side as two
staples
Same side as two
staples
Same side as two
staples
Same side as two
staples
Same side as two
staples
Same side as two
staples
Same side as two
staples
Same side as two
staples
Same side as two
staples
Same side as two
staples
Same side as two
staples
Same side as two
staples
Same side as two
staples
Same side as two
staples
Same side as two
staples
Same side as two
staples
Same side as two
staples
Same side as two
staples
Same side as two
staples
Same side as two
staples
Same side as two
staples
Same side as two
staples
Angled
Custom
ABC
1
ABC
1
Not available
ABC
2
ABC
3
ABC
2
ABC
3
Portrait
Rotated
Flip Page Up
(tablet)
Letter
Simplex
Long edge
Landscape
Print Both Side
(booklet)
Long edge
Landscape
Rotated
Print Both Side
(booklet)
Letter
Long edge
Landscape
Flip Pages Up
(tablet)
Letter
Long edge
Landscape
Rotated
Flip Pages Up
(tablet)
Letter
ABC
1
ABC
1
Letter
Letter
ABC
2
ABC
3
ABC
3
ABC
2
ABC
2
ABC
3
ABC
3
ABC
3
ABC
2
ABC
2
ABC
2
ABC
3
ABC
3
ABC
3
ABC
2
ABC
2
Letter
ABC
1
Not available
Not available
Not available
ABC
2
ABC
3
Not available
ABC
3
ABC
2
Not available
Not available
ABC
3
Long edge
Landscape
Rotated
ABC
1
ABC
2
Landscape
ABC
3
Simplex
ABC
2
Long edge
ABC
1
Not available
ABC
3
Long edge
ABC
3
Letter
ABC
2
Flip Pages Up
(tablet)
ABC
2
Portrait
ABC
3
Long edge
ABC
2
Letter
ABC
2
Print Both Side
(Booklet)
ABC
3
Portrait
Rotated
ABC
2
Long edge
ABC
3
Not available
About
By clicking the About button on the Basics tab or selecting the HP logo on any of the
driver property pages, the About box appears. To close the About box, click OK,
press ESC, press ALT + F4, or press ENTER. The figure below shows the About box.
The information varies according to HP LaserJet model number, driver, date, and
versions.
88 3 Driver features
Software Technical Reference
Figure 34.
About This Driver dialog box
Driver extensions
The Driver extensions text box provides you with some visibility of any extended driver
functionality. It can contain a brief description of the driver extension and a version
number.
Software Technical Reference
PCL 6 and PCL 5e driver features 89
Configure tab features
The Configure tab lets you tell the driver about the hardware configuration of the printer.
If bidirectional communication is enabled in a supported environment, set up this tab by
clicking the Update Now button. If your environment does not support bidirectional
communication, the Update Now button will be unavailable, so you must manually
configure the options on this tab.
The Configure tab is available when the driver is opened from the Printers folder by
clicking Properties. When you open the driver from within an application, the Configure
tab will not be visible, with a few exceptions, such as when using Excel 5.0 or Corel Chart
4.0. When opened from the Printers folder, the Configure tab looks like the following
illustration.
Figure 35.
Configure tab
The printer image in the lower-right portion of the Configure tab represents the current
physical configuration of the printer and corresponds to its configuration data, either
obtained automatically through bidirectional communication or configured manually. It
should look the same as the image that appears in the same location on the Paper tab
and the Destination tab. For more information, see “Paper tab features.”
Note
The printer image shown in the illustration might differ from your HP LaserJet product, depending on
the model number and accessory devices.
90 3 Driver features
Software Technical Reference
Paper handling options
The Paper Handling Options group box provides options for configuring the majority
of paper-handling device features.
Duplexing unit
Select this option if a duplexing unit is installed in the printer. When it is selected,
additional controls appear in the Document Options group box in the Finishing tab.
Unlike most options in this group box, the Duplexing Unit option does not affect the
printer image because the duplexing unit is contained within the printer. To print on
both sides, click Print from the application, click the Properties button, click the
Finishing tab, and then click Print on Both Sides.
Mopier enabled
A mopier is a printer designed by HP to produce multiple, collated copies from a single
print job. Multiple original printing (mopying) increases printer performance and
reduces network traffic by sending the job to the printer once, then storing it on the
hard disk. The rest of the copies are printed at the printer’s fastest speed. All
documents can be created, controlled, managed, and finished from the desktop,
eliminating the extra step of going to a photocopier.
The HP LaserJet 9000mfp supports the Transmit Once mopying feature, and the
Mopier Enabled option is selected by default.
The HP Laserjet 9000mfp ships with 128 MB or more of memory installed.
MFP Module
Select the MFP Module check box if the HP LaserJet product is a multifunction printer
(mfp). The MFP Module option affects the printer image by applying the scanner
bitmap to the top of the printer. Also, the Driver Work Space value is 19.08 MB; the
total memory is 128 MB; the Top Bin (Face Down) option is removed from the
Output Bin Options drop-down menu on the Destination tab; the HP 2000-sheet
high-capacity input (HCI) tray 4 is automatically configured and rendered
unconfigurable in the Optional Paper Sources: drop-down menu on the Configure
tab, and Tray 1 Installed is checked, the duplex unit is checked, and Printer Hard
Disk is checked under Other Options (More...) feature of the Configure tab, and
HP Multifunction Finisher is available in the Optional Paper Destinations: dropdown menu on the Configuration tab. This option is checked by a successful
bidirectional communication query or when the mfp bundle is selected during
installation. Unselecting this box will cause the printer bitmap to show the HP LaserJet
9000 product with standard top bin and the top bin will be an available destination
once again.
Tray 1 installed
Tray 1 is available on the HP LaserJet 9000mfp. Tray 1 can be selected in the
Configure tab. The printer image automatically changes to include tray 1.
Software Technical Reference
PCL 6 and PCL 5e driver features 91
Optional Paper Destinations
The Optional Paper Destinations drop-down menu contains the following options:
• HP 3000-Sheet Stapler/Stacker
• HP 3000-Sheet Stacker
• HP Multifunction Finisher
If the 3000-Sheet Stapler/Stacker or Multifunction Finisher is configured on the
Configure tab, the Staple option is included on the Finishing tab.
The Optional Paper Destinations control is a drop-down list containing the various multibin output devices that are supported by the HP LaserJet 9000mfp. This includes the
HP LaserJet 3000-sheet Stapler/Stacker and the HP LaserJet 3000-sheet Stacker. In
addition, the HP LaserJet Multifunction Finisher will be listed if MFP Module is checked.
Configuring the HP Multifunction Finisher will cause four additional Quick Sets to appear,
Booklet on Letter, Booklet on 11x17, Booklet on A4, and Booklet on A3 (see the
“Quick Sets” section). The first item in this list is "(none)," which is the default setting. The
selection made from this list will be shown in the printer image and will affect the choices
available on the Destination tab. Each of these devices has a different effect on the
Destination tab. Note that these devices cannot be attached to the printer unless the
2000-sheet tray 4 is in place. So, when any of these devices is chosen, the HP LaserJet
XY Input Tray (HCI) is automatically configured and grayed.
When the Multifunction Finisher is selected in the Optional Paper Destinations: dropdown menu on the Configure tab, Booklet Bin is added to the Output Bin Options
drop-down menu on the Destination tab. In addition, the Fold/Saddle Stitch option is
added to the Document Options group box on the Finishing tab.
Any change made to this setting will reset the output bin (specified in the Destination tab)
to the default setting.
Optional Paper Sources
The Optional Paper Sources: drop-down menu lists optional paper sources for the
HP LaserJet 9000mfp. The list of available paper sources varies, depending on your
product, its input accessories, and the product configuration settings on the
Configure tab.
For the HP LaserJet 9000mfp, the Input Tray option (tray 4) is grayed out in the
Optional Paper Sources: drop-down menu, since tray 4 is pre-installed and is
therefore no longer an “optional” paper source. Tray 4 can be chosen using the Paper
tab.
92 3 Driver features
Software Technical Reference
Other Options
The Other Options group box contains a single More... command button. Clicking the
More... button opens the More Configuration Options dialog box.
Figure 36.
More Configuration Options dialog box
Storage
In Storage, you can specify whether a printer hard disk is installed and whether Job
Retention is enabled. Job Retention is enabled by default. The printer hard disk
control can be set manually or updated by a successful bidirectional communication
query using the Update Now button in environments supporting bidirectional
communication. Job Retention Enabled determines whether Job Retention appears
as a feature on the Destination tab. Because this is the only possible Destination
Feature for the HP LaserJet product, this also determines if the Destination Features
group box appears on the Destination tab. If Job Retention Enabled is not selected
in this dialog box, the Destination Features drop-down menu does not appear on the
Destination tab.
The Job Retention Enabled check box is disabled unless the More... dialog box of
the Configure tab indicates the printer has a hard disk and at least 128 MB of RAM
installed. When the Printer Hard Disk check box under More Options is selected,
and 128 MB of RAM is installed, the Job Retention Enabled check box is selected by
default.
Printer Memory
Total Memory. This shows the total amount of memory physically installed in the
printer. Total Printer Memory updates from a successful bidirectional query.
Software Technical Reference
PCL 6 and PCL 5e driver features 93
Driver Work Space. The Driver Work Space (DWS) option lets you specify the
amount of work-space memory available to the printer. In environments supporting
bidirectional communication, this option is configured automatically. To manually set
DWS, print a configuration page and find the DWS value in the Memory section of the
configuration page. The DWS value might change if you switch printer model settings.
Then, enter that value in the DWS box in the More Configuration Options dialog
box. An accurate DWS value optimizes driver performance.
Fonts
The Fonts group box contains a Font DIMM check box and a corresponding
Configure... button. Clicking the Font DIMM check box tells the driver that a Font
DIMM is installed, and that stored data regarding the fonts on the DIMM is available.
When the check box is selected, the Configure button is enabled. Click the
Configure button to open the Configure Font DIMMs dialog box. If the Font DIMM
check box was not selected when you entered the More Configuration Options
dialog box, selecting that check box automatically opens the Configure Font DIMMs
dialog box.
Figure 37.
Configure Font DIMMs dialog box
The Configure Font DIMMs dialog box lets you:
•
•
•
•
Add up to two font DIMMs by clicking the Add button.
Specify a unique font DIMM name.
Select specific font DIMM data files that contain lists of fonts on specified DIMMs.
Select one or more installed DIMMs in the Installed DIMM list, and based on the
selected DIMM(s). The list to the right (Fonts on DIMM) will display all of the fonts
available on the selected DIMM(s).
• Enable or disable one or more of the selected font(s).
94 3 Driver features
Software Technical Reference
Use the following procedure to configure a font DIMM.
Note
1
Make sure that the font DIMM is properly installed.
2
Click Add. The Add Font DIMM dialog box appears.
3
Click Browse. The Font DIMM Files dialog box appears.
4
Find and select the appropriate Printer Cartridge Metrics (PCM) file that came with the font
DIMM.
5
Click Open.
6
If you want, specify a Font DIMM Name in the Add Font DIMM dialog box.
7
Click OK. The selected .PCM file appears in the Installed DIMMs: list. Select the .PCM file to
display a list of available fonts in the Fonts on DIMM: list.
8
Click OK to close the Add Font DIMM dialog box. The fonts on the DIMM should now be
available on the system.
When using font DIMMs with the PCL 5e and PCL 6 drivers: To install screen fonts that match the font
DIMM, use the .hpb file specifically designed to work with that DIMM. If there are no screen fonts for
the DIMM, use the printer cartridge metrics (.PCM) file specifically designed to work with that DIMM.
Ignore Application Collation
Clicking Ignore Application Collation overrides collation settings in software
application print options. This option is set by default. The Ignore Application
Collation check box is disabled and set to OFF when the Mopier Enabled check box
is not selected.
The table below shows the expected behavior for a two-page print job when the
number of copies is three.
Table 14.
Printer behavior with Ignore Application Collation settings
Hard disk
on printer
Mopier
Enabled
check box
Ignore
Application
Collation
check box
Application Commands Pages sent Pages
to printer
output from
sent by
Collation
printer
check box printer
in Print
Dialog
Yes
On
On
On
QTY=3
1,2
1,2,1,2,1,2
Off
None
Yes
On
On
On
QTY=3
1,2
1,2,1,2,1,2
Yes
On
Off
Off
Copies=3
1,2
1,1,1,2,2,2
Yes/No
Off
Off
On
Copies=1
1,2,1,2,1,2
1,2,1,2,1,2
Yes/No
Off
Off
Off
Copies=3
1,2
1,1,1,2,2,2
Yes/No
Off
Off
None
Copies=1
1,2,1,2,1,2
1,2,1,2,1,2
Yes/No
Off
Off
None
Copies=3
1,2
1,1,1,2,2,2
No
On
On
On
QTY=3
1,2
1, 2
Off
None
Software Technical Reference
PCL 6 and PCL 5e driver features 95
Table 14.
Printer behavior with Ignore Application Collation settings (continued)
Hard disk
on printer
Mopier
Enabled
check box
Ignore
Application
Collation
check box
Application Commands Pages sent Pages
to printer
output from
sent by
Collation
printer
check box printer
in Print
Dialog
No
On
Off
On
QTY=3
1,2
1, 2
Off
None
Placing the Ignore Application Collation setting in the printer properties means that,
on a Windows NT network, clients connecting to the printer through a network share
cannot change its value; only the print queue administrator has the power to decide
how the printer driver is set up.
The Ignore Application Collation setting is not a means to print non-collated copies.
If you want to print non-collated copies, disable mopying.
Automatic Configuration
If you have modified the configuration of the HP LaserJet product since installation,
click the Update Now button to automatically reflect the new configuration in the
driver. For more information about the Driver Automatic Configuration feature, see
“Driver Autoconfiguration.”
Printer image
The bitmap image in the lower-right portion of the Configure tab screen represents
the current physical configuration of the printer according to the driver configuration
data (obtained automatically through bidirectional communication, or configured
manually in the Paper-Handling Options group box). It should have the same
appearance as the image in the same location on the Paper tab and the Destination
tab.
96 3 Driver features
Software Technical Reference
NT Forms tab features
The NT Forms tab appears only in the Microsoft Windows NT 4.0, Windows 2000, and
Windows XP operating environments. The NT Forms tab (like the Configure tab) can be
viewed only from the Properties window.
Figure 38.
Driver NT Forms tab
The NT Forms tab lets you specify which media sizes and types are loaded in each of the
available paper trays. The advantage is that it constrains the choices available in the Size
and Type lists on the Paper tab. This constraint prevents information overload when you
request unavailable sizes or types.
Available Trays is a drop-down menu containing all product trays specified on the
Configure tab. The This Tray Contains/Size (Forms) drop-down menu contains a list of
standard paper sizes supported by the HP LaserJet product, as well as any custom forms
defined in the Forms tab. The This Tray Contains/Type drop-down menu lists all of the
media types supported by the HP LaserJet product. The Clear All button removes all size
and type constraints on the Paper tab.
Software Technical Reference
PCL 6 and PCL 5e driver features 97
Configuring the trays
1
Select the appropriate tray from the Available Trays list.
2
Use the This Tray Contains/Size (Forms) drop-down menu to select the paper size (or form)
loaded in that tray.
3
Use the This Tray Contains/Type drop-down menu to select the paper type that is configured
for the tray.
4
Repeat steps 1 through 3 for the remaining trays.
5
If necessary, click the Clear All button to reconfigure all the trays, and remove the size and type
constraints imposed on the Paper tab.
98 3 Driver features
Software Technical Reference
Windows PS driver features
This section provides information about the features of the Windows PScript printer driver.
PS 3 Emulation support for the HP LaserJet product
The PS Level 3 Emulation maintains full compatibility with Adobe PS Level 3 when PS
Level 3 soft fonts are purchased from Adobe.
A set of 92 PS Level 3 soft fonts is included with the printing-system software. If you want
to permanently install the fonts in the printer, PS Level 3 emulation fonts are also
available from HP in an optional font DIMM.
Users of Adobe-licensed applications might also have the right to use the Adobe PS level
3 printer drivers from Adobe with the HP LaserJet printer PS Level 3 emulation PPD,
available on the HP LaserJet printer software CD-ROM or from the HP Web site. When
using the Adobe PS Level 3 printer driver, users must comply with all Adobe licensing
agreements, as stated on the Adobe Web site at http://www.adobe.com/support/
downloads/license.html. See “Font support” for a list of the additional fonts.
Note
The driver interface shown in this section is for Windows NT 4.0. The order and appearance of tabs
can vary among operating systems.
Software Technical Reference
Windows PS driver features 99
Page Setup tab features
The Page Setup tab contains controls for the following options:
•
•
•
•
Figure 39.
Paper size
Paper source
Copy count
Orientation
Page Setup tab
100 3 Driver features
Software Technical Reference
Advanced tab features
The Advanced tab contains controls for the following types of options:
• Paper/Output (advanced control over the options available on the Page Setup
tab)
• Graphic (including resolution, scaling, and TrueType font controls)
• Document Options (including printer features)
Figure 40.
Advanced tab
Software Technical Reference
Windows PS driver features 101
Job Retention tab features
Figure 41.
Job Retention tab
The HP LaserJet product offers the following PS 3 emulation Job Retention options:
Off
This option turns the Job Retention feature off (it is disabled), which means the
print job will not be stored in the printer.
Quick Copy
Quick Copy stores a copy of a printed job on the hard disk, and allows you to print
additional copies of a print job using the control panel. The number of quick-copy
print jobs that can be stored in the printer is set from the printer control panel.
Note
The printer configuration can be set to hold a maximum of 50 quick-copy or proof-and-hold jobs. The
number is set on the printer control panel in the Configuration menu, and the default is 32. When this
preset limit is reached, a newer document will overwrite the oldest. Also, a document that has the
same user and job name as one already stored on the hard disk will overwrite the existing document.
Quick-copy jobs are deleted if the printer's power is removed.
102 3 Driver features
Software Technical Reference
Proof and Hold
This option stores the print job on the printer hard disk, and prints only the first
copy of the job, allowing you to check the first copy. If the document prints
correctly, you can print the remaining copies of the print job from the printer control
panel. The number of proof-and-hold print jobs that can be stored in the printer is
set from the printer control panel.
Private Job and Stored Job)
The Private Job and Stored Job options can be secured by a four-digit personal
identification number (PIN).
PIN
You can assign a four-digit PIN to a print job when you are using the Private
Job or Stored Job feature. This number must be entered in the printer control
panel before it prints the job.
The box labeled PIN is usually inactive. Selecting Private Job or Stored Job
along with Require PIN to Print activates the PIN box. The Stored Job/PIN
coupling has a PIN restriction of four ASCII numeric characters (ASCII 0-30
through 0-39). If you enter non-numeric characters, they are removed
immediately. If you enter more than four characters, the characters past the
fourth are truncated. The field temporarily allows fewer than four digits in the
string, but when the edit field loses focus, the zeroes pad the left end until
there are exactly four digits. The default initialized value for the PIN is 0000 for
Private Job and Stored Job with Require PIN to Print checked.
Private Job
This option allows you to send a print job directly to the printer memory.
Selection of Private Job activates the PIN field.The print job can be printed
only after you enter a PIN in the printer control panel. After the job is printed,
the printer removes the job from the printer memory. This feature is useful
when you are printing sensitive or confidential documents you do not want to
leave in an output bin after printing. Private Job stores the print job on the
hard disk.
Once released for print, the private job is immediately deleted from the printer.
If more copies are needed, it will be necessary to reprint the job from the
application. If you send a second private job to the printer with the same user
name and job name as an existing private job (and you have not released the
original job for printing), the second job will overwrite the older job, regardless
of the PIN. Private jobs are deleted if power to the printer is removed.
Stored Job
Stored Job allows you to send a print job directly to the printer hard disk. The
print job will be stored in the printer as if it is an electronic file cabinet. After the
print job is stored in the printer's hard disk, you can print the job from the
printer control panel. Nothing will be printed until the job is requested from the
printer control panel.
The job remains stored on the printer until it is deleted or overwritten by a
document with the same user and job names. Stored jobs remain on the
printer hard disk when power is interrupted. Use this feature for forms and
other common or shared documents.
Software Technical Reference
Windows PS driver features 103
A stored job can be handled in two ways, as either a private or a public job. A
private stored job allows you to send a print job directly to the printer memory
and can be printed only after you enter a PIN in the printer control panel. (You
can set the PIN in the Print dialog box.) After the job is printed, the job remains
in the printer memory and can be printed again from the printer control panel.
This feature is useful when you are printing sensitive or confidential
documents you do not want to leave in an output bin after printing. Private
mode is initiated by clicking the Require PIN to Print check box. In this mode,
a PIN entry at the control panel is required to release the job.
The box labeled PIN is usually inactive. The Require PIN to Print option is
activated if you click Stored Job. If selected, you must enter a PIN to make
the stored job private.
Note
A private stored job is not the same as a private job (see above). Private jobs are deleted from the
printer memory after they are printed. Private stored jobs are retained in the printer memory after
printing, but require that a PIN be entered each time they are printed.
Device Settings tab features
The Device Settings tab contains controls for paper-handling devices and controls
for managing the HP LaserJet product. To gain access to the Device Settings tab,
click Start, then click Settings, then click Printers. Right-click the product name and
click Properties, then click the Device Settings tab.
Figure 42.
Device Settings tab
104 3 Driver features
Software Technical Reference
HP LaserJet software CD-ROM
In-box file layout
The HP LaserJet printer system consists of two partitions, one for installation using
Windows operating systems, the other for Macintosh operating systems. The files include
both documentation files and files required to install and uninstall the systems.
HP LaserJet software CD-ROM, Windows partition
Directory structure
The files contained in the Windows partition of the HP LaserJet software CDROM, grouped by language, reside in the following directories:
•
•
•
•
•
•
•
Root directory
Drivers directory
Fonts directory
Manuals directory
Reader directory
Additional software
Setup
File layouts differ according to language for the European and Asian versions of
the software CD-ROM.
To view the files, insert the HP LaserJet printing system software CD-ROM, rightclick Start, then click Explore, and then select the CD-ROM drive.
HP LaserJet software CD-ROM, Macintosh Partition
The files contained in the Macintosh partition of the HP LaserJet software CD-ROM,
grouped by language, reside in the following directories:
• Root directory
• HP LASERJET INSTALLERS (for Macintosh operating systems)
• PDF (for guides and manuals)
File layouts differ according to language for the European and Asian versions of
the software CD-ROM.
Availability and fulfillment
This section provides information about the availability of the HP LaserJet printing system
software and related software and firmware. Software and firmware are available on CDROM from HP fulfillment centers or can be downloaded from the http://www.hp.com/go/
lj9000_software Web site.
In-box CD-ROMs
The HP LaserJet software CD-ROM is available in three regional versions. The
following table lists the three versions of the software CD-ROM, along with the
languages each version supports.
Software Technical Reference
HP LaserJet software CD-ROM 105
Table 15.
CD-ROM versions
CD-ROM version
Languages supported
Americas
Dutch (Nederland)
English
French (Français)
German (Deutsch)
Hebrew
Italian (Italiano)
Portuguese (Português) - Brazilian
Spanish (Español)
European
Arabic
Czech (Cesky)
Danish (Dansk)
English
Finnish (Suomi)
Hungarian (Magyar)
Norwegian (Norsk)
Polish (Polski)
Russian (Russ)
Swedish (Svenska)
Turkish (Turkçe)
Asian
English
Chinese (Simplified)
Chinese (Traditional)
Korean
Japanese
9000mfp Web ordering
The HP LaserJet 9000mfp software CD-ROM and related software CD-ROMs can
be ordered from the http://www.hp.com/go/lj9000_cdrom Web site. Search by
product name and number to find the appropriate Web links.
Web deployment
Software and firmware to support HP LaserJet products are available for download
from the http://www.hp.com/go/lj9000_software and http://www.hp.com/go/
lj9000_firmware Web sites
This is the preferred method for obtaining the latest software and firmware. The Web
site offers a notification option for automatic e-mail notification about new software
and firmware releases.
106 3 Driver features
Software Technical Reference
Printing-system software
The HP LaserJet printing system software is available for download from the
HP Web site at:
http://www.hp.com/go/lj9000_software
The software supports the following operating systems:
• Windows 95, Windows 98, and Windows Me
• Windows NT 4.0, Windows 2000, and Windows XP
Printer firmware
Firmware to support the HP LaserJet products is available for download from the
HP Web site at http://www.hp.com/go/lj9000_firmware. Use the notification option
to be notified of new firmware releases.
Standalone drivers
The HP LaserJet PCL 6, PCL 5e, and PS drivers are available individually to
support the following operating systems:
•
•
•
•
•
Note
Windows 3.1x (all three drivers, plus fonts)
Windows 95, Windows 98, and Windows Me
Windows NT 4.0
Windows 2000
Windows XP
PCL 5e is not supported in Asian languages.
Operating system driver bundles
The HP LaserJet 9000PCL 6, PCL 5e, and PS drivers are available in bundled
configurations to support the following operating systems:
• Windows 95, Windows 98, and Windows Me
• Windows NT 4.0, Windows 2000, and Windows XP
Point-and-print bundles
The HP LaserJet 9000mfpPCL 6 driver is available in a point-and-print bundle to
support the Windows operating environments.
Other operating systems
Drivers and related software are available for these additional operating
environments:
• Macintosh OS (PPDs and Universal Installer)
• AutoCAD (AutoCAD family drivers)
• OS/2 (PCL 6, PCL 5e, and PS)
Software Technical Reference
HP LaserJet software CD-ROM 107
Software component availability
The following table lists the availability of HP LaserJet software components by
operating system.
In the following table, “3.x” refers to Windows 3.1x. “9x/Me” refers to Windows 95,
Windows 98, and Windows Me. “2K” refers to Windows 2000. “4.0” refers to Windows
NT 4.0. “XP” refers to Windows XP.
Table 16.
Software component availability for HP LaserJet 9000 product
Component
3.x
9x/
Me
4.0
2K/
XP
PCL 6
X
X
X
PCL 5e
X
X
X
OS/2 Mac UNIX Linux
Drivers
PCL 6 8100
X
PCL 5e 8100
X
PCL5 Unidriver GPD
PScript Driver & PPD
X
X
X
X
X
Mac QuickDraw PPD
X
OS/2 IBM Drivers
X
AutoCAD
X
X
X
Common Windows Installer
X
X
X
CD-ROM Browser
X
X
X
Customization Utility
X
X
X
Network Installer
X
X
X
Fonts
X
X
X
X
X
X
Plug & Play
X
X
X
Point & Print
X
X
X
X
X
X
Installers
INF File (Add Printer)
Add Printer
X
X
1
3.1x Font Installer
X
Macintosh Installer for OSs 8
and 9
X
Macintosh Installer for OS X
X
Web Registration
X
X
X
X
X
X
Web JetAdmin
X
X
X
Applet for Web JetAdmin
X
X
X
Bidirectional communication
Network Bidirectional
Communications
Remote management and status
Macintosh LJ Utility
Printer Status and Alerts
108 3 Driver features
X
X
X
X
Software Technical Reference
Table 16.
Software component availability for HP LaserJet 9000 product (continued)
Component
3.x
Autoconfiguration
9x/
Me
4.0
2K/
XP
X
X
X
OS/2 Mac UNIX Linux
Online Documentation
Adobe Acrobat Reader
X
X
X
X
X
HP LaserJet 9000mfp start
X
X
X
X
X
HP LaserJet 9000mfp use
guide
X
X
X
X
X
HP LaserJet 9000mfp
Installation
X
X
X
X
X
HP LaserJet 9000mfp Release X
Notes
X
X
X
X
2000-sheet Feeder Guide
X
X
X
X
X
Duplexing unit Guide
X
X
X
X
X
Multipurpose Tray Guide
X
X
X
X
X
HP Jetdirect Guide
X
X
X
X
X
Stacker/Stapler Guide
X
X
X
X
X
X
X
X
X
X
X
X
X
Guide
Multifunction Finisher Guide
Online Manual Printer
X
Mac PS Help
X
Help
X
X
X
X
X
X
X
X
X
X
X
X
Other
PS Fonts
PS Fonts DIMM
1
X
Supported as a stand-alone utility.
Software component localization
The following table provides localization information about the HP LaserJet Series
Printing system software. The information in this table does not necessarily reflect inbox solutions.
Components that are not available in any given language are supported in English.
Table 17.
Software component localization
Component Operating AR EN FR IT
system
GE HE SP JN KO TC SC SW DU PG NW FN DN CZ PO RU HU TU
PS PPD
3.x, 9x,
4.0, 2000,
XP
x1 x
x
x
x
x1 x
x
x
x
x
x
x
x
x
x
x
x
x
x
x
x
Printer
Status and
Alerts
9x, 4.0,
2000, XP
x
x
x
x
x
x
x
x
x
x
x
x
x
x
x
x
x
x
x
x
x
HP
Resource
Manager
9x, 4.0,
2000, XP
x
x
x
x
x
x
x
x
Software Technical Reference
x
x
HP LaserJet software CD-ROM 109
Table 17.
Software component localization (continued)
Component Operating AR EN FR IT
system
GE HE SP JN KO TC SC SW DU PG NW FN DN CZ PO RU HU TU
Mac
x
x
x
x
x
Macintosh LJ Mac
Utility
x
x
x
x
x
Macintosh
Installation
Notes
Mac
x
x
x
x
x
x
x
x
PCL 6
9x, 4.0,
2000, XP
x
x
x
x
x
x
x
x
x
x
PCL 5e
9x, 4.0,
2000, XP
x
x
x
x
x
x
x
Printing
System
Installation
Notes
ReadMe
9x, 4.0,
2000, XP
x
x
x
x
x
x
x
x
x
x
x
x
x
x
x
x
x
x
Macintosh
PS PPD
x
x
x
x
x
x
x
x
x
x
x
x
x
x
x
x
x
x
x
x
x
x
x
x
x
x
x
x
x
x
x
x
x
x
x
x
x
x
x
x
x
x
x
x
x
x
x
x
x
x
x
x
x
x
x
x
x
x
x
x
x
x
x
x
x
x
x
x
x
x
x
x
x
x
x
x
x
x
Printing
9x, 4.0,
System
2000, XP
Release
Notes (Latebreaking
ReadMe
x
Common
Windows
Installer
9x, 4.0,
2000
Web
JetAdmin
4.0, 2000,
XP, UNIX
x
x
x
x
x
x
x
x
x
x
x
x
x
x
x
x
x
x
x
x
Web
JetAdmin
Help
4.0, 2000,
XP, UNIX
x
x
x
x
x
x
x
x
x
x
x
x
x
x
x
x
x
x
x
x
x
x
x
x
x
x
x
x
x
x
x
x
x
x
x
x
x
x
x
x
x
x
x
x
x
x
x
x
x
x
x
x
x
HP Web
Access
Online
manuals
(PDF)
9.x, 4.0,
2000, XP
x
IBM OS/2
Driver PCL5C
OS/2
IBM IBM IBM IBM
IBM
IBM IBM IBM IBM IBM IBM
IBM OS/2
Driver - PS
OS/2
IBM IBM IBM IBM
IBM
IBM IBM IBM IBM IBM IBM
Standard
Fonts
9x, 4.0,
2000, XP
x
x
x
x
x
x
x
x
x
x
x
x
x
x
x
x
x
x
x
PS3 Fonts
9x, 4.0,
2000, XP
x
x
x
x
x
x
x
x
x
x
x
x
x
x
x
x
x
x
x
1For
x
x
x
the Windows NT 4.0 operating system, the English driver is used.
Language Key:
AR = Arabic
EN = English
FR = French
HE = Hebrew
IT = Italian
GE = German
SP = Spanish
JN = Japanese
KO = Korean
TC = Traditional Chinese
SC = Simplified Chinese
SW = Swedish
DU = Dutch
PG = Portuguese
110 3 Driver features
Software Technical Reference
NW = Norwegian
FN = Finnish
DN = Danish
CZ = Czech
PO = Polish
HU = Hungarian
TU = Turkish
Software Technical Reference
HP LaserJet software CD-ROM 111
112 3 Driver features
Software Technical Reference
4
Installing Windows printing
system components
Introduction
This section provides system requirements and procedures for installing and removing
the HP LaserJet printing system software using Windows operating systems. It also
provides information about font support and system modifications. The following Windows
operating systems are supported:
l
l
l
Windows 95, Windows 98, and Windows Me
Windows NT 4.0, Windows 2000, and Windows XP
Windows 3.1x
System Requirements
The system requirements necessary to install and use the HP LaserJet printing system
software on each supported operating system are listed below.
Note
The available disk space listed in the subsections below must be available on the same partition as
the operating system.
Windows 3.1x
l
l
l
l
386 processor or higher
Minimum 16 color/greyscale display with 640 x 480 pixel resolution (VGA)
16 MB RAM
20 MB of available disk space for full installation
Windows 95, 98, Me, NT 4.0, 2000, and XP
l
l
l
l
Pentium processor
Minimum 16 color/greyscale display with 640 x 480 pixel resolution (video graphics
array [VGA])
Same as the minimum requirements for the operating system
64 MB of available disk space for full installation
Software Technical Reference
Introduction 113
Windows 95, 98, Me, NT 4.0, 2000, and XP
This section addresses the following topics:
l
l
l
l
Font support
General installation for Windows 95, WIndows 98, WIndows Me, Windows NT 4.0,
WIndows 2000, and Windows XP operating systems
Detailed WIndows installation instructions
Setting a default printer
Font support
Basic fonts
Microsoft Windows software includes these basic fonts that can be used with any
HP printer:
•
•
•
•
•
•
•
•
•
•
•
•
•
•
Arial (R)
Courier New Italic
Times New Roman Italic
Arial Italic
Courier New Bold
Times New Roman Bold
Arial Bold
Courier New Bold Italic
Times New Roman Bold Italic
Arial Bold Italic
Symbol
Wingdings
Courier New
Times New Roman
Default Fonts
The following default fonts are installed through a Typical Installation of the
HP LaserJet printing system software.
Table 18. Default Fonts
File name
Font name
albr85w.TTF
Albertus Extra Bold
albr55w.TTF
Albertus Medium
olvr55w.TTF
Antique Olive
olvr75w.TTF
Antique Olive Bold
olvr56w.TTF
Antique Olive Italic
cgor45w.TTF
CG Omega
cgor65w.TTF
CG Omega Bold
114 4 Installing Windows printing system components
Software Technical Reference
Table 18. Default Fonts
File name
Font name
cgor66w.TTF
CG Omega Bold Italic
cgor46w.TTF
CG Omega Italic
cgtr45w.TTF
CG Times
cgtr65w.TTF
CG Times Bold
cgtr66w.TTF
CG Times Bold Italic
cgtr46w.TTF
CG Times Italic
clar67w.TTF
Clarendon Condensed Bold
coronet.TTF
Coronet
cpsr45w.TTF
CourierPS
cpsr65w.TTF
CourierPS Bold
cpsr66w.TTF
CourierPS Bold Oblique
cpsr46w.TTF
CourierPS Oblique
garr45w.TTF
Garamond
garr65w.TTF
Garamond Bold
garr46w.TTF
Garamond Italic
garr66w.TTF
Garamond Kursiv Halbfett
helr45w.TTF
Helvetica
helr65w.TTF
Helvetica Bold
helr66w.TTF
Helvetica Bold Oblique
helr47w.TTF
Helvetica Narrow
helr67w.TTF
Helvetica Narrow Bold
helr68w.TTF
Helvetica Narrow Bold Oblique
helr48w.TTF
Helvetica Narrow Oblique
helr46w.TTF
Helvetica Oblique
avgr45w.TTF
ITC Avant Garde Gothic Book
avgr46w.ttg
ITC Avant Garde Gothic Book Oblique
avgr65w.TTF
ITC Avant Garde Gothic Demi
avgr66w.TTF
ITC Avant Garde Gothic Demi Oblique
bokr75w.TTF
ITC Bookman Demi
bokr76w.TTF
ITC Bookman Demi Italic
bokr35wq.TTF
ITC Bookman Light
bokr36w.TTF
ITC Bookman Light Italic
chanc___.TTF
ITC Zapf Chancery Medium Italic
dings___.TTF
ITC Zapf Dingbats
letr65w.TTF
Letter Gothic
letr65w.TTF
Letter Gothic Bold
letr46w.TTF
Letter Gothic Italic
marigold.TTF
Marigold
ncsr75w.TTF
New Century Schoolbook Bold
ncsr76w.TTF
New Century Schoolbook Bold Italic
Software Technical Reference
Windows 95, 98, Me, NT 4.0, 2000, and XP 115
Table 18. Default Fonts
File name
Font name
ncsr56w.TTF
New Century Schoolbook Italic
ncsr55w.TTF
NEw Century Schoolbook Roman
palr65w.TTF
Palatino Bold
palr66w.TTF
Palatino Bold Italic
palr46w.TTF
Palatino Italic
palr45w.TTF
Palatino Roman
symps__.TTF
SymbolPS
timr65w.TTF
Times Bold
timr66w.TTF
Times Bold Italic
timr46w.TTF
Times Italic
timr45w.TTF
Times Roman
unvr65w.TTF
Univers Bold
unvr66w.TTF
Univers Bold Italic
unvr67w.TTF
Univers Condensed Bold
unvr68w.TTF
Univers Condensed Bold Italic
unvr57w.TTF
Univers Condensed Medium
unvr58w.TTF
Univers Condensed Medium Italic
unvr55w.TTF
Univers Medium
unvr56w.TTF
Univers Medium Italic
Ninety-two additional PS 3 fonts are also available on the CD-ROM.
Table 19.
Additional PS 3 fonts
File name
Font name
PS_12639.TTF
Albertus MT
PS_12640.TTF
Albertus MT Italic
PS_14530.TTF
Albertus MT Light
PS-11120.TTF
Antique Olive CompactPS
PS_11119.TTF
Antique Olive Roman
PS_11118.TTF
Antique Olive Roman Bold
PS_11846.TTF
Antique Olive Roman Italic
PS_24516.TTF
Apple Chancery Italic
PS_12704.TTF
Bodoni Poster
PS_14508.TTF
Bodoni PosterCompressed
PS_12581.TTF
BodoniPS
PS_12585.TTF
BodoniPS Bold
PS_12586.TTF
BodoniPS Bold Italic
PS_12582.TTF
BodoniPS Italic
PS_24517.TTF
Candid
PS_24518.TTF
Chicago
116 4 Installing Windows printing system components
Software Technical Reference
Table 19.
Additional PS 3 fonts (continued)
File name
Font name
PS_14513.TTF
Clarendon Light
PS_10269.TTF
ClarendonPS
PS_12968.TTF
ClarendonPS Bold
PS_10369.TTF
Cooper Black
PS_10370.TTF
Cooper Black Italic
PS_14514.TTF
Copperplate32bc
PS_14515.TTF
Copperplate33bc
PS_10249.TTF
Coronet
PS_10267.TTF
Eurostile
PS_10268.TTF
Eurostile Bold
PS_14512.TTF
Eurostile Bold ExtendedTwo
PS_14511.TTF
Eurostile ExtendedTwo
PS_10267.TTF
Eurostile Medium
PS_24509.TTF
Geneva
PS_13872.TTF
GillSans
PS_13874.TTF
GillSans Bold
PS_13875.TTF
GillSans Bold Italic
PS_14053.TTF
GillSans Condensed
PS_14054.TTF
GillSans Condensed Bold
PS_14051.TTF
GillSans ExtraBold
PS_13873.TTF
GillSans Italic
PS_13870.TTF
GillSans Light
PS_13871.TTF
GillSans Light Italic
PS_12542.TTF
Goudy
PS_12544.TTF
Goudy Bold
PS_10695.TTF
Goudy Bold Italic
PS_12545.TTF
Goudy ExtraBold
PS_12543.TTF
Goudy Italic
PS_14526.TTF
Helvetica Condensed
PS_14528.TTF
Helvetica Condensed Bold
PS_14529.TTF
Helvetica Condensed Bold Italic
PS_14527.TTF
Helvetica Condensed Italic
PS_24519.TTF
Hoefler Text
PS_24521.TTF
Hoefler Text Black
PS_24522.TTF
Hoefler Text Black Italic
PS_24520.TTF
Hoefler Text Italic
PS_24523.TTF
Hoefler Text Ornaments
PS_14503.TTF
Joanna MT
PS_14505.TTF
Joanna MT Bold
PS_14506.TTF
Joanna MT Bold Italic
Software Technical Reference
Windows 95, 98, Me, NT 4.0, 2000, and XP 117
Table 19.
Additional PS 3 fonts (continued)
File name
Font name
PS_14504.TTF
Joanna MT Italic
PS_13778.TTF
Letter Gothic Italic
PS_13777.TTF
Letter GothicPS
PS_13779.TTF
Letter GothicPS Bold
PS_13780.TTF
Letter GothicPS Bold Italic
PS_12675.TTF
Lubalin Graph
PS_12677.TTF
Lubalin Graph Bold
PS_12625.TTF
Lubalin Graph Bold Italic
PS_12623.TTF
Lubalin Graph Italic
PS_94073.TTF
Marigold
PS_14525.TTF
Mona Lisa Recut
PS_24524.TTF
Monaco
PS_24510.TTF
New York
PS_12506.TTF
Optima
PS_12510.TTF
Optima Bold
PS_12511.TTF
Optima Bold Italic
PS_12507.TTF
Optima Italic
PS_14072.TTF
Oxford Italic
PS_11546.TTF
Stempel Garamond Roman Italic
PS_11545.TTF
StempelGaramond Roman
PS_11547.TTF
StempelGaramond Roman Bold
PS_11548.TTF
StempelGaramond Roman Bold
Italic
PS_14507.TTF
Taffy
PS_13501.TTF
Univers 45 Light
PS_14023.TTF
Univers 45 Light Bold
PS_14024.TTF
Univers 45 Light Bold Italic
PS_13502.TTF
Univers 45 Light Italic
PS_14030.TTF
Univers 47 Condensed Light Bold
PS_14040.TTF
Univers 47 CondensedLIght Bold
Italic
PS_14021.TTF
Univers 55
PS_14022.TTF
Univers 55 Italic
PS_14029.TTF
Univers 57 Condensed
PS_14039.TTF
Univers 57 Condensed Italic
PS_13548.TTF
Univers Extended Italic
PS_13547.TTF
Univers ExtendedPS
PS_14481.TTF
Univers ExtendedPS Bold Italic
PS_14480.TTF
Univers ExtendedPS Italic
118 4 Installing Windows printing system components
Software Technical Reference
Installation instructions
General installation for Windows 95, 98, Me, NT 4.0, 2000, and XP OSs
General installation instructions for the Windows 95, Windows 98, Windows Me,
Windows NT 4.0, Windows 2000, and Windows XP operating systems, presented in
the following table, are similar. When instructions are not shared by all of these
Windows operating systems, the pertinent ones are listed in the left column of the
table.
If the HP LaserJet product is connected through a file or print server, the HP LaserJet
printing system software must first be installed on the server before being installed on
any client systems. If the HP LaserJet printing system software is not first installed on
the server, bidirectional communication, some Driver Autoconfiguration methods, and
Printer Status and Alerts will not be available to the client systems.
For Windows NT 4.0, Windows 2000, and Windows XP, administrator rights on the
system are necessary to install the software.
When the HP LaserJet printing system installer runs, the HP LaserJet uninstaller is
always added to the system.
Bidirectional communication and Driver Autoconfiguration are installed on the system
only in supported network environments. Parallel and USB connections do not
support bidirectional communication.
Installing from the printing system CD-ROM
To install the HP LaserJet printing system from the CD-ROM that came with your
product, follow these instructions:
Step 1 Close all applications.
Step 2 Insert the CD-ROM in the CD-ROM drive.
Step 3 Click install printer and follow the screen prompts.
Step 4 If your CD-ROM does not autostart, browse to the SETUP.EXE file in
the root location of the CD-ROM.
Installing from a network or from downloaded files
Follow these instructions if you downloaded the files from the Web, or if you are
installing the printing system files from a network. You may need to see your
administrator for the location of the printing system software file.
Step 1 Browse to the location of the SETUP.EXE file.
Step 2 Double-click the SETUP.EXE file.
Step 3 Click install printer and continue to follow the instructions until the
product is installed. For detailed installation instructions, see “Detailed
Windows installation.”
Detailed Windows installation
This section provides information about the installation dialog box sequence for
installing the HP LaserJet printing system software in Microsoft Windows
environments. You can choose to install the software by using either a Typical
Installation or a Custom Installation.
Software Technical Reference
Windows 95, 98, Me, NT 4.0, 2000, and XP 119
Typical Installation dialog box sequence
Note
The dialog boxes shown here appear in the Windows NT 4.0 installation sequence. The order and
appearance of dialog boxes can vary among operating systems.
The Typical Installation includes the following components:
• HP LaserJet PCL 6 driver.
• Screen fonts.
• Driver Autoconfiguration (in environments that support bidirectional
communication). This option will not appear in unsupported bidirectional
communications environments.
When you select the Install Printer option from the HP LaserJet software CD-ROM
browser, the Choose Setup Language dialog box appears. This dialog box does not
display when the setup language is Arabic or Hebrew.
Figure 43.
Choose Setup Language dialog box
Note
The Choose Setup Language dialog box lists only the languages available on the particular
HP LaserJet software CD-ROM you are using.
Table 20.
Choose Setup Language dialog box text strings
Title of dialog box
Text in dialog box
Choose Setup Language
Select the language for this
The installer automatically detects
installation from the choices below: your computer system language and
presents this choice as the default.
[Drop-down menu lists available
languages for installation.]
OK [button]
Cancel [button]
User options and descriptions
You can select another language
available on the CD-ROM by
clicking the down arrow of the dropdown menu.
Click OK to initiate the printing
system setup.
Click Cancel to go to the Exit Setup
dialog box.
120 4 Installing Windows printing system components
Software Technical Reference
Next, the Setup dialog box appears.
Figure 44.
Setup dialog box
Note
While the Setup dialog box appears, the installer is decompressing files into the system Temp
directory. The elapsed time to complete this action depends upon the performance of the system.
Table 21.
Figure 45.
Setup dialog box text strings
Title of dialog box
Text in dialog box
User options and descriptions
Setup
HP LaserJet 9000 Series Printing
System Setup is preparing the
InstallShield (R) Wizard that will
guide you through the rest of the
setup process. Please wait.
No user options. This is an
information-only dialog box.
Welcome dialog box
Software Technical Reference
Windows 95, 98, Me, NT 4.0, 2000, and XP 121
Table 22.
Welcome dialog box text strings
Title of dialog box
Text in dialog box
User options and descriptions
Welcome
Welcome to the HP LaserJet 9000
Series Printing System Setup
Wizard.
Next takes you to the
HP Software License Agreement
dialog box.
It is strongly recommend that you
close all other applications before
running this Setup wizard.
Click Installation Notes to open the
file READXXXX.WRI.
Before continuing, refer to the
Setup poster and make any
required connections.
Click Cancel to go to the Exit Setup
dialog box.
Click Next to continue.
Copyright Hewlett-Packard XXXX
Figure 46.
HP Software License Agreement dialog box
122 4 Installing Windows printing system components
Software Technical Reference
Table 23.
HP Software License Agreement dialog box text strings
Title of dialog box
Text in dialog box
User options and descriptions
HP Software License Agreement
Please read the following license
agreement. Use the scroll bar to
view the entire agreement.
Yes takes you to the Web Update
dialog box.
[Scrolling fields with text of license
agreement]
Back returns you to the Welcome
dialog box.
No takes you to the Exit Setup
Do you accept the terms of the
dialog box.
preceding license agreement? If so,
click Yes. If you click No, Setup will
close.
Figure 47.
Web Update dialog box
Software Technical Reference
Windows 95, 98, Me, NT 4.0, 2000, and XP 123
Table 24.
Web Update dialog box text strings
Title of dialog box
Text in dialog box
Web Update
Setup can look for updated software This is a conditional dialog box; that
at the Hewlett-Packard Web site.
is, it appears only if the Setup
program determines there might be
an Internet connection available.
Would you like Setup to check the
Web for updated software?
(Conditional)
User options and descriptions
Yes (requires an active Internet
connection) [option button]
No [option button]
If No is selected, Next takes you to
the Type of Connection dialog box.
This is the default option.
If Yes is selected, clicking Next
starts the Web Update. Details of
the Internet installation are not
covered in this document. Web
Update requires Internet Explorer
4.0 or later.
Back returns you to the HP
Software License Agreement
dialog box.
Cancel takes you to the Exit Setup
dialog box.
124 4 Installing Windows printing system components
Software Technical Reference
Figure 48.
Type of Connection dialog box
Table 25.
Type of Connection dialog box text strings
Title of dialog box
Text in dialog box
Type of Connection
Please select the way your printer
will be connected:
Connected to this computer (by
parallel cable, USB cable or IR)
[option button]
Connected to the network (that is,
the printer is connected directly to
the network or shared through
another computer on the network)
[option button]
User options and descriptions
If Connected to this computer (a
“direct connection”) is selected,
Next takes you to the Select Port
dialog box. This is the default option.
If Connected to the network is
selected, Next takes you to the
Network Setup dialog box.
Back returns you to the HP
Software License Agreement
dialog box.
Cancel takes you to the Exit Setup
dialog box.
Software Technical Reference
Windows 95, 98, Me, NT 4.0, 2000, and XP 125
Figure 49.
Select Port dialog box
Table 26.
Select Port dialog box text strings
Title of dialog box
Text in dialog box
User options and descriptions
Select Port
Select the port you want to use with Regardless of the port chosen
this printer:
(Parallel or Other), clicking Next
takes you to the printer Model
dialog box.
(If Connected to this computer was
selected in the Type of Connection Parallel [option button]
dialog box)
[Default. When selected, a pullClicking Back returns you to the
down list of parallel ports is
Type of Connection dialog box.
available.]
Other [option button]
Clicking Cancel takes you to the
Exit Setup dialog box.
[When selected, a pull-down list of
other port types is available]
126 4 Installing Windows printing system components
Software Technical Reference
Figure 50.
Network Setup dialog box
Software Technical Reference
Windows 95, 98, Me, NT 4.0, 2000, and XP 127
Table 27.
Network Setup dialog box text strings
Title of dialog box
Text in dialog box
User options and descriptions
Network Setup
Indicate the type of network
connection
If you choose the Client Setup
option, Next takes you to the
Specify Network Path dialog box,
and then to the Installation Type
dialog box.
[If Connected to the network was
selected in the Type of Connection Basic Microsoft Server Setup
dialog box], Next takes you to the
Create a connection (network port)
Network Printer Configuration
to a printer attached directly to the
dialog box.
network. Your computer will
manage its own print jobs and may
optionally share the printer with
other network users.
[option button]
If the Help me option is chosen,
Next initiates a series of question
dialog boxes that help you
determine the best connection type
option to follow. This series begins
with the Cable Type Selection
dialog box.
Client Setup
Back returns you to the Type of
The printer is already set up as a
Connection dialog box.
shared printer on the network and is
managed by a server or another
computer.
Cancel takes you to the Exit Setup
dialog box.
[option button]
Help me determine which setup is
right for me
Setup will ask you questions to help
you determine the appropriate
network setup for your situation.
[option button]
128 4 Installing Windows printing system components
Software Technical Reference
Figure 51.
Network Printer Configuration dialog box
Table 28.
Network Printer Configuration dialog box text strings
Title of dialog box
Text in dialog box
User options and descriptions
Network Printer Configuration
How do you want to identify the
network printer you are installing?
If you click Search from a list of
available printers, Next takes you
to the Identify Printer dialog box.
Search from a list of available
printers [option button]
If you click Specify a printer by
address, Next takes you to the
Identify Printer dialog box.
[Description] Searches the local
network for printers and allows you
to choose your printer from a list of Always choose Specify a printer by
discovered printers.
address when the printer address is
available. On large networks,
selecting Search from a list of
available printers might not result
Specify a printer by address
in the location of a specific printer.
[option button]
Back returns you to the Network
[Description] Allows you to specify Setup dialog box.
your printer by entering one of the
following attributes: Hardware
Address, IP Address, IP Hostname,
Cancel takes you to the Exit Setup
or IPX Address.
dialog box.
Description
[Conditional text]
Software Technical Reference
Windows 95, 98, Me, NT 4.0, 2000, and XP 129
Figure 52.
Identify Printer dialog box (1 of 2)
Figure 53.
Identify Printer dialog box (2 of 2)
130 4 Installing Windows printing system components
Software Technical Reference
Table 29.
Identify Printer dialog box text strings
Title of dialog box
Text in dialog box
Identify Printer
Select the network printer you want If you identify the printer by selecting
to install.
from the list, and your
Printers on your local network:
[List, with attributes of Hardware
Address, IP Address, and IPX
Address listed, if available]
If your printer is not found on the
list, click ’Refresh’, or go back and
click ’Specify a printer by address’.
User options and descriptions
HP LaserJet product appears in the
list and is selected, Next takes you
to the Set Network
Communication Mode dialog box.
If your HP LaserJet product is not
found on the network, click Refresh
or go back to the Network Printer
Configuration dialog box to specify
the device by address.
Refresh updates the list of network
printers.
OR
Specify the network printer you
want to install.
Specify by:
Hardware Address. [option button]
[text field]
IP Address [option button}
[text fields]
If you identify the printer by
specifying a specific network
address, Next takes you to the Set
Network Communication Mode
dialog box.
Back returns you to the Network
Printer Configuration dialog box.
Cancel takes you to the Exit Setup
dialog box.
IP Hostname [option button]
[text field]
IPX Address [option button}
[text fields]
Description
[Conditional text]
Software Technical Reference
Windows 95, 98, Me, NT 4.0, 2000, and XP 131
Figure 54.
Specify Network Path dialog box
Table 30.
Specify Network Path dialog box text strings
Title of dialog box
Text in dialog box
Specify Network Path
Type the network path or the queue If a network path or queue name is
name of your printer. If you do not entered, Next takes you to the
know its name, click Browse to view Cable Type Selection dialog box.
the available network printers.
Network path or queue name:
[text field]
User options and descriptions
NOTE: If you reached this dialog
box from the Connected to
Selection dialog box, Next takes
you to the Installation Type dialog
box.
Browse ...[button]
Click Browse to bring up a list of
devices available on the network.
Back returns you to the Network
Setup dialog box.
Cancel takes you to the Exit Setup
dialog box.
132 4 Installing Windows printing system components
Software Technical Reference
Figure 55.
Set Network Communication Mode dialog box
Table 31.
Set Network Communication Mode dialog box text strings
Title of dialog box
Text in dialog box
Set Network Communication Mode Select a communication mode for
this printer
[drop-down menu:
User options and descriptions
Select a communication mode and
type the appropriate address
information.
Windows TCP/IP (recommended)
After you have specified a
communications mode, Next takes
you to the printer Model dialog box.
other modes listed]
TCP/IP Settings
[Conditional fields for entering TCP/ Back returns you to the Identify
Printer dialog box.
IP or other address information]
Use default port name [check box]
Software Technical Reference
Cancel takes you to the Exit Setup
dialog box.
Windows 95, 98, Me, NT 4.0, 2000, and XP 133
Figure 56.
Printer Model dialog box
Table 32.
Printer Model dialog box text strings
Title of dialog box
Text in dialog box
User options and descriptions
Model
Select the model you are setting up. Next takes you to the Installation
Type dialog box.
Model:
[List of HP LaserJet models]
Description
[Conditional text, depending upon
which model is chosen in the list]
Back returns you to the Select Port
dialog box when you are performing
a direct connection installation, or to
the Set Network Communication
Mode dialog box when you are
performing a network installation.
Cancel takes you to the Exit Setup
dialog box.
134 4 Installing Windows printing system components
Software Technical Reference
Figure 57.
Installation Type dialog box
Software Technical Reference
Windows 95, 98, Me, NT 4.0, 2000, and XP 135
Table 33.
Installation Type dialog box text strings
Title of dialog box
Text in dialog box
User options and descriptions
Installation Type
Choose the installation type.
If Typical Installation is selected,
Next takes you to the Printer Name
dialog box.
Typical Installation
[option button]
The following components will be
installed:
· HP LaserJet 9000 PCL 6 Driver
· Driver Autoconfiguration (if
connecting to a network port)
· Screen Fonts
Custom Installation
If Custom Installation is selected,
Next takes you to the Components
Recommended for advanced users
dialog box.
and system administrators.
Provides more flexibility for
installing drivers and software.
Back returns you to the printer
Model dialog box.
[option button]
Cancel takes you to the Exit Setup
dialog box.
NOTE: For direct connection
installations, Driver
Autoconfiguration is not an
available option.
136 4 Installing Windows printing system components
Software Technical Reference
Figure 58.
Printer Name dialog box
Table 34.
Printer Name dialog box text strings
Title of dialog box
Text in dialog box
User options and descriptions
Printer Name
Specify a name for this printer. You Next takes you to the Printer
can use the name supplied below or Sharing dialog box.
type a new one. The name will be
used to identify the printer in your
Printers folder.
The default printer name in the text
field is HP LaserJet 9000 PCL 6.
Printer Name:
[text entry field]
Back returns you to the Installation
Type dialog box.
Do you want your Windows-based
programs to use this as the default
printer?
Cancel takes you to the Exit Setup
dialog box.
Yes [option button]
No [option button]
Software Technical Reference
Windows 95, 98, Me, NT 4.0, 2000, and XP 137
Figure 59.
Printer Sharing dialog box
Note
When you do not share the printer, additional driver support is not available. If you share the printer
on Windows NT 4.0, Windows 2000, or Windows XP operating systems by selecting Share as, you
must type a name. You can also provide additional printer driver support for other operating systems.
138 4 Installing Windows printing system components
Software Technical Reference
Table 35.
Printer Sharing dialog box text strings
Title of dialog box
Text in dialog box
User options and descriptions
Printer Sharing
Indicate whether this printer will be Next starts the file copy process.
shared with other network users. If
you choose sharing, give the printer
a share name.
Back returns you to the Printer
Name dialog box.
Not shared [option button]
Cancel takes you to the Exit Setup
dialog box.
Share as [text entry field]
NOTE: Exceeding 12 characters
can make the printer inaccessible to
Windows 95/98 clients. (Windows
Me is not displayed but is
supported.)
Client Driver Support
Additional drivers can be installed
on this computer to support
automated driver download to
clients.
Install a Windows 95 (or Windows
98 or Windows Me) driver. [check
box]
Software Technical Reference
Windows 95, 98, Me, NT 4.0, 2000, and XP 139
Figure 60.
Finish dialog box
Table 36.
Finish dialog box text strings
Title of dialog box
Text in dialog box
Finish
Your HP LaserJet 9000 printer has Finish completes the installation
been successfully installed.
process and initiates test-page
printing and Web-page registration if
those options are selected.
Installation Details
[button]
Select the actions to perform when
Setup finishes.
Print a test page [check box]
User options and descriptions
Click Installation Details to display
a modal dialog box that shows
installation details.
NOTE: If the computer must be
restarted, the Print a test page and
Web Registration functions will
occur after the computer is started.
Web Registration [check box]
140 4 Installing Windows printing system components
Software Technical Reference
Figure 61.
Exit Setup dialog box
Table 37.
Exit Setup dialog box text strings
Title of dialog box
Text in dialog box
User options and descriptions
Exit Setup
Setup is not complete. If you quit
the Setup program now, the
program will not be installed.
Exit Setup quits the Installer
program.
[when Cancel is selected]
Resume takes you to the dialog box
You can run the Setup program at a you most recently canceled.
later time to complete the
installation.
To continue installing the program,
click Resume. To quit the Setup
program, click Exit Setup.
Custom installation
The custom installation gives you the option of installing the following components:
•
•
•
•
•
•
HP LaserJet PCL 6 driver
HP LaserJet PCL 5e driver
HP LaserJet PS driver
screen fonts
printer documentation
accessory documentation
Software Technical Reference
Windows 95, 98, Me, NT 4.0, 2000, and XP 141
Note
Windows NT 4.0, Windows 2000, and Windows XP computers running a terminal server do not support
the Printer Status and Alerts option.
Figure 62.
Components dialog box, Custom Installation
142 4 Installing Windows printing system components
Software Technical Reference
Table 38.
Custom Installation dialog box text strings
Title of dialog box
Text in dialog box
User options and descriptions
Components
Select the components you want to Next takes you to the Printer Name
install.
dialog box.
Back returns you to the Installation
Type dialog box.
Components:
Description
Cancel takes you to the Exit Setup
[Conditional text, according to the
dialog box.
item currently highlighted in the list]
Space Required
[Specifies disk space required to
install components currently
selected in list]
NOTE: Custom Installation
automatically selects the options
available in the Typical Installation.
You can also select from among the
following components:
· PCL 5e driver
Space Available
· PS driver
[Specifies disk space available on
disk drive specified in Choose
Destination Location dialog box
(00)]
· screen fonts
· printer documentation
· accessory documentation
Product registration (HP WebReg)
The HP LaserJet software CD-ROM browser provides two options for registering the
HP LaserJet product:
• Registration through the Internet to the http://register.hp.com Web site
• Registration by e-mail
Note
Web registration for Hebrew and Arabic is in English.
Software Technical Reference
Windows 95, 98, Me, NT 4.0, 2000, and XP 143
To gain access to the product-registration options, go to the main menu of the
HP LaserJet software CD-ROM browser and click Register Product. This starts the
HP WebReg utility and opens the following window.
Figure 63.
Hewlett-Packard’s Electronic Registration dialog box
144 4 Installing Windows printing system components
Software Technical Reference
Table 39.
Hewlett-Packard’s Electronic Registration text strings
Title of dialog box
Text in dialog box
User options and descriptions
Hewlett-Packard's Electronic
Registration
Welcome to HP's registration. This
information is confidential and for
HP registration purposes only. This
is the fastest and easiest way for
you to join our select group of
HP owners who register to receive:
Click the WWW Registration button to
open the default Web browser and
connect to the product registration page
at the http://register.hp.com Web site.
Direct-to-you details about:
l ideas and ways to use your
new HP product.
l other exciting HP products.
l news about emerging
technologies.
Click the Electronic Registration button
to open the Welcome to HewlettPackard's Registration dialog box.
Click the Exit button to open the Exiting
Registration! dialog box.
Technical support updates.
If you have internet access and
would like to register using our
World Wide Web registration page,
click here:
WWW Registration [button] [default
option]
If you do not have internet access
or would rather register using email, please click here to continue
with Hewlett-Packard's Electronic
Registration.
Electronic Registration [button]
Exit [button]
Software Technical Reference
Windows 95, 98, Me, NT 4.0, 2000, and XP 145
Figure 64.
Welcome to Hewlett-Packard’s Registration dialog box
Table 40.
Welcome to Hewlett-Packard’s Registration dialog box text strings
Title of
dialog box
Text in dialog box
User options and
descriptions
Welcome to Hewlett-Packard's
Registration
Welcome to HP's electronic
registration. This information is
confidential and for HP registration
purposes only.
Click the Previous button to return
to the Hewlett-Packard's
Electronic Registration dialog
box.
Please select the country/region
Click the Continue button to start a
where you are located. [drop-down sequence of three screens. The
menu]
first screen provides fields for
typing your registration information.
The second screen prompts you for
information about your HP LaserJet
Please continue to go to the next
screen and begin your registration 9000 product. The third screen
gives you the option of sending the
e-mail message to register the
product.
Previous [button]
Continue [button]
[default option]
Click the Exit button to open the
Exiting Registration! dialog box.
Exit [button]
146 4 Installing Windows printing system components
Software Technical Reference
Figure 65.
Hewlett-Packard’s Electronic Registration dialog box (1 of 3)
Software Technical Reference
Windows 95, 98, Me, NT 4.0, 2000, and XP 147
Table 41.
Hewlett-Packard’s Electronic Registration dialog box text strings (1 of 3)
Title of
dialog box
Text in dialog box
User options and descriptions
Hewlett-Packard's Electronic
Registration
Please complete the following
(required fields are denoted by a
blue asterisk):
Click the Previous button to go back
to the Welcome to HewlettPackard's Registration dialog box.
[The following items are fields
unless otherwise noted.]
Click the Continue button to go to
the second screen in this sequence.
First name*
Click the Exit button to open the
Exiting Registration! dialog box.
[This is the first of three screens.]
Middle Initial
Last Name*
Company/Organization Name*
Building/Mail Stop/Dept.
Mailing Address*
City/Town*
State* [drop-down menu]
Zip Code*
E-mail Address
Telephone Number
Extension
Occasionally HP communicates
information about products and/or
programs that might be relevant to
you. Please select the method(s)
HP can use to contact you. (check
all that apply)
E-mail [check box]
Mail [check box]
Telephone [check box]
Please don't contact me unless I
specifically request it [check box]
Previous [button]
Continue [button]
Exit [button]
148 4 Installing Windows printing system components
Software Technical Reference
Figure 66.
Hewlett-Packard’s Electronic Registration dialog box (2 of 3)
Software Technical Reference
Windows 95, 98, Me, NT 4.0, 2000, and XP 149
Table 42.
Hewlett-Packard’s Electronic Registration dialog box text strings (2 of 3)
Title of
dialog box
Text in dialog box
User options and
descriptions
Hewlett-Packard's Electronic
Registration
Please tell us about the HewlettPackard product you purchased:
Click the Previous button to go
back to the first screen in this
sequence.
[This is the second of three
screens.]
Where will your new HewlettPackard product primarily be used? Click the Continue button to go to
[drop-down menu]
the third screen in this sequence.
Which Hewlett-Packard product did Click the Exit button to open the
you purchase? [drop-down menu] Exiting Registration! dialog box.
When did you purchase your
Hewlett-Packard product? [field]
Type the date you purchased your
Hewlett-Packard product.
Serial Number [field]
Type the product’s serial number.
Approximately how many
employees work at your...site?
Worldwide?
The questions about the number of
employees and your job
responsibility (answering is
optional) appear only if you
answered that you will use your
What is your job responsibility as it Hewlett-Packard product primarily
for business or telecommuting.
relates to HP products?
Dropdown boxes with possible
answers are provided for your
convenience.
150 4 Installing Windows printing system components
Software Technical Reference
Figure 67.
Hewlett-Packard’s Electronic Registration dialog box (3 of 3)
Table 43.
Hewlett-Packard’s Electronic Registration dialog box text strings (3 of 3)
Title of
dialog box
Text in dialog box
User options and
descriptions
Hewlett-Packard's Electronic
Registration
Please send your registration to
Hewlett-Packard using e-mail.
[This is the third of three screens.]
E-mail [button] [default option]
Click the E-mail button to send an
e-mail to HP containing the
registration information you
specified. A thank-you screen
appears when the e-mail is sent.
Previous [button]
Click the Previous button to go
back to the second screen in this
sequence.
Exit [button]
Click the Exit button to open the
Exiting Registration! dialog box.
Software Technical Reference
Windows 95, 98, Me, NT 4.0, 2000, and XP 151
Figure 68.
Exiting registration! dialog box
152 4 Installing Windows printing system components
Software Technical Reference
Table 44.
Exiting registration text strings
Title of
dialog box
Text in dialog box
User options and
descriptions
Exiting Registration!
You have selected to exit HewlettPackard's registration.
Click the Continue button to go
back to the screen where you were
when you clicked the Exit button.
If you would like to continue with
registration, please press the
continue button to return to the
place where you exited.
Click the Exit button to close the
WebReg utility.
Continue [button] [default option]
Otherwise, you can go to the
universal resource locator (URL)
below to register your product at
any time.
http://register.hp.com
Thank you for your valuable time!
Exit [button]
Customization Utility for Windows
Use the Customization Utility button to create your own customized installation of
printing-system components. To start the utility, click Customization Utility on the main
menu of the HP LaserJet software CD-ROM browser. The available options for
creating a customized installation are:
• Copy printer drivers only. Using this option, you can copy the HP LaserJet
Windows printer drivers to a selected form of media (disk, CD-ROM, network drive,
and so on). You can use the resulting disk set with the Windows Add Printer
Wizard. The Customization Utility prompts these choices:
• operating system
• printer model
• printing system components (drivers to copy)
• destination path
• Create customized installer. Using this option, you can create either an
interactive or silent (unattended) installer customized by any of the following
selections:
• operating system
• printer model
• printing system components
• iInteractive or silent (unattended) installer
Software Technical Reference
Windows 95, 98, Me, NT 4.0, 2000, and XP 153
• Copy entire printing system installer. Using this option, you can copy the
HP LaserJet printing system installer to a selected form of high-capacity media
such as a network drive. The customization utility prompts these choices:
• Language
• Operating system
Silent installer
You can use the HP LaserJet printing system software to create a silent installer
that runs the SETUP.EXE program without user interaction. This installation
method is useful when you want to use the default selections provided by the
installer or when you want to run the installation without being prompted. You also
have the option of creating a custom disk image that contains specific drivers and
utilities, allowing users to run the installer without further interaction.
Silent installation can be performed in two ways:
• Customized silent installer
• Command-line silent installer
Customized silent installer
Use this option to select the printing-system components to include in the silent
installation. You can select the operating system, language, printer models,
drivers, utilities, and documentation to install.
Command-line silent install
This method cannot be customized and installs only the printing-system
components that are included in the Typical Installation.
Note
Values that follow equal signs ( = ) in a command line must not contain intervening spaces.
Method 1: Command line
Type the following at the command line (do not type the beginning and ending
quotation marks):
"<CD-ROM-ROOT>/SETUP/SETUP.EXE /U /PORT=XXXX /PRINTER=N /PD=N"
Method 2: SETUP.LST
Use the SETUP.LST file to specify command-line arguments to the installer for an
unattended installation. You can send command-line arguments in one of the
following ways:
• Send the command directly to the installer.
• Send the command using the SETUP.LST file located in the setup directory.
• Use a combination of the two methods.
For example, this file contains two options: /port and /printer. The installer
operates as normal because the /u option has not been specified. If you use
setup /u for the installer, it operates in unattended mode and uses the two values
specified in the defaults section of the SETUP.LST file. If you use setup /u /
printer=4 for the installer, it operates in unattended mode and chooses the
HP LaserJet 9000mfp. The options specified on the command line override the
options specified in the SETUP.LST file.
154 4 Installing Windows printing system components
Software Technical Reference
The options available can also include the /u option. Using this option key makes
the installer always operate as unattended. The following descriptions explain the
available options:
• /u signals the installer to use the specified port and printer given on the
command line (or in this file), and to use all default selections. Installation then
proceeds without prompting the user.
• /port=xxxx is used to specify the default port when performing an unattended
installation. The value specified by xxxx should be a valid port and should
contain no spaces.
• /printer=n is used to specify the default printer when doing an unattended
installation. The value specified by “n” is an integer that references the list of
available printers. For example, the following printers are available for the
HP LaserJet 9000 series printer installation:
0 = HP LaserJet 9000 printer
1 = HP LaserJet 9000n printer
2 = HP LaserJet 9000dn printer
3 = HP LaserJet 9000hns printer
4 = HP LaserJet 9000mfp printer
• /pd=n is used to specify whether the selected printer is the default printer, when
you have multiple printers connected to your network. The value specified by n
is an integer (that is, 0 or 1). For this argument, entering one sets the selected
printer as the default printer. Entering zero (0) or not specifying a value at all
sets the printer as a non-default printer.
You can preset these options in the SETUP.LST file located in the root directory of
the HP LaserJet software CD-ROM. In the defaults section, add the following
syntax:
[Defaults]
Options= /port=<value> /printer=<number> /pd=<number>
Driver-only installation
Step 1
Close all software applications.
Step 2
Click Start, click Settings, and then click Printers.
Step 3
Double-click Add Printer.
Step 4
Answer the questions in the Add Printer Wizard dialog box until you
reach the screen with the printer manufacturer list.
Step 5
Click Have Disk.
Step 6
Browse to the driver location using one of these options:
• Inbox CD-ROM. Browse to the appropriate directory for your operating system
and language.
• Internet download. Browse to the folder where the Web files were downloaded
and decompressed.
Step 7
Select the appropriate .INF file.
Step 8
Click Open, and then click OK.
Step 9
Select the appropriate printer.
Software Technical Reference
Windows 95, 98, Me, NT 4.0, 2000, and XP 155
Step 10 Follow the remaining instructions to complete the printer installation. At
this point, the driver is been copied to your hard disk and is included with
the list of installed printers.
Point and Print installation for Windows 95, 98, Me, NT 4.0, 2000, and XP
The following information will assist you as you install a printer driver using the
Microsoft Point and Print function when you cannot see the printer on the network.
Point and Print is a Microsoft term used to describe a two-step driver installation
process. The first step is to install a shared driver on a network print server. The
second step is to “point” to the print server from a network client so that the client can
use the print driver.
Note
This section outlines the procedures for installing print drivers with Point and Print. If these procedures
are not successful, contact Microsoft. Hewlett-Packard provides drivers that are compatible with the
Point and Print feature, but this is a function of the Microsoft operating systems, not of HP print drivers.
Windows NT, Windows 2000, and WIndows XP drivers from HP are supported only on Intel X86 (R)
processor types. Any other processor types must use Windows NT drivers from Microsoft.
To install the printer driver on a Windows NT 4.0, Windows 2000, or Windows XP server, you must
have administrator privileges.
To completely install the Windows NT 4.0 printer driver on the Windows NT 4.0 server (or, for Windows
2000, the Windows 2000 printer driver on the Windows 2000 server), you must have administrator
privileges on the server.
The Windows NT 4.0 Printer .INF file (or, for Windows 2000, the Windows 2000 Printer .INF file) must
contain the same printer name as the Windows 95, Windows 98, or Windows Me printer .INF file.
Point and Print installation of a PS driver is supported only with a Microsoft Windows 95, Windows 98,
or Windows Me PScript driver version 4.0 or later.
For all operating systems, use the Add Printer Wizard to install the appropriate
operating system driver on the server and client machines, as shown in the following
table.
Table 45.
Windows servers with Windows clients
Computer function
Steps
Server and clients
1. Click Start, click Settings, and then click Printers.
Server and clients
2. In the Printers folder, double-click the Add Printer icon to start the Add
Printer Wizard.
Server only
3. Click Next, and then click Local Printer. Click Next. If your operating
system is Windows 95, Windows 98, or Windows Me, go to step 6.
Server and clients
4. Select the appropriate port in the list of ports, or click Add Port to
connect to a network port not in the list of available ports.
Server and clients
5. Select the printer model in the list of available printers, or click Have
Disk if installing the driver from an alternative source, such as disk, CDROM, or software download. If installing from a software download, you
must know the path where the software has been downloaded.
Server only
6. After the installation is complete, highlight the Printer icon and click
File, and then click Properties. In the Printer Properties window, click the
Sharing tab.
Server only
7. You must enable the File and Print Sharing service for either Microsoft
networks or Novell networks on the server.
156 4 Installing Windows printing system components
Software Technical Reference
Table 45.
Windows servers with Windows clients (continued)
Computer function
Steps
Server only
8. To exit Properties, click OK. A hand appears beneath the Printer icon
in the Printers folder, indicating that the printer is shared.
Client only
9. You can install the driver using Point and Print in one of the following
four ways:
· In Network Neighborhood, locate the server and double-click the printer
share name.
· In Network Neighborhood, locate the server. Then drag and drop the
icon for the shared printer into your Printers folder.
· In the Printers folder, open the Add Printer Wizard. Then, depending on
the operating system:
· For Windows 95, Windows 98, and Windows Me, click Network Printer.
· For Windows NT 4.0, Windows 2000, and Windows XP, click Network
printer server.
Client only
10. Click Next. Type the network path or queue name, or choose Browse
to search the network to locate the appropriate path.
Client only
11. In Network Neighborhood, locate the server and double-click. Then
locate the printer share name and right-click.
Client only
12. Click Install to complete the installation through the Add Printer
Wizard.
Setting a default printer
This section applies to Windows 95, 98, Me, NT 4.0, 2000m and XP.
Step 1 From the Start menu, click Settings, and then click Printers.
Step 2 Select the printer you want to set as the default printer.
Step 3 From the File menu, click Set As Default. A check mark appears next to the
menu option.
Step 4 Click Close.
Windows 3.1x
Printer support
l
l
The PS emulation driver supports the HP LaserJet product, but only on standalone
versions of Windows 3.1x. Other PS printers can be supported with additional PPDs.
The PCL 6 and PCL 5e drivers support HP LaserJet products.
Installing printer drivers on Windows 3.1x
Windows 3.1x is not supported by the CD-ROM browser and printing system installer for
the HP LaserJet product. Printing from Windows 3.1x is supported using the PCL 5e and
PCL 6 drivers for the HP LaserJet 8100, and with the PS driver. To install these drivers,
you must use the Add Printer function in the Windows 3.1x control panel:
Step 1 Close all programs. Turn off virus checkers and TSR programs. After
installation, these programs can be turned back on.
Step 2 Go to Main in the Program Manager and click Control Panel.
Software Technical Reference
Windows 3.1x 157
Step 3 Click Printers.
Step 4 Under Printer, choose Add.
Step 5 Under the list of printers, choose Unlisted and click Install.
Step 6 Browse to the driver location using one of the options below:
• CD-ROM. Browse to the appropriate <CD-ROM
Drive>:\<Language>\Drivers\Win3.x directory for your operating system and
language.
• Internet download. Browse to the <CD-ROM Drive>:\<Language>\Drivers\Win3.x
folder where the Web files were downloaded and decompressed.
Step 7 Select the appropriate printer and click OK.
Step 8 Follow the remaining instructions to complete the printer installation.
158 4 Installing Windows printing system components
Software Technical Reference
5
Installation and removal for
non-Windows operating systems
Introduction
This section provides system requirements and procedures for installing and removing
the HP LaserJet printing system software for other supported operating system than
Windows. It also provides information about font support and system modifications.
Supported operating systems include:
l
l
Macintosh
IBM OS/2
System Requirements
System requirements necessary to install and use the HP LaserJet printing system
software on each supported operating system are listed below.
Macintosh
l
l
l
l
68-kilobyte processor
Macintosh OS 7.5.3 or later
16 MB RAM
20 MB available disk space
IBM OS/2
l
l
l
Pentium processor
32 MB RAM (required for OS/2)
5 MB available disk space (required for driver)
Macintosh
Macintosh component descriptions
The printer includes the following software for Macintosh computers.
PPDs (Mac OS 8.6 to 9.x and Mac OS X classic)
Software Technical Reference
Introduction 159
HP LaserJet PPDs
These PS printer-definition files for HP LaserJet products are installed to the Printer
Descriptions folder, which is in the Extensions folder within the System folder.
PPDs, in combination with the LaserWriter driver, provide access to the printer
features and allow the computer to communicate with the printer. An installation
program for the PPDs is provided on the printing software CD-ROM.
For Mac OS 8.6 to 9.x, the Apple LaserWriter 8 driver must be installed to use the
PPD file. Use the Apple LaserWriter 8 driver that came with your Macintosh. For Mac
OS X, use Print Center to print.
PDEs (Mac OS X)
Printer Dialog Extensions (PDEs) are code plug-ins that provide access to printer
features, such as number of copies, duplexing, and quality settings. An installation
program for the PDEs and other software is provided on the printing software CDROM.
HP LaserJet Utility
This Hewlett-Packard printer utility is installed to the HP LaserJet folder in Macintosh
OS 8.6 to 9.1 Macintosh systems. It provides configuration and management support
for PS and PCL printers.
HP LaserJet Utility allows control of features that are not available in the driver. The
illustrated screens make selecting printer features from the Macintosh computer
easier than ever. Use the HP LaserJet Utility to do the following:
• customize the printer’s control panel messages.
• name the printer, assign it to a zone on the network, download files and fonts, and
change most of the printer settings.
• set a password for the printer.
• From the computer, lock out functions on the printer’s control panel to prevent
unauthorized access. (See the printer software help.)
Installation notes
This text file contains important information about product features, instructions for
installing the printing-system software, and technical assistance.
Online Help
This HTML-based help system replaces the Apple Guide help system provided with
earlier HP printers. The help system can be viewed through a browser or in the
Macintosh OS Help Center.
HP Auto Setup Utility
This utility is installed to the Startup Items folder of Macintosh OS 7 and newer
Macintosh systems. It provides assistance to set up a new printer, then moves itself to
Trash.
Screen fonts
These screen fonts are available only for Macintosh computers and Macintosh
compatibles. The screen fonts match your printer fonts, allowing you to see on screen
how your printed page will look.
160 5 Installation and removal for non-Windows operating systems
Software Technical Reference
Font support
To ensure that you can use all installed fonts with the HP LaserJet product, the
Macintosh printing system includes the standard 35 screen fonts in 11 families:
•
•
•
•
•
•
•
•
•
•
•
Avant Garde
Helvetica Narrow
Times
Bookman
New Century Schoolbook
Zapf Chancery
Courier
Palatino
Zapf Dingbats
Helvetica
Symbol
The Macintosh printing system also includes the HP 45 XPS font families:
•
•
•
•
•
•
•
•
•
•
•
•
•
•
•
•
Clarendon Condensed Bold
Symbol
Albertus Medium
Coronet
Times New Roman
Antique Olive
Courier
Univers
Arial
Garamond
Univers Condensed
CG Omega
Letter Gothic
Wingdings
CG Times
Marigold
The following bitmap screen fonts reside on the HP LaserJet product:
•
•
•
•
•
•
•
•
•
•
•
Software Technical Reference
ITC Avant Garde Gothic Book
Helvetica
Palatino
ITC Avant Garde Gothic Book Oblique
Helvetica Bold
Palatino Bold
ITC Avant Garde Gothic Demi
Helvetica Bold Oblique
Palatino Bold Italic
ITC Avant Garde Gothic Demi Oblique
Helvetica Oblique
Macintosh 161
•
•
•
•
•
•
•
•
•
•
•
•
•
•
•
•
•
•
•
•
•
•
•
•
Palatino Italic
ITC Bookman Demi
Helvetica Narrow
Symbol
ITC Bookman Demi Italic
Helvetica Narrow Bold
Times Bold
ITC Bookman Light
Helvetica Narrow Bold Oblique
Times Bold Italic
ITC Bookman Light Italic
Helvetica Narrow Oblique
Times Italic
Courier
New Century Schoolbook Bold
Times Roman
Courier Bold
New Century Schoolbook Bold Italic
ITC Zapf Chancery Medium Italic
Courier Bold Oblique
New Century Schoolbook Italic
ITC Zapf Dingbats
Courier Oblique
New Century Schoolbook Roman
The following fonts are resident on all HP LaserJet products, but can be used by
Macintosh platforms only by installing additional screen fonts. You can either use
these screen fonts directly from the HP LaserJet software CD browser, or obtain
them from the HP Web site at http://www.hp.com/go/lj9000 CD-ROM.
•
•
•
•
•
•
•
•
•
•
•
•
•
•
•
•
Albertus Extra Bold
CG Times Italic
Marigold
Albertus Medium
Clarendon Condensed Bold
Symbol
Antique Olive
Coronet
Times New Roman
Antique Olive Bold
Courier
Times New Roman Bold
Antique Olive Italic
Courier Bold
Times New Roman Bold Italic
Arial Courier Bold Oblique
162 5 Installation and removal for non-Windows operating systems
Software Technical Reference
•
•
•
•
•
•
•
•
•
•
•
•
•
•
•
•
•
•
•
•
•
•
•
•
•
•
•
•
•
Times New Roman Italic
Arial Bold
Courier Italic
Univers Bold
Arial Bold Italic
Garamond Antiqua
Univers Bold Italic
Arial Italic
Garamond Halbfett
Univers Condensed Bold Italic
CG Omega
Garamond Kursiv
Univers Condensed Medium
CG Omega Bold
Garamond Kursiv Halbfett
Univers Condensed Medium Italic
CG Omega Bold Italic
Letter Gothic
Univers Medium
CG Omega Italic
Letter Gothic Bold
Univers Medium Italic
CG Times
Letter Gothic Italic
Univers Italic
CG Times Bold
CG Times Bold Italic
Wingdings
CG Times Bold Italic
Installing the Macintosh printing system
On a Macintosh-compatible computer, the installation procedures are the same for a
network administrator, a network client, and a single user. Install the software on any
computer with access rights to the printer.
Note
If the computer is connected to the product by a LocalTalk (Printer Port) or EtherTalk connection, the
AppleTalk (or Network) control panel must be configured for the correct connection to communicate
with the product.
The HP LaserJet product must be set up, connected to the computer, and turned on before the software
is installed.
Macintosh OS systems do not support parallel connections. You must use a USB connection for a
direct connection to a computer running Macintosh OS.
In the following instructions, “XXXX” represents the HP LaserJet product model number.
Software Technical Reference
Macintosh 163
The Macintosh partition contains an installer program for each language. Find the
language appropriate for the operating system being used, and use the installer program
for that language.
To install the HP LaserJet printer software for Macintosh OS
Step 1 Insert the CD-ROM that came with the Macintosh product software into the CDROM drive.
Note
If the CD screen does not open automatically, double-click the CD-ROM icon on the desktop to open
the CD-ROM window.
Step 2 Open the HP LaserJet Installers folder. Find the Installer icon for the
appropriate language. Double-click the Installer icon to launch the Installer. In
the opening dialog, click Continue.
Step 3 The main Installer dialog box appears. Click Install and then follow the
instructions on the screen to complete the software installation.
Step 4 When software installation is complete, click Restart.
Step 5 Run the Apple Desktop Printer Utility.
Step 6 Click HP Printer (USB) and then click OK.
Step 7 Click Change in the USB Printer Selection area.
Step 8 Click HP Printer (USB) and then click OK.
Step 9 Click Auto Setup. This attempts to match a PPD file and USB driver to your
printer. If this fails, click Change, scroll through the list, click HP LaserJet
XXXX, and then click Select.
Step 10 Click Create.
Uninstalling the Macintosh printing system
To uninstall the Macintosh Printing System, drag the PPDs and the unwanted
component(s) to Trash.
In-box disk layout
The Macintosh Printing System consists of one file: the HP LaserJet Installer Integrated installer program.
Folders and files added through installation of the HP LaserJet
software (Macintosh OS)
The tables in the following sections detail the changes to your system as new folders and
files are added when the HP LaserJet product software is installed on Macintosh OS
systems.
Note
This listing does not include temporary directories and files that are created, and then deleted, during
the installation process.
In the following listing, "MACINTOSH HD" indicates the drive on which the software was
installed.
164 5 Installation and removal for non-Windows operating systems
Software Technical Reference
Macintosh (Macintosh OS) installation
This section provides information about the various installation dialog box sequences for
the Macintosh operating system.
Main Install dialog box sequence
This section provides information about the Macintosh installation dialog box
sequence for the Easy Install (the typical installation option).
Figure 69.
hp LaserJet for Macintosh installer splash screen dialog box
Table 46.
hp LaserJet for Macintosh installer splash screen dialog box text strings
Title of dialog box
Text in dialog box
User Options and Descriptions
Splash screen
HP LaserJet for Macintosh
Click Continue to open the HP
LaserJet Installer dialog box.
[This title does not appear in the
dialog box.]
Continue... [button}
Software Technical Reference
Macintosh 165
Figure 70.
HP LaserJet Installer dialog box (easy install)
Table 47.
HP LaserJet Installer dialog text strings (easy install)
Title of dialog box
Text in dialog box
User Options and Descriptions
HP LaserJet Installer
Easy Install [drop-down menu]
If you want to install the files in a
location other than the default
"Macintosh HD," click Select Folder
to specify a location.
Click the Install button to install:
· Printer Descriptions
· HP LaserJet Utility
· Installation Notes
You can also choose a Custom
installation option from the dropdown menu at upper left.
· ColorSync Profiles
Disk space available: [conditional]
Approximate disk space needed:
[conditional]
Click the Read Me button to open the
Installer readme file.
Click the Install button to start the
installation on the selected disk
The folder "HP LaserJet Folder" will
be created on the disk "Macintosh Click the Quit button to quit the
HD"
Installer without making changes to
the system.
Select Folder [button]
Quit [button]
Install [button] (default option)
166 5 Installation and removal for non-Windows operating systems
Software Technical Reference
Figure 71.
HP LaserJet Installer dialog box (custom install)
Software Technical Reference
Macintosh 167
Table 48.
HP LaserJet Installer dialog text strings (custom install)
Title of dialog box
Text in dialog box
User Options and Descriptions
HP LaserJet Installer
Custom Install [drop-down menu]
Select the install location using the
Select Folder option (if the desired
location is different from "Macintosh
HD").
Printer Descriptions
HP LaserJet Utility
Installation Notes
Select available components to install
by using the check boxes in the list.
Click the Read Me button to open the
Installer readme file.
ColorSync Profiles
HP LaserJet Help
LaserJet Printer Help
Clicking Install starts the installation
on the selected disk.
Click the Quit button to quit the
Installer without making any changes
to the system.
USB Components
Disk space available: [conditional]
Approximate disk space needed:
[conditional]
The HP LaserJet Folder will be
created on the disk "Macintosh
HD."
Select Folder [button]
Quit [button]
Install [button] [default option]
168 5 Installation and removal for non-Windows operating systems
Software Technical Reference
Figure 72.
Installing dialog box
Table 49.
Installing dialog text strings
Title of dialog box
Text in dialog box
User Options and Descriptions
Installing
Items remaining to be installed:
[conditional number]
This dialog box shows installation
progress. No action is required
unless you wish to stop the
installation. Click the Stop button to
interrupt the install file copy process.
Installing: HP LaserJet XXXX
Series
Stop [button]
Figure 73.
Installation was successful dialog box
Table 50.
Installation successful dialog text strings
Title of dialog box
Text in dialog box
User Options and Descriptions
[This untitled dialog box begins with Installation was successful. If you Click the Quit button to exit the
the words "Installation was
are finished, click Quit to leave the Installer. The Printer Setup Assistant
successful.”]
Installer. If you want to perform
opens.
additional installations, click
Continue.
Click the Continue button to return to
the HP LaserJet Installer.
Software Technical Reference
Macintosh 169
Printer setup using AppleTalk Chooser
This section provides information about installing the printer using the AppleTalk
Chooser.
Figure 74.
Important! dialog box
Table 51.
Important! dialog box text strings
Title of dialog box
Text in dialog box
User Options and Descriptions
Important!
To set up your HP LaserJet printer, Click OK, and then continue
use one of the following methods: installing the printer using either the
AppleTalk Chooser, or USB/LPR.
AppleTalk - Open the Chooser (in
the [Apple icon] menu) and select a
printer.
USB/LPR - Open the Desktop
Printer Utility and select a printer.
Figure 75.
How do I select my printer? dialog box
170 5 Installation and removal for non-Windows operating systems
Software Technical Reference
Table 52.
How do I select my printer? dialog text strings
Title of dialog box
Text in dialog box
User Options and Descriptions
How do I select my printer?
For instructions, click the right
arrow.
This is a standard Macintosh OS
help sequence.
Topics [button]
[An eight-panel Apple Guide
sequence describes how to gain
access to the Macintosh Chooser
and how to select and set up the
printer.]
HP LaserJet Screen Fonts Installer dialog box sequence
This section provides information about the installation dialog box sequence for the
HP Screen Font Installer.
Figure 76.
HP LaserJet Screen Fonts splash screen dialog box
Table 53.
HP LaserJet Screen Fonts splash screen dialog text strings
Title of dialog box
Text in dialog box
User Options and Descriptions
HP LaserJet Screen Fonts
HP LaserJet Screen Fonts
Click the Continue button to open
the HP LaserJet Screen Fonts
dialog box.
[The phrase "Screen Fonts" is
repeated in multiple scripts and
languages.]
Continue [button]
Software Technical Reference
Macintosh 171
Figure 77.
HP LaserJet Screen Fonts installer dialog box
Table 54.
HP LaserJet Screen Fonts installer dialog text strings (1 of 2)
Title of dialog box
Text in dialog box
User Options and Descriptions
HP LaserJet Screen Fonts
Click the Install button to install:
Click the Install button to start the
installation.
Screen Fonts
Items will be installed on the disk
"Apple External HD"
Click the Quit button to quit the
Installer without making changes to
the system.
Quit [button]
Install [button] (default option}
When you click Install, an installation progress bar dialog box briefly appears. The
following table details the contents of that dialog box.
Table 55.
HP LaserJet Screen Fonts installer dialog text strings (2 of 2)
Title of dialog box
Text in dialog box
User Options and Descriptions
Installing
Items remaining to be installed:
[conditional number]
Click the Stop button to interrupt the
install file copy process.
Stop [button]
172 5 Installation and removal for non-Windows operating systems
Software Technical Reference
Figure 78.
Installation was successful dialog box
Table 56.
Installation was successful dialog text strings
Title of dialog box
Text in dialog box
User Options and Descriptions
[This untitled dialog box begins with Installation was successful. If you Click the Quit button to exit the
the words "Installation was
are finished, click Quit to leave the Installer.
successful."]
Installer.
If you want to perform additional
installations, click Continue.
Click the Continue button to return
to the HP LaserJet Screen Fonts
installer.
IBM OS/2 Warp 3.0 and greater
OS/2 installation instructions
Note
Installation procedures differ depending upon whether or not a printer object does or does not exist
on the OS/2 Desktop being used. Use the instructions that match the desktop.
Installing a printer in OS/2 when printer object is missing
Use this procedure when a printer object does not appear on the computer desktop.
To create a printer object and install a printer driver, follow these steps:
Note
Use this procedure if the OS/2 desktop does not have a printer object. A system can have this
configuration if no printer was selected during OS/2 installation, or if all the print objects have been
deleted from the desktop.
Step 1
Open the templates folder that is located in OS/2 system folder after
OS/2 installation.
Step 2
Click the Printer template. Press and hold the right mouse button.
Step 3
Drag the template to Desktop.
Step 4
Release the right mouse button.
Step 5
Type a name for the printer in the Name field.
Step 6
Select a port to which the printer is connected.
Step 7
Click Install new printer driver. A window appears with a list of the
printer drivers that are shipped with O/S2.
Software Technical Reference
IBM OS/2 Warp 3.0 and greater 173
Step 8
Click Other printer driver.
Step 9
Point to the downloaded printer drivers.
Step 10 Click Refresh. Wait until the window fills with printer drivers.
Step 11 Select a driver by clicking the left mouse button over the desired driver.
Step 12 Click Install.
Installing a printer in OS/2 with pre-existing printer object on desktop
To install a new printer driver using an existing printer object, use the following
procedure:
Note
If the 16-bit HP LaserJet driver is installed on a system, delete it before installing this driver.
Use these directions if a printer object exists on the OS/2 desktop, but you do not
have the correct printer driver installed on the system. This could happen if a different
printer has been added to the system.
Step 1
Select the Printer object using the right mouse button.
Step 2
Click Settings.
Step 3
Click the Printer Driver tab.
Step 4
Select one of the Printer Driver objects using the right mouse button.
Step 5
Click Install.
Step 6
Click Other OS/2 printer driver.
Step 7
Point to the downloaded printer drivers.
Step 8
Click the Refresh button. Wait until the window fills with printer drivers.
Step 9
Select a driver by clicking the left mouse button over the desired driver.
Step 10 Click the Install button.
Additional information about the OS/2 drivers is included in the readme files that come
with each driver.
174 5 Installation and removal for non-Windows operating systems
Software Technical Reference
Font support
Note
Fonts can be downloaded to the printer by using the Font Installer feature of the printer driver.
l
l
l
l
l
l
l
l
l
l
l
l
l
l
l
l
l
l
l
l
l
l
l
l
l
l
l
l
l
l
l
l
l
l
l
l
l
l
l
l
l
Albertus
CG Times Italic
Symbol
Albertus Extra Bold
Clarendon Condensed
Times New Roman
Antique Olive· Coronet
Times New Roman Bold
Antique Olive Bold
Courier
Times New Roman Bold Italic
Antique Olive Italic
Courier Bold
Times New Roman Italic
Arial
Courier Bold Italic
Univers
Arial Bold
Courier Italic
Univers Bold
Arial Bold Italic
Garamond Antiqua
Univers Bold Italic
Arial Italic
Garamond Halbfett
Univers Italic
CG Omega
Garamond Kursiv
Univers Condensed
CG Omega Bold
Garamond Kursiv Halbfett
Univers Condensed Bold
CG Omega Bold Italic
Letter
Univers Condensed Bold Italic
CG Omega Italic
Letter Bold
Univers Condensed Medium Italic
CG Times
Letter Italic
Wingdings
Software Technical Reference
IBM OS/2 Warp 3.0 and greater 175
l
l
l
l
CG Times Bold
Line Printer
CG Times Bold Italic
Marigold
Changing a printer driver in the printer object
Once both the printer object and the printer driver have been installed, the correct printer
driver should be selected in the print object. This might also be necessary if using different
printer drivers with a single print object. To change to a different printer driver:
1. Right-click the Printer object.
2. Click Settings.
3. Click the Printer Driver tab.
4. Double-click the Titlebar icon.
The printer object is now set up to use a different printer driver. To customize the settings
for this printer driver, see "Changing the printer properties" or "Changing the job
properties."
Changing the printer properties
Printer properties describe how a particular printer is physically set up. Examples of
printer properties include the amount of memory in a printer, forms defined by the printer,
forms associated with the printer paper trays, and installed printer patterns.
To set or change printer properties:
Step 1 Point to the Printer object. Right-click the Printer object.
Step 2 Click Settings.
Step 3 Click the Printer Driver tab.
Step 4 Select the printer driver, and then right-click the mouse button.
Step 5 Click Settings.
Step 6 Change the properties to match the printer setup.
Step 7 Double-click the Titlebar icon.
The printer object is now set up to print a job. For information about how to print a job, see
the OS/2 tutorial or the information folder for information about printing.
176 5 Installation and removal for non-Windows operating systems
Software Technical Reference
Changing the job properties
Job properties describe how a particular print job is printed. Examples of job properties
include number of copies, print resolution, print quality, and orientation (portrait or
landscape). Applications generally allow the selection of a printer object, and they allow
you to change the job properties associated with a particular job by selecting setup or
options buttons. Under certain conditions, it is appropriate to change job properties
outside of an application, such as when performing drag-and-drop printing.
To change the default job properties associated with a printer object outside of an
application:
Step 1 Right-click the Printer object.
Step 2 Click Settings.
Step 3 Click the Job Properties tab.
Step 4 Change the properties.
Step 5 Click Save.
The default job properties associated with a printer object are now set up. For more
information about how to print a job, see the OS/2 tutorial or the information folder.
Software Technical Reference
IBM OS/2 Warp 3.0 and greater 177
178 5 Installation and removal for non-Windows operating systems
Software Technical Reference
6
Engineering Detail
Introduction
This section presents engineering detail for the following topics:
l
l
l
Digital Sending Config Applet
Media attributes
Printer Status and Alerts
Digital Sending Config Applet
The Digital Sending Config Applet provides an interface between the digital sending
functions of the HP LaserJet MFP and your computer using a Web browser. To gain
access to the Digital Sending Config Applet, open your Web browser and type your
product TCP/IP address to open HP Web Access. Click the Settings tab, then click
Digital Sending in the menu on the left.
Note
Some browsers require downloading Java libraries from the Sun Web site.
Software Technical Reference
Introduction 179
General tab
The fields in the General tab help to identify the administrator for this MFP. When used
with HP Digital Sending Software version 3.0, this tab has options for delivering
administrative alerts to this person.
Figure 79.
Digital Sending Config Applet — General tab
The Administrator Contact Information group box contains the following fields:
l
l
l
l
Name:
E-mail Address:
Phone Number (optional):
Location (optional):
180 6 Engineering Detail
Software Technical Reference
Send to E-mail tab
The Send to E-mail tab is shown in the following illustration.
Figure 80.
Digital Sending Config Applet — Send to E-mail tab
Click the Enable Send to E-mail check box to use the feature.
Note
You will not be able to exit from this tab if the SMTP server TCP/IP address is not configured.
Select the Use Service Settings check box to allow Digital Sending Software version 3.0
to override these settings.
The Server’s IP Address field in the SMTP Settings group box shows the server TCP/IP
address, which determines the network address of the e-mail gateway. DNS names are
not supported.
Click the Find Server button to acquire SMTP gateway information in one of two ways:
1. Broadcast a predetermined query on the local subnet that MFP devices listen for.
2. If DNS is configured, query the DNS server for the “mail exchanger” (mx) record,
which defines where SMTP network traffic is routed.
Select the Test button to verify the e-mail server at the configured address in one of two
ways:
1. Start an SMTP conversation on TCP port 25 with the HELO command.
Software Technical Reference
Digital Sending Config Applet 181
2. Attempt to send an e-mail by using the MAIL FROM command. This verifies that the
gateway will accept messages.
Use the Default ‘From’: Address group box to create default settings for e-mail sent
from your MFP.
The SMTP protocol will not allow a message to be sent if it does not contain a return
address. The address in the E-mail Address: field under Default ‘From:’ Address will
be added to the From: field. It can be overridden by typing in a different address.
Text typed in the Display Name: box is the alias that appears in the From: field instead of
the e-mail address.
Text typed in the Default Subject: box will automatically be populated in the Subject:
field. It can be overridden by typing in different text.
Advanced E-mail Settings
To gain access to these settings, click the Advanced... button on the Send to E-Mail
tab.
Figure 81.
Digital Sending Config Applet - Advanced E-mail Settings
Information in the Message Text group box defines the content of the e-mail message
that includes the scanned attachment. If you click Use Default Message, the
Message Language drop-down menu becomes available. If you click Use a Custom
Message:, you can type your own message.
Information in the Attachment Settings group box determines the default settings for
the scanned attachment:
• Default File Format
• Default Color Preferences
• Maximum File Size
182 6 Engineering Detail
Software Technical Reference
Addressing tab
The Addressing tab is shown in the following illustration.
Figure 82.
Digital Sending Config Applet — Addressing tab
Select the Enable Network Address Book check box to use an LDAP database for
address queries.
An address book is stored locally on the MFP and is available to all users. When an
address is typed at the control panel, the MFP queries the user about whether to save the
address.
Click the Clear Local Address Book button to delete all addresses from the local
address book.
Note
This address book is not accessible or editable from the legacy Address Book Manager application.
The Network Address Book Settings (LDAP) group box includes controls for
configuring network settings for the address book.
Click the Find Server button to acquire LDAP servers on the network by broadcasting a
predetermined query on the local subnet that MFP devices listen for.
You can type the network address of the LDAP server in the LDAP Server: field. DNS
names are not supported.
Software Technical Reference
Digital Sending Config Applet 183
Click the Find Settings button to determine LDAP database search root by using the
following methods:
1. Connecting to the LDAP database at the configured port and querying for the “base
dn” record.
2. Querying for address records using various values for the search root, including the
null search value and values discovered from the base dn record.
3. Querying for e-mail and fax records using standard LDAP attribute values.
In the Log-on method: field, the settings are:
Anonymous — no username or password is submitted to the LDAP server with the
query.
l
Simple — the values from the Username and Password boxes are used to
authenticate to the LDAP server. This is not NTLM authentication. The username and
password are set up by an administrator for this instance of an LDAP database.
Use the Search Root box to indicate where in the LDAP database hierarchy to begin
searching for the requested address record.
l
Use the Find addresses using… group box to find addresses according to certain
attributes.
Select Exchange 5.5 Defaults to use a predefined set of LDAP attribute associations to
locate address records. Alternatively, you can select Custom Look-up to locate address
records with the following customizable attributes:
Match attribute... — Select UID, CN, SN, givenName, or type the value.
l
to obtain e-mail address from... — Select rfc822Mailbox, email, or type the value.
l
to obtain fax number from... — Select FacsimileTelephoneNumber or type the
value.
The user name you type at the control panel is used to find matches for records in the
LDAP database that are filed under the UID, CN, SN, or givenName attributes. When a
match is found, the email and fax addresses are completed by using the addresses stored
in the attributes named in the to obtain e-mail address from... and to obtain fax
number from... fields.
l
Note
Fax numbers are supported only if you are using Digital Sending Software version 3.0.
Select the LDAP Database is Alphabetized check box to sort the records that are
returned from an LDAP search. This is required for automatic completion.
Click the Test button to query the LDAP database with the configured look-up options and
obtain any records.
184 6 Engineering Detail
Software Technical Reference
Advanced Network Addressing Settings
The Advanced Network Addressing Settings mini-tab is shown in the following
illustration.
Figure 83.
Digital Sending Config Applet - Advanced Network Addressing Settings
Use the Port: box under Advanced Connection Options to determine the TCP port
through which the MFP communicates with the LDAP server.
Use the boxes under Advanced Search Options to set the following controls:
Max LDAP Addresses: This value determines how many records are returned in a
single database query.
Max Search Time: This value determines the timeout interval for a database query.
LDAP Filter Condition: Additional search conditions must be in the form of a valid
LDAP filter. For example, “L = any city, any state, any country” limits the search to
addresses located in that city.
Software Technical Reference
Digital Sending Config Applet 185
Preferences tab
The Preferences tab is shown in the following illustration.
Figure 84.
Digital Sending Config Applet — Preferences tab
On the Preferences tab, use Default Copy and Send Settings to set the default settings
for document size, expected page content, and duplexing:
l
l
l
Document Size
Page Content
2 Sided Document check box
186 6 Engineering Detail
Software Technical Reference
Log tab
The Log tab is shown in the following illustration.
Figure 85.
Digital Sending Config Applet — the Log tab
Click Refresh to refresh log events.
Click Details to view additional details about the selected log event.
Software Technical Reference
Digital Sending Config Applet 187
About tab
The About tab is shown in the following illustration.
Figure 86.
Digital Sending Config Applet — The About tab
The About tab shows the MFP firmware version.
E-mail Servers That Function as SMTP Gateways
Exchange 5.5
In Exchange 5.5, the Internet Mail Service (IMS) is responsible for the transfer of
SMTP mail. To transfer the mail successfully, the IMS must be configured with a route
to another gateway.
Exchange 2000
Exchange 2000 (IIS5) does not directly support SMTP, but it is installed with IIS5,
which does support the SMTP service. Exchange 2000 integrates with Active
Directory. It does not have its own data store. Similarly, IIS5 manages the SMTP
service for Exchange 2000. You can verify that the SMTP service in Windows 2000 is
running by viewing Administrative Tools > Services.
Sendmail
Sendmail runs as a Unix daemon (service) - In many large networks, as in HP's
network, several Exchange servers are routed to a Sendmail gateway, which can
serve as a kind of firewall.
188 6 Engineering Detail
Software Technical Reference
Qmail
Qmail is very similar to Sendmail. Qmail does not accept a 'bare line-feed character' in
any of the SMTP content. We have seen several problems with the standalone Digital
Sender products because of this. Earlier versions of the DSM 2.x and the 9100C sent
messages with bare line feed characters.
Lotus Domino (Notes)
The SMTP MTA or Message Transfer Agent must be configured in Domino for it to
work as an SMTP gateway.
SMTP Gateway Verification
Telnet to Port 25
By opening a telnet session and sending an e-mail, you not only verify that you can
communicate with the SMTP gateway, you also verify that the SMTP gateway is
correctly configured to route Internet e-mail. To fully verify this, you should use an email account outside of the local network - for example, a Hotmail® account.
By verifying that e-mail can be sent, you can rule out any problem with the particular
gateway you have configured for the HP LaserJet 9000mfp to use.
Procedure
You cannot backspace in a telnet session. Any characters that you type will be sent
one character at a time to the SMTP gateway, backspaces included. Note also that
SMTP is not case-sensitive.
Step 1
Open a command prompt, type “telnet <smtp gateway> 25", and press
Enter (where <smtp gateway> is the fully qualified domain name or IP
address of the SMTP gateway) to establish communication with the
SMTP gateway on port 25.
Step 2
Type “help” and the Enter key. Note the different SMTP options that are
returned.
Step 3
To start a conversation with the SMTP gateway, type “HELO <smtp
gateway>” and press Enter. Note that the response contains a list of
attributes as well as the type of SMTP gateway that you are
communicating with.
Step 4
To initiate the sending of an e-mail, type “mail from: <your e-mail
address> and press Enter
Step 5
Type “rcpt to: <your e-mail address>” and press Enter.
Step 6
Type “subject: This is a test message.”
Step 7
Type “data:” and press Enter.
Step 8
Whatever you type next goes into the body of the message.
Step 9
To send the message type “.” and press Enter.
Step 10 Type “quit” and press Enter to end the Telnet session.
You should see the test e-mail message in your inbox in a few seconds.
Software Technical Reference
Digital Sending Config Applet 189
Lightweight Directory Access Protocol
Lightweight Directory Access Protocol (LDAP) is a directory access service
(RFC1777). LDAP stores attribute-based data in hierarchical data structures.
Common Abbreviations for LDAP Attributes
•
•
•
•
•
•
•
Uid, NTDomainAccountName, or SamAccountName: User id
Cn: Common Name
Sn: Surname
Mail or rfc822mailbox: e-mail address
o: Organization
dc: Domain Component
st: State
E-mail Servers that support LDAP
• If Exchange 5.5 is installed in Windows 2000 with Active Directory, and the Active
Directory connector is not configured, both by default enable LDAP. Since both
cannot use port 389, one or the other may have been configured for a different port
number.
• Windows 2000 Active Directory is also very hierarchical in nature. LDAP is tightly
integrated with Active Directory.
Note
When using Active Directory, the entire, fully-qualified domain name must be defined using the “DC=”
qualifier. For example, for the “City.Company.com” domain name, use “DC=City, DC=Company,
DC=com”.
• Sendmail runs in Unix.
More information about open source LDAP can be found at the following URL:
http://www.openldap.org
Media attributes
This section includes the following information about media attributes:
l
l
l
paper-source commands
media types and sizes
PCL 5e and PCL 6 custom paper sizes
Paper-source commands
The PCL 5e escape sequence for paper source is “Esc&l#H” (the “l” is a lowercase “L”
rather than the numeral “1”). See the table 9 for values of #. For example, “Esc& l1H” is
the command for tray 2.
The PCL 6 escape sequence for paper source is “ubyte # MediaSource”. See the table 9
for values of #. For example, “ubyte 4 MediaSource” is the command for tray 2.
190 6 Engineering Detail
Software Technical Reference
Table 57.
Paper source commands for the HP LaserJet 9000mfp product
Paper source
PCL 5e
PCL 6
Tray 1
4
3
Tray 2
1
4
Tray 3
5
5
Tray 4
20
8
Auto Select
7
1
Manual Feed
2
2
Media types and sizes
The tables in this section provide information about media features, media attributes, and
paper-handling constraints for the HP LaserJet products.
Note
Table 58.
The following table lists the features and attributes of various media listed under the Size Is: dropdown menu on the Paper tab. The list order can vary, depending on the product and operating system.
The list will contain all the sizes shown below, and might contain sizes from other drivers.
Supported features and attributes
Paper sizes
Width
Height
PCL 5 PCL 62
escape
value1
PCL 5
margin x,y
portrait
PCL 5
margin
x,y
landscape
PCL 6
margins
Letter3
216 mm
(8.5 inches)
279 mm
(11.0 inches)
2
“LETTER”
150,100
120,100
100, 100
Legal
216 mm
(8.5 inches)
356 mm
(14.0 inches)
3
“LEGAL”
150,100
120,100
100, 100
Executive
184 mm
(7.25 inches)
267 mm
(10.5 inches)
1
“EXEC”
150,100
120,100
100, 100
A5
148 mm
(5.83 inches)
210 mm
(8.27 inches)
25
“A5”
150,100
120,100
100, 100
A43
210.0 mm
(8.27 inches)
297 mm
26
“A4”
142, 100
118, 100
100, 100
297 mm
(11.69 inches)
420 mm
27
“A3”
142, 100
118, 100
100, 100
81
“COM10”
150, 100
120, 100
100, 100
A3
(11.69 inches)
(16.53 inches)
Envelope
105 mm
Commercial #10 (4.12 inches)
241 mm
Envelope DL
(ISO)
110 mm
(4.3 inches)
220 mm (8.66
inches)
90
“DL”
142, 100
118, 100
100, 100
Envelope C5
(ISO)
162 mm
229 mm
91
“C5”
142, 100
118, 100
100, 100
(6.38 inches)
(9.01 inches)
Envelope B5
(ISO)
176 mm
250 mm
100
“B5 ENV”
142, 100
118, 100
100, 100
(6.93 inches)
(9.84 inches)
Software Technical Reference
(9.5 inches)
Media attributes 191
Table 58.
Supported features and attributes
Paper sizes
Width
Height
PCL 5 PCL 62
escape
value1
Envelope
Monarch
98 mm
190 mm
80
(3.87 inches)
(7.5 inches)
11 by 17
279 mm
432 mm
(11.0 inches)
(17.0 inches)
257 mm
364 mm
(10.12 inches)
(14.33 inches)
182 mm
257 mm
(7.16 inches)
(10.12 inches)
Double
Postcard4
148 mm
200 mm
(5.83 inches)
(7.87 inches)
4
197 mm
273 mm
(7.75 inches)
(10.75 inches)
273 mm
394 mm
(10.75 inches
(15.5 inches)
216 mm
330 mm
(8.5 inches)
(12.99 inches)
B4 (JIS)
B5 (JIS)
16K
8K
4
Executive
(JIS)4
Custom (leading Minimum:
edge)
98 mm
(other edge)
Minimum: 312
mm
PCL 5
margin
x,y
landscape
PCL 6
margins
“MONARCH” 150, 100
120,100
100, 100
6
“LEDGER”
100, 100
100, 100
100, 100
46
“JIS B4”
100, 100
100, 100
100, 100
45
“JIS B5”
142,100
142, 100
100, 100
72
“JPOSTD”
100, 100
100, 100
100, 100
17
“ROC16K”
150, 100
100, 100
100, 100
19
“ROC8K”
100, 100
100, 100
100, 100
18
“JISEXEC”
150, 100
120, 100
100, 100
101
5
5
5
5
PCL 5
margin x,y
portrait
(12.28 inches)
(3.87 inches)
Maximum:
Maximum:
470 mm
356 mm
(12.28 inches)
(18.5 inches)
1
The PCL 5e escape sequence for paper size is Esc&l#H. The values in this column are for #.
The PCL 6 command for paper size is ubyte array(String)MediaSize. The values in this column are the values for “String”.
3
Long-edge feed (others are short-edge feed).
4
In Windows NT 4.0, this paper size is treated as a custom size.
5
For custom sizes, the PCL 6 Wizard specifies actual dimensions - for example, for 8-inch by 9-inch custom size,
“real32_8.000000 9.000000 CustomMediaSize”.
2
The following table shows paper sizes that are supported by HP LaserJet 9000mfp
product input devices, trays 1 through 4. Envelopes and labels can only be fed to the
product from tray 1.
Table 59.
Input-device supported sizes for the HP LaserJet 9000mfp product
Standard paper sizes
Tray 1
Tray 2
Tray 3
Tray 4 HCI
Letter
Y
Y
Y
Y
Legal
Y
Y
Y
Y
Executive
Y
Y
Y
Y
A5
Y
Y
Y
N
1
192 6 Engineering Detail
Software Technical Reference
Table 59.
Input-device supported sizes for the HP LaserJet 9000mfp product
Standard paper sizes
Tray 1
Tray 2
Tray 3
Tray 4 HCI
A4
Y
Y
Y
Y
A3
Y
Y
Y
Y
Envelope #10
Y
N
N
N
Envelope DL
Y
N
N
N
Envelope C5
Y
N
N
N
Envelope B5
Y
N
N
N
Envelope Monarch
Y
N
N
N
11 by 17
Y
Y
Y
Y
B4 (JIS)
Y
Y
Y
Y
B5 (JIS)
Y
N
N
N
Double Postcard
Y
N
N
N
16K
Y
N
N
N
8K
Y
N
N
N
Executive (JIS)
Y
N
N
N
Oversize 11.7 by 17.7
Y
N
N
N
3
Custom
2
3
3
Y
Y
Y3
Y
1
Long-edge feed (others are short-edge feed).
This input device supports custom paper sizes that meet the following specifications: for the leading edge, minimum 98
mm (3.87 inches), maximum 312 mm (12.28 inches); for the other edge, minimum 312 mm (12.28 inches), maximum
470 mm (18.5 inches).
3
This input device supports custom paper sizes that meet the following specifications: for the leading edge, minimum 148
mm (5.83 inches), maximum 297 mm (11.7 inches); for the other edge, minimum 210 mm (8.27 inches), maximum
432 mm (17.0 inches).
2
The following table lists media sizes that are supported by the following HP LaserJet
9000mfp output devices:
l
l
l
duplexing unit
HP 3000-Sheet Stacker
HP 3000-Sheet Stapler/Stacker
Table 60.
Supported media sizes — duplexing unit, 3000-Sheet Stacker, and 3000-Sheet
Stapler/Stacker
Paper sizes
Duplexing 3000-Sheet Stacker
unit
Face up
Face
down
Face up
Face
down
Stapling
Letter1
Y
Y
Y
Y
Y
Y
Legal
Y
Y
Y
Y
Y
Y
Executive
Y
Y
Y
Y
Y
Y2
A5
Y
Y
Y
Y
Y
Y2
A4
Y
Y
Y
Y
Y
Y
A3
Y
Y
Y
Y
Y
Y
Software Technical Reference
3000-Sheet Stapler/Stacker
Media attributes 193
Table 60.
Supported media sizes — duplexing unit, 3000-Sheet Stacker, and 3000-Sheet
Stapler/Stacker (continued)
Paper sizes
Duplexing 3000-Sheet Stacker
unit
Face up
Face
down
Face up
Face
down
Stapling
Envelope #10
N
Y
N
Y
N
N
Envelope DL
N
Y
N
Y
N
N
Envelope C5
N
Y
N
Y
N
N
Envelope B5
N
Y
N
Y
N
N
Envelope Monarch
N
Y
N
Y
N
N
11 by 17
Y
Y
Y
Y
Y
Y
B4 (JIS)
Y
Y
Y
Y
Y
Y
B5 (JIS)
N
Y
Y
Y
Y
Y2
Double Postcard3
N
Y
Y
Y
Y
Y
16K3
N
Y
Y
Y
Y
Y
N
Y
Y
Y
Y
Y
Executive (JIS)
N
Y
Y
Y
Y
Y
Oversize3
N
Y
Y
Y
Y
Y4
Custom3,5
N
Y
Y
Y
Y
Y
8K
3
3000-Sheet Stapler/Stacker
1
Letter and A4 paper are both long-edge and short-edge feed. Other paper sizes are short-edge feed.
When the 6-staples option is selected, the device puts in only 4 or 5 staples, depending on the staple-position calibration.
3
This is not standard paper. It is supported as a custom size.
4
The angle staple position and opposite stapled position are not supported.
5
Paper size 98 mm x 191 (3.86 x 7.52 inches) stays in the printer and does not reach the output device.
2
The following table lists media sizes that are supported by the HP Multifunction Finisher
for the HP LaserJet 9000mfp.
Table 61.
Paper sizes
Supported media sizes — HP Multifunction Finisher
Multifunction Finisher
Stacker bin
Booklet
bin
Stapling
Face up
Face
down
Letter
Y
Y
Y1
Y
Legal
Y
Y
Y
Y
Executive
Y
Y
Y
Y
A5
Y
Y
Y
Y
Y
A4
Y
Y
Y1
A3
Y
Y
Y
Y
Envelope #10
Y
N
N
N
Envelope DL
Y
N
N
N
Envelope C5
Y
N
N
N
Envelope B5
Y
N
N
N
194 6 Engineering Detail
Software Technical Reference
Table 61.
Supported media sizes — HP Multifunction Finisher (continued)
Paper sizes
Multifunction Finisher
Stacker bin
Booklet
bin
Stapling
Face up
Face
down
Envelope Monarch
Y
N
N
N
11 by 17
Y
Y
Y
Y
B4 (JIS)
Y
Y
Y
Y
B5 (JIS)
Y
Y
Y
Y
Double Postcard
Y
N
Y
Y
16K
Y
Y
Y
Y
8K
Y
Y
Y
Y
Executive (JIS)
Y
Y
Y
Y
Oversize
Y
N
Y
Y
Y
Y
Custom
1
2
Y
2
Y
Short-edge feed only (Letter and A4 paper must be rotated when loading the selected input tray).
All custom sizes from standard input trays can be flipped over and delivered face-down.
PCL 5e and PCL 6 custom paper sizes
The following table shows custom paper sizes available for the HP LaserJet 9000mfp.
Table 62.
PCL 5e and PCL 6 custom paper sizes
Tray
Paper sizes
Width
Height
Tray 1
Custom (leading edge)
Minimum: 98 mm
Minimum: 191 mm
(3.87 inches)
(7.52 inches)
Maximum: 312 mm
Maximum: 470 mm
(12.28 inches)
(18.50 inches)
Minimum: 148 mm
Minimum: 210 mm
(5.83 inches)
(8.27 inches)
Maximum:297 mm
Maximum:432 mm
(11.69 inches)
(17.01 inches)
(other edge)
Trays 2 through 4
Custom (leading edge)
(other edge)
Note
The PS driver does not support custom paper sizes.
The following table identifies the media types that are supported by HP LaserJet 9000mfp
product input devices, Trays 1 through 4.
Software Technical Reference
Media attributes 195
Table 63.
Input-device supported media
Input media types Tray 1
(PS string)
Tray 2
Tray 3
HCI Tray 4
Plain
Y
Y
Y
Y
Preprinted
Y
Y
Y
Y
Letterhead
Y
Y
Y
Y
Transparency
Y
Y
Y
N
Prepunched
Y
Y
Y
Y
Labels
Y
N
N
N
Bond
Y
Y
Y
Y
Recycled
Y
Y
Y
Y
Y
Y
Y
Y
Y
Y
Y
Y
Y
Y
Y
Y
Color
Card stock
1
Rough
1
Tray 1 accepts card stock at a maximum weight of 216 g/m2 (60-lb.). Trays 2, 3, and 4 accept cardstock of 16 to 28 lb.
weight.
The following table identifies the media types that are supported by these HP LaserJet
9000mfp output devices:
l
l
l
duplexing unit
3000-Sheet Stacker/Stapler
3000-Sheet Stapler/Stacker
Table 64.
Output-device supported media
Output
Duplexing
media types unit
3000-Sheet Stacker
3000-sheet stacker
Face up
Face down
Face up
Face down
Stapling
Plain
Y
Y
Y
Y
Y
Y
1
Y
Y
Y
Y
Y
Y
1
Y
Y
Y
Y
Y
Y
Transparency N
Y
Y
Y
Y
N
Prepunched
Y
Y
Y
Y
Y
Y
Labels
N
Y
N
Y
N
N
Bond
Y
Y
Y
Y
Y
Y
Recycled
Y
Y
Y
Y
Y
Y
Color
Y
Y
Y
Y
Y
Y
Y
Y
N
Y
N
N
Y
Y
Y
Y
Y
Y
Preprinted
Letterhead
Card stock
Rough
1
2
2
Media must be properly oriented when loaded in selected input trays.
Stapling and/or folding is not recommended.
The following table identifies the media types that are supported by the HP LaserJet
9000mfp Multifunction Finisher.
196 6 Engineering Detail
Software Technical Reference
Table 65.
HP Multifunction Finisher supported media
Output
Multifunction Finisher
media types
Stacker bin
Booklet bin Stapling
Face down
Face up
Plain
Y
Y
Y
Y
Preprinted
Y
Y
Y
Y
Letterhead
Y
Y
Y
Y
Transparency Y
Y
N
N
1
Prepunched
Y
Y
Y
Y2
Labels
Y
N
N
N
Bond
Y
Y
Y
Y
Recycled
Y
Y
Y
Y
Color
Y
Y
Y
Y
Card stock
Y
Y3
Y3,4
Y3,5
Rough
Y
Y
Y
Y
1
Mechanically feasible, but impractical.
2
Media must be properly oriented when loaded in selected input trays.
3
Up to a weight of 199 grams per square meter. Between 199 grams per square meter, and 216 grams per square meter,
only face-up delivery is supported.
4
Only covers are supported.
5
Stapling is allowed to a maximum weight of 199 grams per square meter.
Paper Type commands
The PCL 5e escape sequence for paper type is “Esc&n#Wdpapertype”, where “n#” is the
number of characters in the paper type plus 1. For example, in the sequence
“Esc&n6WdPlain”, “Plain” has 5 letters plus 1 for a total of 6.
For the command to work properly, at least one of the paper trays in the product must be
configured in the control panel for the paper type used in the command.
Some paper type options listed in the table below might not be defined in the printer
driver.
Table 66.
Paper-type commands
Esc&
n#
Wd
Paper type
Esc&
5
Wd
Bond
Esc&
10
Wd
Card stock1
Esc&
6
Wd
Color
Esc&
7
Wd
Labels
Esc&
11
Wd
Letterhead
Esc&
6
Wd
Plain
Esc&
11
Wd
Preprinted
Esc&
11
Wd
Prepunched
Software Technical Reference
Media attributes 197
Table 66.
Paper-type commands
Esc&
n#
Wd
Paper type
Esc&
9
Wd
Recycled
Esc&
6
Wd
Rough
Esc&
13
Wd
Transparency2
1The
correct command for card stock is “Esc&n11WdCard Stock”, with a space between the “d” and the “S”, and with an
uppercase “S”.
2
You must spell out the word “Transparency” in the string, although it is abbreviated on the printer control panel.
Printer Status and Alerts
HP product models and drivers that support Printer Status and
Alerts
The following table lists the HP product models and drivers that support Printer Status
and Alerts.
Table 67.
Printer Status and Alert driver support
Product model
Drivers supported
HP Color LaserJet 45001
PCL 6, PCL 5e (but not the older
RASDD version), PS
HP Color LaserJet 4550
PCL 6, PCL 5e, PS
HP Color LaserJet 8500
HP Color LaserJet 8550
PS
4
HP LaserJet 4000 Series
PCL 5c, PS
2
HP LaserJet 4050 Series
PCL 6, PCL 5e, PS
HP LaserJet 4100 Series
HP LaserJet 5000 Series
HP LaserJet 8000
3
PCL 6, PCL 5c, PS
PCL 6, PCL 5e, PS
2
PCL 6, PCL 5e, PS
PCL 6, PCL 5e, PS
HP LaserJet 8100 Series
PCL 6, PCL 5e, PS
HP LaserJet 8150 Series
PCL 6, PCL 5e, PS
HP LaserJet 9000 Series
PCL 6, PCL 5e, PS
HP Mopier 240
PCL 6, PS
HP Mopier 320
PCL 6, PS
1The
HP Color LaserJet 4500 drivers (PCL 5, PCL 6, and PS) are not supported in Windows 95, Windows 98, and Windows Me. However, new PCL 5 and PCL 6 (but not PS) drivers for this printer that will be supported by Printer Status
and Alerts will be available soon. Check http://www.hp.com for the newest Windows 95, Windows 98, and Windows
Me PCL 5 and PCL 6 drivers. This restriction does not affect the Color LaserJet 4550 drivers.
2
The original drivers released with the HP LaserJet 4000 series and HP LaserJet 5000 Series printers do not support Printer Status and Alerts. Since those products were introduced, the drivers have been updated. The new drivers support
Printer Status and Alerts.
3
The PCL6 driver for the HP LaserJet 8000 is not supported in Windows 95, Windows 98, and Windows Me.
4
The original MS version of the HP Color LaserJet 8550 PS driver (included on the CD that came with the product) is not
supported. A new version, available at http://www.hp.com, is supported.
For an updated list of products that support the Printer Status and Alerts feature, open the
text file HPSASDRV.MTX located in the Windows subdirectory.
198 6 Engineering Detail
Software Technical Reference
Software Technical Reference
Printer Status and Alerts 199
200 6 Engineering Detail
Software Technical Reference
Index
Symbols
% of Normal Size option in printer drivers 65
.hpb files 95
.inf file (add printer) 108
.pcm files 95
.rfu (remote firmware update) files
corrupted 30
description 26
wrong printer model contained in 31
Numerics
3000-sheet stapler/stacker. See stapler/stacker
A
About tab in Digital Sending Config Applet 188
About This Driver dialog box 89
accessories
autoconfiguration 19
documentation 17, 42
media supported by output devices 196, 197
monitoring with Printer Status and Alerts utility 20, 24
stapler/stacker 56
supported paper sizes for HP LaserJet 9000mfp 193,
194
verifying installed options 24
accounting vendor portal 39
Acrobat Reader requirement for documentation 16
addresses and address books, configuring for digital sending
182, 183
Addressing tab in Digital Sending Config Applet 183
administrator
configuring contact information and alerts 180
identifying 180
Adobe Acrobat Reader requirement for documentation 16
Adobe PS Level 3 printer drivers 99
Advanced tab in printer drivers 101
alerts
administrator 180
configuring pop-up windows 20, 24
configuring refresh rate 24
disabling in Printer Status and Alerts utility 24
e-mail 37
icons 22
monitoring with Printer Status and Alerts utility 20
printer status 198
All Pages tab in printer drivers 70
Apple LaserWriter driver 43
AppleTalk 43
AppleTalk Chooser, installing printers 170
Arabic registration 143
attachments, configuring for digital sending e-mail 182
Auto Select
option for media source 77
option for paper type 78
AutoCAD printer drivers
availability of components by operating system 108
supported versions 44
autoconfiguration
accessories supported 19
availability of components by operating system 108
description 19
Software Technical Reference
automatic e-mail notifications about software and firmware
releases 106
B
Back Cover tab in printer drivers 72
back covers
including for documents 71
selecting for booklets 56
Basics tab in printer drivers 85
Best Quality printer driver setting 60
bidirectional communication
autoconfiguration 19
availability of components by operating system 108
description 18
for parallel and USB connections 19
supporting operating systems and network environments
18
bindery
See also NDS; Novell NetWare
binding options 53, 54
bins. See output bins
bitmaps, sending TrueType fonts as 63
black, printing all text as 63
booklets
binding options 54
impositioning 55
page borders option 59
page order option 59
pages per sheet option 59
paper sizes for which disabled 54
printing 54
quick sets 51
selecting back cover 56
selecting cover 56
borders option for printing 59
Bubble Help 49
bundle configurations
geographic variations 13
HP LaserJet 9000mfp 14
C
Cancel button in messages 48
CD browser for HP LaserJet printing system software
availability of components by operating system 108
description 40, 41
CD-ROM for installation
availability and fulfillment 105
in-box file layout 105
regional versions 105
changing
job properties 177
printer driver in printer object 176
printer properties 176
watermarks 68
character, euro 40
Choose Setup Language dialog box 120
codes for firmware level 26
collating
multiple original print jobs 91
overriding settings in software programs 95
201
colors
configuring for digital sending e-mail 182
selecting for watermarks 68
commands
paper source 190
paper type 197
Complex Graphics option in printer drivers 62
Components dialog box 142
confidential documents, printing 81, 82, 103, 104
configuration
automatic using Driver Autoconfiguration 19
verifying physical configuration 79
verifying printer 69
viewing remotely 34
configuration page
printing 26
viewing remotely using HP Web Access 33
configurations
geographic variations 13
HP LaserJet 9000mfp 14
Configure Font DIMMs dialog box 94
Configure tab in driver help 90
configuring 180
administrator contact information and alerts 180
destinations 92
devices remotely 34
digital sending 38, 179
duplexing unit 91
e-mail alerts 37
e-mail command and response 39
font DIMMs 94
job retention 93
LDAP for digital sending 183
links to off-printer solutions 33
mopier 91
paper destinations 92
paper sources 92
pop-up windows in Printer Status and Alerts utility 20,
24
predefined user settings for printing 50
printer driver hard disk 80
printer driver work space 94
printer memory 93
printer storage 93
refresh rate for printer status and alerts 24
Tray 1 91
trays for Windows operating systems 97
conflict in settings for printing 78
connections
EtherTalk 163
LocalTalk 163
parallel for Macintosh operating systems 163
consumables
monitoring with Printer Status and Alerts utility 20, 24
monitoring with Supplies Status page 32
contact information for administrator, viewing and
configuring 180
control panel, viewing simulation with Printer Status and
Alerts utility 20
copies
conflict between printer driver and application 86
maximum number 85
printing noncollated 96
selecting number to print 85
setting number to print 85, 100
Copies option in printer drivers 85
covers
including for document back 71
selecting for booklets 56
202
Current Watermarks option in printer drivers 67
Custom installation
Windows operating systems 141
Custom Paper Size dialog box 73
custom paper sizes
defining 69
limits on width and height 76
naming 75
PCL 5e 195
PCL 6 195
removing 74, 75
renaming 74, 75
selecting 74
setting 73
setting width and height 75
supported by HP LaserJet 9000mfp 193
supported by HP LaserJet 9000mfp output devices 194,
195
supported by PS printer driver 195
viewing list of supported 72
custom paper types 78
Customization Utility for installation 153
D
defaults
installed fonts 114
job properties for printer objects 177
number of quick-copy and proof-and-hold jobs 81, 102
printer 157
printer driver Basics options 85
printer driver Configure options 90
printer driver Destination options 79
printer driver Effects options 64
printer driver Finishing options 50
printer driver Paper options 69
watermarks 69
deleting. See removing
Destination Features options in printer drivers 79
Destination tab in printer drivers 79
destinations, configuring 92
Device Settings tab in printer drivers 104
Device Status 32
devices
configuring remotely 34
monitoring with Printer Status and Alerts utility 24
verifying installation 24
viewing status 32
dialog boxes
About This Driver 89
Choose Setup Language 120
Components 142
Configure Font DIMMs dialog box 94
Custom Paper Size 73
Exit Setup 141
Exiting Registration 152
Finish 140
Hewlett-Packard’s Electronic Registration 144, 147
HP LaserJet for Macintosh Installer splash screen 165
HP LaserJet Installer (custom install) 167
HP LaserJet Installer (easy install) 166
HP LaserJet Installing 169
HP LaserJet Screen Fonts Installer 171
HP Software License Agreement 122
Identify Printer 130
Installation Type 135
Software Technical Reference
dialog boxes, continued
Model 134
More Configuration Options 93
Network Printer Configuration 129
Network Setup 127
Print Quality Details (600 dpi) 62
Print Quality Details (Best Quality) 61
Printer Name 137
Printer Sharing 138
Select Port 126
Set Network Communication Mode 133
Setup 121
Specify Network Path 132
Type of Connection 125
Watermark Details 67
Web Update 123
Welcome 121
Welcome to Hewlett-Packard’s Registration 146
different paper for first page 70
digital sending
configuring from control panel 37
configuring from the control panel 38
configuring from Web browser 179
description 37
Digital Sending Config Applet
About tab 188
Addressing tab 183
description 179
General tab 180
Log tab 187
opening 179
Preferences tab 186
Send to E-mail tab 181
DIMMs (dual inline memory modules)
availability of fonts by operating system 108
fonts 94
directory structure on installation CD-ROM 105
disabling
alerts 24
job retention 80, 102
disk storage, verifying installed options 24
Document Options for printer drivers 52
documentation for product 41
availability of components by operating system 108
description 16
localization of components by operating system 109
location on installation CD-ROM 105
obtaining 16
documents
configuring settings for all pages 70
folding and saddle-stitching 58
including back cover 71
indentifier for job retention 82
printing confidential or sensitive 81, 82, 103, 104
scaling for different paper sizes 65
scaling to fit target paper size 65
selecting number to copy 85
setting different first page 70
stapling 56
dots per inch (dpi) setting in printer drivers 60, 62
double-sided printing. See duplexing
downloading
firmware updates 26
firmware updates using HP Web JetAdmin 28
firmware upgrades 105
HP LaserJet printing system software 107
operating system driver bundles 107
software 105
standalone printer drivers 107
Software Technical Reference
dpi (dots per inch) setting in printer drivers 60, 62
Driver Autoconfiguration 19
Driver Work Space (DWS) option in printer drivers 94
drivers. See printer drivers
dual inline memory modules (DIMMs). See DIMMs (dual
inline memory modules)
duplex printing accessory. See duplexing unit
duplexer. See duplexing unit
duplexing
binding option 53
option. See Print on Both Sides option
setting default 53
duplexing unit
configuring 91
custom paper size limits on width and height 76
paper sizes supported by HP LaserJet 9000mfp 193,
194
Print on Both Sides option 53
DWS (Driver Work Space) option in printer drivers 94
E
EconoMode option in printer drivers 60, 63
Edge-to-Edge Printing option in printer drivers 63
Effects tab in printer drivers 64
e-mail
alerts 37
command and response 39
configuring for digital sending from control panel 38
configuring for digital sending in Web browser 181
notifications about software and firmware releases 26,
106
registration of product 143
using to send scanned documents 37
verifying communication 189
e-mail servers
Exchange 2000 188
Exchange 5.5 188
Lotus Domino (Notes) 189
Qmail 189
Sendmail 188
supporting LDAP 190
enabling. See configuring
envelopes
dimensions supported 191
paper sizes supported by HP LaserJet 9000mfp output
devices 194
supported by HP LaserJet 9000mfp 193
error messages. See messages
EtherTalk connection 163
euro character 40
Event Log page, viewing with HP Web Access 32
Exchange 2000 e-mail server 188
Exchange 5.5 e-mail server 188
Exit Setup dialog box 141
Exiting Registration dialog box 152
extensions for printer drivers 89
F
face-down bin. See output bins
face-up bin. See output bins
fax numbers supported for digital sending 184
features
HP LaserJet 9000mfp 14
HP LaserJet printing system software installer 42
printer driver 47
FIH (Foreign Interface Harness 39
203
files
added through installation of HP LaserJet printing
system for Macintosh operating systems 164
configuring format and size for digital sending e-mail
182
.hpb 95
included on installation CD-ROM 105
.inf (add printer) 108
.pcm 95
PPD 43, 108, 109, 160
Find Server button
for LDAP server 183
for SMTP gateway 181
Finish dialog box 140
Finishing tab in printer drivers 50
firmware
automatic notification of releases 106
determining current level 26
downloading 106
notification of new releases 26
updating remotely 26
viewing version number for MFP 188
firmware update. See RFU (remote firmware update)
first page, setting to be different 70
Flip Pages Up option for duplexing 53
Fold/Saddle Stitch option in printer driver 58
folders added through installation of HP LaserJet printing
system for Macintosh operating systems 164
folding documents 58
font DIMMs 94
Font Settings option in printer drivers 63
fonts
availability of components by operating system 108
euro character 40
HP 80 114
installing for IBM operating systems 173
installing for Macintosh operating systems 171
localization of components by operating system 109
location on installation CD-ROM 105
options in printer drivers 63
printer driver options 94
selecting for watermarks 68
support for IBM operating systems 173
support for Macintosh operating systems 160
support for Windows operating systems 114
TrueType, controlling in printer driver 101
TrueType, sending as bitmaps 63
Foreign Interface Harness (FIH) 39
fulfillment centers 105
G
General tab in Digital Sending Config Applet 180
graphic options, setting in printer driver 101
Graphics Settings for printer drivers 62
H
hard disk
configuring printer driver 80, 93
removing jobs 84
sending jobs directly to 82, 103
Hebrew registration 143
help
Bubble 49
for PCL 5e and PCL 6 drivers 47
localization by operating system 109
What’s this? 47
Hewlett-Packard’s Electronic Registration dialog box 144,
147
history information for jobs 20
204
HP 80 fonts installed for HP LaserJet printing system
software 114
HP Auto Setup Utility for Macintosh operating systems 160
HP LaserJet 9000mfp
availability of software components 108
configurations 14
custom paper size limits on width and height 76
EconoMode settings 63
features 14
media supported by input devices 195
media supported by output devices 196
models 14
multibin output devices supported 92
optional output devices 84
paper sizes supported by 3000-Sheet Stacker and 3000Sheet Stapler/Stacker 193
paper sizes supported by duplexing unit 193
paper sizes supported by HP Multifunction Finisher 194
paper sizes supported by input devices 192
paper sizes supported by Multifunction Finisher 194
paper source commands 191
paper source options 92
stapling option 56
HP LaserJet for Macintosh Installer splash screen dialog box
165
HP LaserJet Installer (custom install) dialog box 167
HP LaserJet Installer (easy install) dialog box 166
HP LaserJet Installing dialog box 169
HP LaserJet Multifunction Finisher
configuring as destination 92
media supported 196
paper sizes supported by HP LaserJet 9000mfp 193,
194
Quick Sets 51
HP LaserJet printing system software
availability of components by operating system 108
bidirectional communication technology 18
CD browser 40
components 40
Custom installation for Windows operating systems 141
downloading 107
installable components 43
installation CD-ROM 105
installing on Macintosh operating systems 163
localization of components by operating system 109
operating systems supported 15
printer drivers 43
Printer Status and Alerts utility 20
requirements for IBM operating systems 159
requirements for Macintosh operating systems 159
Typical installation for Windows operating systems 120
versions 40
HP LaserJet Screen Fonts Installer dialog box 171
HP LaserJet Utility 160
HP Resource Manager, localization by operating system
109
HP Software License Agreement dialog box 122
HP Web Access
description 31
localization of components by operating system 109
printer configuration page 33
HP Web JetAdmin
availability of components by operating system 108
description 45
localization of components by operating system 109
supported operating systems 45
using to download firmware 28
using with HP Web Access 31
website 45
Software Technical Reference
HP Web Registration 45
HPB files 95
I
IBM operating systems
availability of components 108
changing job properties 177
changing printer driver in printer object 176
changing printer properties 176
font support 173
installing fonts 173
installing printers when printer object missing from
desktop 173
installing printers when printer object present on desktop
174
localization of components by operating system 109
printer drivers 44
requirements for HP LaserJet printing system software
159
supporting HP LaserJet printing system software 15
icons
printer in Destinations tab 78, 84, 96
printer in Paper tab 69
status and alert 22
Identify Printer dialog box 130
Ignore Application Collation option in printer drivers 95
images
orientation 86
rotating versus stapling 86
scaling on pages 64
impositioning for booklet printing 55
IMS (Internet Mail Service) 188
inches
selecting as unit of measure 72
switching to millimeters 76
INF file (add printer) 108
installation
customizing 153
Microsoft Point and Print 156
printer drivers only 155
requirements for IBM operating systems 159
requirements for Macintosh operating systems 159
requirements for Windows operating systems 113
silent 154
using autoconfiguration 19
Installation Type dialog box 135
installers
availability of components by operating system 108
for HP LaserJet printing system software 41, 42
for Macintosh operating system 165
localization of components by operating system 109
installing
fonts for IBM operating systems 173
fonts for Macintosh operating systems 171
HP LaserJet printing system software 40, 119
Macintosh printing system 163
Microsoft Point and Print 156
online documentation 16
only printer driver 155
Printer Status and Alerts utility 20
printers using AppleTalk Chooser 170
using Customization Utility 153
using silent installer 154
Windows printing system 113
Internet Mail Service (IMS) 188
Software Technical Reference
J
Java software included with HP Web Access 31
JetAdmin. See HP JetAdmin
Job Retention option in printer drivers
description 79
disabling 80, 102
document identifier 82
enabling 93
job retention mode 80
limitations among printer drivers 83
using when printing 83
Job Retention tab in printer drivers 102
jobs
changing properties 177
collating multiple original print 91
disabling monitoring in Printer Status and Alerts utility 24
history information 20
identifier for job retention 82
managing memory using printer drivers 62
monitoring with Printer Status and Alerts utility 20
naming 83
private 81, 103
private stored 82, 104
proof-and-hold 81, 103
quick copy 81, 102
releasing stored 83
removing from memory or hard disk 84
sending directly to hard disk 82, 103
sending directly to printer memory 81, 103
setting number of copies to print 85
stored 81, 82, 103
using PINs 81, 103
L
landscape orientation
description 86
duplex-binding option 53
languages
for Macintosh operating systems 164
Hebrew and Arabic registration 143
key to abbreviations 110
localization of components by operating system 109
supported on installation CD-ROM 105
LDAP (Lightweight Directory Access Protocol)
common abbreviations for attributes 190
configuring for digital sending 183
description 190
e-mail servers that support 190
Web site 190
license agreement 122
Lightweight Directory Access Protocol (LDAP). See LDAP
(Lightweight Directory Access Protocol)
links to off-printer solutions 33
Linux operating systems
availability of components 108
printer drivers 44
localization of components by operating system 109
LocalTalk connection 163
Log tab in Digital Sending Config Applet 187
long-edge stapling 86
Lotus Domino (Notes) e-mail server 189
205
206
M
N
Macintosh LaserJet Utility, availability of components by
operating system 108
Macintosh operating systems
availability of components 108
component descriptions 159
directory structure on installation CD-ROM 105
folders and files added through installation of HP
LaserJet software 164
font support 160
HP LaserJet printing system software components 44
installable components 43
installing fonts 171
installing printers 170
installing printing system 163
localization of components by operating system 109
requirements for HP LaserJet printing system software
159
supported printer drivers 43
supporting bidirectional communication 18
supporting HP LaserJet printing system software 15
uninstalling printing system 164
managing
memory for print jobs using printer drivers 62
printers using HP Web Access 31
using HP Web JetAdmin 45
manuals. See documentation for product
Measurement Units button 76
media
attributes for paper-source, type, and size 190
configuring destinations 92
supported by input devices 196
supported by output devices 196, 197
supported types and sizes 191
viewing list of supported sizes 72
memory
managing for jobs using printer drivers 62
printer error messages 62
removing jobs 84
sending jobs directly to printer 81, 103
storing documents in printer 80
Memory Enhancement technology (MEt) option in printer
drivers 62
messages
Bubble Help 49
configuring for digital sending e-mail 182
firmware update 29
printer memory-error 62
MEt (Memory Enhancement technology) option in printer
drivers 62
MFP Module option in printer driver 91
Microsoft Point and Print installation 156
millimeters
selecting as unit of measure 72
switching to inches 76
Model dialog box 134
model numbers, viewing 88
models
HP LaserJet 9000mfp 14
moire effect, resolving 63
monitoring
disabling in Printer Status and Alerts utility 24
print jobs and printer status using Printer Status and
Alerts utility 20
mopier, enabling 91
More Configuration Options dialog box 93
multifunction finisher. See HP LaserJet Multifunction
Finisher
naming
custom paper sizes 74, 75
jobs 83
NDS
See also bindery; Novell NetWare
NetWare. See Novell NetWare 199
network operating systems. See IBM operating systems;
Linux operating systems; operating systems; Macintosh
operating systems; UNIX operating systems; Windows
operating systems
Network Printer Configuration dialog box 129
Network Setup dialog box 127
nonvolatile random-access memory (NVRAM). See NVRAM
(nonvolatile random-access memory)
notifications
configuring e-mail 37
e-mail software and firmware releases 106
new firmware releases 26
Novell Directory Printer Services (NDPS). See NDPS (Novell
Directory Printer Services)
Novell NetWare
operating systems supporting bidirectional
communication 18
NT Forms tab in printer driver 97
numbers
firmware level 26
NVRAM (nonvolatile random-access memory), changes
from firmware update 26
O
OK button in messages 48
online documentation for product
availability of components by operating system 108
description 16
installing 16
obtaining 16
viewing 16
online help for Macintosh operating systems 160
operating systems
availability of components 108
localization of components 109
supported by HP Web JetAdmin 45
supporting bidirectional communication 18
supporting HP LaserJet printing system software 15
See also IBM operating systems; Linux operating
systems; Macintosh operating systems; UNIX
operating systems; Windows operating systems
optimizing printer driver performance 94
Optional Paper Destinations menu 92
Optional Paper Sources menu 92
Options menu 84
order of pages 59
ordering
from HP Web site 106
orientation of image on page
description 86
setting in printer driver 100
See also landscape orientation; portrait orientation;
rotated orientation
OS/2. See IBM operating systems
Other Options options in printer drivers 93
Other Pages tab in printer driver 71
Software Technical Reference
output bins
custom paper size limits on width and height 76
media supported 196, 197
paper sizes supported by HP LaserJet 9000mfp 193,
194
printing options 84
selecting on Configure tab 96
selecting on Destination tab 78, 84
Output Settings options in printer drivers 62
P
Page Order option in printer drivers for booklets 59
page orientation
duplex-binding options 53
setting in printer driver 100
Page Setup tab in printer drivers 100
Pages per Sheet menu 59
paper
configuring destinations 92
supported by input devices 196
supported by output devices 196, 197
Paper Handling options in printer driver 91
paper level, monitoring with Printer Status and Alerts utility
20
paper sizes
disabled for printing booklets 54
priority when settings conflict 78
selecting for first and subsequent pages 72
setting for custom 75
setting in printer driver 100, 101
supported 191
supported by HP LaserJet 9000mfp input devices 192
supported by HP LaserJet 9000mfp output devices 193,
194
paper source commands
description 190
for HP LaserJet 9000mfp 191
paper sources
configuring 92
setting in printer driver 100
Paper tab in printer drivers 69
paper type commands 197
paper types
adding manually from the driver 78
auto select 78
priority when settings conflict 78
supported 78, 191
parallel connections
bidirectional communication 19
for Macintosh operating systems 163
PCL (printer command language)
supporting operating systems 15
PCL 5e
localization by operating system 109
paper type commands 197
PCL 5e printer driver 15
autoconfiguration 19
bidirectional communication 19
custom paper sizes 195
description 43
font DIMMs 95
help system 47
support for Windows 3.1x 157
Software Technical Reference
PCL 6 printer driver 15
autoconfiguration 19
bidirectional communication 19
custom paper sizes 195
description 43
font DIMMs 95
help system 47
localization by operating system 109
support for Windows 3.1x 157
PCM files 95
Percentage of Normal Size option in printer drivers 65
PIN, assigning to print jobs 81, 103
plug and play component availability by operating system
108
point and print component availability by operating system
108
portrait orientation
description 86
duplex-binding option 53
postcards
supported by HP LaserJet 9000mfp 193
supported by HP LaserJet 900mfp 194, 195
supported dimensions 192
PostScript (PS) printer driver. See PS (PostScript) printer
driver
PPDs (printer definition files)
availability of components by operating system 108
description 43, 160
localization of components by operating system 109
Preferences tab in Digital Sending Config Applet 186
Print all Text as Black option in printer drivers 63
Print Document On option in printer drivers 65
print jobs. See jobs
Print on Both Sides option in printer drivers 53
Print Page Borders option in printer drivers for booklets 59
Print Quality Details dialog box
600 dpi 62
Best Quality 61
print quality options in printer drivers 60
Print Quality portion of Finishing tab 50
printer command language (PCL)
supporting operating systems 15
printer definition files (PPDs). See PPDs (printer definition
files)
printer driver options
% of Normal Size 65
binding 54
booklet printing 54
Complex Graphics 62
Copies 85
Current Watermarks 67
Destination Features 79
Document Options 52
dpi setting 60, 62
Driver Work Space (DWS) 94
duplex-binding options 53
EconoMode 63
Edge-to-Edge Printing 63
Flip Pages Up 53
Fold/Saddle Stitch 58
Font Settings 63
Fonts 94
Graphics Settings 62
Ignore Application Collation 95
Job Retention 80, 82, 83, 93, 102
MEt (Memory Enhancement technology) 62
MFP Module 91
207
printer driver options, continued
Other Options 93
Output Settings 62
Pages per Sheet 59
Paper Handling Options 91
Print all Text as Black 63
Print Document On 65
Print on Both Sides 53
Print Page Borders 59
print quality 60
Printer Memory 93
Private Job 81, 103
Proof and Hold 81, 103
Quick Copy 81, 102
Resolution 62
REt (Resolution Enhancement technology) 62
Scale Patterns (WYSIWYG) 63
Scale to Fit 65
Size is 72
Staple 56, 92
Storage 93
Stored Job 82, 83, 103
Watermarks 66
ZoomSmart 64
printer driver tabs
Advanced 101
All Pages 70
Back Cover 72
Basics 85
Configure 90
Destination 79
Device Settings 104
Effects 64
Finishing 50
Job Retention 102
NT Forms 97
Other Pages 71
Page Setup 100
Paper 69
printer drivers
adding paper types manually 78
Adobe PS level 3 99
AutoCAD 44
autoconfiguration 19
availability of components by operating system 108
changing in printer object 176
configuring for hard disk 80
downloading Macintosh, AutoCAD, and IBM 107
downloading standalone 107
downloading system driver bundles 107
enabling hard disk or job retention for storage 93
extensions 89
features 47
help system for PCL 5e and PCL 5 47
included with HP LaserJet printing system software 43
installing for Windows 3.1x 157
installing only 155
installing when printer object missing from desktop 173
installing when printer object present on desktop 174
localization of components by operating system 109
location on installation CD-ROM 105
managing memory for print jobs 62
optimizing performance 94
PCL 5e 15
PCL 6 15
208
printer drivers, continued
support for Macintosh operating systems 43
support for Windows operating systems 43
supporting operating systems 15
supporting Printer Status and Alerts 198
viewing version number and date 88
Printer Memory options in printer drivers 93
Printer Name dialog box 137
printer objects
changing printer driver 176
creating 173
installing printer when missing from desktop 173
installing printer when present on desktop 174
Printer Sharing dialog box 138
Printer Status and Alerts utility
availability of components by operating system 108
description 20
disabling monitoring 24
icons 22
installing 20
list of products that support 198
localization of components by operating system 109
restrictions for HP projects 21
supporting operating systems and browsers 21
printers
changing properties 176
configuring memory 93
configuring storage 93
default 157
downloading firmware 107
information provided by image in printer driver
Destinations tab 78, 84, 96
information provided by image in printer driver Paper tab
69
installing using AppleTalk Chooser 170
managing using HP Web Access 31
printing
booklets 54
confidential or sensitive documents 81, 82, 103, 104
configuration page 26
configuring user-defined settings 50
noncollated copies 96
priority when settings conflict 78
setting number of copies 85
using Job Retention option while 83
printing system software. See HP LaserJet printing system
software
Private Job option in printer drivers
description 81, 103
private stored jobs 82, 104
Proof and Hold option in printer drivers
description 81, 103
maximum number of jobs 81, 102
Properties button for Windows 3.1x 47
PS (PostScript) printer driver
custom paper sizes 195
description 43
features 99
operating systems supported by 15
PS 3 Emulation support for HP LaserJet products 99
PS 3 fonts
localization of components by operating system 109
Software Technical Reference
Q
Qmail e-mail server 189
quality of print options in printer drivers 60
Quick Copy option in printer drivers
availability 81, 102
description 81, 102
maximum number of jobs 81, 102
Quick Sets
custom 51
description 50
for HP LaserJet Multifunction Finisher 51
preset booklet 51
too many defined 51
R
refresh rate
configuring for printer status alerts 24
description 24
regions
supported by installation CD-ROM 105
registration of product
availability of components by operating system 108
for Hebrew and Arabic 143
options 143
using HP Web Registration 45
releasing stored jobs 83
remote firmware update. See RFU (remote firmware update)
remote management using HP Web Access 31
removing
custom paper sizes 74, 75
private jobs 81, 103
stored jobs 82, 103
renaming custom paper sizes 74, 75
requirements
for IBM operating systems 159
for Macintosh operating systems 159
for Windows operating systems 113
Resolution Enhancement technology (REt) option in printer
drivers 62
Resolution option in printer drivers 62
resolution, setting in printer drivers 101
REt (Resolution Enhancement technology) option in printer
drivers 62
retention of jobs. See Job Retention option in printer drivers
RFU (remote firmware update)
changes to NVRAM 26
description 26
description of files 26
files corrupted 30
interrupted 31
messages 29
troubleshooting 30
verifying success 30
wrong printer model contained in files 31
rotated orientation 86
rotating images
description 86
versus stapling 86
S
saddle-stitching documents 58
saving toner using EconoMode 63
Scale Patterns (WYSIWYG) option in printer drivers 63
Scale to Fit option in printer drivers 65
Software Technical Reference
scaling
documents for different paper sizes 65
documents to fit target paper size 65
images on pages 64
setting percentage 65, 101
scanning documents
to e-mail 37
to fax 37
Select Port dialog box 126
Send to E-mail tab in Digital Sending Config Applet 181
Sendmail e-mail server 188
servers
configuring for digital sending e-mail 181
configuring for LDAP 183
e-mail that function as SMTP gateways 188
supporting LDAP 190
Set Network Communication Mode dialog box 133
Setup dialog box 121
shading, selecting for watermarks 68
short-edge stapling 88
silent installer 154
Size is option in printer drivers 72
SMTP gateway
acquiring information about 181
configuring settings 181
e-mail servers 188
verifying 189
software
automatic notification of releases 106
downloading 106
embedded virtual machine for Java 31
HP Digital Sender Module 37
HP Web Access 31
included with product 15
Software License Agreement dialog box 122
Source Is menu 77
Specify Network Path dialog box 132
Staple option in printer driver 56, 92
stapler. See stapler/stacker
stapler/stacker
availability of 56
configuring as destination 92
custom paper size limits on width and height 76
media supported 196
paper sizes supported by HP LaserJet 9000mfp 193,
194
stapling
documents 56
long edge 86
short edge 88
versus image rotation 86
status
configuring pop-up windows 20, 24
configuring refresh rate 24
disabling in Printer Status and Alerts utility 24
icons 22
monitoring with Printer Status and Alerts utility 20, 24
Storage options in printer drivers 93
Stored Job option in printer drivers
description 81, 82, 103
releasing stored jobs 83
requirements 82, 103
storing documents in printer memory 80
subject, configuring for digital sending e-mail 182
supplies
monitoring with Printer Status and Alerts utility 20, 24
monitoring with Supplies Status page 32
Supplies Status page, viewing with HP Web Access 32
system requirements. See requirements
209
T
W
Test button in Digital Sending Config Applet 181
testing
e-mail server 181
SMTP gateway 189
third-party software portal through Foreign Interface Harness
(FIH) 39
toner
monitoring level with Printer and Status Alerts utility 20
saving using EconoMode 63
Transmit Once mopying feature 91
Tray 1, configuring 91
trays
auto select 77
configuring for Windows operating systems 97
controlling in printer driver 104
custom paper size limits on width and height 76
media supported 196
paper sizes supported by HP LaserJet 9000mfp 192
paper sizes supported by PCL 5e and PCL 6 printer
drivers 195
paper source commands 191
verifying installation 24
viewing available 77
troubleshooting
firmware update 30
TrueType fonts
controlling in printer driver 101
sending as bitmaps 63
Type Is menu 78
Type of Connection dialog box 125
Typical installation
Windows operating systems 120
Watermark Details dialog box 67
watermarks
creating new 67
editing existing 68
limit to number of 67
preset 66
printing only on first page 66
selecting font, color, shading, size, and style 68
selecting from available 66
selecting shading 68
setting message angle 68
Watermarks option in printer drivers 66
Web JetAdmin
localization by operating system 109
using to download firmware 28
using with HP Web Access 31
Web sites
documentation 16
firmware 26, 105, 106
firmware update 26
LDAP 190
Microsoft Winsock2 patch 21
software 105, 106
Web Update dialog box 123
Welcome dialog box 121
Welcome to Hewlett-Packard’s Registration dialog box 146
What’s this? help 47
Windows 3.1x
substitute for Properties button 47
support for job retention 80
support for printers 157
Windows operating systems
configuring trays 97
directory structure on installation CD-ROM 105
font support 114
installing Microsoft Point and Print function 156
installing printing system 113
localization of components by operating system 109
PCL 5e and PCL6 printer drivers 15
printer drivers supported 43
PS (PostScript) printer driver 99
requirements for installing printing system components
113
supporting bidirectional communication 18
supporting HP LaserJet printing system software 15
Wizards, availability of components by operating system
108
workspace option for printer drivers 94
U
uninstalling
Macintosh printing system 164
Windows printing system 119
units of measurement, switching between inches and
millimeters 72, 76
UNIX operating systems
availability of components 108
printer drivers 44
updating status and alerts 24
upgrades. See RFU (remote firmware update)
URLs. See Web sites
Usage Page, viewing with HP Web Access 32
USB connections 19
utilities
availability of components by operating system 108
HP Auto Setup for Macintosh operating systems 160
HP LaserJet Utility for Macintosh operating systems 160
localization of components by operating system 109
Printer Status and Alerts 20
Z
ZoomSmart option in printer drivers 64
V
versions
firmware level 26
HP LaserJet printing system software 40
installation CD-ROM 105
printer drivers supported 43
viewing number 88
210
Software Technical Reference
Software Technical Reference
211
212
Software Technical Reference
copyright © 2002
Hewlett-Packard Company