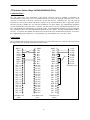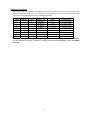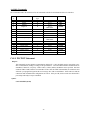
1
1000 Series PLC Interface Options p/n 50-00101-01 Revision 2.8 Eason Technology, Inc. 7975 Cameron Dr. Bldg 300 Windsor, CA 95492 Phone (707) 837-0120 FAX (707) 837-2742 www.eason.com Copyright 2001, Eason Technology, Inc. Eason Technology, Inc. All rights reserved. Specifications subject to change without notice. TABLE OF CONTENTS INTRODUCTION .....................................................................................................................................................2 CALL PLCINIT STATEMENT ..............................................................................................................................4 CALL PLCREAD STATEMENT............................................................................................................................5 CALL PLCWRITE STATEMENT .........................................................................................................................6 PLC SPECIFIC INFORMATION...........................................................................................................................8 -MOD INTERFACE OPTION ....................................................................................................................................... 9 -GE9 INTERFACE OPTION ....................................................................................................................................... 11 -TI3 INTERFACE OPTION (KOYO 240/340/405/430/440 PLCS).............................................................................. 13 -TI5 INTERFACE OPTION ........................................................................................................................................ 16 -SL5 INTERFACE OPTION ....................................................................................................................................... 25 -OM1 INTERFACE OPTION...................................................................................................................................... 31 -IDEC FA-1J\FA2-J INTERFACE OPTION ............................................................................................................... 34 -MITSUBISHI FX PLC INTERFACE ( -MFX )........................................................................................................... 38 -SQD SQUARE D SY/MAX PLC INTERFACE .................................................................................................... 43 -SS5 INTERFACE OPTION........................................................................................................................................ 47 -KKV INTERFACE OPTION ..................................................................................................................................... 51 -SQUARE D MODEL 50 INTERFACE OPTION ...................................................................................................... 57 -AROMAT FP INTERFACE OPTION (PRELIMINARY) ................................................................................................. 59 Introduction The Eason Technology 1000 Series PLC Interfaces are designed to make many of the individual intricacies of the various PLC Interfaces transparent to the user. That is to say that reading a register in a Modicon PLC uses the same procedure as reading a register in an Omron PLC. This allows a given program to be written for one PLC and then used with another PLC just by changing the PLC Interface option in your 1000 Series unit. This assumes, of course, that both PLC's have equivalent functionality. For example Modicon and TI treat analog I/O very differently (Modicon treats analog I/O as simply another register, whereas TI has separate memory locations for registers and analog I/O) so they are accessed differently via the 1000 Series. Three "calls" are the heart of the PLC communications. They are CALL PLCINIT, CALL PLCREAD, and CALL PLCWRITE. These calls can be used in any reasonable location within a BASIC program running in the Model 1000 or 1100 with a PLC Interface option. This allows the use of the data in a register, bit status, analog I/O value, or any other applicable data available from a PLC in a process or interface program in the 1000 Series device. For most of the PLC Interface Options, the PLC Interface is on COM1 of the 1000 Series device. COM2 retains its default status. The -MOD, -PL5, and -SL5 Options have the ability to communicate to the PLC from either COM port. In effect, this allows you to hook two PLC's to each 1000 or 1100. In a Model 1000, COM2 is still standard RS232C. In a Model 1100, COM2 can still be configured to be RS232C, RS422, or RS485. This allows the integration of a PLC and virtually any other serial communications device. For example, you can connect a PLC to COM1 and another device that uses serial communication (e.g., motion controllers, PC's, serial displays, temperature controllers, etc.) to COM2 and communicate to all devices via the 1000 Series interface. In effect, the 1000 Series acts as an Operator Interface and an ASCII/BASIC module in one. Current PLC Interface Options are: Interface Option -MOD -GE9 -TI3 -TI5 -PL5 -OM1 -PL2 -SL5 -ID1 -MFX -SQD -SS5 -KKV -AFP PLC Protocols Supported Modbus (Modicon) GE Series 90 (GE Fanuc) TI305 (GE Series 1) & TI405 TI505 (Siemens/TI) Allen Bradley PLC-5 Omron Hostlink Allen Bradley PLC-2 Allen Bradley SLC 500 IDEC FA-1J\FA2-J Mitsubishi FX Square-D Siemens S5 Keyence KV Aromat FP Series Software Version 20-0000X-02-X.XX 20-0000X-03-X.XX 20-0000X-04-X.XX 20-0000X-05-X.XX 20-0000X-06-X.XX 20-0000X-07-X.XX 20-0000X-08-X.XX 20-0000X-09-X.XX 20-0000X-10-X.XX 20-0000X-11-X.XX 20-0000X-13-X.XX 20-0000X-15-X.XX 20-0000X-16-X.XX 20-0000X-17-X.XX As mentioned above, the PLC Interfaces all work in a similar, if not identical, fashion (the -PL5, -SL5, -ID1, -MFX, and -SQD interfaces are more unique than any of the others - refer to the PLC SPECIFIC sections for detailed information on how to use these interfaces). Initialization of the PLC Interface (setting the proper communication parameters and verifying the establishment of the link between the PLC and the Model 1000 or 1100) always occurs with the CALL PLCINIT command. This command need only be issued once, usually during the initialization portion of your program. Any data that you wish to get from the PLC is retrieved by the CALL PLCREAD command. Data that you wish to write in a register, memory locations that you wish to define, or I/O bits you wish to set are all effected with the CALL PLCWRITE statement. The following section describes the CALL PLCINIT, CALL PLCREAD, and CALL PLCWRITE commands in general. Most of the PLC Interfaces developed so far use the same arguments for similar functionality, no matter which Interface is installed. Exceptions are noted in the tables. More specific information follows in sections particular to each Interface Option. Refer to the section for your PLC to see if the "normal" implementation for a given function is different for you PLC. See the PLC and SLC specific sections on the PL5 and -SL5 Options for the CALL PLCREAD and CALL PLCWRITE commands for the Allen Bradley PLC-5 and SLC 500 PLC's as they are significantly different from the rest of the interface options. 3 PLC Interface Commands CALL PLCINIT Statement Purpose: This command is used to initialize communication with a given PLC of a given type. CALL PLCINIT must be issued prior to any other communication (reading or writing) to the specified PLC. CALL PLCINIT does auto-baud rate detect for some PLC's and sets up specific communications parameters for others. See the section specific to your Interface Option for information regarding the initialization parameters for that particular system. If the CALL PLCINIT command fails, the 1000 Series unit will break your program and generate the error message "PLC link not established." If this occurs, refer to the individual section for your option to make sure that the connections and communications configurations are correct. If they are OK, check to make sure that you do not have a password in your PLC that is not allowing access to the programming port. Syntax: CALL PLCINIT(id,cmd) Comments: id specifies the address of the PLC that you wish to initialize. Some PLC's allow addressing of multiple PLC's, others do not. Refer to your PLC Operator's manuals for information regarding capability and implementation. cmd specifies the type of PLC protocol that you are initiating. manufacturer, and possibly model, according to the following table: Interface Option -MOD -GE9 -TI3 -TI5 -PL5 -SL5 -OM1 -PL2 -ID1 -MFX -SQD Cmd 1000 Series COM port: 1 or 2 See GE9 Section Specific PLC Model: 315, 325, 330, 425, 435 1 1000 Series COM port: 1 or 2 1000 Series COM port: 1 or 2 1000 Series COM Port: 1 or 2 1000 Series COM port: 1 or 2 See IDEC Section See Mitsubishi Section See Square D Section 4 This can vary depending upon PLC PLC Protocol Modbus COM1 GE Series 90 TI305/405 TI505 DF1 DF1-1 port only Host Link PLC-2 Programming Port See IDEC Section See Mitsubishi Section See Square D Section Examples: 10 CALL PLCINIT(1,1) Establishes communication with a Modbus, GE Series 90, PLC-5, SLC-500, Omron Hostlink, or TI505 PLC (depending on the installed interface option) with an ID (address) of 1. 10 CALL PLCINIT(1,435) Establishes communication with a TI435 PLC with an ID (address) of 1 (when the -TI3 option is installed). 10 CALL PLCINIT(1,2) Establishes communication with a Modicon, AB PLC-5, or SLC-500 with an ID (address) of 1 on COM 2. CALL PLCREAD Statement Purpose: This command is used to read the value(s) in a PLC's registers, the status of bits, or any other accessible memory location within the PLC. Refer to the -PL5 and -SL5 for information on how to use this command with the Allen-Bradley PLC-5 and SLC-500 processors. Syntax: CALL PLCREAD(id,cmd,start address, # of registers/bits,variable/array) Comments: id specifies the address of the PLC from which you wish to read data. This number is usually 1 when interfacing to one PLC. cmd specifies the read operation you wish to perform. See the table below for the read operation possibilities: MOD • • • • • • GE9 • • • • • • TI3 • • • • TI5 • • • • OM1 • • • • PL2 • • • • • • • • • Cmd 1 2 3 4 5 6 7 8 9 10 11 Function Read PLC CPU Status Read Discrete Input Status Read Discrete Output Status Read Register Read Input Register Quick Status Read Analog Inputs Read Analog Outputs Read Discrete Internals/Coils/Relays Read Holding Relays Read Auxiliary Relays Typical Data/Response* 2 words; ID, run status 1 word per 16 bits 1 word per 16 bits 1 word per register 1 word per register 1 word with 8 bits 1 word per register 1 word per register 1 word per 16 bits 1 word per 16 bits 1 word per 16 bits *The Data/Response format described here is typical. Refer to the section regarding your specific interface for the actual format start address is the starting address of the bit(s) or register(s) you are interested in reading. In the case of the PLC interfaces implemented so far, this does not include a data type specifier (%, $, !, etc.) # of registers/bits is the number of consecutive registers, memory locations, or bits that you wish to read. Most PLC interfaces only allow you to read one at a time, and for many applications that is all you will need to read. If this is the case, # of registers/bits will be 1. If you wish to read more than one register or memory location at a time, this number will be the number of consecutive registers or locations you wish to read. If 5 you are reading the status of more than one I/O bit, this number will be the number of consecutive bits you wish to read. variable/array is the variable name or array name where you wish to store the data you are reading. This variable MUST be a short integer (% variable). If the value of # of registers/bits (see above) is 1, this will be a variable expression. If you are reading registers or memory locations that are stored as words (cmd = 1, 4, 5, 6, 7, 8) and the # of registers/bits is greater than one, this will be a short integer array (make sure you properly dimension the array prior to using it). If you are reading the status of more than one, but less than 16 I/O bits, you will be reading one word, and therefore will need to use a single short integer. If you are reading more than 16 bits, you will need to use a short integer array. The dimension of the array variable will be the next integer greater than the desired number of bits divided by 16. For example, if you wish to read the status of bits 1-24 you will need to dimension your array to at least two since 24/16 = 1.5 and two is the next greater integer. Remember, any time you are reading more than one word of data (more than one register or more than 16 bits) you must use a dimensioned short integer array. Examples: 10 DIM stat%(2) 20 CALL PLCREAD(1,1,0,2,stat%(1)) This command returns the ID of the PLC as stat%(1) and the current run status as stat%(2) from the Modbus or GE Series 90 PLC with an id (address) = 1. 10 DIM regdat%(10) 20 CALL PLCREAD(1,4,16,5,regdat%(4)) This command returns the contents of register 16 in regdat%(4), register 17 in regdat%(5), register 18 in regdat%(6), register 19 in regdat%(7), register 20 in regdat%(8), from any of the PLC's currently implemented. 10 CALL PLCREAD(1,5,47,1,regdat1%) This command reads the data in input register number 47 in the Modbus PLC with id (address) = 1 and stores it in the variable regdat1% 10 CALL PLCREAD(1,7,3,1,analog1%) This command reads the value of analog input number 3 in a GE Series 90 or TI 505 PLC with address = 1 and stores it in the variable analog1% CALL PLCWRITE Statement Purpose: This command is used to write value(s) to a PLC's register(s), memory location(s), or to force one or more output bits in a PLC. Refer to the -PL5 and -SL5 for information on how to use this command with the Allen-Bradley PLC-5 and SLC-500 processors. Syntax: CALL PLCWRITE(id,cmd,start address, # of registers/bits,expression/variable/array) Comments: id specifies the address of the PLC to which you wish to write. This number is usually 1 when interfacing to one PLC. 6 cmd specifies the write operation you wish to perform. possibilities: MOD GE9 • • • • • • TI3 • • • • • • • TI5 OM1 PL2 • • • • • • • • • • • • • • Cmd 1 2 3 4 5 6 7 8 9 10 11 See the table below for the write operation Function Clear Status Write Input Bit(s) Write Output Bit(s) Write to a Register N/A N/A N/A Write to Analog Output(s) Write to Discrete Internals/Coils/Relays Write to Holding Relays (bits) Write to Auxiliary Relays (bits) Typical Data* Any 5 words 16 bit words 16 bit words 1 word per register N/A N/A N/A 1 word per output 16 bit words 16 bit words 16 bit words *The Data format described here is typical. Refer to the section regarding your specific interface for the actual format. start address is the starting address of the bit(s) or register(s) you are interested in writing. In the case of the Modbus, this does not include a data type specifier (%, $, !, etc.) # of registers/bits is the number of consecutive registers, memory locations, or bits that you wish to set. Many PLC Interfaces only allow you to set one at a time, and for many applications that is all you will need to read. If this is the case, # of registers/bits will be 1. If you wish to set more than one register or memory location at a time, this number will be the number of consecutive registers or locations you wish to set. If you are writing the status of more than one I/O bit, this number will be the number of consecutive bits you wish to set. expression/variable/array is the expression, variable or array data you wish to write to the PLC's I/O, registers, or other memory locations. If the value of # of registers/bits (see above) is 1, this will be an expression or a variable. If the number of words is greater than one, this must be an array (make sure you properly dimension the array prior to using it). If you wish to write the status of up to 16 I/O bits, you will be writing one word, and therefore will need to use an expression or discrete variable name. If you wish to set more than 16 consecutive bits, you will need to use an array. The dimension of the array variable will be the next integer greater than the desired number of bits divided by 16. For example, if you wish to set the status of bits 1-24 you will need to dimension your array to at least two since 24/16 = 1.5 and two is the next greater integer. Remember, any time you are writing more than one word of data (more than one register or more than 16 bits) you must use a dimensioned array variable Examples: 10 DIM stat(10) 20 CALL PLCWRITE(1,1,1,5,stat(1)) This command clears the status in a TI305/405 PLC 10 CALL PLCWRITE(1,3,12,5,13) This command writes a 1 to outputs 12, 14, and 15, and a 0 to outputs 13 and 16 in a PLC with an id (address) = 1. Note that 13 represents the binary "01101" which is the bit pattern desired. 10 DIM newdat%(10) 20 CALL PLCWRITE(1,4,5,2,newdat%(4)) This command writes the value of newdat%(4) to register 5 and newdat%(5) to register 6 in a PLC with an id (address) = 1. 7 10 DIM anout%(10) 20 CALL PLCWRITE(1,8,1,2,anout%(1)) This command writes the value of analog1% to analog output 1 and to analog output 2 in a GE Series 90 or TI505 PLC with address = 1 PLC Specific Information In general, PLC's from various manufacturers behave similarly. There are, however, a number of "quirks" that need to be mentioned. Also, various PLC's deal with Operator Interfaces in various ways. Some allow access to the registers, memory locations, and discrete I/O through the CPU's programming port, while others require some sort of communication module to be added to the system to allow the CPU and Operator Interface to interact properly. This section deals with the criteria specific to each of the 1000 Series PLC Interface Options -- command variances, communication hardware, cabling, etc. PLC Summary: Option -MOD PLC's Supported Any Modicon PLC Supporting Modbus: Micro 84, 484, 584, 184/384, 884, 984/381, etc. GE Fanuc Series 90-30 Protocol Modbus Communicate via Programming Port Com Parameters Auto-Detect SNP Programming Port GE Fanuc Series 90-70 TI Model 315 TI Model 325 TI Model 330 TI Model 425 TI Model 435 TI Model 520(C) TI Model 530(C) TI Model 525 TI Model 535 TI Model 560 TI Model 565 TI Model 545 TI Model 575 Allen Bradley PLC-5 SNP CCM CCM CCM CCM CCM TI Direct Connect TI Direct Connect TI Direct Connect TI Direct Connect TI Direct Connect TI Direct Connect TI Direct Connect TI Direct Connect 1785-KE Allen Bradley PLC-5 1770-KF2 -SL5 Allen Bradley SLC-500 1747-KE -OM1 -PL2 Omron Host Link Allen Bradley PLC-2 Allen Bradley PLC-2 Host Link 1771-KA2 Programming Port Programming Port DCU DCU DCU DCM CPU Serial Interface Port CPU Serial Interface Port CPU Serial Interface Port CPU Serial Interface Port CPU Serial Interface Port CPU Serial Interface Port CPU Serial Interface Port CPU Serial Interface Port CPU Serial Interface Port Computer (Asynchronous) Port Computer (Asynchronous) Port Computer (Asynchronous) Port RS232C Port Programming Port Programming Port 19.2 kbaud, 1 stop bit, 8 data bits, odd parity Same as 90-30 Auto-Detect Auto-Detect Auto-Detect Auto-Detect Auto-Detect Auto-Detect Auto-Detect Auto-Detect Auto-Detect Auto-Detect Auto-Detect Auto-Detect Auto-Detect Set Full Duplex & BCC, All others auto-detected Set Full Duplex & BCC, All others auto-detected Set Full Duplex & BCC, All others auto-detected Auto-Detect Auto-Detect Auto-Detect -GE9 -TI3 -TI5 -PL5 8 -MOD Interface Option Communications: The -MOD Option communicates via the Modbus protocol. It was developed to allow the 1000 Series to communicate easily to the Modicon PLC's that use the Modbus protocols (Micro 84, 484, 584, 184/384, 884, 984/381, etc.) It also works well with communication modules available for other PLC's like GE Fanuc's Serial Communications Module (Cat.# IC693CMM311 used in RTU Mode). When used with a Modicon PLC, the communications occurs via the programming port. The 1000 Series does auto-detect for the serial communications parameters, therefore no special procedures are necessary for configuring the serial port on the PLC. The CALL PLCINIT command takes care of configuring COM1 on the 1000 Series device and initializing the communications with the PLC. Please note that the PLC needs to be in RUN MODE for communication with the 1000 Series device. Connections: The -MOD Option comes with the proper cable to interface to the Modicon PLC. For those who need to change the length of the cable, the proper connections are shown below: PLC Model 1100 PLC Model 1000 SHLD RXD TXD DTR GND DSR RTS CTS N.C. 1 2 3 4 5 6 7 8 9 9-PIN MALE D TYPE 1 SHLD 2 TxD 3 RxD 4 N.C. 5 N.C. 6 N.C. 7 GND 8 N.C. 9 N.C. 10 N.C. 11 N.C. 12 N.C. 13 N.C. 14 N.C. 15 N.C. 16 N.C. 17 N.C. 18 N.C. 19 N.C. 20 N.C. 21 N.C. 22 N.C. 23 N.C. 24 N.C. 25 N.C. SHLD RXD TXD DTR GND DSR RTS CTS N.C. 1 2 3 4 5 6 7 8 9 9-PIN MALE D TYPE 25-PIN FEMALE D TYPE (COM1) 1000 Series to Modbus Communication Connections Command Variations: 9 1 2 3 4 5 6 7 8 9 N.C. RxD TxD N.C. GND N.C. N.C. N.C. N.C. 9-PIN FEMALE D TYPE There are no variations between the descriptions of CALL PLCINIT, CALL PLCREAD, and CALL PLCWRITE in the previous section and the Modbus implementation of those commands. 10 -GE9 Interface Option Communications: The -GE9 Option uses GE Fanuc's SNP Protocol to communicate to their Series 90 PLCs. Access to the PLC occurs via the programming port. In the near future, they will also be offering a Serial Communications Module that supports SNP which will allow simultaneous connections to the PLC by more than one Model 1000 or 1100, as well as a programmer. Check with GE for availability. If you need to allow simultaneous communication to one Series 90 from both a 1000 Series unit and a programming device, GE's Serial Communication Module (catalog # IC693CMM311) supports the Modbus protocol when in RTU mode. You would then need to use the MOD option to communicate to the PLC. See the previous section for more information. The rest of this section will deal with the -GE9 SNP protocol currently only available through the programming port. (Note: since the original publication of this document, it appears that GE Fanuc has released a version of Serial Communications Module that does support the SNP protocol.) Connections: The -GE9 Option comes with the proper cable to interface to a GE Fanuc Series 90 PLC. For those who need to change the length of the cable, the proper connections are shown below: PLC Model 1100 PLC Model 1000 SHLD 1 N.C. 2 N.C. 3 N.C. 4 +5V 5 RTS (A) 6 0V 7 CTS (B) 8 N.C. 9 RD (B) 10 RD (A) 11 SD (B) 12 SD (A) 13 RTS (B) 14 CTS (A) 15 15-PIN MALE D TYPE 1 SHLD 2 N.C. 3 N.C. 4 N.C. 5 N.C. 6 N.C. 7 GND 8 N.C. 9 N.C. 10 N.C. 11 N.C. 12 Tx+ 13 Tx14 Rx+ 15 Rx16 N.C. 17 N.C. 18 N.C. 19 N.C. 20 N.C. 21 N.C. 22 N.C. 23 N.C. 24 N.C. 25 N.C. SHLD 1 N.C. 2 N.C. 3 N.C. 4 +5V 5 RTS (A) 6 0V 7 CTS (B) 8 N.C. 9 RD (B) 10 RD (A) 11 SD (B) 12 SD (A) 13 RTS (B) 14 CTS (A) 15 15-PIN MALE D TYPE 25-PIN MALE D TYPE (COM1) 1000 Series to GE Series 90 Communication Connections 11 1 2 3 4 5 6 7 8 DC INDC IN+ GND Rx B Rx A Tx B Tx A SHLD 8-PIN SCREW TERMINAL Command Variations: CALL PLCINIT Statement Purpose: This command is used to initialize communication with the GE Series 90. CALL PLCINIT must be issued prior to any other communication (reading or writing) to the specified PLC. Either COM 1 or COM 2 can be specified according to the table below. Note that on Model 1000's only COM1 is available for RS422 communication. If the CALL PLCINIT command fails, the 1000 Series unit will break your program and generate the error message "PLC link not established." If this make sure that the connections and communications configurations are correct. If they are OK, check to make sure that the GE Series 90 is powered up and ready to accept Commands. The Eason will step through baud rates 19,200 to 1,200 with Odd, Even and No parity tried for each. Syntax: CALL PLCINIT(id,cmd) Comments: id specifies the address of the GE Series 90. cmd specifies the communications mode: 1 - RS422, COM 1 2 - RS422, COM 2 - Model 1100 only 3 - RS232, COM 1 4 - RS232, COM 2 Examples: 10 CALL PLCINIT(1,1) Establish communications with the PLC via the 1000 Series COM 1 RS422 Port. 12 -TI3 Interface Option (Koyo 240/340/405/430/440 PLCs) Communications: The -TI3 Option uses Texas Instruments' CCM protocol (otherwise known as Hostlink or DirectNet) for communicating to TI Series 305, Series 335 and Series 405 PLC's as well as the Koyo DL230/305/405 series. Please note that we cannot talk to the Koyo 230/330 PLC as that does not have a DirectNet port The Hex mode of transmission is used, so please check with the PLC manual to set up communications for Hex (as opposed to ASCII). The Series 305 PLC's (Models 315, 325, and 330) communicate via a DCU module. The communication parameters are auto-detected by the 1000 Series device. Therefore, you don't need to set up any communication parameters in your PLC. The TI Model 425 communicates via the DCM module. It's communication parameters are also auto-detected. The TI Model 435 has a serial communication port built into the CPU module. No other communications module is necessary. As with the other Models, the 1000 Series auto-detects the 435's communication parameters. In all cases, the communication protocol is RS232C, so use the RS232C port, not the RS422 port, if you have a choice. Connections: The -TI3 Option comes with the proper cable to interface to a TI 305 or 405 Series PLC. For those who need to change the length of the cable, the proper connections are shown below: PLC SHLD 1 TxD 2 RxD 3 RTS 4 CTS 5 DSR 6 GND 7 DCD 8 N.C. 9 N.C. 10 N.C. 11 N.C. 12 N.C. 13 N.C. 14 N.C. 15 N.C. 16 N.C. 17 N.C. 18 N.C. 19 DTR 20 N.C. 21 N.C. 22 N.C. 23 N.C. 24 N.C. 25 25-PIN MALE D TYPE (RS232C) Model 1100 PLC 1 SHLD 2 TxD 3 RxD 4 N.C. 5 N.C. 6 N.C. 7 GND 8 N.C. 9 N.C. 10 N.C. 11 N.C. 12 N.C. 13 N.C. 14 N.C. 15 N.C. 16 N.C. 17 N.C. 18 N.C. 19 N.C. 20 N.C. 21 N.C. 22 N.C. 23 N.C. 24 N.C. 25 N.C. SHLD 1 TxD 2 RxD 3 RTS 4 CTS 5 DSR 6 GND 7 DCD 8 N.C. 9 N.C. 10 N.C. 11 N.C. 12 N.C. 13 N.C. 14 N.C. 15 N.C. 16 N.C. 17 N.C. 18 N.C. 19 DTR 20 N.C. 21 N.C. 22 N.C. 23 N.C. 24 N.C. 25 25-PIN FEMALE D TYPE (COM1) Model 1000 1 2 3 4 5 6 7 8 9 9-PIN FEMALE D TYPE 25-PIN MALE D TYPE (RS232C) 1000 Series to TI Series 305 or TI Series 405 RS232C Communication Connections 13 N.C. RxD TxD N.C. GND N.C. N.C. N.C. N.C. PLC 1 2 3 4 RxD TxD RTS GND 1 2 3 4 5 6 7 8 9 RJ-11 (4-WIRE, HANDSET) 4 1 RJ-11, FRONT VIEW OF CABLE PLC Model 1000 1 2 3 4 5 4 N.C. RxD TxD N.C. GND N.C. N.C. N.C. N.C. Model 1000 GND 5V TxD RxD 5v 0V 1 2 3 4 5 6 7 8 9 RJ-11 (6-WIRE, PHONE TYPE) 9-PIN FEMALE D TYPE N.C. RxD TxD N.C. GND N.C. N.C. N.C. N.C. 9-PIN FEMALE D TYPE 1 6 RJ-11, FRONT VIEW OF CABLE 1000 to TI335/DL340 Port1 CPU Connections 1000 to DL240 CPU Communications Connections PLC 1 2 3 4 RxD TxD RTS GND RJ-11 (4-WIRE, HANDSET) Model 1100 1 2 3 4 5 6 7 PLC 1 2 3 4 5 4 N.C. TxD RxD N.C. GND N.C. N.C. Model 1100 GND 5V RxD TxD 5v 0V 1 2 3 4 5 6 7 RJ-11 (6-WIRE, PHONE TYPE) } All N.C. 4 1 RJ-11, FRONT VIEW OF CABLE N.C. TxD RxD N.C. GND N.C. N.C. } All N.C. 25 N.C. 25 N.C. 25-PIN FEMALE D TYPE 1 6 RJ-11, FRONT VIEW OF CABLE 1100 to TI335/DL340 Port1 CPU Connections 25-PIN FEMALE D TYPE 1100 to DL240 CPU Communications Connections 14 Command Variations: TI Series 305 and 405 PLC's return 5 words of network status information when using CALL PLCREAD with cmd = 1. The following example describes a typical way to read the status information: 10 DIM stat%(5) 20 CALL PLCREAD(1,1,0,5,stat%(1)) Note: numbers in bold cannot be changed This will store Last Error and Previous Error in stat%(1), Number of Successful Communications in stat%(2), Number of Erroneous Communications in stat%(3), Number of Retries For Header in stat%(4), and Number of Retries for Data in stat%(5). (See your PLC manual for more details) You must read 5 words of data any time you wish to read the network status. You can reset the status registers by using the CALL PLCWRITE command with cmd = 1. You must write five words. The data can be arbitrary, since the net result is resetting the status registers, no matter what you write. See the example: 10 DIM newstat%(5) 20 CALL PLCWRITE(1,1,0,5,newstat%(1)) Note: numbers in bold cannot be changed (See your PLC manual for more details) You must write 5 words of data any time you wish to reset the network status. Also, on the Model 435, the V-Memory registers are specified in octal in the TI documentation with an offset of 1400. The 1000 series specifies the memory registers in decimal with an offset of 0. For example, to access register V7377 you would first subtract 14008 from 73778 and then convert the result (57778) to decimal (307110). You must take care when specifying the address to take this difference into account. call plcwrite(1,4,3071,1,23) The above command writes the value 23 to register V7327. CALL PLCINIT Statement Purpose: This command is used to initialize communication with the TI3. If the CALL PLCINIT command fails, the 1000 Series unit will break your program and generate the error message "PLC link not established." If this make sure that the connections and communications configurations are correct. If they are OK, check to make sure that the PLC is powered up and ready to accept Commands. Syntax: CALL PLCINIT(id,cmd, port) Comments: id specifies the address of the PLC cmd specifies the PLC type: 305 - for the TI305/TI315/DL330 PLC series 335 - for the TI335/DL340 PLC series 405 - for the TI405/DL405/DL230 PLC Examples: CALL PLCINIT(1,405,2) Establish communications with the Koyo 230 PLC over the COM 2 RS232 Port. 15 -TI5 Interface Option Communications: The -TI5 Option uses Texas Instruments' Direct Connect protocol for communicating to TI Series 505 PLC's. All models in the TI500/505 Series have an RS232C serial port on the CPU module. The 1000 Series -TI5 Option uses this port for communication to the PLC. Both the Model 1000 and Model 1100 auto detect the communication parameters, so no setup is needed to get the two devices communicating. The only caution is to make sure that no passwords exist that would not allow the 1000 Series unit access to the programming port. You can also communicate from the Eason to an the auxiliary communications port option plugged into a 505 rack if you are not also using more than one I/O rack at the same time. This is because the port uses hardware handshaking that the Eason does not recognize. If the I/O is being accessed frequently over the rack’s bus, the auxiliary port will not be updated as frequently as the Eason needs. In the case of a very busy rack bus, a read by the Eason of a PLC register will return non-valid data. Connections: The -TI5 Option comes with the proper cable to interface to a TI 505 Series PLC. For those who need to change the length of the cable, the proper connections are shown below: SHLD RXD TXD DTR GND DSR RTS CTS N.C. PLC Model 1100 1 2 3 4 5 6 7 8 9 1 SHLD 2 TxD 3 RxD 4 N.C. 5 N.C. 6 N.C. 7 GND 8 N.C. 9 N.C. 10 N.C. 11 N.C. 12 N.C. 13 N.C. 14 N.C. 15 N.C. 16 N.C. 17 N.C. 18 N.C. 19 N.C. 20 N.C. 21 N.C. 22 N.C. 23 N.C. 24 N.C. 25 N.C. 9-PIN FEMALE D TYPE SHLD RXD TXD DTR GND DSR RTS CTS N.C. PLC Model 1000 1 2 3 4 5 6 7 8 9 1 2 3 4 5 6 7 8 9 9-PIN FEMALE D TYPE 25-PIN FEMALE D TYPE (COM1) N.C. RxD TxD N.C. GND N.C. N.C. N.C. N.C. 9-PIN FEMALE D TYPE 0 1000 Series to TI Series 505 RS232C Communication Connections 16 Command Variations: The following table will help make the terminology of the previous sections make more sense with respect to the TI Series 505 documentation. It is a cross reference between the Memory Type in the PLC documentation and the cmd for the CALL PLCREAD and CALL PLCWRITE commands. READ • • • • WRITE Cmd Memory Type Range Data/Response 1 STW Memory 1-15 1 word per register 2 X Memory 1-1024 1 word per 16 bits • 3 Y Memory 1-1024 1 word per 16 bits • 4 V Memory 1-NNNN 1 word per register 5 N/A N/A N/A 6 N/A N/A N/A • 7 WX Memory 1-1024 1 word per register • • 8 WY Memory 1-1024 1 word per register • • 9 CR Memory 1-32768 1 word per 16 bits NOTE: The -TI5 Option limits you to reading or writing a maximum of 7 elements at one time. For example, you are restricted to accessing 7 registers in V memory with one CALL PLCREAD or CALL PLCWRITE command. 17 -PL5 Interface Option Communications: The -PL5 Interface Option allows the 1000 Series to communicate to the Allen Bradley PLC-5 through the 1785-KE or 1770-KF2 Series B Data Highway RS-232-C Interface Modules. The communications cable is Eason Technology's standard Null Modem cable (N-MODEM-25-25 for the Model 1100 and N-MODEM-9-25 for the Model 1000). Connections: The -PL5 Option comes with the proper cable to interface direct to a PLC-520,540 or 580 DF1 port. You may also choose a cable to interface to either a 1785-KE or a 1770-KF2 Series B Data Highway RS-232-C Interface Module. The cable sections are as follows: Using the -PL5 with a 1785 KE Module Model 1000 - 20-00138-01 Model 1100 - 20-00141-01 Using the -PL5 with a 1770 KF2 Module: Model 1000 - 20-00109-02 Model 1100 - 20-00109-01 Using the -PL5 with a PLC-520, 540, or 580 DF1 port: Model 1000 - 20-00109-02 Model 1100 - 20-00141-01 Refer to the end of this section for the schematics for the above cables 1000 Series to Allen Bradley 1785-KE or 1770-KF2 Module Communication Connections Allen-Bradley 1785 KE and 1770 KF2 Set-Up: Correctly setting the dip switches on the 1785 KE or 1770 KF2 Interface Module is an important step in the set up process. Furthermore it is a good idea to make sure that your 1785 KE or 1770 KF2 is working properly by communicating to the PLC5 via the KE or KF2 interface and Allen Bradley's programming software (APS). Follow the appropriate Allen-Bradley user's manual for setting up your system to communicate in this fashion. Once you have successfully communicated with between the PC and your PLC, communicating with the Eason is a snap. Configure the 1785 KE dip switches in the following manner (UP=OPEN, DN=CLOSED): SWITCH NUMBER: SW1 SW2 SW3 SW4 1 UP DN DN UP 2 UP DN DN UP 3 UP UP UP 4 UP UP DN 5 UP UP DN 6 UP UP DN 7 8 UP UP Configure the 1770 KF2 dip switches in the following manner: SWITCH NUMBER: 1 2 3 4 5 6 18 SW1 SW2 SW3 SW4 SW5 SW6 SW7 SW8 DN DN UP UP UP DN UP DN DN DN UP UP UP UP DN UP UP DN DN UP UP UP UP Command Variations: The CALL PLCREAD and CALL PLCWRITE commands for the PLC-5 are significantly different from the other PLC's described here. The following descriptions apply to the -PL5 Option only: CALL PLCREAD Statement Syntax: CALL PLCREAD(id, file, address, [bit], count, variable/array) Comments: This command is specific to the -PL5 Interface Option. id specifies the address of the PLC from which you wish to read data. This number is usually 1 when interfacing to one PLC. file specifies the file number that you wish to access. address is the address of the first element to access in the above file. [bit] is an optional parameter which specifies the starting bit location of the bits you wish to read. If you are reading words (as in reading a register value), leave this field blank (i.e., ...address,,count,...). If you are reading bits (I/O points, internal coils, etc.) specify the starting bit in the element you are addressing (address). This could be any bit from 0-15. count specifies the number of bits and/or elements that you wish to read. If you are reading data in the form of words, it is the number of consecutive elements you wish to read. If you are reading bits, it is the number of consecutive bits you wish to read. variable/array is the variable name or single dimension array name where you wish to store the data you are reading. If the value of count (see above) is 1, this will be a variable expression. If you are reading elements that are stored as words and count is greater than one, this will be an array (make sure you properly dimension the array prior to using it). If you are reading the status of more than one, but less than 16 bits, you will be reading one word, and therefore can use a discrete variable name. If you are reading more than 16 bits, you will need to use an array. The dimension of the array variable will be the next integer greater than the desired number of bits divided by 16. For example, if you wish to read the status of bits 1-24 you will need to dimension your array to at least two since 24/16 = 1.5 and two is the next greater integer. Remember, any time you are reading more than one word of data (more than one register or more than 16 bits) you must use a dimensioned array variable 19 Examples: 10 DIM regdat%(10) 20 CALL PLCREAD(1,4,16,,5,regdat%(4)) This command returns the contents of element 16 in regdat%(4), element 17 in regdat%(5), element 18 in regdat%(6), element 19 in regdat%(7), element 20 in regdat%(8), from file #4 in the PLC-5 with id #1. 10 CALL PLCREAD(2,5,47,,1,regdat1%) This command reads the data in input element number 47 in file #5 in the PLC-5 with id (address) = 2 and stores it in the variable regdat1% 10 DIM stat%(2) 20 CALL PLCREAD(1,1,1,15,18,stat%(1)) This command would access file 1 in the PLC with an id of 1. It would return the status of address 1, bit 15, and address 2, bits 0-14 in stat%(1) and the status of address 2, bit 15 and address 3 bit 0 (and 14 zeros) in stat%(2). CALL PLCWRITE Statement Syntax: CALL PLCWRITE(id, file, address, [bit], count, variable/array) Comments: This command is specific to the -PL5 Interface Option. id specifies the address of the PLC in which you wish to write data. This number is usually 1 when interfacing to one PLC. file specifies the file number that you wish to write to. address is the address of the first element to write to in the above file. [bit] is an optional parameter which specifies the starting bit location of the bits you wish to write. If you are writing words (as in writing a register value), leave this field blank (i.e., ...address,,count,...). If you are writing bits (I/O points, internal coils, etc.) specify the starting bit in the element you are addressing (address). This could be any bit from 0-15. count specifies the number of bits and/or elements that you wish to set. If you are writing data in the form of words, it is the number of consecutive elements you wish to write. If you are setting bits, it is the number of consecutive bits you wish to set. variable/array is the variable name or single dimension array name where you wish to store the data you are writing. If the value of count (see above) is 1, this could be a variable expression. If you are writing elements that are stored as words and count is greater than one, this will be an array (make sure you properly dimension the array prior to using it). If you are setting more than one, but less than 16 bits, you will be writing one word, and therefore can use a discrete variable name. If you are setting more than 16 bits, you will need to use an array. The dimension of the array variable will be the next integer greater than the desired number of bits divided by 16. For example, if you wish to set bits 1-24 you will need to dimension your array to at least two since 24/16 = 1.5 and two is the next greater integer. Remember, any time you are writing more than one word of data (more than one register or more than 16 bits) you must use a dimensioned array variable 20 Examples: 10 DIM regdat%(10) 20 CALL PLCWRITE(1,4,16,,5,regdat%(4)) This command writes the contents of regdat%(4) in element 16, regdat%(5) in element 17, regdat%(6) in element 18, regdat%(7) in element 19, and regdat%(8) in element 20 to file #4 in the PLC-5 with id (address) of 1. 10 CALL PLCWRITE(2,5,47,,1,regdat1%) This command writes the data in regdat1% into element number 47 in file #5 in the PLC-5 with id (address) of 2. 10 DIM stat%(2) 20 CALL PLCWRITE(1,2,33,12,5,13) This command sets bits 12, 14, and 15 to a 1, and bits 13 and 16 to a 0 in element 33 in file #2 in PLC with an ID (address) of 1. 21 22 23 24 -SL5 Interface Option Communications: The -SL5 Interface Option allows the 1000 Series to communicate to the Allen Bradley SLC-500 (DH-485) through the 1747-KE DH-485 to RS-232-C Interface Module. The communications cable is Eason Technology's standard Null Modem cable (N-MODEM-25-9 for the Model 1100 and N-MODEM-9-9 for the Model 1000). Connections: The -SL5 Option comes with the proper cable to interface to a 1747-KE Interface Module. For those who need to change the length of the cable, the proper connections are shown below: SHLD RXD TXD DTR GND DSR RTS CTS N.C. PLC Model 1100 1 2 3 4 5 6 7 8 9 1 SHLD 2 TxD 3 RxD 4 N.C. 5 N.C. 6 N.C. 7 GND 8 N.C. 9 N.C. 10 N.C. 11 N.C. 12 N.C. 13 N.C. 14 N.C. 15 N.C. 16 N.C. 17 N.C. 18 N.C. 19 N.C. 20 N.C. 21 N.C. 22 N.C. 23 N.C. 24 N.C. 25 N.C. 9-PIN FEMALE D TYPE SHLD RXD TXD DTR GND DSR RTS CTS N.C. PLC Model 1000 1 2 3 4 5 6 7 8 9 1 2 3 4 5 6 7 8 9 9-PIN FEMALE D TYPE 25-PIN FEMALE D TYPE (COM1) N.C. RxD TxD N.C. GND N.C. N.C. N.C. N.C. 9-PIN FEMALE D TYPE 0 1000 Series to Allen Bradley 1747-KE Module Communication Connections 25 SLC-500 Setup: The SLC-500 needs to have a 1747-KE interface module installed in it. If the processor is a stand-alone type (SLC500), you may have to add a two slot option rack to add this interface module. Some newer SLC-500's have a built-in serial port, this port can be used to gain direct access to SLC-500 by using the DF1 protocol. This document refers only to the setup and use of the 1747-KE module. Please consult Eason Technology for other applications. Follow the setup guidelines for the 1747-KE module exactly. If possible, use your Allen-Bradley programming software to communicate to the SLC-500 once you perform all of the setup operations. In general you can use the default settings as long as you change the DF1 Port Setup Parameters, select the correct node address, and select FULL DUPLEX operation. If you want to check all of the parameters using a terminal connected to the setup port, use the following parameters: DF1 Port Setup Parameters: 19.2K baud (this is not critical, the -SL5 option will auto-baud and find your baud rate) 8 data bits No parity 1 stop bit. DH-485 Port Setup Parameters: Node Address - 2 Set the PLC to node address 1 (this is performed with the Allen-Bradley setup software for the PLC). The -SL5 interface will reside at node address 0. Max Node Address - 31 Message Time-out - 1000ms Pass Through - Enabled Baud Rate - 19200 DF1 Protocol Menu: Full Duplex DF1 Protocol Full Duplex Setup Menu: Duplicate Packet Detection - Disabled Checksum - BCC Constant Carrier Detect - Disabled Modem Init String - (blank) Embedded Response Detect - Embedded Response ACK Time-out - 1.0 Seconds ENQuriy Retries - 2 NAK Received Retries - 2 Be sure to return the 1747-KE module to the Run mode (jumper settings), and jumper the 1747-KE for RS-232. Connect the DF1 port to COM1 on the 1000 Series product, and you should be able to communicate. Try sending a CALL PLCINIT(1,1) to see if you get a Ready response. If you do, start programming! If not, try checking that you are using COM1 on the 1000 Series product. Make sure you are plugged into the DF1 port, not the configuration port on the 1747-KE. Make sure you are no longer in setup mode for the 1747-KE, and that the jumpers are set to RS-232. 26 Command Variations: The CALL PLCREAD and CALL PLCWRITE commands for the SLC-500 are significantly different from the other PLC's described here. The following descriptions apply to the -SL5 Option only: CALL PLCREAD Statement Syntax: CALL PLCREAD(id, type, file, address, [bit], count, variable/array) Comments: This command is specific to the -SL5 Interface Option. id specifies the address of the PLC from which you wish to read data. This number is usually 1 when interfacing to one PLC. See the SLC-500 Setup section for more information on the selection of the id. type specifies the file type that is required for a specific file. The allowable file types and their use are as follows: 0 1 2 3 4 5 6 7 Outputs - The -SL5 option will not allow direct access to I/O. Inputs - The -SL5 option will not allow direct access to I/O. Status - S file types Bit - B file types Timer - T file types Counter - C file types Control - R file types Integer - N file types file specifies the file number that you wish to access. The use of a specific file is restricted to files which your program access. For instance, if your program uses no timers, and you access a timer file you will get a "PLC LINK NOT ESTABLISHED" error. address is the address of the first element to access in the specified file. Allen-Bradley restricts reading from or writing to locations which are not specified within a program. For example if your program only access N7:0 through N7:4 and you try to read from N7:5 (one address higher than your program access), you will get an error. To avoid this problem, we suggest that your program access data at least one word higher than words that the -SL5 interface is trying to access. When addressing bit files (type 3), you must specify the WORD address, rather than the BIT address. For example to access B3:250 you need to think of accessing word address B3:15/10. See the examples at the end of this section for further clarification. bit is the starting bit location of the bits you wish to read. If you are reading words (as in reading a register value), leave this field blank (i.e., ...address,,count,...). If you are reading bits in any file type, specify the starting bit in the element you are addressing (address). This could be any bit from 0-15. count specifies the number of bits and/or elements that you wish to read. If you are reading data in the form of words, it is the number of consecutive elements you wish to read. If you are reading bits, it is the number of consecutive bits you wish to read. variable/array is the variable name or single dimension array name where you wish to store the data you are reading. If the value of count (see above) is 1, this will be a variable expression. If you are reading elements that are stored as words and count is greater than one, this will be an array (make sure you properly dimension the array prior to using it). If you are reading the status of more than one, but less than 16 bits, you will be 27 reading one word, and therefore can use a discrete variable name. If you are reading more than 16 bits, you will need to use an array. The dimension of the array variable will be the next integer greater than the desired number of bits divided by 16. For example, if you wish to read the status of bits 1-24 you will need to dimension your array to at least two since 24/16 = 1.5 and two is the next greater integer. Remember, any time you are reading more than one word of data (more than one register or more than 16 bits) you must use a dimensioned array variable Examples: 10 DIM regdat%(5) 20 CALL PLCINIT(1,1) 30 CALL PLCREAD(1,7,7,16,,5,regdat%(1)) Line 10 dimensions the array regdat%(10) for future use, line 20 initializes the PLC (this only needs to be done once in your program). Line 30 returns the contents of N7:16 in regdat%(1), N7:17 in regdat%(2), N7:18 in regdat%(3), N7:19 in regdat%(4), and N7:20 in regdat%(5) in the SLC-500 with a node address of 1. 10 CALL PLCREAD(2,5,5,3,,1,reg%) This command reads the data in C5:3 in an SLC-500 with node address of 2 and stores it in the variable reg% 20 CALL PLCREAD(1,3,3,1,8,15,stat%) This command would access B3:1 in the PLC with a node address of 1. It would return the status of B3:1/8 through B3:2/7 stat%. Note that if your PLC's program does not access any elements from B3:2/8 through B3:255/15, an error will result. This is because the SLC-500 protects (disables external access) to elements which are above the highest accessed elements in a file. Normally this is not a problem for most file types, and status types. B type files however, are protected in bytes. The -SL5 interface reads and writes in words. Therefore, if the -SL5 interface accesses any low bits within the PLC (bits 0 through 7), make sure that your PLC program accesses any bits in the next higher byte. The easiest way to insure that you will not have a problem is to make sure your PLC program accesses the next higher word in memory. CALL PLCWRITE Statement Syntax: CALL PLCWRITE(id,type, file, address, [bit], count, variable/array) Comments: This command is specific to the -SL5 Interface Option. id specifies the address of the PLC in which you wish to write data. This number is usually 1 when interfacing to one PLC. See the SLC-500 Setup section for more information on the selection of the id. type specifies the file type that is required for a specific file. The allowable file types and their use are as follows: 0 1 2 3 4 5 6 7 Outputs - The -SL5 option will not allow direct access to I/O. Inputs - The -SL5 option will not allow direct access to I/O. Status - S file types Bit - B file types Timer - T file types Counter - C file types Control - R file types Integer - N file types 28 file specifies the file number that you wish to write to. The use of a specific file is restricted to files which your program access. For instance, if your program uses no timers, and you access a timer file you will get a "PLC LINK NOT ESTABLISHED" error. address is the address of the first element to write to in the above file.. Allen-Bradley restricts reading from or writing to locations which are not specified within a program. For example if your program only access N7:0 through N7:4 and you try to read from N7:5 (one address higher than your program access), you will get an error. To avoid this problem, we suggest that your program access data at least one word higher than words that the -SL5 interface is trying to access. When addressing bit files (type 3), you must specify the WORD address, rather than the BIT address. For example to access B3:250 you need to think of accessing word address B3:15/10. See the examples at the end of this section for further clarification. bit is the starting bit location of the bits you wish to write. If you are writing words (as in writing a register value), leave this field blank (i.e., ...address,,count,...). If you are writing bits (I/O points, internal coils, etc.) specify the starting bit in the element you are addressing (address). This could be any bit from 0-15. count specifies the number of bits and/or elements that you wish to set. If you are writing data in the form of words, it is the number of consecutive elements you wish to write. If you are setting bits, it is the number of consecutive bits you wish to set. variable/array is the variable name or single dimension array name where you wish to store the data you are writing. If the value of count (see above) is 1, this could be a variable expression. If you are writing elements that are stored as words and count is greater than one, this will be an array (make sure you properly dimension the array prior to using it). If you are setting more than one, but less than 16 bits, you will be writing one word, and therefore can use a discrete variable name. If you are setting more than 16 bits, you will need to use an array. The dimension of the array variable will be the next integer greater than the desired number of bits divided by 16. For example, if you wish to set bits 1-24 you will need to dimension your array to at least two since 24/16 = 1.5 and two is the next greater integer. Remember, any time you are writing more than one word of data (more than one register or more than 16 bits) you must use a dimensioned array variable Examples: 10 DIM regdat%(5) 20 CALL PLCINIT(1,1) 30 CALL PLCWRITE(1,7,7,16,,5,regdat%(1)) Line 10 dimensions the array regdat%(10) for future use, line 20 initializes the PLC (this only needs to be done once in your program). Line 30 writes the contents of regdat%(1) in N7:16, regdat%(2) in N7:17, regdat%(3) in N7:18, regdat%(4) in N7:19, and regdat%(5) in N7:20 in the SLC-500 with a node address of 1. 10 CALL PLCWRITE(2,5,5,3,,1,reg%) This command writes the data contained in the variable reg% into C5:3 in an SLC-500 with a node address of 2. 20 CALL PLCWRITE(1,3,3,1,8,15,stat%) This command would write the contents of variable stat% into the PLC data bits B3:1/8 through B3:2/7. Note that if your PLC's program does not access any elements from B3:2/8 through B3:255/15, an error will result. This is because the SLC-500 protects (disables external access) to elements which are above the highest accessed elements in a file. Normally this is not a problem for most file types, and status types. B type files 29 however, are protected in bytes. The -SL5 interface reads and writes in words. Therefore, if the -SL5 interface accesses any low bits within the PLC (bits 0 through 7), make sure that your PLC program accesses any bits in the next higher byte. The easiest way to insure that you will not have a problem is to make sure your PLC program accesses the next higher word in memory. 20 CALL PLCWRITE(1,7,7,15,1,1,0) This command writes a zero to bit location N7:15/1. Note the restrictions mentioned in the example above. 30 -OM1 Interface Option Communications: The -OM1 Option uses the Omron Host Link protocol for communicating to all suitably equipped Omron PLC's. The Omron Host Link port is connected to the Model 1000 or Model 1100's COM1 or COM2 port via the supplied cable. Both the Model 1000 and Model 1100 auto detect the communication parameters, so no setup is needed to get the two devices communicating. Connections: The -OM1 Option comes with the proper cable to interface to a Host Link equipped PLC. For those who need to change the length of the cable, the proper connections are shown below: PLC SHLD 1 TxD 2 RxD 3 RTS 4 CTS 5 DSR 6 GND 7 DCD 8 N.C. 9 N.C. 10 N.C. 11 N.C. 12 N.C. 13 N.C. 14 N.C. 15 N.C. 16 N.C. 17 N.C. 18 N.C. 19 DTR 20 N.C. 21 N.C. 22 N.C. 23 N.C. 24 N.C. 25 25-PIN MALE D TYPE (HOST LINK) Model 1100 PLC 1 SHLD 2 TxD 3 RxD 4 N.C. 5 N.C. 6 N.C. 7 GND 8 N.C. 9 N.C. 10 N.C. 11 N.C. 12 N.C. 13 N.C. 14 N.C. 15 N.C. 16 N.C. 17 N.C. 18 N.C. 19 N.C. 20 N.C. 21 N.C. 22 N.C. 23 N.C. 24 N.C. 25 N.C. SHLD 1 TxD 2 RxD 3 RTS 4 CTS 5 DSR 6 GND 7 DCD 8 N.C. 9 N.C. 10 N.C. 11 N.C. 12 N.C. 13 N.C. 14 N.C. 15 N.C. 16 N.C. 17 N.C. 18 N.C. 19 DTR 20 N.C. 21 N.C. 22 N.C. 23 N.C. 24 N.C. 25 25-PIN FEMALE D TYPE (COM1) 25-PIN MALE D TYPE (HOST LINK) 1000 Series to Omron Host Link RS232C Communication Connections 31 Model 1000 1 2 3 4 5 6 7 8 9 N.C. RxD TxD N.C. GND N.C. N.C. N.C. N.C. 9-PIN FEMALE D TYPE 0 Command Variations: The following table will help the terminology of the previous sections make more sense with respect to the Omron Host Link documentation. It is a cross reference between the Memory Type in the PLC documentation and the cmd for the CALL PLCREAD and CALL PLCWRITE commands. READ • • • • WRITE • • • • • • • • • • Cmd 1 2 3 4 5 6 7 8 9 10 11 AREA Status Word Input Registers Output Registers DM N/A N/A N/A N/A LR HR AR Range * * * * * * * * * * * Data/Response 1 word 1 word per 16 bits 1 word per 16 bits 1 word per register N/A N/A N/A N/A 1 word per 16 bits 1 word per 16 bits 1 word per 16 bits *PLC Dependent NOTE: The -OM1 Option limits you to reading or writing a maximum of 32 words of data (512 bits) during one read or write operation. For example, you are restricted to accessing 32 registers in the DM area with one CALL PLCREAD or CALL PLCWRITE command. Addressing bits in the -OM1 Option is a little different than in the rest of the PLC interfaces. The -OM1 Option utilizes the Host Link bit addressing scheme which combines the WORD address and the BIT address into one number. For the IR, SR, LR, HR, and AR areas data is accessed in this fashion. To read a bit at word 5 bit 3, will require an address of 503, word 11 bit 13 requires the address of 1113. For example, to access the IR data area, word 5, bits 6 through 9, use the following command: CALL PLCREAD(0, 2, 506, 4, A) This command accesses word 5, bit 6 and reads four bits placing the result in variable A. Note that the four bits will be aligned in variable A with bit 506 in the 2^0 location 507 in the 2^1 location and so on. This makes bit testing within a BASIC program very simple. Writes to individual bit locations in the Omron PLC is performed via a read modify write process. EXTREME care should be taken when using data bits which may be updated during a scan. Host Link only allows data to be read and written to on WORD boundaries. This forces the -OM1 Option to read surrounding bits to obtain an entire word, then sets or clears the desired bits and write the recomposed words back to the PLC. If the data the OM1 Option reads surrounding the operation is updated during a scan, unpredictable results may occur. Writing to outputs may be something to avoid if your program does not continually update them. Reads do not suffer from this problem. Writes to individual word locations are limited to signed short integers (+32767 to -32768). If you need to send a number that is outside of this range, you must transfer the number in binary to the PLC by doing a bit write to the IR registers. You can then internally transfer the resulting number to the appropriate register using the PLC’s ladder logic. The Omron status write must be performed in the following manner: CALL PLCWRITE(0,1,0,1,mode) mode: 0 - program 1 - debug 2 - monitor 3 - run 32 The Omron PLC must be in the monitor mode to enable write commands to perform without errors. A CALL PLCINIT( id, 1) places the PLC into the monitor mode, but if your application has a programming panel or some other peripheral device attached, it may be possible for the operator to disable writes to the PLC. Use the status write function to return the PLC to the monitor mode when necessary. 33 -IDEC FA-1J\FA2-J Interface Option Communications The -IDEC option uses the Idec protocol to communicate between the Series 1000 unit and the PLC. The unit is configured by using the -plcinit(x,y) command. Parameter-FA-1J-FA-2J-FA-2J-- Mode RS232C RS232C RS232C Baud Rate 9600 baud 9600 baud 9600 baud Data Bits 8 8 8 Stop Bit(s) 1 1 1 Parity None None Even Connections In order for the Series 1000 and the Idec unit to communicate, a specialized cable is sent with the Eason unit. The pinout for this cable is shown in the table below illustrating the view for the Model 1000/1100. PLC Model 1100 PLC Model 1000 SHLD 1 TxD 2 RxD 3 RTS 4 CTS 5 DSR 6 GND 7 DCD 8 N.C. 9 N.C. 10 N.C. 11 N.C. 12 N.C. 13 N.C. 14 N.C. 15 N.C. 16 N.C. 17 N.C. 18 N.C. 19 DTR 20 N.C. 21 N.C. 22 N.C. 23 N.C. 24 N.C. 25 25-PIN MALE D TYPE 1 SHLD 2 TxD 3 RxD 4 N.C. 5 N.C. 6 N.C. 7 GND 8 N.C. 9 N.C. 10 N.C. 11 N.C. 12 N.C. 13 N.C. 14 N.C. 15 N.C. 16 N.C. 17 N.C. 18 N.C. 19 N.C. 20 N.C. 21 N.C. 22 N.C. 23 N.C. 24 N.C. 25 N.C. SHLD 1 TxD 2 RxD 3 RTS 4 CTS 5 DSR 6 GND 7 DCD 8 N.C. 9 N.C. 10 N.C. 11 N.C. 12 N.C. 13 N.C. 14 N.C. 15 N.C. 16 N.C. 17 N.C. 18 N.C. 19 DTR 20 N.C. 21 N.C. 22 N.C. 23 N.C. 24 N.C. 25 25-PIN FEMALE D TYPE (COM1) 1 2 3 4 5 6 7 8 9 9-PIN FEMALE D TYPE 25-PIN MALE D TYPE 1000 Series to Idec FA-1J and FA-2J PLC Communication Connections 34 N.C. RxD TxD N.C. GND N.C. N.C. N.C. N.C. Available Commands The commands listed in the table below list the commands available for the Idec FA-1J and the Idec FA-2J interfaces. Cmd # 1 2 2 3 3 4 4 9 9 12 13 14 15 16 17 Command Status In_Out ( Input ) In_Out ( Expansion Input ) In_Out ( Output ) In_Out ( Expansion Output ) Register Register ( Expansion Register ) Internal Relay Internal Relay ( Expansion Relay ) Timer Value Timer Preset Counter Value Counter Preset Shift Register Ten Mil Timer Address none 0-157 2000-2157 200-357 2200-2357 800-899 1500-1799 400-717 2400-2717 0-79 0-79 0-47 0-47 0-127 1100-1179 Size BIT BIT BIT BIT BIT WORD WORD BIT BIT WORD WORD WORD WORD BIT WORD Read • • • • • • • • • • • • • • • Write FA-1J • • • • • • • • • • • • • • • • • • • FA-2J • • • • • • • • • • • • • • • 1000 Series commands and address ranges for the Idec FA-1J and the FA-2J CALL PLCINIT Statement Purpose: This command is used to initialize communication with the IDEC FA-1J and FA-2J series PLC. CALL PLCINIT must be issued prior to any other communication (reading or writing) to the IDEC PLC. CALL PLCINIT sets up specific communications parameters. If the CALL PLCINIT command fails, the 1000 Series unit will break your program and generate the error message "PLC link not established." If this occurs, make sure that the connections and communications configurations are correct. Syntax: CALL PLCINIT(id,cmd) Comments: id specifies the address of the PLC that you wish to initialize. For the FA-1J and FA-2J series PLC, this number will always be 1. cmd specifies the type of PLC protocol that you are initiating : 1 - FA-1J on com port 1 - No Parity 2 - FA-2J on com port 1 - Even Parity 3 - FA-1J on com port 2 - No Parity 4 - FA-2J on com port 2 - Even Parity 5 - FA-2J on com port 1 - No Parity 6 - FA-2J on com port 2 - No Parity 35 Examples: 10 CALL PLCINIT(1,1) Establishes communication with the Idec FA-1J on communications port 1. 10 CALL PLCINIT(1,4) Establishes communication with the Idec FA-2J on communications port 4. CALL PLCREAD Statement Purpose: This command is used to read the value(s) in a PLC's registers, the status of bits, or any other accessible memory location within the PLC. Syntax: CALL PLCREAD(id,cmd,start address, # of registers/bits,variable/array) Comments: id specifies the address of the IDEC - always use 1. cmd specifies the read operation you wish to perform. See the table under Available the read operation possibilities: Commands for address - describes where in memory the value is to be read from count - number of bits to be read ( when using command of size WORD this will be a 1 ) variable/number - this is the variable or number that is to be written in memory in the case of a variable that will store the value being read the Examples CALL PLCREAD( 1, 9, 400, 13, a%) Starting at address 400 in the internal relays of the Idec, this command will instruct the PLC to read the first 13 bits and store the result into a%. CALL PLCREAD( 1, 12, 30, 1, t% ) This will capture the monitor value of a timer. CALL PLCWRITE Statement Purpose: This command is used to write value(s) to the IDEC's register(s), memory location(s), or to force one or more output bits in a PLC. Syntax: CALL PLCWRITE(id,cmd,start address, # of registers/bits,expression/variable/array) Comments: 36 id specifies the address of the IDEC - always use 1. cmd specifies the write operation you wish to perform. possibilities: See the table below for the write operation address - describes where in memory the value is to be stored or read from count - number of bits to be read ( when using command of size WORD this will be a 1 ) variable/number - this is the variable or number that is to be written in memory in the case of a the variable that will store the value being read write or Examples: CALL PLCWRITE( 1, 4, 805, 1, 12345) This command tells the Idec PLC to write in register #805 the value 12345. This function is only available in the FA-2J PLC. CALL PLCWRITE( 1, 9, 400, 13, 4077) This instructs the PLC to write into the internal relays at address 400, the value of 4077 using 13 bits. 37 -Mitsubishi FX PLC Interface ( -MFX ) Communications The -MFX Option uses the Mitsubishi FX's RS422 port to communicate with the 1000 Series products. For the Model 1000 this utilizes com port 1 and either port is available for use in the Model 1100. Connections In order for the Series 1000 and the FX unit to communicate, a specialized cable is sent with the Eason unit. The pinout for this cable is shown in the table below for the Model 1000 and the Model 1100. PLC Model 1100 PLC Model 1000 SHLD 1 RxD+ 2 TxD+ 3 DsR+ 4 CTS 5 DSR 6 GND 7 GND 8 N.C. 9 N.C. 10 N.C. 11 N.C. 12 N.C. 13 N.C. 14 RxD- 15 TxD- 16 DsR- 17 N.C. 18 N.C. 19 GND 20 PWE- 21 N.C. 22 N.C. 23 +5 V 24 N.C. 25 1 SHLD 2 TxD 3 RxD 4 N.C. 5 N.C. 6 N.C. 7 GND 8 N.C. 9 N.C. 10 N.C. 11 N.C. 12 TxD+ 13 TxD14 RxD+ 15 RxD16 N.C. 17 N.C. 18 N.C. 19 N.C. 20 N.C. 21 N.C. 22 N.C. 23 N.C. 24 N.C. 25 N.C. 25-PIN MALE D TYPE SHLD 1 RxD+ 2 TxD+ 3 DsR+ 4 CTS 5 DSR 6 GND 7 GND 8 N.C. 9 N.C. 10 N.C. 11 N.C. 12 N.C. 13 N.C. 14 RxD- 15 TxD- 16 DsR- 17 N.C. 18 N.C. 19 GND 20 PWE- 21 N.C. 22 N.C. 23 +5 V 24 N.C. 25 25-PIN FEMALE D TYPE (COM1) 1 2 3 4 5 6 7 8 8-PIN SCREW TERMINAL 25-PIN MALE D TYPE 1000 Series to the Mitsubishi FX series PLC Communication Connections 38 DC INDC IN+ GND Rx B Rx A Tx B Tx A SHLD 0 Available Commands The commands listed in the table below list the commands available for the Mitsubishi FX series interfaces. Cmd # 1 2 3 4 5 6 7 8 9 10 11 12 13 14 15 16 Command PLC Data Type Address Size Inputs Outputs Registers X Y D 0-177 0-177 0-511 8000-8255 BIT BIT WORD Auxiliary Relays M BIT Timer Contacts Counter Contacts Timer Value T C T 0-1023 8000-8255 0-255 0-255 0-255 BIT BIT WORD Counter Value C 0-199 WORD States S 0-999 BIT CALL PLCINIT Statement Purpose: This command is used to initialize communication with the FX. CALL PLCINIT must be issued prior to any other communication (reading or writing) to the specified PLC. CALL PLCINIT initializes the BAUD rate to 9600 Baud, 7 data bits, even parity. Either COM 1, COM 2, RS422, and RS232 can be specified. Note that on Model 1000's COM1, RS422 is recommended. If the CALL PLCINIT command fails, the 1000 Series unit will break your program and generate the error message "PLC link not established." If this make sure that the connections and communications configurations are correct. If they are OK, check to make sure that the FX is powered up and ready to accept Commands. Syntax: CALL PLCINIT(id,cmd) 39 Comments: id specifies the address of the FX - always use 1. cmd specifies the communications mode: 1 - RS422, COM1 - most common and recommended. 2 - RS422, COM2 - Model 1100 only 3 - RS232 COM 1 - Must use an RS232 to RS422 adapter 4 - RS232 COM 2 - Must use an RS232 to RS422 adapter Examples: 10 CALL PLCINIT(1,1) Establish communications with the PLC via the 1000 Series COM 1 RS422 Port. CALL PLCREAD Statement Purpose: This command is used to read the value(s) in a PLC's registers, the status of bits, or any other accessible memory location within the PLC. Syntax: CALL PLCREAD(id,cmd,start address, # of registers/bits,variable/array) Comments: id specifies the address of the FX - always use 1. cmd specifies the read operation you wish to perform. See the table below for the read operation possibilities: start address is the starting address of the bit(s) or register(s) you are interested in reading. Inputs and Outputs (data types X and Y) are specified in OCTAL just like you would specify in the PLC ladder logic program. The type specified for this parameter if a variable is to be used is an integer: %. # of registers/bits is the number of consecutive registers, memory locations, or bits that you wish to read. If you wish to read one bit or register, set this parameter to 1. If you wish to read more than one register or memory location at a time, this number will be the number of consecutive registers or locations you wish to read. If you are reading the status of more than one I/O bit, this number will be the number of consecutive bits you wish to read. variable/array is the variable name or array name where you wish to store the data you are reading. If you are reading only one register or bit, you may use any variable type you wish. If you are reading multiple registers or more than 16 bits of data, this variable MUST be a short integer (%) array variable. If you are reading registers or memory locations that are stored as words and the # of registers/bits is greater than one, this will be a short integer array (make sure you properly dimension the array prior to using it). If you are reading the status of more than one, but less than 16 I/O bits, you will be reading one word, and therefore will need to use a single short integer. If you are reading more than 16 bits, you will need to use a short integer array. The dimension of the array variable will be the next integer greater than the desired number of bits divided by 16. For example, if you wish to read the status of bits 1-24 you will need to dimension your array to at least two since 24/16 = 1.5 and two is the next greater integer. Remember, any time you are reading more than one word of data (more than one register or more than 16 bits) you must use a dimensioned short integer array. Examples: 40 10 DIM regdat%(10) 20 CALL PLCREAD(1,4,16,5,regdat%(4)) This command returns the contents of register 16 in regdat%(4), register 17 in regdat%(5), register 18 in regdat%(6), register 19 in regdat%(7), register 20 in regdat%(8), from any of the PLC's currently implemented. 10 CALL PLCREAD(1,5,47,1,regdat1%) This command reads the data in input register number 47 with id (address) = 1 and stores it in the variable regdat1% CALL PLCWRITE Statement Purpose: This command is used to write value(s) to the FX's register(s), memory location(s), or to force one or more output bits in a PLC. Syntax: CALL PLCWRITE(id,cmd,start address, # of registers/bits,expression/variable/array) Comments: id specifies the address of the FX - always use 1. cmd specifies the write operation you wish to perform. possibilities: See the table below for the write operation start address is the starting address of the bit(s) or register(s) you are interested in writing. Inputs and Outputs (data types X and Y) are specified in OCTAL just like you would specify in the PLC ladder logic program. The type specified for this parameter if a variable is to be used is an integer: %. # of registers/bits is the number of consecutive registers, memory locations, or bits that you wish to write. If you wish to write one bit or register, set this parameter to 1. If you wish to write more than one register or memory location at a time, this number will be the number of consecutive registers or locations you wish to write. If you are writing the status of more than one I/O bit, this number will be the number of consecutive bits you wish to write. expression/variable/array is the expression, variable or array data you wish to write to the PLC's I/O, registers, or other memory locations. If the value of # of registers/bits (see above) is 1, this will be an expression or a variable. If the number of words is greater than one, this must be an array (make sure you properly dimension the array prior to using it). If you wish to write the status of up to 16 I/O bits, you will be writing one word, and therefore will need to use an expression or discrete variable name. If you wish to set more than 16 consecutive bits, you will need to use an array. The dimension of the array variable will be the next integer greater than the desired number of bits divided by 16. For example, if you wish to set the status of bits 1-24 you will need to dimension your array to at least two since 24/16 = 1.5 and two is the next greater integer. Remember, any time you are writing more than one word of data (more than one register or more than 16 bits) you must use a dimensioned array variable Examples: 41 10 CALL PLCWRITE(1,3,9,2,3) This command writes a 1 to outputs 0 and 1. Note that 3 represents the binary "11" which is the bit pattern desired. 10 DIM newdat%(10) 20 CALL PLCWRITE(1,4,5,2,newdat%(4)) This command writes the value of newdat%(4) to register 5 and newdat%(5) to register 6 in a PLC with an id (address) = 1. PLC Model 1000 7 16 3 15 2 N/C 4 8 20 21 17 24 25 Pin D 3 4 5 6 7 8 Signal Name GND TXDFX RXDRXD+ SHIELD DSR+ GND GND PWE DSR+5V 8 Pin Screw 42 -SQD SQUARE D SY/MAX PLC Interface Communications: The -SQD PLC option uses the SY/MAX RS422 port to communicate with the 1000 Series products. The connections are as follows: Model 1000 Interface Cable: SQUARD D SY/MAX PLC MODEL 1000 PLC PIN # PIN NAME PIN # PIN NAME 1 TX- 4 RXA 2 TX+ 5 RXB 3 RX- 6 TXA 4 RX+ 7 TXB 5 RTS+ 3 GROUND 6 CTS+ 7 RTS- 8 CTS- 9 SHEILD PART OF 8 PIN SCREW CONNECTOR 9 PIN D MALE CONNECTOR Model 1100 Interface Cable: SQUARD D SY/MAX PLC MODEL 1100 PLC PIN # PIN NAME PIN # PIN NAME 1 TX- 15 RX- 2 TX+ 14 RX+ 3 RX- 13 TX- 4 RX+ 12 TX+ 5 RTS+ 7 GROUND 6 CTS+ 7 RTS- 8 CTS- 9 SHEILD PART OF 25 PIN D FEMALE CONNECTOR 9 PIN D MALE CONNECTOR 43 CALL PLCINIT Statement Purpose: This command is used to initialize communication with the SY/MAX. CALL PLCINIT must be issued prior to any other communication (reading or writing) to the specified PLC. CALL PLCINIT auto detects the baud rate and parity. Either COM 1 or COM 2 can be specified. Note that on Model 1000's only COM 1 is available (Model 1000's only have one RS422 port). A single non-networked route is specified by the id, see comments below. If the CALL PLCINIT command fails, the 1000 Series unit will break your program and generate the error message "PLC link not established." If this happens, make sure that the connections and communications configurations are correct. If they are OK, check to make sure that the SY/MAX is powered up and ready to accept commands. Syntax: CALL PLCINIT(id,cmd) Comments: id specifies the route for the SY/MAX. Specifying an id of 0 will specify an route of 0,100, an id of 1 will specify a route of 1,101. Networking route specifications will be available in future versions of this interface, check with Eason Technology for more details. cmd specifies the communications mode: 1 - RS422, COM 1 2 - RS422, COM 2 - Model 1100 only Examples: 10 CALL PLCINIT(0,1) Establish communications with the PLC via the 1000 Series COM 1 RS422 Port, specifying a route of 0,100. CALL PLCREAD Statement Purpose: This command is used to read the value(s) in the SY/MAX PLC's registers. It can read words or bits in all allowable addresses for a specific SY/MAX PLC. Syntax: CALL PLCREAD(id,start address,[bit position],# of registers/bits,variable/array) Comments: id specifies the route. See CALL PLCINIT above. start address is the starting address of the register(s) you are interested in reading. [bit position] is an optional parameter which specifies the position within a 16 bit register to start reading from. An allowable range for bit position is 1 through 16. By specifying this parameter, a bit (single or multiple) read will be performed. For example specifying a bit position of 2 will allow the read to place the data at the PLC's bit 2 (2^1) in the bit 0 (2^0 bit) position of the variable/array (Note that all Eason documentation references bits 0 through 15 for bits inside variables in the EASON, while SY/MAX documentation references bits 1 through 16 for registers in the PLC... sorry about the confusion).. Note that only the contents of 1 register's bits may be read at a time. This means that a bit position of 9 (2^8 bit) will 44 only allow 8 bits to be read. This is due to the fact that there are only 16 bits available in one register, and we are starting at bit 8 this leaves a result of 8 bits. Omitting the bit position parameter will specify that the read will return whole registers rather than bits. Refer to the following examples for samples of how to specify bits or whole registers # of registers/bits is the number of consecutive registers, memory locations, or bits that you wish to read. If the bit position parameter is omitted, # of registers/bits will specify the number of 16 bit registers to read. If you wish to read more than one register or memory location at a time, this number will be the number of consecutive registers or locations you wish to read. If you have included a bit position parameter, this number will be the number of consecutive bits you wish to read. variable/array is the variable name or array name where you wish to store the data you are reading. If you are reading only one register or bit, you may use any variable type you wish. If you are reading multiple registers, this variable MUST be a short integer (%) array variable. If you are reading registers or memory locations that are stored as words and the # of registers/bits is greater than one, this will be a short integer array (make sure you properly dimension the array prior to using it). If you are reading the status of more than one, but less than 16 I/O bits, you will be reading one word, and therefore will need to use a single short integer. Remember, any time you are reading more than one register you must use a dimensioned short integer array. Examples: 10 DIM regdat%(10) 20 CALL PLCREAD(1,16,,5,regdat%(4)) This command returns the contents of register 16 in regdat%(4), register 17 in regdat%(5), register 18 in regdat%(6), register 19 in regdat%(7), and register 20 in regdat%(8). 10 CALL PLCREAD(1,47,,1,regdat1%) This command reads the data in register number 47 with and stores it in the variable regdat1%. 10 CALL PLCREAD(1,100,5,2,bits%) This command reads two bits from register 100 starting at bit position 5. The result is placed in the variable bits% with register 100, bit 5 in bit position 0, and register 100 bit 6 in bit position 6. CALL PLCWRITE Statement Purpose: This command is used to write 16 bit words and bits into the SY/MAX PLC's register(s). Syntax: CALL PLCWRITE(id,start address,[bit position], # of registers/bits,expression/variable/array) Comments: id specifies the route. See CALL PLCINIT above. start address is the starting address of the register(s) you are interested in writing. [bit position] is an optional parameter which specifies the position within a 16 bit register to start writing to. An allowable range for bit position is 1 through 16. By specifying this parameter, a bit (single or multiple) write will be performed. For example specifying a bit position of 2 will allow the write to place data 45 contained in the variable/array bit 0 (2^0 bit) in the bit 2 (2^1 bit) position of the result (Note that all Eason documentation references bits 0 through 15 for bits inside variables in the EASON, while SY/MAX documentation references bits 1 through 16 for registers in the PLC... sorry about the confusion). Note that only the contents of 1 register's bits may be written at a time. This means that a bit position of 9 (2^8 bit) will only allow 8 bits to be written. This is due to the fact that there are only 16 bits available in one register, and we are starting at bit 8 this leaves a result of 8 bits. Omitting the bit position parameter will specify that the write will return whole registers rather than bits. Refer to the following examples for samples of how to specify bits or whole registers # of registers/bits is the number of consecutive registers, memory locations, or bits that you wish to write. If the bit position parameter is omitted, # of registers/bits will specify the number of 16 bit registers to write. If you wish to write more than one register or memory location at a time, this number will be the number of consecutive registers or locations you wish to write (up to a maximum of 16). If you have included a bit position parameter, this number will be the number of consecutive bits you wish to write. variable/array is the variable name or array name where you wish to store the data you are writing. If you are writing only one register or bit, you may use any variable type you wish. If you are writing multiple registers, this variable can either be a short integer (%) array variable or a constant (like 1234). If you are writing registers or memory locations that are stored as words and the # of registers/bits is greater than one, this will be a short integer array (make sure you properly dimension the array prior to using it). If you are writing the status of more than one, but less than 16 I/O bits, you will be writing one word, and therefore will need to use a single short integer. Remember, any time you are writing more than one register you must use a dimensioned short integer array. Examples: 10 CALL PLCWRITE(1,15,1,2,3) This command writes a 1 to register 15 bits 1 and 2. Note that 3 represents the binary "11" which is the bit pattern desired. 10 DIM newdat%(10) 20 CALL PLCWRITE(1,5,,2,newdat%(4)) This command writes the value of newdat%(4) to register 5 and newdat%(5) to register 6 in a PLC with an id (address) = 1. 10 CALL PLCWRITE(1,100,,1,1234) CALL Note that you cannot write to multiple locations with the same data (i.e. PLCWRITE(1,100,,10,1234), as this will generate a "VARIABLE REQUIRED" BASIC error). This operation must be performed by initializing elements of a dimensioned array and writing the array in the following fashion: 10 DIM A%(16) 20 FOR N=1 TO 16: A%(N)=1234: NEXT 30 CALL PLCWRITE(1,100,,10,A%(N)) This command writes 1234 to register 100. 46 -SS5 Interface Option Communications: The -SS5 Interface Option allows the 1000 Series to communicate to the Siemens S5 series PLC's. At present the 100 and 115 Series PLC's are supported by this interface. The communications cable is the Siement communications cable supplied with the PLC. You will need a 25 to 9 pin adaptor to use the cable with the model 1000. Release Notes: NOTE: Timers and counters can be accessed indirectly by moving the values in the PLC ladder program to memory areas where the values can be read by the 1000 series product. S5 Setup: The S5 communicates to the Eason 1000 series through the programming port on the PLC module. Please consult the Siemens S5 series manuals for more information on the location of this port. Use the Siemens RS232 to current loop cable, Siemens part number 6ES5734-1BD20 for this interface. This cable must be obtained from Siemens or a Siemens distributor. 100,115 - Series Setup Parameters: Baud rate - 9600 8 data bits Parity - even . 1 stop bit. Be sure to return the system module to the Run mode. Connect the Programming port to COM1 on the Eason, and you should be able to communicate. Try sending a CALL PLCINIT(1,1), to the 100 Series PLC, to see if you get a Ready response. If you do, start programming! If not, try checking that you are using COM1 on the Eason. Command Variations: The CALL PLCREAD , CALL PLCWRITE and CALL PLCINIT commands for the SIEMENS 100 Series PLC’s are significantly different from the other PLC's described here. The following descriptions apply to the -S5 Option only: CALL PLCINIT Statement Syntax: CALL PLCINIT(id, cmd, device) Comments: This command is specific to the -S5 Interface Option. This command is used to initialize communication with a given PLC of a certain type. CALL PLCINIT must be issued prior to any other communication(reading or writing) to the specified PLC. If the CALL PLCINIT command fails, the 1000 unit will break your program and generate the error message “PLC link not established “. If this occurs check the cable connections also cycle power on both the PLC and the Eason unit. 47 id Specifies the address of the PLC module you wish to address. Typically it is 1 . cmd Specifies the number of the comport out of which the Eason will communicate; this is 1 or 2. device Specifies the type of Siemens PLC the Eason is communicating with . This can be 95, 100, 102, or 103 for the 100 series or 941, 942, 943, 944 for the 115 series. (if device is blank the default is 100 series ). Examples: 10 CALL PLCINIT(1,2) Establishes communication with a Siemens S5-95 PLC , using com2 as the Eason output port. 10 CALL PLCINIT(1,1,943) Establishes communication with a Siemens S5-115-943 PLC, using com1 as the Eason output port. CALL PLCREAD Statement Syntax: CALL PLCREAD(id, cmd, module, address, [bit], count, variable/array) Comments: This command is specific to the -S5 Interface Option. id Specifies the address of the PLC module from which you wish to read data. This number is usually 1 when interfacing to Siemens PLC’S via the programming port. cmd Specifies the type of area on the PLC you are reading from. For the S5 Series system the allowable commands are below: 2 INPUT WORDS - These are inputs to the PLC. They are addressed as words on even addresses. 3 OUTPUT WORDS- These are outputs PLC They are addressed as words on even addresses. 4 DATA BLOCK WORDS- This memory area is addressed as words , even or odd addresses. (Module number must also be used ). 9 FLAG WORDS - This area, is addressed as words, even addresses. 13 OUTPUT BYTES - These are output ports of 8 bit length , addressing is even and odd. 12 INPUT BYTES- These are input ports of 8 bit length, addressing is even and odd. 14 DATA BLOCK, RIGHT BYTE - same area as above but data is in bytes, at word addresses. Data is low byte. 15 DATA BLOCK, LEFT BYTE - same area as above but data is in bytes, at word addresses. Data is high byte. 19 FLAG BYTES - Same area as above , but data is addressed as bytes. Odd and even addresses. High bytes are even and low bytes odd. 5 SYSTEM DATA WORDS- System Data area. Addressed as words, odd and even module The module address of the data area talked to this is used most often with the data block command. In non-data block commands this should be 0. address The address of the first element to access in the specified file. When addressing bytes you must 48 address the byte to be read. When addressing words , the address will typically be odd or even . Refer to the Siemens S5 manuals for more information. bit The starting bit location of the bits you wish to read. If you are reading words (as in reading a register value), leave this field blank (i.e., ...address,,count,...). If you are reading bits in any file type, specify the starting bit in the element you are addressing (address). This could be any bit from 0-15. The element for bit addressing is the word, this mode is set up for any word file. count Specifies the number of bits and/or elements that you wish to read. If you are reading data in the form of words, it is the number of consecutive elements you wish to read. This count value cannot exceed 10 words or bytes. If you are reading bits, it is the number of consecutive bits you wish to read. This cannot exceed 16. variable/array The variable name or single dimension array name where you wish to store the data you are reading. If the value of count (see above) is 1, this will be a variable expression. If you are reading elements that are stored as words and count is greater than one, this will be an array (make sure you properly dimension the array prior to using it). If you are reading the status of more than one, but less than 16 bits, you will be reading one word, and therefore can use a discrete variable name. Remember, any time you are reading more than one word of data or more than 1 byte in the byte command modes you must use a dimensioned array variable. Examples: 10 DIM regdat%(5) 20 CALL PLCINIT(1,1) 30 CALL PLCREAD(1,19,0,0,,5,regdat%(1)) Line 20 initializes the system as a S5-95U, communicating with the Eason system Com1. Line 10 dimensions the array regdat%(5) for future use, line 20 initializes the PLC (this only needs to be done once in your program). Line 30 returns the contents of Flag Bytes 0-4 in 5 bytes from starting location 0 in module 0. 5 CALL PLCINIT(1,1,941) 10 CALL PLCREAD(1,4,5,2,,1,reg%) Line 5 initializes the system as a S5-115-941U system, communicating with the Eason system Com1 and the S5- PLC . Line 10 reads one word from data block space, module 5, with an address of 2. 20 CALL PLCREAD(1,3,0,0,3,1,stat%) This command reads a bit from address location 0 , bit position 3 of the output module and stores it in location stat%. CALL PLCWRITE Statement Syntax: CALL PLCWRITE(id, cmd, module, address, [bit], count, variable/array) Comments: This command is specific to the -S5 interface Option. id Specifies the address of the PLC in which you wish to write data. This number is usually 1. cmd Specifies the type of area that will be written to. Refer to the cmd list in the description of the PLCREAD command for possible choices. ONLY the following areas may be written to: Data 49 Block words ,bits and bytes, also Flag words, bits and bytes may be written to. module Specifies the module number of the area you wish to write to. It needs to be set to 0 when not using data block commands. It is typically used in the data block commands. address The address of the first element to write to in the above file. It is an even or odd address when writing words to memory areas ,(Flag words are even only) . It can be odd or even when writing bytes to byte addressed areas. When writing bits it is the word address of the word to be written to . bit The starting bit location of the bits you wish to write. If you are writing words (as in writing a flag value),or bytes, leave this field blank (i.e., ...address,,count,...). If you are writing bits (I/O points, internal coils, etc.) specify the starting bit in the element (word) ,you are addressing (address). This could be any bit from 0-15. count Specifies the number of bits and/or elements that you wish to write. If you are writing data in the form of words, or bytes it is the number of consecutive elements you wish to write. This value of count cannot exceed 10 for words or bytes .If you are writing bits, it is the number of consecutive bits you wish to write. This value cannot exceed 16 bits. variable/array is the variable name or single dimension array name where you wish to store the data you are writing. If the value of count (see above) is 1, this could be a variable expression. If you are writing elements that are stored as words and count is greater than one, this will be an array (make sure you properly dimension the array prior to using it). The number of bits to write, which is always equal or less than 16, can be stored in a single integer variable location. Examples: 10 DIM regdat%(5) 20 CALL PLCINIT(1,1) 30 CALL PLCWRITE(1,4,3,0,,5,regdat%(1)) Line 20 initializes communications with a S5-95U PLC and the Eason system on com1. Line 10 dimensions the array regdat%(5) for future use. Line 30 writes the contents of regdat%(1) in Data Block module 3 ,address 0 ; regdat%(2) in address 1, regdat%(3) in address 2 ; regdat%(4) in address 3 ; and regdat%(5) in address 4. 50 -KKV Interface Option Communications: The -KKV Interface Option allows the 1000 Series to communicate to the Keyence KV series PLC's. communications cable is Keyence connector kit OP-97047. The Connections: The -KV option comes with the proper cable to interface to the KV system. For those who need to change the length of the cable, the proper connections are shown below: PLC Model 1100 1 2 3 4 1 SHLD 2 TxD 3 RxD 4 N.C. 5 N.C. 6 N.C. 7 GND 8 N.C. 9 N.C. 10 N.C. 11 N.C. 12 N.C. 13 N.C. 14 N.C. 15 N.C. 16 N.C. 17 N.C. 18 N.C. 19 N.C. 20 N.C. 21 N.C. 22 N.C. 23 N.C. 24 N.C. 25 N.C. 4 PIN MODULAR PLUG PLC Model 1000 1 2 3 4 5 6 7 8 9 1 2 3 4 9-PIN FEMALE D TYPE 4 PIN MODULAR PLUG 1 2 3 N.C. RxD TxD N.C. GND N.C. N.C. N.C. N.C. 4 FOUR PIN MODULAR PLUG, FRONT VIEW 25-PIN FEMALE D TYPE (COM1) 0 1000 Series to Keyence Communication Connections KV Setup: The KV communicates to the Eason 1000 series , typically, through the RS-232C port on the PLC module. Please consult the Keyence KV series manuals for more information. KV Setup Parameters: 51 Baud rate - 9600 8 data bits Parity - even . 1 stop bit. Be sure to return the system module to the Run mode. Connect the PLC com port to COM1 on the 1000 Series product, and you should be able to communicate. Try sending a CALL PLCINIT(1,1) for the KV-10T, to see if you get a Ready response. If you do, start programming! If not, try checking that you are using COM1 on the 1000 Series product. Command Variations: The CALL PLCREAD , CALL PLCWRITE and CALL PLCINIT commands for the KEYENCE series of PLC’s are significantly different from the other PLC's described here. The following descriptions apply to the -KV Option only: CALL PLCINIT Statement Syntax: CALL PLCINIT(id, cmd,[device]) Comments: This command is specific to the -KV Interface Option. This command is used to initialize communication with a given PLC of a certain type. CALL PLCINIT must be issued prior to any other communication(reading or writing) to the specified PLC. If the CALL PLCINIT command fails, the 1000 unit will break your program and generate the error message “PLC link not established “. If this occurs check the cable connections also cycle power on both the PLC and the Eason unit. id specifies the address of the KV module you wish to address. Typically it is 1 . cmd specifies the number of the comport out of which the Eason will communicate; this is 1 or 2. device specifies the type of Keyence PLC the Eason is communicating with . At present leave blank. The default is the KV-10T. Examples: 10 CALL PLCINIT(1,2) Establishes communication with a Keyence ,KV-10T PLC , using com2 as the Eason output port. 10 CALL PLCINIT(1,1) Establishes communication with a Keyence KV-10T PLC, using com1 as the Eason output port. 52 this field CALL PLCREAD Statement Syntax: CALL PLCREAD(id, cmd, address, [bit], count, variable/array) Comments: This command is specific to the -KV Interface Option. id specifies the address of the PLC module from which you wish to read data. This number is usually 1 when interfacing to Keyence PLC’S via the RS-232C port. cmd specifies the type of area on the KV you are reading from. For the KV system the allowable commands are below: 9 RELAY CONTACTS- These are inputs,outputs and memory locations . These are addressed singly with a count of one. 26 ANALOG TRIMMERS - These are analog timer values, they are addressed as address 0 and 1. 4 DATA MEMORY - These are memory locations in the unit , addressed as words or bits. 11 12 TEMP. MEMORY- These are temporary, scratch pad, type locations , addressed as words or bits. Some of these locations may be used by the system consult the manual. TIMERS- Timer values are addressed as words. 13 TIMER PRESETS - Timer presets are addressed as words. 18 TIMER CONTACTS - Timer contacts have the same address as the associated timer . The contacts have a value of 1 or 0 and are read singly. 14 COUNTERS - Counters are addressed as words. 15 COUNTER PRESETS - Counter presets are addressed as words. 19 COUNTER CONTACTS- Counter contacts are addressed same as timer contacts above. 20 HIGH SPEED COUNTERS- These counters are addressed as words. 21 HIGH SPEED COUNTER PRESET- These values are addressed as words. 22 HIGH SPEED COUNTER CONTACTS- These values are addressed same as counter contacts above. 23 HIGH SPEED COUNTER COMPARITOR- These values are addressed as words. 24 HIGH SPEED COUNTER COMPARITOR PRESETS - These values are addressed as words. 25 HIGH SPEED COUNTER COMPARITOR CONTACTS - These are addressed the same as counter contacts above. 53 address is the address of the first element to access in the specified file. When addressing bits you must address the word to be read. When addressing words , the address will typically be odd or even . Refer to the Keyence manuals for more information. bit is the starting bit location of the bits you wish to read. If you are reading words (as in reading a register value), leave this field blank (i.e., ...address,,count,...). If you are reading bits in any file type, specify the starting bit in the element you are addressing (address). This could be any bit from 0-15. The element for bit addressing is the word, this mode is set up for data memory and temporary data memory. count specifies the number of bits and/or elements that you wish to read. If you are reading data in the form of words, it is the number of consecutive elements you wish to read. If you are reading bits, it is the number of consecutive bits you wish to read. This cannot exceed 16. When reading contacts or relays count can only be 1, also data returned is a 1 or 0. variable/array is the variable name or single dimension array name where you wish to store the data you are reading. If the value of count (see above) is 1, this will be a variable expression. If you are reading elements that are stored as words and count is greater than one, this will be an array (make sure you properly dimension the array prior to using it). If you are reading the status of more than one, but less than 16 bits, you will be reading one word, and therefore can use a discrete variable name. Remember, any time you are reading more than one word of data you must use a dimensioned array variable. Examples: 10 DIM regdat%(5) 20 CALL PLCINIT(1,1) 30 CALL PLCREAD(1,4,0,,5,regdat%(1)) Line 20 initializes the system as a KV-10T, communicating with the Eason system Com1. Line 10 dimensions the array regdat%(5) for future use, line 20 initializes the PLC (this only needs to be done once in your program). Line 30 returns the contents of data memory, words 0-4 in 5 words from starting location 0 . 5 CALL PLCINIT(1,2) 10 CALL PLCREAD(1,5,2,,1,reg%) Line 5 initializes the system as a KV-10T system, communicating with the Eason system Com2 and the KV10T PLC . Line 10 reads one word from temp. data space, with an address of 2. 20 CALL PLCREAD(1,5,0,3,1,stat%) This command reads a bit from address location 0 , bit position 3 of temp. memory and stores it in location stat%. CALL PLCWRITE Statement Syntax: CALL PLCWRITE(id, cmd, address, [bit], count, variable/array) Comments: This command is specific to the -KV interface Option. id specifies the address of the PLC in which you wish to write data. This number is usually 1. cmd specifies the type of area on the KV you are reading from. For the KV system the allowable commands 54 are below: 9 RELAY CONTACTS- These are inputs,outputs and memory locations . These are addressed singly with a count of one. 26 ANALOG TRIMMERS - These are analog timer values, they are addressed as address 0 and 1. 4 DATA MEMORY - These are memory locations in the unit , addressed as words or bits. 11 12 TEMP. MEMORY- These are temporary, scratch pad, type locations , addressed as words or bits. Some of these locations may be used by the system consult the manual. TIMERS- Timer values are addressed as words. 13 TIMER PRESETS - Timer presets are addressed as words. 18 TIMER CONTACTS - Timer contacts have the same address as the associated timer . The contacts have a value of 1 or 0 and are read singly. 14 COUNTERS - Counters are addressed as words. 15 COUNTER PRESETS - Counter presets are addressed as words. 19 COUNTER CONTACTS- Counter contacts are addressed same as timer contacts above. 20 HIGH SPEED COUNTERS- These counters are addressed as words. . 24 HIGH SPEED COUNTER COMPARITOR PRESETS - These values are addressed as words. address is the address of the first element to write to in the above file. It is an even or odd address when writing words to memory areas . It can be odd or even when writing bits to data memory areas. When writing bits it is the word address of the word to be written to . bit is the starting bit location of the bits you wish to write. If you are writing words (as in writing a memory value), leave this field blank (i.e., ...address,,count,...). If you are writing bits , specify the starting bit in the element (word) ,you are addressing (address). This could be any bit from 0-15. count specifies the number of bits and/or elements that you wish to write. If you are writing data in the form of words, or bytes it is the number of consecutive elements you wish to write. If you are writing bits, it is the number of consecutive bits you wish to write. variable/array is the variable name or single dimension array name where you wish to store the data you are writing. If the value of count (see above) is 1, this could be a variable expression. If you are writing elements that are stored as words and count is greater than one, this will be an array (make sure you properly dimension the array prior to using it). The number of bits to write, which is always equal or less than 16, can be stored in a single int variable location. 55 Examples: 10 DIM regdat%(5) 20 CALL PLCINIT(1,1) 30 CALL PLCWRITE(1,4,0,,5,regdat%(1)) Line 20 initializes communications with a KV-10T PLC and the Eason system on com1. Line 10 dimensions the array regdat%(5) for future use. Line 30 writes the contents of regdat%(1) in Data memory ,address 0 ; regdat%(2) in address 1, regdat%(3) in address 2 ; regdat%(4) in address 3 ; and regdat%(5) in address 4. 20 CALL PLCWRITE(1,5,1,4,3,stat%) This command would write three bits, LSBits, of variable stat% into the PLC temp. memory word 1 location , bit position 4. 56 -SQUARE D MODEL 50 Interface Option Communications The -SQ50 option uses the Square D model 50 protocol to communicate between the Series 1000 unit and the PLC. The unit is configured by using the -plcinit(x,y) command. A special cable must be used to talk to the 1000 series units. The cable is the Niobrara SC50D Smart Cable. The cable uses an DB25 connector to the operator interface, so a 9 pin adapter must be used also for the 1000 unit. Most distributors who handle Square D products will stock the cable. Available Commands The commands listed in the table below list the commands available for the Square D model 50. Cmd # Command Address Size Read 1 2 Status In_Out ( Input ) none 0-157 BIT BIT • • 3 In_Out ( Output ) 200-357 BIT • Write • 4 Register 800-899 WORD • • 9 Internal Relay 400-717 BIT • • 12 Timer Value 0-79 WORD • 13 14 Timer Preset Counter Value 0-79 0-46 WORD WORD • • • 15 Counter Preset 0-46 WORD • • 16 17 Shift Register Ten Mil Timer 0-127 1100-1179 BIT WORD • • • 1000 Series commands and address ranges for the Square D model 50. CALL PLCINIT Statement Purpose: This command is used to initialize communication with the Square D model 50. CALL PLCINIT must be issued prior to any other communication (reading or writing) to the PLC. CALL PLCINIT sets up specific communications parameters. If the CALL PLCINIT command fails, the 1000 Series unit will break your program and generate the error message "PLC link not established." If this occurs, make sure that the connections and communications configurations are correct. Syntax: CALL PLCINIT(id,cmd) 57 Comments: id specifies the address of the PLC that you wish to initialize. For the Square D model 50, this number will always be 1. cmd specifies the type of PLC protocol that you are initiating ,( all parameters as 9600 baud, 8 bit data, 1 stop bit- typically you will use no parity): 1 - SD-50 on com port 1 - No Parity 2 - SD-50 on com port 1 - Even Parity 3 - SD-50 on com port 2 - No Parity 4 - SD-50 on com port 2 - Even Parity Examples: 10 CALL PLCINIT(1,1) Establishes communication with the PLC on communications port 1. 10 CALL PLCINIT(1,3) Establishes communication with the PLC on communications port 2. CALL PLCREAD Statement Purpose: This command is used to read the value(s) in a PLC's registers, the status of bits, or any other accessible memory location within the PLC. Syntax: CALL PLCREAD(id,cmd,start address,count,variable) Comments: id - specifies the address of the model 50 - always use 1. cmd - specifies the read operation you wish to perform. See the table under Available Commands for the read operation possibilities: address - describes where in memory the value is to be read from count - number of bits to be read ( when using command of size WORD this will be a 1 ) variable - this is the variable ,integer type, where the value read from the PLC will be stored. Examples CALL PLCREAD( 1, 9, 400, 13, a%) Starting at address 400 in the internal relays of the , this command will instruct the PLC to read the first 13 bits and store the result into a%. CALL PLCREAD( 1, 12, 30, 1, t% ) This will capture the monitor value of a timer. 58 CALL PLCWRITE Statement Purpose: This command is used to write value(s) to the model 50’s register(s), memory location(s), or to force one or more output bits in a PLC. Syntax: CALL PLCWRITE(id,cmd,start address,count,variable/number) Comments: id - specifies the address of the model 50 - always use 1. cmd -specifies the write operation you wish to perform. See the table below for the write operation possibilities: address - describes where in memory the value is to be written. count - number of bits to be written ( when using command of size WORD this will be a 1 ). variable/number - this is the variable or number that is to be written in memory. Examples CALL PLCWRITE( 1, 4, 805, 1, 12345) This command tells the PLC to write in register #805 the value 12345. CALL PLCWRITE( 1, 9, 400, 13, 4077) This instructs the PLC to write into the internal relays at address 400, the value of 4077 using 13 bits. -Aromat FP Interface Option (Preliminary) Communications The -AFP option uses the Aromat FP protocol to communicate between the Series 1000 unit and the PLC. The unit is configured by using the -plcinit(x,y) command. A special cable must be used to talk to the 1000 series units. The cable is Aromat #AFP15201-US9. Most distributors who handle Aromat products will stock the cable. Available Commands The commands listed in the table below list the commands available for the Square D model 50. Cmd # 2 3 4 4 Command Input Contact (XF) Output Contact (YF) Data Register (DT) Special Data Registers (DT) Address 0-127 0-127 0-2047 9000-9121 59 Size BIT BIT WORD WORD Read • • • • Write • • • 9 12 14 Relays (RF) Set Values (SV) Elapsed Values (EV) 0-97 0-255 0-255 BIT WORD WORD • • • • • 1000 Series commands and address ranges for the Aromat FP. CALL PLCINIT Statement Purpose: This command is used to initialize communication with the Aromat FP. CALL PLCINIT must be issued prior to any other communication (reading or writing) to the PLC. CALL PLCINIT sets up specific communications parameters. If the CALL PLCINIT command fails, the 1000 Series unit will break your program and generate the error message "PLC link not established." If this occurs, make sure that the connections and communications configurations are correct. Syntax: CALL PLCINIT(id,cmd) Comments: id specifies the address of the PLC that you wish to initialize. For the Aromat FP, this number will always be 1. cmd specifies the communications port that you will use to communicate with the Aromat FP: 0 - com port 1 RS422 (not implemented at this time) 1 - com port 1 RS232 2 - com port 2 RS232 (not implemented at this time) Examples: CALL PLCINIT(1,1) Establishes communication with the PLC on communications port 1. CALL PLCREAD Statement Purpose: This command is used to read a value in a PLC's registers, the status of bits, or any other accessible memory location within the PLC. Syntax: CALL PLCREAD(id,cmd,start address,count,variable) Comments: id - specifies the address of the Aromat FP - always use 1. cmd - specifies the read operation you wish to perform. See the table under Available Commands for the read operation possibilities. address - describes where in memory the value is to be read from count - number of bits to be read - always use a 1 for now 60 variable - this is the variable ,integer type, where the value read from the PLC will be stored. Examples CALL PLCREAD( 1, 4, 278, 1, a%) This command will instruct the PLC to read Data Register 278 and store the result into a%. CALL PLCREAD( 1, 3, 0, 2, t%) This command tells the PLC to read output 2 . Note that the FP address format is Yxxy, this translates to a CALL PLCREAD( 1, 3, xx, y, t%) where y is in decimal (converted from the hex value). Note that you cannot read from multiple locations. This operation must be performed by initializing elements of a dimensioned array and reading data to the array in the following fashion: DIM A%(16) FOR N=1 TO 16 CALL PLCREAD(1,4,(29+N),1,A%(N)) NEXT N This command reads the registers 30 to 46 in to data array A%. CALL PLCWRITE Statement Purpose: This command is used to write a value to an Aromat FP memory location. Syntax: CALL PLCWRITE(id,cmd,start address,count,variable/number) Comments: id - specifies the address of the Aromat FP - always use 1. cmd -specifies the write operation you wish to perform. See the table under Available Commands for the read operation possibilities. address - describes where in memory the value is to be written. count - number of bits to be written - always use a 1 for now variable/number - this is the variable or number that is to be written in memory. Examples CALL PLCWRITE( 1, 3, 0, 5, 1) This command tells the PLC to turn on output 5 . Note that the FP address format is Yxxy, this translates to a CALL PLCWRITE( 1, 3, xx, y, 1) where y is in decimal (converted from the hex value). CALL PLCWRITE( 1, 4, 40, 1, 555) This instructs the PLC to write into the data register at address 40, the value of 555. 61