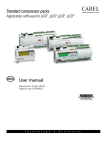
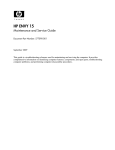
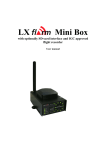
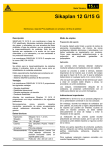
1
UPGRADING SHORTCUTS 7.3 TO SHORTCUTS BLACK (WINDOWS 7) SALON I BEAUTY I SPA I CLINIC I SCHOOL VERSION 1.1 Table of Contents Getting Started............................................................................................................ 1 Determine your current version of Shortcuts ............................................................. 2 Ensure that your computer meets the Minimum Requirements ........................................... 3 Ensure your Computer is Running in Normal Sized Fonts ................................................... 8 Ensure your Regional Settings are Correct ........................................................................ 9 Deactivate User Account Control .................................................................................... 10 Turn On Windows Firewall............................................................................................. 11 Adding an Exception to Windows Firewall.................................................................................................................................................................. 13 Turn off any Virus Scanning Software............................................................................. 15 Are you installing on a Network? .................................................................................... 15 Upgrading from Shortcuts V7.3 to Shortcuts Black .................................................. 16 Run a Hardware session ................................................................................................ 16 Backup your Shortcuts data ........................................................................................... 16 Upgrading to Shortcuts Black......................................................................................... 17 Re-authorising your copy of Shortcuts Black ................................................................... 21 Manually Downloading your License File.................................................................................................................................................................... 22 Getting Started Welcome to the Upgrading to Shortcuts Black Installation Checklist! This document will take you through the steps necessary to upgrade your copy of Shortcuts V7.3 to the latest version of Shortcuts Black. In order for you to be able to upgrade to Shortcuts Black, you will need to be running Shortcuts V7.3 (version 7.3.30 or higher) on your computer. The steps you need to perform are as follows: 1. Determine your current version of Shortcuts. This step will determine which of the following steps you need to start at in order to upgrade to Shortcuts Black. you have any version of Shortcuts that is earlier than 7.3.30, contact the Shortcuts Helpdesk for 8 Ifassistance (see “Determine your current version of Shortcuts” on page 2 for more information). 2. Ensure that your computer meets the Minimum Requirements. Before beginning, it’s vital to ensure that your computer meets the minimum requirements for Shortcuts Black. 3. Upgrading from Shortcuts V7.3 to Shortcuts Black. This final step will take you through the process for upgrading from Shortcuts V7.3 to Shortcuts Black. If you would like assistance with your upgrade, please complete and return the Upgrade and Training Options flyer included with your upgrade pack, or call the Shortcuts Head Office to obtain fee details and to schedule a day and time. A typical upgrade should be completed within two hours, provided your computer meets the minimum requirements for Shortcuts Black (see “Ensure that your computer meets the Minimum Requirements” on page 3). Should you require additional training in using Shortcuts Black, we can provide this along with the installation. Please complete and return the Upgrade and Training Options flyer included with your upgrade pack. 1 Determine your current version of Shortcuts Before you can start upgrading your software, you first need to know which version of Shorcuts you are currently running. This will determine which versions of Shortcuts you need to install before you can upgrade to Shortcuts Black. To check what is your current version of Shortcuts: 1. In Shortcuts, press the Shift + F1 keys together. This will display the information window. Note down your version number as indicated in the picture below, then go to Step 2. Your version number is located here If pressing Shift + F1 does not work, exit Shortcuts if it is running. Run Shortcuts again, and check the version number in the top left corner of the splash screen. Your version number is located here 2. If your version number is 7.3.30 or higher, you are ready to install Shortcuts Black. Go to the next page. If you have any version of Shortcuts that is earlier than 7.3.30, please contact the Shortcuts Helpdesk to obtain detailed upgrade instructions and advice. 2 Ensure that your computer meets the Minimum Requirements Shortcuts recommends the Windows XP Pro, Windows Vista Business and/or Windows 7 Professional operating systems for running Shortcuts Black, but also supports certain other operating systems. are running Windows XP Pro, you must update your copy of Windows to the latest Service Pack 8 If(SP)youbefore attempting to install Shortcuts. For detailed instructions on how to update your copy of Windows, visit the Microsoft Windows Update page at: http://update.microsoft.com/windowsupdate/ 2.0 GHz Dual/Quad Core Tri-Core Processors Intel Atom Processors Supported - z Not Supported - Client Terminals Server - 4 Machine Network Minimum - Server - 3 Machine Network Server - 2 Machine Network Standalone Machine Recommended - Server - 5+ Machine Network The following table outlines the hardware requirements for Shortcuts Black. For best performance, the recommended specifications should be used: Processor 3.0 GHz Memory 1GB+ RAM (Windows XP only) 2GB+ RAM 4GB+ RAM Hard Disk Space z z z z z z z z z z Microsoft Windows 7 Home Microsoft Windows Vista Business z z z z z Microsoft Windows Vista Home Microsoft Windows XP (SP2) 2 GB+ Operating System Microsoft Windows 7 Professional (32 & 64-bit) Microsoft Windows 7 Enterprise (32 & 64-bit) Microsoft Windows 7 Ultimate (32 & 64-bit) (32 & 64-bit) Microsoft Windows Vista Ultimate (32 & 64-bit) (32 & 64-bit) 3 Server - 4 Machine Network Mac supported on Boot Camp z z z z z Microsoft Windows 2000 Pro (SP4) Microsoft Windows Server 2000 Microsoft Windows Server 2003 z z z z z Microsoft Windows Server 2008 z z z z z Firewall (Windows Firewall must be turned on) Anti-virus Minimum - Supported - z Not Supported - Client Terminals Server - 3 Machine Network Server - 5+ Machine Network Server - 2 Machine Network Standalone Machine Recommended - Networking (between Shortcuts Terminals) Wireless Network Local Area Network (Cable) Internet Access (not required to run Shortcuts) * High speed internet access (e.g. DSL) including suitable modem Security Monitor Resolution 1024 x 768 1280 x 1024 (or greater) * An Internet connection is required if you wish to use any of our 24ON Products (BookME, Set & Forget Marketing, BackMEup, ConnectME, SMS Confirmations). An Internet connection is highly recommended for troubleshooting. Under minimum specifications, performance related issues may arise when running Shortcuts Black outside normal usage. Shortcuts will only support performance related issues if clients are running the recommended hardware specifications. Shortcuts may charge additional fees to undertake investigations for non-recommended operating systems. To check if your computer meets the minimum requirements: 1. Right-click on the Computer icon on your Windows desktop (usually located on the top left-hand side of the screen). A pop-up menu will will appear. 4 2. Select the Properties option. The Systems Properties window will appear. 3. You must have a supported version of Windows 3. Your RAM and processor must meet minimum requirements 3. Ensure that you are using a supported version of Windows, and that you meet at least the minimum requirements for RAM and processor. 4. Your computer name must not be longer than 15 characters, or Shortcuts Black will not be able to run properly. To check the length of your computer name, click on the Computer Name tab. 4. Click on Computer Name 5. Click the Change button 5 5. Click the Change button. The Computer Name/Domain Changes window will appear. 6. Check the name 6. Check your computer name to ensure that it is not longer than 15 characters. If your computer name is longer than 15 characters, change it to one that is shorter than 15 characters, then click the OK button until you are back at the Windows Desktop. Otherwise, click the OK button until you are back at the Windows Desktop. 7. Double-click on the Computer icon on your Windows desktop. The Computer window will appear. 8. Click on the icon representing the hard drive you wish to install Shortcuts to. The hard drive’s details, including free and used space, will be displayed on the screen. Ensure that you have at least the minimum amount of free space available on your hard drive. 8. Your hard drive details are displayed here 6 9. If the details are not displayed as shown in the above screenshot, right-click on the hard drive you wish to install Shortcuts to and select Properties from the pop-up menu that appears. Ensure that you have at least the minimum amount of free space available on your hard drive. 9. Your hard drive’s disk space appears here 8 Only continue if your computer(s) meet the all of the above requirements! 7 Ensure your Computer is Running in Normal Sized Fonts Shortcuts Black is optimised to run with Normal sized fonts. If you have setup your PC to use a font size of Large or Custom, text may not be displayed properly when running Shortcuts Black. To check whether your computer is using Normal sized fonts: 1. Right-click on the Desktop and select Personalise from the pop-up menu that appears. The Personalisation window will appear. 1. Select Personalise 2. Click on the Adjust Font Size (DPI) link. The DPI Scaling window will appear. 2. Click Adjust Font Size (DPI) 2b. C 8 3. Ensure the Default Scale (96 DPI) option is selected, then click the Apply button, followed by the OK button. 3. Select Default Scale (96 DPI) 4. If Windows asks you to restart your computer, click the Restart Now button and wait until your computer has restarted before continuing with the next step. Otherwise, close the Personalise window by clicking on the ‘X’ button in the top right corner of the window. Ensure your Regional Settings are Correct Shortcuts Black draws on certain information provided by your computer about your region. If your region is not setup correctly, some functions of Shortcuts such as date and time may not work as expected. To ensure your Regional Settings are correct: 1. Click on the Windows Start button (or press Ctrl + Esc on your keyboard). Select Control Panel (or Settings -> Control Panel). The Control Panel window will appear. 1. Click Control Panel 2. Double-click Regional and Language Options 9 2. Double-click on the Regional and Language Options icon. The Regional and Language Options window will appear. 3. Verify your details are correct 3. Ensure the details in the Format and Location tabs are correct for your country, then click the Apply button, followed by the OK button. 4. Continue to click the OK button until you return to the Desktop. Deactivate User Account Control User Account Control (UAC) is a feature that was designed to prevent unauthorised changes to your computer in Windows 7. Whenever you run a program or access a part of Windows that could potentially affect your computer's operation, UAC will ask you for permission before continuing with the task. Any computer purchased from Shortcuts Software that uses Windows 7 will have UAC turned off. UAC may interfere with your proper running of Shortcuts, and has been known to cause issues with other applications. If you are using your own hardware to run Shortcuts, you will need to deactive UAC via the following steps: 1. Click on the Windows Start button (or press Ctrl + Esc on your keyboard). Select Control Panel (or Settings -> Control Panel). The Control Panel window will appear. 2. Double-click on the User Accounts icon. The User Accounts window will appear. 2. Double-click User Accounts 10 3. Click on the Change User Account Control Settings link. The User Account Control window will appear. 3. Click Change User Account Control Settings 4. Drag the slider bar to the bottom (“Never notify”), then click the OK button. 4a. Drag the slider bar to the bottom 4b. Click OK 5. Restart your computer, as changes to UAC will not take effect until you do. Turn On Windows Firewall You need to ensure that Windows Firewall has been turned on before you upgrade Shortcuts, as part of the installation process requires several exceptions be created by Windows Firewall to allow various functions of Shortcuts (such as SMS confirmations, or online bookings) to access the Internet. To ensure that Windows Firewall is turned on, perform the following steps: 1. Click on the Windows Start button (or press Ctrl + Esc on your keyboard). Select Control Panel (or Settings -> Control Panel). The Control Panel window will appear. 11 2. Double-click on the Windows Firewall icon. The Windows Firewall window will appear. 2. Double-click User Accounts 3. Click on the Turn Windows Firewall on or off link. The Customise Settings window will appear. 3. Click on Turn Windows Firewall on or off 12 4. Click to select the Turn on Windows Firewall option for each of your networks, then click the OK button. 4a. Turn on Windows Firewall for all your networks 4b. Click OK Adding an Exception to Windows Firewall In some cases, you may need to add an exception to Windows Firewall to allow a program to send or receive information over the Internet. Usually, this is for add-on Shortcuts modules such as BookME or Set & Forget Marketing. To add an exception to Windows Firewall, perform the following steps: 1. Click on the Windows Start button (or press Ctrl + Esc on your keyboard). Select Control Panel (or Settings -> Control Panel). The Control Panel window will appear. 2. Double-click on the Windows Firewall icon. The Windows Firewall window will appear. 2. Double-click User Accounts 13 3. Click on the Allow a program or feature through Windows Firewall link. The Customise Settings window will appear. 3. Click on Allow a program through Windows Firewall 4. Look through the list and ensure that the following exceptions are ticked. • Shortcuts.exe • ShortcutsServices.exe • Shortcuts Communication Server (Server machine only) • LicenseServer.exe • M4usms.dll • POSOnlineMarketing.exe 4. Tick the appropriate options 5. Click OK 14 5. Click the OK button to save your changes. Turn off any Virus Scanning Software Some virus scanning software may interfere with your Shortcuts Black installation/upgrade. Ensure any virus scanners have been switched off or disabled before attempting to install or upgrade your copy of Shortcuts. If your virus scanning software is setup to automatically load on start up, you will need to turn off this option temporarily. Refer to your respective virus scanner’s user manual for how to turn off or disable your software. 8 Remember to turn on your virus scanning software again once you have finished installing Shortcuts! Are you installing on a Network? If you are upgrading Shortcuts on a network, please read the “Networking Shortcuts” document and follow all instructions contained within before proceeding with your upgrade. This document is located on your Shortcuts CD under “Installation Instructions”. 15 Upgrading from Shortcuts V7.3 to Shortcuts Black This section will take you through the steps necessary to upgrade your copy of Shortcuts V7.3 to Shortcuts Black. You will need to run a Hardware session and back up your Shortcuts data as part of the procedure. This will ensure that your data will not be lost if the upgrade process fails at any point. you are running a network, all computers MUST be upgraded to Shortcuts Black before you attempt to run the new 8 Ifsoftware. The server/main computer must be upgraded first, followed by the client computers. Ensure that Shortcuts is not running on any other computer while you are upgrading a computer as this will cause problems. Note that you do not need to run a Hardware session, Backup, or obtain a license for client computers. Run a Hardware session 1. Run the Hardware utility in Shortcuts (Setup Menu (Navigation Bar) J Hardware Icon). The Hardware window will appear. 2a. Click on the Receipt and Cash Drawer tabs 2b. Make a note of your settings 3. Click OK 2. You will need to make a note of your Receipt and Cash Drawer settings in the event that you need to manually enter them afterwards. Click on the Receipt/Cash Drawer tabs, and note down the settings in the Manual Configure section. 3. Click OK to close the Hardware window. Backup your Shortcuts data Refer to your User Guide for instructions on how to perform a Backup. It is strongly recommended that you backup your data onto a USB key instead of other storage media. Shortcuts backup only backs up your Shortcuts database, excluding Shortcuts Marketing Letters and any other 8 The documents in the computer. You will need to manually backup all your other documents etc. in each computer. 16 Upgrading to Shortcuts Black Now that you’ve made all necessary preparations, you’re ready to upgrade to Shortcuts Black! If you receive any errors during the installation procedure, please call the Shortcuts Helpdesk for assistance. It is strongly recommended that you proceed with the Shortcuts upgrade only during business hours (8.00am - 3.00pm 8 EST, Monday to Friday) to ensure technicians are available in case you encounter problems during your upgrade. you are running a network, you MUST upgrade the server computer to Shortcuts Black before upgrading the client 8 Ifcomputers. 1. Close Shortcuts and any other programs that may be running on all computers. 2. Insert the Shortcuts Black CD into your CD-ROM drive and wait a few seconds. The Install window will appear. If the Install window does not appear, click Start (or press Ctrl & Esc on your keyboard), then select Run. The Run window will appear. In the Open dialog box, type ‘D:\install.exe’ (where ‘D’ is the letter assigned to your CD-ROM drive). Click OK. The Install window will appear. 3. Click on Install Shortcuts Black 3. Click Install Shortcuts Black to begin the installation. Your computer may require installation of several components to make it compatible with Shortcuts. If this is the case, an InstallShield Wizard window similar to the following will appear. Simply click Install to continue. A progress bar will be displayed at the bottom of the window. Please be patient as it may take a while for the components to be installed. Click Install to continue 17 4. The Preparing to Install... window will appear as Shortcuts gathers all necessary information. Please be patient as this may take a minute or two. 5. The Shortcuts Point of Sale InstallShield Wizard window will now appear. Read the instructions on screen. Click Next to continue 6. When ready, click Next to continue. The License Agreement window will appear. Select the ‘I accept’ option Click Next to continue 7. Please read the license agreement carefully. If you accept the terms in the agreement, then select the ‘I accept...’ option and click Next to continue. The Customer Information window will appear. Type in your Business Details Type in your serial number 18 Click Next to continue 8. Type in your Business Details along with your Shortcuts Black serial number. Your serial number is located on the inside cover of the CD case, on the front cover of the installation guide, or within the information letter you received. Once you have finished entering your details, click Next to continue. The Network Mode window will appear. Select the appropriate option Click Next to continue 9. If you are upgrading to Shortcuts Black on a stand alone machine, select the Stand Alone/ Server option and click Next to continue. The Setup Type window will appear. OR If you are upgrading to Shortcuts Black on a network client machine, select the Client option and ensure that the correct computer name is typed into the Computer field. Click on the Test Connection button to verify the connection status, then click Next to continue. The Setup Type window will appear. Select the Complete option Click Next to continue 10.By default, the Complete option is selected and Shortcuts will be installed to C:/Program Files/ Shortcuts Software/Point Of Sale/. It is recommended you leave the Complete option selected unless you wish to change the installation directory (which we do not recommend) or customise which features of Shortcuts are installed. If you are using the Complete option, go to Step 12. If you have purchased the BookME feature, or wish to install the Payment Processor feature of Shortcuts, click to select the Custom option, then click Next to continue. The Custom Setup screen will appear. Go to Step 11. 19 11.To install the BookME Agent, click to expand the Program Files tree, then click on the Online Booking option and select the This feature will be installed on local hard drive option. Select necessary features Click Next to continue To install the Payment Processor feature, click to expand the Program Files and Extra Features trees, then click on the Payment Server option and select the This feature will be installed on local hard drive option. 8 If you are running Shortcuts on a network, the BookME Agent must be installed on the main Shortcuts Server computer. 12.Click Next to continue. The Ready to Install the Program window will appear. Click Install to continue 13.Click the Install button to begin the upgrade. A progress bar will then appear to indicate the current status of your installation. Please be patient as this may take a while. 20 14.Once the installation process is complete, the InstallShield Wizard Completed window will appear. Click the Finish button to close the window and return to the Windows Desktop. Click Finish are running Shortcuts on a network, you need to upgrade your client computers to the new version as well. To do 8 Ifthis,yousimply follow the same procedure as you did for installing Shortcuts on the server. Pay particular attention to Step 9! are experiencing problems with your receipt printer and cash drawer, you may need to run the Hardware program 8 Ifandyoure-enter the settings you took down in Step 2 on page 16. To access the Hardware program, simply click on the Hardware icon located in the Setup Menu of Shortcuts. 15.Double-click on the Shortcuts icon on your Desktop to run Shortcuts. Re-authorising your copy of Shortcuts Black 1. You will need to re-authorise the software as part of the upgrade process. When you have finished installing Shortcuts Black, start Shortcuts by double-clicking on the Shortcuts icon on your Desktop. 2. If you are connected to the Internet at the time of your installation, you do not need to do anything. Shortcuts will automatically connect to our head office servers and download your license. Simply start Shortcuts and enjoy! If you are not connected to the Internet, however, a License Authorisation Warning window will appear. 3. Your Expiry Code 3. The License Authorisation Warning window contains an Expiry Code. Call the Shortcuts Helpdesk and quote this expiry code to the technician. 4. The Helpdesk technician will issue you with an Activation Code which you must enter correctly into the Activation Code field. 8 If you are running a network, note that only the server requires an activation code. 21 5. Click the Done button to complete the authorisation process and start using Shortcuts! Congratulations! You have successfully upgraded your computer to use Shortcuts Black. Remove the CD from your CD-ROM drive, place it back into the CD case and store it in a safe place. We also recommend viewing the What’s New in Shortcuts Black document on the CD (under the Documentation menu) so you can see what are the newest features of Shortcuts. Manually Downloading your License File Shortcuts will automatically download the latest version of your license file whenever you start it. If you need to manually download your license file, however, you can do so via the following process: 1. On the Windows Task Bar, you will see the License Server. Click on the License Server Click on the License Server icon. The License Server window will appear. 8 If you are running a network, the License Server will be located on the server/main computer. 2. Click on the Authorisation tab. 2. Click on the Authorisation tab 7. Click the Exit License Server button 4. Click Save 3. Click Download the latest License file 3. Click the Download the latest License file button. 4. Once you have entered in the Authorisation Code, click the Save button. The Overwrite Existing License File window will appear. 22 5. Click Yes. The License File Updated window will appear. 6. Click OK to return to the main License Server window. 7. Click on Exit License Server button. A window will appear asking you if you are sure you want to exit the license server. 8. Click the Yes button to exit the license server. 9. Finally, restart the license server (Start Button J All Programs/Programs J Shortcuts Software J Point of Sale LicenseServer). 23 AUSTRALIA NORTH AMERICA UNITED KINGDOM 166 Knapp Street, 7777 Center Avenue, Suite 100, Dalton House, Dane Road, Sale Fortitude Valley Qld 4006 Huntington Beach CA 92647 Cheshire M33 7AR p: +61 (0)7 3834 3232 p: +1 714 622 6600 p: +44 (0) 161 972 4900 www.shortcuts.com.au www.shortcuts.net www.shortcuts.co.uk Shortcuts Software © Shortcuts Software. All rights reserved.