1
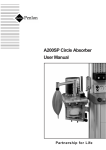
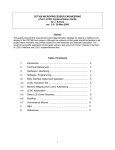
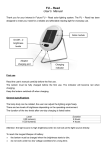
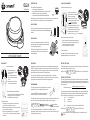
OL2A USER MANUAL INTRODUCTION 2-HOLE FLANGE MOUNT The OL2A Solar Hazard Marker is: • Self-contained and solar-powered • Easy-to-install and low-maintenance with a long-life LED • Available in red, green, white, yellow and blue • Easy-to-maintain with replaceable AA NiMH batteries To attach the 2-hole flange mount 2-Hole Flange Mount 1.Use the alignment keys to align the top cover and flange mount. Press together. 2.Attach the mount to the top cover using the provided 3 screws ( ). Do not over tighten! 3.Apply a thin coat of silicone lubricant to the bottom cover o-ring. 4.Align the bottom cover and press Alignment Keys into the top cover. It only fits one way. 5.Secure the bottom cover with the provided 3 screws ( ) . Do not over tighten! Pole Mount Nominal range of a lantern depends on its effective intensity and environmental conditions. For details on how to calculate range, see www.carmanah.com. APPLICATIONS The OL2A is suitable for ground marking, way finding, perimeter marking and other applications where a hazard marking light is required. Up to 4 bird deterrents can be installed: INSTALLATION Year-round, unrestricted solar exposure is critical to longterm performance. Shade dramatically reduces the ability of the light to charge its battery. The OL2A has changeable mounts. Ensure either the 2-hole flange mount or pole mount is attached before lantern installation. POLE MOUNT Install the Pole Mount 1.Apply a thin coating of silicone lubricant to the polemount o-ring 2.Use the alignment keys to align the top cover and pole mount. 3.Attach the mount to the top cover using the provided 6 Up to 6 bird deterrents can be installed: 1.Insert a mounting screw through the bird deterrent 2.Install the screw. Do not over tighten! 3.Bend bird deterrent as needed 1.If required, insert the reducing sleeve into the pole mount. Note that it aligns only one way. 2.Slide the lantern and sleeve over the pole; press down to ensure lantern is well seated. 3.Secure with the provided 3 screws; if required, drill 1/8 - 9/64 in. [3.2 - 3.6 mm] pilot holes and then install the screws. To install the lantern: Fix in place with 2x bolts, studs & nuts, nails or screws. Recommended bolt size is 1/4-20 UNC or M6. OPERATION SETTING THE FLASH In daylight, the solar panel charges the battery using the Energy Management System (EMS). The capacity of the battery ensures that even with poor levels of sunlight over an extended period, the lantern has enough reserve power to continue to perform reliably. Stored battery energy then powers the LED during the night. To set the flash pattern, enter its flash code using the IR programmer. Flash codes are listed in a table at the end of this document. The change from night-to-day or day-to-night is called a transition. To avoid false transitions and ensure stable operation, the transition time is 2 minutes. For example, 2 minutes of dark is needed for the lantern to switch to night operation. Alignment Keys To install the lantern: X 1.Insert the provided screw through the bird deterrent 2.Drive the screw into one of the 4 small holes on the top of the mount. Do not over tighten! 3.Bend the bird deterrent as required. Example: Enter 1 2 9 for quick flash Q 1s 0.3, (flash code 129) SETTING THE INTENSITY The OL2A is configured using the IR programmer. The lantern’s mating IR receiver is on an energy-saving sleep cycle. The OL2A is programmed using Effective Intensity. Effective Intensity is the brightness of a flashing light as perceived by the human eye (as opposed to Peak Intensity which is the actual intensity of a light during a flash). Effective Intensity is calcluated using the following equation: Peak Intensity (cd) x Flash Duration (sec) Effective Intensity (cd) = 0.2 (sec) + Flash Duration (sec) Press and hold for 2 seconds to awaken the IR receiver and begin communication with the lantern: The OL2A makes this calculation automatically based on your programmed flash code and Effective Intensity selected. Note that for a fixed/steady-burning light (code 001), effective intensity equals peak intensity. The range of intensity codes are: PROGRAMMING The lantern is now ready to accept programming. Note that the lantern will quickly flash after every key it receives. All programming codes follow the same sequence: # # # 3 quick flashes Command accepted 2 slow flashes Command rejected The number symbol # represents 0 - 9. Commands can be rejected if they are unsupported, contain an incorrect key sequence, or have an effective intensity too high for the programmed flash code. 600 601 602 ... 6## Example: Enter CAUTION 0.1 - 0.4 effective cd 1 effective cd 2 effective cd Maximum values vary by flash code and LED colour 6 0 5 for intensity of 5 effective cd Product performance varies by installation location. Visit carmanah.com for details. TURNING ON/OFF BATTERY CHARGING STORAGE In “on” mode, the OL2A LED turns on at night and off during the day. In “off” mode, the lantern charges in sunlight, but the LED remains off. When turned on again, the lantern activates at its last programmed settings (1 minute preview for daytime activations). The batteries are best charged inside the lantern. The OL2A can recharge 0 V or 0% SOC batteries back to 100% SOC: Turn the lantern off to store. In switched models, set the switch to the “off” position. To turn off using the IR programmer, press and hold for 4 seconds. • Option 1: Switched Models Set the switch to on or off position OFF ON Option 2 : IR Programmer Press and hold 4 seconds. The lantern LED will fade on or off to confirm your setting change. Good battery 8 1 or Charge battery SOC > 75% 0 SOC < 30%, LVD Active AUTOMATIC LIGHT CONTROL 1 SPECIFICATIONS Disable ALC: 8 0 0 Visit www.carmanah.com for complete specifications Temperature -40 to 176 °F (-40 to 80 °C) Light Source High-power LED, >100,000 hrs lifetime Intensity See Flash Code table Flash See Flash Code table Divergence >8 ° FWHM Vertical Divergence Chromaticity Blue, red, white, yellow, and green Battery 3x AA high-temperature nickel-metal hydride (NiMH), 1.2 V nominal each. -40 to 185 °F (-40 to 85 °C) ambient Immersion IP68, 3 ft. (1m) for 72 hrs.; EN 60529 MIL-STD-202G immersion & damp heat cycling, MIL-STD-810G rain & salt fog Regulatory Patents RoHS Restriction of Hazardous Substances Directive 2002/95/EC (RoHS) CE FCC ICES EN 60945, EN 61000-6-1, EN 61000-6-2, EN 61000-6-3 This device complies with Part 15 of the FCC Rules (see 15.109) This Class [B] digital apparatus complies with Canadian ICES-003. Cet appareil numérique de la classe [B] est conforme à la norme NMB- 003 du Canada. US and International patents apply Pole Mount 0.9 lb (0.40 kg) 2-Hole Flange Mount 0.8 lb (0.35 kg) 0.27 in 6.8 mm 4.9 - 5.0 in 124 - 128 mm 4.6 in 117 mm 6.1 in 154 mm 3.0 in 70 mm 2.2 in 56 mm With sleeve: 1.9 in (48 mm) pole ID Without sleeve: 2.4 in (61 mm) pole ID Overtop mount: 2.8 in (71 mm) pole OD 2.2 in 56 mm 3.8 in 97 mm 0.8 in 20 mm TROUBLESHOOTING LED is off during the night Batteries are very low and lantern cannot turn on Charge the lantern or replace the batteries Batteries are low and LVD is active Confirm with code 810 using IR programmer. Charge lantern or replace batteries. Decrease eff. intensity to a sustainable level Switch is off Switch to on Night not yet detected Wait for the lantern to detect 2 min. of consistent “dark” Nearby light source is illuminating the lantern Move away from light source, turn off unneeded light, or shield lanterns Solar panel is not charging the battery well during the day Under bright sunlight, enter code 815 using the IR programmer: 1x flash= too low for charging, 2x flashes = solar panel is fine No response to IR programmer Batteries are very low and lantern cannot turn on Charge the lantern or replace the batteries Sunlight is obscuring IR signal Move the IR programmer closer to the lantern Moisture inside Condensation Ensure the vent on the bottom cover is not dirty or obstructed Seal failure Ensure the bottom cover o-ring is dry (no water) and lubricated Ensure o-ring is not pinched and all screws are fully installed The OL2A comes with 3x AA industrial-grade, high-temperature NiMH batteries. The OL2A will only operate with all 3x batteries installed correctly. The lantern remembers its settings even when the batteries are removed. CAUTION During periods of sustained poor solar charging, Automatic Light Control (ALC) may decrease LED intensity based on battery SOC and recent charging trends. When solar charging returns to a sustainable level, ALC increases intensity back to the user setting. ALC may be disabled to keep the lantern at a constant intensity. 8 0 • • If a lantern detects continuous dark for 24 hrs, it will disable the LED. Upon sensing light, it will enable the LED and continue normal operation Check the battery state of charge every 1 - 2 months and charge if required High-grade NiMH batteries shipped with the OL2A can be stored without any charging for up to 12 months with no battery damage BATTERY INSTALLATION If the battery is < 30%, Low Voltage Disconnect (LVD) disables the LED, attempts to charge the battery to a sustainable SOC. The LED is re-enabled once SOC is >30%. Enable ALC: Do not use a battery charger with >370 mA charge rate. High charge rates will over heat the batteries and cause internal damage. Take care when charging using a lamp. Provide air circulation or a fan so that lantern and batteries do not exceed max. temperature CAUTION Low battery SOC 30 - 75% 8-12 hours 18-36 hours 15-36 hours A commercial charger designed for 1.2 V AA batteries can also be used. CAUTION CHECKING BATTERY STATE OF CHARGE (SOC) Using the IR programmer, enter: Summer sunlight Winter sunlight 60 W incandescent lamp 1.6 in 40 mm Other rechargeable AA NiMH batteries will not void your warranty. However, shock, vibration, temperature, and optical performance may be limited. To install batteries: 1. Apply a thin coat of silicone lubricant to the large sealing o-ring 2. Install batteries noting their polarity 3. Align top cover and assembly components; secure with the provided screws. Do not over tighten! FLASH CODES MAINTENANCE Maximum effective intensity varies by flash code and color. “FL” is the flash duration (sec) and “EC” is an eclipse (sec). Intensities are IALA values (10th percentile) over a 360° horizontal measurement. Although the OL2A is maintenance-free, performance gains can be made. Clean with water and a soft sponge or cloth. A mild non-abrasive cleanser can be used for more stubborn residue. Clean more frequently during drier months as dust accumulates more quickly. Check the exterior and o-rings for cracks, missing or broken hardware. Flash Code 000 001 012 016 043 044 049 050 051 052 055 058 059 060 061 063 064 066 068 069 070 072 078 079 098 099 103 104 125 126 129 131 144 147 160 174 178 179 209 238 251 Flash Character FL1 EC1 off F Fl (2) 6s 0.5 Fl (2) 8s 0.5 Fl 1.5s 0.5 Fl 10s 0.5 Fl 2.5s 0.3 Fl 2.5s 0.5 Fl 2.8s 0.3 Fl 2s 0.2 Fl 2s 0.5 Fl 3s 0.3 Fl 3s 0.5 Fl 3s 0.7 Fl 3s 1.0 Fl 4.4s 0.4 Fl 4s 0.5 Fl 4s 1.0 Fl 5s 0.3 Fl 5s 0.5 Fl 5s 1.0 Fl 6s 0.5 Iso 2s Iso 4s Mo(U) 10s 0.3 Mo(U) 10s 0.4 Mo(U) 15s 0.7 0.5 Mo(U) 15s 0.7 0.7 Q 1.2s 0.3 Q 1.2s 0.5 Q 1s 0.3 Q 1s 0.5 Q(4) 20s 0.5 Q(5) 20s 0.3 VQ 0.6s 0.3 Fl 4s 0.4 Fl (3+1) 20s 0.5 Fl (3+1) 20s 0.6 Q 1s 0.15 CST9 Fl 3.5s 0.7 0 60 0.5 0.5 0.5 0.5 0.3 0.5 0.3 0.2 0.5 0.3 0.5 0.7 1 0.4 0.5 1 0.3 0.5 1 0.5 1 2 0.3 0.4 0.7 0.7 0.3 0.5 0.3 0.5 0.5 0.3 0.3 0.4 0.5 0.6 0.15 0.6 0.7 0 0 1 1 1 9.5 2.2 2 2.5 1.8 1.5 2.7 2.5 2.3 2 4 3.5 3 4.7 4.5 4 5.5 1 2 0.7 0.6 0.5 0.7 0.9 0.7 0.7 0.5 0.5 0.7 0.3 3.6 1.5 1.4 0.85 0.3 2.8 FL2 EC2 0.5 0.5 4 6 FL3 EC3 FL4 EC4 0.3 0.4 0.7 0.7 0.7 0.6 0.5 0.7 0.9 1.2 1.9 2.1 7.1 6.8 10.7 10.1 0.5 0.3 0.5 0.7 0.5 0.3 0.5 0.7 0.5 0.3 16.5 0.7 0.5 0.6 1.5 1.4 0.5 0.6 4.5 4.4 0.5 0.6 10.5 10.4 0.6 0.3 1.5 56.7 FL5 0.3 EC5 15.7 Duty Cycle 0% 100% 16.7% 12.5% 33.3% 5% 12% 20% 10.7% 10% 25% 10% 16.7% 23.3% 33.3% 9.1% 12.5% 25% 6% 10% 20% 8.3% 50% 50% 15% 20% 22% 23.3% 25% 41.7% 30% 50% 10% 7.5% 50% 10% 10% 12% 15% 4.5% 20% Maximum Effective Intensity (cd) White Yellow Green Red Blue 0 0 0 0 0 29 25 23 18 8 20 17 17 12 6 20 17 17 12 6 20 17 17 12 6 20 17 17 12 6 17 15 14 10 5 20 17 17 12 6 17 15 14 10 5 14 12 11 9 4 20 17 17 12 6 17 15 14 10 5 20 17 17 12 6 22 19 18 14 6 24 20 19 15 7 19 16 15 12 5 20 17 17 12 6 24 20 19 15 7 17 15 14 10 5 20 17 17 12 6 24 20 19 15 7 20 17 17 12 6 24 20 19 15 7 26 22 21 16 7 17 15 14 10 5 19 16 15 12 5 22 19 18 14 6 22 19 18 14 6 17 15 14 10 5 20 17 17 12 6 17 15 14 10 5 20 17 17 12 6 20 17 17 12 6 17 15 14 10 5 17 15 14 10 5 19 16 15 12 5 20 17 17 12 6 21 18 17 13 6 12 10 10 7 3 21 18 17 13 6 22 19 18 14 6 RECYCLING This product may contain substances that could be harmful to the environment or human health if improperly handled at the product’s end of life. Check your local municipality for electronics recyclers. The batteries are rechargeable nickel-metal hydride (NiMH). Consult your local laws for information on recycling. This product complies with the European Union’s requirements according to Directive 2002/96/EC on waste electrical and electronic equipment (WEEE). WARRANTY This product is covered by the Carmanah warranty. Failure to comply with the use, storage, maintenance, or installation instructions detailed in this manual could void the warranty. Changes or modifications not expressly approved by the party responsible for compliance could void the user’s authority to operate the equipment. Email: Toll Free: Worldwide: Fax: Web: [email protected] 1.877.722.8877 (US & Canada) 1.250.380.0052 1.250.380.0062 carmanah.com 70951_OL2A_UserManual_RevA