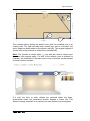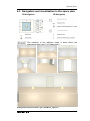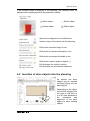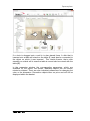
1
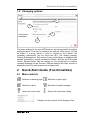
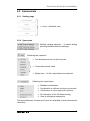
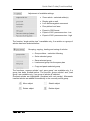
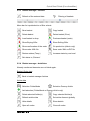
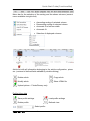
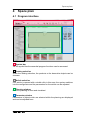
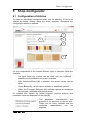
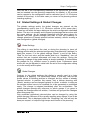
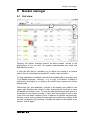
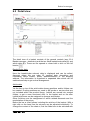
imos NET 3.0 – User manual imos NET 3.0 – User manual August 2011 imos AG Planckstrasse 24 D-32052 Herford Tel. +49(0)5221.976-0 Fax +49(0)5221.976-123 [email protected] www.imos3d.com Copyright 2011 by imos AG. Technical issues are subject to change without notice. No part of this document may be reproduced or otherwise circulated without the prior permission of the publisher. AutoCAD, imos, and other trademarks are or may be the property of their respective owners. Content CONTENT .................................................................................................................................... 3 1 BASICS ............................................................................................................................... 4 1.1 1.2 2 PROGRAM START AND LOGIN ...................................................................................................... 4 CHANGING OPTIONS ................................................................................................................. 5 QUICK-START-GUIDE (FUNCTIONALITIES)........................................................................... 5 2.1 MAIN CONTROLS ..................................................................................................................... 5 2.1.1 Exclusive controls of the space plan .......................................................................... 6 2.1.2 Exclusive controls of the shop .................................................................................... 6 2.1.3 Exclusive controls of the 3D Preview ......................................................................... 6 2.1.4 Exclusive controls of the basket manager ................................................................. 6 2.2 SUBCONTROLS......................................................................................................................... 7 2.2.1 Starting page ............................................................................................................. 7 2.2.2 Space plan ................................................................................................................. 7 2.2.3 Basket manager - listview ......................................................................................... 9 2.2.4 Basket manager - detailview ..................................................................................... 9 3 STARTING PAGE ............................................................................................................... 11 4 SPACE PLAN ..................................................................................................................... 12 4.1 4.2 4.3 4.4 4.5 4.6 4.7 4.8 4.9 5 SHOP-CONFIGURATOR ..................................................................................................... 24 5.1 5.2 5.3 6 PROGRAM INTERFACE ............................................................................................................. 12 CREATE FLOOR PLAN ............................................................................................................... 13 NAVIGATION AND VISUALIZATION IN THE SPACE PLAN .................................................................... 15 INSERTION OF ARTICLES INTO PLANNING ..................................................................................... 16 INSERTION OF DECO OBJECTS INTO THE PLANNING ........................................................................ 17 LIGHT SOURCES...................................................................................................................... 19 VISUALIZATION IN THE ROOM ................................................................................................... 19 OPTIONS IN THE SPACE PLANNING ............................................................................................. 21 GROUPING, SAVING AND LOADING OF ARTICLES ........................................................................... 23 CONFIGURATION OF ARTICLES .................................................................................................. 24 GLOBAL SETTINGS & GLOBAL CHANGES ..................................................................................... 25 3D-PREVIEW ........................................................................................................................ 26 BASKET MANAGER ........................................................................................................... 27 6.1 6.2 LIST VIEW ............................................................................................................................. 27 DETAIL VIEW ......................................................................................................................... 28 This document may be used as a guideline for the creation of own user manuals. Within the user manual of the Shop-Provider the product configuration should be described more detailed. Also it is recommendable to add an overview of the offered products. Basics 1 Basics 1.1 Program start and login Run the application with a double-click on the desktop shortcut „imos NETshop“. Enter your username (1.) and your password (2.) within the login screen. The input is confirmed with a click on (3.) or canceled by clicking on (4.). By selection of (5.) the dialog to change the options is opened. 1. 2. 5. 3. 4. If the checkmark next to „Save Password?“ is activated, the password is saved and does not have to be entered again the next time a session is started. Advice: The password is stored in plain text. Also it has to be considered, that an unauthorized user can perform orders under your’s name. imos NET 3.0 – User manual 4 Quick-Start-Guide (Functionalities) 1.2 Changing options 1. 2. 3. 4. The basic settings for the imos NETshop can be changed within the dialog displayed above. That way for example the address of the server (1.) can be edited. If a proxy server is used to connect to the internet, the necessary adjustments can be done here (2.). The catalog property ”Display Subcategories” (3.) controls if the product library is displayed with opened (checked) or closed (unchecked) folders. With the aid of the slide control „Shadow Mode“ (4.) the settings for the visualization of realtime rendered shadows can be choosen. Different settings like hard, smooth or adjusted to the PC’s performance are available here. 2 Quick-Start-Guide (Functionalities) 2.1 Main controls Switches to starting page Switches to space plan Switches to shop Switches to basket manager Opens the online help Opens the information dialog Displays current content of the Shopping Cart imos NET 3.0 – User manual 5 Quick-Start-Guide (Functionalities) Catalog selection (displayed at start) 2.1.1 Exclusive controls of the space plan Global settings Globale changes Save room & New Save room Take screenshot 2.1.2 Exclusive controls of the shop Insert article into the room/basket 3D – Preview Cancel editing 2.1.3 Exclusive controls of the 3D Preview Walk Fly Examine Plan Pan Turn Roll Goto Straighten Previous viewpoint Next viewpoint Restore Fit 2.1.4 Exclusive controls of the basket manager Refresh basket imos NET 3.0 – User manual 6 Quick-Start-Guide (Functionalities) 2.2 Subcontrols 2.2.1 Starting page Links – individual view 2.2.2 Space plan Multiple catalog selection – to switch during planning between different catalogs Switching the viewpoint Two-dimensional view of the floor plan Three-dimensional views Object-view – At first, object has to be selected Switching the visual styles Standard visualization Visualization w. defined contours (uncolored) Visualization in comic style with contours De-/Activation of the 2D dimensioning View in orthogonal perspective The styles Standard, Outline and Comic are available in three-dimensional views only. imos NET 3.0 – User manual 7 Quick-Start-Guide (Functionalities) Adjustment of available settings Zoom article - selected article(s) Display grid on wall Lock articles against movement Plan pitched roof area Export in 3DS format Export of 360° panorama view - low Export of 360° panorama view - high The function “single article view” is available only, if an article or a group of articles has been selected before. Grouping, copying, loading and saving of articles Group articles – selection following Solve selected group Save selected group Load saved group into the space plan Copy and paste selected group The functions „ungroup articles“ and „save group“ are available only, if a group has been created before. The function „group articles“ and „load group“ are available only, if no group of articles is selected. Grouped articles are highlighted (visualized with red overlay). Afterwards inserted articles are added automatically to the currently active group. Move object Stretch object Rotate object Delete object imos NET 3.0 – User manual 8 Quick-Start-Guide (Functionalities) 2.2.3 Basket manager - listview Refresh of the entered data Filtering of baskets Menu bar for input/selection of filter criteria Save basket Copy basket Delete basket Delete basket (Error) Load basket in shop Purchase basket (order) Show Buying-Offer Show Selling-Offer Show confirmation of the order Go production (Admin only) Show order XML file Save order XML as ZIP file Restore status (Temp) Increase status by one level Set status to „Returns“ 2.2.4 Basket manager - detailview Already mentioned elements are not listed again. Basket-/Order data Back to basket manager listview Article data Selection Folder/Node Selection Dummy-Article Add selection (Folder/Node or Dummy-Article only) Delete selected Article(s) Copy selected Article(s) Refresh article data Set article discount globally Hide details Show details Open all nodes Close all nodes imos NET 3.0 – User manual 9 Quick-Start-Guide (Functionalities) Menu bar for the selection of the sorting and the shown columns (context menu available via right click). Ascending sorting of selected column Descending sorting of selected column Automatic fit of column width Automatic fit Selection of displayed columns Article list with all information belonging to the article configuration, prices etc. (contend of defined fields editable by double clicking) Delete article Copy article Modify article Show VRML file Upload picture – Folder/Dummy only Profile-/View data Save profile settings Load profile settings Delete profile Refresh view Select profile imos NET 3.0 – User manual 10 Starting page 3 Starting page The starting page represents the entrance to the NETshop system. Herefrom it is possible to navigate to the further program parts. Actual information can be displayed and existing orders, respectively offers can be viewed. Navigation bar With the aid of the navigation bar it is possible to switch to the space plan, the shop or to existing baskets. There is also a help available via and by clicking the information about the version of the program is displayed. If the planning is started within the shop, the selected articles cannot be inserted into a room situation. Therefore it has to be considered, if the planning is started within the space plan or within the shop. Menu bar Functions for existing orders, offers and also user settings/administration can be accessed here. The functions are adjusted for each shop individually. Information area Here the Shop-Provider can present actual news. imos NET 3.0 – User manual 11 Space plan 4 Space plan 4.1 Program interface Symbol bar Via the symbol bar the essential program functions can be accessed. Catalog selection Within the catalog selection, the products or the decorative objects can be choosen. Article selection If an article is opened with a double click in this area, the system switches into the configurator and the parameters for the article can be adjusted. Planning window Here the planning is done and visualized. Parameter window Parameters of objects wich are selected within the planning are displayed and can be adjusted here. imos NET 3.0 – User manual 12 Space plan 4.2 Create floor plan 1. During the start of the space planning a pre-defined room can be selected with a click (1.). This room can be modified as shown afterwards. 1. 2. A selected wall can be moved by pressing and holding the left mousebutton, while dragging the wall into position. The room is changed accordingly. If a wall is selected with a click on it, dimension lines appear and within the parameter window the adjustable options are shown (1.). Via the buttons a dialog is opened where the wall length can be defined. Depending on the room shape it may be necessary to define these clockor counterclockwise. If the mouser cursor is moved from the inner of the room situation onto a wall, a bar is shown (2.). This can be used to extend the floor plan by edges or inclinations. Add edge (clockwise) Delete existing wall Add edge (counter clockwise) Move end of the wall to inclination (click and hold) imos NET 3.0 – User manual 13 Space plan 1. 2. 3. The example above shows the default room and the modified one in an overlay view. The right wall has been moved here into an inclination (1.) and a edge has been added to the bottom wall (2.). The angular degree is shown next to the subcontrol, while this is activated (3.). Note: The function to delete walls ( ) can also be used to create room situations with angular walls. If a wall of the default room is deleted for example, the endpoints of the walls next to are connected, so that always a closed contour is drawn. 1. If a wall, the floor or other objects are selected within the threedimensional views, the parameter window displays a menu (1.). This allows to assign materials or to upload your own textures into the system. imos NET 3.0 – User manual 14 Space plan 4.3 Navigation and visualization in the space plan 2D-Navigation 3D-Navigation The selection of the different views is done above the planning window (see 2.2.2 Space plan). Perspective gound view Bird’s eye view Perspective standing Perspective sitting Worm’s eye view Object view Orthogonal projection of bird’s eye view (Menu „options“) imos NET 3.0 – User manual 15 Space plan 4.4 Insertion of articles into planning To insert articles with the same configuration options/default values quickly into the planning, these can be simply dragged into. Thereto the article is clicked and with held left mouse button dragged into the room situation (1.). 2. 1. For this insertion process the default values defined within the article configuration are used. Alternatively it is possible to modify the global defaults, to use the same settings for all subsequent articles to be inserted. Note: As soon as the first article is inserted into the room, a basket including article position and price is created. Basket and room can be saved via the button „Save intermediately“ (2.) within the space plan or also within the basket manager. This is important insofar, that when performing bigger and more time-consuming plannings the loss of data – e.g. when having a system crash or loosing the internet connection – can be minimized. Therefore the planning should be saved in periodical time intervals with the aid of this function. If the space plan is closed without being saved before, a dialog appears that prompts to save. The confirmation of this dialogue with „Yes“ results in saving the basket inclusively the room. Selecting „No“ will delete both (Warning message!). Because without saving the basket is stored on the server, but the related room geometry is missing. Reloading the basket would result in a planning without room (situation). imos NET 3.0 – User manual 16 Space plan If the inserted article is selected in the planning, the following menu for adjustments is displayed within the paramater window. Move object Stretch object Rotate object Delete object Opens the configurator for modifications Inserts a copy of the article into the planning Defines the insertion height in mm Defines the movement sidewarts in mm Defines the movement forwards in mm Defines the rotation angle in degree (°) De-/Activates the collision controll De-/Activates the automatical allignment 4.5 Insertion of deco objects into the planning As articles the deco objects can be inserted via Drag & Drop into the planning (1.). 1. imos NET 3.0 – User manual Depending on the object it should be dragged into the room in top view or in a 3D view, because of the orientation and alignment of the deco objects to other existing objects. 17 Space plan 2. 1. If a clock is dragged onto a wall is is also placed there. A dish that is inserted onto a table will stand on the table (1.) and also be connected to the object on which it was inserted. This results therein, that a dish standing on a table will in case the table is moved also be moved with the table (2.). In the parameter window the corresponding parameters, which are available for the object, are shown. Basically objects can be moved, rotated or deleted. There are also individual parameters for changing the color or the dimension. Decorative objects have no price and will not be displayed within the basket. imos NET 3.0 – User manual 18 Space plan 4.6 Light sources Light sources work like deco objects, but they can be turned on/off by parameters, the color and the bightness can be controlled. By default in every room enough light sources are included for an even illumination. Clever placing more light sources lets you arrange the whole atmosphere of the picture respectively the room. 4.7 Visualization in the room Also on top of the planning window the selection of the visualization styles is done (see 2.2.2 Space plan). There are three different visualization styles (examples - see page 16). Standard Displays the room situation most realistically. The rendering is done colored/textured, at which light, shadows, glare etc. are visible. Comic Behaves similar to Standard, but the outer contours of all objects include outlines. Outline Here only the outer contours are displayed as outlines. Colors/Textures, light, shadows, glare etc. are not visible. imos NET 3.0 – User manual 19 Space plan Standard Comic Outline imos NET 3.0 – User manual 20 Space plan 4.8 Options in the space planning The options are located above the planing window (see 2.2.2 Space plan). With the aid of the function „grid on/off“ a grid pattern can be projected on the actually selected wall. Having the option „single article view“ enabled additionally to the grid, will show a wall with the placed articles inclusive a grid pattern with dimensioning. If an article is moved within this view, it will result in an automatically adjusted dimensioning at the boundary of the grid, too. imos NET 3.0 – User manual 21 Space plan Note: Options and visualization styles can be combined. The planning can be displayed in a standing perspective view, with a grid on the wall and visualized in comic style for example. The orthogonal view allows a good overview of the room in a whole without any spatial distortion. Roof pitches can also be planned. The following pictures show the necessary steps from different views. At first the option “roof pitch” is activated. The appearing grips can be moved with a left click and while holding the left mouse button pressed pulling them into position. Origin Roof pitch activated Result Also here the combination of activated grid and article view is very helpful for a fast and easy planning. Furthermore the roof pitch can be done most exactly by clicking on a part of the wall and entering the value (e.g. flap tile height). imos NET 3.0 – User manual 22 Space plan 4.9 Grouping, saving and loading of articles Articles can be gouped, copied, saved and loaded via the „group articles“ menu on top of the planning window (see 2.2.2 Space plan). Thereto the function „group articles“ is activated and the articles for the group are choosen. Selected articles are displayed with a red overlay. If a grouped article is clicked again, it will be removed from the selection. Within the picture above all article of the kitchen have been selected and combined into one group. Article-Groups offer the follwing advantages: Articles are moved together within the room Articles keep their position and their orientation to each other Article-Groups can be saved on the local computer Saved groups can be loaded into existing or new plannings (Orientation and insertion point are kept) By loading or copying Article-Groups, standard plannings can be done very quickly and easily imos NET 3.0 – User manual 23 Shop-Configurator 5 Shop-Configurator 5.1 Configuration of Articles To insert an individually configured article into the planning, it has to be opened by double clicking within the article selection. Afterwards the configuration window is opened. 1. 3. 2. 4. 5. For the configuration of the articles different input or selection fields are available: - Via input fields (1.) entries can be done with the keyboard possible value constraints are given in brackets - With Dropdown-Boxes (2.) a selection from preset values can be done - Check-Boxes (3.) can be used to activate or deactivate options - Within the Pictogram-Selection (4.) available options are displayed as pictogram (scrollable with mouse wheel) To visualize and explain the actual selection, preview pictures and information texts are displayed on the right (5.). The adjustable characteristics are grouped in the selection on the left side. These can be freely choosen and the contained characteristics can be adjusted. imos NET 3.0 – User manual 24 Shop-Configurator With the aid of the corresponding elements in the symbol bar the article can be inserted into the planning respectively the basket, a 3D preview can be opened or the configuration can be canceled (see 2.1.2. Exclusive controls of the shop). In the latter case you return to the planning without inserting anything. 5.2 Global Settings & Global Changes The globale settings and/or the global changes are opened via the corresponding control (see 2.1.1 Exclusive controls of the space plan). Those are set within the same dialog as the article configuration described before. The aim is to simplify and to speed up plannings that are done with the same settings. As an example plannings with the same decor for carcase and front (global settings) and also to offer the possibility to change selections of already planned articles instantly, without creating a new configuration (global changes). Global Settings This dialog is used before the start or during the planning to insert all follwing articles with the selected configuration characteristics (settings). In detail this means, if in the global settings “Beech” is set for the dekor, “Red” for the front color and the handle shall be a “Handlebar”, then all articles that are inserted afterwards will keep this settings. During the planning a change of the global setting is always available, to individualize the presets for e.g. different rooms or product lines. Furthermore each article still can be adjusted in detail with the aid of the configuration dialog or via the modify article option. Global Changes Contrary to the global settings this dialog is usually used at a later progress of a planning. The functionality differs in that way, that not the preset values of following articles is changed, but the values of already inserted articles. In practice this means, that a kitchen planning with „Beech“ as decor can be changed instantly to „Alder“ or others. In doing so the articles neither have to be modified nor to be generated or positioned newly. The change is adopted immidiately after the confirmation. The global changes operate with reference to article groups. If no group is created the changes affect all articles, if articles are grouped the changes affect this group only. Only materials respectively decors/colors can be changed by using the global changes. Because of the usually resulting price change it has to be recalculated. This is displayed within the “Shopping Cart” and will only be done per request, to keep the high tempo and comfort of the planning. imos NET 3.0 – User manual 25 Shop-Configurator Shopping Cart interface: Refresh Status bar 5.3 3D-Preview 1. In the 3D Preview the article can be viewed and it can be double checked, if all settings are correct before it is inserted. This mode offers also the possibility to display the fronts with transparency (depending on the configuration dialog) to view the interior. With the aid of the control bar at the bottom of the window (1.) the view can be changed and the article can be moved, zoomed, rotated and more (see 2.1.3 Exclusive controls of the 3D ). For an easy handling it is recommenden to use the following control elements in combination. Free article view with rotation and automatic fit (zoom) Examine imos NET 3.0 – User manual Turn Fit 26 Basket manager 6 Basket manager 6.1 List view 1. 2. 3. Opening the basket manager without an active basket, results in the displayment of the list view. All created baskets/ordes are listed and administered in here. A click the filter bar (1.) enables you to adjust the sorting or to search and/or filter for information as basket ID, creator, date and more. For the adjustment of baskets controls are available (2.) on the right (see 2.2.3 Basket manager - listview) – e.g. to copy or to delete. A basket is selected by clicking on it. In doing so the detail view is opened for further adjustments. Within both list- and detailview, controls of the basket are located in the upper right. Besides the refresh or offer download the functions to save the basket is located in here. To keep the associated space plan (room) of the basket it is necessary to save it, every time the program is quit or also if the room has been modified (see 4.4 Insertion of articles into planning). Existing rooms and/or baskets are opened and modified by loading them into the configurator (3.) primarily. Thereby the status of the basket is set back to “Active” again. imos NET 3.0 – User manual 27 Basket manager 6.2 Detail view 1. 2. The detail view of a basket consists of the general controls (see 2.2.4 Basket manager - detailview) and the two fields basket/order data (1.) and article data (2.). These can be opened or closed with a click on the left border ( ). Basket/Order data Here the basekt/order relevant data is displayed and can be edited. Amongst others this are order ID, creation date, description and information about creator, prices, addition/discount or the shipping address. The information is organized in separated tabs which can be switched and help to get a clear arrangement. Article data Via the bar on top of the article data dummy-positions and/or folders can be created. Dummy-positions are used to bill goods or services that are not included within the product library. Articles are moved into created folders, to get a more structured offer. In the basket and on the offer individual pictures can be assigned to dummys and folders. Other functions are the assignment of article related discounts and the recalculation of the prices. Below the bar a chart follows including the articles of the basket. With a right click on the head line the columns can be adjusted individually. To change the content of the chart at, first the fields have to be activated with imos NET 3.0 – User manual 28 Basket manager a double click – changes will be active after switching from the edited field to another one. The options and adjustments of the article chart decribed before can be saved and loaded – a profile administration is located in the lower right. Any amount of profiles can be saved or loaded from there. You can find a complete overview about the available options of the basket manager in chapters’ 2.2.3 Basket manager - listview and 2.2.4 Basket manager - detailview. imos NET 3.0 – User manual 29