1
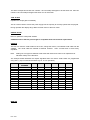
CHP1
INSTRUCTION MANUAL
C120
(Issue 1.0)
!!WARNING!!
THE USER MUST BE FULLY AWARE THAT EXTRA CARE AND THOUGHT
MUST BE EXERCISED WHEN USING CHP1 FOR REPROGRAMMING
VALIDATORS
PROGRAMMED
FOR
MULTI-CURRENCY
OPERATION.
FUNCTIONS CLEAR WINDOWS, TEACH AND SET PATHS MAY CAUSE SOME
OR ALL FACTORY SET-UP DATA TO BE LOST RESULTING IN THE
VALIDATOR RETURNING TO SINGLE CURRENCY MODE OR, ALL COUNTRY
CODES TO BE SET TO 'CUSTOM'.
INTRODUCTION
Batteries
Opening the case or removal of the internal batteries will make the warranty void and Coin Controls
Limited (CCL) will not accept any liability for damage sustained if the internal batteries are mishandled.
The user must be aware that the CHP1 terminal is fitted with non-rechargeable Lithium batteries, an
rechargeable Nicad batteries. They contain toxic substances, which is hazardous to health if they are
punctured.
Removal of the internal batteries will, in any case, cause the application programme to be lost and the
CHP1 terminal will need returning to CCL for reprogramming.
Under normal usage, the internal Lithium batteries will give an operating life of approximately 5 years.
After this time the CHP1 terminal must be returned CCL for reprogramming. If the user allows the Nicad
batteries to become completely discharged, the Lithium batteries will encounter a much higher load. As
a consequence, they may expire within a couple of months or less. It is important therefore to
REGULARLY RECHARGE THE CHP1 TERMINAL.
Fully charged, the Nicad batteries will have a life of approximately 35 hours before the need to recharge.
Recharge input is 15mA at +12V +/-3V. WHEN THE Nicad BATTERY CHARGE IS BECOMING LOW,
THE CHP1 TERMINAL WILL BLEEP CONTINUOUSLY. At this point the terminal must be placed on
charge immediately.
Ref: C120
Powering-Up the CHP-1
Switching ON/OFF
The CHP1 terminal is switched on by pressing function key F1/ON. Upon switch-on the display will
show the 'USAGE REMAINING' display, which is the time left (in months) before the CHP1 terminal is
disabled. After approximately 12 months, the functions will be disabled and the terminal must
be returned to CCL for reprogramming. The time can go down to zero months and still be operative.
This is dependent on when the CHP1 terminal was programmed. Thus, for example, it can display that
there is 1 months usage time left, but actually have approximately 1.75 months left to run.
If the display remains blank after switch-on, press the 'OFF' key then the 'F1/ON' key again. If this fails,
try adjusting the display contrast using the thumb wheel control on the right-hand side of the terminal.
It is possible to turn the terminal off whilst in the U
' SAGE REMAINING' display by pressing the O
' FF'
key. Pressing any other key will forward you into the E
' NTER CODE' display. The terminal cannot be
switched off whilst it is waiting for the code to be entered. Once the code has been entered and
accepted the terminal can be turned off whilst in any of the subsequent display screens.
User Code
Ref: C120
As a security feature, the user will be allocated their own unique four-digit code (Password). After
switch-on and obtaining the 'ENTER CODE' display, the user is allowed four attempts to input the correct
code.
If the user fails to input the correct code after the fourth attempt, the display will show I'NCORRECT
PASSWORD ENTRY PLEASE WAIT'. The terminal will now be disabled for approximately 5 minutes.
After this time has elapsed, the terminal will return to the E
' NTER CODE' display and the user has a
further four attempts. It is not possible to switch the terminal off during this time.
Passwords must NOT be disclosed to any unauthorised persons.
General
It is recommended that the validator be powered up and the CHP1 terminal connected into the validator,
before switching on the CHP1 terminal.
To preserve battery power, the terminal will switch itself off if the keyboard or serial communications are
inactive for a period of greater than approximately 3 minutes.
The user must then restart by switching on and re-entering your password.
Most commands are issued via pages of menus. Pages are "turned" using the up/down arrowhead
'CURSOR' keys or by directly entering the page number. The page number is indicated at the top right
hand corner of the display. Elements of each menu are activated by pressing indicated function keys
(F1, F2, etc.).
Function keys F1 to F6 can also double up as Alpha characters A to F respectively, when the user is
required to enter Hexadecimal numbers.
Any mistakes when entering data after a prompt, can be corrected by using the backspace key
indicated by the left pointing arrowhead key situated between the '0' and 'ENTER' keys.
The 'ENTER' key is used for confirming entry of values and, in many cases, for escaping from functions
to return to the main menu, or continuing after the display of messages.
The 'HELP' key is not used, pressing this key has no affect.
Access is prevented to validators that have had their CHP1 access location set appropriately in
EEPROM. CHP1 will display 'ACCESS DENIED' if this is the case.
NOTE: AFTER REPROGRAMMING A VALIDATOR (USING ANY OF THE
FUNCTIONS DESCRIBED IN THE NEXT SECTION), CHP1 MUST BE
DISCONNECTED FROM THE VALIDATOR TO ENABLE ACCEPTANCE OF
COINS AND TOKENS.
DESCRIPTION OF FUNCTIONS
Ref: C120
Introduction
The following sections describe how to use the CHP1 terminal for various reprogramming operations. It is
assumed that the user has entered their password and is now accessing the "paged menus" and the
CHP1 terminal is connected to the validator. The validator must be powered up to allow the CHP1
terminal to communicate with the validator.
Time/Date
Pressing the F5 function key whilst in any menu page will display the time and date. The Time/Date
cannot be adjusted and will not allow for any time zones, it is for CCL reference only, for example:
27/09/1995
14:33
Pressing any key will return the user to the main menu.
Functions
IDENTIFY
Displays various data held within the validator. The first display presents the following data: Factory setup date, Serial number and validator type. Pressing the 'ENTER' key brings up the second display and
shows four sets of option data. Pressing the 'ENTER' key again then returns the user to the Page zero
menu.
The options data is displayed in binary format, and is for CCL use only.
OVERLAPS
Tests if any window set completely overlaps another set and displays those coin numbers which have
overlapping windows. Window sets for tokens are not checked, and this test reports overlapping
windows independent of credit codes and inhibit status.
CHP1 downloads the coin window data into its memory indicated by the headed display OVERLAP
'
CHECK' and 'Loading windows' comment. A comparison between all coin windows is then carried out
indicated by the display changing to 'Checking. . . . '.
On completion of the test, CHP1 will either indicate that no windows overlap and the display will change
to 'NO OVERLAPS!!' or, if there are any overlaps, the display will change to 'OVERLAPS FOUND!'. The
coin numbers which have overlapping windows will be displayed grouped together for those coins which
appear the same. Therefore a typical display could be as follows:
OVERLAPS FOUND!
<1&5>
<3&6>
Press a key
Pressing any key will return the user to the main menu. If the number of overlapping windows cannot fit
on one pass of the display, pressing any key will bring up the next display.
Ref: C120
The above example shows that coin numbers 1 and 5 overlap and appear to be the same coin. Also coin
numbers 3 and 6 overlap and appear the same coin as each other.
TEST FLAPS
Operates the accept gate momentarily
This is a useful check to ensure the power supply has the capacity to correctly operate the accept gate.
During operation the display will go blank and then return to the main menu.
CREDIT PULSE
Read or update the credit pulse duration.
CAUTION: Ensure that the pulse length is compatible with host machine requirements
CREDITS
The user can view the credit codes for each coin, change the code or, load default credit codes into the
validator. The credit codes are entered as decimal numbers. CHP1 converts them to their binary
equivalent
Note:
Setting two coin types to different credit codes will cause those coins to be rejected if their
Windows overlap or are the same.
The example below illustrates the outputs signalled when the various credit codes are programmed
using CHP1, (o/p 6 is used as the strobe o/p, for 12 coin operation).
COIN
1
2
3
4
5
6
7
8
9
10
11
12
MEM DIS
Ref: C120
CODE
ENTERED
32
33
34
35
36
37
38
39
40
41
42
43
A6
A5
A4
A3
A2
A1
1
1
1
1
1
1
1
1
1
1
1
1
0
0
0
0
0
0
0
0
0
0
0
0
0
0
0
0
0
0
0
0
1
1
1
1
0
0
0
0
1
1
1
1
0
0
0
0
0
0
1
1
0
0
1
1
0
0
1
1
0
1
0
1
0
1
0
1
0
1
0
1
Disables the validator memory (puts the validator in run mode).
During reprogramming, the validator memory is enabled, allowing stored data to be updated (the validator
is in programme mode). After completion of a reprogramming function, CHP1 automatically disables the
validator memory which configures the validator back into run mode for validation and acceptance of
coins (CHP1 must be disconnected for the validator to accept coins).
However, if the validator has been inadvertently left in programme mode, by for example, an interruption
to the serial communications between CHP1 and the validator, the user can manually disable the
memory, using the 'MEM DIS' function, putting the validator back into run mode.
CHP1 will issue the message 'MEMORY DISABLED' on completion of the action and return the user to
the main menu.
Note: Validators will not accept any coins or tokens if the memory is left enabled (left in programme
mode), even if the validator is powered down then powered up or reset.
ERR CODES
Enables or disables the signalling of some error codes via the acceptor accept lines.
CHP1 prompts the user to select either ‘1’ to switch the signalling on, or ‘0’ to switch it off. After the
selection has been keyed in, pressing ‘ENTER’ will program the acceptor and then return the user to the
main menu.
Entering any other number than those specified above will result in the comment ‘RANGE ERROR’
being displayed. The user must then press any key to return to the main menu.
Signalling of error codes, to the Host machine, can only be achieved by utilising the acceptor accept
lines. Car should be exercised by the user so that error codes are not interpreted as credit codes by
the Host machine. (refer to C435 Technical Manual).
The error codes which are generated by the acceptor pertain to the following items:
Reject coin
Coin inhibited
Multiple window
2nd coin too close
Token not seen by token rundown opto
TEST ACCEPT
Tests the accept lines by strobing them.
SAMPLE NUM
Permits the user to temporarily change the number of coin entries required when using the TEACH'
'
function.
Teaching a coin with CHP 1
Ref: C120
SEE NEXT PAGE FOR DETAILED INSTRUCTIONS
Ref: C120
TEACH
Allows the user to set up their own coin window references.
Before using the T
' EACH' function, the user must decide how many new coins they wish to use to
reprogram the validator. This is achieved using the 'SAMPLE NUM' function described earlier.
Pressing the 'TEACH' function key will call up the display headed 'TEACH & RUN' and prompt the user
to enter the 'TOLERANCE?' value.
The 'TOLERANCE' value can be set between '0' up to a maximum of '40'. This value (typically set to 5)
determines the deviation from the running mean of the entered new coins. Entering a value outside this
range will return the user to the main menu.
Key in the required value and press 'ENTER' to accept.
CHP1 will now prompt the user to enter their new coins through the validator. The number of coins asked
for will either be default 5 or will reflect the number of coins required set by the 'SAMPLE NUM' function.
For example, if the 'SAMPLE NUM' function was used to set the required number of coins to 20, CHP1
will now prompt the user to 'Enter 20 coins'.
The user must now drop the requested number of coins through the validator one by one. The number of
coins entered and read by the validator will be displayed by CHP1. If however, one or more of the coins
entered have readings which fall outside the running mean tolerance limits (set by the T
' OLERANCE'
value) of the previously entered coins, the word 'ignored' will be displayed.
To clarify the above functions consider the following example:
Assume the SAMPLE NUM is set to 20, and the TOLERANCE value is set to 5.
CHP1 prompts the user to enter 20 coins through the validator. Each coin is entered one by one and
CHP1 keeps a check on the readings fed back from the validator, and therefore monitors the running
mean. The readings are not displayed by CHP1 but, for this example, assume the running mean
internally logged is 120 for one of the sensors. Therefore, the max and min mean values that can be
accepted are from 125 to 115 (+/- 5). If the next coin entered had a mean value of 126, the coin would be
'ignored'.
If many coins are 'ignored' then the user should suspect one of the following causes:The first one or two coins were entered unusually e.g. bounced badly.
The first one or two coins were defective, e.g. bent or badly worn.
The coin type is inconsistently manufactured.
Having entered the requested number of coins successfully, CHP1 then prompts the user to select
either a N
' ARROW' or W
' IDE' window extension. A narrow selection extends the windows for each
sensor by 1 count. A wide selection extends the windows for each sensor by 3 counts. Selection is
made via the left/right arrow head cursor keys and accepted by pressing 'ENTER'.
Finally, the user is prompted for the 'WINDOW NUM'. This actually refers to the channel number (e.g.
shown on the validator label). The user must key in the required coin channel number and press 'ENTER'
to be accepted. Only numbers between 1 and 12 will be accepted.
Ref: C120
Keying in a number outside the above range will result in the 'RANGE ERROR' message. Pressing any
key will return the user to the main menu. The user must then start from the beginning to teach a new
coin.
It is suggested that a representative selection of coins be used during teaching. If coins vary widely,
increase the sample number and set the window wide.
CURRENCY
Checks the currency directory held in the validators memory and displays the options.
This directory contains a list of country codes along with the number of coins in each currency set
(multi-currency validators only).
CHP1 will display the message r' eading currency directory' as it interrogates the data. If the first
country code in the directory is zero, the validator is deemed to be a single currency validator. CHP1 will
display the message 'SINGLE CURRENCY' 'Press a key to continue'. Pressing any key will return the
user to the main menu and so no further action can be taken.
If the validator is multi-currency, CHP1 will display the fact. The user is given a flexible arrangement of
currency selection. Any combination of groups of coins up to 12 in total can be structured.
Standard country codes are defined beyond which 'special' codes are used. CHP1 displays the country
name for the defined codes and spec 'n' for others (n=coin set number).
CLR WINDOW
Clear one or all coin / token windows.
WARNING: THIS SHOULD BE USED WITH CAUTION. MULTI-CURRENCY DATA AND OTHER
FACTORY WINDOW SET-UP DATA WILL BE LOST.
VALID WINDOWS
Displays non zero (valid) windows of either coin or tokens. Only the coin/token number is displayed.
For example, the validator may have been programmed as follows:
Coin 1 = £1
Coin 2 = 50p
Coin 3 = 20p
Coin 4 = 10p
Coin 5 = Token (several token groups programmed)
Pressing function key F1 (display valid coin windows) at the above prompt, will result in the following
display:
1 2 3 4 - - - - - - - - -
Ref: C120
The valid coin numbers are shown 1(£1), 2(50p), 3(20p) and 4(10) The dashes signify those coin
numbers which are not programmed or valid (a total 12 possible coins).
INHIBITS
Continuously monitors the inhibit bank select status. Each coin that can be uninhibited has its coin
number displayed. If the coin is inhibited its position on the display is left blank. Both banks are shown
an “enabled” or “disabled” accordingly. If a bank is disabled in the inhibit status for all of its coins will
also be blanked out.
SET PATHS
You are prompted to enter which coin you wish to be stored (coin channel 1-12). Upon entering your
choice CHP1 will display the current status of your chosen coin i.e. “Coin not sorted” or “Coin sorted”
will be displayed. You are prompted to enter your choice either 0=no sort, or 1=Sort and press enter to
accept your selection.
ERROR CODES
Switches on or off error code signalling.
If you have “Err codes” switched on (1=set), the credit lines will now have two functions.
1) Issue a credit pulse when a coin is accepted as per normal operation.
2) Issue an error code which may relate to a problem on the validator i.e. coin rejected,
Coin jam, etc. All six accept lines are used to generate a particular binary code and
Identify the error.
With the “Err code” switched off (0=clear) the validator operates as normal i.e. accept lines are only
active when a coin is accepted.
It is important to note that confusion may arise with the “Err code” signalling being switched on when
looking for credit pulses.
TEST OPTOS
Continually monitors the state of the accept and sorter optos (if available). If the optos are unobstructed
CHP1 will display “Clear” for each opto (accept and sorter) . If the optos are unobstructed, CHP1 will
display “Blocked” under the relevent item.
Ref: C120