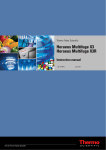
1
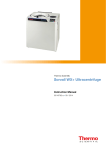
Thermo Scientific
Touchscreen
User Interface
for Sorvall LYNX Superspeed Centrifuges
Instruction Manual
50136520-c • 07 / 2015
I
Table of Contents
Chapter 1
Screen Views . . . . . . . . . . . . . . . . . . . . . . . . . . . . . . . . . . . . . . . . . . . . . . . . . . . . . . . . . . . . . . . . . . . . . . . . . . . 1-1
Main Screen . . . . . . . . . . . . . . . . . . . . . . . . . . . . . . . . . . . . . . . . . . . . . . . . . . . . . . . . . . . . . . . . . . . 1-1
Lighthouse Mode . . . . . . . . . . . . . . . . . . . . . . . . . . . . . . . . . . . . . . . . . . . . . . . . . . . . . . . . . . . . . . . 1-5
Chapter 2
Centrifugation . . . . . . . . . . . . . . . . . . . . . . . . . . . . . . . . . . . . . . . . . . . . . . . . . . . . . . . . . . . . . . . . . . . . . . . . . . . 2-1
Chapter 3
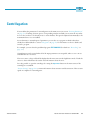
Entering Parameters . . . . . . . . . . . . . . . . . . . . . . . . . . . . . . . . . . . . . . . . . . . . . . . . . . . . . . . . . . . . . . . . . . . . . 3-1
Temperature . . . . . . . . . . . . . . . . . . . . . . . . . . . . . . . . . . . . . . . . . . . . . . . . . . . . . . . . . . . . . . . . . . . 3-1
Precooling . . . . . . . . . . . . . . . . . . . . . . . . . . . . . . . . . . . . . . . . . . . . . . . . . . . . . . . . . . . . . . . . . . . . . 3-2
Time . . . . . . . . . . . . . . . . . . . . . . . . . . . . . . . . . . . . . . . . . . . . . . . . . . . . . . . . . . . . . . . . . . . . . . . . . 3-3
Speed and RCF Value . . . . . . . . . . . . . . . . . . . . . . . . . . . . . . . . . . . . . . . . . . . . . . . . . . . . . . . . . . . . 3-4
Acceleration / Deceleration Profile. . . . . . . . . . . . . . . . . . . . . . . . . . . . . . . . . . . . . . . . . . . . . . . . . . . 3-6
Chapter 4
Configuration . . . . . . . . . . . . . . . . . . . . . . . . . . . . . . . . . . . . . . . . . . . . . . . . . . . . . . . . . . . . . . . . . . . . . . . . . . . 4-1
Help . . . . . . . . . . . . . . . . . . . . . . . . . . . . . . . . . . . . . . . . . . . . . . . . . . . . . . . . . . . . . . . . . . . . . . . . . 4-2
Runs Configuration. . . . . . . . . . . . . . . . . . . . . . . . . . . . . . . . . . . . . . . . . . . . . . . . . . . . . . . . . . . . . . 4-3
Settings . . . . . . . . . . . . . . . . . . . . . . . . . . . . . . . . . . . . . . . . . . . . . . . . . . . . . . . . . . . . . . . . . . . . . . . 4-8
Chapter 5
Tooltip Mode. . . . . . . . . . . . . . . . . . . . . . . . . . . . . . . . . . . . . . . . . . . . . . . . . . . . . . . . . . . . . . . . . . . . . . . . . . . . 5-1
Chapter 6
Rotor . . . . . . . . . . . . . . . . . . . . . . . . . . . . . . . . . . . . . . . . . . . . . . . . . . . . . . . . . . . . . . . . . . . . . . . . . . . . . . . . . . . 6-1
Rotor import . . . . . . . . . . . . . . . . . . . . . . . . . . . . . . . . . . . . . . . . . . . . . . . . . . . . . . . . . . . . . . . . . . . 6-1
Chapter 7
Thermo Scientific Centri-Vue Application . . . . . . . . . . . . . . . . . . . . . . . . . . . . . . . . . . . . . . . . . . . . . . . . . . 7-1
Requirements . . . . . . . . . . . . . . . . . . . . . . . . . . . . . . . . . . . . . . . . . . . . . . . . . . . . . . . . . . . . . . . . . . 7-1
Quick Guide . . . . . . . . . . . . . . . . . . . . . . . . . . . . . . . . . . . . . . . . . . . . . . . . . . . . . . . . . . . . . . . . . . . 7-1
Connectivity Plug-In (Touchscreen User Interface) . . . . . . . . . . . . . . . . . . . . . . . . . . . . . . . . . . . . . . 7-6
Centri-Vue App. . . . . . . . . . . . . . . . . . . . . . . . . . . . . . . . . . . . . . . . . . . . . . . . . . . . . . . . . . . . . . . . . 7-7
Chapter 8
REST-Webserver . . . . . . . . . . . . . . . . . . . . . . . . . . . . . . . . . . . . . . . . . . . . . . . . . . . . . . . . . . . . . . . . . . . . . . . . 8-1
Thermo Scientific
Touchscreen User Interface for Sorvall LYNX
i
1
Screen Views
The following manual describes the touchscreen or graphical user interface (GUI) for
Thermo Scientific™ Sorvall™ LYNX superspeed centrifuges.
Contents
• “Main Screen” on page 1-1
• “Lighthouse Mode” on page 1-5
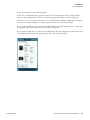
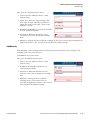
Main Screen
The main screen is subdivided into the following sections:
Status
Parameters
Control and Configuration
Thermo Scientific
Touchscreen User Interface for Sorvall LYNX
1-1
1
Screen Views
Main Screen
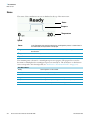
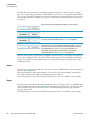
Status
The status of the centrifugation process is displayed at the top of the main screen.
Status
Progress
Temperature
Speed
Status:
In the Time mode, the remaining time for the centrifugation process is shown here. In
the Hold mode, the elapsed time is displayed.
Progress:
The curve diagram is divided into the sections Accelerate, Centrifugation and
Deceleration.
Temperature:
The current temperature in the rotor chamber is shown here.
Speed:
The current speed of the rotor is shown here.
The remaining time is shown for a centrifugation process in progress. The progress bar is used to
determine in which phase the centrifugation process is currently in. The acceleration or deceleration
curve corresponds to the selected profile (see “Acceleration / Deceleration Profile” on page 3-6).
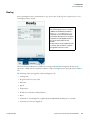
Possible statuses:
1-2
Ready
Centrifugation can be started.
Door open
The centrifuge door is open.
Error
An error has occurred.
Stopped
Centrifugation has been halted manually.
Completed
Centrifugation or precooling has been successfully completed.
No rotor
No rotor has been placed in the centrifuge.
Touchscreen User Interface for Sorvall LYNX
Thermo Scientific
1
Progress
Screen Views
Main Screen
Status
The rotor has been installed and the centrifuge door is closed;
precooling in progress. The remaining time for cooling is
displayed. (See “Precooling” on page 3-2).
The rotor is in place and the centrifuge door is closed; press the
button
to start centrifugation.
Centrifugation begins with the acceleration phase. The displayed
curve corresponds to the selected profile. The time remaining for
the complete centrifugation (without deceleration phase) is
displayed (see “Acceleration / Deceleration Profile” on page 3-6).
Centrifugation is taking place at the set speed. The time remaining
for centrifugation is displayed.
Centrifugation has been successfully completed. The centrifuge is
in the deceleration phase. The displayed curve corresponds to the
selected profile. The centrifuge door cannot be opened until the
rotor has come to a complete stop. (See “Acceleration /
Deceleration Profile” on page 3-6).
Centrifugation has been successfully completed. The rotor has
come to a complete stop and the centrifuge door can be opened.
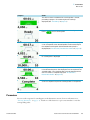
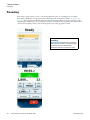
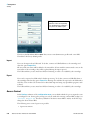
Parameters
You can set the setpoints for centrifugation in the Parameters section (for more information see
“Entering Parameters” on page 3-1). Touch one of the buttons to open a new window to enter the
corresponding value.
Thermo Scientific
Touchscreen User Interface for Sorvall LYNX
1-3
1
Screen Views
Main Screen
Acceleration mode:
Time:
Braking profile:
Here, you can select an
acceleration profile (Level
1-9).
Select the duration for centrifugation and
the Time mode here.
Select the
deceleration profile
(0-9) here.
Speed:
Temperature:
Set the speed as RPM
or RCF here.
Set the
temperature (in
°C) for the rotor
chamber here.
Program:
Select a program for centrifugation here. The
previously selected program will always be
displayed initially. You can change the parameters
once you have selected a program. Changing a
parameter will cancel the program.
Rotor:
The rotor currently in use is displayed
here (in this case: F12-6X500 LEX).
Control & Configuration
In this section you can start and halt centrifugation. You can also define other settings, such as for the
centrifugation programs, in this section (for detailed information refer to the Section “Programs” on
page 4-3). If you are not sure of the general use of a button you can use the Tooltip mode, which
provides information about all of the operator control elements (see “Tooltip Mode” on page 5-1).
1-4
Start centrifugation:
Open Door / Stop:
Centrifugation can only
be started when a rotor
has been installed and
identified, when all
parameters are
acceptable and when the
centrifuge door is closed.
When centrifugation
starts, this button switches
to Stop:
When the rotor comes to a
complete stop, this button
switches back to Open
Door.
Configuration:
Operator:
Tooltip Mode:
The configuration menu is
displayed when this button is
clicked. This button is not active
while centrifugation is in progress.
In certain modes,
touching the
operator name
opens a window for
selecting other
operators.
This button is used to activate the
Tooltip mode. All functional
elements are de-activated with
this mode. When an element is
selected in the Tooltip mode a field
is displayed with information about
that particular element. If you
press the Tooltip button again, this
mode is canceled.
Touchscreen User Interface for Sorvall LYNX
Thermo Scientific
1 Screen Views
Lighthouse Mode
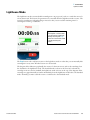
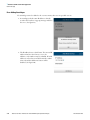
Lighthouse Mode
The Lighthouse mode is activated while centrifugation is in progress if you do not touch the screen for
at least 30 seconds. The buttons for parameters are concealed when the Lighthouse mode is active. The
status for centrifugation is displayed larger instead so that you can read the remaining time for
centrifugation from a good distance.
Lighthouse Mode:
Centrifugation can be halted
at any time in the Lighthouse
mode by touching the Stop
button. You can exit this mode
by simply touching the
screen.
The Stop button is the only button active in the Lighthouse mode in order that you can manually halt
centrifugation at any time. All other buttons are de-activated.
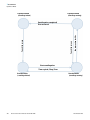
The diagram below illustrates graphically the statuses for the main screen, such as the switching from
the Standard to the Lighthouse mode. The Standard mode is shown at the bottom, both with the
centrifuge in motion and at standstill; the Lighthouse mode is shown at the top of the diagram. If the
centrifuge is stopped manually it switches immediately from the Lighthouse mode back to the Standard
mode. Normally you must touch the screen to switch back to the Standard mode
Thermo Scientific
Touchscreen User Interface for Sorvall LYNX
1-5
1
Screen Views
Lighthouse Mode
Lighthouse Mode
(centrifuge running)
Lighthouse Mode
(centrifuge halted)
No interaction for 30 s
Touch the screen
Touch the screen
Centrifugation completed/
Error occurred
Start centrifugation
Time expired / Stop / Error
Standard mode
(centrifuge halted)
1-6
Touchscreen User Interface for Sorvall LYNX
Standard mode
(centrifuge running)
Thermo Scientific
2
Centrifugation
You can define the parameters for centrifugation via the main screen (see section “Entering Parameters”
on page 3-1). Touching a button opens a corresponding window in which you can enter the new value.
A rotor does not have to be already in use to enter this data. The speed is adjusted automatically to the
maximum when a rotor is installed.
As an alternative to manual input of parameters you can also use a program in which values have
already been defined. Refer to section “Programs” on page 4-3 for information on how to define and
activate a program.
For example, you can select the predefined program PRE-COOLING (for details see “Precooling” on
page 3-2).
Centrifiguation can be started when all of the input parameters are acceptable, when a rotor is in use
and when the door is closed.
If an error occurs, a large red X will be displayed in the main screen in the Lighthouse mode. Touch the
screen to obtain information about the exact information about the error.
It is only possible to open the centrifuge door using the Open Door button in the main screen, if the
centrifuge is at standstill.
“Device Settings” on page 4-17 contains information about activation and de-activation of the acoustic
signal on completion of centrifugation.
Thermo Scientific
Touchscreen User Interface for Sorvall LYNX
2-1
3
Entering Parameters
Contents
• “Temperature” on page 3-1
• “Precooling” on page 3-2
• “Time” on page 3-3
• “Speed and RCF Value” on page 3-4
• “Acceleration / Deceleration Profile” on page 3-6
You can change any parameter prior to and during a centrifugation process.
Temperature
You can set the temperature using the Temperature button in the main screen.
When you press this button, a window opens in which you can enter the temperature (in °C). Either
positive or negative values can be entered here. The temperature limits (upper/lower) for the centrifuge
may not be exceeded, however. An error message is issued to indicate any unacceptable values.
When centrifugation is in progress, the temperature will be adjusted immediately to the newly defined
temperature by means of cooling. This does not affect the duration of centrifugation.
Thermo Scientific
Touchscreen User Interface for Sorvall LYNX
3-1
3
Entering Parameters
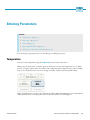
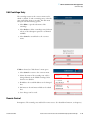
Precooling
Precooling
Precooling is used to bring a rotor to a desired temperature prior to centrifugation of a sample.
Precooling is defined as a set program and is called up via the configuration menu “Programs” on
page 4-3. This program is activated using the button Load. In the main screen you can then set the
required target temperature. The settings for acceleration and deceleration profile, time and speed are
set from the centrifuge. If the values are changed, the precooling program is exited.
Precooling:
PRE-COOLING (marked line) is stored as a
fixed program. Use the Load button to apply
the program. You can set the target
temperature after this in the main screen.
3-2
Touchscreen User Interface for Sorvall LYNX
Thermo Scientific
3
Entering Parameters
Time
Time
You can set the time for the centrifugation process using the Time button in the main screen. When
you click the Time button, a window opens in which you can enter the required time. The Time, ACE
(w2 dt) or HOLD modes can be selected. The selected mode is clearly displayed in the main screen. The
selected mode is displayed on the Time button. As shown in the diagram below, the Time mode has
been activated.
Thermo Scientific
Touchscreen User Interface for Sorvall LYNX
3-3
3
Entering Parameters
Speed and RCF Value
Time
HOLD Run
ACE (w2 dt)
Duration of centrifugation; input
as hh:mm. The set time is
counted down when
centrifugation is in progress.
Initial value: Defined duration
hh:mm:00
Unlimited duration of
centrifugation. The time elapsed
so far is displayed while
centrifugation is in progress.
Initial value: 00:00:00
Accumulated Centrifugal Effect
Input as x.y * 10z
X: Whole digits
Y: Decimal numbers
Z: Power
If you change the time setting while centrifugation is in progress the newly defined countdown is
restarted. Any time that has already elapsed is disregarded and the acceleration phase is skipped.
Centrifugation in progress:
Time change while centrifugation
in progress:
The centrifugation period,
including acceleration, is 1
minute.
The centrifugation time is changed to
2 minutes.
Countdown restarting:
The new centrifugation time is
now 2 minutes.
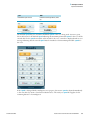
Speed and RCF Value
You can set the Speed and the RCF value using the Speed button in the main screen. When you click
this button a window opens in which you can enter the Speed as rpm or the RCF Value.
3-4
Touchscreen User Interface for Sorvall LYNX
Thermo Scientific
3
rpm
RCF
Revolutions per minute
Relative centrifugal force, Units:
xg
Entering Parameters
Speed and RCF Value
The defined speed may not exceed the maximum speed of the rotor being used. A notice is given
below the button for the defined speed indicating the maximum permissible speed for the rotor. If the
entered value for the speed exceeds the value entered for the rotor, a window is displayed with an error
message indicating that the entered speed must be matched to the maximum permissible speed for
the rotor.
If the speed is changed while centrifugation is in progress, the current speed is adjusted immediately
to the new value (by means of acceleration/deceleration). The newly set speed then applies for the
remaining duration of centrifugation.
Thermo Scientific
Touchscreen User Interface for Sorvall LYNX
3-5
3
Entering Parameters
Acceleration / Deceleration Profile
Acceleration / Deceleration Profile
There are 9 profiles available for acceleration (1-9) and ten for deceleration (0-9). You can select the
acceleration / deceleration profiles via the main screen.
After clicking on the appropriate button a window opens in which the required profile can be selected
by moving a slide selector over it. You can also define a profile by direct point and select. Touch the
Apply button to define the profile for the next centrifugation process, or cancel your selection using
Cancel.
The profile with the smallest number has the most gradual slope and is indicated by min; the profile
with the number 9 has the steepest slope and is denoted by max. In the main screen, the current profile
is indicated by the number on the Profile button and the slope (curve) in the Status section (see
“Status” on page 1-2). Presentation of the profiles must be taken symbolically. The exact slope is
complex and is a function of the rotor being used and the set speed. The curve that is displayed
represents an abstract simplification for distinguishing between the different profiles (gradual slope –
steep slope).
Acceleration,
Brake:
Select the profile by
clicking the slide on the
screen. You can also
move the slide on the
screen on both ends
using your finger.
3-6
Touchscreen User Interface for Sorvall LYNX
Thermo Scientific
3 Entering Parameters
Acceleration / Deceleration Profile
Profile display in status section:
The profiles selected for
acceleration and deceleration are
indicated by profile numbers on
the buttons and by the curve in
the status section.
If a profile is changed while centrifugation is in progress, the new profile is applied immediately.
acceleration or deceleration of centrifugation is modified accordingly.
Thermo Scientific
Touchscreen User Interface for Sorvall LYNX
3-7
4
Configuration
Contents
• “Help” on page 4-2
• “Runs Configuration” on page 4-3
• “Settings” on page 4-8
You can open the configuration menu using the button at the bottom left-hand corner of the main
screen. This menu is subdivided into the sections Help, Runs and Configuration. Touching one of
these buttons will open a second level with the corresponding submenus.
All of the sections of the configuration menu can be viewed by any user. However, to make or change
any settings a PIN must be entered for authentication. Details about distribution and assignment of
user rights are given in “User Management” on page 4-9.
The Configuration submenu is closed automatically if there is no interaction with the user for 30
seconds. The Manual and Training videos submenus are closed automatically if there is no interaction
with the user for 60 seconds. The submenu will not be closed automatically when a training video is
being played. Any input or changes which have not been saved up to then will be lost. Therefore,
always be sure to save any changes at once.
Opening the configuration
menu:
The buttons for
centrifugation are covered
while the configuration menu
is open. The contents of the
selected menu are displayed
instead.
Thermo Scientific
Touchscreen User Interface for Sorvall LYNX
4-1
4
Configuration
Help
Help
Help and assistance for a number of areas is provided in this menu. The first two submenus Training
Videos and Manual contain helpful videos and informative texts.
Values for two different rotors can be converted in the Calculators submenu. First select a rotor on the
left (a Thermo Scientific rotor or from other manufacturers) and then select a Thermo Scientific rotor
for Thermo Scientific Sorvall LYNX centrifuges. All of the parameters input for the rotor on the left
will then be converted automatically for the rotor on the right. Besides selecting the rotors, you can also
enter speeds and times for conversion for the particular centrifugation.
4-2
Touchscreen User Interface for Sorvall LYNX
Thermo Scientific
4 Configuration
Runs Configuration
Runs Configuration
You can define settings for programs and for log processes in the Runs section of the configuration
menu.
Programs
You can save set values for a centrifugation process in a centrifugation program. Avoid multiple,
identical input for similar centrifugation runs by defining the values in advance in individual programs.
Programs may only be administered when the rotor is at standstill.
PRE-COOLING is stored as a default program and cannot be deleted. You can only change the target
temperature in this program; all other values are calculated automatically when PRE-COOLING is
loaded. For more details refer to “Precooling” on page 3-2.
The list of available programs is given in the first submenu Programs in the Runs menu. If the
program list should exceed the length of the screen you can use the pager to easily navigate through the
individual pages of the list. A maximum of 120 programs can be contained in the list. The list can also
be called up in the main screen by touching the button with the name of the program.
If a program has already been selected, a blue arrow is displayed in front of the program name. Before
that program can be activated, you must first select a program by touching the display showing the
program name and the parameters. Touch the Load button to activate the particular program. Now, the
blue arrow is displayed in front of the selected program indicating that it is activated.
Use the button New to create a new program. When you touch this button the standard program
editor is displayed that you can use to set all relative parameters for centrifugation.
Thermo Scientific
Touchscreen User Interface for Sorvall LYNX
4-3
4
Configuration
Runs Configuration
The rotor that is currently in use in the centrifuge will be assigned automatically to the program. Note
here that the parameters that are entered may not exceed the limits for the rotor. A program can still be
defined, even if no rotor is currently in use. The parameters will be checked as soon as the program is
loaded.
To save the changes made in the program editor use the button Apply.
When you click the Load button the parameters for the program are set as setpoints in the main screen.
The parameters are then subjected to a plausibility check for the type of rotor being used. A warning is
issued if any values are not acceptable. These values can then be adjusted automatically to match the
type of rotor being used.
4-4
Touchscreen User Interface for Sorvall LYNX
Thermo Scientific
4 Configuration
Runs Configuration
For programs and rotors the following applies:
If the rotor is installed after the program has been chosen, than the speed of the centrifuge will be
limited to the maximum speed of the rotor and the program name will not be shown any longer.
If the rotor is set in a program and another rotor is installed, than a dialogue is displayed, showing the
inserted rotor and the expected rotor. The program name will not be shown any longer.
If a program is loaded after a rotor has been installed and the set speed in the program is too high, than
the program will not be loaded and an error message is displayed.
If a program is loaded after a rotor has been installed, than a dialogue is displayed, showing the inserted
rotor and the expected rotor. The program name will not be shown any longer.
Thermo Scientific
Touchscreen User Interface for Sorvall LYNX
4-5
4
Configuration
Runs Configuration
The table below lists possible cases for loading a program. A program is either assigned to a specific
type of rotor (when the program has been defined with a rotor in use) or not (program defined without
a rotor in use). Normally, centrifugation can only be started when its assigned parameters do not exceed
the limits defined for the centrifuge or the type of rotor being used. A warning will be issued if this is
not the case.
No program has been loaded. Centrifugation can be started.
The program has been loaded. Centrifugation can be started.
The program has been loaded. No rotor is currently being used. In
the rotor information field the notice No rotor is displayed.
No program has been loaded, or a program has been loaded and
the parameters were subsequently changed in the main screen so
that at least one parameter no longer corresponded to the value in
the loaded program. A rotor is in use and all parameters are
acceptable. Centrifugation can be started. In the program
information field the notice No program is displayed.
Once the values for the program have been applied in the main screen, you can adjust the parameters
for the next centrifugation run. The values stored for the program will not be affected by subsequent
changes in the main screen. Program parameters can only be edited using the program editor in the
configuration menu.
Import
Programs can be imported via USB stick. To do this, connect an USB flash drive to the centrifuge and
select the option Import List.
All programs with new names will be added to the internal list. If programs with the same name do
exist on the centrifuge, they will be replaced during the import process.
The USB stick that you use, must have FAT32 formatting in order to be readable by the centrifuge.
Export
Programs can be exported via USB stick for further processing. To do this, connect an USB flash drive
to the centrifuge and select the option Export List. Existing programs will then be exported to the USB
stick as CSV files. Programs in this CSV format can be edited and imported using any spreadsheet
program, such as Excel.
The USB stick that you use, must have FAT32 formatting in order to be readable by the centrifuge.
4-6
Touchscreen User Interface for Sorvall LYNX
Thermo Scientific
4 Configuration
Runs Configuration
Run log
Every centrifugation run is documented as a log. A new entry in the log list is registered as soon as a
centrifugation run is started.
Run log:
Every centrifugation process is logged.
In addition to the defined parameters,
such as Time, Speed and Temperature,
an operator can also be registered for
each configuration process as an option.
An operator must be logged on prior to
the start of centrifugation for this,
however.
The log settings can be loaded using the
Load button. The parameters used are
then applied in the main screen.
The list of the last 120 entries is available for viewing under Run log. If required, this list can be
exported to a USB stick for systematic evaluation of the centrifugation runs using the button Export
list.
The following values are logged for each centrifugation run:
• Starting time
• Program used (if one was used)
• Run time
• Speed
• Temperature
• Profiles for acceleration and deceleration
• Rotor
• Termination of centrifugation (completed successfully/halted manually/error occurred)
• User name (if a user was logged in)
Thermo Scientific
Touchscreen User Interface for Sorvall LYNX
4-7
4
Configuration
Settings
Rotor log
All of the types of rotor known by the centrifuge are listed in the Rotor log submenu. The maximum
values and the number of centrifugation runs that have already been performed with this type of rotor
are displayed for each rotor type.
The following values are saved in a Rotor log:
• Rotor type and rotor name
• Rotor material
• Capacity (maximum number and volume of specimen containers)
• Maximum speed
• Number of centrifugation runs performed up to this time in this centrifuge with this type of rotor
The centrifugation runs performed with each rotor type are saved.
Rotor log:
You can view the rotor data and the number
of centrifugation runs performed with this
rotor here for each rotor type and rotor name
ever used in the centrifuge. The type of rotor
being used is indicated by the open round
arrow.
Settings
You edit the settings for user management, general settings, device and contact in the setting section of
the configuration menu.
4-8
Touchscreen User Interface for Sorvall LYNX
Thermo Scientific
4
Configuration
Settings
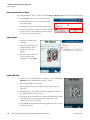
User Management
A centrifugation run can be assigned to a user. That user is then saved in the centrifuge log, enabling
subsequent evaluation of which user(s) conducted which centrifugation run(s). You can define in the
menu Settings whether a log-in is required to start centrifugation (see “Settings” on page 4-8 and
“Access Control” on page 4-10).
Go to the submenu User IDs in the configuration menu to determine which users are listed. Here, you
can create new user accounts, or edit existing ones.
Any user that is logged in can edit his/her own user information. The user may also change his/her user
name and PIN (4-digit) for the corresponding configuration. Only users with Admin rights may create
new users or manage other users.
A user needs not be logged in the “open environment” (see “Open Environment” on page 4-12). New
user accounts can be created by any users in this environment. These new users are not assigned a PIN,
however. These user accounts can, as a result, not be used in the closed environment, for which a
password must be entered. PINs must be assigned to user accounts at a later time for working in a
closed environment.
User Management:
The logged-in user is indicated by an open
round arrow. All users holding a valid PIN are
indicated by 4 dots to the right of his/her name.
Thermo Scientific
Touchscreen User Interface for Sorvall LYNX
4-9
4
Configuration
Settings
Editing a user:
Selection of the corresponding
user role determines whether a
user possesses Admin rights.
The factory default Admin PIN is 0000. First, create a new administrator profile with a new PIN.
Then delete the factory default profile.
Import
Users can be imported via USB stick. To do this, connect an USB flash drive to the centrifuge and
select the option Import List.
All users with new names will be added to the internal list. If users with the same name do exist on the
internal list of the centrifuge, they will be replaced during the import process.
The USB stick that you use, must have FAT32 formatting in order to be readable by the centrifuge.
Export
Users can be exported via USB stick for further processing. To do this, connect an USB flash drive to
the centrifuge and select the option Export List. Existing users will then be exported to the USB stick as
CSV files. Users in this CSV format can be edited and imported using any spreadsheet program, such
as Excel.
The USB stick that you use, must have FAT32 formatting in order to be readable by the centrifuge.
Access Control
In the Settings submenu of the configuration menu you can define whether log-in is required to start
a centrifugation run. Device policy settings can only be made after entering a master PIN (5-digit) (see
“User Roles” on page 4-15). The factory default for the device master PIN is 12345. As the first step,
change the device master PIN.
The following access control options are possible:
• Open environment
4-10
Touchscreen User Interface for Sorvall LYNX
Thermo Scientific
4
Configuration
Settings
• Log-in is not required in this mode. Centrifugation can be started by any user.
• Closed environment (PIN protected)
• In this mode, log-in using a PIN must be entered to make any settings and to start a
centrifugation run.
Access control
Options
Open environment
• No user specified
• Optional user selection
• Mandatory user selection
Closed environment
• Login with name and PIN
Closed environment:
The closed environment is activated by
checking this box. This box must remain
unchecked (blank) for an open environment.
Thermo Scientific
Touchscreen User Interface for Sorvall LYNX
4-11
4
Configuration
Settings
Open Environment
A PIN is not required to operate the centrifuge in an open environment. Any user can enter parameters
and perform centrifugation runs. Various options are available for the open environment scenario to
establish which centrifugation runs were started by which users. A distinction is drawn in these options
as to whether the user is also to be documented in a centrifugation log.
Open environment
The open environment scenario is
activated.
You can now define whether the user is
to be included in every centrifugation
log (here: logging of user is activated).
• No user specified
• No user is selected prior to starting the centrifugation run. The centrifugation log contains no
information about the user who started the centrifugation run.
• Optional user selection
• In this mode, a user may be selected when starting the centrifuge. The centrifugation run is
assigned to the selected user and the user name is listed in the centrifugation log. Specifying a
user is optional. If no user is selected, this log is equivalent to the first option above for the
open environment: No user.
• Mandatory user selection
• In this mode, a user must be selected in order to start the centrifuge. As a result, each
centrifugation run is allocated uniquely to a specified user.
4-12
Touchscreen User Interface for Sorvall LYNX
Thermo Scientific
4
Configuration
Settings
Mandatory user selection:
Allocation of a user to a centrifugation run
is obligatory for mandatory user selection.
Closed Environment
In a closed environment, users must log in using their PIN before they can operate the centrifuge. The
login window is opened by touching the user name at the bottom of the screen.
Login:
When you press the arrow in the USER ID
field, a list of all available users is opened.
In the centrifugation log the user logged in for the specific centrifugation run is documented. If no user
is logged in, the centrifuge cannot be started in a closed environment. Any user can halt an ongoing
centrifugation run or open the Tooltip mode and the configuration menu without having to be logged
in. All displays and screens are, however, available as read only. Only users that have logged in may
define/change settings.
Thermo Scientific
Touchscreen User Interface for Sorvall LYNX
4-13
4
Configuration
Settings
A user can log in/out at any time when the rotor is not spinning simply by touching the user name field
at the bottom of the main screen. As an alternative, the user can also log out under User ID in the
configuration menu using the Log out button.
In a closed environment it is possible to activate an automatically locking of the user interface, so that
no other user is able to change the settings while a run is active. This option is called „Lock after start“
and has to be enabled in the configuration menu under Acces control. It can only be enabled, if the
option „Protected by user PIN“ is enabled.
When the user interface is in the „Lock after start“-mode, no changes to the centrifuge are possible
except stopping it, by pressing the Stop button.
To unlock the user interface, touching the button for the set points or the one for the user name will
bring up the log in dialog. When the correct user PIN has been entered, the user interface will be
unlocked. Instead of using the user PIN it is possible to enter the device master PIN instead.
Read only mode:
Parameters cannot be changed until a
user logs in.
Lock after start:
The user interface is locked after a
centrifugation has been started.
In the closed environment you can also specify the setting for whether and when the registered user is
logged out automatically. These settings can be defined under Settings in the configuration menu
using the device master PIN (see “User Roles” on page 4-15). The factory default for the device master
PIN is 12345.
The following settings are required for automatic logout:
• Directly after a completed centrifugation run (as soon as the cover has been opened)
• 5 minutes without any interaction after a completed centrifugation run
• The user is not logged out automatically and remains logged in until he/she logs off, or until a
different user logs in.
4-14
Touchscreen User Interface for Sorvall LYNX
Thermo Scientific
4
Configuration
Settings
User Roles
A distinction is made between the following user roles: Administrator and User. The centrifuge
includes the device master PIN, which can be used to define all settings for the centrifuge. The device
master PIN is handed over to the owner of delivery of the unit and may be changed. Therefore, for
safety and security reasons, this PIN should not be disclosed to persons besides the owner.
An administrator is authorized for user account management (see “User Management” on page 4-9).
The device master PIN is required to make changes in the Settings, Device and Contact menus. All of
the settings in the open menu are enabled for editing after the master PIN has been entered. If a menu
is closed completely and then re-opened, the master PIN must be entered again to make changes to any
of the settings in that menu.
General Settings
The Settings submenu of the Configuration menu consists of two pages. On the first page you define
settings for device policy and general settings, such as the energy saving option. Signal settings and
languages can be defined on the second page.
The master PIN must be entered before any changes can be made in this menu (see “User Roles” on
page 4-15). Signal settings do not require input of the device master PIN.
Overview of possible settings in this menu:
• Device Policy
• Define whether operation of the centrifuge requires a PIN to be entered (Closed environment
or not Open environment). In an open environment you can also define whether a user is to be
assigned to each centrifugation run.
• Language
• Language
• Energy Saving Options
• Define various energy-saving modes.
Possible options: Green Mode, Balanced Mode, max. Availability
• Centrifuge Vacuum
• Define whether a vacuum is to be employed.
Possible options: High Speed only, Smart Energy Optimized
• Brightness
• Brightness Control.
• Sound Signal
• You can define different acoustic signals in order to distinguish between various centrifuges.
• Volume Control
• Use this regulator to adjust the volume of the signal
Thermo Scientific
Touchscreen User Interface for Sorvall LYNX
4-15
4
Configuration
Settings
Settings Menu:
In the Settings menu you can modify
the volume of the signal, for example.
4-16
Touchscreen User Interface for Sorvall LYNX
Thermo Scientific
4
Configuration
Settings
Device Settings
In the Device submenu of the configuration menu you can specify special data about the location of
the device. The master PIN is required to make any changes in this menu (see “User Management” on
page 4-9).
If the centrifuge is incorporated into a network you can specify the address of the centrifuge here.
These settings are important when rotor types are to be imported or exported from a server via the
network.
A device master PIN must be entered to make any changes in this menu.
Thermo Scientific
Touchscreen User Interface for Sorvall LYNX
4-17
4
Configuration
Settings
Contact
Contact data for Thermo Fisher Scientific is given in the contact section in the event that you have any
queries about the device or experience technical difficulties. If a caretaker is given for your centrifuge
you can enter the data for this person in this section so that your employees know who to contact for
any questions they may have. Also contact the person specified here if changes are to be made which
required the master PIN.
Any changes to the name and contact data of the person responsible for the centrifuge require the
master PIN.
4-18
Touchscreen User Interface for Sorvall LYNX
Thermo Scientific
5
Tooltip Mode
As with the configuration menu, the Tooltip mode cannot be accessed while a centrifugation run is in
progress. You can activate the Tooltip mode while the rotor is at standstill to view information about
the individual buttons. Use the button at the bottom right-hand corner of the main screen to activate
the Tooltip mode.
Touch any element on the screen to view detailed information about it. The actual function of the
element is not activated or initiated while in the Tooltip mode. Touching the screen again de-activates
the Tooltip mode. The Tooltip mode is available for every button in the main screen and most of the
elements on the configuration screens.
Thermo Scientific
Touchscreen User Interface for Sorvall LYNX
5-1
6
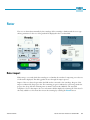
Rotor
The rotor is detected automatically by the centrifuge. If the centrifuge is familiar with the rotor type
the key parameters for the rotor being used will be displayed in the rotor data field.
Rotor import
When using a rotor with which the centrifuge is not familiar, the window for importing rotor data via
a USB stick is displayed. This dialog guides the user through the import process.
Import of the rotor data is begun when the USB stick is connected to the centrifuge. Progress of the
import is indicated by the progress bar. The remaining progress is indicated as a percentage under the
progress bar, along with the remaining time in minutes and seconds (MM:SS). On successful
completion of rotor data import, the rotor information field is displayed, containing all of the data for
the newly added rotor. You must then restart the centrifuge by touching the Restart button.
Thermo Scientific
Touchscreen User Interface for Sorvall LYNX
6-1
7
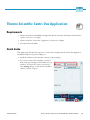
Thermo Scientific Centri-Vue Application
Requirements
• Thermo Scientific Sorvall LYNX centrifuge with Thermo Scientific Touchscreen User Interface
software, version 1.2.2 or higher
• Thermo Scientific™ Centri-Vue™ application, version 0.1.2 or higher
• Local Area Network (LAN)
Quick Guide
This quick guide describes the steps how to connect the centrifuge with the Centri-Vue application.
Detailed descriptions are given in Chapter 4.
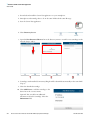
1. Install the touchscreen user interface software on the centrifuge.
2. For remote control of the centrifuge you have to
make some option changes in the touchscreen user
interface. To activate the remote control access,
select Settings (Step 1-3) and select the checkbox
„Remote Control“ (Step 4).
4
3
2
1
Thermo Scientific
Touchscreen User Interface for Sorvall LYNX Superspeed Centrifuges
7-1
7
Thermo Scientific Centri-Vue Application
Quick Guide
3. Download and install the Centri-Vue application on your smartphone.
4. Smartphone and centrifuge have to be in the same LAN with the same IP range.
5. Start the Centri-Vue application.
6. Select Discovery Screen.
7. Open the New Discovered Devices list in the discovery menu to search for new centrifuges in the
network (Step 1 and 2).
1
2
3
8. Centrifuges with installed Connectivity Plug-In will be identified automatically in the same LAN
(Step 3).
9. Select the identified centrifuge.
10. Select Add Device to add the centrifuge to the
device list in the overview menu.
Optional: You can add some additional
information about the centrifuge. Select the
Information field.
7-2
Touchscreen User Interface for Sorvall LYNX Superspeed Centrifuges
Thermo Scientific
7
Thermo Scientific Centri-Vue Application
Quick Guide
11. The application switches to the overview menu
and shows the formerly added centrifuge entry in
an information block (name, information, status).
12. Select the added centrifuge entry to switch to detail view.
13. For remote control select Request Remote in
detail view.
Thermo Scientific
Touchscreen User Interface for Sorvall LYNX Superspeed Centrifuges
7-3
7
Thermo Scientific Centri-Vue Application
Quick Guide
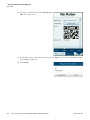
14. Generate a new Remote ID. Select Generate new
ID in the settings screen.
15. In the request remote access screen of the Centri-Vue application you can enter the ID by hand or
by scanning the QR-Code.
16. Select Verify.
7-4
Touchscreen User Interface for Sorvall LYNX Superspeed Centrifuges
Thermo Scientific
7
Thermo Scientific Centri-Vue Application
Quick Guide
17. If you have remote access to the centrifuge the start
button is green.
Thermo Scientific
Touchscreen User Interface for Sorvall LYNX Superspeed Centrifuges
7-5
7
Thermo Scientific Centri-Vue Application
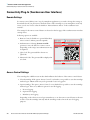
Connectivity Plug-In (Touchscreen User Interface)
Connectivity Plug-In (Touchscreen User Interface)
Remote Settings
For remote control ability (start / stop by smartphone application) you need to change the settings as
described below. If you just want to check the status of the centrifuge on your smartphone (read only
access) you do not need to select the checkbox “Activate Remote Access” in the touchscreen user
interface.
The settings for the remote control feature are located on the last page of the touchscreen user interface
settings menu.
Following options are available:
1. Remote Control: Checkbox to general allow/deny
remote control. (Master passcode required)
1
2. Authentication: Selecting Generate new ID
generates a new code (ID) for a remote session.
Depending on the setup a user authentication may
be required.
2
3. QR- Code: The generated ID is shown in a
QR-Code.
3
4. Numerical Code: The generated ID is displayed in
text form.
4
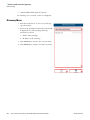
Access Control Settings
The centrifuge has 2 different user modes which influence the behavior of the remote control feature.
1. Closed centrifuge: If the option “Access Control” is selected it is not possible to start the centrifuge
without login. A Remote ID can just be generated if a user is logged in.
2. Open centrifuge: The option „Access Control“ is not checked. It is possible to start the centrifuge
without login. There are 3 different options for user ID logging:
a. No user logging.
b. Optional user logging.
c. Mandatory user logging.
Depending on the selection a user login is mandatory to use the remote control feature as the user
is able to start the centrifuge remotely and the centrifuge needs to know the user for logging
purposes.
7-6
Touchscreen User Interface for Sorvall LYNX Superspeed Centrifuges
Thermo Scientific
7
Thermo Scientific Centri-Vue Application
Centri-Vue App
Centri-Vue App
The Centri-Vue application can discover available centrifuges in the LAN and create a list of local
centrifuges with optional additional user information. This information can be used to add location
information to the local centrifuge entry.
Overview Menu
1. Select New to manually add new centrifuges.
1
2. List view: shows the added centrifuges in a list
showing following information:
a. Name of the centrifuge
(if no name is entered for the centrifuge, the IP
address of the centrifuge is shown instead)
b. Optional information (e.g. for location
information)
c. Centrifuge status
2
Select a centrifuge entry, to open the detail view for a
centrifuge.
3. Select Overview to switch to the overview menu.
4. Select Discovery to switch to the discovery menu.
To edit or delete a locally saved centrifuge, select a list
element and keep it touched. Detailed information to this
screen is listed below at 4.5.
3
4
Centrifuge States
The centrifuge can show following states:
• "DOOR OPEN (if the door is open)
• "READY (if the centrifuge can be started)
• "ACCELERATING (if the centrifuge accelerates)
• "RUNNING (if the centrifuge is running)
• "STOPPING (if the centrifuge decelerates)
• "COMPLETE (when a run has been completed successful)
• "STOPPED (If a run get canceled)
• „POWER DOWN“ (centrifuge is switched off )
Note This message is only available when the centrifuge is connected to a network with PoE.
Thermo Scientific
Touchscreen User Interface for Sorvall LYNX Superspeed Centrifuges
7-7
7
Thermo Scientific Centri-Vue Application
Centri-Vue App
• "DISCONNECTED (Network timeout)
If a centrifuge error occurred, a red cross is displayed.
Discovery Menu
1. New discovered devices: To start a new discovery,
open the item list.
2. List view: all centrifuges found in the network will
be displayed. For each centrifuge following
information is shown:
1
a. Name of the centrifuge
b. IP address of the centrifuge
3. Select Overview to switch to the overview menu.
4. Select Discovery to switch to the discovery menu.
2
3
7-8
Touchscreen User Interface for Sorvall LYNX Superspeed Centrifuges
4
Thermo Scientific
7
Thermo Scientific Centri-Vue Application
Centri-Vue App
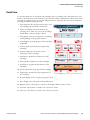
Detail View
To enter the detail view of a locally stored centrifuge, select a centrifuge entry. The detail view is very
similar to the main screen of the touchscreen user interface software and shows the current values of the
centrifuge (at a refresh rate of one second). All parameters are read only, they can only be changed by
accessing the LYNX centrifuge directly.
1. User (Optional): If a user login is necessary to start
the centrifuge, the username is shown here.
2. Name of centrifuge: shows the name of the
centrifuge. If no name is set yet for the centrifuge,
the IP address of the centrifuge is shown.
1
2
3
4
3. Time display: shows processing time or remaining
time depending on the program selection.
5
4. Status display: shows the progress of the centrifuge
graphically.
5. Current speed: shows the current speed of the
centrifuge.
6. Current temperature: shows the current
temperature of the centrifuge.
7. Acceleration: specifies the acceleration of the
centrifuge.
7
10
12
6
9
8
11
13
8. Time: specifies the duration of the centrifuge.
9. Deceleration: specifies the deceleration of the
centrifuge.
10. Speed: specifies the target speed of the centrifuge.
14
15
16
11. Temperature: specifies the target temperature of
the centrifuge.
12. Program display: shows, if a preset program is used.
13. Rotor display: shows the name of the installed rotor.
14. Request remote: select button to switch to the "Request Remote Access" menu.
15. Overview: select button to switch to the „Overview“ menu.
16. Discovery: select button to switch to the „Discovery“ menu.
Thermo Scientific
Touchscreen User Interface for Sorvall LYNX Superspeed Centrifuges
7-9
7
Thermo Scientific Centri-Vue Application
Centri-Vue App
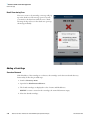
Detail View during Error
If an error occurs to the centrifuge, a message will pop
up in the detail view. The message opens every time
you switch to the detail view until the error is fixed.
Selecting the big red cross in the detail view opens up
the message manually.
Adding a Centrifuge
Search on Network
If the IP address of the centrifuge is not known, the centrifuge can be discovered with discovery
functionality. Follow the provided steps:
1. Switch to Discovery menu.
2. Open the list New Discovered devices.
3. The found centrifuges are displayed in a list of names and IP addresses.
NOTE If no name is entered in the centrifuge, the name field remains empty.
4. Select the desired centrifuge.
7-10
Touchscreen User Interface for Sorvall LYNX Superspeed Centrifuges
Thermo Scientific
7
This opens the „Add New Device“ menu:
Thermo Scientific Centri-Vue Application
Centri-Vue App
1
1. Cancel: closes the „Add New Device“ menu
without saving.
2
2. Name: shows the name of the centrifuge. The
name is detected automatically and cannot be
edited. If no name is retrievable, "Device name
Example" is shown.
3
3. IP-Address: the IP address is entered automatically.
It can be edited subsequently.
4
4. Information: additional information can be
entered later in order to identify the centrifuge
better.
5
5. Add device: selecting this button adds the centrifuge in the overview menu. If saved succesful, the
application switches to the overview menu and shows the added centrifuge.
Add Manually
If the IP address of the centrifuge is known (after selecting the found device), the centrifuge can be
manually saved in the overview menu:
Select New in the overview menu.
This opens the Add New Device menu:
1. Cancel: closes the „Add New Device“ menu
without saving.
2. IP-Address: the IP address will be entered
automatically if available.
3. Information: additional information can be
entered in order to better identify the centrifuge
later.
4. Add device: selecting this button adds the
centrifuge in the overview menu. If saved
succesful, the application switches to the overview
menu and shows the added centrifuge.
Thermo Scientific
Touchscreen User Interface for Sorvall LYNX Superspeed Centrifuges
7-11
7
Thermo Scientific Centri-Vue Application
Centri-Vue App
Error Adding Centrifuges
If a centrifuge cannot be added to the overview menu, there are two possible reasons:
1. A centrifuge with the same IP address is already
stored in the local list. A pop-up message indicates
the error. (See figure 19)
2. The IP address has no valid format. The entered IP
address must have the format (x.x.x.x). In
addition, only numbers may be included. If an IP
address is entered in an invalid format the outline
turns red and the add device button will be
disabled. (See figure 20)
7-12
Touchscreen User Interface for Sorvall LYNX Superspeed Centrifuges
Thermo Scientific
7
Thermo Scientific Centri-Vue Application
Centri-Vue App
Edit Centrifuge Entry
The centrifuge entries in the overview menu can be
edited or deleted. To edit a centrifuge entry, select the
entry and hold it (about 3 seconds). The edit menu
will open with the following options:
1. Select Edit to open the edit menu of the
centrifuge.
2. Select Delete to delete a centrifuge entry. Deletion
is done, if the subsequent question is confirmed
with Yes.
3. Select Cancel to switch back to the overview
menu.
1
2
3
If Edit is selected, an "Edit Device" menu opens.
1
1. Select Cancel to return to the overview menu.
2
2. Name: the name of the centrifuge can only be
changed directly at the LYNX centrifuge and is
therefore not editable.
3
3. IP-Address: the stored IP address can be changed
here.
4
4. Information: the information field can be edited
here.
5. Save: changes can be saved.
5
Remote Control
Prerequisites: The centrifuge was enabled for remote access. (For detailed information, see chapter 3).
Thermo Scientific
Touchscreen User Interface for Sorvall LYNX Superspeed Centrifuges
7-13
7
Thermo Scientific Centri-Vue Application
Centri-Vue App
Request Remote Access Menu
The „Request Remote Access“ menu opens when Request Remote Access is selected in the detail view.
1. Select Cancel to return to the overview menu.
1
2. ID: the Remote ID from the centrifuge can be
entered manually.
2
3. Scan QR-Code: opens the integrated QR-Scanner.
4. Verify: the entered or scanned code will be verified.
A new session for this smartphone will be created
in case of a successful verification.
3
4
Input by Hand
1. Generate a new ID on the
centrifuge
2. Press in the "ID" field of the
„Request Remote Access“
menu. The keyboard
appears.
6F65GN3BUC
3. Enter the numerical ID into
the input field on the
smartphone. Select Verify.
Input by QR-Code
1. Generate a new remote ID in the centrifuge (s. 3.2.2). Select Scan
QR-Code in the „Request Remote Access“ menu.
2. The integrated QR scanner opens.
3. Scan the QR-code on the centrifuge with the QR scanner (See
figure 25).
4. If the QR-code is successfully scanned, the application returns to
the „Request Remote Access“ menu.
5. The remote ID is decoded from the QR-code and shown in the ID
field. The ID can be checked again, by comparing it to the
numerical code on the centrifuge.
6. Select Verify. If successfully verified, the application returns to the
„Detail view“ menu.
7-14
Touchscreen User Interface for Sorvall LYNX Superspeed Centrifuges
Thermo Scientific
7
Thermo Scientific Centri-Vue Application
Centri-Vue App
Error Establishing the Remote Connection
If a message "Request Error" pops up when selecting Verify, no remote connection is established to the
centrifuge.
Possible error sources:
• The remote ID was not transferred correctly from the centrifuge.
• Another user has already built up a remote session with this remote ID.
• The centrifuge and/or smartphone are not on the same network
QR-Code is not Recognized by the Scanner
• To scan the QR-code quickly and correctly, the phone must be held vertically over the QR-code.
• The entire QR-code should be in the bright area of the scanner.
• If you have problems to focus the QR-code, check if the camera of the phone works and if the
camera lens needs to be cleaned.
Closing the Remote Session
The remote session cannot be terminated manually. However, the remote session terminates
automatically at the following events:
• A new remote ID is generated at the centrifuge.
• Centrifuge without User login: If the centrifuge door has been opened, 5 minutes without
interaction in the application on the smartphone or the centrifuge.
• Centrifuge with User login: If the current user is logged off (manually or automatically, depending
on the selection of the combo box in the configuration menu)
The session management for the smartphone is directly attached to the user management of the LYNX
centrifuge. This means that the smartphone session becomes invalid in case any user logs in or out at
the LYNX centrifuge.
Thermo Scientific
Touchscreen User Interface for Sorvall LYNX Superspeed Centrifuges
7-15
7
Thermo Scientific Centri-Vue Application
Centri-Vue App
Connection to a Network with active PoE
The user interface of the LYNX centrifuge is a PoE1 enabled device. If it is connected to a PoE network
port, it may remain active after the main power switch of the centrifuge has been turned off. While it is
in this state, the following screens will be displayed at the centrifuge and in the Centri-Vue application:
After turning on the main power switch, the centrifuge will return to the normal state of operation. To
avoid keeping the user interface in the active state, disable PoE on the used network port2.
7-16
1
"Power over Ethernet" or PoE describes a system which passes electrical power along with the Ethernet cabling.
2
Disabling PoE is recommended to prevent premature wear of the user interface display components.
Touchscreen User Interface for Sorvall LYNX Superspeed Centrifuges
Thermo Scientific
8
REST-Webserver
Port of REST-Webservers: 800 (TCP). The data is exchanged via defined JSON objects.
Resource Overview
In the table below, the REST-interface provided methods are listed.
URL
Method allowed
Description
<device ip>:<port>/getall
GET
Information and data about the
current state of the centrifuge
<device ip>:<port>/getstate
GET
Brief information, only state and
name of the centrifuge
Detailed description of the resources:
GET <device ip>:<port>/getall
Query the current state of the centrifuge, supplies target and actual values.
Request:
No data
Response:
{
"actualValues": {
"ace": <ace value in x.xxExx>,
"powerDown": <true orfalse>
"rcf": <rcf value in xg>,
"rpm": <rotation speed in rpm>,
"state": <state identifier>,
"temperature": <temperature in °C>,
"time": <time format hh::mm::ss>
},
"error":
<error object>,
"name": <centrifuge name>
"program": <program name>,
"rotorName": <rotor name>
Thermo Scientific
Touchscreen User Interface for Sorvall LYNX Superspeed Centrifuges
8-1
8
REST-Webserver
"setValues": {
"accelerationProfile": <profile number>,
"ace": <ace value in x.xxExx >,
"decelerationProfile": <profile number>,
"rcf": <rcf value in xg>,
"rpm": <rotation speed in rpm>,
"temperature": <temperature in °C>,
"time": <time in hh::mm::ss>
},
"user": <user name>
}
<error object>:
{
"code": <error code>,
"description": <error description in gui language>
"title": <error title / type of error>
"time": <error occurrence time in year/month/day hh:mm:ss>
}
If a value is not available, the value is set to zero. This can be used to distinguish between the following
modes of operation:
• LYNX in RPM-Mode: rpm set, rcf contains the value zero
• LYNX in RCF-Mode: rpm contains the value zero, rcf set
The distinction of operation mode time, hold and ACE is mapped as follows:
• Time-Mode: time set, ace Value is zero
• ACE-Mode: time is zero, ace is set
• Hold-Mode: As in Time-Mode, but the value for time at setValues is also zero
Examples
Centrifuge in Time-RPM-Mode and an error occurred:
{
"actualValues": {
"ace": null,
"powerDown": false
"rcf": null,
"rpm": 0,
"state": "EREADY",
"temperature": 0,
"time": "00:02:00"
8-2
Touchscreen User Interface for Sorvall LYNX Superspeed Centrifuges
Thermo Scientific
8
REST-Webserver
},
"error": {
"code": 36575,
"description": "Error Text",
"title": "Centrigue Error",
"time": "2015/03/23 03:32:37 PM"
},
"name": "My Centrifuge",
"program": "",
"rotorName": "F10-4x1000 LEX",
"setValues": {
"accelerationProfile": 9,
"ace": null,
"decelerationProfile": 9,
"rcf": null,
"rpm": 500,
"temperature": 0,
"time": "00:02:00"
},
"user": "Centrifuge User"
}
Centrifuge in Hold-RCF-Mode:
{
"actualValues": {
"ace": null,
"powerDown": false
"rcf": 0,
"rpm": null,
"state": "STOPPED",
"temperature": 0,
"time": "00:00:38"
},
"error": null,
"name": "My Centrifuge ",
"program": "",
"rotorName": "F10-4x1000 LEX",
"setValues": {
"accelerationProfile": 9,
"ace": null,
"decelerationProfile": 9,
Thermo Scientific
Touchscreen User Interface for Sorvall LYNX Superspeed Centrifuges
8-3
8
REST-Webserver
"rcf": 1000,
"rpm": null,
"temperature": 0,
"time": null
},
"user": ""
}
Centrifuge in ACE-RPM-Mode:
{
"actualValues": {
"ace": "0.00E00",
"powerDown“ : false
"rcf": null,
"rpm": 0,
"state": "STOPPED",
"temperature": 0,
"time": null
},
"error": null,
"name": "My Centrifuge",
"program": "",
"rotorName": "F10-4x1000 LEX",
"setValues": {
"accelerationProfile": 9,
"ace": "2.22E02",
"decelerationProfile": 9,
"rcf": null,
"rpm": 500,
"temperature": 0,
"time": null
},
"user": ""
}
8-4
Touchscreen User Interface for Sorvall LYNX Superspeed Centrifuges
Thermo Scientific
8
REST-Webserver
GET <device ip>:<port>/getstate
Query status and name of the centrifuge.
Request:
No data
Response:
{
"name": <centrifuge name>,
"powerDown" : <true or false>
"state": <state identifier>
}
Example
{
"name": "My Centrifuge ",
"powerDown" : false
"state": "STOPPED"
}
Thermo Scientific
Touchscreen User Interface for Sorvall LYNX Superspeed Centrifuges
8-5
Thermo Electron LED GmbH
Zweigniederlassung Osterode
Am Kalkberg, 37520 Osterode am Harz
Germany
thermoscientific.com/centrifuge
© 2015 Thermo Fisher Scientific Inc. All rights reserved.
Delrin, TEFLON, and Viton are registered trademarks of DuPont. Noryl is a registered trademark of SABIC. POLYCLEAR is a registered trademark of Hongye CO.,
Ltd. Hypaque is a registered trademark of Amersham Health As. RULON A and Tygon are registered trademarks of Saint-Gobain Performance Plastics. Alconox
is a registered trademark of Alconox. Ficoll is a registered trademark of GE Healthcare. Haemo-Sol is a registered trademark of Haemo-Sol. Triton X-100 is a
registered trademark of Sigma-Aldrich Co. LLC. Valox is a registered trademark of General Electric Co.
All other trademarks are the property of Thermo Fisher Scientific Inc. and its subsidiaries.
Specifications, terms and pricing are subject to change. Not all products are available in all countries. Please consult your local sales representative for details.
Shown pictures within the manual are examples and may differ considering the set parameters and language.
Australia +61 39757 4300
Austria +43 1 801 40 0
Belgium +32 53 73 42 41
China +800 810 5118 or
+400 650 5118
France +33 2 2803 2180
Germany national toll free 0800 1 536 376
Germany international +49 6184 90 6000
India +91 22 6716 2200
Italy +39 02 95059 552
Japan +81 3 5826 1616
Netherlands +31 76 579 55 55
New Zealand +64 9 980 6700
Nordic/Baltic/CIS countries
+358 10 329 2200
Russia +7 812 703 42 15
Spain/Portugal +34 93 223 09 18
Switzerland +41 44 454 12 12
50136520-c original instruction manual published in 07 / 2015.
UK/Ireland +44 870 609 9203
USA/Canada +1 866 984 3766
Other Asian Countries +852 2885 4613
Countries not listed +49 6184 90 6000