1
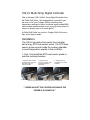
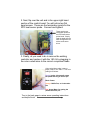
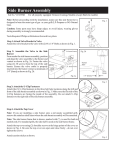
180-LV Multi-Temp
Digital Controller
Installation Instructions and User Manual
Pellet Grill Outlet
1720 Willamette Falls Dr
West Linn, OR 97068
(800) 606-9118
www.PelletGrillOutlet.com
180-LV Multi-Temp Digital Controller
This is the latest 180-LV Multi-Temp Digital Controller from
the Pellet Grill Outlet. We designed this controller to get
the most out of your Traeger Grill by including lower
temperature settings for slow, all natural wood cooked BBQ
and included enhancements to get your grill hotter faster for
when you simply want to do some grillin’!
At Pellet Grill Outlet, we cook on Traeger Grills 24 hours a
day, seven days a week!
Installation:
The 180-LV consists of two parts: the controller
and a long, RTD heat sensor probe. The RTD heat
sensor probe mounts inside the cooking chamber
to send temperature signals to the controller.
1. First, let’s install the RTD heat sensor probe inside the cooking chamber:
1. Inside the Grill, note two
pre-drilled holes on the left
hand side of the grill
cooking chamber.
2. Feed the probe
through the hopper hole
and through the predrilled hole.
3. Tighten down the
probe with the provided
hardware.
Photos courtesy of Rick Schumacher, another Traeger Grill owner. Thanks Rick!
** NEVER ADJUST THE CONTROLLER WHILE THE
POWER IS PLUGGED IN **
2. Next, flip over the unit and in the upper right hand
section of the control board. You will notice two flat
head screws. These are the termination points for the
RTD heat sensor probe. Connect and tighten!
These are the two
termination points for
the RTD heat sensor
probe leads. Simply
feed the leads into the
slots and tighten them
with a small screwdriver.
3. Finally, all you need to do is remove the existing
controller and replace it with the 180-LV by plugging in
the color coded wires to the correct component leads.
Color coded wires make it easy to
simply “snap-in” the 180-LV. The color
coding is as follows:
Purple: Igniter, this actually starts
the pellets burning in the fire pot.
Black: Power
Orange: Muffin Fan, or Combustion
Fan
Red: Auger Motor for getting the
pellets to the fire pot.
Turn to the back page to review some operating instructions
and helpful hints!
Starting the 180-LV
Once pellets are in the hopper and primed in the auger, we
like to start the controller on SMOKE. You will note that
the fire gets hot quickly and when it exceeds 150 move the
dial to the desired temperature setting. There may be fluctuations in the temperature, but if you are cooking at 180,
you will be cooking for several hours so this won’t affect the
outcome of your food.
Adjusting the 180-LV
On the back of the controller is a dial 0-9. You can adjust
this setting to compensate if your grill is getting too hot or not
hot enough.
The controller feeds pellets for a certain time, then off for a
certain time, to allow the pellets to burn. Increasing this
dial setting increases the amount of time it is “off”. By
increasing this setting, you should decrease the temperature
of the grill.
Be Patient!
Cooking with wood is awesome, but it reacts much slower than
gas or charcoal. When cooking, be patient and allow the grill
some fluctuations in temperature as is the nature of wood.
** NEVER ADJUST THE CONTROLLER WHILE THE
POWER IS PLUGGED IN **