1
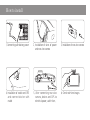
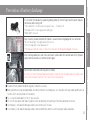
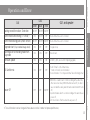
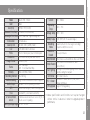
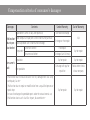
User’s manual
Be fore us ing
Contents
U s ing Product
User ’s caution ........................................................................................................ 4
Caution in use .......................................................................................................... 5,6
Function and Feature ......................................................................................................... 7,8
Caution in Installation ................................................................................................ 9
Product contents ................................................................................................................ 10
Name of each parts & Functions ........................................................................................................11
How to install ............................................................................................................ 12
Prevention of battery discharge .................................................................................... 13
Operation and Error message ............................................................................................................... 14,15
Information _ POP-UP...................................................................................................... 16,17
GUI of Menu .................................................................................................................. 18~30
How to upgrade .................................................................................................... 31
How to install viewer program on PC.......................................................................................... 32
Viewer program ......................................................................................................... 33,34
Specification ........................................................................................................................ 35
Compensation criteria for consumer‘s damages ..................................................................................... 36
Check items before claim ..................................................................................................... 37
Warranty ............................................................................................................................... 39
Vi e we r program
Etc.
3
User’s caution
It’s a product, which is recorded automatically images of car crash or accident, happening
events to support and help for analyzing its moments and named Car Black Box mounted
HD/HD LCD touch panel.
The images recorded in this product don’t carry legal binding force and our company can’t
accept liability for any legal disputes causing recorded or unrecorded images.
● Pls, install and use our device only in accordance with user’s manual properly.
● Our company can’t accept liability for any malfunction or accident due to different way of installation with the
written in user’s manual and unprescribed modification.
● Our viewer program is worked at PC being installed Window XP/ Vista / Window 7.
● S/W and H/W we provided can be made revisions to improve product performance without notice in advance.
● Pls, do not operate this device while driving for your safety.
● Pls, Wire connection with battery power should be done at car speciality store surely and our company is not
liable for any problems caused by those connection.
● It informs that sometimes events may be not recorded because of the condition of micro SD card, damages or
using environment.
Be fore us ing
Caution In Use
These are the information for user to operate this device properly and prevent malfunctioning
and damages in advance so that user should abide by these information.
And our company can’t accept liability for any problems caused by not abide by rules written
in user’s manual.
U s ing Product
● Pls, install this device using by double-side tape tightly.
And use double-side tape after taking out foreign material and moisture on window.
● When it get wet,
Vi e we r program
Dry it in cool and airy place and don’t put it on electric appliance like heater and microwave oven in order
to dry it..
● Prohibition of disassembly
Our company don’t provide warranty service free of charge on damage or malfunction caused by
disassembling product or external shock by carelessness.
● Caution in installation of rear-view camera.
5
Etc.
Quality of recorded image may varies according to darkness of window tint film .(Pls, install rear-view
camera after cutting out tint film around the camera lens.)
Caution In Use
● Cause in use of Micro SD memory
Pls. use only Micro SD card in Box and back up images of events files to PC when accident or car crash
happened.
- There is no need to format because Micro SD memory based on SeFS file storage.
- Life time of memory card is limited with 6 month warranty and new images can’t be saved at it after longterm use. So in that case, purchase new memory card and use it.
● Keep device out of direct ray of the sun while parking.
It may be caused malfunction or defect to put it on enclosed car with direct sunlight long time.
● LCD TOUCH PANEL
Don’t touch with sharp tool on LCD panel and operate this device followed by voice information service or
touch sound. Too many touch on LCD Panel cause the malfunction of touch panel.
● Do not play images in SD card back by your smart phone
In case of playing back images in SD card by your smart phone, saved images may be deleted by
accident due to collision of system files. Pls, play files back only through viewer program in your PC or
LCD monitor at this device.
Be fore us ing
Function and Feature
1. Real time record
- When starting a car, automatically start recording after booting up this device and when stop the car, automatically stop the
recording.
2. Event Record(G-sensor ,Shock sensor, Manual Record)
U s ing Product
- By working gravity sensor installed in case of Jackrabbit start or sudden brake and external shock, the event is recorded in SD card
automatically before and after event occurred. Event images for parking are recorded by high sensitive shock sensor. And also
events can be recorded by manual record button.
3. LCD Protection
- For protecting the LCD, if the inner temperature is higher than 80℃, it will make a sound of “LCD protection is on” or “Normal
recording is on” once touching the LCD. (Sound can be changed the beep sound etc.)
- The LCD is turned on by touching it if the temperature is dropped down to 70℃.
Vi e we r program
4. WIDE TOUCH LCD Support
- It is very convenient to use due to high resolution touch screen, 800*480 with 4,0 inches bases of smart GUI.
5. HD high quality images
- This device provides high quality resolution with 1280 X 720 and optimum view angle with 120° both front and rear day and night.
* The view angle is bigger, the objects looks smaller and more round.
6. Self-format function
- For erasing images from the Micro SD memory, it can be formatted without being moved to a PC.
7. Real time display and confirmation of front/rear view images recorded
7
Etc.
- These recorded images can be seen and confirmed through high resolution LCD panel with 4.0 inches in real time.
Function and Feature
8. Convenience to set-up of environment
- Set values can be changed by touch screen and make it operated on the spot, not using PC.
9. Video play-back program
- Display recorded images through viewer program by connecting SD card with PC.
(Possible to check location of vehicles and speed)
10. GPS (Location)
- This device can save vehicle’s location and speed together with images by GPS(option) and google map.
11. Front, Rear and function of PIP
- This device can record front and rear view(option) and can display front and rear view (PIP) selectively.
12. Voice service through self-checking system.
- Inform malfunction status like detaching power and SD card and also camera condition by voice information service after self-check
13. Flash light on parking mode at night.
- To maintain clear images under the low light level at night, high sensitive 2 second flash light 5 times each when event occurs.
14. ZOOM
- It is possible to magnify images when playing them back by viewer program or LCD monitor at device.
15. Installation of voltage cut-off system for anti-battery discharge and support of cut-off voltage and timer setting.
- In order to prevent battery discharge due to overuse of battery power, voltage cut-off system is set up. This device will be dead
automatically when voltage goes down below discharge voltage, which is set.
16. Support of cut-off high temperature
- The power is turned off for protecting the LCD, when the inner temperature becomes higher than 90℃. Automatic recording is started
once it is dropped down to 70℃ or lower.
● Pls, check in-box contents.
● Decide the exact location to be installed and then clean the surface of the location on glass by dry
towels.
● Wiring works should be implemented under the main S/W off and then install outer mounted camera,
GPS and insert SD card.
● Before connecting electrical power, pls, check whether micro SD card is inserted properly or not.
● Pls, take out protection film on camera lens after installation.
● Adjust direction of camera lens with looking at real-time images, after connecting electrical power.
● Pls, install rear camera, not to be obstructed by heat wire and tint films in order to keep high image
quality.
Etc.
9
Vi e we r program
● Pls, install this device, not to obstruct driver’s field of vision..
U s ing Product
● Pls, check whether this device works normally before wiring works.
Be fore us ing
Caution in installation
Product contents
In-Box contents
Main body
Craddle
Micro SD CARD
SD card reader
Optional contents
Wires of power / Cigar-Jack
Manual
Rear-view camera
Outer mounted GPS
※ Above in-box contents and optional contents can be changed without notice in advance in order to upgrade product
performance.
No.
Name
1
On/Off Switch
Power Plug (DC)
GPS Plug
4
R-CAM
Function
Main power of Product
Plug for connecting electrical power with device
Plug for connecting main body with outer mounted
GPS
Plug for connecting main body with rear-view
camera
5
Micro SD card slot
6
Screw Lever
Lever to adjust direction in height of its device
7
Cradle
Tool for connecting device with window glass
Joint part of Cradle Connection part between main body and cradle
9
Speaker
10
Camera lens
11
Operating LED
To inform user device’s condition (Green,Blue,Red )
12
LED Flashlight
Flashlight for low light levels in case of occurring
event at parking mode
13
Lens for Car Black Box
4.0 inch LCD touch Real time images, images recorded, forced
recording, LCD off, parameter setting, taking photos.
menu
MIC
Voice recording
11
Etc.
14
To provide voice information
Vi e we r program
8
Slot for inserting removable micro SD card
U s ing Product
2
3
Be fore us ing
Name of each part and function
How to install
1. Connecting with battery power
2. Installation of wires of power
and rear view camera
3. Installation of rear view camera
4. Installation of cradle and GPS
and connect device with
cradle
5. After connecting rear view
camera, device and GPS to
electrical power, switch it on.
6. Check real-time images
Be fore us ing
Prevention of battery discharge
It is a function to make device supporting parking mode, by which of supply electric power to device
continuously while turning it off.
* Yellow cable (B+) = Continuous power supply in case of turning it off.
* Red cable (ACC) = Power supply when starting car.
* Black (GND) = Ground
U s ing Product
Open 'fuse box', located at bottom left of driver's seat and check wiring diagram of fuse connection.
* B+ is for break light, turn signal and electric seat etc.
* ACC is for cigar-jack, outket and audio etc.
* This map varies with car models, so that connect wires after checking wiring diagram of fuse box.
After checking needed fuse, take it out and connect yellow cable (B+) and red cable (ACC) of power
supply cable to selected fuse. And then install it again.
13
Etc.
■ It needs to check product condition regularly in order to use safely.
■ Battery performance may be depended on outside environment like temperature, so it may does not keep steady performance of
funtions which are connected with car battery
■ Pls, use fuse of rated capacity. If not, it may cause fire.
■ Pls, turn off main power and stop using device when you do long-term parking or find some abnormal occurrence
■ Our company is not liable for demages and loss due to consumer's mistake.
■ Our company is not liable for damage and loss due to modification and misuse of main power cable we provide.
Vi ewer pro gram
Connect black cable (GND) with steel part of car body
Pls, when you connect with black cable and steel part of car body, bolt should be made by conductor and
connect with steel part of car body. If not, device doesn't work properly
Operation and Error
List
LED
GUI and speaker
Green
Blue
Red
Initial booting
ON
ON
ON
* All LED, which are G,B and R are turned on .
* Intro screen => Display "warning message"
* Voice information = 'Pls, don't operate device while driving'
Starting record
ON
ON
OFF
* Green and Blue LED are turned on and Red LED is turned off
* Display real-time image
* Voice information = ' Recording starts'
Not to be inserted when booting
Detachment of SD Card during record
(system abnormality)
ON
OFF
ON/OFF
* System will be restarted after voice information, "System reboots" when
putting SD card in.
Camera module error
ON
ON
ON/OFF
* When removing front camera, it is rebooted after repeating 2 times
"Camera (module abnormality) is detected"
* When removing rear camera, it is rebooted after repeating 3 times
"Camera (module abnormality) is detected"
When you touch the screen during
record.
ON
ON
OFF
* “peep” touch sound
* “Click” shuttler sound. ( It doesn't work when event occurs )
When taking still shot
ON
ON
OFF
Normal parking record
ON/OFF
ON
ON/OFF
Parking record for motion : No detection
ON/OFF
ON
ON/OFF
* When starting parking mode(Normal , Shock, Motion) ,B LED goes ON
and G,R LED goes in and out.
List
LED
GUI and speaker
Blue
Red
ON/OFF
ON/OFF
ON/OFF
ON
ON /OFF
Event record during park (Shock sensor)
ON/OFF
ON/OFF
Playmode start (Play recorded images back)
Swiching over to recording mode from
play mode
Firmware update
ON
OFF
OFF
ON
ON
OFF
* Record starts.
ON
ON
ON
* All LED, G, B, R, are on until completing upgrade.
SD Card format
ON
OFF
OFF
* Touch "format" on the format menu.
* " It starts to format" voice information
* Voice information "It is completed format" when finishing format
Parking record for motion : Detection
OFF
OFF
* Device trills when event is occurred
ON/OFF * Device trills when event is occurred
* It is play mode.
* RED LED is on and it starts to finish recording at the same time.
After device shut down, RED LED will be turned off. (In order to
save recorded files safely, take SD Card out after Red LED turns
ON/OFF
off)
* System terminates after 3 seconds recording at the same time as
power-off.
* LCD screen turns off at the same time as power-off.
15
Etc.
※ These information can be changed without advance notice in order to improve performance.
Vi ewer pro gram
Power Off
OFF
U s ing Product
Event record while driving ( G-sensor )
Green
Be fore us ing
Operation and Error
Information _ POP-UP
Warning message
It is displayed at the same time as
the case on both of booting after
power supply and rebooting.
Touch adjustment
message
It is displayed when you touch
"Touch adjustment".
No SD Card message
It is displayed when SD card doesn't
inserted at device, and if you put
SD card in device, it restarts with
rebooting.
SD card format message
It is displayed until completing SD
card format, and it starts to reboot
after format completion.
Upgrade message
It is displyed until completing
firmware upgrade, and it starts to
reboot after upgrade completion .
Be fore us ing
Information _ POP-UP
Camera error message
It is displayed when detecting abnormality on camera.
Recording stop message
Recording start message
It is dispalyed when switching from play mode to recording mode and going to recording mode
after selection of image quality at menu of recording set.
U s ing Product
It is displayed when starting playmode, selecting image quality for recording and choosing SD
format at SD Memory.
※ These information can be changed without advance notice in order to improve performance.
Vi ewer pro gram
Etc.
17
GUI of Menu
1. Power ON
1) 3 seconds for intro image.
2) ‘Voice Information’
Don’t operate this device while driving for your
safety and “Start to record”
After above voice information, start real-time
image.
2. Real-Time image
: Driving mode
: Parking mode
: GPS connection icon ON
DRV INF
G-S EVT
IMG CAP
S-S EVT
MAN EVT
Real time Record
Event by G-sensor
Capture(Taking photo)
Event by shock sensor at
parking mode
Manual event record
PRK MOT
Parking motion mode
MOT INF
Parking motion record
PRK SHO Parking Shock(impact) mode
PRK INF
Real time mode while parking
3. Menu Screen
Manual record : Button for manual recording (Manual event record)
Player : Click this button when you want to see images recorded
through LCD panel of device.
Screen off : Click this button when you want to turn LCD off.
Settings : Click this button in order to set product parameter.
U s ing Product
Capture : Click this button when you want to take photos you want.
( To be saved photos both of front and rear at PHOTO folder)
Be fore us ing
GUI of Menu
4. Playback of record images (Infinite:Real time files)
Drive : The real time recorded file lists at only while driving are displayed.
Park : The real time recorded file lists rded in lists at only while parking are displayed.
Front : Channel selection( Front/Rear)
△/▽ : Page up and down
Vi ewer pro gram
All : All the real time recorded file lists are displayed.
Play button : Click this button to play chosen file back
Etc.
19
GUI of Menu
5. To display recorded images (Event files)
▶ In order to display event file lists, touch “Event”.
All : Display all the event files
G-sensor : Display event files recorded by G-sensor
Shock sensor : Display event files recorded by Shock sensor
Manual : Display event files by manual record.
6. To display recorded images (Motion record files)
▶ In order to display motion record files, touch “ Motion”.
Play button : Click this button to play chosen file back
: Go back : : Go back to recording mode
7. To display recorded photos [Picture(Photo) files]
▶ In order to display recorded pictures, touch “Picture”
Rear : Display rear photo lists
8. Play recorded file back
STOP button
“Return” button to go file lists
Go to previous file
Go to next file
Etc.
Pause button : If you touch the screen under the freeze-frame,
that area is enlarged by 2.5times. And if you touch
it again, returning to original size.
21
Vi ewer pro gram
▶ When you touch the screen during playback, play bar and menu are
displayed.
U s ing Product
All : Display all photo file lists both of front and rear . (C1:Front/C2:Rear view)
Front : Display front photo lists
Be fore us ing
GUI of Menu
GUI of Menu
9. Setting
▶ If you press “setting” button at menu, setting menu will be
popped up.
10. Setting (Record setting)
▶ Touch “Record setting” in order to display its menu .
Video quality : setting of record quality
Go back to record
mode.
Parking record : setting of parking mode
Sensitivity of sensor : setting of G-sensor
Power cut : Setting of cut-off voltage
and time
Go back to previous
menu.
Be fore us ing
GUI of Menu
10-1. Record setting ( Video quality )
▶ In order to select menu of video quality, touch “Video quality”
2CH
Front
Rear
Low quality
6Mbps
4Mbps
3Mbps
Normal quality
8Mbps
5Mbps
4Mbps
U s ing Product
Channel
1CH
High quality
10Mbps
6Mbps
5Mbps
10-2. Record setting ( Parking record )
real time(infinite) record : A continuous record at 10fs.
Motion record : record and save only in case of detecting motion.
Vibrate record : Record and save in case of working shocking sensor
Vi ewer pro gram
▶ Touch “parking record” on record setting menu in order to display
menu of parking record which is recorded at 10fs each channel.
Event by impact is recorded, even though under the set of real time and motion record
Etc.
23
GUI of Menu
10-3. Record setting (Sensitivity of sensor)
▶ Touch “sensitivity of sensor” on recording setting in order to display
menu of sensitivity of sensor
- To set sensitivity of G-sensor under driving mode.
- G-sensor value is set by X+Y+Z
10-4. Record setting (Power cut)
▶ Touch “Power cut” on recording setting in order to display menu of
Power cut.
Current voltage : To display current voltage
- In order to prevent battery discharge, Power is cut off
automatically ,lasting more than 1 min. under the condition the
lower than setting voltage.
- The power of device is cut off after setting time under parking
mode
Be fore us ing
GUI of Menu
▶ Display of Parking voltage
11. Setting ( SD Memory )
U s ing Product
- If you touch “Parking voltage” at above menu, current voltage
and parking voltage at the beginning of parking mode are
displayed and inform you consumption of battery during parking.
Vi ewer pro gram
▶ Touch “setting” on menu in order to display ‘SD Memory”
SD format : Icon for format of SD memory card.
Format alarm : To set the time to do format of SD card.
SD Info : To display information of SD memory.
Etc.
25
GUI of Menu
11-1. SD Memory ( SD Format )
▶ Touch “SD format” on SD Memory in order to display execution
screen for SD Format
OK : Button for format of SD Memory. After completing format, it is
rebooted automatically.
Cancel : Go back to previous menu.
11-2. SD Memory ( Format Alarm )
▶ Touch “Format Alarm” on SD Memory in order to display alarm
setting menu.
- After formatting SD memory in device, set the time of alarm,
which will inform you of format alarm after elapsed time.
- If you touch “cancel” on SD Format, it goes back to previous
screen.
- If you touch “ Format” on SD Format, it works automatically and
then reboots after completion
Be fore us ing
GUI of Menu
11-3. SD Memory ( SD Info )
▶ Touch “SD Info” on menu of SD Memory in order to display setting
and use amount of memory
Vi ewer pro gram
Volume : Setting volume level of speaker or MIC.
U s ing Product
12. Setting (System setting)
▶ Touch “system setting” on Setting menu in order to display its
menu
Screen : Setting brightness level, screen off time and wrong
coordination of touched location.
PIP : Display ‘PIP’, picture in picture, under 2 channel.
Time : To set Year,Month,Day,Hour, Minute,second.
System Info : Model, SW version, S.N number
Etc.
27
GUI of Menu
12-1. System setting (Volume)
▶ Touch “Volume” on system setting in order to display menu of
volume
Speaker : 1~5 stages
MIC : 1~5 stages
12-2. System setting (Screen setting)
Brightness : 1~3 stages
Screen off : To set screen off time after starting car.
Touch adjustment : To adjust touched location followed by guide
information .
Be fore us ing
GUI of Menu
12-3. System setting (PIP)
▶ Touch “PIP” on system setting in order to display menu of PIP
setting
.
U s ing Product
- Select the location of PIP under 2 channel operation, which are
left upper end, right top, lower end of left and right lower end.
12-4. System setting (Time)
- Input year, month, date, hour, minute and second by using
below numeric keypad and then touch “ OK”
Vi ewer pro gram
▶ Touch “Time” on system setting in order to display menu of time
set
- If you input wrong number, touch “Init” to correct it.
29
Etc.
[OK] If you touch it, time is set.
GUI of Menu
12-5. System setting (System Info)
▶ Touch “ System Info” on setting in order to display device information
- Model Name
- S/W Version Info.
- Serial Number
- Micom Ver.
U s ing Product
1. Pls, connect “web-site” of our company and then down load “FIRMWARE” file.
- Web-site : www.elsrodinotec.com
2. Decompress downloaded file.
3. Copy decompressed file and then paste it on upgrade folder of SD CARD.
4. Supply power after input SD card into device.
5. Update is progressed with information screen automatically, and real time recording mode starts safely after
rebooting.
Be fore us ing
How to upgrade
Vi ewer pro gram
Etc.
31
How to install viewer program on PC
● Pls, connect our wet-site,www.elsrodinotec.com, and down load exclusive viewer installation file,
name of BE_PC_Player. And the follow the below steps in order to install viewer program.
After completion of installation, you can see
the above icon on PC monitor .
Be fore us ing
Viewer program
① Main screen (Front & Rear view or Map)
② Sub screen (Front & Rear view or Map)
③ Driving condition Play status BAR
U s ing Product
④ Speed meter ( installation of GPS only)
⑤ G-sensor Info (Shock sensor Info)
⑥ Main screen selection button
(Front, Rear, Map)
⑦ Playback selection button
Vi ewer pro gram
(real time, Event, Motion)
⑧ Sub screen selection button
(Rear , Map)
Etc.
33
Viewer program
ⓐ Go back to previous file
ⓖ Go to next frame
ⓜ Screen capture
ⓑ Rewind button (1 second before)
ⓗ Opening file
ⓝ PIP location setting button UP/
ⓒ Play // Pause
ⓓ Stop
ⓔ Forward button (1 second after)
ⓕ Go to next file
ⓘ Save file button
ⓙ Control brightness of images
ⓚ Volume button
ⓛ Double speed playback
DOWN
ⓞ PIP location setting button LEFT/
RIGHT converting (rear view)
ⓟ Setting
ⓠ format
Current
350 ~ 450mA
Operating
Temp.
-20℃ ~ 65℃
Storage Temp. -30℃ ~ 85℃
Battery Capa.
ELDC 3.0F/5.4V( To save last image )
Recording
Mode
Real time
Record
Event Record
Real time/Event & Forced urgent recording/
Impact record/Motion record.
Motion Record
Flash-lighting
SD Format
PC – Viewer
F/W Upgrade
At every 2 minutes
10 sec. before event and 20 sec. after event (30sec.)
10 sec. before motion and 20 sec. after
motion(30sec.)
Working 2 seconds flash lighting 5times under low
sensitive during the car park
SD format for device
Exclusive PC viewer( Win XP , Vista , Win 7 )
Media, GOM Player
Support F/W upgrading
※ Above specifications and functions can may be changed
without notice in advance in order to upgrade product
performance.
Etc.
35
Vi ewer pro gram
BLACK EYE - MAX Ⅱ
Black
117(W) X 63(H) X 23(D)
2 channel (Front/Rear view)
Front / Rear view : Opposite angle 120°
0.5 LUX above
HD LED ( RED , GREEN , BLUE )
4.0” (800 X 480) Touch Panel
Front: 2 million pixel , Rear : 2 million pixel
Front:1280*720(HD),Rear:1280*720(HD)
MPEG4 (H.264)
1CH : Max 30fps
Frame
2CH : Front/Rear Max 30fps
Memory
Micro SD (16GB ~32GB)
Recording method
Over Writing
Audio recording
High sensitive internal MIC(ON/OFF support)
Audio Output
Speaker(to inform operating condition)
GPS
Outer mounted type ,Location/Time/Speed
Time
Internal RTC , (Automation with GPS)
G-sensor/Shock
3 dimensional accelerometer sensor (X,Y,Z) &
sensor
Shock sensor for parking
Working voltage range DC 12V ~ DC 24V
U s ing Product
Model
Color
Size (mm)
Channel (Front/Rear)
Lens angle (Front/Rear)
Illumination
Security LED
LCD
PIXEL
Resolution
Image Format
Be fore us ing
Specification
Compensation criteria of consumer’s damages
Damages
Contents
Major defects within 10 days after purchase.
Malfunction Need to repair at major parts within 1month after purchase.
due to pro Reoccur problem with 1 month after exchange.
duct defect
Defect occurrence
Repairable
Recurrence of defect
Repairable
Consumer’s
fault
Not repairable
1) Malfunction due to natural disaster like fire, damage from sea wind,
earthquake, Gas etc…
2) Malfunction due to repair or modification from unqualified person or
repair shop
3) In case of exchange of expendable parts under the natural normal use.
4) Malfunction due to user’s fault like impact, disassemble etc…
Under Warranty
Out of Warranty
One to one exchange
Exchange or free repairs
Free repairs
Exchange (Until 4 times)
N/A
Pay for repairs
Pay for repairs
Pay for repairs
Exchange with pay for
repair fee
Follow other criteria
of our company
Pay for repairs
Pay for repairs
Be fore us ing
Check items before claim
● Don’t’ use this device for other purpose except to Car Black Box.
● Pls, back up all the data saved at Micro SD card into PC because it might be happened to be deleted recorded
data for repairing this device.
U s ing Product
● It is considered that user already backed up all the data saved at SD Card in order to repair it before deposited
at service center. So, Service center does not back up data recorded at SD Card and our company is not liable
for deleted date for repair this device.
● Pls, pack properly not to be exposed on impact and breakage during transport and enclose sender’s name,
address, telephone number and troubles with product.
● Self-checking method on malfunction
Trouble shooting
Vi ewer pro gram
Trouble
No main power
Check wiring between main body and cigar-jack
LCD is not touched
Try to reboot
Display wrong time
Reset Correct exact time at Time set in main screen in case that GPS is not installed
GPS is not working
Check connection of GPS
No display of rear images
Check wires of rear camera
Pls, ask customer’s center when you have problems and follow the instructions we provide.
Etc.
37
Be fore us ing
Warranty
Warranty Card
Product
BLACK EYE-MAXⅡ
Manufacturer
Elsrodinotec Co.,Ltd
U s ing Product
Seller
Serial NO.
Terms
Buyer
Customer center
.
.
20
Name
Tel. No.
Address
Name
1588-9301,
Tel. No.
Vi ewer pro gram
Seller
1 year from
www.elsrodinotec.com
● BLACK EYE-MAXⅡ comes with 1-year guarantee.
● One-year guarantee is applied to not only in-box contents but also other optional accessories.
( Micro SD CARD // Built-in battery : 6month )
39
Etc.
● This product is guaranteed as written in warranty card.
● Purchased date should be written in warranty card because warranty term is calculated from that date.
●Pls, see the “Compensation criteria” for your references.
www.elsrodinotec.com
#1011 Unitechvill, 1141-2, Baekseok 1- dong, Ilsandong-gu
Goyang-si, Gyeonggi-do, Korea