1
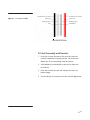
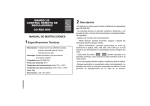
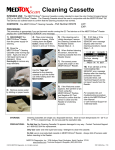
user manual
Electroblotting Systems
Complete Electroblotting System for 10 × 10 cm Mini Gels, Cat. No. E4103
Complete Electroblotting System for 20 × 20 cm Standard Gels, Cat. No. E4203
um DNTV100-EBK-IM/Rev. A0/08-11
Contents
Safety Warnings and Precautions
General Information
Packing Lists
System Details
Using the Denville Electroblotting Units
A. Attaching Electrode Leads to the Lid
B. Care and Maintenance
C. Tank and Cassette Preparation D. Final Assembly and Transfer
Ordering Information
Warranty
Disposal
ii
1
2
3
4
4
5
6
7
8
9
10
• pi
Safety Warnings and Precautions
Important user information
Please read this entire manual to fully understand the safe
and effective use of this product.
The exclamation mark within an equilateral triangle is
intended to alert the user to the presence of important
operating and maintenance instructions in the literature
accompanying the instrument.
Should you have any comments on this manual, we will be
pleased to receive them at:
Denville Scientific, Inc. P.O. Box 4588 Metuchen, NJ 08840-4588 Denville Scientific, Inc. reserves the right to make changes in
the specifications without prior notice.
When used correctly, these units pose no health risk.
However, these units can deliver dangerous levels of electricity
and are to be operated only by qualified personnel following
the guidelines laid out in this instruction manual.
The unit must never be used without the safety lid correctly
in position.
The unit should not be used if there is any sign of damage to
the external tank or lid.
These units comply with the statutory CE safety directives:
73/23/EEC: low voltage directive: IEC 1010-1:1990 plus
amendment 1:1992 EN 61010-1:1993/BS EN 61010-1:1993
• pii
General Information
The Denville Electroblotting Systems provide a cost-effective,
safe, and easy to use system for the transfer of proteins and
nucleic acids from 10 × 10 cm mini and 20 × 20 cm standard
gels. Both units are supplied with four asymmetric color-coded
cassettes as a unique design feature to prevent them from
being inserted into the tank in the wrong orientation, against
the direction of transfer. Operational
Model
Buffer Volume
Maximum Voltage
E4103
2 L
100 V
E4203
6.3 L
200 V
• p1
Packing Lists
The packing lists should be referred to as soon as the unit is
received to ensure that all components have been included.
The unit should be checked for damage when received. Be sure
to keep all packaging material for damage claims for to use
should it become necessary to return the unit. Please contact
your supplier if there are any problems or missing items. Complete Electroblotting System for 10 × 10 cm Mini Gels
Package includes: Cooled tank, lid, a black cable, a red cable,
4× electroblotting cassettes, and 8× fiber pads. Complete Electroblotting System for 20 × 20 cm
Standard Gels
Package includes: Cooled tank, lid, a black cable, a red cable,
4× electroblotting cassettes, and 8× fiber pads.
• p2
System Details
Usage guidance and restrictions
• Maximum altitude 2000 m.
• Temperature range between 4 °C and 60 °C.
• Maximum relative humidity 80% for temperatures up to
31 °C decreasing linearly to 50% relative humidity at 40 °C.
• Not for outdoor use.
This apparatus is rated POLLUTION DEGREE 2 in accordance
with IEC 664. POLLUTION DEGREE 2, states that: “Normally
only non-conductive pollution occurs. Occasionally, however, a temporary conductivity caused by condensation must be expected”.
• p3
Using the Denville Electroblotting Units
A. Attaching Electrode Leads to the Lid
1 Note the position of the lid on the unit. This shows the
correct polarity and the correct orientation of the cables,
black is negative and red is positive.
2 Remove the lid from the unit. Note if the lid is not
removed, fitting the cables may loosen the gold plug and
cause damage to the electrode.
3 Screw the cables into the tapped holes as fully as possible
so that there is no gap between the lid and the leading
edge of the cable fitting.
4
• p4
Refit the lid.
B. Care and Maintenance
Units are best cleaned using warm water and a mild
detergent. Water at temperatures above 60 °C can cause
damage to the unit and components. The units should
not be left in detergents for more than 30 minutes. The tank
should be thoroughly rinsed with warm water and distilled
water to prevent build up of salts but care should be taken not
to damage the electrode. Vigorous cleaning is not necessary or
advised. Air drying is recommended before use.
Caution! The units should never come into contact with the
following cleaning agents, these will cause irreversible and
cumulative damage:
Acetone, Phenol, Chloroform, Carbon tetrachloride, Methanol,
Ethanol, Isopropyl alcohol, Alkalis.
Caution! DEPC is a suspected carcinogen. Always wear gloves
and safety glasses.
• p5
C. Tank and Cassette Preparation
1 Prepare the appropriate amount of transfer buffer (see
General Information, page 1).
2 Fill the tank halfway with transfer buffer.
3 Connect the cooling water supply to the tank base hose
connectors. Use hose clips to secure the tubing.
4 Add a magnetic stir bar to the tank to maintain uniform
temperature and conductivity during electrophoretic
transfer.
Note: Use gloves when
handling the compression
cassette components.
5 Pre-wet nitrocellulose or nylon membranes with distilled
water. Pre-wet PVDF membranes in methanol. Then soak
all membrane types in transfer buffer.
6 Familiarize yourself with the interlocking hinge of the
compression cassette.
7 Place the open cassette in a tray filled with transfer buffer
so that molecules will migrate toward the membrane (see
Figure 1). For negatively charged macromolecules (nucleic
acids and most proteins) build the transfer stack on the
red half of the cassette.
8 Place a fiber pad on the red half of the transfer cassette
and press until all air is expelled.
9 Place a sheet of blotting paper on the fiber pad and then
place the membrane on the blotting paper.
10 Place the gel — which contains a sample that has been
electrophoretically separated and equilibrated (if required)
with transfer buffer — on the membrane.
11 Use a clean glass rod soaked in transfer buffer to roll out
any trapped bubbles between the membrane and gel.
12 Cover the gel with a sheet of blotting paper and then
a second fiber pad, again pressing to gently expel any
trapped air.
13 Close the cassette and slide the clamping clip into place.
• p6
Compression cassette
Figure 1. Cassette Assembly.
Compression cassette
Fiber pad
Fiber pad
Blotting paper
Blotting paper
Gel
Membrane
Direction of transfer
D. Final Assembly and Transfer
1 Insert the cassette into one of the tank slots with the
transfer membrane facing the positive side of the tank.
Repeat for all cassettes being used for transfer.
2 Add additional transfer buffer to the tank to reach the
max fill line.
3 Place the lid onto the tank and connect the leads to a
power supply.
4 Set the voltage and current to suit the transfer application.
• p7
Ordering Information
Product
Complete Electroblotting System for 10 × 10 cm Mini Gels
Replacement parts and accessories: Hinged 10 × 10 cm cassette with 2 fiber pads
10 × 10 cm fiber pads, pkg/4
Complete Electroblotting System for 20 × 20 cm Standard Gels
Replacement parts and accessories: Hinged 20 × 20 cm cassette with 2 fiber pads
20 × 20 cm fiber pads, pkg/4
• p8
Cat. No.
E4103 E4136 E4137
E4203 E4236 E4237
Warranty
Denville warrants that the unit you have received has been
thoroughly tested and meets its published specification.
This unit (excluding all accessories) is warranted against
defective material and workmanship for a period of twelve
(12) months from the date of shipment ex factory.
Denville will repair all defective equipment returned during
the warranty period without charge, provided the equipment
has been used under normal laboratory conditions and in
accordance with the operating limitations and maintenance
procedures outlined in this instruction manual and when not
having been subject to accident, alteration, misuse or abuse.
No liability is accepted for loss or damage arising from the
incorrect use of this unit. Denville’s liability is limited to the
repair or replacement of the unit or refund of the purchase
price, at Denville’s option. Denville is not liable for any
consequential damages.
Denville reserves the right to alter the specification of its
products without prior notice. This will enable us to implement
developments as soon as they arise.
Denville’s products are for research use only.
A return authorization must be obtained from Denville before returning any product for warranty repair on a freightprepaid basis.
• p9
Disposal
T his equipment is marked with the crossed out wheeled
bin symbol to indicate that it must not be disposed of with
unsorted waste.
Instead it is your responsibility to dispose of your equipment
correctly at lifecycle-end by handing it over to an authorized
facility for separate collection and recycling.
It is also your responsibility to decontaminate the
equipment in case of biological, chemical and/or radiological
contamination, so that the persons involved in the disposal
and recycling of the equipment are protected from any
potential hazard.
For further information about where you can drop off
your waste equipment, please contact your local Denville
representative.
By doing so, you will help to conserve natural and
environmental resources and you will ensure that your
equipment is recycled in a manner that protects human health.
Thank you
• p10
Denville Scientific, Inc.
P.O. Box 4588
Metuchen, NJ 08840-4588
Toll Free: 1-800-453-0385
Phone: 1-908-757-7577
Fax: 1-908-757-7551
Email: [email protected]
Web: www.densci.com
© 2011 Denville Scientific, Inc. All rights reserved.
Printed in the USA.
• p11