1
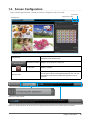
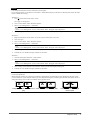
Ver. 1.0
Important
Please read this User’s Manual carefully to familiarize yourself with
safe and effective usage.
•The latest software and User’s Manual are available for download
from our web site:
http://www.eizo.com
No part of this manual may be reproduced, stored in a retrieval system, or transmitted, in any form or by any means,
electronic, mechanical, or otherwise, without the prior written permission of EIZO Corporation.
EIZO Corporation is under no obligation to hold any submitted material or information confidential unless prior
arrangements are made pursuant to EIZO Corporation’s receipt of said information. Although every effort has been
made to ensure that this manual provides up-to-date information, please note that EIZO software specifications are
subject to change without notice.
2

CONTENTS
Cover....................................................................... 1
CONTENTS.............................................................. 3
Chapter 1 Introduction........................................ 4
1-1.
About ColorNavigator Elements.................. 4
1-2.
Features.......................................................... 4
1-3.
Screen Configuration.................................... 5
Chapter 2 Setup................................................... 6
2-1.
System Requirements................................... 6
●●
●●
Computer.......................................................... 6
Monitor............................................................. 6
2-2.
Installing the Software.................................. 8
2-3.
Uninstalling the Software............................10
●●Macintosh......................................................... 8
●●Windows........................................................... 9
●●Macintosh........................................................10
●●Windows 8.1....................................................10
●●Windows 8.......................................................10
●●Windows 7.......................................................11
●●Windows XP....................................................11
Chapter 3 Adjusting the Monitor..................... 12
3-1.
Operation Flow..............................................12
3-2.
Preparing for Adjustment............................13
3-3.
Adjustment Procedure.................................14
Chapter 4 Reference......................................... 24
4-1.
Setting SelfCorrection................................ 24
4-2.
Checking for the Latest Software Version.25
4-3.
Displaying the Version Information........... 26
Chapter 5 Troubleshooting............................... 27
5-1.
Performance of the Software..................... 27
5-2.
Quality........................................................... 27
Chapter 6 Glossary........................................... 28
Appendix............................................................... 29
Trademark................................................................ 29
CONTENTS
3
Chapter 1 Introduction
1-1. About ColorNavigator Elements
ColorNavigator Elements is monitor adjustment software for the ColorEdge CS/CX series monitors. The color of
the monitor can be adjusted easily while comparing it with a printed picture.
1-2. Features
• Monitor adjustment functions
-- The color and luminance of the monitor can be adjusted while comparing a picture displayed on the
monitor with a printed picture.
-- Feature colors such as skin tone and sky tone can be adjusted individually so that a color displayed on the
monitor is close enough to that of a printed picture.
-- You can save three adjustment profiles, which you can easily call up to change the monitor settings as
desired by clicking “1” to “3.”
• SelfCorrection setting function
-- The monitor can be adjusted periodically using the SelfCorrection function.
4
Chapter 1 Introduction
1-3. Screen Configuration
When ColorNavigator Elements is started, the software is displayed in full screen mode.
Close button
“Preferences” button
Navigation bar
Operation area
Displays the progress of the software and operations to be
performed in the operation area.
Navigation bar
Operation area
“Preferences” button
Displays the “Preferences” dialog box.
Close button
Exits the software.
Displays messages from the software and images for monitor
fine adjustment. When a blue hyperlink appears, click it to open
the Website of the reference information (Internet access is
required).
The configuration of the navigation bar is as follows:
Displays the overall progress.
Displays the operation details as well as the button to be clicked when the operations in the operation area are completed.
Chapter 1 Introduction
5
Chapter 2 Setup
Set up the operating environment according to the following procedures.
2-1. System Requirements
●●Computer
Common
• Macintosh or Windows system that satisfies the Adobe AIR 3.0 or later system requirements.
• Resolution: recommended resolution of the monitor*1
• USB port: at least 1 free port is required*2
*1 See the User’s Manual of the monitor regarding the recommended resolution of the monitor.
*2 An EIZO USB cable (MD-C93) is required to connect the monitor to the PC.
Macintosh
• Operating System (OS): OS X Mavericks (10.9), OS X Mountain Lion (10.8), Mac OS X 10.7.5, 10.6.8
• Macintosh that satisfies the OS requirement
• Memory:
-- OS X Mavericks (10.9): 2 GB or more
-- OS X Mountain Lion (10.8): 2 GB or more
-- Mac OS X 10.7.5: 2 GB or more
-- Mac OS X 10.6.8: 1 GB or more
• 16.7 million or more colors
Windows
• Operating System (OS):
-- Windows 8.1 (32 bit edition and 64 bit edition)
-- Windows 8 (32 bit edition and 64 bit edition)
-- Windows 7 Service Pack 1 (32 bit edition and 64 bit edition)
-- Windows XP Service Pack 3 (32 bit edition)
• Memory:
-- Windows 8.1 (32 bit edition): 1 GB or more
-- Windows 8.1 (64 bit edition): 2 GB or more
-- Windows 8 (32 bit edition): 1 GB or more
-- Windows 8 (64 bit edition): 2 GB or more
-- Windows 7 (32 bit edition): 1 GB or more
-- Windows 7 (64 bit edition): 2 GB or more
-- Windows XP (32 bit edition): 512 MB or more
• Color: 24 bits or more
●●Monitor
• EIZO ColorEdge CS/CX series monitors*3
*3 The portrait display position of the monitors cannot be used. Be sure to use the landscape display position.
6
Chapter 2 Setup
Attention
• ColorNavigator Elements cannot be used with ColorNavigator.
• If your OS is Windows 8.1, Windows 8 or Windows 7 and Windows Display Calibration is enabled, please follow the steps
below to disable this setting.
Windows 8.1
1. Click
at the bottom of the “Start” screen.
The “Apps” screen appears.
2. Click “Control Panel” under “Windows System”.
3. Select “Color Management” - “Advanced”.
Note
• Search “Color Management” on the “Control Panel” home. The applet will be displayed.
4. Click “Change system defaults” and select the “Advanced” tab of the displayed dialog box.
Windows 8
1. Right-click the mouse on the “Start” screen at a position where there are no tiles.
2. Click “All apps”.
3. Click “Control Panel” under “Windows System”.
4. Select “Color Management” - “Advanced”.
Note
• Search “Color Management” on the “Control Panel” home. The applet will be displayed.
5. Click “Change system defaults” and select the “Advanced” tab of the displayed dialog box.
6. Uncheck the “Use Windows display calibration” check box.
Windows 7
1. Click the Start button and select “Control Panel”.
2. Select “Color Management” - “Advanced”.
Note
• Search “Color Management” on the “Control Panel” home. The applet will be displayed.
3. Click “Change system defaults” and select the “Advanced” tab of the displayed dialog box.
4. Uncheck the “Use Windows display calibration” check box.
• A USB hub may be required if adjusting several monitors in a multiple monitor environment. Also, USB cables are required
for monitor adjustment.
• When multiple monitors are connected, each monitor should display an independent screen. Displaying the same screen
on each monitor or across multiple monitors prevents adjustment using the ColorNavigator Elements. For details of how to
change the settings, refer to the User’s Manual of the graphics board.
A
B
A
A
Independent screen on each monitor Same screen on each monitor (NG)
(OK)
A
Screen spread across multiple
monitors (NG)
Chapter 2 Setup
7
2-2. Installing the Software
●●Macintosh
To Install the software from the CD-ROM
1.Insert the “EIZO LCD Utility Disk” to the CD-ROM drive
The “EIZO LCD Utility Disk” icon appears on the desktop. Double-click the icon to open the window.
2.Double-click “ColorNavigator Elements” folder on the window
3.Double-click “ColorNavigator Elements.pkg” icon on the window
The ColorNavigator Elements installer starts up.
4.Install the software
Follow the instructions to install the software.
To download and install the software from our website
1.Double-click the downloaded file
The “ColorNavigator Elements” icon is displayed on the desktop. Double-click the icon to open the window.
Note
• The “ColorNavigator Elements” folder may open automatically depending on your system environment.
2.Double-click the “ColorNavigator Elements.pkg” icon on the window
The installer starts up.
3.Install the software
Follow the instructions to install the software.
8
Chapter 2 Setup
●●Windows
Attention
• A user account with the “Administrator” authority is required.
• Please consult your system administrator regarding your account.
To install the software from the CD-ROM
1.Insert the “EIZO LCD Utility Disk” to the CD-ROM drive
The menu opens. Click the “Software” tab.
Click “ColorNavigator Elements” - “Install” on the start menu. The ColorNavigator Elements installer starts
up.
Note
• Double-click the “Launcher.exe” icon if the menu does not open automatically.
• If your OS is Windows 8.1, Windows 8 or Windows 7, the “Security Warning” dialog box may appear when you doubleclick “Launcher.exe”. Click “Run” to open the menu.
2.Install the software
Follow the instructions to install the software.
Chapter 2 Setup
9
To download and install the software from our website
1.Double-click the downloaded file
The installer starts up.
2.Install the software
Follow the instructions to install the software.
2-3. Uninstalling the Software
●●Macintosh
1.Delete the “ColorNavigator Elements” icon in the “Application” folder
The software uninstallation process is completed.
Attention
• Before reinstalling the software, execute “Empty Trash” for the system.
●●Windows 8.1
Attention
• A user account with the “Administrator” authority is required.
• Please consult your system administrator regarding your account.
1.Click
at the bottom of the “Start” screen.
The “Apps” screen appears.
2.Click “Control Panel” under “Windows System”.
3.Select “Uninstall a program”, and click it
4.Select “ColorNavigator Elements” from the list and click “Uninstall”
●●Windows 8
Attention
• A user account with the “Administrator” authority is required.
• Please consult your system administrator regarding your account.
1.Right-click the mouse on the “Start” screen at a position where there are no
tiles.
2.Click “All apps”.
3.Click “Control Panel” under “Windows System”.
4.Select “Uninstall a program”, and click it
10
Chapter 2 Setup
5.Select “ColorNavigator Elements” from the list and click “Uninstall”
●●Windows 7
Attention
• A user account with the “Administrator” authority is required.
• Please consult your system administrator regarding your account.
1.Click the Start button and select “Control Panel”.
2.Select “Uninstall a program” from “Control Panel”, and click it
3.Select “ColorNavigator Elements” from the list and click “Uninstall”
●●Windows XP
Attention
• A user account with the “Administrator” authority is required.
• Please consult your system administrator regarding your account.
1.Click the “Start” and select “Control Panel”.
2.Select “Add and remove programs” from “Control Panel”, and double-click “Add
and remove programs”
3.Select “ColorNavigator Elements” from the list and click “Remove”
Chapter 2 Setup
11
Chapter 3 Adjusting the Monitor
This section describes adjustment procedures when one monitor is connected to a PC.
3-1. Operation Flow
The main operation flow of ColorNavigator Elements is as follows:
1.Prepare for adjustment
Set up the environment for monitor adjustment (see “3-2. Preparing for Adjustment” (page 13)).
2.Start up ColorNavigator Elements
Start up ColorNavigator Elements (see “1. Start up ColorNavigator Elements” (page 14)).
3.Set up the monitor
1. Select a monitor. (If multiple supported monitors are connected.)
Select a monitor for adjustment (see “2. If multiple supported monitors are connected, select a monitor for adjustment.”
(page 15)).
2. Selecting an adjustment number
Select the location (adjustment number) to save the adjustment results.
3. Select a function.
When selecting an adjustment number that has not been assigned, perform basic setup for the monitor. When you
select an adjustment number that has already been assigned, select either “Set up,” “Printing,” or “Adjustment.”
(see “3. Select a function” (page 16)).
4. Set up the monitor.
Set up the white and color gamut of the monitor (see “4. Perform basic setup” (page 17)).
4.Print the picture you want to color match
see “5. Print out a picture” (page 17)
5.Take screen capture of the picture
Take screen capture of the picture by the ColorNavigator Elements (see “6. Capture a picture” (page 19)).
6.Adjust the monitor to match the color of the printed picture
Perform fine adjustment of the monitor (see “7. Adjust the monitor” (page 20)). When the fine adjustment is
completed, the setting is saved on the monitor. After that, save the SelfCorrection settings to the monitor (see “8.
Set SelfCorrection” (page 23)).
The process is completed.
12
Chapter 3 Adjusting the Monitor
3-2. Preparing for Adjustment
1.Connect the USB upstream port of the monitor and the USB downstream port
of the PC with a USB cable
USB
Attention
• The signal cable needs to be connected to display a screen on the monitor. Refer to the Setup Guide of the monitor in
use for details.
• When the monitor is equipped with multiple USB upstream ports, use the port that is associated with the input signal to
be displayed. For details, see the User’s Manual of the monitor.
2.Turn on both the monitor and PC before starting up the software
The monitor display is not stabilized immediately after the monitor power is turned on, and adjustment cannot
be performed correctly. Therefore, you need to turn on the monitor and wait for a while until the monitor
display is stabilized. This is called warming-up. The warming-up time varies depending on the monitor being
used. For details on the warming-up time, see the User’s Manual of the monitor.
Attention
• Before performing SelfCorrection, 60 minutes or more are required to stabilize the monitor.
Chapter 3 Adjusting the Monitor
13
3-3. Adjustment Procedure
1.Start up ColorNavigator Elements
Attention
• Do not disconnect the USB cables of the monitor while running the software. Doing so may result in a system freeze or
software malfunction.
●●Macintosh
1. Double-click the “ColorNavigator Elements” icon in the “Application” folder.
The “ColorNavigator Elements” icon appears in the Dock and then the software starts up.
●●Windows 8.1
1. Click
on the “Start” screen and then click “ColorNavigator Elements” on the “Apps” screen.
After the screen is switched to the desktop, the “ColorNavigator Elements” icon appears on the Task bar, and the
software starts up.
●●Windows 8
1. Click the tile displayed as “ColorNavigator Elements” in the Start Screen.
After the screen is switched to the desktop, the “ColorNavigator Elements” icon appears on the Task bar, and the
software starts up.
●●Windows 7 / Windows XP
1. Click “Start” - “All Programs” - “EIZO” - “ColorNavigator Elements” - “ColorNavigator Elements” (or
double-click the “ColorNavigator Elements” shortcut icon on the desktop).
The “ColorNavigator Elements” icon appears on the Task bar and then the software starts up.
Note
• Upon startup of ColorNavigator Elements, the availability of a newer version will be checked for on our website by
default. If a newer version is available, instructions will be displayed. Update the software according to the instructions.
• Update checking can be disabled for startup or performed at any time. For more information, see. “4-2. Checking for the
Latest Software Version” (page 25)
When ColorNavigator Elements is started, the Start Screen is displayed.
14
Chapter 3 Adjusting the Monitor
Click to display the User’s Manual (this document).
Click “Start”.
2.If multiple supported monitors are connected, select a monitor for adjustment.
A monitor selection window is displayed.
1. Select the monitor for adjustment from the pull-down menu.
The monitor information window (OSD) is displayed on the selected monitor.
2. Drag and drop the monitor selection window to the monitor for adjustment.
Chapter 3 Adjusting the Monitor
15
Click “OK” to open the function selection window.
Attention
• The screen layout (arrangement of buttons) may differ according to the OS. This User’s Manual adopts the Windows
format. (See “3. Select a function” (page 16) for an example.)
Windows
Macintosh
3.Select a function
• When you select an adjustment number that has not been assigned, click “Set up” and proceed with “4.
Perform basic setup” (page 17).
• When you choose an assigned adjustment number, you can select “2.3. Printing” or “4. Adjustment.”
-- When “2. 3. Printing” is clicked, proceed to “5. Print out a picture” (page 17).
-- When “4. Adjustment” is clicked, proceed to “7. Adjust the monitor” (page 20).
Note
• When you select an adjustment number that has been assigned, the previously set adjustment profile is displayed on
the monitor.
• You can edit the name of adjustment numbers that have already been assigned.
• Start editing by clicking “Edit.” You can enter up to 64 characters.
• Quit editing by clicking “Done.”
• “Not adjusted” is displayed for adjustment numbers that have not been assigned. You cannot edit the name until the
adjustment is completed.
16
Chapter 3 Adjusting the Monitor
4.Perform basic setup
The monitor display is set so that it is optimum for viewing pictures, based on the information of the monitor.
A message appears first.
Click “OK” to start the setup.
When the operation is completed, a message appears. Click “Next”.
5.Print out a picture
Print out a picture for color matching to prepare for the monitor color adjustment.
• To print out a picture supplied with ColorNavigator Elements and use it for the monitor adjustment, click “Print
a picture supplied by EIZO.” to proceed to “When “Print a picture supplied by EIZO.” is clicked” (page 18).
• To print out your picture, click “Print a picture you took.” to proceed to “When “Print a picture you took.” is
clicked” (page 18).
Chapter 3 Adjusting the Monitor
17
●●When “Print a picture supplied by EIZO.” is clicked
1. Click “OK”.
The folder in which the picture is saved appears on the desktop. For ColorNavigator Elements, only the navigation bar
is displayed.
2. Open the picture “eizo_standard” using your standard software for picture printing.
3. Print out the picture.
Note
• Use the following procedures to compare the printout and the monitor display and make fine adjustments to the
monitor. For this purpose, the picture will be loaded to ColorNavigator Elements. Do not exit the software used for
printing.
4. Proceed to “6. Capture a picture” (page 19).
●●When “Print a picture you took.” is clicked
1. Click “OK”.
Only the navigation bar of ColorNavigator Elements is displayed.
2. Open the picture you took using your standard software for picture printing.
3. Print out the picture.
Note
• The picture will be captured to ColorNavigator Elements, so do not exit the software used for printing.
4. Proceed to “6. Capture a picture” (page 19).
18
Chapter 3 Adjusting the Monitor
6.Capture a picture
To adjust the color while comparing the printed picture with the picture displayed on the monitor, capture the
picture to ColorNavigator Elements.
Note
• Please wait until the printed picture is dry to improve the color matching accuracy.
1. Open the picture printed in “5. Print out a picture” (page 17) using the software used for printing the picture
again if you have closed it.
Attention
• If the picture is opened using other software, the monitor cannot be adjusted correctly. Be sure to open the picture
with the software used for picture printing.
• For correct monitor adjustment, set the software in the same way as for picture printing.
2. Click “Capture” on the right side of the navigation bar.
A message appears.
Chapter 3 Adjusting the Monitor
19
3. Click “OK”.
A box appears in the operation area for specifying the capture area of the picture.
The area within the dotted lines will be loaded to the software. Adjust the size of the box using the squares on the four
corners.
4. Adjust the capture area of the picture using the mouse, and click “Capture”.
The picture is loaded to the software, and the picture for adjustment is displayed in the operation area.
7.Adjust the monitor
●●Adjust the luminance and color of the monitor
Enlarges the picture. You can move the displayed section by
dragging the sample picture.
Click the “White” tab to make fine adjustments to the luminance and color of the monitor.
1. First, adjust the luminance of the monitor using the
and
Note
• For rough luminance adjustment, the slider is useful.
and
buttons are useful.
• For fine luminance adjustment, the
20
Chapter 3 Adjusting the Monitor
buttons and the slider.
2. Adjust the color of the monitor.
Make a fine adjustment to the color of the monitor using the blocks shown above. Place the printed picture beside the
monitor and adjust the color of the monitor by comparing the printed picture with the picture displayed on the monitor.
During adjustment, use the frame color of the 3-by-3 thumbnail image for reference. When you click a thumbnail
image, the display on the monitor changes to the same color as the selected thumbnail.
The color scheme can be adjusted using the slider shown on the right.
Minimum color scheme
Standard color scheme
Maximum color scheme
Note
• The center image shows the current color of the monitor.
• The scheme increases based on the center image. For example, the adjustment result displayed after the upper right
image is selected can be canceled when the lower left image is selected.
To return to the state before adjustment, click “Reset”.
Chapter 3 Adjusting the Monitor
21
●●Fine adjustments to the feature colors
Click the “Feature colors” tab and make fine adjustments to the colors of the skin tone (yellow) and sky tone
(blue) individually.
Attention
• The feature colors other than yellow and blue cannot be adjusted.
• The color saturation cannot be adjusted.
Note
• For rough adjustment of the feature colors, the slider is useful.
• For fine adjustment of the feature colors, the
and
buttons are useful.
When the fine adjustments are completed, click “Complete adjustment” on the navigation bar.
22
Chapter 3 Adjusting the Monitor
8.Set SelfCorrection
Note
• To change the SelfCorrection execution time or disable SelfCorrection, open “Preferences…” and chenge the setting (see
“4-1. Setting SelfCorrection” (page 24)).
• By default, SelfCorrection is set to execute after 200 hours (monitor usage time).
A message to start the SelfCorrection setting is displayed. Click “OK” to start the SelfCorrection setting.
When the SelfCorrection setting is completed, a message is displayed.
The name can be edited.
Clicking “Back to Adjustment Number Selection” displays the selected screen of the adjustment number (page 16).
Click “Exit” to quit ColorNavigator Elements.
The monitor adjustment is completed.
Chapter 3 Adjusting the Monitor
23
Chapter 4 Reference
4-1. Setting SelfCorrection
Enabling/disabling of SelfCorrection and execution timing can be changed.
Attention
• Before performing SelfCorrection, it is necessary to wait 60 minutes or more after the monitor power is turned on to
stabilize the monitor.
Note
• For details on SelfCorrection, refer to the User’s Manual of the monitor.
• If multiple adjustment results are saved, SelfCorrection is performed with respect to all adjustment results at the same time.
1.Click “Preferences”
The “Preferences” dialog box is displayed.
2.Select the “Settings” tab
The “Settings” window is displayed. Set enabling/disabling and usage time (intervals for execution) for
SelfCorrection.
Select the checkbox to enable SelfCorrection.
SelfCorrection starts when the monitor shifts to the power saving mode
24
Chapter 4 Reference
4-2. Checking for the Latest Software Version
Checking for updates automatically when ColorNavigator Elements starts up can be enabled or disabled and
checking for the latest software version can be performed at any time.
1.Click “Preferences”
The “Preferences” dialog box is displayed.
2.Select the “Settings” tab
The “Settings” window is displayed.
When the checkbox is selected, ColorNavigator Elements checks for the
latest software version on startup.
3.Click “Check for updates now”
A message is displayed if a newer software version is available on our website. Update the software according
to the displayed instructions.
Chapter 4 Reference
25
4-3. Displaying the Version Information
The version information is displayed.
1.Click “Preferences”
The “Preferences” dialog box is displayed.
2.Select the “Version” tab
The version information window appears.
26
Chapter 4 Reference
Chapter 5 Troubleshooting
If a problem still remains after applying the suggested remedies, contact your local EIZO representative.
5-1. Performance of the Software
Problem
1. Software cannot be installed.
2. Monitor cannot be recognized /
software cannot be started.
3. The software cannot be reinstalled
after being uninstalled.
Possible cause and remedy
• Check whether the PC meets the requirements for operation
described in “2-1. System Requirements” (page 6).
• Check whether the monitor meets the requirements for operation
described in “2-1. System Requirements” (page 6).
• Check whether the USB cables are connected properly.
• If you use a ColorEdge CG series monitor, ColorNavigator
Elements does not work. Use ColorNavigator instead.
• If you use Mac OS X, execute “Empty Trash” for the system, and
reinstall the software.
5-2. Quality
Problem
1. The colors on the screen and picture
do not match.
2. Periodic monitor adjustment
Possible cause and remedy
• Use white paper. Perform adjustment using two-ply pieces of
paper so that color and light cannot be seen through the paper.
• Adjust the luminance before adjusting the color.
• Adjust the skin tone and sky tone as the final fine adjustment.
• For lightening, use a fluorescent tube with high color rendering
properties.
• Use SelfCorrection (see “4-1. Setting SelfCorrection” (page 24)).
Chapter 5 Troubleshooting
27
Chapter 6 Glossary
Adobe RGB
This is a definition of the practical RGB color space proposed by Adobe Systems in 1998. The color
reproduction range (color gamut) is broader than sRGB, and is highly adaptable to such fields as printing etc.
Gamma
Generally, the monitor luminance varies nonlinearly with the input signal level, which is called “Gamma
Characteristic”. A small gamma value produces a low-contrast image, while a large gamma value produces a
high-contrast image.
Resolution
A measurement that defines the clarity with which an image can be represented. It is defined by the number
of pixels which can be displayed per line multiplied by the number of lines on the screen such as “1024 ×
768”. The more number of pixels, the more information the image has.
sRGB (Standard RGB)
International standard for color reproduction and color space among peripheral devices (such as monitors,
printers, digital cameras, scanners). As a form of simple color matching for the Internet, colors can be
displayed using tones close to those of the transmission and reception devices.
28
Chapter 6 Glossary
Appendix
Trademark
The terms HDMI and HDMI High-Definition Multimedia Interface, and the HDMI Logo are trademarks or
registered trademarks of HDMI Licensing, LLC in the United States and other countries.
VESA is a registered trademark of Video Electronics Standards Association.
Acrobat, Adobe, Adobe AIR, and Photoshop are registered trademarks of Adobe Systems Incorporated in the
United States and other countries.
AMD Athlon and AMD Opteron are trademarks of Advanced Micro Devices, Inc.
Apple, ColorSync, eMac, iBook, iMac, iPad, Mac, MacBook, Macintosh, Mac OS, PowerBook, and QuickTime
are registered trademarks of Apple Inc.
ColorMunki, Eye-One, and X-Rite are registered trademarks or trademarks of X-Rite Incorporated in the United
States and/or other countries.
ColorVision and ColorVision Spyder2 are registered trademarks of DataColor Holding AG in the United States.
Spyder3 and Spyder4 are trademarks of DataColor Holding AG.
ENERGY STAR is a registered trademark of the United States Environmental Protection Agency in the United
States and other countries.
GRACoL and IDEAlliance are registered trademarks of International Digital Enterprise Alliance.
NEC is a registered trademark of NEC Corporation.
PC-9801 and PC-9821 are trademarks of NEC Corporation.
NextWindow is a registered trademark of NextWindow Ltd.
Pentium is a registered trademark of Intel Corporation in the United States and other countries.
PowerPC is a registered trademark of International Business Machines Corporation.
PlayStation is a registered trademark of Sony Computer Entertainment Inc.
PSP and PS3 are trademarks of Sony Computer Entertainment Inc.
RealPlayer is a registered trademark of RealNetworks, Inc.
TouchWare is a trademark of 3M Touch Systems, Inc.
Windows, Windows Media, Windows Vista, SQL Server, and Xbox 360 are registered trademarks of Microsoft
Corporation in the United States and other countries.
EIZO, the EIZO Logo, ColorEdge, DuraVision, FlexScan, FORIS, RadiCS, RadiForce, RadiNET, Raptor, and
ScreenManager are registered trademarks of EIZO Corporation in Japan and other countries.
ColorNavigator, EcoView NET, EIZO EasyPIX, EIZO ScreenSlicer, i • Sound, Screen Administrator, and UniColor
Pro are trademarks of EIZO Corporation.
All other company and product names are trademarks or registered trademarks of their respective owners.
Appendix
29
http://www.eizo.com
Copyright © 2012-2013 EIZO Corporation All rights reserved.
5th Edition-December, 2013
03V24227E1
(U.M-CNELEMENTS)