1
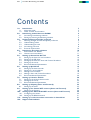
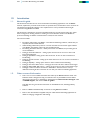
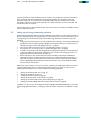
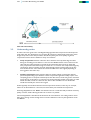
1/34
Live Video Broadcasting over BGAN
BGAN solutions guide
Live Video
Broadcasting
over BGAN
Version 01
05.10.06
www.inmarsat.com/bgan
Whilst the information has been prepared by Inmarsat in good faith, and all reasonable efforts have been made to ensure its accuracy, Inmarsat makes no warranty or
representation as to the accuracy, completeness or fitness for purpose or use of the information. Inmarsat shall not be liable for any loss or damage of any kind, including
indirect or consequential loss, arising from use of the information and all warranties and conditions, whether express or implied by statute, common law or otherwise, are
hereby excluded to the extent permitted by English law. INMARSAT is a trademark of the International Mobile Satellite Organisation, Inmarsat LOGO is a trademark of
Inmarsat (IP) Company Limited. Both trademarks are licensed to Inmarsat Global Limited. © Inmarsat Global Limited 2006. All rights reserved.
2/34
Live Video Broadcasting over BGAN
Contents
1.0.
Introduction
1.1.
About this guide
1.2.
Other sources of information
2.0.
Introducing audio/video over BGAN
2.1.
Introducing broadcasting solutions
2.2.
Setting up and using broadcasting solutions
3.0.
Understanding audio/video protocols
3.1.
Selecting the right terminal and Quality of Service
3.2.
Understanding codecs
3.3.
Understanding bit rates
3.4.
Introducing protocols
3.5.
Protocol requirements
4.0.
Introducing broadcast solutions
4.1.
Performance over BGAN
4.2.
General recommendations
5.0.
Setting up Streambox ACT-L3
5.1.
Setting up the client for Live broadcast
5.2.
Setting up the IFB client
5.3.
Setting up the client for Store and Forward broadcast
5.4.
Setting up the server
5.5.
Recommendations/Optimizations
6.0.
Setting up QuickLink
6.1.
Setting up the client encoder
6.2.
Setting up a server address
6.3.
Making a Live broadcast
6.4.
Making a Store and Forward broadcast
6.5.
Recommendations/Optimisation:
7.0.
Setting up Livewire M-Link
7.1.
Setting up the M-Link client encoder
7.2.
Setting up the server
7.3.
Recommendations/Optimization
8.0.
Setting up Clipway (Store and Forward)
8.1.
Setting up the client
9.0.
Setting up the Canon WiFi camera (Store and Forward)
9.1.
Setting up the Camera
10.0. Setting up the Nikon D2H WiFi camera (Store and Forward)
10.1. Configuring the camera
10.2. Setting up the BGAN terminal
11.0. Setting up a video broadcast connection in LaunchPad
12.0. Support and feedback
3
3
3
4
4
5
6
6
7
8
8
10
10
11
11
12
14
15
15
15
16
16
17
18
18
19
20
20
21
22
22
22
23
25
26
29
29
31
31
34
3/34
Live Video Broadcasting over BGAN
1.0.
Introduction
1.1.
About this guide
This document describes the use of Live audio/video broadcasting applications over the BGAN
network, explains the protocols used and how to optimize them, and introduces some common off-the-shelf and professional solutions. It also explains how to set up a dedicated streaming IP
connection using BGAN LaunchPad.
This document is intended for end users, Distribution Partners and Service Providers who either
want to integrate an existing solution or looking for new audio/video solution over BGAN. A
previous knowledge of satellite communications is useful, but not essential.
The sections include:
•
•
•
•
•
•
•
•
•
•
1.2.
Introducing audio/video over BGAN – introduces broadcasting solutions, and lists the prerequisites, and the tested solutions.
Understanding audio/video protocols – lists the terminals and connection types available
over BGAN, and explains codecs, bit rates and IP protocols.
Introducing broadcast solutions – details performance over BGAN, and provides general
recommendations.
Setting up Streambox ACT-L3 – setting up the client and server for Live or Store and
Forward broadcasting.
Setting up Quicklink – setting up the client and server for Live or Store and Forward
broadcasting.
Setting up Livewire M-Link - setting up the client and server for Live or Store and Forward
broadcasting.
Setting up ClipWay – setting up the client for Store and Forward broadcasting.
Setting up the Canon WiFi camera – setting up the camera for Store and Forward images.
Setting up Nikon D2H WiFi camera – setting up the camera for store and forward images
Setting up a video broadcast connection in LaunchPad – describes how to set up a
dedicated streaming IP data connection for use with your video broadcasting application.
Other sources of information
•
This is one of a series of PDF documents that make up the BGAN Solutions Guide. The
Solutions Guide is designed to help you make the most of your BGAN terminal. Other
documents in the series are available for download from www.inmarsat.com/bgan. Click
on BGAN support, then click on How to guides.
This Web site also gives further information on the BGAN service, including Industry
solutions.
•
Refer to “BGAN LaunchPad Help” for details on using BGAN LaunchPad.
•
Refer to the documentation supplied with your audio/video broadcasting application for
details on changing configuration and settings.
4/34
2.0.
Live Video Broadcasting over BGAN
Introducing audio/video over BGAN
The BGAN service enables remote offices or users to establish audio/video communications with
company headquarters or business partners anywhere in the world.
Audio/Video solutions are divided into 3 main categories. This guide covers Live audio/video
broadcasting only. Each of the other categories is covered by its own Solutions Guide; refer to the
appropriate guide for details on the other categories.
•
•
•
Broadcasting solutions (Encoder & Decoder based)
o Typically one-way broadcast of live audio/video from the field.
o Includes a high quality Store-and-Forward option for near real-time breaking news
coverage.
Video conferencing solutions (Hardware or Software based) – typically, two-way video
conferencing between remote and fixed office.
Remote surveillance solutions (Remote IP camera) – typically, a one-way JPEG or motion
video clip from field to fixed office when motion is detected; alternatively, the fixed office
can access a live video stream remotely.
IMPORTANT: It is important that you select the correct BGAN terminal and
streaming IP quality of service for the solution you want to use. Refer to
the appropriate Solutions Guide for details.
Symmetrical QoS over BGAN
It is important to note that BGAN streaming IP offers symmetrical QoS. For instance 256kbps
streaming IP offers 256kbps in the up direction, and 256kbps in the down direction. Normally,
broadcast solutions only use the uplink (return channel) for live broadcast and the downlink
(forward channel) for audio feed from news room studio. You can also use BGAN 4K voice channel
simultaneously, but it is more efficient and cost effective to use BGAN streaming IP channel for both
audio and video transmission.
2.1.
Introducing broadcasting solutions
The arrival of BGAN, which utilises Internet Protocol (IP) and has a bandwidth capacity of up to
seven times that of the Inmarsat GAN service, has started a revolution in television coverage of
breaking news. BGAN certainly presents a compelling proposition to the professional broadcaster,
because the terminals are small and as easily portable as a laptop computer, while the BGAN
streaming IP service delivers high quality live video back to studio room from anywhere within the
satellite foot print.
Typically BGAN service offers two core options for broadcasters:
• Live video, which is typically transmitted one-way from the field, using Streaming IP data
rates of up to 256Kbit or 64K ISDN
• Store-and-forward video, using Streaming IP, ISDN or Standard IP.
The BGAN IP service allows you to use some of the latest broadcasting compression protocols,
such as H.264, MPEG 4 and Windows Media 9, for live broadcasting over BGAN.
The BGAN IP service also plays a bigger role in broadcasting store-and-forward video, giving you the
ability to transmit high quality video at a variety of connection rates, including standard IP.
The flexibility of the BGAN service when compared to GAN is another highly attractive feature for
video broadcasting. On Class 1 terminals, such as the HNS 9201, multi-user functions allow users to
5/34
Live Video Broadcasting over BGAN
perform more than one task simultaneously. For instance, it is possible to send store-and-forward
video via Standard IP, while simultaneously using Streaming IP for a live broadcast. In this way,
important footage can be received by the studio and edited ready for broadcast at the earliest
opportunity. The level of compression determines the quality of picture received at the other end
and the time taken to transmit.
Typical setup requires a laptop-based encoder with firewire camera connected to a BGAN terminal
over the Ethernet interface.
2.2.
Setting up and using broadcasting solutions
Audio/Video broadcasting solutions introduce additional requirements over the ordinary transfer of
data. For example, latency must be guaranteed to ensure that frames are transmitted in the form of
a moving image, and sound must be synchronized with image. Audio/video solutions require the
following:
•
A large amount of information to be sent simultaneously, requiring a consistent bandwidth with
guaranteed end-to-end QoS. Typically, a BGAN streaming IP connection is required (refer to
“Selecting the right terminal and Quality of Service” on page 6).
•
Some form of data compression (refer to “Understanding codecs” on page 7).
•
The selection of a bit rate type (refer to “Understanding bit rates” on page 8).
•
A number of protocols to be used alongside the streaming IP connection to control data flow
and provide additional conferencing capabilities (refer to section “Introducing protocols” on
page 8 and “Protocol requirements” on page 10).
•
End-to-end QoS for the required data rate. This is particularly important for UDP-based
applications running over Streaming IP connections. To maintain throughput and quality it is
important that QoS is maintained across the terrestrial ‘last mile’ link as well as the satellite
interface. BGAN Distribution Partners and Service Providers can provide details of available
interconnect last mile options.
When these requirements are met, you can further optimize your applications based on Inmarsat’s
recommended settings. Refer to “Introducing broadcast solutions” on page 10, and any of the
following sections based on your preferred video broadcasting application:
•
•
•
•
•
•
“Setting up Streambox ACT-L3” on page 12.
“Setting up QuickLink” on page 16.
“Setting up Livewire M-Link” on page 20.
“Setting up Clipway (Store and Forward)” on page 22.
“Setting up the Canon WiFi camera (Store and Forward)” on page 25.
“Setting up the Nikon D2H WiFi camera (Store and Forward)” on page 29.
In addition, you can set up a streaming IP connection in BGAN LaunchPad, dedicated to your video
conferencing application. Refer to “Setting up a video broadcast connection in LaunchPad” on page
31”.
6/34
3.0.
Live Video Broadcasting over BGAN
Understanding audio/video protocols
This section explains IP data connections over BGAN, data compression algorithms, and the data
transfer protocols and audio/video protocols used to ensure effective audio/video solution over
BGAN.
3.1.
Selecting the right terminal and Quality of Service
The BGAN terminal provides two classes of connection: standard IP and streaming IP.
On a standard IP connection, traffic throughput varies depending on terminal and network usage.
Streaming IP differs from standard IP in that it offers a guaranteed, consistent connection rate,
provided network resources are available end to end.
TIP:
Inmarsat strongly recommends that you use a streaming IP connection for live
audio/video applications
The streaming rates provided by the BGAN terminals differ, as shown in the following table:
Terminal
Standard IP
(up to…)
Streaming IP
HNS 9201
Thrane & Thrane EXPLORER 700
492kbps send
492kbps receive
32kbps, 64kbps, 128kbps, 256kbps
Thrane & Thrane EXPLORER 500
464 kbps send
448 kbps receive
32kbps, 64kbps, 128kbps
Nera WorldPro 1000/1010
Thrane & Thrane EXPLORER 300
384kbps send
240kbps receive
32kbps, 64kbps
You can also link your audio/video application to a particular streaming class connection. To do this,
you must configure a dedicated streaming IP connection, and use a traffic flow template to ensure
that only the AV traffic is transmitted over that particular connection. All other traffic uses the
standard IP connection.
To set up this connection, refer to 11.0 “Setting up a video broadcast connection AV connection”.
Last mile connectivity
If you want to use BGAN for live video and audio streaming traffic using UDP-based applications,
Inmarsat recommends that you investigate and implement ‘last mile’ routing arrangements which
guarantee end-to-end QoS. This is particularly important for UDP-based applications running over a
Streaming IP connection on BGAN. To maintain throughput and quality it is important that QoS is
maintained across the terrestrial ‘last mile’ link as well as the satellite interface.
BGAN Distribution Partners and Service Providers can provide details of available interconnect
options.
7/34
Live Video Broadcasting over BGAN
Last mile connectivity
3.2.
Understanding codecs
A codec is the name given to the encoding/decoding algorithm that compresses and decompresses
audio video data. The effectiveness of a streaming IP connection is determined partly by the codec.
A high compression codec will provide the data stream quickly, but at low quality. In general,
compression schemes can be classified as "lossy" and "lossless."
•
Lossy compression schemes reduce the size of the data stream by discarding some data
during the encoding process before it is sent over the BGAN network. Once received on the
client side, the codec attempts to reconstruct the information that was lost or discarded.
Lossy compression offers data savings of around 10:1. If a voice file was compressed using lossy
compression, silence would be removed, and both high and low frequency data may be lost
from the data stream. The resultant file could sound different to the original (depending on
how aggressive the codec was).
•
Lossless compression simply squeezes data into smaller packets of information without
permanently discarding any of the data. Lossless compression algorithms usually require more
computing power to compress and decompress the data stream, and do not give the same data
savings as lossy compression. If a voice file was compressed using lossless compression, it could
still be encoded, in order to reduce the size, but no data would be lost. The resultant file
would sound exactly the same as the original.
Codecs typically used combine elements of both compression schemes; in this way, for example,
silence can be discarded from a voice file, but all non-silent parts retained and compressed.
Streaming IP applications over BGAN must therefore choose a codec that will provide the necessary
quality of stream, whilst reducing the data rate as much as is possible.
The tested applications described in this document all come with their own coding schemes. Some
allow you to change various settings which can make a difference in the way the application works
over BGAN.
8/34
3.3.
Live Video Broadcasting over BGAN
Understanding bit rates
Audio/Video solutions are designed to use either Constant bit rate or Variable bit rate depending
upon the network behaviour. BGAN’s streaming IP connection is different to ADSL-type IP
networks, as the BGAN network supplies the requested Quality of Service (QoS) from the time you
request the connection until you disconnect
It is important to understand the difference between Constant bit rate and Variable bit rate, as the
quality of the audio/video solution over BGAN may vary depending upon whether the solution uses
Constant or Variable bit rate.
Constant Bit Rate
Constant bit rate is recommended for use with streaming applications over the BGAN streaming IP
service as the output from the codec is sent in a steady stream with a fixed bit rate. Since the BGAN
streaming IP service is assigned to a specific QoS (32kbps, 64kbps, 128kbps and 256kbps, depending
on the terminal), Contact bit rate performs better than Variable bit rate. This is because on a
defined BGAN channel, a Constant bit rate takes advantage of all the capacity of the streaming IP
connection.
Variable Bit Rate
Variable bit rate is designed to cope with variable network bandwidth, such as that provided by
ADSL or the BGAN standard IP connection, which adjust audio/video quality according to the
available bandwidth. A Variable bit rate solution has the capability to throttle back when it detects
any packet drop or loss, which typically occurs when IP traffic travels through a series of Internet
routers. This throttling back reduces the speed of data transmission and results in loss of video
quality. Variable bit rate solutions are therefore more suitable for a standard IP connection than a
streaming IP connection.
3.4.
Introducing protocols
Inmarsat recommends that you use a streaming IP connection to send and receive video data. A
number of protocols can be used alongside the streaming connection to control the data flow and
provide additional video broadcasting capabilities.
The following two transport protocols are for the general transmission of data over IP:
•
TCP
•
UDP
Protocols that are specific to video solutions over IP are relatively new, and still evolving. The
following two main sets of call control protocol are in use by the Internet at the time of publication:
•
H.323
•
SIP
All these protocols are described below.
TCP and UDP
TCP and UDP are transport protocols that are used to transmit data over IP connections. The TCP
protocol is configured to deliver data from end to end in a reliable manner. It is connectionoriented, and provides flow control and retransmission of lost packets. The UDP protocol is
connectionless and designed for speedy delivery, but does not guarantee reliability, flow control or
detection of lost packets.
9/34
Live Video Broadcasting over BGAN
TCP/IP application will be more effective over Standard IP due to the nature of BGAN Standard IP
service. Typical corporate application i.e. Email, Web browsing, FTP etc uses TCP
UDP is more suited to Streaming IP because if packets are lost, they are ignored and packet
transmission continues. This may cause a slight loss of quality in the transmission, but the
transmission is not interrupted. If the same packets were lost over a TCP connection, TCP would
stop delivery of further packets until the lost packets are successfully been retransmitted. This
would cause an unacceptable break in the flow of the application.
Therefore, UDP thus gives streaming applications greater control over the data flow than TCP.
These characteristics mean that majority of the audio video applications use a combination of TCP
and UDP where needed. Typically, call set-up and data flow control is carried out using TCP. The
audio and video data is sent using UDP.
TIP:
BGAN LaunchPad allows the configuration of error correction. Inmarsat
recommends that you disable error correction for UDP applications. Refer to
“BGAN LaunchPad Help” for details.
H.323
The H.323 protocol is defined by the ITU-T (International Telecommunications Union). It describes
how real-time multimedia communications can be exchanged on packet-based networks. The
standard was drawn up following collaboration between traditional telephony experts and those
from the computer communications arena. In addition to fully-interactive media communications
such as video conferencing, H.323 also has provisions for other forms of communication, such as
multi-media streaming.
The complete specification documents can be found at http://www.itca.org.
During a point to point H.323 call, an initial TCP connection is made (using default port 1720). Data
is exchanged over this connection (using Q.931 packets) to determine which port will be used for
the actual multi-media connection. Once this port has been decided, an H.245 connection is made,
to the new port.
The H.245 protocol handles all of the call parameter negotiations, such as which codecs to use.
H.245 also has commands that make UDP connections. Once the audio and video codecs and
parameters have been negotiated, the H.245 session starts the underlying data stream.
The data stream consists of an RTCP (Real-Time Transport Connection Protocol) connection
(UDP), and the actual data stream which uses the RTP (Real Time Protocol).
The H.323 protocol covers all aspects of telephony and conferencing, including capability exchange,
conference control, basic signalling, Quos, registration, service discovery, gateways etc.
SIP
SIP (Session Initiation Protocol) is defined by the IETF (Internet Engineering Task Force) and is a
relatively simple protocol when compared to H.323. It is designed to be modular, allowing the
protocol to be extended to cover specific applications.
SIP is defined as being responsible for basic call signalling, user location, and registration.
Whereas H.323 can operate in a peer to peer mode, two SIP users require a SIP server in order for
them to communicate. SIP clients send a series of messages (defined in the Session Description
10/34
Live Video Broadcasting over BGAN
Protocol) to the server in order to set-up a call with another user. The client must first register
with the server, then invite the other user to join a call. The SDP message will detail what is to be
included in the call; audio, video, Codecs etc.
Once the call recipient has accepted the call by responding to messages from the SIP server, the
actual data connection is set-up directly between the two SIP users. The data connection uses the
RTCP and RTP protocols, as for H.323.
3.5.
Protocol requirements
Both H.323 and SIP use the same data transport protocols to send and receive data across the
BGAN network.
The applications that use these protocols use different encoding techniques however. In addition,
the applications normally impose a higher level protocol to control the user session. For instance,
whilst Yahoo Messenger and iChat may both use the SIP protocol for audio and video, the
applications must first initiate a session using their respective Instant Messaging (IM) protocols with
the IM servers.
In order to use either the H.323 or SIP protocols through a firewall, based on your computer or
corporate servers, the following ports must be open. Due to the dynamic nature of the lower
protocols, it may be necessary to allow the whole application access through the firewall, rather
than rely on specific port entries.
Protocol
Ports
H.323
UDP ports 1718 and 1719 (discovery and registration of gatekeepers)
TCP/UDP 1720 (call signalling)
TCP 1300 (secure call signalling)
TCP dynamic port 1024-65535 (H.245)
UDP dynamic port 1024-65535 (RTCP)
UDP dynamic port 1024-65535 (RTP)
SIP
TCP port 5060 (SIP)
UDP dynamic port 1024-65535 (RTCP)
UDP dynamic port 1024-65535 (RTP)
NOTE: When using a streaming IP connection from a mobile client to a fixed server,
the above ports refer to the firewall protecting the fixed server (any firewall on
the client must be correctly configured for outbound traffic).
4.0.
Introducing broadcast solutions
This section details the setup of some of the professional broadcast solution tested over the BGAN
network.
The solutions tested over the BGAN network include:
•
•
•
•
•
Streambox ACT-L3 – Live and Store and Forward
QuickLink – Live and Store and Forward
Livewire M-Link – Live and Store and Forward
Clipway – Store and Forward
Canon WiFi Camera – Store and Forward Images (off the shelf)
11/34
•
Live Video Broadcasting over BGAN
Nikon WiFi Camera – Store and Forward Images (off the shelf)
Each of the above applications is described in greater detail in the following sections.
4.1.
Performance over BGAN
The solutions were all tested to ensure that they work over the BGAN network. Then a typical
configuration was set up, and the application data stream examined to see how much bandwidth is
required to run the application.
TIP:
All these applications operate more effectively over a streaming IP connection
than a standard IP connection. Note the following:
•
Ensure that you choose a streaming IP connection that matches the data
requirements or settings of your application. Leave some capacity for IP
overheads when selecting the bandwidth. Some of these solutions now have
a built-in BGAN profile for ease of use.
•
Do not leave the application (or the streaming IP connection) active when
not in use.
In addition to Live broadcast, some of these solutions also offer Store and Forward capability for
sending high quality video in highly compressed format without compromising on picture quality.
File sizes and transmission times
The following table shows the typical file sizes and approximate transmission times of a 250MB, 1
minute DV file, using different encoding rates.
Encoding rate
used to
compress file
Approx.
compressed
file size *
Approx. transmission time
over BGAN 256kbps
connection
750kbps
6MB
4-5 minutes
1Mbps
8MB
5-6 minutes
1.5Mbps
12MB
7-8 minutes
2Mbps
16MB
9-10 minutes
* May vary from solution to solution.
Note that the actual transmission time is fundamentally determined by a number of factors including
data channel rate, video sequence length, physical signalling overhead, Layer 4 transport and
transmission protocol overhead (i.e. TCP overhead), error checking, protocol headers and
handshaking negotiation procedures like "TCP slow start". Also, the transmission speed varies
between solution to solution due to the different type of compression and transport protocols used.
4.2.
General recommendations
The following recommendations apply to all video broadcasting solutions over BGAN:
• Make sure that you have pointed the terminal correctly – the terminal must have unobstructed line of sight and maximum possible signal strength before network registration
• Make sure you are using a higher streaming IP class QoS for higher quality video.
• Make sure your Distribution Partner has a dedicated last mile connection to ensure endto-end QoS,
• Use the Ethernet Interface to achieve high transmission speed.
12/34
•
•
•
•
•
•
•
5.0.
Live Video Broadcasting over BGAN
Make sure that you have chosen the correct protocol. Inmarsat recommends UDP.
Make sure that for a UDP-based live broadcast, you use BGAN LaunchPad to switch off
packet retransmission for your streaming IP connection before you open the streaming IP
connection.
Make sure you switch off any windows or MAC auto download while doing live broadcast
Test your solution before take it out in the field.
Use a correct format camera, that is PAL or NTSC
Configure your decoder with a static IP address that can be accessed from the BGAN
terminal.
Inmarsat recommends that you do not use any VPN connection for live broadcast as it can
add extra VPN overheard of between 10-40% based on your VPN application
Setting up Streambox ACT-L3
Streambox® ACT-L3TM and Inmarsat BGAN provides the ideal mobile solution for live satellite news
gathering. The high compression, low latency video transport system delivers unrivalled quality over
the BGAN network. Streambox enables you to deliver live or stored video whenever and wherever
it is needed.
The Streambox BGAN News Gathering solution consists of the following:
•
•
•
•
•
•
Streambox Portable Encoder(s).
o Streambox Portable Encoder (laptop format).
o Streambox SBT3-7500 Encoder.
Streambox Distribution Server(s).
Streambox SBT3 Decoder(s).
o Streambox SBT3-5100 Decoder.
o Streambox SBT3-7100 Decoder.
Streambox IFB Client(s).
Streambox IFB Server(s).
Streambox Store and Forward.
The Servers and Decoders are typically located at the studio. The Portable Encoders, or the SBT37500 Encoders, are located on the client side. The camera is connected to the Portable Encoder via
a firewire (IEEE 1394) cable. The SBT3-7500 Encoder features SDI and composite analogue video
input. The Encoders use any standard user interface to connect with the BGAN terminal, for
example Ethernet, USB or WiFi.
The video is captured, compressed, and transported using Streambox’s advanced video compression
codec, ACT-L3, which is ideal for transmission over the BGAN network. In a simple configuration,
the studio receives the stream, which is decoded by the Streambox Decoder(s) for live on-air
broadcast.
13/34
Live Video Broadcasting over BGAN
Streambox end-to-end configuration
The Streambox Distribution Server is capable of receiving multiple streams from multiple BGAN
terminals located at separate locations around the world, and of delivering video to several
Streambox Decoders. The Streambox® IFB Server is used to provide a real-time low latency
talkback channel from studio to field reporters, using the BGAN back channel.
Prerequisites
To get the highest quality from live streaming, Inmarsat recommends that you use a dedicated
streaming IP connection directly from the distribution partner to your Headquarters/Global
Network. Inmarsat only guarantees BGAN streaming connections up to the distribution partners’
point of presence (POP). There is no control of quality if the stream is routed over the public
Internet.
For the highest quality video, use the 256kbps streaming IP connection, which is offered on both the
HNS 9201 and the Thrane & Thrane EXPLORER 700.
Inmarsat recommends that you use BGAN LaunchPad to interfacing with the terminal of your
choice.
14/34
Live Video Broadcasting over BGAN
Equipment Required
•
•
•
•
•
5.1.
Streambox Portable Encoder (MAC or Windows compatible), or Streambox STB3-7500
Encoder.
DV camera for Portable Encoder, or Analogue/SDI camera for STB3-7500 Encoder.
BGAN terminal.
Streambox STB3-5100 or Streambox STB3-7100 Decoder.
Optional components:
o Streambox Distribution Server.
o Streambox IFB Server.
o Streambox Store and Forward
Setting up the client for Live broadcast
To set up the client for live broadcast:
1. Install BGAN LaunchPad on the Streambox Encoder.
2. Launch the Streambox Encoder. Streambox video transport solutions enable you to
customize settings. This optimises live video streaming over the BGAN streaming class
service. The recommended settings are usually preloaded as ’Presets’ on the Streambox
Encoder.
3. The chart below lists the recommended settings for optimal quality over the BGAN
streaming IP connection. Please configure your Streambox Encoder as follows:
Settings
M4 Phone
64kbps
BGAN
128kbps
BGAN
256kbps
BGAN
256kbps CIF
Target Bitrate
55kbps
110kbps
220kbps
220kbps
VBR Buffer Size
0.8s
0.8s
0.5s
0.8s
FEC
Off
Off
Off
Off
Video Resolution
QVGA
QVGA
QVGA
CIF
Color Profile
4:2:0
4:2:0
4:2:0
4:2:0
Closed Captions
Off
Off
Off
Off
Prefer Quality
o/Frame Rate *
300/40
300/40
300/40
300/40
Frame rate
1/3
1/2
1/2
1/2
Change Key Frame
300
300
300
300
Min-Max Filter
Off
Off
Off
Off
Soft Filter
Off
Off
Off
Off
Overlapped DCT
Filter *
On
On
On
On
De-interlace **
Off
Off
Off
Off
Swap Field Order
Off
Off
Off
Off
Monitor CPU
Usage
Off
Off
Off
Off
15/34
Live Video Broadcasting over BGAN
Live Preview
Off
Off
Off
Off
Audio Codec
CELP
CELP
CELP
CELP
Audio Channels
Mono
Mono
Mono
Mono
Audio Capture
Frequency
48000kHz
48000kHz
48000kHz
48000kHz
* - these options require progressive video. QVGA and CIF are progressive (half-field).
**-1/2…. D1 requires de-interlacing with (*)-options ON.
4.
5.
6.
Open the Presets menu, and store the settings for your 256 Kbps BGAN connection.
Enter a destination IP address (Decoder or Server), in the Network menu. It is also
recommended that you change the packet size to 1360 in the same menu.
Open a BGAN streaming IP connection using BGAN LaunchPad. The video will
automatically stream to the Decoder (destination IP address). However, the local image will
not get updated unless you select Live Preview from the Encoder’s video menu.
NOTE: Make sure that you are using the correct broadcast standard for your camera.
You can toggle between PAL, NTSC and NTSC-Japan. An inappropriate setting
could result in black and white or scrolling video.
5.2.
Setting up the IFB client
To set up Streambox IFB client:
1. Launch Streambox IFB Client.
2. To setup IFB Client for the first time:
• Click on IFB Server button.
• Type in the Server’s IP address.
• Type in a password (default password is empty word).
• Click on OK.
3. Select the appropriate IFB channel to listen to audio. You can select additional audio
devices, such as USB or Bluetooth, from the Audio menu. Audio devices/drives should be
installed separately using Windows or Mac OSX standard procedures.
5.3.
Setting up the client for Store and Forward broadcast
To set up the client for store and forward:
1. Select Store to file from the Encoder’s File menu to start recording live video. You can
use higher bandwidth than 256 Kbps for store and forward recording; usually 1 to 3 Mbps
bandwidth is used for Full D1.
2. Click Stop Recording when the video is captured.
3. Open the Streambox File Transfer Tool (FTT).
4. Select Remote Server IP using the FTT interface.
5. Select Recorded File, and click Upload to start data transfer.
6. Once file is transferred, use Playback Remote to play out the video file.
Refer to the Streambox Store & Forward User Manual for details.
5.4.
Setting up the server
The set up of the Streambox Distribution Server is beyond the scope of this document. Please note
that video and audio is sent via the IP/UDP port. Usually, Streambox uses UDP port 1770 for direct
16/34
Live Video Broadcasting over BGAN
streaming to the Decoder. The UDP port range 3700-5100 is used when streaming to the
Distribution Server. This means that multiple Encoders can send video to a single IP, but to different
port numbers. The Distribution server interface enables you to monitor which Encoder(s) are
sending video, and to redirect to the appropriate Decoder(s). A user-friendly web interface is
provided for this purpose.
5.5.
Recommendations/Optimizations
•
•
6.0.
Remember to switch off error correction in BGAN LaunchPad before you open a
streaming IP data connection using LaunchPad.
Use the 256kbps streaming IP connection, if available, for the best video quality.
Setting up QuickLink
QuickLink® News Broadcaster is the network-efficient and cost-effective way of transcoding and
delivering high quality media for both Live and Store and Forward broadcasts over BGAN. The
unique design of the Quicklink system when combined with BGAN enables you to choose the
functionality and features to meet your precise media-encoding transmission requirements.
Prerequisites
As a minimum, you must have the following equipment:
• DV Camera, or Analogue camera with DV converter.
• QuickLink Encoder (Windows laptop).
• BGAN terminal.
• QuickLink Decoder (studio room).
To get the best possible quality from live video streaming, Inmarsat recommends that you use an
end-to-end, dedicated streaming IP connection directly from your Distribution Partner to your
headquarters/global network. Inmarsat only guarantees streaming connections up to the Distribution
Partner’s point of presence (POP). Inmarsat cannot control quality of service if the stream is routed
over the public Internet.
For the highest quality video, use the 256kpbs streaming IP connection, offered on both the HNS
9201 and the Thrane & Thrane EXPLORER 700.
Inmarsat recommends that you use BGAN LaunchPad to interface with the terminal of your choice.
17/34
Live Video Broadcasting over BGAN
Network and Connectivity Options
The solution consists of a decoder box which is kept at the studio, and a software encoder which
can be loaded onto a laptop (at the client side). Connect the camera to the software encoder using a
firewire cable. Connect the laptop to the BGAN terminal using any standard interface, such as
Ethernet (recommended), USB and WiFi.
The video is captured and compressed using QuickLink’s proprietary codecs, optimized for transmission
over the BGAN network. The studio then receives the stream which is decoded in the QuickLink server,
ready for a Live ON AIR broadcast. The decoding server is capable of receiving multiple streams from
multiple BGAN terminals, which could be located at a number of locations around the world.
6.1.
Setting up the client encoder
Before you start, make sure that BGAN LaunchPad is installed on the Streambox encoder.
To set up your QuickLink encoder:
1.
2.
3.
4.
Connect the camera to the computer, and ensure that it is configured properly.
Start up QuickLink.
Select the Creation and Transmission Application on the computer.
Select one of the following options:
• Capture Video – for Store and Forward. Captures a video, encodes it, and then sends it
to the server immediately, or later. Refer to Store and Forward, below.
• Import Video File – imports a video file (pre-encoded) from the hard disk, and sends it
to server.
• Send/View File – sends a previously recorded video, or enables viewing before sending.
• Live Broadcast – starts a Live broadcast to the server.
18/34
6.2.
Live Video Broadcasting over BGAN
Setting up a server address
Before sending a video or live broadcast, you must specify the server address. To do this:
6.3.
1.
Select Settings > Connections on the main toolbar. The following window is displayed.
2.
Add the name for the recipient server (your QuickLink decoder), and its IP address.
Making a Live broadcast
To make a live broadcast:
1.
Select the Live Broadcast option. The following screen is displayed:
2.
3.
4.
Select the appropriate Connection Type.
Select the recipient.
Click Connect to start your live broadcast. You can also send messages to server using the
text box at the bottom of the window.
Once the broadcast is complete click Hangup to disconnect, and Close to return to the main
screen.
5.
To receive live broadcasts or video feeds, start up the server application QuickLink Live Start.
19/34
Live Video Broadcasting over BGAN
QuickLink Live Start is used for live broadcasts and must be active before a broadcast is started from the
remote (BGAN terminal) end. The following screen shot shows the interface on the server side.
BGAN
6.4.
Making a Store and Forward broadcast
To store and forward a video to the server, you must first either capture a video or import one.
To import a video, simply select Import Video File.
To capture a video:
1.
2.
3.
4.
5.
6.
Make sure your camera is connected to the computer.
Select Capture Video to display the capture window.
Change the Capture Mode on the main toolbar to Capture (instead of Preview), and click
on the red Record button on the video toolbar.
Once recording is complete, click on Stop and exit the window via the File menu on the main
toolbar. You are now prompted to select the encoding rate for compression.
Inmarsat recommends 2 MB 2 Pass for general broadcast quality but you can select another
option if it is more appropriate.
Once encoding finishes, you are prompted to enter information about the clip, as shown below:
20/34
7.
Live Video Broadcasting over BGAN
Complete the required fields, and select Continue. You are prompted to select the recipient
(decoder) for the video if you want to send it immediately.
If you want to send it later, use the Send/View Video option. To use this option, select the file to be
transmitted (you can also play it in the viewer to double check), and the select the recipient (decoder IP
address) in the Send To option. Then simply click Send.
6.5.
Recommendations/Optimisation:
Remember to switch off error correction before you establish a streaming IP connection
7.0.
Setting up Livewire M-Link
Livewire M-Link solution is based on the latest H.264 AVC codec, an industry standard video codec
that has seen a steady rise in adoption by companies such as Apple, Sony, Intel, Motorola and
Tandberg. H.264/AVC is key to the delivery of High-Definition TV and offers stunning performance
over limited bandwidth connections. Livewire has an integral support for establishing the requisite
BGAN IP service for Live and Store and forward workflows. This provides a simple one click
operation through one single M-Link user interface.
Livewire M-Link end-to-end configuration
The solution consists of a decoder box which is kept at the studio, and a software encoder which
can be loaded onto a laptop (at the client side). Connect the camera to the software encoder using a
21/34
Live Video Broadcasting over BGAN
firewire cable. Connect the laptop to the BGAN terminal using any standard interface, such as
Ethernet (recommended), USB and WiFi.
The video is captured and compressed using Livewire H.264 AVC codecs, optimized for
transmission over the BGAN network. The studio then receives the stream which is decoded in the
Livewire server, ready for a Live ON AIR broadcast. The decoding server is capable of receiving
multiple streams from multiple BGAN terminals, which could be located at a number of locations
around the world.
Prerequisites
As a minimum, you must have the following equipment:
• DV Camera, or Analogue camera with DV converter.
• Livewire M-Link® Encoder (Windows laptop).
• BGAN terminal.
• Livewire® Decoder (studio room).
To get the best possible quality from live video streaming, Inmarsat recommends that you use an
end-to-end, dedicated streaming IP connection directly from your Distribution Partner to your
headquarters/global network. Inmarsat only guarantees streaming connections up to the Distribution
Partner’s point of presence (POP). Inmarsat cannot control quality of service if the stream is routed
over the public Internet.
For the highest quality video, use the 256kpbs streaming IP connection, offered on both the HNS
9201 and the Thrane & Thrane EXPLORER 700.
Inmarsat recommends that you use BGAN LaunchPad to interface with the terminal of your choice.
7.1.
Setting up the M-Link client encoder
To set up your computer and BGAN terminal for M-Link:
1. Install M-Link onto your computer.
2. Use a Firewire cable to connect your camera to the computer running M-Link.
3. The M-Link interface detects your BGAN terminal and will automatically register the
terminal on the network
4. For Store and Forward:
a. Click on Capture and acquire the video, then click on Encode (make sure
you select correct encoding rate for the transmission speed), select the BGAN
service required and then click on Transmit.
5. For Live broadcast:
a. Click on the Live icon.
b. Select your destination
c. Select the encoding profile and the Streaming IP service, at one of the following
data rates: 32kbps, 64kbps, 128kbps or 256kbps. (The available data rates depend
on the terminal you are using.)
22/34
7.2.
Live Video Broadcasting over BGAN
Setting up the server
To receive live broadcasts or video feeds from the remote side you just start up the server side
applications
7.3.
Recommendations/Optimization
Remember to switch off error correction before you establish streaming class connection.
8.0.
Setting up Clipway (Store and Forward)
Clipway is a Store and Forward application which has built-in capture, compress and transfer
capability integrated into one streamline application. Clipway differs from other off-the-shelf
applications in that it not only works with terrestrial networks and existing satellite products, but is
also customized for optimal performance over BGAN.
23/34
Live Video Broadcasting over BGAN
The solution consists of a server side software application which is kept at the studio, and a
software encoder which can be loaded onto a laptop (at the client side). Connect the camera to the
software encoder using a firewire cable. Connect the laptop to the BGAN terminal using any
standard interface, such as Ethernet (recommended), USB and WiFi.
The video is captured and compressed using Clipway WinMedia 9 codecs, optimized for transmission
over the BGAN network. The studio then receives the file on Clipway server for editing.
Prerequisites
As a minimum, you must have the following equipment:
• DV Camera, or Analogue camera with DV converter.
• Clipway client (Windows laptop).
• BGAN terminal.
• Clipway server (studio room).
Inmarsat recommends that you use BGAN LaunchPad to interface with the terminal of your choice,
and that you open your IP data connection using BGAN LaunchPad.
8.1.
Setting up the client
The following is the main interface of Clipway:
Exit clipway
Delete
Attach another file
View Video
Capture
Transmit
Compress/Encode
To set up Clipway client
1. If you haven’t done already, connect your DV camera to the PC. If the camera is not
connected or has not been detected the camera icon will remained greyed out.
2.
. This will
Once the camera is connected to the computer, click the capture button
open up the capture window. You can control the video in the capture window by using
standard video controls.
3.
Once you are ready to capture, press Play and then press the Record button on the
bottom right. The button will display a red light to show that it is actively recording. The
timers will only work when there is a cassette in the camera.
24/34
4.
Live Video Broadcasting over BGAN
Once you have finished recording, press the Record button again to stop recording. The
captured file will appear on the main interface window with a filename in green text
meaning that it is a raw DV capture.
You can change the filename by double-clicking on it, and you can also add a short
description of the video.
Note the following:
•
•
Clipway gives an estimate of the transmission time, based on a connection speed of
250kbps (you can change this on the transmit screen once the video is
encoded/compressed).
To see the estimated size of the file, or to see the size of any file or attachment, click on
the Transmission duration column. This will toggle to show the File sizes instead.
Now that the video is captured it needs to be compressed and encoded. To do this:
1.
Select the raw video that you want to encode and click the Compress button
. The
‘Compression’ window is displayed.
Note the following:
•
Clipway has four compression rates for you to select from depending on your desired
quality of service, and makes two passes to ensure quality. The higher the quality the
larger the file will be and the longer it will take to transfer the file. The estimated
transmission time will adjust accordingly to your selection.
•
Clipway will automatically detect the video standard of the video input i.e. NTSC/PAL,
the video standard will be denoted with an N or a P.
2. Click the Compress button on the compression window to compress the file. On the
main window another video displays in blue to indicate that video has been compressed.
You can now transmit the video.
3. To transmit the video click on the Transmit button
displayed.
. The transmit window is
4. To configure where to transmit the video click the settings button
.
You can now enter a name for the server and an IP address. Select the BGAN radio button
and enter one of the following into the Speed Kbits/s text box. The speed entered here is
only to give you an estimate of the transmission time and will not affect the actual
throughput of your transfer.
• 230k for a 256kbps streaming connection
• 110k for a 128kbps streaming connection
• 56k for a 64kbps streaming connection
• Xx for a standard connection.
Once the settings have been entered press the settings (
screen.
) button again to close the
5. Click the Transmit button on the transmit window to begin the transfer. You can view
what the estimated remaining time is by clicking on Connected time to toggle to
remaining time. The Speed reported is the average over the entire transfer. To see current
throughput you must view the throughput reported on the server side.
25/34
Live Video Broadcasting over BGAN
Note the following:
• If the connection does not connect make sure that the server side application is open.
• Clipway supports multiple input streams simultaneously. If the connection fails or needs to
be terminated prematurely for whatever reason you can resume the transfer from where
you left off.
• The Clipway server also allows you to play out incomplete or mid transfer files. So you can
preview a file as it is still coming in or play out the amount of video that has been received.
This means that a video transmission that fails in the last few seconds does not need to be
scrapped, it can still be used with full quality.
9.0.
Setting up the Canon WiFi camera (Store and Forward)
The combination of the Canon Digital IXUS Wireless camera and BGAN is the ultimate low cost
solution for journalists. You can take Super High Quality 5 Mega Pixel pictures and transmit them
anywhere in the world, instantly. There is no need to manually FTP or email back to HQ, the
pictures are automatically uploaded to the destination seconds after you press the shoot button.
Prerequisites
As a minimum, you must have the following equipment:
• BGAN terminal with WiFi.
• WiFi 802.11x compatible computer.
• Canon camera and memory card.
• Third party, auto-upload software
Resources used over BGAN
Inmarsat tested this solution over a Standard IP data connection. The cost of transmission depends
on the resolution and quality you choose.
Resolution
Quality
Approx JPG
file size
Approx images on
512MB card
Large
(2816 x 2112)
Superfine
Fine
Normal
2.7MB
1.6MB
780KB
176
292
603
Wide (16:9)
2816 x 1584
Superfine
Fine
Normal
2.0MB
1.2MB
585KB
235
392
794
26/34
Live Video Broadcasting over BGAN
Medium 1
(2272 x 1704)
Superfine
Fine
Normal
2.0MB
1.1MB
556KB
237
425
839
Medium 2
(1600 x 1200)
Superfine
Fine
Normal
1002KB
558KB
278KB
471
839
1590
Small
(640 x 480)
Superfine
Fine
Normal
249KB
150KB
84KB
1777
2747
4317
Recommendations
•
•
•
9.1.
The Canon WiFi Camera only works with Windows XP SP2 at the moment.
Inmarsat recommends a standard IP data connection to send images.
Use TCP/PEP for faster uploads, in particular when sending small individual files.
Setting up the Camera
You can only connect the Cannon WiFi camera through Wireless connections to HP-compatible
printers or computers. So you also must have a computer connected to the BGAN terminal. The
camera transfers the images to your computer, then a third-party application automatically uploads
the images over BGAN.
There are a number of applications that you can buy that will automatically sync files. Inmarsat has
found two freeware/shareware applications:
•
•
Goodsync, available from: http://www.goodsync.com/
Netdrive, available from: http://www.acs.uwosh.edu/novell/netdrive.htm
Currently, Goodsync does not support FTP natively. However, you can use third-party software adapters
that transform Internet folders into local drives on your computer. Inmarsat recommends using the free
utility available from Novell, Inc called NetDrive.
To set up this software for use with the camera:
1. Download both these pieces of software, and install them.
2. Configure Netdrive as follows:
a. Launch Netdrive and click on New Site.
b. Enter the information for your FTP Server, and select a free Drive letter. Netdrive
will create a virtual drive on your computer which is your FTP server.
3. Configure the camera as described below. A description of how to configure Goodsync
is given later.
Configuring the Camera
The first time you use the camera to upload data over BGAN, you must configure the camera. To
do this:
1. Connect the camera to your computer using the USB cable.
2. Turn on the camera in Playback mode.
3. Once the camera is turned on, press the Menu button on the back of the camera.
This opens the display menu.
27/34
Live Video Broadcasting over BGAN
4. Press the right button (labelled Set Flash in the image below) to display the wireless
menu.
5. In the wireless menu, click Reg. Target Device… This launches the Wireless setup
Program on your computer.
6. Follow the on-screen instructions for setting up your connection. Name your
connection and enter the SSID of your BGAN device. Remember also to select an
Infrastructure connection and not an Adhoc connection. Also choose a suitable
location where the files will be stored on your computer.
7. Once this is done the camera’s LCD display returns to the wireless menu. Select the
Auto transfer option, and switch on the camera. The Auto transfer option is only
available when you have successfully connected to your chosen SSID.
Now, when you take a picture, it is instantly transferred to your computer.
NOTE: Each time you want to use the camera in wireless mode you will need to return
to the Wireless menu and connect the camera to the SSID.
The camera configuration is complete. The last thing to do is setup Goodsync for automatic transfer.
To do this:
1.
2.
Open up Goodsync.
Click on Browse, and select the local directory that receives the camera images (you
selected this directory as part of the camera set up process, described above.
28/34
Live Video Broadcasting over BGAN
Local
3.
4.
5.
6.
7.
8.
Remote
Click on the remote Browse button, and select the virtual drive that you created at
the start of this guide using Netdrive.
Enter the directory on the FTP server that you want to upload your images to.
Click on the large green arrow in the centre of the screen. Change the radio buttons
so that the arrow points from the local to the remote side exclusively.
From the menu at the top click on view >>options.
From the options page click on Automatic Synchronization.
Check the box next to “When file changes are detected”, and from the drop down box
select minute.
9. Click Apply, then OK to finalise the changes.
10. Open BGAN LaunchPad, and open the required IP data connection.
You can now start taking pictures. Goodsync automatically checks the server, and uploads any new
images every minute.
29/34
Live Video Broadcasting over BGAN
10.0. Setting up the Nikon D2H WiFi camera (Store and Forward)
Nikon's Professional D2H SLR camera over BGAN can keep you on top of breaking news with the
click of a camera. BGANs WiFi connectivity enables you to use the Nikon D2H to transfer images
directly from the camera immediately after taking the shot, so that you can be among the first to get
your images back to the office and into the press. As long as you are with in the 300m (depending
on environmental conditions) wireless range of the BGAN terminal, you can continue taking pictures
knowing that they are automatically getting sent back to headquarters.
NOTE: You must have the Flash card (memory) in the camera for this solution to
work.
Prerequisites
As a minimum, you must have the following equipment:
• BGAN terminal with WiFi.
• Nikon D2H camera with WiFi pack.
• Memory card.
• FTP server address.
10.1.
Configuring the camera
To set up the Nikon D2H WiFi camera
1. Turn on the Nikon Camera, and press Menu on the back of the camera.
2. Go to the Setup menu, select USB, and change the USB option to FTP.
3. Turn off the camera, and connect the WT-1 wireless access point pack.
4. Plug in the USB cable, remove the protecting rubber cover on the bottom of the camera and
secure the locking wheel on the WT-1. If the WT-1 wireless access point is connected properly
the Power light on the access point should go green.
5. Turn the camera back on and return to the setup menu. There will now be a 'Wireless LAN'
option in the setup menu.
6. Select Wireless LAN, and make sure that
• The 'Transceiver' is on
• Auto send is switched on
• You have selected the type of file you want to send
NOTE: Sending Images as NEF produces very large File sizes, which take longer to
send.
Network Settings – Camera Wireless Settings
You will also need to set up the camera to talk to the HNS 9201 or the Thrane & Thrane
EXPLORER 700. You can do this by going to Network Settings in the Wireless LAN menu.
30/34
Live Video Broadcasting over BGAN
NOTE: Make sure that you have turned on the wireless interface on the BGAN
terminal, and that you know the SSID
To set up the camera wireless settings, select the Wireless option, and make sure that you:
• Change the Communication mode to ' Infrastructure'.
• Change the SSID to the SSID of the BGAN terminal.
• Enter encryption the information under the Encryption menu, if encryption is set on the
BGAN terminal.
You do not need to enter any information under Channel.
Network Settings - TCP/IP Settings
•
•
•
•
Under IP Address, enter an IP address for the Camera.
o For the HNS 9201, this must be in the 192.168.128.101 range.
o For the EXPLORER 700, this must be in the 192.168.0.2 range. It is recommended
that you use DHCP, and check the Obtain Automatically check box.
Enter 255.255.255.0 for the subnet mask.
Enter the gateway address for the BGAN terminal.
o For the HNS 9201, enter 192.168.128.100.
o For the EXPLORER 700, enter 192.168.0.1.
If you are not using an IP address for you FTP server, you must enable DNS and enter a
DNS address.
o For the HNS 9201, open BGAN LaunchPad, and from the main menu select
Terminal > IP configuration. Enter the address listed in upper field.
o For the EXPLORER 700, the DNS address is 192.168.0.1.
31/34
Live Video Broadcasting over BGAN
Network Settings - FTP Settings
•
•
•
•
Server: Enter the FTP server address that you want to upload the images to.
User: Enter a username and password for the FTP server.
Proxy: If you need to connect to the FTP server through a proxy, you must enter the
details here
Advanced: Enter Port information, and if you want to use Passive mode check the box
next to PASV mode.
You are now ready to begin taking pictures with automatic transfers. As long as you are in range of
the BGAN terminal, your pictures will be automatically be uploaded to your desired FTP site as you
take them.
NOTE: Your BGAN terminal must be set to register and activate a standard IP data
connection automatically
NOTE: As the WT-1 Access Point draws it power directly from the camera, the
battery will not last as long as you may be used to.
10.2.
Setting up the BGAN terminal
This section explains how to set up the BGAN terminal for use with the Nikon D2H WiFi camera.
Equipment needed
•
•
•
Nikon D2H camera.
Nikon WT-1 Wireless Access Point.
HNS 9201 terminal, or EXPLORER 700 terminal.
HNS 9201
Set up the terminal to establish a Standard IP data connection automatically
EXPLORER 700
Point and register the terminal on the BGAN network, as normal.
When you take the picture, the camera should automatically open a PDP data connection and start
to transfer your images. This is indicated by the blinking busy light on the WT-1 access point.
11.0. Setting up a video broadcast connection in LaunchPad
Inmarsat recommends that you configure a data connection in BGAN LaunchPad that is dedicated to
your video broadcasting application. You can then open a video broadcasting connection when
required by clicking on an icon in BGAN LaunchPad.
32/34
Live Video Broadcasting over BGAN
To do this:
1.
Open BGAN LaunchPad, and click on the Data icon:
A screen similar to the following is displayed:
2.
Click on Advanced. The following screen is displayed:
33/34
Live Video Broadcasting over BGAN
3.
4.
Click on Add new connection. The Connection Configuration screen is displayed.
Select Create new Dedicated IP Data connection, and click on OK. The Dedicated Connection
Tab screen is displayed, as shown below:
5.
From the Icon menu, select an icon to associate with your video broadcasting application.
In the Icon label text box, enter a name for this connection, e.g. Quicklink, Streambox and so
on.
Select the video broadcasting application you want to associate with this icon and icon label
from the Application Traffic Flow Template check box. The traffic flow template ensures
that only traffic associated with the application can use this dedicated connection.
NOTE: TFTs for Streambox and QuickLink are supplied with BGAN LaunchPad.
Contact your Service Provider if you require a TFT for any other video
broadcasting application.
Select the Desired Rate from the drop-down list. This is the QoS that you want to use for
this connection.
Select the Minimum Rate from the drop-down list. This is the minimum QoS that you will
accept for this connection. Inmarsat recommends that you set the Minimum Rate to the same
as the Desired Rate, to ensure that you are allocated the data rate that you require.
If required, change the error correction setting. By default, error correction is switched off
because UDP applications do not require re-transmission.
6.
7.
8.
9.
34/34
Live Video Broadcasting over BGAN
10. Click on OK to save these settings.
The new icon is displayed in the Data connections screen in BGAN LaunchPad. This connection is
associated exclusively with your video broadcasting application. Your video broadcasting application
does not share the connection with any other traffic.
To open the video broadcasting connection from BGAN LaunchPad, click on the icon that you
created.
To close the data connection and the video broadcasting application (and therefore your
broadcasting call), click on the video conferencing icon again.
NOTE: If you close your video broadcasting application only, the BGAN data
connection remains open.
NOTE; You can also start a video broadcast call by connecting to the BGAN network
using one of the pre-configured data connections, and then opening the video
broadcasting application in the normal way. However, the video broadcasting
application has to share this connection with other terminal traffic.
12.0. Support and feedback
For help with the BGAN service, contact:
[email protected]
For feedback on this document, and suggestions for improvement, contact:
[email protected]