1
J74 BassLine - User Manual
Page 1 of 20
J74 BassLine
A tool set for BassLine Progressions
J74 BassLine - User Manual
Page 2 of 20
About J74 BassLine
J74 BassLine is a Max for Live MIDI plug-in specialized in bass line progressions.
They key idea behind this device is to have a powerful tool which combines both rhythm and harmony together.
In terms of rhythm, which is key for bass parts, J74 BassLine makes use of performance tricks such as groove,
swing, legato, glide, accent and humanize dynamics. Programming is done through a simple user interface, based
on concepts well known to electronic musicians, such as step sequencing, effect knobs and probabilistic variations.
From the harmony point of view the tool works having knowledge of scales, chords and progressions, and combines
these with the rhythmic pattern creation: the generated bass-lines get transparently and automatically adapted to
the progression, on a chord by chord, tonic by tonic basis, remaining in-key to the selected scale (if you wish it to).
This works at its best when J74 BassLine is combined with J74 Progressive (another J74 tool set, available at
http://fabriziopoce.com/progressive.html), in what is called “Linked Mode”.
Using the two tools together you have an integrated environment for chord progressions programming and for
bass-line production at the same time. In “Linked Mode” the progressions created in J74 Progressive, as well as the
selected scale information, are automatically synchronized to J74 BassLine. J74 BassLine will consequently produce
bass-lines which follow the scale and chords of the progression, with harmonically consistent results.
Harmonic integration goes further then note adaptation. The tool uses the concept of intervals (thirds, fifths,
octaves, etc) and allows you to add leading notes in the bass-line too (notes which lead to the next chord), giving
your progression a driving musical feel which is peculiar to bass parts.
J74 BassLine can also work in three standalone modes. It can be used as a standalone bass-line editor (with its own
internally programmed progression), as a real-time bass sequencer (still using its internally defined progression, but
generating notes on the fly, without clips) or even as a slave device following chords from another track (extracting
the tonic to play the bass-line onto, in this case also generating notes on the fly).
How to Install the tool
J74 BassLine requires a Max for Live license for Ableton Live 9 to run (older versions of Live are not supported).
Installation is actually quite easy: just unzip the download pack, copy the files to your computer hard drive and you
are ready to go. To start the tool drop the “J74 BassLine.amxd” plug-in device on any MIDI track in the Ableton Live
liveset.
Note: BassLine operates on the Session View only (meaning that only MIDI Clips in the Session View can be created).
This limitation is not very restrictive: it is very easy to make a copy of a MIDI clip from the Session view into the
Arrangement View by just drag it over or by global recording and clip triggering.
Let's now go through the user interface of the tool, explaining what each command and function does.
J74 BassLine - User Manual
Page 3 of 20
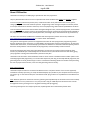
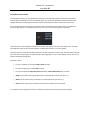
Start-up and Modes of Operation
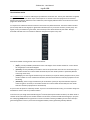
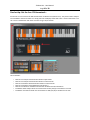
To open the tool, and define the mode of operation, use the device controls on the little "docked" user interface:
•
•
•
The [Bass-Line Editor] button opens the BassLine Editor, as shown below and explained next.
The [Mode] menu and the [Linked Progressive] switch define the mode of operation (see further below)
The [Help] button opens the help page
The device has several modes of operation as defined by the [Mode] and [Linked Progressive] controls:
1) Linked - Editor Mode: [Mode] = “Editor Mode” & [Linked Progressive] = ON
J74 BassLine operates as an editor and synchronizes to J74 Progressive (if present). Any change made in J74
Progressive to the scale settings (root and scale) and to the progression are automatically synchronized. If you press
[Start/Stop] on any of the tools, the action is synchronized.
2) Linked - Live Standalone Sequencer Mode: [Mode] = “Live Standalone” & [Linked Progressive] = ON
J74 BassLine works as a standalone real time sequencer, generating MIDI notes in output and synchronizes to J74
Progressive (if present). Any MIDI note in input to the device will be silently dropped in this mode of operation. All
features except the Leading Notes are supported in this mode.
3) Unlinked - Editor Mode: [Mode] = “Editor Mode” & [Linked Progressive] = OFF
J74 BassLine works as a standalone editor, using its own scale and progression information, and does not check if
J74 Progressive is present in the liveset. All features and techniques on J74 BassLine are further available for use.
4) Unlinked - Live Standalone Sequencer Mode: [Mode] = “Live Standalone” & [Linked Progressive] = OFF
J74 BassLine works as a standalone real time sequencer, generating MIDI notes in output, using its own Scale/Root
and Progression Matrix settings. No synchronization is done with J74 Progressive. In this mode any MIDI note in
input to the device will be silently dropped and all features except the Leading Notes are supported.
5) Live Chords Sequencer Mode: [Mode] = “Live Chords”
J74 BassLine works as a real time sequencer and follows the chords detected by the “J74 ChordDetect.amxd”
companion device (also included in the pack). Put the “J74 ChordDetect.amxd” on the track where chords are
received and J74 BassLine will adapt the bass sequence to the chord tonic, playing in tune.
More information regarding the modes of operation (and the applications they are made for) will be provided
further through this user manual.
J74 BassLine - User Manual
Page 4 of 20
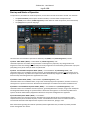
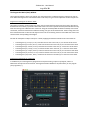
The BassLine Editor
The BassLine Editor is the place for programming your bass-lines. The device works using a combination of rhythmic
and harmonic techniques and generates extremely realistic results, with just a few clicks. When working as an
editor, results are always provided in the form of standard MIDI clips in the Session View (clips are created on the
track the device is hosted). When working as a sequencer, notes are instead generated in real time to the track.
Note: Reference to the previous paragraphs if you need to know how to set up the mode of operation.
The Main section provides the basic settings and the buttons for creating and starting MIDI clips:
•
•
•
•
[Root] and [Scale] define the scale harmonic environment to work with [*]
[Create Clip] creates a new clip for the bass-line progression you programmed
[Start/Stop] can be used to start or stop the last created clip [*]
[I'm Lucky] randomizes all parameters and generates a new clip
[*] In Linked Mode these functions are synchronized to J74 Progressive.
The Options section defines some important characteristic of the entire bass line:
•
•
•
•
•
[InKey/Chromatic] InKey adapts the bass-line so that the results remain in key with the working scale (for
any chord tonic / degree in the progression). Chromatic instead let's the pitch values in the
sequencer/editor work in chromatic mode (no scale adaptation/filtering is applied)
[Duration/Legato] selects the way notes are released. With Duration being selected, notes are played for
the length defined in the sequencer Duration (D) line (see next for details). With Legato selected, the bass
line is performed in legato mode (that is: a note extends till a new note begins)
[Compress] defines if skipped notes are left muted or completely removed. This affects the Legato mode:
if Compress in ON skipped notes are removed and played notes extend till the next non-skipped note. If
Compress is Off skipped notes are muted but left in the sequence, allowing a form of Staccato
performance. More on the skip function later in this manual.
[Interval] defines the number of bars the sequencer will cover. By default this is one (1) bar.
[Octave] defines the reference octave and can transpose the sequence one or more octaves, up or down.
J74 BassLine - User Manual
Page 5 of 20
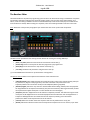
The Sequence Section
The Sequencer section allows you to program the five fundamental characteristics of the bass line performance:
Trigger Sequence
Pitch (offset) Sequence
Leading Sequence
Velocity Sequence
Duration Sequence
•
The [Trigger sequence] or (T) defines when a new note is played as a step in time (unless skipped by the
variation skip effect). This defines the fundamental aspect of timing, although the actual timing can be
radically altered by the Rhythm section (using the Swing and/or Groove effects), as explained later.
•
The [Pitch (offset) sequence] or (P) defines the pitch of the note. Anyway, instead of being an exact pitch
(like C or D), a P value represents the RELATIVE pitch (or simply offset) from the tonic of the currently
active chord/degree in the progression. Positive values move the pitch up, Negative values move the pitch
down. With a A minor chord having tonic on A2, a pitch (offset) value +7 will give an E3, while a value of -5
will play an E2. With another chord, other pitches will be generated using the same rules. The [Pitch
Display] (placed below the sequencer section) shows the programmed pitch offset value and which note
interval the pitch will be in the scale. Important: with InKey mode selected J74 BassLine may still modify
the pitch for you so that the result remains in tune with the selected scale.
•
The [Leading sequence] or (L) controls an important performance technique: the use of "leading notes"
(notes which lead to the next chord/degree). When a step has a Leading trigger ON (blue), the pitch will
be not defined in reference to the current but to the NEXT degree/chord in the progression. So if the
current tonic is A2 but the next degree will have a tonic of C2, a +7 offset with Leading ON will cause the
pitch to become G3 (and not E3), while a -5 will give a G1 (and not E2).
•
[Velocity sequence] or (V) defines the volume applied to the note, useful for accents or quite notes.
•
[Duration sequence] or (D) defines the length of the note, if Legato is not selected. Using longer durations
before shorter durations on contiguous steps you can achieve glide effects, which sounds nice on many
monophonic instruments (the length of a note extends beyond the beginning of the next).
Note: Both [Velocity sequence] and [Duration sequence] offer two little arrows on the left side of the interface.
These arrows allow you to move up and down all the corresponding values.
Other controls on this section:
•
•
•
•
[Shift Left/Right] to shift the entire sequence (indeed left or right)
[Step Cursor/Clock] to activate a cursor visualizing the position for the active step, if playback is active.
[Preset] which provides you with useful built-in presets.
[Edit Progression] which opens the Progression Matrix for editing the progression [*]
[*] In Linked Mode the progression is synchronized to J74 Progressive.
J74 BassLine - User Manual
Page 6 of 20
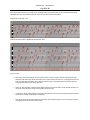
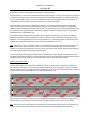
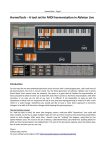
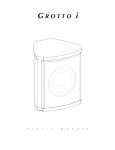
Here an example of the harmonic behavior of J74 BassLine. The selected scale in this case is Bb Minor.
The progression is 4-5-1-1, repeated four times.
The sequence has triggers (T) on step 1, 4, 7, 10, 13 and 15. This is a variation of the 3+3+2 model often used in
rhythm. Noticeable is also the use of Pitch offsets (P) and of Leading notes (L) in the sequence:
•
•
•
•
•
•
Trigger 1 has Pitch offset = 0, so it will be the tonic (depending of the active chord / degree)
Trigger 4 has Pitch offset = +7, so it would be a perfect fifth up from the tonic.
Trigger 7 has Pitch offset = +12, so it would be an octave up from the tonic.
Trigger 10 has Pitch offset = +7, so it would also be a perfect fifth up from the tonic.
Trigger 13 has Pitch offset = -5 and Leading note trigger ON, so it would be a perfect fifth down, but based
on the tonic of the next chord. More on this when looking at the resulting clip.
Trigger 15 has Pitch offset = -2 and also a Leading trigger ON. Again will be looking at this in a few lines.
J74 BassLine - User Manual
Page 7 of 20
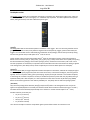
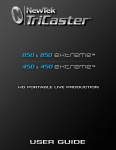
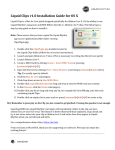
If we observe the result for the portion corresponding to a B Minor chord (B Minor is the first degree in the scale,
which in the example progression is programmed at interval 3), the clip portion looks like this:
•
•
•
•
•
•
Trigger 1 has Pitch offset = 0, so it is set to be the tonic of the chord, in this case Bb0 (or A#0)
Trigger 4 has Pitch offset = +7, a perfect fifth up, which in this case resolves into a F1
Trigger 7 has Pitch offset = +12, the tonic but an octave up, giving a B1 (or A#1)
Trigger 10 has Pitch offset = +7, a perfect fifth up, again F1
Trigger 13 has Pitch offset = -5 and Leading note trigger ON, so it maps to a perfect fifth down but in
reference to the tonic of the next chord. In the example progression (at interval 3) the next chord is
another B Minor (no chord change). So this gives a F0. Further in this paragraph we will see the effect of
the same Leading trigger, but on the chord of interval 4 (which is followed by a different chord), resulting
in a different outcome.
Trigger 15 has Pitch offset = -2 and also a Leading note trigger ON. As in this case the next chord is also
another B Minor, this give as Ab0 (G#0) note.
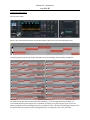
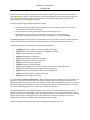
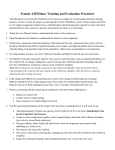
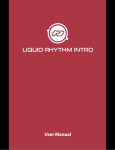
Let's now have a look the the entire clip, where more bars are created in relation to the different chords in the
progression (degrees 4-5-1-1). This will show the effect of the harmonization and of the leading notes.
Here the full clip:
As you can see the results is 16 bars long, given by the 4-5-1-1 progression sequence (four bars) repeated four
times. The same bass-line is harmonized each time to the active chord.
If you look at bar 3 and 4 you can see the effect of the Leading note. The first time (bar 3 in the clip) notes
corresponding to steps 13 and 15 have been set to F0 and G#0 (as in the detailed explanation above). Anyway the
second time (on bar 4) the notes on steps 13 and 15 have changed to A#-1 and C#0 as the next chord is a D# Minor.
As InKey has been selected, notes not resulting part of the scale are transposed automatically to fit into the scale.
Note: The InKey option operates kind-of underwater. The best way to see it in action is by using a Pitch Offset of a
third interval (which is a +3 or +4, depending from the context). An example will clear things up. Let's say we work
on with the C Major scale (CDEFGAB) and that we use a pitch is of +4 on a step. If the tonic of the first chord is C2,
+4 will gives E2 (which is up a major third interval). This note is in scale, no transposition needed. But, if the next
chord tonic becomes D2, +4 would be F#2, which is not a note of the scale. With InKey active, F#2 will be
automatically transposed by the plugin to F2, making this a minor third interval (which is +3). Of course, if you
disable InKey (or better set it to Chromatic), you will get F#2 as result. This is what InKey really does!
J74 BassLine - User Manual
Page 8 of 20
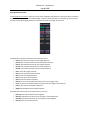
Step Operations section
The Step Operations section is where you can do some mangling of the sequences. The section offers a number of
functions (or just operations) useful while building a sequence. Some operations are individual for each sequence
line (for instance affecting only Velocity or only Duration), while some apply to all the lines.
Step Operations which are individual to the sequence lines are:
• [Rnd-T] calls a Random function for the Trigger Sequence
• [Rnd-P] calls a Random function for the Pitch (offset) Sequence
• [Rnd-L] calls a Random function for the Leading Sequence
• [Rnd-V] calls a Random function for the Velocity Sequence
• [Rnd-D] calls a Random function for the Duration Sequence
• [Rst-T] resets the Trigger Sequence
• [Rst-P] resets the Pitch (offset) Sequence
• [Rst-L] resets the Leading Sequence
• [Rst-V] resets the Velocity Sequence
• [Rst-D] resets the Duration Sequence
• [Rev-P] reverse the Pitch (offset) Sequence (for the active triggers only)
• [Inv-P] inverts the Pitch (offset) Sequence (positive become negative and viceversa)
• [Left-P] shifts Left the Pitch (offset) Sequence
• [Right-P] shifts Right the Pitch (offset) Sequence
Step Operations which work on all sequence lines at once are:
• [Rev-All] reverse all the sequence lines together
• [Mix-All] redistributes the values across the steps in each sequence line
• [Rnd-All] calls a Random function for all the sequence lines together
• [Rst-All] resets all the sequence lines
J74 BassLine - User Manual
Page 9 of 20
The Variations section
The Variations section is useful to add a degree of randomness to the bass-line. The way the randomness is applied,
though, is not limited to the sixteen steps of the sequencer: it extends to the entire progression and each new
degree in the progression will have its own randomness, with a slightly different effect. The result over the entire
progression will be natural.
It is important to understand that the controls in this section only define thresholds. The actual random numbers
(for each step and for each degree) are generated underwater (that is: you do not see them, but they exist). The
higher you set a threshold for a given effect, the more likely a note will be affected by such effect. Setting a
threshold to 0% will assure no variation is added on that particular aspect to any note.
Here the thresholds meaning and the nature of the effects:
•
•
•
•
[Skip%], sets the probability threshold for notes to be skipped. If the random number for a note is below
the threshold, the note will be skipped.
[Spread%], sets the probability threshold for notes to be spread within the scale on a two octave range. If
the random number for a note is below the threshold, the note will be spread to a potentially different
note (in the same scale).
[Velocity%], sets the range of randomness for the velocities (on top of the Velocity Sequence values). If the
random number for a note is below the threshold, the note will be altered in volume (in proportion to the
threshold).
[Duration%], sets the range of randomness for the duration of notes (on top of the Duration Sequence
values if Legato is not active). If the random number for a note is below the threshold, the note will be
altered in duration (in proportion to the threshold)
As you can see this process is inherently random. If you are not satisfied with the results, you can either change the
thresholds or create a new set of random numbers.
In the first case you change the threshold using the % controls (but keep the random numbers): the effect will be a
variation of the same effect (as the random numbers are the same, but the thresholds have changed). If you press
the underlying [Seed] bottom this generates a new set of random numbers (probability) for the notes. New clips
generated against the new set, even with unchanged thresholds, will be (potentially) radically different.
J74 BassLine - User Manual
Page 10 of 20
Here an example (with the same progression proposed before) first without and the with variation effects being
applied (in this case all threshold have been set to 20%, for demonstration purposes):
Original (all thresholds = 0%):
With the Variations effects applied (all thresholds at 20%):
As you can see:
•
Some notes have been skipped. See for instance at bar 1: there is a D#1 in the first clip which has been
skipped in the second clip. Notice also that in bar 5, which restarts the same 4-5-1-1 progression a second
time, the same does not apply. This to show that the function is not repeated at each new bar, but has
some unpredictability across the progression.
•
There are also examples of notes being changed in pitch by the spread effect. In the second clip there are
instances of the G#1 note, which are not present in the first clip.
•
Velocities are clearly being affected, as we see a fluctuation in velocity in the second clip (original volumes
where flat at velocity = 100, which is the default).
•
Also the Duration has been affected by the variation: the second F0 (in bar 2) in the second clip is shorter
if compared to the same note in the first clip.
J74 BassLine - User Manual
Page 11 of 20
The Rhythm section
The Rhythm section allows you to manipulate the timing in a rhythmic way, affecting the trigger times, which are
otherwise quantized to 1/16th note lengths, as in traditional step sequencers. The section provides two separate
effects, Swing and Groove, each with a different rhythmic goal.
[Swing%]
The Swing effect adds incremental anticipation or hesitation to the triggers. This is an extremely powerful tool for
giving the bass-line an unusual, funky cadence. Negative values anticipate the triggers, positive values delay the
triggers. The incremental nature is defined by the combination of the [Swing%] value and the [Time Base] setting
and can easily provide ways to add triplets or 32 nd notes in the mix.
Useful rhythmic values for generating triplets and 32nd notes are the integer fractions of the interval (which by
default is set to one bar), such as: 1/4 (+/-25%), 1/3 (+/-33%), 1/2 (+/-50%). These values can be quickly set up using
the little box below the [Swing%] control. Other [Swing%] values, unrelated to such fractions, will create a more
unusual syncopation. As mentioned, an important factor which affects how the incremental time shifting is applied
is the setting of the [Time Base] control, which is explained just a few lines below (with a few examples).
[Groove%]
The Groove effect adds per trigger independent random anticipation or hesitation, and does this looping the effect
across the degrees of the progression (each time a bass-line restarts, as with each new degree, the same groove is
applied). This has a rhythmic effect, given by the looping. Anyway the overall result has a more random emphasis,
as the timing has a random component. The way to combine the [Groove%] values with the [Time Base] setting is
explained below (with a few examples). It is also important to notice that in the case of [Groove%] the [Seed]
button can be used to generate a new random probability set. The [Seed] does not affect the [Swing%] effect.
[Time Base]
The [Time Base] setting affects both the [Swing%] and [Groove%] effects. This setting defines the area for the
effects to be applied/looped on. Essentially this influences which beats will be less affected (and more "on beat")
and which will be more effected (and potentially more “off beat” or moved towards triplets or 32 nd notes).
Possible values for [Time Base] are:
• 4n (or a 1/4th interval)
• 2n (or a 1/2th interval)
• 2dot (or 3/4th interval)
• 1n (or full bar interval)
Let's do some examples so that the manipulation given by these effects will be more intuitive to see.
J74 BassLine - User Manual
Page 12 of 20
Example of [Swing%] effect
Here the device setup:
When a clip is created without Rhythm section effects (both at 0%), this results in the following bass-line:
The following shows how the clip changes with different values of [Swing%] and [Time Base], as depicted:
On the left side all clips have been processed with [Time Base] = 1n, on the right side with [Time Base] = 2n.
In the middle (fourth row) the original clip is re-obtained, as [Swing%] is set to 0%. Moving up you can see the
effect of a gradual decrease of [Swing%] (from 0%, to respectively -25%, -33% and -50%). Moving down you can see
the specular effect of a gradual increase of [Swing%] (from 0%, to respectively +25%, +33% and +50%).
J74 BassLine - User Manual
Page 13 of 20
As you may have noticed, the timing of notes changes, in rhythmic fashion.
With [Time Base] = 1n, the area for the effect extends to the full length (1n = 1 bar), so the swing either compresses
or expands all the triggers time, with all notes either being anticipated (with [Swing%] < 0) or delayed (with [Swing
%] > 0), in gradual fashion (notes at time 0 are unaffected, the more you proceed, the more swing is applied). At
each new bar the effect restarts (as we have [Time Base] = 1n), with a looping feel.
With [Time Base] = 2n, the area is reduced to half a bar (2n = 1/2 nd) and therefore the compression/expansion
restarts at each half bar. Notes are anticipated with [Swing%] < 0) or delayed with [Swing%] > 0, but in gradual
fashion and with a periodicity of half a bar: notes at time 0 are unaffected, the more you proceed till the half of the
bar, the more swing is applied and then, at half of the sequence, the effect starts all over again. This give again a
looping effect, but a quite different one.
The same logic applies with the other [Time Base] values, 2dot (3/4 th) and 4n (1/4th), with the areas of looping
having their respective periodicity length of 3/4 th and 1/4th of the [Interval]. Particularly interesting is the case of
2dot (3/4th). This setting partitions the clip in an asymmetrical way, in trunks of three beats. As this extends across
multiple bars, it produces a quite strange result, full of triplets and pauses. Try it out!
Note: the values of +/-25%, +/-33% and +/-50% for the [Swing%] control are important. They move the notes from
the boundary of the 1/16th into intervals of 1/32nd or, in case of notes separated of 1/8th, it introduces triplets.
Needless to say these are good elements to throw in for an interesting musical receipt, without actually needing to
be a funky player or program them meticulously on the grid.
As you can experience by yourself, the difference to the ear between a simple “straight” sequence and the same
sequence processed with [Swing%] can be quite noticeable. Some of the combinations of [Swing%] and [Time Base]
introduces peculiar “swing cadences” into the sequence. The results can be quite funky indeed!
Example of [Groove%] effect
The [Groove%] effect is more random-like, although it is still very rhythmical (as it is looped across the interval).
Let's take the same sequence setup, as used in the example above, and apply a [Groove%] of 50% in combination
with [Time Base] set to 2n. The progression is also repeated four times. This results in the following clips (on top the
original, on the bottom the one with [Groove%] = 50% and [Time Base] = 2n):
As you can see each sequence step has now a per-step different anticipation or hesitation (delay) timing. You can
also see that this is repeated over each interval of the progression (interval is here set to 1 bar, the default).
Note: [Groove%] works at its best with just a limited amount, something about 20-25% (50% in this example is just
to show the results more clearly). Some little [Groove%] can be combined with [Swing%] for good results.
J74 BassLine - User Manual
Page 14 of 20
The Custom Preset section
In the Sequencer section you may already have noticed a menu with built-in presets. These presets have been
made to give some specific result on some popular genre of music and are particularly useful to show how the
changes affect the bass-line sequence and how they can be combined to achieve a particular musical result.
As you can get from their names, there is a level of “taste” involved with these presets, which is probably a bit
personal (read: there is a lot of funky stuff in there). This may or may not result good to every body.
That's why there is also a dedicated Custom Preset section. This allows you to create your own presets, save them
and recall them. They can be stored in bank files, recalled when necessary, in any new project.
The section shows a matrix of bulbs and few buttons. The bulb represents a memory slot. The color of the bulb tells
you if the slot is free (dark gray), if it holds already a preset (light gray) or if it is active (yellow). You can also save or
load the whole bank through files.
Here how it works.
•
To store a snapshot on a slot press SHIFT+CLICK on a bulb
•
To recall a snapshot from a slot CLICK on a bulb
•
To erase a snapshot do SHIFT+ALT+CLICK (Windows) / SHIFT+CMD+CLICK (Mac) on a bulb
•
[Read] can be used to load a preset bank from a preset bank file saved on your drive [**]
•
[Write] can be used to save a preset bank as a preset bank file on your drive [**]
•
[Erase] can be used to clear all custom presets (all slots / bulbs) in the current bank.
[**] Important: preset bank files must have a .maxpresets extension to be correctly saved and recalled!
J74 BassLine - User Manual
Page 15 of 20
The Progression Matrix (Bass) Window
The Progression Matrix is where you program your own progression, as indeed a sequence of degrees in order of
time. Before showing how the user interface works in this view, let's give a short explanation on what degrees are.
Progressions and Degrees in Western Music
The majority of western musical scales uses seven notes (or is derived from scales using seven notes). Chords can
be built from such scales by a procedure which adds notes in the scale at specific intervals (third and fifth intervals),
each time starting from a different note of the scale. Using this method (called the diatonic method) seven chords
can be built, each chord associated to a different starting note, part of the selected scale. These starting notes and
their associated chords are what we call degrees of the scale. These starting notes are also called tonic notes in the
context of their corresponding chord degree.
Consider for example the C Major scale (C D E F G A B). Applying the diatonic method results in this chord set:
•
•
•
•
•
•
•
Chord Degree 1 (I): C major, C-E-G (= triad from the 1st note in the scale, C). C is the tonic of this chord.
Chord Degree 2 (II): D minor, D-F-A (= triad from the 2nd note in the scale, D). D is the tonic of this chord.
Chord Degree 3 (III): E minor, E-G-B (= triad from the 3rd note in the scale, E). E is the tonic of this chord.
Chord Degree 4 (IV): F major, F-A-C (= triad from the 4th note in the scale, F). F is the tonic of this chord.
Chord Degree 5 (V): G major, G-B-D (= triad from the 5th note in the scale, G). G is the tonic of this chord.
Chord Degree 6 (VI): A minor, A-C-E (= triad from the 6th note in the scale, A). A is the tonic of this chord.
Chord Degree 7 (VII): B dim., B-D-F (= triad from the 7th note in the scale, B). B is the tonic of this chord.
Progressions and Degrees in J74 BassLine
In J74 BassLine (as in J74 Progressive) progressions are expressed using a sequence of degrees, which is a
abstraction concept from the actual scale. The Progression Matrix Window is the place where you can program
your progression [*].
J74 BassLine - User Manual
Page 16 of 20
As you can see from the picture, the progression is expressed as sequence of degrees in order of time. Where a
yellow dot is placed, a degree is inserted. When an actual scale is applied this results in actual chords and in tonic
notes. J74 BassLine automatically calculates the tonic notes of the corresponding chord, using them as the
reference 0 value for the Pitch Offset (P) sequence.
The actual programming in the Progression Matrix is simple:
•
•
•
On the horizontal axis you define when the degree is placed in time (time between 1 and 16, the time
unit defined by the [Interval] in the Options).
On the vertical axis you define which degree will be inserted (degrees 1 to 7)
A special value for a dot is the empty or rest interval. An empty / rest can be inserted by
adding a dot on the grayed-out row set below the row for degree {1 - I}) and named [empty].
The [Hold] toggle defines how rest intervals are translated into the clip. If [Hold] is set to ON, it holds the bass-line
on the previous degree over the empty interval. If Hold is set to OFF no bass-line is played in that interval.
The following operations are available on the Progression Matrix Window:
•
•
•
•
•
•
•
•
•
•
•
•
•
[Left/Right] Shift arrows: Applies a rotation to the left or to the right
[Up/Down] Shift arrows: Move the progression one degree up or down
[Undo]: does an undo of the last operation
[Duplicate]: duplicates the Progression
[Expand]: shifts right and duplicates the first chord
[Shorten]: shifts left and removes the first chord
[Reverse]: reverses the chord progression
[Compact]: removes any chord repetition
[Copy]: copies the progression in memory (for paste action like Insert, Append or Restore)
[Insert]: does a paste of the last copy before the current progression
[Append]: does a paste of the last copy after the current progression
[Restore]: deletes all and does a paste of the last copy
[Clear All]: erases the progression entirely
[*] In Linked Mode ([Linked to J74 Progressive] = ON) the progression matrix of J74 BassLine is synchronized to J74
Progressive. Anyway synchronization only works one way: changes made in J74 Progressive are pushed to J74
BassLine, but not the other way around. This is intentional and allows you to change the bass-line so that it can play
differently from the chords (and their tonic notes). An example of use for this is to keep the bass-line on the scale
root as tonic while changing chords, as it is often done in dance and funky music.
On the Progression Matrix you also find a shortcut button to enter the “Live Standalone Sequencer” mode of
operation, in the form of a [Live] toggle. Is set to OFF (black) the BassLine device is set in Editor Mode (by default
linked to J74 Progressive). If set to ON the mode of operation changes into “Live Standalone Sequencer” mode, still
keeping synchronization to J74 Progressive if this was enabled. This is useful for switching into on the fly
programming, eventually in combination with J74 Progressive own Live mode.
Next a few additional considerations on the modes of operation which should clarify this.
J74 BassLine - User Manual
Page 17 of 20
Additional information on Linked mode operation (working with J74 Progressive)
J74 BassLine can efficiently be used in combination with J74 Progressive providing an integrated tool for writing
music (chord progressions and harmonically consistent bass parts). Using the two tools together in “Linked Mode”
you can work with the two tools at the same time, having their basic information always [*] synchronized.
To activate Linked Mode set [Linked Progressive] to ON (which is actually the default), in the docked device view
(OR equivalently [Linked to J74 Progressive] = ON in the Progression Matrix View: they do the same thing).
In this mode J74 BassLine synchronizes to J74 Progressive. Any change made in J74 Progressive to the scale settings
(root and scale) and to the progression are automatically applied to J74 BassLine. Also, if you press [Start/Stop]
after creating a new clip on any of the two devices, the start or stop action is applied to both simultaneously.
Important Notes:
•
•
•
•
In Linked mode, J74 Progressive is automatically set to "track mode" (clips of J74 Progressive are
automatically created in the track J74 Progressive is into, same behavior as J74 BassLine).
Changes to the Root/Scale and to the progression as done in J74 Progressive are automatically copied to
J74 BassLine.
Start/Stop buttons operate in tandem between the device.
If you changed the J74 BassLine progression or temporarily disable Linked mode you can the [Query J74
Progressive] button to synchronize manually.
[*] As mentioned already synchronization in Linked Mode pushes changes made in J74 Progressive to J74 BassLine
but not the other way around. This option is useful for some specific applications, such as keeping the scale root
tonic bass while doing chord changes. This is a powerful bass technique often used in dance, funky and even jazz
music. For example you could have J74 Progressive programmed with a chord progression 1-5-6-4, but modify the
progression of J74 BassLine to have something different, like 1-1-1-4 or even 1-1-1-1, keeping the same degree on
the root of the scale for multiple intervals/bars. Try yourself and hear the effect!
Note: You can work in Linked Mode with J74 Progressive in both “Editor Mode” and “Live Standalone Mode”:
•
•
In “Editor Mode” with [Linked Progressive] = ON the tools work as synchronized editors.
In “Live Standalone Mode” with [Linked Progressive] = ON, and J74 Progressive in its own Live mode, the
tools work as synchronized real time sequencers.
J74 BassLine - User Manual
Page 18 of 20
Additional Information on modes of operation
The J74 BassLine plugin can work in several modes for various goals:
•
•
•
•
•
Linked - Editor Mode
Linked - Live Standalone Sequencer Mode
Unlinked - Editor Mode
Unlinked - Live Standalone Sequencer Mode
Live Chords Sequencer Mode
Here a few additional notes on these modes of operation and what you can use them for.
1) Linked - Editor Mode (default)
This is the default mode of operation J74 BassLine turns to if J74 Progressive is part of the Live set. In “Editor
Mode” (with [Linked Progressive] = ON) the two tools work as synchronized editors (passing through any incoming
MIDI and creating MIDI clips) and synchronize to J74 Progressive settings, as explained in the previous paragraphs.
There is no additional consideration applicable to this mode other than what already described in this user manual.
Settings: [Mode] = “Editor Mode” & [Linked Progressive] = ON
2) Linked - Live Standalone Sequencer Mode
You can turn to this mode of operation if you like to work on a composition without passing first through MIDI clip
creation. The idea is to enable both J74 Progressive own Live mode (see J74 Progressive instructions for this) and
J74 BassLine “Linked - Live Standalone Sequencer” mode, at the same time. In this way the two tools work as
synchronized real time sequencers.
Other relevant notes:
•
•
•
•
•
This mode of operation is meant to be combined with J74 Progressive own Live mode for changes to be
effective (a change in the progression applied to both chords and bass).
In this setup you should use J74 Progressive Chord Progression Matrix and Root/Scale setting to define the
progression and the scale, and program the bass line using BassLine sequencer in the main view.
Random variations of Skip%, Spread%, Velocity% and Duration% modifiers may sound different in this
mode compared to the Editor mode, due to the different random generation engines being used.
With the exception of Leading Notes, all features in J74 BassLine are supported in this mode.
For the limitations of Live mode in J74 Progressive (on J74 Progressive own feature set) please refer to the
J74 Progressive user manual.
Settings: [Mode] = “Live Standalone” & [Linked Progressive] = ON
J74 BassLine - User Manual
Page 19 of 20
3) Unlinked - Editor Mode
J74 BassLine can of course work as a standalone editor without J74 Progressive. In this case (with [Mode] menu =
“Editor Mode”, [Linked Progressive] = OFF), it is on J74 BassLine itself that you select the root and scale and
program your progression in the Progression Matrix Window. If no J74 Progressive is in your liveset, this is actually
the mode J74 BassLine will automatically turn to. There are further no caveats. In this mode you just work as
explained in this manual and all features and techniques described here apply.
Settings: [Mode] = “Editor Mode” & [Linked Progressive] = OFF
4) Unlinked - Live Standalone Sequencer Mode
In this mode J74 BassLine works as a more traditional real-time sequencer while using its own progression and scale
settings for the harmonic features. Please note that all features except Leading Notes are supported in this mode
and that the random variations of Skip%, Spread%, Velocity% and Duration% modifiers may sound different in this
mode compared to the Editor mode due to the different random generation engines being used.
Settings: [Mode] = “Live Standalone” & [Linked Progressive] = ON
5) Live Chords Sequencer Mode
J74 BassLine works as a real time sequencer and follows the chords detected by the “J74 ChordDetect.amxd”
companion device (also included in this pack).
Put the J74 ChordDetect.amxd device on the track where chords, as MIDI notes, are received (in real time
or triggered from a clip).
Put J74 BassLine on the track with the bass instrument you wish to use.
•
•
J74 BassLine will follow the chords being detected and adapt the bass sequence to the chord tonic, playing in tune.
•
•
•
•
Please note that in this mode the setting of [Linked Progressive] is not relevant (there is no scale or
progression to follow, but real time chords).
As chords restrict the set of notes available, the bass line being produced may present less harmonic
variation if compared to the bass line which could be produced having a full scale available.
All features except Leading Notes and Progression Matrix are supported in this mode.
Random variations of Skip%, Spread%, Velocity% and Duration% modifiers may sound different in this
mode compared to the Editor mode due to the different random generation engines being used.
Settings: [Mode] = “Live Chords” & [Linked Progressive] = Any
J74 BassLine - User Manual
Page 20 of 20
One last tip: Get the free J74 Harmotools...
HarmoTools is a set of devices for MIDI harmonization for Ableton Live (Max for Live). They can be used to adapt in
real-time MIDI to chords and scales or to simply discover and display chords and scales. It can be used within a Live
set or even in collaboration with other musicians using a TCP/IP network.
The set includes:
•
•
•
•
•
•
•
Max for Live analyzer and harmonizer based on input chords
Max for Live analyzer and harmonizer based on a selected scale
Max for Live diatonic chord harmonizer based on a selected scale
Max for Live diatonic auto-populated rack of chords (*)
Max for Live add-on for network communication of chord and scale information
Standalone chord analyzer which can communicate via OSC (TCP/IP) to the Max for Live tools
Standalone scale selector which can communicate via OSC (TCP/IP) to the Max for Live tools