1
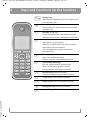
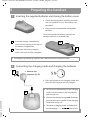
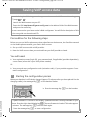
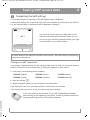
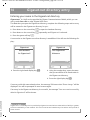
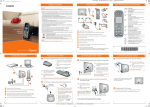
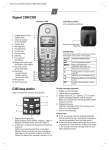
C470 IP
Simple
step-by-step
installation
C470 IP / AUS en / A31008-M1916-C401-3-7643 / security_1pg.fm / 7/27/10
Safety precautions
2
Warning:
Read the safety precautions and the user guide on the CD before use.
Explain their content and the potential hazards associated with using the telephone to your children.
> Only use the mains adapters supplied, as indicated on the underside of the base station or charging
cradle.
> Only use the recommended, rechargeable batteries, i.e. never use a conventional (non-rechargea-
>
>
>
>
>
>
>
>
>
>
>
>
ble) battery or other battery types as this could result in significant health risks and personal injury.
For example, the outer casing of the batteries could be damaged or the batteries could explode.
The phone could also malfunction or be damaged as a result of using batteries that are not of the
recommended type.
Insert rechargeable batteries with the correct polarity, and use them in accordance with the user guide
(polarity symbols are displayed in or on the handset's battery compartment).
Batteries should not be disposed of in general household waste. Observe the local waste disposal
regulations, details of which can be obtained from your local authority or the dealer you purchased
the product from.
The operation of medical appliances may be affected. Be aware of the technical conditions in your
particular environment, e.g. doctor's surgery.
Do not hold the rear of the handset to your ear when it is ringing or when the handsfree function is
activated. Otherwise you risk serious and permanent damage to your hearing.
The handset may cause an unpleasant humming noise in hearing aids.
Do not install the base station or charging cradle in bathrooms or shower rooms. The handset, base
station and charging cradle are not splashproof.
The charging cradle and base station are designed for use in enclosed dry rooms with a temperature
range of +5°C to +45°C.
Do not use the phone in environments with a potential explosion hazard, e.g. paint shops.
Never expose the telephone to any of the following: heat sources, direct sunlight or other electrical
appliances.
Protect your Gigaset from moisture, dust, corrosive liquids and vapours.
If you give your Gigaset to someone else, make sure you also give them the user guide.
Please remove faulty base stations from use or have them repaired by our Service Centre, as they could
interfere with other wireless services.
All electrical and electronic equipment must be disposed of separately from general household waste
using the sites designated by local authorities.
If a product displays this symbol of a crossed-out rubbish bin, the product is subject
to European Directive 2002/96/EC.
The appropriate disposal and separate collection of used equipment serve to prevent
potential harm to the environment and to health. They are a precondition for the reuse and recycling of used electrical and electronic equipment.
For further information on disposing of your used equipment, please contact
your local authority, your refuse collection service or the dealer you purchased the
product from.
Warning:
Version 5, 23.09.2008
When the keypad lock is active, you cannot call emergency numbers.
C470 IP / AUS en / A31008-M1916-C401-3-7643 / Pack_Content_1pg.fm / 7/27/10
Pack contents
3
5
7
1
2
8
4
3
11
Version 5, 23.09.2008
6
10
9
1
Gigaset C470 IP base station
2
Mains adapter for connecting the base station to the mains power supply
3
Phone cord for connecting the base station to the fixed line network
4
Ethernet (LAN) cable for connecting the base station to the router (LAN/Internet)
5
Gigaset C47H handset
6
Two batteries for the handset (uncharged)
7
Battery compartment cover for the handset
8
Belt clip for the handset
9
Mains adapter for connecting the charging cradle to the mains power supply
10
Handset charging cradle
11
CD with the user guide for your Gigaset.
If the firmware for your base station is updated, the user guide will also be updated and
made available for download on the Internet at www.gigaset.com.
C470 IP / AUS en / A31008-M1916-C401-3-7643 / overview_handset_1pg.fm / 7/27/10
4
Keys and functions on the handset
A
B
Display keys:
Start function displayed to the left or right of the
bottom display line
d
Handsfree key:
Switch between earpiece and handsfree mode
(key lights up)
c
Talk key: accept call
After entering number: start dialling via VoIP/
fixed line network (press briefly/press and hold)
p
Control key:
Open directory (press down)
Open list of online directories (press and hold
the bottom of the control key)
Scroll through menus (press up or down)
Navigate in text
f
Message key:
Open calls and messages lists
Flashes: new call, new message/firmware
a
End call key, on/off key:
End call, cancel function (press briefly)
Return to idle status (press and hold)
Switch handset on/off (press and hold)
Fast access key (press and hold):
Listen to messages on the network mailbox
*
* key: Ringer on/off (press and hold)
#
# key: Keypad lock on/off (press and hold)
S
Recall/pause key (fixed line network)
Version 5, 23.09.2008
C
Open call-by-call list (fixed line network)
C470 IP / AUS en / A31008-M1916-C401-3-7643 / connect_overview.fm / 7/27/10
Connection overview
5
6
5
3
1
4
Version 5, 23.09.2008
2
1
Preparing the handset: inserting the batteries
2
Connecting the charging cradle to the mains power supply and charging the batteries
3
Connecting the phone cord and power lead to the base station
4
Connecting the base station to the fixed line network and the mains power supply
5
To connect the base station to the Internet, first connect the base station to the router
(connection via router and modem or via router with integrated modem)
6
PC in LAN (optional) for advanced configuration of the Gigaset C470 IP base station
C470 IP / AUS en / A31008-M1916-C401-3-7643 / install_3pg.fm / 7/27/10
Preparing the handset
6
1
Inserting the supplied batteries and closing the battery cover
> Check the polarity when inserting the batteries (see symbols in or on the battery compartment).
> Only use the recommended rechargeable
batteries.
Once the batteries have been inserted, the
handset switches on automatically.
A
Insert the battery compartment
cover into the notches at the top of
the battery compartment.
B
Then press the battery compartment cover until it clicks into place.
A
B
> The display is protected by a plastic film. Please remove the protective film!
2
B
Connecting the charging cradle and charging the batteries
> Observe the
sequence (A, B)!
> Place the handset in the charging cradle and
wait until the batteries are fully charged.
A
> Do not put the handset back in the charging
cradle until the batteries are fully discharged through use.
Version 5, 23.09.2008
> After the first battery charge and discharge,
you may place your handset in the charging
cradle after every call.
> The battery charging status is displayed in
the idle display: = e V U (flat to full).
C470 IP / AUS en / A31008-M1916-C401-3-7643 / install_3pg.fm / 7/27/10
Connecting the base station
3
7
Connecting the phone cord and power lead to the base station
B
A
C
A
Insert the phone cord into the lower
connection socket at the rear of the
base station.
B
Insert the power lead of the mains
adapter into the upper connection
socket at the rear of the base station.
C
Insert both cables into their respective cable recesses.
Only use the supplied phone cord and the
supplied mains adapter.
4
Connecting the base station to the fixed line network
and mains power supply
A
Insert the phone cord into the
fixed line network connection
socket.
B
Then insert the mains adapter
into the mains socket.
B
A
Keep the mains adapter plugged in at
all times for operation, as the phone
does not work without a mains connection.
Version 5, 23.09.2008
You can now use your phone to make calls via the fixed line network:
Enter the number using the handset, and then press and hold the talk key c.
C470 IP / AUS en / A31008-M1916-C401-3-7643 / install_3pg.fm / 7/27/10
Connecting the base station
8
5
Connecting the base station with the router (Internet)
B
A
A
Connect one Ethernet cable plug to
the LAN socket at the side of the
base station.
B
Insert the second Ethernet cable plug
into a LAN socket on the router.
Use the Ethernet cable supplied.
As soon as the cable connecting the phone and router
is plugged in, the key lights up on the front of the base
station (paging key).
6
Connecting the PC to the router (optional)
Further configuration of the base station can be performed via a PC in the LAN.
> Connect the PC network connection to a free LAN socket on your router.
> The procedure below requires that your phone is automatically assigned an IP address
by the router (i.e. DHCP is enabled on router and phone).
In exceptional cases (e.g. if DHCP is not enabled on the router) you will have to assign
a static IP address to the base station for LAN access. You must enter this IP address on
the handset before carrying out the following steps. Further information can be found
in the user guide on the enclosed CD.
The following handset menu can be used to make the entry:
v ¢ Settings ¢ Base ¢ Local Network ¢ (Enter system PIN)
Version 5, 23.09.2008
> VoIP should be set as the default line for your phone (default setting). You will then
immediately receive corresponding messages if a connection to the provider's VoIP server cannot be established due to incorrect/incomplete data.
C470 IP / AUS en / A31008-M1916-C401-3-7643 / configuration_6pg.fm / 7/27/10
Saving VoIP access data
9
Instead of using the following procedure, you can also enter the VoIP access data using your
PC (steps 7 to 11 ):
> Launch the Web browser on your PC.
> Enter the URL http://www.Gigaset-config.com in the address field of the Web browser
and press the return key.
You are connected to your base station's Web configurator. You will find a description of this
in the user guide on the enclosed CD.
Precondition for the following steps:
Before you can use VoIP to phone any other subscribers on the Internet, the fixed line network
or the mobile phone network, you need a VoIP account.
> Set up a VoIP account with a VoIP provider.
> Have the VoIP account data you received from your VoIP provider to hand.
You will need:
> Your registration name (login ID), your password and, if applicable (provider-dependent),
a user name (often this is your VoIP phone number).
Or
> Your personal auto-configuration code (activation code), if your provider supports "automatic configuration".
7
Starting the configuration process
When your handset is sufficiently charged (approx. 20 minutes after you have placed it in the
charging cradle), the message key f on the handset flashes.
Version 5, 23.09.2008
> Press the message key f on the handset.
If "Update firmware?" is shown in the display, updated firmware is already available for your
phone. Press the right-hand display key §Yes§. The new firmware is loaded. This takes approx.
3 minutes. The message key f will now flash again.
> Press the message key f to start configuration.
C470 IP / AUS en / A31008-M1916-C401-3-7643 / configuration_6pg.fm / 7/27/10
Saving VoIP access data
10
8
Starting the connection assistant, entering the PIN
System PIN
Connection Assist.
Start assistant
Please enter
for entry of VoIP
System PIN:
connection data?
[- - - -]
No
Ý
Yes
OK
> Using the number keys, enter the base
> Press the key below §Yes§ on the display
station's system PIN. By default, the PIN
is "0000".
(= right display key).
> Press the right-hand display key §OK§.
If the connection assistant does not start properly, you can start it via the menu:
v ¢ Settings ¢ Telephony ¢ Connection Assist.
Provided that your phone is set for auto-configuration (default setting), you will see the following display. Otherwise go to 10 .
If you have received a
registration name/password and, if applicable,
a user name:
> Press the left-hand
code for automatic
If you have received an
auto-configuration code:
configuration?
> Press the right-hand dis-
Do you have a
No
Yes
> For more information,
display key §No§.
Version 5, 23.09.2008
> For more information,
see
10
.
play key §Yes§.
see
Or
9
.
C470 IP / AUS en / A31008-M1916-C401-3-7643 / configuration_6pg.fm / 7/27/10
Saving VoIP access data
9
11
Entering an auto-configuration code
Auto Configuration
Please enter code
Ý
> Enter your auto-configuration code using the keypad (max. 32 characters).
> Press the right-hand display key §OK§.
OK
All data necessary for VoIP telephony is loaded
directly from the Internet to your phone.
Following successful download, Saved is shown in
the display.
Proceed as described under 12 .
10 Selecting a provider and loading provider data to the
base station
Select Country
Select Provider
Germany
Provider 1
England
Provider 2
France
Provider 3
Netherlands, the
Provider 4
Ý
Ý
OK
OK
> Select your country with the control
> Select your provider with the control
> Press the display key §OK§.
> Press the display key §OK§.
key p (press down arrow).
key p (press down arrow).
If your provider does not appear in the list, you have the following options:
> Press the left display key ” twice and continue as described in 11 .
However, you can only make a call via VoIP once you have completed the provider details
using the Web configurator. Your VoIP provider will supply you with this data.
Version 5, 23.09.2008
> Exit the connection assistant by holding the end call key a and entering the provider
and VoIP account details via the Web configurator.
You will find more detailed information about this in the user guide on the enclosed CD.
C470 IP / AUS en / A31008-M1916-C401-3-7643 / configuration_6pg.fm / 7/27/10
Saving VoIP access data
12
11 Entering VoIP account data
Connection Assist.
Authent. Name :
Ý
Connection Assist.
Authent. Password:
OK
> Using the number keys, enter the
authentication name (user identification) that you received from your VoIP
provider. This entry is case-sensitive.
> Press the right display key §OK§.
Ý
OK
> Using the number keys, enter the
authentication password that you received from your provider. This entry is
case-sensitive.
> Press the right display key §OK§.
> To switch between upper and lower case and digits, press the # key (several times
if necessary).
> Characters entered incorrectly can be deleted using the left display key X. The character to the left of the cursor will be deleted.
> You can navigate within the input field using the control key p (press right/left).
> Depending on your provider, you may be prompted to enter a user name. Enter it as described above.
If you have made all the required entries, the message "Connection data complete" will appear
briefly on the display.
Version 5, 23.09.2008
You can enter five additional VoIP accounts (VoIP phone numbers) via your base station's
Web configurator. You will find more information in the user guide on the enclosed CD.
C470 IP / AUS en / A31008-M1916-C401-3-7643 / configuration_6pg.fm / 7/27/10
Saving VoIP access data
13
12 Completing the VoIP settings
The handset switches to idle status. The idle display status is displayed.
If all the VoIP settings are correct and if the phone can establish a connection to the VoIP server, the internal name of the handset will be displayed: (example)
Ð
V
You can now use your phone to make calls via the
fixed line network and the Internet! Callers can contact you on your fixed line network number, your Gigaset.net number or your VoIP number!
INT 1
INT
Time
To ensure that you can always be reached via the Internet, the router must be permanently
connected to the Internet.
Testing your VoIP connection
If a message is displayed when you are trying to make a call via VoIP, you can check the base
station's connection to the Internet by e.g. calling the Gigaset.net echo service:
> Enter one of the following phone numbers:
12341#9 (English)
12344#9 (French)
12342#9 (Dutch)
12345#9 (German)
12343#9 (Italian)
12346#9 (Spanish)
> Press the talk key c.
> When prompted, speak into the microphone on the handset.
If you hear your own voice, your base station is connected to the Internet.
If you do not hear your voice, check your phone and router settings.
Version 5, 23.09.2008
In the user guide on the enclosed CD, you will find detailed information
about setting up and operating your phone, as well as possible solutions to
frequently asked questions and common problems.
C470 IP / AUS en / A31008-M1916-C401-3-7643 / configuration_6pg.fm / 7/27/10
Gigaset.net directory entry
14
Entering your name in the Gigaset.net directory
Gigaset.net* is a VoIP service provided by Gigaset Communications GmbH, which you can
use to make free calls to other Gigaset VoIP users.
The first time you open the Gigaset.net directory, complete the following steps and an entry
will be created in the Gigaset.net directory for you:
> Press down on the control key p to open the handset directory.
> Press down on the control key p repeatedly until Gigaset.net is selected.
> Press the green talk key c.
A connection to the Gigaset.net online directory is established. You will see the following display:
Gigaset.net
Gigaset.net
Start assistant
for Gigaset.net?
No
Yes
> Press the right-hand display key §Yes§.
Your Gigaset.net
Nickname:
Ý
OK
> Using the number keys, enter the name
that you would like to be listed under in
the Gigaset.net directory.
> Press the right display key §OK§.
If an entry with this name already exists, the message "Nickname exists! Please change." will be
displayed. You will be prompted to enter a name again.
Version 5, 23.09.2008
If an entry in the Gigaset.net directory is successful, the message "Your user name is succesfully
added to Gigaset.net!" will be shown.
* Exclusion of liability
Gigaset.net is a voluntary service provided by Gigaset Communications GmbH with no liability or guarantee for the availability of the network. This service can be terminated at any time with a notice period of
three months.
C470 IP / AUS en / A31008-M1916-C401-3-7643 / telephony_1pg.fm / 7/27/10
Making calls
15
Making calls
> Enter a phone number using your handset's number keys.
Please note that, even with local calls, you must always dial the area code for calls via VoIP
(provider-dependent).
> Briefly press the talk key c if you want to make a call via VoIP.
Or
> Press and hold the talk key c if you want to make a call via the fixed line network.
Version 5, 23.09.2008
When making a call via VoIP, IP is shown in the top right-hand corner of the display.
C470 IP / AUS en / A31008-M1916-C401-3-7643 / CC_1pg.fm / 7/27/10
16
Customer service & product warranty
IMPORTANT
Please retain your sales receipt as proof of the date of purchase.
Customer Service
If you require assistance in operating this product please contact us
AUS: 1300 780 878 or by e-mail at the Customer Care section of our website at
www.gigaset.com/au
NZ: 0800 780 878 or by e-mail at the Customer Care section of our website at
www.gigaset.com/au
If you are trying to access a Network Service and require assistance specifically related to the
network service or would like to subscribe to the service, contact your service provider.
Product Warranty
Subject to the conditions below, this product, excluding battery and accessory devices, is guaranteed against any defect in materials or workmanship under conditions of normal use for a
period of 24 months from date of purchase.
The benefits conferred by this warranty are in addition to other warranties and remedies that
are implied under the Australian Trade Practices Act and similar Country, State and Territory
laws (Statutory Rights).
Subject to your Statutory Rights, the goods will not be eligible for service under this warranty
if:
1. Proof of purchase cannot be provided;
2. The defect was caused by an accident, misuse, abuse, improper installation or operation,
vermin infestation, lack of reasonable care, unauthorised modification, loss of parts, tampering or attempted repair by a person not authorised by Gigaset; or
3. The product has been damaged by lightning or a mains power surge.
4. The Phone was not imported into Australia by Gigaset Communications GmbH.
To obtain service during the terms of this warranty call the Gigaset Information Line on
AUS: 1300 780 878 or by e-mail at the Customer Care section of our website at
www.gigaset.com/au
NZ: 0800 780 878
Version 5, 23.09.2008
If it is necessary to have the product serviced, the Customer Service Representative will inform
you of the product return process.
Please ensure that:
1. You provide proof of purchase;
2. Your product is suitably packaged; and
3. You have included all components from the original purchase.
C470 IP / AUS en / A31008-M1916-C401-3-7643 / CC_1pg.fm / 7/27/10
Customer service & product warranty
17
Subject to your Statutory Rights:
1. Any claim under this warranty is limited to the cost of repair or replacement of the product;
and
2. If the goods are found to be in sound working order by the authorised service centre, you
may be charged a fee for service and for any other direct costs associated with having the
product delivered for service.
Replacement or repair services are only offered for products purchased in Australia and New
Zealand that bear Gigaset Communications GmbH local registered N Number and Telepermit
markings.
ustomer service &
Please have your proof of purchase ready when calling.
Version 5, 23.09.2008
product warranty
C470 IP / AUS en / A31008-M1916-C401-3-7643 / CC_1pg.fm / 7/27/10
Version 5, 23.09.2008
18
Gigaset A580IP KBA / IM-NORD EN / A31008-M2013-R201-1-PG43 / CC_1pg.fm / 3.6.09
Version 4, 16.09.2005
23
Gigaset A580IP KBA / IM-NORD EN / A31008-M2013-R201-1-PG43 / CC_1pg.fm / 3.6.09
Version 4, 16.09.2005
23
Gigaset A580IP KBA / IM-NORD EN / A31008-M2013-R201-1-PG43 / CC_1pg.fm / 3.6.09
Version 4, 16.09.2005
23
Gigaset A580IP KBA / IM-NORD EN / A31008-M2013-R201-1-PG43 / CC_1pg.fm / 3.6.09
Version 4, 16.09.2005
23
Gigaset A580IP KBA / IM-NORD EN / A31008-M2013-R201-1-PG43 / CC_1pg.fm / 3.6.09
Version 4, 16.09.2005
23
C470 IP / AUS en / A31008-M1916-C401-3-7643 / CC_1pg.fm / 7/27/10
Version 5, 23.09.2008
19
Issued by
Gigaset Communications GmbH, Schlavenhorst 66, D-46395 Bocholt
Gigaset Communications GmbH is a trademark licensee of Siemens AG
© Gigaset Communications GmbH 2009
All rights reserved. Subject to availability. Rights of modifications reserved.
www.gigaset.com