1
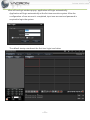
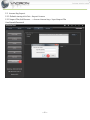
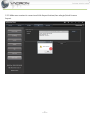
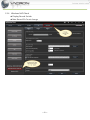
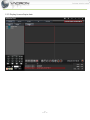
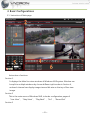
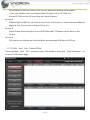
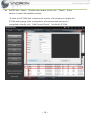
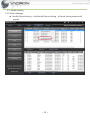
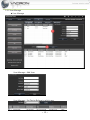
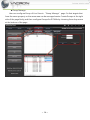
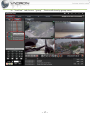
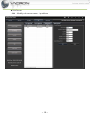
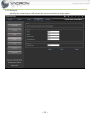
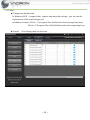
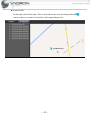
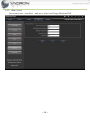
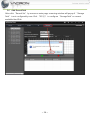
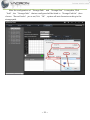
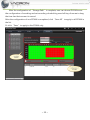
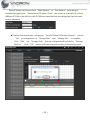
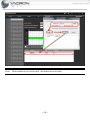
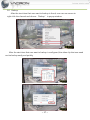
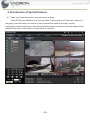
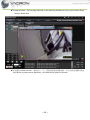
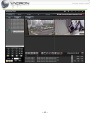
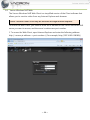
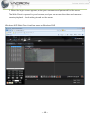
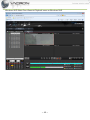
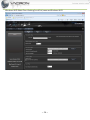
VACRON-NVR User’s Manual V2.00 Table of Contents 1. Installation ............................................................................................................................................................... 1 1.1 System Requirements ......................................................................................................................... 1 1.2 Process of installation......................................................................................................................... 1 2. Start Windows NVR .............................................................................................................................................. 1 3. 2.1 Run in Windows Vista、7 .................................................................................................................. 1 2.2 License Key Import .............................................................................................................................. 4 Basic Configurations ........................................................................................................................................ 8 3.1 Instruction of Main page ................................................................................................................... 8 3.2 IP CAM Add、Edit、Delete IPCAM ............................................................................................ 9 3.3 System Setting ................................................................................................................................... 13 3.4 Live View ............................................................................................................................................... 27 3.5 Map View ............................................................................................................................................. 29 3.6 Add Record Path................................................................................................................................ 30 3.7 Play Back video .................................................................................................................................. 35 3.8 Backup ................................................................................................................................................... 37 4. Introduction of Special features ................................................................................................................... 38 4.1 Swap Live-View channels by using a mouse to drag .......................................................... 38 4.2 Support multiple boot-up module ............................................................................................ 39 4.3 Support Remote DVR playback ................................................................................................... 40 4.4 Monitor Recording/Storage space ............................................................................................. 41 4.5 Motion Detection.............................................................................................................................. 43 4.6 Vacron Windows NVR Web ........................................................................................................... 46 ~2~ Precautions Welcome to use VACRON’s Windows NVR Management system. This Manual will introduce Basic features to help you to familiar with this product. Please refer to “Windows NVR USER’s MANUAL” in CD for other advance features. This End-user License Agreement is a legally binding agreement between you (either an individual or a single entity) and our company for the software product, which may include associated software components, media, printed materials, and online or electronic documentation. By installing, copying, or otherwise using the product covered by this EULA, you agree to be bound by the terms of this EULA. If you do not agree to the terms of this EULA, do not install or use the product. The product is protected by copyright laws and international copyright treaties, as well as other intellectual property laws and treaties. Note that the product is licensed to you, not sold. The license you have been granted is identified by the Software License Code on the License Certificate. * Installation and Use * The company hereby grants you the right to install and use the software product with the following restrictions: 1. The product may be installed on as many computers that meet the hardware and software requirements. 2. The product may only be used on computers running operating systems for which the product was designed. 3. You can and may only use the product in connection with video hardware equipment for which you have rightfully obtained the corresponding Device License Keys from our authorized dealer or the CD that ship with the equipment. * Copyright * All titles, including but not limited to copyrights, in and to the software product and any copies thereof are owned by our company. All rights not expressively granted are ~3~ reserved by our company. * No Warranties * The company expressly disclaims any warranty for the product when the software product and any related documentation is provided as is without warranty of any kind, either express or implied: without limitation, the implied warranties or merchantability, fitness for a particular purpose, or non-infringement. ~4~ Terms and Conditions The entire risk arising out of use or performance of the software product remains with you as the user. You are notified that the product, when used with certain equipment or other software, may enable you to perform surveillance actions and data processing which are likely to be restricted by or contrary to applicable law, including but not limit to data privacy and criminal law. The sole responsibility for verification of your use against compliance with applicable law lies with you as the user. * Limitation of Liability * The provisions of this paragraph are in effect to the maximum extent permitted by applicable law. In no event shall VACRON or its suppliers be liable for any special, incidental, indirect, or consequential damages whatsoever (including, without limitation, damages for loss of business profits, business interruption, loss of business information, or any other pecuniary loss) arising out of the use of or inability to use the software product or the provision of or failure to provide proper support, even if our company has been advised of the possibility of such damages. Absent any willful misconduct or gross negligence, VACRON's entire liability under any provision of this agreement shall be limited to the amount actually paid by you for the product. * Miscellaneous * (a) You may make as many copies of the software product as may be necessary for backup and archival purposes. (b) You may distribute copies of the software product to third parties. (c) You may not reverse engineer, decompile, or disassemble any of the software product’s components except to the extent permitted by applicable law which cannot be contractually waived. (d) You may permanently transfer all of your rights for this product, provided the recipient agrees to the terms of this agreement. * Termination * Without prejudice to any other rights, our company may terminate this license agreement if you fail to comply with its terms and conditions. In such event you must destroy all copies of the software product. 1. Installation 1.1 System Requirements Minimum system requirement Hardware Requirement CPU 16 channel or above 32 channel or above Intel Core i5 or above Intel Core i7 or above RAM 16 channel or above 32 channel or above 4GB or above is recommended 8GB or above is recommended HDD SATA 200GB or above is recommended Display card Independent display card with 1GB RAM or above is suggested DPI Make sure your display DPI setting is set to 96DPI Ethernet 100Mb Ethernet card or above interface Software Requirement OS Windows XP, Windows Vista, and Windows 7,Windows 8 Installation CD Contents •Windows NVR Installation File •User’s Manual •IPSearcher IPSearcher (Device search software for VACRON IPCAM, NVR, DVR, etc…) 1.2 Process of installation Execute FHS-X.X.X.X(CMS&NVR).exe installation application 2. Start Windows NVR 2.1 Run in Windows Vista、7 Due to the UAC (User Access Control) function in Windows Vista or Windows 7, the software would need to be run under the “Administrator” privilege. If you are lower than “Administrator” privilege level, your must follow the instructions below when every time you start the program: (Windows XP don’t need this setting.) ~1~ Right-click the Driver Execution program on desktop, click on the “Properties” option and change “Privilege Level” by enable “Run this program as an Administrator” in “Compatibility” page. ~2~ You will see login window popup, application will login automatically. Application will login automatically at the fist time execution system. After the configuration of user account is completed, input user account and password is required to login the system. The default startup window at the first time login is as below. ~3~ 2.2 License Key Import 2.2.1 Default startup,click Set > Import License 2.2.2 Import File,click Browse… > choose License key > Input Import File UserName&Password ~4~ 2.2.3 Make sure content is correct and click Import button,then relogin,finish License Import ~5~ 2.2.4 Windows NVR Check Display Record Set tab Max Record Ch Count change ~6~ 2.2.5 Display License Expire date ~7~ 3. Basic Configurations 3.1 Instruction of Main page Instruction of sections Section 1. It displays the Main live-view windows of Windows NVR system. Window can be split to multiple windows by choose different split modes in Section 4, and each channel can display image size and bit rate on the top of live-view image. Section 2 This is the main menu of Windows NVR, includes configuration pages of “Live-View”, “Map View”, “Play Back”, “Set”, “Record Set” Section 3 ~8~ All available IP CAMs are listed in this section, parameter setting and playback in live-view window can be configured here. By right-click on IP CAM, the chosen IP CAM can do AVI recording and image Capture. Section 4 Different Split modes of Live-View can be chosen in this section. Switch between different pages of Live-View can be configured here, too. Section 5 Create Preset Point and adjust Focus of IPCAMs with PTZ feature can be done in this section. Section 6 This section can display real-time feedback and message of Windows NVR log. 3.2 IP CAM Add、Edit、Delete IPCAM Device Manage:click “Set” button on top of the window , then click “Device Manage” to access IP CAM search page. ~9~ Add IPCAM – Search:To add a new camera, click on the “Search” at the bottom to search all available cameras. Double-click IP CAM that is listed at the bottom of the window to display the IP CAM setting page. After configuration of username and password is completed correctly, click “Add Current Device” to add this IP CAM. ~ 10 ~ Add IPCAM –Manual Add Device:Click “Manual Add Device” can add complete product line of VACRON manually. After configuration of Address”, “Device Type”, “IP and Username/Password in drop-down menu is completed correctly, click “Add Current Device” to add this Device. ~ 11 ~ Edit IPCAM:Fill in the fields you want to modify, click "Modify" to save it Delete IPCAM ~ 12 ~ 3.3 System Setting 3.3.1 Device Manage Modify Device Setting:click Modify Device Setting, , a Device Setting window will popup ~ 13 ~ Video: Set Stream、Rate Control、Bit Rate、Frame Rate Camera: Set Brightness、Contrast、Saturation、Sharpness ~ 14 ~ 3.3.2 User Manage User Manage User Manage – Add User User Manage – Set Device Belong to which user ~ 15 ~ Group Manage User can configure Group of Live-View in “Group Manage” page. So that targets that have the same property or the same area can be managed easier. Create Groups at the right side of the page firstly, and then configure Groups for IPCAMs by choosing from drop menu at the bottom of the page. ~ 16 ~ In “LiveView” tab,choose “group” , Device will show by group name. ~ 17 ~ Sub Server Add、Modify sub server name、ip address ~ 18 ~ Mail Manage Set which events need to send e-mail notifications. ~ 19 ~ 3.3.3 System setting Click “Set” button on the top of the main MENU to access the configuration page of system set. There are 3 pages to configure different features when user clicks the left list of “Local Set”. Backup format, Record AVI Path, Snapshot Path, Auto-Change Duration of Live-View Cycle page, and language can be configured in page 1. ~ 20 ~ Graphic Card support options, run Windows NVR to see live-view and record video when Windows start, and Sync time on all devices with PC can be configured in page 2. ~ 21 ~ Alarm type and Alarm Duration time can be configured in page 3. ~ 22 ~ 3.3.4 Network Modify the network port will restart the server and need to login again. ~ 23 ~ 3.3.5 Map: Change map background In Windows NVR’s image folder , replace map.bmp then relogin , you can see the replacement of the map background. Installation location 32 bits:C:\Program Files \NetMonitorServer\image\map.bmp 64 bits:C:\Program Files (x86)\NetMonitorServer\image\map.bmp Overall: Click display then set direction. ~ 24 ~ Location Info In the right side of the map, click on the left mouse over the image device remove device to where it located on the map background ~ 25 ~ , 3.3.6 Web Control Set connect time、user limit、web port , when use IE login Windows NVR ~ 26 ~ 3.4 Live View 3.4.1 Windows Images Description 1 Win 4 Win 9 Win 16 Win 25 Win、36 Win ~ 27 ~ 3.4.2 Functions Images Description Record Snapshot Auto Flip、Stop Auto Flip LiveView Status Main Stream、Sub Stream PrevPage、NextPage Hide Log List、Show Log List 3.4.3 PTZ Images Description IRIS Close、IRIS Open Zoom Up、Zoom Down Focus Near、Focus Far Up、Down、Left、Right Left-Up、Right-Up、Left-Down、Right-Down Stop Preset Go Preset Set Add、Subtract RS485 On、RS485 Off Menu ON/OFF Menu Left、Menu Right、Menu Down、Menu Up ~ 28 ~ 3.5 Map View After the channel is choose, Doubleclick left button of mouse will open little liveview window ~ 29 ~ 3.6 Add Record Path After click “Record Set” by mouse on main page, a warning window will popup if “Storage Path” is not configured by user. Click “YES (Y)” to configure “Storage Path" on current available Hard Disk. ~ 30 ~ After the configuration of “Storage Path” and “Storage Size” is complete, Click “Add”, the “Storage Path” that we configured will be listed in “Storage Path list”,then choose “Record Audio” yes or no,Click “OK”, system will auto format according to the storage path. ~ 31 ~ After the configuration of “Storage Path” is complete, user can choose IPCAM to see the configuration of recording and set recording schedule by press left-key of mouse to drag the time-bar that we want to record. After the configuration of one IPCAM is completed, click “Save All” to apply to all IPCAM in the list. Or click “Save” to apply to this IPCAM only. ~ 32 ~ Record Stream can choose from “Main Stream” or “Sub Stream” according to available Storage Space. “Alarm Record Duration Time” can be set up manually. By choose different IP CAM in the left list, each IPCAM can have the best recording plan that can meet various scenarios. Double click record path , will popup “Sure To Delete All Storage Spaces?” choose “No” to configuration of “Storage Path” and “Storage Size” is complete, Click “Add”, the “Storage Path” that we configured will be listed in “Storage Path list” , Click “OK”, system will auto format according to the storage path. ~ 33 ~ Note: When delete any of record path , will delete all record path. ~ 34 ~ 3.7 Play Back video Play Back: Click “Play Back” button on the top of the main MENU to access the configuration page of “Play Back”. Instruction of Sections Section 1 This section display calendar with marks to let user choose the date that recorded video is available conveniently. The dates on calendar with red frame indicate that recorded video is available in that day. Section 2 Choose the date that recorded video is available in section 1, right-click twice on the IPCAM that you want to open in section2. Then section 3 will display period that has recorded video available on time-line, and indicate different type of recording by different color. Section 3 ~ 35 ~ After choose period that has recorded video available in that day, user can use mouse to configure “Hour” and “Minute” that he want to Play Back in section 3. Windows NVR will Play Back video after the start time of Play Back is configured. Section 4 This section will display feature buttons of Playback, including Re-Draw the time-line with mark that indicate the period has recorded video available in section 3, Capture, Play Back, Stop, etc…. Playback speed can be controlled by Speed-Bar at the right side of this section. ~ 36 ~ 3.8 Backup After the start-time that user want to backup is found, user can use mouse to right-click the channel and choose “Backup” in popup window. After the start-time that user want to backup is configured, the video clip that user need can be backup easily and quickly. ~ 37 ~ 4. Introduction of Special features 4.1 Swap Live-View channels by using a mouse to drag After IPCAM was added to Live-View window, if the sequence of Channels need to be changed, press left button of mouse on the Channel that need to be swap, a small transparent window will popup, drag the small transparent window to the other channel and release left button of the mouse to swap these 2 channels. ~ 38 ~ 4.2 Support multiple boot-up module When multiple Live-view status configurations when boot-up are needed, click “live-View status” at the bottom of sub-menu to configure Live-View status. After Live-View status are created, one of the available Live-View status can be choose to be auto play when login. ~ 39 ~ 4.3 Support Remote DVR playback “Remote Playback” feature in “Play Back” page can play back video on any VACRON DVR at remote side. Choose “Remote Playback” feature in “Play Back” page, after the DVR/Channel is choose, the time-line with mark that indicate the period has recorded video available will display at the bottom of the page. User can configure “Hour” and “Minute” to play back recorded video on remote DVR through Windows NVR. ~ 40 ~ 4.4 Monitor Recording/Storage space To save storage space, except recording by “motion detection”, “Record stream” in “Record Set” page can configure either record “Main Stream” or “Sub Stream” for each channel by user to maximize the usage of HD space. ~ 41 ~ ~ 42 ~ 4.5 Motion Detection Motion Detection indicator and Info notify ~ 43 ~ Popup window:Set to play liveview in the existing window or pop-up window when motion detection 群組播放 Group Liveview:當群組內,任一裝置有動態偵測警報時,即於現有視窗顯示播放 Any device of group motion detection , will show whole group on liveview ~ 44 ~ ~ 45 ~ 4.6 Vacron Windows NVR Web The Vacron Windows NVR Web Client is a simplified version of the Client software that allows you to monitor video from any Internet Explorer web browser. Note: The Web Client is can only be accessed through Internet Explorer. To access the Web Client, you need to know the IP address of the Vacron Windows NVR server you want to access, and the server's web access port number. 1. To access the Web Client, open Internet Explorer and enter the following address: http://<server ip address>:<port number>/ (For example, http://192.168.2.62:8080/) ~ 46 ~ If you have not accessed the Web Client before, you may be prompted to install the required software before the Web Client open. ~ 47 ~ 2. When the login screen appears, enter your username and password for the server. The Web Client is opened in your browser, and you can access the video and cameras、 remote playback、local setting stored on the server. Windows NVR Web Client LiveView same as Windows NVR ~ 48 ~ Windows NVR Web Client Remote Playback same as Windows NVR ~ 49 ~ Windows NVR Web Client Setting(Local Set) same as Windows NVR ~ 50 ~