1
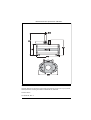
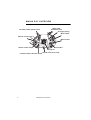
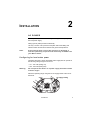
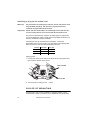
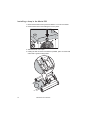
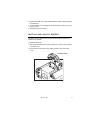
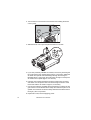
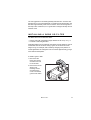
Mania DC3
user manual
Measurements are expressed in millimeters.
Ø13
310
215
160
340
290
© 2004 Martin Professional A/S, Denmark.
All rights reserved. No part of this manual may be reproduced, in any form or by any means,
without permission in writing from Martin Professional A/S, Denmark.
Printed in China.
P/N 35000156, Rev. A.
Introduction . . . . . . . . . . . . . . . . . . . . . . . . . . . . . . . . . . . . . . . . . . . . . . . . . . 5
Safety information . . . . . . . . . . . . . . . . . . . . . . . . . . . . . . . . . . . . . . . . . . . 5
Unpacking . . . . . . . . . . . . . . . . . . . . . . . . . . . . . . . . . . . . . . . . . . . . . . . . . 7
Mania DC3 overview . . . . . . . . . . . . . . . . . . . . . . . . . . . . . . . . . . . . . . . . . 8
Installation . . . . . . . . . . . . . . . . . . . . . . . . . . . . . . . . . . . . . . . . . . . . . . . . . . . 9
AC power . . . . . . . . . . . . . . . . . . . . . . . . . . . . . . . . . . . . . . . . . . . . . . . . . . 9
Choice of mounting . . . . . . . . . . . . . . . . . . . . . . . . . . . . . . . . . . . . . . . . . 10
Operation . . . . . . . . . . . . . . . . . . . . . . . . . . . . . . . . . . . . . . . . . . . . . . . . . . . 12
Focusing the Mania DC3 . . . . . . . . . . . . . . . . . . . . . . . . . . . . . . . . . . . . . 12
Oil wheel rotation . . . . . . . . . . . . . . . . . . . . . . . . . . . . . . . . . . . . . . . . . . . 13
Remote control operation . . . . . . . . . . . . . . . . . . . . . . . . . . . . . . . . . . . . . 13
Basic service . . . . . . . . . . . . . . . . . . . . . . . . . . . . . . . . . . . . . . . . . . . . . . . . 14
Cleaning . . . . . . . . . . . . . . . . . . . . . . . . . . . . . . . . . . . . . . . . . . . . . . . . . .
Lamp maintenance . . . . . . . . . . . . . . . . . . . . . . . . . . . . . . . . . . . . . . . . . .
Installing an oil wheel . . . . . . . . . . . . . . . . . . . . . . . . . . . . . . . . . . . . . . . .
Installing a gobo or filter . . . . . . . . . . . . . . . . . . . . . . . . . . . . . . . . . . . . . .
Reconfiguring the beam . . . . . . . . . . . . . . . . . . . . . . . . . . . . . . . . . . . . . .
Lens assembly . . . . . . . . . . . . . . . . . . . . . . . . . . . . . . . . . . . . . . . . . . . . .
Replacing the mains fuse . . . . . . . . . . . . . . . . . . . . . . . . . . . . . . . . . . . . .
14
15
17
19
20
23
23
Troubleshooting . . . . . . . . . . . . . . . . . . . . . . . . . . . . . . . . . . . . . . . . . . . . . 24
Specifications . . . . . . . . . . . . . . . . . . . . . . . . . . . . . . . . . . . . . . . . . . . . . . . 25
3
4
Mania DC3 user manual
1
INTRODUCTION
Thank you for selecting a Martin Mania DC3. The Mania DC3 is a
motorized oil wheel projector that features variable oil wheel rotation
speed and direction as well as remote operation in which up to four
fixtures can be controlled from one remote control. The beam angle can
be adjusted from 25° to 32°. A 43° beam angle can also be obtained using
a separately available accessory.
SAFETY INFORMATION
Warning!
This product is not for household use. It presents risks of
lethal or severe injury due to fire and heat, electric shock, and
falls.
Read this manual before powering or installing the fixture, follow the
safety precautions listed below and observe all warnings in this manual
and printed on the fixture. If you have questions about how to operate the
fixture safely, please contact a Martin distributor for assistance. Refer any
service operation not described in this manual to a qualified technician.
Do not modify the fixture or install other than genuine Martin accessories
and upgrade kits.
Refer servicing to qualified personnel.
Maximum ambient temperature Ta = 40°C(104°F).
See serial label for replacement fuse size and lamp type.
Suitable for mounting on normally flammable surfaces.
Do not look directly into the light.
Risk of fire, electrical shock and burns.
Use only in dry locations.
For indoors use only.
Do NOT block exhaust vents.
Introduction
5
Shields, lenses or ultraviolet screens must be changed if they become
visibly damaged to the extent that their effectiveness is impaired, for
example, by cracks or deep scratches.
The lamp must be changed if it becomes damaged or thermally deformed.
If the external power cord of this luminaire is damaged, it must be
replaced by a special cord exclusively available from your Martin dealer.
Avoiding electric shocks
Warning
Always disconnect from mains power before replacing the
lamp, fuses, or any part, and when not in use.
• Before operation ensure that factory setting of voltage and frequency
match local power supply.
• Always ground (earth) the fixture electrically.
• Use only a source of AC power that complies with local building and
electrical codes and has both overload and ground-fault protection.
• Do not expose the fixture to rain or moisture.
• Never operate the fixture with missing or damaged lenses and/or
covers.
Prot ecting yourself and others from burns and fire
Warning
Hot lamp. The exterior of the fixture can become hot. Allow to
cool for at least 20 minutes before handling or opening.
•
•
•
•
•
•
•
•
•
•
6
Surface temperature under steady state condition = 95°C (203° F).
Minimum distance to flammable material = 0.3 m (1 ft).
Minimum distance to illuminated surface 1.0 m (3.3 ft).
Never attempt to bypass the thermostatic switch or fuses. Always
replace defective fuses with ones of the specified type and rating.
Ensure that the air flow through vents is free and unobstructed.
Provide a minimum clearance of 0.1 meters (4 inches) around air vents.
Never place filters or other materials over the lens or in the optical path.
The exterior of the fixture can become hot. Allow the fixture to cool for at
least 20 minutes before handling.
Do not operate the fixture if the ambient temperature (Ta) exceeds 40° C
(104° F).
Never operate the fixture without all lenses and covers installed: an
unshielded lamp emits dangerous UV radiation that can cause burns
and eye damage.
Mania DC3 user manual
P r e v en ti ng i nj ur i e s du e to fal ls
• When suspending the fixture above ground level, check that the
structure can hold at least 10 times the weight of all installed devices.
• Always work from a stable platform.
• Check that all external covers and rigging hardware are securely
fastened and use an approved means of secondary attachment such as
a safety cable.
• Block access below the work area whenever installing or removing the
fixture.
UNPACKING
The packing material is carefully designed to protect the fixture during
shipment – always use it to transport the fixture.
The following items are supplied with the Mania DC3:
•
•
•
•
•
•
3-wire (grounding/earthing-type) power cable
User manual
Oil wheel
2mm Allen key for installing oil wheel and changing beam angle.
Remote control unit with 5-meter (16.4 ft.) RJ-45 cable
White glove with Martin logo
Introduction
7
MANIA DC3 OVERVIEW
Safety cable
attachment point
AC supply setting
Oil wheel rotation speed control
Mains switch
Remote control input
Mains socket
Remote control output
Fuse holder
Cooling fan
Thumb screw (cover lock)
Oil wheel rotation direction switch
8
Mania DC3 user manual
2
INSTALLATION
AC POWER
Before operation, ensure that the factory-set voltage and frequency match
the local power supply.
Always ground (earth) the fixture electrically.
Use only a source of AC power that complies with local building and
electrical codes and has both overload and ground-fault protection.
Note:
If the external power cord of this luminaire is damaged, it
must be replaced by a special cord exclusively available from
your Martin dealer.
Configuring for local mains power
The Mania DC3 has a switch-selectable power supply that can operate in
the following voltage ranges at 50-60 Hz:
• 115 - 120 volts (setting 115)
• 220 - 240 volts (setting 230)
Warning
Do not operate the fixture on a power supply that falls outside
of these ranges.
Select the operating range using the red AC supply switch at the rear of
the fixture.
AC supply setting
Installation
9
Installing a plug on the mains lead
Warning!
For protection from dangerous electric shock, the fixture must
be grounded (earthed). The AC mains supply must have
overload and ground-fault protection.
Important! Check that the feed cables are undamaged and rated for the
current requirements of all connected devices before use.
The fixture’s mains lead may require a grounding-type cord cap that fits
your power distribution cable or outlet. Consult a qualified electrician if you
have any doubts about proper installation.
Following the cord cap manufacturer’s instructions, connect the
appropriate wires to ground (earth), live, and neutral. The following table
below shows some common wire identification schemes.
Function
Wire (EU)
Wire (US)
live
brown
black
neutral
blue
white
ground
yellow/green
green
Applying power
1. Connect the mains power cable to the fixture at the 3-prong IEC male
input socket at the rear of the fixture.
Mains switch
Mains socket
2. Turn the power on using the mains switch.
DC10
C HMania
OICE O
F M OMains
U N T I N ID.cdr
G
The Mania DC3 may only be operated in a standing position or hung
overhead with a clamp. The fixture can be installed at an angle pointing
10
Mania DC3 user manual
either up or down, but bear in mind that the oil wheel is affected by gravity.
Installing the fixture too far away from a horizontal position will affect oil
wheel performance.
Overhead mounting
Warning!
Block access below the work area before proceeding.
Always use a secure means of secondary attachment.
For indoors use only.
To hang the Mania DC3 on an overhead support:
1. Check that the structure can support at least 10 times the weight of all
installed fixtures, clamps, cables, auxiliary equipment, and other items.
2. If hanging the fixture with a rigging clamp, check that the clamp is
undamaged and is designed for the fixture’s weight. Bolt the clamp
securely to the mounting bracket on the fixture with a grade 8.8
(minimum) M12 bolt and lock nut, or as recommended by the clamp
manufacturer, through the clamp hole in the mounting bracket.
3. If permanently installing the fixture, check that fasteners and mounting
surface can bear at least 10 times the fixture’s weight.
4. Working from a stable platform, clamp or fasten the fixture to the
structure.
5. Install a safety cable that can hold at least 10 times the weight of the
fixture through the safety cable attachment point on the fixture.
Safety cable attachment point
6. Loosen the swivel locks, tilt the fixture to the desired angle, and
retighten.
7. Check that the fixture is at least 1 meter (3.3 ft.) from the surface to be
illuminated and at least 0.3 meters (1 ft.) from any combustible
materials. Check that the clearance around the air vents is at least 0.1
meters (4 in.).
Installation
11
3
OPERATION
The lamp will light when the mains switch at the rear of the fixture is turned
on.
FOCUSING THE MANIA DC3
Focus is adjusted using the knob next to the lens. Twist the knob until a
sharp image is acquired. Do not look directly into the light.
12
Mania DC3 user manual
OIL WHEEL ROTATION
You can adjust the speed and direction of the oil wheel rotation using the
controls at the rear of the fixture.
Oil wheel rotation speed
Oil wheel direction
REMOTE CONTROL OPERATION
The remote control unit can control up to four daisychained Mania DC3s. Connect the remote control to
the RJ-45 In connector on the first Mania DC3 fixture
and connect successive fixtures using the RJ-45 Out
connector.
Rotation speed
Slow
The maximum cable length between daisy-chained
fixtures is 10 metres (33 ft).
Fast
Rotation direction
Mains switch
Operation
13
BASIC SERVICE
4
This chapter describes the maintenance procedures that you can perform
yourself.
Warning
The exterior of the fixture can become hot. Always disconnect
the fixture from AC power and allow to cool for at least 20
minutes before handling or opening.
CLEANING
Regular cleaning of the elements in the optical path, as well as the air
vents, is vital to maintaining the operational quality of the Mania DC3.
Important! Excessive dust, smoke residue and particle buildup degrades
performance and causes overheating and damage to the
fixture that is not covered by the warranty.
Cleaning the air vents and fan
To maintain adequate cooling, dust must be cleaned from the air vents
periodically. Remove dust from the air vents with a soft brush, cotton
swab, vacuum, or compressed air.
Cleaning optical components
Clean the optical components regularly. The presence of smudges or dust
on optical surfaces can reduce the strength of the light output and the
quality of the effects.
Use care when cleaning optical components and work in a clean, well lit
area. The coated surfaces are fragile and easily scratched. Do not use
solvents that can damage plastic or painted surfaces.
1. Disconnect the fixture from power and allow it to cool for 20 minutes.
14
Mania DC3 user manual
2. Remove the thumb screw holding the cover in place.
3. Slide the fixture cover open.
4. Vacuum or gently blow away dust and loose particles with compressed
air.
5. Remove stuck particles with an unscented tissue or cotton swab
moistened with glass cleaner or distilled water. Do not rub the surface:
lift the particles off with a soft repeated press.
6. Remove smoke, and other, residues with cotton swabs or unscented
tissues moistened with isopropyl alcohol. A commercial glass cleaner
may be used, but residues must be removed with distilled water. Clean
with a slow circular motion from center to edge. Dry with a clean, soft
and lint-free cloth or compressed air.
7. Close the fixture cover and tighten the thumb screw, taking care not to
trap any wires.
LAMP MAINTENANCE
Warning
Isolate from power supply before re-lamping. The lamp must
be changed if it becomes damaged or thermally deformed.
Caution
Hot lamp.
Important
The Mania DC3 is supplied with a Philips 6958 24V 250W 10H
lamp (Martin P/N 97000115) with an average life of 1000 hours.
The fixture must only be used with this lamp. Using any other
lamp type may damage the fixture and will invalidate the
product warranty.
Basic service
15
I ns ta ll in g a lamp i n the M an ia D C3
1. Disconnect the fixture from power and allow it to cool for 20 minutes.
2. Remove the thumb screw holding the cover in place.
3. Slide the fixture cover open.
4. Holding the bulb as close to the base as possible, pull it out of the bulb
socket with a gentle rocking motion.
16
Mania DC3 user manual
5. Replace the bulb. Use only a Philips 6958 24V 250W 10H lamp (Martin
P/N 97000115).
6. Close the fixture cover and tighten the thumb screw, taking care not to
trap any wires.
7. Reapply power to the fixture.
INSTALLING AN OIL WHEEL
The Mania DC3 is supplied with a multi-colored oil wheel. Other color
variants are available.
To install the oil wheel:
1. Disconnect the fixture from power and allow it to cool for 20 minutes if it
has been in use.
2. Remove the two oil wheel cover retaining screws and remove the
cover.
Oil wheel cover
Basic service
17
3. Turn the fixture over and remove the thumb screw holding the fixture
cover in place.
4. Slide the fixture cover open and place the fixture on its side.
2 mm
5. If you have previously installed an oil wheel, remove it by loosening the
two grub screws in the oil wheel hub by approx. one full turn, sliding the
oil wheel off its spindle and withdrawing it through the housing as
illustrated above. Only loosen the grub screws enough to unclamp the
oil wheel from its spindle (approx. one full turn).
6. Pass the new oil wheel carefully through the aperture in the housing
and slide it onto its spindle. Pass one hand through the bottom of the
fixture and hold the oil wheel to support it, if necessary.
7. Use the 2mm Allen key supplied with the Mania DC3 to tighten the two
grub screws in the oil wheel hub and clamp the oil wheel in place on its
spindle. Check that the oil wheel is firmly attached and rotates without
fouling any other components.
8. Replace all covers, before reapplying power.
18
Mania DC3 user manual
The color pigments in oil wheels gradually fade with time. For best color
reproduction, it is recommended that you replace the oil wheel with a new
item after approximately 1000 hours of service. Since the average life of
the lamp is also 1000 hours, it is a good idea to change both lamp and oil
wheel as a set.
INSTALLING A GOBO OR FILTER
The Mania DC3 can be fitted with either:
• a size D gobo with a maximum image diameter of 38 mm (1.5 in.), or
• a colored or textured glass filter
Interesting effects can be achieved when either of these effects is used in
combination with the oil wheel. Using a gobo, the oil wheel can fill an
image or logo, for example, with constantly changing color patterns. A
colored glass filter can strengthen color and reduce light intensity, giving a
more intimate atmosphere.
To install a gobo or filter:
1. Disconnect the
fixture from power
and allow it to cool
for 20 minutes.
2. Remove the two oil
wheel cover
retaining screws
and remove the
cover to reveal the
gobo access hatch.
Basic service
19
3. Remove the two
gobo holder
retaining screws and
carefully lift the gobo
holder up and out of
the fixture.
4. Slide the gobo or
glass filter into the steel
clip in the gobo holder.
Note that for correct
focus, the coated side of
the gobo or filter should
face the lamp.
5. Replace the gobo
holder and oil wheel
cover, before reapplying
power.
RECONFIGURING THE BEAM
The Mania DC3 is supplied with an adjustable lens module allowing the
beam angle to be set to either 25° or 32°. A 43° beam angle converter is
also available from your Martin dealer as an accessory.
The lens is factory-set to 25°, but this can be changed to 32° as follows.
You will need the 2mm Allen key supplied with the Mania DC3 for this
operation.
To reconfigure the lens:
1. Disconnect the fixture from power and allow it to cool for 20 minutes.
20
Mania DC3 user manual
2. Turn the fixture over and remove the thumb screw holding the cover in
place.
3. Slide the fixture cover open.
4. Turn the focus knob clockwise as far as it will go. This will move the
lens module towards the front of the fixture, giving enough space to
remove the lens module.
5. The lens module has a
bayonet-type fitting.
Working through the
front aperture of the
fixture, loosen – but do
not remove – the three
2mm Allen bolts
around the lens.
6. Working inside the fixture, grasp the lens module and twist it
counterclockwise so that it is released from the mounting screws. Lift
the lens module out of the fixture.
Basic service
21
7. Prepare a soft cloth or similar device to catch components if they fall
out of the lens module.
8. See illustration below. Open the lens module by unscrewing the
retaining ring (D). To obtain a 32° beam angle, remove the concave
lens (C) and thin spacer (B). Insert the thick spacer (E) supplied with
the fixture and retighten the retaining ring (D).
32° beam angle
25° beam angle
A
A
Remove B + C
B
Insert E
E
C
D
D
9. Retain components B and C for possible future use.
22
Mania DC3 user manual
LENS ASSEMBLY
When you open the Mania DC3 lens module,
you may find out the hard way that it is easy
to mix up the lenses. To reassemble the
lenses correctly, see the illustration on the
right and remember that:
A
C
• The flat surfaces must face towards the
lamp
• The concave lens (C) must be placed
closest to the lamp, and the convex lens
(A) furthest away from the lamp.
REPLACING THE MAINS FUSE
The Mania DC3 uses a time-delay fuse for protection against current
overload. An indication that the fuse may have blown is that when power
is applied and the lamp is switched on, no light is produced.
If the fuse blows repeatedly, there is a fault with the unit that requires
service by a Martin technician.
Never bypass the fuse or replace it with one of another size or rating.
1. Unplug the mains cable from the input socket.
2. Pry open the fuse holder (located next to the mains power connector)
with a flat-head screwdriver and remove the fuse.
Fuse holder
3. Replace the fuse with one of the same type. The fuse rating is listed on
the serial number label and in “Specifications” on page 25.
4. Replace the fuse holder.
Basic service
23
5
TROUBLESHOOTING
24
Problem
Probable cause(s)
Suggested remedy
No light
No power to the fixture
Check connections
Blown fuse
If power is applied and the
lamp is switched on, but
does not light, then check
and replace fuse if
necessary.
Burned out lamp
Install new lamp
Fixture too hot
Allow to cool
Improve air flow around
fixture
No action
Electrical malfunction
Refer to a Martin service
technician
Fuse blows repeatedly
Electrical malfunction
Refer to a Martin service
technician
Mania DC3 user manual
S PECIFICATIONS
PHYSICAL
Size without mounting bracket (LxWxH) . . .340x290x215 mm (13.4x11.4x8.5 in.)
Weight. . . . . . . . . . . . . . . . . . . . . . . . . . . . . . . . . . . . . . . . . . . . . . .9 kg (19.8 lbs)
CONSTRUCTION
Housing. . . . . . . . . . . . . . . . . . . . . . . . . . . . . . . . . . . . . . . . . steel and aluminum
THERMAL
Exterior surface temperature under steady state condition . . . . . . .95°C (203°F)
Time required to cool before handling . . . . . . . . . . . . . . . . . . at least 20 minutes
Maximum ambient temperature (Ta) . . . . . . . . . . . . . . . . . . . . . . . . 40° C (104°F)
INSTALLATION
Minimum distance to flammable material . . . . . . . . . . . . . . . . . . . . . . . 0.3 m (1ft)
Minimum distance to illuminated surface . . . . . . . . . . . . . . . . . . . . . 1.0 m (3.3ft)
Minimum clearance around air vents . . . . . . . . . . . . . . . . . . . . . . . . . 0.1 m (4in)
CONTROL
Oil wheel direction . . . . . . . . . . . . . . . reversible via control panel and/or remote
Oil wheel rotation speed . . . . . . . . . . .adjustable via control panel and/or remote
Remote control unit. . . . 4 fixture control with up to 10 m (16 ft) between fixtures
GOBO
Size . . . . . . . . . . . . . . . . . . . . . . . . . . . . . . . . . . . . . . . . . . . . . . . . . . . . . . . . . . . D
Maximum image diameter . . . . . . . . . . . . . . . . . . . . . . . . . . . . . . 38 mm (1.5 in.)
COLOR/TEXTURE FILTERS
Size . . . . . . . . . . . . . . . . . . . . . . . . . . . . . . . . . . . . . . . . Circular 53.3mm (2.1 in.)
Thickness . . . . . . . . . . . . . . . . . . . . . . . . . . . . . . . . . . . . 1.1-2 mm (0.05-0.08 in.)
PHOTOMETRICS
Beam angle. . . . . . . . . . . . . . . . . . . . . . 25°, configurable to 32°. Also 43° option.
ELECTRICAL
Input . . . . . . . . . . . . . . . . . . . . . . . . . . . . . . . . . . . . . . . 3-prong IEC male socket
AC Power switch selectable, operating ranges 115-120 V / 220-240 V, 50-60 Hz
Main fuse . . . . . . . . . . . . . . . . . . . . . . . . . . .3.15 AT (time delay), P/N 05020013
Specifications
25
TYPICAL POWER AND CURRENT
115 V, 50 Hz
115 V, 60 Hz
120 V, 50 Hz
120 V, 60 Hz
220 V. 50 Hz
220 V, 60 Hz
230 V, 50 Hz
230 V, 60 Hz
240 V, 50 Hz
240 V, 60 Hz
. . . . . . . . . . . . . . . . . . . . . . . . . . . . . . . . . . . . . . . . . . .265 W, 2.3 A
. . . . . . . . . . . . . . . . . . . . . . . . . . . . . . . . . . . . . . . . . . .262 W, 2.3 A
. . . . . . . . . . . . . . . . . . . . . . . . . . . . . . . . . . . . . . . . . . .284 W, 2.3 A
. . . . . . . . . . . . . . . . . . . . . . . . . . . . . . . . . . . . . . . . . . .281 W, 2.3 A
. . . . . . . . . . . . . . . . . . . . . . . . . . . . . . . . . . . . . . . . . . .247 W, 1.1 A
. . . . . . . . . . . . . . . . . . . . . . . . . . . . . . . . . . . . . . . . . . .244 W, 1.1 A
. . . . . . . . . . . . . . . . . . . . . . . . . . . . . . . . . . . . . . . . . . .265 W, 1.1 A
. . . . . . . . . . . . . . . . . . . . . . . . . . . . . . . . . . . . . . . . . . .263 W, 1.1 A
. . . . . . . . . . . . . . . . . . . . . . . . . . . . . . . . . . . . . . . . . . .284 W, 1.2 A
. . . . . . . . . . . . . . . . . . . . . . . . . . . . . . . . . . . . . . . . . . .282 W, 1.2 A
INCLUDED ITEMS - US VERSION
2 m (6.5 ft) US mains cable 18AWG with US male connector (UL approved)
Lamp: Philips 6958 24V 250W 10H (average life 1000 hrs.). . . . . .P/N 97000115
Multi-colored oil wheel
User manual
Remote control with 5 m (16.4 ft) RJ-45 cable
2mm Allen key
White glove with Martin logo
INCLUDED ITEMS - NON-US VERSION
3 m (9.8 ft) EU mains cable 3x1.0mm2 with Schuko male connector
3 m (9.8 ft) EU mains cable 3x1.0mm2 with no male connector
Lamp: Philips 6958 24V 250W 10H (average life 1000 hrs). . . . . .P/N 97000115
Multi-colored oil wheel
User manual
Remote control with 5 m (16.4 ft) RJ-45 cable
2mm Allen key
White glove with Martin logo
ACCESSORIES
Philips 6958 24V 250W 10H lamp (average life 1000 hrs).. . . . . . .P/N 97000115
Half-coupler clamp . . . . . . . . . . . . . . . . . . . . . . . . . . . . . . . . . . . . P/N 91602005
3.15 AT fuse . . . . . . . . . . . . . . . . . . . . . . . . . . . . . . . . . . . . . . . . . P/N 05020013
UTP patch cable 5 m (16.4 ft) RJ-45. . . . . . . . . . . . . . . . . . . . . . . .P/N 11840095
White glove with Martin logo . . . . . . . . . . . . . . . . . . . . . . . . . . . . . P/N 50590002
43° beam angle converter
ORDERING INFORMATION
Mania DC3, 220-240v . . . . . . . . . . . . . . . . . . . . . . . . . . . . . . . . . . P/N 90430070
Mania DC3, 115-120v . . . . . . . . . . . . . . . . . . . . . . . . . . . . . . . . . . P/N 90430071
26
Mania DC3 user manual
www.martin.com • Olof Palmes Allé 18 • 8200 Aarhus N • Denmark
Tel: +45 8740 0000 • Fax +45 8740 0010