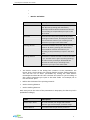
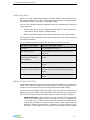
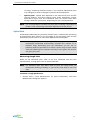
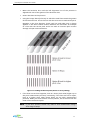
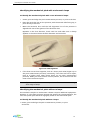
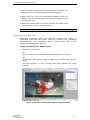
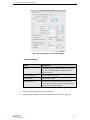
1
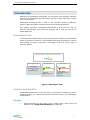
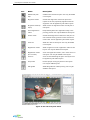
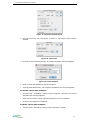
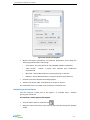
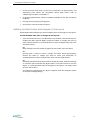
HumanEyes Producer3D User’s Guide
®
HumanEyes Producer3D
Version 3.0 User’s Guide
This page intentionally left blank
http://www.humaneyes.com
Document version 3.0
© 2009 HumanEyes Technologies, Ltd.
All rights reserved. HumanEyes Creative and the HumanEyes logo are trademarks of HumanEyes
Technologies Ltd. All other trademarks and registered trademarks are the property of their respective owners.
HumanEyes Producer3D User’s Guide
Preface
Preface
Welcome to HumanEyes Producer3D, an innovative and complete software
solution for printing lenticular lens effects with flip, morph, animation and 3D
without any limitations on output size, from source to print.
HumanEyes Producer3D fills a need in the lenticular printing production
market, exceeding any similar lenticular printing product in the market.
About this guide
This guide describes how to use HumanEyes Producer3D to impose and print
your lenticular projects, and contains comprehensive information about the
program’s features:
y
Chapter 1 “Introducing HumanEyes Producer3D” discusses the program’s
features and benefits, and where the program fits into the suite.
y
Chapter 2 “Installing the program” explains how to install the program.
y
Chapter 3 “Getting Started “ describes the program’s interface to the
first time user, and walks you through the creation of a simple lenticular
project layout.
y
Chapter 4 “Producing an Advanced lenticular project” goes beyond the
basics, describing how to create a complicated lenticular project using
the program’s more advanced features.
y
Appendix A “Glossary of Terms” discusses terminology used in lenticular
printing.
Related documents
y
HumanEyes Producer3D also includes complete documentation in an
Online Help system.
y
HumanEyes Creative3D user guide
HumanEyes Internet resources
You can access additional resources for learning more about HumanEyes
products by browsing the Humaneyes.com web site. These resources are
continually updated.
iHumanEyes Technologies Ltd.
HumanEyes Producer3D User’s Guide
Table of Contents
Preface ........................................................................................................................ i
About this guide ................................................................................................... i
Related documents ............................................................................................... i
HumanEyes Internet resources ............................................................................ i
Table of Contents...................................................................................................... ii
Introduction .............................................................................................................. 1
HumanEyes Suite ................................................................................................. 1
Features and benefits .......................................................................................... 1
Pre-press.......................................................................................................... 1
Interlace .......................................................................................................... 2
Pre-print .......................................................................................................... 2
Installing HumanEyes Producer3D........................................................................... 6
Overview .............................................................................................................. 6
System Requirements .......................................................................................... 6
Package Contents ................................................................................................ 6
Installation ........................................................................................................... 6
Getting Started ......................................................................................................... 7
Overview .............................................................................................................. 7
Starting HumanEyes Producer3D........................................................................ 7
Looking at the work area .............................................................................. 8
Selecting Lens..................................................................................................... 10
Measuring Lens Pitch......................................................................................... 10
Optical Pitch.................................................................................................. 11
Mechanical Pitch .......................................................................................... 16
Opening an Ldoc file ......................................................................................... 19
Editing Ldocs ...................................................................................................... 20
Using Print Marks (layout and job)................................................................... 20
Adding Print Marks ...................................................................................... 20
Using Print Marks Templates....................................................................... 22
Interlacing the layout ........................................................................................ 24
Interlacing a selected area........................................................................... 25
Saving a layout for future use .......................................................................... 26
Setting preferences............................................................................................ 26
Specifying general display options ............................................................. 26
Specifying Snap Parameters ........................................................................ 27
Unit of Measurement and Resolution Defaults ......................................... 28
Specifying the timing frequency of backups.............................................. 29
Specifying the default tile size .................................................................... 29
Restoring Default Preferences..................................................................... 29
Producing an Advanced Lenticular Project ........................................................... 31
Overview ............................................................................................................ 31
Creating an advanced layout ............................................................................ 31
ii
HumanEyes Producer3D User’s Guide
Adding multiple Ldocs and images to the layout ........................................... 32
Fitting the Layout to Objects ............................................................................ 33
Lens Orientation ................................................................................................ 34
Using Step and Repeat ...................................................................................... 34
Aligning multiple Ldocs on the layout............................................................. 35
HumanEyes LensFree – print without using a lenticular lens ......................... 36
Tiling to several lenses*..................................................................................... 39
Appendix ................................................................................................................. 41
Appendix A – Glossary of Terms.................................................................. 41
iii
HumanEyes Producer3D User’s Guide
Introduction
Welcome to HumanEyes Producer3D, an innovative and complete software
solution for printing lenticular lens effects with flip, morph, animation and 3D,
from source to print.
HumanEyes Producer3D fills a need in the lenticular printing production
market, supporting higher resolutions than most competing products.
This chapter introduces HumanEyes Producer3D to the first time user, its
features and benefits, and where the program fits in with the rest of the
HumanEyes suite.
HumanEyes Suite
A revolutionary breakthrough for the Lenticular print industry, the HumanEyes
Family of products is based on cutting-edge technology allowing the creation
and printing of natural, panoramic, 3D images, as well as a full range of
lenticular effects.
HumanEyes Family of products
Photographers
Designers
Printers
HumanEyes
Photography Engine
3D
photography engine.
•2D to 3D conversion
•Animations
•Hard Proofing 40 LPI,
5’’*7’’.
•Generating the views
• Interlace engine
•Impressive array of prepress tools.
•Tiling option
Figure 1: HumanEyes Suite
Features and benefits
HumanEyes Producer3D is a fast and easy to use program, offering the printer
complete control for customizing printed lenticular output. Use HumanEyes
Producer3D to:
Pre-press
y
Repeat elements on the layout, from a single source, using “Step and
Repeat” (see “Using Step and Repeat” on page 34)
1
HumanEyes Producer3D User’s Guide
y
Determine lens pitch with ease using HumanEyes Producer3D's enhanced
pitch measurement mechanism with some optional additional advanced
options (see “Measuring Lens Pitch” on page 10)
y
Import multiple Ldocs and images and manipulate them as floating
objects by dragging them independently on the same layout (see
“Adding multiple Ldocs and images to the layout” on page 32)
y
Apply pre-press registration instructions for full control of lenticular
marking such as alignment marks, registration marks, center marks,
printer marks, layout templates, printer job presets and more, even save
them as presets for future use (see “Using Print Marks (layout and
job) ” on page 20)
y
Arrange images of different sizes on the same layout, according to a
pitch frequency, and print your plate in a single run (see “Adding
multiple Ldocs and images to the layout” on page 32)
Interlace
y
Interlace to a PDF workflow - interlaced files can be saved to a PDF,
offering smaller sized files with a higher resolution (see “Interlacing
the layout” on page 24)
y
The new improved Interlace engine lets you control anti-aliasing per
layer and enjoy better support for smaller-sized texts
y
Interlace whatever you want - the most powerful and accurate interlace
tool in the industry now also supports printing only a selected area of the
source file; now you can test just a small part of the job – or multiple
small areas - without printing the whole job (see “Interlacing the
layout” on page 24)
Pre-print
y
Tile layouts to a series of lenses with total production confidence (see “
y
HumanEyes LensFree – print without using a lenticular lens
Lensfree is another way to print 3D, Motion, animation and flip effects,
WITHOUT using a lenticular lens. By printing a series of equally spaced black
lines - according to the job’s LPI - on one side of a flat, clear material (such as
flexi-glass or glass) and an interlaced file on the opposite side of the same
material, you can create all known lenticular effects by passing the need to
purchase a batch of lenses.
NOTE: Lensfree jobs MUST be backlit to make the lenticular effects visible. If
the job is not lit from behind, the image will appear dark and
unrecognizable.
Lensfree Barrier Generator – How it Works
The Lensfree Barrier Generator helps you arrive at the necessary required
parameters – according to your input – to facilitate high quality lenticular
effects. You simply input the type of printing material, poster size, viewing
distance, type of effect, and the generator will calculate the optimum Lensfree
barrier for your job, along with the optimum optical pitch value for the
interlaced file.
2
HumanEyes Producer3D User’s Guide
To create the barrier for the Lensfree job:
Choose Tools > Lensfree Barrier Generator. The Lensfree Barrier Generator
dialog box appears.
1.
Figure 30: Lensfree Barrier Generator Dialog
•
Output Settings
Field
Description
Preset
A selected range of document sizes. You can save
your own customized presets. Saved presets are
added to the list.
Portrait/Landscape
The orientation of the job.
Width/Height
The job’s dimensions.
Printer Resolution
The resolution of the printer that will create the
barrier. We recommend to use the same printer for
creating the interlaced image job.
2.
Define the final poster size and orientation.
3.
Set the printer resolution for the printer that will print the final job.
•
3
HumanEyes Producer3D User’s Guide
•
•
•
Barrier and other
Field
Description
Barrier Pitch
The pitch of the black lines (barriers) in lines per inch
(LPI). By locking (clicking) the radio button,
HumanEyes Producer3D will calculate this value for
you according to the parameters you input in the
other fields.
Thickness
The thickness of the printing material. By locking
(clicking) the radio button, HumanEyes Producer3D
will calculate this value for you according to the
parameters you input in the other fields.
Viewing distance
The distance between the poster and the viewing
audience. By locking (clicking) the radio button,
Producer3D will calculate this value for you
according to the parameters you input in the other
fields.
Walking distance
The distance a viewer will walk in order to see views
1,2,3…and then view 1 again. By locking (clicking)
the radio button, HumanEyes Producer3D will
calculate this value for you according to the
parameters you input in the other fields.
4.
The barrier section in the dialog box contains 4 main parameters: the
barrier pitch, the thickness, the viewing distance and the walking distance.
You can lock one of those parameters by clicking the radio button:
HumanEyes Producer3D will then calculate this value for you according to
the 3 other parameters you input in the other fields. For example, let us
lock the barrier pitch:
5.
Define the thickness of the printing material.
6.
Set the viewing distance.
7.
Set the walking distance.
Each time you set the value of the parameters in steps 4,5,6, the barrier pitch is
updated accordingly.
Field
Description
Barrier Gap in Pixels
As a rule of thumb, use 1/3 gap and 2/3 black.
Narrower gap creates sharper yet darker image.
Barrier Material
The material the final job will be printed on.
4
HumanEyes Producer3D User’s Guide
Field
Description
Recommended Optical
The optical pitch value for Ldocs to be interlaced for
Pitch
this barrier.
Max number of flip
According to your inputs, the Lensfree Barrier
images, Barriers line
Generator will display the maximum number of flip
images, and will inform you whether the barrier
lines will be visible or not.
Image Mode
The output barrier file (bitmap or CMYK). For CMYK,
the barrier info only appears in the K channel.
Borders Size
The thickness of the border around the barrier lines.
Borders hide the interlaced alignment marks.
8.
Leave the Barrier gap in Pixels as is.
9.
Choose your printing material from the list.
10. Choose the image mode for the final output.
11. Set Borders Size to 1cm. This is enough to hide the alignment marks around
the interlaced file (backprint).
12. Click Continue. Save the TIFF file to the desired location.
To create the interlaced file for the Lensfree job:
1.
Choose Layout > Settings. The Layout Settings dialog box appears. Close the
interlaced file according to the recommended optical pitch value as
calculated in the Lensfree Barrier Generator .Interlace with the mirror
option selected..
2.
Save the file to the desired location.
3.
Send the interlaced file, and the Lensfree barrier file, to the printer.
y
Tiling to several lenses” on page 43)
y
Soft-proofing (coming soon, 2009) runs a print simulation based on a
profile of the lenticular workflow that offers a realistic view of the way
the job will look.
5
HumanEyes Producer3D User’s Guide
Installing HumanEyes Producer3D
Overview
This chapter describes system requirements, how to install HumanEyes
Producer3D, and what the software ships with.
System Requirements
y
PowerPC® G4/G5 or Intel® Core™ Duo 2 processors
y
Mac OS X 10.4.7 and later
y
QuickTime 7.1 or later
y
1 GB RAM
y
1 GB disk space
y
A graphic card with at least 64 MB memory (more memory is
recommended)
Package Contents
The package includes:
y
CD containing HumanEyes Producer3D v1.1 software, video tutorials and
User Guide (in PDF).
y
HASP (Dongle).
Installation
To install the software and HASP driver:
4.
Make sure that the HASP is in the USB drive
5.
Close any HumanEyes applications that may be open.
6.
Insert the HumanEyes Producer3D v1.1 CD into your computer’s CD drive,
the Producer3D installation window opens.
7.
Double-click the HumanEyesProducer3D1.1.mpkg package icon, and then
follow the on-screen installation instructions.
6
HumanEyes Producer3D User’s Guide
Getting Started
Overview
A simple lenticular project consists of carrying out the following tasks:
y
Starting the program.
y
Selecting a lens to fit the job.
y
Measuring the lens’ pitch.
y
Opening an Ldoc file.
y
Adding print marks (optional).
y
Interlacing the layout.
y
Printing the job.
Starting HumanEyes Producer3D
The HASP prevents unauthorized use of HumanEyes Producer3D and must be
connected every time you use it.
To start the program:
1.
In the Mac OS X Finder, navigate to the HumanEyes Producer3D 1.1 folder
under the Applications folder.
2.
Double-click the HumanEyes Producer3D 1.1 icon.
Figure 2: HumanEyes Producer3D Icon
The program starts and displays the menu bar and the Document List
window.
7
HumanEyes Producer3D User’s Guide
Figure 3: HumanEyes Producer3D Document List Window
NOTE: If the software doesn’t run, make sure the HASP is in the USB and that
its LED (red light) is on. If it isn’t, you might need to update the HASP
driver (freely available from http://www.ealaddin.com/h2). When the
HASP driver is up-to-date, its LED lights up (glows red), indicating
HumanEyes software is authorized for use.
Looking at the work area
HumanEyes Producer3D’s work area is arranged to help you focus on lenticular
imposition. The work area brings together, in a visual interface, all the tools
you need for lenticular output. HumanEyes Producer3D’s work area includes a
collection of tools and context-sensitive info windows.
Layout toolbar
There are six layout tools for manipulating files in the layout:
Tool
icon
Name
Tool Function
Move an object
select and move objects (Ldocs, images and print
marks) around the layout.
Move the canvas
Move the canvas around the work area (the canvas
will move, as well as the layout and the objects
placed on it). Also accessed temporarily by holding
the Spacebar down and dragging the mouse
simultaneously.
Zoom
Zoom in and out of the layout. Zoom in on an area
by holding the Left mouse button and drawing a
selection over the area you want to enlarge, or
simply click on the layout to enlarge it. Zoom out
by holding the Option key as you click the layout.
8
HumanEyes Producer3D User’s Guide
Tool
icon
Name
Tool Function
Select area for
Select an area of the layout when interlacing a
interlace
section, or multiple sections of it. Multiple areas
are selected by holding shift key while marking a
new area.
Step and repeat
Repeat an object multiple times on the layout,
such as a business card.
Set tiling
Display and control the tiling grid when printing
across several lenses.
Canvas area
The Canvas area is a working area where you can place objects when you don’t
want to interlace them (anywhere on the grey area that surrounds the layout);
everything placed outside of layout will not be included in the final interlaced
output.
Layout area
The Layout area is where objects and print marks are positioned before you
interlace them (the checkerboard area). Select the objects by clicking on them.
Select the layout by clicking on it.
Start Interlace button
The Interlace button, when clicked, starts the interlacing process. Pressing
Command+I also starts the interlacing process.
Object Information window
The Context-sensitive info window displays information about the currently
selected object or layout.
Document List window
The Document List window contains a list of objects and layout print marks
currently on the layout and canvas. You can show or hide objects and rearrange
their ordering in the list.
Object Management icons
The object management icons provide a handy access to the following common
instructions:
Icon
Name
Description
Insert object
Add Ldocs and images to the layout and canvas.
Remove object
Remove objects off the layout and canvas.
Show/Hide Layout
Show or hide layout print marks.
Print Marks
9
HumanEyes Producer3D User’s Guide
Selecting Lens
There is a critical relationship between lenticular effects, lens orientation and
the viewing distance. Your choice of lens (and its orientation) will depend upon
the effects you want to achieve in the printed output.
You can save valuable lenticular production time by considering the following
critical questions:
y
Will the job consist of just a single lenticular effect, or will it consist of a
combination of Flip, Motion, and 3D effects?
y
Will the job will physically fit the lens dimensions, or will it need tiling?
The answers to these questions will ultimately determine the lens orientation
and other parameters.
Use the following table to help choose the correct lens to fit the Ldoc:
To achieve this effect...
..print on this type of lens
Flip effect
A wide-angled lenticular lens.
Handheld flip effect
A wide-angled lenticular lens whose orientation is
horizontal.
Large-scale, long-distance
A wide-angled Lenticular lens whose orientation is
flip effects, such as Posters
vertical.
(not handheld)
3D effect
A narrow-angled Lenticular lens whose orientation is
vertical.
Motion effects, such as
Both wide-angled and narrow-angled lenses, the
animation, video and morph
narrower the lens the smoother the motion effect
will be.
A mix of 3D and other effects
A narrow-angled Lenticular lens whose orientation is
vertical.
Measuring Lens Pitch
HumanEyes Producer3D interlaces the final image according to an optical pitch
value. This ensures an optimal viewing experience. Incorrect optical pitch can
result in an unclear and out of focus image, and ineffective 3D viewing.
To achieve the best possible interlaced results, a series of tests are performed to
determine the precise pitch values required for the lenticular job. The tests are
fine-tuned until the pitch value has been attained. There are two pitch types:
y
Mechanical pitch - Each lenticular lens has a specific mechanical pitch,
which is the exact physical count of lenticules in a unit of length (cm,
inch, meter etc). In order to synchronize the centering and alignment of
several jobs printed on the same layout, such as when using Step and
Repeat, a mechanical pitch value is necessary. If the job consists of only
one Ldoc or one image (such as a poster), and a single lens (as opposed
10
HumanEyes Producer3D User’s Guide
to tiling), measuring mechanical pitch is not required. Mechanical pitch
may change as a result of changes of pressure and temperature.
Optical pitch - Optical pitch depends on the mechanical pitch and the
viewing distance, and varies slightly when those parameters change.
Note that a layout with one mechanical pitch can contain Ldocs each
having a different optical pitch, depending on their viewing distance.
y
NOTE: It is recommended to measure the pitch when receiving a new batch of
lenses or after performing mechanical adjustments to the printer.
Optical Pitch
HumanEyes Producer3D lets you easily measure pitch, automatically calculating
an approximate pitch value for you according to the lens being used and the
parameters you have set for it in the Pitch Measurement dialog box.
NOTE: Measuring pitch is iterative. It goes from Rough to Fine where
HumanEyes Producer3D automatically calculates the number of inbetween steps, depending upon the parameters you set. The inbetween values are spaced so as to allow a wider range of pitch values
while still obtaining the maximum accuracy for the given lens and for
the given print size .
Measuring Rough Pitch
Based on the estimated pitch value of the lens (obtained from the lens
manufacturer), a rough pitch value is initially attained.
NOTE: For advanced users who don’t need to print the rough pitch, we
recommend working manually, or just use the Fine Step as your first
step.
To attain a rough pitch value:
3.
Choose Tools > Pitch Measurement (or press Command-T). The Pitch
Measurement dialog box appears.
11
HumanEyes Producer3D User’s Guide
Figure 4: Pitch Measurement
4.
In the Output Settings block, set the width, height, orientation and printer
resolution for the pitch measurement output, or choose a preset from the
drop-down list.
Pitch width should be at the same length of job width. You can also save
the current values as a preset for future use.
5.
In the Pitch block, set the estimated pitch (obtained from the lens
manufacturer) and choose “Step 1 (Rough)” from the Pitch Range list.
HumanEyes Producer3D calculates the range and displays it in bold figures.
A rough preview appears to the right of the Pitch Measurement dialog box.
Notice the preview changes as you change the parameters.
12
HumanEyes Producer3D User’s Guide
Figure 5: Pitch Measurement with rough preview
6.
In the More Settings block, set the height of the strips and extra text you
might want displayed on the printed output, and choose Mirrored (when
printing directly on the lens), Rotated and/or Smooth depending on the
destination printer and nature of the job.
Generally, smooth should be used when working with lenses that have a
low pitch value, such as 20, 30, or 40 LPI, and when stochastic screening. .
y
Click the Continue button, navigate to the location where you want to
save the pitch measurement file, and choose a file format (TIFF, PDF,
PostScript or Scitex CT).
y
Click Save to output the rough preview sheet to a file, for printing and
future use.
7.
Open the rough preview sheet (created in the previous step) in an image
editor application, or directly in the RIP.
8.
Print the file to the printer that is destined to print the lenticular output.
Printer resolution must match the output of the pitch file.
NOTE: Make sure the pitch measurement file is printed using the same
orientation, material, and actual size (no scaling in any way) as the
final lenticular output.
9.
If you are not printing the pitch measurement directly on the lens, place
the lens on top of the printed image.
10. Align the lens by rotating it right or left until the broken side alignment
lines are straight, as shown below:
13
HumanEyes Producer3D User’s Guide
Figure 6: Aligned pitch measurement printout (continuous black line)
Figure 7: Misaligned pitch measurement printout (broken black lines)
11. View the pitch measurement printout from the same distance from which
the final lenticular image will be viewed. If there is a range of distances
from which the image will be viewed, use the shortest distance in that
range.
12. Find the two least broken lines, one black and one white, as shown below.
Figure 8: Find the two least broken lines to locate the pitch
The curved lines seem to be pointing to these lines. If you move your head
from side to side you will notice that the lines above these strips seem to
move to one side and the lines below them seem to move to the other side.
In fact, lines with a pitch that is too low will move in the opposite direction
14
HumanEyes Producer3D User’s Guide
to the direction of the movement of your head, and lines with a pitch that
is too high will move in the same direction as the movement of your head.
When you are looking towards the printout lenses, close one eye. When
you are looking from the side (against lenses direction), use both eyes..
NOTE: The pitch value between the two unbroken lines is the result of the
rough preview.
Measuring for Fine Pitch
Using the results of the rough pitch value as the estimated pitch, repeat the
following fine-tuning until you arrive at the precise pitch value.
To attain a fine-tuned pitch value:
1.
In the Estimated Pitch field type the rough pitch value you attained in the
previous section. Notice Step 2 (fine) is now automatically displayed in the
Pitch Range list. A preview of the fine-tuned measurement appears to the
right of the Pitch Measurement dialog box.
Figure 9: Pitch Measurement Step 2 (Fine) with preview
2.
Click the Continue button, navigate to the location where you want to save
the pitch measurement, choose a file format (TIFF, PDF, PostScript or Scitex
CT) and then click Save to output the pitch measurement sheet to a file, for
printing and future use.
NOTE: If you just change the batch, it may be enough to start from the fine
stage. If the rough estimate has changed, then the fine stage has
changes as well, so you cannot use the same file.
3.
Print the file to the printer that is destined to print the lenticular output.
Printer resolution must match the output of the pitch file.
15
HumanEyes Producer3D User’s Guide
NOTE: Make sure the pitch measurement file is printed using the same
orientation, material, and actual size (no scaling in any way) as the
final lenticular output.
4.
Locate the strip with the most consistent color. It will also be the strip that
changes from black to white most quickly. The movement of the strips from
side to side will be the same as mentioned above. This process may be
repeated more than twice.
Figure 10: Locating the exact pitch value
Mechanical Pitch
Mechanical pitch is required for accurate placement of multiple interlaced
images when printed on the same sheet, or when tiled across several lenses.
NOTE: When printing only one interlaced image on a single lens, mechanical
pitch is NOT required.
There are three ways to determine mechanical pitch:
y
Using a telecentric loupe (the most consistent and accurate method)
y
Using any other type of loupe
y
Without the aid of a loupe (the easiest but least accurate method)
Identifying the mechanical pitch with a telecentric loupe
This very accurate method is especially important when working with thin
lenses and lithographic printing, to ensure that repeated images are spaced
correctly.
In lithographic printing, for maximal accuracy, it is recommended to repeat the
measurement until the mechanical pitch is precise and of an accuracy sufficient
for digital printing.
To identify the mechanical pitch with a telecentric loupe:
1.
Create and print the pitch measurement printout.
2.
Place the lenticular lens on the printout, with the smooth side facing up, or
print directly to the lens.
16
HumanEyes Producer3D User’s Guide
3.
Move the lenticular lens until the left alignment line of the printout is
aligned with one of the gutters of the lenticular lens.
4.
Secure the sheet to the printout.
5.
Using the loupe, identify the strip in which the small lines match the gutters
of the lenticular lens. This is the line with the most correct mechanical pitch.
Opposite to the lens direction, check each line and make sure it always
appears in the same relative location between two lenticules. An example
of a line with the correct pitch and a line with an incorrect pitch as seen
through a loupe are shown below:
Figure 11: Finding mechanical pitch (direct on lens printing)
6.
If the lines are too close together, look at a lower pitch value (higher up on
the pitch measurement printout). Conversely, if the lines are too far apart,
look at a higher pitch value (lower down on the pitch measurement
printout). When you have found a uniform pattern, this is the line with the
most correct mechanical pitch.
NOTE: If you can’t find the correct row, make a finer measurement using a
finer range of steps.
17
HumanEyes Producer3D User’s Guide
Identifying the mechanical pitch with a telecentric loupe
To identify the mechanical pitch with a non telecentric loupe:
1.
Create, print and align the pitch measurement printout, or print to the lens.
2.
Place the lenticular lens on the printout, with the smooth side facing up, or
print directly to the lens.
3.
Move the lenticular lens until the left alignment line of the printout is
aligned with one of the gutters of the lenticular lens.
Opposite to the lens direction, check each line and make sure it always
appears in the same relative location between two lenticules.
Figure 12: Pitch alignment
4.
If the lines are too close together, look at a lower pitch value (higher up on
the pitch measurement printout). Conversely, if the lines are too far apart,
look at a higher pitch value (lower down on the pitch measurement
printout). When you have found a uniform pattern, this is the line with the
most correct mechanical pitch.
NOTE: If you can’t find the correct row, make a finer measurement using a
finer range of steps.
Identifying the mechanical pitch without a loupe
This method is simpler to use because it doesn’t require additional equipment.
However, it is the least accurate, because the greater the viewing distance, the
more the optical pitch becomes negligibly similar to the mechanical pitch.
To identify the mechanical pitch without a loupe:
1. Create, print and align the pitch measurement printout, or print
to the lens.
18
HumanEyes Producer3D User’s Guide
2. Place the pitch measurement printout with the attached lens
against a wall or any other instrument that can support it.
3. Move away from the pitch measurement printout, while still
facing it. The most consistent line will seem to change and move
down the printout.
4. When the viewing distance is at least 10 times the width of the
lenticular sheet, the lines will stop moving.
NOTE: The pitch of the most consistent line is the mechanical pitch estimate.
Opening an Ldoc file
HumanEyes Producer3D works with Lenticular Documents or “Ldocs,” a
HumanEyes proprietary file format. Ldocs are created using HumanEyes
Creative3D. For more information about creating Ldocs, refer to the
HumanEyes Creative3D User Manual.
To open an Ldoc file as a simple layout:
1.
Double-click an Ldoc file
OR
Drag an Ldoc file on to the HumanEyes Producer3D icon in the dock.
OR
Choose File > New Simple Layout, navigate to the desired Ldoc and click
Open.
The Ldoc appears in a new, untitled, layout with default print marks
around it.
Figure 13: An Ldoc in a New Simple Layout (with print marks)
19
HumanEyes Producer3D User’s Guide
Editing Ldocs
Ldocs are modified using HumanEyes Creative3D.
To edit an Ldoc:
1.
Select an Ldoc on the canvas by clicking on it. A bounding box appears
around the Ldoc confirming the selection.
2.
Choose Edit > Edit Ldoc in HumanEyes Creative3D. HumanEyes Creative3D
opens and displays the Ldoc.
Figure 14: Creative3D - editing an Ldoc file
3.
Modify the Ldoc. When you save the changes, the Ldoc in the layout is
automatically updated. For more information about HumanEyes
Creative3D, refer to the HumanEyes Creative3D User Manual
Using Print Marks (layout and job)
You can add print marks to the layout and jobs by:
y
Dragging print mark icons onto an Ldoc or the layout
y
Applying custom job and layout mark templates via context-sensitive info
windows
NOTE: You can add print marks to Ldocs and layout. Print marks cannot be
added to an image.
Adding Print Marks
To insert a print mark:
1.
Drag the relevant print mark icon onto the layout, or Ldoc. The print mark
displays a bounding box to confirm its placement.
OR
Choose Insert > Print Mark > [the mark you want to add].
A selection of print marks are available; some can be used only on the layout;
others can be attached only to jobs on the layout; yet others can be added to
either the layout or to jobs.
20
HumanEyes Producer3D User’s Guide
Icon
Name
Description
Mechanical pitch
Validates the mechanical pitch. Can only be added
strip
to the layout.
Alignment marks
Verifies the alignment of the final print with
respect to the lens, especially angular/rotational
alignment. Can be applied to jobs and/or layout.
Alignment marks (4
Adds a frame of alignment marks around jobs or
strips)
the layout.
Initial registration
Helps identify bad color registration early in the
marks
printing process. Can only be added to the layout.
Center marks
Verifies shift-alignment of the lens to the print so
that a viewer looking from the front will see the
center view. Can be applied to jobs and/or layout.
Color bar
Adds color bars to the layout. Can only be added
to the layout.
Registration marks
Adds a single set of color registration marks to the
layout. Can only be added to the layout.
Registration marks
A set of 4 registration marks, one in each corner of
(on 4 corners)
the layout. Can only be added to the layout.
Info line
A line of text describing the job or the layout. Can
be applied to jobs and/or layout.
Crop marks
Ensures proper cutting of jobs from the layout.
Can only be added to jobs.
Side guides
Adds side guides for offset printing. Can only be
added to the layout.
Figure 15: An Ldoc with print marks
21
HumanEyes Producer3D User’s Guide
2.
To move a print mark around a layout, click the Move an Object tool to
make it active, select the mark, and move it to a new position.
3.
To delete a print mark, click the Move an Object tool to make it active,
select the print mark you want to delete, and then press the Backspace key.
NOTE: You can also Command+click multiple print marks when deleting more
than one mark.
4.
To modify print marks settings, right-click (or Ctrl+click) the print mark’s
icon in the Layout Editor window. The print mark’s info window appears.
We chose the Centre Mark icon in the example below.
Figure 16: Center Marks Settings
y
Set the parameters to fit the job or layout, depending on the print
mark you selected.
NOTE: You can modify print mark settings during any stage of production.
Using Print Marks Templates
A print mark template is a customized collection of Job and Layout marks that
can be applied to other jobs or the layout during lenticular production.
Creating a new Print Marks Template
To create a print mark template:
1.
Add any combination of marks to the layout.
2.
Click the Move an Object tool to make it active.
3.
For Job marks, click the Ldoc whose combination of marks you want to save
as a preset/template for future application. The Lenticular Document Info
window appears:
22
HumanEyes Producer3D User’s Guide
Figure 17: Lenticular Document Info
4.
For Layout marks, click the layout to select it. The Layout Info window
appears.
Figure 18: Layout Info
5.
Click the Create Template button. The Create Template window appears.
Figure 19: Create template
6.
Enter a name and description for the template.
7.
Click the Save New button. The template is added to the list of templates.
To rename a print mark template:
1.
Choose Tools > Templates > Name of your template > Rename. The Create
Template info window appears.
2.
Enter the new name, and an optional description for the template.
3.
Click OK. The template is renamed.
To delete a print mark template:
1.
Choose Tools > Templates > Name of your template > Delete.
23
HumanEyes Producer3D User’s Guide
2.
Click the Yes button to confirm you want to delete the template.
HumanEyes Producer3D deletes the template.
Using an Existing Print Mark Template
To apply a print mark template:
1.
Select the layout (by clicking on it), or select the Ldocs (Command+click for
multiple Ldoc selections) you want to apply the template to.
2.
For Job marks, in the Lenticular Document Info window, choose a template
from the Job Marks template list.
OR
Choose Tools > Templates > [Name of your template]. HumanEyes
Producer3D applies the marks saved in the chosen template to the Ldocs.
3.
For Layout marks, in the Layout Info window, choose a template from the
Layout Marks template list. HumanEyes Producer3D applies the marks saved
in the chosen template to the layout.
Or
Choose Tools > Templates > [Name of your template]. HumanEyes
Producer3D applies the marks saved in the chosen template to the layout.
Interlacing the layout
The layout must be interlaced to a digital file, such as TIFF, PDF, PostScript and
Scitex CT format, before lenticular printing can take place.
To interlace the layout:
1.
Click the Interlace button in the layout editor. The Interlace dialog box
appears.
24
HumanEyes Producer3D User’s Guide
Figure 20: Interlace dialog box
2.
Review the layout information and interlace parameters, and modify the
following options before interlacing:
y
Color Space - the color space for the job (RGB, CMYK or Grayscale).
y
Color Profile - choose a profile that matches your production
requirements.
y
Mirrored - choose Mirrored when printing directly on the lens.
y
Rotated - choose Rotated when it suits your printer’s specifications.
3.
Click OK. The Select Output File dialog appears.
4.
Save the file as TIFF, PDF, and PostScript or Scitex CT format.
The interlaced file is now ready to be printed on a lenticular lens.
Interlacing a selected area
You can interlace a small part of the layout – or multiple areas - without
printing the whole job.
To interlace a small part of the layout:
.
1.
Click the Select Area for Interlace tool
2.
Drag the cursor over the area you want to interlace (Shift+drag for multiple
areas).
25
HumanEyes Producer3D User’s Guide
3.
Click the Interlace button in the layout editor and follow the Interlacing
procedure as described in the previous section “To interlace a layout”. To
de-select the selected areas, press Command+D.
Saving a layout for future use
You can save a layout for future use. When a layout is saved, all information
(such as the positioning of objects on the layout and canvas, print marks and
settings) are retained, and the layout can be re-opened at anytime for further
modifications.
NOTE: HumanEyes Producer3D’s layouts have an HLT (HumanEyes Layout) file
extension.
To save a layout for future use:
1.
Choose File > Save As. The Save As dialog box appears.
2.
Navigate to the location where you want to save the layout, name the file
and click the Save button. HumanEyes Producer3D saves the layout as an
HLT file, to the location you specified.
HLT files are linked to the external source Ldocs. If you want to copy an HLT
file, you will need to copy the source Ldocs related to it as well.
Setting preferences
Numerous program settings can be defined in the Preferences window,
including general display options, the default unit of measurement, the default
unit of resolution, snapping parameters, timing frequency of automatic
backup, and the default tiling size.
Specifying general display options
You can specify the coloring of general display options.
To specify the coloring of general display options:
1.
Choose HumanEyes Producer3D 1.1 > Preferences (or press Command+,).
The Preferences window appears.
26
HumanEyes Producer3D User’s Guide
Figure 21: Preferences
2.
Click a display option. The Colors window appears.
Figure 22: Color preferences
3.
Choose a new color for the display option.
4.
Click OK. The Colors window closes and you are returned to the Preferences
window.
5.
Click OK. The Preferences window closes and you are returned to the
Layout Editor.
Specifying Snap Parameters
Snapping helps with precise placement of objects on the layout. You can snap
an object on the layout to another object, or snap an object to an edge of the
layout. You can enable and disable snapping, as well as change the snapping
distance between objects and/or edges.
27
HumanEyes Producer3D User’s Guide
To specify snap parameters:
1.
Choose HumanEyes Producer3D 1.1 > Preferences (or press Command+,).
The Preferences window appears.
2.
Click the Settings option to make it active.
Figure 23: Settings preferences
3.
4.
Set the Snapping parameters:
y
Enable automatic snapping - When checked, automatic snapping is
enabled. When unchecked, snapping is disabled.
y
Snap strength - Controls the strength of the snapping distance when it
is active. Lets you specify how close the object you are moving must be
before it snaps to another object (the stronger the snapping strength,
the larger the area of attraction will be; the gentler the strength, the
weaker the attraction).
Click the OK button.
NOTE: HumanEyes Producer3D automatically aligns objects with the
Mechanical pitch value (if specified). This means that even after
snapping, there may be a very small gap between the objects being
snapped. You cannot change anything about this, except the value of
the mechanical pitch.
Unit of Measurement and Resolution Defaults
You can set the default measurement unit for jobs and layouts.
To specify the default unit of measurement and resolution:
1.
Choose HumanEyes Producer3D 1.1 > Preferences (or press Command+,).
The Preferences window appears.
2.
Click the Settings option to make it active. HumanEyes Producer3D displays
the Default Units parameters.
28
HumanEyes Producer3D User’s Guide
3.
Choose the new unit of measurement from the Size list.
4.
Choose the new unit of resolution from the Resolution list.
5.
Click OK. The Preferences window closes and you are returned to the
Layout Editor.
Specifying the timing frequency of backups
HumanEyes Producer3D can automatically perform periodic backups of your
layout to prevent you from loosing your work in case of a system malfunction
or shutdown. Backup copies are deleted once you manually save the layout.
To enable automatic saved backups and specify its frequency:
1.
Choose HumanEyes Producer3D 1.1 > Preferences (or press Command+,).
The Preferences window appears.
2.
Click the Settings option to make it active. HumanEyes Producer3D displays
the Automatic Backup Save parameters.
3.
Check the “Save Backup Every” box to make it active.
4.
Enter the time frequency (in minutes) you want the program to save
automatic backups.
5.
Click OK. The Preferences window closes and you are returned to the
Layout Editor.
Specifying the default tile size
You can define the dimensions of the tile size and not need to change the
values again later.
To set the default tile size:
1.
Choose HumanEyes Producer3D 1.1 > Preferences (or press Command+,).
The Preferences window appears.
2.
Click the Settings option to make it active. HumanEyes Producer3D displays
the Default Tile Size parameters.
3.
In the Width field, type the desired width of the tile.
4.
In the Height field, type the desired Height of the tile.
5.
Click OK. The Preferences window closes and you are returned to the
Layout Editor.
Restoring Default Preferences
Unexpected behavior may indicate damaged preferences. If you suspect
damage to preferences, restore them to the factory settings.
To restore all preferences to the factory settings:
1.
Choose HumanEyes Producer3D 1.1 > Preferences (or press Command+,).
The Preferences window appears.
29
HumanEyes Producer3D User’s Guide
2.
Click the Reset to Factory Settings button. Preferences revert to the factory
settings. Any changes you previously made to the preferences will be lost.
3.
Click OK. The Preferences window closes and you are returned to the
Layout Editor.
30
HumanEyes Producer3D User’s Guide
Producing an Advanced Lenticular Project
Overview
In Chapter 3 we created a simple layout with one Ldoc. This chapter goes
beyond the basic concepts, uses multiple Ldocs and images, and explains how
to create an advanced lenticular project using the program’s more innovative
features.
Creating an advanced layout
An advanced layout consists of multiple Ldocs and images, of varying sizes,
proportions, and pitch values that are meant to be printed on the same
lenticular lens. When printing on paper, the program can be used to interlace
jobs that are not meant to be laminated to the same lens type.
NOTE: Before creating an advanced layout, choose a suitable lens, as discussed
in “Selecting Lens ” in Chapter 3.
To create a new layout:
1.
Choose File > New. The Layout Settings dialog box appears.
Figure 24: Layout Settings
2.
In the Output Settings block, set the width, height, page orientation and
printer resolution of the lens you will be printing on, or choose a preset
layout size from the list. You can also save the current values as a preset for
future use.
31
HumanEyes Producer3D User’s Guide
3.
In the Lenticular Lens block, set the lens orientation, its optical pitch, and
mechanical pitch values. For information about pitch values, refer to
“Measuring Lens Pitch” in Chapter 3.
4.
In the Print Marks block, choose a suitable template for the job and layout
(or None).
5.
Click OK and an empty layout appears.
6.
Choose File > Save and save the layout.
Adding multiple Ldocs and images to the layout
HumanEyes Producer3D lets you place multiple Ldocs and images on the layout.
To add multiple Ldoc files or images to the layout:
1.
Click the Insert Files icon in the Document List window, and choose Ldocs or
Images (TIF, PSD, GIF and JPEG). Choose the Ldocs or images you want to
insert (use Shift+Click or Command+Click to select multiple files) then click
the Open button.
OR
Drag multiple Ldoc files and/or images from the Finder onto the layout.
OR
Choose Insert > Ldocs or Insert > Images. The Insert dialog box appears.
Choose the Ldocs or images you want to insert (use Shift+Click or
Command+Click to select multiple files) then click the Open button.
OR
HumanEyes Producer3D automatically arranges the Ldocs, without overlaps,
in a manner that maximizes the layout space. If an Ldoc cannot fit into the
layout, it is placed outside and to the right of the layout. You might need
to zoom out to see it.
The objects are placed onto the layout, together with the template chosen
in the layout settings dialog.
32
HumanEyes Producer3D User’s Guide
Figure 25: Multiple objects on the layout
The objects are listed in the Document List window.
Figure 26: Document List window
NOTE: When you move an Ldoc around the layout, its center is automatically
aligned so that it resides on the center of a lenticule, according to the
mechanical pitch value.
Fitting the Layout to Objects
1.
To fit the layout to an object, select the object on the layout by clicking on
it and (for Ldocs), choose Layout > Fit to LDOCs, or, for images, choose
Layout > Fit to Image.
33
HumanEyes Producer3D User’s Guide
2.
To fit the layout to multiple objects, select multiple objects on the layout by
Command+clicking on them, or selecting them in the Document List, and
then choose Layout > Fit to LDOCs (or Fit to Image). The layout wraps
around the selected objects.
NOTE: When arranging Ldocs on the layout, an overlap frame will display
when the selected Ldoc overlaps another Ldoc, displaying a red contour
around the overlapped Ldoc.
Lens Orientation
Lens orientation can be vertical or horizontal. HumanEyes Producer3D
automatically takes into account the lens orientation chosen, and the interlace
direction (interlace orientation) defined in HumanEyes Creative3D. HumanEyes
Producer3D decides whether the Ldoc will be added as is, or rotated by 90
degrees.
When inserting an Ldoc with a different lens orientation, HumanEyes
Producer3D will rotate it and place it on the layout in perfect imposition and
frequency in relation to the other objects.
Using Step and Repeat
Use Step and Repeat when placing several appearances of the same object on
the layout. This is especially useful when printing multiple occurrences of a
single job, such as a series of business cards.
To repeat a job multiple times:
1.
Select an Ldoc or an image.
2.
Select the Step and Repeat tool in the Layout Editor window. The Step and
Repeat Info window appears under the Document List, and eight handles
appear around the selected object on the layout.
34
HumanEyes Producer3D User’s Guide
Figure 27: The Step and Repeat Info window
Figure 28: Step and repeat - before
3.
Drag any handle up, down, left, right or diagonally across the Layout. As
you drag the handle, duplicates of your image will appear.
Figure 29: Step and repeat - after
4.
Choose File > Save and save the layout.
Aligning multiple Ldocs on the layout
You can align or distribute Ldocs relative to other Ldocs on the layout. Aligning
moves Ldocs so that they lie on a straight line along one edge or their centers.
To align Ldocs:
1.
Select the desired objects you want to align by Shift+clicking, or
Command+clicking them.
2.
Choose Layout > Alignment > and then select one of the desired alignment
option from the menu:
y
Align Left Edges- Aligns objects so their left edges are all on a single
line.
y
Align Horizontal Centers - Aligns objects by their centers, distributed
horizontally.
y
Align Right Edges - Aligns objects by their right edges.
35
HumanEyes Producer3D User’s Guide
y
Align Top Edges - Aligns objects by their top edges.
y
Align Vertical Centers - Aligns objects by their centers, distributed
vertically.
y
Align Bottom Edges - Aligns objects by their bottom edges.
HumanEyes LensFree – print without using a lenticular lens
Lensfree is another way to print 3D, Motion, animation and flip effects,
WITHOUT using a lenticular lens. By printing a series of equally spaced black
lines - according to the job’s LPI - on one side of a flat, clear material (such as
flexi-glass or glass) and an interlaced file on the opposite side of the same
material, you can create all known lenticular effects by passing the need to
purchase a batch of lenses.
NOTE: Lensfree jobs MUST be backlit to make the lenticular effects visible. If
the job is not lit from behind, the image will appear dark and
unrecognizable.
Lensfree Barrier Generator – How it Works
The Lensfree Barrier Generator helps you arrive at the necessary required
parameters – according to your input – to facilitate high quality lenticular
effects. You simply input the type of printing material, poster size, viewing
distance, type of effect, and the generator will calculate the optimum Lensfree
barrier for your job, along with the optimum optical pitch value for the
interlaced file.
To create the barrier for the Lensfree job:
3.
Choose Tools > Lensfree Barrier Generator. The Lensfree Barrier Generator
dialog box appears.
36
HumanEyes Producer3D User’s Guide
Figure 30: Lensfree Barrier Generator Dialog
•
Output Settings
Field
Description
Preset
A selected range of document sizes. You can save
your own customized presets. Saved presets are
added to the list.
Portrait/Landscape
The orientation of the job.
Width/Height
The job’s dimensions.
Printer Resolution
The resolution of the printer that will create the
barrier. We recommend to use the same printer for
creating the interlaced image job.
4.
Define the final poster size and orientation.
5.
Set the printer resolution for the printer that will print the final job.
37
HumanEyes Producer3D User’s Guide
•
Barrier and other
Field
Description
Barrier Pitch
The pitch of the black lines (barriers) in lines per inch
(LPI). By locking (clicking) the radio button,
HumanEyes Producer3D will calculate this value for
you according to the parameters you input in the
other fields.
Thickness
The thickness of the printing material. By locking
(clicking) the radio button, HumanEyes Producer3D
will calculate this value for you according to the
parameters you input in the other fields.
Viewing distance
The distance between the poster and the viewing
audience. By locking (clicking) the radio button,
Producer3D will calculate this value for you
according to the parameters you input in the other
fields.
Walking distance
The distance a viewer will walk in order to see views
1,2,3…and then view 1 again. By locking (clicking)
the radio button, HumanEyes Producer3D will
calculate this value for you according to the
parameters you input in the other fields.
6.
The barrier section in the dialog box contains 4 main parameters: the
barrier pitch, the thickness, the viewing distance and the walking distance.
You can lock one of those parameters by clicking the radio button:
HumanEyes Producer3D will then calculate this value for you according to
the 3 other parameters you input in the other fields. For example, let us
lock the barrier pitch:
7.
Define the thickness of the printing material.
8.
Set the viewing distance.
9.
Set the walking distance.
Each time you set the value of the parameters in steps 4,5,6, the barrier pitch is
updated accordingly.
Field
Description
Barrier Gap in Pixels
As a rule of thumb, use 1/3 gap and 2/3 black.
Narrower gap creates sharper yet darker image.
Barrier Material
The material the final job will be printed on.
Recommended Optical
The optical pitch value for Ldocs to be interlaced for
Pitch
this barrier.
38
HumanEyes Producer3D User’s Guide
Field
Description
Max number of flip
According to your inputs, the Lensfree Barrier
images, Barriers line
Generator will display the maximum number of flip
images, and will inform you whether the barrier
lines will be visible or not.
Image Mode
The output barrier file (bitmap or CMYK). For CMYK,
the barrier info only appears in the K channel.
Borders Size
The thickness of the border around the barrier lines.
Borders hide the interlaced alignment marks.
10. Leave the Barrier gap in Pixels as is.
11. Choose your printing material from the list.
12. Choose the image mode for the final output.
13. Set Borders Size to 1cm. This is enough to hide the alignment marks around
the interlaced file (backprint).
14. Click Continue. Save the TIFF file to the desired location.
To create the interlaced file for the Lensfree job:
15. Choose Layout > Settings. The Layout Settings dialog box appears. Close the
interlaced file according to the recommended optical pitch value as
calculated in the Lensfree Barrier Generator .Interlace with the mirror
option selected..
16. Save the file to the desired location.
17. Send the interlaced file, and the Lensfree barrier file, to the printer.
Tiling to several lenses*
* This feature hasn’t been released yet. It will be released in a next service
package.
When the layout’s physical dimensions exceed the lenticular lens sizes you are
using, or your printer print size limitations, you can use several smaller lens to
construct your final image. Use the Tiling tool to divide the layout into several
areas that correspond to the lens size available on your printer.
To tile the layout to several lenses:
1.
Choose Layout > Settings. The Layout Settings dialog appears.
2.
Set the dimensions of the layout.
3.
Click the Set Tiling tool. A tiling grid appears based on the default tile size,
which can be set in the Preferences window.
39
HumanEyes Producer3D User’s Guide
Figure 31: Tiling Grid
4.
You can customize the tiled grid (otherwise without customizing, the tile
size will be the default tile size set in the preferences) by entering the
following optional parameters in the Tiling Info window:
Field
Description
Tile origin
The origin from where you want the tiling grid to start.
Default values are x=0 and y=0.
Tile size
The dimensions of the tiled grid. There are 2 options: use
regular width/height or use net width/height.
Number of Tiles
The number of tiles you want per row and per column on
the layout.
Tile Overlap
The amount of tile overlap for the job.
Use Marks
The Marks template that will be applied to the tiles.
Template
5.
Choose File > Save and save the job.
40
HumanEyes Producer3D User’s Guide
Appendix
Appendix A – Glossary of Terms
Alignment and centering (marks)
When printing on paper and laminating the paper with the lens, it is crucial
that the print is properly aligned to the lens. This alignment includes rotation
and translation. Alignment marks are used to eliminate rotation between the
paper and the lens. Centering marks are used to make sure that lens is properly
shifted with respect the paper, making sure that the center view will indeed
appear when looking on the lens from the front center.
Anti-aliasing
Anti-aliasing is a process that reduces the amount of aliasing in images. Aliasing
artifacts appear when resizing images to make them smaller by mere
sampling/interpolation. Aliasing is mostly noticeable in three forms: Jaggy
edges, distortion in small objects like text and small noisy flickers when looking
across different views. In order to reduce aliasing, the anti-aliasing process
blurs the images prior to resizing them.
Centering
The lens is shifted correctly with respect to the print. When viewing the job
from the front, the viewer will see the center view. When there are several jobs
on the layout, they will be centered to the lens as long as there is a mechanical
pitch value (in the Layout Settings dialog box).
hlt
HumanEyes proprietary file format; HumanEyes Layout
Interlacing
The process of creating a lenticular image, from ldocs or from a set of 2D
images. A small strip is taken from each 2D image and is combined to one
image to match a specific lens pitch. Interlacing the image according to the
optical pitch ensures optimal viewing experience. Incorrect optical pitch can
introduce blurriness and ineffective 3D viewing. In flip and animated effects an
incorrect pitch would result in ghosting.
Ldoc
Lenticular document, HumanEyes proprietary file format, output from the
HumanEyes Creative3D application.
LensFree printing
A term referring to printing of lenticular effects without using a lenticular lens.
This is implemented by printing two patterns from two sides of a transparent
media such as plastic or glass surface. The first pattern is the conventional
interlaced file and the second pattern is a set of stripes that serve as a light
barrier.
41
HumanEyes Producer3D User’s Guide
Lens Thickness
A distinction is usually made between thick lenses (up to 60 LPI) and thin lenses
(60 LPI and above). The lens thickness varies between 150 mil (3.81 mm) to 48
mil (1.22 mm) for thick lenses, and from 27 mil (0.686 mm) to 14 mil (0.355 mm)
for thin lenses. Different thickness lenses are suitable for different applications.
In general, thick lenses are more suitable for printing wide format applications.
Thin lenses are more suitable for small, handheld applications and ones with a
short viewing distance.
Lenticular (Image)
A specially prepared image to which the lens is attached. Views are arranged
under lenticules so that each eye is projected a different view. The brain then
processed these views to a single coherent 3D image.
Lenticular (Lens)
A plastic lens, consisting of an array of optical elements (lenticules). When
viewed from different angles, different areas under the lens are magnified.
Lenticule
A single optical element, a strip in the lenticular lens sheet
Pitch (Mechanical)
The exact physical count of lenticules per inch. Pitch value is measured in
Lenticules Per Inch (LPI).
Pitch (Optical)
Optical Pitch is the correct pitch for interlacing the content in order to view the
content properly. The optical pitch depends on the mechanical pitch and on the
viewing distance. When the viewer is assumed to be located at a very large
distance, the optical pitch equals the mechanical pitch.
Viewing Angle
The viewing angle of a lens can be defined in many ways. One popular
definition is (roughly) the angle between the rays corresponding to the two
most extreme views.
Thank you for using HumanEyes Producer3D
http://www.humaneyes.com
42