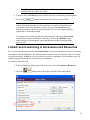
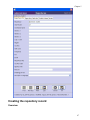
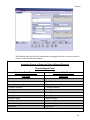
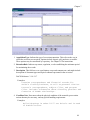
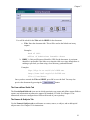
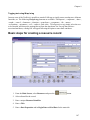
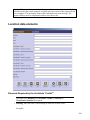
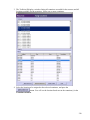
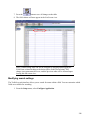
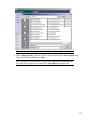
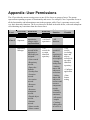
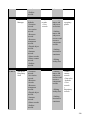
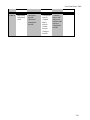
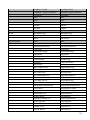
1
User Manual Version 1.5 / 1.5.9 Table of Contents Preface .............................................................................................................................5 Chapter 1: Introduction to the Archivists’ ToolkitTM .................................................8 System requirements Overview of features The Archivists’ ToolkitTM license Using this manual Chapter 2: Acquiring and Installing the Archivists’ ToolkitTM ...............................13 Acquiring the Archivists’ ToolkitTM Installing the Archivists’ ToolkitTM Chapter 3: Archivists’ ToolkitTM Basics .....................................................................19 Getting started Working with records Chapter 4: Searching....................................................................................................33 Filtering record lists Basic searching in all records Linked record searching in accessions and resources Chapter 5: Managing the Archivists’ ToolkitTM........................................................45 Creating the repository record Managing users Chapter 6: Importing Data ..........................................................................................61 EAD 2002 MARCXML Tab-delimited accessions data Legacy data cleanup Chapter 7: Accessioning Archival Materials .............................................................81 Basic steps for creating an accession record Accession data elements Relationships with other records Accession reports Chapter 8: Deaccessioning Materials .........................................................................97 Basic steps for creating a deaccession record Deaccession data elements Relationships with other records Deaccession reports Chapter 9: Describing Archival Materials ...............................................................101 Resource and component records Using the Archivists’ ToolkitTM for multi-level description The hierarchical interface Basic steps for creating a resource record Basic steps for creating a resource component record Description data elements Creating component records with the rapid data entry screen Instances 2 The Names & Subjects tab The Notes, etc. & Deaccessions tab Creating links for EAD output Adding deaccessions The finding aid data tab Relationships with other records Resource reports Chapter 10: Describing Digital Objects....................................................................155 Digital object and digital object component records The hierarchical interface Basic steps for creating a digital object record Basic steps for creating a digital object component record Digital object data elements Adding file versions Relationships with other records Digital object exports Chapter 11: Managing Access Terms .......................................................................165 Managing name headings Managing subject (non-name) headings Merging access terms Chapter 12: Linking Name and Subject Records ....................................................193 Adding names Adding subjects Chapter 13: Creating and Assigning Locations .......................................................201 Basic steps for creating a location record Location data elements Using Batch Add to generate multiple location records Assigning locations Removing locations Location reports Chapter 14: Generating Outputs ..............................................................................215 Generating reports Exporting data Chapter 15: Customizing the Archivists’ ToolkitTM ...............................................231 Terminology Default values Configuring the application interface Modifying the date format setting Lookup lists Configuring user-defined fields Customizing reports Appendices ..................................................................................................................279 User Permissions ..........................................................................................................279 Record Validation Rules...............................................................................................283 Unique Constraints .......................................................................................................286 Lookup Lists .................................................................................................................289 Search Editor Defaults..................................................................................................310 3 List Screen Defaults .....................................................................................................313 Fields Supporting Default Values ................................................................................320 Preparing Tab-delimited Accession Files.....................................................................326 Preparing XML Accession Files ..................................................................................334 Glossary of Archivists’ ToolkitTM Terms .....................................................................343 Support and Upgrades ..................................................................................................353 References ....................................................................................................................355 4 Preface Acknowledgements Few projects like the Archivists’ ToolkitTM are successfully completed without the generous support and contributions of a great number of people. Below is a list of most of the people who have assisted with the successful conclusion of this endeavor. Undoubtedly, we have forgotten some people, and we apologize for doing so. While everyone listed here shares in the success of the project, the errors of the application are wholly the fault of the project team members. Institutional Administrators David Ackerman, Executive Director for Digital Library Initiatives, New York University James Bullen, formerly Head of the Digital Library Development Team, NYU Libraries, New York University Nancy Cricco, University Archivist, NYU Libraries, New York University Luc Declerck, Associate University Librarian of Information Technology, UCSD Libraries, UC, San Diego Tiffany Hoag, Post-Award Administrator, UCSD Libraries, UC, San Diego Brian Hoffman, Business Analyst, NYU Libraries, New York University Suzanne Lodato, Associate Program Officer, Scholarly Communication. The Andrew W. Mellon Foundation Carol Mandel, Dean of NYU Libraries, New York University Jerome McDonough, formerly of NYU Libraries, New York University Anne C. Moore, Associate Director for User Services, University of Massachusetts Amherst Lorna Peterson, Executive Director, Five Colleges, Inc. Brian Schottlaender, University Librarian, UCSD Libraries, UC, San Diego Colby Sellman, Contract & Grant Administrator, UCSD Libraries, UC, San Diego Jay Schafer, Director of Libraries, University of Massachusetts, Amherst Donald J. Waters, Program Officer, Scholarly Communications. The Andrew W. Mellon Foundation AT Consultants Judy Dombrowski, User Interface Designer, Boston, MA Jane Lee, Usability Consultant, California Digital Library, University of California Winona Salesky, Stylesheets Design, University of Vermont Kelcy Shepherd, Digital Librarian, University of Massachusetts, Amherst Stephen Yearl, Systems Archivist, Yale University AT Advisory Board Robin Chandler, Digital Library Program Manager, UCSD Michael Fox, Assistant Director, Minnesota Historical Society Merrilee Proffitt, Program Officer, RLG Programs and Research, OCLC Richard Szary, Associate University Librarian for Special Collections, University of North Carolina, Chapel Hill 5 Günter Waibel, Program Officer, RLG Programs and Research, OCLC Elizabeth Yakel, Associate Professor, School of Information, University of Michigan AT Beta Testers Patricia Albright, Archives and Special Collections, Mount Holyoke College Paula Alosio, Schlesinger Library, Harvard University Elaine Ardia, Muskie Archives, Bates College David Best, Harvard University Archives, Harvard University Karim Boughida, GRI Information Systems, Getty Research Institute Kate Bowers, Harvard University Archives, Harvard University Ann Butler, Fales Library, New York University Peter Carini, Rauner Special Collections Library, Dartmouth College Johanna Carll, Schlesinger Library, Harvard University Christine de Catanzaro, Archives and Record Management, George Institute of Technology Donna Coates, Alexander Architectural Archives, University of Texas, Austin Jennifer Cole, Mudd Library, Princeton University Jay Collier, Muskie Archives, Bates College Steve Coy, Mandeville Special Collections Library, UC, San Diego Nancy Cricco, University Archives, New York University Ashley Crossen, Colorado Plateau Digital Archive, Northern Arizona University Deborah Day, SIO Archives, UC, San Diego Nancy Deromedi, Bentley Library, University of Michigan Beth Dodd, Alexander Architectural Archives, University of Texas, Austin Pat Donoghue, Harvard University Archives, Harvard University Cristela Garcia-Spitz, Mudd Library, Princeton University Larry Hansard, Archives, Georgia Institute of Technology Andrea L’Hommedieu, Muskie Archives, Bates College Virginia Hunt, Countway Library, Harvard University Arwen Hutt, Metadata Analysis and Specification Unit, UCSD Libraries, UC, San Diego Skip Kendall, Harvard University Archives, Harvard University Jennifer Gunter King, Archives, Mount Holyoke College Chris Kitto, Mudd Library, Princeton University Danielle Kovacs, Manuscripts, University of Massachusetts, Amherst Juliana Kulpers, Harvard University Archives, Harvard University Michael Lotstein, Archives and Special Collections, Arizona State University Colin Lukens, Harvard University Archives, Harvard University Christine Lutz, Mudd Library, Princeton University Kristen Mable, Anthropology, American Museum of Natural History Tim Mahoney, Baker Library, Harvard University Joyce Martin, Labriola National American Indian Data Center, Arizona State University Barbara Mathe, American Museum of Natural History Robin McElheny, Harvard University Archives, Harvard University Barbara Meloni, Harvard University Archives, Harvard University Ed Moby, Law School, Harvard University Leslie Morris, Houghton Library, Harvard University Stanislav Pejsa, Center for Jewish History Jennifer Pelose, Countway Library, Harvard University Library Christie Peterson, Muskie Archives, Bates College Leah Prescott, Institutional Records and Archives, Getty Research Institute 6 Carolyn Rainey, SIO Archives, UC, San Diego Clay Redding, Digital Library Operations, Princeton University Polly Reynolds, Bentley Library, University of Michigan Peter Runge, Special Collections and Archives, Northern Arizona University Dan Santamaria, Mudd Library, Princeton University Sharon Saunders, Muskie Archives, Bates College Joshua Shaw, Rauner Special Collections Library, Dartmouth College Joe Shubitowski, GRI Information Systems, Getty Research Institute Rebecca Smith, SIO Archives, UC, San Diego Katherine Stefko, Muskie Archives, Bates College Jody Thompson, Archives and Records Management, Georgia Institute of Technology Henny van Schie, Datamanagement Department, National Archief Susan von Salis, Harvard University Art Museums, Harvard University Viola Voss, Leo Baeck Institute Archives Pat Weber, Muskie Archives, Bates College Rachel Wise, Baker Library, Harvard University Kent Woynowski, Archives and Records Management, Georgia Institute of Technology Participants in DLF-Sponsored Archivists’ Workbench meetings (Feb 4-5 & Nov. 4-6, 2002) Peter Carini, Mount Holyoke College Robin Chandler, Online Archive of California Morgan Cundiff, Library of Congress Michael Fox, Minnesota Historical Society Bernie Hurley, University of California, Berkeley Mary Lacy, Library of Congress Bill Landis, formerly of University of California, Irvine Bertram Ludaescher, formerly of San Diego Supercomputer Center Stephen Miller, University of Georgia Regan Moore, formerly of San Diego Supercomputer Center John Ober, California Digital Library Merrilee Proffitt, OCLC / Research Libraries Group Chris Prom, University of Illinois Clay Redding, formerly of American Institute of Physics David Ruddy, Cornell University Elizabeth Shaw, formerly of University of Pittsburgh Kelcy Shepherd, University of Massachusetts, Amherst Mackenzie Smith, Massachusetts Institute of Technology Brian Tingle, California Digital Library Brad Westbrook, University of California, San Diego Stephen Yearl, Yale University Beth Yakel, University of Michigan 7 Chapter 1 Introduction to the Archivists’ ToolkitTM The Archivists’ ToolkitTM is an open source database application that supports description and management of archival materials, including accessioning, registering source information for archival resources, providing topical and name access points for subjects and creators of resources, tracking locations of archival resources, and producing finding aids, collection guides, METS digital objects, and various administrative reports. The Toolkit is customizable to local work settings, and it can be implemented as a stand-alone desktop application, a multi-user networked application, or a multi-repository networked application. Initial funding for the development of the Archivists’ ToolkitTM has been provided by The Andrew W. Mellon Foundation. System requirements Below are the system requirements for the client application, which runs the interface to the Toolkit database. Minimum System Requirements for AT Client PC Operating System: Windows 2000 Java 1.5.0_11 or Java 1.6.0_7* CPU: Pentium 3, 500Mhz System Memory (RAM): 128MB Hard Disk: 100MB free space Screen resolution: 1024x768 Mac Operating System: Mac OS X 10.3.9 Java 5 JRE or JDK or Java 6 JRE or JDK CPU: G3 500Mhz System Memory (RAM): 256MB Hard Disk: 100MB free space Screen resolution: 1024x768 Recommended System Requirements PC Operating System: Windows XP (or higher) Java 1.6.0_07 CPU: Pentium 4 2.4GHz+ or AMD 2400xp+ System Memory (RAM): 512MB 8 Hard Disk: 100MB free space Screen: 1024x768 Mac Operating System: Mac OS X 10.4.5 (or higher) Java 6 JRE or JDK CPU: G4 1.2Ghz System Memory (RAM): 512MB Hard Disk: 100MB free space Screen: 1024x768 Database Backends To run the client it is necessary to install a database backend. Currently, the AT supports a MySQL 5.0, MS SQLServer 2005, or an Oracle 10g backend. For information about the system requirements for the MySQL database backend, see the database installation instructions, available at: http://archiviststoolkit.org/support/DownloadServer or the MySQL documentation at http://dev.mysql.com/doc/refman/5.0/en/mysql-cluster-multi-hardware-softwarenetwork.html and http://dev.mysql.com/doc/refman/5.0/en/faqs-mysql-cluster.html#qandaitem-26-10-7. For Microsoft SQL Server installation, see http://www.microsoft.com/sql. For Oracle installation, see http://www.oracle.com/database. Overview of features Features Recording accessions Tracking sources / donors Controlling basic authorities for names and subjects Describing archival resources and digital objects Managing locations Importing legacy data in standardized formats (MARCXML and EAD, including batch import for EAD files) and non-standard formats (accessions XML or tab-delimited data files) Interface customizations Support for MySQL, MS SQLServer, and Oracle backends Output EAD finding aid, including batch output METS digital object MARC XML record, including batch output MODS record Dublin Core record Accession record(s) Accession receipt Accession production report 9 Accessions acquired Accessions cataloged Accessions not cataloged Accession intellectual property status Accessions with rights transferred Accessions processed Accessions unprocessed Accession inventory Accession processing plan Accessions with deaccessions Accessions with linked names and subjects list Location shelf list/locations with resource or accession record(s) Name record(s) Names list Names with accession(s) Names with resource(s) Names with resource(s) and accession(s) Names with non-preferred names Resource record(s) Resources list Resource(s) restricted Resources with name(s) linked as creator Resource(s) with name(s) linked as source Resource(s) with names linked as subjects and with subjects Resource(s) with location(s) Resources with deaccession(s) Subject record(s) Subject(s) with linked accession(s) and resource(s) Repository Profile Report Locally-created Jasper Reports The Archivists’ ToolkitTM License Archivists’ ToolkitTM Copyright (c) 2006-2009; Five Colleges, Inc., New York University, and UC Regents Licensed under the Educational Community License version 1.0 The Archivists’ ToolkitTM, including software, source code, documents, or other related items, is provided by the copyright holder(s) subject to the terms of the Educational Community License. By obtaining, using and/or copying the Archivists’ ToolkitTM, you agree that you have read, understand, and will comply with the following terms and conditions of the Educational Community License: Permission to use, copy, modify, merge, publish, distribute, and sublicense the Archivists’ ToolkitTM and its documentation, with or without modification, for any purpose, and without fee or royalty to the copyright holder(s) is hereby granted, provided that you include the following on ALL copies of the Archivists’ ToolkitTM or portions thereof, including modifications or derivatives, that you make: --The full text of the Educational Community License in a location viewable to users of the redistributed or derivative work. 10 --Any pre-existing intellectual property disclaimers, notices, or terms and conditions. --Notice of any changes or modifications to the Archivists’ ToolkitTM, including the date the changes were made. --Any modifications of the Archivists’ ToolkitTM must be distributed in such a manner as to avoid any confusion with the Archivists’ ToolkitTM of the copyright holders. THE SOFTWARE IS PROVIDED “AS IS”, WITHOUT WARRANTY OF ANY KIND, EXPRESS OR IMPLIED, INCLUDING BUT NOT LIMITED TO THE WARRANTIES OF MERCHANTABILITY, FITNESS FOR A PARTICULAR PURPOSE AND NON-INFRINGEMENT. IN NO EVENT SHALL THE AUTHORS OR COPYRIGHT HOLDERS BE LIABLE FOR ANY CLAIM, DAMAGES OR OTHER LIABILITY, WHETHER IN AN ACTION OF CONTRACT, TORT OR OTHERWISE, ARISING FROM, OUT OF OR IN CONNECTION WITH THE SOFTWARE OR THE USE OR OTHER DEALINGS IN THE SOFTWARE. The name and trademarks of copyright holder(s) may NOT be used in advertising or publicity pertaining to the Original or Derivative Works without specific, written prior permission. Title to copyright in the Original Work and any associated documentation will at all times remain with the copyright holders. Using this manual Intended audience This user manual is designed for repository staff at all levels, from administrator to processing archivist to student or volunteer. In order to accommodate both archival novices and technological novices, the style of the manual aims at being somewhat simple and direct. While the manual attempts to incorporate good practice and conventions, it is by no means a replacement for a repository’s own processing manual or for archival training. The manual is designed to be a basic learning and reference device for all operations of the Archivists’ ToolkitTM. To the extent it is necessary, any troubleshooting support is available through the Toolkit web site (http://www.archiviststoolkit.org). Typographical conventions Certain typographical conventions are used throughout the manual in order to improve readability and recognition of key components: 1. Times New Roman 12pt bold is used to identify all interface components, filenames, and field names. 2. Courier New 12 pt signifies data entry examples. 3. Times New Roman 12 pt bold italic is used for general emphasis. 4. Notes and tips are indented and set apart with a line above and below as follows: Note: 11 5. Cautions include exclamation symbol and are surrounded by a box: Caution! Screen shots The screen shots in this manual reflect the application in its default installation state, i.e., before any customizations have taken place. All screen shots were captured on a computer running the Windows XP operating system. The operating system dictates some superficial differences in the basic features of the windows (e.g. the title bar, minimize and close buttons, etc.). Therefore, the screen shots may not look exactly like the screens for Mac OS X or Linux machines. The layout, headers, data elements, and buttons will, however, be easily recognizable and applicable across all operating systems. 12 Chapter 2 Acquiring and Installing the Archivists’ ToolkitTM Overview The Archivists’ ToolkitTM requires both a client application and a relational database. The client application provides an interface for entering, editing, searching, and deleting data, which is stored in the database. These instructions for download and installation are for the client application of the Archivists’ ToolkitTM. Before downloading and installing the client, the repository or the repository’s IT support staff must install one of the three database backends that the Toolkit supports – MySQL 5.0, Microsoft SQL Server 2005, and Oracle 10g – and configure it to be used with the Archivists’ Toolkit. Instructions for installing and configuring the MySQL database are available at: http://www.archiviststoolkit.org/support/downloads/InstallGuidelines.pdf. Instructions for installing and configuring the Microsoft SQL Server and Oracle backends can be found on the Toolkit wiki: https://wikis.nyu.edu/ArchivistsToolkit/. Note: The XAMPP distribution does not ship with InnoDB tables enabled in MySQL. This is required for the AT. To solve this problem, edit c:\xampp\mysql\bin\my.cnf, commenting out the “skip-innodb” line and uncommenting the other innodb configuration lines. Then restart the MySQL service, and the installation should go smoothly. Acquiring the Archivists’ ToolkitTM You can download the client application for the Archivists’ ToolkitTM at http://www.archiviststoolkit.org Follow these instructions to download the client application: 1. Locate the appropriate version for your operating system. 2. If you have Java Virtual Machine version 1.5 or 1.6 running on your computer, select the link for the version without Java VM, which will install the AT client without Java VM. If not or if you are uncertain which Java VM version you have, select the download option with Java VM. After clicking on the link to the appropriate version of the software, your browser will open a download window from which you can save the installation file to your desktop, or in any directory where you will be able to locate it during installation. 3. Once the installation file is saved to your computer, follow the installation instructions in the following section. Installing the Archivists’ ToolkitTM After downloading the installation file for the Archivists’ ToolkitTM client application, you must execute the installation process following these instructions: 1. Launch the installation process: For Windows, double-click installArchivistsToolkit.exe or for Mac OS X, doubleclick installArchivistsToolkit. Notes: Requires Mac OS X 10.4 or later. If you do not have a Java Virtual Machine version 1.6 or 1.5 installed, be sure to download the package that includes Java VM. If uncertain, download the package that includes Java VM. The compressed installer should be recognized by StuffIt Expander and is automatically expanded after downloading. If it is not expanded, you can expand it manually using StuffIt Expander 6.0 or later. 2. An InstallAnywhere window will appear, followed by a window displaying the Archivists’ Toolkit icon. An installation window will open. 14 Chapter 2 After reading the introductory information, press the button. 3. Read the license information provided, scrolling down through the full text of the license. If you accept the terms of the license, select I accept the terms of the License Agreement and press the will not be installed. . If not, you can Cancel the installation process and the Toolkit 15 4. Choose the folder on your computer where you wish to install the Toolkit. You can accept the default directory that is provided, or press open a dialog for selecting a different folder. Press when you have selected the desired folder. Note: The Mac installation presumes the user is logged onto an administrator account. To install on a non-administrator account, change the default directory to a directory the user is allowed to modify. 5. Select a location where you would like to create a shortcut for starting the Toolkit. Press the button. 16 Chapter 2 Note: After the Toolkit has been installed on an administrator account there are two options for setting up aliases on non-administrator accounts for Mac users: 1. Launch the application from the non-administrator user account. Right click on the application in the dock and select “Keep in Dock.” 2. Open the directory in which the Toolkit is installed. Hold down the Command and Option keys and drag the program icon to the desktop. 6. You will see a summary of the configuration settings you have established for the installation. If they are correct, press the process. button to finish the installation 17 Note: Canceling the Install process does not guarantee that the Toolkit, or some part of it, will not be written into the selected directory. 7. The installation window will display progress of the installation. When the installation is complete, a message will appear indicating that the installation has completed. Press to close the installation window. 18 Chapter 3 Archivists’ ToolkitTM Basics Overview This chapter introduces the Archivists’ ToolkitTM interface and basic features. It describes starting and logging into the application and working with Toolkit records. Getting started Starting the Archivists’ ToolkitTM Launching the Archivists’ ToolkitTM depends upon where you chose to locate Toolkit shortcuts during the installation process. For all platforms: Double click the Toolkit icon on your desktop. Open the Toolkit from the folder in which you installed the application. For the MAC platform: Create a Toolkit alias installed in the dock, and then click on it. For the Windows platform: Select the Toolkit from within the Programs menu. Select the Toolkit from the Start menu. Double click the Toolkit icon in the Quick Launch bar. Establishing the database connection The first time the Toolkit is started, a window opens, requesting connection information for the database. This connection information, which specifies the backend database targeted for the AT client, must be completed for the application to load. This information should be provided to you by the person who installed the Toolkit’s database. On subsequent launchings of the application, the Connection Settings window will be bypassed. The connection settings only need to be re-entered when the location of the targeted backend database changes, typically because the database has been moved or a different database is targeted. To specify a connection for the AT client, enter the following information: 1. Connection URL. The network address of the database. 2. User Name. The user name established for the database installation. 3. Password. The valid password for this username. 4. Database Type. The type of database used (Microsoft SQL Server, MySQL, or Oracle). Note: The username and password for the database is not the same as the username and password that is used on a regular basis to log into the Toolkit’s client application. For more information on logging in to the client, see the next section of this chapter. Note: The connection window should only appear for the first launching of the application. To change the connection settings after the initial launching of the application (if you are running multiple instances of the Toolkit, for example), press the Select Server button from the login window (displayed in the next section). Frequently users will work with multiple databases. Now it is possible to save different connection information, including url, username, password and database type. By saving the connection settings, the user does not need to reenter all the information when changing databases. 20 Chapter 3 Enter the database properties and click on the ‘save’ button. When the connection settings window is opened again, the drop-down menu will display all Connection URLs that have been previously saved. Logging in Before the application fully loads, a login window will appear. Enter your username and password and press Login, or press Cancel to stop the application from initializing. User names are not case-sensitive; passwords are case-sensitive. 21 Note: The User Name and Password should be provided by the person who installed the Toolkit’s database, or by the person managing the Toolkit in your repository. For information about creating new user names, see Chapter 5. Becoming familiar with the Archivists’ ToolkitTM interface The application’s initial screen appears when the launch process is completed. The primary AT screen has a menu / command zone at the top, a navigation zone on the left, and a list screen display zone on the right that occupies most of the window. Some screens for individual records have zones for navigation controls and record information at the bottom of the screen. Working with records Overview The AT includes several kinds of records to support description and management of archival resources. Most of these record types are accessible through the navigation zone on the left of the main screen. Repository, location, and user records, however, are available through the Setup menu. Each of these records and their sub-records is described more fully in subsequent chapters. 22 Chapter 3 Briefly, the records are: Repository record For identifying the repository having custody of the resources described. Includes sub-records for expressing data defaults to be used by the repository and basic characteristics of the physical repository, as well as its holdings and staff. User record For creating and managing Toolkit user accounts. Location record For indicating the location(s) at which a resource is or may in the future be located. Location records may be defined in advance and then linked to a resource as it is processed and then shelved at the location. Accession record For recording accessions and basic collection management data. Resource record For describing an item or collection of items in a standard multi-level manner. The resource record contains sub-records for resource components, digital objects, and material instances (e.g. text vs. microform vs. digital object). A sub-record is a linked record that can only be viewed, created, and edited through the primary record. Name record For recording the names (personal, corporate body, or family) associated with accessions and/or resources as a creator, source, or subject. The name records serve as name headings in exports such as EAD, MARCXML, and MODS. Subject record For describing topical terms associated with an accession or a resource. The subject records serve as subject headings in exports such as EAD, MARCXML, and MODS. Basic components of a record 23 Title bar The title bar for each record type appears at the top left of the record with the title of the record type— e.g, Resources, Accessions, etc, and each has its own color scheme. Component list / buttons These buttons appear only with resource, resource component, and digital object records. They enable the hierarchical listing of the components comprising a resource or digital object. The component buttons support adding additional components—either children or siblings, or deleting components. The order of the component list may be modified using the drag and drop feature. The component list / buttons are discussed more fully in Chapter 9. Data entry window The window where data is entered to create a certain kind of record. Navigation buttons These buttons are for navigating to the next or previous record in a list of records, or to the first or last record in the list. Next, previous, first, and last are all relative terms and are determined by how the list is sorted. Command buttons Buttons for canceling a record, saving a record, or saving a record and opening a new record window. Tracking bar Located at the bottom of the record, the tracking bar indicates the record number, when the record was created and by whom, and, if applicable, when the record was last modified and by whom. This information is searchable using the search editor tool described in Chapter 4, and will assist in tracking record creation and editing activity. 24 Chapter 3 Basic characteristics of Toolkit records A record in the Archivists’ ToolkitTM may contain any number of data elements (fields). Each element allows either alphanumeric, Boolean (yes / no), date, or numeric data to be entered. Some alphanumeric fields have drop-down lists containing predefined terms for use in the field. The repository can modify most of these lists by redefining the lookup list via the Configure Application option on the Setup menu (see Chapter 15); however, some lists may not be modified, in whole or in part, as correct operation of the application depends on the values in the lists. The list of note types in the resource and resource component records is an example of a list that may not be modified. A table with a complete list of lookup lists, the field to which they are associated, and whether or not the values in the list can be modified is available in the appendices. Some of the records in the Toolkit are multi-sectioned. The individual sections of a record are represented as tabs across the top of the record. Clicking on one of the tabs will bring that part of the record to the front of the display where data can then be entered into it. Some of the records contain sub-records that are available only through the primary record. For example, the container record is only available within the resource and resource component records, whereas the file version record is only available within the digital object record. Finally, some of the records may be linked to other records as described more completely in the Linking Records section of this chapter, and in Chapter 12. Listing records Records from any of the four key functional areas in the Toolkit (Names, Subjects, Accessions, Resources) may be listed from the initial browse screen. For example, to list resource records, either double click on Resources in the left column, or click once on Resources. The bar across the top of the right-side display zone will then change to Resources. Click the window and a resource record listing will be displayed. button at the top of the Note: As you work in different functional areas, the color of the title bar in the display zone changes. For example, if you click on Accessions in the main screen, the bar at the top of the right-hand display zone is green, but if you click on Resources, the bar is purple. The same will be true for the headers in each of the interface windows for each functional area. 25 All the records for the active functional area will be listed in the main area of the window. The total number of records listed will be posted to the right of the filter frame just below the title bar for the area. The list can be navigated through by using either the scroll bar at the right side of the window or by using the up and down arrow keys on the keyboard. Sorting record lists Once it is retrieved, every list may be sorted in multiple ways. For example, to sort the list of resources, double click on the Title heading at the top of the title column. This will establish the column as the active sorting column. Click on the Title heading to change the sort order of the titles, either in ascending or descending order. An arrow will appear after the column label and will point upward for an ascending sort or downward for a descending sort. Levels may be added to the sort by selecting an additional column(s) to sort on after the first column is selected and set. Simply click once on the heading for another column, and then click again to toggle between an ascending or descending sort. To clear the existing sort settings, double click on the column that is to be the basis of the new sort. For instance, to sort resources by resource identifier, double click on the Resource Identifier heading at 26 Chapter 3 the top of corresponding column and then indicate if the sort should be in ascending or descending order. Other columns may be added to the list screen using the Configure Application commands (covered in Chapter 15). Printing record lists Records lists can be printed in a table similar to their appearance on the screen. The current record list is also the set of records that will be output in reports. For more information about printing records lists and other reports, see Chapter 14. Creating a new record To create a new record: 1. Select the functional area for the new record (Names, Subjects, Accessions, or Resources). 2. Click on the button on the top of the window. A new name, subject, accession, or resource record will open on top of the main window. Most of the records are multi-tabbed, with each tab opening a different part of the record. Simply click on a tab to open that part of the record. 3. Enter data into the fields in any of the tabbed sections. Data in one section will be retained while opening another section of a record. Note: See Chapters 5-13 for specific instructions on creating various records in the Toolkit. Saving a record To save a record, simply click on the or button at the bottom of the record screen. This saves all the data that has been added to the record. It will save all data that has been added to sub-records such as a resource component record or digital object record. If you are entering multiple records, the open a new record of the same type. button will save the record you are working in and Clicking the button or closing the record using the window close button at the top right corner will display the option message dialog box. 27 . Clicking the be discarded. button navigates you out of the window and causes any additions to the record to Most records in the AT require that data be present in certain elements for the record to be saved. For instance, the resource record requires an extent statement. If either the extent number or extent measurement is not completed, then the record cannot be saved until values are entered for both fields. Trying to save an invalid record produces a validation error message indicating which field(s) needs to be completed for the record to be saved. See the Record Validation Rules appendix for a complete list of fields necessary to create a valid record. Editing a record To edit a record: 1. Locate the record to be edited by using the filter box in the main screen or the search tool, both of which are described in Chapter 4. Once you see the record you are interested in editing, double click on the record entry in the list screen. 2. Make the desired changes in the record. 3. Press to save the changes, or to close the record. If record has not been modified, the record is closed with no message. If the record has been modified a window will appear after pressing the button asking whether you want to save or discard the changes or cancel and return to the open record. Note: Editing a record may affect output from linked records. For example, changing a subject term changes that term in all of the descriptive outputs (for example, EAD and printed finding aids) for resources linked to the subject. 28 Chapter 3 Repositories implementing the Toolkit should establish procedures and workflows for updating information in one record that may affect linked records. Record locking When a second user attempts to access a record that is already opened, s/he will receive a message that the record is already in use. Access is denied and the Record in Use message, ‘This record is currently in use by [username]’ is displayed. Cancel processing of record(s) A cancel button has now been implemented in progress dialogs for tasks that are known to take a long time, e.g. deleting a large number of records, printing finding aids, generating repository profile, importing batch EADs etc. Deleting a record 29 To delete a record: 1. Locate the record(s) to be deleted by using the filter box in the main screen or the search tool, both of which are described in Chapter 4. Once you see the record(s) you are interested in deleting, click on the record entry in the list screen. button. 2. Press the The Toolkit will ask if you are certain that you want to delete the record(s). 3. Press to delete the record(s). 4. The record(s) will be deleted. Caution! Deleting a record may affect output from linked records. For example, deleting a subject term removes the link to that term from any accession or resource records linked to the record. The Toolkit will not warn you that linked records will be affected. It is advisable to search accessions and resources for any linked records before deleting any subject, name, or location records. Linking records The Toolkit allows you to link information stored in different types of records. This provides consistency of repeated data (such as names linked to multiple description records), and allows you to establish relationships between records. The following linkages are possible in the Toolkit: Resource records may be assigned to accession records Location records may be assigned to accession and resource records Name records may be assigned to accession and resource records Subject records may be assigned to accession and resource records Navigating records Records may be navigated using the list screens or the navigation buttons at the bottom of each record screen. To navigate records using the list screen: 1. Close all record windows and return to the list screen. 2. Select the functional area containing the records to browse and the click the button. 3. Sort the list as desired. Once the display screen is populated and sorted, use the scroll bar to move forward and 30 Chapter 3 backward in the list until the record desired is found, or use the up and down arrow keys to move forward or backward one record at a time. 4. Double click on any record to open it. 5. Navigate through the sorted list of records using the set of four navigation buttons located at the bottom of the record: First, Previous, Next, and Last. As a whole, the functionality of these buttons is determined by contents and sort order of the list that is open in the list screen. If resources are listed, then the navigation buttons will move through the list of resources in the order displayed in the list screen. To consider a list of resources sorted in descending order, the First button would open the record at the top of the descending title list, in effect the last title alphabetically, whereas the Last button would open the last title in the list, or the first alphabetically. The Previous button will open the record that occurs in the list just before the record that is already open, whereas the Next button will open the record that occurs in the list just after the record that is already open. To reiterate, what records will be opened by the navigation button depends on how the list of records is sorted. If the primary sort of resource records is on Resource Id, then using the navigation buttons will cause different results than if the primary sort is on Title. 31 Chapter 4 Searching Overview The Archivists’ ToolkitTM provides support for searching Name, Subject, Accession, and Resource records. All data fields in these records can be searched as well as linked data in accession and resource records. Searching linked data allows for accession and resource records to be retrieved by searching for related data such as creator, source, and subject names; subjects; deaccession dates, and location. Resources can also be retrieved by searching for a specific instance type or for text within notes. Note: The search interface includes a number of default search fields. These can be customized for a given repository. A list of the default fields in the search editor is available in the appendices. More information about customization is available in Chapter 15. Filtering record lists Every list may be filtered by typing text into the filter frame located at the top right side of the screen. The filter process takes into account the values in all the columns that are present in the list screen display. For example, filtering on the number 9 on the list of resources pictured will reduce the list to those resources in which “9” appears in the Title, Extent Number, Resource Id, Extent Measurement, or Resource Identifier. Filtering on the number 97 will limit the list to only those resources in which that numeric expression is contained in the data of the list screen fields. 34 Chapter 4 This example indicates another characteristic of the filter feature: the filter is applied anew as each character is added or removed. Thus, adding or deleting a character from the filter expression will likely change the contents of the list. To remove a filter, simply delete the text from the filter frame. The list screen will revert to its prior state. Basic searching in all records The Search tool provides the ability to search within a specific field, apply specific search operators, and create Boolean queries when searching any type of record. To retrieve a subset of records using the search tool: 1. In the left hand navigation pane of the main screen, select the functional area (Names, Subjects, Accessions, or Resources) containing the records you wish to view. 35 2. Press the button. 3. Select a field to search. Note: In any of the functional areas, information about record creation and updating can be searched using the Created, Created by, Updated, and Updated by fields. Created and Updated refer to the date the record was created or updated. Created by and Updated by are fields for the username of the person who performed the creation or update. In addition, each area has a list of additional fields that can be searched. For example, under the Names functional area, it is also possible to search by Name Rule, Name Source, and Sort Name. These fields can be customized. See Chapter 15 for more information. See the appendices for a list of default searching fields for each functional area. 4. Select a search operator. Options are dependent upon the type of field being searched: Options for text fields include: Fields associated with lookup lists offer the following options: Begins with Contains Equals Is Not Equal to Is Empty Is Not Empty Equals Is Not Equal to Is Empty Is Not Empty Integer and date fields provide the following search operators: Equals Is between 36 Chapter 4 Is greater than Is greater than or equal to Is less than Is less than or equal to Yes/No fields provide only true or false search options Note: Date searching requires that the date(s) entered be in the format established for the application. If you enter a date in the wrong format, the Toolkit may try to convert that date to the appropriate format, leading to an unexpected search. To ascertain the appropriate format for a date search, put any character in the search field and press the button. The Toolkit will return an error message giving the proper date format. For information on establishing a date format for the Toolkit, see Chapter 15. 5. Enter or select a search term. Options are dependent upon the type of field being searched, and in some cases the operator: a. Fields associated with lookup lists will provide the lookup list so that you can select the search string. All other text, date, or integer fields provide a search box for you to enter the search term. b. Selecting the Is between operator will result in two entry boxes, the first for the earlier number or date, the second for the later number or date. This search is inclusive, so that the begin date 1/1/2006 and end date 12/31/2006 will retrieve all actions for the year 2006. 37 Note: The search string in date fields must follow the date format established for the system as a whole. 6. If desired, select a Boolean operator (and/or) and enter a second set of search options. 7. Press the button immediately below the basic query fields. Tip: The Search tool has “sticky” values in order to allow you to easily refine a search. This means that once you have performed a search in a functional area, your search values will remain the next time you press the Search button for that functional area. The last search performed for a given area remains until the application is closed and restarted. To quickly clear a search, open the first drop-down box and select Select a field, which clears all values for that part of the query. If clearing a Boolean search using both sets of search options, repeat this operation in the second part of the query as well. Linked record searching in Accessions and Resources For Accession and Resource records, the Search Editor also provides the ability to retrieve records by searching for related information. This includes names (creators, sources, subjects), subjects, location, or deaccession dates. In addition, you can search for resources containing a specific instance type, for example, digital objects and also for specific text within notes. To search by linked records: 1. In the left-hand navigation pane of the main screen, select Accessions or Resources. 2. Press the button, then click on the Search By Linked Record tab. 38 Chapter 4 Note the “Include components in search” box in the Search Editor checked by default 3. Use the following instructions to enter data into the Search by linked record screen. Entering data into more than one of the following areas will create a Boolean “and” search of the values entered. Find by name: a. To search for creator, source, or subject name, press the Lookup button next to the Find by name search box. b. Use the scroll bar to browse through the names, or the Filter box to narrow down the list. c. Once the desired name is located, select it by double clicking on the name or by clicking the name once and pressing the Select button. The Find by name search box will now contain the desired name. d. You may also select a Function to search by a name related to an accession or resource in a specific way, either as Creator, Source, or Subject. Find by subject: a. Press the Lookup button next to the Find by subject search box. 39 b. Use the scroll bar to browse through the subjects, or the Filter box to narrow down the list. c. Once the desired subject is located, select it by double clicking on the entry or by clicking the subject term once and pressing the Select button. The Find by subject search box will now contain the desired subject term. Find by location: a. Press the Lookup button next to the Find by location search box. 40 Chapter 4 b. Use the scroll bar to browse through the locations, or the Filter box to narrow down the list. c. Once the desired location record is located, select it by double clicking on the record or by clicking the record once and pressing the Select button. The Find by location search box will now contain the desired location. Find by deaccession date: a. There are two Find by deaccession date search boxes, one for the begin date and one for the end date. Enter the earlier date in the first box, following the preferred date format for the application. b. Enter the later date in the second box, following the preferred date format for the application. 41 Find by note type (for resource records only): a. Enter the note text for which you are searching and click Search. b. The search return screen will list all of the resource records that have note(s) which contain the text searched upon. Find by instance type (for resource records only): c. Open the Find by instance type drop-down list. d. Select the type of instance you wish to search 42 Chapter 4 . Note: Searching by instance type may require more time than other types of searches. 4. Once the desired fields have been populated, press the Search button immediately below the linked record search fields. Tip: The Search Editor has “sticky” values in order to easily refine a search. This means that once a search is completed in a functional area, the search values remain the next time you press the Search button for that functional area. The last search data for a given area remains until the application is closed and restarted. If you wish to quickly clear a linked record search, press the Clear button next to the appropriate field. Capability to customize search result display when searching resource components Search results can now be customized when using component searches to facilitate browsing search results. Users can customize search results list screen using Configure Application (under the Setup menu) ResourcesComponentsSearchResults table to edit the Return Screen Order. 43 44 Chapter 5 Managing the Archivists’ ToolkitTM Overview The Archivists’ ToolkitTM has a setup menu with options for creating a repository record, establishing users and assigning permissions, managing locations, editing lookup lists, and customizing the application interface. Some tasks such as creating a repository record and establishing users should be done prior to entering other data into the Toolkit. Other tasks, such as customizing the application interface, can be done at any time, although it is ideal to become familiar with the default application before doing so (see Chapter 15 for details on customizing the application interface.) Note: Once you have completed the process of establishing your repository record and creating all needed user accounts, you may wish to enter location records for the repository. Creating location records before they are assigned may result in more consistency among the records; the Toolkit provides a Batch Add feature for efficient creation of multiple location records. For details on creating and assigning location records, see Chapter 13. To edit a repository record 1. From the Setup menu, select Repositories. 2. Double-click on the repository listed to edit the repository record. 46 Chapter 5 Creating the repository record Overview 47 During installation of the Toolkit, a basic repository record is created. The repository record serves two basic purposes: to store information for later output, and to differentiate between repositories. It stores information, like the repository’s contact information and identifying codes, so that it can be later output in administrative and descriptive reports. For example, this information serves as the source for content in the headers for EAD and METS. Recording and storing it in one place – at the repository level of description – alleviates the need for repetitive data entry at the resource level and makes revision of all AT exports easier. The second purpose of the repository record is to distinguish one repository’s records and data rules from those of another repository using the same AT implementation in a multi-repository implementation of the Toolkit. Basic steps for creating the repository record 3. From the Setup menu, select Repositories. 48 Chapter 5 4. Press the button. 5. Enter the Repository Name. This is the name that will appear on administrative reports and descriptive outputs. 6. Enter the Short Name for the repository, which will appear in the Toolkit interface. 49 7. Save the repository record by pressing the window. If you are entering multiple records, the are working in and open a new repository record. button at the bottom right corner of the button will save the record you Caution! If the record does not include the required elements listed above, the Toolkit will indicate that the record cannot be saved because one or more of the required fields is not complete. The incomplete fields will be listed in the error message. These fields must be completed in order to save the record. Repository record data elements Elements Required by the Archivists’ ToolkitTM 1. Repository Name. Enter the name of the repository as it should appear on administrative reports and descriptive outputs. Examples: University of Massachusetts Amherst Special Collections and University Archives Scripps Institution of Oceanography Archives 2. Short Name. Enter an abbreviated version of the repository name, as you would like it to be displayed in the AT interface. Examples: UMass SCUA SIO Archives Additional Elements The minimum repository record can be extended by recording data for any of the following data elements. None of these data elements are required to create the repository record, but many of them may be desirable. For example, your institution will likely want to include contact information that can be exported with any descriptive outputs that will be shared with researchers. 1. Address. The Toolkit offers three address lines for the repository's address, although none are mandatory. Examples: W.E.B. Du Bois Library 154 Hicks Way 50 Chapter 5 2. City. The town or city in which the repository is located. Examples: Amherst New York 3. Region. The repository’s state, province, or other region. Examples: MA Ontario 4. Country. Enter the country in which your repository is located. Examples: U.S.A. Canada 5. Mail Code. Zip code, postal code or other mail code. Examples: 01003 K1A 0N4 6. Telephone. Repository telephone number. Example: 212-555-1212 7. Fax. Repository fax number. Example: 212-555-1213 8. Email. Repository email address. Because this will be exported into descriptive outputs for long-term use, a general contact email may be desirable, rather than a specific staff member’s email. Example: [email protected] 9. URL. URL for the repository web site. Example: 51 http://www.collectionscanada.ca/ 10. Country Code. The code for the country in which the repository is located. The country code should follow the ISO 3166-1-alpha-2 standard. Examples: US (United States) CA (Canada) 11. Agency Code. The institutional code should follow the ISO 15511 standard. The purpose of ISO 15511:2003 is to define and promote the use of a set of standard identifiers for the unique identification of libraries and related organizations. Many U.S. institutions already use an appropriate code, assigned by the Library of Congress, in their catalog records. The Library of Congress can also assign codes for institutions in the U.S. that do not already have one. Examples: US-MaNoSCA US-CaLjSIOA 12. NCES Id. The National Center for Education Statistics number used to identify schools in the U.S. The NCES Id can be found at: http://nces.ed.gov/globallocator/. Examples: 510009000015 13. Branding Device. The URI for a repository logo. Example: http://www.collectionscanada.ca/seal.gif 14. Descriptive Language. The primary language used for description by the repository. Examples: eng fre Repository Statistics The Repository Statistics tab was designed to contain statistical information on repositories for the Archival Metrics project. The Archival Metrics project is working to standardize data collection instruments, procedures, and definitions to allow for consolidation and analysis of data across institutions. Basic steps for recording repository statistics 52 Chapter 5 1. From the repository record, click on the Repository Statistics tab. 2. Select the button. 53 3. Enter the Year Of Report. This is the year in which the repository statistics were recorded. This is the only required field for this tab. 4. Save the repository record by pressing the button at the bottom right corner of the window. The information entered will now be listed under the Repository Statistics list 54 Chapter 5 button will save the record you screen. If you are entering multiple records, the are working in and open a new Repository Statistics record. 5. The information entered will now be listed under the Repository Statistics list screen. Additional Elements 55 1. Services provided. Check the applicable patron services provided by the repository. 2. Staff size. A numerical representation of the types of staff members working at the repository. 3. FTE Functional Distribution. A numerical representation of the time the repository dedicates to archival tasks. 4. Collection Foci. Check all the applicable collection types for the repository. 5. Major Subject Areas. List the major subject areas the repository’s collections cover. 6. Percentage Off Site. A percentage representing a portion of the repository’s total collection that is stored off-site versus onsite. 7. Repository’s Physical Characteristics. A square footage assessment of each of the areas the repository may have. Default Values The repository record also contains a Default Values tab where default values for data elements and notes within the Toolkit can be established. This is one of the Toolkit’s customization features and is described in detail in Chapter 15. Notes The repository record has a Notes tab for recording any narrative information about the repository itself. This might include the collection development policy, details about operating hours, etc. 1. Label. A header or brief explanatory statement of what the note is. A few options are provided in an editable drop-down list. Examples: Reading Room Hours 2. Note Text. Content of the note itself. Examples: Open Monday through Friday, 9:00-5:00 Managing users Overview Once the repository record is completed, the Toolkit is ready to be used by anyone with access to the computers / servers on which the application is installed. It is likely that most repositories using the Toolkit will want to control certain users' access to some of the information or features of the application. 56 Chapter 5 The Toolkit provides the means to assign a user to one of five access classes. The classes represent an expanding sequence of functionality and access. Class 5, for instance, represents access to all the functionality and information stored in the AT for all repositories, while Class 1 represents access to very basic data entry functions for describing already accessioned resources and their components. Class 1 is the default value. Note: Class 5 permissions are analogous to what are often referred to as superuser permissions. As with other systems, it is not recommended to do daily work in the Toolkit while logged in as a superuser. Therefore, the Toolkit’s administrator may wish to create and use two accounts - one as the superuser and one with Class 4 or Class 3 permissions. For more information on permission designations, see the User record data elements section. A detailed listing of user permissions is provided in the appendices. Basic steps for creating a user record 1. From the Setup menu, select Users. 57 2. Press the button. 3. Enter a User Name. 4. Press the button to assign a password. A window will appear asking you for the new password. Enter a password, re-enter it in the Repeat New Password box, and press OK. 5. Save the user record by pressing the button at the bottom right corner of the window. If you are entering multiple records, the are working in and open a new user record. button will save the record you 58 Chapter 5 Caution! If the record does not include the required elements listed above, the Toolkit will indicate that the record cannot be saved because one or more of the required fields is not complete. The incomplete fields will be listed in the error message. These fields must be completed in order to save the record. User record data elements Elements Required by the Archivists’ ToolkitTM 1. Username. Create a user name to use when logging into the Toolkit. 4. Password. Use the previously described. button to assign a password for the user, as Additional Elements The minimum user record can be extended by recording data for any of the following data elements: 1. Full Name. The user’s complete name. Examples: John Depp Marie Smith 2. Title. The user's position title. Examples: Head, Archives and Special Collections Project archivist 3. Department. If your repository is organized into departments, you may wish to record the user’s department here. Examples: Technical services Public services 4. Email. The user’s email address. Examples: [email protected] 5. Access class. The access classes, ranging from one to five, correspond to the following permissions: 59 Class 5: Superuser. All read/write and functional permissions for all repositories sharing the installation. Class 4: Repository Manager. All read/write and functional permissions for a single repository. Class 3: Project Manager. Read only permissions for repository and user records, all other read/write and functional permissions for a single repository. Class 2: Advanced Data Entry Staff. No application or project management customization permissions. Unable to read or write name contact information. Class 1: Beginning Data Entry Staff. No application customization permissions. Unable to read or write name contact information. Read only access to accession, digital object, name and subject records. Read/write permissions on resource and component description records. A more complete list of user class permissions is provided in the Appendices 6. Repository. Use the drop-down box to assign the user to the appropriate repository. 60 Chapter 6 Importing Data EAD 2002 The Archivists’ ToolkitTM allows for the importing of valid EAD version 2002 finding aids into description resource and component records. Note: The AT does not guarantee complete round-tripping of data (i.e. the data that is imported into the system may not be exactly the same as the data that is exported). For more details, see the section on data mapping at the end of this chapter, and the EAD to AT data map in the appendices. Constraints on EAD To be imported, the EAD must meet the following conditions: 1. EAD files must: a. Be valid version 2002 documents. Version 1.0 EAD files need to be converted to version 2002 prior to import. b. Contain a <unitid> within the <archdesc>. c. Conform to the EAD DTD or to the EAD schema (EADs using the EAD group DTD are not accommodated in the AT EAD import process). 2. Not all valid EAD tagging can be accommodated by the Toolkit’s data model, though such instances are rare. Where inline tagging is encountered in a source EAD, it is imported into the Toolkit as mixed content and is visible as XML in its appropriate database field. Examples of inline content include formatting tags (such as <emph>, <lb/> and tables), access points outside of <controlaccess> tags, and external references (with the exception of dao types, which are mapped as digital instances). For example, a note encoded as follows: . . .taken at the crossing of the Ebro in July 1938. In an article that appeared in the <title render="italic">Volunteer for Liberty</title> in September . . . Ebro Offensive:</p> <blockquote><p> In the period of reorganization ... </p></blockquote> Will be imported with some tagging retained as mixed content : Note: As seen in the example above, paragraphs are displayed in the AT with two line returns. Therefore, the <p> tags do not appear in the note. 4. Most internal referencing between id and target tag attributes are retained with some provisions: the Toolkit’s “persistent identifier” replaces the id target pairing and the Toolkit’s “targets” are limited to notes and components. 5. The quantity of data for an element must not exceed the data size stipulated for the target field, e.g., the size of a <head> must not exceed the limit for a note label. 6. Named entities are not supported. Entities must be resolved before import. For example, if you use entities to reference special characters, substitute the Unicode hexadecimal character for the named entity. Importing a single EAD file 1. From the Import menu, select Import EAD. 62 Chapter 6 2. Choose the file to be imported. 3. Select the repository that holds the materials described in the finding aid. 4. Press the button. The Toolkit will display a message indicating the progress of the import: 63 If an error is encountered, such as an invalid EAD, the Toolkit will display an error message indicating that the file could not be imported: There are several factors that could result in a failed import of an EAD instance: 64 Chapter 6 The EAD instance is not a version 2002 EAD. The EAD instance is not well formed: all start tags need to have end tags, all elements need to be correctly nested, all files should have a root element, and attribute values should be enclosed in quotation marks. The EAD to be imported already exists in the Toolkit as a multi-level resource, that is, there is already a resource record in the Toolkit with the same resource identifier as the EAD to be imported and that resource record has linked resource component records. If the resource record does not have linked resource component records, then the EAD selected for import will be imported and will overwrite or merge with fields in the existing Toolkit resource record. Fields that are present on re-import will overwrite the existing field, and fields that are not present on re-import will retain the old values rather than inserting a blank or null value for that field. The problem may be corrected by deleting the resource description already in the AT and then importing again the EAD that failed to import. It can also be avoided by restricting editing processes to within the Toolkit. There should be no line breaks in the <ead> tag, including breaks in between attributes of the tag. Otherwise the EAD will not import. The quantity of data in the EAD source element exceeds the quantity of data permitted for the AT target element. Named entities must be resolved before import. If import of the record is successful, the Import Log appears, and lists any record validation errors in the resulting AT record(s): 65 These particular errors indicate how the newly created AT record fails to meet AT record requirements. They typically consist of absent data elements that are necessary for a valid AT record. You will be prompted to correct these errors once the resulting record is opened in the AT. They must be corrected in order for you to save the record again. In addition, the Import log will list items that have been added to lookup lists. These items should be reviewed for accuracy and in most instances removed as they can affect system functionality. More information about data cleanup is listed at the end of this chapter. Batch Importing EAD 1. From the Import menu, select Import EAD. 2. Choose the folder that contains the EAD files to be imported. 3. Select the repository that holds the materials described in the finding aid. Only one repository can be selected. If you are importing EAD files from various repositories, the files should be grouped by repository and imported in smaller batches. 66 Chapter 6 4. Press the button. 5. The Toolkit will proceed in the same manner it does when importing a single record; it will first display a processing message, and then either output a failed import message if the import is unsuccessful, or output an import log. See the section on importing a single EAD record for troubleshooting failed import messages. 6. If the import is at least partially successful (i.e. some of the EADs were imported), the Import Log will list any errors that occurred during the import process. These errors typically consist of absent data elements that are necessary for a valid AT record. You will be prompted to correct these errors once you open the resulting record in the AT. They must be corrected in order for you to save the record again. The import log will also display a file-by-file listing of which EADs were successfully imported. 67 Mapping of EAD elements to Archivists’ ToolkitTM fields The entire EAD data structure does not map directly to the AT’s data structure; thus, in order to make sure that no data is lost, certain elements are imported as mixed content. That is, some data will be imported into a field with all of its internal tagging intact. Tables and linking elements are examples of EAD elements that are imported as mixed content. For example, a biographical note (<bioghist>) that contains a <table> will be imported into the Toolkit’s Biographical/ historical note field, with all content and tagging. Note: A complete EAD to AT mapping is available in the appendices. It is organized into four sections, each on an individual tab in the Excel spreadsheet. Though some aspects of the mapping are explained below, those interested in 68 Chapter 6 the complete details of how EAD elements are imported into the Toolkit should refer to the mapping document. Linking elements are also imported as mixed content. For internal references imported into the Toolkit (<ptr>,<ptrloc>, <ref>, <refloc>) the target and id pairs are realigned so that they contain Toolkit persistent ID values. For descriptions created within the AT, only <extref> and <ref> elements are used by the Wrap in tag editor, though you are free to hand code any other linking elements you wish to use. A final note on linking elements relates to importing indexes; within an <index>, the Toolkit only supports one link per index entry. Therefore, <ptrgrp> elements are not imported. Due to the flexibility of EAD, some instances of imported data will not map to the desired field. For example, the complete content of <revisiondesc> is mapped in the AT to the Revision Description field. The <date> attribute is not parsed into the Revision Date field because there can be multiple <revisiondesc><date> elements in the imported EAD. It is necessary to manually place the <date> attribute into the Revision Date field for the EAD to export correctly. If this is not done, the <revisiondesc> element will not be present in the EAD export. This is because a date element is required for a valid EAD <revisiondesc><change> element. On import, data in the <daodesc> is mapped to a general note, with the title of “Digital Archival Object Description” attached to the newly created digital object. Data is imported to this location (rather than to a more specific data element) because usage of the <daodesc> varies widely. The data, as imported into general note will not be included in EAD exports generated from the parent resource; the newly exported <daodesc> will be populated with data from the digital objects title and date fields. Exports (MODS, DC, MARCXML) of the digital object record will include the general note (according to the export data maps). Consequently, post-import clean up of the data from <daodesc> highly is recommended. Depending on the nature of information, this can be done by moving it to a more appropriate element in the digital object record or by deleting it from the record. MARCXML The Archivists’ ToolkitTM allows you to import valid MARCXML records into description resource records; however, the AT is not designed to manage MARC records. The MARC import function is provided simply to allow repositories to bring all their resources within a single management tool, whether they are described in legacy MARCXML records, EAD records, or created from scratch in the Toolkit. Caution! The AT MARC import function does not support round tripping of MARCXML records (i.e., the MARCXML record exported from the AT will not be the same as the MARCXML record that was imported). The import of MARCXML records into the AT involves loss of data granularity, and in some cases, loss of data. For instance, some subfield demarcations are not supported in the AT so that, although the data is imported, it is concatenated within the same AT field. While the AT is designed to support the MARCXML data elements typically used for describing archival materials, there may be cases where an imported MARCXML record contains a field not supported by the AT. 69 Despite these constraints, repositories may wish to import MARCXML in the following scenarios: When legacy data for archival resources is in the form of MARCXML records and not in the form of EAD finding aids and the repository wants to manage the resources described in the MARCXML records in the AT. When the MARCXML records for archival materials are considered to contain the only, or the more authoritative, name and subject headings than what are present in a repository’s EAD finding aids. Import has been intentionally designed as a “one record at a time” process based on the aforementioned recommendations for MARCXML import scenarios. Though MARCXML records usually are exported from an Integrated Library System as a “batch,” importing batches of resources may cause AT records to be unintentionally overwritten or duplicated. Constraints on MARCXML To be imported, the MARCXML record must meet the following conditions: 1. It must be a valid MARCXML record with type coded to “bibliographic.” 2. The source file must contain only a single MARCXML record. 3. MARCXML records that contain a 773 field, indicating the record is a “child” record related to a “parent” record, will not be imported. 4. The MARCXML record must contain a 210, 222, 240, or 245 title field or the record will not be imported. 5. If the tagging follows the <marc:[tag]> convention, the namespace declaration of the imported document must be: xmlns:marc="http://www.loc.gov/MARC21/slim" xmlns:xsi="http://www.w3.org/2001/XMLSchema-instance" xsi:schemaLocation=http://www.loc.gov/MARC21/slim http://www.loc.gov/standards/marcxml/schema/MARC21slim.xsd Otherwise the namespace declaration must be: xmlns="http://www.loc.gov/MARC21/slim" xmlns:xsi="http://www.w3.org/2001/XMLSchema-instance" xsi:schemaLocation="http://www.loc.gov/MARC21/slim http://www.loc.gov/standards/marcxml/schema/MARC21.xsd" Importing MARCXML 1. From the Setup menu, select Import, then Import MARC. 70 Chapter 6 2. Choose the file containing the MARCXML record to import. 3. Select the repository that holds the materials described in the MARCXML record. 4. Indicate resource identifier. 71 Note: If the resource identifier matches the resource identifier of an existing record, the Toolkit will ascertain whether or not the existing AT record contains linked component records. If it does not contain linked component records, the resource record will be overwritten. If it does contain linked component records, the Toolkit will respond that the MARCXML record cannot be imported. 5. Indicate whether you wish to import the entire MARCXML record or ONLY the 1xx, 6xx, and 7xx fields for name and subject headings. 6. Press the button. If an error, such as an invalid MARCXML is encountered, the Toolkit will display an error message indicating that the file could not be imported. If import of the record is successful, an import log will appear, listing any validation errors present in the imported record: 72 Chapter 6 These errors typically consist of absent data elements that are necessary for a valid AT record. The first time you open the resulting AT record, the AT will prompt you to correct these errors, and will not allow you to save the record again until the corrections have been made. Mapping of MARCXML elements to Archivists’ ToolkitTM fields A MARCXML to AT mapping is available in the Data Maps section of the AT web site support page (www.archiviststoolkit.org/support). Tab-delimited accessions data Importing accessions data The Archivists ToolkitTM allows you to import data from either a tab-delimited file from a table or flat file, or from an XML file structured according to the Accessions XML schema provided with the Toolkit. This data may be imported into the accessions, names, or subjects functional areas. There are certain limitations inherent in implementing the tab-delimited method: only one name and subject type can be imported per accession. The tab-delimited import is also more likely to introduce data errors that result in extra data clean-up work. The XML accessions schema was designed to address the limitations of the tab-delimited ingest method. While the XML schema method is recommended for these reasons, it does require more technical knowledge in order to transfer data from a database to the XML format. Importing tab-delimited accessions data 73 The Toolkit will not import information straight from a database, such as Access or Filemaker Pro. To transfer accessions data to the Toolkit, a tab-delimited file must be exported from the database containing the information. This tab-delimited file can then be imported into the Toolkit. Before importing data into the Toolkit, the data must be mapped to the fields in the Toolkit. See the Preparing the Tab-delimited Accession File appendix for mapping instructions. Importing accessions data 1. From the Import menu, select Import Accessions (Tab delimited) 2. Make the following selections: a. Choose the file to be imported. b. Select the repository to which the accession data applies. c. Indicate the format of the dates contained in the file to be imported. d. Select the appropriate Resource record creation option. Do not create resource record. No resource records will be created; only accession records. If there is a resource identifier in the import file the system will check to see if the resource exists and link to it. Create resource with resource id only. If there is a resource identifier in the import file the system will check to see if the resource exists and link to it. If not, a new resource record will be created. Only the resource identifier and repository fields will be present in the resource record; all other fields will be empty. Create resource record using all fields. If there is a resource identifier in the import file the system will check to see if the resource exists and link to it. If not, a new resource record will be created. All of the fields that can be transferred from an accession record will be populated in the resource record. See Chapter 7 for a table listing how these fields are mapped. 74 Chapter 6 3. Press the button to begin. A progress window will track the import process. If errors are encountered, an error log will appear at the end of the process. Note: Several error conditions can cause the import to fail, in whole or in part: An improperly formatted import document will cause the entire process to fail. No records will be imported. An invalid record will not be imported. To be valid an accession record must have an accession number and an accession date. A list of validation rules is provided in the appendices. Incorrectly formatted data, e.g., a non-accepted date format, or data mismatch, e.g., text data where integer data is required, will cause import of a record to fail. If the import document is formatted correctly, the process will proceed record by record. All valid and error-free records will be imported. All invalid and / or errant records will not be imported and will be listed as such in the resulting log. If no errors are encountered, you will see a window like the one shown below. 75 If any record does not follow the validation rules listed in the appendices, import of that record will fail. Importing XML accessions data XML formatted accession data can also be imported into the Toolkit. The XML format allows for multiple names and subjects types to be imported. The XML schema needed to create XML formatted data is named accessionsImport.xsd and can be found in the “conf” folder in the directory where the Toolkit is stored. Sample documents are provided in the appendices. To import XML accessions data: 1. From the Import menu, select Import Accessions (XML). 76 Chapter 6 2. Make the following selections: a. Choose the file to be imported. b. Select the repository to which the accession data applies. c. Select the appropriate Resource record creation option: Do not create resource record. No resource records will be created; only accession records. If there is a resource identifier in the import file the system will check to see if the resource exists and link to it. Create resource with resource id only. If there is a resource identifier in the import file the system will check to see if the resource exists and link to it. If not, a new resource record will be created. Only the resource identifier and repository fields will be present in the resource record; all other fields will be empty. Create resource record using all fields. If there is a resource identifier in the import file the system will check to see if the resource exists and link to it. If not, a new resource record will be created. All of the fields that can be transferred from an accession record will be populated in the resource record. See Chapter 7 for a table listing how these fields are mapped. 77 3. Press the button to begin. A progress window will track the import process. If errors are encountered, an error log will appear at the end of the process. Note: Several error conditions can cause the import to fail, in whole or in part: An improperly formatted import document will cause the entire process to fail. No records will be imported. An invalid record will not be imported. To be valid an accession record must have an accession number and an accession date. A list of these validation rules is provided in the appendices. If the import document is formatted correctly, the process will proceed record by record. All valid and error free records will be imported. All invalid and / or errant records will not be imported and will be listed as such in the resulting log. 78 Chapter 6 Legacy Data Cleanup Overview Importing legacy data will likely require data cleanup, either before the data is imported, or within the Toolkit once the data have been imported. Failure to cleanup legacy data will lead to subsequent problems within the Toolkit; it is recommended that data cleanup be a top priority after import is completed. Potential data cleanup issues The following issues may present themselves in data that is imported into the Toolkit: 1. Import of invalid records. In most cases, the Toolkit will import resource records that do not contain required fields. These fields must be completed before any additional edits to the record can be saved. These invalid records can cause problems with operations such as merging of subject or name terms, merging resource records or merging of items in a lookup list. 2. Import of repetitive terms in lookup lists. When importing into fields controlled by lookup lists, the Toolkit will import data that doesn’t match elements in the lookup list. For example, you may import “aat” into the Subject Source field, where the default value in the lookup list is “Art & Architecture Thesaurus (aat).” At times the terms may appear to be the same, but trailing whitespace causes the two strings to be different. The Merge Item 79 feature in the lookup lists can assist you with cleaning up this kind of inconsistency in your data. 3. Import of punctuation repeated by built-in operations in the Toolkit. In many instances, the Toolkit automatically provides punctuation for subject and name terms. If your subject and name data is imported with punctuation, there may be repetition in the Toolkit’s displays and outputs. Methods for data cleanup Correcting invalid records Each record in the AT has required fields. The Toolkit can import resource records that are missing these fields, and the import log will highlight which imports have these absences associated with them. These fields must be corrected before any additional information can be stored in the record. Invalid records can also create problems when merging data; since merging data is a necessary method for cleaning up other data errors, it is important to fill in the required fields for all imported records first. To correct these fields, each imported record needs to be opened, the field data entered, and then saved. The application will alert users to which required fields are necessary if they are not completed. The Merge function The Toolkit offers a Merge feature for subjects and names, as well as lookup lists, which is useful for management and clean up of your authority records and lookup lists. Merging two terms together results in the undesirable or redundant heading or list item being deleted, and all of its linked accession and description records being linked to the more desirable heading or list item. You might use this feature to perform data clean up if importing data has resulted in redundant records or if you find that related terms have been used inconsistently. Refer to Chapter 11 for instructions on merging Name and Subject headings. Refer to Chapter 15 for instructions on merging lookup list items. Correcting data mapping Due to the flexibility of EAD, some instances of imported data will not map to the desired field. Examples of this are listed in the section above on Mapping of EAD elements to AT fields. Moving the data into the correct fields will ensure that records are exported correctly. 80 Chapter 7 Accessioning Archival Materials Overview The Accessions functional area is designed for establishing basic intellectual and physical control over a new accession at the time it is received in the repository. The accession record allows for recording information about the accession transaction, about the contents of the accession, and about several basic collection management events related to the accession. An accession record documents a single accession transaction. The Toolkit requires two data elements for an accession record, though you may enter many more. The required elements are a unique Accession number and the Accession date. These two elements serve to document the accession transaction only. The Toolkit provides additional elements for describing the accession more fully and for capturing basic collection management information. It also allows for the addition of creator, source, subject, and location information to an accession record by linking the record to name, subject, and location records. It is not necessary to use the Accessions module if the sole objective is to create end-user descriptive products, such as finding aids and catalog records for the repository’s archival resources. However, one of the benefits of using the Toolkit is the ability to record accession, collection management, and description information within the same system. Basic steps for creating an Accession record 1. From the Main Screen, select Accessions and press the button. 2. Enter a unique Accession Number. 3. Enter the date of the accession transaction in the Accession Date field. 4. Save the accession record by pressing the window. If you are entering multiple records, the are working in and open a new accession record. button at the bottom right corner of the button will save the record you Caution! The record cannot be saved if the Accession Number is not unique. The Toolkit will indicate if this is the case and will prompt you to change it to a unique string. If the record does not include the two required elements listed above, the Toolkit will indicate that the record cannot be saved because one or more of the required fields is not completed. The incomplete fields are indicated in the error message and those required field(s) must be completed in order to save the record. Accession data elements Elements Required by the Archivists’ Toolkit 1. Accession Number. The accession number must be unique. It may consist of up to four individual elements of which only the first is required. This first element, limited to 10 characters, is the only element that is required, though it is best to use more than one element if the accession number is a multi-part number such as year followed by a consecutive number. In all displays and output, the Toolkit inserts a period between each element. If the accession number is not unique, the Toolkit will alert you that the accession number already exists in the system (“Can’t save, duplicate record”). Enforcing uniqueness ensures that every accession record in the Toolkit represents only one accession. DACS Reference: 5.2.5 Examples: One element: G10669 Two elements: 1976.034 Four elements: NYU.Fales.2010.33 2. Accession Date. The date of the accession transaction represents the date of receipt of the materials, which is not necessarily the same as the date the accession record is created. In other words, the date stamp that the Toolkit automatically assigns to the accession record documents the record creation, and is not intended to document the accession transaction. The date must be input according to the format established as the preferred date format in the application. See Chapter 15 for more information on setting the date format. Examples: 12/03/2004 (mm/dd/yyyy) Additional Elements The minimum accession record can be extended by recording data for any of the following data elements available for the accession record. None of these data elements are required to create an accession record. However, there are requirements associated with some of the data elements if they are utilized. For instance, certain date fields must be expressed by four-digit year format only. 82 Chapter 7 The Basic Information Tab 1. Link Resource. The accession may be linked to one or more archival resources using the Link Resource button. Clicking on this will open a list of resources. To link to the resource, locate the name by scrolling through the list or use the Filter box to narrow down the list. Then, either double click on the resource in the list, or select the resource and press Link. 83 Multiple Resource IDs may be added to link the accession record to more than one archival description or resource record. This may be necessary if the accession has a mixed provenance and its contents are distributed among multiple archival resources. When this occurs, you may wish to use the Accession Disposition Note field (located on the Accession Notes tab) to provide more information. In addition to linking an accession record to an already existing resource record, it is possible to create a new resource record from the accession record. To do so, select the button. A new resource record will appear. Some fields in this record will already be populated with information from the accession record from which it originated. For example, the Title from the accession record will appear in the Title field of the new resource record. 84 Chapter 7 The following table lists all of the elements that are mapped from the accession record to a resource record created in this manner. Accession Record to Resource Record Mapped Elements Directly Mapped Fields Accession Table Elements Resource Table Elements Field Label Field Label Title Extent Number [Extent Measurement] Title Extent Number [Extent Measurement] Container Summary Date Expression Date Begin Date End Bulk Date Begin Container Summary Date Expression Date Begin Date End Bulk Date Begin Bulk Date End Restrictions Apply Repository Bulk Date End Restrictions Apply Repository 85 Indirectly Mapped Fields Accession Table Elements Field Label Description Condition Note Access Restriction Note Use Restriction Note Accession Number Title Name Linked Subject Linked Resource Table Elements Field Label Scope and Contents Note General Physical Description Note Conditions Governing Access Note Conditions Governing Use Note Accession Number Linked Accession Linked Name (Linked) Subject (Linked) Note: The Toolkit will not validate a unique Resource Id until all of the required fields are completed and the OK button is clicked. If the Resource Id is not unique, all the information previously entered will be lost. Thus it is a good idea to filter through the existing Resource records in the Link Resource to Accession screen to determine whether the new Resource Id is unique. Once all of the desired resources are linked, press Close Window to return to the accession record. The linked resources will appear in the Resources linked to this accession area. To delete links between accessions and resources, highlight the resource ID you wish to remove under the Resources Linked to this accession area and click on Remove Link. DACS Reference: 2.1.3 2. Resource Type. Each resource can be classified into a subdivision of the repository's holdings. For example, a College and University Archives may wish to distinguish manuscript collections from archival records for the purpose of generating statistics. A manuscript repository may have multiple collecting areas to track, such as literary collections, business collections, etc. The Toolkit provides a list of default options for the field (Collection, Papers, Records), but the list may be customized by the repository (see Chapter 15). DACS Reference: 2.3.18 Examples: Organizational records Personal papers History of science and technology collection 3. Title. The title is usually a concatenation of the creator name and a term describing the form of materials, whether general (papers, records) or specific (correspondence, diaries). The title of the accession will typically, but need not always, match the title of the resource to which the accession belongs. For example, the accession title may be John Smith Diaries, 86 Chapter 7 which is to become part of the Smith Family Papers. DACS Reference: 2.3.18-2.3.22 Examples: John Smith Diaries Office of the President Correspondence Marie Dolores Jones Papers 4. Extent. First, enter the number of units as a whole or decimal number. Then select the type of measurement (cubic feet or linear feet). DACS Reference: 2.5.4-2.5.9 Examples: 10 cubic feet 148.5 linear feet 5. Container Summary. Enter an enumeration of the number and type of containers that house the accession. DACS Reference: 2.5.4-2.5.9 Examples: 5 cartons, 3 boxes, 1 flat box 10 record cartons, 3 archives boxes, 4 map folders 6. Change Repository. Press the Change Repository button to open the list of repositories and change the repository to which the accession is assigned. Note: This option is only available to users with class 5 permissions. 7. Dates. A number of elements are available for recording the dates of creation of the materials. Dates can be entered in integer form (Date Begin, Date End, Bulk Date Begin, Bulk Date End), and/or as a free-text string (Date Expression). Integer dates are used to support computer processing of date information (e.g., searching). The date expression is designed for human readability and allows for the use of qualifiers, such as circa or before. It is the date expression that typically displays to end-users. a. If you wish, you may only enter a Date Expression rather than using the fields for integer dates. However, doing so may limit your ability to support searching by date in exported objects such as MARCXML records and EAD documents. DACS Reference: 2.4 Examples: Between 1925 and 1953 ca. 1911 87 1913-1998, bulk 1950-1972 b. Integer Dates. (Date Begin, Date End, Bulk Date Begin, Bulk Date End). Integer dates must be entered in years only, with no days or months. Enter inclusive dates using the Date Begin and Date End fields. Enter bulk dates in the Bulk Date Begin and Bulk Date End fields. A value must be entered in both Date Begin and Date End. For single dates, the values are identical, whereas for ranges, they differ. In addition, bulk dates can only be expressed when inclusive dates are specified, and the bulk dates must be contained within the inclusive dates. DACS Reference: 2.4 Examples: 1922--1922 (Single date) 1900--1930 (Inclusive dates) 1910--1918 (Bulk dates) 8. Deaccessions. A deaccession record may be linked to an accession or resource record. See Chapter 8 for instructions. 9. Locations. Use the button to assign locations to the accession. See Chapter 13 for specific instructions on assigning locations. 10. General Accession Note. Use this field to note any information that does not fit in any of the more defined fields. This is a catch-all note for use by repository staff. The Accessions Notes Tab 88 Chapter 7 1. Acquisition Type. Indicate the type of accession transaction. This refers to the way in which the accession was acquired. Options include: deposit, gift, purchase, or transfer. These options may be customized by repository. See Chapter 15 for instructions. 2. Retention Rule. Indicate any statute, regulation, or rule establishing the minimum period for maintaining the records. 3. Description. This field serves as a preliminary scope and contents note, and might include description of document types and topical contents represented in the accession DACS Reference: 3.1.4-3.1.7 Examples: Contains correspondence and financial records for Smith's clothing business, as well as personal diaries. Provost's correspondence, subject files, and program files. Includes information about diversity protests and formation of ALANA scholarships. 4. Condition Note. Enter notes about the physical condition of the materials, preservation actions that may be necessary, and any special handling requirements. Examples: Rolled drawings in tubes 10-17 are brittle and in need of humidification. 89 Collection is filled with mold and silverfish. Deep freeze treatment is scheduled. Materials should not be unpacked in the department and persons processing the materials should wear inhalation guards. Nitrate negatives in box 12 are in poor condition and should not be filed with other negatives. Schedule for reproduction and subsequent destruction. 5. Inventory. You may enter or paste a container list or other form of preliminary inventory in this field. As an alternative, you may provide a reference to the existence and location of an external paper or electronic document that contains the inventory. Examples: Box list from office of origin filed in archives. c:/transfers/provost/20061213contentslist.doc or Box 1 Correspondence, ca. 1970-1983 Boxes 2-3 Subject files, 1972-1984 Box 4 Program files, 1980s 6. Accession Disposition Note. Note documenting the eventual disposition of the accession. May include information about materials weeded, the archival resource(s) into which the accession was integrated, any materials returned to the source, etc. DACS Reference: 5.3, 6.3 Examples: During processing, it was determined that the accession included materials created by both John Smith and his cousin and business partner, Zachariah Smith. The accession was separated into the John Smith papers and the Zachariah Smith diaries. Duplicates weeded and returned to the donor. 7. External Documents. Link to related external documents that are stored outside of the Toolkit. For example, you may wish to link to transfer documents, deeds of gift, or preliminary descriptions made available online. To link to a document, press the Add Document button. 90 Chapter 7 You will be asked for the Title and the HREF for the document. a. Title. Enter the document title. This will be used as the linked text in any outputs. Examples: Deed of Gift Office of Admissions Transfer Sheet b. HREF. A Universal Resource Identifier (URI) for the document. A persistent identifier is preferable if the links are to remain viable over time, though there is nothing to preclude you from using a local directory path and filename. Examples: ftp://ftp.is.co.za/rfc/rfc1808.txt http://www.ietf.org/rfc/rfc2396.txt file:///etc/hosts Once you have entered the Title and HREF, press OK to save the link. You may also preview the document by pressing the button. The User-defined fields Tab The User-defined fields tab is an area in which repositories can create and define custom fields to capture any information not otherwise captured by standard AT fields. See Chapter 15 for instructions on how to configure these fields to the needs of your repository. The Names & Subjects Tab Use the Names & Subjects tab to add names as creator, source, or subject, and to add topical subject terms. See Chapter 12 for instructions. 91 The Acknowledgements, Restrictions & Processing Tasks Tab 1. Acknowledgement Sent/ Acknowledgement Date. Check the Acknowledgement Sent box if a letter acknowledging the accession has been sent. Record the date of this acknowledgment in the Acknowledgement Date box. These fields will assist you in tracking the status of accessioning activities, and can be used to output a report of accessions that need to be acknowledged. The date must be formatted according to the preferred date format established for the application. See Chapter 15 for information on establishing date format preferences. Examples: 2005/10/3 06-12-6 2. Agreement Sent/Agreement Sent Date. Check the box and/or record the date that the repository mailed a deed of gift, purchase agreement, transfer agreement, deposit agreement, etc., to the source of the accession. These fields will assist you in tracking the status of accessioning activities, and can be used to output a report of acquisition agreements to be mailed. The date must be formatted according to the preferred date format established for the application by the repository. See Chapter 15 for information on establishing date format preferences. Examples: 2005/6/8 05-6-8 3. Agreement Received/Agreement Received Date. Check the box and/or enter the date that the repository received a signed acquisition agreement. These fields assist in tracking the status of accessioning activities, and can be used to output a report of acquisition agreements that have not yet been received. The date must be formatted according to the preferred date format established for the application by the repository. See Chapter 15 for information on establishing date format preferences. Examples: 2005/8/17 05-8-17 4. Rights Transferred/Rights Transferred Date. Indicate if intellectual property rights have been transferred to the repository. If the source of the accession has transferred intellectual rights to the custodial repository, check this box and record the date of transfer in the Rights Transferred Date field. Because this is a simple yes/no field, repositories that wish to track this information should establish a documented policy on its use. For example, whether or not to indicate “yes” if rights have been transferred for only a portion of the materials. 92 Chapter 7 The date must be formatted according to the preferred date format established for the application. See Chapter 15 for information on establishing date format preferences. DACS Reference: 4.4 Examples: 2004/7/21 06-9-22 5. Rights Transferred Note. Record if there are any notable aspects concerning the transfer of intellectual property rights from the source of the accession to the repository. For example, this field can be used to record if rights have only been transferred for a portion of the materials. 6. Restrictions Apply. Indicate if restrictions apply to the accession. This is a simple yes/no field. Click to put a check mark in the box if there are restrictions, and use the next four fields to characterize the restrictions. DACS Reference: 4.1.5-4.1.6; 4.2.6-4.2.7; 4.3.5-4.3.6 7. Access Restrictions. Indicate if the restrictions are access restrictions. 8. Access Restrictions Note. Include here any useful statements indicating what materials in the accession have restricted access, what the authority of the restriction is, and for how long the restriction is to be in effect. DACS Reference: 4.1.5-4.1.6; 4.2.6-4.2.7; 4.3.5-4.3.6 Examples: Diaries in box 12 have been restricted by the donor until 10 years after her death. Medical records in cartons 42 and 66 are restricted by legal statute until 75 years after the date of their creation. Manuscripts in box 33 are fragile and restricted from use. 9. Use Restrictions. Indicate if the restriction is a use restriction. 10. Use Restriction Note. Indicate which materials have use restrictions, how the materials can be used, what the authority of the restriction is, and for how long the restriction is to be in effect. DACS Reference: 4.4 Examples: Material is in the public domain. Diary is fragile. User photocopy must be used in its place. 11. Processing Priority. Indicate the priority the repository assigns to completing processing of the accession. The values in the lookup list can be configured by the repository. See Chapter 15 for details on such customization. 93 12. Processors. Enter here the names of the staff members responsible for processing the collection. 13. Processing Plan. Type or paste a complete processing plan here, or, if a processing plan exists in print or electronic form externally, its existence and location may be referenced here. Examples: Processing plan available in control file. 14. Processing Started Date. Record the date on which the processing of the accession began. The date must be formatted according to the preferred date format established for the application. See Chapter 15 for information on establishing date format preferences. 15. Processing Status. Describe here at which stage the processing project is, i.e., just begun, near completion, completed, etc. The values in the lookup list can be configured by the repository. See Chapter15 for details on such customization. 16. Accession Processed/Accession Processed Date. Indicate the date when arrangement and description of the accession is completed. This will likely be added later, rather than at the time of accessioning. This field will assist in tracking processing activities, and can be used to produce a report of processed accessions. The date must be formatted according to the preferred date format established for the application. See Chapter 15 for information on establishing date format preferences. Examples: 1997-10-13 10/13/97 17. Cataloged/Cataloged Date. Indicate if the accession is represented in a completed catalog record (e.g., MARC) record. If the accession has been cataloged, check this box. This field can be used to generate a report of all cataloged or un-cataloged accessions. Use the Cataloged Date field to record the date the accession was cataloged. The date must be formatted according to the preferred date format established for the application by the repository. See Chapter 15 for information on establishing date format preferences. 18. Cataloged Note. Record notes related to the catalog record, for example the record control number of the MARC record documenting the accession. Note: To produce a MARCXML record from the Toolkit, you must complete a preliminary description record. MARCXML records cannot be output from an accession record. Relationships with other records Adding creator, source, subject, and location information to the accession record involves establishing relationships with records from other functional areas. 94 Chapter 7 1. Description. Accession records may be linked to one or more resource description records. Linking accessions to their eventual archival resource records requires linking to the Resource ID for the appropriate archival resource. A resource record may also be generated from the accession record using the Create Resource function on the Link Resource to Accession record picker. See above for a list of resource record fields that can be derived from the accession record. 2. Creator(s). Adding creator information to the record involves linking the accession record to one or more name records. See Chapter 12. 3. Source(s). The source refers to the individual or organization from which the repository acquired the materials. As with creators, adding a source to the accession record involves linking to a name record. See Chapter 12. 4. Subject Name(s). As with creators and sources, adding a name as subject to the accession record involves linking to a name record. See Chapter 12. 5. Subject(s). Adding topical, geographic, and genre headings to the accession record requires linking to one or more subject records. See Chapter 12. 6. Location(s). To assign a shelf location for the accession, a location record linked to the accession must be created. See Chapter 13. Accession reports Many descriptive, administrative, and statistical reports can be generated from the data stored in accession records. Chapter 14 provides instructions for generating reports. Examples of the following reports are available in the appendices: 1. Print Screen. Prints the list of accessions as displayed in the accessions list screen. This report is only available through the list view. 2. Accession intellectual property status. Displays the intellectual property status of listed accession(s). Report contains accession number, linked resources, title, extent, cataloged, date processed, rights transferred and a count of the number of records selected with rights transferred. 3. Accession inventory. Displays the inventory of an accession record or records. Report contains accession number, linked resources, title, extent, accession date, container summary, and inventory. 4. Accession processing plan. Displays accessions that have a processing plan. Report contains accession number, linked resources, title, date range, extent, container summary, and processing plan. 5. Accession production report. Displays accessions that have been accessioned, processed, and cataloged during a specified time period. Produces a summary statement of the total number of accessions, the total extent, total extent processed, and extent cataloged within the specified date range. 6. Accession receipt. Displays a receipt indicating accessioning of materials. Report contains accession number, title, extent, accession date, and repository. 95 7. Accession record(s). Displays key fields for selected accession record(s). 8. Accessions acquired. Displays a list of all accessions acquired in a specified time period. Report contains accession number, title, extent, accession date, container summary, cataloged, date processed, rights transferred and the total number and physical extent. 9. Accessions cataloged. Displays a list of all accessions that have been cataloged. Report contains accession number, linked resources, title, extent, cataloged, date processed, a count of the number of records selected that are checked as cataloged, and the total extent number for those records cataloged. 10. Accessions not cataloged. Displays accession(s) that have not been checked as cataloged. Report contains accession number, linked resources, title, extent, cataloged, date processed, a count of the number of records selected that are not checked as cataloged, and the total extent number for those records not cataloged. 11. Accessions processed. Displays accession(s) that have been processed based on the date processed field. Report contains accession number, linked resources, title, extent, cataloged, date processed, a count of the number of records selected with a date processed, and the total extent number for those records with date processed. 12. Accessions unprocessed. Displays accession(s) that have not been processed. Report contains accession number, linked resources, title, extent, cataloged, date processed, a count of the number of records selected with date processed, and the total extent number for those records without a completed date processed field. 13. Accessions with deaccessions. Displays a list of accession record(s) with linked deaccession record(s). Report contains accession number, title, extent, accession date, container summary, cataloged, date processed, rights transferred, linked deaccessions and total extent of all deaccessions. 14. Accessions with linked names and subjects list. Displays accessions with their linked names and subjects. Report contains accession number, linked resources, accession date, title, extent, linked names, and linked subjects. 15. Accessions with rights transferred. Displays list of accession(s) for which rights have been transferred. Report contains accession number, linked resources, title, extent, cataloged, date processed, access restrictions, use restrictions, rights transferred and a count of the number of records selected with rights transferred. User defined fields are not figured into the default accession reports. Repositories implementing userdefined fields in the accession record and wanting to include those fields in reports will need to use JasperReports or some similar report writer to modify the default reports or create new reports. The method for importing these custom reports is described in Chapter 15. Repositories doing so are encouraged to share the reports they create with the rest of the AT community. 96 Chapter 8 Deaccessioning Materials Overview During processing and even sometimes after processing is completed, a repository may decide to permanently remove material from its holdings. These deaccessioned materials may be returned to their source, offered to another institution, or destroyed. In the Toolkit, these events and the materials deaccessioned are recorded in a deaccession record, which may be linked to an accession or resource record. Basic steps for creating a deaccession record 1. From the appropriate accession or resource description record, press the button. 2. Enter the date of deaccessioning. 3. Enter a description of the materials being deaccessioned. 4. Save the deaccession record by pressing the button at the bottom right corner of the window. If you are entering multiple records, the you are working in and open a new deaccession record. button will save the record Caution! If the record does not include the required elements listed above, the Toolkit will indicate that the record cannot be saved because one or more of the required fields is not completed. The incomplete fields will be indicated in the error message. The required field(s) must be completed in order to save the record. Deaccession data elements Elements Required by the Archivists’ ToolkitTM 1. Deaccession Date. The date of the deaccession transaction. The date must be formatted according to the preferred date format established for the application. See Chapter 15 for information on establishing date format preferences. 98 Chapter 8 Examples: 12/3/2004 12-3-04 2. Description. Description of materials to be removed from the repository’s holdings as part of the deaccession action. Examples: Medical records covering the years of practice. Eight track tapes that have been converted to digital audio. Additional Elements You can amplify the minimum deaccession record by recording data for any of the following data elements. 1. Reason. Enter the reason for deaccessioning the materials. Examples: The medical records are not an integral part of the collection and should not have been included in the accession. The eight track tapes are no longer a serviceable media. 2. Extent. First, enter the number of units as a whole or decimal number. Then select the type of measurement (cubic feet or linear feet). Examples: 10 cubic feet 148.5 linear feet 3. Disposition. Description of the disposition of the records upon their removal. Examples: Returned to source Destroyed Transferred to University Archives 4. Notification. A yes/no field indicating whether the source of the materials was notified of their removal. Check the box if the source was notified. Relationships with other records 99 A specific deaccession record may be associated with only one accession record or resource record, though an accession or resource record may be associated with many deaccession records. An accession or resource record displays a list of all associated deaccession records. Because there is a one to one relationship between a specific deaccession record and its related accession or resource record, a specific deaccession record may only be assigned or viewed within the context of the associated record. It is assumed that deaccession records created prior to the completion of arrangement and description of a resource will be linked to the accession record, whereas deaccession records created for a processed resource will be linked to the resource record. Deaccession reports Reports containing deaccession information, described below, are available in the Accessions and Resources functional areas. Chapter 14 provides instructions for generating reports. Examples of these reports are available in the appendices: 1. Accessions with deaccessions. Displays a list of accession record(s) with linked with linked deaccession record(s). Report contains information from all deaccession fields, including a calculation of the amount of material deaccessioned. 2. Resources with deaccessions. Displays a list of resources with linked deaccession record(s). Contains information from all deaccession fields, including a calculation of the amount of material deaccessioned 100 Chapter 9 Describing Archival Materials Overview Supporting the description of archival resources is a core function of the Archivists’ ToolkitTM. The resources functional area allows you to capture information about the physical and intellectual content of an archival resource, as well as contextual information about collection creators and topics. You can output this information in various formats including finding aids, catalog records, and other descriptive products used by researchers to access materials. It is important to note that the Toolkit stores data in linked tables within a relational database structure, a structure that provides more flexibility for producing multiple outputs such as MARCXML, MODS, EAD, subject guides, etc. - all from the same data. Although the Toolkit can import and export descriptive data in EAD format, the data is not stored as an EAD instance within the Toolkit. Resource and component records In the Toolkit, an archival resource is described using two types of records, resource records and component records. A resource record can represent one of two types of resources: aggregations (collections, record groups, or fonds, for example) or independent items, that is, items that are not part of a larger aggregation. Either of these types of resource records can stand on their own to form a single-level description. In the case of the aggregate type of resource record, the resource record may also be linked to resource component records to form multi-level descriptions. Though component records may represent a series, subseries, file, item, or other subdivision, the input template for each component level contains the same data elements. Using the Archivists’ ToolkitTM for multi-level description The SAA Glossary of Archival and Records Terminology defines multi-level description as “A finding aid or other access tool that consists of separate, interrelated descriptions of the whole and its parts, reflecting the hierarchy of the materials being described.” In the Archivists’ ToolkitTM, multi-level descriptions are built through the creation of a resource record and linked resource component records. These two resource record types accommodate the twelve numbered levels of description permitted in the Encoded Archival Description standard and an unbounded number of unnumbered levels. A resource record may be the parent of a component resource record that is parent to a component resource record that is parent to a component resource record, and so on. Also, there may be an unlimited number of component resource records at a given level. For example, there is no limit on the number of series records or file records. Records at the same level are referred to as sibling records in the AT, while component records are referred to as child records. The hierarchical interface Overview As you describe archival resources and their components in the Toolkit, each new record will be reflected in the hierarchical interface, which can then be used to navigate and reorder components as necessary. In the hierarchical view, a folder represents the resource (Alvah Bessie Papers in this instance), or any component which contains additional components. Components that have no children are represented with a bullet. The title is displayed for every record. To display the contents of a component, click on the + to the left of a folder, and the Toolkit will display all of the components within it. To collapse the list, click on the - to the left of an open folder. Note: The graphical navigation displays for the Mac are slightly different. For example, an arrow graphic is used to depict a component with subcomponents instead of a +. Otherwise the navigational capabilities are the same. To display the record for any component, click on the title of the component. This will navigate you directly to a given record for editing or review. To reorder component records, simply select the component you wish to move, and drag it up or down in the hierarchy, releasing the mouse button where you wish to place the component. 102 Chapter 9 To insert a new component into the description, use the buttons found below the hierarchical interface. Keep in mind that the context for the following buttons is the component currently selected and displayed in the record window. The Add Child button opens a new component record that is hierarchically subordinate to the context record. For example, if your context record is a series and you want to create a subseries within it, press this button. The Add Sibling button opens a new component record that is at the same level as the context record and that follows the context record within the sequence. If you are entering multiple series one after another in sequence, use this button to create the next series. The Delete Component button deletes the selected component and all of its children. If you wish to delete the component but not its children, you must reorder the components first so that they are no longer part of the component you wish to delete. Reordering components using drag and drop It is possible to reorder components in the hierarchical interface using drag and drop techniques. That is, selecting a component while holding the mouse button down, moving the component to another location, then finally releasing the button to drop the component in its new location. A component can be moved to the end of a group of components. 103 Components can be re-arranged, with all associated children, within the same level and at any level of the hierarchy. 104 Chapter 9 Can promote a component and all of its children to any level up to level 2, including the ability to place the component between two components, both of which may have children. 105 Can demote a component and all of its children and the demoted component remains at the same level. A component does not need to have at least one child for another component to be dropped into it as a child. Scrolling in the complete hierarchical component window is possible when using the drag and drop feature as well. 106 Chapter 9 Tagging text using Wrap in tag In many areas of the Toolkit it is possible to encode EAD tags to signify names, markup text, delineate functions, etc. The following Wrap in tag elements are available: <blockquote>, <corpname>, <date>, <emph>, <extref>, <famname>, <function>, <genreform>, <geogname>, <lb>, <name>, <occupation>, <persname>, <ref>, <subject>, and <title>. To wrap text in a tag, simply select the text to be encoded, and choose the appropriate tag from the drop-down list. For tags that can have associated attributes, a dialog box will appear allowing the option to enter those attributes. Basic steps for creating a resource record 1. From the Main Screen, select Resources and press the button. 2. Select a Level for the record. 3. Enter a unique Resource Identifier. 4. Enter a Title. 5. Enter a Date Expression and/or Begin Date and End Date for the materials. 107 6. Enter the Extent Number and Extent Measurement (cubic feet or linear feet). 7. Enter the Language Code for the language of the materials. 8. Save the resource description record by pressing the button at the bottom right corner of the window. If entering more than one resource record, save the record by pressing the button. This will save the current record and open a new resource description screen so a subsequent record can be entered. Caution! If the record does not include the required elements listed above, the Toolkit will indicate that the record cannot be saved because one or more of the required fields is not complete. The incomplete fields will be indicated in the error message. The required field(s) must be completed in order to save the record. For a complete list of validation rules, see the appendices. Note: A resource record can also be created from an accession record. Some fields in this new record will be automatically populated with information from the accession record from which it originated. For example, the Title from the accession record will appear in the Title field of the new resource record. See Chapter 7 for details and a list of fields that are automatically applied to the new resource record. Basic steps for creating a resource component record 108 Chapter 9 1. From an open resource record or component record, press the or the button. Siblings can only be added to component records. 2. Select a Level for the record. 3. Enter a Title. or 4. Enter a Date Expression and/or Begin Date and End Date for the materials. 5. Save the record by pressing the button at the bottom right corner of the window. or If entering more than one component record, save the record by pressing the button. This will save the current record and open a new component screen so a subsequent record can be entered. The Rapid Data Entry function, available through the RDE dropdown , is another means of quickly entering data. See the description in this chapter and Chapter 15 for more information. Caution! If the record does not include the required elements listed above, the Toolkit will indicate that the record cannot be saved because one or more of the required fields is not complete. The incomplete fields will be indicated in the error message. The required field(s) must be completed in order to save the record. For a complete list of validation rules see the appendices. Description data elements Note: If you wish to examine how these data elements will be exported into standard outputs such as EAD and MARCXML, see the mappings available in the appendices. The Basic Information Tab 109 1. Level. This is required for resource and component records, and is the label for the hierarchical level of the materials being described. Options are class, collection, file, fonds, item, other level, record group, series, subfonds, subgroup, and subseries. 2. Other Level. If you have selected “otherlevel” for the Level element, use this field to provide a specific level description. 3. Title. A title is required for resource records. Either the title or the date is required for component records. At the resource level, the title is usually a concatenation of the creator name and a term describing the form of materials, whether general (papers, records) or specific (correspondence, diaries). DACS Reference: 2.3.18-2.3.22 Examples: John Smith Diaries Office of the President Correspondence Outgoing correspondence You may also use the Wrap in tag feature to apply EAD tags such as title, persname, corpname, etc., within the title. To do so, simply select the text to be encoded, and choose the appropriate tag from the drop-down list. This will, however, affect how the Resource record title is displayed in list view and how the resource record sorts in relation to other resource records. 110 Chapter 9 4. Dates. Date is required for resource records. Title or date is required for component records. Dates can be entered in integer form (Date Begin, Date End, Bulk Date Begin, Bulk Date End), and/or as a free-text string (Date Expression). Integer dates are used to support computer processing of date information (e.g., searching). The date expression is designed for human readability, and allows for the use of qualifiers, such as “circa” or “before”. It is the date expression that displays to end-users. a. Integer dates. (Date Begin, Date End, Bulk Date Begin, Bulk Date End). Integer dates must be entered in the YYYY format: month and day elements are not supported. To enter a single date, enter the same date in the Date Begin field and Date End field. Enter inclusive dates using the Date Begin and Date End fields. Enter bulk dates in the Bulk Date Begin and Bulk Date End fields. You may not enter bulk dates unless inclusive dates are present. You may not enter bulk dates that do not fall within the range of the inclusive dates. DACS Reference: 2.4 Examples: Date Begin: 1922 Date End: 1936 Bulk Date Begin: 1925 Bulk Date End: 1930 b. Date Expression. A natural language expression specifying the date or date range of the materials. You may enter only a Date Expression rather than using the fields for integer dates, however, doing so may limit your ability to support meaningful date searching. DACS Reference: 2.4 Examples: 1876-1933 Between 1925 and 1953 ca. 1911 1913-1998, bulk 1950-1972 5. Language Code. This field is required for resource records. Select the code for the language that predominates in the materials being described. You may jump to the appropriate place in the list by typing the first few letters of the language you are seeking. Examples: English ; eng French ; fre 111 If most of the materials in the repository are of one language, it is recommended setting the default value for this field to that language. See Chapter 15 for more explanation. Use the Language of Materials note to describe other languages present in the collection. 6. Repository Processing Note. For recording any internal information regarding processing that the repository wishes to record. This information will not be exported into descriptive outputs for researcher use. For processing information to be included in descriptive outputs, use the Processing Information note. 7. Change Repository. Press the button to open the list of repositories and change the repository to which the resource is assigned. Note: This option is only available to users with class 5 permission. 8. Resource ID. This field is available in resource records only and is required. Like the accession number, the resource ID may consist of up to four elements, though only one element is required. The resource ID may be linked to one or more accessions also recorded in the Toolkit. If this is the case, a list of linked accessions will appear below the resource ID. DACS Reference: 2.1.3 Examples: MSS 263 RG 3/1-1960 9. Accessions linked to this Resource ID. This is a listing of linked accessions. Accessions can only be linked to resource records through the accession record; it is not possible to link from a resource record to an accession record. It is possible to create a resource record from accession record. For more information see Chapter 7. 10. Component Unique Identifier. This field is available in component records only. This is the identification number or code used to uniquely identify the component among the other components within the same unit. Component identifiers need not be unique across the entire repository's holdings. DACS Reference: 2.1.3 Examples: Series 1. D-1.1 11. Extent Number and Extent Measurement. Both of these fields are required for resource records. First, enter the number of units as a whole or decimal number. Then select the type of measurement (cubic feet or linear feet). Extent is intended to be a measurement of the entire contents of the resource or component. 112 Chapter 9 Enumerations of containers in the resource or component can be entered in the Container Summary. Note: Certain reports rely on the extent fields to calculate statistics such as total holdings, amount of material processed, etc. Consistently using the same measurement, whether cubic or linear feet, will allow for best use of the Toolkit’s reporting capabilities. DACS Reference: 2.5.4-2.5.9 Examples: 10 cubic feet 148.5 linear feet 12. Container Summary. Enter an enumeration of the number and type of containers that house the accession. Note: The container summary can be used in conjunction with the Extent Number and Extent Measurement fields to create a parallel statement of extent, as described in DACS rule 2.5.7. DACS Reference: 2.5.4-2.5.9 Examples: 5 cartons, 3 boxes, 1 flat box 10 record cartons, 3 archives boxes, 4 map folders 13. Instances. Instances are used to record container information for materials in the collection, and to describe digital objects. See the Instances section below. 14. Internal Only. This is a yes/no field used to indicate if the resource record or component record is for internal use only. If the box is checked, data from the record and all of its children may be withheld from descriptive outputs designated for researcher use, or, in the case of EADs be exported with the audience attribute set for “internal.” Whether or not the data is withheld is determined as part of the export process. 15. Restrictions Apply. This is a yes/no field indicating if access restrictions apply to the materials being described. Creating component records with the Rapid Data Entry screen The Toolkit offers a Rapid Data Entry screen which allows for repeated entry of component records with fewer mouse clicks than one would use during the process of adding individual component records and then adding instances. The Rapid Data Entry feature is customizable and provides a more efficient interface for entering things like folder lists, where multiple components of the same level are entered one after another. 113 Note: In the Toolkit, the hierarchy of components is not driven by the Level element. When entering multiple components through the Rapid Data Entry screen, you can change the Level element for each, but the components are all entered at the same level (as siblings) in the hierarchy. For example, if your first component is set at the series level and the second component is set at the file level, the Toolkit will not automatically make the file a child of the series. The hierarchy can be modified later. Customizing Rapid Data Entry screens Rapid Data Entry screens are devices intended to accelerate data entry by letting elements of two or more data entry templates be configured into a single template best reflecting the nature of the data entry being done. This can minimize toggling across multiple data entry screens. Users may define multiple Rapid Data Entry Screens and invoke each one at the appropriate time during data entry. Rapid Data Entry screen customization is accessible through the Setup menu options: Selecting ‘Configure Rapid Data Entry Screens’ opens the ‘Edit RDE Entry Screens’ window: 114 Chapter 9 Select to configure a custom RDE screen: 115 Provide a name for the custom RDE screen. Next, click on the fields desired for the RDE and then on Add to put them on the RDE. You can change the vertical sequence of the field list by highlighting a field name and clicking on the ‘Move Up’ and ‘Move Down’ buttons. 116 Chapter 9 The newly created custom RDE screen(s) will now appear in the drop-down selection in a Resource record. You may configure as many custom RDE screens as desired. 117 Selecting the ‘Dr. Seuss Papers’ in this example, the RDE screen will include only those fields selected in customization setup for that RDE screen and the fields will appear in the order selected and saved. 118 Chapter 9 Selecting ‘default’ RDE from a Resource record will open the default RDE screen: 119 On any RDE screen, fields can be made ‘sticky’ or ‘unsticky’ by clicking on ‘Ctrl’ and the field name. The field label will appear in red if it is a sticky value. A field configured to be sticky means data entered into will be carried over to the next record created using the RDE. To remove the ‘sticky’ value, click on ‘Ctrl’ and the field name again. Sticky values override any default value specified for the field. However, sticky values are in effect only during the session in which they are being used. Closing the resource record closes the session, and the values that were set to be sticky no longer are. Default values, if specified, will become functional. 120 Chapter 9 Follow these instructions to use the rapid data entry interface from any resource or component record: 1. Select an RDE from the pull-down menu. The sample RDE screen shown above is the default RDE screen. See Chapter 15 for information on how to customize rapid data entry screens. 2. Enter desired data. The Level element and either Title or one of the Date elements is required. Instance type and at least one container type/number are necessary if locations are to be linked to the resource. 121 3. Press the button, or to enter another component, press the button. Instances Overview The descriptive information recorded for an archival resource or archival resource component may be applicable to one or more instances. For example, an archival component record that contains descriptive information for a scrapbook may be equally representative of both the original scrapbook and a digital object surrogate of the scrapbook. An archival resource record for a collection of correspondence may provide accurate description for both the original collection and a microfilm that reproduces the collection exactly. Therefore, any description record in the Toolkit may include data about multiple instances of the resource or component being described. Instances do not need to be declared at any level, but an instance must be declared if either a digital object is to be described or if container information is to be provided and linked to a repository location. If you do declare an instance then you must also provide container information for the instance, unless the instance is a digital object, in which case you must complete the top-level digital object record. Adding Analog Instances It is necessary to add an instance wherever you wish to create a digital object or input container information such as box and folder numbers. Use the following instructions to add one or more instances to a resource or resource component record. Digital object instances are discussed in the next chapter. 1. From the Basic Information tab, press the button. 2. Select the type of instance you wish to create. Note: The list of instance types is not authoritative, with the exception of the Digital object type. With the exception of that one term, you can use the Lookup Lists option to modify or add items to the list as you choose. It is recommended is that you devise a local authoritative list of instance types and apply it consistently in all cases. The Digital object type may not be deleted or modified as it activates a set of records for describing the files comprising a 122 Chapter 9 digital object, whether it is a surrogate of another instance or a born digital object. See Chapter 10 for instructions on describing digital objects. 3. Enter Container 1 Type. This is the type of container within which the instance is stored. For example, Box, Disk, Reel, and Volume are all potential values for this field. 4. Enter the container information, or enter a single Barcode. You may record a Container type, Numeric Indicator, or Alphanumeric Indicator for up to three nested containers (e.g. box and folder numbers; reel and frame numbers; folder and item numbers, etc.). Use a Numeric Indicator for any integer or decimal number used to identify the container (e.g. 12, 1.3). Use the Alphanumeric Indicator if a mixture of numbers and letters is used to identify the container (e.g. 1A, 3b). Be aware that alphanumeric indicators may not sort as expected; all “numbers” beginning with “1” will precede all “numbers” beginning with “2.” In addition, when a container has both a numeric and alphanumeric value, the numeric value will take precedence over the alphanumeric value on export. 5. Press to save the instance record or add another instance record. +1 to save the instance record and 6. Once you have recorded container information, you can assign a location to each container using the button. See Chapter 13 for more detailed instructions. 123 Note: The Rapid Data Entry screens allows for analog instance records and container information to be entered in a more efficient fashion. Caution! When working with analog instances, the CANCEL button will occasionally not function as expected and instead of canceling, save the input information. It is best to double-check data after canceling. The Names & Subjects Tab Use the Names & Subjects tab to add names as creator, source, or subject, and to add topical subject terms. See Chapters 11 and 12 for instructions. The Notes, etc. & Deaccessions Tab The Notes, etc. tab provides 29 notes that can be added at the resource level or at any component level. Notes generally include four elements, though certain notes contain more detailed data. These are described in the list of specific note types. 124 Chapter 9 1. Type. A specific designation for the type of note you wish to add. Note types, which are listed and defined below, correspond to specific DACS and EAD elements. 2. Note Label. A title for the note, output in the <head> element of an EAD finding aid and as a header for the note in print finding aids. If not defined, the note Type will be used. 3. Internal Only. Indication that the note is for repository use only. It will not be output in print finding aids, and will be omitted from EAD encoded finding aids or output with the audience attribute set for “internal.” Note: See the section below on Multi-part notes for a description of the Multipart checkbox. 4. Note Content. The content of the note itself. To enter multiple paragraphs, use two line breaks between each paragraph. You may also use the Wrap in tag feature to encode EAD tags such as title, <persname>, <corpname>, etc., within the text of a note. To do so, simply select the text to be encoded, and then select the appropriate tag from the drop-down list. It is not necessary to use the Wrap in tag feature to insert line breaks within notes. Note: The Bibliography and Index options include an Ead Ingest Problem field. This field is for EAD elements that did not map directly into a Toolkit note. The Toolkit inserts these elements into the Ead Ingest Problem area in order to place them as close as possible to where they belong. It is important to 125 check after EAD import if note information exists in these fields, and if so, move it to more appropriate areas. Note types 1. Abstract. A brief description of the context and content of the materials. DACS Reference: 3.1 EAD Tag: <abstract> Examples: Manuscripts and drawings of Theodor S. Geisel, author and illustrator known internationally as Dr. Seuss. The collection (1919-1992) includes early drawings, manuscripts and drawings for the majority of his children's books, scripts and storyboards for Dr. Seuss films, television specials and theatre productions, advertising artwork, magazine stories, speeches, awards, memorabilia, fan mail, Dr. Seuss products and photographs. Also included are videorecordings and cassette audiorecordings of UCSD events held to commemorate Geisel's life and work. 2. Accruals Note. Information about expected additions to the materials. DACS Reference: 5.4 EAD Tag: <accruals> Examples: Additional accruals are expected. 3. Appraisal Note. Information about appraisal, retention scheduling, or destruction of the materials. DACS Reference: 5.3 EAD Tag: <appraisal> Examples: Appraisal criteria for retention included the presence of handwritten notes. 4. Arrangement Note. Description of organization or arrangement of materials. 126 Chapter 9 DACS Reference: 3.2 EAD Tag: <arrangement> Examples: Organized into two series: Series 1. Biographical materials; Series 2. Correspondence. Arranged chronologically. 5. Bibliography. Information related to publications about or based on the materials. The bibliography is output in EAD as <bibref> tags, and therefore the note content for a bibliography consists of multiple items rather than a single large text field. To enter items in a bibliography, press the button and enter the data for that item. 127 button, or to enter another item, press the Press the button. DACS Reference: 6.4 EAD Tag: <bibliography> Examples: Annotated edition of letters in the collection published in The Massachusetts Historical Review, Spring 1997. 6. Biographical/Historical Note. Note for information about creator(s) of materials. DACS Reference: 10 EAD Tag: <bioghist> Examples: The Council of Provosts (COP) reviews academic files for appointment and promotion and makes recommendations to the Committee on Academic Personnel and academic departments. 128 Chapter 9 The COP assigns faculty members to individual colleges, reviews and coordinates student housing policies with the Vice Chancellor for Business Affairs, and forms part of the Teaching Assistant Allocation Committee, which reports to the Program Review Committee. The chair of the Council of Provosts serves on the Chancellor's Cabinet, the cabinet of the Vice Chancellor for Academic Affairs and the Program Review Committee. 7. Conditions Governing Access Note. Field for indicating restrictions on the material due to repository policy, donor specifications, legal requirements, etc. DACS Reference: 4.1 EAD Tag: <accessrestrict> Examples: Open to researchers without restriction. Tenure records closed for 75 years. 8. Conditions Governing Use Note. Restrictions on use of the materials (for example, reproduction or publication) that apply after access has been granted. DACS Reference: 4.4 EAD Tag: <userestrict> Examples: Materials in this collection are in the public domain. 9. Custodial History Note. History of ownership and custody of the materials. DACS Reference: 5.1 EAD Tag: <custodhist> Examples: The records were originally collected and maintained by the Hampshire County Art Ceramic Society, before being donated to the Hampshire County Historical Society in 1976. 10. Dimensions Note. Numerical data about the size of material being described. DACS Reference: 2.5 EAD Tag: <dimensions> 129 Examples: 5 x 20 inches 11. Existence and Location of Copies Note. Information about copies available in additional formats, for example microfilm, photocopies, or digital surrogates. DACS Reference: 6.2.5 EAD Tag: <altformavail> Examples: Correspondence also available on microfilm. 12. Existence and Location of Originals Note. Information about the existence and location of originals, in cases where copies are being described. DACS Reference: 6.1 EAD Tag: <originalsloc> Examples: Originals are in the Massachusetts State Archives. 13. File Plan Note. Information about any classification method used by the creator(s) of the materials. EAD Tag: <fileplan> Examples: The ACM used the following classification system to organize its publications: A. General Literature A.0 GENERAL Biographies/autobiographies Conference proceedings General literary works (e.g., fiction, plays) A.1 INTRODUCTORY AND SURVEY 14. General Note. Any information that does not fit in a more specifically defined note. DACS Reference: 7.1 130 Chapter 9 EAD Tag: <odd> Examples: Drawings humidified, flattened, and repaired. 15. General Physical Description Note. General information about the physical characteristics of the materials that cannot be accommodated in other fields or notes that capture physical description information. EAD Tag: <physdesc> Examples: Videocassettes in this series are recorded in Hi-8 format. 16. Immediate Source of Acquisition Note. Information about the direct source from which the materials were acquired. This could also include date, means of acquisition, and other information relevant to an acquisition. DACS Reference: 5.2 EAD Tag: <acqinfo> Examples: Donated by the Massachusetts Citizens League. 17. Index. List of terms and reference pointers compiled to enhance access to the materials being described. 131 The index is output in EAD as <indexentry> tags, and therefore the note content for an index consists of multiple terms and references, rather than a single large text field. To enter items, press the button. Enter the Item Value, and select the Item Type. The Reference field will automatically populate with note and component records currently in the AT for the resource. Select the Reference you wish to point to and enter any necessary Reference Text. Press OK to save the item, and repeat the process as needed. 132 Chapter 9 EAD Tag: <index> 18. Language of Materials Note. Indicate all languages represented in the materials. DACS Reference: 4.5 EAD Tag: <langmaterial> Examples: Materials primarily in English, with some publications in Arabic. 19. Legal Status Note. Status of the described materials as defined in legal statutes. EAD Tag: <legalstatus> Examples: Public records. 20. Location Note. Natural language expression of location, particularly in cases where location affects access to the materials. DACS Reference: 4.2 EAD Tag: <physloc> Examples: Materials stored off-site. Advance notice required for use. 21. Material Specific Details Note. Information unique to the material format that cannot be assigned to any other element of description. EAD Tag: <materialspec> Examples: Scale: 1:10000, Projection: Universal transverse Mercator projection 22. Other Finding Aids Note. Additional/external finding aids available to facilitate access to the materials. DACS Reference: 4.6 EAD Tag: <otherfindaid> 133 Examples: Item-level index of drawings available in the repository. 23. Physical Characteristics and Technical Requirements Note. Physical conditions or characteristics, or technical requirements that affect access to the materials. DACS Reference: 4.2, 4.3 EAD Tag: <phystech> Examples: Letterpress books are nearly illegible. System requirements: 48K RAM; Apple Disk II with controller; color monitor required to view this file. 24. Physical Facet Note. Specific information about a physical aspect of the materials, such as color, style, marks, materials, or techniques. EAD Tag: <physfacet> Examples: Lost wax process. 25. Preferred Citation Note. Suggested format for citing the materials. DACS Reference: 7.1.5 EAD Tag: <prefercite> Examples: Tom Bailey. While looking at your hair. MSS 0289. Mandeville Special Collections Library, UCSD. 26. Processing Information Note. Information about the arrangement, description, and preservation actions related to the materials. DACS Reference: 8.1.5 EAD Tag: <processinfo> Examples: Collection arranged and described by Joan Salisbury, 1999. 134 Chapter 9 27. Related Archival Materials Note. Information about related collections, either within or outside the repository. DACS Reference: 6.3 EAD Tag: <relatedmaterial> Examples: For more information about the academic career and personal life of Herbert John Davis see the Herbert John Davis Personal Papers in the College Archives. 28. Scope and Contents Note. Information about the materials, such as record types, dates covered, topics and persons represented, etc. DACS Reference: 3.1 EAD Tag: <scopecontent> Examples: The Jesús Colón Papers are a significant contribution to the study of Puerto Rican history and especially to the reconstruction of Puerto Rican community history in New York. They support research principally on such topics as organizational development and political participation among Puerto Ricans in New York. They also shed light on issues of employment and discrimination and Puerto Rican relationships to other groups in the city. The history of the labor movement in Puerto Rico as well as Puerto Rican involvement in labor and left organizations in New York are documented. The collection spans the years from 1901 to 1974, with the bulk of the papers dating from 1920 to 1970. There are letters, notes, drafts of published and unpublished works, reports, clippings, and photographs with a majority of the papers consisting of organizational records such as by-laws, lists, programs, and policy statements. 29. Separated Materials Note. Information about materials related by provenance that have been physically separated or removed. DACS Reference: 6.3 EAD Tag: <separatedmaterial> Examples: 135 Photographs have been transferred to the Pictorial Collections of The Bancroft Library. Creating multi-part notes Notes that include structured data such as lists and chronologies in addition to paragraphs are called multi-part notes in the Toolkit. Multi-part notes may consist of any combination of chronologies, definition lists, ordered lists, and text (paragraphs). Note: Selecting the multi-part note box will cause any data entered into the note field to disappear. Deselecting the box will cause the data to display again. To move data from the general note field to a text section in a multi-part note, copy the text, then select Multi-part and paste it into a text element. To create a multi-part note: 1. At the top of the note window, select Multi-part. 2. Select Chronology, List: definition, List: ordered, or Text from the Add part drop-down box. 3. Enter content. 136 Chapter 9 Note: The Chronology, Definition List and Ordered List options include an Ead Ingest Problem field. This field is for EAD elements that did not map directly into a Toolkit note. The Toolkit inserts these elements into the Ead Ingest Problem area in an attempt to place them as close as possible to where they belong. It is important to check after EAD import if note information exists in these fields, and if so, move it to more appropriate areas. For a chronology: 137 a. Press the button. b. Enter an Event Date. 138 Chapter 9 c. Press the button. d. Enter an Event Description. e. Press to save the event. f. Repeat if multiple events occurred on that date. g. Press to save the item. h. Repeat until the chronology is complete. i. Press to save, or to continue entering events. Note: The Label field and the option to Wrap in tag are not available when adding Events to a chronology due to restrictions in EAD encoding. 139 For a definition list: 140 Chapter 9 a. Press the button. b. Enter a Label and Item Value. c. Press to save the item or to continue entering items. d. Repeat until the list is complete. e. Press to save the definition list. 141 For an ordered list: 142 Chapter 9 button. a. Press the b. Enter an Item Value. c. Press to save the item. d. Repeat until the list is complete. e. Press to save the definition list, or to continue entering items. 143 For text: a. Enter Note Content. b. Press OK to save the text. Note: In multi-part notes, text sections will be output in EAD as paragraphs. For a note that only contains paragraphs, the text can be input into a note with two line breaks indicating paragraphs. 4. Once the proper sequence of parts has been completed, press OK to save the note. Creating links for EAD output 144 Chapter 9 Using the Wrap in tag feature for titles or notes, it is possible to establish links that will be output in EAD. Creating internal links 1. Within the appropriate note, select the text to be linked. 2. In the Wrap in tag drop-down box, select <ref>. 3. Select the appropriate actuate and show attributes from the drop-down lists. Optional. 4. Select a target from the list, which has been automatically generated from the contents of the resource record. The options will include components of the description and other notes. This selection is required to make the link operational. 3. Enter a title, which will be exported in a title attribute. Optional. 4. Press OK. Creating external links 1. Within the appropriate note, select the text to be linked. 2. In the Wrap in tag drop-down box, select <extref>. 145 3. Select the appropriate actuate and show attributes from the drop-down lists. Optional. 4. Enter the URL for the link in the href field. For example, http://www.archiviststoolkit.org. This entry is required to make the link operational. 5. Enter a title, which will be exported in a title attribute. Optional. 6. Press OK. Adding Deaccessions Deaccessions may be added at the resource level from the Notes etc. & Deaccessions tab. Because deaccessions may only be added at the highest level, resource component records do not include the “Deaccessions” section on the Notes, etc tab. See Chapter 8 for details on adding deaccessions. The Finding Aid Data Tab Because all of the information contained in this tab applies to the finding aid for the resource as a whole, this tab is only available through resource records; it is assumed that component records will inherit the information stored in this tab from the resource record. 146 Chapter 9 Elements contained in the finding aid data tab help in managing descriptive outputs, in particular EADencoded finding aids. Many of these fields are exported into the <eadheader> and may be used in the title page of print finding aids. 1. EAD FA Unique Identifier. A unique identifier for the finding aid within a repository context. EAD Tag: <eadid> Examples: mshm23 2. EAD FA Location. Online location of finding aid, in Universal Resource Identifier format. EAD Tag: URL attribute in <eadid> Examples: www.lib.utexas.edu/taro/hrc/00001.xml 3. Finding Aid Title. Name of the finding aid. EAD Tag: <titleproper> Examples: Inventory of the Harold Ramis papers, 1956-2006 147 4. Finding Aid Subtitle. Subtitle for the finding aid. EAD Tag: <subtitle> Examples: A Guide to the Collection 5. Finding Aid Date. Date the finding aid was first published. EAD Tag: <publicationstmt><date> Examples: April 2006 1998 6. Author. Person(s) responsible for writing the finding aid. EAD Tag: <author> Examples: Finding aid written by Samuel Sorenson. 7. Description Rules. Rules used to construct content of the description. Default options are AACR2, CCO, DACS, and RAD, but the repository can configure the list to include other options. EAD Tag: <descrules> 8. Language of Finding Aid. Language in which the finding aid is written. EAD Tag: <language> Examples: Finding aid written in English. 9. Sponsor Note. Name of agent(s) who funded the acquisition, arrangement, and / or description of the resource. EAD Tag: <sponsor> Examples: Encoding funded by a grant from The Andrew W. Mellon Foundation. 10. Edition Statement. Information about the edition of the finding aid. EAD Tag: <editionstmt> Examples: 148 Chapter 9 Second edition. 11. Series. Information about the series to which the finding aid belongs. EAD Tag: <seriesstmt> Examples: Observatories of the Carnegie Institution of Washington Collection 12. Revision Date. Date of last revision to the finding aid. EAD Tag: <revisiondesc><change><date> Examples: May 1998 13. Revision Description. Description of revision made. EAD Tag: <revisiondesc><change><item> Examples: Finding aid updated to include materials integrated from accession number 1998-37. 14. Finding Aid Status. Overall status of the finding aid. Options include Completed, In_process, Under_revision, and Unprocessed. List of options may be configured to the repository's preference. Note: Customized values may not contain spaces. EAD Tag: findaidstatus attribute in <eadheader> element 15. Finding Aid Note. Any information about the finding aid the repository wishes to record. Examples: Finding aid not yet updated to meet most recent guidelines. Merge and Transfer Two or more resource records can be brought together into a single record using the option in the Resource List Screen or using the. option (in postAT1.1 beta releases it was called “Extract Comp.”) from within a resource record. With appropriate planning for processing projects, these features will enable multi-staff to describe simultaneously different parts of the same resource. The parts can then be united, using either of these two features, in a final resource description. 149 Please note that the Merge and Transfer features are new tools subjected only to limited testing. We strongly remind you that 1) data should always be backed up before using these tools and 2) results should be checked immediately and thoroughly after using the tools. Please report any problems through the internal bug reporting function or by email to [email protected] When two resource records are combined using the function, the record that is merged into another record (not highlighted) will be deleted; the data it contained will become part of the record into which it was merged. function, the components When two resource records are combined using the are transferred to the other resource record and deleted from the resource to which they had belonged. The top level resource record from which the components are transferred will remain after the transfer is completed. a. Merge Similar to the name and subject merge function, when merging resource records, select two or more records and click the on the button. Next, you are prompted to select which record to merge into. 150 Chapter 9 It should be noted that all of the components, excluding only the top level resource record, of the resource to be merged will be appended to the resource targeted to receive the data. The top level resource record of the items being merged will not be moved and will be deleted upon completion of the merge. This cannot be undone, except by restoring a backed-up version of the database. After selecting the record to merge into, a message is displayed to verify that the user does want to merge the records as indicated. b. Transfer The Transfer function (in beta releases called “Extract Comp.”) is available from within a resource record and serves the same basic function of the merge option. The most notable 151 difference is that the resource record from which the components are transferred remains in the database. button brings up a window where resource records can be Clicking on the browsed and one or more can be selected for transferring their components to the open resource record. After these are selected, a message is displayed to verify that the user does want to transfer the records. As with the merge function, this cannot be undone, except by restoring the backedup database. If Yes is selected all of the components from the selected resources are pulled into the main resource record (from where “Transfer” was clicked). Unlike the function, the components function does not delete the top level resource record from which components are taken. 152 Chapter 9 Relationships with other records Managing resource locations, maintaining links with accession records, and adding creator, source, subject, and location information to resource records involves establishing relationships with records from other modules. 1. Accession. Resource description records may be linked to one or more accession records. These links are made through the appropriate accession record(s) for the resource. This link is automatically created when a Resource record is generated from an Accession record. See Chapter 7 for more details. 2. Creator(s). Adding creator information to the record involves linking the resource or component record to one or more name records. See Chapter 12. 3. Source(s). The source refers to the individual or organization from which the repository acquired the materials. As with creators, adding a source to the resource record involves linking to a name record. See Chapter 12. Note: A source may only be linked to a resource description record, not a resource component record. 4. Subject Name(s). As with creators and sources, adding a name as subject to a resource or component record involves linking to a name record. See Chapter 12. 5. Subject(s). Adding topical, geographic, genre and other content headings to resource and resource component records requires linking to one or more subject records. See Chapter 12. 6. Location(s). You may assign a shelf location for any container recorded for the resource. See Chapter 13. Resource reports You can generate many descriptive, administrative, and statistical reports drawn from the resource records. Chapter 14 provides instructions for generating reports. Examples of the following reports are available in the appendices: 1. Print Screen. Generates a list of resource records as displayed in the list screen. This option is only available through the list screen view. 2. Finding Aid. A narrative description and inventory of a collection’s content. 3. Resource record(s). Displays key fields for selected resource record(s). 4. Resource(s) restricted. Displays resource(s) that are restricted. Report contains title, resource identifier, level, date range, creator names, and a total extent number of the records selected that are checked as restrictions apply. 153 5. Resource(s) with location(s). Displays resource(s) with all specified location information. Report contains title, resource identifier, level, date range, and assigned locations. 6. Resource(s) with name(s) linked as creator. Displays resource(s) with name(s) linked as creator. Report contains title, resource identifier, level, date range, and creator name. 7. Resource(s) with name(s) linked as source. Displays resource(s) having name(s) linked as source. Report contains title, resource identifier, level, date range, and source name. 8. Resource(s) with name(s) linked as subjects and with subjects. Displays resource(s) with names linked as subjects and with linked subjects. Report contains title, resource identifier, level, date range, linked names and their functions, and linked subjects. 9. Resources list. Displays resource(s) in list fashion. Report contains title, resource identifier, level, date range, and creator names. 10. Resources with deaccession(s). Displays resource(s) with linked deaccession record(s). Report contains title, resource identifier, level, date range, linked deaccessions, creator names, and physical extent totals. 154 Chapter 10 Describing Digital Objects Overview The Archivists’ ToolkitTM enables the description of digital objects. Digital objects are digital content files that are accessible through a network by at least the repository’s staff, if not end users. The digital object may be a digitized version of materials contained in an archival resource or born digital materials collected as an archival resource by a repository. The digital object may be a simple object or a complex object. A simple object is one in which the intellectual content of the object is contained in one digital content file. A digital image of the Golden Gate Bridge is a simple digital object. So too, is a TEI transcription of Melville’s Moby Dick. A complex object is one in which the intellectual content is distributed over two or more digital content files. A digitized version of a 24-page diary would be a complex object since each page would be represented by a different digital image file. Complex digital files require structural metadata so that the parts of the whole will be presented in the right sequence to the end user. Finally, the Toolkit will produce an unbound or bound digital object. An unbound digital object is one in which the metadata record simply references the digital content file. A Dublin Core record that references a digital content file is an example of an unbound digital object. A bound digital object is one which the metadata and the digital content files are bound together through the use of a digital binder or wrapper. The Metadata Encoding and Transmission Standard (METS) is the digital wrapper probably best known in library environments. METS not only binds the metadata and digital content files, but supports expression of the structural relationship(s) existing among the content files. In sum, the digital object description record is designed to accommodate a broad range of repository needs and practices. The repository using this tool will benefit greatly if it develops a firm understanding for how it intends to manage and provide access to its digital objects and then formulates guidelines for producing the appropriate kind of digital objects. Digital object and digital object component records Two types of records, digital object records and digital object component records, are available for describing digital objects. A digital object record represents a unitary digital object, which may be a simple object or a complex object. Digital object component records are for expressing the structure of complex digital objects. They may contain metadata as rich as that in the digital object record or metadata that consists of little more than a label and a file version. The hierarchical interface As you describe a digital object and its component parts in the Toolkit, each new record will be reflected in the hierarchical interface. In the hierarchical view, a folder represents the digital object (United States Housing Authority in this instance), or any component which contains additional components. Components that have no children are represented with a bullet. The title, label, or date is displayed for every component record. To display the contents of a component, click on the + to the left of a folder, and the Toolkit will display all of the components within it. To collapse the list, click on the - to the left of an open folder. To display the record for any component, click on the title, label or date of the component. This helps you navigate directly to a given record for editing or review. 156 Chapter 10 Note: The graphical navigation displays for the Mac are slightly different, for example, an arrow graphic is used to depict a component with subcomponents instead of a +. Otherwise the navigational capabilities are the same. To insert a new component into the description, use the buttons found below the hierarchical interface. Keep in mind that the context for the following buttons is the component currently selected and displayed in the record window. The Add Child button opens a new component record that is hierarchically subordinate to the context record. The Add Sibling button opens a new component record that is at the same level as the context record, and that follows the context record within the sequence. The Delete Node button deletes the selected component and all of its children. If you wish to delete the component but not its children, you must reorder the components first, so that they are no longer part of the component you wish to delete. Basic steps for creating a digital object record 1. From the Resource Record or a Resource Component Record, select the button. 2. Select Digital Object from the drop-down list of instance types and click OK. Note: A digital objects record window will appear over the resources record window. 157 The following data will be copied from the resource or resource component record from which the digital object is created: Title, Date Expression, Date Begin, Date End, Language Code, all notes the repository allows for the digital object, and all linked name and subject records. A repository should modify, delete, or augment the copied data where pertinent. 3. Enter a Title. 4. Enter a Date Expression and/or Begin Date and End Date for the digital object. 5. Select the Object Type from the list of object types. 6. Save the record by pressing the If you are entering multiple records, the working in and open a new record. button at the bottom right corner of the window. button will save the record you are Caution! If the record does not include one of the required elements, either the Date Expression or the Date Begin and Date End fields, the Toolkit will indicate that the record cannot be saved because one or more of the required fields is not complete. The Title and Object Type fields are recommended and a warning message is displayed when they are not complete, however the record will be saved even if they are empty. 158 Chapter 10 Basic steps for creating a digital object component record 1. From an open digital object record or digital object component, press either the or component records. button. Siblings can only be added to digital object 2. Enter at the least either a Date Expression OR a Date Begin and Date End. 3. Save the record by pressing the If you are entering multiple records, the working in and open a new record. button at the bottom right corner of the window. button will save the record you are Caution! If the record does not include one of the required elements listed above, the Toolkit will indicate that the record cannot be saved because one or more of the required fields is not complete. The incomplete fields will be indicated in the error message. The required field(s) must be completed in order to save the record. 159 Digital object data elements The Basic Description Tab 1. Title. Recommended for digital object records. The title is copied over to the digital object record from the resource or resource component record to which the digital object record is linked. The title may be kept as copied or edited to something more specific and descriptive of the digital object. Examples: 1: Resource title: William W. Wurster / Wurster, Bernardi & Emmonds Collection Digital object title: United States Housing Authority (Valencia Gardens), San Francisco A group of materials from a collection presented as a single complex digital object and linked from the resource record. 2: Resource title: Oral History of John Arthur McGowan Digital object title: Oral History of John Arthur McGowan A single digital audiorecording linked to an item level resource record. 3: Resource title: Around South America Digital object title: Around South America A single digital videorecording linked to an item level resource record. 2. Language Code. Copied over to the digital object record from the resource or resource component record to which the digital object record is linked. Otherwise, select the code for the language that describes the digital object as a whole and, at the digital object component level, describes a particular component part of the digital object if it differs from the language expressed at the parent level. You may jump to the appropriate place in the list by typing the first few letters of the language you are seeking. Examples: English; eng French; fre 160 Chapter 10 3. Dates. A number of elements are available for recording the dates of creation of the materials. Dates can be entered in integer form (Date Begin, Date End), and/or as a free-text string (Date Expression). Integer dates are used to support computer processing of date information (e.g., searching). The date expression is designed for human readability, and allows for the use of qualifiers, such as “circa” or “before”. It is the date expression that displays to end-users. a. If you wish, you may only enter a Date Expression rather than using the fields for integer dates. However, doing so may limit your ability to support searching by date. DACS Reference: 2.4 Examples: Between 1925 and 1953 ca. 1911 1913-1998 b. Integer Dates. (Date Begin, Date End). Integer dates must be entered in years only; no days or months can be included. Enter inclusive dates using the Date Begin and Date End fields. The Toolkit will not allow you to save a record if a begin date is entered without an end date (e.g. a single date), or if the end date comes before the begin date. DACS Reference: 2.4 Examples: 1922 1900 4. Restrictions Apply. Yes/no field indicating if access restrictions apply to the materials being described. The Restrictions Apply element is applied to the digital object as a whole and not any component parts. If the digital object record is marked restricted, it is assumed that all component parts are to be restricted as well. 5. Object Type. Recommended for digital object records. A single descriptor for indicating the predominant type of the resource. The list of values is based on the MODS <typeOfResource> element, and thus cannot be modified. The Object Type is applied to the digital object as a whole only and not to the component parts. 6. Mets Identifier. The METS ID associated with the digital object. If a METS ID is present, the digital object as a whole will be listed as a single <dao> element in an EAD and this identifier will be referenced. 7. EAD DAO Actuate. A control element for indicating how a digital object produced as part of an EAD finding aid is to behave, that is, whether a link is enacted automatically or must be requested by a user. The Actuate attribute is used in conjunction with the Show attribute. The 161 default values are 1) none, meaning no action occurs with respect to the link; 2) onLoad, meaning the object is displayed automatically; 3) onRequest, meaning the object is displayed when a user requests it; and 4) other, meaning some other action occurs with respect to the link. 8. EAD DAO Show. A control element for indicating whether a digital object linked to an EAD finding aid appears at the point of the link, replaces the existing link, or appears in new window. The Show attribute is used in conjunction with the Actuate attribute. The default values are: 1) embed, the target resource displays at the point of the link; 2) new, the target resource appears in a new window; 3) none, no target resource displays; 4) other, some other action takes place with respect to the target resource; and 5) replace, the target resource replaces the local resource that initiated the link. 9. File Version. File versions are for recording the URI and the intended use of the digital content file(s) corresponding to a digital object record or digital object component record. See Adding File Versions below. The Names & Subjects Tab Use the Names & Subjects tab to add names as creator or subject, and to add topical subject terms to any component level of a digital object record. See Chapters 11 and 12 for instructions. The Notes Tab The Notes tab provides 20 notes that can be added at any component level of a digital object record. They are the same basic notes available to resource and resource component records, but do not include the structured data elements, like bibliography, that are available in resource and resource component records. See Chapter 9 for definitions of the notes. Adding file versions The file version record is for identifying the digital content files that correspond to the description recorded in a digital object record or digital object component record. The file versions recorded at the same node are understood to be equivalent in respect to content, in the way a tiff, jpeg, and gif can be different format versions of the same image. File versions that are not equivalent in respect to content should be recorded at separate and appropriately sequenced nodes if the digital object is to be rendered via a METS record with a “page” turner application. Use the following instructions to add one or more file versions to a digital object or digital object component description record. 1. From either the Digital Object Record or Digital Object Component Record, select the button. 162 Chapter 10 2. Enter the URI for the digital content file corresponding to the digital object record or digital object component record. 3. Select the appropriate Use Statement from the drop-down list. Note: The Use Statement is used in the METS record for indicating the use for which the digital content file is intended. Some files are intended only for preservation, e.g. a tiff or high quality audio file, while other files, because they require less bandwidth, are intended for use by end users. Such files could be a jpeg or a lower quality audio file. 4. If desired, select a value for DAO Actuate and/or DAO Show for the file version. 5. Save the record by pressing the button at the bottom right corner of the window. button will save the record you are If you are entering multiple records, the working in and open a new record. The record will not be saved unless both the URI and file Use Statement attribute values are recorded. Relationships with other records Managing digital objects requires linking other records to digital object and digital object component records. These include: 1. Creator(s). Adding creator information to the record involves linking the digital object or digital object component record to one or more name records. See Chapter 12. 2. Subject Name(s). As with creators, adding a name as subject to a digital object or digital object component record involves linking to a name record. See Chapter 12. 163 Note: A source may not be linked to a digital object or digital object component record. The source for a digital object is represented in the resource record to which the digital object record is linked. 3. Subject(s). Adding topical, geographic, genre, and other headings to digital object and digital object component records requires linking to one or more subject records. See Chapter 12. Digital object exports Several digital object exports can be generated from the Digital Object record including: 1. MARCXML record. Digital Object level catalog record output in MARCXML with references to the content file(s). 2. Dublin Core record. Digital Object level Dublin Core metadata record with references to the content file(s). 3. MODS record. Digital Object and Digital Object Component level descriptive metadata for objects with references to the content file(s). 4. METS record. A binding of the descriptive and structural metadata for Digital Object and Digital Object Component(s) with references to the content files. METS records can be exported with descriptive metadata in either the MODS or DC metadata standards. Note: When attempting to export METS file before saving the Digital Object, a message will appear. 164 Chapter 11 Managing Access Terms The Toolkit provides two different record types for managing controlled access points: subject records and name records. You may access subject and name records directly, by selecting the Names or Subjects functional area in the navigation menu. You may also access name and subject records within the context of an accession record or a resource record during the process of adding subject terms, source names, creator names, or subject names. This chapter describes procedures for working directly in the name and subject modules, which is useful for creating new subject terms and names, and for managing authorities. Information on procedures for adding names and subjects to accession and description records is available in Chapter 12. Managing name headings Overview Management and description of archival collections involves tracking relationships between the materials and various persons, families, and corporations that may have been sources or creators of the collection, or subjects within the materials. This section describes procedures for creating name authority records, recording non-preferred forms of the name, and establishing related names. Name records may consist of three distinct sections: name details and description, non-preferred forms and linked accessions and resources, and contact information. Only the name identity section is required. Name description is available for entering administrative histories or biographical notes of creators or donors. Contact information is primarily available for use with source names, but could be added to creator and subject names if deemed useful. You may also record non-preferred forms of a name. Name records in the Archivists’ ToolkitTM are designed to conform with the International Council on Archives’ ISAAR(CPF): International Standard Archival Authority Record for Corporate Bodies, Persons, and Families, 2nd ed. and to support the proposed standard Encoded Archival Context (EAC). Name records also accommodate creation of names according to rules established in standards such as AACR2 and DACS. It is beyond the scope of this user manual, however, to provide guidelines for creating headings according to these standards. Examples are given to illustrate use of Archivists’ Toolkit fields, but should not be seen as a replacement for rules for establishing forms of names. It is recommended that the names module be used, at the minimum, to record creators of materials. It is not necessary to record source or subject names in the Toolkit if you do not wish to manage those names in the application. Basic steps for creating a name record 1. From the Main Screen, select Names and press the button. 2. Select the type of name record from the drop-down list: Person, Corporate Body, or Family. 3. Select the Source from the drop-down list or indicate the Rules used to construct the name from the drop-down list. 4. Enter the Primary Name (for personal or corporate body name types) or Family Name (for a family name type). 5. Save the name record by pressing the button at the bottom right corner of the window. If entering more than one name record, save the record by pressing the 166 Chapter 11 button. This will save the current record and open a new name record screen so a subsequent record can be entered. Caution! The Toolkit will not save the record if the name is not unique. If the elements in the name identity section match those in another record for the same type of name, the Toolkit will indicate that the name record is not unique and prompt you to modify the record or cancel the process. If the record does not include the required elements listed above, the Toolkit will indicate that the record cannot be saved because one or more of the required fields is not complete. The incomplete fields will be indicated in the error message. The required field(s) must be completed in order to save the record. The Sort Name field is also required; the default record setting is to automatically generate the content of field. Note: Name records can also be created through accession and resource records. See Chapter 12 for details. Name data elements The Toolkit requires data elements only in the identity section of the name record. Additional identity elements not required by the Toolkit, such as description and contact data elements, can be found below the list of required elements. Within the sections listing name identity elements, the data elements are grouped according to type of name: person, corporate body, or family. Elements required by the Archivists’ ToolkitTM For all name types 1. Name type. An indicator of the type of name being described, whether personal, corporate body, or family. The content of this field is populated with a controlled list, so you may not add values to the field other than those listed below. In compliance with the EAD standard, conferences are considered to be corporate names. DACS Reference: 11.6 Options: Person Corporate body Family 2. Source. Required if a value is not entered in Rules. A code for the authority file in which the name has been established. DACS Reference: 11.26 167 Note: These terms are the default values entered into the name source lookup list as installed. Items may be added to this list by the repository, or in the process of importing legacy data. If variants of these sources are added during legacy data import, the list should be cleaned up using the Merge Items option in the Lookup Lists record. See Chapter 15 on customizing the Toolkit. Defaults: Local Sources (local) NACO Authority file (naf) NAD/ARKII Authority Database (nad) Union List of Artist Names (ulan) Note: If names are imported in accession or resource records, this field will contain the value ingest for those names. It is recommended that this value be changed to the correct term, and the ingest option removed from the lookup list. See Chapter 15 for more detail on how to edit lookup lists. 3. Rules. Required if a value is not entered in Source. The rules used to formulate the name entry. DACS Reference: 11.20 Note: These terms are the default values entered into the name rules lookup list as installed. Items may be added to this list by the repository, or in the process of importing legacy data. If variants of these rules are added during legacy data import, the list should be cleaned up using the Merge Items option in the Lookup Lists record. See Chapter 15 on customizing the Toolkit. Defaults: Anglo-American Cataloging Rules, 2nd ed. (aacr) Describing Archives: A Content Standard (dacs) Local (local) 4. Sort Name. The complete, concatenated version of the name containing all individual elements. This is the form as it will be shown within Archivists’ Toolkit displays and is exported in reports and standardized outputs such as MARCXML and EAD. By default, the Sort name is automatically generated as content is entered into the record. This feature can be activated or turned off through the Create Sort Name Automatically check box. If the box is selected, the Sort Name will be automatically generated as the record is created or edited. If the Sort name is not automatically created as you wish, the feature can be turned off and the Sort name can be edited manually. If you select the Create Sort Name Automatically check box again the Toolkit will overwrite the manually edited Sort Name and enter the system-generated name once again. Examples: Richardson, H.H., 1838-1886, (Henry Hobson) 168 Chapter 11 New York University. Graduate School of Arts and Science. For corporate names 1. Primary Name. The principal name for a corporate body, including organizations, government agencies, educational institutions, and conferences. (Additional fields listed below are used to cover other parts of the name.) DACS Reference: 9.8, 11.5, 14ff Examples: Bollingen Foundation Irvine Company National Organization for Women United States (for United States. Bureau of Insular Affairs.) University of California, San Diego (for University of California, San Diego. Academic Computing Services.) United States (for United States. Congress. Joint Committee on the Library.) For personal names 1. Primary Name. The family name, surname, or primary name of the individual. (Additional fields listed below are used to cover other parts of the name.) DACS Reference: 9.8, 11.5, 12.1-12.11 Examples: Churchill (for Churchill, Winston, Sir, 1874-1965) Ward (for Ward, Humphrey, Mrs., 1851-1920) Johnson (for Johnson, Carl F., fl. 1893-1896) Black Foot (for Black Foot, Chief, d. 1877) H. D. (for H. D., Hilda Doolittle, 1886-1961) John (for John II Comnenus, Emperor of the East, 1088-1143) Taj Mahal (for Taj Mahal (Musician)) For family names 1. Family Name. The last or surname for a family. (Additional fields listed below are used to cover other parts of the name.) DACS Reference: 9.8, 11.5, 12.29 Examples: 169 Hudson family (for Hudson family) Farquhar family (for Farquhar family (New York, NY)) Giroux family (for Giroux family (French)) Charron-Lecorre family (for Charron-Lecorre family (Winemakers)) Additional identity elements The identity section of the minimum identity record can be extended by recording data for any of the following elements. For corporate names 1. Subordinate 1. The name of an organizational unit within the entity named in the Primary Name field. DACS Reference: 9.8, 11.5, 14ff Examples: Bureau of Insular Affairs (for United States. Bureau of Insular Affairs.) Academic Computing Services (for University of California, San Diego. Academic Computing Services.) Congress (for United States. Congress. Joint Committee on the Library.) 170 Chapter 11 2. Subordinate 2. The name of an organizational unit within the entity named in the Subordinate 1 field. DACS Reference: 9.8, 11.5, 14ff Examples: Joint Committee on the Library (for United States. Congress. Joint Committee on the Library.) 3. Number. The number of a meeting. Examples: 2nd (for National Conference on Physical Measurement of the Disabled, 2nd.) 4. Qualifier. A term or phrase that distinguishes the corporate name from another with the same content. The qualifier may be a place term, date, or a generic descriptor. Examples: Osaka, Japan (for Expo '70 (Osaka, Japan)) 1966 (for Belgian-Netherlands Antarctic Expedition (1966)) 1857: Republican (for Minnesota. Constitutional Convention (1857 : Republican)) For personal names 171 1. Prefix. Any word associated with a name that in regular use would come before the name, such as Mr., Miss, etc. Examples: Mrs. (for Ward, Humphrey, Mrs., 1851-1920) 2. Rest Of Name. The given name of the individual along with middle name or initials if necessary to differentiate the name from other similar names. DACS Reference: 9.8, 11.5, 12.1-12.11 Examples: Winston (for Churchill, Winston, Sir, 1874-1965) Humphrey (for Ward, Humphrey, Mrs., 1851-1920) Carl F. (for Johnson, Carl F., fl. 1893-1896) 3. Title. Titles and other words associated with a name. It may include titles designating rank, office, or nobility, terms of address, and other words or phrases associated with the name. Examples include Sir, Saint, or terms used to identify the name and differentiate it from other similar names. DACS Reference: 9.8, 11.5, 12.1-12.11 Examples: 172 Chapter 11 Sir (for Churchill, Winston, Sir, 1874-1965) Chief (for Black Foot, Chief, d. 1877) Emperor of the East (for John II Comnenus, Emperor of the East, 1088-1143) Musician (for Taj Mahal (Musician)) 4. Suffix. Any word associated with a name that in regular use would come after the name. Examples: Jr. (for King, Martin Luther, Jr., 1929-1968) 5. Number. A number used to distinguish like names. It may include a Roman numeral alone or a Roman numeral and subsequent part of a forename, as in the example below. DACS Reference: 9.8, 11.5, 12.1-12.11 Examples: II Comnenus (for John II Comnenus, Emperor of the East, 1088-1143) 6. Dates. Birth, death, or flourishing dates used to distinguish the name from other similar forms. It may include a qualifier, such as b. for a birth date, d. for a death date, or fl. for flourishing dates. DACS Reference: 9.8, 11.5, 12.1-12.11 Examples: 1874-1965 (for Churchill, Winston, Sir, 1874-1965) d. 1877 (for Black Foot, Chief, d. 1877) 1886-1961 (for H. D., Hilda Doolittle, 1886-1961) 1088-1143 (for John II Comnenus, Emperor of the East, 1088-1143) fl. 1893-1896 (for Johnson, Carl F., fl. 1893-1896) 7. Qualifier. A word or phrase that distinguishes between two headings identical in all other respects. The qualifier may include a term of honor or address, a title of position or offices, initials indicating an academic degree or membership in an organization, or a geographical location. Generally used only when other information such as dates or fuller form of the name are not available or do not serve to differentiate the names. DACS Reference: 12.19 Examples: Notary (for Johannes (Notary)) F.I.P.S. (for Brown, George, F.I.P.S.) Captain (for Brown, George, Captain) 173 of Falls Church, Va. (for Baker, Miss, of Falls Church, Va.) 8. Fuller Form. A more complete form of the name than that found in the Rest Of Name field. Generally used to resolve conflicts with other similar names. DACS Reference: 9.8, 11.5, 12.1-12.11 Examples: Hilda Doolittle (for H. D., Hilda Doolittle, 1886-1961) 9. Direct Order. A checkbox used to indicate that an automatically generated Sort Name should be expressed with the Rest Of Name field followed by the Primary Name field (as opposed to Primary Name, Rest Of Name). For example, because the name in direct order box is checked, the Sort Name for the following record is Isaac ben Aaron as opposed to Aaron, Isaac ben. See DACS rules 12.812.9 for examples of names expressed in direct order. For family names 174 Chapter 11 1. Name Prefix. This is an article or preposition that comes before the surname. The Toolkit automatically sorts the prefix after the Family Name. To change the sort order, click off Create Sort Name Automatically and enter the name as it should appear. Examples: de (for de Beers) van (for James van Jones) 2. Qualifier. Terms used to distinguish two similar family names. They may include a statement of occupation, nationality, or geographic location. Use only if necessary to differentiate the heading from other like forms. Examples: New York, NY (for Farquhar family (New York, NY)) French (for Giroux family (French)) Winemakers (for Charron-Lecorre family (Winemakers)) Name description elements Using the following fields, you may add descriptive information to any name record, regardless of the type of record or relationship of the person, family, or corporation to the archival materials being described. Although the Toolkit does not require any of these fields, there are requirements associated with some of the data elements if they are utilized. 175 1. Description Type. (Required if a Description Note is provided.) An indication of the type of description being entered into the Description Note field. Defaults: Administrative History Biography 2. Description Note. A note providing biographical information in the case of personal or family names, or an organizational/administrative history in the case of a corporate body. DACS Reference: 10.13ff, 11.12 3. Citation. A bibliographic reference citing any sources for establishing the name record. DACS Reference: 11.26 Examples: Eichenwald, Kurt. Conspiracy of fools: a true story. New York: Broadway Books, 2005. Non-preferred Forms, Accessions & Resources This tab can be used to record non-preferred forms of names, as discussed in the next section, and also to list all the Accessions and Resources linked to a Name record. The linked Accession and Resource records cannot be opened through a Name record, and these links must be created through the Accession or Resource record. See Chapter 12 for more details on linking Name records to Accession or Resource records. Adding a non-preferred form of name The Archivists’ Toolkit also allows you to record non-preferred forms of names. The fields that form a non-preferred name mimic those outlined in the previous section. So, for example, a non-preferred form for a corporate body has fields for Primary Name, Subordinate 1, etc. You may add one or more non-preferred forms to any name record. Use the following instructions to add a non-preferred name: 1. From the name record, select the Non-Preferred Forms, Accessions & Resources tab 176 Chapter 11 2. Press Add Non-Preferred Form button and enter data into the non-preferred form template. Only Primary Name is required to save a non-preferred form. 177 In general, descriptions of name data elements given in the previous section are also applicable to corresponding fields in the non-preferred name template. The primary difference is that non-preferred forms do not follow rules such as AACR2 or DACS. 3. Save the name record, including the new non-preferred form, by pressing the button. If you are entering multiple records, the are working in and open a new record. button will save the record you Contact Information tab elements Use the following fields to record contact information for the person in question. Contact information can be added to any name record regardless of the type of name or the relationship of the person, corporate body, or family to the archival materials being described. This section of the name record 178 Chapter 11 was designed primarily to assist in managing contacts with records sources, such as donors, dealers, and institutional offices transferring records to the repository. 1. Salutation. Form of name used for greeting in writing or in person. Unlike the Name (see below), the Salutation may refer to the same entity identified in the name record, though in a different form. For example, a record for Wiget, Pamela may have the Salutation Ms Wiget, Pam Wiget, or Pam. 2. Address 1. Street or postal address for the person, corporate body, or family named in the identity section of the record. Examples: 112 Main St. P.O. Box 27 3. Address 2. Additional address information needed to record the address of the person, corporate body, or family named in the identity section of the record. Example: Unit 2 4. City. City or town in which the person, corporate body, or family is located. Examples: New York Ottawa 5. Region. State, province, etc. in which the city is located. The choice of whether to use a mailing code (NY) or full name (New York) is up to the repository. Examples: NY Ontario 6. Country. Name of the country in which the person, corporate body, or family is located. Examples: U.S.A. Canada 7. Mail Code. Zip code or other postal code used in the address. Examples: 10118 K1R 7A8 179 8. Phone. Primary telephone for contacting the entity named in the identity section of the record. Examples: 312-555-1212 +44 08457 300 700 9. Fax. Primary fax number for the entity. Example: 312-555-1213 10. Email. Primary email for contacting the entity. Example: [email protected] 11. Name. Name, in natural order, of a person who serves as the primary contact for the entity recorded in the name record. For example, this may be an individual in a corporate office, a family member or assistant for a personal name, or an individual member of the family for a family name. Example: Tom Jordan Contact notes Contact notes are used to record the interactions with contact persons. You may add any number of contact notes to a single name record, for example, to record and track multiple interactions with the entity over time, to record times the individual is available for picking up materials, or to indicate the relationship between a contact name and the entity. To add a contact note: 1. Click Add Note button from the Contact Info tab. 180 Chapter 11 2. Enter Note text. 3. Save the contact note record press the records, the record. button. If you are entering multiple button will save the record you are working in and open a new The following fields relate to contact notes. 1. Label. Any term or phrase that will help to identify the type of information found in the contact note. Examples: Phone Conversation Times of Availability Relationship 2. Note. Required. Note for clarifying data recorded in the contact fields, for maintaining a contact log, or any other information related to the entity and the act of contacting them. Examples: March 21, 1992. Discussed contents of Chancellor Scott's office files to be transferred to the archives, and necessity of box list with transfer. Call 1-5 p.m. 181 Tom Jordan is Amy Stanford's nephew. All contacts related to her papers should be directed to him. Relationships with other records The Archivists’ ToolkitTM uses name records to document sources and creators of collections, as well as persons, families, and organizations found as subjects in the materials. The Toolkit allows you to add names as sources to accession records and top-level description records. You can also add creator names and subject names to accession records and to all description records. See Chapter 12 for more information on assigning source, creator, and subject names. Name reports You may generate descriptive reports that draw upon data found in the name records and administrative reports useful in managing authorities. See Chapter 14 for specific instructions for generating reports. Examples of the following reports are available in the Appendices: 1. Print Screen. Prints the list of name records as they are displayed in the list screen. This report is only available through the list view. 2. Name record(s). Displays name(s) record information for selected record(s). Report shows all data contained in the Details and Contact Info record tabs. 3. Names list. Displays a list of name(s). Report contains sort name, name type and name source. 4. Names with accession(s). Displays name(s) and all accessions to which the name is linked. Report contains sort name, name type, name source and any accession records linked to that name. 5. Names with non-preferred names. Displays name(s) with all non-preferred name(s) for each name. Report contains sort name, name type, name source and any other non-preferred forms of that name. 6. Names with resource(s). Displays name(s) and all resources to which the name is linked. Report contains sort name, name type, name source and any resources records linked to that name. 7. Names with resource(s) and accession(s). Displays names and all resource(s) and accession(s) to which the name is linked. Report contains sort name, name type, name source and any resources records or accession records linked to that name. Managing subject (non-name) headings Overview The Toolkit allows you to create and manage six different types of subject access points: uniform titles, topical terms, geographical names, genre/form terms, occupations, and functions. Names that are 182 Chapter 11 related to resources or accessions as subjects should be entered as a name record, even if they have topical divisions. See Chapter 12 for information on adding names as subjects to accession and resource records. The Toolkit does not support thesaurus management through designations of broader terms, related terms, narrower terms, etc., but it does provide a scope note for recording local application guidelines. If you do not wish to add controlled access terms to descriptive outputs such as catalog records and finding aids to your repository, then it is not necessary to create and use subject records. Basic steps for creating a subject record 1. From the Main Screen, select Subjects and press the button. 2. Enter a new Subject Term. 3. Select the Type from the drop-down list: function, genre / form, geographic name, occupation, topical, or uniform title. 183 184 Chapter 11 4. Select the Source of the term (i.e., the controlled vocabulary from which the term derived) from the drop-down list. 5. Save the subject record by pressing the button at the bottom right corner of the window. If entering more than one subject record, save the record by pressing the button. This will save the current record and open a new subject term screen so a subsequent record can be entered. Caution! Subject records must be unique. If the subject term, type, and source of the new record match those fields in an existing record, the Toolkit will indicate that the record cannot be saved because the record is not unique. If the record does not include the required elements listed above, the Toolkit will indicate that the record cannot be saved because one or more of the required fields is not complete. The incomplete fields will be indicated in the error message. The required field(s) must be completed in order to save the record. Note: Subject records can also be created through accession and resource records. See Chapter 12 for details. 185 Subject data elements Elements required by the Archivists’ ToolkitTM 1. Subject Term. A descriptor that indicates the content or type of resource. Subject terms may describe topics, titles, places, events, geographical areas, occupations, or functions documented in the materials, or genres or forms that the records take. This field allows for simple terms and phrases, as well as modified terms and phrases entered with or without separation devices. The Toolkit does not, however, enforce consistency in the use of separation devices. Because the entire subject string is entered in as a single data element, it may be necessary to edit some outputs where individual subfields are important (for example, MARCXML). Examples: Hiking Playing cards Correspondence Hydroelectric power plants -- Snake River 186 Chapter 11 Owens Valley (Calif.) -- Fiction 2. Type. Indicates the type or category of a subject term: uniform title, topical term, geographic name, genre/form, occupation, or function. The content of this field is populated with a controlled list, so you may not add values to the field other than those listed below. In addition to the name type, the list provides the MARC equivalent for that type. For example, a geographic name corresponds to the 651 MARC field. In the Toolkit, names that are subjects are managed with name records, therefore a name type is not listed. Note: These terms are the default values entered into the subject source lookup list as installed. Items may be added to this list in the process of importing legacy data, but they should be removed using the Merge Items option in the Lookup Lists record. See Chapter 15 on customization. Defaults: Function (657) Genre / Form (655) Geographic Name (651) Occupation (656) Topical Term (650) Uniform Title (630) 3. Source. Provides the thesaurus in which the term is listed, giving the authority for the term. This field is populated using a controlled list derived from the Library of Congress list of codes for term, name, and title sources. Items may be added or deleted from the list to meet the needs of the repository. The option Local is available for cases when the term has not been derived from one of the thesauri provided in the list, or is based on local guidelines. Note: These terms are the default values entered into the subject source lookup list as installed. If you add terms to this list, you must follow the same format (title followed by code in parentheses) in order for the code to export into standardized outputs such as MARCXML and EAD. Items may be added to this list in the process of importing legacy data, but the lists should be cleaned up using the Merge Items option in the Lookup Lists record. See Chapter 15. Defaults: Art & Architecture Thesaurus (aat) Dictionary of Occupational Titles (dot) Form terms for archival and manuscripts control (ftamc) Genre Terms: A Thesaurus for Use in Rare Book and Special Collections Cataloging (rbgenr) 187 GeoRef Thesaurus (georeft) Getty Thesaurus of Geographic Names (tgn) Library of Congress Subject Headings (lcsh) Local (Local) Medical Subject Headings (mesh) Thesaurus for Graphic Materials (gmgpc) Additional elements 1. Scope Note. The subject record can be extended by recording a subject scope note. Use this field to indicate how a subject term is to be applied within your institution. It is particularly useful to state the scope of local terms. Examples: Use the more specific term "Landscape architecture drawings" rather than "Architectural drawings" for landscape design materials. Note: Also listed in the subject record are accession and resource records linked to the subject record. The linked accession and resource records cannot be opened through a subject record, and these links can only be created through the accession or resource record. See Chapter 12 for more details on linking subject records to accession or resource records. Relationships with other records Subject records exist to help the archivist and the researcher discover relevant archival materials. Toward this purpose, you can add subject terms to accession records and to resource records at any level (see Chapter 12 for instructions). Subject reports You can generate descriptive reports that draw upon data found in the subject records and administrative reports useful in the management of authorities. See Chapter 14 for specific instructions for generating reports. Examples of the following reports are available in the Appendices: 1. Print Screen. Prints a list of subject records as they are displayed in the list screen. This report is only available through the list view. 2. Subject Record(s). Displays selected subject record(s). Report lists subject term, subject term type, and subject source. 188 Chapter 11 3. Subject(s) with linked accession(s) and resource(s). Displays subject(s) with linked accession(s) and resource(s). Report contains sort subject term, type, source and any resource records and accession records linked to that subject. Merging access terms The Toolkit offers a Merge feature for subjects and names, which is useful for management and clean up of your authority lists. Merging two terms together results in the deletion of the undesirable or redundant heading, and all of its linked accession and description records being linked to the more appropriate heading. You might use this feature to perform clean up if importing data has resulted in redundant records or if you find that related terms have been used inconsistently. To merge two name or subject records: 1. Open the Names or Subjects list screen. 2. Select the two or more terms that you wish to merge. 3. Press the button. 4. The Toolkit will prompt you to select the term you wish to merge into. Select a term in the list. This will be the record that remains in the system: the other term will be merged into this record. All links from the other record will now be linked to this record. 189 5. Press Select. 6. You will be asked to verify that you wish to merge the records into the record you selected. Press Yes. If a number of records are linked, the operation may take a few seconds. If there are few or no records linked, the process will take place immediately. Caution! Merging subjects and names will create changes in any records linked to the term that is to be merged. The Toolkit will not alert you to those records that will be changed. If you wish to identify the records that will be changed, complete a search for 190 Chapter 11 the term to be merged in the Accessions and Resources functional areas to retrieve a list of the linked records. 191 Chapter 12 Linking Name and Subject Records to Accession and Resource Records The primary purpose of name and subject records is to amplify source, creator, and content information found in accession and description records. Within these records, the Archivists’ ToolkitTM provides features for adding subject terms, source names, creator names, and subject names. When a needed subject term or name does not yet exist in the Toolkit, it can be created directly from within the accession or description record while in the process of assigning a source, creator, subject name, or other subject term to that record. This chapter describes procedures for adding terms to accession and resource records, and for creating new subject terms and names. See Chapter 11 for instructions on creating new terms directly within the Names and Subjects functional areas. Adding names Overview The accession and description records include command buttons for assigning name terms to these records, and for removing a name term that was previously assigned to the record. Once a name term is assigned, it will appear in the accession or description record and in any accession or description reports that make use of name terms. For example, the name term will be included in an accession record output. Types of name relationships There are three options for assigning a name to an accession or resource record. You may add the name as a source for the materials, as a creator of the materials, or as a subject documented in the materials. In addition to these functions, you may further refine information about the entity’s relationship to the materials by recording a role for a creator, source, or subject, and by adding a form subdivision to a subject. Neither of these two options is required. The function, role, and form fields do not become part of the name record, but instead are part of the link between the name record and the description or accession record. 1. Name Link Function. The function of the name, either creator, source, or subject, in relation to this accession, description resource, description component record, digital object record, or digital object component record. The same name can be linked multiple times to an accession, description, or component record, as long as the function, role and form division is different. For example, you could link the name Smith, Jane to an accession record as the source, the creator, and the subject of the materials. Note that names as sources may only be assigned to accession and description resource records, not description component records. If desired, sources for descriptive components may be recorded in the Immediate Source of Acquisition note. 2. Role. An indication of what role the name has in regard to its function as creator, source, or subject. Examples include identifying a source as a donor or a dealer, or identifying a creator as collector, a director, or an illustrator. The content of this field is populated with a controlled list that is drawn from the list of MARC relator codes. You may not add other values to the field. The roles available for creator and subject are different than the roles available for source. 3. Form Subdivision. This field is for topical, geographical, chronological, or form descriptors, singly or in some combination, that modify a name assigned as a subject. The Toolkit does not enforce consistency in the use of separation devices where combinations of descriptors are used. Examples: Correspondence (for Salk, Jonas--Correspondence.) Finance, Personal (for Hudson, Erasmus Darwin, 1806-1880 -- Finance, Personal.) Criticism and interpretation--History--18th century (for Shakespeare, William--1564-1616--Criticism and interpretation--History--18th century.) Assigning names 1. From the Names & Subjects tab of an accession or resource record, press the button. The Toolkit will display a list of names available. 194 Chapter 12 2. To retrieve the desired name, scroll through the list or begin to type the desired name in the Filter box. As you type, the list will be filtered to include only those terms containing the character string entered into the Filter box. a. If the desired name does not appear, and if you have the proper permissions, you may create a new name record. Press the Create Name button, which will cause the Toolkit to prompt you for the type of name record, and then open a blank name record. b. Follow the instructions in Chapter 11 to create the new record. When you have saved the record, the Toolkit will return to the Name Lookup window, where the new name has been added to the list. c. Select a Name Link Function for the name: Creator, Source, or Subject. This step is required. 195 3. If the desired name(s) appears in the list, select the name and then choose a Name Link Function for the name(s): Creator, Source, or Subject. This step is required. Note If you are selecting multiple names, they must be linked with the same Name Link Function. 4. If you wish, select a more specific role for the creator from the Role field. The Role will be applied to all names, if more than one is selected. 5. For names as subjects, you may also choose to add a Form Subdivision. The Form Subdivision will be applied to all names if more than one is selected. 6. Once you have selected a name and a function, and have identified the role and subdivision (if so desired), press the button, or double-click the name in the list. The name(s) will be added to the open accession or resource record. 7. Repeat the process of selecting names as often as necessary, and then press the button to return to the accession or resource record. Editing name links You can edit aspects of a name link, such as function, role, or subdivision, even after the name has been added to an accession or resource record. 1. Retrieve and open the accession or resource record that contains the name. 2. From the Names & Subjects tab of an accession or resource record, select the name whose link is to be modified. 3. Press the button or double click on the name. The Toolkit will open a window showing the current settings for the Name Link Function, Role, and if applicable, Form Subdivision. Make the desired changes to these elements. 196 Chapter 12 4. Press OK to save the new linking information. Removing names Once a creator, source, or subject name has been successfully assigned to an accession or description record, it can easily be removed. 1. Retrieve and open the accession or description record that contains the incorrect name. 2. From the Names & Subjects tab of an accession or resource record, select the name whose link is to be modified. 3. Press the button. 4. The name will no longer be included in the name list. Note: Removing a creator, source, or subject name from an accession or description record removes that specific relationship between the two records, but does not remove other types of name relationships with the record. For example, if an accession shares a source and a creator, removing the creator from the record does not remove the same name from the source list. Removing a creator, source, or subject name does not delete the name record itself. Adding subjects Overview The accession and resource record templates include command buttons for assigning subject terms to these records, and for removing a subject term that was previously assigned to the record. Once a subject term is assigned, it will appear in the accession or description record and in any accession or description reports that make use of subject terms. For example, the subject term will be included in MARCXML and EAD outputs for that resource record. Assigning subjects Use the following instructions for assigning subjects from either an accession or resource record. Remember, subjects can be added at any level of description. 1. From the Names & Subjects tab of an accession or resource record, select the button. The Toolkit will display a list of subject terms available. 197 2. Scroll or filter through the list of subjects to determine if the subject term is currently in the Toolkit button, or 3. If the subject is in the Toolkit, select the subject term and click on the double-click on the term to link the subject to the accession or resource record. If the desired term does not appear, and if you have the proper permissions, you may create a new term. Press the button, which will open a blank subject record. 4. Follow the instructions in Chapter 11 to create the new record. When you have saved the record, the Toolkit will return to the Subject Term Lookup window, where the new term will now appear in the list. 5. Repeat the process of selecting terms as often as necessary, and then press the button to return to the accession or resource record, or select multiple terms and add them at the same time. Removing subjects 198 Chapter 12 Once a subject has been successfully assigned to an accession or resource record, it can easily be removed if you decide that it does not appropriately represent the materials. 1. Retrieve and open the accession or resource record that contains the subject term. 2. Select the term(s) to be removed in the list of subject terms in the record. 3. Press the button. 4. The term will no longer be included in the subject terms list for that record. Note: Removing a subject term from an accession or resource record removes the relationship between the two records, but does not delete the subject record itself. 199 Chapter 13 Creating and Assigning Locations Overview The locations function of the Toolkit is for recording shelf location(s) of the materials in an archival resource or accession record. Because the accession record may not provide details on containers within the collection, the process for assigning locations to accessions is different than assigning locations to resource records. It is possible, however, to supply multiple locations for accessions and for resources, and to identify specific containers within each location. The location record is not intended to support tracking the movement of archival accessions and containers from shelf to reading room and back or from shelf to exhibition area and back. It is assumed the locations linked to the accession or to the container are the permanent locations of the materials when they are not in use for any purpose. You can, of course, modify the location if necessary, for example if the collection is being shifted or the materials are being relocated after processing. It is possible to define locations in one of three ways: as space managed by your repository, as a barcode used to identify a unique location, or as a classification number used to signify a location. When defining space, you may choose to be specific or general based on your needs for location management and retrieval. Elements defining space are somewhat hierarchical, in that you can define a building, floor, room, area within a room, and specific stack coordinates. If you have a single location in which your archival resources are housed, you may simply wish to record the building and one or two stack coordinates. If you have multiple spaces within the same building, you may wish to record more specific details about each space. Creating location records when you first configure the Archivists’ ToolkitTM is recommended. The Batch Add feature, used for creating many location records at once, is described later in this chapter. Basic steps for creating a location record 1. From the Setup menu, select Locations. 202 Chapter 13 2. Press the button. 3. Enter a Building name and Coordinate 1 Label. or 4. Enter a Barcode. or 5. Enter a Classification Number. button at the bottom right corner of the 6. Save the location record by pressing the window. If entering more than one location record, save the record by pressing the button. This will save the current record and open a new location screen so a subsequent record can be entered. 203 Caution! If the record does not include the required elements listed above, the Toolkit will indicate that the record cannot be saved because one or more of the required fields is not complete. The incomplete fields will be indicated in the error message. The required field(s) must be completed in order to save the record. Location data elements Elements Required by the Archivists’ ToolkitTM Note that either Building and Coordinate 1 Label, or Barcode, or Classification Number are required. 1. Building. Enter the name of the building in which the location exists. Examples: 204 Chapter 13 Fales Library West Annex Five Colleges Depository 2. Coordinate 1 Label. The first of three available fields for identifying locations within the stacks or other storage units. The Coordinate 1 Label field is designed to describe either a Coordinate 1 Numeric Indicator or a Coordinate 1 AlphaNumeric Indicator. In the examples below, the first term (i.e. Range, Flat File, Bin) serves as the Coordinate 1 Label, and the second as the Coordinate 1 Numeric Indicator. If an alphanumeric indicator is used, the Coordinate 1 AlphaNumeric Indicator field should be used. Examples: Range 12 Flat File 5 Bin 4c 3. Barcode. The number of the barcode assigned to the materials. Examples: 41822000182301 4. Classification Number. The classification number assigned to the materials. This is used only if the classification number is a device for shelving and locating materials, rather than simply a means of uniquely identifying the materials. Examples: LD7093.37 .B33 LD7092.8 Adams Additional Elements The location record can be extended by recording data for any of the following data elements. The choice of which location elements to record will depend on the nature of the space(s), the need for space management, and complexities of retrieval in your repository. 1. Floor. The floor on which the location exists. Examples: Basement Level A Floor 24 2. Room. A number or other identifier for the room. Examples: 2602 205 Tab Filer Memorial Storage Area 3. Area. The location's area within the room. Examples: Oversize storage area 4. Coordinate 2. The second of three specific coordinate labels for identifying locations within the stacks or other storage units. The Coordinate 2 Label field is designed to describe either a Coordinate 2 Numeric Indicator or a Coordinate 2 AlphaNumeric Indicator. In the examples below, the first term (i.e. Bay, Drawer) serves as the Coordinate 2 Label, and the second as the Coordinate 2 Numeric Indicator. If an alphanumeric indicator is used, the Coordinate 2 AlphaNumeric Indicator field should be used. Examples: Bay 3 Drawer 5a 5. Coordinate 3. The third of three specific coordinate labels for identifying locations within the stacks or other storage units. The Coordinate 3 Label field is designed to describe either a Coordinate 3 Numeric Indicator or a Coordinate 3 Alpha Num Indicator. In the example below, the first term (i.e. Shelf) serves as the Coordinate 3 Label, and the second as the Coordinate 3 Numeric Indicator. If an alphanumeric indicator is used, the Coordinate 3 Alpha Num Indicator field should be used. Examples: Shelf 4 6. Repository. Select the repository name from the drop down list. Examples: University of Massachusetts Amherst Scripps Institution of Oceanography Archives Using Batch Add to generate multiple location records Batch Add allows you to automatically generate a number of location records by providing a range of coordinates. 1. From the Setup menu, select Locations. 206 Chapter 13 2. Press the button. 3. Enter the Building, Floor, Room, and/or Area as appropriate. Building is required. 4. Enter the Label for Coordinate 1 and the Start and End values for the series of records you wish to create. For example, to automatically create records for Ranges 1-12, enter the Label Range, the Start value 1, and the End value 12. The data values must be either numeric or alphabetical when expressing a range for a location coordinate. Alphanumeric numbers must be entered individually. 5. Repeat step four for Coordinate 2 and Coordinate 3 as needed. 6. Press the button. 7. The Toolkit will automatically generate the appropriate records, and will return a message indicating the number of records it created. For example, if you entered data for Ranges 112, Bays 1-5, the Toolkit would create sixty location records. 8. Repeat the process as needed, then press the Creation window. button to close the Batch Add Assigning locations Overview You can assign locations to accessions or resources. Assigning locations to accession records 207 1. Open the desired accession record. 2. From the Basic Information tab, press the button. 3. The Toolkit will display a window listing all locations available for your repository. Select the location to be assigned. 4. If desired, enter Note/Container information to help track which specific containers in the accession are housed in the location. Examples: Boxes 1-3 Box 4 Oversize materials 5. Press the button. You will see the location listed in the accession record. 208 Chapter 13 6. Repeat the process until all locations have been assigned. You may also create a location record from this screen by pressing the location record. button, which will open a new 7. Once all locations have been assigned to the accession record, press button. Assigning locations to containers in described resources 1. Open the desired resource or resource component record. 2. Press button. 209 3. The Toolkit will display a window listing all containers recorded for the resource and all locations available for the repository. Select one or more containers. 4. Select the location to be assigned to the selected containers, and press the button. You will see the location listed next to the container(s) in the Containers window. 210 Chapter 13 Note: Locations cannot be batch added through this screen. Batch additions must be done through the Locations option available through the Setup menu. 5. Once all locations have been assigned to the resource record, press the button. Removing location links 1. Highlight the container with the location link to be deleted and press the button. 211 2. The Remove Linked Location dialog box will open. 3. Click ‘yes’ and the container will no longer be linked to a location and the ‘no location assigned’ will be displayed. Removing locations 1. From the Setup menu, select Locations. 2. Select the desired location record and press the button. 212 Chapter 13 3. The record will no longer appear in the list of locations. Note: It is not possible to delete a location record that is linked to accessions or containers. If the location record you wish to delete has been assigned to an accession or location record, the Toolkit will inform you that the record cannot be removed. You can use the Search tool to locate the record(s) assigned to the location, and reassign them to new locations as necessary. Location reports You can print the locations list or a shelf list by pressing the button at the button of the Location Management screen. Chapter 14 provides instructions for generating reports. Examples of the following report is available in the appendices: Location shelf list/locations with resource or accession record(s). Displays a list of locations, indicating any accessions or resources assigned to defined locations. 213 Chapter 14 Generating Outputs Overview The Toolkit produces two distinct types of outputs: reports and exports. Reports include both administrative and descriptive products, such as lists of acquisitions for a given time period or a collections guide. Exports are typically, but not exclusively, XML files conforming to standards such as EAD, METS, and MARC. The Archivists’ Tookit is designed to produce data exports, or metadata records, such as EAD, MARCXML, MODS, DC, METS. The application does not, however, provide the means to manage, access, or display those export products. It is assumed the exports will be added to external access delivery systems such as an EAD database, an Integrated Library System (ILS), or a METS database where the objects can be searched and displayed to end users. However, the data for each record should be stored and edited in the Toolkit Generating reports Overview The Toolkit allows you to print an individual screen or record, to generate a report containing data from all records, or to produce a report that draws upon data appearing in a selected subset of records. When generating reports for multiple records, the output reflects the result set as ordered and displayed in the list screen for a specific functional area. A complete list of reports, along with their description and a sample of each report, is available in the appendices. Reports can be generated from list screens, using the button or from individual records using the button. Using the Reports button from the list screen allows for the creation of reports from a group of records, while generating reports from an individual record produces a report for only that single record. The Reports drop-down list in the menu / command zone provides the option to generate a repository profile; this will be discussed later in this chapter. You may print, preview, or create a file of the report. To preview a file, the Select Output field must be set to “Printer.” File options are: PDF, HTML, RTF, Excel, or CSV. Each version differs in its usefulness. Currently the PDF, RTF, and HTML options produce the most ready-to-use reports. The RTF option is useful for bringing the report information into MS Word for editing. The Excel format is helpful for manipulating the report in Excel. For tabular reports, such as Print Screen, the CSV option is useful to extract delimited data. For producing finding aids, one can choose between a PDF rendering or HTML encoding of the EAD file. Generating a list screen You may print the contents of any list screen. When printing list screens, the output will match the content, order, and sorting of elements found on the screen. Use the Configure Application option (under the Setup menu) to add or omit content from the list. Use the sort functions to reordered the records. To print a list screen: 1. From any list screen, press the button. 2. Select Print Screen in the Select Report drop-down list. 3. Enter any text you wish to appear in the Report Header. 4. Select Output for the report. Options are: Printer PDF, HTML, RTF, Excel, or CSV files. 5. Press the button to print or the button to preview the file. Generating reports for a single record You may print the contents of any individual record by pressing the button. To generate a report for a single record: 216 Chapter 14 1. From any record press the Reports button. 2. Select the type of report desired. For example, to print a name record, select Name Record(s). 3. Enter any text you wish to appear in the Report Header. 4. Select Output for the report. Options are: Printer, PDF, HTML, RTF, Excel, or CSV files. 5. Press the output. , , or button depending on the desired Generating reports for multiple records Overview Any report can be generated for a record set of more than one record. To print a formatted report containing data from multiple records, you must first create the list of records to be output into the button to generate a report of all records of a given report. You can do this by using the type. Or, you can generate a report for multiple records by using the filter or search options to create a subset. For example, using the search tool, a list of accession records can be generated for all records with an accession date between January 1, 2006 and December 31, 2006 in order to generate a report calculating the year's acquisitions. The list screen and search editor can be customized using the configuration tools if necessary to provide the desired search and sort options. See Chapter 15 for customization instructions. Generating a records set To print multiple records: 1. From any list screen, use the button and filter or search options or select the desired records with the Shift/Ctrl keys, then use the right-click mouse function and highlight the list selected records option to create the set of records you wish to output. 217 2. Use the buttons at the top of each column to sort the list in the order you wish the report to be generated. 3. Press the button. 4. The Select Report field provides a list of reports available for the functional area. Note: A list of reports for each functional area, along with a description and a sample of each report, is available in the appendices. 5. Enter any text you wish to appear in the Report Header. 6. Select Output for the report. Options are: Printer, PDF, HTML, RTF, Excel, or CSV. 7. Press the , , or button. Generating a finding aid To generate a finding aid: 1. Select the resource record(s) from which you wish to generate a finding aid(s). 2. Click on the button. 3. Select Finding Aid in the Select Report drop-down list. 218 Chapter 14 4. Three options appear: Suppress components and notes when marked “internal only”? Indicate if you wish to suppress components and notes when the status is set to “Internal.” If checked, the internal notes will not be exported. If left unchecked, the internal notes will be exported with the audience attribute set to “internal.” Include DAO’s in output? Indicate if you wish to include <dao> elements in your output. This is only relevant when there are digital object records linked to the description. If not selected, the Finding Aid will not include any <dao> elements. If selected, the <dao> will reference the METS identifier where there is one. Where there is no METS identifier, the <dao> will reference the file versions, their file use statements and when present the title, date and label of the associated node. Select Output to generate the finding aid as a PDF file or an HTML file. The PDF file is designed for immediate printing, whereas the HTML file is designed for uploading to the web Options are pdf file (default) or html file 5. Add a Report Description, if desired. button when generating a HTML file or press the 6. Press the button when generating a PDF file. The Preview functionality is not available for finding aids. Generating a repository profile A Repository Profile provides a quick snapshot of the repository’s holdings listed in the Toolkit. Statistical information about Resources, Accessions, Extent of Holdings, Name Authorities and Subject Authorities is compiled within the report. To generate a repository profile: 1. From the Reports menu, select Generate Repository Profile. 219 2. The Toolkit presents a progress window as the report is generating. Upon completion, the JasperViewer window will appear with a preview of the Comprehensive Repository Profile report. This preview can then be printed or saved. Note: Repository profiles can take a long time to generate. 220 Chapter 14 Customizing reports The Toolkit allows customized reports to be added to the application environment however customization of reports is not possible within the Toolkit interface. For more information on using customized reports, see Chapter 15. Exporting data Overview The Toolkit supports export of data from resource description and digital object description records. For archival resources, EAD and resource-level MARCXML (e.g., collection-level MARCXML records) can be exported. For digital objects, METS, MARCXML, MODS, and Dublin Core can be exported. For each type of export, a map of the AT field to export field is located in the appendices. 221 Exporting data with mixed content Mixed content is data that contains both text and mark-up. The Toolkit allows the existence of mixed content in many of the description elements. This is because mixed content is allowed in EAD, currently the primary standardized output for archivists in the United States. The Toolkit's model for mixed content is, indeed, based on EAD and therefore not relevant to other descriptive outputs. For this reason, mixed content is only retained for EAD exports. It is stripped when exporting MARCXML, METS, MODS, and Dublin Core. Users should be aware, however, that mixed content that is not well-formed XML may not be stripped accurately. More information about mixed content can be found in Chapter 5. Exporting standardized metadata for archival resources Overview The Toolkit provides the ability to export EAD and MARCXML for archival resources. EAD export will include all data in the resource description and any linked resource component records. There is also the option of exporting any linked digital object descriptions as <dao> elements within the EAD. MARCXML export will only export data from the resource level description. It will include a link to an online finding aid if noted in the resource description but not to any digital objects linked to the resource. Exporting EAD To export EAD from a resource description: 1. Open the resource description to be exported. 2. Press the button. 3. Indicate if you wish to output numbered component levels (<c01> as opposed to <c>). Note: EAD only defines twelve component levels. The Toolkit does not support outputting numbered component levels exceeding twelve levels. 4. Indicate if you wish to suppress components and notes when the status is set to “Internal.” If checked, the internal notes will not be exported. If left unchecked, the internal notes will be exported with the audience attribute set to “internal.” 5. Indicate if you wish to include <dao> elements in the output. This is only relevant when there are digital object records linked to the description. If left unchecked, the EAD will not include any <dao> elements. If selected, the <dao> will reference the METS identifier where there is one. Where there is no METS identifier, the <dao> will reference the file versions and their file use statements, and output the file versions listed according to their sequence. 6. Open the folder where the file is to be saved, and indicate the name of the file (usually the same as the EAD Identifier) 222 Chapter 14 . 7. Press Save to export EAD. 8. A progress window will appear while the EAD is generating. An Export Log will appear at the completion of the process and list the export time and output file(s). Export logs also include options to print or save the log file. Batch Exporting EAD EAD can also be exported in batches rather than singly. To export a batch of EAD files: 223 1. Select the resource records from which the EAD files should be generated. A batch of EAD files can only be created from the Resources list view. 2. Press the button. 3. Indicate if you wish to output numbered component levels (<c01> as opposed to <c>). Note: EAD only defines twelve component levels. The Toolkit does not support outputting numbered component levels exceeding twelve levels. 4. Indicate if you wish to suppress components and notes when the status is set to “Internal.” If checked, the internal notes will not be exported. If left unchecked, the internal notes will be exported with the audience attribute set to “internal.” 5. Indicate if you wish to include <dao> elements in the output. This is only relevant when there are digital object records linked to the description. If left unchecked, the EAD exports will not include any <dao> elements. If selected, the <dao> will reference the METS identifier where there is one. Where there is no METS identifier, the <dao> will reference the file versions and their file use statements, and output the file versions listed according to their sequence in the digital object record. 6. Open the folder where the files are to be saved. 7. Press Save to export EADs. 8. A progress window will appear while the EADs are generating. An Export Log will appear at the completion of the process and list the export time and output file(s). Export logs also include options to print or save the log file. 224 Chapter 14 Exporting MARCXML Note: The granularity of certain fields, such as subject headings, is not the same in the Toolkit as in MARCXML. In addition, the Toolkit's mapping of certain elements into MARC may differ slightly from your repository's existing practices. Therefore, you may wish to edit the Toolkit's MARCXML after it has been exported from the system. See the appendices for export mapping from the Toolkit to MARCXML. To export MARCXML from a resource description: 1. Open the resource description to be exported. 2. Press the button. 3. Indicate if you wish to suppress components and notes when the status is set to “Internal.” If “Withhold data marked ‘internal only’” is selected, the internal notes will not be exported. If left unchecked, the internal notes will be exported. 4. Open the folder where the file is to be saved, and indicate the name of the file. 225 5. Press Save to export MARCXML. Batch Exporting MARCXML To batch export MARCXML from a resource description: 1. Select the resource records from which the MARCXML records should be generated. A batch of MARCXML records can only be created from the Resources list view. 2. Press the button. 3. Indicate if you wish to suppress components and notes when the status is set to “Internal.” If “Withhold data marked ‘internal only’” is selected, the internal notes will not be exported. If left unchecked, the internal notes will be exported. 4. Open the folder where the files are to be saved. 5. Press Save to export MARCXML. 226 Chapter 14 Exporting standardized metadata for digital objects Overview The Toolkit offers a number of options for exporting data from digital object descriptions. METS can be exported with descriptive metadata encoded in either MODS or Dublin Core. MARCXML, MODS, or Dublin Core descriptive metadata can also be exported. Note: It is also possible to export digital object descriptions as <dao> elements in an EAD by checking the appropriate box in the EAD export dialog window. Exporting METS To export METS from a digital object description: 1. Open the digital object record to be exported. 2. Press the button. 3. Choose whether to export METS with MODS descriptive metadata or Dublin Core descriptive metadata. 4. Indicate if you wish to suppress components and notes when the status is set to “Internal.” If “Withhold data marked ‘internal only’” is selected, the internal notes will not be exported. If left unchecked, the internal notes will be exported. 5. Open the folder where the file is to be saved, and indicate the name of the file (usually the same as the METS Identifier). 6. Press Save to export METS. 227 Note: The METS files created by the AT are designed to be compliant with the METS Navigator (http://metsnavigator.sourceforge.net/) created by the Indiana University Digital Library Program. The METS Navigator is an open source application made available to the general METS using community. Minimal configuration of the METS Navigator is required to accommodate the file use values utilized in the Toolkit. Exporting MARCXML To export MARCXML from a digital object description: 1. Open the digital object record to be exported. 2. Press the button. 3. Indicate if you wish to suppress components and notes when the status is set to “Internal.” If “Withhold data marked ‘internal only’” is selected, the internal notes will not be exported. If left unchecked, the internal notes will be exported. 4. Open the folder where the file is to be saved, and indicate the name of the file. 5. Press Save to export MARCXML. Exporting MODS To export MODS from a digital object description: 1. Open the digital object record to be exported. 2. Press the button. 3. Indicate if you wish to suppress components and notes when the status is set to “Internal.” If “Withhold data marked ‘internal only’” is selected, the internal notes will not be exported. If left unchecked, the internal notes will be exported. 4. Open the folder where the file is to be saved, and indicate the name of the file. 5. Press Save to export MODS. Exporting Dublin Core To export Dublin Core from a digital object description: 1. Open the digital object record to be exported. 2. Press the button. 228 Chapter 14 3. Indicate if you wish to suppress components and notes when the status is set to “Internal.” If “Withhold data marked ‘internal only’” is selected, the internal notes will not be exported. If left unchecked, the internal notes will be exported. 4. Open the folder where the file is to be saved, and indicate the name of the file. 5. Press Save to export Dublin Core. 229 Chapter 15 Customizing the Archivists’ ToolkitTM Overview The Archivists’ ToolkitTM provides a number of customization features that allow for maximum productivity by tailoring the application to your needs. You can: establish default values for fields configure the interface by customizing field labels, identifying which fields should appear in list screens, modifying search settings, and editing rollover tips that appear for each field edit lookup lists that provide multiple controlled values for a field customize default titles for notes configure user-defined fields in the accession record ingest customized reports These options can increase data entry efficiency and provide an interface that is more closely aligned with your repository context. Note: Customizing the Toolkit is an advanced operation, requiring some investigation into the underlying table structure of the Toolkit’s database. Before beginning the customization process, it is advisable to review the terminology provided in the following section and to study the relevant appendices. Customization options are only available to those with Superuser (Access Class 5) and Repository Manager (Access Class 4) permission levels. Superusers are permitted to do all customizations; Repository Managers can establish default values for their repository and edit lookup lists. Terminology The following terms represent concepts related to the Archivists’ ToolkitTM database or interface. Familiarity with these terms is essential to understanding and using the customization features. Field: A basic unit, or element, of data entry in the Toolkit. Examples: Title Extent Number Field name: The identifier for a field in the Toolkit’s database. The field name does not appear in data entry or other interface screens and cannot be modified. Examples: subjectTerm extentNumber Field label: The term displayed in the interface to identify a specific field. Field labels appear in data entry screens and list screens. Field labels may be modified. Examples: Subject Term Extent Number List screen: A screen that lists a group of records in the Toolkit. These include the lists used to retrieve and access name, subject, accession, and resource records when pressing the button from the main screen. List screens are also used to display linked records. For example, in an accession record, the source, creator, and name subject records linked to the accession record are displayed on the Names & Subjects tab in a list screen. Lookup list: A list of terms that provides a set of predefined values for a given field. The lookup list values appear during the data entry process as drop-down lists; the values that populate dropdown lists are from lookup lists. Table: A set of data elements that is organized into horizontal rows and vertical columns. A row represents a record in the table and a cell is a specific instance of a field within that record. 232 Chapter 15 Relational databases, such as that used in the Toolkit, are comprised of multiple tables that are linked together. Therefore, the fields appearing on a single data entry screen may actually be stored in different tables. In order to access a field for customization purposes, you must first identify the table that contains the field. Note: In order to access the specific field to be customized, you must know which table contains the field. In the Lookup Lists appendix, you will find a table listing the predefined lookup lists, the field to which they are linked, and the type of lookup list. Default values Overview If your repository uses boilerplate text (i.e. text that can be reused without change) for particular fields or notes, you may wish to create a default value so that the same data does not need to be entered repeatedly. Establishing the default value for a certain field or note will result in that default text being input into the field or note each time you create a new record. You may then edit the default value if you wish. For example, if you enter Materials closed until processed as a default value for the Access Restrictions field, that phrase will be entered into the Access Restrictions field whenever a new accession record is created for the repository. The default value can then be edited when necessary. Because default values are repository-specific, they are stored as part of the repository record. Note: Not all fields will be available for establishing a default value. For example, information such as the user and date of record creation or update is automatically captured by the Toolkit. For a complete list of fields for which a default value can be established, as well as a list of the Toolkit’s table names and fields, see Fields Supporting Default Values in the appendices. Creating a default value for a field 1. From the Setup menu, select Repositories. 2. Open the repository record by double-clicking on the repository name in the list. 3. Click on the Default Values tab. 233 4. Press the button. 234 Chapter 15 5. Select the appropriate Table, then the Field for which you are establishing a default value. Note: Fields Supporting Default Values appendix may assist you in locating the field for which you want to create a default value. Depending on which option is available: 6. Enter the default text in the Value field. or Check the Boolean Value box. or Select the appropriate Value from the drop-down list. 235 7. Save the default value record by pressing the button at the bottom right corner of the window. If you are entering multiple records, the are working in and open a new default value record. button will save the record you Creating a default title and default value for a note 1. From the Setup menu, select Repositories. 2. Open the repository record by double-clicking on the repository name in the list. 3. Click on the Default Values tab. 236 Chapter 15 4. Double-click on the note you wish to customize. 237 5. Enter a Default Title and/or Default Content for the note. 6. Press the button to save the record. Note: Default notes are not automatically added to resource records. However, when the user decides to add the note to the resource record, the default text will be present. Editing and removing default values 1. From the Setup menu, select Repositories. 2. Open the repository record by double-clicking on the repository name in the list. 3. Click on the Default Values tab. 4. Edit or remove the default value: a. To edit a default, double click the appropriate entry in the list to open the record in question and edit the value. b. To remove a default, select the appropriate entry in the list and press the button. 238 Chapter 15 5. Press the button to save the record. Configuring the application interface Overview Configuring the application interface will allow you to: change the field labels that display on data entry screens modify the field columns that appear in list screens customize which fields are available in the search interface edit rollover tips, including field definitions and examples Modifying field labels You may wish to modify field labels that appear in the Toolkit interface, for example, to reflect terminology used in your repository or to match existing processing and procedure documentation. Note: Changing the label of a field is a superficial change that only affects the interface. You cannot turn a Container Summary field into a Preservation Actions field, for example. The underlying field name, data type, and any associated import and output mappings will not change. The user-defined fields should be implemented for this purpose. 1. From the Setup menu, select Configure Application. 239 2. Double-click on the table that contains the field you wish to customize. 240 Chapter 15 3. Double-click on the appropriate field in the list. 241 4. In the Database Field window, modify the Field Label. 242 Chapter 15 5. Press the button to save the field record. 6. Repeat for additional fields in the same table until all desired modifications are complete. 7. Press the button to save all changes to the table. 8. The application will now show the modified field label in applicable screens. 243 Customizing the list screens List screens are used for browsing name, subject, accession, and resource records, and for displaying linked records such as a list of names associated with an accession record. You may add a field to a list screen, change the left to right order of fields (columns) in a list screen, or remove a field from a list screen. Note: Customizing list screens is accomplished by customizing specific field records. In order to modify the list screen, you must first identify the table that is the source of fields in the list screen. Refer to the List Screen Defaults appendix for assistance. 1. From the Setup menu, select Configure Application. 244 Chapter 15 2. Double-click on the table that contains the field you wish to add to or remove from the list screen. 245 3. Double-click on the appropriate field in the list. 246 Chapter 15 4. In the Database Fields window, enter a value in the Return Screen Order field. A 0 will remove the field from the list screen, a number will add the field to the list screen in the order that you designate. Note: The Toolkit does not prevent you from creating duplicate entries in this field. If you enter 3 for one field and another field in the table also has the value 3, the Toolkit will reorder the rest of the fields. When the record is saved, the fields with a return screen order other than 0 will be sorted and then renumbered starting at 1. 5. Press the button to save the field record. 6. Repeat until desired modifications are made. 247 7. Press the button to save all changes to the table. 8. The field column will now appear in the List Screen view. Note: Column listing order can also be changed by dragging and dropping the Field Name column heading to the desired place in the screen listing. This change is not permanent, however, and the previous order will be restored upon leaving this list screen view. Modifying search settings The Toolkit's search interface allows you to search for terms within a field. You can customize which fields are available for searching. 1. From the Setup menu, select Configure Application. 248 Chapter 15 2. Double-click on the table that contains the field for which you wish to change search settings. 249 3. Double-click on the appropriate field in the list. 250 Chapter 15 4. In the Database Fields window, click on the Include in Search Editor checkbox to change the setting. 5. Press button to save the field record. 6. Repeat until desired modifications are complete. 7. Press the button to save all changes to the table. 8. The field will now appear as an option in the drop-down list in the Search Editor within the Simple Search tab. 251 Modifying rollover tips Rollover tips contain text that appears when the cursor hovers over a field label. They provide guidance during the data entry process. Rollover tips are composed of a definition and examples. You may modify either of these fields. Rollovers are a good place to integrate repository processing / description policy into the AT application. 1. From the Setup menu, select Configure Application. 252 Chapter 15 2. Double-click on the table that contains the field you wish to customize. 253 3. Double-click on the appropriate field in the list. 254 Chapter 15 4. In the Database Field window, modify the Definition and/or Examples. 5. Press the button to save the field record. 6. Repeat until desired modifications are complete. 7. Press the button to save all changes to the table. 8. The rollover windows will now reflect the modified changes. 255 Modifying the date format setting The system date format establishes a standardized format for entering and displaying all transaction dates (i.e., dates that are not for descriptive purposes). This includes accession date, acknowledgement date, etc. 1. From the Setup menu, select Date Format Setting. 2. Choose the desired System date format. Version 1.5 of the Toolkit includes 12 date formats including international date formats d/m/yyyy, d/m/yy, d-m-yyyy, d-m-yy. 256 Chapter 15 3. Press the button to save the record. 4. The changes will take place once the application is restarted. Lookup lists Overview Lookup lists provide a set of predefined values that can be selected during data entry to populate a field. The Toolkit comes with a number of pre-defined lookup lists. You can modify many of these lists, though there are some that can not be modified because either their values are necessary for correct operation of the Toolkit, or are necessary in order to produce valid standardized outputs such as EAD or MODS. Note: You will find a table listing the predefined AT lookup lists, the fields to which they are linked, and the type of lookup list in the appendices. The Lookup Lists list view The Lookup List list view contains the List Name, List Items, Codes, whether the List Items and Codes are paired values, and whether the List Items are restricted To Nmtoken. 257 List Name. Contains the name of the lookup list. These can all be customized. List Items. These are items that appear on the lookup lists. Some items cannot be modified and are presented in red text to signify their immutability. Items listed in blue text are AT initial values. Any items added by the repository are listed in black text. The differences in color helps highlight which items are repository customizations. Some list items will have the Restrict To Nmtoken box activated. This is to signify that these items have specific constraints to follow for correct XML formatting. Codes. Codes generally are abbreviations for List Items. For example, the code for the English language is eng. Because these codes represent List Items, they are considered paired with particular List Items, and thus the Paired Values box is activated. 258 Chapter 15 Using the Show Record Count Function Editing or deleting lookup list values can cause changes in the records that contain those values. To determine how many records will be affected, use the Show Record Count function to list the number of records that contain lookup list values. To use the Show Record Count function: 1. From the Setup menu, select Lookup Lists. 259 2. Double-click on the name of the lookup list you wish to view. 260 Chapter 15 3. Click on the button. The list will now display how many records are linked to each list item 261 Editing lookup lists You may edit an existing lookup list by adding, deleting, changing, or merging items in a list, or by importing terms. Note: Editing a lookup list may cause changes in some records. If any of the records to be changed are invalid, or if the edit would create duplicate records, the Toolkit will return an error message and you will be unable to complete the operation. More information about data cleanup of imported data is available in Chapter 6. 1. From the Setup menu, select Lookup Lists. 262 Chapter 15 2. Double-click on the list you want to edit. 3. To add a list item: a. Press the button. b. Enter in the value for the new list item, and press OK. The item will now appear in the list. 4. To import list items: a. Press the button. 263 b. Select the file you wish to import. The list must be in a plain text file, with each item in the list on a single line. For example: List item 1 List item 2 List item 3 c. Press Open. The new values will appear in the list. d. Press the button to save the list. Deleting items from a lookup list 1. From the Setup menu, select Lookup Lists. 2. Double-click on the list to be modified. It is also possible to delete more than one item at a time by using the Shift and/or Control keys and clicking on the desired items or range of items. 3. Select the value(s) that you wish to delete. 4. Press the button. 264 Chapter 15 5. Because editing a lookup list value may result in changing records that contain that value, the Toolkit will respond with the number of records that you will be updating, and ask you to confirm that you wish to update those records. Press Yes to change the list and update any records that use the value being modified. 6. The Toolkit will verify the number of records that have been modified. Press the button. Caution! If any of the records to be modified were imported into the application and are not valid records, the operation cannot be performed, and the Toolkit will return an error message. 7. Press the button to save the list. Changing items in a lookup list 1. From the Setup menu, select Lookup Lists. 2. Double-click on the list to be modified. 265 3. Select the value that you wish to edit. 4. Press button. 5. Edit the value. 6. Because editing a lookup list value may result in changing records that contain that value, the Toolkit will respond with the number of records that you will be updating, and ask you to confirm that you wish to update those records. Press Yes to change the list and update any records that use the value being modified. 7. The Toolkit will verify the number of records that have been modified. Press OK. 8. Press the button to save the list. Merging items in a lookup list 266 Chapter 15 If imported records contain information in a field that is controlled by a look up list and a List Item does not already represent this information, a new List Item will be added to the lookup list. For example, if an EAD is imported with the subject source listed as “lsch” instead of “lcsh,” the term “lsch” will be added to the lookup list. The merge function can be used to rectify this inconsistency. To merge List Items together: 1. From the Setup menu, select Lookup Lists. 2. Double-click on the list to be modified. 3. Select the first value to be merged. 4. Holding down the control (CTRL) key, select the second value to be merged. 5. Press button. 267 6. Select the item to merge into (the value to which both sets of records should be linked). If the item cannot be modified, it will be the only item listed because it cannot be merged into another item. 7. The Toolkit will respond with the number of records that you will be updating, and ask you to confirm that you wish to update those records. Press Yes to change the list and update any records that use the value being modified. 8. The Toolkit will verify the number of records that have been modified. Press OK. 268 Chapter 15 9. Press the button to save the list. Configuring note options For any of the descriptive notes, you can customize the label that appears in the Toolkit's interface. Note: To customize the title of the note that is output as a header in EAD, print finding aids, and other descriptive outputs, you must edit the default value for notes. Instructions are provided in the Default Values section of this chapter. 1. From the Setup menu, select Notes Etc. 269 2. Double-click on the note for which you wish to customize the label. 3. Edit the Label. 4. Press the button to save the list. 5. Repeat until you have completed the desired customizations. 6. Press the button to save the customizations. Note: These customizations will not appear in the interface until the application has been restarted. Configuring user-defined fields The Accessions record contains a User-defined fields tab. This section is specifically designed as a means for repositories to create their own fields to capture information not already captured by the Toolkit. User-defined fields are not included in any reports; however, repositories can create their own customized reports to include these fields. This is discussed more fully in the Customizing Reports section below. User-defined data types To configure user-defined fields, it is necessary to understand what types of data fields are available. It is also important to understand that user-defined fields are configured for the repository and not just a particular resource. Thus, some thought should go into determining if the user-defined element is needed for just one resource or should be available to all resources in the database. If the answer is the former, using a note might be the better solution. 270 Chapter 15 The following terms are used to describe the data fields available for manipulation in the User defined fields tab: Date: A field that stores a specific date. Dates must be entered according to the default date setting specified. Boolean: A field which can have one of two values: typically true/false or yes/no. Integer: A number field limited to whole numbers (not decimals). Real: A number field that can accommodate decimals. String: An alphanumeric field that can store a maximum of 255 characters. Text: An alphanumeric field that can store an unlimited number of characters. Configuring user-defined fields To configure a user-defined field: 1. Decide which data type field is necessary to use for the information you want to capture. For example, to configure a field that requires a yes/no answer, a Boolean data field should be used. However if the field is to be a free text note of unknown length, a text data field should be configured. 2. From the Setup menu select Configure Application. 271 3. Select the Accessions table. 272 Chapter 15 4. Scroll down to the user-defined fields and select the data type determined in Step 1. For example, if a Boolean field was determined upon, select userDefinedBoolean1. The Toolkit provides at least two user-defined fields for each data type. 273 5. Change the Field Label to represent the information you want stored in the field. 274 Chapter 15 6. Check the Include in Search Editor box if the field is to be included in the Search Editor screen. 7. In the Database Field window, enter a value in the Return Screen field. A 0 will remove the field from the list screen; a different number will add the field to the list screen in the order that you designate. Note: The Toolkit does not prevent you from creating duplicate entries in this field. If you enter 3 and another field in the table also has the value 3, the Toolkit will reorder the rest of the fields. When the record is saved, the fields with a return screen order other than 0 will be sorted and then renumbered starting at 1. 8. Provide a Definition for the field. This definition will appear in the rollover tips. 9. Provide Examples of data entries for the field. These examples will appear in the rollover tips. 275 10. Press the button to save the new field. Customizing reports The Toolkit allows customized reports to be utilized, however customization of reports is not supported by the Toolkit. To create and generate reports, you must use the open-source application, JasperReports. JasperReports, which utilizes a complex report generating syntax, can be used on its own or in conjunction with iReports, another open-source application that provides a graphical user interface for designing JasperReports. You may use these applications to customize the Toolkit’s reports or to create your own reports. You may also use other reporting applications designed to work the backend databases supported by the Toolkit. Instructions for creating such reports are out of scope for the Toolkit’s user manual, but the JasperReports manual may be purchased at http://jasperforge.org/sf/projects/jasperreports and the iReports user manual is freely available at http://jasperforge.org/sf/projects/ireport. Those wishing to create or customize their own reports will also need to make use of the Toolkit’s application programming interface (API), which is available on the Archivists’ Toolkit web site. To add a custom report to the drop-down list of available reports: 1. Place the report in the appropriate directory within the Reports folder located in the same folder as the Toolkit program files. For example, an accession report should be placed in the reports/Accessions directory. Note: The custom report will only be available in the local client in which it is placed. It will not appear in other clients within the repository unless these steps are repeated for each individual client. 276 Chapter 15 2. If the application is open, close it and then relaunch it. 3. The report should now be available in the list of accession drop-down reports. Note: The filename will appear as the report title in the Select Report dropdown list. To customize this and the Report Description, include the property names, as well as the desired values, of reportTitle, and reportDescription within the report. To load a report into specific functional area for one-time processing: 1. Press the 2. Select the button. button. 3. A file-picker window will appear, prompting for the report file to be chosen. Select the appropriate file and press Open. 277 Note: The screen will not change after the report is loaded. 4. Input a Report Header if desired. Pick an output method from the Select Output dropdown list and click on Preview or Print. Note: This process will not load the report into the application permanently and the report will not appear as an option in the Select Report drop-down list. 278 Appendix: User Permissions The AT provides the means to assign a user to one of five classes or groups of users. The groups represent an expanding sequence of functionality and access. For example, Class 5 represents access to all the functionality and information present in the programs, while Class 1 represents access to only very basic data entry functions. The access classes are defined in the table below, with each subsequent class inheriting any restrictions from the classes above. Access Level Level Title Read/Write Read Only Perform Function Class 5 Superuser • All for all repositories using a single implementation • All for all repositories • All functions Class 4 Repository Manager For only the records of the repository to which they are assigned: • All records for a certain identified repository • User records For only the records of the repository to which they are assigned: • Repository records • Editing lookup lists • Data rules / defaults • Linking names and subjects to accessions • Lookup lists • Location records • Accession records • Resource records • Resource component records • Digital object records • Instance records • Name records • Name contact • Linking names and subjects to resource and resource component records • Linking locations to containers • All reports / outputs • Creating / editing users at level 4 or Not Viewable • Any records (excluding name and subject records) for any other identified repository • Configure application • Date format setting records below • Subject records Class 3 Project Manager • Data rules / defaults • Repository records • Location records • User records • Accession records • Resource records • Resource component records • Digital object records • Instance records • Linking names and subjects to accessions • Generate repository profile • Linking names and subjects to resource and resource component records • Linking locations to containers • Name records • Name contact records • Editing lookup lists • Subject records Class 2 Advanced Data Entry Staff • Location records • Accession records • Resource records • Resource component records • Digital object records • Instance records • Name records • Linking names and subjects to resource and resource component records • Editing lookup lists • Name contact records • Data rules / defaults • User records • Repository records • Linking locations to containers • Subject records 280 User Permissions Table Class 1 Beginning Data Entry Staff • Resource records • Accession records • Resource component records • Digital object records • Name records • Linking names and subjects to resource and resource component records • Subject records 281 Appendix: Record Validation Rules This table lists rules used to determine if a record is valid in the Toolkit. Valid records are those that satisfy the minimum data requirements for the record type. Listed are the combinations of mandatory fields required to save a record, along with any content rules. Table Accessions Mandatory Fields accessionNumber1 accessionDate repository ArchDescriptionAnalogInstances container1Type container1Value ArchDescriptionNames function ArchDescriptionNotes DigitalObjects noteType noteContent Object Date: dateBegin and dateEnd or dateExpression Recommended: objectType objectTitle Other Rules 1. DateEnd must be equal to or greater than DateBegin. 2. BulkDateEnd must be equal to or greater than BulkDateBegin. 3. If either DateEnd or DateBegin are present the other must also be present. 4. If either BulkDateEnd or BulkDateBegin are present the other must also be present. 5. If Bulk Dates are present then they must fall within Inclusive Dates. 6. Bulk dates cannot be recorded without recording DateBegin and DateEnd. 1. Names as sources can only be linked to Accession and Resource records. 1. DateEnd must be equal to or greater than DateBegin. FileVersions Locations LookupListItems Names uri useStatement Location Area: building and coordinate1 or barcode or classificationNumber listValue nameType sortName 1. If descriptionNote present, descriptionType must also be present nameRules or nameSource if nameType = corporateBody, then corporatePrimaryName if nameType = person, then personalPrimaryName NameContactNotes Repositories Resources if nameType = family, then familyName nameContactNote repositoryName shortName resourceIdentifier1 level title extentNumber extentType languageCode Resource Date: dateBegin and dateEnd or dateExpression 1. DateEnd must be equal to or greater than DateBegin 2. BulkDateEnd must be equal to or greater than BulkDateBegin 3. If either DateEnd or DateBegin are present the other must also be present 4. If either BulkDateEnd or BulkDateBegin are present the other must also be present 5. If Bulk Dates are present then they must fall within Inclusive Dates 6. Bulk dates cannot exist without DateBegin 284 Record Validation Rules ResourcesComponents Level componentTitle or componentDate Subjects subjectTerm subjectTermType subjectSource userName password Users and DateEnd 1. DateEnd must be equal to or greater than DateBegin 2. BulkDateEnd must be equal to or greater than BulkDateBegin 3. If either DateEnd or DateBegin are present the other must also be present 4. If either BulkDateEnd or BulkDateBegin are present the other must also be present 5. If Bulk Dates are present then they must fall within Inclusive Dates 6. Bulk dates cannot exist without DateBegin and DateEnd 7. title or (dateBegin and dateEnd) or dateExpression 285 Appendix: Unique Constraints Below is a list of all the unique constraints for the Toolkit. This is a field or group of fields that must be unique within the repository, or, in some instances, for the entire application without regard to the number of repositories using a single implementation. Table Accessions AccessionsResources ArchDescriptionNames Constraint The constraint column lists the fields that taken together must be unique repositoryId, accessionNumber1, accessionNumber2, accessionNumber3, accessionNumber4 resourceId, accessionId nameId, digitalObjectId, resourceId, accessionId, resourceComponentId, role, function, form ArchDescriptionSubjects digitalObjectId, subjectId, resourceId, accessionId, resourceComponentId Locations Names Repositories Resources building, floor, room, area, coordinate1, coordinate2, coordinate3, classificationNumber, barcode corporatePrimaryName, corporateSubordinate1, corporateSubordinate2, qualifier, personalPrimaryName, personalRestOfName, personalPrefix, personalSuffix, number, personalDates, personalFullerForm, personalTitle, familyName, familyNamePrefix repositoryName repositoryId, Description Accession numbers must be unique within a repository. A resource and accession can only be linked to each other once. The combination of name, role, function and form can only be linked to a resource, component or digital object once. A subject can only be linked once to a resource, component or digital object. Locations must be unique. Repository names must be unique. Resource ID must be Subjects Users resourceIdentifier1, resourceIdentifier2, resourceIdentifier3, resourceIdentifier4 subjectTerm, subjectTermType, subjectSource username unique within an institution. Subject terms must be unique. User names must be unique. 288 Appendix: Lookup Lists Three basic types of lookup lists are supported in the AT: 1. Lookup lists in which all values can be modified. Lists of this type will ship with selected values. However, all values can be deleted and replaced without impacting operation of the application 2. Lookup lists in which all values cannot be modified. Lists of this type will ship with the required values. Modification will be prohibited as values are necessary for correct operation of the application 3. Lookup lists comprised of both required and modifiable values. Lists of this sort will ship with all required values and selected modifiable values. Modification of the required values will not be permitted. Attempts to modify them will prompt an error message / explanation. Name of Lookup List Acquisition type Calendar Container types Description rules Type of Lookup List 1 - All values can be modified 1 - All values can be modified 1 - All values can be modified 1 - All values Used in AT Record Types Used in AT Fields Values Accessions acquisitionType • Deposit • Gift • Purchase • Transfer • gregorian ArchDescriptionAnalogInstances ArchDescriptionAnalogInstances ArchDescriptionAnalogInstances container1Type container2Type container3Type Resources descriptionRules • Bin • Box • Box-folder • Carton • Cassette • Disk • Drawer • Folder • Frame • Map-case • Object • Oversize • Page • Reel • Reel-Frame • Volume • Anglo-American Cataloguing Rules can be modified Era Extent type File use attributes 1 - All values can be modified 1 - All values can be modified 1 - All values can be modified (aacr) • Cataloging Cultural Objects (cco) • Describing Archives: A Content Standard (dacs) • Rules for Archival Description (rad) • ce Accessions Resources ResourcesComponents Deaccessions FileVersions extentType extentType extentType extentType useStatement • Cubic feet • Linear feet • Audio-Clip • Audio-Master • Audio-MasterEdited • Audio-Service • Audio-Streaming • Image-Master • Image-MasterEdited • Image-Service • Image-ServiceEdited • Image-Thumbnail • Text-Codebook [human readable interpretation of a data file] • Text-Data • Text-Data Definition [or Syntax, machine readable interpretation of a data file] • Text-Georeference • Text-OCR-Edited • Text-OCR-Unedited • Text-TEITranscripted • Text-TEI-Translated • Video-Clip • Video-Master • Video-Master290 Lookup Lists Finding aid status Name description type Name link form 1 - All values can be modified 1 - All values can be modified 1 - All values can be modified Resources findingAidStatus Names descriptionType ArchDescriptionNames form Edited • Video-Service • Video-Streaming • Completed • In_process • Under_revision • Unprocessed • Administrative History • Biography • Administration • Archives • Correspondence • Diaries • History • History-Sources • Pictorial works • Trials, litigation, etc. • Local Sources (local) • Naco Authority File (naf) • NAD/ARK II Authority Database (nad) • Union List of Artist Names (ulan) • Anglo-American Cataloguing Rules (aacr) • Describing Archives: A Content Standard (dacs) • Local (local) • High • Low • Medium Name source 1 - All values can be modified Names nameSource Name rules 1 - All values can be modified Names nameRule Processing priorities 1 - All values can be modified 1 - All values can be modified 1 - All values can be modified Accessions processingPriority Accessions processingStatus • In Progress • New • Processed RepositoryNotes label • Access Policy • Collection Policy • Hours of Operation • Repository Processing statuses Repository Note Types 291 Resource type Subject term source Actuate Digital object types 1 - All values can be modified 1 - All values can be modified 2 - All values cannot be modified 2 - All values cannot be modified Accessions resourceType Subjects subjectSource ExternalReference FileVersions DigitalObjects actuate eadDaoAcutate eadDaoAcutate DigitalObjects objectType Description • Repository History • Collection • Papers • Records • Art & Architecture Thesaurus (aat) • Dictionary of Occupational Titles (dot) • Genre Terms: A Thesaurus for Use in Rare Book and Special Collections Cataloging (rbgenr) • GeoRef Thesaurus (georeft) • Getty Thesaurus of Geographic Names (tgn) • Library of Congress Subject Headings (lcsh) • Local (local) • Medical Subject Headings (mesh) • Thesaurus for Graphic Materials (gmgpc) • actuatenone • actuateother • onLoad • onRequest • cartographic • mixed materials • moving image • multimedia • notated music • software, multimedia • sound recording • sound recordingmusical • sound recordingnonmusical • still image 292 Lookup Lists Index value types 2 - All values cannot be modified IndexItems itemType Language codes 2 - All values cannot be modified Resources ResourcesComponents DigitalObjects Repositories languageCode languageCode languageCode descriptiveLanguage • text • three dimensional object • Corporate Name • Genre Form • Name • Occupation • Personal Name • Subject • Abkhaz; abk • Achinese; ace • Acoli; ach • Adangme; ada • Adygei; ady • Afar; aar • Afrihili; afh • Afrikaans; afr • Afroasiatic (Other); afa • Akan; aka • Akkadian; akk • Albanian; alb • Aleut; ale • Algonquian (Other); alg • Altaic (Other); tut • Amharic; amh • Apache languages; apa • Arabic; ara • Aragonese Spanish; arg • Aramaic; arc • Arapaho; arp • Arawak; arw • Armenian; arm • Artificial (Other); art • Assamese; asm • Athapascan languages; ath • Australian languages; aus • Austronesian (Other); map • Avaric; ava • Avestan; ave • Awadhi; awa 293 • Aymara; aym • Azerbaijani; aze • Bable; ast • Balinese; ban • Baltic (Other); bat • Baluchi; bal • Bambara; bam • Bamileke languages; bai • Banda; bad • Bantu (Other); bnt • Basa; bas • Bashkir; bak • Basque; baq • Batak; btk • Beja; bej • Belarusian; bel • Bemba; bem • Bengali; ben • Berber (Other); ber • Bhojpuri; bho • Bihari; bih • Bikol; bik • Bislama; bis • Bosnian; bos • Braj; bra • Breton; bre • Bugis; bug • Bulgarian; bul • Buriat; bua • Burmese; bur • Caddo; cad • Carib; car • Catalan; cat • Caucasian (Other); cau • Cebuano; ceb • Celtic (Other); cel • Central American Indian (Other); cai • Chagatai; chg • Chamic languages; cmc • Chamorro; cha • Chechen; che • Cherokee; chr • Cheyenne; chy • Chibcha; chb 294 Lookup Lists • Chinese; chi • Chinook jargon; chn • Chipewyan; chp • Choctaw; cho • Church Slavic; chu • Chuvash; chv • Coptic; cop • Cornish; cor • Corsican; cos • Cree; cre • Creek; mus • Creoles and pidgins(Other); crp • Creoles and pidgins, English-based (Other); cpe • Creoles and pidgins, French-based (Other); cpf • Creoles and pidgins, Portuguese-based (Other); cpp • Crimean Tatar; crh • Croatian; scr • Cushitic (Other); cus • Czech; cze • Dakota; dak • Danish; dan • Dargwa; dar • Dayak; day • Delaware; del • Dinka; din • Divehi; div • Dogri; doi • Dogrib; dgr • Dravidian (Other); dra • Duala; dua • Dutch; dut • Dutch, Middle (ca. 1050-1350); dum • Dyula; dyu • Dzongkha; dzo • Edo; bin • Efik; efi • Egyptian (Ancient); egy 295 • Ekajuk; eka • Elamite; elx • English; eng • English, Middle (1100-1500); enm • English, Old (ca.450-1100); ang • Esperanto; epo • Estonian; est • Ethiopic; gez • Ewe; ewe • Ewondo; ewo • Fang; fan • Fanti; fat • Faroese; fao • Fijian; fij • Finnish; fin • Finno-Ugrian (Other); fiu • Fon; fon • French; fre • French, Middle (ca.1400-1600); frm • French, Old (842ca.1400); fro • Frisian; fry • Friulian; fur • Fula; ful • Galician; glg • Ganda; lug • Gayo; gay • Gbaya; gba • Georgian; geo • German; ger • German, Middle High (ca.1050-1500); gmh • German, Old High (ca.750-1050); goh • Germanic (Other); gem • Gilbertese; gil • Gondi; gon • Gorontalo; gor • Gothic; got • Grebo; grb • Greek, Ancient (to 1453); grc 296 Lookup Lists • Greek, Modern (1453-); gre • Guarani; grn • Gujarati; guj • Gwich’in; gwi • Gã; gaa • Haida; hai • Haitian French Creole; hat • Hausa; hau • Hawaiian; haw • Hebrew; heb • Herero; her • Hiligaynon; hil • Himachali; him • Hindi; hin • Hiri Motu; hmo • Hittite; hit • Hmong; hmn • Hungarian; hun • Hupa; hup • Iban; iba • Icelandic; ice • Ido; ido • Igbo; ibo • Ijo; ijo • Iloko; ilo • Inari Sami; smn • Indic (Other); inc • Indo-European (Other); ine • Indonesian; ind • Ingush; inh • Interlingua (International Auxiliary Language Association); ina • Interlingue; ile • Inuktitut; iku • Inupiaq; ipk • Iranian (Other); ira • Irish; gle • Irish, Middle (ca.1110-1550) ; mga • Irish, Old (to 1100); sga • Iroquoian (Other); iro 297 • Italian; ita • Japanese; jpn • Javanese; jav • Judeo-Arabic; jrb • Judeo-Persian; jpr • Kabardian; kbd • Kabyle; kab • Kachin; kac • Kalmyk; xal • Kalâtdlisut; kal • Kamba; kam • Kannada; kan • Kanuri; kau • Kara-Kalpak; kaa • Karen; kar • Kashmiri; kas • Kawi; kaw • Kazakh; kaz • Khasi; kha • Khmer; khm • Khoisan (Other); khi • Khotanese; kho • Kikuyu; kik • Kimbundu; kmb • Kinyarwanda; kin • Komi; kom • Kongo; kon • Konkani; kok • Korean; kor • Kpelle; kpe • Kru (Other); kro • Kuanyama; kua • Kumyk; kum • Kurdish; kur • Kurukh; kru • Kusaie; kos • Kutenai; kut • Kyrgyz; kir • Ladino; lad • Lahnda; lah • Lamba; lam • Lao; lao • Latin; lat • Latvian; lav • Letzeburgesch; ltz • Lezgian; lez • Limburgish; lim 298 Lookup Lists • Lingala; lin • Lithuanian; lit • Low German; nds • Lozi; loz • Luba-Katanga; lub • Luba-Lulua; lua • Luiseño; lui • Lule Sami; smj • Lunda; lun • Luo (Kenya and Tanzania); luo • Lushai; lus • Macedonian; mac • Madurese; mad • Magahi; mag • Maithili; mai • Makasar; mak • Malagasy; mlg • Malay; may • Malayalam; mal • Maltese; mlt • Manchu; mnc • Mandar; mdr • Mandingo; man • Manipuri; mni • Manobo languages; mno • Manx; glv • Maori; mao • Mapuche; arn • Marathi; mar • Mari; chm • Marshallese; mah • Marwari; mwr • Masai; mas • Mayan languages; myn • Mende; men • Micmac; mic • Minangkabau; min • Miscellaneous languages; mis • Mohawk; moh • Moldavian; mol • Mon-Khmer (Other); mkh • Mongo-Nkundu; lol • Mongolian; mon 299 • Mooré; mos • Multiple languages; mul • Munda (Other); mun • Nahuatl; nah • Nauru; nau • Navajo; nav • Ndebele (South Africa); nbl • Ndebele (Zimbabwe); nde • Ndonga; ndo • Neapolitan Italian; nap • Nepali; nep • Newari; new • Nias; nia • Niger-Kordofanian (Other); nic • Nilo-Saharan (Other); ssa • Niuean; niu • No linguistic content; No_linguistic_content • Nogai; nog • North American Indian (Other); nai • Northern Sami; sme • Northern Sotho; nso • Norwegian; nor • Norwegian Bokmål; nob • Norwegian Nynorsk; nno • Nubian languages; nub • Nyamwezi; nym • Nyanja; nya • Nyankole; nyn • Nyoro; nyo • Nzima; nzi • Occitan (post 1500); oci • Ojibwa; oji • Old Norse; non • Old Persian (ca.600300 Lookup Lists 400 B.C.); peo • Oriya; ori • Oromo; orm • Osage; osa • Ossetic; oss • Otomian languages; oto • Pahlavi; pal • Palauan; pau • Pali; pli • Pampanga; pam • Pangasinan; pag • Panjabi; pan • Papiamento; pap • Papuan (Other); paa • Persian; per • Philippine (Other); phi • Phoenician; phn • Polish; pol • Ponape; pon • Portuguese; por • Prakrit languages; pra • Provençal (to 1500); pro • Pushto; pus • Quechua; que • Raeto-Romance; roh • Rajasthani; raj • Rapanui; rap • Rarotongan; rar • Reserved for local user; qaa-qtz • Romance (Other); roa • Romani; rom • Romanian; rum • Rundi; run • Russian; rus • Salishan languages; sal • Samaritan Aramaic; sam • Sami; smi • Samoan; smo • Sandawe; sad 301 • Sango (Ubangi Creole); sag • Sanskrit; san • Santali; sat • Sardinian; srd • Sasak; sas • Scots; sco • Scottish Gaelic; gla • Selkup; sel • Semitic (Other); sem • Serbian; scc • Serer; srr • Shan; shn • Shona; sna • Sichuan Yi; iii • Sidamo; sid • Sign languages; sgn • Siksika; bla • Sindhi; snd • Sinhalese; sin • Sino-Tibetan (Other); sit • Siouan (Other); sio • Skolt Sami; sms • Slave; den • Slavic (Other); sla • Slovak; slo • Slovenian; slv • Sogdian; sog • Somali; som • Songhai; son • Soninke; snk • Sorbian languages; wen • Sotho; sot • South American Indian (Other); sai • Southern Sami; sma • Spanish; spa • Sukuma; suk • Sumerian; sux • Sundanese; sun • Susu; sus • Swahili; swa • Swazi; ssw • Swedish; swe • Syriac; syr 302 Lookup Lists • Tagalog; tgl • Tahitian; tah • Tai (Other); tai • Tajik; tgk • Tamashek; tmh • Tamil; tam • Tatar; tat • Telugu; tel • Temne; tem • Terena; ter • Tetum; tet • Thai; tha • Tibetan; tib • Tigrinya; tir • Tigré; tig • Tiv; tiv • Tlingit; tli • Tok Pisin; tpi • Tokelauan; tkl • Tonga (Nyasa); tog • Tonga; ton • Truk; chk • Tsimshian; tsi • Tsonga; tso • Tswana; tsn • Tumbuka; tum • Tupi languages; tup • Turkish; tur • Turkish, Ottoman; ota • Turkmen; tuk • Tuvaluan; tvl • Tuvinian; tyv • Twi; twi • Udmurt; udm • Ugaritic; uga • Uighur; uig • Ukrainian; ukr • Umbundu; umb • Undetermined; und • Urdu; urd • Uzbek; uzb • Vai; vai • Venda; ven • Vietnamese; vie • Volapük; vol • Votic; vot • Wakashan 303 List numeration types Name link creator / subject role 2 - All values cannot be modified 2 - All values cannot be modified ListOrdered numeration languages; wak • Walamo; wal • Walloon; wln • Waray; war • Washo; was • Welsh; wel • Wolof; wol • Xhosa; xho • Yakut; sah • Yao (Africa); yao • Yapese; yap • Yiddish; yid • Yoruba; yor • Yupik languages; ypk • Zande; znd • Zapotec; zap • Zenaga; zen • Zhuang; zha • Zulu; zul • Zuni; zun • arabic • loweralpha • lowerroman • upperalpha • upperroman • Actor (act) • Adapter (adp) • Animator (anm) • Annotator (ann) • Applicant (app) • Architect (arc) • Arranger (arr) • Artist (art) • Assignee (asg) • Associated name (asn) • Attributed name (att) • Author (aut) • Author in quotations or text extracts (aqt) • Author of afterword, colophon, etc. (aft) • Author of dialog (aud) • Author of 304 Lookup Lists screenplay, etc. (aus) • Bibliographic antecedent (aut) • Binder (bud) • Binding designer (bdd) • Book designer (bkd) • Book produce (bkp) • Bookjacket designer (bjd) • Bookplate designer (bpd) • Calligrapher (cll) • Cartographer (ctg) • Censor (cns) • Choreographer (chr) • Cinematographer (cng) • Client (cli) • Collaborator (clb) • Collotyper (clt) • Commentator (cmm) • Commentator for written text (cwt) • Compiler (com) • Complainant (cpl) • Complainantappellant (cpt) • Complainantappellee (cpe) • Composer (cmp) • Compositor (cmt) • Conceptor (ccp) • Conductor (cnd) • Consultant (csl) • Consultant to a project (csp) • Contestant (cos) • Contestant-appellant (cot) • Contestant-appellee (coe) • Contestee (cts) • Contestee-appellant (ctt) • Contestee-appellee (cte) 305 • Contractor (ctr) • Contributor (ctb) • Copyright claimant (cpc) • Copyright holder (cph) • Corrector (crr) • Correspondent (crp) • Costume designer (cst) • Cover designer (cov) • Curator of an exhibition (cur) • Dancer (dnc) • Dedicatee (dte) • Dedicator (dto) • Defendant (dfd) • Defendant-appellant (dft) • Defendant-appellee (dfe) • Degree grantor (dgg) • Delineator (dln) • Depicted (dpc) • Depositor (dpt) • Designer (dsr) • Director (drt) • Dissertant (dis) • Distributor (dst) • Draftsman (drm) • Dubious author (dub) • Editor (edt) • Electrotyper (elt) • Engineer (eng) • Engraver (egr) • Etcher (etr) • Expert (exp) • Facsimulist (fac) • Film editor (flm) • First party (fpy) • Forger (frg) • Honoree (hur) • Host (hst) • Illuminator (ilu) • Illustrator (ill) 306 Lookup Lists • Inscriber (ins) • Instrumentalist (itr) • Interviewee (ive) • Interviewer (ivr) • Inventor (inv) • Landscape architect (lsa) • Lender (len) • Libelant (lil) • Libelant-appellant (lit) • Libelant-appellee (lie) • Libelee (lel) • Libelee-appellant (let) • Libelee-appellee (lee) • Librettist (lbt) • Licensee (lse) • Licensor (lso) • Lighting designer (lgd) • Lithographer (ltg) • Lyricist (lyr) • Manufacturer (mfr) • Markup editor (mrk) • Metadata contact (mdc) • Metal-engraver (mte) • Moderator (mod) • Musician (mus) • Narrator (nrt) • Opponent (opn) • Organizer of meeting (orm) • Originator (org) • Other (oth) • Papermaker (ppm) • Patent applicant (pta) • Patent holder (pth) • Patron (pat) • Performer (prf) • Photographer (pht) • Plaintiff (ptf) • Plaintiff-appellant 307 (ptt) • Plaintiff-appellee (pte) • Platemaker (plt) • Printer (prt) • Printer of plates (pop) • Printmaker (prm) • Process contact (prc) • Producer (pro) • Production personnel (prd) • Programmer (prd) • Proofreader (pfr) • Publisher (pbl) • Publishing director (pbd) • Puppeteer (ppt) • Recipient (rcp) • Recording engineer (rce) • Redactor (red) • Renderer (ren) • Reporter (rpt) • Research team head (rtm) • Researcher (res) • Respondent (rsp) • Respondentappellant (rst) • Respondentappellee (rse) • Responsible party (rpy) • Restager (rsg) • Reviewer (rev) • Rubicator (rbr) • Scenarist (sce) • Scientific advisor (sad) • Scribe (scr) • Sculptor (scl) • Second party (fpy) • Secretary (sec) • Set designer (std) • Signer (sgn) • Singer (sng) 308 Lookup Lists Name function link Name link source role Name type Render 2 - All values cannot be modified 2 - All values cannot be modified ArchDescriptionNames 2 - All values cannot be modified 2 - All values cannot be modified Names NonPreferredNames function nameType nameType • Speaker (spk) • Sponsor (spn) • Standards body (stn) • Stereotyper (str) • Storyteller (stl) • Surveyor (srv) • Teacher (tch) • Thesis advisor (ths) • Transcriber (trc) • Translator (trl) • Type designer (tyd) • Typographer (tyg) • Videographer (vdg) • Vocalist (voc) • Witness (wit) • Woodcutter (wdc) • Wook-engraver (wde) • Writer of accompanying material (wam) • Creator • Source • Subject • Auctioneer (auc) • Bookseller (bsl) • Collector (col) • Depositor (dpt) • Donor (dnr) • Former owner (fmo) • Funder (fnd) • Owner (own) • Corporate body • Family • Person • altrender • bold • bolddoublequote • bolditalic • boldsinglequote • boldsmcaps • boldunderline • doublequote • italic 309 Resource levels 2 - All values cannot be modified Resources level Resource component levels 2 - All values cannot be modified ResourcesComponents level Show 2 - All values cannot be modified 2 - All values cannot be modified ExternalReference FileVersions DigitalObjects show eadDaoShow eadDaoShow Subjects subjectTermType ArchDescriptionInstances instanceType Subject term type Instance types 3 - Some values can be modified • nonproport • singlequote • smcaps • sub • super • underline • class • collection • file • fonds • item • otherlevel • recordgrp • series • subfonds • subgroup • subseries • class • collection • file • fonds • item • otherlevel • recordgrp • series • subfonds • subgroup • subseries • embed • new • replace • shownone • showother • Function (657) • Genre / Form (655) • Geographic Name (651) • Occupation (656) • Topical Term (650) • Uniform Title (630) • Audio • Books • Computer disks / tapes • Digital object • Graphic materials • Maps • Microform 310 Lookup Lists • Mixed materials • Moving Images • Realia • Text 311 Appendix: Search Editor Defaults The following table lists the default fields that appear in the Search Editor for each functional area and the order in which those fields appear. In addition, all four functional areas can be searched by the Created, Created By, Last Updated, and Last Updated By fields. These are the settings in place when the Toolkit is initially installed. They may be modified using the Configure Application menu. List Screen Table Accessions Accessions Names Names Resources Resources Subjects Subjects Field Label Accession Date Accession Number Container Summary Repository Resource Type Title Name Rules Name Source Sort Name Container Summary Repository Resource Identifier Resource Title Subject Scope Note Subject Term Subject Term Source Subject Term Type Appendix: List Screen Defaults The following table lists the default fields that appear in the list screens for each functional area, and the order, left to right, in which those fields appear. These are the settings in place when the Toolkit is initially installed. They may be modified using the Configure Application menu or by dragging and dropping a column to a new position. Location Order Table Accession List 1 2 3 4 Field Label Accession Functional Area Accessions Accession Number Accessions Title Accessions Extent Number Accessions Extent Measurement Accession Record 1 2 AccessionsResources AccessionsResources Resource Identifier Resource Title Accession Record 1 2 3 Deaccessions Deaccessions Deaccessions Deaccession Date Extent Extent Measurement Accession Record 1 2 AccessionsLocations AccessionsLocations Location Note Accession Record 1 2 3 4 ArchDescriptionRepeatingData ArchDescriptionRepeatingData ArchDescriptionRepeatingData ArchDescriptionRepeatingData HREF Type Title Content Accession Record 1 2 3 ArchDescriptionNames ArchDescriptionNames ArchDescriptionNames Name Name Link Function Name Link Creator / Subject Role Accession Record 1 Subjects Subject Names Functional Area Name List 1 2 3 4 Names Names Names Names Sort Name Name Type Source Rules Names Record 1 2 NonPreferredNames NonPreferredNames Sort Name Name Type Names Record 1 2 3 4 Accessions Accessions Accessions Accessions Accession Number Title Extent Number Extent Measurement Names Record 1 2 3 4 5 Resources Resources Resources Resources Resources Resource Title Extent Number Resource Id Extent Measurement Resource Identifier Names Record 1 2 NameContactNotes NameContactNotes Label Note Resource List 1 2 3 4 5 Resource Functional Area Resources Resource Title Resources Extent Number Resources Resource Id Resources Extent Measurement Resources Resource Identifier Resource Record 1 2 Accessions Accessions Accession Number Accession Title Resource Record 1 2 ArchDescriptionAnalogInstances ArchDescriptionAnalogInstances or DigitalObjects Instance Type Instance Label Resource Record 1 2 3 ArchDescriptionNames ArchDescriptionNames ArchDescriptionNames Name Name Link Function Name Link Creator / Subject Role Resource Record 1 Subjects Subject Resource Record 1 2 3 ArchDescriptionRepeatingData ArchDescriptionRepeatingData ArchDescriptionRepeatingData Type Title Content Resource Record 1 2 3 Deaccessions Deaccessions Deaccessions Deaccession Date Extent Extent Measurement Digital Object 1 FileVersions Use Statement 316 List Screen Defaults Record 2 FileVersions URI 1 ArchDescriptionNames Name 2 3 ArchDescriptionNames ArchDescriptionNames Name Link Function Name Link Creator / Subject Role Digital Object Record 1 Subjects Subject Digital Object Record 1 ArchDescriptionRepeatingData Type 2 3 ArchDescriptionRepeatingData ArchDescriptionRepeatingData Title Content Bibliography Note 1 BibItems Item Value Index Note 1 2 3 4 IndexItems IndexItems IndexItems IndexItems Item Value Item Type Reference Reference Text List Definition Note 1 2 ListDefinitionItems ListDefinitionItems Label Item Value List Ordered Note 1 ListOrderedItems Item Value Chronology List Note 1 ChronologyItems Event Date 2 ChronologyItems Event Description 1 Events Event Description Digital Object Record Chronology Item Event List Subject Functional Area Subject List 1 2 3 Subjects Subjects Subjects Subject Term Type Source Subject Record 1 2 3 4 Accessions Accessions Accessions Accessions Accession Number Title Extent Number Extent Measurement 317 Subject Record 1 2 3 4 5 Resources Resources Resources Resources Resources Resource Title Extent Number Resource Id Extent Measurement Resource Identifier User List 1 2 3 4 5 Users Users Users Users Users Username Full Name Title Department Repository Repository List 1 Repositories Repository Repository Record 1 RepositoryStatistics Year Of Report Repository Record 1 2 3 DefaultValues DefaultValues DefaultValues AT Field Table Name Value as String Repository Record 1 2 3 RepositoryNotesDefaultValues RepositoryNotesDefaultValues RepositoryNotesDefaultValues Note Type Default Title Default Content Repository Record 1 2 RepositoryNotes RepositoryNotes Label Note Text Lookup Lists 1 LookupList List Name Lookup Lists 1 2 LookupListItems LookupListItems List Item Code Locations List 1 2 3 4 Locations Locations Locations Locations Building Floor Room Coordinates Notes Etc. 1 2 NotesEtcTypes NotesEtcTypes Notes Etc. Name Label Configure Application 1 DatabaseTables Table Name Setup Area 318 List Screen Defaults Database Tables 1 2 3 4 DatabaseFields DatabaseFields DatabaseFields DatabaseFields Field Name Field Label Data Type Return Screen Order 319 Appendix: Fields Supporting Default Values A default value is data that can be pre-recorded and then will automatically be entered into a field whenever a user creates a new record containing that field. For example, if you enter Mixed materials as a default value for the Instance Type field that phrase automatically appears in the Instance Type field whenever a new instance record is created for your repository. The default value can be edited in any given record, if necessary. The default value can also be modified at any given time. Changes to the default will not affect records retrospectively, but only records yet to be created. The default value feature is available for selected fields only. The following table includes the Table, Field Label, and Field Name for fields that can have a default value. This information is necessary for navigating and using the Default Values tab in the repository record, where default values are established and stored. Table Accessions Field Label Access Restrictions Access Restrictions Note Accession Number Acknowledgement Sent Acquisition Type Agreement Received Agreement Sent Cataloged Cataloged Date Cataloged Note Condition Container Summary Description Disposition Note Extent Measurement General Accession Note Inventory Processed Processed Date Processing Plan Field Name accessRestrictions accessRestrictionsNote accessionNumber1 acknowledgementSent acquisitionType agreementReceived agreementSent cataloged catalogedDate catalogedNote conditionNote containerSummary description accessionDispositionNote extentType generalAccessionNote inventory accessionProcessed accessionProcessedDate processingPlan Processing Priority Processing Started Date Processing Status Processors Resource Type processingPriority processingStartedDate processingStatus processors resourceType Restrictions Apply Retention Rule Rights Transferred Rights Transferred Date Rights Transferred Note Title Use Restrictions Use Restrictions Note User Defined Boolean 1 User Defined Boolean 2 User Defined Date 1 User Defined Date 2 User Defined Integer 1 User Defined Integer 2 User Defined Real 1 User Defined Real 2 User Defined String 1 User Defined String 2 User Defined String 3 User Defined Text 1 User Defined Text 2 User Defined Text 3 User Defined Text 4 ArchDescriptionAnalogInstances Container 1 Alphanumeric Indicator Container 1 Numeric Indicator Container 1 Type Container 2 Alphanumeric Indicator Container 2 Numeric Indicator Container 2 Type Container 3 Alphanumeric Indicator Container 3 Numeric Indicator Container 3 Type Instance Label ArchDescriptionNames Name Link Form Name Link Function Name Link Creator / Subject Role Bibliography Note Title ChronologyList Note restrictionsApply retentionRule rightsTransferred rightsTransferredDate rightsTransferredNote title useRestrictions useRestrictionsNote userDefinedBoolean1 userDefinedBoolean2 userDefinedDate1 userDefinedDate2 userDefinedInteger1 userDefinedInteger2 userDefinedReal1 userDefinedReal2 userDefinedString1 userDefinedString2 userDefinedString3 userDefinedText1 userDefinedText2 userDefinedText3 userDefinedText4 container1AlphaNumericIndicator container1NumericIndicator container1Type container2AlphaNumericIndicator container2NumericIndicator container2Type container3AlphaNumericIndicator container3NumericIndicator container3Type instanceLabel form nameLinkFunction role note title note 322 Fields Supporting Default Values Deaccessions Digital Objects FileVersions Index ListDefinition ListOrdered Locations Title Description Disposition Extent Extent Measurement Notification Reason Ead Dao Actuate Ead Dao Show Label Language Code Object Type Restrictions Apply Title Ead Dao Actuate Ead Dao Show Use Statement Note Title Note Title Note Numeration Title Area Building Classification Number Coordinate 1 Coordinate 1 Alphanumeric Indicator Coordinate 1 Label Coordinate 1 Numeric Indicator Coordinate 2 Coordinate 2 Alphanumeric Indicator Coordinate 2 Label Coordinate 2 Numeric Indicator Coordinate 3 Coordinate 3 Alphanumeric Indicator title description disposition extent extentType notification reason eadDaoActuate eadDaoShow label languageCode objectType restrictionsApply title eadDaoActuate eadDaoShow useStatement note title note title note numeration title area building classificationNumber coordinate1 coordinate1AlphaNumIndicator coordinate1Label coordinate1NumericIndicator coordinate2 coordinate2AlphaNumIndicator coordinate2Label coordinate2NumericIndicator coordinate3 coordinate3AlphaNumIndicator 323 LookupListsItems NameContactNotes Names RepositoryNotes RepositoryStatistics Coordinate 3 Label Coordinate 3 Numeric Indicator Coordinates Floor Room Code Editable List Item Label Description Type Rules Source Label Administration Administration Offices Classrooms Collections Storage Digitization Exhibit Loans Food Beverage Historical Institutional Major Subject Areas Manuscript Net Usable Area Non Professional FTE Other Percentage Off Site Personal Papers Photographic Reproduction Preservation Processing Professional FTE Reading Room Repository Statistics Id Retail Gift Sales Student FTE Volunteer FTE Year Of Report coordinate3Label coordinate3NumericIndicator coordinates floor room code editable listItem label descriptionType nameRule nameSource label functDistAdmin administrationOffices classrooms collectionsStorage digitization exhibitLoans foodBeverage collFociHistorical collFociInstitutional majorSubjectAreas collFociManuscript netUsableArea nonProfessionalFTE collFociOther percentageOffSite collFociPersonalPapers photographicReproduction functDistPreservation functDistProcessing professionalFTE readingRoom repositoryStatisticsId retailGiftSales studentFTE volunteerFTE yearOfReport 324 Fields Supporting Default Values Resources ResourcesComponents Subjects Users Author Container Summary Description Rules Ead FA Location Edition Statement Extent Measurement Finding Aid Note Finding Aid Status Internal Only Language Language of Finding Aid Level Label Other Level Resource Identifier Restrictions Apply Revision Description Series Sponsor Note Title Container Summary Extent Measurement Internal Only Language Level Other Level Restrictions Apply Title Source Department author containerSummary descriptionRules eadFaLocation editionStatement extentType findingAidNote findingAidStatus internalOnly languageCode languageOfFindingAid level otherLevel resourceIdentifier1 restrictionsApply revisionDescription series sponsorNote title containerSummary extentType internalOnly languageCode level otherLevel restrictionsApply title subjectSource department 325 Appendix: Preparing Tab-delimited Accession Files Importing tab-delimited accessions data The Toolkit will not import accession information straight from a database, such as Access or Filemaker Pro. To transfer accessions data to the Toolkit, a tab-delimited file must be exported from the database containing the information. This tab-delimited file can then be imported into the Toolkit. Before importing data into the Toolkit, the data must be mapped to the fields in the Toolkit. Some mapping tips are listed below. Basic steps for importing tab-delimited accessions data: 1. Map the fields in the accessions database (or spreadsheet if that is where the data is stored) to the corresponding AT fields listed in the table below. If some data fields do not match AT fields, you may want to consider implementing a user-defined field. See Chapter 15 for more information on user-defined fields. 2. Format your data to meet the constraints listed below. This step may also be done after Step 3. The decision of when to adjust the data should be done after an evaluation of the requirements for data import (listed throughout the rest of this chapter) and a comparison of those requirements to how the data is currently stored in the database (or spreadsheet). In some instances, it may be more efficient to adjust the data while it is still in database form. In others, it may be quicker after the database has been exported to a tab-delimited file. 3. Export a tab-delimited, unformatted text document out of the accessions database (or spreadsheet). 4. If not done in Step 2, format the data according to the constaints listed below. 5. Import the tab-limited file according to the instructions listed in Chapter 6. Constraints on legacy accessions data There are constraints on the format of tab-delimited data to be imported that may require cleanup of your legacy data prior to import. Not satisfying these constraints will cause the accession import process to fail. Formatting the file: 1. Export a tab delimited, unformatted text document out of your database (or spreadsheet). All tabs, line breaks, and hard returns within your data should be removed. This will help reduce the need for data cleanup later. It is optional, but may be helpful, to map the AT headings to your database fields, and then replace the previous headings with the AT headings within the database prior to export. This will bypass the need to input the header line in Step 2. 2. The first line has to be a header line that contains information about what is in the column, generally the field name. If this was not exported into the tab-delimited file, it needs to be created. Names of the column headers must match the Import Field/Column Label entries listed in the table below; if your database application exported headers that match field names in your database, these names need to be converted to the entries listed in the table below. The column headers are case-sensitive. The following shows a sample import file in tab-delimited format. Every space depicted between field values (where “Linear feet” is one field value and “Fales Family Papers” is another) is a single tab, and the first row is the field/column header. In this example, the accessionNumber for the first entry is 1957.029 and the title is Fales Family Papers: resourceIdentifier accessionDate accessionNumber extentNumber extentType title MSS 029 1957-01-01 1957.029 45 Linear feet Fales Family Papers MSS 002 1964-0101 1964.002 126 Linear feet The Elizabeth Robins Papers 3. If Excel is used to create a tab-delimited file, then the last column in the file needs to contain data for every single accession entry--none of the cells in the last column can be left blank. This helps guarantee the information will contain the correct number of tabs and thus be parsed correctly, otherwise the empty field may be parsed as a tab, and the data will import incorrectly. Excel will also add double quotes around any characters that can be interpreted as delimiters, such as commas. If these quotes are not stripped from the data, either manually or through find-and-replace mechanisms, they will be imported into the Toolkit. 4. Hard returns and other formatting within the cells of the table should be removed. Line breaks or hard returns in the data may be replaced by the pipe character (|) and those pipe characters will be converted to line breaks in the Toolkit if the target field has a free-text data type. 5. If you have a single field in the database that needs to get mapped into more than one field in the Toolkit, you will need to parse the data into two separate fields. For example, in many cases accessions data will combine extent into one field, such as “11 linear feet.” The Toolkit provides two separate fields for extent: extentNumber and extentType. Extent number contains the numerical value of the extent (as a real number) and extent measurement contains the extent measurement type of the accession, such as linear feet. Other fields that may need to be parsed include name fields, etc. 6. Boolean fields (cataloged, restrictionsApply, rights) may only contain the values true or false. 7. Integer fields (dateBegin, dateEnd) can only contain whole numbers. 8. Real number fields (extentNumber) can contain integers and decimals. Field / Column Header Mapping 328 Preparing the Tab-delimited Accession file The following table shows the allowed field names and the target fields for accession data to be imported into the Toolkit. Some fields have controlled vocabularies, and those are listed in the Rule column. The Field Length is the maximum number of characters allowable for each field. Importing more characters than allowed will result in data truncation. Accession Fields / Column Headers Import Field/Column Header Where Stored /AT Target Field Length accessionNumber Data Type text accessionNumber1 accessionNumber1 10 string accessionNumber2 accessionNumber2 10 string accessionNumber3 accessionNumber3 10 string accessionNumber4 accessionNumber4 10 string accessionDate accessionDate description description no limit text accessionDispositionNote accessionDispositionNote no limit text accessRestrictions accessRestrictions accessRestrictionsNote accessRestrictionsNote useRestrictions useRestrictions useRestrictionsNote Rule parsed by delimiters into: accessionNumber, accessionNumber2 accessionNumber3 accessionNumber4 date boolean no limit text useRestrictionsNote no limit text generalAccessionNote generalAccessionNote no limit text acknowledgementDate acknowledgementDate date acknowledgementSent acknowledgementSent boolean agreementReceivedDate agreementReceivedDate date agreementSentDate agreementSentDate date agreementSent agreementSent boolean agreementReceived agreementReceived boolean agreementProcessed accessionProcessed boolean accessionProcessedDate accessionProcessedDate acquisitionType acquisitionType 255 string dateExpression dateExpression 255 string bulkDateBegin bulkDateBegin integer bulkDateEnd bulkDateEnd Integer dateBegin dateBegin Integer dateEnd dateEnd Integer boolean date cataloged cataloged boolean catalogedDate catalogedDate date catalogedNote catalogedNote no limit string conditionNote conditionNote no limit extentNumber extentNumber extentType extentType string real number string containerSummary containerSummary 255 no limit Deposit, Gift, Purchase, Transfer Linear Feet, Cubic Feet string 329 inventory inventory no limit processingPlan processingPlan no limit processingPriority processingPriority 255 text text string processors processors 255 string processingStatus processingStatus 255 string processingStartedDate processingStartedDate resourceType resourceType date 255 string retentionRule retentionRule no limit text title title no limit text restrictionsApply restrictionsApply boolean rightsTransferred rightsTransferred boolean rightsTransferredDate rightsTransferredDate rightsTransferrednote rightsTransferredNote Collection, Papers, Records date no limit text userDefinedDate1 userDefinedDate1 date userDefinedDate2 userDefinedDate2 date userDefinedBoolean1 userDefinedBoolean1 boolean userDefinedBoolean2 userDefinedBoolean2 boolean userDefinedInteger1 userDefinedInteger1 integer userDefinedInteger2 userDefinedInteger2 userDefinedReal1 userDefinedReal1 userDefinedReal2 userDefinedReal2 integer real number real number userDefinedString1 userDefinedString1 255 userDefinedString2 userDefinedString2 255 string userDefinedString3 userDefinedString3 255 string string userDefinedText1 userDefinedText1 no limit text userDefinedText2 userDefinedText2 no limit text userDefinedText3 userDefinedText3 no limit text userDefinedText4 userDefinedText4 no limit text resourceIdentifier resourceIdentifier1 20 string Subject Fields / Column Headers Import Field/Column Header subjectTerm Where Stored /AT Target subjectTerm Field Length 150 Data Type Rule string subjectTermType subjectTermType 50 string subjectSource subjectSource 100 string Types are: Function (657), Genre / Form (655), Geographic Name (651), Occupation (656), Topical Term (650), Uniform Title (630) default "ingest" Name Fields / Column Headers Import Field/Column Header Where Stored /AT Target Field Length Data Type Rule NameFunction nameFunction 50 string Creator, Source, Subject Name_nametype nametype 255 string Person, Corporate Body, Family 330 Preparing the Tab-delimited Accession file Name_sortName sortName 255 string Name_qualifier qualifier 255 string Name_number number 255 string Name_Source NameSource 50 string Name_descriptionType descriptionType 255 string Name_descriptionNote descriptionNote no limit text Name_citation citation no limit text Name_salutation salutation 255 string Name_contactAddress1 contactAddress1 255 string Name_contactAddress2 contactAddress2 255 string Name_contactCity contactCity 255 string Name_contactRegion contactRegion 255 string Name_contactCountry contactCountry 255 string Name_contactMailCode contactMailCode 255 string Name_contactPhone contactPhone 255 string Name_contactFax contactFax 255 string Name_contactEmail contactEmail 255 string Name_contactName contactName 255 string Name_familyName familyName 35 string Name_familyNamePrefix familyNamePrefix 15 string Name_corporatePrimaryName corporatePrimaryName 70 string Name_corporateSubordinate1 corporateSubordinate1 45 string Name_corporateSubordinate2 corporateSubordinate2 45 string Name_personalPrimaryName personalPrimaryName 30 string Name_personalRestOfName personalRestOfName 25 string Name_personalPrefix personalPrefix 25 string Name_personalSuffix personalSuffix 25 string Name_personalDates personalDates 15 string Name_personalFullerForm personalFullerForm 25 string Name_personalTitle personalTitle 25 Name_personalDirectOrder personalDirectOrder Administrative History, Biography string boolean Individual field constraints accessionNumber The Toolkit offers two ways to import accessionNumber data: a. If the import field is labeled accessionNumber, the number will be parsed so that an accession number, 2005-54.1 will be targeted to accessionNumber1=2005, accessionNumber2=54, accessionNumber3=1. Periods, forward slashes, and dashes are the three characters that will delimit the accession number fields. b. You may bypass this parsing by labeling the import field containing 2005-54.1 as accessionNumber1, but keep in mind that each of the four fields for the accession number is limited to ten characters. Note: Accession numbers must be unique to import correctly. 331 resourceIdentifier If the import field is resourceIdentifier, the ID will be mapped so that a resource identifier, MC 543 will be targeted to resourceIdentifier1=MC 543 and stored as part of the resource record, if the option to create resource data is selected at the beginning of the import process (see Chapter 6 for further clarification). Date fields dateBegin and dateEnd These fields will accept only integer dates. A.D. dates after 1000 A.D. should be expressed with four digits, e.g., 1972, 1514, 2006, etc. B.C. dates should be expressed with a negative sign first, e.g., -999, -10000, -3. dateExpression Natural language date strings, such as ca. 1976-spring 1987, can be imported into the dateExpression field. Note: The dateExpression field has a parser that will parse 1963-1987 into dateBegin=1963 and dateEnd=1987. If a dateBegin is provided without a corresponding dateEnd the record will not be imported, and if the dateEnd is less than the dateBegin (e.g., dateBegin = “1967” and dateEnd = “0”), the record will not be imported. accessionDate, acknowledgementDate, agreementSent, agreementReceived Upon import, the Toolkit requires that you declare the formal date structure for these transaction date fields. These transactional dates may be in the following formats: yyyy-m-d (example: 196309-27), yyyy/m/d (example: 1963/09/27), m-d-yyyy (example: 09-27-1963) or m/d/yyyy (example: 9/27/1963). Any data in this type of date field that is not properly formatted will cause an error. Subject fields The import of subjects requires the inclusion of both subjectTerm and subjectTermType fields. subjectTermType subjectTermType should be one of the following: (Function (657), Genre / Form (655), Geographic Name (651), Occupation (656), Topical Term (650), Uniform Title (630). subjectTerm Multiple subject terms may be imported by delimiting terms with a pipe character, for example: Boating. | United States History Civil War, 1861-1865. When multiple subjects are imported, they will all be given the same subjectTermType value, as only one subjectTermType may be used for a row of data. Therefore, only one type of subject may be imported for an accession record. Consequently, subject headings, especially multiple subject headings, imported with accession data will likely require remediation after import is complete. To overcome this limitation, you may 332 Preparing the Tab-delimited Accession file choose to import accession data without subject headings and create them directly in the AT. Subject headings created directly in the AT can be manually linked to appropriate accession records. Another option is to use the XML-based method of importing accession data, which allows for the ingest of multiple subjects and subject types. Repositories will need to determine which strategy is most efficient and cost-effective for them. subjectSource On import, subject terms are assigned the source value of “ingest” if no subjectSource is supplied. You may then more easily identify subject terms that require editing or remediation. Name fields Only one name per accession may be imported; therefore you may elect to import only a source name, only a creator name, or only the first name as a subject per each accession record. (Additional names can be added through the Toolkit interface, or by using the XML-based accession import method which does allow for the ingest of multiple names.) Name column headings must be prefaced with “Name.” The only exceptions to this are the nameFunction, nameRole, and nameForm headings. The import of names requires the inclusion of both nameFunction and nameType. nameFunction The function describes the relationship of the name to the accession. NameFunctions are limited to the following entries: source, creator, or subject. nameType The nameType must be: Person, Corporate Body or Family. a. If names exist in a single field in the legacy data, they may be imported into the primary name field for the particular name type, and parsed into individual fields by hand in the Toolkit. To load names into the correct type of primary name field, you must first separate each name into its appropriate target field, as shown below: NameFunction creator subject source Name_corporatePrimaryName Name_personalPrimaryName Smith, John, 1904-1990 Name_familyName Smith Family Acme Industrial Products name_Type Person Family Corporate Body 333 Appendix: Preparing XML Accession Files Importing XML accessions data The Toolkit will not import accessions information straight from a database, such as Access or Filemaker Pro. One method of importing accessions data is through the use of an XML file based on the XML schema included with the Toolkit. The XML format supports the import of multiple names and subjects types. The XML schema needed to create XML formatted data is named accessionsImport.xsd and can be found in the “conf” folder in the directory where the Tookit is stored. Before importing data into the Toolkit, the source accessions data must be mapped to the fields supported by the AT accession import schema. Some mapping tips are listed below. There are many ways to configure accessions data to the Toolkit’s XML schema. All require some understanding of XML. One method is to export the accessions database information into XML and write an XSLT stylesheet to map the database fields to the Toolkit’s schema. Another method is to duplicate the database (for backup purposes), replace the original database fields with the mapped AT fields (listed below), and export the database as an XML file. Other options are possible depending on what type of technical knowledge is accessible to your repository. Element Mapping The following table shows the allowed elements for accession data to be imported into the Toolkit. Some fields have controlled vocabularies, and those are listed in the Rule column. The Field Length is the maximum number of characters allowable for each field. The XML will not validate against the Toolkit schema if field lengths are too long. AccessionNumber and accessionDate must be included in the XML for each accession for the file to validate. Fields need to be listed in the same order as they are presented in the accessionsImport.xsd file. Examples of XML import files are included at the end of this chapter. Accession Elements AT Element Field Length Data Type accessionNumber text accessionDate accessionDispositionNote date no limit accessRestrictions accessRestrictionsNote boolean no limit useRestrictions acknowledgementDate text boolean useRestrictionsNote generalAccessionNote text text no limit text date Rule parsed by delimiters into: accessionNumber1 accessionNumber2 accessionNumber3 accessionNumber4 acknowledgementSent boolean agreementReceivedDate date agreementSentDate date agreementSent boolean agreementReceived boolean accessionProcessed boolean accessionProcessedDate date acquisitionType 255 string dateExpression 255 string bulkDateBegin integer bulkDateEnd integer dateBegin integer dateEnd integer description no limi text cataloged boolean catalogedDate date catalogedNote no limit string conditionNote no limit string real number extentNumber extentType 255 string containerSummary no limit string inventory no limit text processingPlan no limit text processingPriority 255 string processors 255 string processingStatus 255 string processingStartedDate Linear Feet, Cubic Feet date resourceType 255 string retentionRule no limit text title 255 string restrictionsApply boolean rightsTransferred boolean rightsTransferredDate rightsTransferredNote Deposit, Gift, Purchase, Transfer date no limit userDefinedDate1 text date userDefinedDate2 date userDefinedBoolean1 boolean userDefinedBoolean2 boolean userDefinedInteger1 integer userDefinedInteger2 integer real number real number userDefinedReal1 userDefinedReal2 userDefinedString1 255 string userDefinedString2 255 string userDefinedString3 255 string 336 Preparing XML Accession Files userDefinedText1 no limit text userDefinedText2 no limit text userDefinedText3 no limit text userDefinedText4 no limit text resourceIdentifier 20 string Where Stored/AT Target subjectTerm Field Length 150 Data Type Rule string Types are: Function (657), Genre / Form (655), Geographic Name (651), Occupation (656), Topical Term (650), Uniform Title (630) default "ingest " subjectTermType 50 string subjectSource 100 string Field Length Data Type 50 string Creator, Source, Subject Person, Corporate Body, Family Where Stored/AT Target nameLinkFunction nameType 255 string sortName 255 string number 255 string qualifier 255 string nameSource 50 string nameRule 50 string descriptionType 255 string descriptionNote no limit text citation no limit text salutation 255 string contactAddress1 255 string contactAddress2 255 string contactCity 255 string contactRegion 255 string contactCountry 255 string contactMailCode 255 string contactPhone 255 string contactFax 255 string contactEmail 255 string contactName 255 string familyName 35 string familyNamePrefix 15 string corporatePrimaryName 70 string corporateSubordinate1 45 string corporateSubordinate2 45 string personalPrimaryName 30 string personalRestOfName 25 string personalPrefix 25 string personalSuffix 25 string personalDates 15 string personalFullerForm 25 string personalTitle 25 string Rule Administrative History, Biography 337 personalDirectOrder boolean Constraints on legacy accessions data There are constraints on the importing of XML format of accessions data in XML format that may require cleanup of your legacy data prior to import. Not meeting these constraints prevents the record from being ingested into the Toolkit. The following steps are required for correct accession data import: 1. The XML accession file must validate against the schema: a. Dates have to be in valid XML date format, i.e. yyyy-mm-dd. b. Boolean fields (cataloged, restrictionsApply, rights) may only contain the values true, false or 1, 0. c. Integer fields (dateBegin, dateEnd) can only contain whole numbers (for example, 2004, or -50). d. Real number fields (extentNumber) can contain integers and/or decimals. 2. If you have a single field in the database that needs to get mapped into more than one field in the Toolkit, you will need to parse the data into two separate fields. For example, in many cases accessions data will combine extent into one field, such as “11 linear feet”. The Toolkit provides two separate fields for extent: extentNumber and extentType. Extent number contains the numerical value of the extent (as a real number) and extent type contains the extent measurement type of the accession, such as linear feet. 3. Accession Number. The Toolkit offers two ways to import accession number data: a. If the import field is labeled accessionNumber, the number will be parsed so that an accession number, 2005-54.1 will be parsed out as accessionNumber1=2005, accessionNumber2=54, accessionNumber3=1. Periods, forward slashes, and dashes are the three characters that will delimit the accession number fields. b. You may bypass this parsing by labeling the import field containing 2005-54.1 as accessionNumber1, causing the accession number to be stored in one field. Be aware that the each of the four accession number fields are limited to ten characters. Note: Duplicate accession numbers are not allowed and will cause an error. 4. If the import field is labeled resourceIdentifier, the ID will be mapped so that a resource identifier, MC 543 will be imported as resourceIdentifier1=MC 543 and stored as part of the resource record, if the option to create resource data is selected at the beginning of the import process (see below). 5. Dates 338 Preparing XML Accession Files a. dateBegin and dateEnd fields will accept only integer dates. A.D. dates after 1000 A.D. should be expressed with four or less digits, e.g., 814, 1514, 2006. B.C. dates should be expressed with a negative sign first, e.g., -999, -10000, -3. b. Natural language date strings, such as ca. 1976-spring 1987, can be imported into the dateExpression field. Note: The dateExpression field has a parser that will parse 1963-1987 into dateBegin=1963 and dateEnd=1987. If a dateBegin is provided without a corresponding dateEnd, or if the dateEnd field is less than the dateBegin field,the record will not be imported. 6. Subjects. Multiple subjects are allowed. Each subjectTerm must have a corresponding subjectTermType and subjectSource. If no subjectSource is included, the system assigns the value “ingest” to that element. The following is an example of how subjects are represented according to the XML schema: <subjectLink> <subjectTerm>Railroads -- Mexico</subjectTerm> <subjectType>Topical Term (650)</subjectType> <subjectSource>Library of Congress Subject Headings </subjectSource> </subjectLink> 7. Names a. Every name must have a nameFunction (source, creator, or subject) and a corresponding primary name. The function describes the relationship of the name to the accession. The name can additionally have a Role and a Form. b. Every name must also have a nameType. The nameTypes are: Person, Corporate Body or Family. c. If names exist in a single field in the legacy data, they may be imported into one of the primary name fields, and parsed into individual fields by hand in the Toolkit. To load names into the correct type of primary name field, you must first separate each name into its appropriate target field, as shown in the name example below: <nameLink> <nameLinkFunction>Source</nameLinkFunction> <name> <nameType>Person</nameType> <nameSource>lcnaf</nameSource> <nameRule>DACS</nameRule> <contactAddress1>111 Broadway</contactAddress1> <contactCity>New York</contactCity> <contactRegion>New York</contactRegion> <contactCountry>US</contactCountry> <contactMailCode>11211</contactMailCode> <contactEmail>[email protected]</contactEmail> <personalPrimaryName>Clark</personalPrimaryName> 339 <personalRestOfName>Don R.</personalRestOfName> </name> </nameLink> XML Accession File Examples Example One: Simple Accession Files <?xml version="1.0" encoding="UTF-8"?> <accessionRecords xmlns:xsi="http://www.w3.org/2001/XMLSchema-instance" xsi:noNamespaceSchemaLocation="file:/Users/sibylroud/Desktop/accessionsImport.xsd"> <record> <accessionNumber> <part1>MSS</part1> <part2>2007</part2> <part3>034</part3> </accessionNumber> <accessionDate>2007-08-14</accessionDate> <extentNumber>20</extentNumber> <extentType>Linear feet</extentType> <title>Henry Jones papers</title> </record> </accessionRecords> Example Two: Accession Files with Subjects and Names <?xml version="1.0" encoding="UTF-8"?> <accessionRecords xmlns:xsi="http://www.w3.org/2001/XMLSchema-instance" xsi:noNamespaceSchemaLocation="file:/Users/sibylroud/Desktop/accessionsImport.xsd"> <record> <accessionNumber> <part1>MC</part1> <part2>210</part2> </accessionNumber> <accessionDate>2007-12-13</accessionDate> <extentNumber>.5</extentNumber> <extentType>Linear feet</extentType> <containerSummary>programs; participant portfolios; participant bios</containerSummary> <title>Records of the Global Colloquium of University Presidents on Climate Change</title> <restrictionsApply>false</restrictionsApply> <subjectLink> <subjectTerm>Climate change</subjectTerm> <subjectTermType>Topical Term (650)</subjectTermType> <subjectSource>Library of Congress Subject Headings</subjectSource> </subjectLink> <subjectLink> <subjectTerm>University presidents</subjectTerm> 340 Preparing XML Accession Files <subjectTermType>Occupation (656)</subjectTermType> <subjectSource>local</subjectSource> </subjectLink> <nameLink> <nameLinkFunction>Source</nameLinkFunction> <name> <nameType>Person</nameType> <nameSource>local</nameSource> <nameRule>DACS</nameRule> <contactAddress1>Office of University Relations and Public Affairs</contactAddress1> <contactAddress2>111 Broadway</contactAddress2> <contactCity>New York</contactCity> <contactRegion>New York</contactRegion> <contactCountry>US</contactCountry> <contactMailCode>11211</contactMailCode> <contactEmail>[email protected]</contactEmail> <personalPrimaryName>Beyeni</personalPrimaryName> <personalRestOfName>Amelia</personalRestOfName> </name> </nameLink> </record> </accessionRecords> Example Three: Accession Files with Subject, Names, and User-Defined Fields <?xml version="1.0" encoding="UTF-8"?> <accessionRecords xmlns:xsi="http://www.w3.org/2001/XMLSchema-instance" xsi:noNamespaceSchemaLocation="file:/Users/sibylroud/Desktop/accessionsImport.xsd"> <record> <accessionNumber> <part1>RG</part1> <part2>20</part2> <part3>9</part3> </accessionNumber> <accessionDate>2007-08-09</accessionDate> <accessRestrictions>true</accessRestrictions> <accessRestrictionsNote>This collection may contain materials pertaining to student records or student work. Viewing of such materials may be prohibited under FERPA guidelines. Check with the University Archivist for specific restriction guidelines.</accessRestrictionsNote> <generalAccessionNote>Little to no discernible order</generalAccessionNote> <accessionProcessed>false</accessionProcessed> <dateExpression>ca. 1985-2000</dateExpression> <extentNumber>13</extentNumber> <extentType>Linear feet</extentType> <inventory>Student work; published articles; newsletters; planning materials; memoranda; emails; exhibit materials</inventory> <processingStatus>new</processingStatus> <title>Records of the Public History Program</title> <userDefinedBoolean1>true</userDefinedBoolean1> 341 <userDefinedInteger1>6</userDefinedInteger1> <userDefinedText1>Materials picked up from the Public History Office in King Juan Carlos I in July 2007, per request by Peter Wosh.</userDefinedText1> <subjectLink> <subjectTerm>New York City history and culture</subjectTerm> <subjectTermType>Topical Term (650)</subjectTermType> <subjectSource>Library of Congress Subject Headings</subjectSource> </subjectLink> <nameLink> <nameLinkFunction>Creator</nameLinkFunction> <name> <nameType>Corporate Body</nameType> <nameSource>local</nameSource> <corporatePrimaryName>Public History Program</corporatePrimaryName> </name> </nameLink> </record> </accessionRecords> 342 Appendix: Glossary of Archivists’ ToolkitTM Terms The following terms are useful for understanding the features, interface, and documentation for the Archivists’ ToolkitTM. In some cases, general archival or database terms have been given a definition that reflects its application within the context of the Toolkit. Archivists interested in additional or more general archival definitions should refer to the Society of American Archivists Glossary of Archival and Records Terminology by Richard Pearce-Moses (http://www.archivists.org/glossary/). Accession A transaction by which a repository acquires custody of materials deemed to have archival value. The accession may result from a transfer of records from another office in the repository’s institution, from a purchase, or from a gift. In such cases the material becomes the property of the repository or its parent institution, unless the material has been placed in the repository on deposit. An accession may represent a new resource or an accrual to a resource already in the custody of the repository. Administrative metadata Used for managing a digital object and providing more information about its creation and constraints governing its use. See also the following types of metadata: behaviors, descriptive, structural, and technical (digital provenance, rights management, and source). Archival resource An item or an aggregation of items acquired, managed, and made accessible by an archival agency to document certain kinds of activities of individuals and agencies and to support research. One archival resource is typically distinguished from another archival resource by provenance and, in addition, by a unique archival resource identifier such as a collection number or call number. There are three basic types of archival resources as distinguished by provenance. The categories contain items and aggregations. 1. Papers derive from and document the activities of persons and families. 2. Records derive from and document the activities of agencies and institutions 3. Collections derive from the collecting activity of a third party and typically represent multiple provenances. In cases where an archival resource is an aggregation of items, the resource is generally organized and described in a hierarchical fashion. The resource is organized into components that may be organized into smaller components. Each of these components may be described individually in the database. See also hierarchy, multilevel description Description of archival resources is supported in the AT by an array of record types: accession records, location records, name records, subject records, description records (resource, resource component, surrogate, and surrogate component records). Authority Control Names a set of procedures and devices for assuring establishment and consistent application of names and subject terms for use as access terms. The AT supports use of nationally established vocabularies and names. Repositories can also use the same features to build local vocabulary and name files. Behaviors metadata Metadata used to associate executable behaviors with content in the METS object. Complex digital object Includes two or more content files (and their format variants or derivatives) and corresponding metadata. The content files are related as parts of a whole and are sequenced either physically, such as pages, or logically, such as entries in a diary. For example, a complex digital object could consist of a multi-page diary scanned as TIFF images, from which are generated display images (JPEGs and GIFs), plus a transcription of the diary and the metadata for each file. See also digital object and simple digital object. 344 Glossary Container The means by which material enclosures are physically controlled. Container types include box, disc, file, etc. Containers can be linked to a repository location for location management purposes. Content file A file that is either born digitally or produced using various kinds of capture application software. Audio, image, text, and video are the basic kinds of content files. Versions of a content file may be dispersed across several file formats. For example, an image may be scanned into a TIFF file, and then JPEG and GIF files may be created from the TIFF file to increase delivery speeds and protect property rights. See also digital surrogate and surrogate. Data map A construct showing the relationship(s) between two or more data types or formats. The map is typically drawn at the entity and attribute levels, and it is typically used for modeling how to transform a source data type to a target data type. Descriptive metadata Metadata used for the discovery and interpretation of a digital object. Descriptive metadata may be referred to externally or indirectly by pointing from the digital wrapper to a metadata object, a MARC record, or an EAD instance located elsewhere. Or, descriptive metadata may be embedded in the descriptive metadata section of a digital wrapper. See also the following types of metadata: behaviors, administrative, structural, and technical. Digital assets A collection of computer files that contain intellectual content (images, texts, audio, video) and/or metadata of the content and its digital format. The digital assets represent an investment for the creator and / or depositor and an information resource for the researcher. 345 Digital object An entity in which one or more content files and their associated metadata are united, physically and/or logically, through the use of a digital wrapper. See also complex digital object, and simple digital object. Digital provenance metadata Administrative metadata that records the history of migrations/translations performed on a digital library object since its original digital capture or encoding. It should contain information regarding the ultimate origin of a digital object and the derivation of its current elements. Digital wrapper An encoding specification for binding digital content files and their metadata together and for specifying the logical or physical relationship of the content files. METS is the emerging national standard for wrapping digital library materials. All of the content files and corresponding metadata may be embedded in the digital wrapper and stored with the wrapper. This is physical wrapping or embedding. The content files and metadata may also be stored independently of the wrapper and referred to by file pointers from within the wrapper. This is logical wrapping or referencing. A digital object may partake of both kinds of wrapping, for example, embedding of metadata and referencing of content files. Field A specific individual data element stored in one or more tables in the Toolkit’s database. For example, an accession title or a subject source. See also field label and field name. Field label A field's identifier, as it is displayed in the Toolkit’s interface. Field labels can be customized. See also field and field name. Field name The technical name of a given field in the Toolkit. Used in the Toolkit’s technical specifications and configuration interface, this term refers to the name of the field as it is identified in the Toolkit’s programming and back end 346 Glossary database. The field name is not customizable. See also field and field label. File inventory metadata A list of all content files referenced in a digital object. Metadata records referenced in the digital object are not part of the file inventory. Finding aid A description of an archival resource in the custody of an archive, museum, library, or historical society. The description serves as an access tool for researchers. A finding aid typically includes information about the physical and intellectual content of the resource, as well as contextual information about the individual or organization that created it. The finding aid may provide a hierarchical description of a resource, including its intellectual organization and, at varying levels of analysis, descriptions of the component parts (series, folders, items) comprising the collection. Sometimes referred to as an inventory or register. Hierarchy The intellectual organization of an archival resource, proceeding from larger aggregations through varying levels of aggregate components, down to individual items. Hierarchical organization is represented in a finding aid through multi-level description. Two kinds of hierarchy are employed for resource description in the AT. One is the resource, series, subseries, file, item hierarchy that informs DACS and EAD. The other is a simpler parent, child, sibling hierarchy for describing and relating component parts of digital objects or digital surrogates in the AT. Import The process by which external legacy digital records are mapped and incorporated into the AT application. Instance Refers to different states or embodiments of the described content. For example, the resource record or resource component record may describe a letter, but the letter may exist as a sheet of paper, a microfilm image, and a digital object. The AT is structured to allow you to use 347 the same description for multiple instances rather than repeating it for each one. Digital objects are stored in the AT as instances. Inventory A type of finding aid that lists the contents of an archival resource according to their physical or intellectual arrangement. Contextual information about the source of the resource and a summary description of the resource is omitted. Sometimes called a container list. Item The smallest intellectual unit of an archival resource. Although an item may consist of multiple parts (for example, a multi-page letter), it is only as a whole that those parts form a complete unit. In the AT, the item may exist within a resource hierarchy, or on its own. List screen A screen that lists a group of records in the Toolkit. These include the lists used to retrieve and access name, subject, accession, and resource records when you press List All from the main screen. List screens are also used to display linked records. For example, in an accession record, the source, creator, and name subject records linked to the accession record are displayed on the Names & Subjects tab in a list screen. Location Guide A list of all archival resources and accessions and their assigned locations within a repository setting. Lookup List A list of terms that provides a set of predefined values for a certain field. The lookup list is accessed during the data entry process. Multi-level description A finding aid or other access tool that consists of separate, interrelated descriptions of the whole and its parts, reflecting the hierarchical structure of the materials being described. Rapid Data Entry A feature in the Toolkit allowing repeated entry of 348 Glossary component records an efficient manner. Record, Accession For documenting the accession transaction. Record, Archival Resource Identifies an archival entity from other archival entities. Record, Child In a resource or surrogate hierarchy, a child record is a record that is created one or more levels down from the top level of the resource and may be considered a component of another record in the hierarchy. Record, Location A record for identifying the location of an archival resource in whole or in parts. The location record may have a many to one relationship to an archival resource. It may link only to accession records or to archival resource records. Record, Name A record for identifying names and their functions in the context of archival resources. There are three types of names supported, personal, corporate body, and family. And there are three types of functions supported: creator, source, and subject. Each archival resource has only one archival resource record. The archival resource record has a one-to-many relationship to its component records (series/subseries, file, and item, e.g.), as well as to accession records, location records, name records, and subject records. Name records may have a one to many relationship to archival resources. Name records may be linked as a creator or subject to accession records, to archival resource records and resource component records, and to digital object records and digital object component records. Name records linked as sources may only be connected to top-level records, i.e., not component records. Record, Parent In a record hierarchy, a parent record is a record to which 349 other records (child records) resolve. Record, Repository A record for identifying the repository, such as its name, address, contact person, institutional code, etc. Record, Resource Component Record types that are child records of an archival resource record. Subseries, file, and item records are some types of possible component records for an archival resource record in the AT. All component records must resolve to a resource record. Record, Sibling In a hierarchy of records, another record at the same level of a record that is the point of reference. Two series records for the same archival resource would be sibling records. Record, Subject A record for indicating what an archival resource, as a whole or in part, is about. A subject may be a topical term, a geographical term, a function term, an occupational term, or a genre term. (Names that are subjects are applied via the name record type in the AT.) A subject record may have a one-to-many relationship to an archival resource and its component parts. Record, Subdivision A record for delineating a series or subseries with a multilevel archival resource description. The subdivision record is a child record to the archival resource record and a parent record to a lower subdivision record, or to a file record, or to an item record. Record validation The process of checking the content of a record to ensure that it has data in each of the required fields, and that the data meets any uniqueness constraints on the record. If the record does not include required elements or conform to uniqueness requirements, the user is informed that the record is not valid, and provided with information necessary to fix the record. 350 Glossary Repository For the AT, a library, archive, or museum that has custody of archival materials. Repository guide A descriptive tool that includes high-level information about multiple collections within a repository. This may be a complete, alphabetical guide, or a subject-based guide that includes some or all collections in custody of a repository. Resource Can represent one of two types of resources: aggregations (collections, record groups, or fonds, for example) or independt items, that is items that are not part of a larger aggregation. Resource Components The hierarchical levels of an archival resource below the collection level. Components can be series, subseries, file, and item. Components are repeatable indefinitely for each archival resource that is a collection. A resource component cannot be recorded in the AT unless it is linked to its appropriate hierarchical parent and is resolved with a top-level record. Rights management metadata Administrative metadata that indicates the copyrights, user restrictions, and license agreements that govern enduse of the content files. Shelf list A sequential list of physical space in a repository and of the resources assigned to those spaces. Simple digital object Comprised of a single content file (and its format variants or derivatives) and the metadata for the content file. For example, a TIFF of the Mona Lisa, a user JPEG, a reference GIF, and the appropriate metadata would comprise a simple digital object. See also digital object, complex digital object. Source metadata Administrative metadata for describing the object from which the digital content files were produced. Sometimes 351 this will be the original; other times it will be an intermediary, such as a photographic slide used to create a digital version of a poster. Source object The original object from which a surrogate was created. Structural metadata Metadata used to indicate the logical or physical relationship of the content files comprising a complex digital object, e.g., the sequence of pages for a group of images of a diary or of detailed images of a larger image. The structural metadata determines the “correct” presentation of the digital object for the user. Table A set of data elements in the Toolkit’s database, organized in columns and rows as in a table. Relational databases such as the Toolkit are comprised of multiple, linked tables. Therefore, a single record such as an accession record may actually be comprised of data stored in multiple tables. Many of the Toolkit’s customization features require the user to find the appropriate table containing the field or data to be customized. Technical metadata Administrative metadata that describes the technical attributes of a digital file. Unique constraint A method of data control based on the uniqueness of the value of a field, or multiple fields. For example, in the Toolkit all Accession Number values must be unique within a given repository. For all Subject records, the combination of Subject Term, Subject Source, and Subject Rules must be unique within the application as a whole. User-defined fields Repository-specific custom fields enabling the capture of any information not otherwise captured by standard AT fields. 352 Appendix: Support and Upgrades Application Support and Development The New York University Libraries and the UCSD Libraries have committed together to ensuring the Archivists’ ToolkitTM application remains available in good working order until at least 31 December 2011. The terms of this commitment may be extended as additional funding for development of the application is awarded. When such extensions occur, they’ll be announced via the user group listserv described below, and they’ll be posted to the project website at www.archiviststoolkit.org. The two academic library organizations will collaborate to: • make the application available for download and installation, • provide users of the application with a reasonably efficient means for reporting application bugs and tracking their resolution, • resolve reported bugs in the application, • keep the user documentation synchronized with modifications of the application, and • issue new versions of the application and user documentation as warranted. In addition, the following will be provided to support use of the application: • A listserv called [email protected] (Archivists’ Toolkit User Group) has been established as a communication forum for users of the Archivists’ Toolkit. • A FAQ for the application will supplement the listserv. The FAQ will be augmented by project staff as questions and their answers are revealed. • A sandbox has been established so that prospective users may explore the full functionality of the application before downloading and installing it. The data collected in the sandbox will be periodically purged to optimize the functioning of the sandbox. • A cleaner, more restricted instance of the application and data will be hosted on the project website to support using the application in classroom settings. • Workshops, national and regional, developed in collaboration with other interested parties to support training in use of the application. Upgrades of the Application New versions of the Archivists’ ToolkitTM application and its user documentation will be released periodically as a result of reported software bugs being fixed and / or the addition of new functionality in the application: • Fatal and near-fatal software bugs will be resolved immediately, resources permitting, and a new version of the application will be issued soon after. • Less threatening software bugs will be resolved as resources permit. After a certain accumulation of such bugs, a new updated version of the application will be released. • New functionality will be added to the application as the result of securing funding to support the activity. Ongoing development projects will be announced on the project website and will usually include a prospective release schedule for the targeted functionality. Releases of new version of the Archivists’ ToolkitTM will be announced via the project website; ATUGL, the listserv support AT users, and various third party listservs such as those for Archives, EAD, and METS. 354 Appendix: References Archivists’ Toolkit Website (http://www.archiviststoolkit.org/). Archivists Workbench Meetings, 4-5 February and 4-6 November, Sponsored by the Digital Library Federation (http://tpot.ucsd.edu/arc-bench/awwhitepaper.html). Describing Archives: A Content Standard. Chicago: SAA, 2004. Dublin Core Metadata Initiative (http://dublincore.org/). Encoded Archival Context (EAC). (http://www.iath.virginia.edu/eac/) Encoded Archival Description (EAD): Official EAD Version 2002 Web Site (http://www.loc.gov/ead/). International Council on Archives. ISAAR(CPF). International Standard Archival Authority Record For Corporate Bodies, Persons and Families. 2nd Ed. Paris, France, 2003. (http://www.icacds.org.uk/eng/isaar2ndedne_3_1.pdf) International Council on Archives. ISAD(G): General International Standard Archival Description. 2nd Ed. Stockholm, 1999 (http://www.ica.org/sites/default/files/isad_g_2e.pdf). MARC 21 (http://www.loc.gov/marc/). Metadata Object Description Schema: Official Web Site (http://www.loc.gov/standards/mods/). METS: Metadata Encoding & Transmission Standard Official Web Site (http://www.loc.gov/standards/mets/). The Open Archives Initiative Protocol for Metadata Harvesting. Version 2.0. (http://www.openarchives.org/OAI/openarchivesprotocol.html). Society of American Archivists. A Glossary of Archival and Records Terminology (http://www.archivists.org/glossary/).