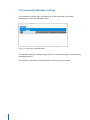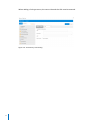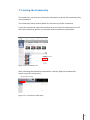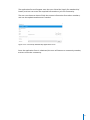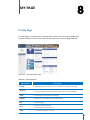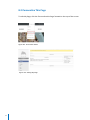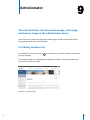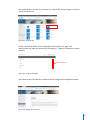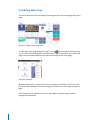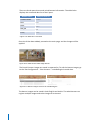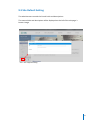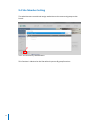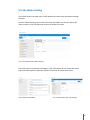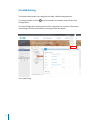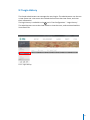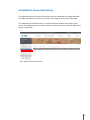
1
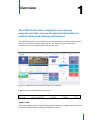
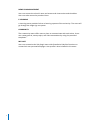
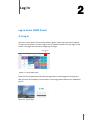
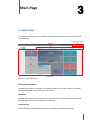
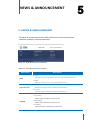
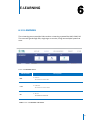
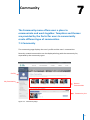
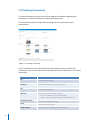
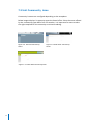
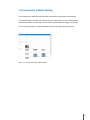
Portal System User Guide for Administrator Ver 1.0 Contents 4 1. Overview 6 2. Log In 7 3. Main Page 8 4. ABOUT JUMP 9 5. NEWS & ANNOUNCEMENT 10 6. E-LEARNING 11 7. Community 11 7.1 Community 12 7.2 Creating Community 13 7.3 Unit Community Home 14 7.4 Community Default Setting 15 7.5 Community Member Setting 16 7.6 Community Menu Setting 18 7.7 Joining the Community 20 8. My PAGE 20 8.1 My Page 21 8.2 Personalize This Page 22 9. Administrator 22 9.1 Editing Contents List 25 9.2 Editing Main Page 2 3 28 9.3 Site Default Setting 29 9.4 Site Member Setting 30 9.5 Site Menu Setting 31 9.6 GNB Setting 32 9.7 Login History 33 9.8 WebPart Connected History Overview 1 The JUMP Portal offers integration of e-Learning program and other various educational information to provide customized learning environment. The JUMP Portal offers it's own bulletins and communities, and other various system functions needed in the LMS, LCMS, and SIS. The Portal users can select and combine services provided by the Portal in 'My Space' Figure 1-1. JUMP(Jazan University Multi Platforms) Portal Main JUMP Portal is composed of 6 main menus. ABOUT JUMP The ‘About JUMP’ menu consists of information needed to navigate the Portal. Users can access Utilities, Manual, FAQ, and Q&A in this menu. 4 NEWS & ANNOUNCEMENT Users can access the school's news and events and view notices and schedules. Users can also access the portal archives. E-LEARNING e-Learning menu provides links to e-learning systems of the university. The users will go through the single sign on system. COMMUNITY The community menu offers users a place to communicate with each other. Users can create general, team project, and club communities by using the provided templates. . MY PAGE Users can customize the 'My Page' menu with SharePoint's My Site functions to create their own personalized pages. User profile is also included in this menu. 5 2 Log In Log in to the JUMP Portal 2.1 Log In The users' initial status in the portal will be a guest, when they access the website. To log in to the portal, click the 'Login Control' button located in the top right of the screen. The page will proceed to single sign on page. Login control Figure 2-1. Portal Main Page Enter the ID and password and click the login button. Once logged in through the SSO, the user will be able to access other e-learning systems without any additional log ins. Figure 2-2. Log In Page 6 3 Main Page 3.1 Main Page The Portal's main page can be divided into SharePoint quick menu, Portal menu, and contents area. SharePoint Quick Menu Site Menu Contents Area Figure 3-1. Portal Main Page Share Point Quick Menu Contains basic menus included in the SharePoint. Users can search within the Portal, and configure basic Portal settings in this menu. Site Menu Displays all the Portal's main menus for users to access. The Portal's main menus are: About JUMP, News & Announcement, e-Learning. Contents Area The contents area displays all the services contents provided by the Portal. 7 4 ABOUT JUMP 4.1 ABOUT JUMP The About JUMP menu not only offers information introducing the Portal page, but also provide information needed to navigate the page. Users can download utilities to optimize the services provided by the Portal. The user manual, FAQ, and Q&A boards are also available to support the Portal users. Figure 4-1-1. About JUMP Menus TABLE 4-1-1. ABOUT JUMP Menus Menu Name ABOUT JUMP Description Vision Mission Goal Introduces JUMP’s visions and missions. System Introduction Information Explains JUMP’s Portal page system information. Work Shops Displays Jazan University's past workshop information. Utilities Offers utilities to be used in the Portal. Manual Offers Portal’s User Manual. Support Q&A Questions and answers regarding the Portal page will be posted in the Q&A board. . FAQ Frequently asked questions and the questions' answers will be posted in the FAQ board. 8 NEWS & ANNOUNCEMENT 5 5.1 NEWS & ANNOUNCEMENT The News & Announcement menu offers latest news and announcements, academic schedules, and multimedia files. Figure 5-1. News & Announcement Menus TABLE 5-1. News& Announcements Menus Menu Name Descriptions NEWS NEWS Displays latest news regarding the university, posted by the administrator. EVENT Displays university’s events , posted by the administrator. Notice ANNOUNCEMENT Displays Portal page’s notices, posted by the administrator . Schedule Displays academic schedules, posted by the administrator. Photo Gallery Offers images uploaded by the administrator. ARCHIVES Video Gallery Offers videos uploaded by the administrator. File Gallery Offers documents uploaded by the administrator. 9 6 E-LEARNING 6.1 E-LEARNING The e-Learning menu provides links to other e-Learning systems like LMS, LCMS, SIS. The users will go through SSO, single sign on service, to log into multiple systems at once. 6-1-1. E-LEARNING Menus Menu Name LMS LCMS SIS Description LMS Link Provides link to the LMS LCMS Link Provides link to the LCMS SIS Link Provides link to the SIS TABLE 6-1-1. E-LEARNING SUB MENU 10 7 Community The Community menu offers users a place to communicate and work together. Templates and themes are provided by the Portal for users to conveniently create different type of communities. 7.1 Community The community page displays the user's profile and the user's communities. Recently created communities are also displayed along with the community list, separated by the community types. Profile My Community Recent Communities Community List Figure 7-1. Community Page 11 7.2 Creating Community To create community, the user must enter required information regarding the community, and check if identical community already exists. The community theme must be selected along with the community access authorization. Figure 7-2. Creating Community The (*) indicates that the information must be entered in order to create the community. Enter all the required information and check for duplicate to create the community. Item 12 Description Title Enter the community’s title. Description Enter the community description and information. URL Enter the community’s URL Public Y/N Select to create public or private community. • Public : All Portal users can join the community. • Private : Users invited by the community administrator can join. Representative Image Select the community’s main image. Theme Select the community’s theme. JAZAN TEMPLATE Select the template according to the community type. 7.3 Unit Community Home Community's menus are configured depending on the templates. Below images displays 3 community types the Portal offers. Since the menus offered by the community types differ from one another, it is important for users to select the right template for the community to minimize editing. Figure 7-3. General Community Home Figure 7-4 Social Club Community Home Figure 7-5. Team Work Community Home 13 7.4 Community Default Setting The community's administrator can edit community information and settings. The administrator can edit the community title, description, access authorization, community leader, community closure status, representative image, and theme. The community leader only be selected from the existing community users. Figure 7-5. Unit Community Default Menu 14 7.5 Community Members Setting The community administrator can add users to the community, and assign authorizations from the 'Member' menu. Figure 7-6. Community Member Menu The 'Member Setting' is used to assign the user as the administrator, for community managing purpose. This function is identical to the SharePoint's 'Person & Group' settings. 15 7.6 Community Menu Setting The community administrator can configure community menus' settings from the 'Menu Settings'. Figure 7-7. Community Menu Setting All the menus included in the community will be displayed on the left of the screen, and the administrator can click the menu to edit or delete. The menu type can also be changed. Available menu types are: Category, Link, and Library & List. Figure 7-8. Library & List Menu 16 When adding a link-type menu, the menu title and the URL must be entered. Figure 7-9. Community Link Setting 17 7.7 Joining the Community The Portal users can view the community information, and join the community they are interested in. The community status must be public for the users to join the community. To join the community, select the community to join from the community list, click the 'Visit Community' button, to visit and view the community information. Visit Community Figure 7-10. Community List After reviewing the community information, click the 'Apply for membership' button to join the community. Joining the Community Figure 7-11. Community’s Main Page 18 The application form will appear once the user clicked the 'Apply for membership' button, and user can enter the required information to join the community. The user can choose to show of hide the contact information from other members, and can also upload attachments if needed. Figure 7-12. Community Membership Application Form Once the application form is submitted, the user will become a community member, and can access the community. 19 8 MY PAGE 8.1 My Page The 'My Page' is a Portal users' personal space, where the users can manage their profiles and tasks, and can also communicate with other users in blogs and SNS. Figure 8-1. Personalized My Page TABLE 8-1. My Page Menus Menu Name Description My Page Composed of portlets, which the users can customize according to their needs. Newsfeed Can share thoughts and have conversations with other users in the Newsfeed. Profile Can manage user information in Profile page. Schedule Manage users can manage, add, and edit schedules. Blog User’s blog page. Apps TASKS Displays all the apps available. Create desirable new list and site. Can add and manage the user’ tasks. 20 8.2 Personalize This Page To edit My Page, click the 'Personalize this Page' located on the top of the screen. Figure 8-2. Personalize Menu Figure 8-3. Editing My Page 21 Administrator 9 The administrators can edit contents page, main page, and banner image in the Administrator menu. The Portal can be edited by using the contents page, saved from the SharePoint. Only administrators can edit the Portal. 9.1 Editing Contents List To edit Portal contents, click the the pop-up page. icon located on top of the screen to proceed to The contents page can be displayed in English and Arabic, and the administrators can click the contents to edit. Figure 9-1. Contents Page 22 22 The administrator can click the 'Content List', where the contents page is saved, to view and edit the list. Figure 9-2. Content List All the contents of the Portal are displayed in the Content List page, and administrator can edit the contents by clicking the [...] button located next to each content. List Item Menu Figure 9-3. Content List Page The administrator can edit the contents and the changes will be applied instantly. Figure 9-4. Editing the Contents 23 The Figure 9-5 displays the contents editing page in Arabic, and the contents can be edited in Arabic and English. Figure 9-5. Contents Page in Arabic Use the 'Edit' menu located on the top of the screen to edit and view the changes. Figure 9-6 Contents Page in English 24 9.2 Editing Main Page The Portal administrators can edit and reconfigure the users‘ main page and guests page. Figure 9-7. JUMP Portal’s Main Page To edit users' main page and guest page, click the icon located on the top of the screen. Click the [Edit Page] from the pop-up window to proceed to the 'edit-mode' page, where the administrators can edit and reconfigure the main page. Figure 9-8. Edit Page Web-part edit mode is composed of various categories like Filters and Forms. click the 'Jazan Main Webparts' form the categories to edit users' main page and guests page. Click the parts to be added to the users' main page and guests' page, and the changes will be applied. Once the part is clicked, the administrator can move the part to desired location by using the 'add part to' function located on the right side of the screen. Figure 9-9 Category List The added parts can be edited by clicking the 'Edit Web Part'. If packaged web part has been added to the Portal, then the administrator must enter ID to view the web part's information. The ID can be entered in ‘Miscellaneous’ menu. Figure 9-10 Edi Web Part Menu Enter the ID on the added web part's Miscellaneous field. For information on ID value, refer to the 9-2-4 Web Part. Figure 9-11 Web Part’s List Title Field The Figure 9-11 displays QnA ID being added to the web part SMS_QNA. 26 There are 6 web parts that needs miscellaneous information. The table belos displays the name and data list of the 6 parts. WebPart Name Webpart Data List Academic Calendar Schedule News News Notice Notice SMS_QnA QnA Survey Survey Figure 9-12 Web Part’s List Value Once the ID has been added, proceed to the main page, and the changes will be applied. Figure 9-13 JUMP Portal’s Main Page Banner The Portal's banner images are saved in separate list. To edit the banner images, go to the 'Site Configuration' - 'Site Contents' - 'mainRollingList' to edit data. Figure 9-14 Banner images saved in the mainRollingList The banner images can be saved in both English and Arabic. The administrator can register multiple images and select images to be viewed. 9.3 Site Default Setting The administrator can edit the Portal's title and descriptions. The entered title and description will be displayed on the left of the sub-page ‘s banner image. 9-3-1. Site Default Setting 28 9.4 Site Member Setting The administrator can add and assign authorities to the users and groups to the Portal. 7-6-1. Unit Community Member Menu This function is identical to the SharePoint's person & group functions. 29 9.5 Site Menu Setting The administrator can add, edit, and/or delete the menu from the Menu Settings function. Click the 'Menu Setting' to view all the menus included in the Portal. Select the menu to edit or click the 'Remove' button to delete the menu. 9-5-1. Unit Community Menu Setting The menu type is composed of Category, Link, and Library & List. Select the menu type and select options and enter menu information to create new menu. 9-5-2 Library & List Menu 9-5-3. Unit Community Link Setting 30 9.6 GNB Setting The Portal administrator can configure the GNB, a Global Navigation Bar. To configure GNB, click the Configuration'. icon of located in the header, and click the 'Site The 'Site Configuration' displays the Portal's navigation list, and their information and settings. Click the information or setting to view the details. 9-6-1. GNB Setting 31 9.7 Login History The Portal administrator can manage the users logins. The administrator can also set a time frame and view users who visited the Portal on that time frame, and view their information. The login history is available in the icon's 'Site Configuration' - 'Login History'. The administrator can set the time frame to view the users, and can download the list as Excel file. 9-7-1. Login History 32 9.8 WebPart Connected History The administrator can view the connection history in between the Portal and LMS. The LMS information is used in the Portal's main page, and the users' 'My Page'. The ‘WebPart Connected History’ is used to analyze the LMS's entry path to the Portal. The administrator can set time frame to view the history, and can download the list as Excel file. 9-8-1. WebPart Connected History 33