1
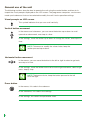
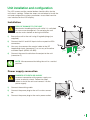
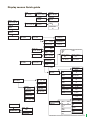
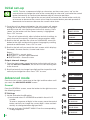
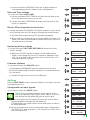
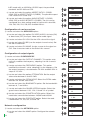
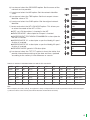
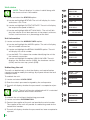
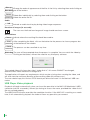
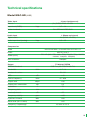
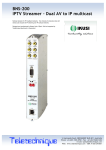
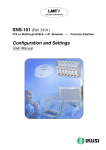
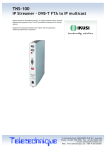
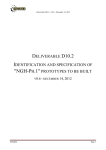
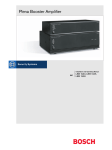
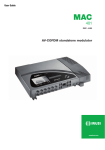
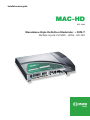
Installation user guide MAC-HD REF. 4493 Standalone High-Definition Modulator DVB-T Multiple inputs: 2xCVBS . HDMI . HD-SDI 2 Contents 4 General safety instructions 4 Types of notices 4 Basic safety instructions 6 Introduction 6 General description 6 Main features 8 General use of the unit 9 Unit installation and configuration 9 Installation 9 Power supply connection 10 Inputs configuration 10 Cascade installation 11 Display Menus Quick-guide 12 Initial set-up 12 Advanced mode 12 General 13 Date and Time settings 12 Block LCD and joystick/control button 12 Restoring factory settings 13 Firmware updates 13 Settings 13 Configuration of INPUT signals 14 Configuration of carrier services 14 Configuration of OUTPUT signals 15 Network configuration 16 Unit status 16 Unit information 16 Unblocking the unit 17 USB PLAYBACK Function 19 Technical Specifications 21 Unit Maintenance, Warranty and Recycling 22 CE Certificate 23 Safety Instructions 3 General safety instructions JJ Read this entire user manual carefully before plugging in the unit. JJ Keep these instructions to hand during unit installation. JJ Follow all the instructions and safety notices when handling the unit. Types of notices The safety notices used in this manual and their meanings are described below: DANGER OF DEATH OR INJURY DANGER This safety notice indicates a potential hazard to people’s lives and/or health. Failure to follow these instructions can lead to severe health consequences and may even cause fatal injuries. JJ Do not install the unit during electrical storms. This could lead to electro-static discharge from lightning. JJ Do not open the unit. You may suffer an electric shock. RISK OF DAMAGE TO THE UNIT ATTENTION This safety notice indicates a potentially hazardous situation. Failure to follow these instructions may cause material damage to the unit. JJ Keep the unit well-ventilated at all times. Install the unit in an area free of dust. Do not place the unit in a place where the ventilation slots may become blocked or obstructed. Leave a distance of at least 20 cm all around the unit’s sides. We recommend installing the unit in the VERTICAL position. JJ Do not expose the unit to rain or moisture. Install in a dry location where potential leaks or condensation will not occur. In the event that liquid gets into the device, disconnect it immediately from the alternating current. JJ Keep flammable objects, candles and anything that may cause a fire away from the unit. JJ Connect the unit to an easily-accessible mains outlet, so that the unit can be quickly disconnected from the outlet in case of emergency. JJ Do not expose the unit to sources of heat (sunlight, radiators, etc). NotE. Do not expose the unit to sources of heat (sunlight, radiators, etc). 4 DO NOT HANDLE ANY OF THE UNIT’S INTERNAL PARTS This notice indicates that users should not handle any internal parts that could affect its working order or warranty. DO NOT DISPOSE OF UNIT AS NORMAL DOMESTIC URBAN WASTE This type of notice indicates that the unit should not be disposed of as unselected domestic urban waste. 5 Introduction General description KEY 1 1 Mains connector 2 3 2 Display (LCD) 3 Control button 5-position joystick 4 HDMI input (for HD or SD channels) 6 4 5 78 9 10 11 12 13 5 AV 1 input 1 yellow RCA CVBS video, 1 white RCA and 1 red RCA for analogue audio (L, R) 6 AV 2 Input 1 yellow RCA CVBS video, 1 white RCA and 1 red RCA for analogue audio (L, R) 7 HD-SDI input (BNC) (for HD or SD channels) 8 USB connector 9 Ethernet connector (RJ-45) 10 TV Loopthrough input (F) 11 TV COFDM output (F) 12 Earthing 13 Removable power source Main features The MAC HD model is a standalone modulator that can process different Video and Audio signals, to form a high-definition COFDM channel. The unit has various inputs: • Two audio and analogue video channels, with 6 RCA connectors. • One digital video and audio channel in HDMI format, with an HDMI connector. • One digital video and audio channel in HD-SDI format, with a BNC connector. This product is ideal for distributing video signals in residential installations, hotels, special buildings or video monitoring systems with digital COFDM digital TV modulation. The MAC HD unit also has a USB connector and includes new functions thanks to its evolving and upgradable software, such as: video playback from a USB memory stick, digital signage and other potential future developments. 6 Programming: • User interface with LCD display and control button for basic configuration. • User interface from web browser via Ethernet connection. • All settings are automatically memorised. • Re-programmable as many times as required. • Firmware updated via Ethernet connection with web browser. • Easy to configure. Signal processing: • CVBS video input and mono/stereo audio. • HDMI input (does not process HDCP-encrypted signals). • HD-SDI Input. • Standard SD and HD quality signal. • Supported colour encoding systems: PAL/SECAM/NTSC/B&W. • RF DVB-T output, adjustable throughout the whole CATV band (45MHz-858MHz). • Looptrough for combination of external RF TV signals. • User interface with LCD and joystick connector. • User interface with internet. • USB interface. • RTC to allow insertion of the TDT, TOT and EITs. To keep the date and time after shutdown, will use a supercapacitor that allows at least keep one days without food. 7 General use of the unit The following sections describe how to operate the unit using the control button and how to interpret the visual prompts displayed on the LCD screen. The programme comprises a main menu made up of submenus that can be selected to modify the unit’s basic operation settings. Visual prompts on LCD screen This symbol indicates that you can scroll vertically. Vertical button movement In the menus and submenus, you can move the button up or down to scroll upwards or downwards, one step at a time. In the settings, move the button up or down to change the values, one step at a time. NOTE. To browse or modify the values faster, keep the button pressed up or down. Horizontal button movement In the menus, you can move the button to the left or right to select or go back, one step at a time. In the settings, move the button to the left or to the right to browse, select or go back, step by step. NOTE. Too browse faster, keep the button pressed to the left or to the right. Press button In the menus, this selects the submenu. In the submenus, this selects the settings. In the settings, this selects the parameter value. 8 Unit installation and configuration The LCD screen and the control button should suffice for the unit’s basic settings. Follow the steps set out below to install the unit and configure the various parameters accessible from the user interface on the LCD display. Installation RISK OF DAMAGE TO THE UNIT ATTENTION Mechanical handling of the unit whilst it is switched on can cause damage to it. Do not plug the unit into the mains before or during installation. 1) Secure the unit to the wall using 3 lag bolts/plugs (no supplied). 2) Connect the AV1 and AV2 inputs to the respective RCA connectors. 3) You may also connect the coaxial cable to the RF loopthrough input (connector F) or use any of the other available inputs (HDMI, HD-SDI). 4) Connect the coaxial cable from the output to the unit (connector F). F HDMI USB Salida R ugh)) ro V (loopth -SDI T V 2 HD ernet A 1 AV Eth NOTE. We recommend installing the unit in a vertical position. Power supply connection DANGER OF DEATH OR INJURY DANGER Incorrect connection of the power supply can cause an electric shock. Follow the steps below to install the unit and connect it to the power supply. 1) Connect the earthing cable. 2) Connect the power plug to the unit’s mains connector. 3) Connect the power plug to the mains power outlet. 9 Inputs configuration L R HDMI CVBS Audio L R CVBS Audio HD SDI 5 Possible combinations : • SD CVBS/Audio + SD CVBS/Audio • SD HDMI + SD CVBS/Audio • SD SDI + SD CVBS/Audio 2 simultaneous SD channels • HD HDMI • HD SDI 1 HD channel Cascade installation It is possible to daisy-chain various MAC-HD units together, to increase the service capacity. To do this, connect the RF output of the first unit to the TV input (loopthrough) of the second unit (see installation example). For installations with 2 or more units, it is necessary identify each unit with a different TSID value, and to identify each service with different SID values as well. Configuring the TSID and SID values requires advanced configuration (see the Advanced unit configuration section). NOTE. The advanced configuration process of the unit is explained in the “Web interface user manual”, available at http://www.ikusi.tv 1 CVBS/Audio 10 HD-SDI TV HDMI 2 CVBS/Audio TV + AV1 + AV2 + HD-SDI + HDMI Display menus Quick-guide IKUSI MAC Stating ... MAC-HD V1.00 CH 21 SYSTEM OK MAC-HD V1.00 CH 21 SYSTEM OK >COUNTRY Insert country COUNTRY GREAT BRITAIN COUNTRY >LANGUE LANGUAGE ANGLAIS INPUT >OUTPUT CHANNEL 21 INPUT OUTPUT ATTENUATION 00 COUNTRY >LANGUE ADVANCED MODE IP DATE-TIME >GENERAL SETTINGS IP ADDRESS 192.168.1.2 TIME 10:10 DATA 1-1-2013 TIMEZONE Europa/Madrid BLOCK OFF BLOCK LCD FACTORY RESET UPDATE GENERAL >SETTINGS NETWORK MASK 255.255.255.0 PUERTA DE ENLACE 192.168.1.1 CODE 0000 ** CAUTION ** CANCEL ACEP CVBS 1 HDMI SDI ** CAUTION ** CANCEL ACTUALI ASPECT RATIO 1 16/9 ASPECT RATIO 2 16/9 BITRATE AUD 1 384 Kbits/s BITRATE AUD 2 384 Kbits/s INPUT TYPE CVBS/HDMI/SDI INPUT OUTPUT DVB-T CVBS 2 CONFIGURATION RF NETWORK COFDM CONFIGURE RF NETWORK CH1: CH1: STATUS INFO MODULE V:X V:X A:X A:X STATUS : OK ALARM : OK MODELE MAC-HD OUTPUT BIT 31.670 Mb/s SERIAL NUMBER 0123456789 MIN ACT MAX NULL XX% XX% XX% MAC 0009E3FFFFFF HW 1.00 MAC-HD SW 1.00 BLOCK CODE INFORMATION NAME XXXX Channel SUPPLIER IKUSI FREQUENCY 474.000 MHz NID 00001 ATTENUATION 00 TSID 00004 COFDM MODE 2K ONID 08442 BANDWIDTH 8 MHz MODE NIT LCN Europe model INTER GUARDE 1/32 INSER TDT-TOT ON/OFF CONSTELLATION 64 QAM 21 CODE RATE 7/8 BS 1.00 SERVICE 1 SERVICE 2 1.00 COFDM OUTPUT ON/OFF VID 2 ON LCN 2 001 BLOCK CODE 0001 SID 2 00001 SERIAL NUMBER 4488SA123456 NAME 2 XXX AUD 2 ON VID 1 ON AUD 1 ON LCN 1 001 SID 1 00001 NAME 1 XXX 11 Initial set-up NotE. To enter a sequence of digits or characters on the screen, press “up” on the control button to change the value of the current digit or character, and move the control button horizontally to confirm/move between digit or character positions. Place the cursor to the right of the current value and move the control button vertically, to increase or decrease the current value. Keep the control button pressed upwards or downwards to increase or decrease the current value faster. 1) Once the unit has been switched on, the start-screen will appear, asking you to enter the COUNTRY. Move the button to the right and the cursor will start flashing next to the first country. Press “down” on the button until the correct country is highlighted. Press “OK” to save. * The unit will automatically adjust all other technical settings to match those of the country in question (see parameters table). 2) Scroll to the left, position the cursor on LANGUAGE, move the button to the right and locate the correct language by scrolling upwards or downwards. Press “OK” to save. 3) Scroll to the left until you reach the start-screen, which displays the model, firmware version, channel and status. Status: SYSTEM OK = correct status. NO input = no input signal detected SYSTEM nOK = incorrect status Output channel change 1) From the start-screen, move the button to the right until you locate the OUTPUT CHANNEL; the cursor will start flashing next to the channel. >COUNTRY GREAT BRITAIN COUNTRY >LANGUAGE MAC-HD 1.00 CH 21 SYSTEM OK INPUT >OUTPUT OUTPUT CHANNEL 21 ATTENUATION 0.0 dB 2) Scroll horizontally to change from digit position to position and vertically to change the value. Press “OK” to save. Advanced mode From the start-screen, move once to the right and then down until you reach the ADVANCED MODE screen. General From the GENERAL screen, move the button to the right to access the following menus: IP Settings 1) Locate and select the IP option. a) Locate and select IP ADDRESS to establish the unit’s IP number. To enter a sequence of digits in the screen, move the control button vertically to change the current digit’s value and horizontally to change between digit positions. b) Locate and select SUBNET MASK. Enter the corresponding 12-digit sequence. 12 MAC-HD 1.00 CH 21 SYSTEM OK ADVANCED MODE >GENERAL SETTINGS >IP DATA-TIME IP ADDRESS 192.168.001.006 NETWO MASKRK 255.255.255.000 GATEWAY 192.168.001.001 c) Locate and select GATEWAY. Enter the 12-digit sequence corresponding to the IP address of the LAN gateway. Date and Time settings 1) Locate and select DATE-TIME. a) Locate and select DATE-TIME to set the time and date of the unit in the format hh:mm yyyy-mm-dd. b) Locate and select TIMEZONE to select the time-zone of the country in question. Block LCD and joystick/control button 1) Locate and select the BLOCK LCD option to block access to the unit’s settings from the LCD display through the control button. a) Activate (ON) or deactivate (OFF) the blocking option. b) Set a code for unblocking the unit if this option has been activated. The code may be used to unblock the unit by means of the web browser interface. >GENERAL SETTINGS IP >DATA-TIME TIME 00:50 DATA 2013-01-01 TIMEZONE Europe/London >LCD BLOCK RESET FACTORY CODE BLOCK OFF 0000 Restoring factory settings 1) Locate and select FACTORY SETTINGS to restore the unit’s factory settings. a) Select the ACCEPT option to delete all the modifications made in the settings by the unit’s installer or operator. Press “OK” to save. After a few seconds, the unit will restart, with the original default settings. Firmware Updates 1) Locate and select the UPDATE option a) Download the FIRMWARE from the website (www.ikusi.tv). b) Unzip the downloaded content and place it in the root directory of a pen drive. LCD BLOCK >RESET FACTORY ** PRECAUCION ** CANCEL ACEPT >UPDATE ** CAUTION ** CANCEL UPDATE c) Connect the pen drive to the unit’s USB input. Settings From the SETTINGS screen, move the button to the right to access the following menus: Configuration of input signals. 1) Locate and select the INPUT option. NotE. Press the control button to the right to access one of the possible input types. Press “down” to access the settings for the following types of input signal. a) Locate and select the CH1 option to check the type of input signal and detect the video (X) and audio (X). In CVBS mode, only video values will be displayed, as there is no audio detection. b) Locate and select one of the five possible input combinations. The MAC-HD is able to process 1 HD channel or two SD channels simultaneously. GENERAL >SETTINGS >INPUT DVB-T OUTPUT TYPE OF INPUT 1 HD/SD SDI TYPE OF INPUT 1 HD/SD HDMI TYPE OF INPUT 2 SD SDI+CVBS TYPE OF INPUT 2 SD HDMI+CVBS TYPE OF INPUT 2 SD CVBS+CVBS 13 In SD mode with an HADMI or HD-SDI input, the permitted standards are SD 480i and 576i. ASPECT RATIO 1 16/9 c) Locate and select the option ASPECT RATIO 1 (CVBS1, HDMI, SDI) or ASPECT RATIO 2 (CVBS2). The possible aspect ratio values are 4:3 and 16:9. BITRATE AUDIO 1 384 KBits/s d) Locate and select the option AUDIO BITRATE 1 (CVBS1, HDMI, SDI) or AUDIO BITRATE 2 (CVBS2). The unit can be configured for a data coding speed at input or bit rate of 96; 128; 160; 192; 224; 256; 320 and 384 Kbits/s. ASPECT RATIO 2 16/9 BITRATE AUDIO 2 384 KBits/s Configuration of carrier services 1) Locate and select the SERVICES option. a) Locate and select the option CH VIDEO AUDIO. Activate (ON) or deactivate (OFF) the input video and/or audio signal. b) Locate and select CH LCN. Set the LCN value of the signal. CH1 VIDEO AUDIO ON ON c) Locate and select CH SID (use the output channel value). Set the Service Identifier. CH1 LCN 001 d) Locate and select CH NAME. Assign a name to the signal on CH1. See characters table at the end of this manual. CH1 SID 00021 Configuration of output signals 1) Locate and select CONFIGURE RF. a) Locate and select the OUTPUT CHANNEL. This option automatically modifies the frequency, adapting it to the channels’ centre. b) Locate and select the FREQUENCY option. This option modified the channel’s value, adapting it to the frequency. Set the output frequency value between 474 MHz and 862 MHz in steps of 125 kHz. CH1 NAME MAC SERV1 INPUT >DVB-T OUTPUT >CONFIGURE RF NETWORK c) Locate and select the option ATTENUATION. Set the output attenuation between 0 and 25.5 dB. CHANNEL OUTPUT 21 d) Locate and select the OFDM MODE. Select the OFDM mode between 2K and 8K subcarriers. FREQUENCY 474.000 MHz e) Locate and select the BANDWIDTH option. Set the bandwidth between 6, 7 and 8 Mhz. f) Locate and select the GUARD INTERVAL option. Select the guard interval between 1/32, 1/16, 1/8 and 1/4 of symbol. g) Locate and select the CONSTELLATION option. Select the modulation constellation between 16QAM and 64QAM. h) Locate and select the CODE RATE option. Select the code rate between 1/2, 2/3, 3/4, 5/6 and 7/8. Network configuration 1) Locate and select the NETWORK option. a) Locate and select the NAME option. Configure the network name. 14 >SERVICE 1 SERVICE 2 ATTENUATION 0.0 dB OFDM MODE 8K BANDWIDTH 8 MHz GUARD INTERVAL 1/4 CONSTELLATION 64 QAM CODERATE 1/4 b) Locate and select the PROVIDER option. Set the name of the network service provider. OUTPUT >DVB-T OUTPUT c) Locate and select the NID option. Set the network identifier value. CONFIGURER RF >NETWORK d) Locate and select the TSID option. Set the transport stream identifier value or TS. NAME Standard e) Locate and select the ONID option. Set the original network identifier. SUPPLIER IKUSI f) Locate and select the NIT LCN MODE option. This allows you to select the mode of the NIT’s LCNs : NID 00001 OFF: no LCN descriptor is inserted in the NIT. EUROPE MODE: a descriptor for Europe is inserted. INDEPENDENT TELEVISION COMMISSION: a descriptor for the UK is inserted. NORDIG MODE V1: a descriptor as per the Nordig V1 specification is inserted. NORDIG MODE V2: a descriptor as per the Nordig V2 specification is inserted. GENERIC MODE: generic LCN descriptor. TSID 00021 ONID 00100 MODE NIT LCN OFF g) Locate and select the TDT-TOT option to insert the tables that provide information pertaining to the date and time, updated according to the country’s time difference or season. INSERT TDT-TOT ON TABLE OF DEFAULT PARAMETERS FOR SELECTED COUNTRY COUNTRY LANG. NITMODE LCN MODE NID TSID ONID Bandwidth Channels Frequencies Australia English ON Generic 1 28 8442 7 Mhz 28 - 69 526000 - 819875 France French ON Europe 1 21 8442 8 Mhz 21 - 69 470000 - 861875 UK English ON IndTlCom(UK) 1 21 8442 8 Mhz 21 - 69 470000 - 861875 Italy Italian ON Europe 1 21 8442 8 Mhz 21 - 69 470000 - 861875 Portugal English ON Generic 1 21 8442 8 Mhz 21 - 69 470000 - 861875 Spain Spanish ON OFF 1 21 8442 8 Mhz 21 - 69 470000 - 861875 Note: When configuring the country settings, the equipment is always configured with the first of the permitted channels, whilst the frequency will be that of the centre channel (529.5 Mhz for Australia and 474 Mhz for all others). . 15 Unit status NotE. The unit displays its status in detail along with the alarms active in the module. 1) Locate and select the STATUS option. >STATUS MODULE INFO CH1: CH2: V:0 A:0 V:0 A:0 a) Locate and highlight STATUS: The unit will display its status and alarms: OK / Error. ESTATUS: OK ALARM: OK b) Locate and highlight OUTPUT BITRATE. The unit will display the output data speed in Mbits/s. OUTPUT BITRATE 19.216 MBits/s c) Locate and highlight MIN ACT MAX NULL. The unit will display the volume of null data packets at the output, minimum, current, and maximum as a percentage of the total. NULL MIN ACT MAX 00% 000% 000% Unit information 1) Locate and select the MODULE INFO option. a) Locate and highlight the MODEL option. The unit will display the unit model and version. b) Locate and highlight the SERIAL NUMBER option. The unit will display the serial number. c) Locate MAC. This shows the number identifying the unit for the network connection. d) Locate and highlight the option V.SW V.HW V.BS. The unit displays the software version (V.SW), the hardware version (V.HW) and the start-up system (V.BS). STATUS >MODULE INFO MODEL MAC-HD SERIAL NUMBER 0123456789 MAC 0009E1234567 V. HW 1.00 V. SW 1.00 V. BS 1.00 Unblocking the unit The unit can be blocked, so that the display and control button cannot be used to modify the settings by anyone without the lock code/password. MAC-HD 1.00 0009E1234567 To unblock the unit: 1) Locate and select LOCK CODE. >BLOCK CODE INFORMATION 2) Enter the unlock password assigned by the unit operator. BLOCK CODE 0001 3) The unit will display whether the password is accepted or rejected. Note. The unit will remain unblocked until it is restarted or the operator deactivates the block. To unblock the unit without the blocking password: 1) Locate and select INFORMATION. 2) Contact the supplier of the unit and provide the serial number. The supplier of the unit will provide an unblocking code for the stated serial number. 3) The unit will display whether the password has been accepted or rejected. 16 BLOCK CODE >INFORMATION SERIAL NUMBER 4488SA123456 USB Player NotE. This device is used to play back videos through the USB port. Using the software, the user can draw up a personalised list of images and videos in order to create the end file (“video-final.ts”), which can then be played back through the MAC-HD modulator. Check the firmware version of the unit, USB PLAYER option, available as of version 1.21. Software to create videos for playback through the MAC-HD. Users should install the software on their PC by downloading the setup file “conversor-mac-installer.exe” from the MAC-HD webpage at www.ikusi.tv. The programme will run the installation wizard. a) Step one, language option. The installation wizard will prompt you to create a shortcut on the desktop (when not using the shortcut, the application is located at: “C: \aplicacion-mac\conversor-mac exe”). Double-click the icon to run the programme. b) The application opens a new window with the following options: Files Add Insert files in the application by locating their path and clicking on the button, or by dragging and dropping them into the application window. The following formats are valid: - Image: jpg, png, bmp, gif - Video: wmv, mpg, mp4, ts, avi - Audio: mp3 17 Move up Change the order of appearance of the files in the list by selecting them and clicking on Move down one of the buttons Remove Delete files individually by selecting them and clicking on the button. Remove all Delete the entire file list. Audio Add Include an audio track to play during video image sequences. Duration of images (in seconds). 0 The user must indicate how long each image should remain on screen. Save address Browse Indicate where the resulting file should be saved to. Start After completing the fields, click on the button for the process to show a progress bar Conversion at the bottom of the window. Cancel The process can be cancelled at any time. Conversion Watch video The user will be prompted when the process is complete. You can watch the video by clicking on the button, without the need for any third-party software. The created video will always be called: “video-final.ts”; this name CANNOT be changed, otherwise Mac Home would fail to recognise it. The application will report any requirements which may be missing when creating the video, and will also state the maximum duration of the resulting video (40 minutes max.). The user should copy this file to a FAT32 format pen drive and insert it in the device’s USB connector. USB Player Video playback Playback will begin automatically when you insert the pen drive in the MAC-HD Modulator’s USB connector (wait for a seconds), without you having to access the menu, provided the “video-final.ts” file was created properly. The USB PLAYER function overrides the modulator function. If the MAC-HD is working as a modulator, it will automatically playback the video.ts file on any pen drive you connect. 18 Technical specifications Model MAC-HD (4493) Video input 4 (non-simultaneous) Format Input level (CVBS) (2x) CVBS, HDMI, HD-SDI Vpp Video standards PAL/SECAM/NTSC/B&W Audio input 1 (Mono and stereo) Digital audio Audio input level (analog) 0.7 - 1.4 Yes (HDMI, HD-SDI) Vpp 0.5 - 2.5 Compression Video MPEG2 MP@ML, H.264/MPEG4 AVC MP L4.1 Audio MPEG1 layer II SD, HD (480i, 576i, 480p, 576p, 720p50, 720p,1080i50, 1080i60, 1080p50, 1080p60) Video quality Max resolution 1080p60 Output TV digital COFDM COFDM Standard Bandwidth DVB-T as per ETSI EN 300 744 MHz Number of carriers MER 6/7/8 2K / 8K dB ≥ 40 Central frequency MHz 45 - 858 Output level dBμV ≥ 80 dB 0.5 Ω 75 kHz 1 Output pitch attenuation Impedance Frequency pitch Level adjustment dB -25 Frequency stability ppm ≤±30 Espurious in band dBc ≤-60 Noise level (∆B = 8 MHz) dBc ≤-65 Frequency Loopthrough 45 MHz at 2.5 G 19 Web user interface LCD Keyboard Web 16x2 characters Joystick 5 positions Ethernet Processing NIT adapted Yes (automatically generated) SDT adapted Yes (entering configurable name) TS Monitoring PSI/SI adapted NETWORK Configuration Yes Generation and insertion of tables PAT, PMT, SDT, NIT NID, ONID, TSID, Network name, Provider SID Configuration Yes LCN Treatment Yes TDT, TOT Treatment Yes EIT Treatment Yes Operation Supply voltage Consumption Operating temperature Firmware updates Video playback through USB port 20 230 - 240 VAC 19 W 0 to 45 ºC Yes, web or USB way Maintenance Unit care HANDLING THE INSIDE OF THE UNIT IS FORBIDDEN Do not dismantle or try to repair the unit, its accessories or its components. This will render the warranty null and void. JJ JJ JJ Do not use the power cable if it is damaged. To disconnect the power cable, pull carefully on the plug and not the cable. To clean the panel and unit connections: FF FF FF JJ JJ Unplug the unit. Clean with a slightly damp, soft cloth. Allow to dry completely before use. Do not spill liquid onto the unit. Keep ventilation slots free of dust and any foreign bodies. Troubleshooting The most frequent problems arising during unit installation are indicated below. If you encounter any other type of problem, please contact the unit sales team. Problem Possible cause Forgotten unlock code Nothing appears on LCD display -----The power cable is not connected properly What to do Contact your supplier Check the power cable Warranty Notwithstanding any complaints made to the direct vendor of the product, IKUSI offers unit users a two-year warranty as of the invoice date, which shall become valid on presenting the receipt of purchase. During the warranty period, IKUSI is responsible for any faults arising due to material or manufacturing defects and shall repair the receiver or replace it for another corresponding to the state of technology at that time. The warranty does not cover any faults or defects due to misuse or non-fulfilment of the information given in this installation manual. All complaints other than those indicated are not included in the warranty. More specifically, the warranty does not cover services provided by the authorised vendor (e.g. installation, configuration or programme updates) or the repair of any damages or injuries caused to the client or others as a result of the installation or of receiver operations. Unit recycling Recycling of electrical and electronic equipment (Applicable in the European Union and in European countries with selective waste collection systems.) This symbol on your unit or its packaging indicates that this product cannot be treated as general domestic waste and must be handed in at the corresponding point of collection for electric and electronic equipment. By ensuring this product is disposed of correctly you will help prevent negative consequences for the environment and human health, which could otherwise be caused by inappropriate waste handling of this product. Recycling of materials helps preserve natural resources. For more detailed information on the recycling of this product, please contact your local council, your nearest collection point or the distributor from whom you purchased the product. 21 CE Certificate EC-Declaration of Conformity marking We, Manufacturer IKUSI, Angel Iglesias, S.A. Paseo Miramón, 170 E-20009 San Sebastián, Spain declare that the product AV-COFDM Autonomous Modulator MAC-HD is in conformity with EMC LVD Council Directive 2004/108/CE (EMC Directive) Standards to which conformity is declared : and EN 50083-2 :2007 Cabled distribution systems for television and sound signals. Part 2: Electromagnetic compatibility for equipment. Council Directive 2006/95/CE (Low Voltage Directive) Standards to which conformity is declared : EN 60728-11 :2005 Cabled Distribution Systems for Television and Sound Signals. Part 11: Safety Requirements. EN 60065 :2003 Safety requirements for mains operated electronics and related apparatus for household and similar general use. Luis Rodríguez Navarrete San Sebastián, march 2013 22 R&D Director Safety Instructions 23 Ángel Iglesias, S.A. Paseo Miramón, 170 20014 San Sebastián, Spain Tel. +34 943 44 88 00 Fax +34 943 44 88 20 [email protected] www.ikusi.tv MAC-HD (EN)