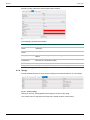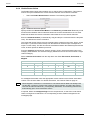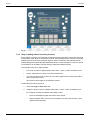
1
User Manual
RollPod Designer
www.s-a-m.com
RollPod
Information and Notices
Information and Notices
Copyright and Disclaimer
Copyright protection claimed includes all forms and matters of copyrightable material and
information now allowed by statutory or judicial law or hereinafter granted, including without
limitation, material generated from the software programs which are displayed on the screen
such as icons, screen display looks etc.
Information in this manual and software are subject to change without notice and does not
represent a commitment on the part of SAM. The software described in this manual is
furnished under a license agreement and can not be reproduced or copied in any manner
without prior agreement with SAM, or their authorized agents.
Reproduction or disassembly of embedded computer programs or algorithms prohibited.
No part of this publication can be transmitted or reproduced in any form or by any means,
electronic or mechanical, including photocopy, recording or any information storage and
retrieval system, without permission being granted, in writing, by the publishers or their
authorized agents.
SAM operates a policy of continuous improvement and development. SAM reserves the right
to make changes and improvements to any of the products described in this document
without prior notice.
Contact Details
Customer Support
For details of our Regional Customer Support Offices please visit the SAM web site and
navigate to Support/Customer Support Contacts.
https://s-a-m.com/support/contact-support/
Customers with a support contract should call their personalized number, which can be found
in their contract, and be ready to provide their contract number and details.
Issue 7 Rev 1
Page 2
© 2015 SAM
RollPod
Contents
Contents
1. Introduction. . . . . . . . . . . . . . . . . . . . . . . . . . . . . . . . . . . . . . . . . . . . . . . . . . . . . . . . .
1.1 System Requirements . . . . . . . . . . . . . . . . . . . . . . . . . . . . . . . . . . . . . . . . . . . . . .
1.2 Installing RollPod Designer . . . . . . . . . . . . . . . . . . . . . . . . . . . . . . . . . . . . . . . . . .
1.3 Overview . . . . . . . . . . . . . . . . . . . . . . . . . . . . . . . . . . . . . . . . . . . . . . . . . . . . . . . .
1.3.1 1U RollPods . . . . . . . . . . . . . . . . . . . . . . . . . . . . . . . . . . . . . . . . . . . . . . .
1.3.2 3U RollPods . . . . . . . . . . . . . . . . . . . . . . . . . . . . . . . . . . . . . . . . . . . . . . .
1.3.3 GPI Modules . . . . . . . . . . . . . . . . . . . . . . . . . . . . . . . . . . . . . . . . . . . . . .
1.3.4 Luna Router Control Panels. . . . . . . . . . . . . . . . . . . . . . . . . . . . . . . . . . .
6
6
6
6
6
7
7
7
2. General Concepts. . . . . . . . . . . . . . . . . . . . . . . . . . . . . . . . . . . . . . . . . . . . . . . . . . . .
2.1 RollPod Controls . . . . . . . . . . . . . . . . . . . . . . . . . . . . . . . . . . . . . . . . . . . . . . . . . .
2.1.1 Hard Buttons . . . . . . . . . . . . . . . . . . . . . . . . . . . . . . . . . . . . . . . . . . . . . .
2.1.2 Soft Buttons (3U RollPods only). . . . . . . . . . . . . . . . . . . . . . . . . . . . . . . .
2.1.3 Shaft Encoders (3U RollPods only) . . . . . . . . . . . . . . . . . . . . . . . . . . . . .
2.2 GPI Ports. . . . . . . . . . . . . . . . . . . . . . . . . . . . . . . . . . . . . . . . . . . . . . . . . . . . . . . .
2.3 Functions. . . . . . . . . . . . . . . . . . . . . . . . . . . . . . . . . . . . . . . . . . . . . . . . . . . . . . . .
2.4 Pages . . . . . . . . . . . . . . . . . . . . . . . . . . . . . . . . . . . . . . . . . . . . . . . . . . . . . . . . . .
2.5 Categories . . . . . . . . . . . . . . . . . . . . . . . . . . . . . . . . . . . . . . . . . . . . . . . . . . . . . . .
2.6 Channels . . . . . . . . . . . . . . . . . . . . . . . . . . . . . . . . . . . . . . . . . . . . . . . . . . . . . . . .
8
8
8
8
8
8
8
9
9
9
3. RollPod Designer User Interface. . . . . . . . . . . . . . . . . . . . . . . . . . . . . . . . . . . . . . .
3.1 Drag and Drop Support . . . . . . . . . . . . . . . . . . . . . . . . . . . . . . . . . . . . . . . . . . . .
3.2 File Menu Options . . . . . . . . . . . . . . . . . . . . . . . . . . . . . . . . . . . . . . . . . . . . . . . .
3.2.1 Create a New Configuration. . . . . . . . . . . . . . . . . . . . . . . . . . . . . . . . . .
3.2.2 Open an Existing Configuration . . . . . . . . . . . . . . . . . . . . . . . . . . . . . . .
3.2.3 Close the Current Configuration. . . . . . . . . . . . . . . . . . . . . . . . . . . . . . .
3.2.4 Save the Current Configuration . . . . . . . . . . . . . . . . . . . . . . . . . . . . . . .
3.2.5 Convert a Configuration to a Different RollPod Type . . . . . . . . . . . . . . .
3.2.6 Exit RollPod Designer . . . . . . . . . . . . . . . . . . . . . . . . . . . . . . . . . . . . . .
3.3 Edit Menu Options. . . . . . . . . . . . . . . . . . . . . . . . . . . . . . . . . . . . . . . . . . . . . . . .
3.4 RollCall Menu Options. . . . . . . . . . . . . . . . . . . . . . . . . . . . . . . . . . . . . . . . . . . . .
3.5 Help Menu Options . . . . . . . . . . . . . . . . . . . . . . . . . . . . . . . . . . . . . . . . . . . . . . .
11
12
12
12
12
12
13
13
13
13
13
13
4. Network View . . . . . . . . . . . . . . . . . . . . . . . . . . . . . . . . . . . . . . . . . . . . . . . . . . . . . .
4.1 Connecting to a RollCall Network . . . . . . . . . . . . . . . . . . . . . . . . . . . . . . . . . . . .
4.2 The Network Tab . . . . . . . . . . . . . . . . . . . . . . . . . . . . . . . . . . . . . . . . . . . . . . . . .
4.2.1 Discover Network - all units . . . . . . . . . . . . . . . . . . . . . . . . . . . . . . . . . .
4.2.2 Discover Network - gateways only . . . . . . . . . . . . . . . . . . . . . . . . . . . .
4.2.3 Expand Tree . . . . . . . . . . . . . . . . . . . . . . . . . . . . . . . . . . . . . . . . . . . . .
4.2.4 Collapse Tree . . . . . . . . . . . . . . . . . . . . . . . . . . . . . . . . . . . . . . . . . . . .
4.2.5 View . . . . . . . . . . . . . . . . . . . . . . . . . . . . . . . . . . . . . . . . . . . . . . . . . . .
4.2.6 Contextual (right-click) Menus . . . . . . . . . . . . . . . . . . . . . . . . . . . . . . . .
4.3 The Cached Units Tab . . . . . . . . . . . . . . . . . . . . . . . . . . . . . . . . . . . . . . . . . . . . .
14
14
15
15
15
15
15
16
16
17
5. Remote View . . . . . . . . . . . . . . . . . . . . . . . . . . . . . . . . . . . . . . . . . . . . . . . . . . . . . . . 18
6. Config View . . . . . . . . . . . . . . . . . . . . . . . . . . . . . . . . . . . . . . . . . . . . . . . . . . . . . . . .
6.1 Edit Mode . . . . . . . . . . . . . . . . . . . . . . . . . . . . . . . . . . . . . . . . . . . . . . . . . . . . . .
6.1.1 Model View. . . . . . . . . . . . . . . . . . . . . . . . . . . . . . . . . . . . . . . . . . . . . . .
6.1.2 Virtual Controls. . . . . . . . . . . . . . . . . . . . . . . . . . . . . . . . . . . . . . . . . . . .
6.1.3 Tallies . . . . . . . . . . . . . . . . . . . . . . . . . . . . . . . . . . . . . . . . . . . . . . . . . . .
6.1.4 Strings . . . . . . . . . . . . . . . . . . . . . . . . . . . . . . . . . . . . . . . . . . . . . . . . . .
6.1.5 Lua Script . . . . . . . . . . . . . . . . . . . . . . . . . . . . . . . . . . . . . . . . . . . . . . . .
6.2 Pages . . . . . . . . . . . . . . . . . . . . . . . . . . . . . . . . . . . . . . . . . . . . . . . . . . . . . . . . .
6.2.1 Cutting and Pasting Pages Between Configurations . . . . . . . . . . . . . . .
6.3 Property Sheet View . . . . . . . . . . . . . . . . . . . . . . . . . . . . . . . . . . . . . . . . . . . . . .
6.4 Global Properties. . . . . . . . . . . . . . . . . . . . . . . . . . . . . . . . . . . . . . . . . . . . . . . . .
Issue 7 Rev 1
Page 3
20
20
20
24
25
26
27
31
32
32
33
© 2015 SAM
RollPod
Issue 7 Rev 1
Contents
6.4.1 Category Table . . . . . . . . . . . . . . . . . . . . . . . . . . . . . . . . . . . . . . . . . . . .
6.4.2 Channel Table . . . . . . . . . . . . . . . . . . . . . . . . . . . . . . . . . . . . . . . . . . . .
6.4.3 Dynamic Table . . . . . . . . . . . . . . . . . . . . . . . . . . . . . . . . . . . . . . . . . . . .
6.4.4 Enable Router-follow . . . . . . . . . . . . . . . . . . . . . . . . . . . . . . . . . . . . . . .
6.4.5 Ethernet table . . . . . . . . . . . . . . . . . . . . . . . . . . . . . . . . . . . . . . . . . . . . .
6.5 Page Properties. . . . . . . . . . . . . . . . . . . . . . . . . . . . . . . . . . . . . . . . . . . . . . . . . .
6.6 Control Properties . . . . . . . . . . . . . . . . . . . . . . . . . . . . . . . . . . . . . . . . . . . . . . . .
6.6.1 Hard Button Control Properties . . . . . . . . . . . . . . . . . . . . . . . . . . . . . . .
6.6.2 Soft Button Control Properties . . . . . . . . . . . . . . . . . . . . . . . . . . . . . . . .
6.6.3 Shaft Encoder Properties . . . . . . . . . . . . . . . . . . . . . . . . . . . . . . . . . . . .
6.6.4 GPI Port Control Properties . . . . . . . . . . . . . . . . . . . . . . . . . . . . . . . . . .
6.7 Virtual Control Properties . . . . . . . . . . . . . . . . . . . . . . . . . . . . . . . . . . . . . . . . . .
6.7.1 Virtual Hard Button Control Properties . . . . . . . . . . . . . . . . . . . . . . . . . .
6.7.2 Virtual String Region Control Properties . . . . . . . . . . . . . . . . . . . . . . . .
6.7.3 Virtual Edit String Control Properties . . . . . . . . . . . . . . . . . . . . . . . . . . .
6.7.4 Virtual Shaft Encoder Control Properties . . . . . . . . . . . . . . . . . . . . . . . .
6.7.5 Virtual Button Set Control Properties . . . . . . . . . . . . . . . . . . . . . . . . . . .
6.8 String Regions (3U RollPods Only) . . . . . . . . . . . . . . . . . . . . . . . . . . . . . . . . . . .
6.8.1 Adding a New String Region . . . . . . . . . . . . . . . . . . . . . . . . . . . . . . . . .
6.8.2 Repositioning and Resizing String Regions . . . . . . . . . . . . . . . . . . . . . .
6.8.3 String Region Functions . . . . . . . . . . . . . . . . . . . . . . . . . . . . . . . . . . . . .
6.9 Functions. . . . . . . . . . . . . . . . . . . . . . . . . . . . . . . . . . . . . . . . . . . . . . . . . . . . . . .
6.9.1 Unused. . . . . . . . . . . . . . . . . . . . . . . . . . . . . . . . . . . . . . . . . . . . . . . . . .
6.9.2 Page Navigation. . . . . . . . . . . . . . . . . . . . . . . . . . . . . . . . . . . . . . . . . . .
6.9.3 Page Select . . . . . . . . . . . . . . . . . . . . . . . . . . . . . . . . . . . . . . . . . . . . . .
6.9.4 Remote Control . . . . . . . . . . . . . . . . . . . . . . . . . . . . . . . . . . . . . . . . . . .
6.9.5 Channel Select. . . . . . . . . . . . . . . . . . . . . . . . . . . . . . . . . . . . . . . . . . . .
6.9.6 Lock . . . . . . . . . . . . . . . . . . . . . . . . . . . . . . . . . . . . . . . . . . . . . . . . . . . .
6.9.7 Take and Cancel . . . . . . . . . . . . . . . . . . . . . . . . . . . . . . . . . . . . . . . . . .
6.9.8 Radio Button . . . . . . . . . . . . . . . . . . . . . . . . . . . . . . . . . . . . . . . . . . . . .
6.9.9 Checkbox . . . . . . . . . . . . . . . . . . . . . . . . . . . . . . . . . . . . . . . . . . . . . . . .
6.10 Search Tab . . . . . . . . . . . . . . . . . . . . . . . . . . . . . . . . . . . . . . . . . . . . . . . . . . . .
6.11 Download Mode. . . . . . . . . . . . . . . . . . . . . . . . . . . . . . . . . . . . . . . . . . . . . . . . .
6.11.1 Config Details . . . . . . . . . . . . . . . . . . . . . . . . . . . . . . . . . . . . . . . . . . . .
6.11.2 Download Config . . . . . . . . . . . . . . . . . . . . . . . . . . . . . . . . . . . . . . . . .
6.11.3 Update Addresses . . . . . . . . . . . . . . . . . . . . . . . . . . . . . . . . . . . . . . . .
6.11.4 Update Script . . . . . . . . . . . . . . . . . . . . . . . . . . . . . . . . . . . . . . . . . . . .
6.11.5 Resume Edit . . . . . . . . . . . . . . . . . . . . . . . . . . . . . . . . . . . . . . . . . . . . .
6.11.6 Selected Download Targets . . . . . . . . . . . . . . . . . . . . . . . . . . . . . . . . .
6.11.7 Download Log and Progress Bar . . . . . . . . . . . . . . . . . . . . . . . . . . . . .
6.11.8 Warnings . . . . . . . . . . . . . . . . . . . . . . . . . . . . . . . . . . . . . . . . . . . . . . .
6.11.9 Errors . . . . . . . . . . . . . . . . . . . . . . . . . . . . . . . . . . . . . . . . . . . . . . . . . .
36
37
38
39
40
41
41
41
43
44
45
46
47
48
48
49
49
50
50
50
50
51
51
51
51
52
53
54
55
55
58
61
62
63
63
63
63
64
64
64
64
65
7. Examples. . . . . . . . . . . . . . . . . . . . . . . . . . . . . . . . . . . . . . . . . . . . . . . . . . . . . . . . . .
7.1 Example 1: Hello World . . . . . . . . . . . . . . . . . . . . . . . . . . . . . . . . . . . . . . . . . . . .
7.1.1 Start RollPod Designer. . . . . . . . . . . . . . . . . . . . . . . . . . . . . . . . . . . . . .
7.1.2 Choose a RollPod Model . . . . . . . . . . . . . . . . . . . . . . . . . . . . . . . . . . . .
7.1.3 Add a String Region . . . . . . . . . . . . . . . . . . . . . . . . . . . . . . . . . . . . . . . .
7.1.4 Download Configuration to the RollPod . . . . . . . . . . . . . . . . . . . . . . . . .
7.2 Example 2: RollPod Configuration . . . . . . . . . . . . . . . . . . . . . . . . . . . . . . . . . . .
7.2.1 Step 1: Designing the Configuration. . . . . . . . . . . . . . . . . . . . . . . . . . . .
7.2.2 Step 2: Creating Pages and Navigation Buttons . . . . . . . . . . . . . . . . . .
7.2.3 Step 3: Setting up the Main Page. . . . . . . . . . . . . . . . . . . . . . . . . . . . . .
7.2.4 Step 4: Adding Video Processing Controls . . . . . . . . . . . . . . . . . . . . . .
7.2.5 Step 5: Creating the Audio Delay Page . . . . . . . . . . . . . . . . . . . . . . . . .
7.2.6 Step 6: Creating the Audio Delay 1 to Audio Delay 8 Pages . . . . . . . . .
7.2.7 Step 7: Creating the Convert Page . . . . . . . . . . . . . . . . . . . . . . . . . . . .
7.2.8 Step 8: Setting Up Additional Channels . . . . . . . . . . . . . . . . . . . . . . . . .
7.2.9 Step 9: Downloading the Configuration . . . . . . . . . . . . . . . . . . . . . . . . .
68
68
68
69
70
72
73
73
74
77
79
85
86
91
92
93
Page 4
© 2015 SAM
RollPod
Contents
8. RollPod / GPI Template . . . . . . . . . . . . . . . . . . . . . . . . . . . . . . . . . . . . . . . . . . . . . . 94
8.1 Pages . . . . . . . . . . . . . . . . . . . . . . . . . . . . . . . . . . . . . . . . . . . . . . . . . . . . . . . . . 94
8.2 Information Window. . . . . . . . . . . . . . . . . . . . . . . . . . . . . . . . . . . . . . . . . . . . . . . 95
8.3 Setup Pod Hardware (RollPods only) . . . . . . . . . . . . . . . . . . . . . . . . . . . . . . . . . 96
8.3.1 LCD Settings (3U RollPods only) . . . . . . . . . . . . . . . . . . . . . . . . . . . . . . 96
8.3.2 Hard Button LEDs Brightness . . . . . . . . . . . . . . . . . . . . . . . . . . . . . . . . 96
8.4 Setup Pod Software . . . . . . . . . . . . . . . . . . . . . . . . . . . . . . . . . . . . . . . . . . . . . . 96
8.4.1 Network Name . . . . . . . . . . . . . . . . . . . . . . . . . . . . . . . . . . . . . . . . . . . . 97
8.4.2 RollCall Address. . . . . . . . . . . . . . . . . . . . . . . . . . . . . . . . . . . . . . . . . . . 97
8.4.3 Version Info . . . . . . . . . . . . . . . . . . . . . . . . . . . . . . . . . . . . . . . . . . . . . . 97
8.4.4 Restart . . . . . . . . . . . . . . . . . . . . . . . . . . . . . . . . . . . . . . . . . . . . . . . . . . 97
8.5 Configuration . . . . . . . . . . . . . . . . . . . . . . . . . . . . . . . . . . . . . . . . . . . . . . . . . . . . 98
8.6 Connections . . . . . . . . . . . . . . . . . . . . . . . . . . . . . . . . . . . . . . . . . . . . . . . . . . . . 98
8.6.1 Local Control . . . . . . . . . . . . . . . . . . . . . . . . . . . . . . . . . . . . . . . . . . . . . 98
8.6.2 Category. . . . . . . . . . . . . . . . . . . . . . . . . . . . . . . . . . . . . . . . . . . . . . . . . 98
8.7 Logging . . . . . . . . . . . . . . . . . . . . . . . . . . . . . . . . . . . . . . . . . . . . . . . . . . . . . . . . 99
8.7.1 LogServer. . . . . . . . . . . . . . . . . . . . . . . . . . . . . . . . . . . . . . . . . . . . . . . . 99
8.7.2 Log Control. . . . . . . . . . . . . . . . . . . . . . . . . . . . . . . . . . . . . . . . . . . . . . 100
8.7.3 Aggregate Comms . . . . . . . . . . . . . . . . . . . . . . . . . . . . . . . . . . . . . . . . 100
8.8 Hard Buttons . . . . . . . . . . . . . . . . . . . . . . . . . . . . . . . . . . . . . . . . . . . . . . . . . . . 100
8.8.1 Down event . . . . . . . . . . . . . . . . . . . . . . . . . . . . . . . . . . . . . . . . . . . . . 100
8.8.2 Up event. . . . . . . . . . . . . . . . . . . . . . . . . . . . . . . . . . . . . . . . . . . . . . . . 100
8.8.3 LED Colour. . . . . . . . . . . . . . . . . . . . . . . . . . . . . . . . . . . . . . . . . . . . . . 101
8.8.4 Log Button . . . . . . . . . . . . . . . . . . . . . . . . . . . . . . . . . . . . . . . . . . . . . . 101
8.9 Local Control . . . . . . . . . . . . . . . . . . . . . . . . . . . . . . . . . . . . . . . . . . . . . . . . . . . 101
8.10 Virtual Control Pages . . . . . . . . . . . . . . . . . . . . . . . . . . . . . . . . . . . . . . . . . . . 102
8.10.1 Virtual Buttons . . . . . . . . . . . . . . . . . . . . . . . . . . . . . . . . . . . . . . . . . . 102
8.10.2 Virtual String Regions. . . . . . . . . . . . . . . . . . . . . . . . . . . . . . . . . . . . . 102
8.10.3 Virtual Shaft Encoders . . . . . . . . . . . . . . . . . . . . . . . . . . . . . . . . . . . . 103
8.10.4 Virtual Button Sets . . . . . . . . . . . . . . . . . . . . . . . . . . . . . . . . . . . . . . . 103
8.10.5 Virtual Edit Strings . . . . . . . . . . . . . . . . . . . . . . . . . . . . . . . . . . . . . . . 103
Issue 7 Rev 1
Page 5
© 2015 SAM
RollPod
Introduction
1. Introduction
RollPod Designer’s main function is to create and download custom configurations for
RollPod Configurable Control Panels, IQGPI modules and Luna Router Control Panels.
RollPod Designer has two secondary functions:
•
To provide download of custom configurations created by the SPI and GPI
configurations
•
To provide custom template downloads for SPI modules.
1.1 System Requirements
RollPod Designer requires:
Note:
•
Microsoft Windows 7, Windows XP, Windows 2000, or Windows Vista.
•
Sun™ Java runtime version 1.6.0_18 or later.
•
RollPod/GPI with firmware v5.13 or later.
There are two board variants -1A and 2Y. The 1A board is not supported.
1.2 Installing RollPod Designer
RollPod Designer is installed as part of the RollCall Suite using a Windows installation
executable.
To install the RollPod Designer software:
•
Double click on the installer file, and then follow the on-screen instructions.
The default installation location of RollPod Designer is:
•
C:\Program Files\SAM\RollCall Suite\Pod Designer
For more information about the installation process, refer to RollCall Suite: Introduction.
1.3 Overview
RollPod Designer is a configuration tool used to program RollPods, GPI modules and Luna
Router Control Panels. When a RollPod or Luna is delivered from the factory, it has no
functionality. Similarly, GPI modules have very limited functionality. RollTrack commands from
other ports can be used to activate an IQGPI module’s output ports but, beyond that, they
have no functionality. To unlock the power of these devices, first program them to do
something useful – this program is known as a configuration.
1.3.1 1U RollPods
There are five models of 1U RollPod, 8 button, 10 button, 16 button, 18 button and 40 button.
The buttons are illuminated press buttons and are referred to as hard buttons.
Note:
Issue 7 Rev 1
Hard buttons do not support soft labeling. The RollPod manual describes how to insert
acetate labels. 1U RollPods, 3U RollPods and the Luna LED panels require acetate labels.
The Luna LCD panels have soft labeling.
Page 6
© 2015 SAM
RollPod
Introduction
1.3.2 3U RollPods
There are two models of 3U RollPods:
•
3U-12: 8 soft buttons, 12 hard buttons, 4 shaft encoders, and an LCD display screen.
•
3U-16: 8 soft buttons, 16 hard buttons, 2 shaft encoders, and an LCD display screen.
1.3.3 GPI Modules
The supported GPI types are the GPI-12 Input/Output (IQGPI01/IQCGPI-B-R), GPI-12
Output Only (IQGPIO2, IQGPIO3, IQGPIO4), and the GPI-23U Input/Output(IQGPI00).
1.3.4 Luna Router Control Panels
These panels can be configured as router control panels or as RollPods (or both).These are
1U and 2U panels with either LED or LCD buttons.
The Luna panels provide:
•
RGB button color
•
Ethernet connectivity
The LCD panels support soft button labelling.
Issue 7 Rev 1
Page 7
© 2015 SAM
RollPod
General Concepts
2. General Concepts
This section provides useful background information.
2.1 RollPod Controls
2.1.1 Hard Buttons
On a RollPod, each control can provide a function and indicate an output state reflecting the
status of the control.
Each output state has its own user definable style, defined by a combination of:
•
Color (Green, Orange, or Red)
•
Brightness (Dim or Bright)
•
Flashing (Flashing or Solid)
Additionally, a style can be defined as off.
Note:
Luna panels support full RGB color.
2.1.2 Soft Buttons (3U RollPods only)
Soft buttons, available on 3U RollPods, can provide the same functions as hard buttons, as
well as Take and Cancel functions, which must be linked to a shaft encoder. Soft button labels
display on the LCD display screen.
Soft buttons can only display two output states: Selected or Unselected.
2.1.3 Shaft Encoders (3U RollPods only)
Shaft encoders, available on 3U RollPods, are used to scroll through a range of specified
values. For example, shaft encoders can be used to adjust values that are controlled by a
slider bar on the control template. Shaft encoder labels appear on the LCD display screen.
Shaft encoders can have Take and Cancel functions associated with them (this is not
required).
Shaft encoders can display Selected, Unselected and Error states.
2.2 GPI Ports
GPI output ports can only exist in one of two states - Open or Closed. The state can be
observed by means of logging or control templates.
2.3 Functions
Every RollPod control has a function. The function determines what the control does. A
control that does not do anything is given an ‘unused’ function. Functions include page and
channel selection (which apply to the RollPod unit or GPI module only) among others.
The Checkbox and Radio Button functions are referred to as Remote Functions. They are
used to control functions on a remote unit, such as an IQ module. For example, a Radio
Button configured to select a specific Input on a module.
For further information, see Functions on page 51.
Issue 7 Rev 1
Page 8
© 2015 SAM
RollPod
General Concepts
2.4 Pages
Pages are used to group functions and allow the same physical control to be given different
properties and behaviors at different times or in different contexts. For example, a RollPod
can be set up so that all of the video settings it controls are on one page and all of the audio
settings it controls on another. The physical controls on the RollPod have different functions
depending on the selected page.
On a RollPod, each hard button can either be defined as a static button or a page-specific
button.
•
When defined as a static button, a button always has the same properties and
behavior regardless of which page is selected.
•
When a button is defined as a page specific button, it can change its properties and
behaviors, depending on which page is currently selected.
GPI ports, soft buttons, and shaft encoders are always page specific.
2.5 Categories
Remote functions need to connect to an actual RollCall unit. This is done by means of a
category. Categories define the units that the RollPod connects to, and are associated with
compatible commands at a specific address or group of addresses. Often categories are
associated with units of the same type, but this is not necessarily the case.
A category has the following properties:
•
Name - a user assigned name, unique to each category, used to reference it
•
Default ID - the RollCall unit ID of the target unit (for information only)
•
CmdSet - the RollCall command set version (for information only)
•
Description - any descriptive text about the category
•
Type - single channel, multi channel or dynamic channel
•
Address - the address of the RollCall unit, for single channel
•
Addresses - a list of RollCall addresses, for multi channel
•
IP index - this is defined by the ‘Number of IP connections‘ global property (Ethernet
enabled models only)
2.6 Channels
A Category can be single channel, multi channel, or dynamic channel.
Issue 7 Rev 1
•
Single channel categories refer to a single RollCall unit. For a single channel
category, enter the RollCall address of the unit.
•
A multi channel category refers to more than one RollCall unit and, therefore, has
more than one RollCall address associated with it. Supply the name of the category to
a remote function, just as for a single channel category. Which of the addresses
associated with the category is used depends upon the currently selected channel, as
specified by the channel select function. For further information, see Channel Select
on page 53.
•
A dynamic channel category refers to more than one RollCall unit but the addresses
do not need to be defined in advance. They are supplied by a remote value from
another category known as the source category. A source category must be a single
channel type.
Page 9
© 2015 SAM
RollPod
General Concepts
Note:
•
A blank address for a single channel category is regarded as a bad address at
runtime, and any associated buttons go to the error state. If a multi channel
category has a blank address for the currently selected channel, this is considered
legal, and does not cause an error condition.
•
Units referred to by a multi channel or dynamic channel category, do not have to be
of the same type, but they should have compatible command sets for the
commands used in the configuration.
In addition to having a numeric index, each channel can also be named. This is useful in
multi-channel configurations on 3U RollPods where the channel name can display in a string
region on the LCD display screen.
Fig 1. illustrates the link between remote functions, categories and select.
Function
Unused
Lock
Page Navigation
Channel Select
Radio Button
Checkbox
Function
Unused
Lock
Page Navigation
Channel Select
Radio Button
Checkbox
Remote Connection 1
Name
Remote Connection 2
Opacity
Name
Aspect
Value
50
Value
800
Mode
Independent
Mode
Independent
Command Number
3676
Command Number
1400
Category
IQDSK00
Category
IQDARCS
Categories
Fig 1.
IQDEC03
Single Channel
0000:01:01
IQDARCS
Single Channel
0000:01:02
IQDSK00
Multi Channel
Channel Number
IQDSK00
1
0000:01:03
2
0000:02:03
3
0000:03:03
4
0000:04:03
Relationship Between Remote Functions, Categories, and Channels
All addresses must be specified with respect to the RollPod or GPI where the configuration is
downloaded. The easiest way to ensure this is to always make a network connection to a
gateway on the same local net as the RollPod or GPI.
Issue 7 Rev 1
Page 10
© 2015 SAM
RollPod
RollPod Designer User Interface
3. RollPod Designer User Interface
Network View
Menu
Toolbar
Config View
Remote View
Fig 2.
RollPod Designer User Interface
The RollPod Designer GUI has five main components:
•
The Menus - the menu bar at the top of the window provides access to most of the
Designer’s functionality.
•
Toolbar - The toolbar provides quick access to the most commonly used menu
functions.
•
Network View - The network view consists of two tabs. The Network tab displays the
current RollCall network, if connected. The Cached Units tab displays any units
previously connected, and their templates.
•
Config View - The config view displays any open configurations.
•
Remote View - The remote view displays any open templates and menu sets for units
that can be controlled by means of a RollPod, Luna or GPI.
The Toolbar can be repositioned to any side of the main window by dragging its grab handle
to the desired side. It can also be made to float freely in front of the window by dragging it to
the middle of the window.
The relative size of the Network, Config and Remote views can be adjusted using the splitter
bars.
Issue 7 Rev 1
Page 11
© 2015 SAM
RollPod
RollPod Designer User Interface
3.1 Drag and Drop Support
One of RollPod Designer’s key user features is drag and drop support. There are several
tasks that support drag and drop, including:
•
When connected to a RollCall Network, units can be dragged from the tree onto a
configuration view to provide category addresses (when in edit mode) or target
addresses (when in download mode).
•
Controls from the template remote view or command list remote view can be dragged
onto controls or GPI ports in the Config model view - assigning the command to the
button or port.
If there is not a suitable category available, the Designer automatically creates one.
•
Controls in the Config model view can be moved by drag and drop.
3.2 File Menu Options
The File menu provides options to create new configurations, open existing configurations,
and save configurations.
Fig 3.
RollPod Designer Menu
3.2.1 Create a New Configuration
To create a new configuration:
1.
From the File menu, select New.
Alternatively, click the New toolbar button.
2.
In the window that displays, choose the type of RollPod, Luna or GPI for the
configuration and then click Create.
3.2.2 Open an Existing Configuration
To open a previously saved configuration, from the File menu, select Open. In the window
that displays, navigate to and select the file to open.
Alternatively, click the Open toolbar button.
3.2.3 Close the Current Configuration
To close the current configuration, from the File menu, select Close. If there are any unsaved
changes to the configuration, a prompt displays to save the configuration before it closes.
Alternatively, click the x in the Config view tab.
Issue 7 Rev 1
Page 12
© 2015 SAM
RollPod
RollPod Designer User Interface
3.2.4 Save the Current Configuration
There are two options for saving the current configuration:
•
Click Save to save the current configuration. The first time a configuration is saved, a
prompt appears to enable the user to enter the name and file path.
Alternatively, click the Save toolbar option.
•
Click Save As to save the current configuration with a new name or file path.
3.2.5 Convert a Configuration to a Different RollPod Type
A new configuration can be created based on the current one, but for use with a different
model of RollPod, Luna or GPI. For example, a RollPod cannot be converted to a GPI or vice
versa.
To convert a configuration:
1.
From the File menu, select Convert.
Alternatively, click the Convert toolbar button.
2.
Note:
In the window that appears, select the model to convert to and then click Convert.
Some controls are lost when converting to a type with fewer physical controls.
3.2.6 Exit RollPod Designer
To exit the RollPod Designer application, from the File menu, select Exit. If there are unsaved
changes to any configurations, a prompt displays to save the configuration before the
application closes.
Note:
The application cannot close if there are any downloads in progress.
3.3 Edit Menu Options
RollPod Designer has a standard set of edit menu functions: Undo, Redo, Cut, Copy, and
Paste. All of these functions are available either under the Edit menu or from the toolbar.
3.4 RollCall Menu Options
The options in the RollCall menu deal with the Designer’s connection to the RollCall network:
•
Connect to a RollCall network.
•
Download configurations to RollPods, Lunas or GPIs.
•
Perform packet traces to diagnose communication problems.
3.5 Help Menu Options
The Help menu comprises two options:
Issue 7 Rev 1
•
View Manual displays this manual.
•
About displays a dialog that shows information about the RollPod Designer release
that is installed.
Page 13
© 2015 SAM
RollPod
Network View
4. Network View
The Network view consists of two tabs:
Note:
•
The Network tab - this displays the RollCall network, similar to the RollCall Control
Panel.
•
The Cached units tab, - this provides a list of all unit types for which cached templates
and menu sets are available.
The Network view is discussed in more detail in the RollCall Control Panel Operator’s
manual.
4.1 Connecting to a RollCall Network
From the RollCall menu, select Network.
1.
Alternatively, click the Network toolbar button.
The Build Network dialog box appears.
Fig 4.
2.
Build Network Dialog Box
Enter the IP address of the required RollCall network The default communication port
is 2050. To use a different port, enter the address as ipaddress@port.
Connect to the same local net as the RollPod or GPI.
Use the drop down list to select the IP address from a list of addresses which the
RollPod Designer has previously connected to successfully.
Note:
3.
Issue 7 Rev 1
Click OK.
Page 14
© 2015 SAM
RollPod
Network View
4.2 The Network Tab
The Network tab displays the current RollCall network in a tree view, similar to that displayed
by the RollCall Control panel.
Fig 5.
Network Tab
4.2.1 Discover Network - all units
The Discover Network - all units button (the large binoculars) polls the entire RollCall Network
and gathers information about everything that is connected to it. Depending on the size of the
RollCall network, this process can take several minutes to complete.
If required, the discovery process can be interrupted by clicking the Cancel button while the
discovery process is running. After a network has been discovered, it displays in the network
tree fully expanded.
4.2.2 Discover Network - gateways only
The Discover Network - gateways only button (the small binoculars) polls the RollCall
Network tree and gathers information down to the Gateway level. Anything below the
Gateway level must then be discovered by manually expanding the relevant Gateways. This
option does not take as much time as Discover Network - all units.
As with the 'all units' option, this action can be canceled while the discovery process is
running. Similarly, when the discovery process is complete, the network tree displays in the
expanded view.
4.2.3 Expand Tree
This button fully expands all of discovered network components in the view. Note that before
a network node can be expanded, it must first be discovered as described previously in this
section.
The Expand Tree button does not perform any function with regard to network discovery. Its
only purpose is to change the visual representation of the network tree view.
4.2.4 Collapse Tree
This button fully collapses the network view. Note that any units that have already been
'discovered' remain so for the remainder of the currently connected session.
Issue 7 Rev 1
Page 15
© 2015 SAM
RollPod
Network View
4.2.5 View
This toolbar menu item is used to specify additional information about the units in the network
view. When the View button is clicked, the user can decide to display any or all of the
following:
•
Unit Address
•
Unit Type
•
Unit Version
4.2.6 Contextual (right-click) Menus
Each controllable unit in the network tree has an associated pop-up menu. To access this
menu, right-click on a unit. The menu options that display depend upon the type of unit and
are noted in the following table.
Menu Selection
Description
Open Template
Opens the template and menu set of the unit in
a new tab in the remote view. Double-clicking All controllable units
on a unit also opens its template.
Download Config
Switches the current configuration from edit
mode to download mode and adds the unit to
the list of download targets.
RollPods, Lunas and
GPI modules that are
compatible with the
current configuration
Extract Config
Reads the configuration currently on the unit
and opens it in a new config tab.
RollPods, Lunas and
GPI modules
Download Setup
Downloads the setup file to the unit. The file
must have been created by either the SPI or
GPI configurator.
IQCGPI, IQCSPI and
IQSPI00 modules
Download Template Downloads a template zip file to the unit.
IQCSPI and IQSPI00
modules
Download Custom
Config
Downloads a configuration that has been
created outside of the RollPod Designer. The
configuration files can either be read from a zip
All controllable units.
file or a directory.
This is an advanced feature intended for expert
users.
Extract Custom
Config
Extracts a custom configuration from a unit.
The custom configuration is saved as a zip file
to the local filing system, in a location chosen
by the user.
Table 1.
Issue 7 Rev 1
Available for Unit
Type
All controllable units
that have been
programmed with a
custom configuration.
Contextual Menus
Page 16
© 2015 SAM
RollPod
Network View
4.3 The Cached Units Tab
The cached units tab provides a list of all the unit types for which there are cached templates
and menu sets.
Fig 6.
Cached Units Tab
Whenever a template and menu set are downloaded from a unit, they are stored locally in the
template and menu caches. Once cached, it is no longer necessary to have a live connection
to a unit in order to view the template. Double-clicking on an entry in the list opens its
template and menu set in a new tab in the remote view.
The cache list is arranged as a table with three columns:
•
Unit Type - the RollCall unit type.
•
Unit ID - the RollCall unit ID (unique for each type).
•
CMD Set - the command set version (one unit type may have more than one
command set version).
The cached list can be sorted on any column by clicking on the column header. To open a unit
template, either double-click on its entry in the table or right-click on it and select Open
Template.
Issue 7 Rev 1
Page 17
© 2015 SAM
RollPod
Remote View
5. Remote View
The remote view provides easy access to a unit’s controls for the purpose of assigning them
to remote functions.
Fig 7.
Remote View
When displayed in the remote view, each unit has its own tab. Each tab displays the unit’s
template and menu set in a split view (template on the left and the menu set on the right). The
relative sizes of the template and menu set views can be adjusted by means of the splitter
bar.
In the remote view, the template is not live, as it would be in the Control Panel. Therefore, it is
not possible to change values on a remote unit.
When a template control is clicked, its corresponding menu entry is selected in the menu set.
The menu entry provides information that is required to make a connection.
Note:
A right click in the template control area displays the complete list of template controls.
Click the appropriate radio button to select the template control.
The menu set appears as a table with the following columns:
Page
The name of the template page on which the entry appears. This can
be blank if it does not appear in the template.
Group
The name of the group within the template page. This can be blank if
it does not appear in the template or if it is not in a group.
Name
The name of a command.
Command
The command number.
The type of menu entry. This states whether the entry represents a
single value, a bi-value, a range of values or a string value:
Style
CM_BUTTON: Single value. The value is given by Min.
•
CM_CHECKBOX: Bi-value. The On value is given by Min and
the Off value is given by max.
•
CM_NUMBER: A range of values.
•
CM_HGRAPH: A range of values.
•
CM_VGRAPH: A range of values.
•
CM_HLEVEL: A range of values.
•
CM_VLEVEL: A range of values.
•
CM_DISPLAY: A non-editable string value.
•
CM_EDITSTRING: An editable string value.
Min
The minimum value.
Max
The maximum value.
Table 2.
Issue 7 Rev 1
•
Remote View - Menu Set
Page 18
© 2015 SAM
RollPod
Remote View
Step
The amount of each increment or decrement. Applies to type
CM_NUMBER.
Scale
Is used to convert between the scale of the displayed value and the
internal value. Applies to type CM_NUMBER.
Format
Is used to format the displayed value. Applies to type CM_NUMBER.
Table 2.
Remote View - Menu Set
The menu set can be sorted on any column by clicking on the column header.
Template controls and menu entries support drag and drop. They can be dragged from the
Remote View and dropped onto a control or GPI port in the Config View, automatically
creating a remote connection. They can also be dragged onto the property sheet for an
existing remote function and they are added to the list of remote connections.
The style of the menu function determines whether the control becomes a checkbox or radio
button (unless a function is already assigned).
Issue 7 Rev 1
Page 19
© 2015 SAM
RollPod
Config View
6. Config View
The config view displays all of the currently open configurations. To switch between open
configurations, click the tabs at the top of the view.
There are two display modes in the config view - edit mode and download mode.
When a new configuration is created, or an existing configuration is opened, it appears in edit
mode.
6.1 Edit Mode
Edit mode provides a split view of the configuration. On the left of the view is the Model View
tab (default) displaying an image of the RollPod, Luna or GPI module, or the Virtual Controls
tab (if that tab is selected), and on the right is the property sheet view of the configuration.
Both the Model View and Virtual Controls tabs have ‘break-out’ buttons allowing them to be
floating windows rather than integral to the RollPod Designer window.
To ‘break-out’ a tab view:
•
Click on the
button on the tab.
Closing a floating window returns it to its position within the RollPod Designer Window. Switch
between the Model View and Virtual Controls by clicking on the relevant tab.
6.1.1 Model View
The model view tab displays a graphical representation of the RollPod, Luna or GPI module
being configured.
Fig 8.
RollPod 3U-12 Module in the Model View Tab
Model
Note:
Issue 7 Rev 1
If the model view is too large to fit into the available space, scroll bars automatically
appear.
Page 20
© 2015 SAM
RollPod
Config View
6.1.1.1
Contextual Menus
Each RollPod control or GPI port has a contextual menu that can be viewed by right-clicking
on it.
Menu
Fig 9.
Model View Contextual Menus
The menu options are as follows:
Replicate
Copies the control/port properties to all pages. Applies to controls and
ports. Note that the replicate function overwrites any assigned
properties on other pages.
Delete
Sets the Function property to unused and clears the label property.
Cut
Copies all of the properties to the clipboard and deletes them from the
control or GPI port.
Copy
Copies all of the properties to the clipboard.
Pastes the contents of the clipboard to the selected control or GPI port.
•
For hard buttons, paste does not change the context property.
That is, it does not change a static button to a page-specific
button or vice versa.
•
For GPI ports, paste does not change the static polarity and
IOType properties.
•
It is not possible to copy between different control types.
Paste
A string region is an area of read-only text that is shown on the display
screen. The text displayed in a string region can either be static display
New String Region text or a system generated information field reporting on certain
(3U RollPods only) parameters such as the current channel number.
For further information, see String Regions (3U RollPods Only) on page
50.
Table 3.
6.1.1.2
Contextual Menu Items
The Display Window (3U RollPods Only)
3U RollPods have an LCD display window that can display the label control properties, states
and values of soft buttons and shaft encoders. The LCD display screen can also display string
regions. For further information, see String Regions (3U RollPods Only) on page 50.
Issue 7 Rev 1
Page 21
© 2015 SAM
RollPod
Config View
LCD Display Screen
A screen region is associated with each control.
Click in any screen region to select it. Screen regions are always selected with the control
with which they are associated (click either region or control to select).
Reposition and resize display areas by selecting the area and dragging the edges. Positions
remain the same on all pages, except for shaft encoder labels, which have a slightly different
behavior. For further information, see Shaft Encoder Properties on page 44.
Note:
6.1.1.3
The space on the RollPod LCD display screen is limited. It is advisable to keep labels short
to avoid truncation.
Selected Controls
To select a RollPod control or GPI port, click on it. When a control or GPI port is selected, its
property sheet appears. For further information, see Property Sheet View on page 32.
Issue 7 Rev 1
Page 22
© 2015 SAM
RollPod
Config View
Fig 10. Property Sheet
Controls and GPI ports in the Model View are color-coded to indicate if they are selected, if
they have an assigned function, and (in the case of GPI ports) whether they are configured as
an input or an output.
Model View colors:
Issue 7 Rev 1
•
A selected control or GPI port has a cyan border.
•
An unselected control has a green border when it has an assigned function.
•
An unselected GPI port has a green border when it has an assigned function and is
configured as an output port.
•
An unselected GPI port has a yellow border when it has an assigned function and is
configured as an input port.
•
String regions have a magenta border.
•
All unused controls and ports have a gray border.
Page 23
© 2015 SAM
RollPod
Config View
6.1.2 Virtual Controls
The Virtual Controls tab is used to define and collate remote output controls, to be used with
RollPods and other units on a network via the unit templates in RollCall.
All virtual controls display on the relevant virtual pages in the unit template. A separate
template page for each of the tabs on this screen is allocated dynamically from the content of
the tabs. Empty tabs do not create the associated template pages.
Fig 11. Virtual Controls Tab
For further information on virtual controls, see “Virtual Control Properties” on page 46.
6.1.2.1
Contextual Menus
Each control has a contextual menu that can be viewed by right-clicking on a control.
Menu
Fig 12. Virtual Controls Contextual Menu
Issue 7 Rev 1
Page 24
© 2015 SAM
RollPod
Config View
The menu options are as follows:
Add
Adds a new control to the end of the list. The Add function is also
available by right-clicking on the table header in any of the tabs.
Insert
Inserts a new control above the selected one.
Delete
Deletes the control.
Cut
Copies the control to the clipboard, sets the Function property to
Unused, and clears the label.
Copy
Copies all of the properties to the clipboard.
Pastes the contents of the clipboard to the selected control or GPI port.
Paste
Table 4.
•
For GPI ports, paste does not change the static polarity and
IOType properties.
•
It is not possible to copy between different control types.
Contextual Menu Items
Adding controls is similar to adding controls in the model view. However, not all controls are
available as virtual controls.
6.1.3 Tallies
This tab is present for all models except GPIs. A tally is used to dynamically calculate a button
style and/or a dynamic string value based on a set of rules.
Fig 13. Tallies tab
A tally can have zero or more rules associated with it. Each rule is a test of a Remote or a
Local value. Each rule can have a button style and a string value associated with it.
Calculation of a tally starts with rule 1, then rule 2 etc...
The calculation stops when a rule is found to be true. If no rules are found to be true, the
default style and string value are used.
The context menu for this tab is the same as the Virtual Controls context menu.
Issue 7 Rev 1
Page 25
© 2015 SAM
RollPod
Config View
Selecting a Tally causes the Tally Properties tab to appear:
Fig 14. Tallies properties
The following properties are available:
Fixed Display
Displays a user entered string literal.
Current Channel
Index
Displays the current channel's index (from 1 to the number of
channels).
Current Channel
Name
Displays the current channel's name (these are user defined).
Category Status
The available categories are: Initializing; Connection OK; Connection
Failed.
Remote
Connection
Displays a remote command value, for example, the current brightness
level set on a particular module.
Local Connection
Displays a local property value.
Tally
Displays a string that corresponds to the matching condition in the tally.
Table 5.
String properties
6.1.4 Strings
This tab enables the user to create custom strings for use with soft buttons on LCD models.
Fig 15. Custom strings
Clicking on a string, sets properties which assign a function to the string.
The context menu for this tab is the same as the Virtual Controls context menu.
Issue 7 Rev 1
Page 26
© 2015 SAM
RollPod
Config View
The following properties are available:
Fixed Display
Displays a user entered string literal.
Current Channel
Index
Displays the current channel's index (from 1 to the number of
channels).
Current Channel
Name
Displays the current channel's name (these are user defined).
Category Status
The available categories are: Initializing; Connection OK; Connection
Failed.
Remote
Connection
Displays a remote command value, for example, the current brightness
level set on a particular module.
Local Connection
Displays a local property value.
Tally
Displays a string that corresponds to the matching condition in the tally.
Table 6.
String properties
6.1.5 Lua Script
This is only available for Luna panels.
The popular open source Lua scripting language can be used to program custom logic for
RollPods that support this feature.
The RollPod Designer includes a fully featured Lua editor and validator.
To allow a Lua script to interact with a RollPod, a special Lua API has been provided.
The RollPod Lua API is a set of functions and a set of standard watch variable identifiers.
A description of the API functions can be accessed by clicking on the Functions button on the
right edge of the editor.
Issue 7 Rev 1
Page 27
© 2015 SAM
RollPod
Config View
6.1.5.1
Note:
Functions
The following functions may not be supported by older versions of RollPod code:
pod.getStringWV(index)
pod.getTallyWV(index, property)
pod.getVirtualWV(type, index, property)
getButtonLogWV(index)
A description of the standard API watch variables can be accessed by clicking on the
Variables button on the right edge of the editor.
Issue 7 Rev 1
Page 28
© 2015 SAM
RollPod
Config View
6.1.5.2
Variables
Some of the functions take a style index as a parameter.
The currently defined button styles and their index values can be accessed by clicking on the
Button Styles button on the right edge of the editor.
6.1.5.3
Button Styles
Some of the functions take a watch variable as a parameter.
This could be one of the standard variables, in which case, the associated identifier can be
used.
If not, then a list of all allocated and free watch variable numbers can be accessed by clicking
on the Watch Map button on the right edge of the editor.
Issue 7 Rev 1
Page 29
© 2015 SAM
RollPod
Config View
6.1.5.4
Watch Map
A script can be enabled or disabled by using the Use Script checkbox above the editor's
toolbar. Next to this checkbox is the name of the Lua script file. If the file name is preceded by
'.\' it signifies that the file location is relative to the location of the configuration file.
A script must be downloaded to the RollPod before it will take effect. This is done on the
Download page.
Issue 7 Rev 1
Page 30
© 2015 SAM
RollPod
Config View
6.2 Pages
Pages are used to allow the same physical control to be given different functions.
On a RollPod, each hard button can either be defined as a static button or a page-specific
button.
•
When defined as a static button, a button always has the same input function and the
same set of output states regardless of which page is selected.
•
When a button is defined as a page specific button, it can change its input function
and set of output states, depending on which page is currently selected.
For example, a RollPod can be set up so that all of the video settings it controls are on one
page, and all of the audio settings it controls on another.
A new configuration is created with just a single page. Each page has its own tab in the model
view.
Page Tab
Page Menu
Fig 16. Configuration Page
The page tab shows the page index and the name of the page. The page index always starts
at 1 and the default name for the first page is Main.
Each page tab has a contextual menu that can be viewed by right-clicking on it. The menu
options are as follows.
Add New Page
Creates a new page with all controls or GPI ports unused.
Copy Page
Creates a new page with all hard buttons or ports taking the
properties of the current page.
Delete Page
Deletes the current page from the configuration. If there is only one
page in the configuration, it cannot b deleted.
Table 7.
Configuration Page
When a new page is created, the page index defaults to the next free index number, and the
name defaults to No name. These values can be changed if desired. For further information,
see Page Properties on page 41.
In configurations with more than one page, page-specific hard buttons are identified by a
<<Page N>> displayed above the button label (see Fig 17.)
Issue 7 Rev 1
Page 31
© 2015 SAM
RollPod
Config View
Fig 17. Buttons - Page Labels
6.2.1 Cutting and Pasting Pages Between Configurations
An entire page can be cut and pasted from one RollPod configuration to another. This action
copies all of the page-specific controls from a page in the source configuration and pastes
them to a page in the destination configuration.
Note:
Static hard buttons are not included when pasting to the new page.
To cut and paste all controls on a page:
1.
Open both configurations.
2.
Click the page tab of the source configuration and then click the Cut toolbar button.
3.
Switch to the destination configuration and click on the destination page.
4.
Click Paste.
All of the page-specific controls on the source page are copied to the destination page.
Note:
If the destination page has static buttons on it, a message displays prompting to convert
them to page specific.
6.3 Property Sheet View
The property sheet view has six tabs.
Global
The global properties are those that apply to the configuration as a
whole.
Page
The page properties are those that apply to the current page only.
Control
The control properties are those that apply to the currently selected
control.
Tally
This page enables the user to dynamically calculate a button style
and/or a dynamic string value based on a set of rules.
String
This page enables the user to create custom strings for use with soft
buttons on LCD models.
Search
The search function is used to search for specific controls.
Table 8.
Issue 7 Rev 1
Property Sheet Tabs
Page 32
© 2015 SAM
RollPod
Config View
6.4 Global Properties
Global properties apply to the configuration as a whole.
Fig 18. Global Properties Tab
A detailed text description of what the configuration does can be added. The configuration
description appears in the RollCall template.
To add a description:
1.
Click Show Configuration Description.
2.
Type, or edit, descriptive text in the dialog box.
3.
Click Save Description (this button is only active when a change to the description is
made).
Click Hide Configuration Description if it is not required on the Global Properties screen.
Issue 7 Rev 1
Page 33
© 2015 SAM
RollPod
Config View
The global properties are:
Auto-lock timeout
The Auto-lock timeout feature specifies a value in seconds after
which, if no button presses are detected, the lock is automatically set
to On. Entering a timeout value of 0 seconds disables this feature. If
auto-lock timeout is enabled, ensure that a lock function has been
added. see Lock on page 54
Command Set
Version
This is not currently used.
This option applies to GPI and non-ethernet enabled RollPods. The
target version is the version of software running on the RollPod/GPI.
The values are:
Target version
•
V5
•
V6
•
V6 Legacy Mode - the unit is running V6 (or above) but
compile it as a V5. This is useful for existing configurations in
order to preserve backwards compatibility.
Note: Ethernet enabled panels only run V6 software (or above).
Default page
This optional feature allows RollPod to navigate to the designated
page, if a total Comms failure is detected.
The number of channels for multi-channel categories.
Number of Channels When the number of channels is set to more than 1, the Channel
table is created and the Enable Router-follow option displays. see
Enable Router-follow on page 39
Number of IP
Connections
This option specifies the total number of permitted Ethernet
connections. Each Ethernet connection can have more than one IP
address associated with it and each of those IP addresses has an
associated priority - primary, secondary, tertiary etc...
For example, in the event that an Ethernet connection fails on its
primary IP address, it automatically switches to using the secondary
IP address.
If an Ethernet connection switches to using its secondary IP address,
this option sets the action to perform when the primary becomes
active again.
IP Priority Mode
If the priority mode is set to on, it switches back to the primary
address. If the priority mode is set to off, it remains on the secondary
address.
Short Description
A brief description of the configuration. This description fits in a
RollCall string command and can be obtained remotely.
Number of Virtual
Button Sets
Define the total number of virtual button sets required. Virtual button
sets can also be added manually in the Virtual Controls tab.
Number of Virtual
Buttons
Define the total number of virtual buttons required. Virtual buttons can
also be added manually in the Virtual Controls tab.
Number of Virtual
Shaft Encoders
Define the total number of virtual shaft encoders required. Virtual
shaft encoders can also be added manually in the Virtual Controls
tab.
Number of Virtual
String Regions
Define the total number of virtual string regions required. Virtual string
regions can also be added manually in the Virtual Controls tab.
Table 9.
Issue 7 Rev 1
Global Properties
Page 34
© 2015 SAM
RollPod
Config View
Number of Virtual
Edit Strings
Define the total number of virtual edit strings required. Virtual edit
strings can also be added manually in the Virtual Controls tab.
This specifies whether the lock type is:
•
Panel - when locked, disables all functions except for the lock
function.
•
Remote actions - when locked, disables only remote control
functions but allows channel select and page navigation.
Lock type
Number of Tallies
This is the number of currently configured Tallies. This option does
not apply to GPIs.
Number of Strings
This is the number of currently configured Strings. This option only
applies to Luna panels.
Default Selected
Style
This option applies to all buttons which are selected and their
assigned function is not an error state. This option does not apply to
GPIs.
Default Unselected
Style
This option applies to all buttons which are not selected and their
assigned function is not an error state. This option does not apply to
GPIs.
Default Inconsistent
Style
This option applies to all buttons which have been changed by an
external source and are not consistent. This option does not apply to
GPIs.
Default Error
Selected Style
This option applies to all buttons which are selected but there is an
error (generally a communication error). This option does not apply to
GPIs.
Default Error
Unselected Style
This option applies to all buttons which are not selected and are in an
error state (generally a communication error). This option does not
apply to GPIs.
Unit Name
The name of the RollPod/GPI as it will appear on the RollCall
network. This can also be configured using the unit's template.
Log server Name
The name of a RollCall log server to which you want the RollPod/GPI
to send its log data. This can also be configured using the unit's
template.
Table 9.
Issue 7 Rev 1
With RGB color available, default global button styles make it easier
to set the defaults for the entire configuration, therefore, avoiding the
need to set the style for each individual hard button.
Global Properties
Page 35
© 2015 SAM
RollPod
Config View
Example global properties
Fig 19. Example Global Properties
For information on the Enable Router-follow option, see Enable Router-follow on page 39.
6.4.1 Category Table
Category definitions are global to the configuration and appear in the Category Table.
Fig 20. Category Table
New category entries can be created automatically by dragging and dropping a template
control or menu entry from the Remote View onto the Config View (the recommended
method). Dragging and dropping a control or menu, adds the RollCall address into the table.
Add other details manually in the appropriate fields.
For each entry select the category Type from the drop-down box:
•
Single Channel —the RollCall Address appears in the table.
•
Multi Channel —an extra column displays in the Channel Table allowing each
channel to be setup. For further information, see Channel Table on page 37.
•
Dynamic Category —the Dynamic table appears. For further information, see
Dynamic Table on page 38.
IP Index column
The user can select from the range of IP Index values (as defined by the Number of IP
Connections property).
For panels that support RollNet and Ethernet, leaving this column blank defaults to using
RollNet. For panels that only support Ethernet, leaving this column blank is equivalent to
selecting an IP Index of one.
Issue 7 Rev 1
Page 36
© 2015 SAM
RollPod
Config View
6.4.2 Channel Table
The number of rows in the Channel Table, correspond to the number of channels. If the global
property value for number of channels is changed, the number of rows in the Channel Table
changes, as shown in Fig 21.
Fig 21. Channel Table
Category addresses must be entered in the format NNNN:UU:PP (Network:Unit:Port).
To delete a category, select it and then click the Delete key. RollPod Designer checks to see
if the category is referenced anywhere. If it is, a warning message appears.
To rename a category, click on the name and enter a new name. All references are updated.
If a value is added to the Page Association column, then RollPod navigates to that page when
the corresponding channel is selected.
When using a Mapped router association (see Enable Router-follow on page 39), an
additional column appears, allowing definition of the router follow command that selects the
appropriate channel.
The Channel Table can be exported as a tab delimited text file, enabling the table to be edited
using a suitable application, saved and re-imported back.
Note:
If using Microsoft Excel, the RollCall address fields must be imported as text fields,
otherwise they cannot be edited properly.
Right-click in the Channel Table to display an Import/Export menu.
Note:
When importing, the import file must be tab-delimited and match exactly to the existing
channel table. The number of column and rows must be the same, and the category
headers must match.
IP Index
The user can select from the range of IP Index values (as defined by the Number of IP
Connections property).
For panels that support RollNet and Ethernet, leaving this column blank defaults to using
RollNet. For panels that only support Ethernet, leaving this column blank is equivalent to
selecting an IP Index of one.
Issue 7 Rev 1
Page 37
© 2015 SAM
RollPod
Config View
Multi Channel Example:
If a unit is multi-channel, the addresses must be added to the Channel Table.
Fig 22. Multi Channel Example
In this example:
Channels 1-5 are all IQSYN30 units, all in the same frame. They have all been given a
channel name, and assigned a router association. The router association is the source (input)
to the router. When a router-follow is applied, the destination (output) that is to be monitored
is selected.
Channels 6 and 7 are IQSYN00 units in frame 50. The assigned inputs to the router are 48
and 49.
Further assignations can be seen in Fig 22.
6.4.3 Dynamic Table
If any of the categories are dynamic, the Dynamic Table appears.
The table has an entry for each dynamic category, including a dynamic category name,
source category, and a remote command number that supplies the dynamic address.
A dynamic RollCall address can, optionally, include an IP Index.
For example, to specify an IP index of 2:
0000:08:01,2
If an IP index is present, it overrides the IP index in the Category table.
Fig 23. Dynamic Category Table
Issue 7 Rev 1
Page 38
© 2015 SAM
RollPod
Config View
6.4.4 Enable Router-follow
The Enable Router-follow option applies only to multi-channel configurations. This option is
used to set up a link between the current channel selection and a remote command.
•
Select the Enable Router-follow checkbox. The following options appear:
Fig 24. Enable Router-follow Options
Specify whether the Router-follow Mode is to be Read-only or Read-write. Read-only mode
means that the RollPod channel selection follows the remote command but not vice-versa.
Read-write enables the remote command to also follow the current channel selection.
Enter a Command Number (or alternatively, drag and drop the command from the template
view). This defines the remote command.
This command number from the remote command is the output from the router. Fig 24. shows
that output 1 (command number 2001) from the IQCSPI is monitored (this corresponds to
output 1 on the router). The SPI card acts as a translator between the RollCall system and the
router, as both operate on different protocols.
From the Category drop-down list, select a category. Every unit that has been input to the
Category Table is listed. The selected category defines the remote unit and must be a single
channel category.
Select a Router Association from the drop-down list. Either Zero-based, One-based, or
Mapped.
Zero-based
One-based
Mapped
Remote Value
Channel
Remote Value
Channel
Remote Value
Channel
0
1
1
1
201
1
1
2
2
2
202
2
2
3
3
3
435
3
3
4
4
4
587
4
Table 10.
Router Association Examples
For a Mapped association enter the appropriate remote values into the Router Association
column in the Channel Table. For further information, see Channel Table on page 37.
Note:
When Mapped is selected, if a zero-based or one-based channel table has already been
constructed, a prompt to compact the existing channels appears. Accepting this prompt
removes all channels without any corresponding addresses, and remaining channels are
automatically given router association values.
If required, define an Unmapped Page from the drop-down list, so that if the router-follow
value is changed such that there is no corresponding channel, RollPod navigates to the
unmapped page.
Issue 7 Rev 1
Page 39
© 2015 SAM
RollPod
Config View
IQCSPI Example:
Fig 25. shows the interface for the IQCSPI config. Communication to the router is made
through this imitation screen. The router has a 17 x 16matrix, so the card is configured to
have the same. A connection is then made to the router via serial cable.
Fig 25. IQCSPI Matrix Screen
6.4.5 Ethernet table
This table contains information on IP addresses for panels which support Ethernet.
Fig 26. Ethernet Table
The priority is automatically calculated. It is based on how many IP addresses a connection
has and where in the list the entry occurs.
For example:
10.0.0.1
IP Index = 1
Priority = 1st
10.0.0.2
IP Index = 1
Priority = 2nd
After reordering in the table, the priorities automatically change:
10.0.0.2
IP Index = 1
Priority = 1st
10.0.0.1
IP Index = 1
Priority = 2nd
Right click in order to manipulate the table entries. The options are:
Issue 7 Rev 1
•
Move up
•
Move down
•
Insert
•
Delete
Page 40
© 2015 SAM
RollPod
Config View
6.5 Page Properties
The page properties apply to the currently selected page.
Fig 27. Page Properties
The property sheet contains the page index, which cannot be edited, and the page name
displayed on the RollCall template, which may be changed. Additionally, it contains a
summary entry for each control on the page. Each summary entry provides a link to the
property sheet for the control, and displays the control’s label and function.
Note:
The label and function properties are read-only. To edit them, go to the corresponding
control property sheet.
6.6 Control Properties
The control properties apply to the currently selected control. If no control is selected, the
control property sheet is blank.
All of these properties, except the Label property, provide drop-down lists of possible property
values. The Label property is any string value that the user wishes to assign. It is used to soft
label the hard button or port controls within the Designer, and displays when associated with a
soft button or shaft encoder control. All labels are shown in the RollCall template. When a
function is assigned to a control, additional properties display that are specific to that function.
6.6.1 Hard Button Control Properties
Fig 28. Hard Button Control Properties
Issue 7 Rev 1
Page 41
© 2015 SAM
RollPod
Config View
6.6.1.1
Context
On a RollPod, each hard button can either be defined as a static button or a page-specific
button.
•
When defined as a static button, a button always has the same input function and the
same set of output states regardless of which page is selected.
•
When a button is defined as a page specific button, it can change its input function
and set of output states, depending on which page is currently selected.
Output State
Selected
The button is selected and its assigned function not in an error state.
Unselected
The button is not selected and its assigned function is not in an error
state.
Inconsistent
The button has been changed by an external source and is not
consistent.
Error Selected
The button is selected but there is an error (generally a communication
error).
Error Unselected
The button is not selected and in an error state (generally a
communication error).
Table 11.
6.6.1.2
Description
Hard Button Output States
Labels
Use the Label property to add a label for the button. RollPods do not support soft labels and
this label does not appear on the physical unit.
However, LCD models support soft labelling of the buttons. By default, the text of an LCD
button is taken from the button's Label property. However, it is possible to dynamically update
LCD button text using the Dynamic Label property.
By default, this property is set to <none> which means that RollPod Designer uses the Label
property. Alternatively, enter any user defined custom string to dynamically update the soft
label.
6.6.1.3
Function
From the drop-down list, select a function for the hard button. Hard buttons can have the
following functions:
•
Unused
•
Page Navigation
•
Channel Select
•
Lock
•
Radio Button
•
Checkbox
For further information, see Functions on page 51.
6.6.1.4
Tally to use
A custom tally can be selected from the drop down list.
The default setting is to use the ‘Style’ properties.
Issue 7 Rev 1
Page 42
© 2015 SAM
RollPod
Config View
6.6.1.5
Custom colors
Depending on the panel model, it is possible to select a custom RGB color for the button as
shown below:
Fig 29. Soft Button Control Properties
6.6.2 Soft Button Control Properties
Soft buttons have the following properties:
Fig 30. Soft Button Control Properties
6.6.2.1
Label
Enter a label for the soft button. Soft button labels display on the LCD display screen. Note
that space on the LCD display screen is limited so it is advisable to keep soft button labels
short to avoid truncation on the display screen.
6.6.2.2
Function
From the drop-down list, select a function for the soft button. Soft buttons can have the
following functions:
•
Unused
•
Page Navigation
•
Channel Select
•
Lock
•
Take
•
Cancel
•
Radio Button
•
Checkbox
For further information, see Functions on page 51.
Issue 7 Rev 1
Page 43
© 2015 SAM
RollPod
Config View
6.6.3 Shaft Encoder Properties
The following properties are available for a shaft encoder:
Fig 31. Shaft Encoder Properties
6.6.3.1
Step and Divisor
The Step, in conjunction with the Divisor, defines the adjustment increment that the value
controlled by the shaft encoder uses. The Step value is divided by the Divisor value to
determine the adjustment value and incrementation.
Table 12.
6.6.3.2
Step
Divisor
Adjustment
Increment
1
1
1
1
10
0.1
8
10
0.8
10
1
10
100
1
100
Step and Divisor Examples
Preset
This defines the shaft encoder’s preset value. The preset must fall between the minimum and
maximum values and is only accessible from the template.
6.6.3.3
Value Format
This specifies the format in which the string value displays and is associated with the Format
column in the remote view.
The following string value formats are available:
•
%f - provides the numeric part of the string value
Add a value to specify a decimal and limit the number of digits that display before and
after the decimal; for example, %1.2f would allow one digit to display in front of the
decimal and two digits to display after it. If no value is added before or after the decimal, there is no limit imposed. Add any other text before or after the %f part of the
value format string, such as a description or unit type.
Note:
In this part of the value format, there must not be any spaces.
•
%s - provides the textual part of the string
The value format can be left blank, in which case, the value displays but no formatting is
applied.
Issue 7 Rev 1
Page 44
© 2015 SAM
RollPod
Config View
6.6.3.4
Orientation
On the LCD display screen, the scrolling bar indicating the value of the shaft encoder can be
positioned either horizontally or vertically. Use the drop-down list to select either Horizontal or
Vertical.
6.6.3.5
Max Value and Min Value
These define the maximum and minimum values to which the shaft encoder can be adjusted.
The minimum value is required, the maximum value is optional for channel or page selectors,
but must be present for remote controls.
6.6.3.6
Label
Enter a label for the shaft encoder. Shaft encoder labels display on the LCD display screen.
Note that space on the LCD display screen, while it can be resized, is limited so it is advisable
to keep shaft encoder labels short to avoid truncation on the display screen. Labels on the
LCD display screen display in uppercase letters.
Note:
In configurations with more than one page, the screen region associated with the shaft
encoder label remains the same on all other pages for all shaft encoders that have the
same Orientation property.
However, if in a configuration not all shaft encoders have the same orientation (for
example, some are horizontal and some are vertical), all of the horizontally oriented shaft
encoders share the same screen region and all of the vertically oriented shaft encoders
share the same screen region.
6.6.3.7
Function
From the drop-down list, select a function for the shaft encoder. Shaft encoders can have the
following functions:
•
Unused
•
Page Select
•
Channel Select
•
Remote Control
see Functions on page 51
6.6.4 GPI Port Control Properties
Fig 32. GPI Port Control Properties
GPI ports have similar properties to RollPod hard buttons; however, there are some
significant differences.
Issue 7 Rev 1
Page 45
© 2015 SAM
RollPod
Config View
Importantly, there are no static GPI ports (as there are static hard buttons); all GPI ports are
page-specific. However, each GPI port has two static properties:
6.6.4.1
•
IOtype
•
Polarity
I/Otype
A GPI port can be defined as either an input or an output. A port cannot be configured as an
input on one page and an output on another.
A port configured for output behaves differently to a port configured for input:
An input port behaves like a hard button. The port going active is equivalent to a button press,
while the port going inactive is equivalent to a button release.
The state of an output port is derived from its associated function. Each change of state can
cause the output port to send either an active or inactive signal. Careful assignment of output
signals to logical states, allows the construction of flexible tallys of multiple remote
parameters.
6.6.4.2
Polarity
A GPI port must be defined as being either ActiveOpen or ActiveClosed. This defines the
relationship between the logical state (Active or Inactive) and the physical state of the port.
6.6.4.3
States
States apply only to output ports and can be set to either Active or Inactive.
6.6.4.4
Label
Add a label for the port. The label is shown in the RollPod Designer, the template and in the
logs.
6.6.4.5
Function
This defines a function for the GPI port. see Functions on page 51.
6.7 Virtual Control Properties
This section contains information on the available virtual control properties.
The following properties are common to all controls:
Label
This property labels the control on the template and in the menu set.
Access
The following values are available:
Issue 7 Rev 1
•
Template and Menu - Read and write access on the template and the menu set.
•
Menu - Read and write access on the menu set, read only access on the template.
•
Internal - The control cannot be accessed externally.
Page 46
© 2015 SAM
RollPod
Config View
Logging
The following values are available:
•
Yes - Logging is required (if the control appears on the template, it is possible to
disable the logging option there).
•
No - Logging is not required.
6.7.1 Virtual Hard Button Control Properties
The following properties are available for a virtual hard button:
Fig 33. Virtual Hard Button Properties
6.7.1.1
State
A user-defined value can be associated with each of the possible virtual button states:
Value
ON
All of the associated local or remote values are On.
OFF
All of the associated local or remote values are not On.
INCONSISTENT
Some of the associated local or remote values are On and
some are not On.
ERROR ON
All of the remote connections have a communications failure;
the last known non-error state was On.
ERROR OFF
All of the remote connections have a communications failure;
the last known non-error state was Off.
ERROR INCONSISTENT
All of the remote connections have a communications failure;
the last known non-error state was Inconsistent.
PARTIAL ERROR ON
Some of the remote connections have a communications
failure; the current state as well as the last known non-error
state is On.
PARTIAL ERROR OFF
Some of the remote connections have a communications
failure; the current state as well as the last known non-error
state is Off.
PARTIAL ERROR
INCONSISTENT
Some of the remote connections have a communications
failure; the current state as well as the last known non-error
state is Inconsistent.
Table 13.
6.7.1.2
Description
State values
Function
From the drop-down list, select a function for the hard button:
•
Issue 7 Rev 1
Unused
Page 47
© 2015 SAM
RollPod
Config View
•
Radio Button
•
Checkbox
For further information, see Functions on page 51.
6.7.2 Virtual String Region Control Properties
The following properties are available for a virtual string region:
Fig 34. Virtual String Region Properties
6.7.2.1
Function
From the drop-down list, select a function for the string region:
•
Unused
•
Radio Button
•
Checkbox
For further information, see Functions on page 51.
6.7.3 Virtual Edit String Control Properties
This is an editable version of a virtual string region.
The following properties are available for a virtual edit string:
Fig 35. Virtual Edit String Properties
6.7.3.1
Function
From the drop-down list, select a function for the edit string:
•
Unused
•
Radio Button
•
Checkbox
For further information, see Functions on page 51.
Issue 7 Rev 1
Page 48
© 2015 SAM
RollPod
Config View
6.7.4 Virtual Shaft Encoder Control Properties
The following properties are available for a virtual shaft encoder:
Fig 36. Virtual Shaft Encoder Properties
6.7.4.1
Function
From the drop-down list, select a function for the shaft encoder:
•
Unused
•
Remote Control
For further information, see Functions on page 51.
For the other properties, see “Shaft Encoder Properties” on page 44.
6.7.5 Virtual Button Set Control Properties
This control defines discrete values that are linked to an external command (Category and
Command Number properties) that, if present on the template, are represented as radio
buttons.
The following properties are available for a virtual button set:
Fig 37. Virtual Button Set Properties
6.7.5.1
Function
From the drop-down list, select a function for the shaft encoder:
Issue 7 Rev 1
•
Unused
•
ButtonSet
Page 49
© 2015 SAM
RollPod
Config View
6.8 String Regions (3U RollPods Only)
String regions are areas of read-only text that can display either fixed user defined text or
system information such as the value of a remote connection. Any number of screen regions
may be on a page.
String
Region
Fig 38. String Region
6.8.1 Adding a New String Region
To add a new string region, right-click on any control or display area in the RollPod Model
view, and from the menu that displays, select New String Region.
A selected screen region displays with a magenta border.
6.8.2 Repositioning and Resizing String Regions
String regions can be repositioned and resized like the other display areas on the LCD
Display screen. To resize a string region, select it and then drag its borders to the desired
position. String regions are always page-specific; however, a string region can be replicated
on all other pages by means of the replicate option. To do this, right-click in the string region
and from the menu that displays, select Replicate.
6.8.3 String Region Functions
String regions can have the following functions:
Function
Fixed Display
Add a string of read-only text, defined by the Label property, to a
string region.
Current Channel
Index
Displays the current channel index, as defined by the Format String
property. By default, this is %s, but this may be changed if required.
Current Channel
Name
Displays the name of the current channel, as defined by the channel
Names column on the Global Properties tab. By default, this is %s,
but this may be changed if required.
Category Status
Displays the status of the category specified by the Category
property.
Remote Connection
Displays the value of any remote connection. Specify a category, a
specific command number and, optionally, a format string and divisor.
see Step and Divisor on page 44
Table 14.
Issue 7 Rev 1
Description
String Region Functions
Page 50
© 2015 SAM
RollPod
Config View
6.9 Functions
6.9.1 Unused
The control or GPI port does not have a function assigned. In the template, each GPI port has
a checkbox that can be used to change its state.
6.9.2 Page Navigation
The page navigation function sets the current page to be the one specified by a fixed page
number or index. The page navigation function can be assigned to either a soft button or a
hard button.
6.9.2.1
Hard Button Page Navigation Function
Configured on a hard button, a page navigation function can display any one of four styles:
•
Selected
•
Unselected
•
Error Selected
•
Error Unselected
If an error condition exists on a page navigation button’s destination page, the page button
indicates an error. However, if an inconsistent condition exists on a page button’s destination
page, the inconsistent state is not indicated by the page navigation button.
A page index must be specified when adding a page navigation function. The page index
determines the page to which the page navigation function navigates.
Fig 39. Page Navigation
In Fig 39. the Page Index value displays in red because no page index has yet been
specified. Click on the value and select the Page Index from the drop-down list.
6.9.2.2
Soft Button Page Navigation Function
Configured on a soft button, a page navigation function displays on the LCD display screen as
either selected and unselected. A page index must be specified when adding a page
navigation function. The page index determines the page to which the page navigation
function navigates.
6.9.3 Page Select
The Page Select function, available only for shaft encoders, is very similar to the Page
Navigation function on soft and hard buttons. Its purpose is to navigate between pages in a
RollPod configuration. However, unlike the soft and hard buttons, the Page Select function on
a shaft encoder scrolls through the configuration’s pages when the shaft encoder is rotated,
according to the properties defined for the control.
Issue 7 Rev 1
Page 51
© 2015 SAM
RollPod
Config View
Fig 40. Page Select
6.9.4 Remote Control
The Remote Control function, available only for shaft encoders, adjusts a remote value on a
RollCall compatible unit. This function is best suited for scroll bar adjustments, such as
ProcAmp controls, where a value needs to be selected from a range.
Fig 41. Remote Control
Normally, these properties are automatically populated when dragging a template control to
the shaft encoder, but they can be manually adjusted, if required.
6.9.4.1
Multiple Remote Connections
Remote controls support multiple remote connections, in which more than one remote
command is controlled by the same shaft encoder. In this case, the mode of each remote
connection determines how it interacts with the other remote connections.
If a remote control has only one remote connection, the mode is irrelevant.
Mode
Description
Externally changing the value of a Master remote connection always
changes the values of all other remote connections to match the new value.
Master
If a remote connection’s mode is set to Independent and its value is
externally changed, the new value is compared to all other master and
independent remote connections.
•
If they agree, all slave remote connections are changed to match
the new value.
•
If they do not agree, the value of any slave remote connections are
not changed.
•
If there is only one independent remote connection with one or
more slaves, the independent connection behaves like a master.
Independent
Slave
Table 15.
Issue 7 Rev 1
If a remote connection’s mode is set to Slave, any external attempt to
change its value is overridden with the current value of the shaft encoder.
Multiple Remote Connections
Page 52
© 2015 SAM
RollPod
Config View
6.9.5 Channel Select
The channel select function selects the channel to use for multi-channel categories. It has
only one property - channel number. This should be in the range of 1 to the maximum number
of channels.
Selecting a channel has the following effects:
•
RollCall control connections to units in the old channel are closed.
•
RollCall connections to units in the new channel are opened.
It is important to be aware that the configuration can no longer monitor the state on any
closed connections.
A channel select function can only be in one of two states:
6.9.5.1
•
Selected
•
Unselected
Hard Buttons, Soft Buttons and GPIs
When adding a channel select function to a hard button or a soft button, specify the channel
the function selects.
Fig 42. Button Channels
In Fig 42. the Channel displays in red because no channel has yet been specified.
6.9.5.2
Note:
Issue 7 Rev 1
Shaft Encoders
When setting a channel select function to a shaft encoder, do not add the channel property
because shaft encoders scroll through a range of values rather than selecting a single one.
Page 53
© 2015 SAM
RollPod
Config View
Fig 43. Shaft Encoders
Step, Divisor, Preset and Minimum values must be specified for channel selection. The other
properties can be specified but are optional.
At runtime, upon turning the shaft encoder, the channels scroll according to the properties
that are specified.
6.9.6 Lock
The Lock function provides operational security against inadvertent button presses by
disabling selected input functions until unlocked by the user. The lock function can be
associated with either a hard button, soft button or GPI port.
There are two types of lock, defined on the global properties tab:
•
Panel – disables all input from the panel except for the lock function.
•
Remote Actions – disables radio button and checkbox input functions.
If a lock function has been assigned, when a RollPod starts, the lock is always on and in the
selected state. Pressing the lock button unlocks the RollPod and sets the button to its
unselected state.
The Auto-lock timeout feature (set in the Global Properties) specifies a value in seconds after
which, if no button presses are detected, the lock is automatically set to on. Entering a
timeout value of 0 seconds disables this feature.
A lock button can use only one of two styles, selected (when locked) and unselected (when
unlocked). Other styles are ignored.
When adding a Lock function to a hard button, specify whether it is to be Latching or
Non-latching:
•
If a lock is set to Latching, press the button once to disable the lock and press the
button a second time to re-enable the lock.
•
If a lock is set to Non-latching, press the button and hold it to disable the lock and
release the button to re-enable the lock (hold the lock button down to operate any of
the other controls).
Fig 44. Hard Button Lock
Issue 7 Rev 1
Page 54
© 2015 SAM
RollPod
Config View
Lock functions associated with a soft button are always latching.
Fig 45. Soft Button Lock
Note:
When a lock button is selected, the lock is ON.
When a lock button is unselected, the lock is OFF.
6.9.7 Take and Cancel
The Take and Cancel functions can only be assigned to soft buttons on a 3U RollPod and
must be associated with a shaft encoder control on the same page.
Take and Cancel functions have only one property, Shaft Index, which designates the shaft
encoder that they are associated with.
Fig 46. Take and Cancel
6.9.7.1
Take
When the associated shaft encoder is adjusted, the settings do not become active until the
Take button is pressed.
6.9.7.2
Cancel
When the associated shaft encoder is adjusted, pressing the Cancel button returns the shaft
encoder adjustment to its default value.
6.9.8 Radio Button
The Radio Button function is used to set one or more individual commands on RollCall
enabled devices such as IQ modules. Each command and device pairing is called a remote
connection. Local connections can also be made for control of individual, or sets of, radio
buttons on hard buttons. Local control allows connection to physical and virtual functions on
radio buttons.
Radio Button functions can be assigned to hard buttons, soft buttons, virtual buttons, or GPI
ports.
Radio buttons may have one or more remote or local connections. see Multiple Connections
on page 60
6.9.8.1
Remote Connections
A remote connection for a radio button is defined by the following properties:
Issue 7 Rev 1
Page 55
© 2015 SAM
RollPod
Config View
•
Name – the name of the RollCall command (Information only. The name is not used at
runtime).
•
Command Number – the RollCall command number.
•
Category – the name of a category. For more information, see the Categories section.
•
Value Type – Choose from Fixed, Dynamic Number, or Dynamic String.
•
Fixed (default) – allows the normal setting of a remote command value in the
displayed Value property.
•
Dynamic Number – allows the setting of a numerical value from another remote
device.
•
Dynamic String – allows the setting of a string value from another remote device.
With either the Dynamic Number, or Dynamic String option selected, the Dynamic
Value Category, Dynamic Value Command, and Dynamic Value Name properties display.
•
Value – the value to set the command to. This can be numeric, string or both. A value
is treated as numeric if it contains only digits. To supply both values, enter the
numeric value followed by a comma, followed by the string value.
•
Dynamic Value Category – the name of a remote device category. For more
information, see the Categories section.
•
Dynamic Value Command – the RollCall command number for the command on the
remote device.
•
Dynamic Value Name – the name of the RollCall command on the remote device.
•
Delay – A delay (in milli-seconds) before the remote connection is actioned after the
button is pressed or GPI triggered.
A Radio Button is in its selected state when the received remote value matches the specified
value.
The Radio Button function displays a button to add a new remote connection. Clicking on this
button causes new properties to display. See Fig 47.
Fig 47. Remote Radio Button Properties
Note:
Template controls and menu entries may be dragged from the Remote View and dropped
onto the function’s property sheet to add remote connections.
When adding a Radio Button to a hard button, specify whether it is to be Read-only or
Read-write:
•
Issue 7 Rev 1
Read-only – the button is set as a status indicator only.
Page 56
© 2015 SAM
RollPod
Config View
•
6.9.8.2
Read-write – the button can control the unit it is configured to.
Local Connections
A local connection for a radio button is defined by the following properties:
•
Local Variable – select the radio button function from the drop-down list.
•
Value – the value to set the command to. This can be numeric, string or both. A value
is treated as numeric if it contains only digits. To supply both values, enter the
numeric value followed by a comma, followed by the string value.
•
Delay – A delay (in milli-seconds) before the local connection is actioned after the
button is pressed or GPI triggered.
A Radio Button is in its selected state when the received local value matches the specified
value.
The Radio Button function displays a button to add a new local connection. Clicking on this
button causes new properties to display. See Fig 47.
Fig 48. Local Radio Button Properties
When adding a Radio Button to a hard button, specify whether it is to be Read-only or
Read-write:
6.9.8.3
•
Read-only – the button is set as a status indicator only.
•
Read-write – the button can control the unit it is configured to.
Multiple Connections
Radio Buttons support multiple remote or local connections, in which more than one
command is controlled by the same button or GPI port. In this case, the mode of each
connection determines how it interacts with the other connections and the button state
displayed (or GPI output sent).
The following additional properties are available when more than one connection is applied to
a Radio Button (and in the case of a hard button, the button is configured as Read-write):
•
Mode – see Table 16.
•
Read only – Yes or No. If Yes the Radio Button is set to read status only. If No the
radio button can control the unit it is configured to.
•
Tally – Include in or Exclude from the tally. Excluding ignores inconsistencies.
Mode
Description
If a remote connection’s mode is set to Master and its value is externally
changed, all other remote connections set their states to match the externally
applied value. This occurs regardless of the other remote connection modes.
Master
In other words, externally changing the value of a Master remote connection
always changes the values of all other remote connections to match the new
value.
Table 16.
Issue 7 Rev 1
Multiple Remote Connections
Page 57
© 2015 SAM
RollPod
Config View
Mode
Description
If a remote connection’s mode is set to Independent and its value is
externally changed, the new value is compared to all other master and
independent remote connections.
Independent
•
If they agree, all slave remote connections are changed to match the
new value.
•
If they do not agree, the value of any slave remote connections are
not changed and the button shows an inconsistent state (or the GPI
signals the output defined as inconsistent).
If a remote connection’s mode is set to Slave its value cannot be changed
unless:
Slave
Table 16.
•
It is changed by a master remote connection.
•
An independent remote connection is changed and that independent
connection agrees with all other independent and master remote
connections.
Multiple Remote Connections
Note:
Soft buttons are limited in the states that they can display and have no way to display
inconsistency. They only display the Selected state when all remote connections are also
in the Selected state. A soft button is disabled when all communication connections are
invalid (or locked).
Note:
GPI input ports have no means of reflecting status.
Because Radio Buttons specify one specific value each, they are normally used in groups of
two or more - one Radio Button to set one value and second button to set another value. It is
therefore possible that an external source could set a pair of Radio Buttons to a value that is
not recognized by either. In this case, none of the buttons would be selected (they would all
be blank).
6.9.9 Checkbox
The Checkbox function is used to toggle between two values on a RollCall enabled device,
such as an IQ or GPI module. Each command and device pairing is called a remote
connection. Local connections can also be made for control of individual, or sets of,
checkboxes on hard buttons. Local control allows connection to physical and virtual functions
on checkboxes.
Checkbox functions can be assigned to either hard buttons, soft buttons, virtual buttons, or
GPI ports.
Checkboxes may have one or more remote or local connections. see Multiple Connections on
page 60
6.9.9.1
Remote Connections
A Checkbox function can have one or more remote connections. A remote Checkbox
connection is defined by the following properties:
Issue 7 Rev 1
•
Name – the name of the RollCall command (optional).
•
Command Number – the RollCall command number.
•
Category – the name of a category. For more information, see the Categories section.
Page 58
© 2015 SAM
RollPod
Config View
Note:
•
On Value – the value to set the command to when selected. Can be numeric, string or
both. A value is treated as numeric if it contains only digits. To supply both values,
enter the numeric value followed by a comma, followed by the string value.
•
Off Value – the value to set the command to when unselected. Can be numeric, string
or both.
•
Delay – A delay (in milli-seconds) before the remote connection is actioned after the
button is pressed, or GPI triggered.
A Checkbox with a current value that is neither on nor off defaults to dim orange flashing
(open for GPI).
The Checkbox function displays a button to add a new remote connection. Clicking on this
button causes new properties to display. See Fig 49.
Fig 49. Remote Checkbox Properties
When adding a Checkbox function to a hard button or GPI module, specify whether it is to be
Latching, Non-latching, or Read-only:
Note:
6.9.9.2
•
If a Checkbox is set to Latching (and is currently unselected), pressing the button
once selects the function and pressing it again deselects the function.
•
If a Checkbox is set to Non-latching, pressing and holding the button selects the
function; releasing the button deselects the function.
•
If a Checkbox is set to Read-only, it acts as a status display only, and pressing the
button has no action.
Soft buttons are always latching.
Local Connections
A local connection for a checkbox is defined by the following properties:
Note:
•
Local Variable – select the checkbox function from the drop-down list.
•
On Value – the value to set the command to when selected. Can be numeric, string or
both. A value is treated as numeric if it contains only digits. To supply both values,
enter the numeric value followed by a comma, followed by the string value.
•
Off Value – the value to set the command to when unselected. Can be numeric, string
or both.
•
Delay – A delay (in milli-seconds) before the local connection is actioned after the
button is pressed or GPI triggered.
A Checkbox with a current value that is neither on nor off defaults to dim orange flashing
(open for GPI).
The Checkbox function displays a button to add a new local connection. Clicking on this
button causes new properties to display. See Fig 47.
Issue 7 Rev 1
Page 59
© 2015 SAM
RollPod
Config View
Fig 50. Local Checkbox Properties
Note:
Template controls and menu entries may be dragged from the Remote View and dropped
onto the function’s property sheet to add local connections.
When adding a Checkbox to a hard button, specify whether it is to be Read-only or
Read-write:
6.9.9.3
•
Read-only – the button is set as a status indicator only.
•
Read-write – the button can control the unit it is configured to.
Multiple Connections
Checkboxes support multiple remote or local connections, in which more then one function is
controlled by the same button or GPI port. In this case, the mode of each connection
determines how it interacts with the other connections and the button state displayed (or GPI
output sent).
The following additional properties are available when more than one connection is applied to
a checkbox:
•
Mode – see Table 17.
•
Read only – Yes or No. If Yes the Checkbox is set to read status only. If No the
Checkbox can control the unit it is configured to.
•
Tally – Include in or Exclude from the tally. Excluding ignores inconsistencies.
Mode
Description
If a remote connection’s mode is set to Master and its value is externally
changed, all other remote connections set their state to match the externally
applied value. This occurs regardless of the other remote connection modes.
Master
In other words, externally changing the value of a Master remote connection
always changes the values of all other remote connections to match the new
value.
If a remote connection’s mode is set to Independent and its value is
externally changed, the new value is compared to all other master and
independent remote connections.
Independent
Table 17.
Issue 7 Rev 1
•
If they agree, all slave remote connections are changed to match the
new value.
•
If they do not agree, the value of any slave remote connections are
not changed and the button shows an inconsistent state (or the GPI
signals the output defined as inconsistent).
Multiple Remote Connections
Page 60
© 2015 SAM
RollPod
Config View
Mode
Description
If a remote connection’s mode is set to Slave its value cannot be changed
unless:
Slave
Table 17.
•
It is changed by a master remote connection.
•
An independent remote connection is changed and that independent
connection agrees with all other independent and master remote
connections.
Multiple Remote Connections
Note:
Soft buttons are limited in the states that they can display and have no way to display
inconsistency. They only display the Selected state when all connections are also in the
Selected state. A soft button is disabled when all communication connections are invalid
(or locked).
Note:
GPI input ports have no means of reflecting status.
6.10 Search Tab
The search tab, found in the property sheet view, is used to search for controls or groups of
controls.
Fig 51. Search Tab
To search for a control, select the criteria type and criteria, then click Apply.
All controls that match the criteria are highlighted. For example, Fig 52. shows the result of a
By Label search for Input 1.
Fig 52. Search Result
Issue 7 Rev 1
Page 61
© 2015 SAM
RollPod
Config View
Note:
Text in searches is case sensitive.
Controls remain highlighted until the search criteria is set back to None.
6.11 Download Mode
Download mode allows a configuration for a RollPod or GPI module to be downloaded. To
switch the config view to download mode, either click the Download toolbar button or from
the RollCall menu, select Download.
Note:
If any of the Edit Mode tabs have been broken out into floating windows, they are closed
automatically when Download Mode is selected.
Fig 53. Download Mode
If any of the download buttons are disabled, as shown above, it is because there are no
download targets currently selected. To select a download target, use the Network View to
either drag a compatible unit onto the Selected Download Targets table above, or use the
unit’s context menu and select ‘Download Config’. When one or more targets have been
selected, the download buttons become enabled, as shown below.
Only compatible units can be added to the list (displayed in the RollPod Type(s) field of the
Config Details).
Fig 54. Download Configuration
Issue 7 Rev 1
Page 62
© 2015 SAM
RollPod
Config View
To remove a unit from the download target table, right-click on the unit and select Remove.
6.11.1 Config Details
The Config Details panel provides the following information.
Config Name
The name of the configuration file.
Config Timestamp
The date and time when the configuration was compiled. If there have
been any changes to the configuration since the last compilation, the
timestamp is replaced by the words ‘Needs compilation’.
Pod Type(s)
A list of compatible unit types for this configuration.
Pod ID(s)
A list of compatible unit IDs for this configuration.
Scripting
Enabled/Disabled (Luna panels only)
Script File
Table 18.
Path name of the script file (Luna panels only)
Configuration Details
6.11.2 Download Config
This downloads the configuration to the selected download target (or targets). If the
configuration has been changed since the last download, or has not been downloaded before,
it is compiled first.
A configuration download automatically restarts the target unit, in preparation for the transfer
of the new configuration and its associated files. The target unit is briefly removed from the
network and redisplays as an Unprogrammed Unit. After the new configuration files are
transferred to the unit, it is restarted once more. It then comes back online as a newly
configured unit.
If the configuration download is successful, the address download commences.
6.11.3 Update Addresses
This downloads category addresses only. This is a relatively quick operation and does not
require a restart of the unit.
To ensure that other parts of the configuration have not changed since the configuration was
last downloaded to the target units, their configuration is extracted and compared to the
current configuration.
6.11.4 Update Script
Updates the script according to whether it is enabled or not.
If enabled, the script file contents are compared with the script file on the target unit and, if
different, the script file is downloaded to the unit and the unit restarted (this is necessary for
the new script to take effect).
If not enabled, then if a script file exists on the unit, it is deleted and the unit restarted.
Note:
Issue 7 Rev 1
Downloading a configuration will also update the script file.
Page 63
© 2015 SAM
RollPod
Config View
6.11.5 Resume Edit
This exits download mode and returns the Config View to edit mode.
6.11.6 Selected Download Targets
This is a tabular list of the RollPods or GPI units to download to. The table has the following
columns:
Address
The RollCall address of the unit.
Name
The RollCall name of the unit.
Type
The RollCall unit type.
ID
The RollCall unit ID.
Version
The RollCall unit version.
Config Timestamp
The timestamp of the configuration currently on the unit. This is blank
if the unit does not contain a configuration.
Config Status
Indicates the result of a configuration download.
Address Status
Indicates the result of downloading addresses.
Table 19.
Selected Download Targets
6.11.7 Download Log and Progress Bar
The Download Log provides details of the current phase of the download and the Progress
bar provides a guide to how much of the current phase has been completed.
6.11.8 Warnings
The following warnings may display in a pop-up message after compilation. The message
gives the option to proceed with the download despite the warning, or to cancel the download
and correct the problem.
Warning
Description
The number of channels in the configuration is 1 but
there is a multi channel category present.
Multi-channel category
CategoryName present in
single-channel config
In this case, the first channel is always used at runtime.
The short description is included in the RollPod's
DisplayData (4 status lines, top right of template). It
cannot contain commas.
Commas not valid in Short
Description, replacing with
semi-colon
If the download operation is continued, all commas in
the short description are replaced with semicolons
during compilation.
The timeout auto-lock feature is turned on, but there is
no mechanism to release the lock.
Timeout auto-lock is enabled, but
there are no Lock controls
In this case, the only way to unlock the RollPod is by
means of the template, which always includes a lock
checkbox.
A page has been defined that does not have a page
navigation control pointing to it.
Page N is unreachable
In this case, the only way to access the page is by
means of the control Panel template.
The preset value for a shaft encoder falls outside of the
Preset for Shaft Encoder N on
range defined by the minimum and maximum values.
Page P outside valid range; setting
The compiler sets the preset to either the minimum or
to min (or max)
maximum value.
Table 20.
Issue 7 Rev 1
Warnings
Page 64
© 2015 SAM
RollPod
Config View
Warning
Description
Name of page P is too long,
truncating to 19 chars
Table 20.
The name of a page is too long. The compiler shortens
the name to the 19 character maximum.
Warnings
6.11.9 Errors
6.11.9.1
Errors prior to compilation
The following additional checks are made before and during compilation. If any of these
errors occur, compilation fails and the errors are recorded in the download log.
Error
Description
The following unit(s) is/are not
currently available: NNNN:UU:PP.
A target unit in the list is not responding to RollCall
Check the connection or remove the commands.
unit(s) from the list
One or more of the target units is running an older
software version, which is not compatible with
RollPod Designer.
Error: the target version is not
supported - v5.13 onwards
Upgrade the unit to continue using RollPod Designer.
Failed to create compiler output
directory
This error generally occurs when there are
insufficient permissions to write to the All Users
directory.
Page numbers must be contiguous,
starting from 1
Page numbers must start at 1 and may only be
incremented by 1.
Maximum number of categories
exceeded (20)
A configuration cannot contain more than 20
categories. This limit only applies to panels running
V5 software. For V6, the categories are unlimited.
Maximum number of Pages
exceeded (50)
A configuration cannot contain more than 50 pages.
This limit only applies to panels running V5 software.
For V6, the pages are unlimited.
Number of channels must be positive
The number of channels in a configuration cannot be
zero or a negative value.
This error only occurs if the xml configuration file has
Multiple clashing definitions for Hard
been modified manually (outside of the RollPod
Button N
Designer application).
Too many pages - mode source limit The limit of NumberHardButtons*NumberPages
exceeded
(1000) has been exceeded.
An Error occurred during XMenu
compilation:
This is an internal error. If this error occurs, the
remainder of the message and the configuration
should be forwarded to SAM technical support.
Cannot have all remote connections
as Slaves on Button N on Page P
At least one of multiple remote connections must be
either independent or master.
Port N on Page P selects invalid
channel C
A channel select function has an index that is less
than 1 or greater than the number of channels.
Hard Button N on Page P selects
invalid channel C
A channel select function has an index that is less
than 1 or greater than the number of channels.
Soft Button N on Page P selects
invalid channel C
A channel select function has an index that is less
than 1 or greater than the number of channels.
No Remote connections specified for A remote connection function (radio button or
Port N on Page P
checkbox) has no remote connections specified.
Table 21.
Issue 7 Rev 1
Errors
Page 65
© 2015 SAM
RollPod
Config View
Error
Description
No Remote connections specified for A remote connection function (radio button or
Hard Button N on Page P
checkbox) has no remote connections specified.
No Remote connections specified for A remote connection function (radio button or
Soft Button N on Page P
checkbox) has no remote connections specified.
No Remote connections specified for A remote connection function (radio button or
Shaft Encoder N on Page P
checkbox) has no remote connections specified.
Hard Button N on Page P navigates
to Page OtherP which is undefined
A page navigation function navigates to a page that is
undefined.
Soft Button N on Page P navigates to A page navigation function navigates to a page that is
Page OtherP which is undefined
undefined.
Port N on Page P navigates to Page A page navigation function navigates to a page that is
OtherP which is undefined
undefined.
Conflicting priorities for Command N
of Category CategoryName. This
command displays as both
ExistingPriority and NewPriority
Remote connection in different
controls
If a particular command number of a particular
category is ever used in a multiple-remote control
configuration, then its uses elsewhere (for example,
in a multiple remote configuration for another control)
must match the Mode used (master, independent or
slave).
Category "catName" (referenced by
Control N on Page P) not found in
category list
A remote connection refers to a category that is not
defined (possibly because it has been deleted).
Category names cannot contain
spaces. Please rename category
"catName"
Spaces are not permitted in any category names.
Rename the category, removing all spaces.
Multi-channel category "CanName"
used for router-follow
Only single channel categories can be used to control
channel selection.
Soft Button N on Page P: invalid
function in a single-channel
configuration
A channel select function is set in a configuration that
only has one channel.
Soft Button N on Page P references
invalid Shaft Encoder S
A Take or Cancel function has been associated with
a non-existent shaft encoder.
Soft Button N on Page P references
Unused Shaft Encoder S
A Take or Cancel function has been associated with
a shaft encoder that does not have an assigned
function.
String Region R on Page P: invalid
function in a single-channel
configuration
A string region has been assigned to display current
or current channel name in a single channel
configuration.
Shaft Encoder S on Page P: invalid
function in a single-channel
configuration
A shaft encoder has been assigned a channel select
function in a single channel configuration.
Must specify max value for Shaft
Encoder N on Page P
A shaft encoder has been assigned a remote control
function but does not have a maximum value
specified. (Max value can be omitted for channel or
page selector functions, but not for remote controls.)
Shaft Encoder N on Page P: Max
Value exceeds number of channels
in configuration
A maximum value has been specified for a shaft
encoder that has a channel select function assigned;
however, the value is greater than the number of
channels.
Shaft Encoder N on Page P: invalid
function in a single page
configuration
A shaft encoder has been assigned a page select
function in a single page configuration.
Table 21.
Issue 7 Rev 1
Errors
Page 66
© 2015 SAM
RollPod
Config View
Error
Shaft Encoder N on Page P: Max
Value exceeds number of pages in
configuration
A shaft encoder has been assigned a page select
function; however, the max value is greater than the
number of pages.
Value not specified
A radio button or checkbox control is missing its
Value or On value or Off value attribute.
Table 21.
6.11.9.2
Description
Errors
Errors When Updating Addresses
The following errors may occur when updating addresses.
Error
Description
Failed to upload config from remote unit
This error occurs if a configuration cannot be
extracted from the unit. For instance, in
cases where the unit has not been previously
programmed by RollPod Designer.
Config Mismatch
The target unit’s configuration differs in ways
other than addresses. A full download is
required.
The target unit’s configuration differs in ways
Number of categories mismatch: local config
other than addresses. A full download is
contains N, remote config contains M
required.
Category type mismatch: category
CategoryName
A category changed from single to multi
channel or vice versa. A full download is
required.
A category name has changed. A full
download is required.
Category name mismatch: category
NewName vs OldName
This error most likely caused by a network
error during the download process.
Failed to download address
Table 22.
Issue 7 Rev 1
Other things about categories (for example,
their descriptions or default unit ID), which do
not affect their run-time operation, may
change without forcing a full recompile.
Errors When Updating Addresses
Page 67
© 2015 SAM
RollPod
Examples
7. Examples
This section provides examples to illustrate some of the basic concepts and operations
required to use the RollPod Designer.
7.1 Example 1: Hello World
This example illustrates how to:
•
Connect RollPod Designer to a RollCall Network.
•
Download a configuration to a RollPod.
This example assumes:
•
A 3U RollPod Unit, with power on, connected to a RollCall Network
•
An installed version of the RollCall Suite, including RollPod Designer.
7.1.1 Start RollPod Designer
1.
Start the RollPod Designer software (From the Start menu, select All Programs >
SAM > RollCall > RollPod Designer).
RollPod Designer opens.
Fig 55. RollPod Designer
2.
Connect RollPod Designer to the RollCall network.
To do this, click the Network toolbar button and in the Build Network dialog that displays, enter the IP Address of the RollCall network. The default communication port is
2050; to use a different communication port, enter it in the format ipaddress@port.
Issue 7 Rev 1
Page 68
© 2015 SAM
RollPod
Examples
Fig 56. Network IP Address
3.
Click OK.
The RollCall network displays in the Network list on the left of the RollPod Designer
window, when connected.
7.1.2 Choose a RollPod Model
1.
Click the New toolbar button.
The Select RollPod Model window appears.
Fig 57. Select RollPod Model
2.
Issue 7 Rev 1
Select the relevant 3U RollPod, either a 3U-12 or a 3U-16, then click Create. The
RollPod model and properties tabs appears.
Page 69
© 2015 SAM
RollPod
Examples
Fig 58. Properties
7.1.3 Add a String Region
1.
Add a string region to the display screen. To do this:
•
Right-click in a soft button or shaft encoder display area and select New String
Region.
Fig 59. Select String Region
The new string region appears in the center of the display window.
Issue 7 Rev 1
Page 70
© 2015 SAM
RollPod
Examples
New String Region
Fig 60. String Region
2.
On the Control properties tab set the Function to Fixed Display and enter Hello
World! in the Label field.
Fig 61. Enter Text
3.
Resize the String Region to fit the text just entered.
Fig 62. Resize String Region
4.
To save the configuration, click the Save toolbar button, navigate to the location to
save the file in, name the file and click Save.
Note: A file extension does not have to be added.
Issue 7 Rev 1
Page 71
© 2015 SAM
RollPod
Examples
7.1.4 Download Configuration to the RollPod
1.
Click the Download toolbar button.
2.
Drag the RollPod unit from the network tree on the left to the Selected Download
Targets list.
Fig 63. Download Target
3.
Click Download Config. The progress of the configuration appears in the Download
Log and the RollPod restarts.
When the download completes, the Download Log reports *Download OK* and the
RollPod unit displays Hello World!.
Fig 64. RollPod Display
Issue 7 Rev 1
Page 72
© 2015 SAM
RollPod
Examples
7.2 Example 2: RollPod Configuration
The previous example demonstrated how to connect a RollPod to a RollCall Network and
download a configuration to the RollPod.
This example illustrates how to set up a configuration which uses:
•
Hard Buttons
•
Soft Buttons
•
Shaft Encoders
•
String Regions
•
Multiple Remote Connections, Categories, and Channels
This example illustrates a configuration in which a 3U-12 RollPod is used to control 4
IQSYN22 modules, each associated to a different channel, to adjust basic video processing
settings and audio delay settings, and an IQUDC00 to select the output standard.
The example begins after a RollPod has been connected to the network and the unit
templates have been downloaded. These operations are illustrated in the previous example.
7.2.1 Step 1: Designing the Configuration
Before configuring the RollPod, it is always advisable to decide what is required. With that
goal in mind, determine how the RollPod configuration should be set up.
Have a clear plan for:
•
The controls and displays that the configuration needs.
•
How many pages the required controls need and how the controls are grouped on
those pages.
•
If multiple channels are required (It is not necessary to determine how many).
•
How many different categories are required.
RollPod Designer automatically populates elements such as category addresses and the
command numbers for the controls, but the importance of a clear plan cannot be over
emphasized.
Issue 7 Rev 1
Page 73
© 2015 SAM
RollPod
Examples
At this stage, consider sketching a diagram of the configuration. For Example:
Page 1: Channel selection
Page 2: Video Processing
Page 3: Audio Delays
Page 12: Convert
Page specific controls:
Λ
Channel select on shaft
encoder
Λ
Take/Cancel on soft
buttons
Page specific controls:
Λ
Master Video Gain, Y
Gain, C Gain and Blk
Level on shaft encoders
Λ
Presets for each on hard
buttons
Λ
Preset all
Page specific controls:
Λ
8 soft buttons, each
navigating to a page that
can be used to set up
audio delays.
Page specific controls:
Λ
String region title
Λ
SD, 1080i, 720p on soft
buttons
Static controls:
Λ
Lock button
Λ
String region showing
channel index
Static controls:
Λ
Lock button
Λ
String region showing
channel index
Static controls:
Λ
Lock button
Λ
String region showing
channel index
Static controls:
Λ
Lock button
Λ
String region showing
channel index
Pages 4 to 11: Audio Delays
Page specific controls:
Λ
String region title
Λ
Off (sets delay to 0) on
soft button
Λ
Delay A/B select on soft
buttons
Λ
Delay A/B adjust on shaft
encoders
Static controls:
Λ
Lock button
Λ
String region showing
channel index
Fig 65. Configuration Diagram
7.2.2 Step 2: Creating Pages and Navigation Buttons
When the design is finished, set up the basic framework for the configuration - the pages that
needed, and the static page navigation buttons. At this stage a Lock function can be added.
These steps are performed in the Configuration view.
1.
Start RollPod Designer and create a new 3U-12 configuration.
Fig 66. New Configuration
2.
Add pages and name them ready for use in the configuration.
To add a page:
Issue 7 Rev 1
•
Right click on a page tab and select Add New Page.
•
Enter a page index or accept the recommended page index (RollPod Designer
numbers each page sequentially). Click OK.
Page 74
© 2015 SAM
RollPod
Examples
Note:
•
Enter a Name for the new page. In this case page 2 should be named Video
Proc. Click OK.
•
Repeat until all required pages are added.
The order in which pages are created does not matter. Note that once the pages are
created, and the navigation controls added, it can be difficult to change the order.
When finished, the configuration should have the following pages:
Fig 67. Configured Pages
3.
Add a lock button and the static page navigation hard buttons. This configuration has
the page navigation buttons along the bottom row, with a lock button in the lower right.
To add the lock button:
•
Select the lower-right hard button.The control properties tab for the button
appears.
•
Assign the following properties to the hard button.
Fig 68. Hard Button Properties
The lock button appears as shown in Fig 69.
Issue 7 Rev 1
Page 75
© 2015 SAM
RollPod
Examples
Fig 69. Lock Button
4.
Add page navigation hard buttons for Main, Video Proc., Audio Delay, and Convert.
For example, to assign a page navigation button to the Main page:
•
Select the lower-left hard button.The control properties tab for the button
appears.
•
Assign the properties to the hard button as shown in Fig 70.
Fig 70. Hard Button Properties
Continue setting up the rest of the page navigation buttons. When finished, the following page
navigation buttons, each pointing to its corresponding page are set up:
Fig 71. Navigation Page Buttons
Issue 7 Rev 1
Page 76
© 2015 SAM
RollPod
Examples
7.2.3 Step 3: Setting up the Main Page
In this configuration, there are four channels. The controls on the Main page are to select the
channel. Because this is a multi-channel configuration, a string region displays the currently
selected channel on each page.
To set up the example Main page:
1.
Select the Page 1: Main tab.
2.
Add the Channel Select shaft encoder. When the shaft encoder is rotated, it scrolls
through the channels sequentially.
Select shaft encoder 1 (the top-left encoder) and configure it as a Channel Select control. The properties appear as shown in Fig 72.
Fig 72. Shaft Encoder Properties
3.
Note:
Add Take and Cancel soft buttons that are linked to the Channel Select shaft encoder.
When the Take button is pressed, the shaft encoder’s value (the channel) is applied.
When the Cancel button is pressed, the shaft encoder’s value returns to the currently
applied channel.
Take and Cancel buttons are optional. If they are not present, the channel changes as the
shaft encoder is turned.
4.
Select soft button 1 (the upper-left soft button) and configure it as a Take button. The
properties appear as shown in Fig 73.
Fig 73. Soft Button 1 Properties
5.
Select soft button 2 (the upper-right) soft button and configure it as a Cancel button.
The properties appear as shown in Fig 74.
Fig 74. Soft Button 2 Properties
6.
Because this is a multi-channel configuration, it is a good idea to add a string region to
indicate the currently selected channel on each page.
To add the string region:
•
Issue 7 Rev 1
Right click on any control in the model view and, from the menu that appears,
select New String Region.
Page 77
© 2015 SAM
RollPod
Examples
Fig 75. New String Region
•
Assign the properties in Fig 76. to the string region. This displays the channel name in
the string region.
Fig 76. String Region Properties
•
Drag the edges of the string region to position it at the top of the display window.
Fig 77. Reposition String Region
•
String regions are page specific. To make the string region appear on every page of
the configuration, right click in the string region and select Replicate.
The model view of the configuration appears as shown in Fig 78.
Issue 7 Rev 1
Page 78
© 2015 SAM
RollPod
Examples
Fig 78. Configured Display
7.2.4 Step 4: Adding Video Processing Controls
By this stage, the layout of the RollPod configuration and its navigation controls are beginning
to take shape. Now, begin to add remote controls. When adding remote controls, it is usually
easiest to be connected to the RollCall network. When connected to the RollCall network,
RollPod Designer automatically adds addresses when it creates categories. However, cached
unit templates can be added, and the category addresses added manually.
The example Video Proc. page includes:
•
Four shaft encoders to adjust Master Video Gain, Y Gain, C Gain, and Black Level.
•
‘Preset’ hard buttons for each of the above parameters.
•
A ‘Preset All’ hard button to return all of the above parameters to their preset values
with a single button press.
All of these controls apply to an IQSYN22 module.
To add video processing functions:
1.
Select the Page 2: Video Proc. tab.
2.
Assign the shaft encoders to Master Video Gain, Y Gain, C Gain, and Black Level.
For example, to assign the Master Video Gain Control:
Issue 7 Rev 1
•
Open the IQSYN22 template and select Video Output.
•
Drag the Master Gain control from the template view onto shaft encoder 1 (the
upper-left shaft encoder).
Page 79
© 2015 SAM
RollPod
Examples
Fig 79. Shaft Encoder Setup
A message prompting the user to create a new category for the unit type displays.
•
Select Yes. The category is created (with the category address if connected to
the network) and the default properties are added to the Control Properties tab.
Note that the default label given to the Control is the same as the template name.
While this isn’t a problem in itself, the RollPod display is limited in the number of
characters that can be shown and it might be advisable to shorten the name to
something like M Gain.
The control properties for shaft encoder 1 appear as shown in Fig 80.
Fig 80. Shaft Encoder Properties
•
Issue 7 Rev 1
Repeat this procedure with the other shaft encoders to add controls for the Y
Gain, C Gain, and Black Level controls.
Page 80
© 2015 SAM
RollPod
Examples
When finished the shaft encoder setup appears as shown in Fig 81.
Fig 81. Shaft Encoder Setup
3.
Add ‘Preset’ hard buttons beneath each level adjustment.
For example, to add the Master Gain preset:
•
Issue 7 Rev 1
Drag the Master Gain control from the template to Hard Button 3 (the upper-left
hard button on a 3U-12 RollPod). This adds the control as a radio button function.
Page 81
© 2015 SAM
RollPod
Examples
Fig 82. Master Gain Preset
•
On the Control properties tab, change the Label parameter to Preset and edit the
radio button Value parameter to be the desired default; in this case 0. The
Control properties appears as shown in Fig 83.
Fig 83. Hard Button 3 Properties
•
Issue 7 Rev 1
Repeat this procedure to add Preset hard buttons for the Y Gain, C Gain, and
Black Level controls.
Page 82
© 2015 SAM
RollPod
Examples
When finished, the model appears as shown in Fig 84.
Fig 84. Hard Button Setup
4.
Add the ‘Preset All’ button to reset the Master Gain, Y Gain, C Gain, and Black Level
remote functions in a single button press. Because this function needs to apply a
setting to four different control simultaneously, set up multiple remote connections
(one to each control).
To create the ‘Preset All’ button:
•
Drag the Master Gain, Y Gain, C Gain, and Black Level Controls to Hard Button
15 (lower row of hard buttons, second from right). This assigns four remote
connections to the Control properties.
•
Specify the preset value (0) for each remote connection in the corresponding
Value fields.
•
Give the hard button the label Preset All.
When finished the Control properties appears as shown in Fig 85.
Issue 7 Rev 1
Page 83
© 2015 SAM
RollPod
Examples
Fig 85. Multiple Remote Connections
The Video Proc. page is now complete. The model view appears as shown in Fig 86.
Fig 86. Hard Button Configuration
Issue 7 Rev 1
Page 84
© 2015 SAM
RollPod
Examples
7.2.5 Step 5: Creating the Audio Delay Page
The example Audio Delay page provides:
•
Coarse manual audio delay adjustment, by means of shaft encoders, for the
IQSYN22’s Audio Delay Select - A and Audio Delay Select - B controls.
•
Page navigation, by means of soft buttons, to the Audio Delay adjustment pages for
each of the IQSYN22’s eight audio pairs.
To set up the Audio Delay page:
1.
Select the Page 3: Audio Delay tab.
2.
From the template, select Audio Delay.
3.
Drag the Manual Coarse Delay (A) control from the Audio Delays template to Shaft
Encoder 1 (upper-left shaft encoder). Remote control properties on the Control
properties tab are updated.
Fig 87. Audio Delay Setup
Issue 7 Rev 1
4.
For clarity, change the control’s label to Adjust Coarse Delay A.
5.
Drag the Manual Coarse Delay (B) control from the template to Shaft Encoder 2
(upper-right shaft encoder). Remote control properties on the Control properties tab
are updated.
6.
For clarity, change the control’s label to Adjust Coarse Delay B.
7.
Select Soft Button 1 (the upper-left soft button) and configure it as Page Navigation
control, pointing to Page 4: Audio Delay 1. Label the button Pair 1.
Page 85
© 2015 SAM
RollPod
Examples
Fig 88. Soft Button Properties
8.
Create similar navigation buttons pointing to pages 5 through 11 (Audio Delay 2 to
Audio Delay 8).
When complete, the model view appears as shown in Fig 89.
Fig 89. Audio Delay Pair Setup
7.2.6 Step 6: Creating the Audio Delay 1 to Audio Delay 8 Pages
The Audio Delay 1 to Audio Delay 8 pages provide the controls for Embedded Delay Pairs
1 - 8 on the IQSYN22.
For each pair, the following controls are created:
Issue 7 Rev 1
•
A soft button to add a delay equal to the unit’s internal delay.
•
A soft button to specify the minimum delay - effectively, zero delay.
•
Soft buttons to select Audio Delay A or Audio Delay B.
•
A shaft encoder to make fine delay adjustments to Audio Delay A and Audio Delay B.
Page 86
© 2015 SAM
RollPod
Examples
To configure the Audio Delay pages:
1.
Select the Page 4: Audio Delay 1 tab.
2.
Drag the Pair 1 Min control from the Audio Delays template to Soft Button 1 (upper-left
soft button). The Control properties are automatically configured.
Fig 90. Audio Delay Pair 1 Min Setup
3.
Issue 7 Rev 1
Drag the Pair 1 V (Internal 1) control from the Audio Delays template to Soft Button 2.
The Control properties are automatically configured.
Page 87
© 2015 SAM
RollPod
Examples
Fig 91. Audio Delay Pair 1 V Setup
4.
Issue 7 Rev 1
Drag the Pair 1 Embedded Delay A and B controls to soft buttons 7 and 8
respectively. The Control properties are automatically configured.
Page 88
© 2015 SAM
RollPod
Examples
Fig 92. Audio Delay Pair 1 A and B Setup
5.
Issue 7 Rev 1
Drag the Fine Delay control to Shaft Encoder 1. The Control properties are
automatically configured.
Page 89
© 2015 SAM
RollPod
Examples
Fig 93. Audio Fine Delay Setup
6.
Add a Fixed Display String Region to identify the pair.
Fig 94. Fixed Display String Region Properties
When complete, the model view appears as shown in Fig 95.
Issue 7 Rev 1
Page 90
© 2015 SAM
RollPod
Examples
Fig 95. Fixed Display String Region
7.
Repeat the above configuration steps for pages 5 to 11 and Embedded Delay Pairs 2
to 8.
7.2.7 Step 7: Creating the Convert Page
The Convert Page is used to specify the Video Output settings on an IQUDC00 module.
Adding controls from a different module type automatically adds a new category to the
RollPod configuration, but otherwise, the procedure is the same.
The Convert page includes soft buttons to select the following output standards:
•
SD
•
1080i
•
720p
To add the Output Standard controls:
Issue 7 Rev 1
1.
Click the Page 12: Convert tab.
2.
From the Video Output page of the IQUDC00 template, drag the Output Standard
controls to the soft button on the RollPod. A new category is added and the Control
properties for each of the controls are configured.
Page 91
© 2015 SAM
RollPod
Examples
Fig 96. Convert Setup
7.2.8 Step 8: Setting Up Additional Channels
Up to this point all of the Categories that have been created for the configuration have been
Single Channel categories. However, this configuration requires 4 channels.
To set up the additional channels:
Issue 7 Rev 1
1.
Click the Global properties tab. Note that the two categories that were created are
both single channel categories.
2.
Change the Number of Channels field to 4.
Page 92
© 2015 SAM
RollPod
Examples
Fig 97. Global Properties Setup
3.
In the Type column for both categories, select Multi Channel. The Addresses for
multi channel categories table displays below with two columns, one for each
category’s addresses. However, the addresses are currently blank.
Fig 98. Channel Setup
The Channel Name column contains the text that displays in the channel static regions. By
default, these are Channel 1, Channel 2, etc..., but they can be changed, if required.
To populate the addresses, either type them directly in the address fields or, if connected to
the network, drag them from the network tree.
Fig 99. Multi-channel Addresses
7.2.9 Step 9: Downloading the Configuration
The configuration is now complete. Download the configuration to the RollPod unit as
described in Example 1. See Download Configuration to the RollPod on page 72.
Issue 7 Rev 1
Page 93
© 2015 SAM
RollPod
RollPod / GPI Template
8. RollPod / GPI Template
Connect to and control any RollPod or GPI unit using the RollCall Control Panel. When
connected the RollCall Control Panel displays the first page of the unit’s template.
Pages
Fig 100. Example RollPod-12 Template
8.1 Pages
The template is made up of several pages. Each page hosts a group of related controls.
To open a different page, either:
•
Select a page from the scrollable list at the top left of the screen,
Fig 101. Pages List
or
•
Right-click anywhere in the main part of the screen, and click on the appropriate page
from the dialog that opens.
Fig 102. Pages Dialog
Issue 7 Rev 1
Page 94
© 2015 SAM
RollPod
RollPod / GPI Template
8.2 Information Window
The Information Window, displayed at the top of the RollCall template, provides basic
information about the status of the unit.
Fig 103. Information Window
Line One: PSUs
This shows the status of the power supply units. Each may show
either:
•
FAIL
No power supply is present or the power supply has
failed.
•
OK
The power supply is operating normally.
Note that GPI units only have a single power supply.
Line Two: Temp
Displays the internal temperature of the unit in degrees Celsius.
(RollPods only, not GPI units)
Line Three: Comms
Displays the overall communication status of the unit.
•
N/A
Default condition when the unit is loaded with an empty
configuration.
•
OK
The target units are connected with no errors detected.
•
Fail
One or more target units are not connected or there are
communication errors.
Line Four:
Configuration Name
Table 23.
Issue 7 Rev 1
This displays the name of the configuration file, as defined in the
Short Description field on the Global properties tab.
Information Details
Page 95
© 2015 SAM
RollPod
RollPod / GPI Template
8.3 Setup Pod Hardware (RollPods only)
These settings are used adjust the LCD display screen’s brightness and contrast settings (on
3U RollPods), and configure the brightness of the LED hard buttons.
Fig 104. Pod Hardware Setup
8.3.1 LCD Settings (3U RollPods only)
The LCD settings are only available for 3U RollPods and allow the contrast and brightness
settings of the LCD display screen to be configured.
8.3.2 Hard Button LEDs Brightness
These controls define the brightness level for the hard button ‘Dim’ and ‘Bright’ display
settings.
8.4 Setup Pod Software
Fig 105. Pod Software Setup
Issue 7 Rev 1
Page 96
© 2015 SAM
RollPod
RollPod / GPI Template
8.4.1 Network Name
•
Network Name
The edit string sets the name of this RollPod as seen from a RollCall network browser
such as RollCall Control Panel.
•
Net Show
If the Net Show checkbox is cleared, then the RollPod continues to operate normally,
but it is hidden in network browsers. However, a RollCall connection may still be
made to a hidden device by entering the address manually, as opposed to browsing.
•
Where am I?
In an installation, there could be a large number of RollPods in a particular area.
Sometimes it may be necessary to locate a specific RollPod. This function allows
visual identification of the box to be made.
3U Versions
When this function is selected the hard buttons and the display flash on and off.
1U Versions
When this function is selected the hard buttons flash on and off.
To return to normal operation uncheck the Who Am I function or press any hard button (this also unchecks the Who Am I function).
Note:
If hard button becomes illuminated red and sequentially cycles around the button array this
indicates a fatal system error. If rebooting the system does not solve the problem please
contact your local SAM dealer for assistance.
8.4.2 RollCall Address
•
RollCall Address
This display shows the current position of the hex switches that define the RollCall
address of the RollPod.
•
Restart If Changed
By default, the Restart if Changed checkbox is selected, which means that the RollPod automatically restarts and uses the new address when the hex switches are
moved.
•
Permit Blind
By default, with this checkbox selected, the RollPod responds to incoming Blind Controls, for example, RollTracks sent from other units. By clearing the checkbox, the
RollPod can be made to ignore incoming RollTracks.
8.4.3 Version Info
The serial number, PCB revision, software version, and software build number of the unit are
shown here.
8.4.4 Restart
Click the Restart button to reboot the RollPod software.
Issue 7 Rev 1
Page 97
© 2015 SAM
RollPod
RollPod / GPI Template
8.5 Configuration
The configuration screen displays information about the RollPod’s current configuration.
Fig 106. Configuration
•
Short Description: The configuration name.
•
Compiled on: The configuration timestamp.
•
Compiler Version: The version of the RollPod Designer compiler that created the
configuration.
•
Description: The long description from the Global properties.
8.6 Connections
These controls provide access to the RollPod’s local controls such as Lock functions, Page
and Channel selection, display information about remote connection states, and allow
communication states to be logged.
Fig 107. Connections
8.6.1 Local Control
The controls shown in this section depend upon the RollCall configuration. They provide
access to the RollPod’s local functions such as Lock, Channel Select and Page Selection.
8.6.2 Category
For each category, the communication state and address of the currently selected channel
display
•
Issue 7 Rev 1
Select the Log Comms_N_STATE to enable logging of status for each category.
Page 98
© 2015 SAM
RollPod
RollPod / GPI Template
8.7 Logging
Use the Logging options to specify LogServer details and the control the general information
to be recorded.
Fig 108. Logging
8.7.1 LogServer
These controls enable the characteristics of the LogServer to be specified.
Issue 7 Rev 1
•
LogServer Name
The Logging Server to be used may be named by editing the text string in the text
window. Click S to save and click P to return to the preset value ‘LogServer’. This
option is only relevant if the Named LogServer option is selected.
•
Current Logger
This displays the name of the current LogServer.
•
Current Logger Address
This displays the RollCall address of the LogServer currently in use.
•
Log To
These options specify whether:
•
Logging is disabled.
•
Logs are only be sent to the LogServer specified in the LogServer Name field
(Named LogServer).
•
Logs are sent to any LogServer on the RollCall network.
•
Accept via IP
Discover log servers via the Ethernet connection.
•
Accept via RollNet
Discover log servers via the RollNet connection
Page 99
© 2015 SAM
RollPod
RollPod / GPI Template
•
Accept via Bridge
Discover log servers via the Bridge connection
8.7.2 Log Control
These controls display the Logging Parameters for the RollPod hardware. Select the
corresponding check boxes to enable logging.
8.7.3 Aggregate Comms
Displays the overall communication status of the unit.
•
N/A
Default condition when the unit is loaded with an empty configuration.
•
OK
The target units are connected with no errors detected.
•
Fail
One or more target units are not connected or there are communication errors.
8.8 Hard Buttons
This template page allows remote actioning of any hard button.
Fig 109. Hard Button Setup
8.8.1 Down event
For each hard button, the Down event button allows remote control to action the behavior of
the RollPod as if the hard button had been physically held down.
8.8.2 Up event
For each hard button, the Up event button allows remote control to action the behavior of the
RollPod as if the hard button had been physically released from being held down.
Depending on the user configuration, some or all of these buttons may have no effect. For
example, the up event has no effect with any latching button, which is the default mode of
RollPod hard buttons.
Issue 7 Rev 1
Page 100
© 2015 SAM
RollPod
RollPod / GPI Template
8.8.3 LED Colour
This indicates the style that corresponds to the current state of the hard button. Possible
colours are:
•
Off
•
Dim Green / Red / Orange
•
Bright Green / Red / Orange
•
Flash Dim Green / Red / Orange
•
Flash Bright Green / Red / Orange
8.8.4 Log Button
Select this option to log button state and name.
The log fields are:
•
BUTTON_N_NAME: Logs the button name. Changes with the page selection.
•
BUTTON_N_STATE: Logs the button state, as displayed in the LED Colour field.
8.9 Local Control
The Local Control pages are completely defined by the user configuration. It includes all the
controls and pages that display on the RollPod LCD, soft buttons, string regions, and shaft
encoders (knobs). The remote user can therefore action any control with the same effect as if
the control was made locally on the RollPod.
It is possible to action controls from any RollPod page, whether or not that page is currently
visible on the RollPod LCD screen.
The image below shows the Main page from “Example 2: RollPod Configuration” on page 57.
Fig 110. Local Control
Issue 7 Rev 1
Page 101
© 2015 SAM
RollPod
RollPod / GPI Template
8.10 Virtual Control Pages
The Virtual Control pages contain the controls setup as remote output controls, to be used
with RollPods and other units on a network via the unit templates in RollCall.
Note:
The following pages only appear if the relevant Virtual Controls are configured.
8.10.1 Virtual Buttons
For each virtual button, the VB# Event button allows remote control to action the behavior of
the RollPod as if a hard button had been physically held down. Virtual button events can also
be logged, by checking the Log VB# checkboxes.
Fig 111. Virtual Buttons
8.10.2 Virtual String Regions
The virtual string regions can be viewed from this page, and logged by checking the Log
VSR# checkboxes.
Fig 112. Virtual String Regions
Issue 7 Rev 1
Page 102
© 2015 SAM
RollPod
RollPod / GPI Template
8.10.3 Virtual Shaft Encoders
The virtual shaft encoders can be adjusted allowing remote control to action the behavior of
the RollPod as if a shaft encoder had been physically adjusted, from this page, and logged by
checking the Log VSE# checkboxes.
Fig 113. Virtual Shaft Encoders
8.10.4 Virtual Button Sets
The virtual buttons sets contain group of controls. These controls can be adjusted allowing
remote control to action the behavior of the RollPod as if a control had been physically
adjusted. The virtual controls can also be logged by checking the Log VBS# checkboxes.
Fig 114. Virtual Button Sets
8.10.5 Virtual Edit Strings
These are virtual string regions which can be edited by the user.
Fig 115. Virtual Edit Strings
Issue 7 Rev 1
Page 103
© 2015 SAM