1
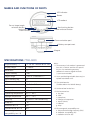
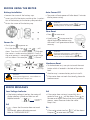
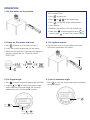
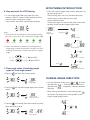
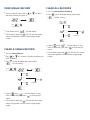
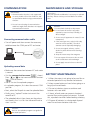
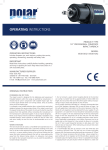
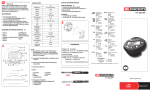
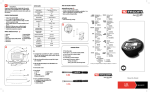
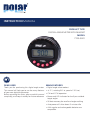
INSTRUCTION MANUAL
PRODUCT TYPE
DIGITAL ANGLE METER WITH MAGNET
MODEL
7700-0001
DEAR USER
Thank you for purchasing this digital angle meter.
This manual will help you to use the many features
of your new digital angle meter.
Before operating the meter, please read this manual
completely, and keep it nearby for future reference.
MAIN FEATURES
Digital angle value readout
■
+/- 2° ( rotating 90° at speed of 30°/sec)
■
CW and CCW operation
■
Buzzer and LED indicator for the 9 pre-settable
target angles
■
50 data memory for recall and angle auditing
■
Auto power off after about 2 minutes idle
■
AAA regular and rechargeable batteries are
compatible
■
NAMES AND FUNCTIONS OF PARTS
LED indicator
Buzzer
LCD readout
Pre-set target angle
selection button
Up button
Down button
Start/setting button
Power on/reset button
Communication port
Battery compartment
Magnet
SPECIFICATIONS 7700-0001
Note:
*1:The accuracy of the readout is guaranteed
from 0.0° to 360.0° and the test speed is
30°/sec. For maintaining accuracy,
calibrate the meter at regular intervals
(1 year recommended).
Angle accuracy *1
± 2° for 90° rotation @ 30°/sec
Display range
0 ~ 999.0°
Resolution
0.1°
Target memory
9 sets
Target range
1~360.0° (increment 1°)
Data memory size
50
PC connectivity *2
No
LED
6 (1 Red + 5 Green)
*3: Two AAA batteries
(Toshiba carbon-zinc R03UG battery)
Button
5
*4: Horizontal and vertical test
Battery *3
AAA x 2
Operating temperature
-10°C ~ 60°C
Storage temperature
-20°C ~ 70°C
Humidity
Up to 90% non-condensing
Drop test
1m
Vibration test *4
10G
Environmental test *5
Pass
Electromagnetic
compatibility test *6
Pass
*2: Use a special designed cable (accessory) to
upload record data to PC.
*5: Environmental test:
a. Dry heat
b. Cold
c. Damp heat
d. Change of temperature
e. Impact (shock)
f. Vibration
g. Drop
*6: Electromagnetic compatibility test:
a. Electrostatic discharge immunity (ESD)
b. Radiation susceptibility (RS)
c. Radiation emission (RE)
BEFORE USING THE METER
Battery Installation
Auto Power Off
Loosen the screw of the battery cap.
The meter will auto power off after about 2 minutes
Insert two AAA batteries matching the -/+ polari- idle for power saving.
ties of the battery to the battery compartment.
■
■
■
Caution:
appears),
During communication period (
the auto power-off function is disabled.
Fasten the screw of the battery cap.
■
Zero Reset
Press
■
■ Usually press
to zero reset the
digital angle meter before using
the meter. It will guarantee a better
accuracy.
Power On
Gently press
■
for zero reset.
to power on.
or
First the direction sign
will
show. Then the LCD shows
. It indicates
the meter is under resetting process. Finally if
the reset process is completed, the target angle
will be shown. For example
is shown.
Press
Caution:
During resetting process, never vibrate or
shake the meter. Keep it rest. If
shows, refer to ”ERROR MESSAGE” section.
Hardware Reset
To do hardware rest, use a pin to touch the reset
button which is located in the hole of the meter
back.
■
Press
Current
target angle
Caution:
During resetting process, never vibrate or
shake the meter. Keep it rest.
Another way is remove battery and re-install it.
■
■ If the meter does not work functionally, please do
hardware reset.
ERROR MESSAGES
Low Voltage Indicator
Er4
If the battery voltage is too low, the meter will
display a battery symbol and then turn off.
Replace batteries.
Low battery
■
indicator
Er5
shows that the meter does not work
functionally, please do hardware reset.
Refer to ”HARDWARE RESET”.
■
If the meter does not reset successfully for a
period of time,
will be shown. Press
to
do zero-reset again. Notice that during resetting
process, never vibrate or shake the meter.
Keep it rest.
■
Er-■ If the meter rotates too fast,
will be shown.
Do press
to zero reset the meter.
OPERATION
1. Put the meter on the wrench
Get started fast
Press
to power on.
Press
or
Press
to start the angle measurement.
■
■
■
to set target angle.
Start rotation.
■
Rotation stop and the LCD will be flashing.
■
Now press
to record angle or press
to
to count from current angle.
clear or press
■
2. Power on the meter and reset
Press
4. Pre-tighten wrench
to power on the meter or reset it.
■
Finally the current target angle will be shown.
■
Hold on your wrench to pre-tighten the screw.
(eliminate the backlash of wrench)
■
Make sure the direction. If you want to change to
direction, please refer to ”CHANGE ANGLE
DIRECTION”.
■
Pre-tighten
Press
Positive
direction
Current
target angle
3. Set target angle
5. Start to measure angle
to select the pre-set target angle (M1~M9).
Press
■
Or press
to modify the current target
or
angle. Note that the target angle will be saved
automatically with the current M number.
■
■ Press
to start the angle meter and immediately
pull your wrench.
Press
Press
to
select angle
Press
or
to
modify target angle
SETUP MENU INTRODUCTION
6. Stop and wait for LCD Flashing
From the current target angle screen, long press to
go into setup menu.
Continuously press can visit the direction menu,
record menu, record clear-all menu and
communication menu.
Finally press again to skip out the setup menu and
go back to the current target angle screen.
■
As the angle meter does not move for a few
seconds, the LCD screen will be flashing and the
current angle is holding on screen.
It also means the meter stop calculating angle.
■
Flashing
Note:
1. There are 6 LEDs to indicate the current angle reaching
80%, 85%, 90%, 95%, 97.5% and 99.5% of target angle.
Current
target angle
or
Long press
Direction menu
Press
99.5%97.5% 95%
90%
85%
80%
2. There is also a buzzer to indicate the reaching level of
target angle. Interval sound means it reaches over 80%
and long sound means it reaches over 99.5% of target
angle.
((…((…
…))…)) è over 80%
((((((((…
…)))))))) è over 99.5%
Record menu
Press
Record clear-all menu
Press
Press
7. Clear angle value, Calculating angle
again or Save angle record
Pressing
■
Communication menu
will clear the current angle.
CHANGE ANGLE DIRECTION
Flashing
■Pressing
angle.
Press
Current
target angle
will calcualte angle again from current
Flashing
Press
Start to count
angle from 30.3
will record the current value and then
Pressing
clear the current value.
Visit the direction menu, press
to select
or
(Positive) means clockwise
the direction.
direction and
(negative) is counter-clockwise
direction.
■
■ After setting the direction, continuously press
to skip out the setup menu and go back to the
current target angle screen.
■
Flashing
Press
Show record and
data number
Press
or
VIEW ANGLE RECORD
Visit the record menu, press
the data number and view it.
■
CLEAR ALL RECORDS
to select
or
Visit the record clear-all menu.
■
■ Press
(
or
Press
to select data
Press
will be shown.
If no record exists,
■
Press
Continuously pressing
will skip out the setup
menu and go back to the current target angle
screen.
■
Visit the record menu.
■ Press
or to select the data number you
or
want to delete.
twice to delete the current data.
will be shown)
or
Press
to select data No.
Press
Press
Abandon
■ If press
once,
will be shown. If you
want to abandon, just press
to skip out this
menu.
Continuously pressing
will skip out the setup
menu and go back to the current target angle
screen.
■
Abandon
Continuously pressing
will skip out the setup
menu and go back to the current target angle
screen.
■
■
Press
Press
■ If press
once,
will be shown. If you
want to abandon, just press
to skip out this
menu.
CLEAR A SINGLE RECORD
■ Press
(
twice to delete the all record data.
will be shown)
COMMUNICATION
MAINTENANCE AND STORAGE
Precaution:
1. Communication function is only supported
on some models. Check the model no. and
its specification before using communication
function.
Attention!
One-year periodic recalibration is necessary to maintain
accuracy. Please contact your local dealer for calibrations.
2. Do not insert the plug of communication
cable into angle meter that does not support
communication function.
Caution:
1. Do not shake violently or drop meter.
2. Do not leave this meter in any place
exposed to excessive heat, humidity, or
direct sunlight.
Connecting communication cable
3. Do not use this apparatus in water.(it is not
waterproof)
Turn off power and then connect the accessory
cable between the COM port of PC and meter.
4. If the meter gets wet, wipe it with a dry
towel as soon as possible. The salt in
seawater can be especially damaging.
■
5. Do not use organic solvents, such as
alcohol or paint thinner when cleaning
the meter.
6. Keep this meter away from magnets.
7. Do not expose this meter to dust or sand
as this could cause serious damage.
8. Do not apply excessive force to the LCD
panel.
Uploading record data
Make sure the connection between PC and meter
is normal.
■
Visit the communication menu (
, shows).
Press
to start communication function.
or
(
will be shown)
■
Use PC to start the uploader program.
■
In uploader program, first select the correct COM
port No.
■
Next, select the file path to save the uploaded data.
■
Finally, press “upload” button to transmit the
records to PC.
BATTERY MAINTENANCE
1. When the meter is not going to be used for an
extended period of time, remove the batteries.
■
2. Keep a spare battery on hand when going on a
long trip or to cold areas.
■
3. Do not mix battery types or combine used
batteries with new ones.
■
4. Sweat, oil and water can prevent a battery’s
terminal from making electrical contact. To avoid
this, wipe both terminals before loading a battery.
■
■
■ The uploaded data is then shown on the column
and saved in the *.csv file. Use Microsoft Excel to
view *.csv file.
■ 5. Dispose of batteries in a designated disposal
area. Do not throw batteries into a fire.
Caution:
Refer to the uploader program user guide for
the detail operations.
POLAR TOOLS A/S
SOLDALEN 9 . 7100 VEJLE . DENMARK . [email protected] . WWW.POLARTOOLS.COM